Post Syndicated from Ulrich Hinze original https://aws.amazon.com/blogs/security/use-iam-roles-anywhere-to-help-you-improve-security-in-on-premises-container-workloads/
This blog post demonstrates how to help meet your security goals for a containerized process running outside of Amazon Web Services (AWS) as part of a hybrid cloud architecture. Managing credentials for such systems can be challenging, including when a workload needs to access cloud resources. IAM Roles Anywhere lets you exchange static AWS Identity and Access Management (IAM) user credentials with temporary security credentials in this scenario, reducing security risks while improving developer convenience.
In this blog post, we focus on these key areas to help you set up IAM Roles Anywhere in your own environment: determining whether an existing on-premises public key infrastructure (PKI) can be used with IAM Roles Anywhere, creating the necessary AWS resources, creating an IAM Roles Anywhere enabled Docker image, and using this image to issue AWS Command Line Interface (AWS CLI) commands. In the end, you will be able to issue AWS CLI commands through a Docker container, using credentials from your own PKI.
The AWS Well-Architected Framework and AWS IAM best practices documentation recommend that you use temporary security credentials over static credentials wherever possible. For workloads running on AWS—such as Amazon Elastic Compute Cloud (Amazon EC2) instances, AWS Lambda functions, or Amazon Elastic Kubernetes Service (Amazon EKS) pods—assigning and assuming IAM roles is a secure mechanism for distributing temporary credentials that can be used to authenticate against the AWS API. Before the release of IAM Roles Anywhere, developers had to use IAM users with long-lived, static credentials (access key IDs and secret access keys) to call the AWS API from outside of AWS. Now, by establishing trust between your on-premises PKI or AWS Private Certificate Authority (AWS Private CA) with IAM Roles Anywhere, you can also use IAM roles for workloads running outside of AWS.
This post provides a walkthrough for containerized environments. Containers make the setup for different environments and operating systems more uniform, making it simpler for you to follow the solution in this post and directly apply the learnings to your existing containerized setup. However, you can apply the same pattern to non-container environments.
At the end of this walkthrough, you will issue an AWS CLI command to list Amazon S3 buckets in an AWS account (aws s3 ls). This is a simplified mechanism to show that you have successfully authenticated to AWS using IAM Roles Anywhere. Typically, in applications that consume AWS functionality, you instead would use an AWS Software Development Kit (SDK) for the programming language of your application. You can apply the same concepts from this blog post to enable the AWS SDK to use IAM Roles Anywhere.
Prerequisites
To follow along with this post, you must have these tools installed:
- The latest version of the AWS CLI, to create IAM Roles Anywhere resources
- jq, to extract specific information from AWS API responses
- Docker, to create and run the container image
- OpenSSL, to create cryptographic keys and certificates
Make sure that the principal used by the AWS CLI has enough permissions to perform the commands described in this blog post. For simplicity, you can apply the following least-privilege IAM policy:
This blog post assumes that you have configured a default AWS Region for the AWS CLI. If you have not, refer to the AWS CLI configuration documentation for different ways to configure the AWS Region.
Considerations for production use cases
To use IAM Roles Anywhere, you must establish trust with a private PKI. Certificates that are issued by this certificate authority (CA) are then used to sign CreateSession API requests. The API returns temporary AWS credentials: the access key ID, secret access key, and session key. For strong security, you should specify that the certificates are short-lived and the CA automatically rotates expiring certificates.
To simplify the setup for demonstration purposes, this post explains how to manually create a CA and certificate by using OpenSSL. For a production environment, this is not a suitable approach, because it ignores security concerns around the CA itself and excludes automatic certificate rotation or revocation capabilities. You need to use your existing PKI to provide short-lived and automatically rotated certificates in your production environment. This post shows how to validate whether your private CA and certificates meet IAM Roles Anywhere requirements.
If you don’t have an existing PKI that fulfils these requirements, you can consider using AWS Private Certificate Authority (Private CA) for a convenient way to help you with this process.
In order to use IAM Roles Anywhere in your container workload, it must have access to certificates that are issued by your private CA.
Solution overview
Figure 1 describes the relationship between the different resources created in this blog post.
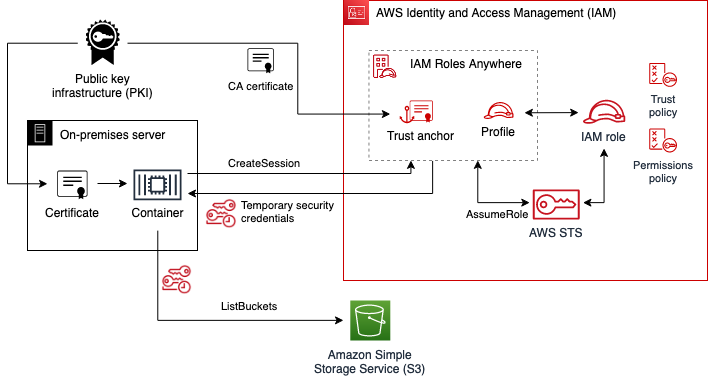
Figure 1: IAM Roles Anywhere relationship between different components and resources
To establish a trust relationship with the existing PKI, you will use its CA certificate to create an IAM Roles Anywhere trust anchor. You will create an IAM role with permissions to list all buckets in the account. The IAM role’s trust policy states that it can be assumed only from IAM Roles Anywhere, narrowing down which exact end-entity certificate can be used to assume it. The IAM Roles Anywhere profile defines which IAM role can be assumed in a session.
The container that is authenticating with IAM Roles Anywhere needs to present a valid certificate issued by the PKI, as well as Amazon Resource Names (ARNs) for the trust anchor, profile, and role. The container finally uses the certificate’s private key to sign a CreateSession API call, returning temporary AWS credentials. These temporary credentials are then used to issue the aws s3 ls command, which lists all buckets in the account.
Create and verify the CA and certificate
To start, you can either use your own CA and certificate or, to follow along without your own CA, manually create a CA and certificate by using OpenSSL. Afterwards, you can verify that the CA and certificate comply with IAM Roles Anywhere requirements.
To create the CA and certificate
Note: Manually creating and signing RSA keys into X.509 certificates is not a suitable approach for production environments. This section is intended only for demonstration purposes.
- Create an OpenSSL config file called v3.ext, with the following content.
- Create the CA RSA private key ca-key.pem and choose a passphrase.
- Create the CA X.509 certificate ca-cert.pem, keeping the default settings for all options.
The CA certificate is valid for three years. For recommendations on certificate validity, refer to the AWS Private CA documentation.
- Create an RSA private key key.pem, choose a new passphrase, and create a certificate signing request (CSR) csr.pem for the container. For Common Name (eg, fully qualified host name), enter myContainer. Leave the rest of the options blank.
- Use the CA private key, CA certificate, and CSR to issue an X.509 certificate cert.pem for the container.
To verify the CA and certificate
- Check whether your CA certificate satisfies IAM Roles Anywhere constraints.
The output should contain the following.
- Check whether your certificate satisfies IAM Roles Anywhere constraints.
The output should contain the following.
Note that IAM Roles Anywhere also supports stronger encryption algorithms than SHA256.
Create IAM resources
After you verify that your PKI complies with IAM Roles Anywhere requirements, you’re ready to create IAM resources. Before you start, make sure you have configured the AWS CLI, including setting a default AWS Region.
To create the IAM role
- Create a file named policy.json that specifies a set of permissions that your container process needs. For this walkthrough, you will issue the simple AWS CLI command aws s3 ls, which needs the following permissions:
- Create a file named trust-policy.json that contains the assume role policy for an IAM role by the service IAM Roles Anywhere. Note that this policy defines which certificate can assume the role. We define this based on the common name (CN) of the certificate, but you can explore other possibilities in the IAM Roles Anywhere documentation.
- Create the IAM role named bucket-lister.
The response should be a JSON document that describes the role.
- Attach the IAM policy document that you created earlier.
This command returns without a response.
To enable authentication with IAM Roles Anywhere
- Establish trust between IAM Roles Anywhere and an on-premises PKI by making the CA certificate known to IAM Roles Anywhere using a trust anchor. Create an IAM Roles Anywhere trust anchor from the CA certificate by using the following command:
The response should be a JSON document that describes the trust anchor.
- Create an IAM Roles Anywhere profile. Make sure to replace <AWS_ACCOUNT ID> with your own information.
The response should be a JSON document that describes the profile.
Create the Docker image
The Docker image that you will create in this step enables you to issue commands with the AWS CLI that are authenticated by using IAM Roles Anywhere.
To create the Docker image
- Create a file named docker-entrypoint.sh that configures the AWS CLI to use the IAM Roles Anywhere signing helper.
- Create a file named Dockerfile. This contains a multi-stage build. The first stage builds the IAM Roles Anywhere signing helper. The second stage copies the compiled signing helper binary into the official AWS CLI Docker image and changes the container entry point to the script you created earlier.
Note that the first build stage can remain the same for other use cases, such as for applications using an AWS SDK. Only the second stage would need to be adapted. Diving deeper into the technical details of the first build stage, note that building the credential helper from its source keeps the build independent of the processor architecture. The build process also statically packages dependencies that are not present in the official aws-cli Docker image. Depending on your use case, you may opt to download pre-built artifacts from the credential helper download page instead.
- Create the image as follows.
Use the Docker image
To use the Docker image, use the following commands to run the created image manually. Make sure to replace <PRIVATE_KEY_PASSSPHRASE> with your own data.
This command should return a list of buckets in your account.
Because we only granted permissions to list buckets, other commands that use this certificate, like the following, will fail with an UnauthorizedOperation error.
Note that if you use a certificate that uses a different common name than myContainer, this command will instead return an AccessDeniedException error as it fails to assume the role bucket-lister.
To use the image in your own environment, consider the following:
- How to provide the private key and certificate to your container. This depends on how and where your PKI provides certificates. As an example, consider a PKI that rotates certificate files in a host directory, which you can then mount as a directory to your container.
- How to configure the environment variables. Some variables mentioned earlier, like ROLESANYWHERE_TRUST_ANCHOR_ARN, can be shared across containers, while ROLESANYWHERE_PROFILE_ARN and ROLESANYWHERE_ROLE_ARN should be scoped to a particular container.
Clean up
None of the resources created in this walkthrough incur additional AWS costs. But if you want to clean up AWS resources you created earlier, issue the following commands.
- Delete the IAM policy from the IAM role.
- Delete the IAM role.
- Delete the IAM Roles Anywhere profile.
- Delete the IAM Roles Anywhere trust anchor.
- Delete the key material you created earlier to avoid accidentally reusing it or storing it in version control.
What’s next
After you reconfigure your on-premises containerized application to access AWS resources by using IAM Roles Anywhere, assess your other hybrid workloads running on-premises that have access to AWS resources. The technique we described in this post isn’t limited to containerized workloads. We encourage you to identify other places in your on-premises infrastructure that rely on static IAM credentials and gradually switch them to use IAM Roles Anywhere.
Conclusion
In this blog post, you learned how to use IAM Roles Anywhere to help you meet security goals in your on-premises containerized system. Improve your security posture by using temporary credentials instead of static credentials to authenticate against the AWS API. Use your existing private CA to make credentials short-lived and automatically rotate them.
For more information, check out the IAM Roles Anywhere documentation. The workshop Deep Dive on AWS IAM Roles Anywhere provides another walkthrough that isn’t specific to Docker containers. If you have any questions, you can start a new thread on AWS re:Post or reach out to AWS Support.
Want more AWS Security news? Follow us on Twitter.

 Ulrich Hinze is a Solutions Architect at AWS. He partners with software companies to architect and implement cloud-based solutions on AWS. Before joining AWS, he worked for AWS customers and partners in software engineering, consulting, and architecture roles for 8+ years.
 Patrick Oberherr is a Staff Data Engineer at Contentful with 4+ years of working with AWS and 10+ years in the Data field. At Contentful he is responsible for infrastructure and operations of the data stack which is hosted on AWS.
 Johannes Günther is a cloud & data consultant at Netlight with 5+ years of working with AWS. He has helped clients across various industries designing sustainable cloud platforms and is AWS certified.