Post Syndicated from Avijit Goswami original https://aws.amazon.com/blogs/big-data/zero-copy-access-to-apache-iceberg-tables-in-amazon-s3-from-salesforce-data-360-using-the-iceberg-rest-endpoint-from-aws-glue-data-catalog/
Companies increasingly need to query and analyze data across platforms without the cost and complexity of moving it. Salesforce and AWS have collaborated to make this possible by providing Zero Copy access to Apache Iceberg tables stored in Amazon Simple Storage Service (Amazon S3) directly from Salesforce Data 360, using the Iceberg REST endpoint from AWS Glue Data Catalog with data access managed by AWS Lake Formation. This integration helps customers federate their Amazon S3 data lakes with Data 360, preserving data governance, freshness, and business semantics without replication.
Zero Copy file federation plays an important role in activating applications and experiences. By removing the need to physically move or copy data, and connecting to data at the storage level, it addresses key challenges including:
- Cost efficiency – Reduce storage duplication costs and minimize the compute resources required for data pipelines.
- High scale – Access data with near-native performance at scale through in-Region access.
- Enhanced agility – Access and analyze data in real time, accelerating time-to-insight and supporting faster response to evolving business needs.
- Streamlined operations – Remove the complexity of building and maintaining intricate data pipelines, clearing up valuable data engineering resources.
In this post, we demonstrate how AWS and Salesforce customers can access their enterprise data lakes on AWS from Data 360 using Zero Copy file federation.
What is Data 360?
Data 360 is the real-time data engine that activates trusted context across the entire Salesforce platform. It connects all your enterprise data — data warehouses, data lakes, third-party signals, and more — to the business context, logic, and governance that already live in Salesforce, without moving or copying it. With Zero Copy federation, your teams and AI agents always operate from a complete, current, and trusted picture of your business in the moment it’s needed. It serves as the essential system of context for Agentforce, enabling agents to reliably get real work done.
What is Apache Iceberg?
Apache Iceberg is a high-performance, open table format for huge analytic datasets that brings the reliability and simplicity of SQL tables to big data. It’s a thriving open source project under the Apache Software Foundation. Data engineers use Apache Iceberg because it’s fast, efficient, and reliable at any scale and keeps records of how datasets change over time. Apache Iceberg offers integrations with popular data processing frameworks such as Apache Spark, Apache Flink, Apache Hive, Presto, and more.
Why Amazon S3 for Apache Iceberg data lakes?
Amazon S3 is regarded as the best place to build data lakes because of its durability, availability, scalability, security, compliance, and audit capabilities, and its ability to integrate with a broad portfolio of AWS and third-party tools for data ingestion and processing. Apache Iceberg was designed and built to interact with Amazon S3, and provides support for many Amazon S3 features as listed in the Iceberg documentation.
What is Zero Copy file federation?
File federation, also termed catalog federation, uses the Data Catalog to communicate with remote catalog systems to discover catalog objects and to authorize access to their data in Amazon S3. When you query a remote Iceberg table, the Data Catalog discovers the latest table information in the remote catalog at query runtime, getting the table’s Amazon S3 location, current schema, and partition information. Your analytics engine then uses this information to access Iceberg data files directly from Amazon S3, and Lake Formation manages access to the table and data by vending scoped credentials to the table data stored in Amazon S3. This approach avoids metadata and data duplication while providing real-time access to remote Iceberg tables through your preferred AWS analytics engines.
Solution overview
Apache Iceberg file federation lets Data 360 directly query data stored in Amazon S3 without copying or moving the data. This Zero Copy approach provides several benefits:
- Real-time access to Amazon S3 data from Salesforce.
- Reduced data movement and storage costs.
- Simplified data architecture.
- Improved data freshness.
The following diagram illustrates the architecture of the integration between Data 360 and Amazon S3 using Apache Iceberg file federation.
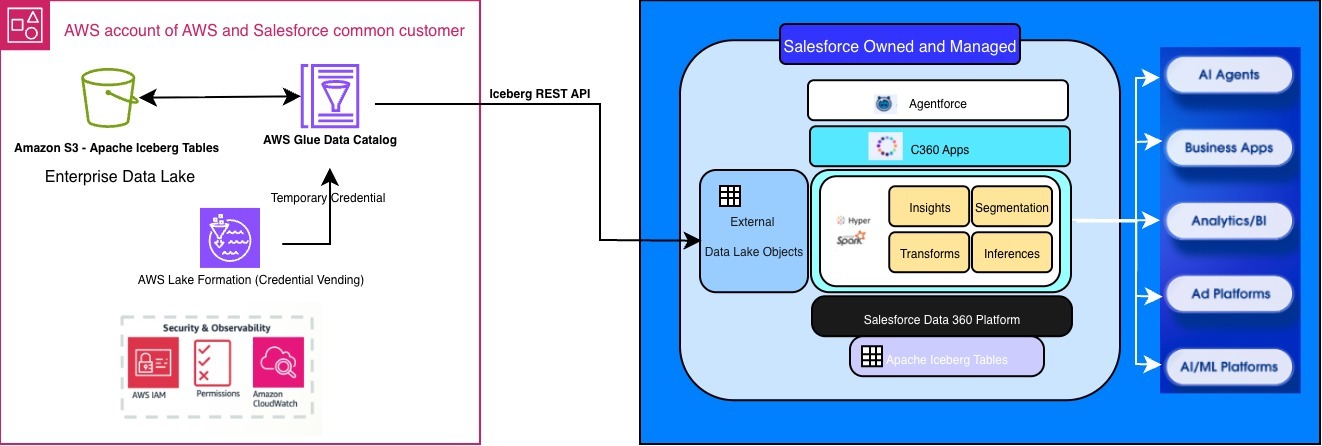
Key components:
- Amazon S3 stores the source data in Apache Iceberg format.
- AWS Glue Data Catalog maintains the metadata for Iceberg tables.
- AWS Glue Iceberg REST endpoint provides RESTful access to Iceberg tables.
- AWS Lake Formation manages metadata and underlying data access for Amazon S3-based data lakes.
- Data 360 processes and analyzes the data.
- Apache Iceberg connector provides direct access to query Amazon S3 data from Salesforce.
Walkthrough
The following walkthrough shows you how to set up Zero Copy file federation.
Prerequisites
Before you begin, you need the following:
- An AWS account.
- A data-lake-admin role following the steps in Lake Formation personas and IAM permissions reference, with access to AWS Identity and Access Management (IAM), AWS Glue Data Catalog, AWS Lake Formation, Amazon S3, and Amazon Athena.
- A Data 360 instance.
- Familiarity with AWS and Data 360.
- A user-defined IAM role that Lake Formation will use to register the bucket. To create one, see Requirements for roles used to register locations.
Configure your AWS environment
Set up an Amazon S3 bucket and Iceberg table
Sign in as the data lake admin and complete the following steps:
- Open the Amazon S3 console.
- Choose Create bucket to create a bucket.
- For Bucket type, choose General purpose, provide a Bucket name, and choose Create bucket.
- In the bucket, create two prefixes by choosing Create folder.
- Name the prefixes athena_iceberg and athena_results.
- Inside the athena_iceberg prefix, create another prefix named customer_iceberg.
Create an Iceberg table using Athena
- Open the Amazon Athena console.
- Choose Query your data in Athena console, then choose Launch query editor.
- In Athena, choose Edit settings.
- Set
s3://<your-bucket-name>/athena_results/as the Location of query result, then choose Save. Replace<your-bucket-name>with your bucket name. - Choose Editor to return to the query editor page.
- To create the database, copy the following query into the query editor and choose Run. You need to be in the Athena Query Editor to run the following commands.
- To create the Iceberg table, copy the following query into the query editor, replace
<s3 bucket location>with your Amazon S3 bucket location hosting the Iceberg table, and choose Run. - Insert some records into the table.
Register the bucket with Lake Formation in Lake Formation mode
To use Lake Formation permissions for access control to the churn table, you must register the location. To do that, complete the following actions:
- Open the AWS Lake Formation console.
- In the navigation pane under Administration, choose Data lake locations.
- Choose Register location and enter the following information:
- For S3 URI, enter
s3://<s3 bucket location>/iceberg/churn. Replace<s3 bucket location>with your Amazon S3 bucket location hosting the Iceberg table. - For IAM role, choose the user-defined IAM role that you created in the prerequisites.
- For Permission mode, choose Lake Formation.
- For S3 URI, enter
- Choose Register location.
Enable third-party integration in Lake Formation
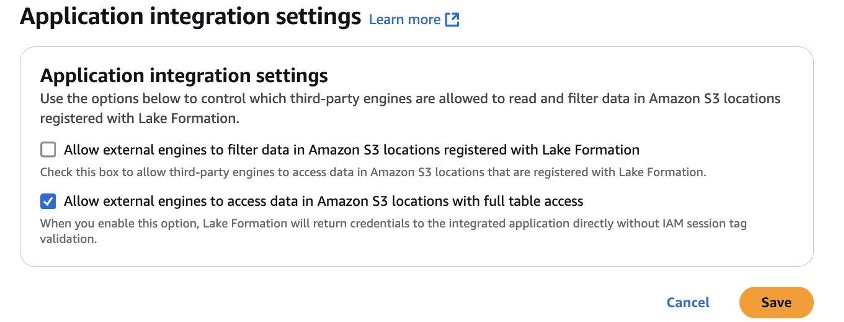
From the Lake Formation console, enable full table access for external engines.
- Open the AWS Lake Formation console.
- On the left pane, expand the Administration section.
- Choose Application integration settings and select Allow external engines to access data in Amazon S3 locations with full table access.
- Choose Save.
Set up an IAM user for third-party access
- Open the IAM console.
- From the left navigation menu, choose Policies, then choose Create policy. Choose JSON and paste the following policy:
- Choose next, provide a name for the policy, and choose Create policy.
- From the left navigation menu, choose Users, then choose Create user.
- For username, enter data_cloud_user, choose next, and choose Attach policies directly.
- Choose AWSGlueServiceRole and the policy that you created in step 3. Choose next and Create user.
- Choose the user, then choose Security credentials to create an access key.
- Scroll down and choose Create access key, choose Applications running outside AWS, and choose Create access key.
- Copy the access key and secret access key, and save them securely. You need these to configure the connector in Data 360.
Set up Lake Formation resource permissions for third-party data access
- Open the Lake Formation console.
- From the left navigation under Data Catalog, choose Databases, then choose the athena_iceberg_db database.
- From the Actions menu, choose Permissions, Grant.
- In Principals, choose IAM users and roles, and from the menu choose
data_cloud_user, which you just created in IAM. - Scroll down to grant permissions by choosing All tables, then choose Select and Describe permissions for the tables.
- Choose Grant to apply the permissions.
Set up Apache Iceberg file federation in Data 360
Create and configure the connection
- Navigate to Salesforce Setup. For instructions, see Set Up the AWS Glue Data Catalog Connection.
- In Data Cloud, choose Setup, then choose Data Cloud Setup.

- Under External Integrations, choose Other Connectors.
- Choose New.
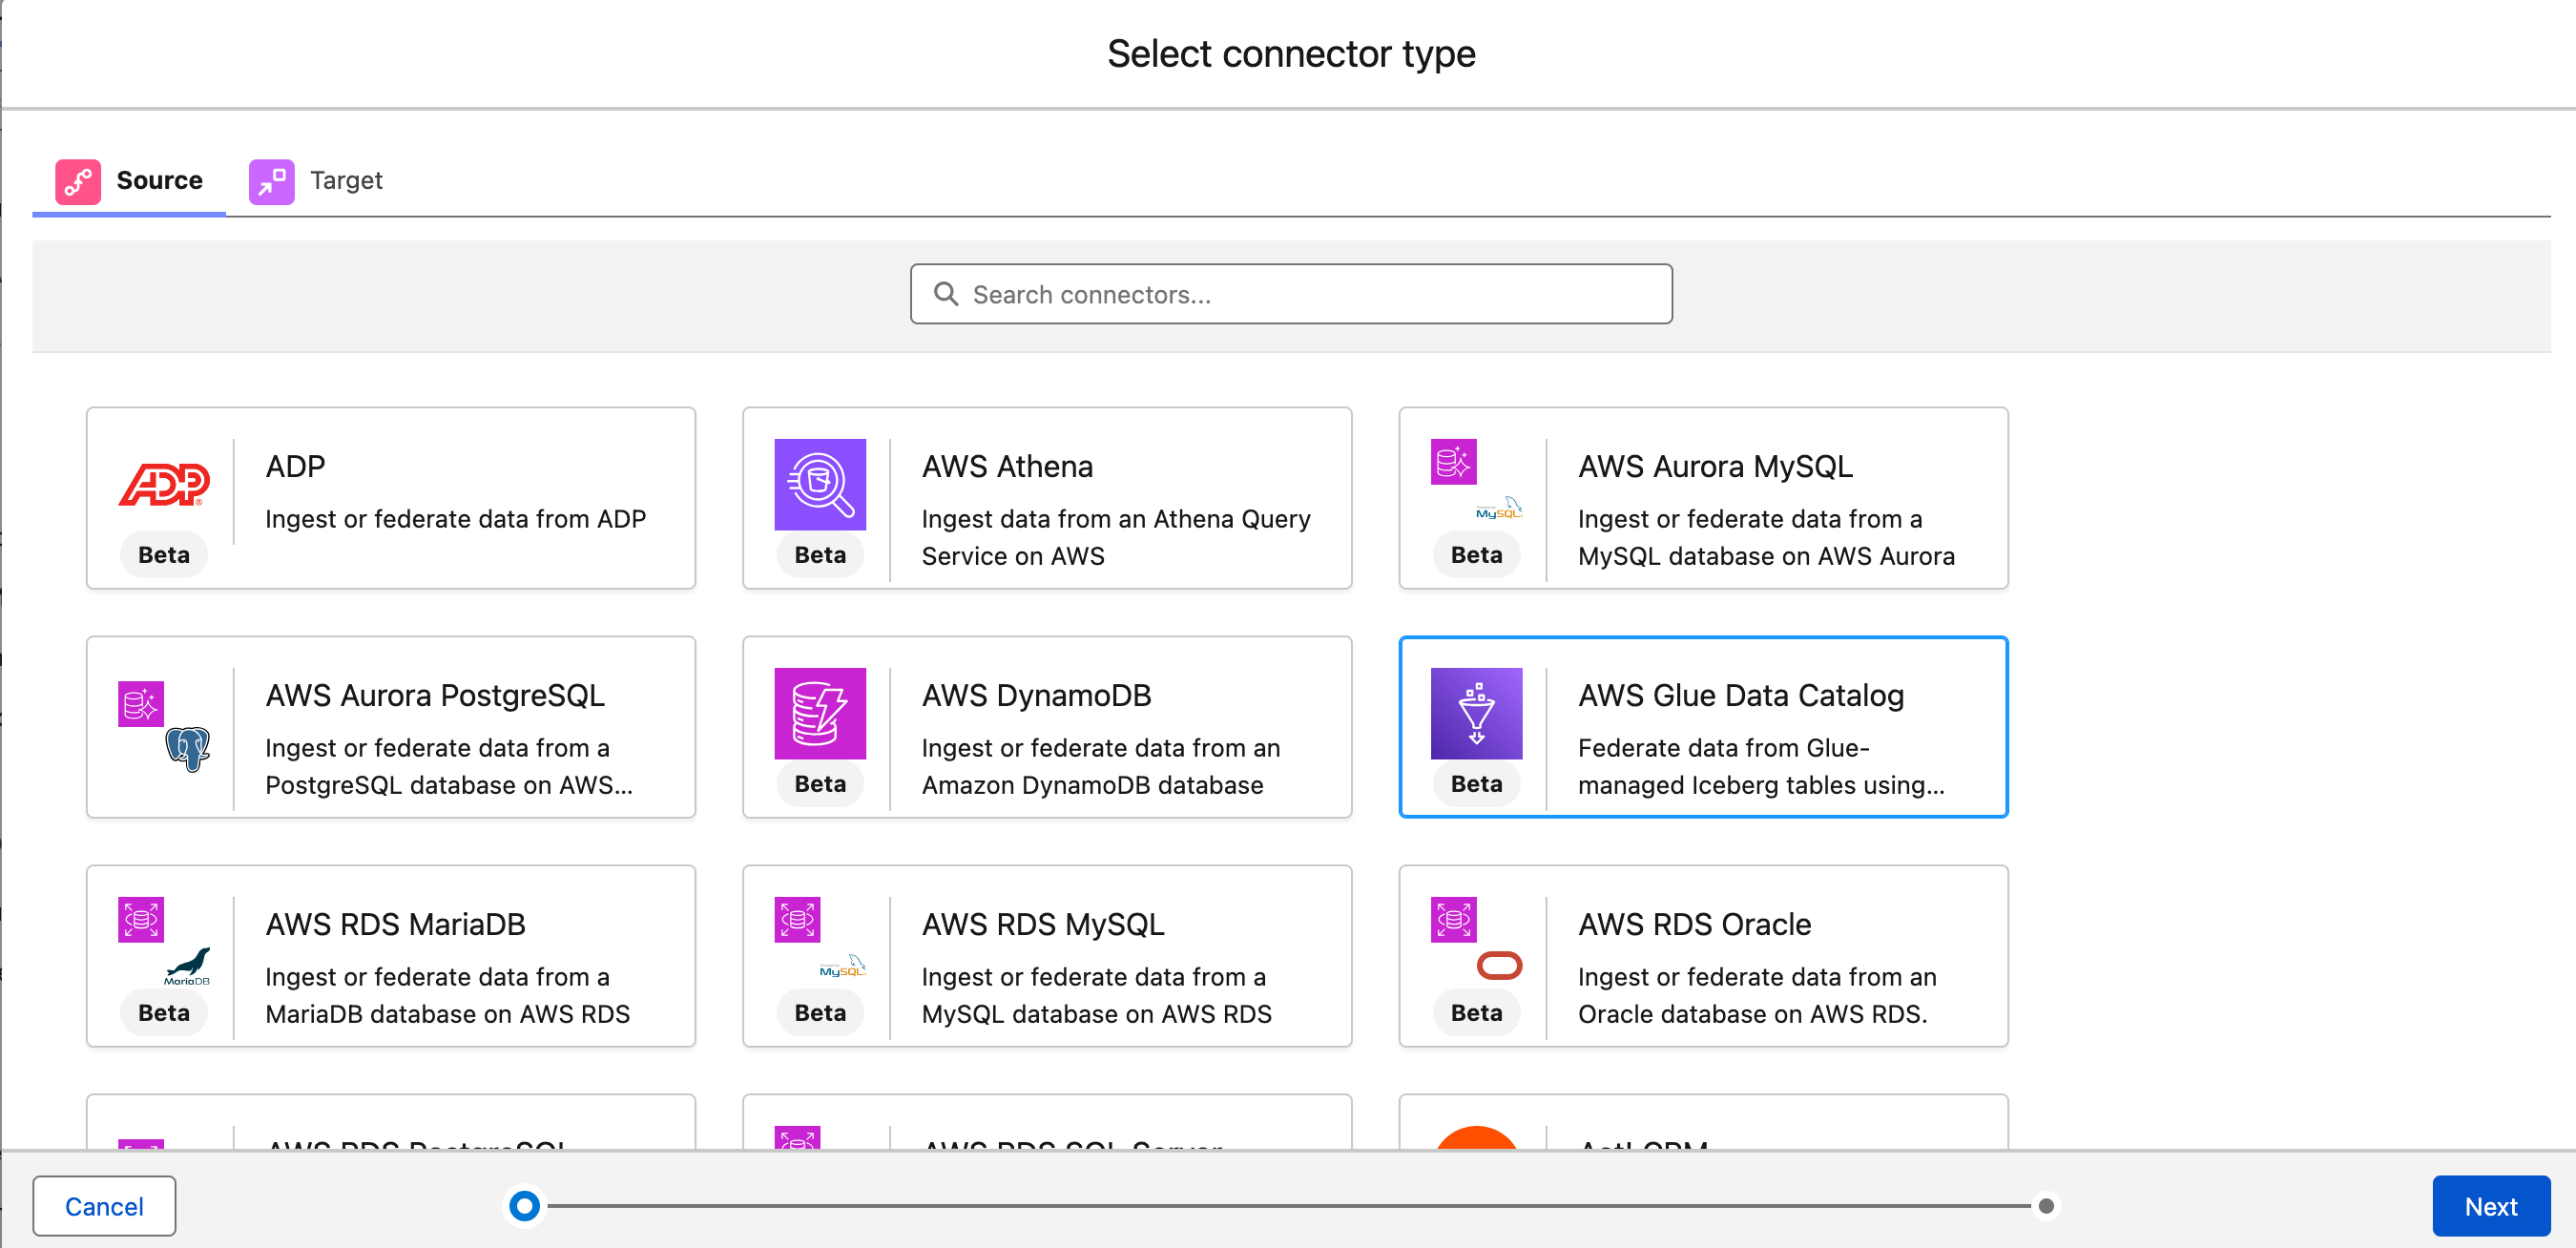
- On the Source tab, choose AWS Glue Data Catalog, then choose Next.
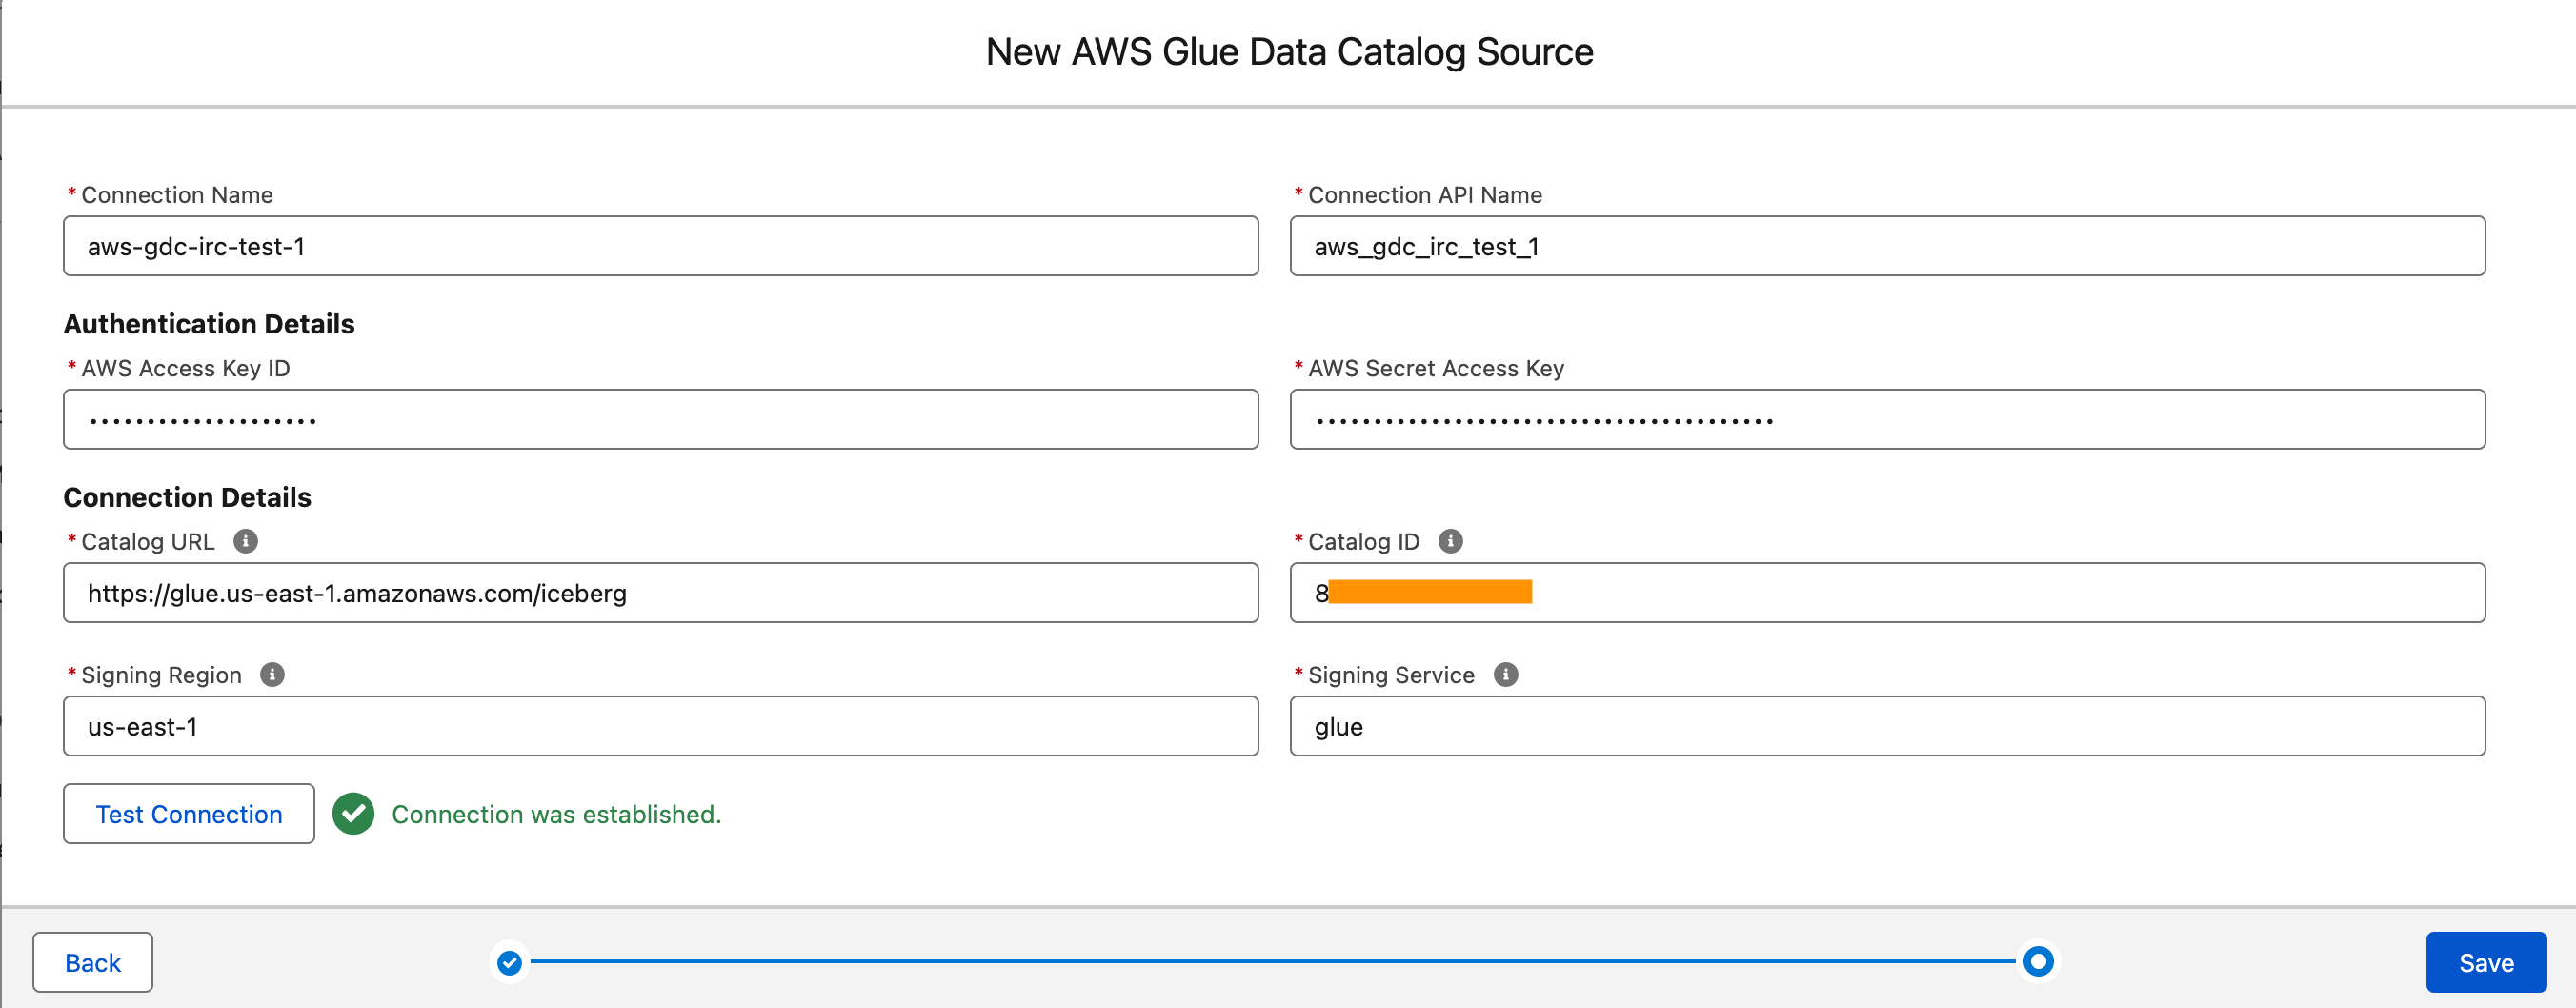
- Complete the following information shown in the following screen:
- In the Authentication Details section, enter the AWS access key ID and AWS secret access key for the IAM user. Make sure that the IAM user has a policy that grants the user read-only access to AWS Glue Data Catalog. Use Lake Formation to configure storage credential vending. This approach is for AWS Glue Data Catalog to vend temporary credentials at run time so that Data 360 can access the underlying storage bucket.
- For Catalog URL, enter the URL of AWS Glue Data Catalog. See Connecting to the Data Catalog by using AWS Glue Iceberg REST endpoint.
- For Catalog ID, enter the 12-digit AWS account ID linked to AWS Glue Data Catalog.
- For Signing Region, enter the host AWS Region where AWS Glue Data Catalog is located.
- For Signing Service, enter
glue. Data 360 requires the Signing Service, in addition to the AWS access key ID, secret access key, and Signing Region, to sign requests to AWS Glue Data Catalog by using AWS Signature Version 4. - Test the connection and check for the success message.
- Save the connection details.
- After the configuration is complete and saved, the new AWS Glue Data Catalog connection shows up with “Active” status in the Connectors screen.


Create and configure the data stream
- In Data Cloud, on the Data Streams tab, choose New.
- Under Other Sources, choose the AWS Glue Data Catalog source, then choose Next.
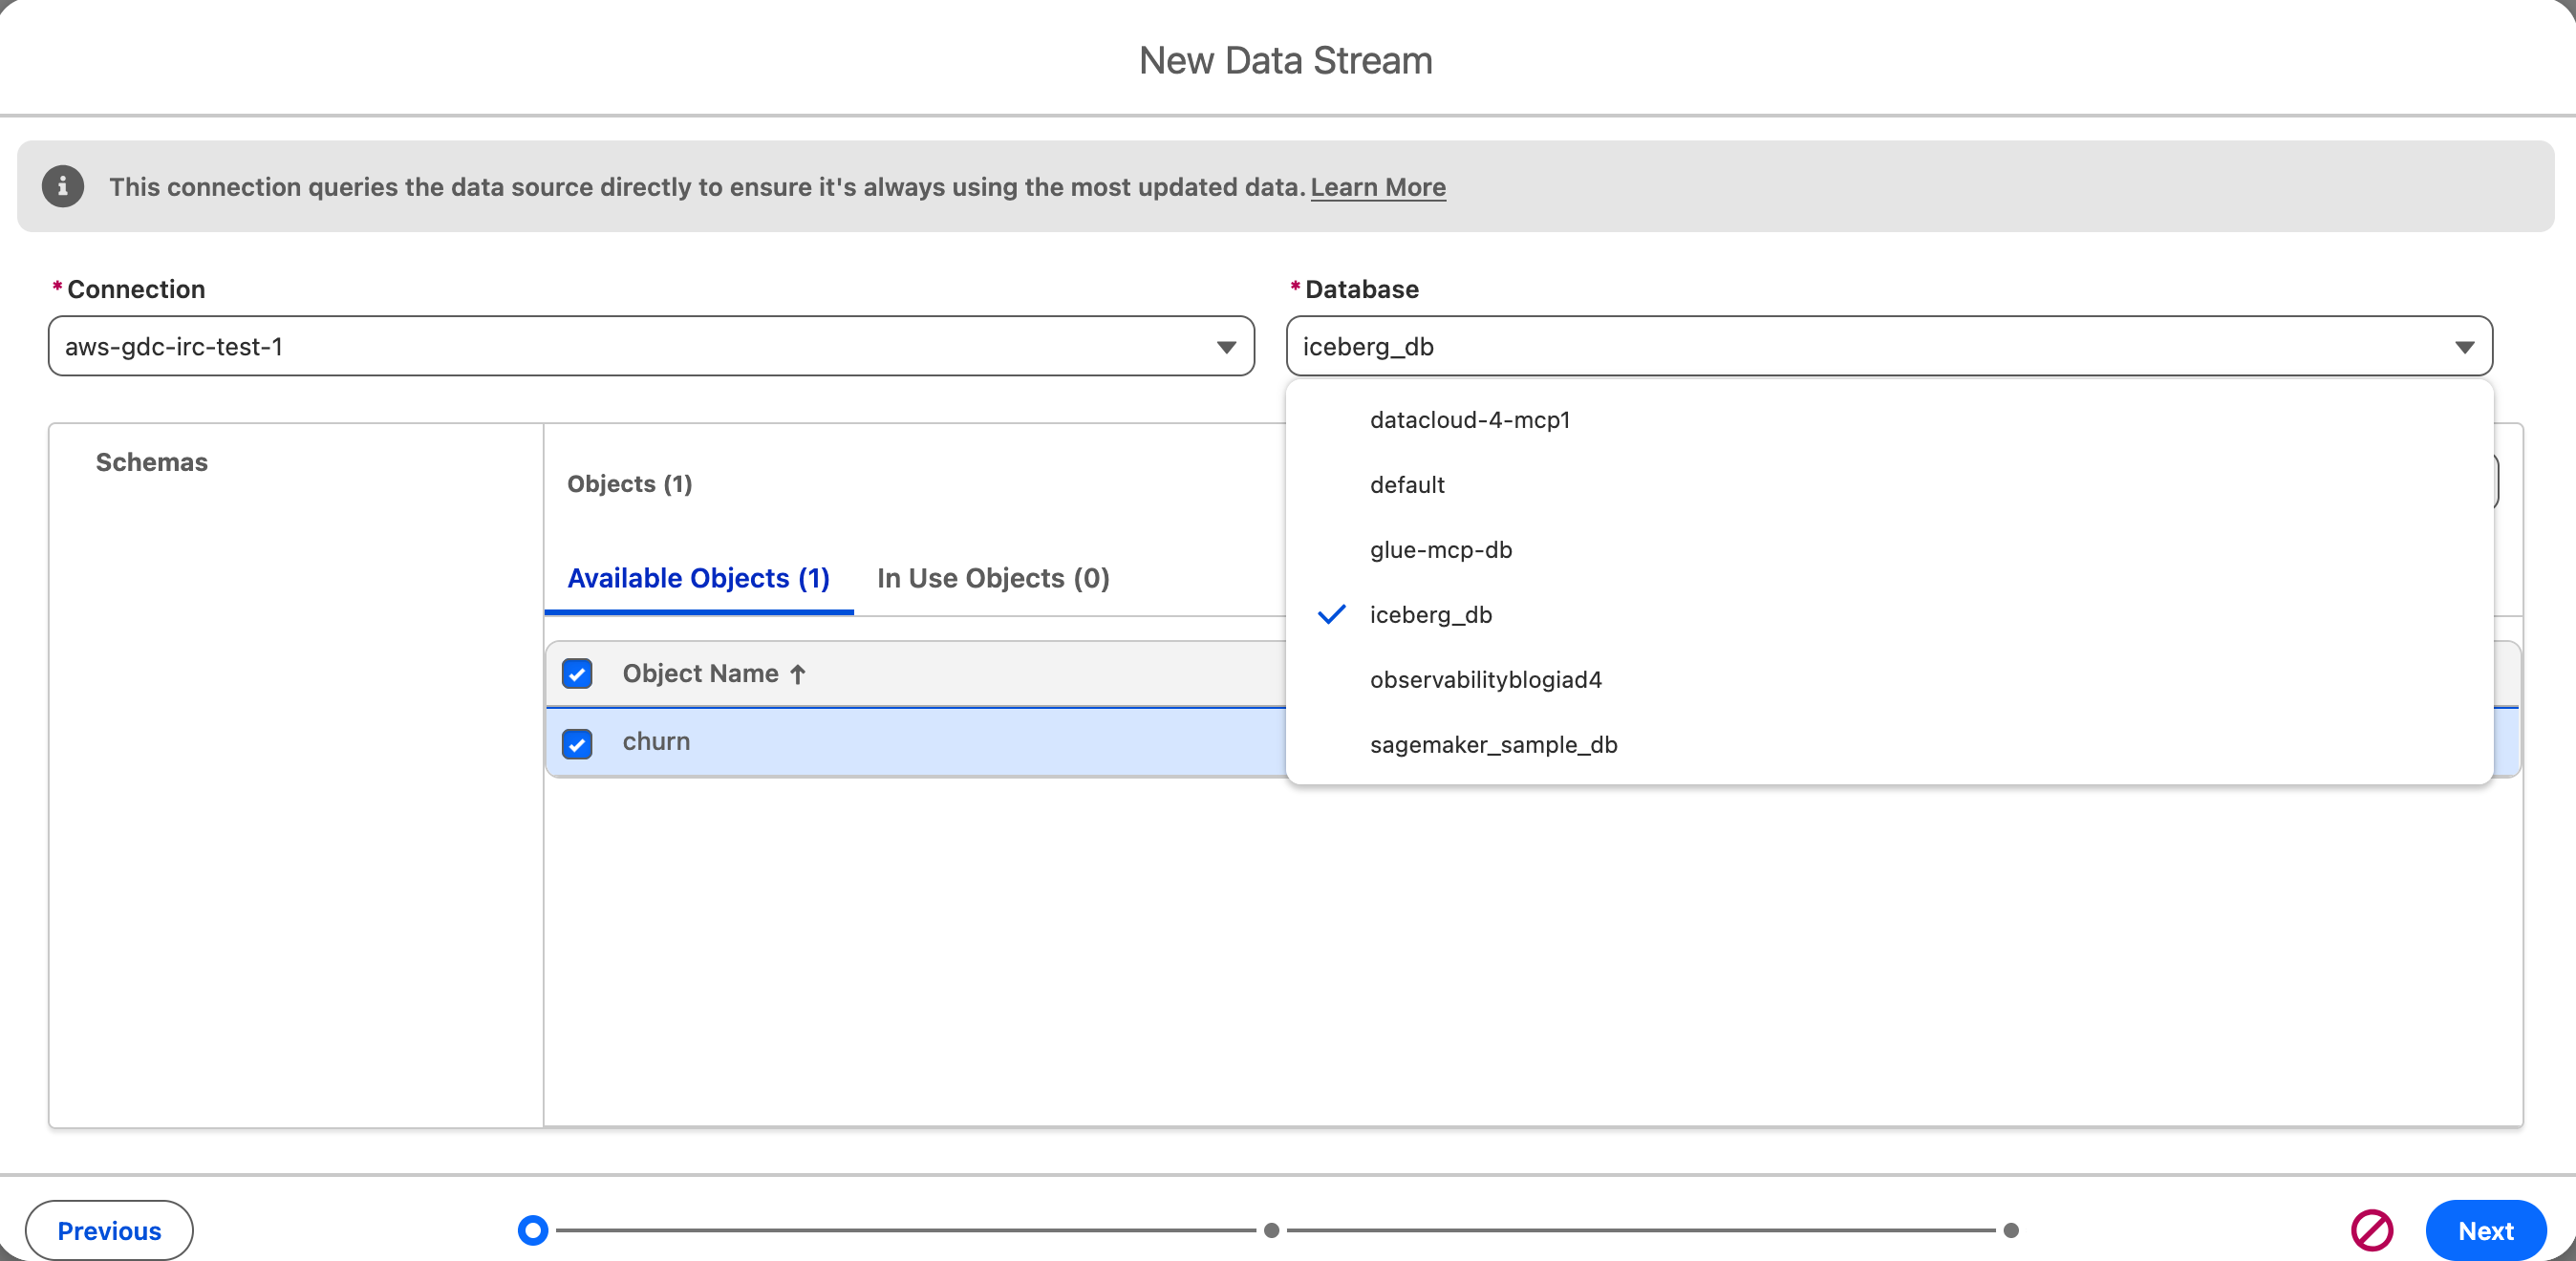
- From the menus, choose the connection that you just set up, choose a database in your AWS Glue catalog where you have an Iceberg table, choose the table that you want to stream, and choose Next.
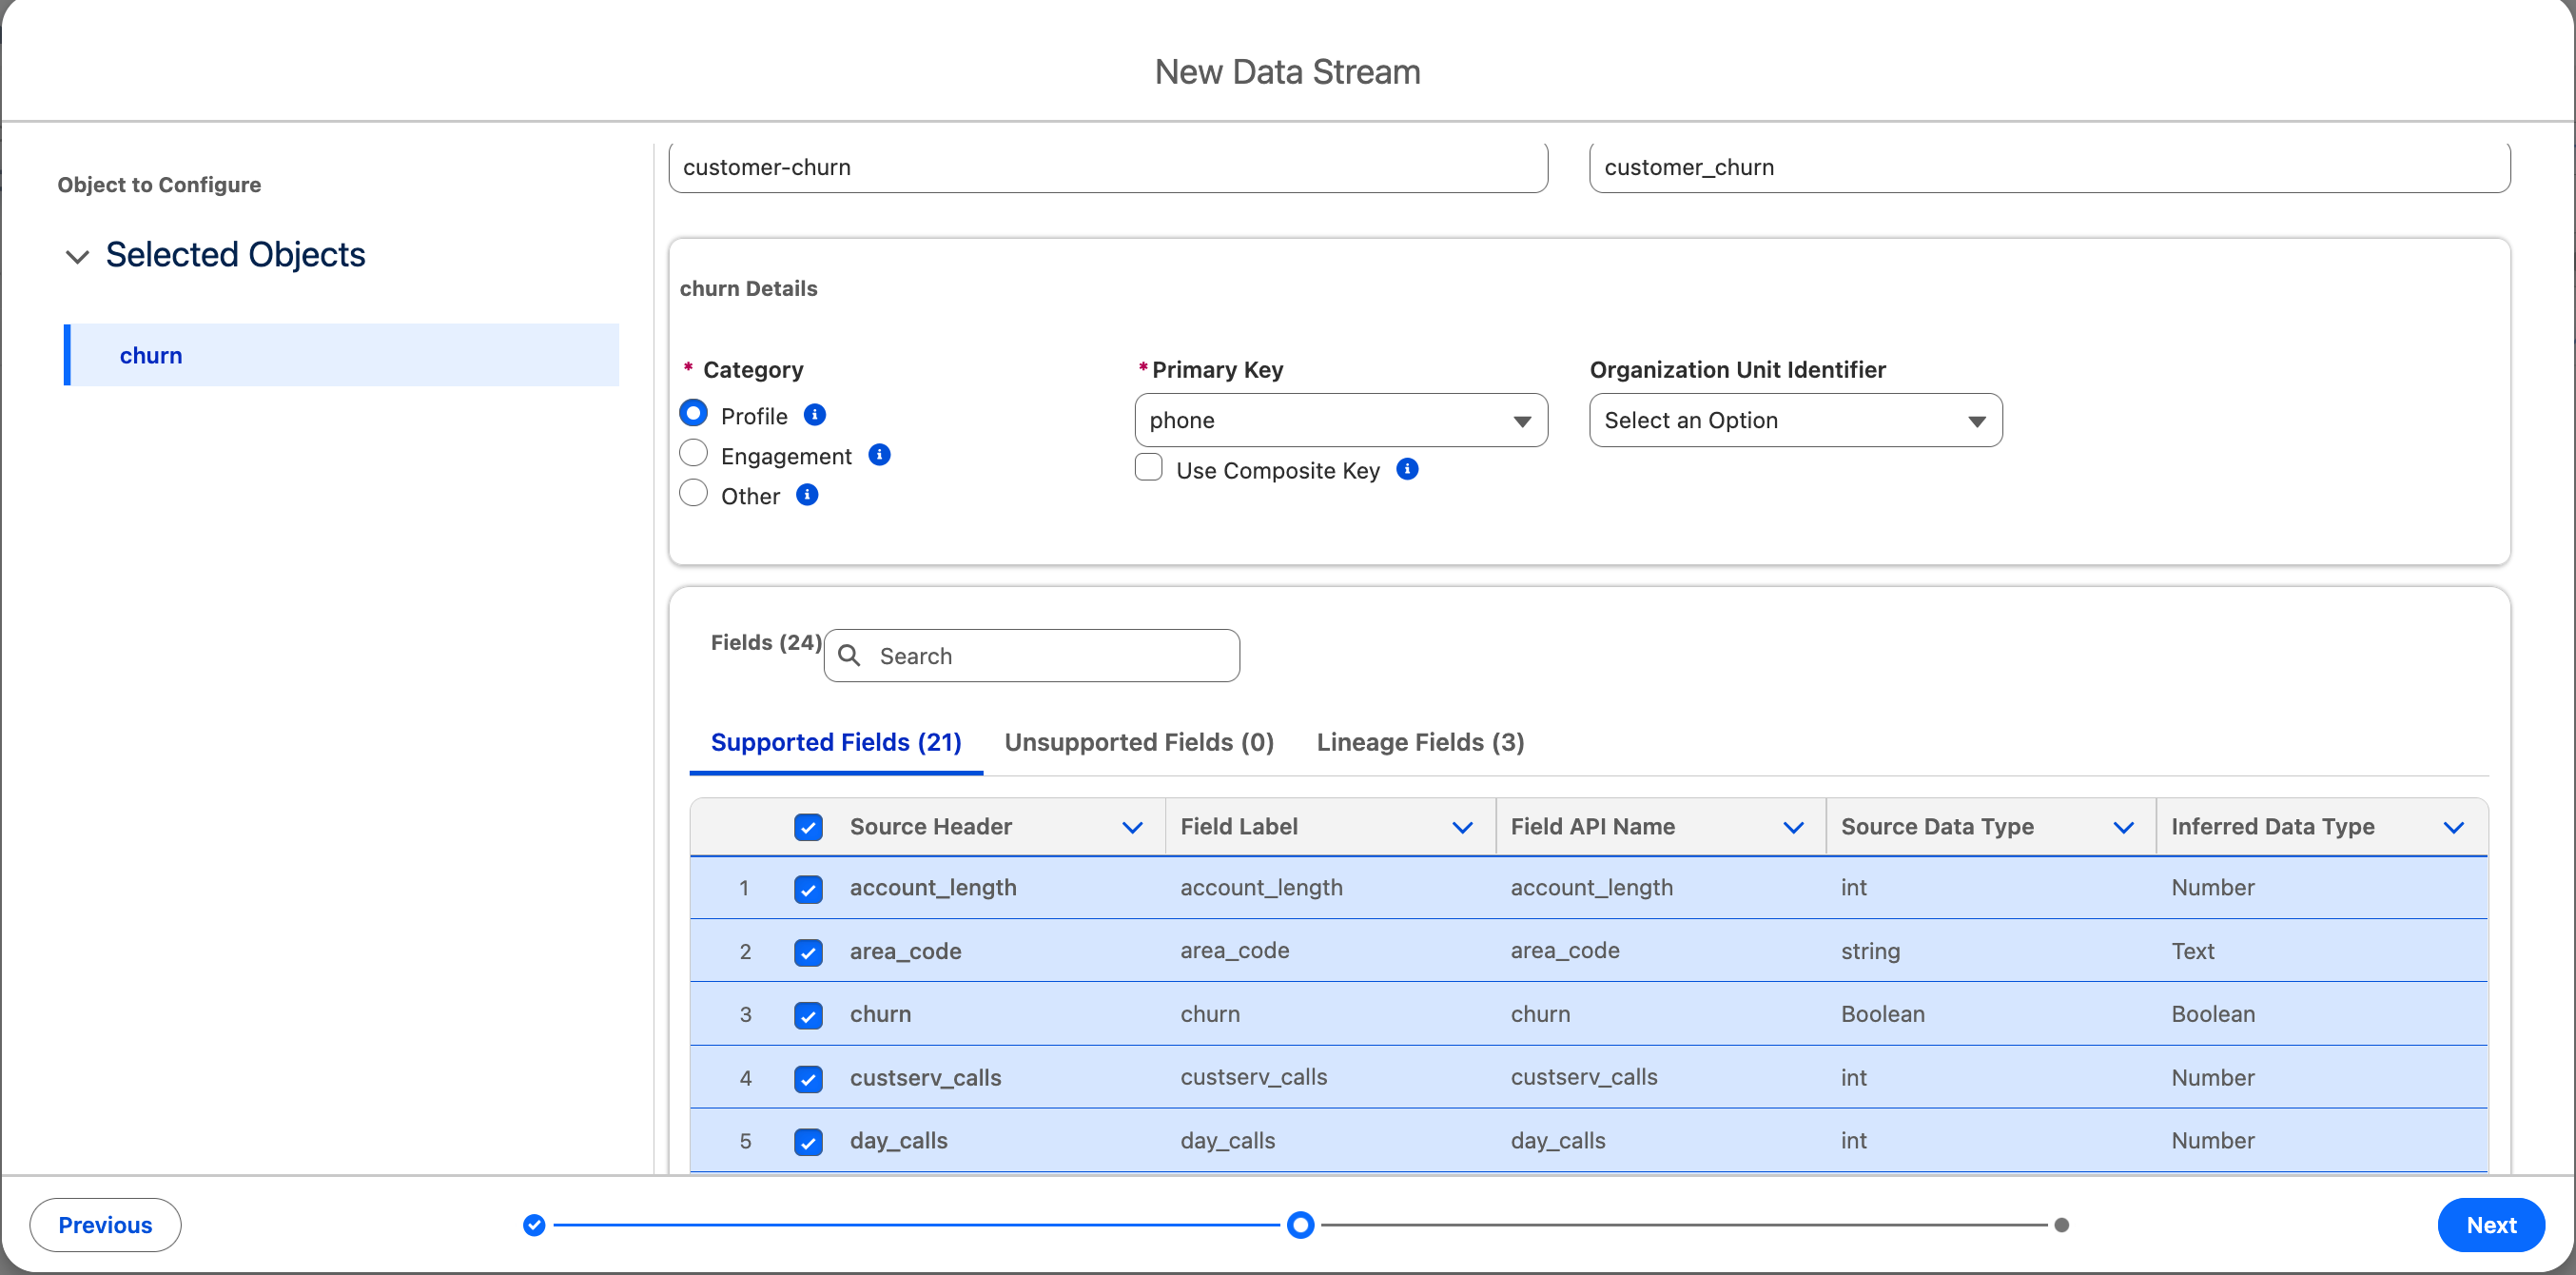
- Enter the object name and object API name. For more information, see Data Lake Object Naming Standards.
- Choose the category to specify the type of data to ingest. For more information, see Category.
- Choose a primary key to uniquely identify the incoming records. For more information, see Primary Key.
- Choose the source fields you want to ingest, then choose Next. Fields with convertible data types are listed under Supported Fields.
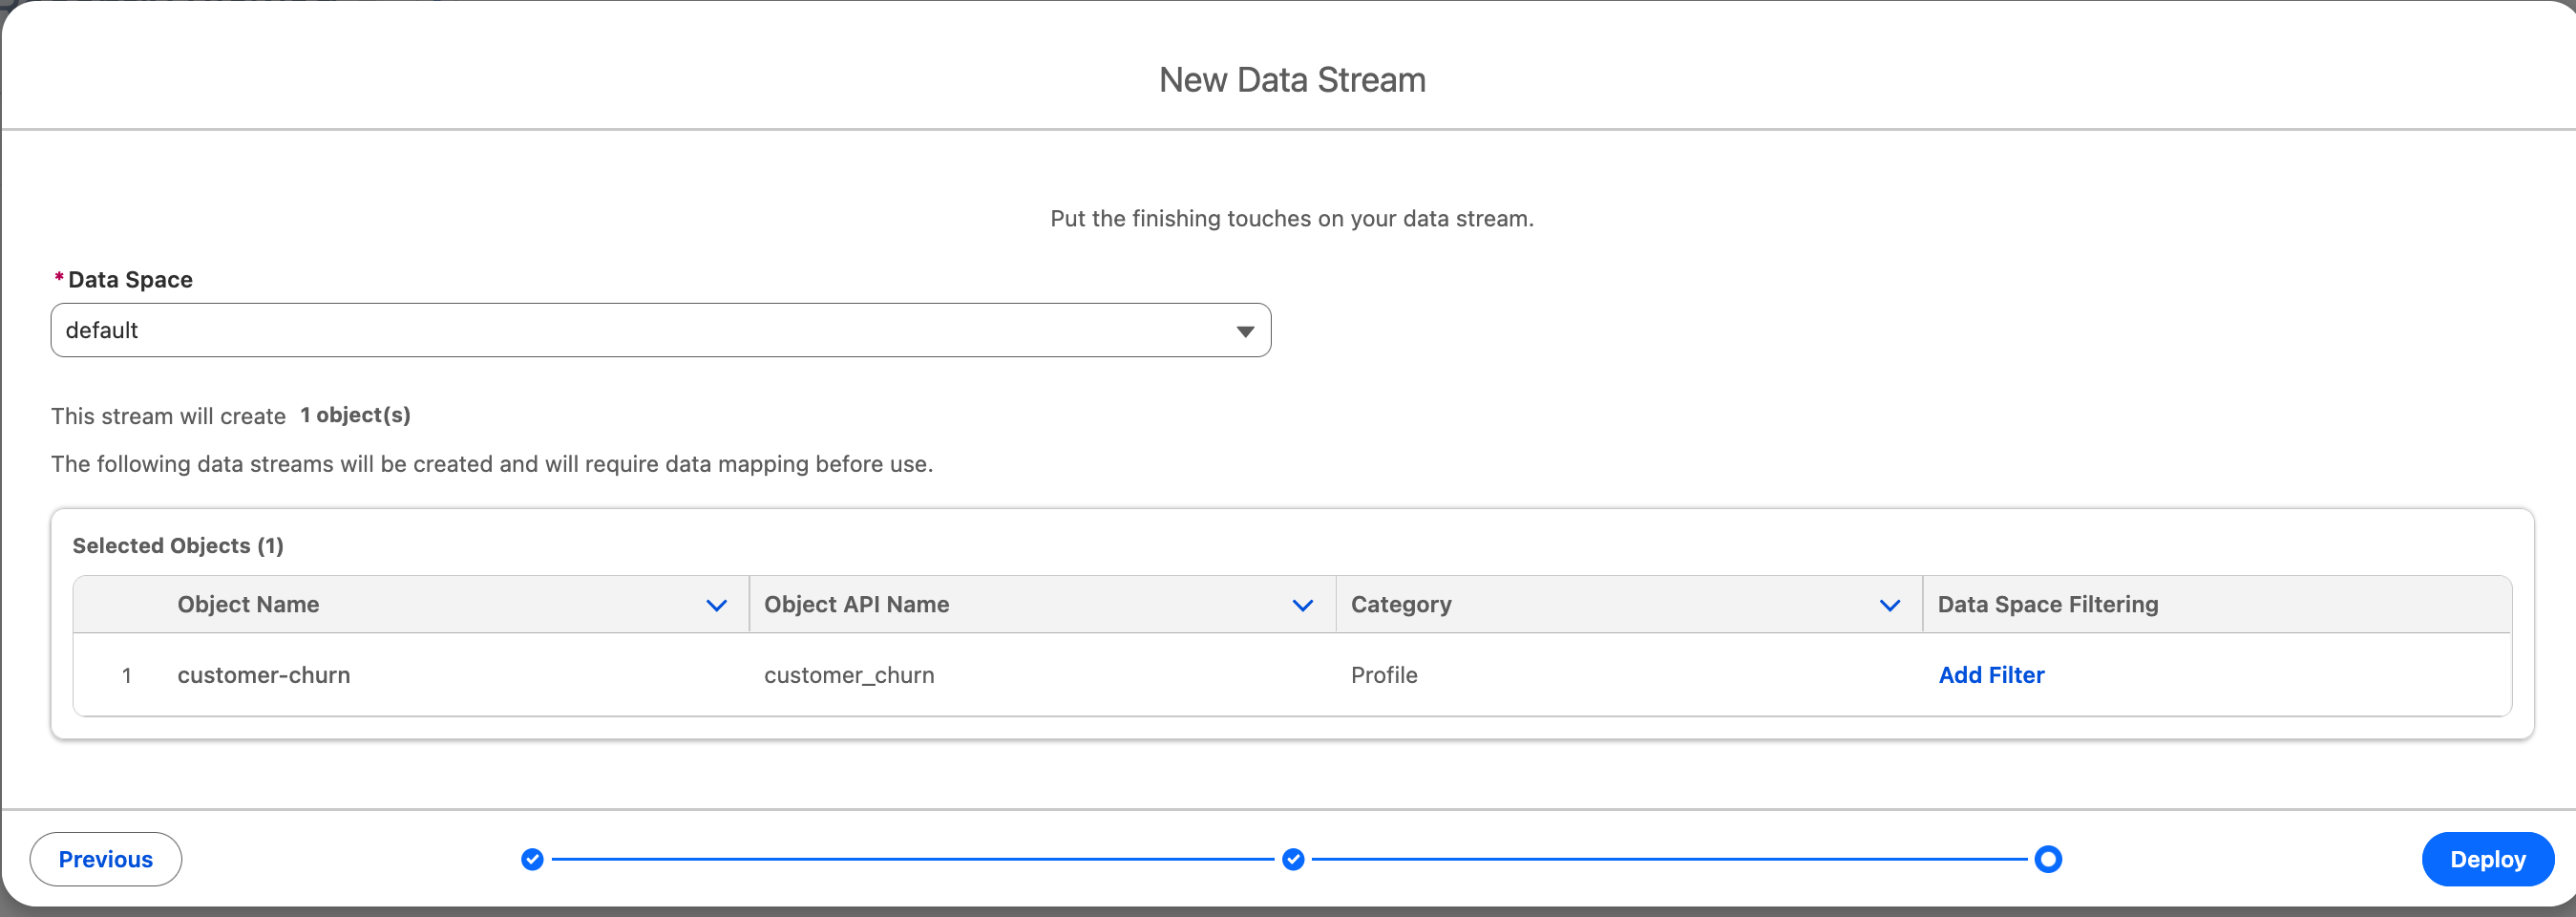
- Choose the relevant data space. Choose “Default” if you don’t have any other data space provisioned in your org. For more information, see Data Spaces.
- Choose Deploy.
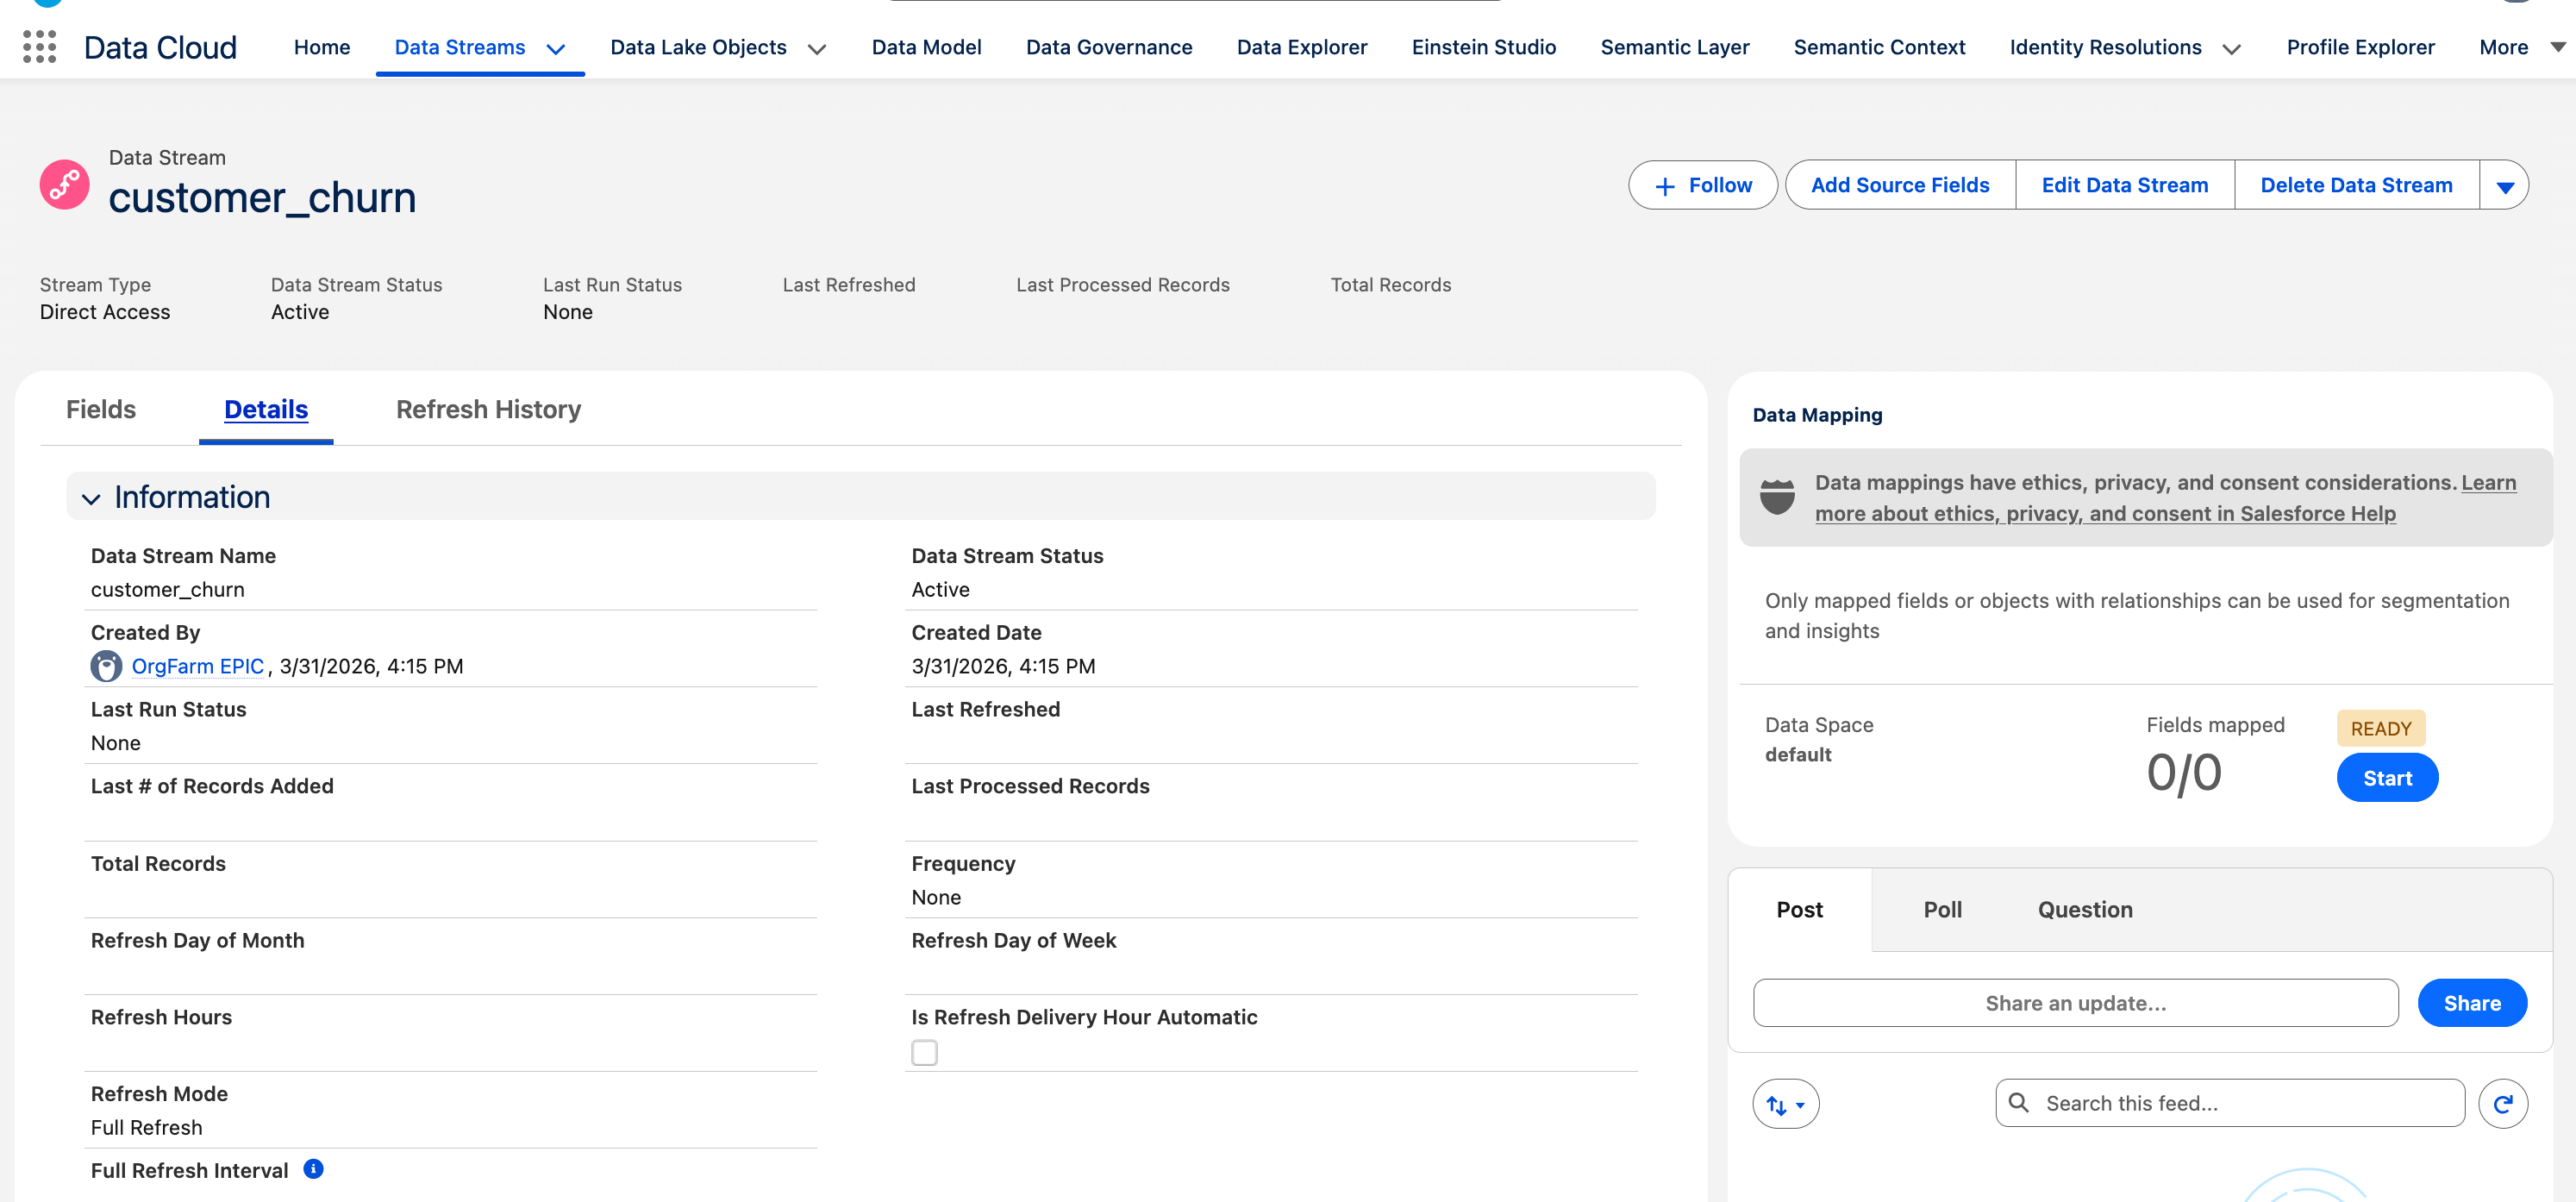
- After the setup is complete, the new data stream appears in your Data Cloud environment.
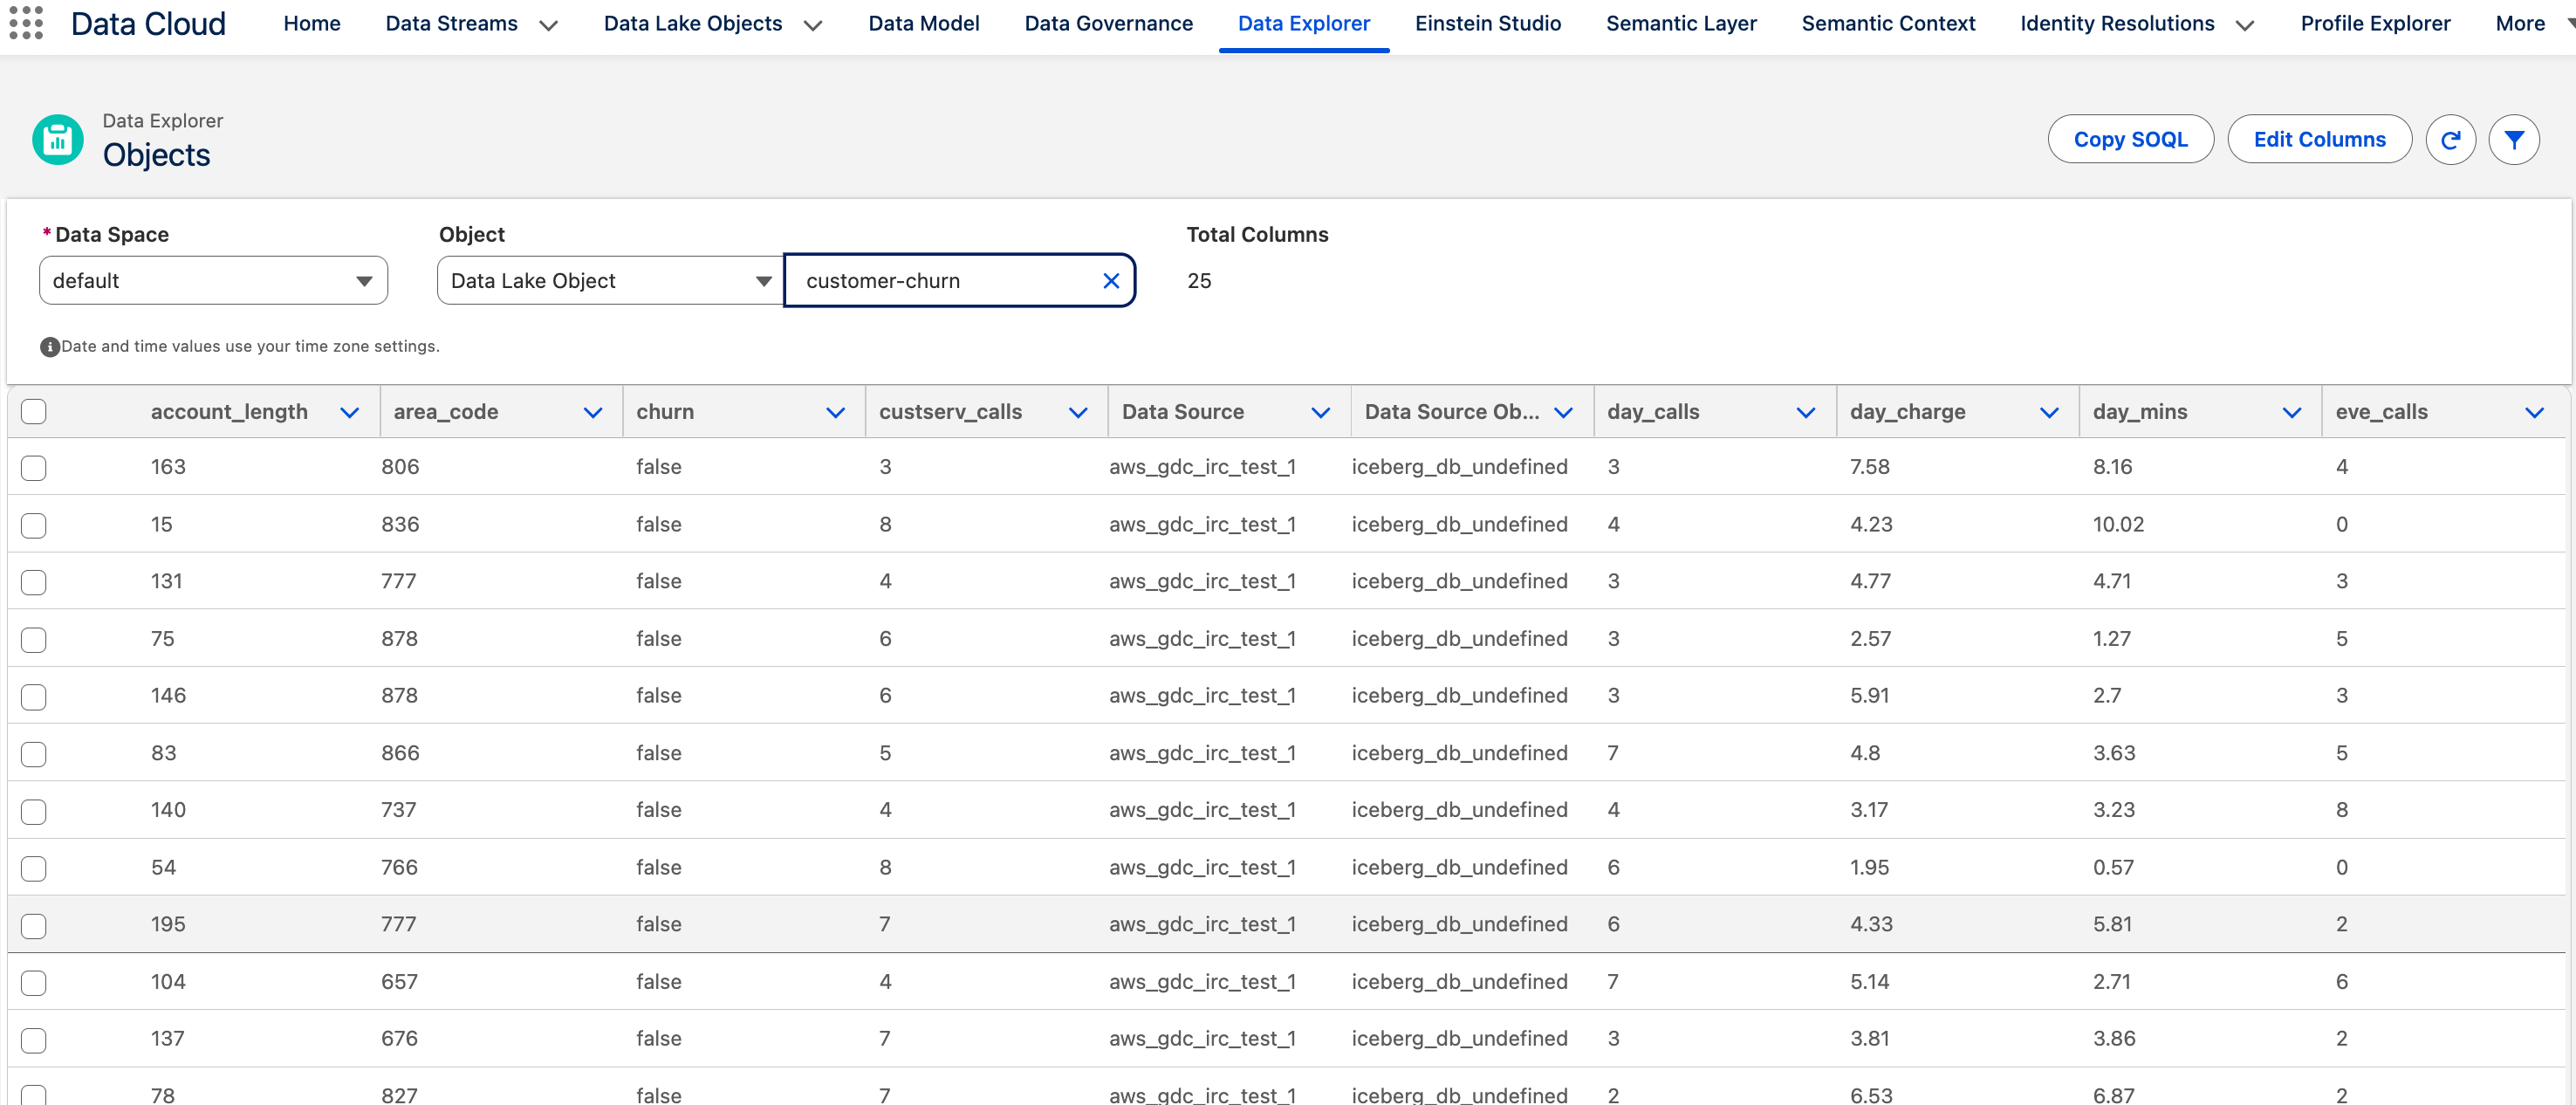
- The data stream is ready. You can now go to the Data Explorer in your Data Cloud environment and start viewing the Iceberg tables that reside in your external AWS account.
Best practices and considerations
- Use IAM roles with least-privilege access. Grant only the specific permissions each service or user needs.
- Implement appropriate Amazon S3 bucket policies. Define bucket-level policies that restrict access by AWS account, VPC endpoint, or IP range.
- Monitor access patterns. Enable Amazon S3 server access logging or AWS CloudTrail data events to track who reads from and writes to your table buckets.
- Optimize Iceberg table partitioning. Choose partition keys that align with your most common query filters.
- Consider data access patterns. Design your table layout around how data is actually queried.
- Implement lifecycle policies for Amazon S3 objects. Configure Amazon S3 lifecycle rules to transition older data files to other storage classes.
- Use appropriate Iceberg file compaction strategies. Run compaction regularly to merge small files produced by streaming or frequent batch appends.
- Monitor data transfer costs. Track cross-Region and internet egress charges using AWS Cost Explorer as applicable.
Clean up
After you finish testing, clean up all the resources in your AWS account that you created (including the Amazon S3 bucket, Athena tables, and other AWS services) to avoid recurring costs.
Conclusion
By implementing Apache Iceberg file federation between Data 360 and Amazon S3, you can create a more efficient and streamlined data architecture. This solution gives you real-time access to Amazon S3 data while using the analytics capabilities of Data 360. As businesses continue to prioritize data-driven decision-making, Zero Copy data sharing plays an important role in unlocking the full potential of customer data across platforms.
To learn more, review the following resources:
- Apache Iceberg documentation
- AWS Glue Iceberg capabilities
- Salesforce Data Cloud documentation
- AWS Big Data Blog