Post Syndicated from Abhishek Panday original https://aws.amazon.com/blogs/security/use-amazon-verified-permissions-for-fine-grained-authorization-at-scale/
Implementing user authentication and authorization for custom applications requires significant effort. For authentication, customers often use an external identity provider (IdP) such as Amazon Cognito. Yet, authorization logic is typically implemented in code. This code can be prone to errors, especially as permissions models become complex, and presents significant challenges when auditing permissions and deciding who has access to what. As a result, within Common Weakness Enumeration’s (CWE’s) list of the Top 25 Most Dangerous Software Weaknesses for 2023, four are related to incorrect authorization.
At re:Inforce 2023, we launched Amazon Verified Permissions, a fine-grained permissions management service for the applications you build. Verified Permissions centralizes permissions in a policy store and lets developers use those permissions to authorize user actions within their applications. Permissions are expressed as Cedar policies. You can learn more about the benefits of moving your permissions centrally and expressing them as policies in Policy-based access control in application development with Amazon Verified Permissions.
In this post, we explore how you can provide a faster and richer user experience while still authorizing all requests in the application. You will learn two techniques—bulk authorization and response caching—to improve the efficiency of your applications. We describe how you can apply these techniques when listing authorized resources and actions and loading multiple components on webpages.
Use cases
You can use Verified Permissions to enforce permissions that determine what the user is able to see at the level of the user interface (UI), and what the user is permitted to do at the level of the API.
- UI permissions enable developers to control what a user is allowed see in the application. Developers enforce permissions in the UI to control the list of resources a user can see and the actions they can take. For example, a UI-level permission in a banking application might determine whether a transfer funds button is enabled for a given account.
- API permissions enable developers to control what a user is allowed to do in an application. Developers control access to individual API calls made by an application on behalf of the user. For example, an API-level permission in a banking application might determine whether a user is permitted to initiate a funds transfer from an account.
Cedar provides consistent and readable policies that can be used at both the level of the UI and the API. For example, a single policy can be checked at the level of the UI to determine whether to show the transfer funds button and checked at the level of the API to determine authority to initiate the funds transfer.
Challenges
Verified Permissions can be used for implementing fine-grained API permissions. Customer applications can use Verified Permissions to authorize API requests, based on centrally managed Cedar policies, with low latency. Applications authorize such requests by calling the IsAuthorized API of the service, and the response contains whether the request is allowed or denied. Customers are happy with the latency of individual authorization requests, but have asked us to help them improve performance for use cases that require multiple authorization requests. They typically mention two use cases:
- Compound authorization: Compound authorization is needed when one high-level API action involves many low-level actions, each of which has its own permissions. This requires the application to make multiple requests to Verified Permissions to authorize the user action. For example, in a banking application, loading a credit card statement requires three API calls: GetCreditCardDetails, GetCurrentStatement, and GetCreditLimit. This requires three calls to Verified Permissions, one for each API call.
- UI permissions: Developers implement UI permissions by calling the same authorization API for every possible resource a principal can access. Each request involves an API call, and the UI can only be presented after all of them have completed. Alternatively, for a resource-centric view, the application can make the call for multiple principals to determine which ones have access.
Solution
In this post, we show you two techniques to optimize the application’s latency based on API permissions and UI permissions.
- Batch authorization allows you to make up to 30 authorization decisions in a single API call. This feature was released in November 2023. See the what’s new post and API specifications to learn more.
- Response caching enables you to cache authorization responses in a policy enforcement point such as Amazon API Gateway, AWS AppSync, or AWS Lambda. You can cache responses using native enforcement point caches (for example, API Gateway caching) or managed caching services such as Amazon ElastiCache.
Solving for enforcing fine grained permissions while delivering a great user experience
You can use UI permissions to authorize what resources and actions a user can view in an application. We see developers implementing these controls by first generating a small set of resources based on database filters and then further reducing the set down to authorized resources by checking permissions on each resource using Verified Permissions. For example, when a user of a business banking system tries to view balances on company bank accounts, the application first filters the list to the set of bank accounts for that company. The application then filters the list further to only include the accounts that the user is authorized to view by making an API request to Verified Permissions for each account in the list. With batch authorization, the application can make a single API call to Verified Permissions to filter the list down to the authorized accounts.
Similarly, you can use UI permissions to determine what components of a page or actions should be visible to users of the application. For example, in a banking application, the application wants to control the sub-products (such as credit card, bank account, or stock trading) visible to a user or only display authorized actions (such as transfer or change address) when displaying an account overview page. Customers want to use Verified Permissions to determine which components of the page to display, but that can adversely impact the user experience (UX) if they make multiple API calls to build the page. With batch authorization, you can make one call to Verified Permissions to determine permissions for all components of the page. This enables you to provide a richer experience in your applications by displaying only the components that the user is allowed to access while maintaining low page load latency.
Solving for enforcing permissions for every API call without impacting performance
Compound authorization is where a single user action results in a sequence of multiple authorization calls. You can use bulk authorization combined with response caching to improve efficiency. The application makes a single bulk authorization request to Verified Permissions to determine whether each of the component API calls are permitted and the response is cached. This cache is then referenced for each component’s API call in the sequence.
Sample application – Use cases, personas, and permissions
We’re using an online order management application for a toy store to demonstrate how you can apply batch authorization and response caching to improve UX and application performance.
One function of the application is to enable employees in a store to process online orders.
Personas
The application is used by two types of users:
- Pack associates are responsible for picking, packing, and shipping orders. They’re assigned to a specific department.
- Store managers are responsible for overseeing the operations of a store.
Use cases
The application supports these use cases:
- Listing orders: Users can list orders. A user should only see the orders for which they have view permissions.
- Pack associates can list all orders of their department.
- Store managers can list all orders of their store.
Figure 1 shows orders for Julian, who is a pack associate in the Soft Toy department

Figure 1: Orders for Julian in the Soft Toy department
- Order actions: Users can take some actions on an order. The application enables the relevant UI elements based on the user’s permissions.
- Pack associates can select Get Box Size and Mark as Shipped, as shown in Figure 2.
- Store managers can select Get Box Size, Mark as Shipped, Cancel Order, and Route to different warehouse.

Figure 2: Actions available to Julian as a pack associate
- Viewing an order: Users can view the details of a specific order. When a user views an order, the application loads the details, label, and receipt. Figure 3 shows the available actions for Julian who is a pack associate.

Figure 3: Order Details for Julian, showing permitted actions


Policy design
The application uses Verified Permissions as a centralized policy store. These policies are expressed in Cedar. The application uses the Role management using policy templates approach for implementing role-based access controls. We encourage you to read best practices for using role-based access control in Cedar to understand if the approach fits your use case.
In the sample application, the policy template for the store owner role looks like the following:
When a user is assigned a role, the application creates a policy from the corresponding template by passing the user and store. For example, the policy created for the store owner is as follows:
To learn more about the policy design of this application, see the readme file of the application.
Use cases – Design and implementation
In this section, we discuss high level design, challenges with the barebones integration, and how you can use the preceding techniques to reduce latency and costs.
Listing orders
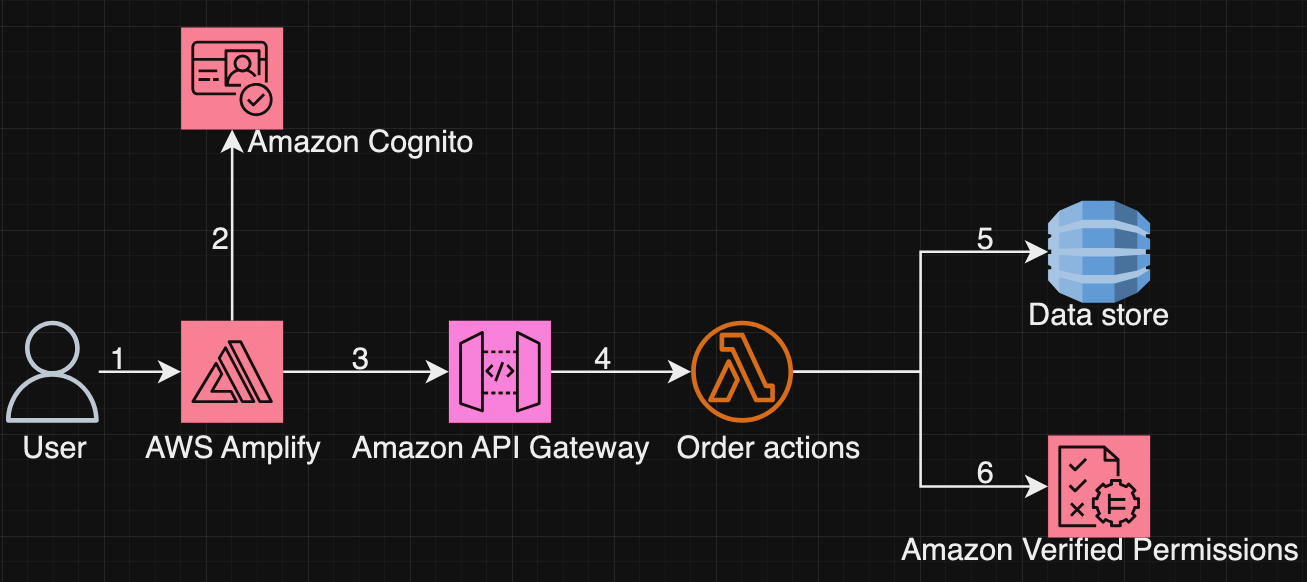
Figure 4: Architecture for listing orders
As shown in Figure 4, the process to list orders is:
- The user accesses the application hosted in AWS Amplify.
- The user then authenticates through Amazon Cognito and obtains an identity token.
- The application uses Amplify to load the order page. The console calls the API ListOrders to load the order.
- The API is hosted in API Gateway and protected by a Lambda authorizer function.
- The Lambda function collects entity information from an in-memory data store to formulate the isAuthorized request.
- Then the Lambda function invokes Verified Permissions to authorize the request. The function checks against Verified Permissions for each order in the data store for the ListOrder call. If Verified Permissions returns deny, the order is not provided to the user. If Verified Permissions returns allow, the request is moved forward.
Challenge
Figure 5 shows that the application called IsAuthorized multiple times, sequentially. Multiple sequential calls cause the page to be slow to load and increase infrastructure costs.
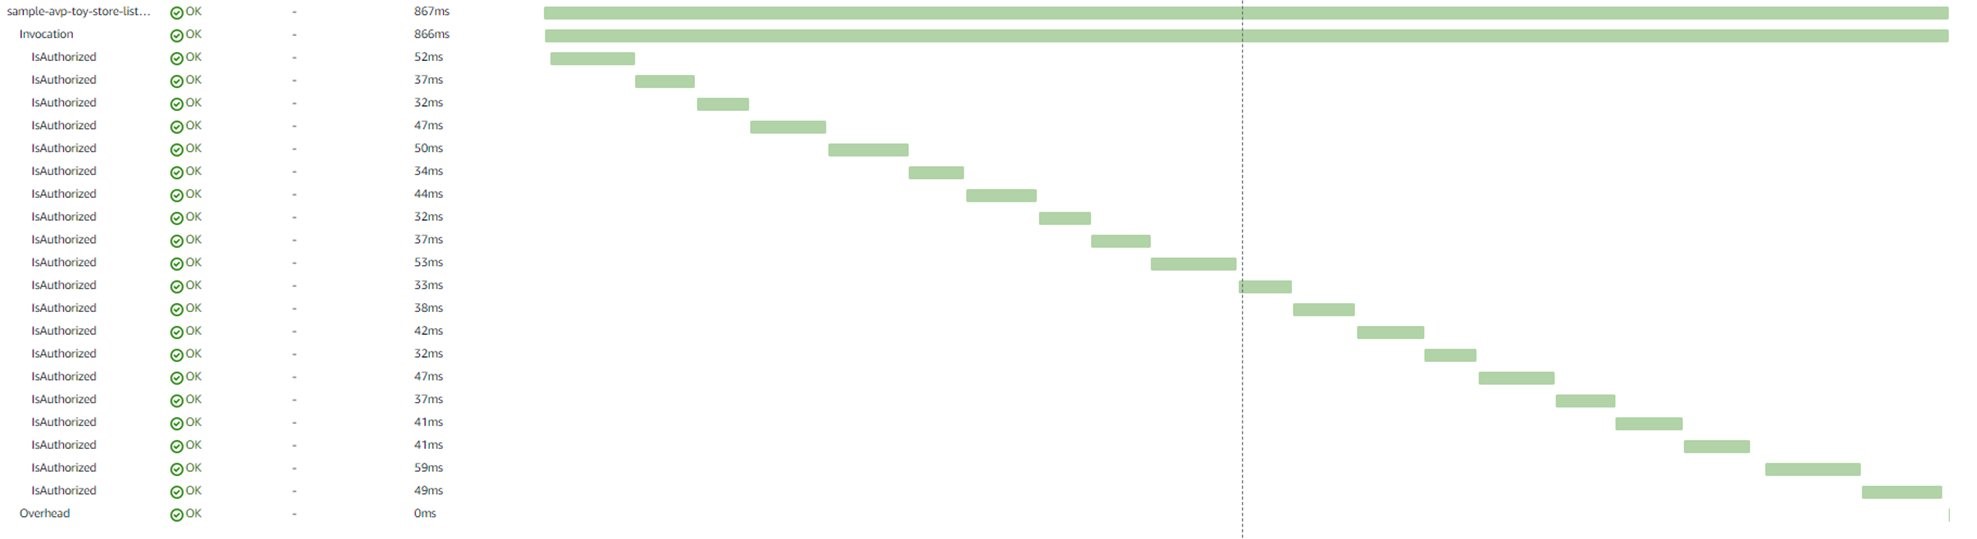
Figure 5: Graph showing repeated calls to IsAuthorized
Reduce latency using batch authorization
If you transition to using batch authorization, the application can receive 30 authorization decisions with a single API call to Verified Permissions. As you can see in Figure 6, the time to authorize has reduced from close to 800 ms to 79 ms, delivering a better overall user experience.

Figure 6: Reduced latency by using batch authorization
Order actions
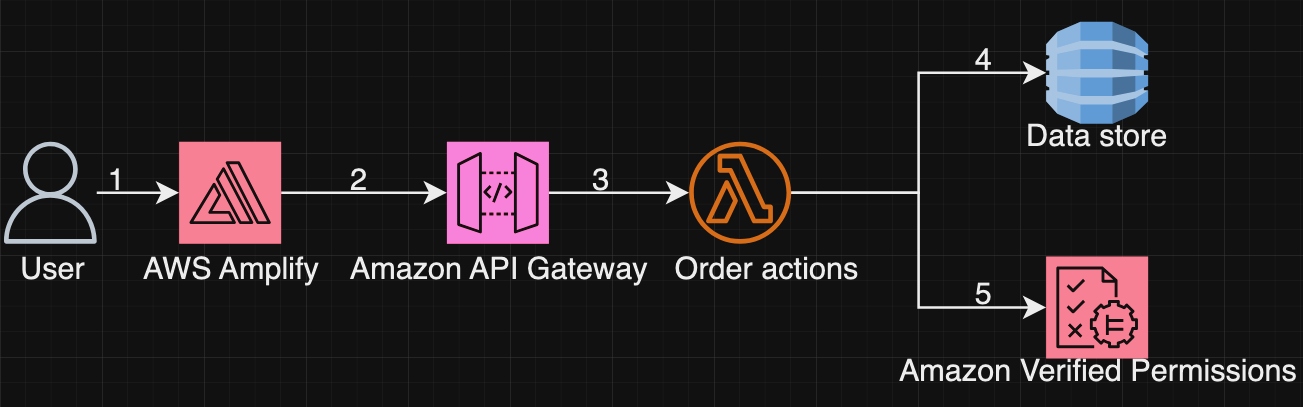
Figure 7: Order actions architecture
As shown in Figure 7, the process to get authorized actions for an order is:
- The user goes to the application landing page on Amplify.
- The application calls the Order actions API at API Gateway
- The application sends a request to initiate order actions to display only authorized actions to the user.
- The Lambda function collects entity information from an in-memory data store to formulate the isAuthorized request.
- The Lambda function then checks with Verified Permissions for each order action. If Verified Permissions returns deny, the action is dropped. If Verified Permissions returns allow, the request is moved forward and the action is added to a list of order actions to be sent in a follow-up request to Verified Permissions to provide the actions in the user’s UI.
Challenge
As you saw with listing orders, Figure 8 shows how the application is still calling IsAuthorized multiple times, sequentially. This means the page remains slow to load and has increased impacts on infrastructure costs.

Figure 8: Graph showing repeated calls to IsAuthorized
Reduce latency using batch authorization
If you add another layer by transitioning to using batch authorization once again, the application can receive all decisions with a single API call to Verified Permissions. As you can see from Figure 9, the time to authorize has reduced from close to 500 ms to 150 ms, delivering an improved user experience.

Figure 9: Graph showing results of layering batch authorization
Viewing an order
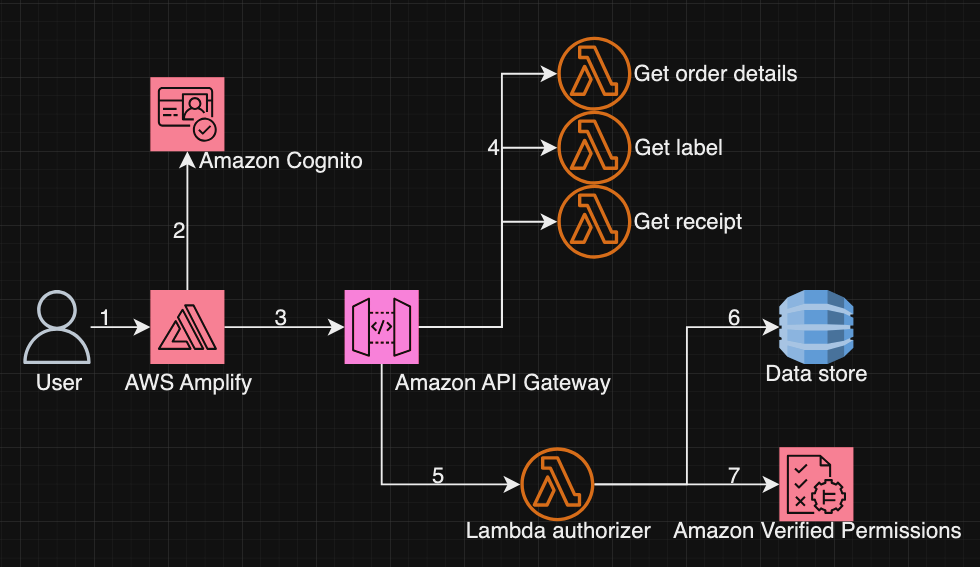
Figure 10: Order viewing architecture
The process to view an order, shown in Figure 10, is:
- The user accesses the application hosted in Amplify.
- The user authenticates through Amazon Cognito and obtains an identity token.
- The application calls three APIs hosted at API Gateway.
- The API’s: Get order details, Get label, and Get receipt are targeted sequentially to load the UI for the user in the application.
- A Lambda authorizer protects each of the above-mentioned APIs and is launched for each invoke.
- The Lambda function collects entity information from an in-memory data store to formulate the isAuthorized request.
- For each API, the following steps are repeated. The Lambda authorizer is invoked three times during page load.
- The Lambda function invokes Verified Permissions to authorize the request. If Verified Permissions returns deny, the request is rejected and an HTTP unauthorized response (403) is sent back. If Verified Permissions returns allow, the request is moved forward.
- If the request is allowed, API Gateway calls the Lambda Order Management function to process the request. This is the primary Lambda function supporting the application and typically contains the core business logic of the application.
Challenge
In using the standard authorization pattern for this use case, the application calls Verified Permissions three times. This is because the user action to view an order requires compound authorization because each API call made by the console is authorized. While this enforces least privilege, it impacts the page load and reload latency of the application.
Reduce latency using batch authorization and decision caching
You can use batch authorization and decision caching to reduce latency. In the sample application, the cache is maintained by API Gateway. As shown in Figure 11, applying these techniques to the console application results in only one call to Verified Permissions, reducing latency.
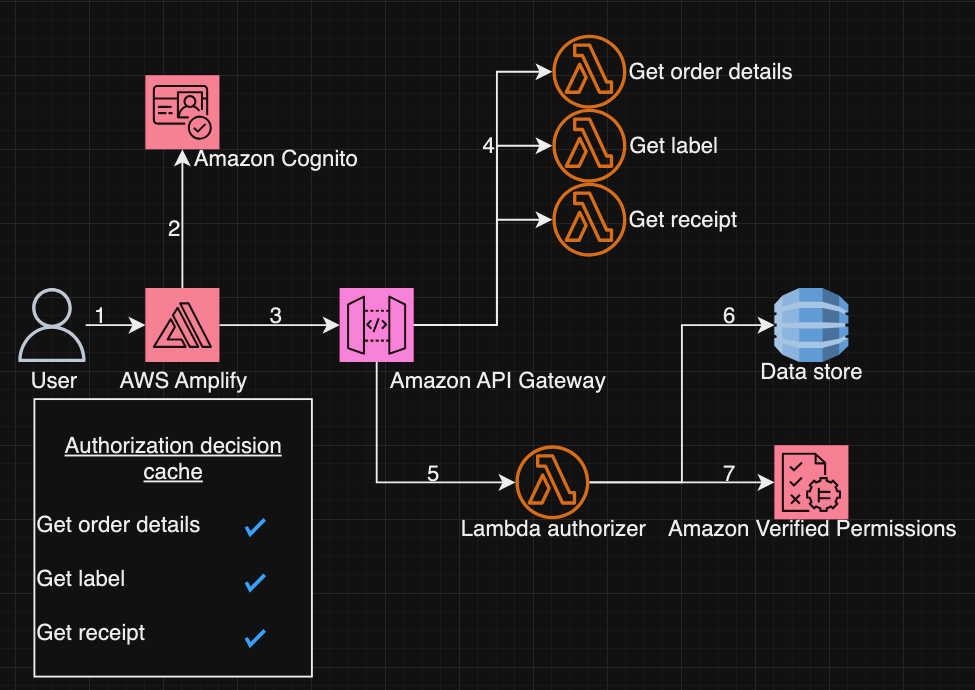
Figure 11: Batch authorization with decision caching architecture
The decision caching processshown in Figure 11, is:
- The user accesses the application hosted in Amplify.
- The user then authenticates through Amazon Cognito and obtains an identity token.
- The application then calls three APIs hosted at API Gateway
- When the Lambda function for the Get order details API is invoked, it uses the Lambda Authorizer to call batch authorization to get authorization decisions for the requested action, Get order details, and related actions, Get label and Get receipt.
- A Lambda authorizer protects each of the above-mentioned APIs but because of batch authorization, is invoked only once.
- The Lambda function collects entity information from an in-memory data store to formulate the isAuthorized request.
- The Lambda function invokes Verified Permissions to authorize the request. If Verified Permissions returns deny, the request is rejected and an HTTP unauthorized response (403) is sent back. If Verified Permissions returns allow, the request is moved forward.
- API Gateway caches the authorization decision for all actions (the requested action and related actions).
- If the request is allowed by the Lambda authorizer function, API Gateway calls the order management Lambda function to process the request. This is the primary Lambda function supporting the application and typically contains the core business logic of the application.
- When subsequent APIs are called, the API Gateway uses the cached authorization decisions and doesn’t use the Lambda authorization function.
Caching considerations
You’ve seen how you can use caching to implement fine-grained authorization at scale in your applications. This technique works well when your application has high cache hit rates, where authorization results are frequently loaded from the cache. Applications where the users initiate the same action multiple times or have a predictable sequence of actions will observe high cache hit rates. Another consideration is that employing caching can delay the time between policy updates and policy enforcement. We don’t recommend using caching for authorization decisions if your application requires policies to take effect quickly or your policies are time dependent (for example, a policy that gives access between 10:00 AM and 2:00 PM).
Conclusion
In this post, we showed you how to implement fine grained permissions in application at scale using Verified Permissions. We covered how you can use batch authorization and decision caching to improve performance and ensure Verified Permissions remains a cost-effective solution for large-scale applications. We applied these techniques to a demo application, avp-toy-store-sample, that is available to you for hands-on testing. For more information about Verified Permissions, see the Amazon Verified Permissions product details and Resources.
If you have feedback about this post, submit comments in the Comments section below. If you have questions about this post, contact AWS Support.


