Tag Archives: Web app

Manage roles and entitlements with PBAC using Amazon Verified Permissions

Post Syndicated from Abhishek Panday original https://aws.amazon.com/blogs/devops/manage-roles-and-entitlements-with-pbac-using-amazon-verified-permissions/

Traditionally, customers have used role-based access control (RBAC) to manage entitlements within their applications. The application controls what users can do, based on the roles they are assigned. But, the drive for least privilege has led to an exponential growth in the number of roles. Customers can address this role explosion by moving authorization logic out of the application code, and implementing a policy-based access control (PBAC) model that augments RBAC with attribute-based access control (ABAC).

In this blog post, we cover roles and entitlements, how they are applicable in apps authorization decisions, how customers implement roles and authorization in their app today, and how to shift to a centralized PBAC model by using Amazon Verified Permissions.

Describing roles and entitlements, approaches and challenges of current implementations

In RBAC models, a user’s entitlements are assigned based on job role. This role could be that of a developer, which might grant permissions to affect code in the pipeline of an app. Entitlements represent the features, functions, and resources a user has permissions to access. For example, a customer might be able to place orders or view pets in a pet store application, or a store owner might be entitled to review orders made from their store.

The combination of roles assigned to a user and entitlements granted to these roles determines what a human user can do within your application. Traditionally, application access has all been handled in code by hard coding roles that users can be assigned and mapping those roles directly to a set of actions on resources. However, as the need to apply more granular access control grows (as with least privilege), so do the number of required hard-coded roles that are assigned to users to obtain this level of granularity. This problem is frequently called role explosion, where role definitions grow exponentially which requires additional overhead from your teams to manage and audit roles effectively. For example, the code to authorize request to get details of an order has multiple if/else statements, as shown in the following sample.


boolean userAuthorizedForOrder (Order order, User user){
    if (user.storeId == user.storeID) {
        if (user.roles.contains("store-owner-roles") {            // store owners can only access orders for their own stores  
            return true; 
        } else if (user.roles.contains("store-employee")) {
            if (isStoreOpen(current_time)) {                      // Only allow access for the order to store-employees when
                return true                                       // store is open 
            }
        }
    } else {
        if (user.roles("customer-service-associate") &&           // Only allow customer service associates to orders for cases 
                user.assignedShift(current_time)) &&              // they are assinged and only during their assigned shift
                user.currentCase.order.orderId == order.orderId
         return true;
    }
    return false; 
}

This problem introduces several challenges. First, figuring out why a permission was granted or denied requires a closer look at the code. Second, adding a permission requires code changes. Third, audits can be difficult because you either have to run a battery of tests or explore code across multiple files to demonstrate access controls to auditors. Though there might be additional considerations, these three challenges have led many app owners to begin looking at PBAC methods to address the granularity problem. You can read more about the foundations of PBAC models in Policy-based access control in application development with Amazon Verified Permissions. By shifting to a PBAC model, you can reduce role growth to meet your fine-grained permissions needs. You can also externalize authorization logic from code, develop granular permissions based on roles and attributes, and reduce the time that you spend refactoring code for changes to authorization decisions or reading through the code to audit authorization logic.

In this blog, we demonstrate implementing permissions in a PBAC model through a demo application. The demo application uses Cognito groups to manage role assignment, Verified Permissions to implement entitlements for the roles. The approach restricts the resources that a role can access using attribute-based conditions. This approach works well in usecases when you already have a system in place to manage role assignment and you can define resources that a user may access by matching attributes of the user with attributes of the resource.

Demo app

Let’s look at a sample pet store app. The app is used by 2 types of users – end users and store owners. The app enables end users to search and order pets. The app allows store owners to list orders for the store. This sample app is available for download and local testing on the aws-samples/avp-petstore-sample Github repository. The app is a web app built by using AWS Amplify, Amazon API-Gateway, Amazon Cognito, and Amazon Verified Permissions. The following diagram is a high-level illustration of the app’s architecture.

Architectural Diagram

Steps

  1. The user logs in to the application, and is re-directed to Amazon Cognito to sign-in and obtain a JWT token.
  2. When user take an action (eg. ListOrders) in the application, the application calls Amazon API-Gateway to process the request.
  3. Amazon API-Gateway forwards the request to a lambda function, that call Amazon Verified Permissions to authorize the action. If the authorization results in deny, the lambda returns Unauthorized back to the application.
  4. If the authorization succeed, the application continues to execute the action.

RBAC policies in action

In this section, we focus on building RBAC permissions for the sample pet store app. We will guide you through building RBAC by using Verified Permissions and by focusing on a role for store owners, who are allowed to view all orders for a store. We use Verified Permissions to manage the permissions granted to this role and Amazon Cognito to manage role assignments.

We model the store owner role in Amazon Cognito as a user group called Store-Owner-Role. When a user is assigned the store owner role, the user is added to the “Store-Owner-Role” user group. You can create the users and users groups required to follow along with the sample application by visiting managing users and groups in Amazon Cognito.

After users are assigned to the store owner role, you can enforce that they can list all orders in the store by using the following RBAC policy. The policy provides access to any user in the Store-Owner-Role to perform the ListOrders and GetStoreInventory actions on any resource.

permit (
         principal in MyApplication::Group::"Store-Owner-Role",
         action in [
              MyApplication::Action::"GetStoreInventory",
              MyApplication::Action::"ListOrders"
         ],
         resource
);

Based on the policy we reviewed – the store owner will receive a Success! when they attempt to list existing orders.

Eve is permitted to list orders

This example further demonstrates the division of responsibility between the identity provider (Amazon Cognito) and Verified Permissions. The identity provider (IdP) is responsible for managing roles and memberships in roles. Verified Permissions is responsible for managing policies that describe what those roles are permitted to do. As demonstrated above, you can use this process to add roles without needing to change code.

Using PBAC to help reduce role explosion

Up until the point of role explosion, RBAC has worked well as the sole authorization model. Unfortunately, we have heard from customers that this model does not scale well because of the challenge of role explosion. Role explosion happens when you have hundreds or thousands of roles, and managing and auditing those roles becomes challenging. In extreme cases, you might have more roles than the number of users in your organization. This happens primarily because organizations keep creating more roles, with each role granting access to a smaller set of resources in an effort to follow the principle of least privilege.

Let’s understand the problem of role explosion through our sample pet store app. The pet store app is now being sold as a SaaS product to pet stores in other locations. As a result, the app needs additional access controls to ensure that each store owner can view only the orders from their own store. The most intuitive way to implement these access controls was to create an additional role for each location, which would restrict the scope of access for a store owner to their respective store’s orders. For example, a role named petstore-austin would allow access only to resources in the Austin, Texas store. RBAC models allow developers to predefine sets of permissions that can be used in an application, and ABAC models allow developers to adapt those permissions to the context of the request (such as the client, the resource, and the method used). The adoption of both RBAC and ABAC models leads to an explosion of either roles or attribute-based rules as the number of store locations increases.

To solve this problem, you can combine RBAC and ABAC policies into a PBAC model. RBAC policies determines the actions the user can take. Augmenting these policies with ABAC policies allows you to control the resouces they can take those actions on. For example, you can scope down the resources a user can access based on identity attributes, such as department or business unit, region, and management level. This approach mitigates role explosion because you need to have only a small number of predefined roles, and access is controlled based on attributes. You can use Verified Permissions to combine RBAC and ABAC models in the form of Cedar policies to build this PBAC solution.

We can demonstrate this solution in the sample pet store app by modifying the policy we created earlier and adding ABAC conditions. The conditions specify that users can only ListOrders of the store they own. The store a store owner owns is represented in Amazon Cognito by employmentStoreCode. This policy now expands on the granularity of access of the original RBAC policy without leading to numerous RBAC policies.

permit (
         principal in MyApplication::Group::"Store-Owner-Role",
         action in [
              MyApplication::Action::"GetStoreInventory",
              MyApplication::Action::"ListOrders"
          ],
          resource
) when { 
          principal.employmentStoreCode == resource.storeId 
};

We demonstrate that our policy restricts access for store owners to the store they own, by creating a user – eve – who is assigned the Store-Owner-Role and owns petstore-london. When Eve lists orders for the petstore-london store, she gets a success response, indicating she has permissions to list orders.
Eve is permitted to list orders for petstore-london

Next, when even tries to list orders for the petstore-seattle store, she gets a Not Authorized response. She is denied access as she does not own petstore-seattle.

Eve is not permitted to list orders for petstore-seattle

Step-by-step walkthrough of trying the Demo App

If you want to go through the demo of our sample pet store app, we recommend forking it from aws-samples/avp-petstore-sample Github repo and going through this process in README.md to ensure hands-on familiarity.

We will first walk through setting up permissions using only RBAC for the sample pet store application. Next, we will see how you can use PBAC to implement least priveledge as the application scales.

Implement RBAC based Permissions

We describe setting up policies to implement entitlements for the store owner role in Verified Permissions.

    1. Navigate to the AWS Management Console, search for Verified Permissions, and select the service to go to the service page.
    2. Create new policy store to create a container for your policies. You can create an Empty Policy Store for the purpose of the walk-through.
    3. Navigate to Policies in the navigation pane and choose Create static policy.
    4. Select Next and paste in the following Cedar policy and select Save.
permit (
        principal in MyApplication::Group::"Store-Owner-Role",
        action in [
               MyApplication::Action::"GetStoreInventory",
               MyApplication::Action::"ListOrders"
         ],
         resource
);
  1. You need to get users and assign the Store-Owner-Role to them. In this case, you will use Amazon Cognito as the IdP and the role can be assigned there. You can create users and groups in Cognito by following the below steps.
    1. Navigate to Amazon Cognito from the AWS Management Console, and select the user group created for the pet store app.
    2. Creating a user by clicking create user and create a user with user name eve
    3. Navigate to the Groups section and create a group called Store-Owner-Role .
    4. Add eve to the Store-Owner-Role group by clicking Add user to Group, selecting eve and clicking the Add.
  2. Now that you have assigned the Store-Owner-Role to the user, and Verified Permissions has a permit policy granting entitlements based on role membership, you can log in to the application as the user – eve – to test functionality. When choosing List All Orders, you can see the approval result in the app’s output.

Implement PBAC based Permissions

As the company grows, you want to be able to limit GetOrders access to a specific store location so that you can follow least privilege. You can update your policy to PBAC by adding an ABAC condition to the existing permit policy. You can add a condition in the policy that restricts listing orders to only those stores the user owns.

Below is the walk-though of updating the application

    1. Navigate to the Verified Permissions console and update the policy to the below.
permit (
         principal in MyApplication::Group::"Store-Owner-Role",
         action in [
              MyApplication::Action::"GetStoreInventory",
              MyApplication::Action::"ListOrders"
          ],
          resource
) when { 
          principal.employmentStoreCode == resource.storeId 
};
  1. Navigate to the Amazon Cognito console, select the user eve and click “Edit” in the user attributes section to update the “custom:employmentStoreCode”. Set the attribute value to “petstore-london” as eve owns the petstore-london location
  2. You can demonstrate that eve can only list orders of “petstore-london” by following the below steps
    1. We want to make sure that latest changes to the user attributed are passed to the application in the identity token. We will refresh the identity token, by logging out of the app and logging in again as Eve. Navigate back to the application and logout as eve.
    2. In the application, we set the Pet Store Identifier as petstore-london and click the List All Orders. The result is success!, as Eve is authorized to list orders of the store she owns.
    3. Next, we change the Pet Store Identifier to petstore-seattle and and click the List All Orders. The result is Not Authorized, as Eve is authorized to list orders of stores she does not owns.

Clean Up section

You can cleanup the resources that were created in this blog by following these steps.

Conclusion

In this post, we reviewed what roles and entitlements are as well as how they are used to manage user authorization in your app. We’ve also covered RBAC and ABAC policy examples with respect to the demo application, avp-petstore-sample, that is available to you via AWS Samples for hands-on testing. The walk-through also covered our example architecture using Amazon Cognito as the IdP and Verified Permissions as the centralized policy store that assessed authorization results based on the policies set for the app. By leveraging Verified Permissions, we could use PBAC model to define fine-grained access while preventing role explosion. For more information about Verified Permissions, see the Amazon Verified Permissions product details page and Resources page.
Abhishek Panday

Abhishek is a product manager in the Amazon Verified Permissions team. He has been working with the AWS for more than two years, and has been at Amazon for more than five years. Abhishek enjoys working with customers to understand the customer’s challenges and building products to solve those challenges. Abhishek currently lives in Seattle and enjoys playing soccer, hiking, and cooking Indian cuisines.

Jeremy Ware

Jeremy is a Security Specialist Solutions Architect focused on Identity and Access Management. Jeremy and his team enable AWS customers to implement sophisticated, scalable, and secure IAM architecture and Authentication workflows to solve business challenges. With a background in Security Engineering, Jeremy has spent many years working to raise the Security Maturity gap at numerous global enterprises. Outside of work, Jeremy loves to explore the mountainous outdoors participate in sports such as Snowboarding, Wakeboarding, and Dirt bike riding.

Integrating AWS Device Farm with your CI/CD pipeline to run cross-browser Selenium tests

Post Syndicated from Mahesh Biradar original https://aws.amazon.com/blogs/devops/integrating-aws-device-farm-with-ci-cd-pipeline-to-run-cross-browser-selenium-tests/

Continuously building, testing, and deploying your web application helps you release new features sooner and with fewer bugs. In this blog, you will create a continuous integration and continuous delivery (CI/CD) pipeline for a web app using AWS CodeStar services and AWS Device Farm’s desktop browser testing service.  AWS CodeStar is a suite of services that help you quickly develop and build your web apps on AWS.

AWS Device Farm’s desktop browser testing service helps developers improve the quality of their web apps by executing their Selenium tests on different desktop browsers hosted in AWS. For each test executed on the service, Device Farm generates action logs, web driver logs, video recordings, to help you quickly identify issues with your app. The service offers pay-as-you-go pricing so you only pay for the time your tests are executing on the browsers with no upfront commitments or additional costs. Furthermore, Device Farm provides a default concurrency of 50 Selenium sessions so you can run your tests in parallel and speed up the execution of your test suites.

After you’ve completed the steps in this blog, you’ll have a working pipeline that will build your web app on every code commit and test it on different versions of desktop browsers hosted in AWS.

Solution overview

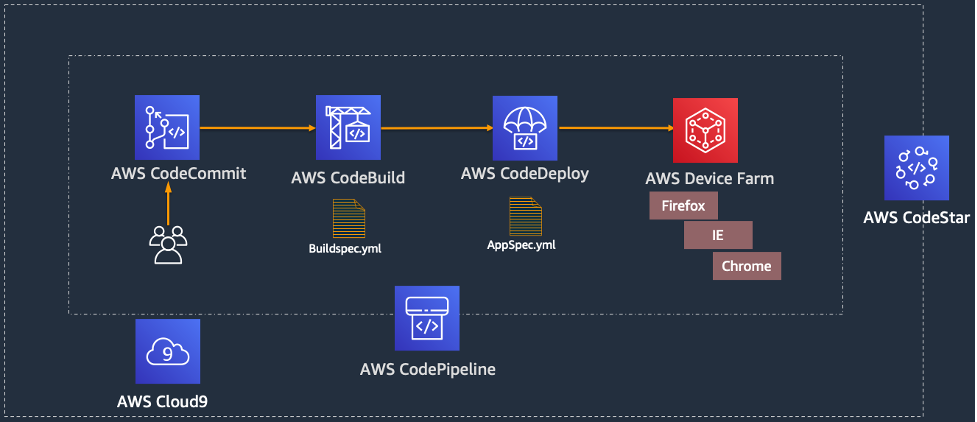
In this solution, you use AWS CodeStar to create a sample web application and a CI/CD pipeline. The following diagram illustrates our solution architecture.

Figure 1: Deployment pipeline architecture

Figure 1: Deployment pipeline architecture

Prerequisites

Before you deploy the solution, complete the following prerequisite steps:

  1. On the AWS Management Console, search for AWS CodeStar.
  2. Choose Getting Started.
  3. Choose Create Project.
  4. Choose a sample project.

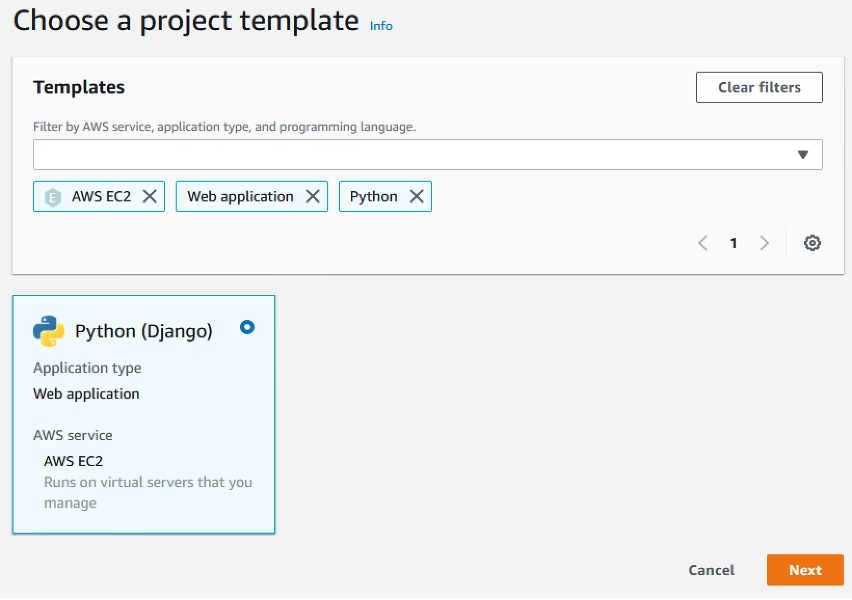
For this post, we choose a Python web app deployed on Amazon Elastic Compute Cloud (Amazon EC2) servers.

  1. For Templates, select Python (Django).
  2. Choose Next.
Figure 2: Choose a template in CodeStar

Figure 2: Choose a template in CodeStar

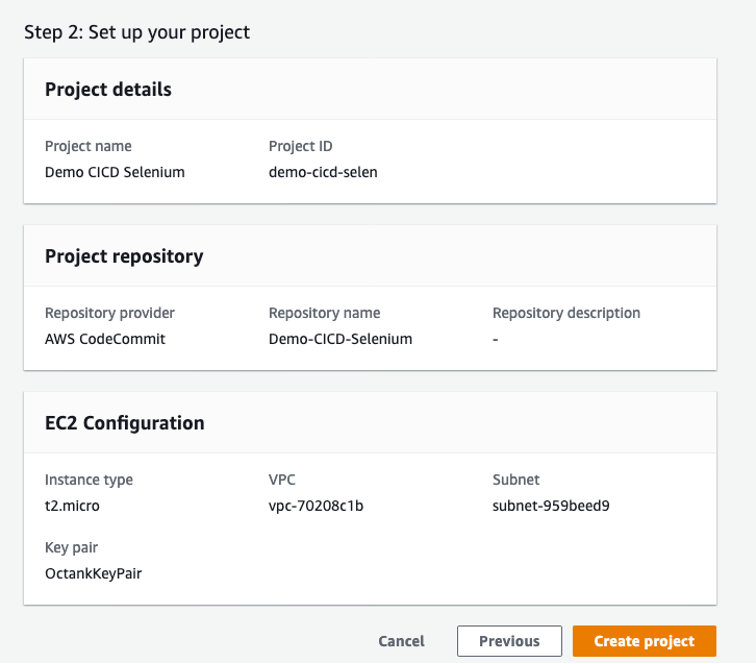
  1. For Project name, enter Demo CICD Selenium.
  2. Leave the remaining settings at their default.

You can choose from a list of existing key pairs. If you don’t have a key pair, you can create one.

  1. Choose Next.
  2. Choose Create project.
 Figure 3: Verify the project configuration

Figure 3: Verify the project configuration

AWS CodeStar creates project resources for you as listed in the following table.

Service Resource Created
AWS CodePipeline project demo-cicd-selen-Pipeline
AWS CodeCommit repository Demo-CICD-Selenium
AWS CodeBuild project demo-cicd-selen
AWS CodeDeploy application demo-cicd-selen
AWS CodeDeploy deployment group demo-cicd-selen-Env
Amazon EC2 server Tag: Environment = demo-cicd-selen-WebApp
IAM role AWSCodeStarServiceRole, CodeStarWorker*

Your EC2 instance needs to have access to run AWS Device Farm to run the Selenium test scripts. You can use service roles to achieve that.

  1. Attach policy AWSDeviceFarmFullAccess to the IAM role CodeStarWorker-demo-cicd-selen-WebApp.

You’re now ready to create an AWS Cloud9 environment.

Check the Pipelines tab of your AWS CodeStar project; it should show success.

  1. On the IDE tab, under Cloud 9 environments, choose Create environment.
  2. For Environment name, enter Demo-CICD-Selenium.
  3. Choose Create environment.
  4. Wait for the environment to be complete and then choose Open IDE.
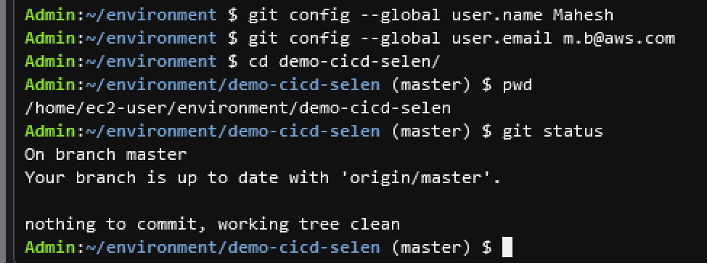
  5. In the IDE, follow the instructions to set up your Git and make sure it’s up to date with your repo.

The following screenshot shows the verification that the environment is set up.

Figure 4: Verify AWS Cloud9 setup

Figure 4: Verify AWS Cloud9 setup

You can now verify the deployment.

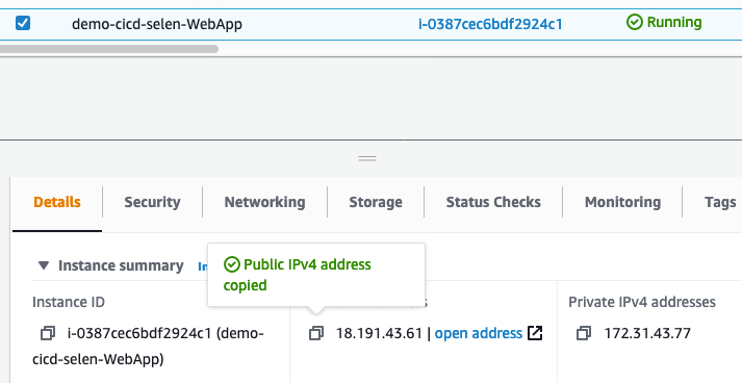
  1. On the Amazon EC2 console, choose Instances.
  2. Choose demo-cicd-selen-WebApp.
  3. Locate its public IP and choose open address.
Figure 5: Locating IP address of the instance

Figure 5: Locating IP address of the instance


A webpage should open. If it doesn’t, check your VPN and firewall settings.

Now that you have a working pipeline, let’s move on to creating a Device Farm project for browser testing.

Creating a Device Farm project

To create your browser testing project, complete the following steps:

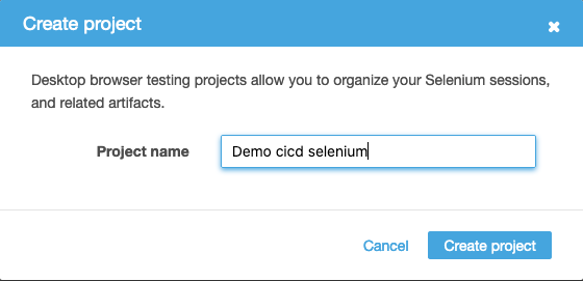
  1. On the Device Farm console, choose Desktop browser testing project.
  2. Choose Create a new project.
  3. For Project name, enter Demo cicd selenium.
  4. Choose Create project.
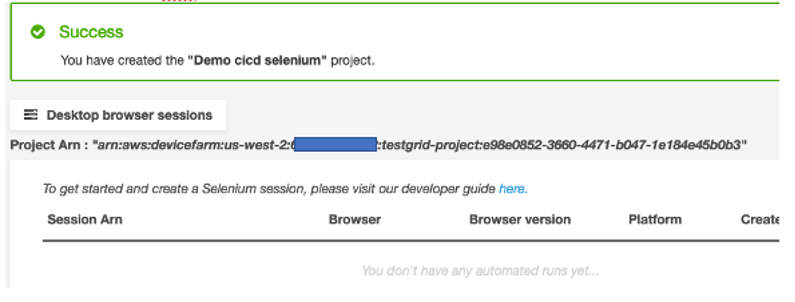
Figure 6: Creating AWS Device Farm project

Figure 6: Creating AWS Device Farm project


Note down the project ARN; we use this in the Selenium script for the remote web driver.

Figure 7: Project ARN for AWS Device Farm project

Figure 7: Project ARN for AWS Device Farm project


Testing the solution

This solution uses the following script to run browser testing. We call this script in the validate service lifecycle hook of the CodeDeploy project.

  1. Open your AWS Cloud9 IDE (which you made as a prerequisite).
  2. Create a folder tests under the project root directory.
  3. Add the sample Selenium script browser-test-sel.py under tests folder with the following content (replace <sample_url> with the url of your web application refer pre-requisite step 18):
import boto3
from selenium import webdriver
from selenium.webdriver.common.keys import Keys

devicefarm_client = boto3.client("devicefarm", region_name="us-west-2")
testgrid_url_response = devicefarm_client.create_test_grid_url(
    projectArn="arn:aws:devicefarm:us-west-2:<your project ARN>",
    expiresInSeconds=300)

driver = webdriver.Remote(testgrid_url_response["url"],
                          webdriver.DesiredCapabilities.FIREFOX)
try:
    driver.implicitly_wait(30)
    driver.maximize_window()
    driver.get("<sample_url>")
    if driver.find_element_by_id("Layer_1"):
        print("graphics generated in full screen")
    assert driver.find_element_by_id("Layer_1")
    driver.set_window_position(0, 0) and driver.set_window_size(1000, 400)
    driver.get("<sample_url>")
    tower = driver.find_element_by_id("tower1")
    if tower.is_displayed():
        print("graphics generated after resizing")
    else:
        print("graphics not generated at this window size")
       # this is where you can fail the script with error if you expect the graphics to load. And pipeline will terminate
except Exception as e:
    print(e)
finally:
    driver.quit()

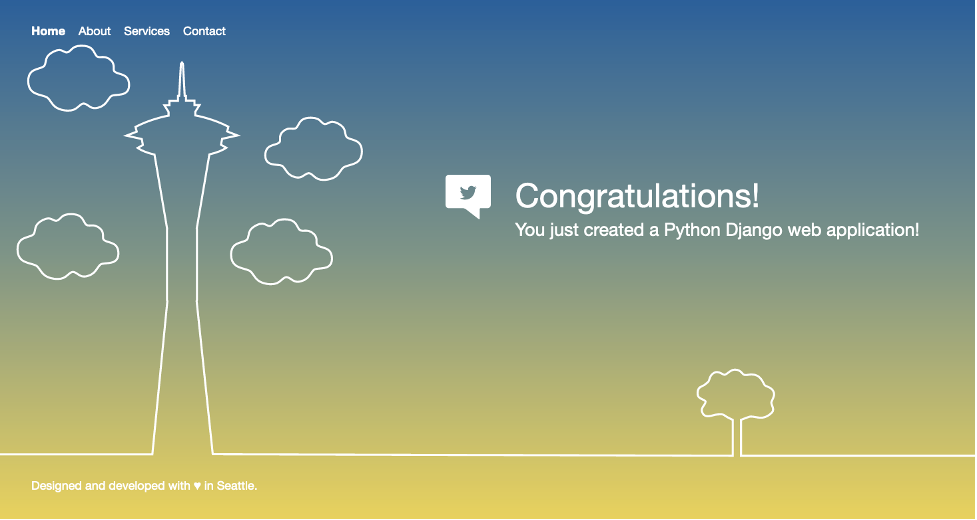
This script launches a website (in Firefox) created by you in the prerequisite step using the AWS CodeStar template and verifies if a graphic element is loaded.

The following screenshot shows a full-screen application with graphics loaded.

Figure 8: Full screen application with graphics loaded

Figure 8: Full screen application with graphics loaded


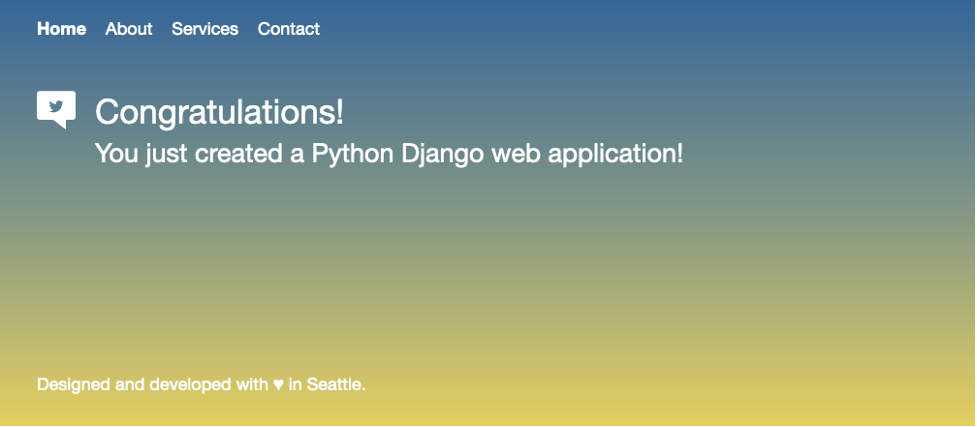
The following screenshot shows the resized window with no graphics loaded.

Figure 9: Resized window application with No graphics loaded

Figure 9: Resized window application with No graphics loaded

  1. Create the file validate_service in the scripts folder under the root directory with the following content:
#!/bin/bash
if [ "$DEPLOYMENT_GROUP_NAME" == "demo-cicd-selen-Env" ]
then
cd /home/ec2-user
source environment/bin/activate
python tests/browser-test-sel.py
fi

This script is part of CodeDeploy scripts and determines whether to stop the pipeline or continue based on the output from the browser testing script from the preceding step.

  1. Modify the file appspec.yml under the root directory, add the tests files and ValidateService hook , the file should look like following:
version: 0.0
os: linux
files:
 - source: /ec2django/
   destination: /home/ec2-user/ec2django
 - source: /helloworld/
   destination: /home/ec2-user/helloworld
 - source: /manage.py
   destination: /home/ec2-user
 - source: /supervisord.conf
   destination: /home/ec2-user
 - source: /requirements.txt
   destination: /home/ec2-user
 - source: /requirements/
   destination: /home/ec2-user/requirements
 - source: /tests/
   destination: /home/ec2-user/tests

permissions:
  - object: /home/ec2-user/manage.py
    owner: ec2-user
    mode: 644
    type:
      - file
  - object: /home/ec2-user/supervisord.conf
    owner: ec2-user
    mode: 644
    type:
      - file
hooks:
  AfterInstall:
    - location: scripts/install_dependencies
      timeout: 300
      runas: root
    - location: scripts/codestar_remote_access
      timeout: 300
      runas: root
    - location: scripts/start_server
      timeout: 300
      runas: root

  ApplicationStop:
    - location: scripts/stop_server
      timeout: 300
      runas: root

  ValidateService:
    - location: scripts/validate_service
      timeout: 600
      runas: root

This file is used by AWS CodeDeploy service to perform the deployment and validation steps.

  1. Modify the artifacts section in the buildspec.yml file. The section should look like the following:
artifacts:
  files:
    - 'template.yml'
    - 'ec2django/**/*'
    - 'helloworld/**/*'
    - 'scripts/**/*'
    - 'tests/**/*'
    - 'appspec.yml'
    - 'manage.py'
    - 'requirements/**/*'
    - 'requirements.txt'
    - 'supervisord.conf'
    - 'template-configuration.json'

This file is used by AWS CodeBuild service to package the code

  1. Modify the file Common.txt in the requirements folder under the root directory, the file should look like the following:
# dependencies common to all environments 
Django=2.1.15 
selenium==3.141.0 
boto3 >= 1.10.44
pytest

  1. Save All the changes, your folder structure should look like the following:
── README.md
├── appspec.yml*
├── buildspec.yml*
├── db.sqlite3
├── ec2django
├── helloworld
├── manage.py
├── requirements
│   ├── common.txt*
│   ├── dev.txt
│   ├── prod.txt
├── requirements.txt
├── scripts
│   ├── codestar_remote_access
│   ├── install_dependencies
│   ├── start_server
│   ├── stop_server
│   └── validate_service**
├── supervisord.conf
├── template-configuration.json
├── template.yml
├── tests
│   └── browser-test-sel.py**

**newly added files
*modified file

Running the tests

The Device Farm desktop browsing project is now integrated with your pipeline. All you need to do now is commit the code, and CodePipeline takes care of the rest.

  1. On Cloud9 terminal, go to project root directory.
  2. Run git add . to stage all changed files for commit.
  3. Run git commit -m “<commit message>” to commit the changes.
  4. Run git push to push the changes to repository, this should trigger the Pipeline.
  5. Check the Pipelines tab of your AWS CodeStar project; it should show success.
  6. Go to AWS Device Farm console and click on Desktop browser testing projects.
  7. Click on your Project Demo cicd selenium.

You can verify the running of your Selenium test cases using the recorded run steps shown on the Device Farm console, the video of the run, and the logs, all of which can be downloaded on the Device Farm console, or using the AWS SDK and AWS Command Line Interface (AWS CLI).

The following screenshot shows the project run details on the console.

Figure 10: Viewing AWS Device Farm project run details

Figure 10: Viewing AWS Device Farm project run details


To Test the Selenium script locally you can run the following commands.

1. Create a Python virtual environment for your Django project. This virtual environment allows you to isolate this project and install any packages you need without affecting the system Python installation. At the terminal, go to project root directory and type the following command:

$ python3 -m venv ./venv

2. Activate the virtual environment:

$ source ./venv/bin/activate

3. Install development Python dependencies for this project:

$ pip install -r requirements/dev.txt

4. Run Selenium Script:

$ python tests/browser-test-sel.py

Testing the failure scenario (optional)

To test the failure scenario, you can modify the sample script browser-test-sel.py at the else statement.

The following code shows the lines to change:

else:
print("graphics was not generated at this form size")
# this is where you can fail the script with error if you expect the graphics to load. And pipeline will terminate

The following is the updated code:

else:
exit(1)
# this is where you can fail the script with error if you expect the graphics to load. And pipeline will terminate

Commit the change, and the pipeline should fail and stop the deployment.

Conclusion

Integrating Device Farm with CI/CD pipelines allows you to control deployment based on browser testing results. Failing the Selenium test on validation failures can stop and roll back the deployment, and a successful testing can continue the pipeline to deploy the solution to the final stage. Device Farm offers a one-stop solution for testing your native and web applications on desktop browsers and real mobile devices.

Mahesh Biradar is a Solutions Architect at AWS. He is a DevOps enthusiast and enjoys helping customers implement cost-effective architectures that scale..

Register for the Modern Applications Online Event

Post Syndicated from Rachel Richardson original https://aws.amazon.com/blogs/compute/register-for-the-modern-applications-online-event/

Earlier this year we hosted the first serverless themed virtual event, the Serverless-First Function. We enjoyed the opportunity to virtually connect with our customers so much that we want to do it again. This time, we’re expanding the scope to feature serverless, containers, and front-end development content. The Modern Applications Online Event is scheduled for November 4-5, 2020.

This free, two-day event addresses how to build and operate modern applications at scale across your organization, enabling you to become more agile and respond to change faster. The event covers topics including serverless application development, containers best practices, front-end web development and more. If you missed the containers or serverless virtual events earlier this year, this is great opportunity to watch the content and interact directly with expert moderators. The full agenda is listed below.

Register now

Organizational Level Operations

Wednesday, November 4, 2020, 9:00 AM – 1:00 PM PT

Move fast and ship things: Using serverless to increase speed and agility within your organization
In this session, Adrian Cockcroft demonstrates how you can use serverless to build modern applications faster than ever. Cockcroft uses real-life examples and customer stories to debunk common misconceptions about serverless.

Eliminating busywork at the organizational level: Tips for using serverless to its fullest potential 
In this session, David Yanacek discusses key ways to unlock the full benefits of serverless, including building services around APIs and using service-oriented architectures built on serverless systems to remove the roadblocks to continuous innovation.

Faster Mobile and Web App Development with AWS Amplify
In this session, Brice Pellé, introduces AWS Amplify, a set of tools and services that enables mobile and front-end web developers to build full stack serverless applications faster on AWS. Learn how to accelerate development with AWS Amplify’s use-case centric open-source libraries and CLI, and its fully managed web hosting service with built-in CI/CD.

Built Serverless-First: How Workgrid Software transformed from a Liberty Mutual project to its own global startup
Connected through a central IT team, Liberty Mutual has embraced serverless since AWS Lambda’s inception in 2014. In this session, Gillian McCann discusses Workgrid’s serverless journey—from internal microservices project within Liberty Mutual to independent business entity, all built serverless-first. Introduction by AWS Principal Serverless SA, Sam Dengler.

Market insights: A conversation with Forrester analyst Jeffrey Hammond & Director of Product for Lambda Ajay Nair
In this session, guest speaker Jeffrey Hammond and Director of Product for AWS Lambda, Ajay Nair, discuss the state of serverless, Lambda-based architectural approaches, Functions-as-a-Service platforms, and more. You’ll learn about the high-level and enduring enterprise patterns and advancements that analysts see driving the market today and determining the market in the future.

AWS Fargate Platform Version 1.4
In this session we will go through a brief introduction of AWS Fargate, what it is, its relation to EKS and ECS and the problems it addresses for customers. We will later introduce the concept of Fargate “platform versions” and we will then dive deeper into the new features that the new platform version 1.4 enables.

Persistent Storage on Containers
Containerizing applications that require data persistence or shared storage is often challenging since containers are ephemeral in nature, are scaled in and out dynamically, and typically clear any saved state when terminated. In this session you will learn about Amazon Elastic File System (EFS), a fully managed, elastic, highly-available, scalable, secure, high-performance, cloud native, shared file system that enables data to be persisted separately from compute for your containerized applications.

Security Best Practices on Amazon ECR
In this session, we will cover best practices with securing your container images using ECR. Learn how user access controls, image assurance, and image scanning contribute to securing your images.

Application Level Design

Thursday, November 5, 2020, 9:00 AM – 1:00 PM PT

Building a Live Streaming Platform with Amplify Video
In this session, learn how to build a live-streaming platform using Amplify Video and the platform powering it, AWS Elemental Live. Amplify video is an open source plugin for the Amplify CLI that makes it easy to incorporate video streaming into your mobile and web applications powered by AWS Amplify.

Building Serverless Web Applications
In this session, follow along as Ben Smith shows you how to build and deploy a completely serverless web application from scratch. The application will span from a mobile friendly front end to complex business logic on the back end.

Automating serverless application development workflows
In this talk, Eric Johnson breaks down how to think about CI/CD when building serverless applications with AWS Lambda and Amazon API Gateway. This session will cover using technologies like AWS SAM to build CI/CD pipelines for serverless application back ends.

Observability for your serverless applications
In this session, Julian Wood walks you through how to add monitoring, logging, and distributed tracing to your serverless applications. Join us to learn how to track platform and business metrics, visualize the performance and operations of your application, and understand which services should be optimized to improve your customer’s experience.

Happy Building with AWS Copilot
The hard part’s done. You and your team have spent weeks pouring over pull requests, building micro-services and containerizing them. Congrats! But what do you do now? How do you get those services on AWS? Copilot is a new command line tool that makes building, developing and operating containerized apps on AWS a breeze. In this session, we’ll talk about how Copilot helps you and your team set up modern applications that follow AWS best practices

CDK for Kubernetes
The CDK for Kubernetes (cdk8s) is a new open-source software development framework for defining Kubernetes applications and resources using familiar programming languages. Applications running on Kubernetes are composed of dozens of resources maintained through carefully maintained YAML files. As applications evolve and teams grow, these YAML files become harder and harder to manage. It’s also really hard to reuse and create abstractions through config files — copying & pasting from previous projects is not the solution! In this webinar, the creators of cdk8s show you how to define your first cdk8s application, define reusable components called “constructs” and generally say goodbye (and thank you very much) to writing in YAML.

Machine Learning on Amazon EKS
Amazon EKS has quickly emerged as a leading choice for machine learning workloads. In this session, we’ll walk through some of the recent ML related enhancements the Kubernetes team at AWS has released. We will then dive deep with walkthroughs of how to optimize your machine learning workloads on Amazon EKS, including demos of the latest features we’ve contributed to popular open source projects like Spark and Kubeflow

Deep Dive on Amazon ECS Capacity Providers
In this talk, we’ll dive into the different ways that ECS Capacity Providers can enable teams to focus more on their core business, and less on the infrastructure behind the scenes. We’ll look at the benefits and discuss scenarios where Capacity Providers can help solve the problems that customers face when using container orchestration. Lastly, we’ll review what features have been released with Capacity Providers, as well as look ahead at what’s to come.

Register now

Using serverless backends to iterate quickly on web apps – part 3

Post Syndicated from James Beswick original https://aws.amazon.com/blogs/compute/using-serverless-backends-to-iterate-quickly-on-web-apps-part-3/

This series is about building flexible backends for web applications. The example is Happy Path, a web app that allows park visitors to upload and share maps and photos, to help replace printed materials.

In part 1, I show how the application works and walk through the backend architecture. In part 2, you deploy a basic image-processing workflow. To do this, you use an AWS Serverless Application Model (AWS SAM) template to create an AWS Step Functions state machine.

In this post, I show how to deploy progressively more complex workflow functionality while using minimal code. This solution in this web app is designed for 100,000 monthly active users. Using this approach, you can introduce more sophisticated workflows without affecting the existing backend application.

The code and instructions for this application are available in the GitHub repo.

Introducing image moderation

In the first version, users could upload any images to parks on the map. One of the most important feature requests is to enable moderation, to prevent inappropriate images from appearing on the app. To handle a large number of uploaded images, using human moderation would be slow and labor-intensive.

In this section, you use Amazon ML services to automate analyzing the images for unsafe content. Amazon Rekognition provides an API to detect if an image contains moderation labels. These labels are categorized into different types of unsafe content that would not be appropriate for this app.

Version 2 of the workflow uses this API to automate the process of checking images. To install version 2:

  1. From a terminal window, delete the v1 workflow stack:
    aws cloudformation delete-stack --stack-name happy-path-workflow-v1
  2. Change directory to the version 2 AWS SAM template in the repo:
    cd .\workflows\templates\v2
  3. Build and deploy the solution:
    sam build
    sam deploy --guided
  4. The deploy process prompts you for several parameters. Enter happy-path-workflow-v2 as the Stack Name. The other values are the outputs from the backend deployment process, detailed in the repo’s README. Enter these to complete the deployment.

From VS Code, open the v2 state machine in the repo from workflows/statemachines/v2.asl.json. Choose the Render graph option in the CodeLens to see the workflow visualization.

Serverless workflow visualization

This new workflow introduces a Moderator step. This invokes a Moderator Lambda function that uses the Amazon Rekognition API. If this API identifies any unsafe content labels, it returns these as part of the function output.

The next step in the workflow is a Moderation result choice state. This evaluates the output of the previous function – if the image passes moderation, the process continues to the Resizer function. If it fails, execution moves to the RecordFailState step.

Step Functions integrates directly with some AWS services so that you can call and pass parameters into the APIs of those services. The RecordFailState uses an Amazon DynamoDB service integration to write the workflow failure to the application table, using the arn:aws:states:::dynamodb:updateItem resource.

Testing the workflow

To test moderation, I use an unsafe image with suggestive content. This is an image that is not considered appropriate for this application. To test the deployed v2 workflow:

  1. Open the frontend application at https://localhost:8080 in your browser.
  2. Select a park location, choose Show Details, and then choose Upload images.
  3. Select an unsafe image to upload.
  4. Navigate to the Step Functions console. This shows the v2StateMachine with one successful execution:State machine result
  5. Select the state machine, and choose the execution to display more information. Scroll down to the Visual workflow panel.Visual workflow panel

This shows that the moderation failed and the path continued to log the failed state in the database. If you open the Output resource, this displays more details about why the image is considered unsafe.

Checking the image size and file type

The upload component in the frontend application limits file selection to JPG images but there is no check to reject images that are too small. It’s prudent to check and enforce image types and sizes on the backend API in addition to the frontend. This is because it’s possible to upload images via the API without using the frontend.

The next version of the workflow enforces image sizes and file types. To install version 3:

  1. From a terminal window, delete the v2 workflow stack:
    aws cloudformation delete-stack --stack-name happy-path-workflow-v2
  2. Change directory to the version 3 AWS SAM template in the repo:
    cd .\workflows\templates\v3
  3. Build and deploy the solution:
    sam build
    sam deploy --guided
  4. The deploy process prompts you for several parameters. Enter happy-path-workflow-v3 as the Stack Name. The other values are the outputs from the backend deployment process, detailed in the repo’s README. Enter these to complete the deployment.

From VS Code, open the v3 state machine in the repo from workflows/statemachines/v3.asl.json. Choose the Render graph option in the CodeLens to see the workflow visualization.

v3 state machine

This workflow changes the starting point of the execution, introducing a Check Dimensions step. This invokes a Lambda function that checks the size and types of the Amazon S3 object using the image-size npm package. This function uses environment variables provided by the AWS SAM template to compare against a minimum size and allowed type array.

The output is evaluated by the Dimension Result choice state. If the image is larger than the minimum size allowed, execution continues to the Moderator function as before. If not, it passes to the RecordFailState step to log the result in the database.

Testing the workflow

To test, I use an image that’s narrower than the mixPixels value. To test the deployed v3 workflow:

  1. Open the frontend application at https://localhost:8080 in your browser.
  2. Select a park location, choose Show Details, and then choose Upload images.
  3. Select an image with a width smaller than 800 pixels. After a few seconds, a rejection message appears:"Image is too small" message
  4. Navigate to the Step Functions console. This shows the v3StateMachine with one successful execution. Choose the execution to show more detail.Execution output

The execution shows that the Check Dimension step added the image dimensions to the event object. Next, the Dimensions Result choice state rejected the image, and logged the result at the RecordFailState step. The application’s DynamoDB table now contains details about the failed upload:

DynamoDB item details

Pivoting the application to a new concept

Until this point, the Happy Path web application is designed to help park visitors share maps and photos. This is the development team’s original idea behind the app. During the product-market fit stage of development, it’s common for applications to pivot substantially from the original idea. For startups, it can be critical to have the agility to modify solutions quickly to meet the needs of customers.

In this scenario, the original idea has been less successful than predicted, and park visitors are not adopting the app as expected. However, the business development team has identified a new opportunity. Restaurants would like an app that allows customers to upload menus and food photos. How can the development team create a new proof-of-concept app for restaurant customers to test this idea?

In this version, you modify the application to work for restaurants. While features continue to be added to the parks workflow, it now supports business logic specifically for the restaurant app.

To create the v4 workflow and update the frontend:

  1. From a terminal window, delete the v3 workflow stack:
    aws cloudformation delete-stack --stack-name happy-path-workflow-v3
  2. Change directory to the version 4 AWS SAM template in the repo:
    cd .\workflows\templates\v4
  3. Build and deploy the solution:
    sam build
    sam deploy --guided
  4. The deploy process prompts you for several parameters. Enter happy-path-workflow-v4 as the Stack Name. The other values are the outputs from the backend deployment process, detailed in the repo’s README. Enter these to complete the deployment.
  5. Open frontend/src/main.js and update the businessType variable on line 63. Set this value to ‘restaurant’.Change config to restaurants
  6. Start the local development server:
    npm run serve
  7. Open the application at http://localhost:8080. This now shows restaurants in the local area instead of parks.

In the Step Functions console, select the v4StateMachine to see the latest workflow, then open the Definition tab to see the visualization:

Workflow definition

This workflow starts with steps that apply to both parks and restaurants – checking the image dimensions. Next, it determines the place type from the placeId record in DynamoDB. Depending on place type, it now follows a different execution path:

  • Parks continue to run the automated moderator process, then resizer and publish the result.
  • Restaurants now use Amazon Rekognition to determine the labels in the image. Any photos containing people are rejected. Next, the workflow continues to the resizer and publish process.
  • Other business types go to the RecordFailState step since they are not supported.

Testing the workflow

To test the deployed v4 workflow:

  1. Open the frontend application at https://localhost:8080 in your browser.
  2. Select a restaurant, choose Show Details, and then choose Upload images.
  3. Select an image from the test photos dataset. After a few seconds, you see a message confirming the photo has been added.
  4. Next, select an image that contains one or more people. The new restaurant workflow rejects this type of photo:"Image rejected" message
  5. In the Step Functions console, select the last execution for the v4StateMachine to see how the Check for people step rejected the image:v4 workflow

If other business types are added later to the application, you can extend the Step Functions workflow accordingly. The cost of Step Functions is based on the number of transitions in a workflow, not the number of total steps. This means you can branch by business type in the Happy Path application. This doesn’t affect the overall cost of running an execution, if the total transitions are the same per execution.

Conclusion

Previously in this series, you deploy a simple workflow for processing image uploads in the Happy Path web application. In this post, you add progressively more complex functionality by deploying new versions of workflows.

The first iteration introduces image moderation using Amazon Rekognition, providing the ability to automate the evaluation of unsafe content. Next, the workflow is modified to check image size and file type. This allows you to reject any images that are too small or do not meet the type requirements. Finally, I show how to expand the logic further to accept other business types with their own custom workflows.

To learn more about building serverless web applications, see the Ask Around Me series.

Using serverless backends to iterate quickly on web apps – part 2

Post Syndicated from James Beswick original https://aws.amazon.com/blogs/compute/using-serverless-backends-to-iterate-quickly-on-web-apps-part-2/

This series is about building flexible solutions that can adapt as user requirements change. One of the challenges of building modern web applications is that requirements can change quickly. This is especially true for new applications that are finding their product-market fit. Many development teams start building a product with one set of requirements, and quickly find they must build a product with different features.

For both start-ups and enterprises, it’s often important to find a development methodology and architecture that allows flexibility. This is the surest way to keep up with feature requests in evolving products and innovate to delight your end-users. In this post, I show how to build sophisticated workflows using minimal custom code.

Part 1 introduces the Happy Path application that allows park visitors to share maps and photos with other users. In that post, I explain the functionality, how to deploy the application, and walk through the backend architecture.

The Happy Path application accepts photo uploads from users’ smartphones. The application architecture must support 100,000 monthly active users. These binary uploads are typically 3–9 MB in size and must be resized and optimized for efficient distribution.

Using a serverless approach, you can develop a robust low-code solution that can scale to handle millions of images. Additionally, the solution shown here is designed to handle complex changes that are introduced in subsequent versions of the software. The code and instructions for this application are available in the GitHub repo.

Architecture overview

After installing the backend in the previous post, the architecture looks like this:

In this design, the API, storage, and notification layers exist as one application, and the business logic layer is a separate application. These two applications are deployed using AWS Serverless Application Model (AWS SAM) templates. This architecture uses Amazon EventBridge to pass events between the two applications.

In the business logic layer:

  1. The workflow starts when events are received from EventBridge. Each time a new object is uploaded by an end-user, the PUT event in the Amazon S3 Upload bucket triggers this process.
  2. After the workflow is completed successfully, processed images are stored in the Distribution bucket. Related metadata for the object is also stored in the application’s Amazon DynamoDB table.

By separating the architecture into two independent applications, you can replace the business logic layer as needed. Providing that the workflow accepts incoming events and then stores processed images in the S3 bucket and DynamoDB table, the workflow logic becomes interchangeable. Using the pattern, this workflow can be upgraded to handle new functionality.

Introducing AWS Step Functions for workflow management

One of the challenges in building distributed applications is coordinating components. These systems are composed of separate services, which makes orchestrating workflows more difficult than working with a single monolithic application. As business logic grows more complex, if you attempt to manage this in custom code, it can become quickly convoluted. This is especially true if it handles retries and error handling logic, and it can be hard to test and maintain.

AWS Step Functions is designed to coordinate and manage these workflows in distributed serverless applications. To do this, you create state machine diagrams using Amazon States Language (ASL). Step Functions renders a visualization of your state machine, which makes it simpler to see the flow of data from one service to another.

Each state machine consists of a series of steps. Each step takes an input and produces an output. Using ASL, you define how this data progresses through the state machine. The flow from step to step is called a transition. All state machines transition from a Start state towards an End state.

The Step Functions service manages the state of individual executions. The service also supports versioning, which makes it easier to modify state machines in production systems. Executions continue to use the version of a state machine when they were started, so it’s possible to have active executions on multiple versions.

For developers using VS Code, the AWS Toolkit extension provides support for writing state machines using ASL. It also renders visualizations of those workflows. Combined with AWS Serverless Application Model (AWS SAM) templates, this provides a powerful way to deploy and maintain applications based on Step Functions. I refer to this IDE and AWS SAM in this walkthrough.

Version 1: Image resizing

The Happy Path application uses Step Functions to manage the image-processing part of the backend. The first version of this workflow resizes the uploaded image.

To see this workflow:

  1. In VS Code, open the workflows/statemachines folder in the Explorer panel.
  2. Choose the v1.asl.sjon file.v1 state machine
  3. Choose the Render graph option in the CodeLens. This opens the workflow visualization.CodeLens - Render graph

In this basic workflow, the state machine starts at the Resizer step, then progresses to the Publish step before ending:

  • In the top-level attributes in the definition, StartsAt sets the Resizer step as the first action.
  • The Resizer step is defined as a task with an ARN of a Lambda function. The Next attribute determines that the Publish step is next.
  • In the Publish step, this task defines a Lambda function using an ARN reference. It sets the input payload as the entire JSON payload. This step is set as the End of the workflow.

Deploying the Step Functions workflow

To deploy the state machine:

  1. In the terminal window, change directory to the workflows/templates/v1 folder in the repo.
  2. Execute these commands to build and deploy the AWS SAM template:
    sam build
    sam deploy –guided
  3. The deploy process prompts you for several parameters. Enter happy-path-workflow-v1 as the Stack Name. The other values are the outputs from the backend deployment process, detailed in the repo’s README. Enter these to complete the deployment.
  4. SAM deployment output

Testing and inspecting the deployed workflow

Now the workflow is deployed, you perform an integration test directly from the frontend application.

To test the deployed v1 workflow:

  1. Open the frontend application at https://localhost:8080 in your browser.
  2. Select a park location, choose Show Details, and then choose Upload images.
  3. Select an image from the sample photo dataset.
  4. After a few seconds, you see a pop-up message confirming that the image has been added:Upload confirmation message
  5. Select the same park location again, and the information window now shows the uploaded image:Happy Path - park with image data

To see how the workflow processed this image:

  1. Navigate to the Steps Functions console.
  2. Here you see the v1StateMachine with one execution in the Succeeded column.Successful execution view
  3. Choose the state machine to display more information about the start and end time.State machine detail
  4. Select the execution ID in the Executions panel to open details of this single instance of the workflow.

This view shows important information that’s useful for understanding and debugging an execution. Under Input, you see the event passed into Step Functions by EventBridge:

Event detail from EventBridge

This contains detail about the S3 object event, such as the bucket name and key, together with the placeId, which identifies the location on the map. Under Output, you see the final result from the state machine, shows a successful StatusCode (200) and other metadata:

Event output from the state machine

Using AWS SAM to define and deploy Step Functions state machines

The AWS SAM template defines both the state machine, the trigger for executions, and the permissions needed for Step Functions to execute. The AWS SAM resource for a Step Functions definition is AWS::Serverless::StateMachine.

Definition permissions in state machines

In this example:

  • DefinitionUri refers to an external ASL definition, instead of embedding the JSON in the AWS SAM template directly.
  • DefinitionSubstitutions allow you to use tokens in the ASL definition that refer to resources created in the AWS SAM template. For example, the token ${ResizerFunctionArn} refers to the ARN of the resizer Lambda function.
  • Events define how the state machine is invoked. Here it defines an EventBridge rule. If an event matches this source and detail-type, it triggers an execution.
  • Policies: the Step Functions service must have permission to invoke the services that perform tasks in the state machine. AWS SAM policy templates provide a convenient shorthand for common execution policies, such as invoking a Lambda function.

This workflow application is separate from the main backend template. As more functionality is added to the workflow, you deploy the subsequent AWS SAM templates in the same way.

Conclusion

Using AWS SAM, you can specify serverless resources, configure permissions, and define substitutions for the ASL template. You can deploy a standalone Step Functions-based application using the AWS SAM CLI, separately from other parts of your application. This makes it easier to decouple and maintain larger applications. You can visualize these workflows directly in the VS Code IDE in addition to the AWS Management Console.

In part 3, I show how to build progressively more complex workflows and how to deploy these in-place without affecting the other parts of the application.

To learn more about building serverless web applications, see the Ask Around Me series.