Post Syndicated from Aditya Challa original https://aws.amazon.com/blogs/big-data/evolve-json-schemas-in-amazon-msk-and-amazon-kinesis-data-streams-with-the-aws-glue-schema-registry/
Data is being produced, streamed, and consumed at an immense rate, and that rate is projected to grow exponentially in the future. In particular, JSON is the most widely used data format across streaming technologies and workloads. As applications, websites, and machines increasingly adopt data streaming technologies such as Apache Kafka and Amazon Kinesis Data Streams, which serve as a highly available transport layer that decouples the data producers from data consumers, it can become progressively more challenging for teams to coordinate and evolve JSON Schemas. Adding or removing a field or changing the data type on one or more existing fields could introduce data quality issues and downstream application failures without careful data handling. Teams rely on custom tools, complex code, tedious processes, or unreliable documentation to protect against these schema changes. This puts heavy dependency on human oversight, which can make the change management processes error-prone. A common solution is a schema registry that enables data producers and consumers to perform validation of schema changes in a coordinated fashion. This allows for risk-free evolution as business demands change over time.
The AWS Glue Schema Registry, a serverless feature of AWS Glue, now enables you to validate and reliably evolve streaming data against JSON Schemas. The Schema Registry is a free feature that can significantly improve data quality and developer productivity. With it, you can eliminate defensive coding and cross-team coordination, reduce downstream application failures, and use a registry that is integrated across multiple AWS services. Each schema can be versioned within the guardrails of a compatibility mode, providing developers the flexibility to reliably evolve JSON Schemas. Additionally, the Schema Registry can serialize data into a compressed format, which helps you save on data transfer and storage costs.
This post shows you how to use the Schema Registry for JSON Schemas and provides examples of how to use it with both Kinesis Data Streams and Apache Kafka or Amazon Managed Streaming for Apache Kafka (Amazon MSK).
Overview of the solution
In this post, we walk you through a solution to store, validate, and evolve a JSON Schema in the AWS Glue Schema Registry. The schema is used by Apache Kafka and Kinesis Data Streams applications while producing and consuming JSON objects. We also show you what happens when a new version of the schema is created with a new field.
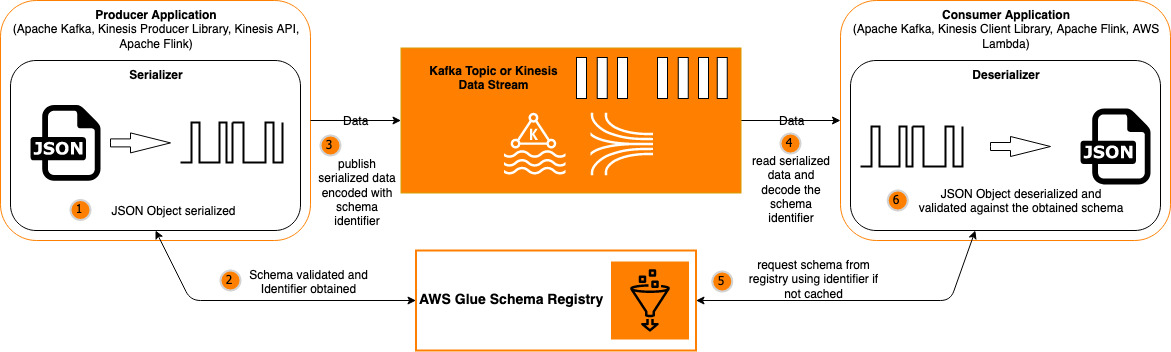
The following diagram illustrates our solution workflow:

The steps to implement this solution are as follows:
- Create a new registry and register a schema using an AWS CloudFormation template.
- Create a new version of the schema using the AWS Glue console that is backward-compatible with the previous version.
- Build a producer application to do the following:
- Generate JSON objects that adhere to one of the schema versions.
- Serialize the JSON objects into an array of bytes.
- Obtain the corresponding schema version ID from the Schema Registry and encode the byte array with the same.
- Send the encoded byte array through a Kinesis data stream or Apache Kafka topic.
- Build a consumer application to do the following:
- Receive the encoded byte array through a Kinesis data stream or Apache Kafka topic.
- Decode the schema version ID and obtain the corresponding schema from the Schema Registry.
- Deserialize the array of bytes into the original JSON object.
- Consume the JSON object as needed.
Description of the schema used
For this post, we start with the following schema. The schema is of a weather report object that contains three main pieces of data: location, temperature, and timestamp. All three are required fields, but the schema does allow additional fields (indicated by the additionalProperties flag) such as windSpeed or precipitation if the producer wants to include them. The location field is an object with two string fields: city and state. Both are required fields and the schema doesn’t allow any additional fields within this object.
{
    "$id": "https://example.com/weather-report.schema.json",
    "$schema": "http://json-schema.org/draft-07/schema#",
    "title": "WeatherReport",
    "type": "object",
    "properties": {
        "location": {
            "type": "object",
            "properties": {
                "city": {
                    "type": "string",
                    "description": "Name of the city where the weather is being reported."
                },
                "state": {
                    "type": "string",
                    "description": "Name of the state where the weather is being reported."
                }
            },
            "additionalProperties": false,
            "required": [
                "city",
                "state"
            ]
        },
        "temperature": {
            "type": "integer",
            "description": "Temperature in Farenheit."
        },
        "timestamp": {
            "description": "Timestamp in epoch format at which the weather was noted.",
            "type": "integer"
        }
    },
    "additionalProperties": true,
    "required": [
        "location",
        "temperature",
        "timestamp"
    ]
}
Using the above schema, a valid JSON object would look like this:
{
    "location": {
        "city": "Phoenix",
        "state": "Arizona"
    },
    "temperature": 115,
    "windSpeed": 50,
    "timestamp": 1627335205
}
Deploy with AWS CloudFormation
For a quick start, you can deploy the provided CloudFormation stack. The CloudFormation template generates the following resources in your account:
- Registry – A registry is a container of schemas. Registries allow you to organize your schemas, as well as manage access control for your applications. A registry has an Amazon Resource Name (ARN) to allow you to organize and set different access permissions to schema operations within the registry.
- Schema – A schema defines the structure and format of a data record. A schema is a versioned specification for reliable data publication, consumption, or storage. Each schema can have multiple versions. Versioning is governed by a compatibility rule that is applied on a schema. Requests to register new schema versions are checked against this rule by the Schema Registry before they can succeed.
To manually create these resources without using AWS CloudFormation, refer to Creating a Registry and Creating a Schema.
Prerequisites
Make sure to complete the following steps as prerequisites:
- Create an AWS account. For this post, you configure the required AWS resources in the
us-east-1 or us-west-2 Region. If you haven’t signed up, complete the following tasks:
- Create an account. For instructions, see Sign Up for AWS.
- Create an AWS Identity and Access Management (IAM) user. For instructions, see Creating an IAM User in your AWS account.
- Choose Launch Stack to launch the CloudFormation stack:

Review the newly registered schema
Let’s review the registry and the schema on the AWS Glue console.
- Sign in to the AWS Glue console and choose the appropriate Region.
- Under Data Catalog, choose Schema registries.
- Choose the
GsrBlogRegistry schema registry.
- Choose the
GsrBlogSchema schema.
- Choose Version 1.
We can see the JSON Schema version details and its definition. Note that the compatibility mode chosen is Backward compatibility. We see the purpose of that in the next section.

Evolve the schema by creating a new backward-compatible version
In this section, we take what is created so far and add a new schema version to demonstrate how we can evolve our schema while keeping the integrity intact.
To add a new schema version, complete the following steps, continuing from the previous section:
- On the Schema version details page, choose Register new version.
- Inside the
properties object within the location object (after the state field), add a new country field as follows:
"country": {
          "type": "string",
          "description": "Name of the country where the weather is being reported."
        }
Because the compatibility mode chosen for the schema is backward compatibility, it’s important that we don’t make this new field a required field. If we do that, the Schema Registry fail this new version.
- Choose Register version.
We now have a new version of the schema that allows the producers to include an optional country field within the location object if they choose to.
Use the AWS Glue Schema Registry
In this section, we walk through the steps to use the Schema Registry with Kinesis Data Streams or Apache Kafka.
Prerequisites
Make sure to complete the following steps as prerequisites:
- Configure your AWS credentials in your local machine.
- Install Maven on the local machine.
- Download the application code from the GitHub repo.
- Build the package:
Use the Schema Registry with Kinesis Data Streams
Run the Kinesis producer code to produce JSON messages that are associated with a schema ID assigned by the Schema Registry:
mvn exec:java -Dexec.mainClass="com.amazonaws.services.gsr.samples.json.kinesis.RunKinesisProducer" -Dexec.args="<<KINESIS_DATA_STREAM_NAME>>"
This command returns the following output:
Putting 1 record into <<KINESIS_DATA_STREAM_NAME>>
Sent message 0
Putting 1 record into <<KINESIS_DATA_STREAM_NAME>>
Sent message 1
Putting 1 record into <<KINESIS_DATA_STREAM_NAME>>
Sent message 2
Successfully produced 3 messages to a stream called <<KINESIS_DATA_STREAM_NAME>>
Run the Kinesis consumer code to receive JSON messages with the schema ID, obtain the schema from the Schema Registry, and validate:
mvn exec:java -Dexec.mainClass="com.amazonaws.services.gsr.samples.json.kinesis.RunKinesisConsumer" -Dexec.args="<<KINESIS_DATA_STREAM_NAME>>"
This command returns the following output with the JSON records received and decoded:
Number of Records received: 1
[JsonDataWithSchema(schema={"$schema":"http://json-schema.org/draft-07/schema#","additionalProperties":true,"title":"WeatherReport","type":"object","properties":{"temperature":{"description":"Temperature in Farenheit.","type":"integer"},"location":{"additionalProperties":false,"type":"object","properties":{"city":{"description":"Name of the city where the weather is being reported.","type":"string"},"state":{"description":"Name of the state where the weather is being reported.","type":"string"}},"required":["city","state"]},"timestamp":{"description":"Timestamp in epoch format at which the weather was noted.","type":"integer"}},"required":["location","temperature","timestamp"],"$id":"https://example.com/weather-report.schema.json"}, payload={"temperature":89,"location":{"city":"Orlando","state":"Florida"},"timestamp":1627335205})]
Use the Schema Registry with Apache Kafka
In the root of the downloaded GitHub repo folder, create a config file with the connection parameters for the Kafka cluster:
# Kafka
bootstrap.servers=localhost:9092
Run the Kafka producer code to produce JSON messages that are associated with a schema ID assigned by the Schema Registry:
mvn exec:java -Dexec.mainClass="com.amazonaws.services.gsr.samples.json.kafka.RunKafkaProducer" -Dexec.args="<<CONFIG_FILE_NAME>><< TOPIC_NAME>>"
This command returns the following output:
Sent message 0
Sent message 1
Sent message 2
Successfully produced 3 messages to a topic called <<TOPIC_NAME>>
Run the Kafka consumer code to consume JSON messages with the schema ID, obtain the schema from the Schema Registry, and validate:
mvn exec:java -Dexec.mainClass="com.amazonaws.services.gsr.samples.json.kafka.RunKafkaConsumer" -Dexec.args="<<CONFIG_FILE_NAME>> <<TOPIC_NAME>>"
This command returns the following output with the JSON records received and decoded:
Received message: key = message-0, value = JsonDataWithSchema(schema={"$schema":"http://json-schema.org/draft-07/schema#","additionalProperties":true,"title":"WeatherReport","type":"object","properties":{"temperature":{"description":"Temperature in Farenheit.","type":"integer"},"location":{"additionalProperties":false,"type":"object","properties":{"city":{"description":"Name of the city where the weather is being reported.","type":"string"},"state":{"description":"Name of the state where the weather is being reported.","type":"string"}},"required":["city","state"]},"timestamp":{"description":"Timestamp in epoch format at which the weather was noted.","type":"integer"}},"required":["location","temperature","timestamp"],"$id":"https://example.com/weather-report.schema.json"}, payload={"temperature":115,"location":{"city":"Phoenix","state":"Arizona"},"windSpeed":50,"timestamp":1627335205})
Clean up
Now to the final step, cleaning up the resources. Delete the CloudFormation stack to remove any resources you created as part of this walkthrough.
Schema Registry features
Let’s discuss the features the Schema Registry has to offer:
- Schema discovery – When a producer registers a schema change, metadata can be applied as a key-value pair to provide searchable information for administrators or developers. This metadata can indicate the original source of the data (
source=MSK_west), the team’s name to contact (owner=DataEngineering), or AWS tags (environment=Production). You could potentially encrypt a field in your data on the producing client and use metadata to specify to potential consumer clients which public key fingerprint to use for decryption.
- Schema compatibility – The versioning of each schema is governed by a compatibility mode. If a new version of a schema is requested to be registered that breaks the specified compatibility mode, the request fails, and an exception is thrown. Compatibility checks enable developers building downstream applications to have a bounded set of scenarios to build applications against, which helps prepare for the changes without issue. Commonly used modes are FORWARD, BACKWARD, and FULL. For more information about mode definitions, see Schema Versioning and Compatibility.
- Schema validation – Schema Registry serializers work to validate that the data produced is compatible with the assigned schema. If it isn’t, the data producer receives an exception from the serializer. This ensures that potentially breaking changes are found earlier in development cycles and can also help prevent unintentional schema changes due to human error.
- Auto-registration of schemas – If configured to do so, the data producer can auto-register schema changes as they flow in the data stream. This is especially helpful for use cases where the source of the data is generated by a change data capture process (CDC) from the database.
- IAM support – Due to integrated IAM support, only authorized producers can change certain schemas. Furthermore, only those consumers authorized to read the schema can do so. Schema changes are typically performed deliberately and with care, so it’s important to use IAM to control who performs these changes. Additionally, access control to schemas is important in situations where you might have sensitive information included in the schema definition itself. In the previous examples, IAM roles are inferred via the AWS SDK for Java, so they are inherited from the Amazon Elastic Compute Cloud (Amazon EC2) instance’s role that the application runs on, if using Amazon EC2. You can also apply IAM roles to any other AWS service that could contain this code, such as containers or AWS Lambda functions.
- Secondary deserializer – If you have already registered schemas in another schema registry, there’s an option for specifying a secondary deserializer when performing schema lookups. This allows for migrations from other schema registries without having to start all over again. Any schema ID that is unknown to the Schema Registry is looked up in the registry tied to the secondary deserializer.
- Compression – Using a schema registry can reduce data payload by no longer needing to send and receive schemas with each message. Schema Registry libraries also provide an option for zlib compression, which can reduce data requirements even further by compressing the payload of the message. This varies by use case, but compression can reduce the size of the message significantly.
- Multiple data formats – The Schema Registry currently supports AVRO (v1.10.2) data format, JSON data format with JSON Schema format for the schema (specifications Draft-04, Draft-06, and Draft-07), and Java language support, with other data formats and languages to come.
Conclusion
In this post, we discussed the benefits of using the AWS Glue Schema Registry to register, validate, and evolve JSON Schemas for data streams as business needs change. We also provided examples of how to use the Schema Registry.
Learn more about Integrating with AWS Glue Schema Registry.
About the Author
 Aditya Challa is a Senior Solutions Architect at Amazon Web Services. Aditya loves helping customers through their AWS journeys because he knows that journeys are always better when there’s company. He’s a big fan of travel, history, engineering marvels, and learning something new every day.