All posts by Chintan Agrawal

Scaling fine-grained access control for enterprise lakehouse using SageMaker Unified Studio and AWS Lake Formation

Post Syndicated from Chintan Agrawal original https://aws.amazon.com/blogs/big-data/scaling-fine-grained-access-control-for-enterprise-lakehouse-using-sagemaker-unified-studio-and-aws-lake-formation/

As enterprise lakehouses grow to thousands of tables across multiple business domains and regions, scaling fine-grained access control becomes a critical governance challenge. Data governance teams spend significant time manually granting table-level permissions, only to face permission drift, inconsistent enforcement, and limited auditability. Without a scalable approach, each new dataset requires manual policy updates, increasing the risk of unauthorized access and slowing time-to-insight for analysts and data scientists.

In this post, we show you how to solve this problem by combining AWS IAM Identity Center, AWS Lake Formation tag-based access control (TBAC), and trusted identity propagation in Amazon SageMaker Unified Studio. You deploy a complete governance architecture using AWS Cloud Development Kit (AWS CDK) that classifies data with LF-Tags, maps IAM Identity Center groups to tag-based policies, and enforces permissions at query time across analytics engines. The solution uses Apache Iceberg tables stored in Amazon Simple Storage Service (Amazon S3) and registered in the AWS Glue Data Catalog.

The core governance challenge

As organizations mature their lakehouse environments, governance complexity increases with each new dataset. Several challenges commonly emerge:

  • Explosive dataset growth: Iceberg-based lakehouses often contain thousands of tables distributed across raw, curated, and conformed zones. Each new dataset introduces additional governance requirements, making table-level permission grants operationally expensive.
  • Multi-domain data ownership: Enterprise lakehouses typically serve multiple business domains such as commercial analytics, clinical research, and regulatory reporting. These domains require strict isolation while still supporting controlled data sharing.
  • Regional data sovereignty: Organizations operating globally must enforce geographic boundaries for sensitive datasets. EU clinical trial data might be restricted by GDPR regulations, whereas US commercial datasets follow different compliance frameworks.
  • Sensitivity-based access controls: Within each domain, datasets vary in sensitivity. Pricing strategies, drug discovery research, and patient-related datasets require stricter access controls than standard operational data.
  • Role explosion: Pure RBAC approaches attempt to encode these dimensions into roles, leading to role proliferation. Manual Lake Formation grants at the table level create permission drift and limited scalability.

To address these challenges, enterprise lakehouse governance must satisfy several criteria:

  • Least-privilege access.
  • Dynamic scalability as new datasets are onboarded.
  • Multi-dimensional enforcement across domain, region, and sensitivity.
  • Auditability traceable to individual users.
  • Automation-ready, configuration-driven workflows.

TBAC addresses each of these challenges directly. Instead of granting permissions on individual tables, you define tag-based policies that automatically apply to any resource matching the tag expression. New datasets inherit access rules through tag inheritance, eliminating manual policy updates (solving explosive dataset growth). Domain and region tags enforce strict isolation between business units (solving multi-domain ownership and regional sovereignty). Sensitivity tags control access within domains without role proliferation (solving sensitivity-based controls and role explosion). The following sections describe the architecture that implements this model and walk you through deploying it end to end.

Reference architecture overview

The governance model integrates identity, metadata, and lakehouse services into a unified access architecture that enforces fine-grained permissions consistently across analytics and machine learning (ML) workloads. The architecture consists of five layers, each handling a distinct responsibility in the access control flow.

The following diagram illustrates the end-to-end architecture, showing how user identity flows from IAM Identity Center through SageMaker Unified Studio to Lake Formation for tag-based policy evaluation against the AWS Glue Data Catalog and Amazon S3 storage layer.
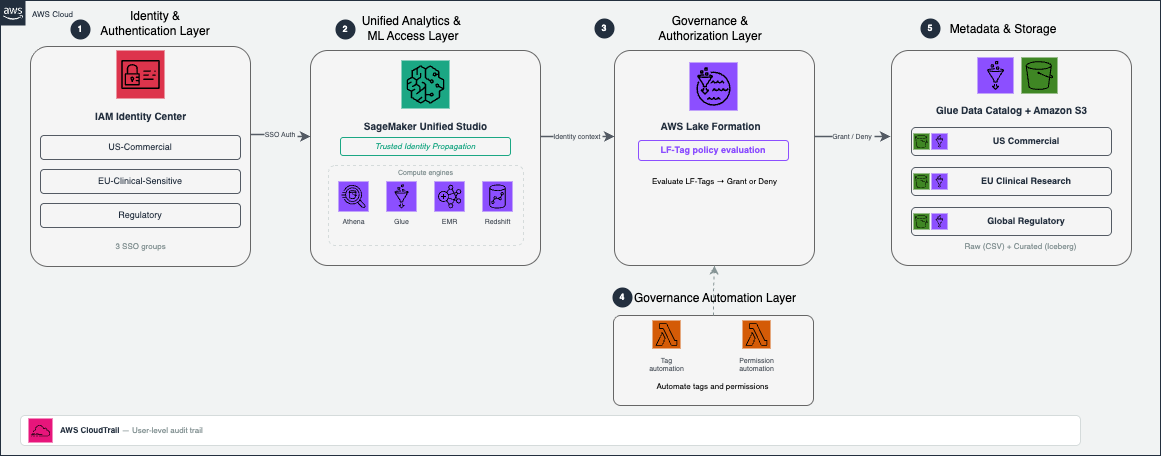
Architecture linking IAM Identity Center, SageMaker Unified Studio, Lake Formation, the Glue Data Catalog, and Amazon S3

Figure 1: End-to-end governance architecture for the enterprise lakehouse

1. Identity and authentication layer: IAM Identity Center manages user identities and group memberships, integrates with corporate identity providers, and provides centralized lifecycle management for enterprise users. IAM Identity Center groups represent business roles and serve as the principals that receive Lake Formation permissions.

2. Unified analytics and ML access layer: Amazon SageMaker Unified Studio serves as the primary interface where analysts, data scientists, and ML engineers discover datasets, run queries, and build ML workflows. Because SageMaker Unified Studio integrates with multiple compute engines, including Amazon Athena, AWS Glue, Amazon EMR, and Amazon Redshift, users can access data using their preferred analytics tools while maintaining consistent governance.

3. Governance and authorization layer: AWS Lake Formation provides fine-grained access control across AWS Glue catalog resources using LF-Tags. Instead of granting permissions directly on databases and tables, Lake Formation evaluates LF-Tag policies dynamically and grants or denies access at query time. Governance teams define access rules once, and Lake Formation automatically applies them to new datasets as they are onboarded.

4. Governance automation layer: Two AWS Lambda functions automate tag assignment and permission provisioning. JSON metadata configuration files drive both pipelines, so governance teams manage access control through configuration rather than manual console operations.

5. Metadata and storage layer: Apache Iceberg tables stored in Amazon S3 form the foundation of the lakehouse. You register these tables in the AWS Glue Data Catalog, which provides centralized metadata management and interoperability across analytics services. Lake Formation evaluates governance decisions at the catalog level rather than independently by each analytics engine.

End-to-end access flow

When a user queries a dataset from SageMaker Unified Studio, the following sequence occurs:

  1. The user authenticates through IAM Identity Center and accesses SageMaker Unified Studio.
  2. SageMaker passes the user’s identity context to downstream analytics services using trusted identity propagation.
  3. The analytics engine requests data access from Lake Formation.
  4. Lake Formation evaluates LF-Tag policies against the user’s IAM Identity Center group membership.
  5. Access is granted or denied dynamically at query time.

Because authorization decisions are centralized in Lake Formation, governance remains consistent regardless of which analytics engine the user employs.

Hybrid RBAC + ABAC governance model

The governance model combines identity context from IAM Identity Center with metadata-driven classification using LF-Tags. The following table summarizes how each layer contributes to the overall governance workflow.

Governance capability IAM Identity Center contribution Lake Formation LF-Tag contribution Governance outcome
Identity context Organizes users into groups aligned with business roles Evaluates permissions using group membership Role-aligned access boundaries
Data classification Provides role eligibility for data access Classifies datasets by domain, region, sensitivity, and layer Attribute-aware authorization
Scalability Simplifies user lifecycle management Automatically applies policies to newly tagged datasets Governance that scales with dataset growth
Operational model Centralizes role lifecycle operations Enables metadata-driven policy automation Reduced administrative overhead

IAM Identity Center defines who can request access, LF-Tags define what datasets are eligible, and Lake Formation enforces policies dynamically at query time.

Enterprise LF-Tag data model

A structured tagging strategy is the foundation of scalable Lake Formation governance. In this solution, the solution classifies datasets across four governance dimensions.

Tag Key Tag Values Purpose Example Usage
region us, eu, global Geographic data location Enforce GDPR compliance for EU data
domain commercial, clinical_research, regulatory Business domain Separate commercial from clinical data
data_class standard, sensitive, regulated Data sensitivity level Restrict access to sensitive pricing data
layer raw, curated, conformed Data processing stage Grant analysts access to curated data only

Together, these dimensions enable multi-dimensional authorization policies that reflect both organizational structure and regulatory requirements.

Tag inheritance and evaluation

LF-Tags can be applied at three resource levels within the Glue Data Catalog: database, table, and column. In this implementation, database-level tags define broad governance attributes (domain, region, layer), table-level tags capture dataset-specific sensitivity (data_class), and column-level tags can further restrict access to individual fields. Lake Formation evaluates the effective tag set at query time by combining inherited and explicitly assigned tags.

For example, a database tagged domain=commercial, region=us, layer=raw automatically applies those tags to all tables within it. A table-level data_class=sensitive tag supplements the inherited tags to distinguish sensitive pricing data from standard sales data. This inheritance model means new tables automatically receive governance coverage without manual tag assignment. To learn more, refer to Lake Formation tag-based access control best practices.

Prerequisites

Before deploying the solution, complete the following setup in the us-east-1 Region. Use the same AWS Region throughout all steps.

  1. AWS account and IAM Identity Center: Enable IAM Identity Center and create test users. Note your Identity Store ID from the IAM Identity Center console under Settings. For setup guidance, see Getting started with IAM Identity Center.
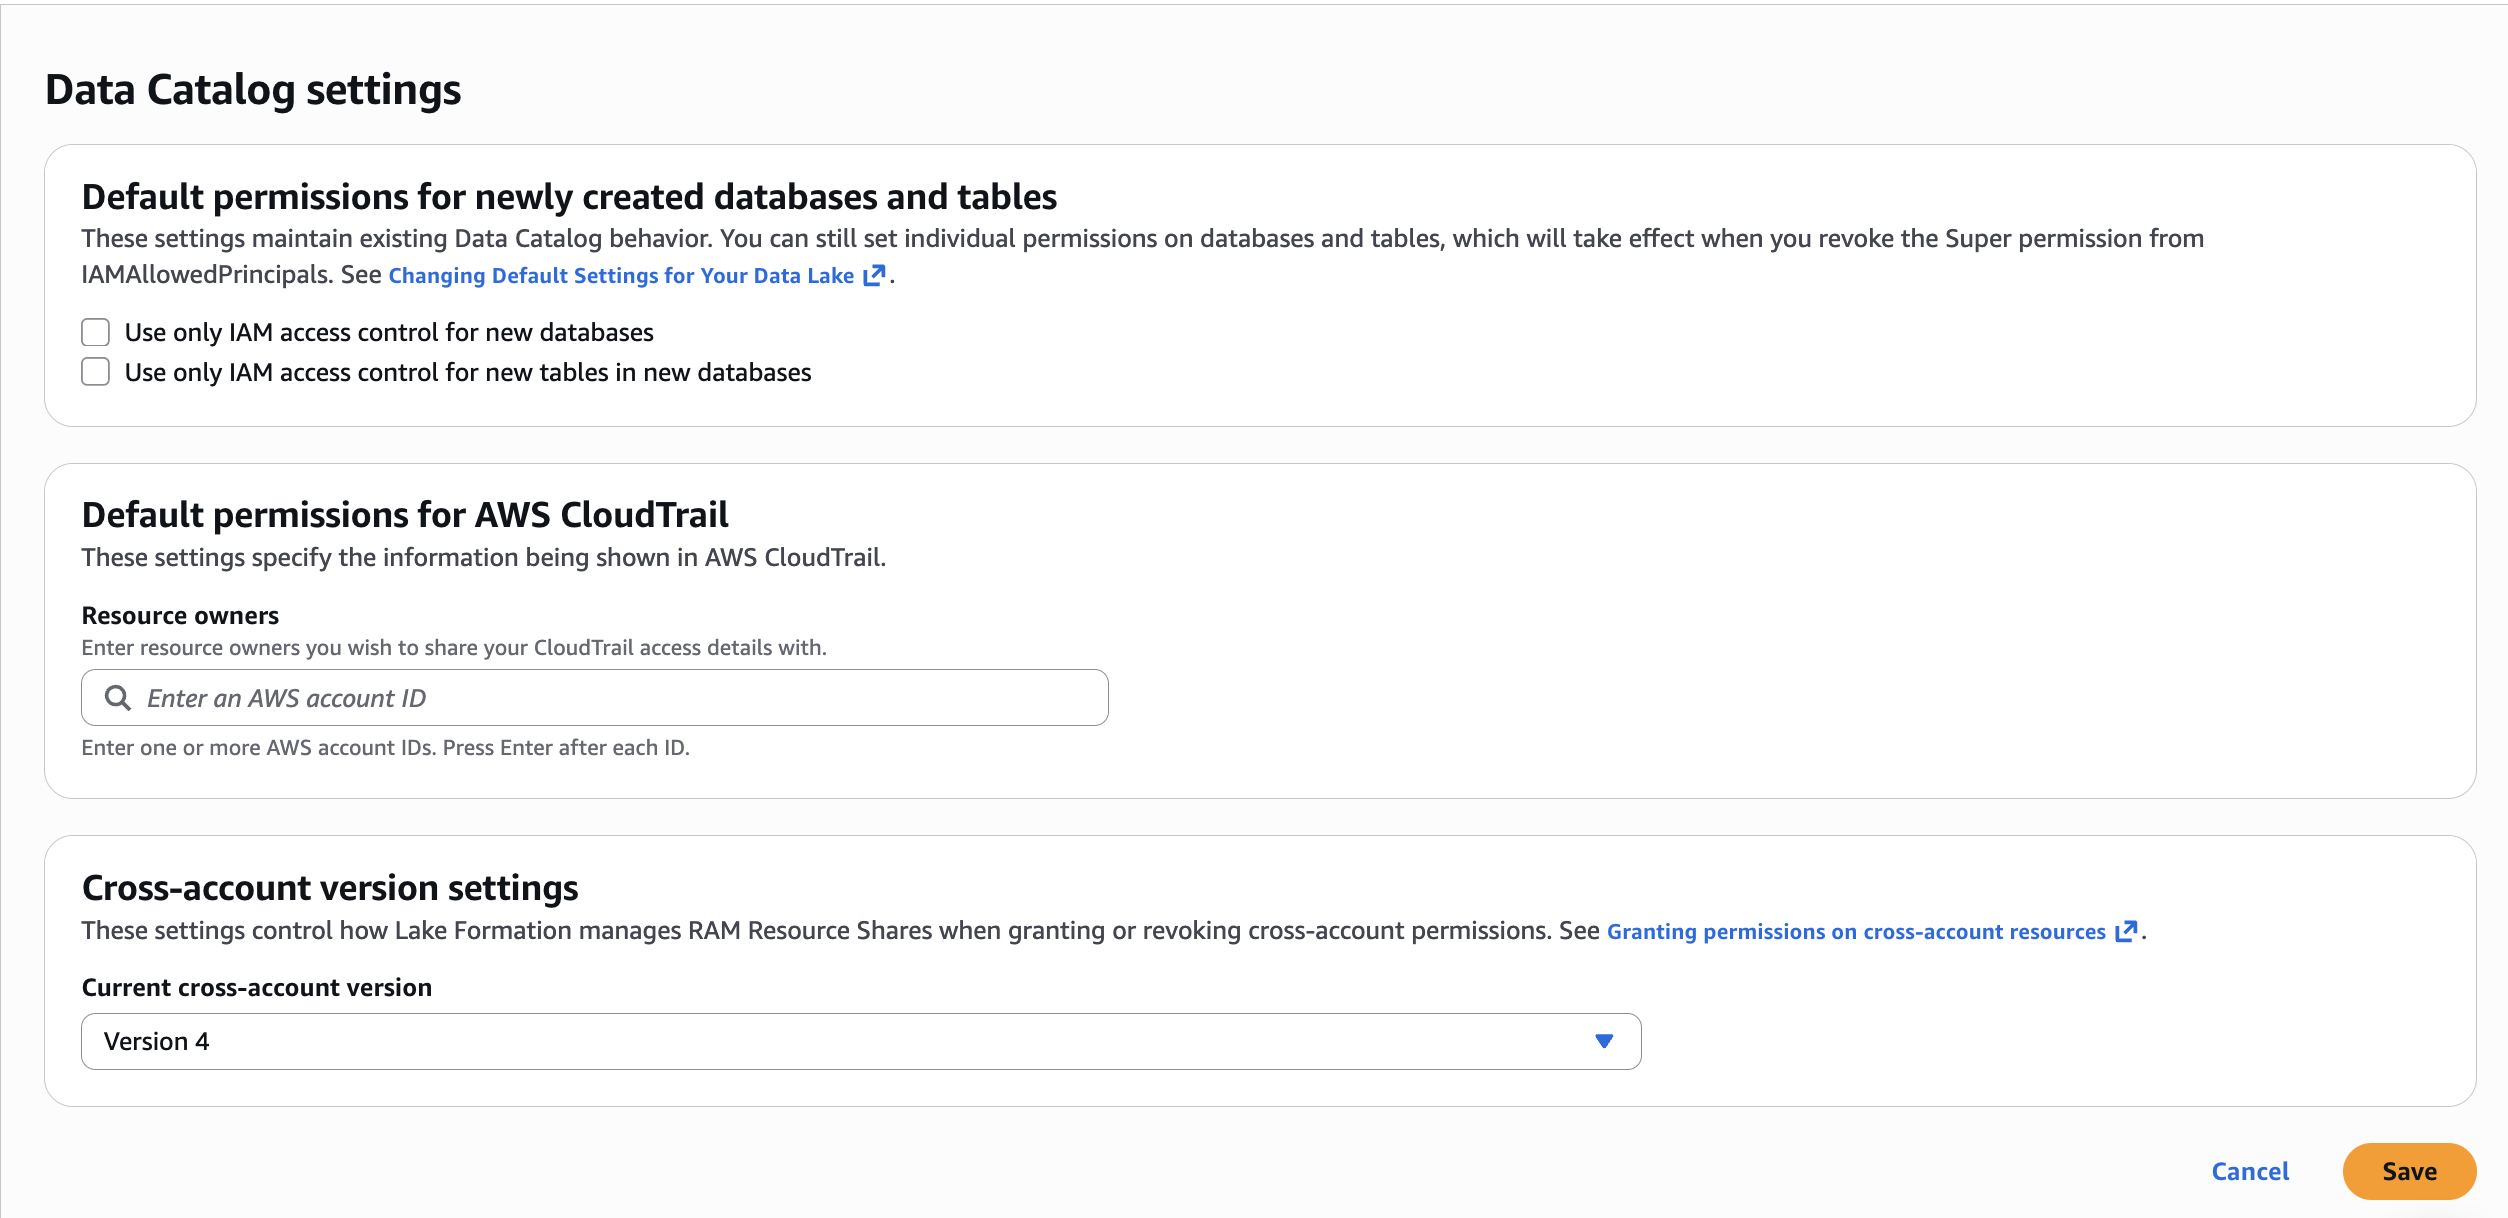
  2. Lake Formation configuration: Complete the following setup in the Lake Formation console:2.1. Change Data Catalog default permissions. In the navigation pane under Administration, choose Data Catalog settings. Uncheck Use only IAM access control for new databases and uncheck Use only IAM access control for new tables in new databases. Choose Save. This makes sure Lake Formation permissions govern access to databases and tables created by the CDK stacks.
    Lake Formation Data Catalog settings with both IAM-only access control checkboxes cleared

    Figure 2: Lake Formation Data Catalog settings with both IAM-only access control checkboxes unchecked

    2.2. Integrate with IAM Identity Center. Complete the prerequisites for IAM Identity Center integration with Lake Formation, including enabling trusted identity propagation.You don’t need to manually create a Lake Formation administrator. The CDK deployment in Step 2: Deploy all stacks automatically registers the required administrators via the LfAdminStack (see lf-admin-stack.ts). S3 data location registration is a post-deployment console step covered after the CDK creates the buckets.

  3. SageMaker Unified Studio: Create a SageMaker Unified Studio domain, select your IAM Identity Center instance for authentication, and enable trusted identity propagation. For a detailed walkthrough, see Accelerate your analytics with Amazon S3 Tables and Amazon SageMaker Lakehouse and enable trusted identity propagation for the domain.
  4. Local tooling: Install AWS Command Line Interface (AWS CLI), Python 3.x, Node.js 18+, AWS CDK CLI (npm install -g aws-cdk), and Git.

Solution overview

Now that you understand the governance model and tag taxonomy, the following section walks you through deploying the complete infrastructure and configuring access control.

The deployment uses AWS CDK (TypeScript) and consists of seven stacks that create the complete governance infrastructure. The CDK app manages stack dependencies automatically, so a single cdk deploy --all command deploys everything in the correct order.

The architecture uses a two-layer data lake pattern. The raw layer stores data as CSV files in Amazon S3, registered as external tables in the AWS Glue Data Catalog. The curated layer uses Apache Iceberg v2 tables for ACID transactions and schema evolution. Three business domains (US Commercial, EU Clinical Research, and Global Regulatory) each have one representative table per layer, giving six tables total.

Lake Formation tag-based access control (TBAC) governs all access using four tag dimensions:

Tag Key Values Purpose
domain commercial, clinical_research, regulatory Business domain isolation
region us, eu Geographic data boundary
data_class standard, sensitive, regulated Sensitivity classification
layer raw, curated Data layer identification

Step 1: Clone the repository and install dependencies

Clone the accompanying repository and install the CDK project dependencies:

git clone https://github.com/aws-samples/sample-aws-smus-governance-automation
cd aws-smus-governance-automation/cdk
npm install

The CDK project is written in TypeScript and uses aws-cdk-lib v2. The lib/ directory contains seven stack definitions, and bin/app.ts wires them together with explicit dependency ordering.

If this is your first CDK deployment in this account and Region, bootstrap the CDK environment. Bootstrapping provisions an S3 bucket and IAM roles that CDK uses to deploy assets:

cdk bootstrap aws://<ACCOUNT_ID>/us-east-1

Step 2: Deploy all stacks

Deploy the entire infrastructure with a single command. Pass your IAM Identity Center Identity Store ID as a CDK context variable:

cdk deploy --all -c identityStoreId=d-xxxxxxxxxx --require-approval never --region us-east-1

CDK will prompt for IAM permission changes on each stack. The --require-approval never flag auto-approves these so the deployment runs unattended.

CDK deploys the seven stacks in dependency order:

  1. LfSetupStack: Lake Formation admin registration + LF-Tags (domain, region, data_class, layer)
  2. GlueRawTablesStack: S3 bucket + three Glue databases + three CSV-backed tables.
  3. GlueCuratedTablesStack: S3 bucket + three Glue databases + three Iceberg v2 tables.
  4. SsoGroupsStack: three IAM Identity Center groups (DataLake-US-Commercial, DataLake-EU-Clinical-Research-Sensitive, DataLake-Regulatory)The three groups map to specific tag combinations that control data access:
    • DataLake-US-Commercial: domain=commercial, region=us, data_class=standard.
    • DataLake-EU-Clinical-Research-Sensitive: domain=clinical_research, region=eu, data_class=sensitive,regulated.
    • DataLake-Regulatory: domain=regulatory (all regions, all data classes within regulatory).

    The following table summarizes the user personas, their group assignments, and the data access each group provides:

  5. AssetTaggingAutomationStack: Tag automation Lambda.
  6. SsoPermissionAutomationStack: Permission automation Lambda.
  7. LfAdminStack: Registers CDK + Lambda roles as Lake Formation admins.

After deployment completes, review the CloudFormation stack outputs. They include S3 bucket names, database names, SSO group IDs, and Lambda function ARNs.

The following figure shows all seven CDK stacks deployed successfully in the CloudFormation console.
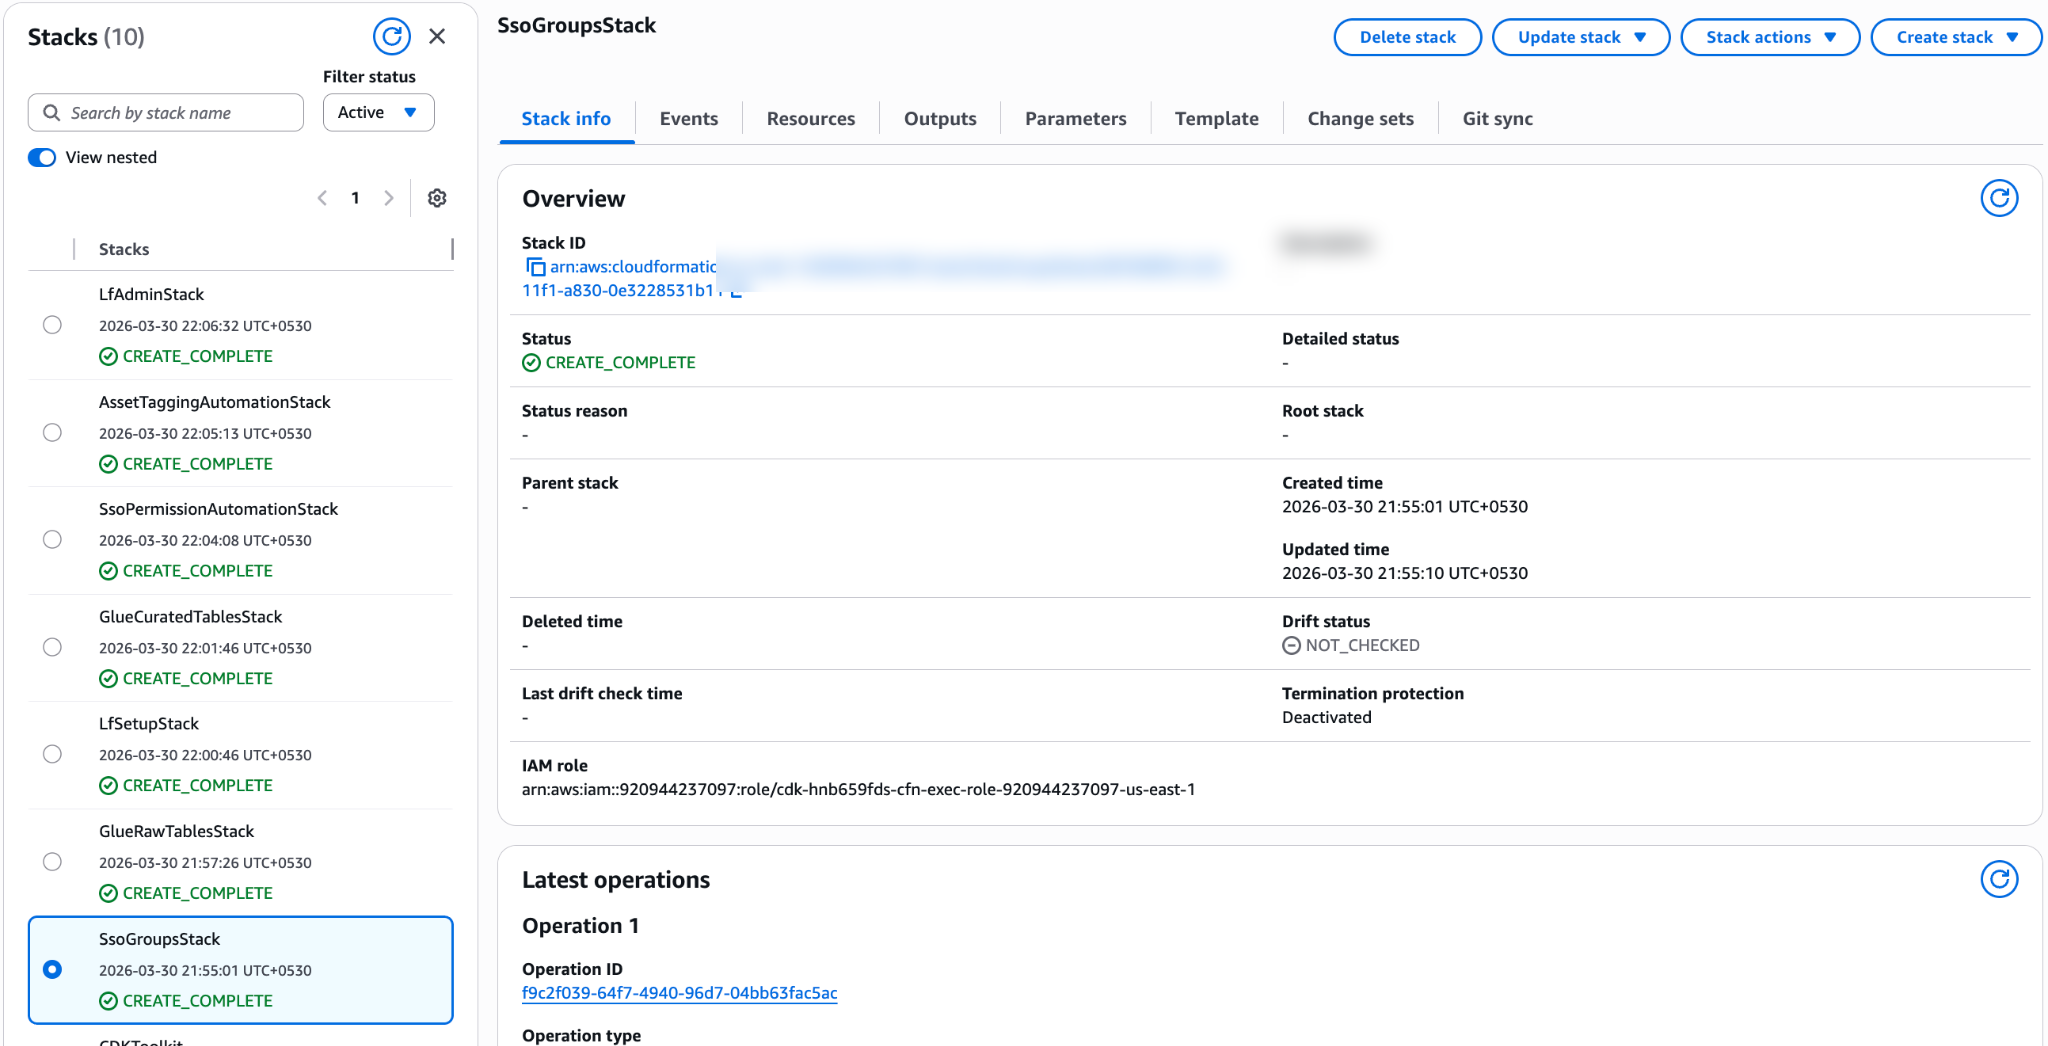
CloudFormation console showing all seven CDK stacks in CREATE_COMPLETE status

Figure 3: CloudFormation console showing all seven CDK stacks in CREATE_COMPLETE status

Register S3 data locations with Lake Formation: Now that the S3 buckets exist, register them with Lake Formation. In the Lake Formation console, under Administration, choose Data lake locations, then choose Register location. Register both buckets from the stack outputs (for example, s3://datalake-raw-data-<ACCOUNT_ID>-us-east-1 and s3://datalake-curated-data-<ACCOUNT_ID>-us-east-1). For IAM role, use the default AWSServiceRoleForLakeFormationDataAccess and choose Lake Formation as the permission mode. See Registering an Amazon S3 location for step-by-step instructions.

The following figure shows both data lake S3 locations registered in the Lake Formation console.

Lake Formation Data lake locations page listing the registered raw and curated S3 buckets

Figure 4: Lake Formation Data lake locations page with raw and curated S3 buckets registered

Step 3: Populate sample datasets

The scripts use Amazon Athena to insert sample data. Athena stores query results under the athena-results/ prefix in the shared governance metadata bucket (lf-governance-metadata-<ACCOUNT_ID>-<REGION>) created by the CDK deployment.

Populate the raw and curated tables:

cd ../scripts
python3 populate_raw_layer.py
python3 populate_curated_layer.py

Each script executes INSERT INTO statements through the Athena StartQueryExecution API and waits for completion. You should see success messages for all six tables (three raw, three curated).

After populating the tables, you can verify the data in the Glue Data Catalog. The following figure shows the six tables across the three raw and three curated databases.
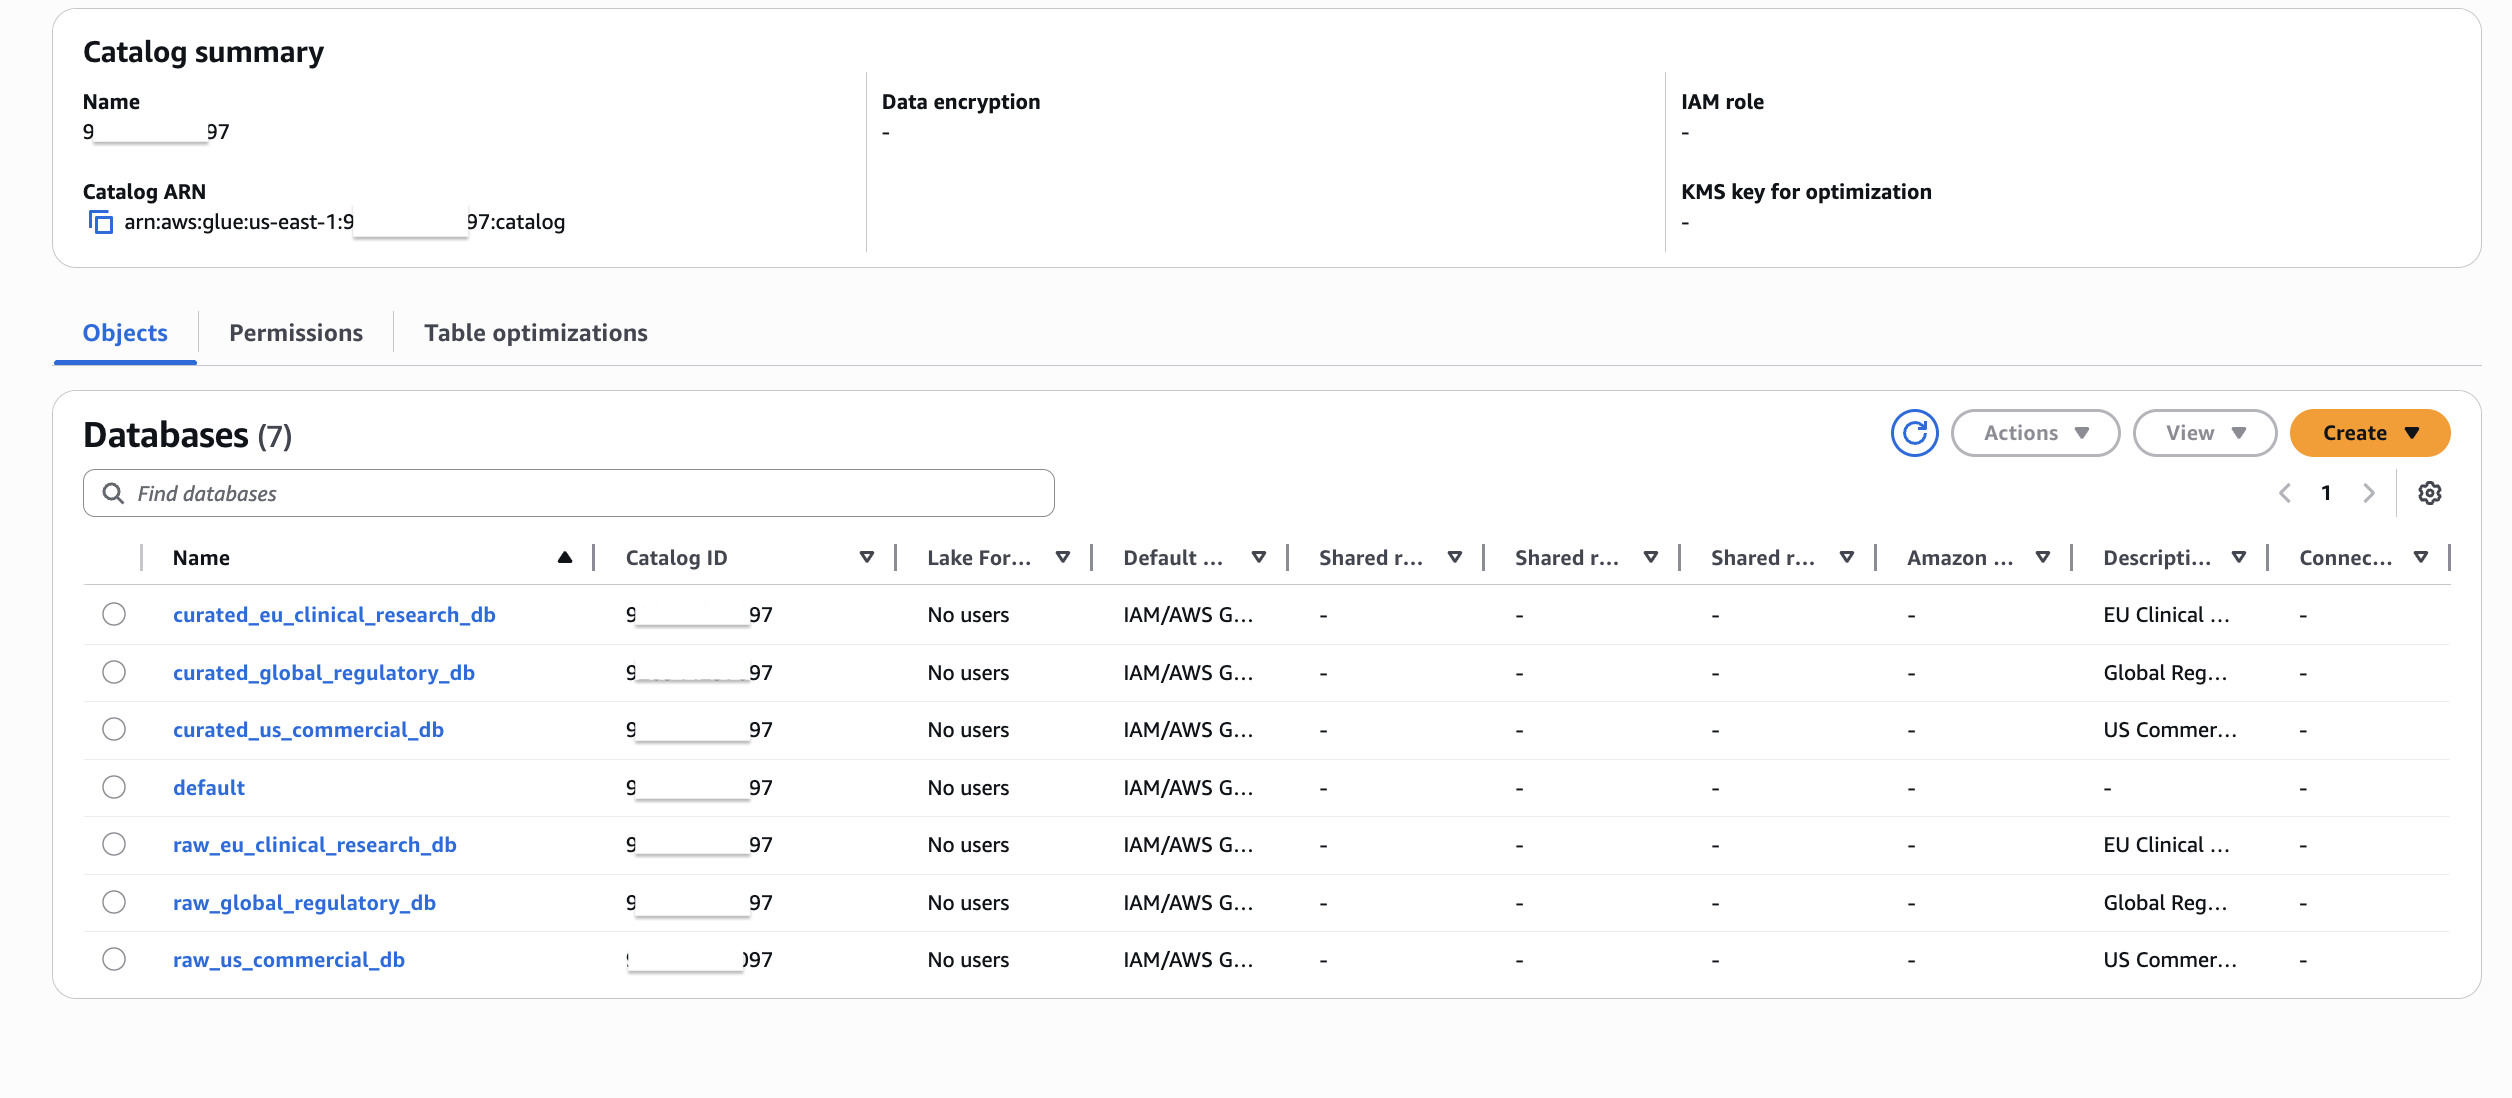
AWS Glue Data Catalog showing the six databases and tables created by the deployment

Figure 5: AWS Glue Data Catalog showing the six databases and tables created by the CDK deployment

You can also preview the data by querying a table. The following figure shows sample data from the us_sales_summary table.
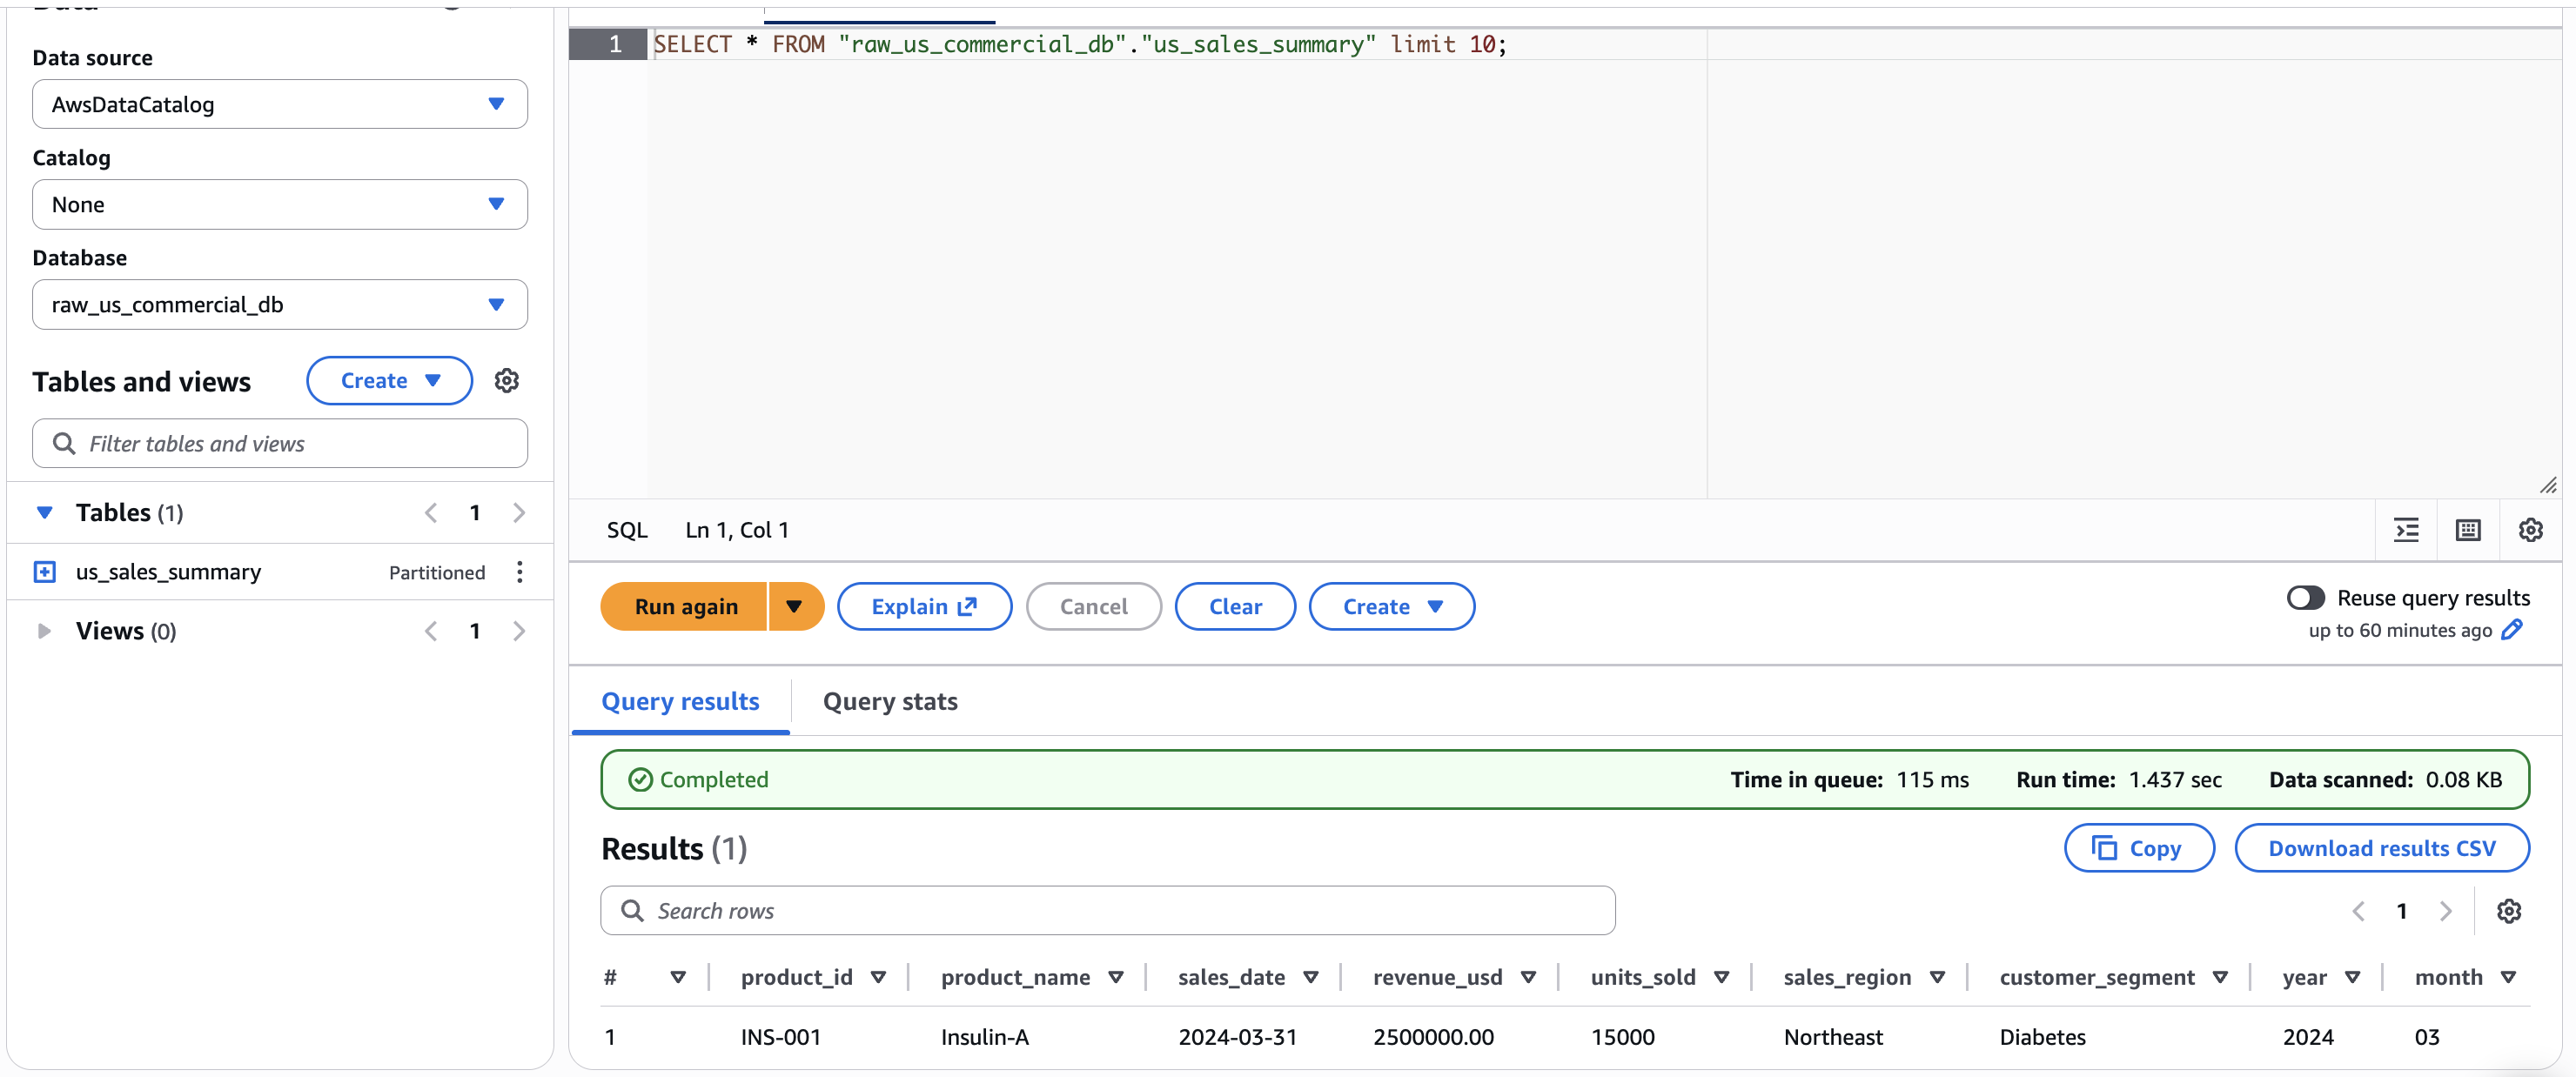
Athena query results showing sample commercial rows from the us_sales_summary table

Figure 6: Query results for the us_sales_summary table with sample commercial data

Step 4: Apply LF-Tags to data assets

The following diagram illustrates the governance automation flow, showing how metadata JSON configuration files drive the two Lambda pipelines for asset tagging and SSO permission management.
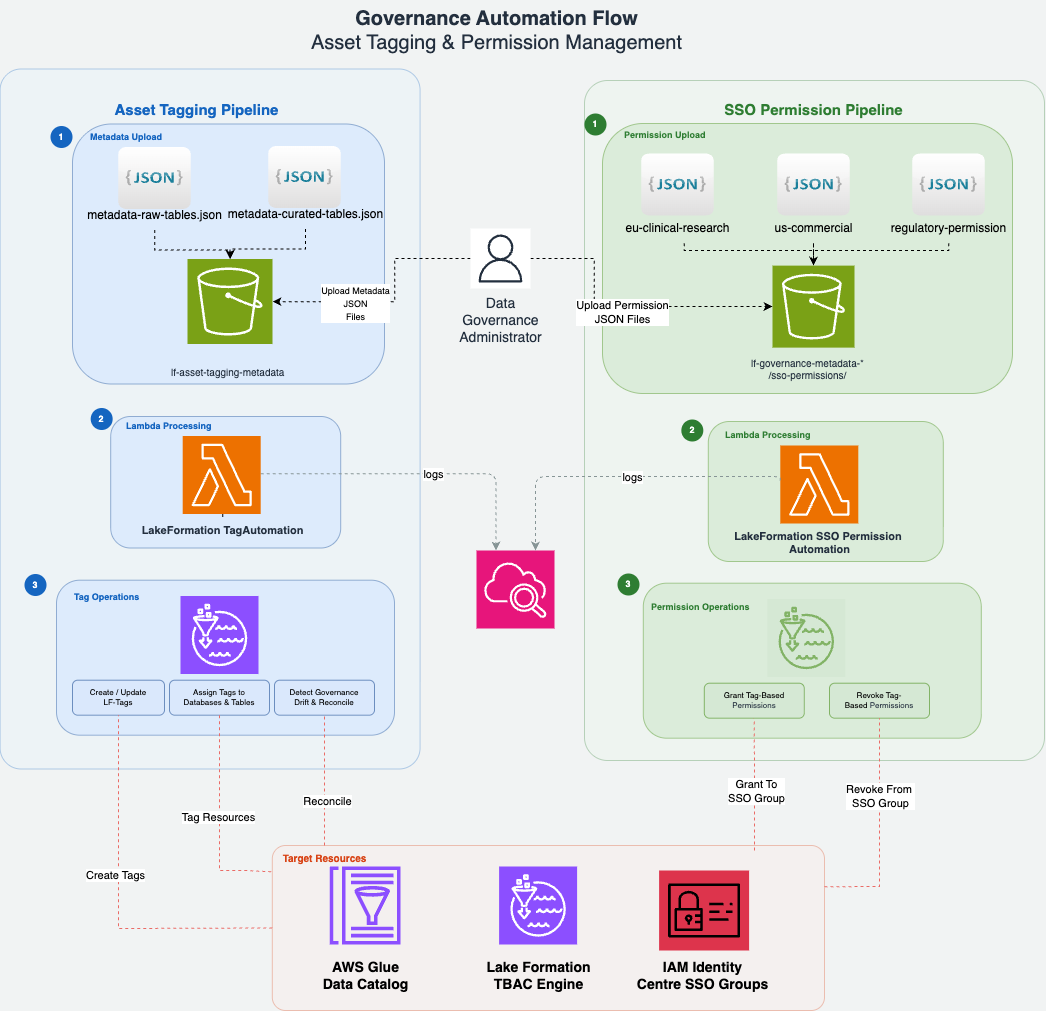
Governance automation flow with the asset tagging and SSO permission Lambda pipelines

Figure 7: Governance automation flow showing the asset tagging and SSO permission Lambda pipelines

The diagram shows two parallel pipelines, each following three steps:

Asset tagging pipeline (left):

  1. Metadata upload – A data governance administrator uploads metadata JSON files (metadata-raw-tables.json and metadata-curated-tables.json) to the asset-tagging/ prefix in the shared S3 governance metadata bucket. These files define which LF-Tags to assign to each AWS Glue database and table.
  2. Lambda processing – The S3 upload triggers the LakeFormationTagAutomation Lambda function, which reads the metadata and calls the Lake Formation API.
  3. Tag operations – The Lambda creates or updates LF-Tags, then assigns them to the target databases and tables in the AWS Glue Data Catalog.

SSO permission pipeline (right):

  1. Permission upload – Three permission JSON files (one per IAM Identity Center group) are uploaded to the sso-permissions/ prefix. These files define the LF-Tag policy expressions that control data access.
  2. Lambda processing – The upload triggers the LakeFormationSSOPermissionAutomation Lambda function.
  3. Permission operations – The Lambda grants tag-based permissions to the corresponding IAM Identity Center groups through the Lake Formation API.

Both pipelines log execution details to Amazon CloudWatch for monitoring and troubleshooting.

Two metadata JSON configuration files drive the asset tagging Lambda that declaratively define which LF-Tags to apply to each AWS Glue resource:

  • metadata-raw-tables.json: Tag definitions for the three raw layer databases and tables.
  • metadata-curated-tables.json: Tag definitions for the three curated layer databases and tables.

Each entry in these files specifies the following fields:

Field Description Example
catalog_id Your AWS account ID (Glue Data Catalog ID) 123456789012
resource_type DATABASE or TABLE DATABASE
database_name AWS Glue database name raw_us_commercial_db
table_name AWS Glue table name (only for TABLE entries) us_sales_summary
lf_tags Array of LF-Tag key/value pairs to assign [{“TagKey”:“domain”,“TagValues”:[“commercial”]}]
access_type Action to perform (GRANT) GRANT

Parameters you must update before invoking: Replace the catalog_id value in every entry of both files with your own AWS account ID. The database and table names match the resources created by the CDK stacks, so those should not be changed unless you customized the stack parameters.

The following snippet from metadata-raw-tables.json shows a database-level entry and a table-level entry:

[
  {
    "comment": "DATABASE LEVEL TAGS - US Commercial RAW Domain",
    "access_type": "GRANT",
    "resource_type": "DATABASE",
    "catalog_id": "<YOUR_ACCOUNT_ID>",
    "database_name": "raw_us_commercial_db",
    "lf_tags": [
      { "TagKey": "region", "TagValues": ["us"] },
      { "TagKey": "domain", "TagValues": ["commercial"] },
      { "TagKey": "layer", "TagValues": ["raw"] }
    ]
  },
  {
    "comment": "TABLE LEVEL TAGS - US Commercial RAW Table (Standard Access)",
    "access_type": "GRANT",
    "resource_type": "TABLE",
    "catalog_id": "<YOUR_ACCOUNT_ID>",
    "database_name": "raw_us_commercial_db",
    "table_name": "us_sales_summary",
    "lf_tags": [
      { "TagKey": "data_class", "TagValues": ["standard"] }
    ]
  }
]

The Lambda applies tags at two levels: database-level entries assign domain, region, and layer tags, while table-level entries assign the data_class tag (standard, sensitive, or regulated). Because of two-level tagging, new tables added to a tagged database automatically inherit the database-level tags. Only the table-specific data_class tag needs explicit assignment. To learn more about this pattern, refer to Lake Formation tag-based access control best practices.

Invoke the Lambda for both layers:

cd ../lf-asset-tagging-automation
aws lambda invoke \
    --function-name LakeFormationTagAutomation \
    --payload fileb://metadata-raw-tables.json \
    --cli-binary-format raw-in-base64-out \
    response.json

aws lambda invoke \
    --function-name LakeFormationTagAutomation \
    --payload fileb://metadata-curated-tables.json \
    --cli-binary-format raw-in-base64-out \
    response.json

Verify tag assignment using the GetResourceLFTags API:

aws lakeformation get-resource-lf-tags \
    --resource '{"Table":{"DatabaseName":"raw_us_commercial_db","Name":"us_sales_summary"}}' \
    --region us-east-1

You should see domain=commercial, region=us, layer=raw, and data_class=standard in the response.

The following figure shows the LF-Tags assigned to the us_sales_summary table in the Lake Formation console, confirming that both database-level inherited tags and table-level tags are applied correctly.
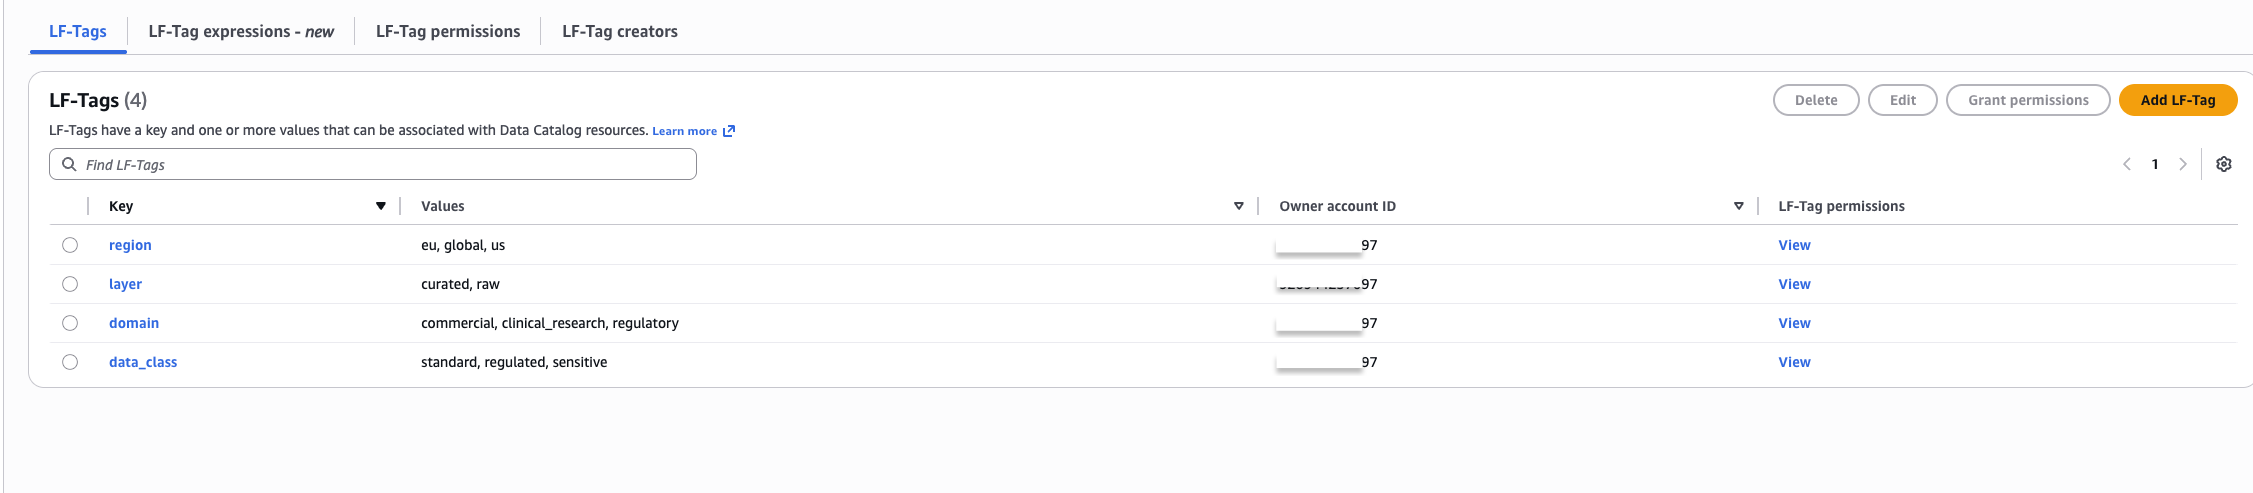
Lake Formation console showing inherited and table-level LF-Tags on the us_sales_summary table

Figure 8: LF-Tags on the us_sales_summary table showing inherited and table-level tags

Step 5: Provision SSO group permissions

Three permission JSON files (one per IAM Identity Center group) define the LF-Tag policy expressions. Update sso_group with the group UUID from the SsoGroupsStack outputs and identity_center_account_id with your AWS account ID. For detailed configuration, see the repository README.

[
  {
    "sso_name": "DataLake-US-Commercial",
    "sso_group": "<GROUP_UUID_FROM_CDK_OUTPUT>",
    "identity_center_account_id": "<YOUR_ACCOUNT_ID>",
    "resources": [
      {
        "resource_type": "DATABASE",
        "permissions": ["DESCRIBE"],
        "lf_tag_expression": [
          { "TagKey": "domain", "TagValues": ["commercial"] },
          { "TagKey": "region", "TagValues": ["us"] },
          { "TagKey": "layer", "TagValues": ["curated", "raw"] }
        ]
      },
      {
        "resource_type": "TABLE",
        "permissions": ["SELECT", "DESCRIBE"],
        "lf_tag_expression": [
          { "TagKey": "domain", "TagValues": ["commercial"] },
          { "TagKey": "region", "TagValues": ["us"] },
          { "TagKey": "data_class", "TagValues": ["standard"] },
          { "TagKey": "layer", "TagValues": ["curated", "raw"] }
        ]
      }
    ]
  }
]

Apply permissions for each group:

cd ../lf-sso-permission-automation
python3 lambda_function.py us-commercial-permissions.json
python3 lambda_function.py eu-clinical-research-sensitive-permissions.json
python3 lambda_function.py regulatory-permissions.json
aws lakeformation list-permissions \
    --principal '{"DataLakePrincipalIdentifier":"arn:aws:identitystore:::group/<GROUP_ID>"}' \
    --region us-east-1

Step 6: Validate fine-grained access control

With all permissions in place, validate that Lake Formation TBAC enforces the correct access boundaries by signing in to SageMaker Unified Studio as different IAM Identity Center users.

Test as Sarah (US Commercial Analyst) — Sarah belongs to DataLake-US-Commercial, which grants access to standard commercial data only.

SELECT * FROM raw_us_commercial_db.us_sales_summary LIMIT 10;

Sarah sees all rows and columns successfully:
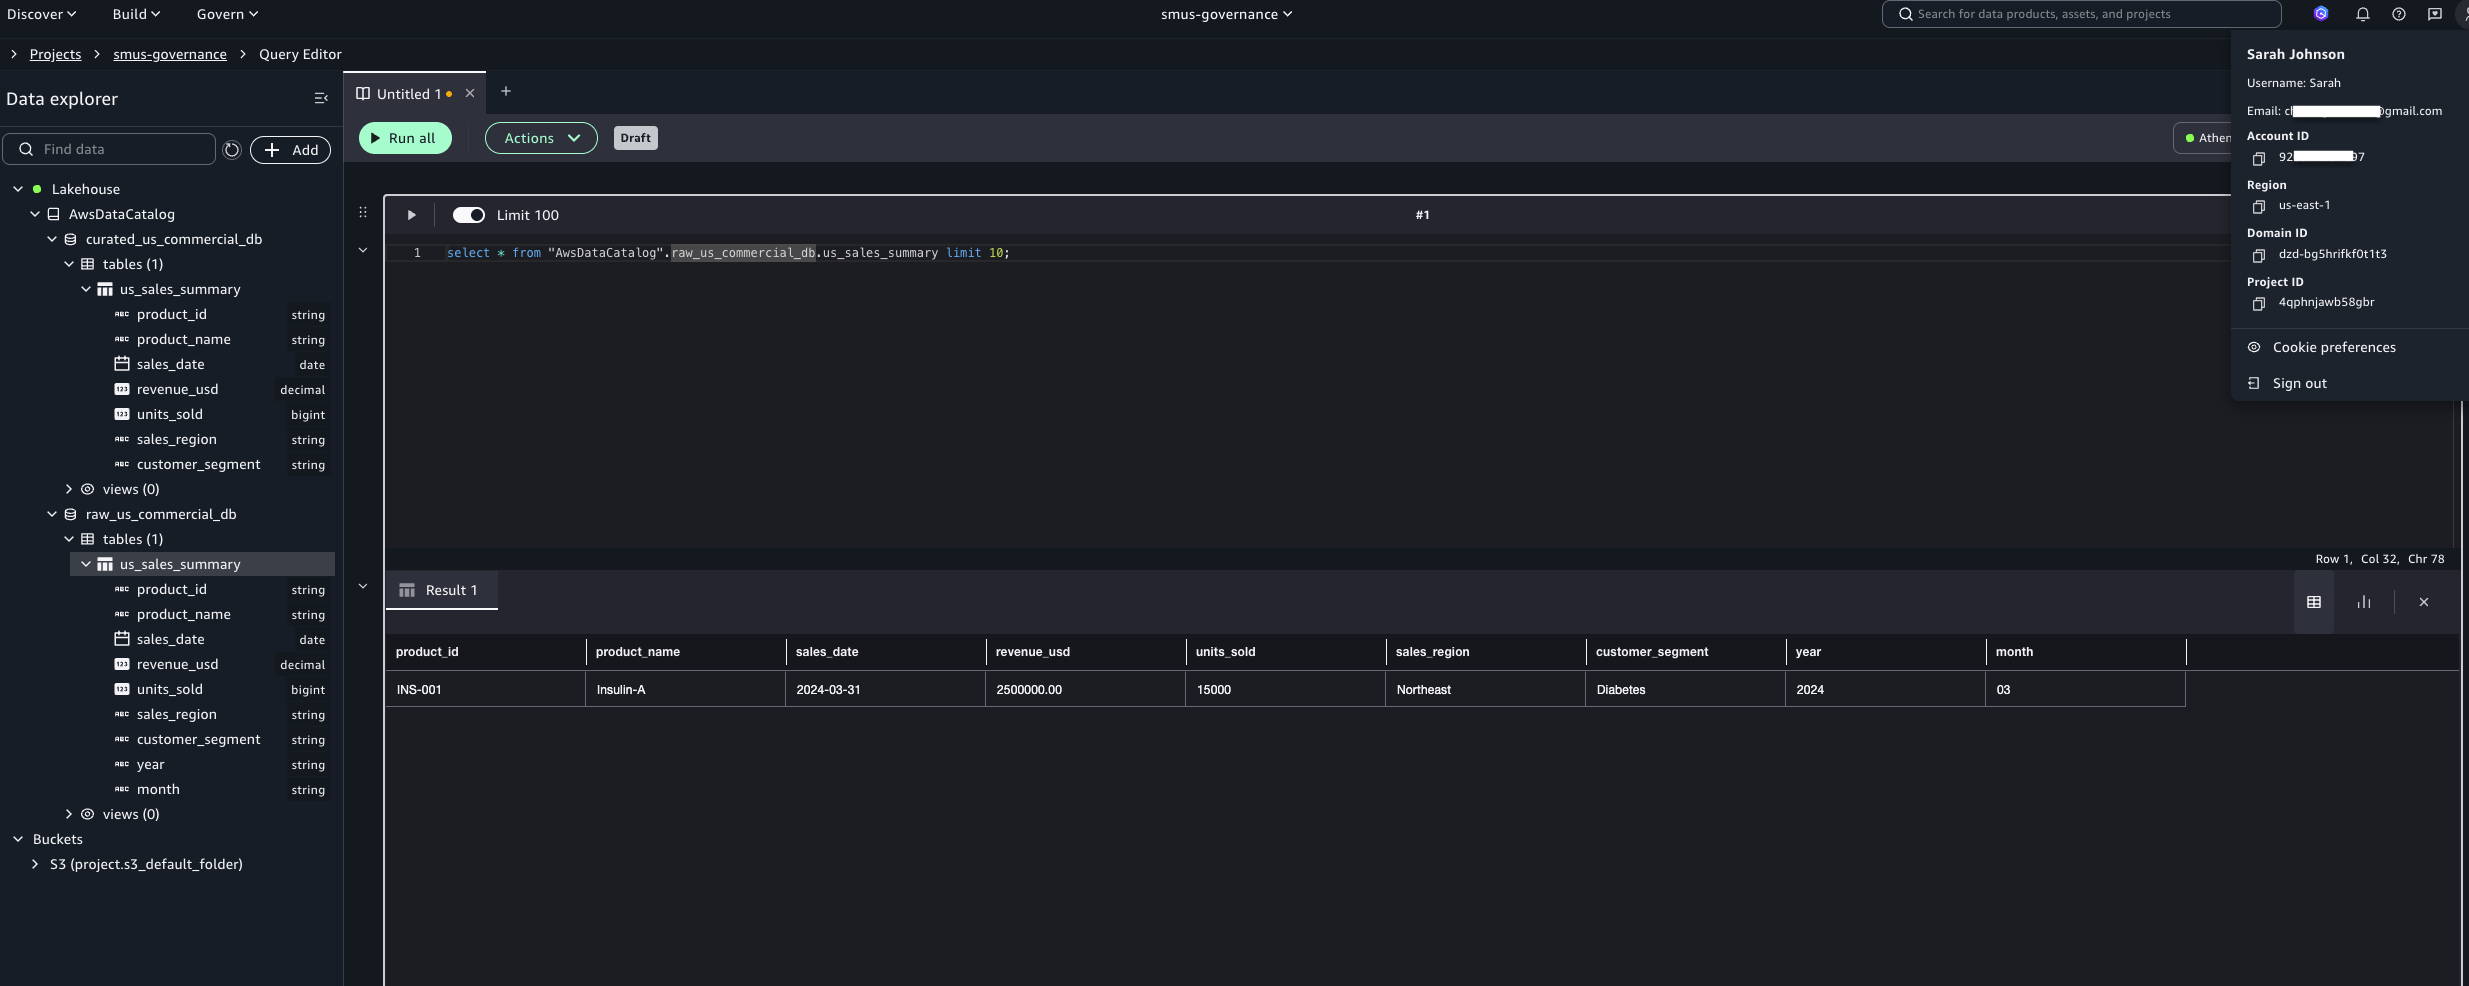
SageMaker Unified Studio results: Sarah’s successful query on us_sales_summary

Figure 9: Sarah’s successful query on us_sales_summary in SageMaker Unified Studio

Querying outside her authorized domain returns an access denied error:
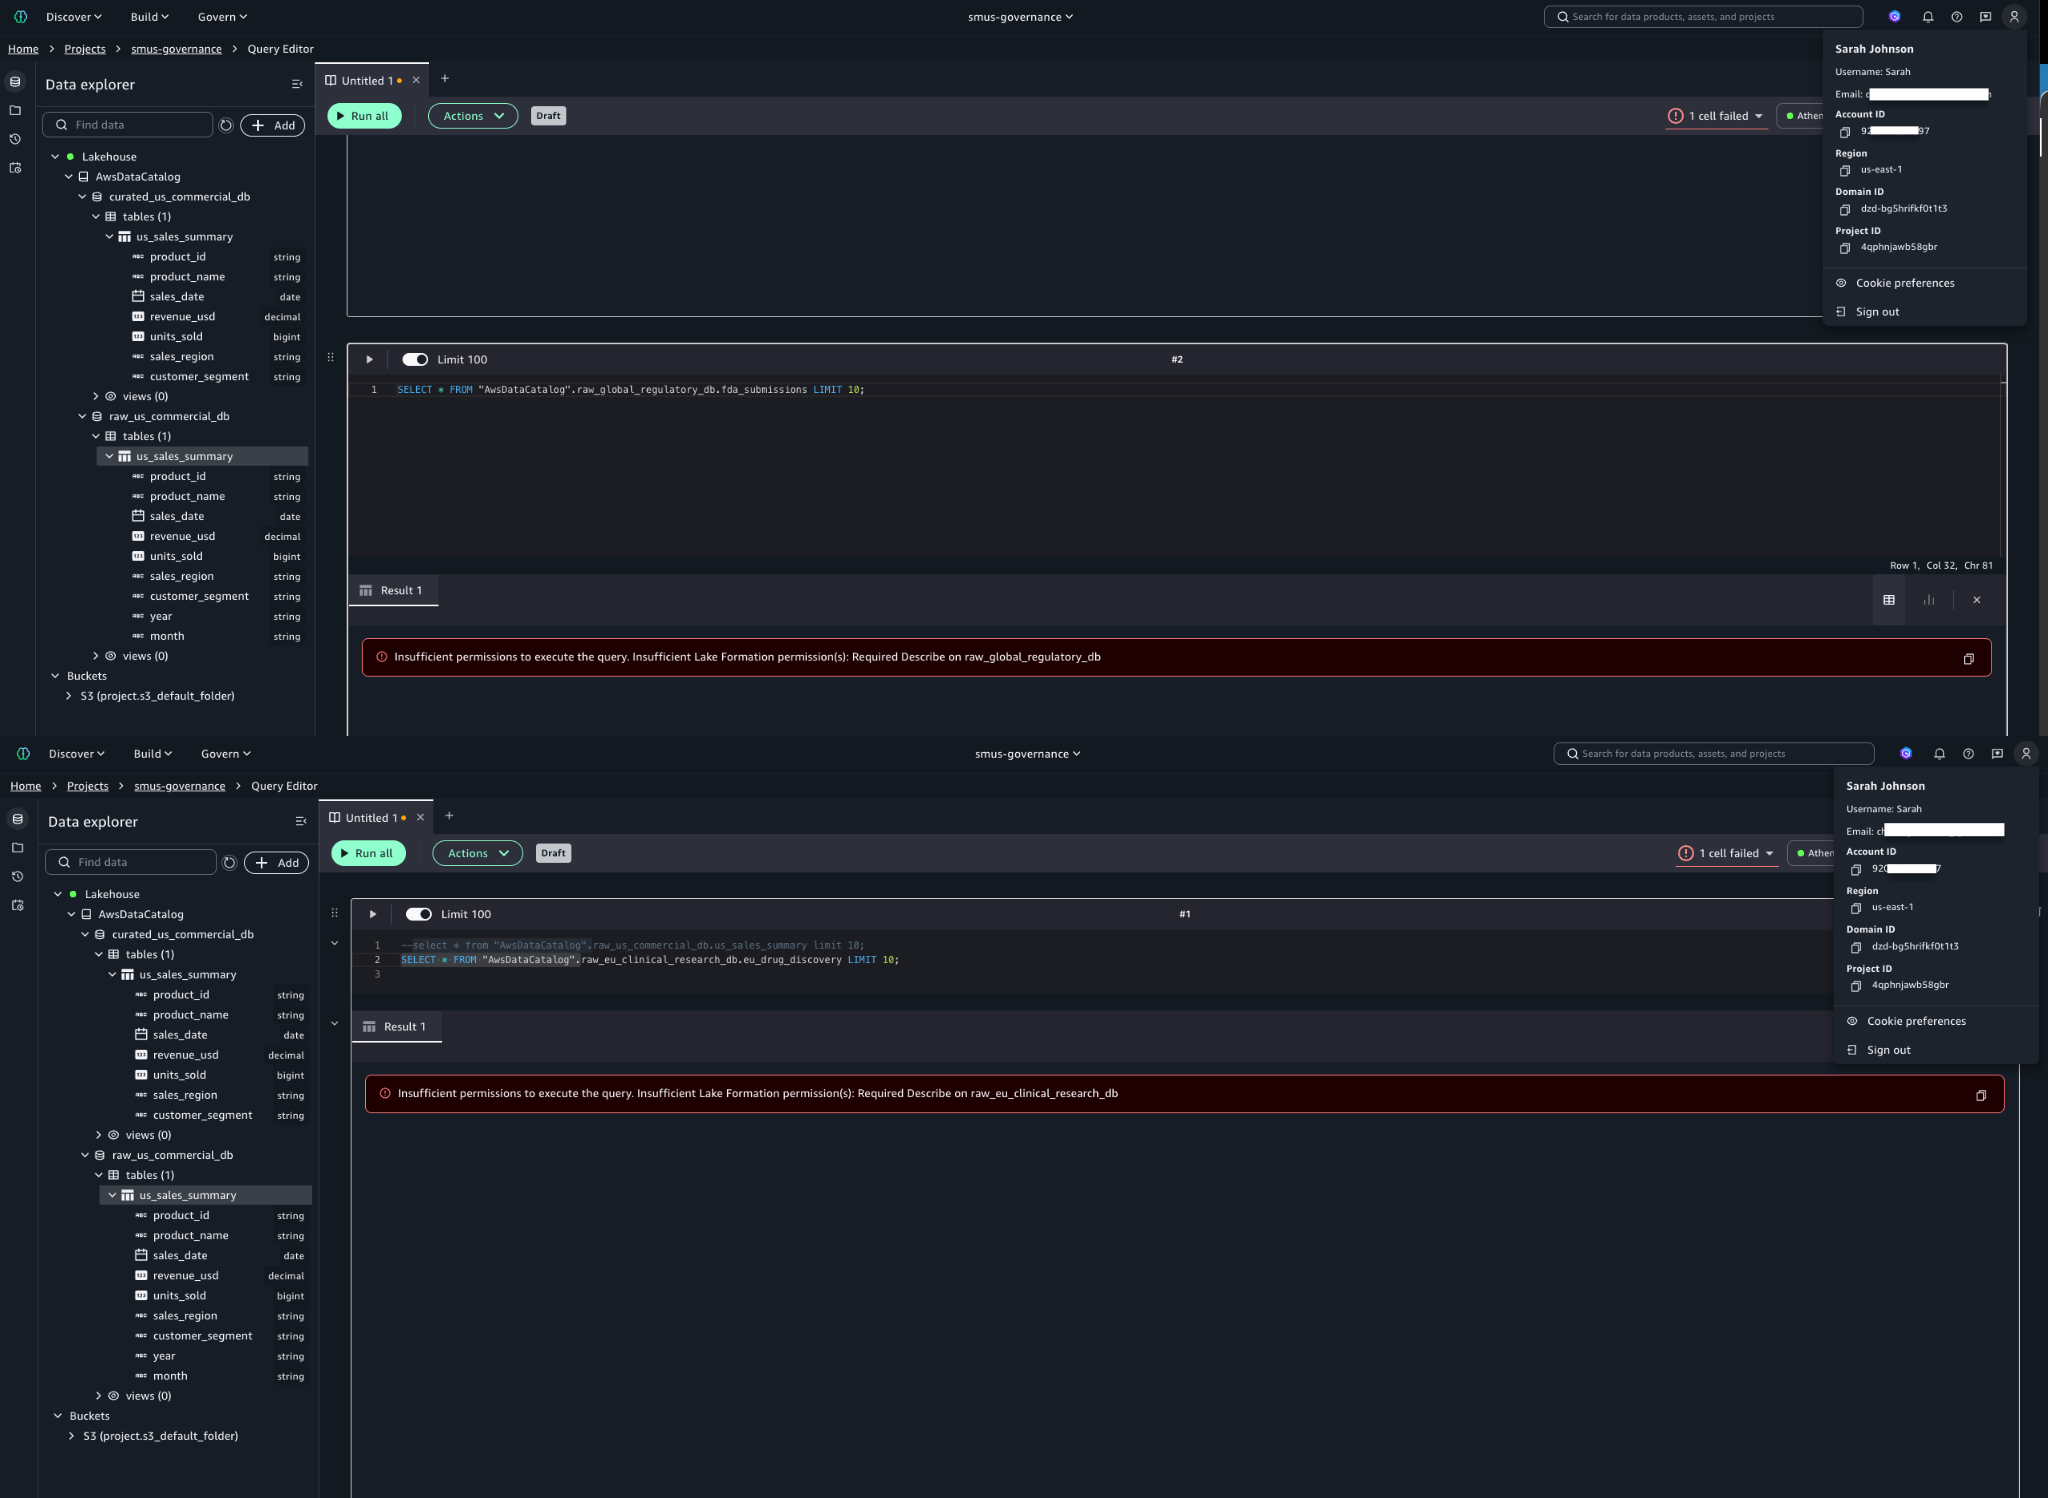
SELECT * FROM raw_eu_clinical_research_db.eu_drug_discovery LIMIT 10;
Access denied error when Sarah queries eu_drug_discovery outside her domain

Figure 10: Access denied when Sarah queries eu_drug_discovery, confirming TBAC enforcement

Test as Dr. Chen (EU Clinical Research Lead) — Dr. Chen can access sensitive and regulated EU clinical research data (eu_drug_discovery) but is denied access to US commercial data (us_sales_summary), confirming regional and domain isolation.
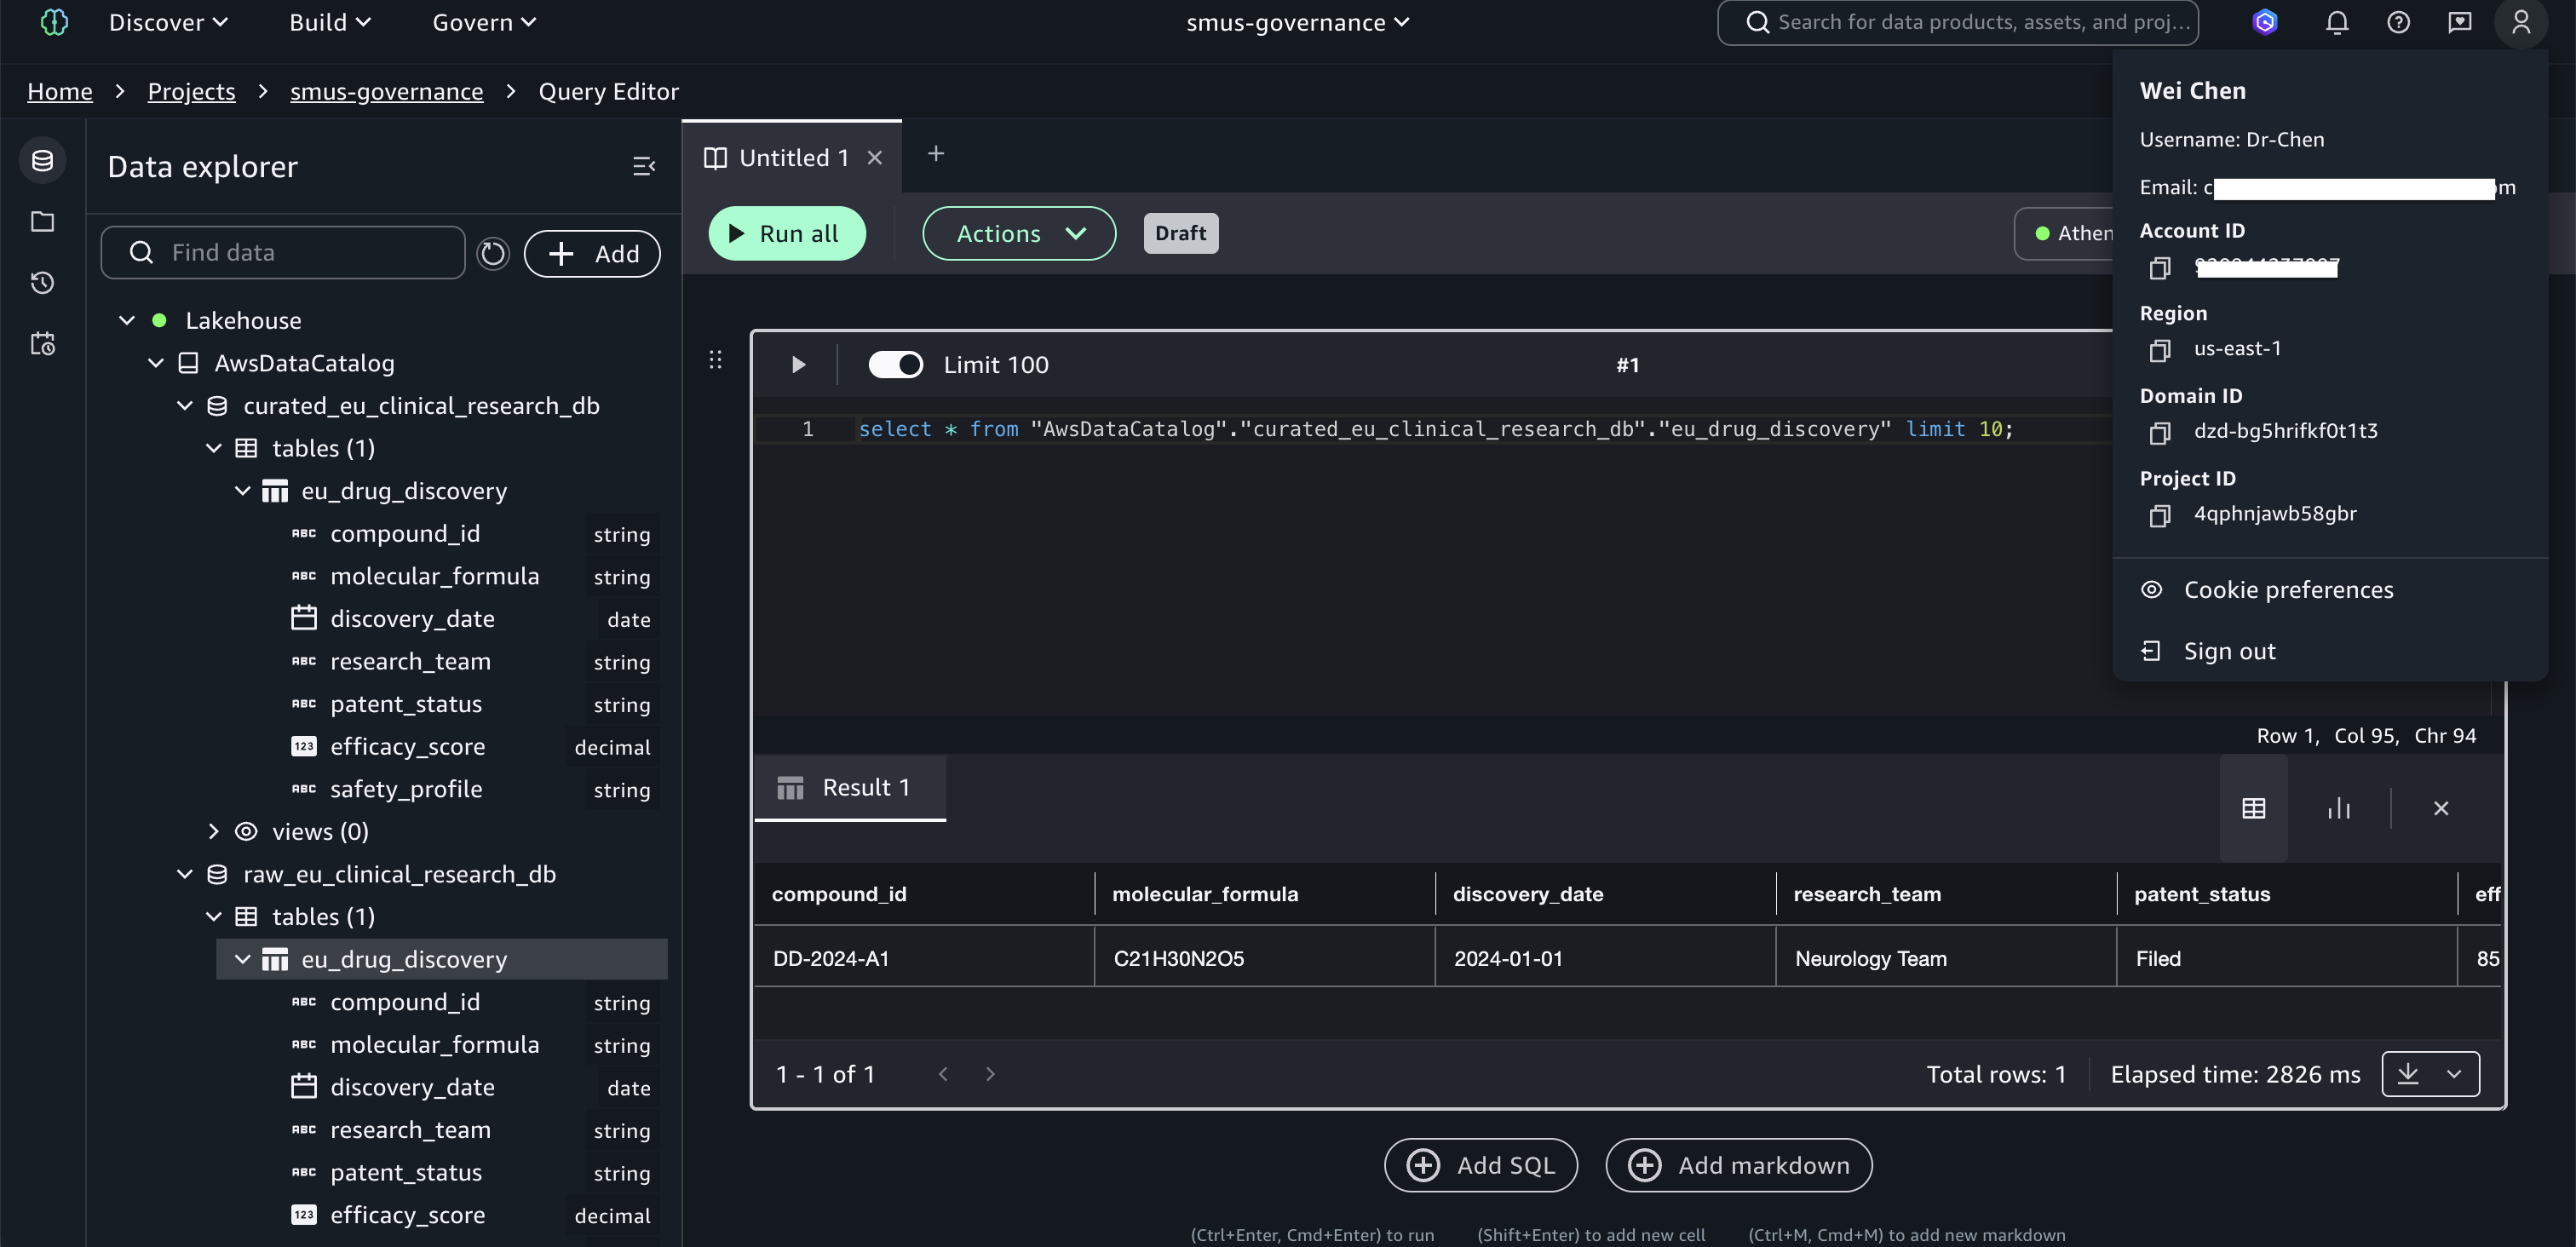
Query results showing Dr. Chen’s successful query on eu_drug_discovery
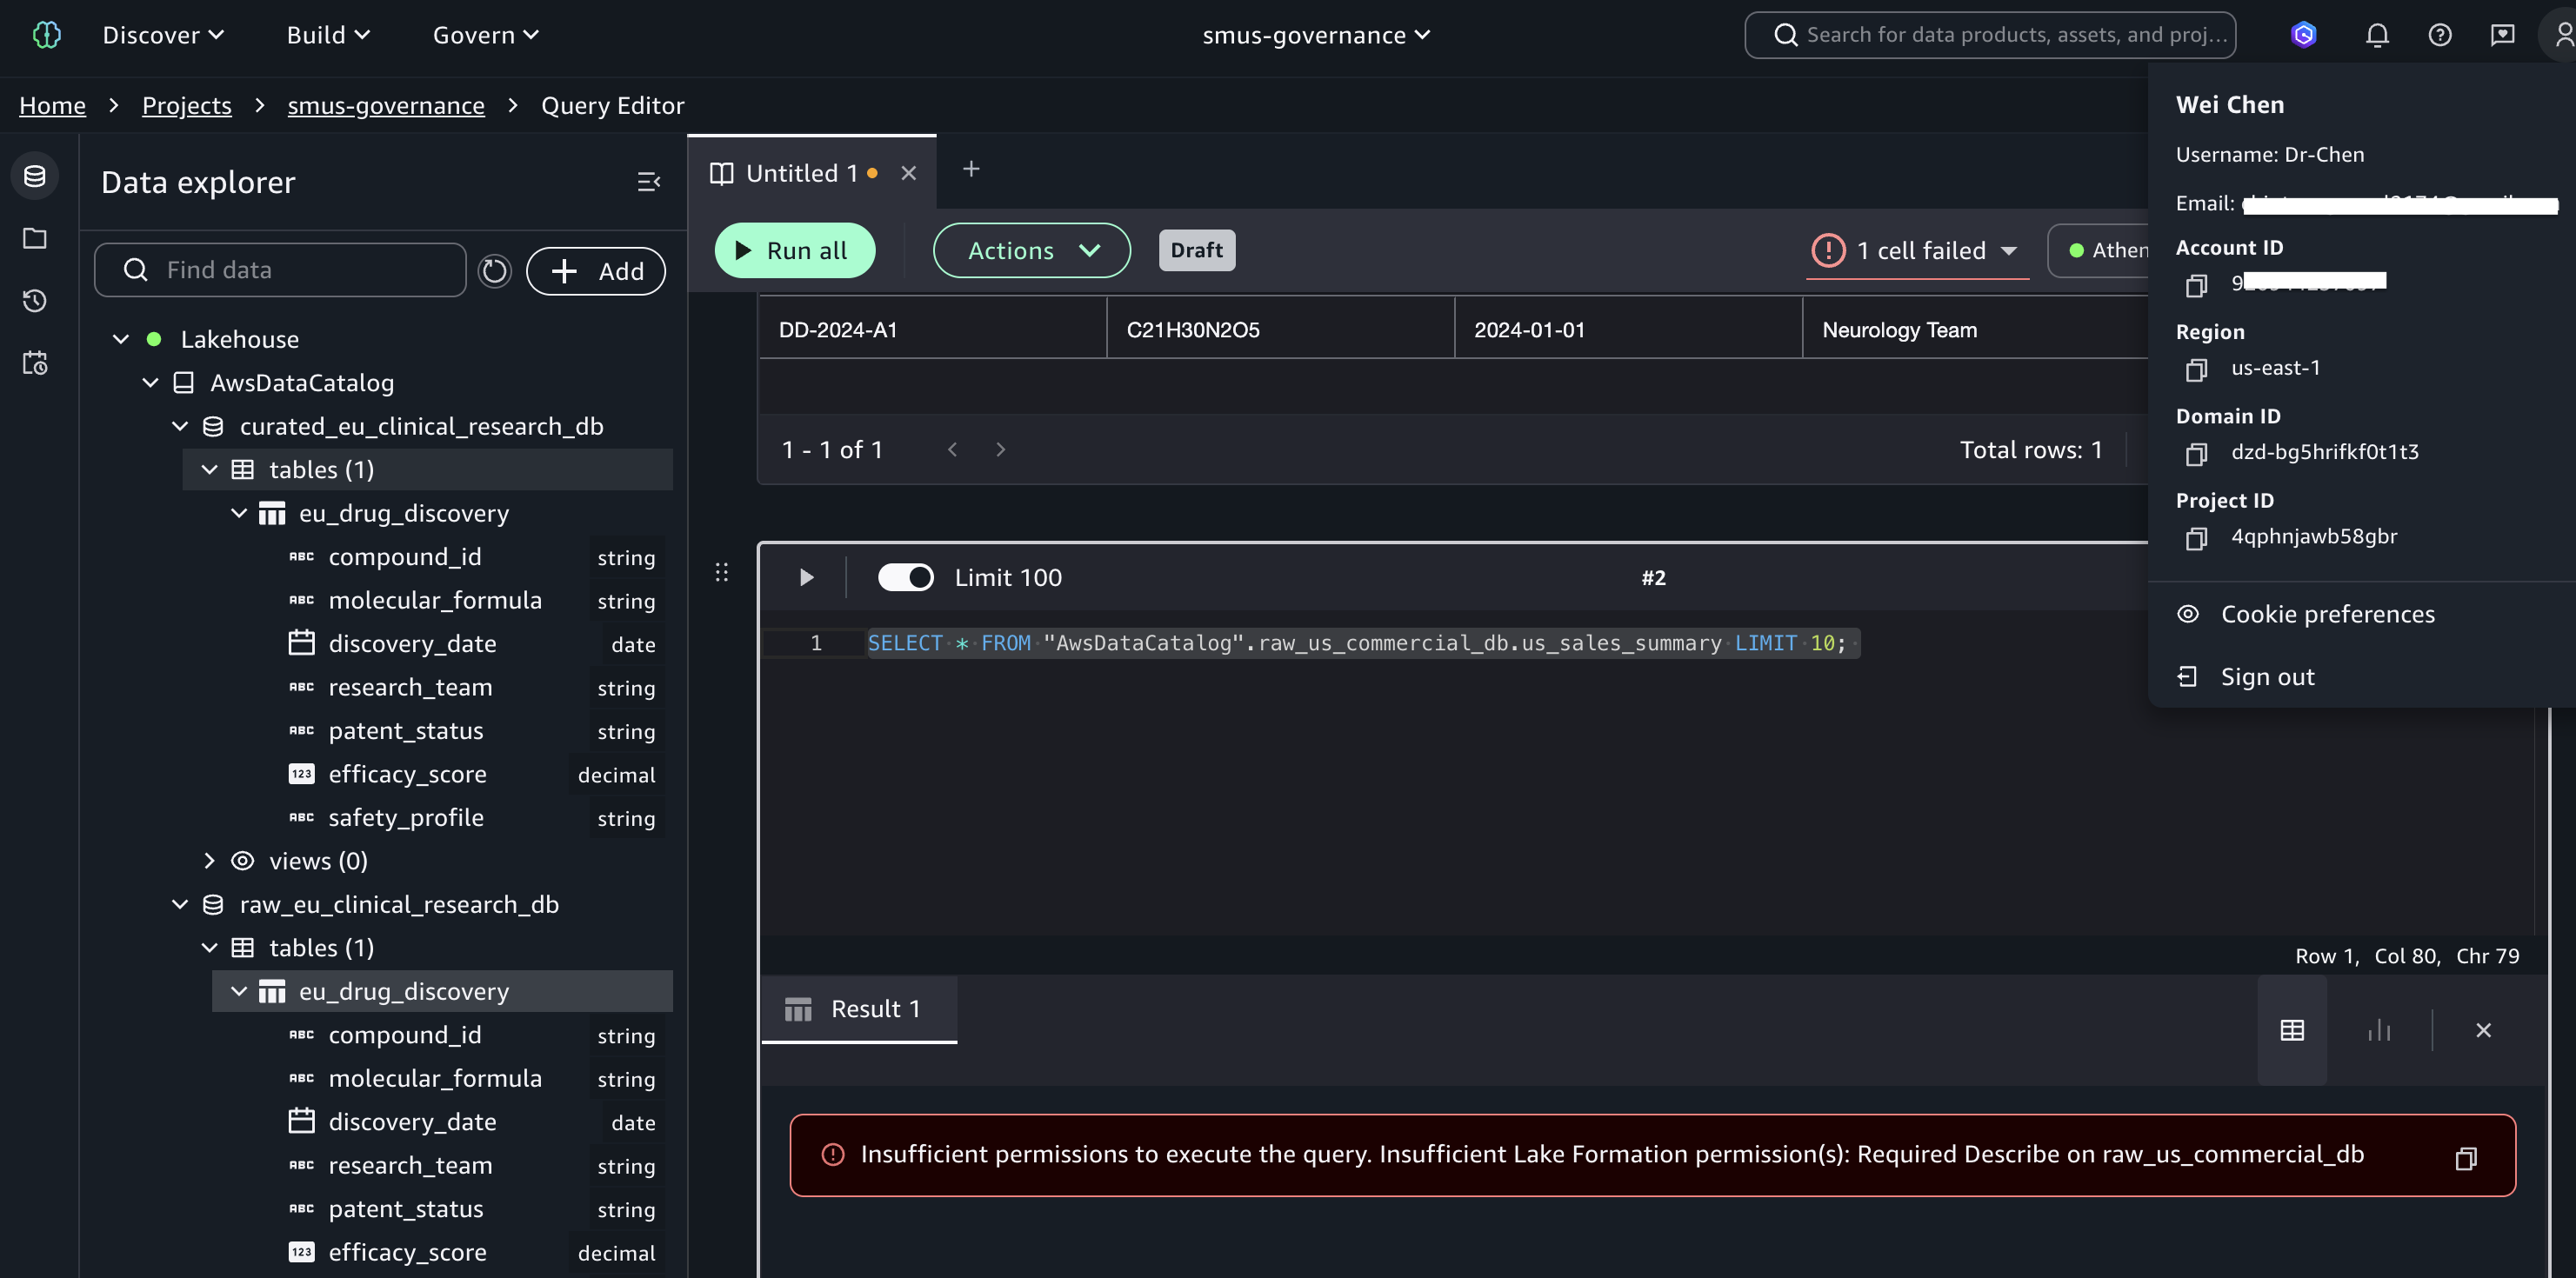
Figure 11: Dr. Chen’s successful query on eu_drug_discovery

Access denied error when Dr. Chen queries us_sales_summary

Figure 12: Access denied when Dr. Chen queries us_sales_summary

Test as Alex (Regulatory Affairs Specialist) — Alex’s tag expression uses only domain=regulatory without a region constraint, granting cross-regional access to regulatory data while maintaining strict isolation from commercial and clinical research domains.
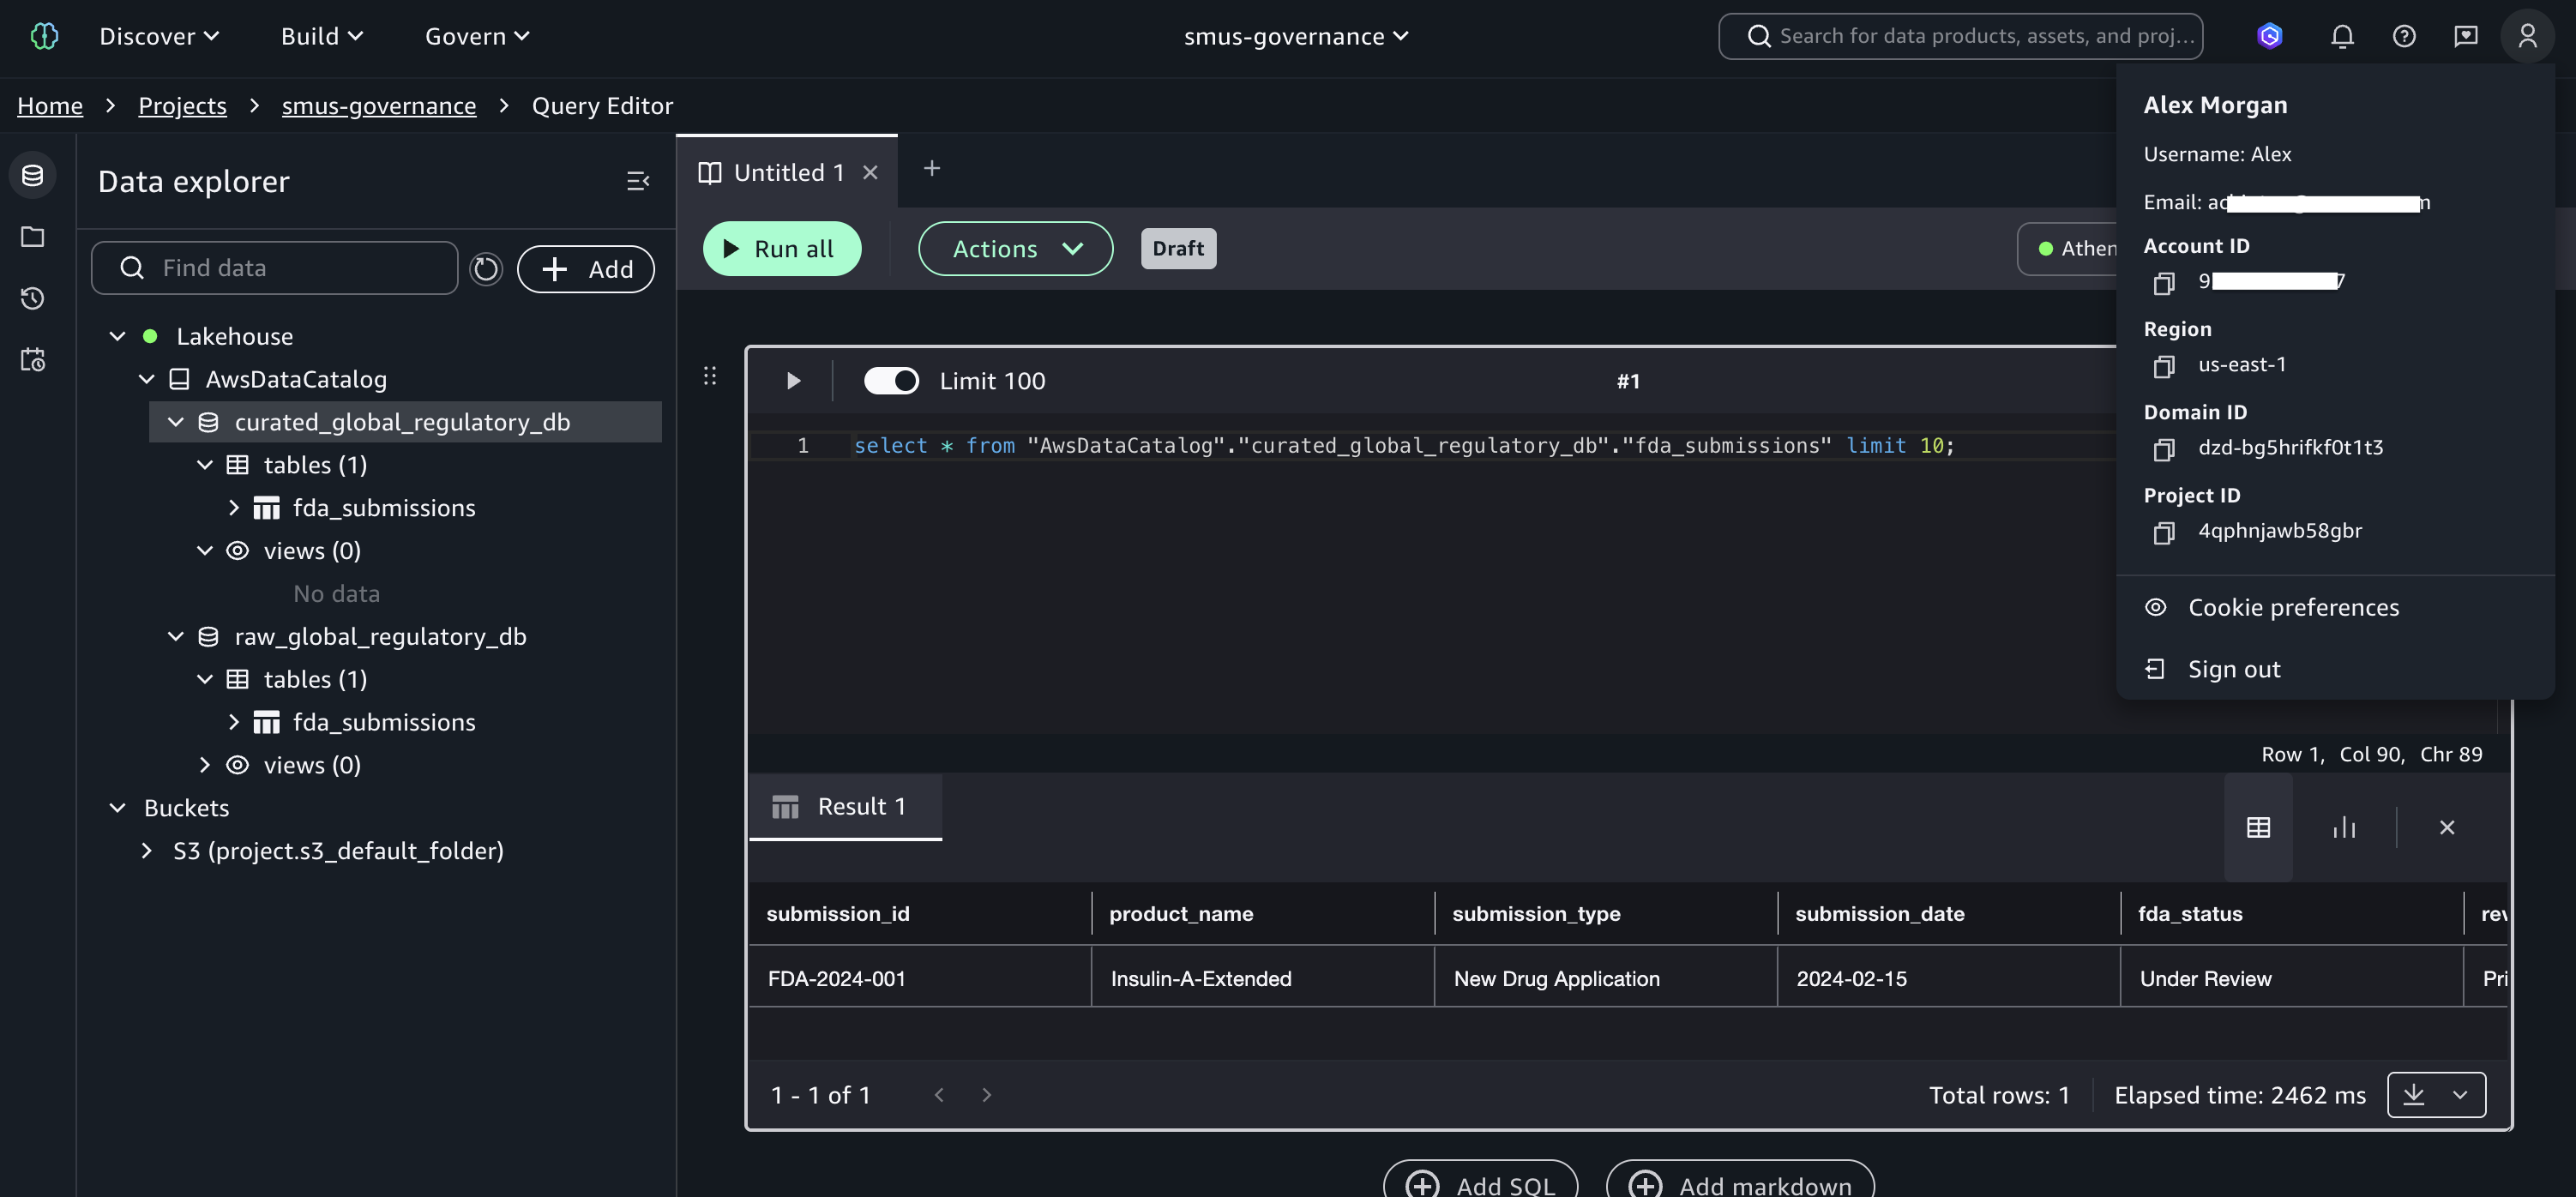
Query results showing Alex’s successful query on fda_submissions
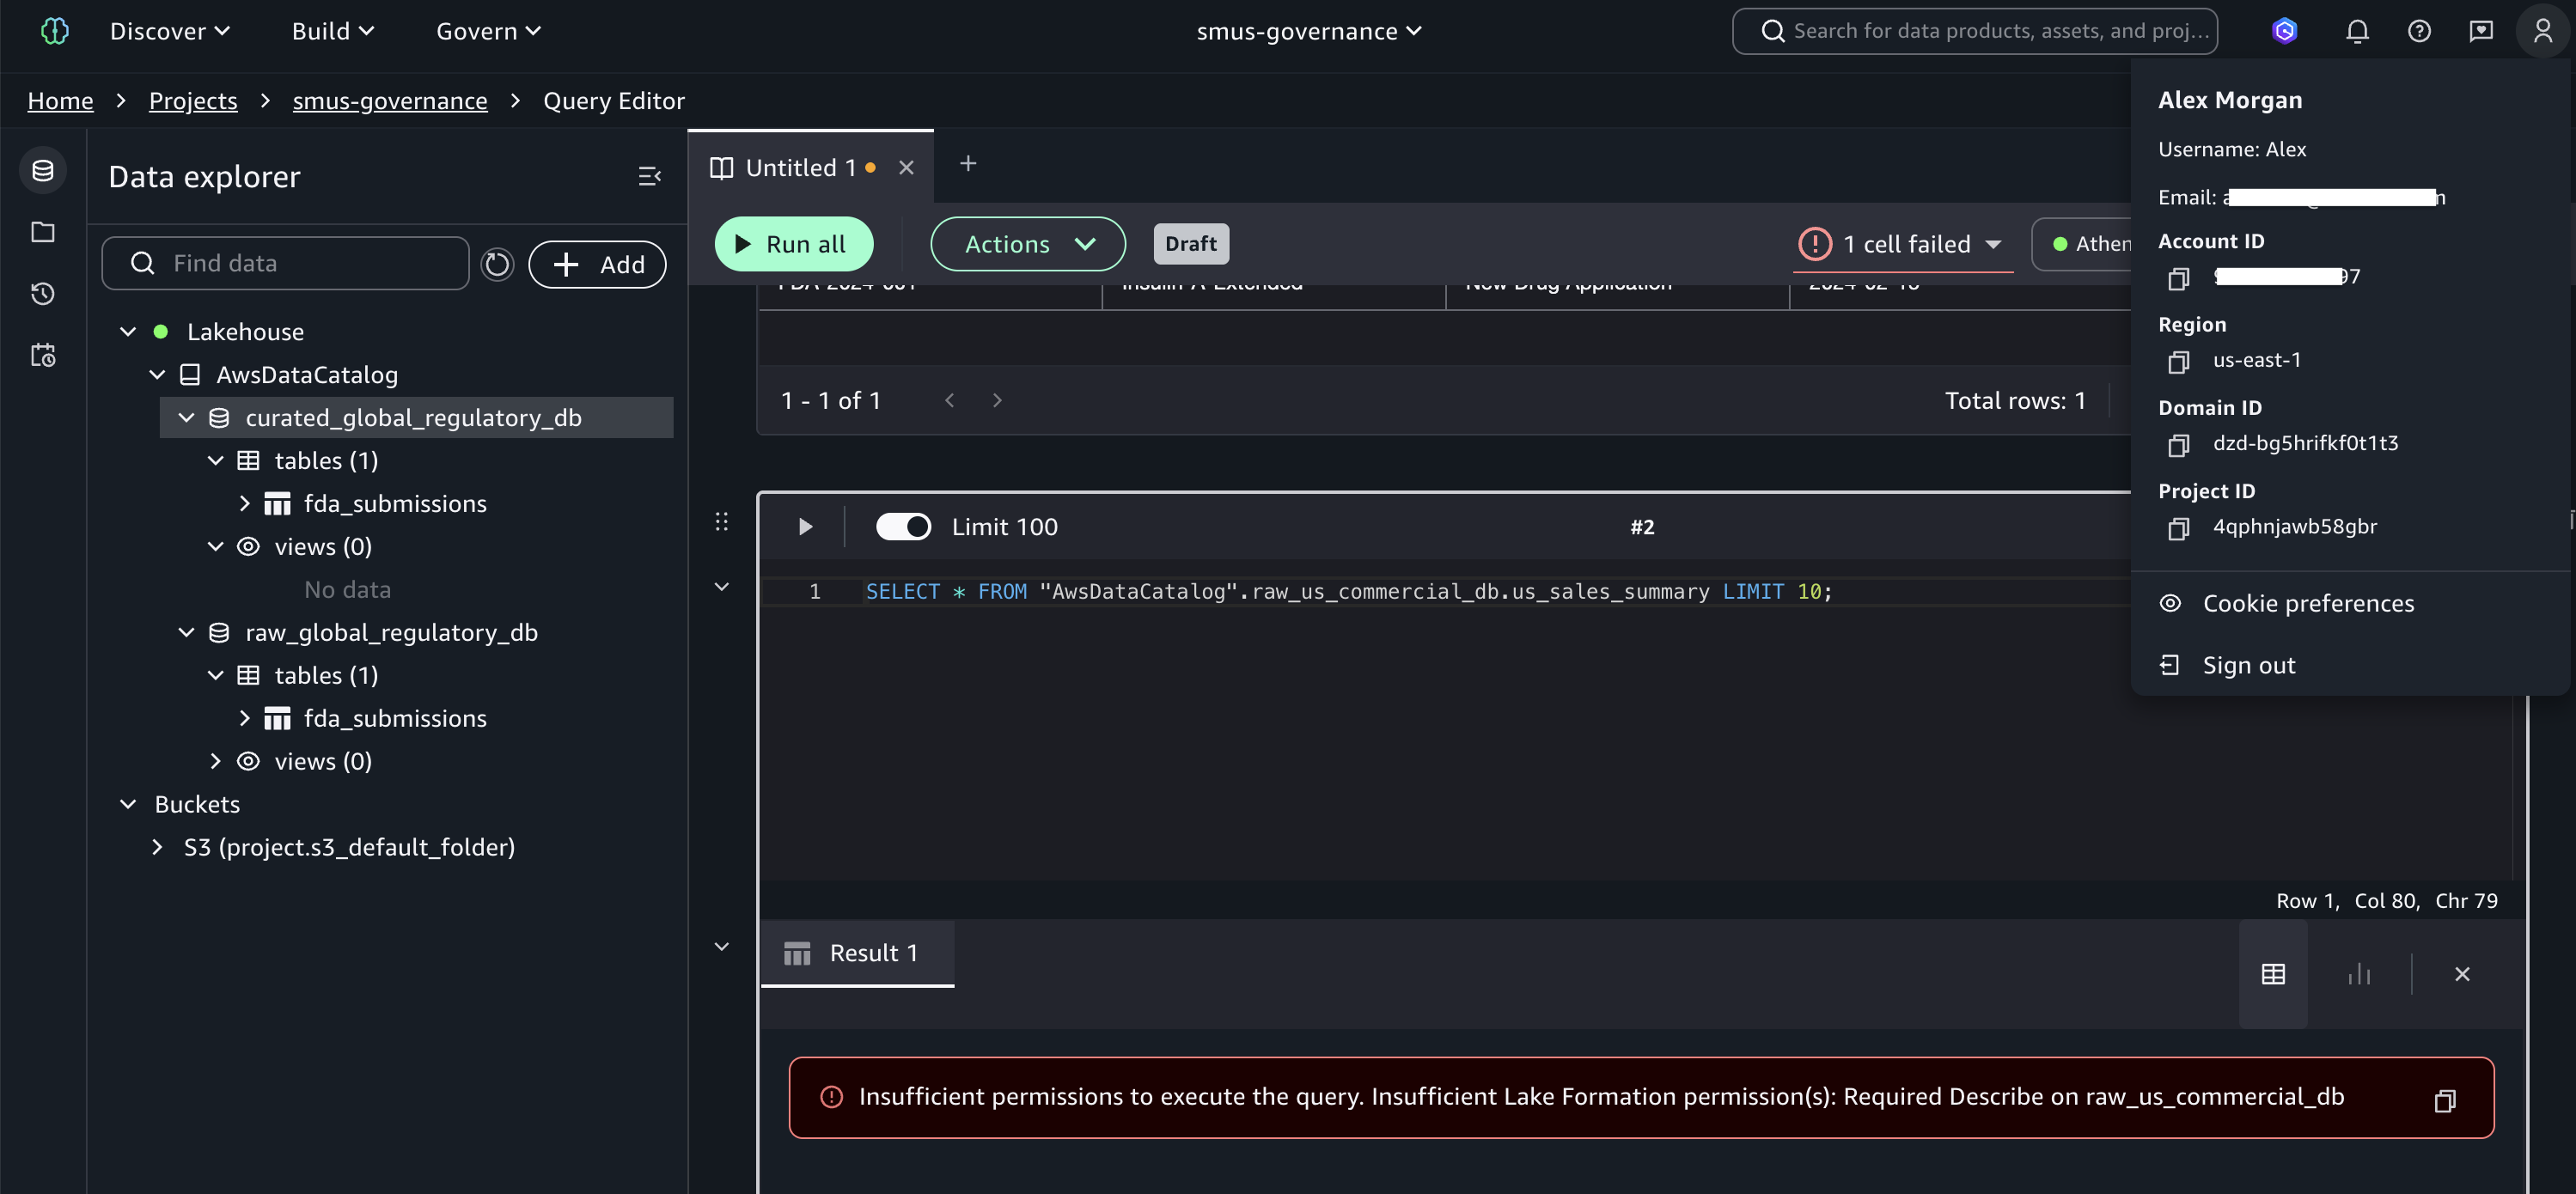
Figure 13: Alex’s successful query on fda_submissions

Access denied error when Alex queries us_sales_summary

Figure 14: Access denied when Alex queries us_sales_summary

These tests demonstrate that TBAC enforces fine-grained permissions based on user identity, data classification, regional boundaries, and domain separation, without per-table permission grants. As new tables are added and tagged, existing groups automatically gain or are denied access based on their tag expressions. This is the core advantage of TBAC over named resource permissions.

Audit user access with CloudTrail

A key benefit of integrating Lake Formation with IAM Identity Center is the detailed audit trail available through AWS CloudTrail. Filter Event history by Event name GetDataAccess to see every data access event. Each record includes the IAM Identity Center user UUID (userIdentity.onBehalfOf.userId), the specific table accessed (requestParameters.tableArn), and confirmation that trusted identity propagation was used (additionalEventData.LakeFormationTrustedCallerInvocation: true).
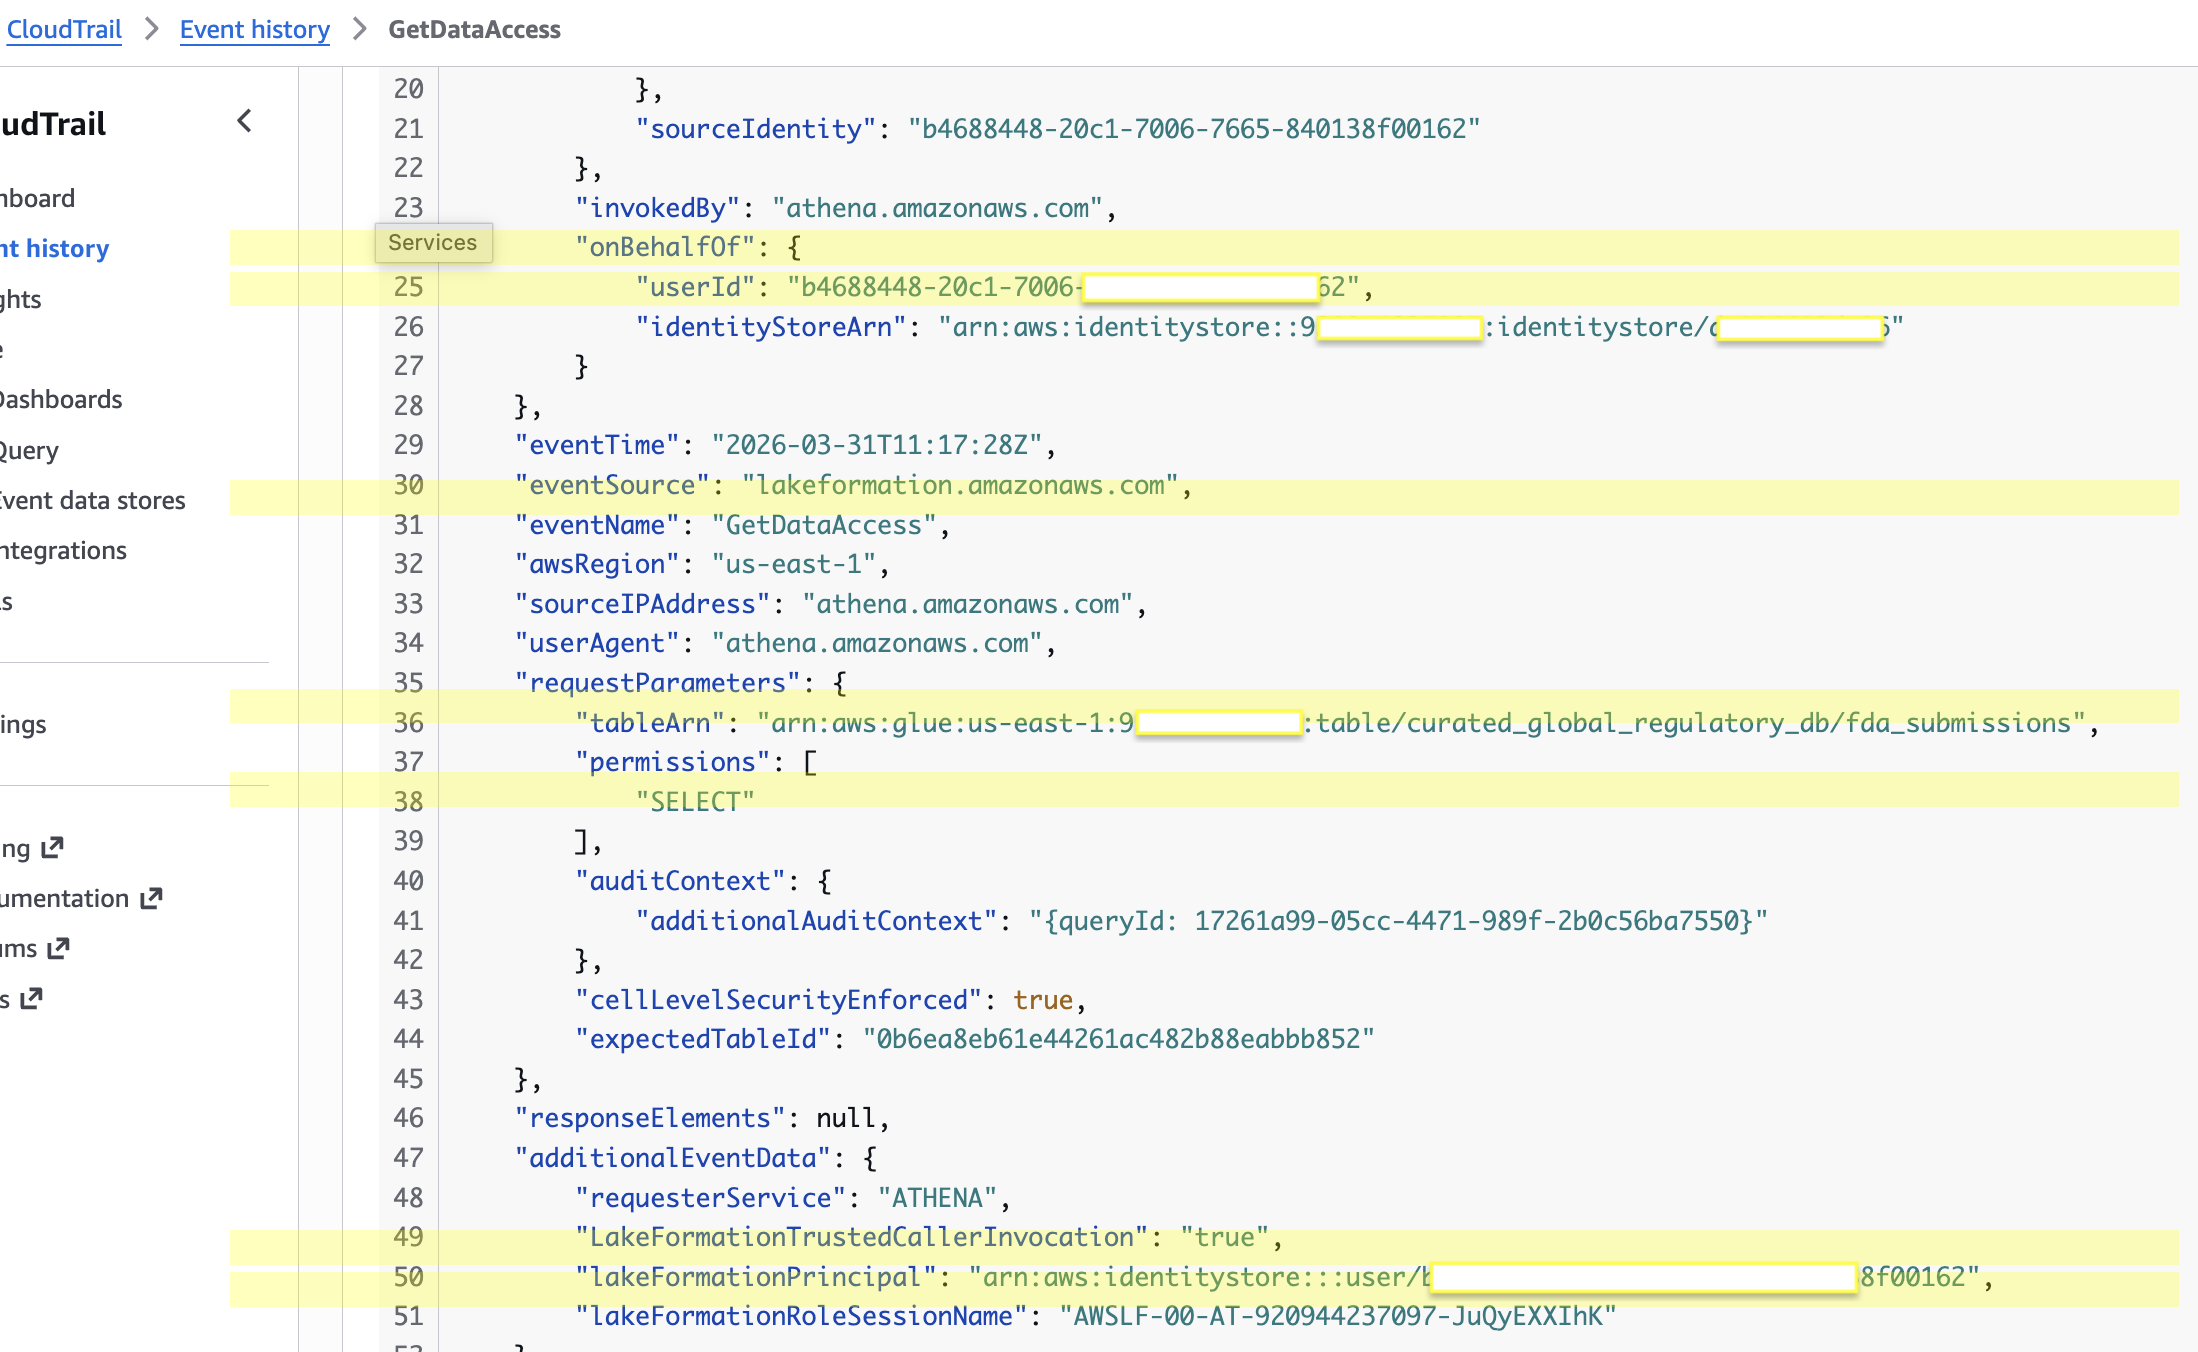
CloudTrail GetDataAccess event showing Identity Center user identity and table access details

Figure 15: CloudTrail GetDataAccess event showing Identity Center user identity and table access details

To resolve the user UUID to a human-readable name, query the Identity Store:

aws identitystore describe-user \
    --identity-store-id d-xxxxxxxxxx \
    --user-id <USER_UUID_FROM_EVENT> \
    --region us-east-1

This audit capability provides the detailed access logs required for HIPAA, GDPR, and FDA compliance, showing exactly which users accessed which data and when. Learn about configuring CloudTrail for Lake Formation in Logging Lake Formation API calls with CloudTrail.

Cleanup

Run cdk destroy --all to remove all stacks. Manually delete the retained S3 data buckets (datalake-raw-data-* and datalake-curated-data-*) and revoke any remaining Lake Formation permissions. For detailed cleanup steps, see the repository README.

Conclusion

In this post, we showed you how to implement scalable fine-grained access control for an enterprise lakehouse by combining AWS Lake Formation tag-based access control, IAM Identity Center, and trusted identity propagation in SageMaker Unified Studio. The four-dimension LF-Tag taxonomy, hybrid RBAC + ABAC governance model, and metadata-driven Lambda automation together create a governance architecture where new datasets automatically inherit access policies through tag inheritance, permissions scale without per-table grants, and every data access event is auditable to the individual user through CloudTrail.

To extend this solution, consider adding new business domains, implementing column-level security with LF-Tags, scaling to multi-account architectures with Lake Formation cross-account sharing, or integrating additional analytics services such as Amazon Redshift Spectrum or Amazon EMR.

Get started by deploying the CDK stacks from the accompanying repository. To learn more:


About the authors

Chintan Agrawal

Chintan Agrawal

Chintan is a Solutions Architect with over 7 years of experience, with a specialization in Analytics and Healthcare domain. He possesses a strong enthusiasm for assisting clients in discovering valuable insights from their data. Through his expertise, he constructs innovative solutions that empower businesses to arrive at informed, data-driven choices.

Chaitanya Vejendla

Chaitanya Vejendla

Chaitanya is a Senior Solutions Architect and part of Global Healthcare and Life Sciences industry division at AWS. He focuses on developing strategic plans for building an end-to-end analytical strategy for large biopharma, healthcare, and life sciences organizations. His expertise spans across data analytics, data governance, AI, ML, big data, and healthcare-related technologies.

Real-time CDC from Aurora PostgreSQL to Amazon S3 Tables using Debezium and Firehose

Post Syndicated from Chintan Agrawal original https://aws.amazon.com/blogs/big-data/real-time-cdc-from-aurora-postgresql-to-amazon-s3-tables-using-debezium-and-firehose/

Enterprises running transactional workloads on Amazon Aurora PostgreSQL-Compatible Edition (Aurora PostgreSQL) need their operational data available for analytics. However, analytical queries and cross-database joins compete for resources on OLTP-optimized clusters. Batch exports introduce latency, and when data spans multiple Aurora clusters, there’s no straightforward way to join datasets or run cross-domain analytics. Real-time change data capture (CDC) addresses this by streaming row-level changes into a separate analytics layer. However, most CDC approaches write append-only records that require downstream consumers to reconstruct current state from the change log.

In this post, we show you how to build a CDC pipeline that delivers query-ready Iceberg tables directly. The pipeline captures inserts, updates, and deletes from Aurora PostgreSQL and applies them as row-level operations in Amazon S3 Tables, a capability of Amazon Simple Storage Service (Amazon S3). The destination tables always reflect the current state of the source database. You use Debezium on Amazon MSK Connect for change capture and Amazon Managed Streaming for Apache Kafka (Amazon MSK) for streaming. You also use AWS Lambda to transform CDC events and resolve operation semantics, and Amazon Data Firehose to deliver records into Iceberg tables. You deploy the infrastructure using the AWS Cloud Development Kit (AWS CDK).

Apache Iceberg supports row-level updates, deletes, ACID transactions, schema evolution, and time travel natively. S3 Tables handles Iceberg snapshot management and compaction automatically. With AWS Lake Formation for access control, multiple teams can query the tables through Amazon Athena, Amazon Redshift, or Amazon SageMaker Unified Studio.

Solution overview

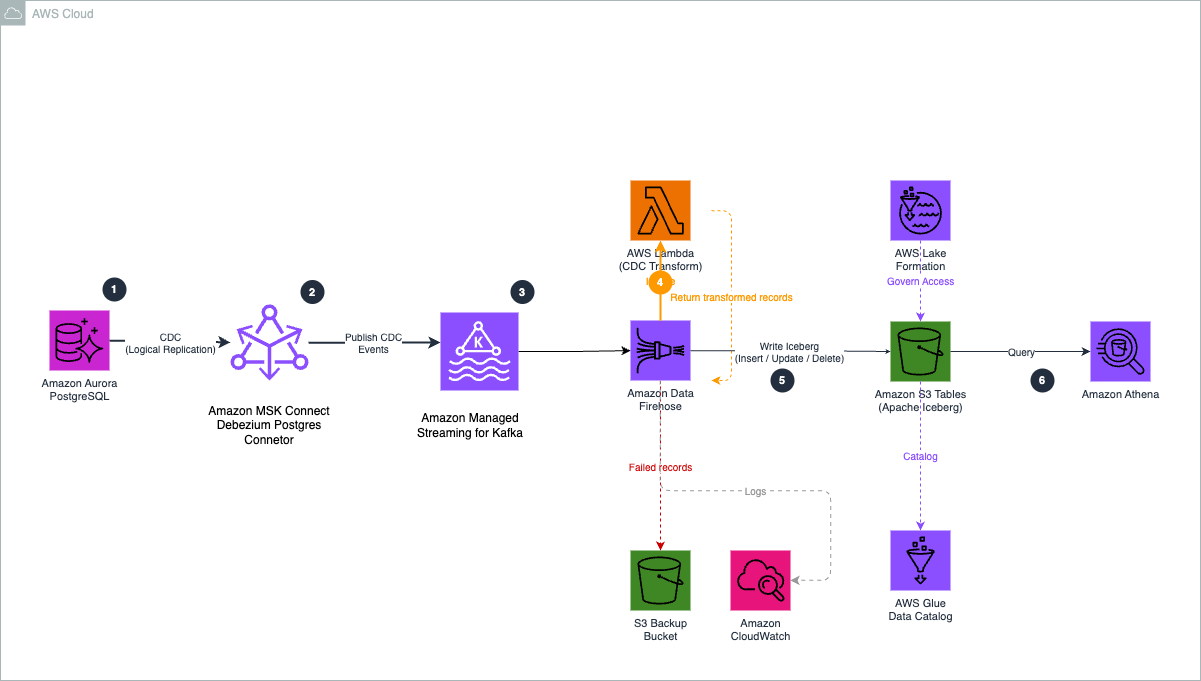
The following diagram shows the architecture of the CDC pipeline.

Figure 1. CDC pipeline architecture from Aurora PostgreSQL to Amazon S3 Tables.

Figure 1. CDC pipeline architecture from Aurora PostgreSQL to Amazon S3 Tables.

The pipeline uses six components:

  1. Aurora PostgreSQL to Debezium. Debezium runs on MSK Connect in your VPC and uses PostgreSQL’s native logical replication to stream row-level changes from the write-ahead log (WAL), with minimal impact on query performance.
  2. Debezium to Amazon MSK. The ByLogicalTableRouter SMT reroutes CDC events from multiple tables into a single topic (aurora.cdc.all-tables), retaining the source table name in each message.
  3. Amazon MSK to Firehose. Firehose connects to the MSK cluster using the IAM access control over AWS PrivateLink and continuously polls the topic for new messages.
  4. Firehose to Lambda. For each batch, Firehose invokes the Lambda function to decode the Kafka message, flatten the Debezium envelope, and set otfMetadata routing with the destination table and operation type.
  5. Firehose to S3 Tables. Firehose reads the otfMetadata, routes each record to the correct Iceberg table, and performs the appropriate row-level operation using configured unique keys (for example, order_id for orders). S3 Tables handles compaction and snapshot management automatically.
  6. Query and access control. After data lands in S3 Tables, you can query the Iceberg tables with Amazon Athena, Amazon Redshift, or Amazon SageMaker Unified Studio, with AWS Lake Formation managing fine-grained access control.

Firehose supports one MSK topic per delivery stream. The single-topic routing pattern uses a Debezium SMT to consolidate multiple tables into one topic, and a Lambda function to route records to the correct destination. With this, you can serve multiple tables through one Firehose stream, reducing cost and operational complexity.

Debezium event transformation

Debezium produces CDC events in an envelope structure containing both the previous and current state of a row, along with metadata about the source database, table, and operation type. However, Firehose expects records in a flattened JSON format with routing metadata that indicates the target table and operation type.

The Lambda function bridges this gap by performing three operations on each record:

  1. Decode. When Firehose uses Amazon MSK as a source, it delivers the Kafka message value as a base64-encoded string in the kafkaRecordValue field. The function base64-decodes this field to obtain the raw Debezium JSON payload.
  2. Flatten and extract. Pulls the row data from the Debezium envelope. For inserts and updates, the function uses the after field (the row after the change). For deletes, it uses the before field, because the after field is null when a row is removed.
  3. Route. Sets the otfMetadata block with destinationTableName (extracted from the Debezium source.table field) and operation (mapped from Debezium’s single-character codes to Firehose’s operation types).

The following table shows how Debezium operation codes map to Firehose Iceberg operations:

Debezium code Meaning Firehose operation
c Row created (insert) insert
u Row updated update
d Row deleted delete
r Snapshot read (initial load) insert

When Debezium starts with snapshot.mode=initial, it reads all existing rows and emits them as r (read) events. These represent rows that existed before CDC began, so they are mapped to insert to establish the baseline state in the destination tables.

For example, the function transforms this Debezium envelope:

{
"op": "c",
"before": null,
"after": {"order_id": 1, "customer_id": 1, "total_amount": 299.99},
"source": {"table": "orders", "db": "cdcdemo"}
}

Into a response record with routing metadata:

{
"recordId": "<original-record-id>",
"result": "Ok",
"kafkaRecordValue": "<base64-encoded flattened row JSON>",
"metadata": {
"otfMetadata": {
"destinationDatabaseName": "aurora_cdc",
"destinationTableName": "orders",
"operation": "insert"
}
}
}

The kafkaRecordValue contains the base64-encoded flattened row data (for example, {"order_id": 1, "customer_id": 1, "total_amount": 299.99}), and the otfMetadata block tells Firehose which table to write to and which operation to perform.

With this routing metadata, a single Firehose stream can write to multiple destination tables. For more information, see Route incoming records to different Iceberg tables.

Walkthrough

The following sections walk you through building the CDC pipeline end to end. Before you begin, complete the prerequisites.

Prerequisites

Before you begin, make sure you have the following:

Step 1: Enable CDC in Aurora PostgreSQL

PostgreSQL supports change data capture through its logical replication framework, which allows database changes to be streamed from the write-ahead log (WAL). Debezium uses this mechanism to continuously read row-level changes and publish them to Kafka topics.

To enable logical replication in Aurora PostgreSQL, configure a custom DB cluster parameter group:

  1. Create a custom parameter group and set the following parameter: rds.logical_replication = 1.
  2. Apply the parameter group to your Aurora cluster and reboot the cluster for the change to take effect.
  3. Connect to your Aurora PostgreSQL cluster and create the source tables:
CREATE TABLE public.orders (
    order_id SERIAL PRIMARY KEY,
    customer_id INTEGER,
    order_date VARCHAR(50),
    total_amount DECIMAL(12,2),
    status VARCHAR(50),
    created_at TIMESTAMP DEFAULT NOW(),
    updated_at TIMESTAMP DEFAULT NOW()
);
CREATE TABLE public.products (
    product_id SERIAL PRIMARY KEY,
    product_name VARCHAR(255),
    category VARCHAR(100),
    price DECIMAL(10,2),
    stock_quantity INTEGER,
    created_at TIMESTAMP DEFAULT NOW(),
    updated_at TIMESTAMP DEFAULT NOW()
);
  1. Create a publication that defines which tables are included in the change stream. Debezium automatically creates the logical replication slot when the connector starts for the first time, so you don’t need to create one manually.
CREATE PUBLICATION dbz_publication FOR TABLE public.orders, public.products;
  1. Verify the publication was created:
SELECT * FROM pg_publication WHERE pubname = 'dbz_publication';

You should see one row returned, confirming the publication is active.

Important: When the Debezium connector starts (Step 6), it creates a replication slot named debezium_slot. This slot retains WAL segments until consumed. If the connector is stopped for an extended period, WAL segments can accumulate and increase storage usage on the Aurora cluster. Monitor the ReplicationSlotDiskUsage Amazon CloudWatch metric for your Aurora cluster.

Step 2: Build and register the Debezium plugin

MSK Connect runs connectors using custom plugins that you upload to Amazon S3. In this step, you download the Debezium PostgreSQL connector, package it as a ZIP file, upload it to S3, and register it with MSK Connect.

First, create an S3 bucket for the plugin, or use an existing metadata management bucket:

aws s3 mb s3://<your-plugin-bucket> --region <your-region>

Download and package the Debezium connector:

DEBEZIUM_VERSION=2.7.3.Final
curl -LO "https://repo1.maven.org/maven2/io/debezium/debezium-connector-postgres/${DEBEZIUM_VERSION}/debezium-connector-postgres-${DEBEZIUM_VERSION}-plugin.tar.gz"
mkdir -p debezium-plugin
tar -xzf debezium-connector-postgres-${DEBEZIUM_VERSION}-plugin.tar.gz -C debezium-plugin/
cd debezium-plugin && zip -r ../debezium-postgres-connector.zip . && cd ..
aws s3 cp debezium-postgres-connector.zip s3://<your-plugin-bucket>/plugins/

Register the plugin with MSK Connect:

aws kafkaconnect create-custom-plugin \
    --custom-plugin-name debezium-postgres-connector \
    --content-type ZIP \
    --location "s3Location={bucketArn=arn:aws:s3:::<your-plugin-bucket>,fileKey=plugins/debezium-postgres-connector.zip}"

Create a worker configuration that tells MSK Connect to serialize Kafka messages as JSON without schemas:

aws kafkaconnect create-worker-configuration \
    --name debezium-worker-config \
    --properties-file-content "$(echo -n 'key.converter=org.apache.kafka.connect.json.JsonConverter
value.converter=org.apache.kafka.connect.json.JsonConverter
key.converter.schemas.enable=false
value.converter.schemas.enable=false' | base64)"

Note the customPluginArn and workerConfigurationArn from the output. You need these for the CDK configuration in the next step.

Note: The custom plugin and worker configuration are created through the AWS CLI because the Debezium connector JARs must be downloaded from the Debezium project and packaged manually. The remaining infrastructure is deployed using the AWS CDK in the following steps.

Step 3: Configure the CDK project

Clone the sample repository and install dependencies:

git clone https://github.com/aws-samples/sample-aurora-cdc-s3tables.git
cd sample-aurora-cdc-s3tables/cdk
npm install

Open cdk/lib/v2/config.ts and update the configuration values to match your environment:

export const CONFIG = {
account: '<your-account-id>',
region: '<your-region>',
// VPC - must match your Aurora cluster's VPC
vpcId: '<your-vpc-id>',
subnetIds: ['<subnet-1>', '<subnet-2>'],
auroraSecurityGroupId: '<aurora-security-group-id>',
// Aurora connection details
auroraEndpoint: '<aurora-cluster-endpoint>',
auroraPort: '5432',
auroraDbName: '<database-name>',
auroraUser: '<db-user>',
auroraSecretArn: '<secrets-manager-arn>',
// Debezium - use the ARNs from Step 2
debeziumPluginArn: '<customPluginArn-from-step-2>',
debeziumWorkerConfigArn: '<workerConfigurationArn-from-step-2>',
debeziumPluginBucket: '<your-plugin-bucket-name>',
debeziumTopicPrefix: 'aurora.cdc',
debeziumTables: 'public.orders,public.products',
// S3 Tables - the table bucket name must be globally unique
s3TablesBucketName: '<your-table-bucket-name>',
s3TablesNamespace: 'aurora_cdc',
tables: ['orders', 'products'],
tableKeys: { orders: 'order_id', products: 'product_id' },
// Firehose - general purpose S3 bucket for failed record backup
firehoseBackupBucket: '<your-backup-bucket-name>',
};

Key configuration notes:

  • auroraSecurityGroupId. The security group attached to your Aurora cluster. The CDK creates an MSK security group with ingress rules allowing traffic from this security group, and a reverse rule allowing MSK Connect workers to reach Aurora on port 5432.
  • tableKeys. The primary key column for each table. Firehose uses these to match incoming records against existing rows for update and delete operations in the Iceberg tables.
  • s3TablesBucketName. The name for your S3 table bucket. Table bucket names must be unique for your account in the chosen Region.

Step 4: Deploy the CDK stacks

Deploy all six stacks with a single command. The CDK resolves the dependency order automatically:

npx cdk --app "npx ts-node bin/app-v2.ts" deploy --all

When prompted, review the AWS Identity and Access Management (IAM) changes and confirm the deployment. The CDK deploys the following stacks:

Stack What it creates
CdcMskCluster Amazon MSK cluster (2x kafka.m5.large brokers) with dual authentication (IAM for Firehose, unauthenticated for Debezium), custom configuration with auto.create.topics.enable=true, security groups with ingress rules for Aurora and MSK Connect workers
CdcMskConnectIam MSK Connect service execution role with permissions for Kafka cluster operations, VPC networking, S3 plugin access, and AWS Secrets Manager; Amazon CloudWatch Logs group for connector logs
CdcS3Tables S3 table bucket, aurora_cdc namespace, two Iceberg tables (orders, products) with column schemas
CdcLambdaTransform Lambda function for CDC event transformation and multi-table routing
CdcFirehoseRole Firehose IAM role with permissions for Amazon MSK, S3 Tables, AWS Glue Data Catalog, AWS Lake Formation, VPC networking, and Lambda invocation
CdcFirehose Firehose delivery stream with MSK as source (private connectivity through AWS PrivateLink), Lambda processing, Apache Iceberg Tables as destination with two table configurations, and S3 backup bucket for failed records

The MSK cluster takes approximately 25 minutes to create. The Debezium connector takes approximately 5 minutes after the cluster is ready. You can monitor the deployment progress in the AWS CloudFormation console.

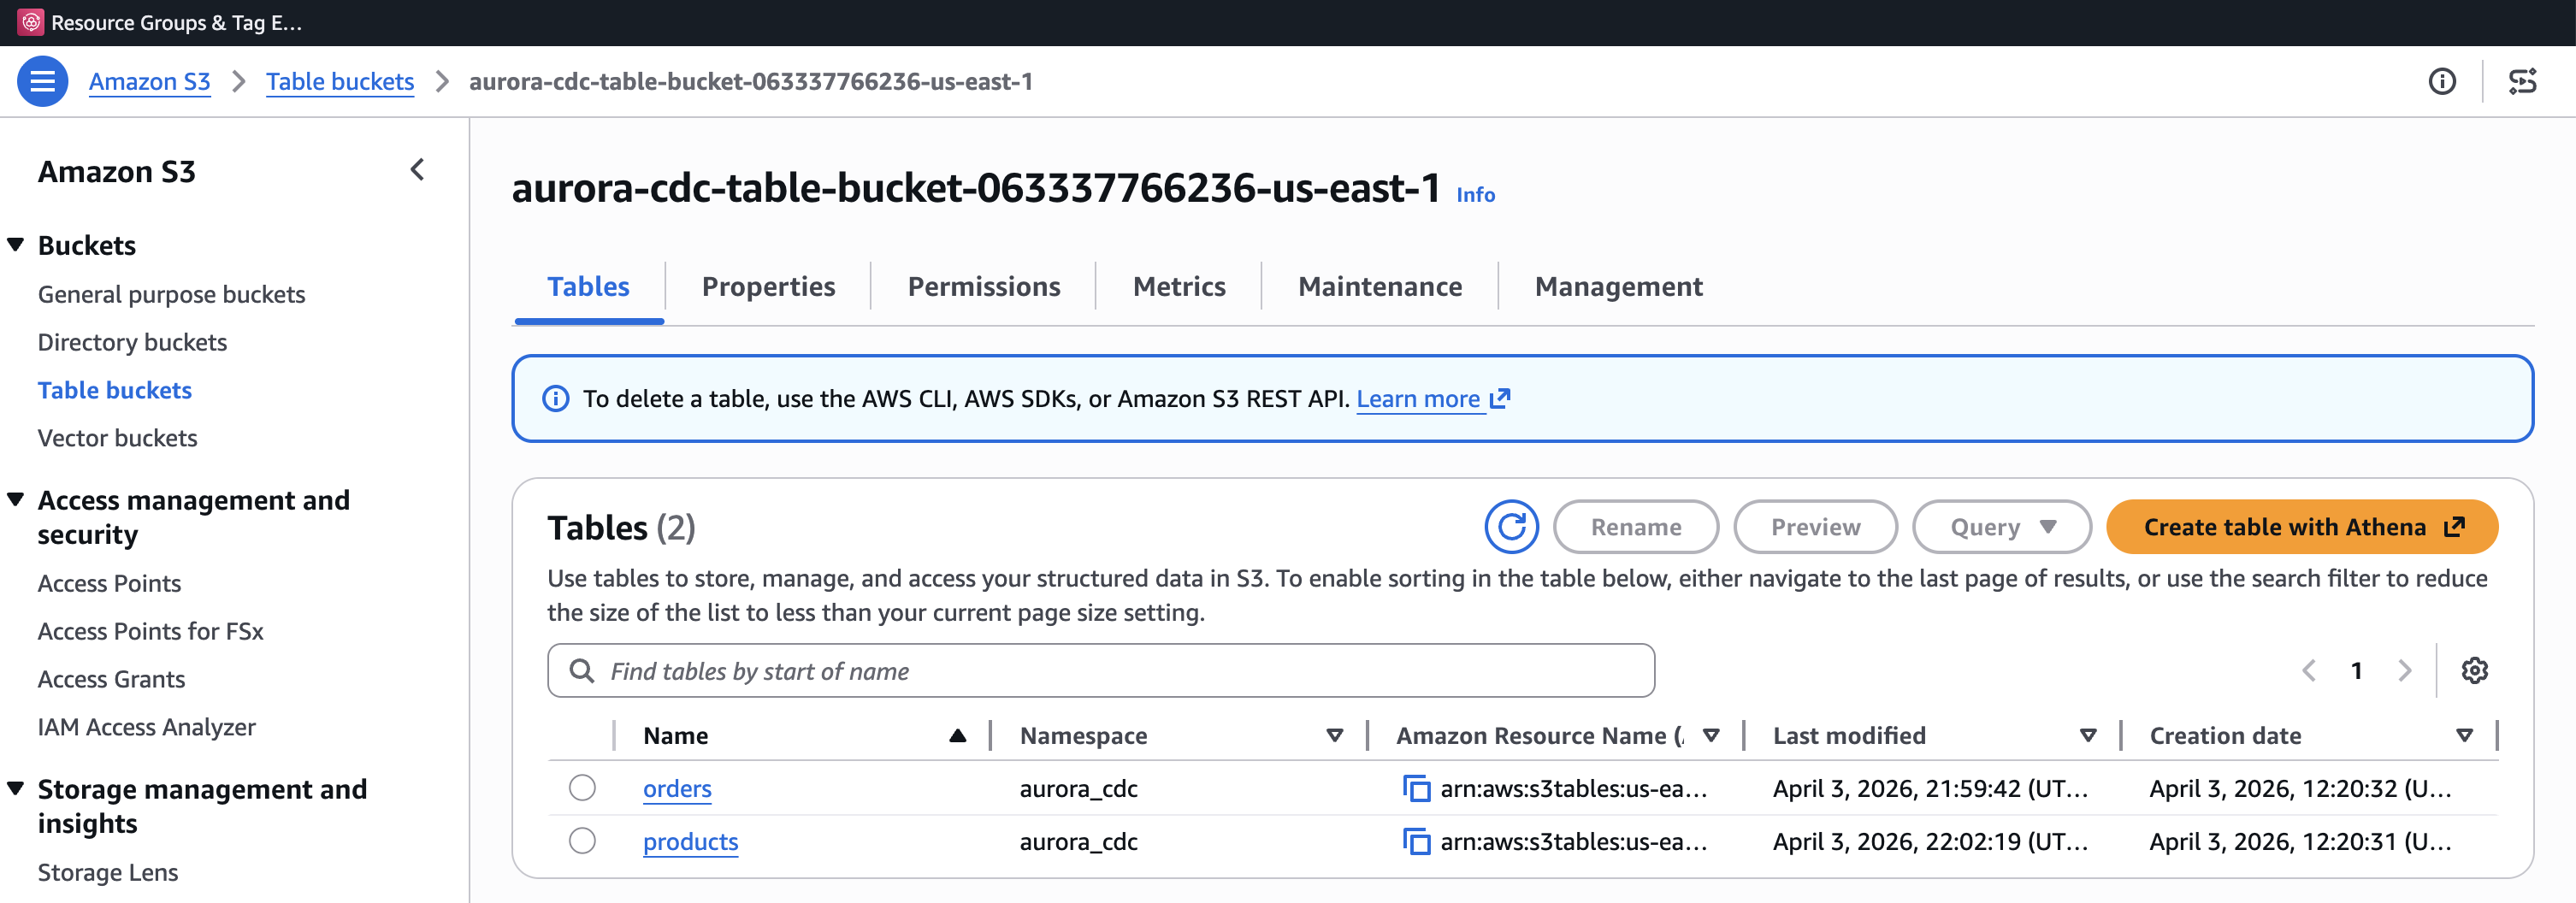
After the deployment completes, you can verify the resources in the AWS console. The S3 table bucket shows the two Iceberg tables in the aurora_cdc namespace.

Figure 2. S3 table bucket showing the orders and products Iceberg tables in the aurora_cdc namespace.

Figure 2. S3 table bucket showing the orders and products Iceberg tables in the aurora_cdc namespace.

The Firehose delivery stream shows the MSK source, Lambda transformation, and Apache Iceberg Tables destination.

Figure 3. Amazon Data Firehose delivery stream with MSK source, Lambda transformation, and Apache Iceberg Tables destination.

Figure 3. Amazon Data Firehose delivery stream with MSK source, Lambda transformation, and Apache Iceberg Tables destination.

The MSK cluster uses dual authentication (IAM for Firehose, unauthenticated for Debezium through TLS_PLAINTEXT), multi-VPC private connectivity for Firehose PrivateLink access, and auto.create.topics.enable=true so Debezium can create topics on first connect. VPC connectivity and the cluster resource policy are configured as CLI steps in Step 5.

Step 5: Enable MSK VPC connectivity, grant Lake Formation permissions, and apply MSK cluster policy

After the CDK deployment completes, enable multi-VPC private connectivity with IAM on the MSK cluster. Firehose requires this to create an AWS PrivateLink endpoint to the MSK brokers. This setting can’t be configured during cluster creation and must be applied as an update, which triggers a rolling broker restart (approximately 20–30 minutes).

# Get the cluster ARN and current version from the CdcMskCluster stack outputs
MSK_ARN=<msk-cluster-arn>
CLUSTER_VERSION=$(aws kafka describe-cluster-v2 \
    --cluster-arn $MSK_ARN \
    --region <your-region> \
    --query 'ClusterInfo.CurrentVersion' --output text)
# Enable VPC connectivity with IAM
aws kafka update-connectivity \
    --cluster-arn $MSK_ARN \
    --current-version $CLUSTER_VERSION \
    --connectivity-info '{"VpcConnectivity":{"ClientAuthentication":{"Sasl":{"Iam":{"Enabled":true}}}}}' \
    --region <your-region>

Wait for the cluster state to return to ACTIVE before proceeding:

aws kafka describe-cluster-v2 \
    --cluster-arn $MSK_ARN \
    --region <your-region> \
    --query 'ClusterInfo.State'

Next, grant the Firehose IAM role permissions through AWS Lake Formation. S3 Tables uses a sub-catalog format for the CatalogId parameter, which differs from the standard AWS Glue Data Catalog. These permissions require a data lake administrator identity.

Grant database-level and table-level permissions to the Firehose role:

# Grant database-level permissions
aws lakeformation grant-permissions \
    --region <your-region> \
    --principal '{"DataLakePrincipalIdentifier": "<firehose-role-arn>"}' \
    --resource '{"Database": {"CatalogId": "<account-id>:s3tablescatalog/<table-bucket-name>", "Name": "aurora_cdc"}}' \
    --permissions '["ALL"]'
# Grant table-level permissions (wildcard for the tables in the namespace)
aws lakeformation grant-permissions \
    --region <your-region> \
    --principal '{"DataLakePrincipalIdentifier": "<firehose-role-arn>"}' \
    --resource '{"Table": {"CatalogId": "<account-id>:s3tablescatalog/<table-bucket-name>", "DatabaseName": "aurora_cdc", "TableWildcard": {}}}' \
    --permissions '["ALL"]'

Note the CatalogId format: <account-id>:s3tablescatalog/<table-bucket-name>. This is specific to S3 Tables and tells Lake Formation to look up permissions in the S3 Tables catalog rather than the default Glue Data Catalog. For more information, see Integrating Amazon S3 Tables with AWS analytics services.

Next, attach a resource-based policy to the MSK cluster that grants the Firehose service principal permission to create VPC connections:

aws kafka put-cluster-policy \
    --cluster-arn <msk-cluster-arn> \
    --region <your-region> \
    --policy '{
"Version": "2012-10-17",
"Statement": [{
"Effect": "Allow",
"Principal": {"Service": "firehose.amazonaws.com"},
"Action": ["kafka:CreateVpcConnection", "kafka:GetBootstrapBrokers", "kafka:DescribeClusterV2"],
"Resource": "<msk-cluster-arn>"
}]
}'

You can find the <msk-cluster-arn> in the CdcMskCluster stack outputs from Step 4, and the <firehose-role-arn> in the CdcFirehoseRole stack outputs.

Step 6: Create the Debezium connector

With the MSK cluster running and Lake Formation permissions in place, create the Debezium connector using the MSK Connect API. The connector reads changes from Aurora PostgreSQL and publishes them to the MSK topic.

Firehose supports only one MSK topic per delivery stream, so each source table would otherwise need its own Firehose stream and VPC connection. To avoid this, the connector uses the Debezium ByLogicalTableRouter Single Message Transform (SMT) to route changes from multiple tables into a single topic (aurora.cdc.all-tables). The Lambda function then uses the source table name in each message to direct records to the correct Iceberg table. This single-topic pattern uses one Firehose stream for multiple tables, reducing cost and operational complexity.

First, retrieve the MSK bootstrap servers from the cluster:

aws kafka get-bootstrap-brokers \
    --cluster-arn <msk-cluster-arn> \
    --region <your-region>

Note the BootstrapBrokerString value (the PLAINTEXT brokers). Then create the connector:

aws kafkaconnect create-connector --cli-input-json '{
"connectorName": "aurora-postgres-debezium-connector",
"kafkaCluster": {
"apacheKafkaCluster": {
"bootstrapServers": "<bootstrap-servers>",
"vpc": {
"subnets": ["<subnet-1>", "<subnet-2>"],
"securityGroups": ["<msk-security-group-id>"]
}
}
},
"kafkaClusterClientAuthentication": {"authenticationType": "NONE"},
"kafkaClusterEncryptionInTransit": {"encryptionType": "PLAINTEXT"},
"kafkaConnectVersion": "2.7.1",
"plugins": [{"customPlugin": {"customPluginArn": "<custom-plugin-arn>", "revision": 1}}],
"serviceExecutionRoleArn": "<msk-connect-service-role-arn>",
"capacity": {"provisionedCapacity": {"mcuCount": 2, "workerCount": 2}},
"workerConfiguration": {"workerConfigurationArn": "<worker-config-arn>", "revision": 1},
"connectorConfiguration": {
"connector.class": "io.debezium.connector.postgresql.PostgresConnector",
"tasks.max": "1",
"database.hostname": "<aurora-cluster-endpoint>",
"database.port": "5432",
"database.user": "<db-user>",
"database.password": "<db-password>",
"database.dbname": "<database-name>",
"database.server.name": "aurora_cdc",
"plugin.name": "pgoutput",
"slot.name": "debezium_slot",
"publication.name": "dbz_publication",
"table.include.list": "public.orders,public.products",
"topic.prefix": "aurora.cdc",
"schema.history.internal.kafka.topic": "schema-changes.aurora",
"schema.history.internal.kafka.bootstrap.servers": "<bootstrap-servers>",
"decimal.handling.mode": "string",
"time.precision.mode": "adaptive_time_microseconds",
"tombstones.on.delete": "false",
"snapshot.mode": "initial",
"publication.autocreate.mode": "filtered",
"transforms": "Reroute",
"transforms.Reroute.type": "io.debezium.transforms.ByLogicalTableRouter",
"transforms.Reroute.topic.regex": "aurora\\\\\\\\.cdc\\\\\\\\.public\\\\\\\\.(.*)",
"transforms.Reroute.topic.replacement": "aurora.cdc.all-tables"
},
"logDelivery": {
"workerLogDelivery": {
"cloudWatchLogs": {
"enabled": true,
"logGroup": "/aws/msk-connect/aurora-cdc-debezium"
}
}
}
}'

The <msk-security-group-id> and <msk-connect-service-role-arn> can be found in the CdcMskCluster and CdcMskConnectIam stack outputs respectively. The ByLogicalTableRouter Single Message Transform routes CDC events from the monitored tables into a single topic (aurora.cdc.all-tables).

Step 7: Verify the Debezium connector

After creating the connector, verify that it is running and has completed its initial snapshot.

aws kafkaconnect list-connectors --region <your-region> \
    --query 'connectors[?connectorName==`aurora-postgres-debezium-connector`].{Name:connectorName,State:connectorState}' \
    --output table

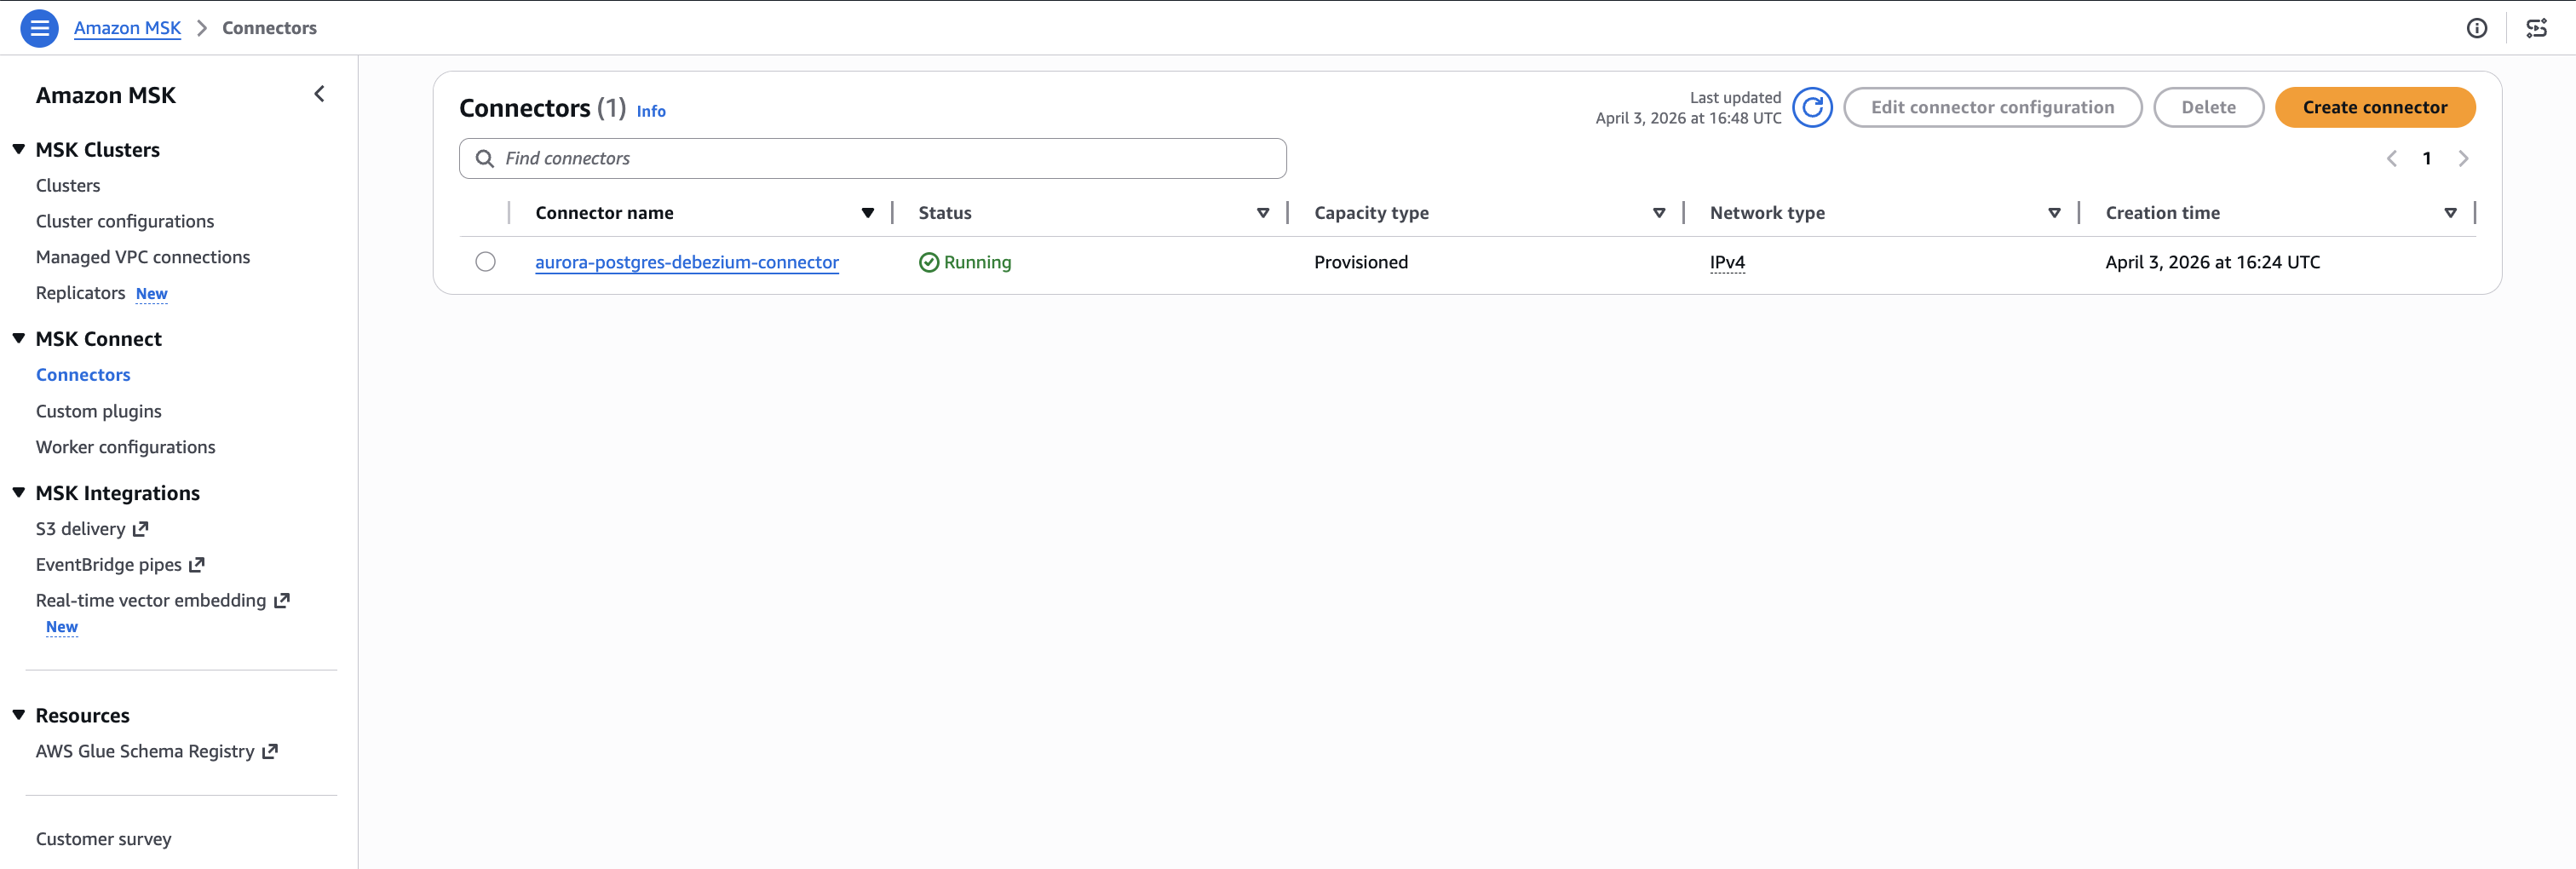
The connector state should show RUNNING, as shown in the following figure.

Figure 4. Debezium connector running on Amazon MSK Connect.

Figure 4. Debezium connector running on Amazon MSK Connect.

Check the CloudWatch Logs to confirm the snapshot completed:

aws logs tail /aws/msk-connect/aurora-cdc-debezium --follow --region <your-region>

You should see messages indicating the transition to streaming mode:

Finished exporting 0 records for table 'public.orders' (1 of 2 tables)
Finished exporting 0 records for table 'public.products' (2 of 2 tables)
Snapshot completed
Starting streaming

If the tables were empty when the connector started, the export count is 0. If you had existing data, the snapshot captures the existing rows as r (read) operations, which the Lambda function maps to insert operations in the Iceberg tables.

Verify that the Firehose delivery stream is active:

aws firehose describe-delivery-stream \
    --delivery-stream-name msk-to-s3tables-firehose \
    --region <your-region> \
    --query 'DeliveryStreamDescription.DeliveryStreamStatus'

The status should return ACTIVE.

Step 8: Test the pipeline

Insert test data into the Aurora PostgreSQL source tables. Each insert triggers a CDC event that flows through the pipeline: Aurora WAL to Debezium to MSK topic to Firehose to Lambda transform to S3 Tables.

-- Insert orders
INSERT INTO public.orders (customer_id, order_date, total_amount, status)
VALUES
(1, '2026-01-20', 299.99, 'shipped'),
(2, '2026-01-21', 149.50, 'processing'),
(1, '2026-01-22', 89.99, 'delivered');
-- Insert products
INSERT INTO public.products (product_name, category, price, stock_quantity)
VALUES
('Wireless Headphones', 'Electronics', 79.99, 150),
('Running Shoes', 'Sports', 129.99, 75),
('Coffee Maker', 'Kitchen', 49.99, 200);

This creates six records across two tables. Each record generates a Debezium CDC event with operation type c (create), which the Lambda function maps to an insert operation in the corresponding Iceberg table.

Step 9: Verify data delivery

Check the Firehose IncomingRecords metric to confirm records are flowing through the delivery stream:

aws cloudwatch get-metric-statistics \
    --namespace AWS/Firehose \
    --metric-name IncomingRecords \
    --dimensions Name=DeliveryStreamName,Value=msk-to-s3tables-firehose \
    --start-time $(date -u -v-10M +%Y-%m-%dT%H:%M:%S) \
    --end-time $(date -u +%Y-%m-%dT%H:%M:%S) \
    --period 60 --statistics Sum \
    --region <your-region>

You should see a Sum value of 6 or more. If the value is 0, wait another minute and retry. There can be a short delay between MSK topic delivery and Firehose metric reporting.

If records aren’t appearing, check the Firehose error output in the backup S3 bucket and the Lambda function’s CloudWatch Logs for transformation errors.

Step 10: Query data using Amazon Athena

With data delivered to S3 Tables, you can query the Iceberg tables using Amazon Athena. S3 Tables integrates with the AWS Glue Data Catalog as a sub-catalog, so you reference tables using the S3 Tables catalog format.

Tip: If records aren’t appearing in Athena, check the Firehose IncomingRecords CloudWatch metric and the Lambda function’s CloudWatch Logs for transformation errors.

Open the Athena console, select the AwsDataCatalog data source, and run the following queries:

SELECT * FROM "s3tablescatalog/<table-bucket-name>"."aurora_cdc"."products" LIMIT 10;
SELECT * FROM "s3tablescatalog/<table-bucket-name>"."aurora_cdc"."orders" LIMIT 10;

Replace <table-bucket-name> with your S3 table bucket name. You should see the records from the initial snapshot that Debezium captured when the connector started.

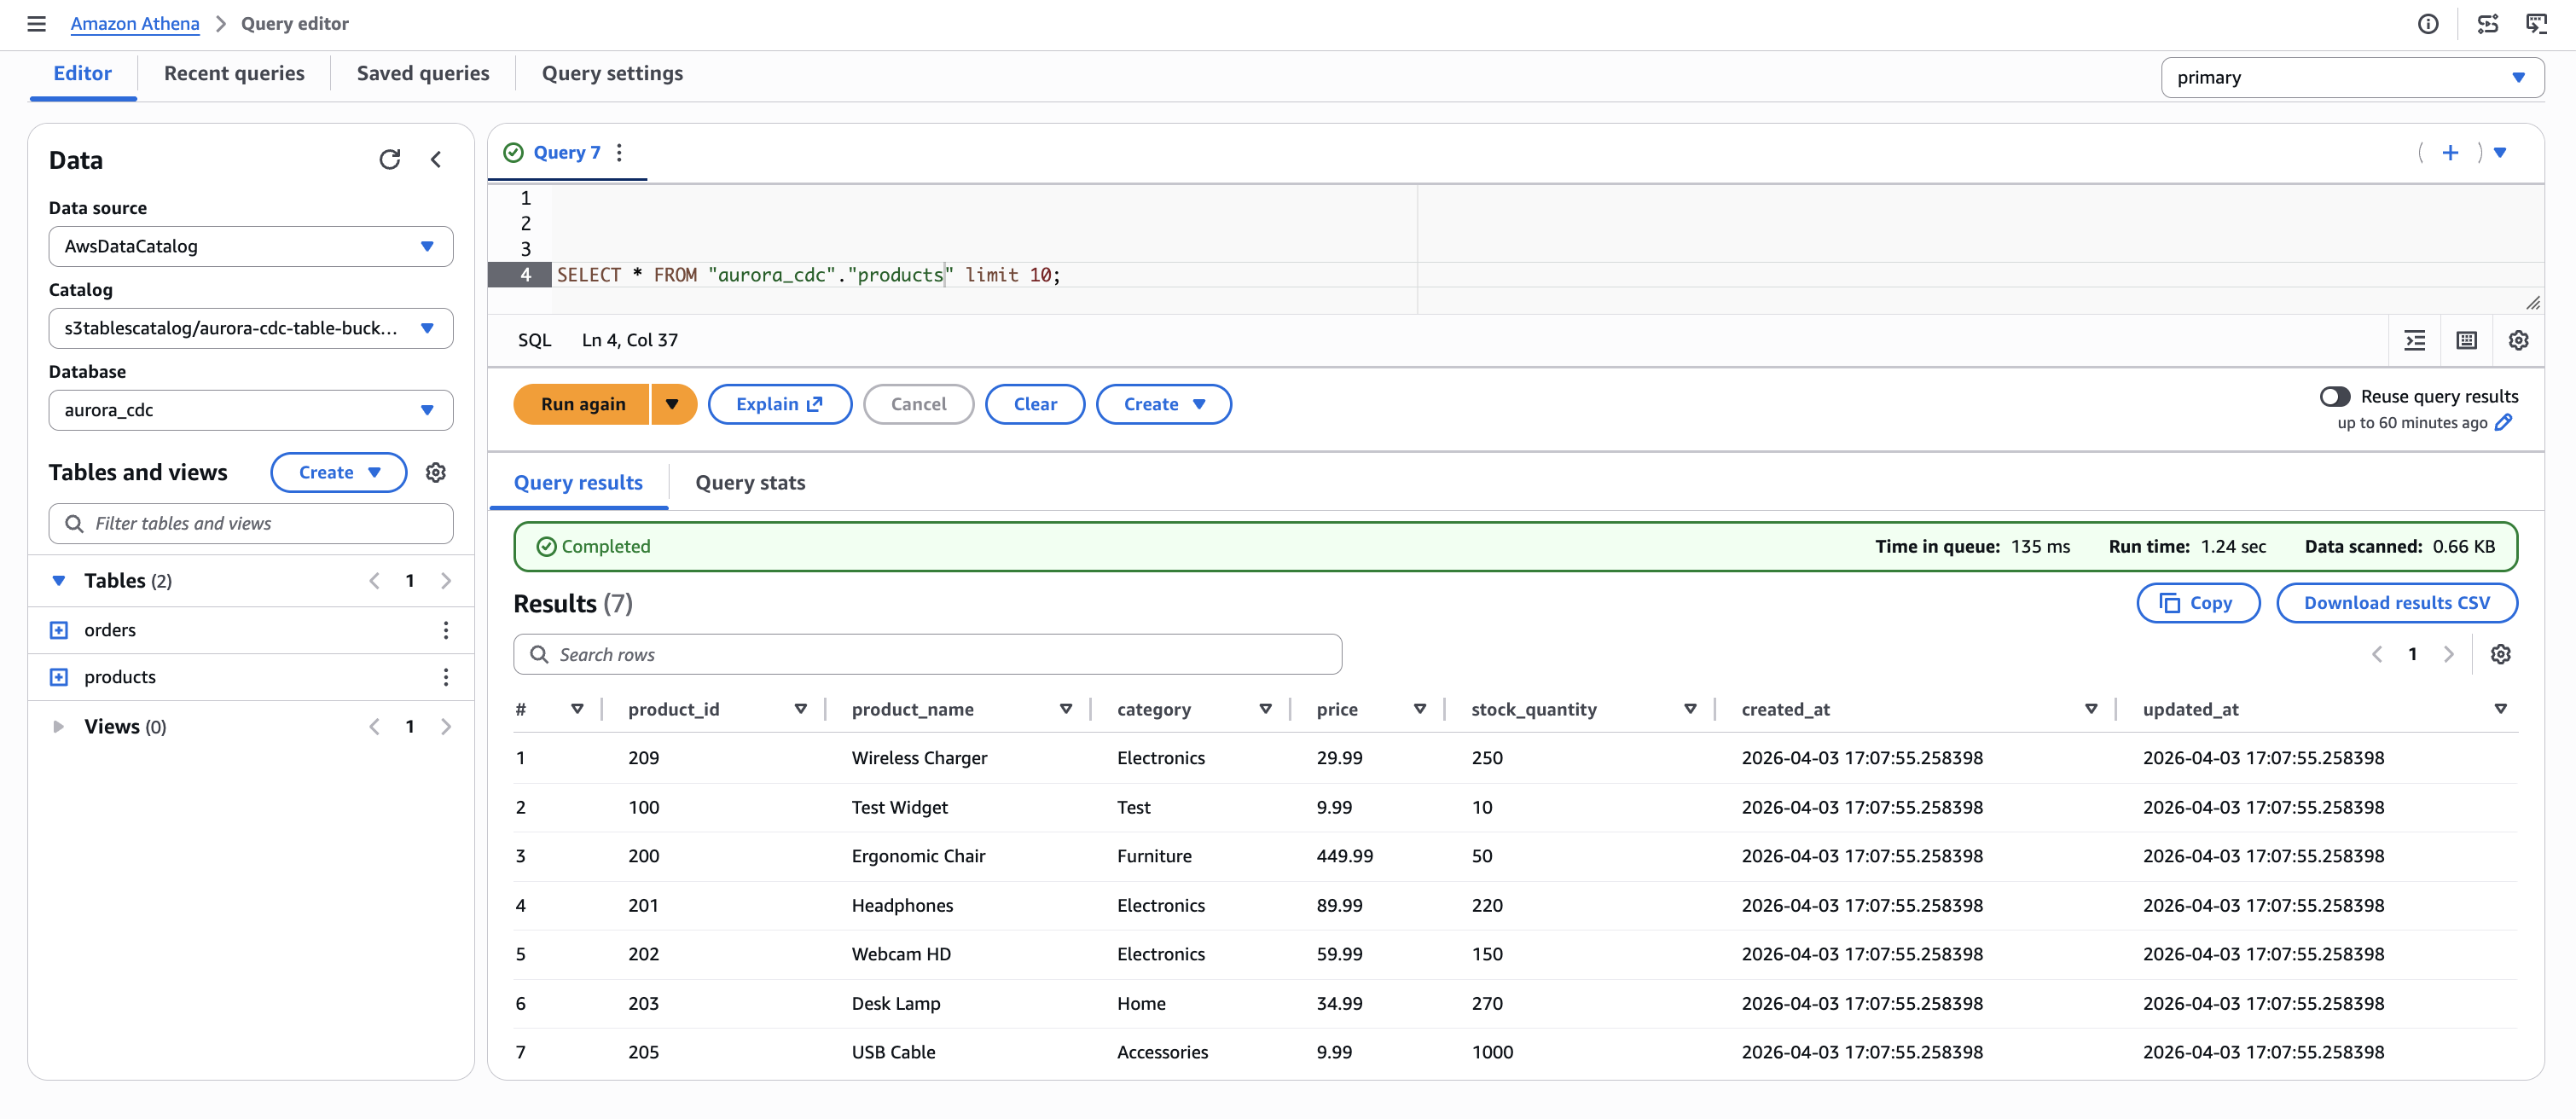
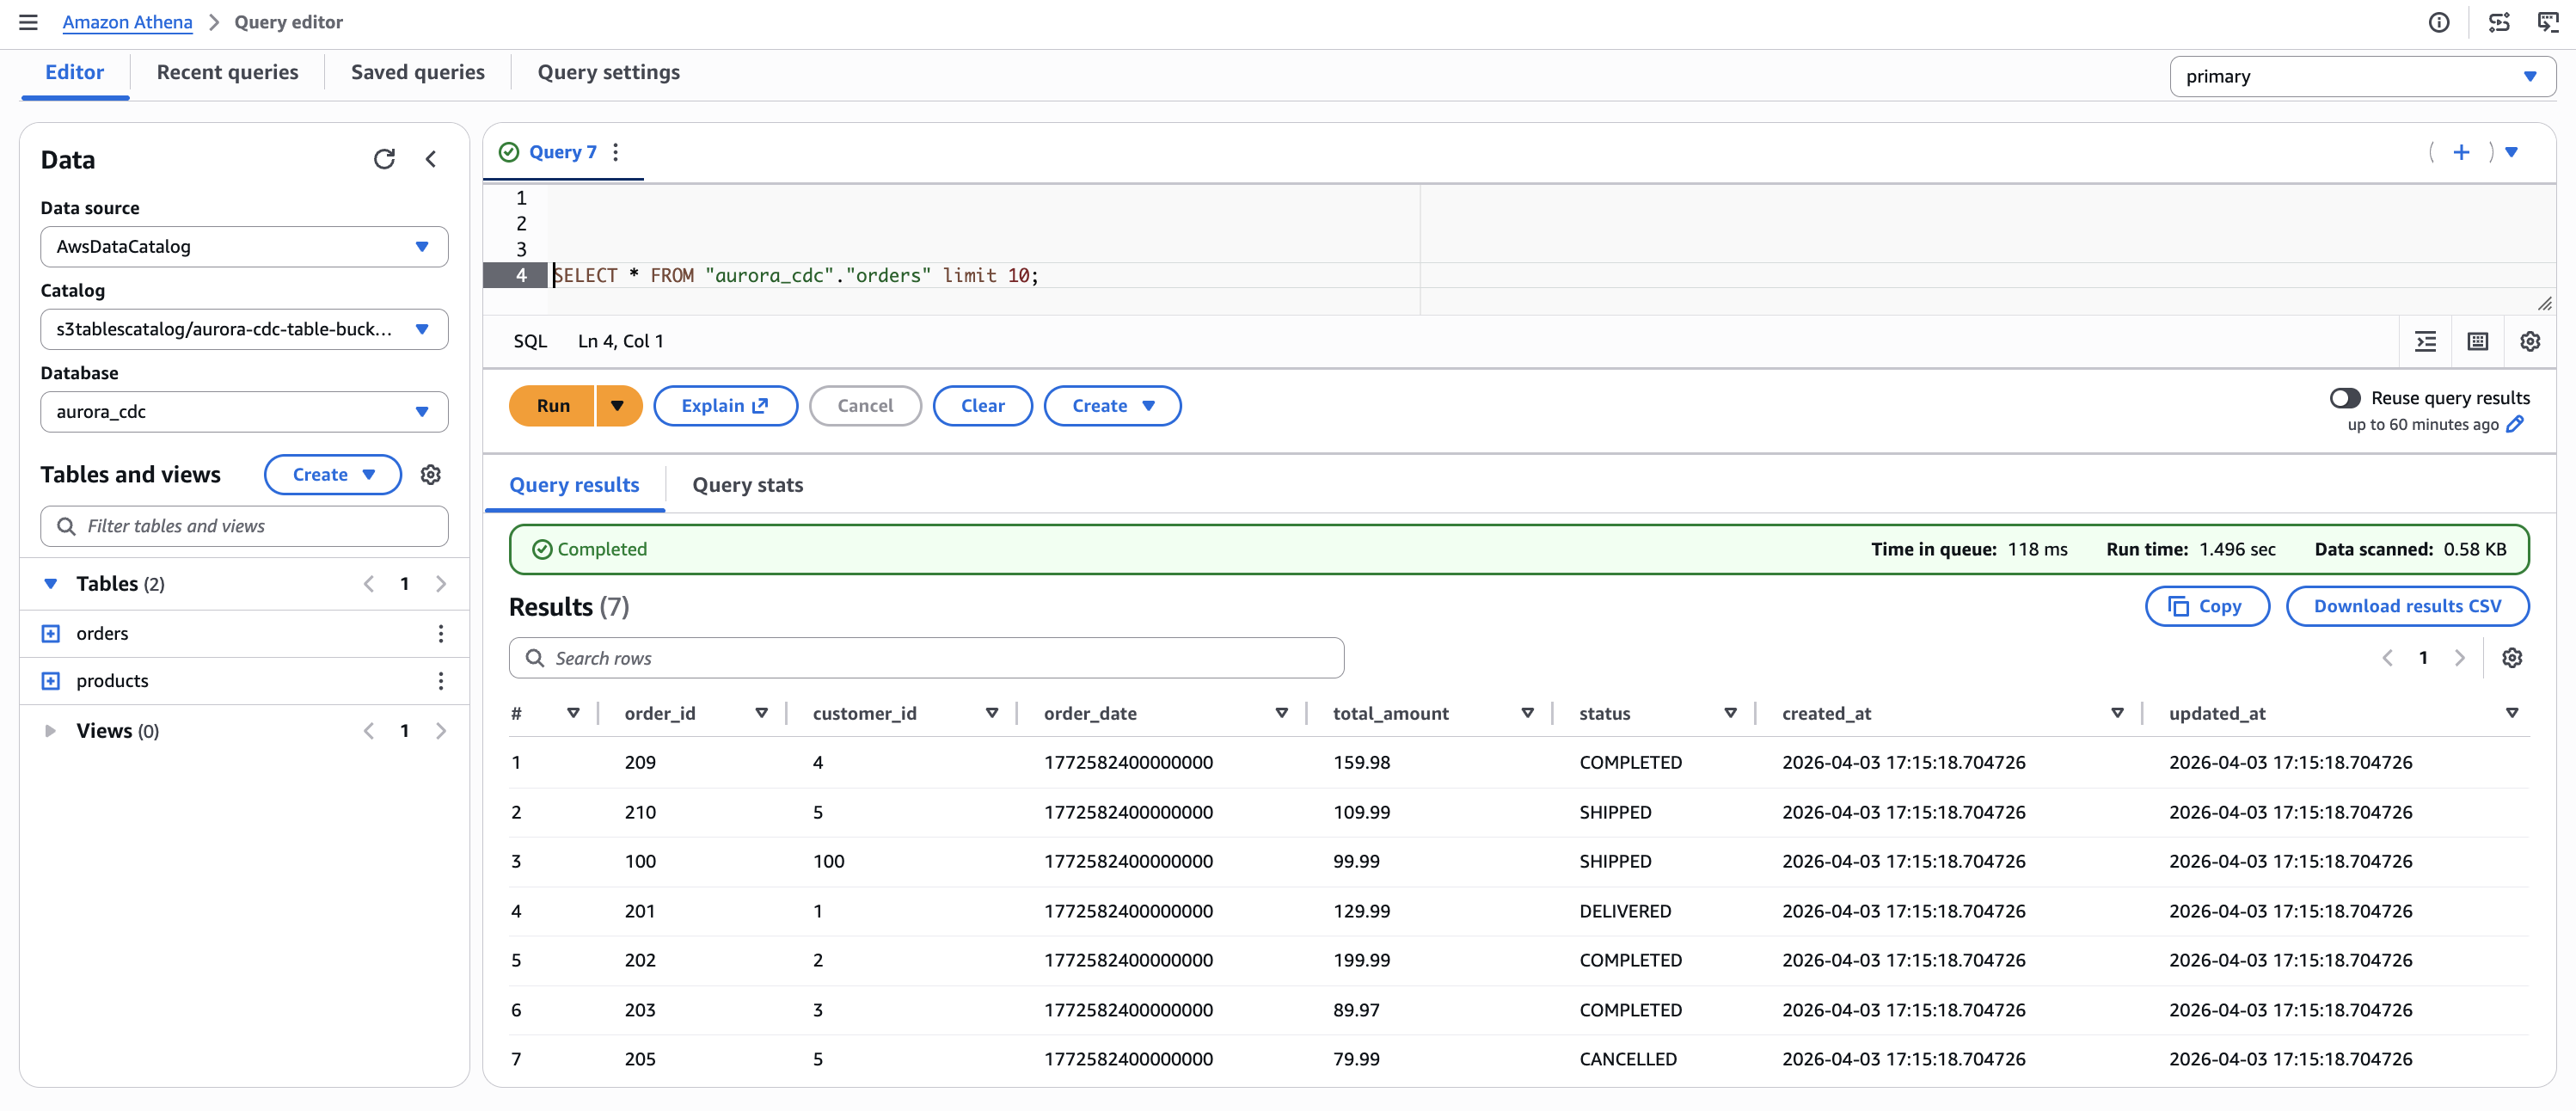
The following figures show the initial state of both tables as queried through Athena. At this point, the products table contains seven records and the orders table contains seven records, captured during the Debezium initial snapshot.

Figure 5. Initial state of the products table in Amazon Athena, showing seven records captured from Aurora PostgreSQL through the CDC pipeline.

Figure 5. Initial state of the products table in Amazon Athena, showing seven records captured from Aurora PostgreSQL through the CDC pipeline.

Figure 6. Initial state of the orders table in Amazon Athena, showing seven records captured from Aurora PostgreSQL through the CDC pipeline.

Figure 6. Initial state of the orders table in Amazon Athena, showing seven records captured from Aurora PostgreSQL through the CDC pipeline.

Now test that update and delete operations propagate correctly. Run the following statements in Aurora:

-- Insert new records
INSERT INTO public.products (product_name, category, price, stock_quantity)
VALUES ('Bluetooth Speaker', 'Electronics', 129.99, 90), ('Standing Desk', 'Furniture', 799.99, 20);
INSERT INTO public.orders (customer_id, order_date, total_amount, status)
VALUES (201, '2026-04-03', 149.99, 'NEW'), (202, '2026-04-03', 249.50, 'NEW'), (203, '2026-04-03', 79.90, 'NEW');
-- Update existing records
UPDATE public.products SET stock_quantity = 30, price = 549.99 WHERE product_name = 'Ergonomic Chair';
UPDATE public.orders SET status = 'DELIVERED' WHERE order_id = 201;
-- Delete a record
DELETE FROM public.products WHERE product_name = 'Test Widget';

Wait for the changes to propagate through the pipeline, then query Athena again. The following figures show the results after the insert, update, and delete operations have been applied.

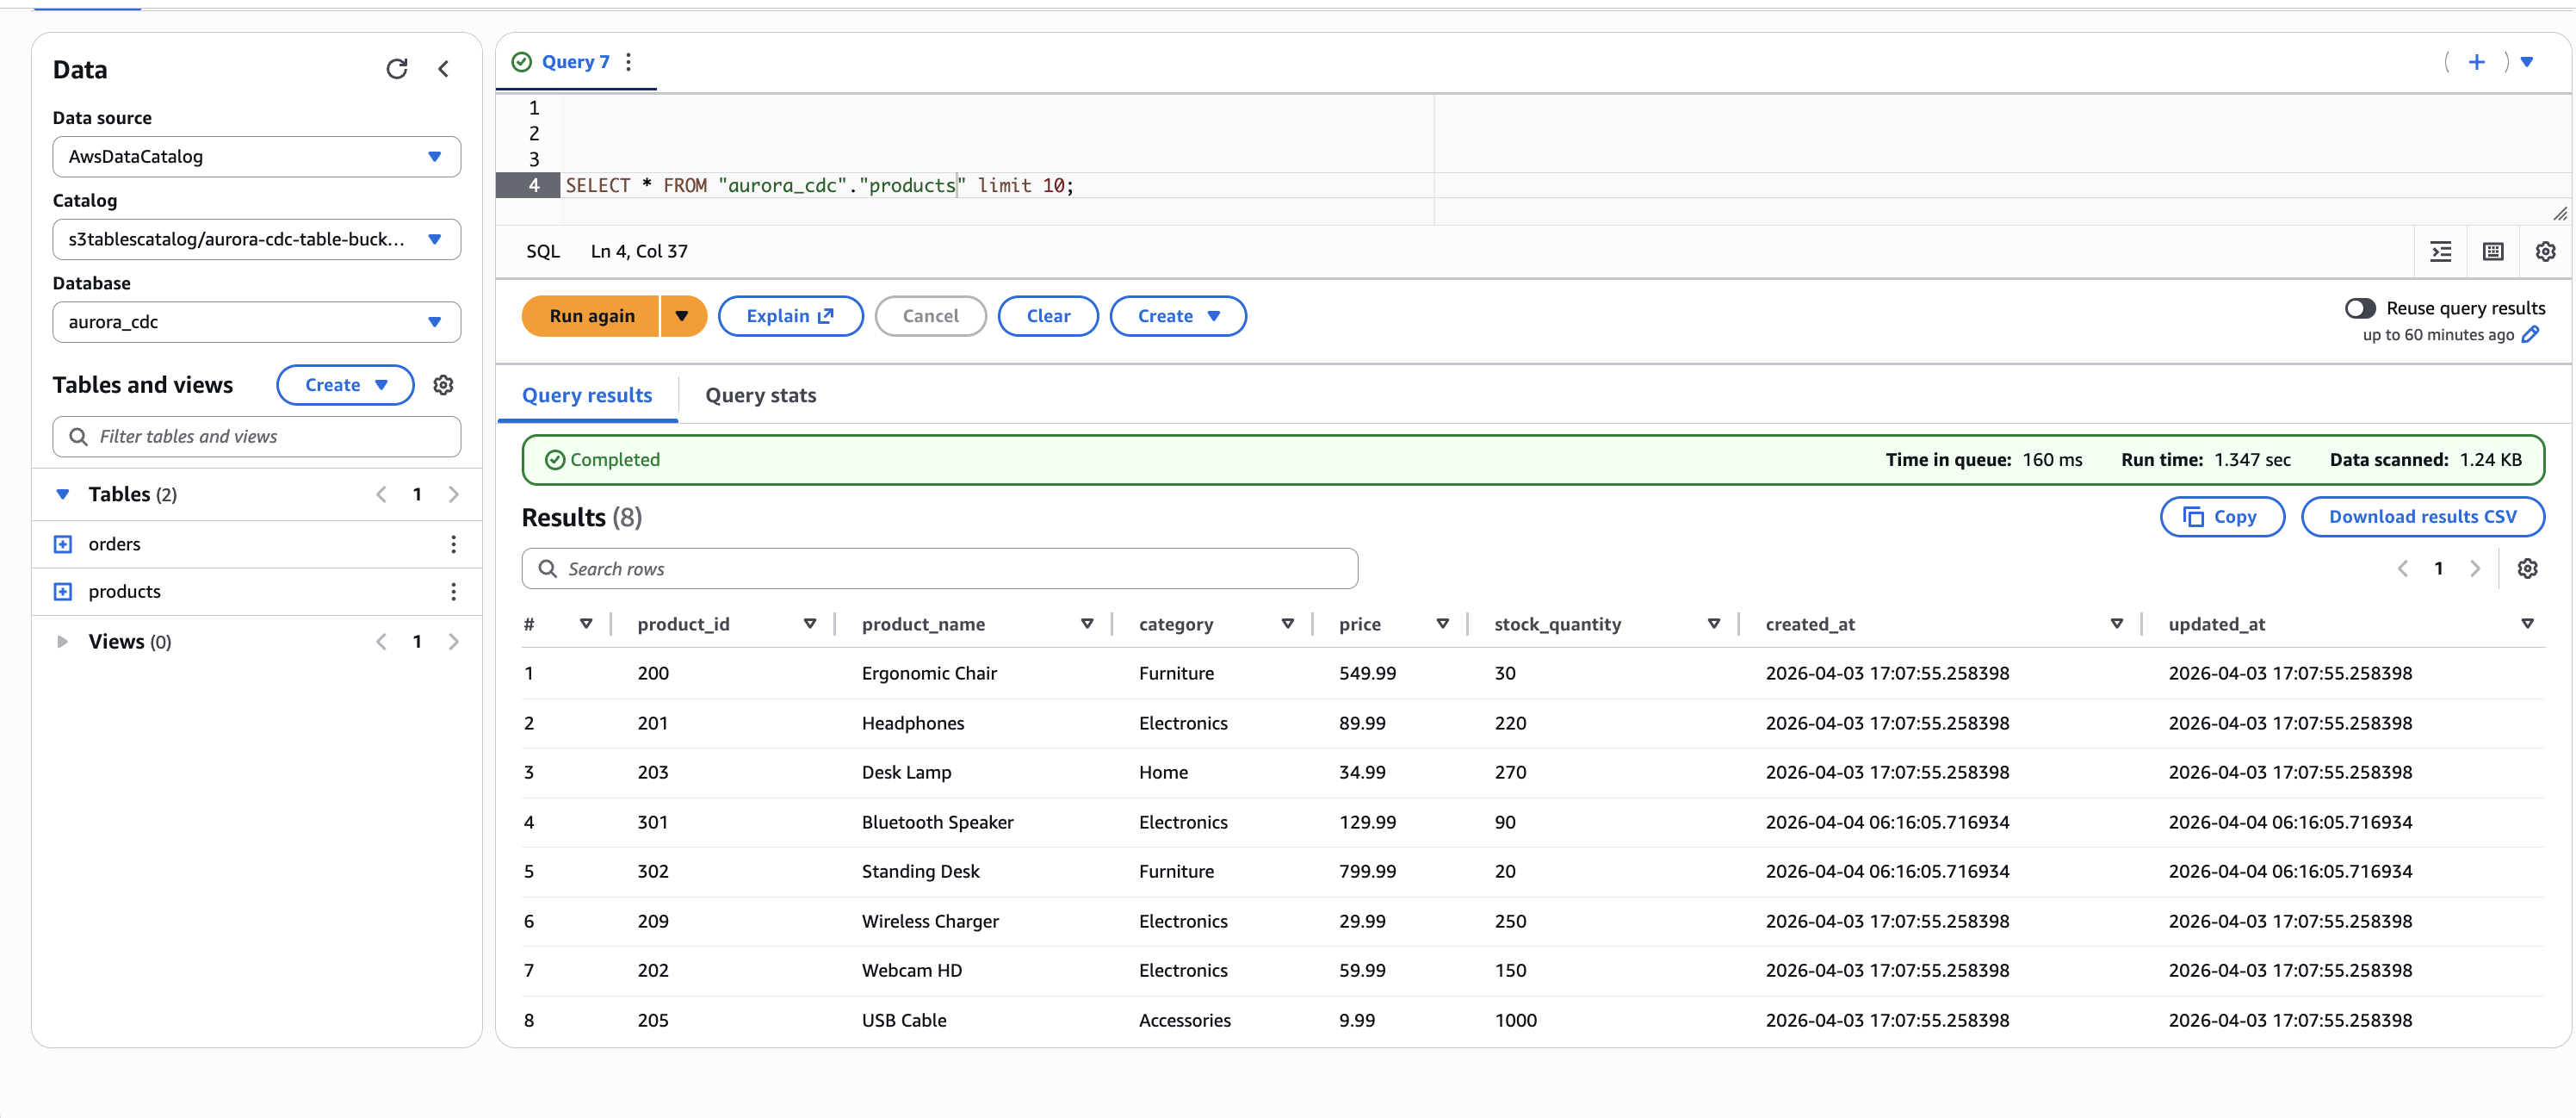
In the products table, the Test Widget record (product_id 100) is no longer present because it was removed by the delete operation. The Ergonomic Chair row now reflects the updated price (549.99) and stock quantity (30). Two new records, Bluetooth Speaker and Standing Desk, appear with a later created_at timestamp, confirming they were inserted after the initial snapshot.

Figure 7. Products table after CDC operations. The Ergonomic Chair, Headphones, and Desk Lamp rows reflect updated values. Bluetooth Speaker and Standing Desk are newly inserted records. The Test Widget record has been removed by the delete operation.

Figure 7. Products table after CDC operations. The Ergonomic Chair, Headphones, and Desk Lamp rows reflect updated values. Bluetooth Speaker and Standing Desk are newly inserted records. The Test Widget record has been removed by the delete operation.

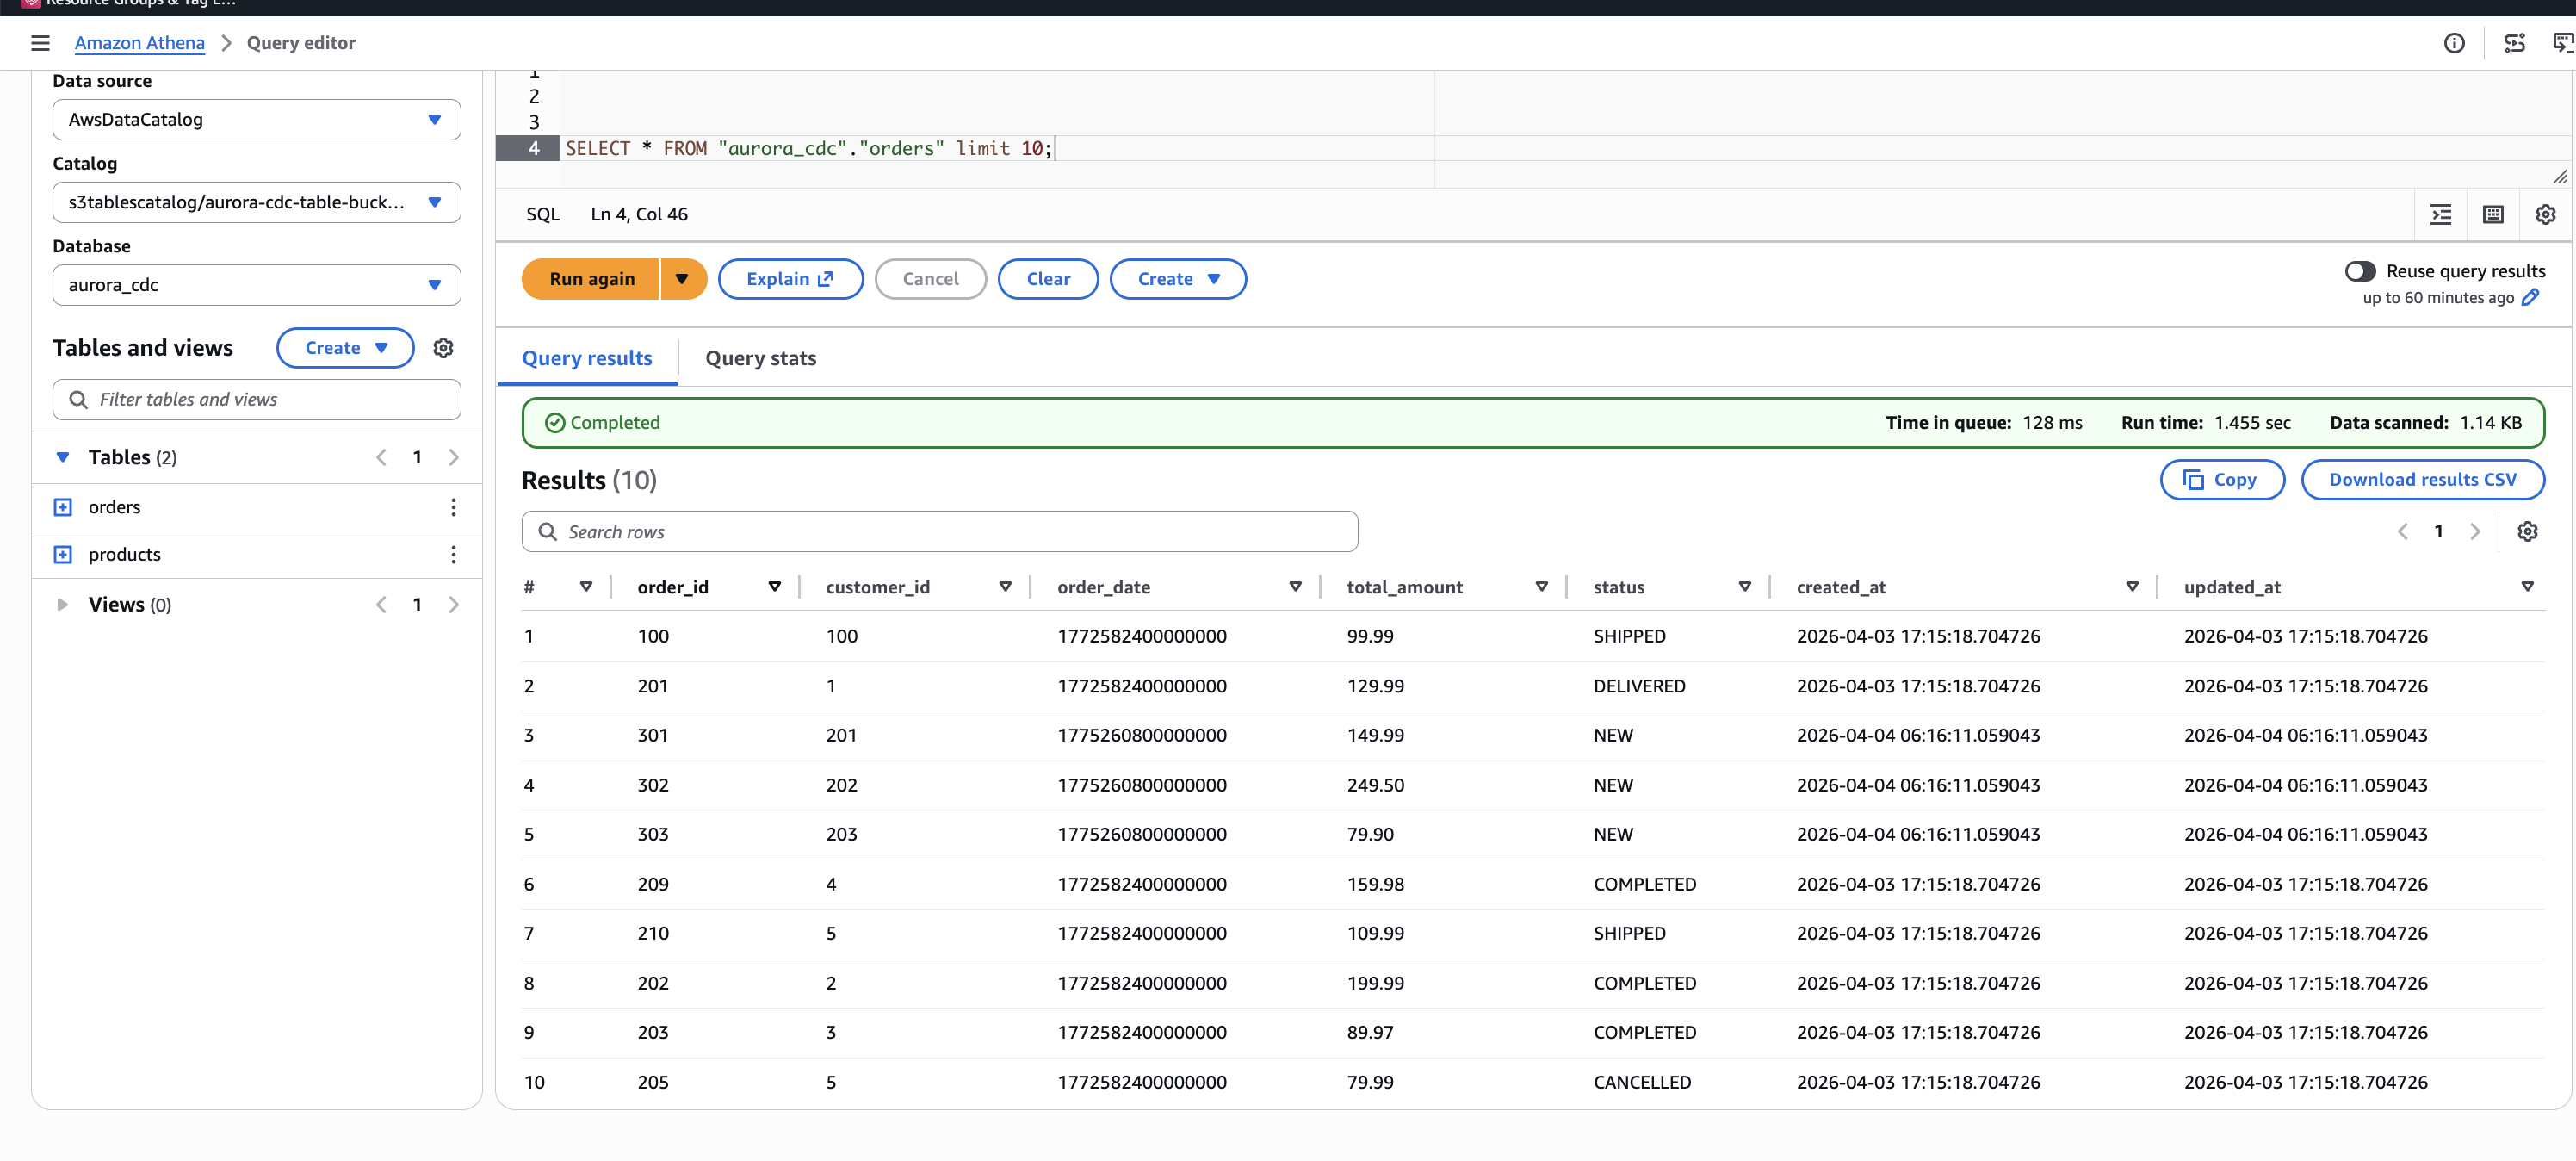
In the orders table, order 100 now shows a status of SHIPPED and order 201 shows DELIVERED, reflecting the update operations. Three new orders (301, 302, 303) appear with status NEW and a later timestamp, confirming they were inserted after the initial load.

Figure 8. Orders table after CDC operations. Orders 100 and 201 reflect updated status values. Orders 301, 302, and 303 are newly inserted records.

Figure 8. Orders table after CDC operations. Orders 100 and 201 reflect updated status values. Orders 301, 302, and 303 are newly inserted records.

This confirms that the pipeline correctly handles the three CDC operation types: inserts, updates, and deletes are captured from the Aurora WAL by Debezium, routed through the single MSK topic, transformed by the Lambda function, and applied as row-level Iceberg operations by Firehose.

S3 Tables handles compaction and snapshot management for Iceberg tables automatically, including compaction of small data files and expiration of old snapshots. You don’t need to run manual maintenance operations.

You can also use Iceberg’s time travel capability to query the table as it existed before the updates:

SELECT * FROM "s3tablescatalog/<table-bucket-name>"."aurora_cdc"."orders"
FOR TIMESTAMP AS OF current_timestamp - interval '5' minute;

This returns the original data before the update, demonstrating the time travel capability that Apache Iceberg provides through S3 Tables.

Cleaning up

To avoid ongoing charges, delete the resources in reverse dependency order.

Delete the CDK stacks:

cd cdk
npx cdk --app "npx ts-node bin/app-v2.ts" destroy --all

Delete the Debezium custom plugin and worker configuration that were created through the AWS CLI in Step 2:

aws kafkaconnect delete-custom-plugin --custom-plugin-arn <plugin-arn>
aws kafkaconnect delete-worker-configuration --worker-configuration-arn <worker-config-arn>

Clean up the Aurora PostgreSQL replication resources:

SELECT pg_drop_replication_slot('debezium_slot');
DROP PUBLICATION dbz_publication;

Important: The replication slot (debezium_slot) was created automatically by Debezium. If you plan to redeploy the pipeline later, you don’t need to drop the slot and publication. However, the replication slot continues to retain WAL segments while the connector isn’t running, which can increase storage usage on the Aurora cluster. The MSK cluster is the largest cost component of this solution and can’t be paused. It can only be deleted and recreated.

Conclusion

In this post, we showed you how to build a near real-time CDC pipeline from Aurora PostgreSQL to Apache Iceberg tables in Amazon S3 Tables. The key architectural decisions include:

  • Single-topic routing with multi-table delivery. The Debezium ByLogicalTableRouter SMT routes CDC events from multiple tables through one MSK topic, and the Lambda otfMetadata routing directs each record to the correct Iceberg table. This reduces VPC connection costs by using a single Firehose stream for inserts, updates, and deletes across multiple destination tables.
  • Fully managed CDC pipeline. MSK Connect runs Debezium, Firehose handles delivery with automatic retries, and S3 Tables manages Iceberg compaction and snapshots. The Lambda transform preserves CDC semantics by mapping Debezium operations to Iceberg row-level operations.
  • Governed lakehouse access. Lake Formation controls fine-grained access to the Iceberg tables, and data from multiple isolated Aurora clusters can be unified in a single S3 Tables namespace for cross-domain analytics.
  • Infrastructure as code. Six AWS CDK stacks deploy the core pipeline, with Lake Formation permissions, MSK cluster policy, and Debezium connector configured through documented CLI steps.

To get started, clone the sample repository and follow the walkthrough steps. For more information about the services used in this solution, see the Amazon MSK Developer Guide, Amazon Data Firehose Developer Guide, and Amazon S3 Tables User Guide.

We encourage you to try this solution and adapt it to your own CDC workloads. If you have questions or feedback, leave a comment on this post.


About the author

Chintan Agrawal

Chintan Agrawal

Chintan is a Solutions Architect with over 7 years of experience, with a specialization in Analytics and Healthcare domain. He possesses a strong enthusiasm for assisting clients in discovering valuable insights from their data. Through his expertise, he constructs innovative solutions that empower businesses to arrive at informed, data-driven choices.