All posts by Damola Oluyemo

Announcing CloudFormation IDE Experience: End-to-End Development in Your IDE

Post Syndicated from Damola Oluyemo original https://aws.amazon.com/blogs/devops/announcing-cloudformation-ide-experience-end-to-end-development-in-your-ide/

If you’ve developed AWS CloudFormation templates, you know the drill; write YAML(YAML Ain’t Markup Language) in your IDE(Integrated Development Environment), switch to the AWS Management Console to validate, jump to documentation to verify property names. Then run CFN Lint(Cloudformation Linter) in your terminal, deploy and wait, then troubleshoot failures back in the console. This constant context switching between your IDE, AWS Console, documentation pages, and validation tools fragments your workflow and kills productivity. What should take 30 minutes often stretches into hours of iteration cycles.

Today, we’re excited to introduce the CloudFormation IDE Experience, a comprehensive solution that brings the entire CloudFormation development lifecycle into your IDE. No more context switching. No more fragmented workflows. Just one unified, intelligent development experience from authoring to deployment.

In this post, you’ll learn how the Cloudformation IDE Experience transforms your workflow with intelligent authoring, real-time validation, AWS integration, and more.

What is the CloudFormation IDE Experience?

The CloudFormation IDE Experience reimagines how you build infrastructure as code by creating an end-to-end development loop entirely within your IDE. Unlike generic YAML or JSON editors, this is a CloudFormation-first solution built specifically for infrastructure developers.

This solution covers the complete lifecycle; from intelligent authoring with smart code completion and navigation that understands CloudFormation semantics, to real-time multi-layer validation that catches issues before deployment. It provides direct AWS integration for seamless resource imports and stack visibility, monitors configuration drift between your templates and deployed resources, and includes server-side pre-deployment checks that prevent common deployment failures.
The result? A development environment that understands your infrastructure code as deeply as your IDE understands your application code.

Core Features

Quick Project Setup with CFN Init

CFN Init streamlines project setup by creating a structured CloudFormation project with environment configurations in seconds. Run “CFN Init: Initialize Project” from the Command Palette, configure your environments (dev, staging, production), and associate each with an AWS profile.

The CloudFormation Explorer displays your environments, letting you switch between them with a single click. Each environment maintains its own deployment settings and parameter values, eliminating manual configuration and ensuring consistent deployments across your infrastructure lifecycle.

Intelligent Authoring with Intelligent Code Completion

The IDE understands CloudFormation semantics and provides context-aware suggestions as you type. Only required properties appear automatically, while optional properties surface on hover, so when you add a Properties section to an EC2 VPC resource, nothing appears because it has no required properties. Create a subnet, however, and VpcId appears immediately because it’s required.

When you use !GetAtt or !Ref, the IDE knows exactly which attributes and resources are available. Navigation features like go-to-definition for logical IDs and hover tooltips let you explore complex templates without losing context. The IDE also provides full support for CloudFormation intrinsic functions and pseudo parameters.

Multi-Layer Validation System

The IDE provides comprehensive validation at multiple levels:

Static Validation (Real-time)

  • CloudFormation Guard Integration: Security and compliance checks using AWS Security pillar rules. For example, it automatically flags insecure configurations like MapPublicIpOnLaunch: true on subnets
  • CFN Lint Integration: Advanced syntax and logic validation, including overlapping CIDR block detection, resource dependency validation, and property checks beyond basic schema validation

Interactive Error Resolution
When errors occur, the IDE doesn’t just highlight them, it helps you fix them. Contextual error messages explain what’s wrong and why it matters, while one-click quick fixes automatically correct common issues like missing required properties or invalid reference formats. If you reference a non-existent resource, the IDE suggests valid alternatives from your template. Reference an invalid attribute with !GetAtt, the IDE immediately shows which attributes are actually available for that resource type.

AWS Resource Integration (CCAPI)

Import existing AWS resources directly into your templates using the Cloud Control API (CCAPI). Browse live resources and view all CloudFormation stacks in your AWS account from within the IDE. Pull resource configurations directly into your template with one click, complete with accurate property values. This transforms existing infrastructure into Infrastructure-as-Code without manual reconstruction or switching to the console to look up property values.

Server-Side Validation

Before you deploy, the IDE performs comprehensive server-side validation through AWS’s intelligent validation service that analyzes your CloudFormation templates against real-world deployment patterns and catches issues static analysis can’t detect.

The AWS’s intelligent validation service uses AWS-managed hooks to analyze your change sets before execution across three categories. Enhanced template validation covers CFN Lint blind spots like transforms and parameter values. Primary identifier conflict detection finds existing resources with the same identifiers before you attempt deployment. Resource state validation checks resource readiness ensuring, for example, that Amazon Simple Storage Service(S3) buckets are empty before deletion attempts.

This validation is based on analysis of the top CloudFormation failure patterns, helping you catch issues before they cause rollbacks or failed states.

Getting Started

Getting started with the CloudFormation IDE Experience is straightforward:

Prerequisite:

  1. Install an IDE that supports the CloudFormation extension, such as Visual Studio Code, Kiro
  2. Download the CloudFormation extension for your platform (available through the AWS Toolkit)
  3. Install the extension following the standard VS Code extension installation process

No complex dependency management or schema updates required—all configuration and updates are handled automatically.

Let’s See How It Works

Let’s walk through a practical example that demonstrates the IDE experience in action. We’ll build a simple Amazon Virtual Private Cloud (Amazon VPC) infrastructure with subnets and an S3 bucket.

Setting Up Your Project

Start by initializing a new CloudFormation project. Open the Command Palette, run “CFN Init: Initialize Project”, choose your project location, and set up environments. For this example, create a “beta” environment and associate it with your AWS development profile. The IDE creates your project structure with configuration files ready to use. You can now select your “beta” environment from the CloudFormation Explorer to ensure all deployments use the correct settings.

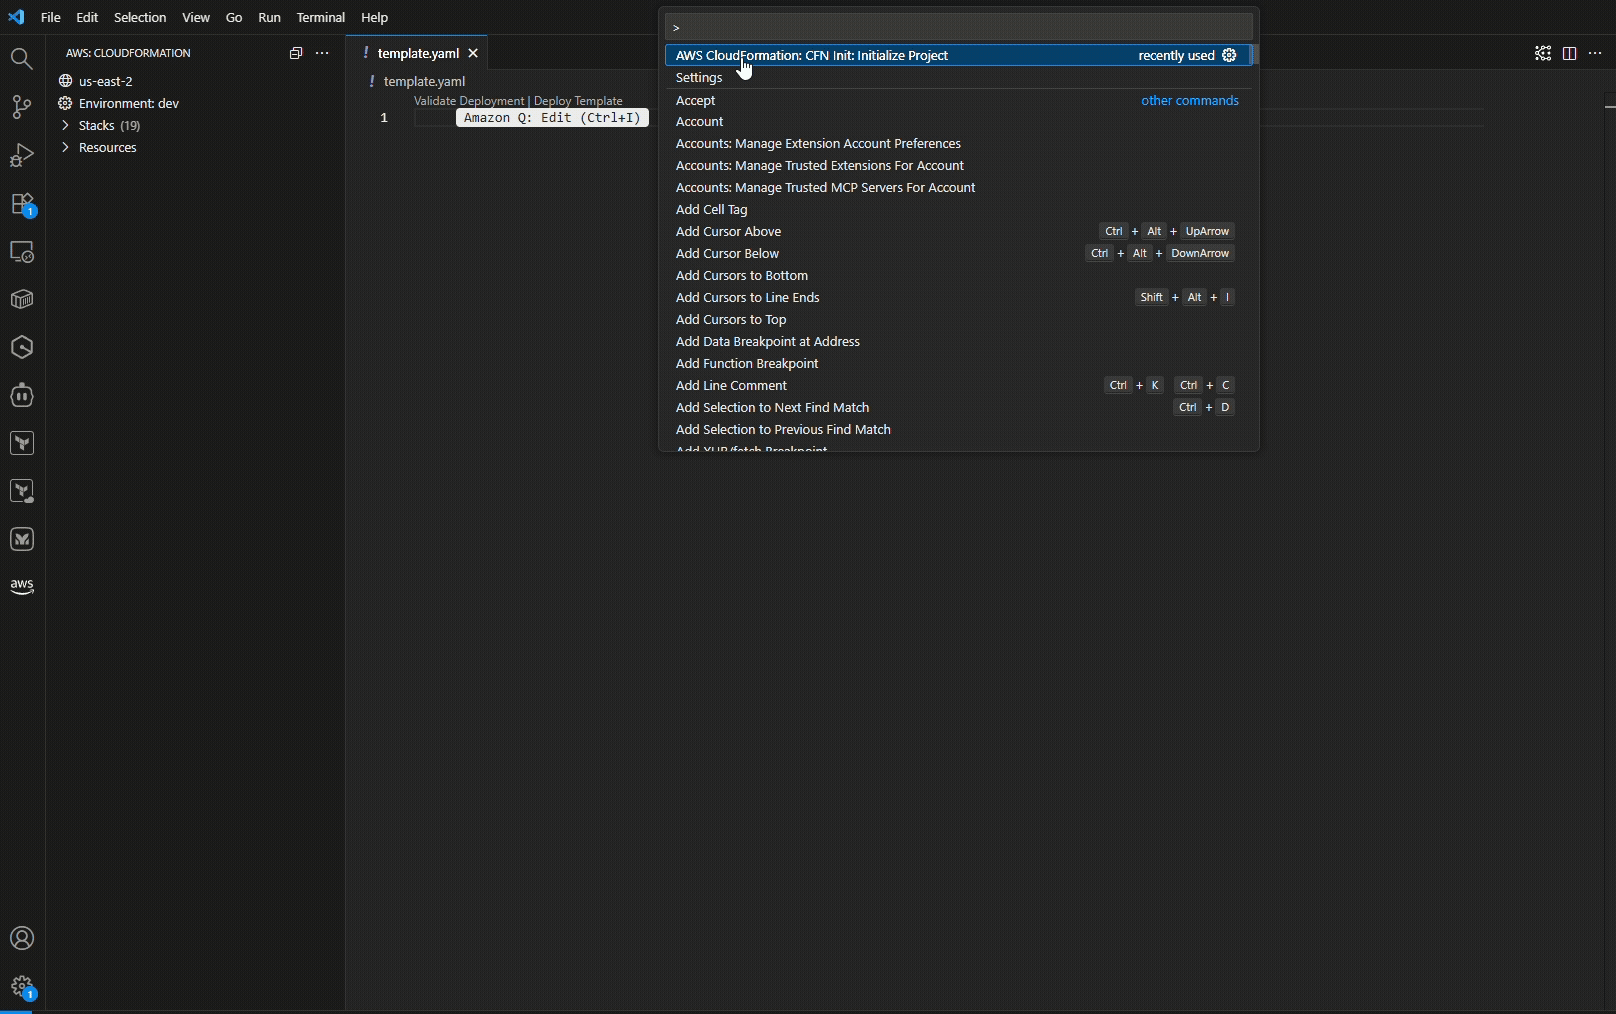
Figure 1: Initializing a CloudFormation project with environment configuration

Starting with Intelligent Authoring

Create a new CloudFormation template and start typing AWS::EC2::VPC. The IDE provides intelligent completions as you type.

Cloudformation IDE extension intelligent completion

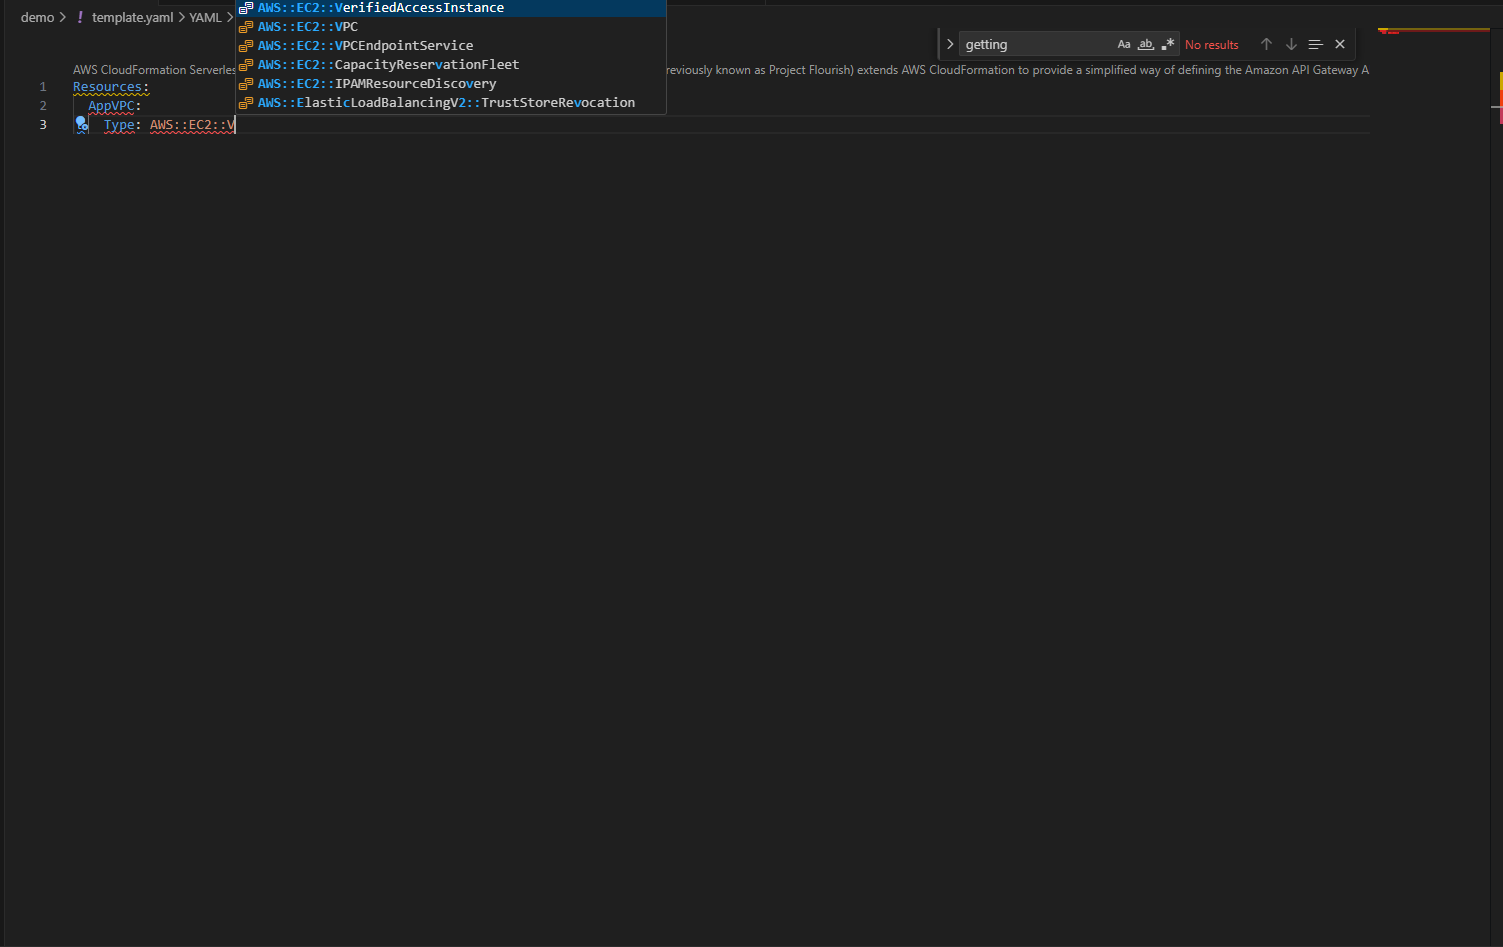
Figure 2.0: Resource type auto-completion with CloudFormation-aware IntelliSense

When you add the Properties section, notice something interesting: nothing appears automatically. That’s because Amazon Elastic Compute Cloud (Amazon EC2) VPC has no required properties.

Cloudformation IDE extension doesn't suggest optional properties
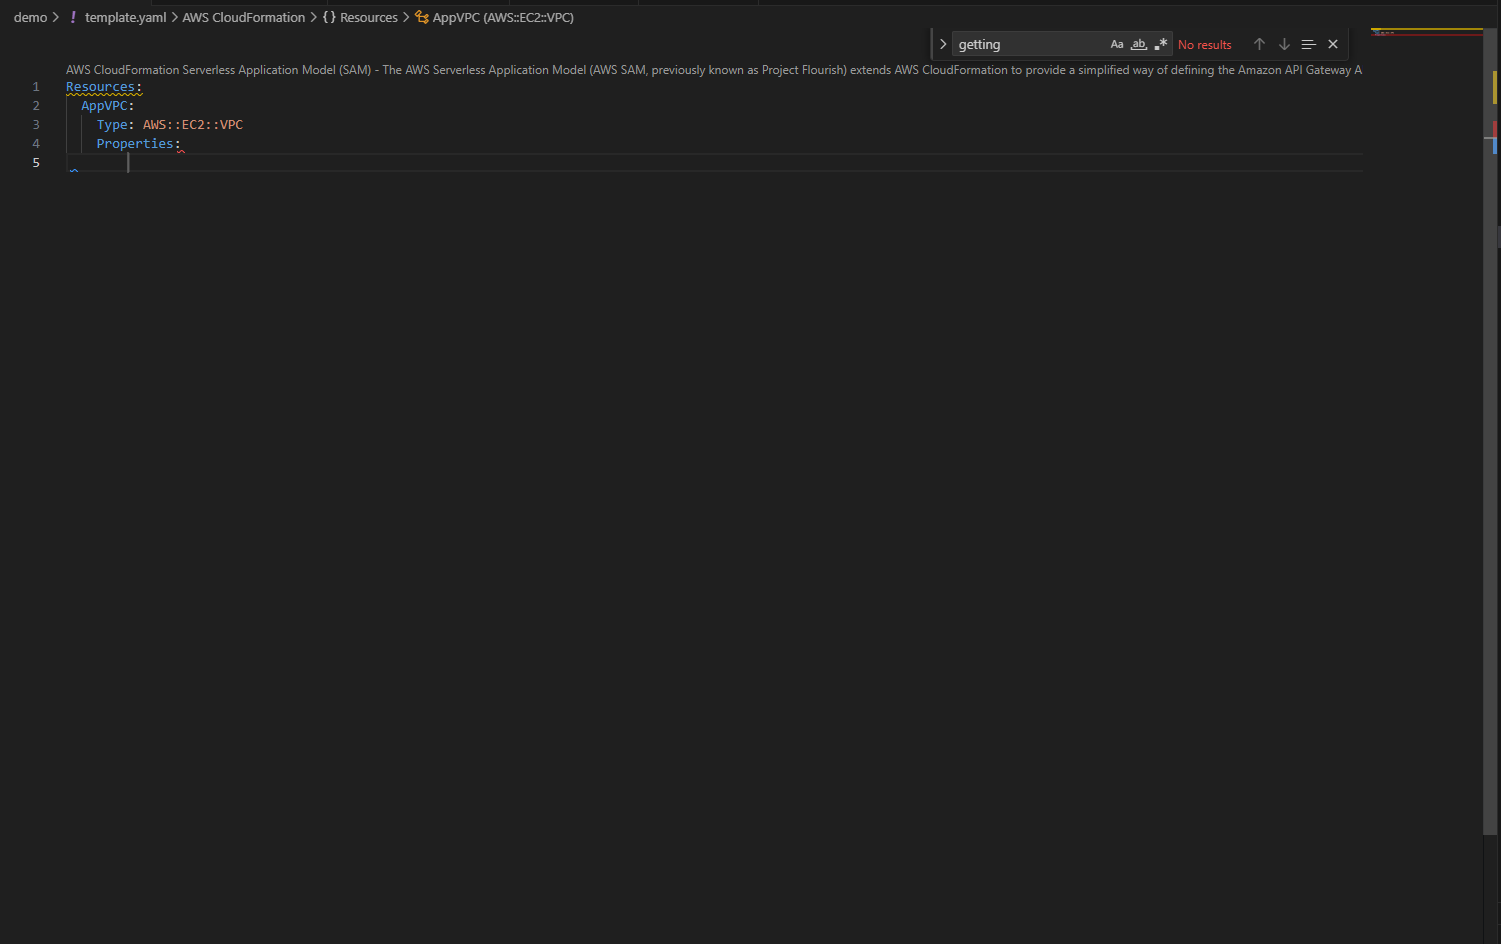
Figure 2.1: No automatic suggestions for VPC properties since none are required

Hover over Properties to see all available options with their types and documentation links.

Hover information displaying optional properties and their documentation

Figure 2.2: Hover information displaying optional properties and their documentation

Add a CIDR block, then create a subnet. This time, when you type Properties, VpcId appears immediately because it’s required.

Required properties VpcID automatically suggested for EC2 Subnet
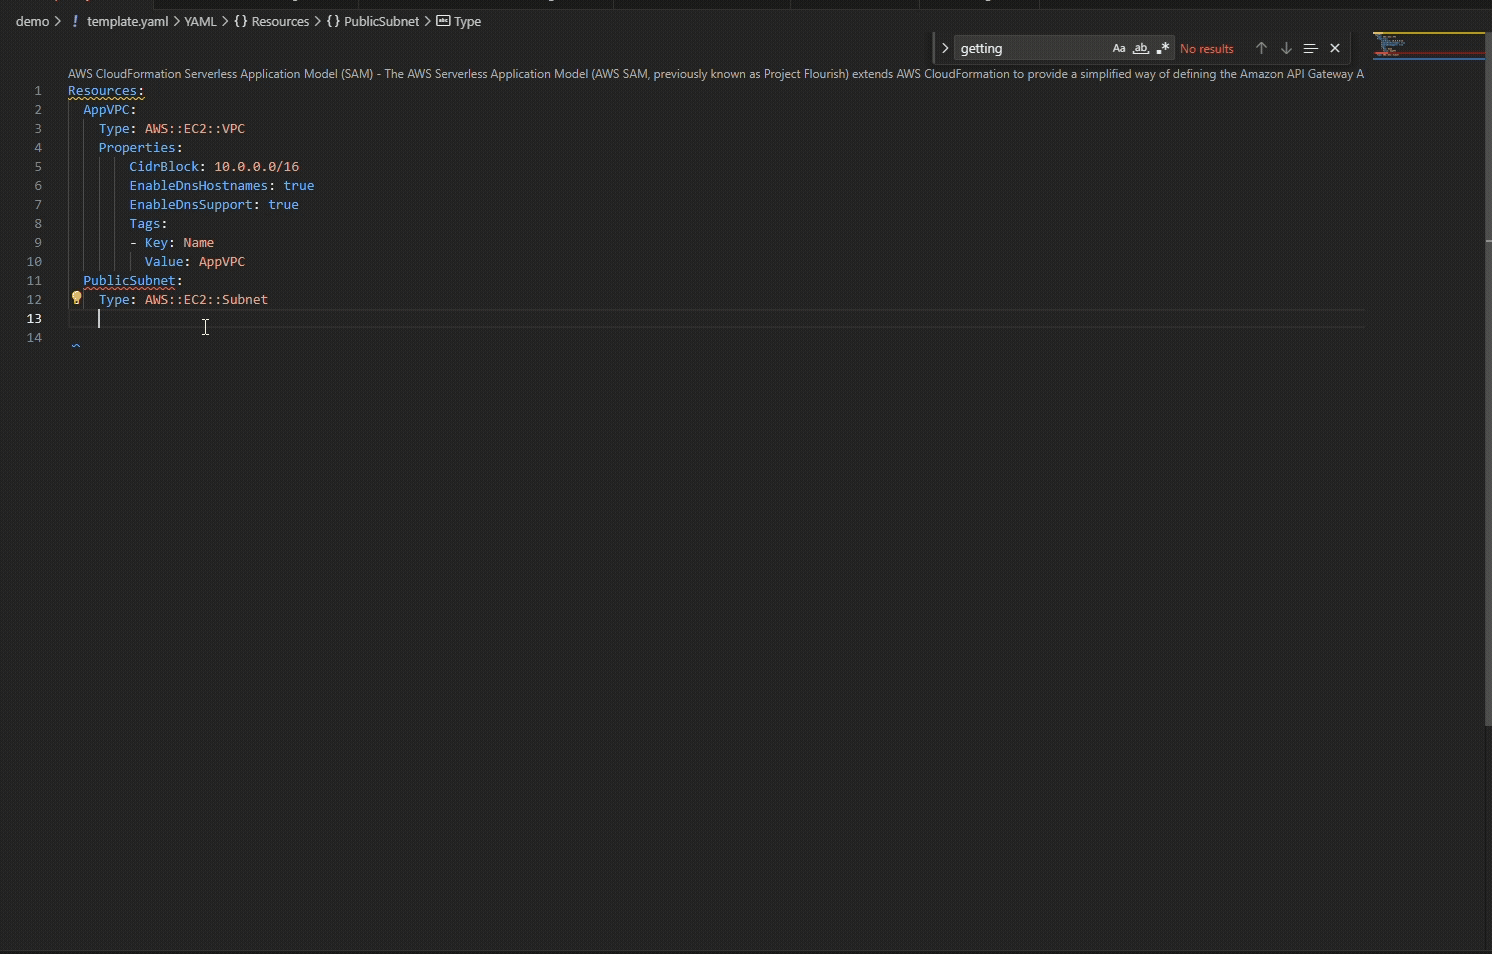
Figure 2.3: Required properties VpcID automatically suggested for EC2 Subnet

The IDE provides the resource names in your template, and when you use !GetAtt or !Ref, it knows which attributes are available for each resource type.

Type-aware completions for intrinsic functions like !GetAtt & !Ref

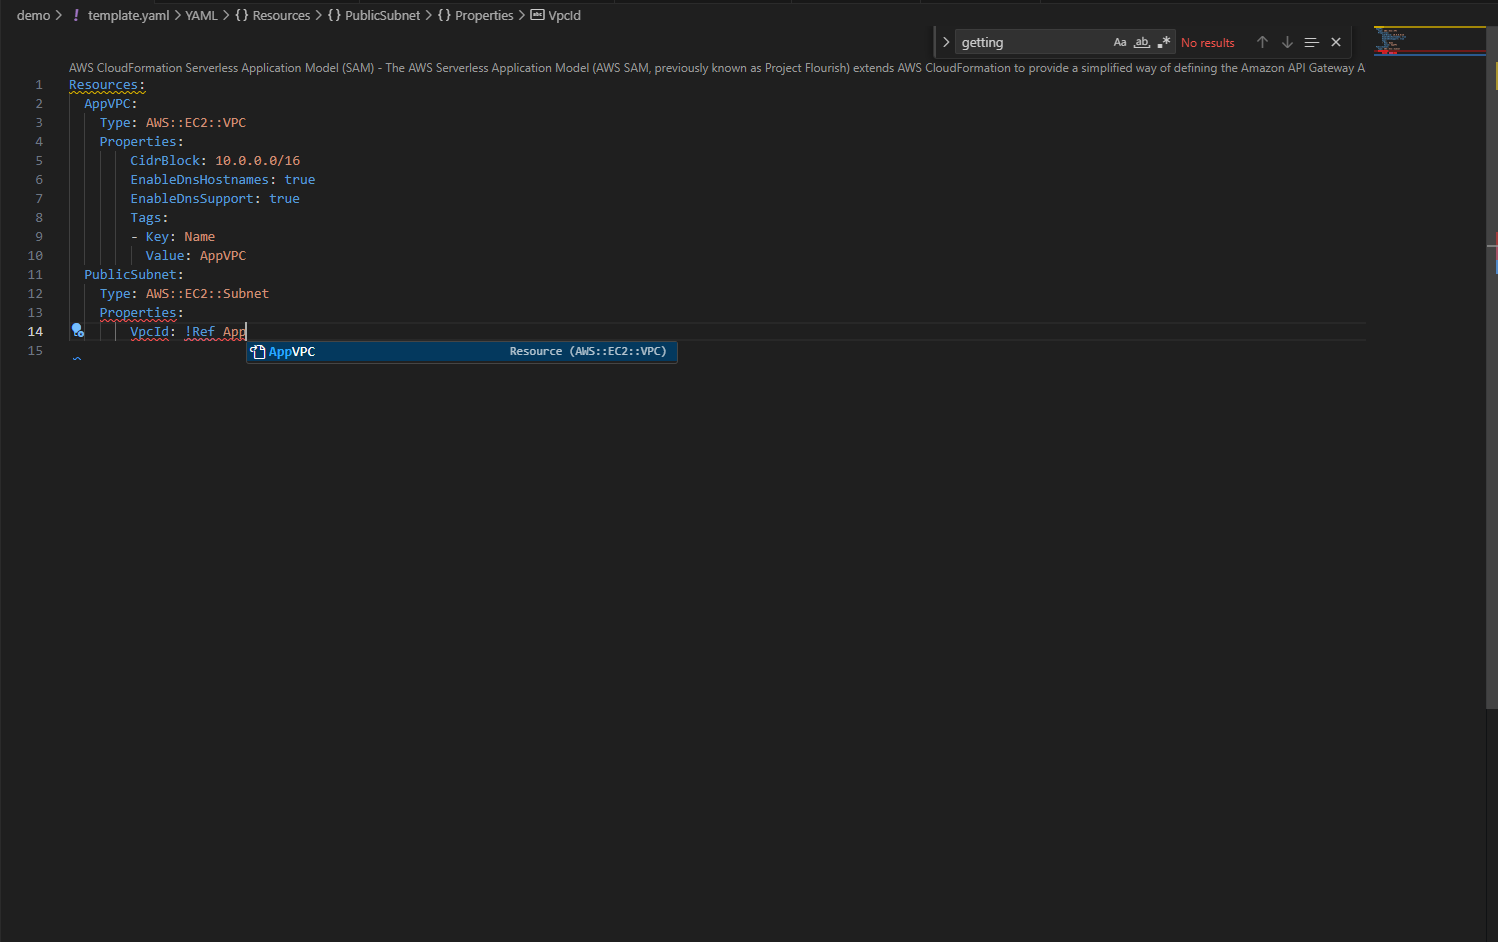
Figure 2.4: Type-aware completions for intrinsic functions like !GetAtt & !Ref

Real-Time Validation in Action

As you continue building, add MapPublicIpOnLaunch: true to make a public subnet. Immediately, a blue squiggly line appears.

CloudFormation Guard warning highlighted in real-time

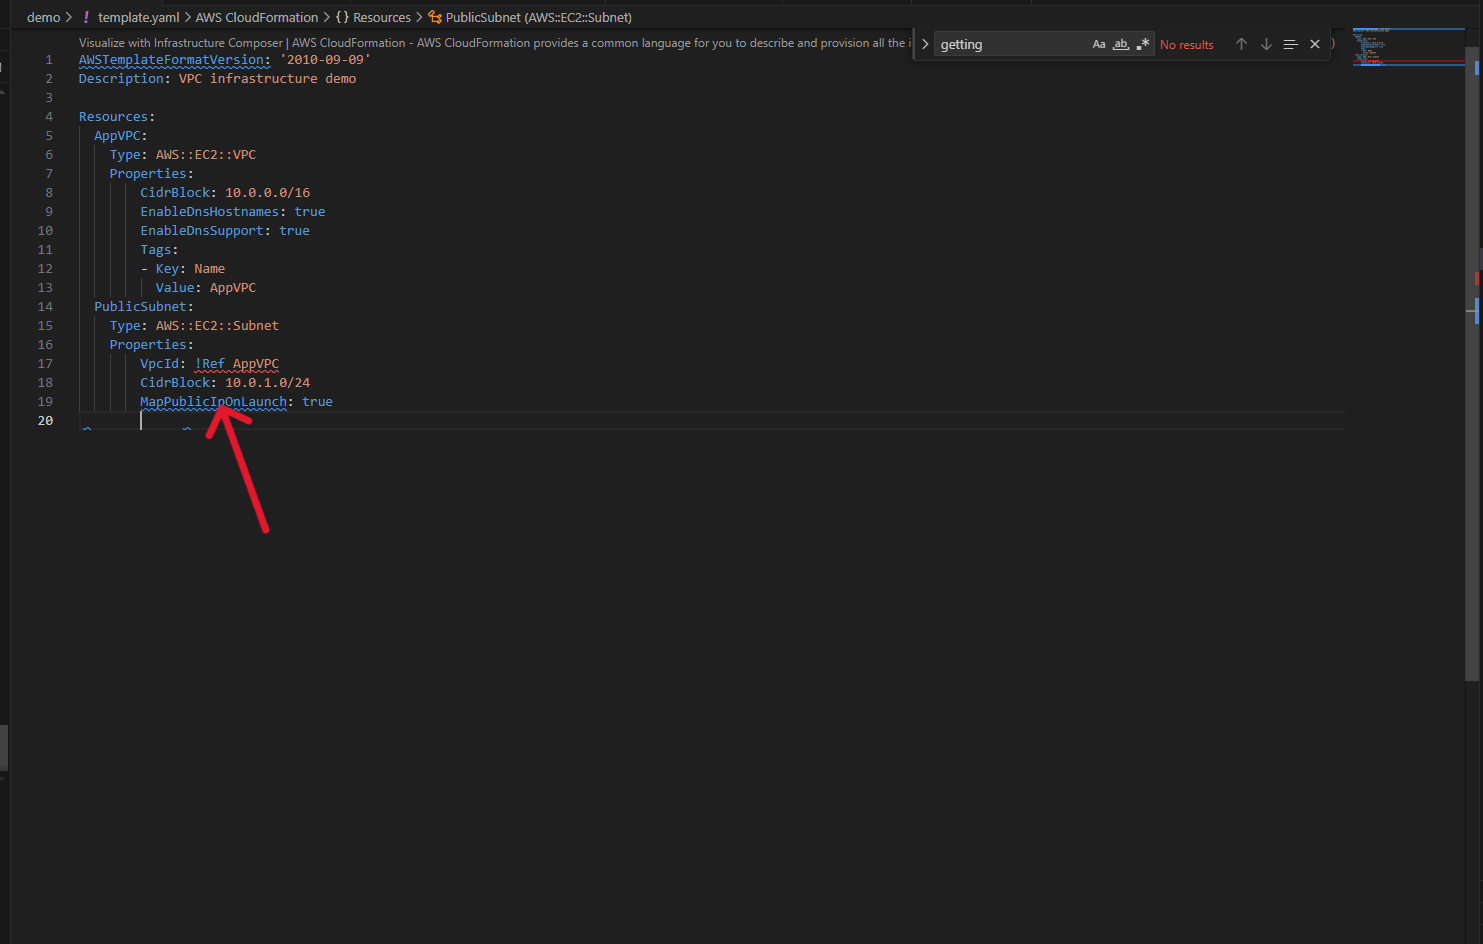
Figure 3: CloudFormation Guard warning highlighted in real-time

Hovering reveals a CloudFormation Guard warning from the AWS Security pillar rules: this configuration isn’t recommended for security compliance.

Security compliance warning with detailed explanation

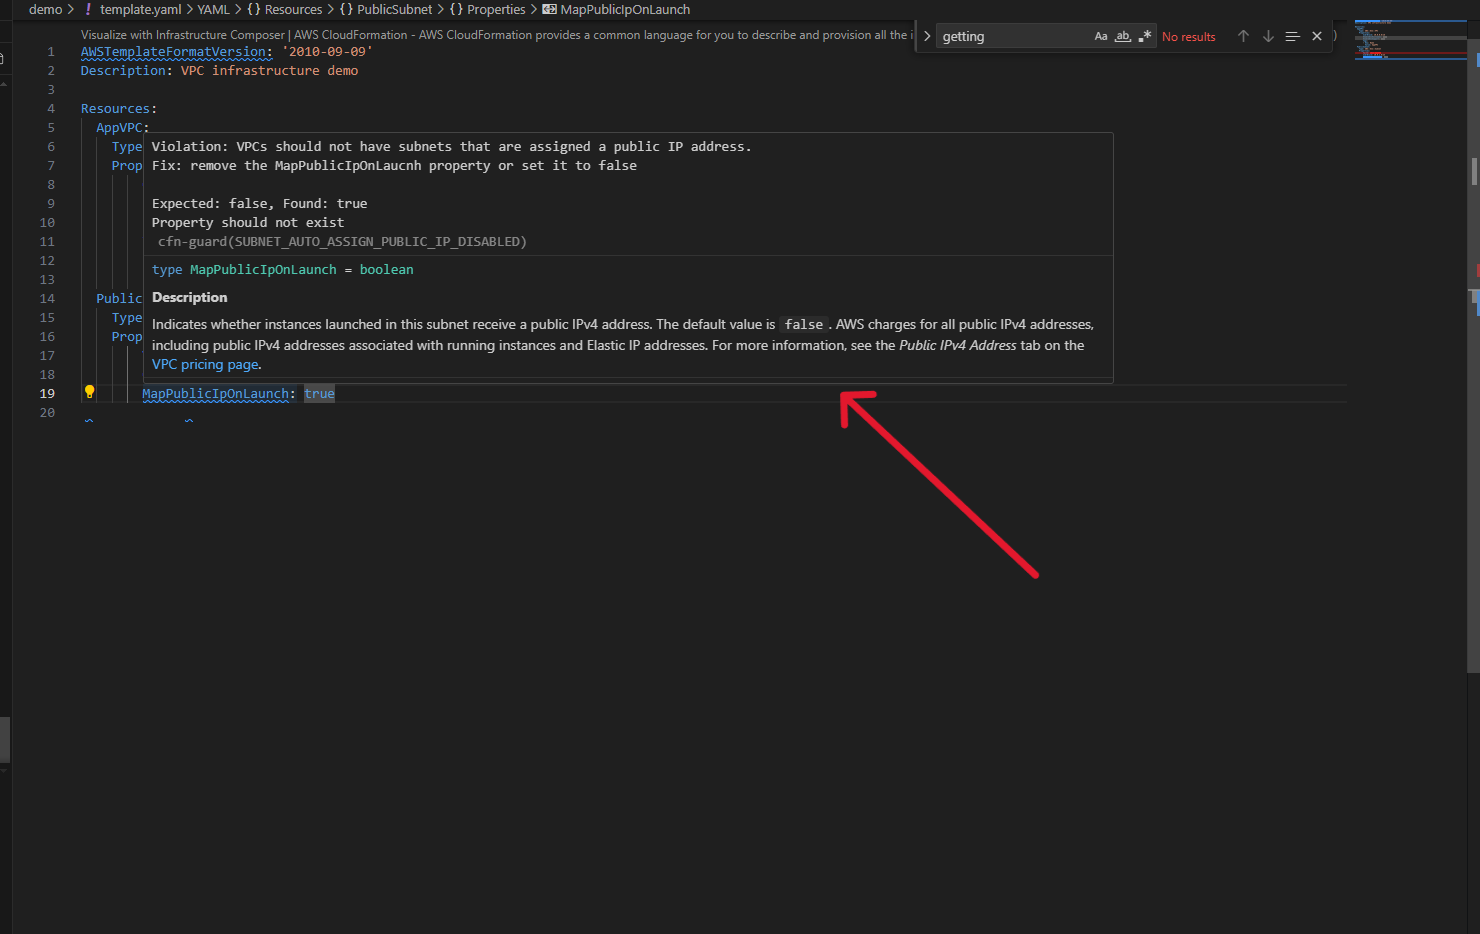
Figure 3.1: Security compliance warning with detailed explanation

Create a second subnet by copying the first, but now red squiggly lines appear. CFN Lint has detected overlapping CIDR blocks between your two subnets – an issue that would fail during deployment. You can fix it immediately with the contextual information provided.

CFN Lint error detection for overlapping CIDR blocks providing detailed error information helping you resolve the issue quickly
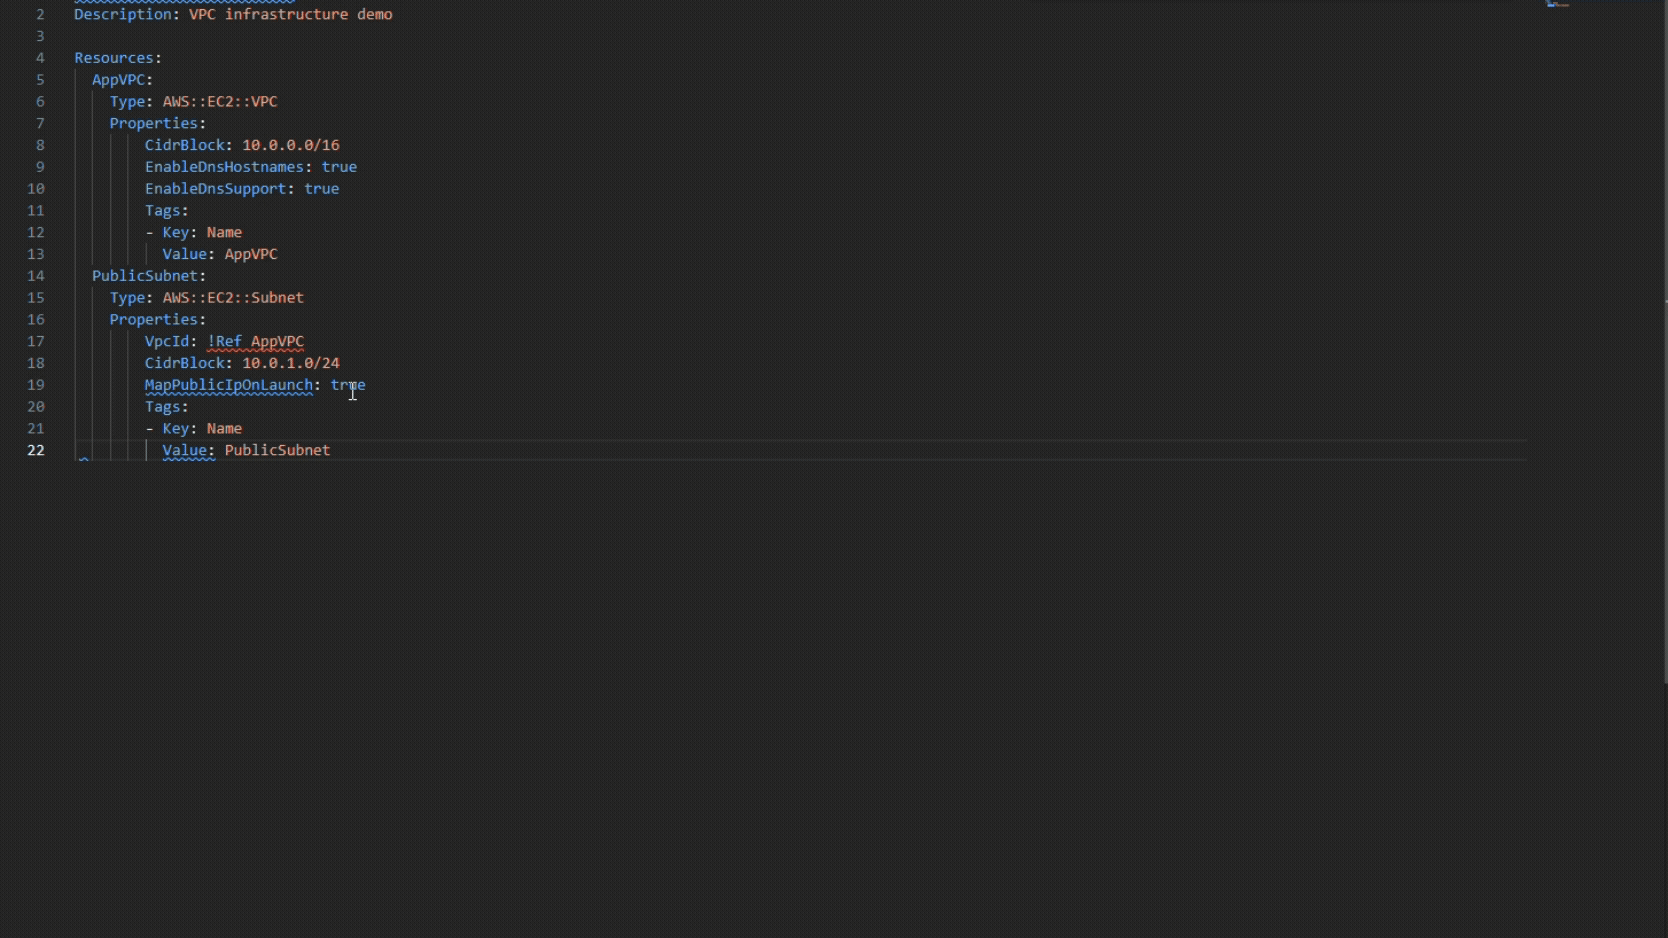
Figure 3.2: CFN Lint error detection for overlapping CIDR blocks providing detailed error information helping you resolve the issue quickly

Importing Existing Resources

Now you need an S3 bucket. Instead of writing it from scratch, open the Resource Explorer panel on the left. Using CCAPI integration, you can see all your existing AWS resources. Select an S3 bucket and click “Import resource state”. The IDE pulls in the complete resource configuration with all properties already set. You can now iterate on this resource without needing to remember or look up all the configuration details.

Automatically imported resource configuration from live AWS resources

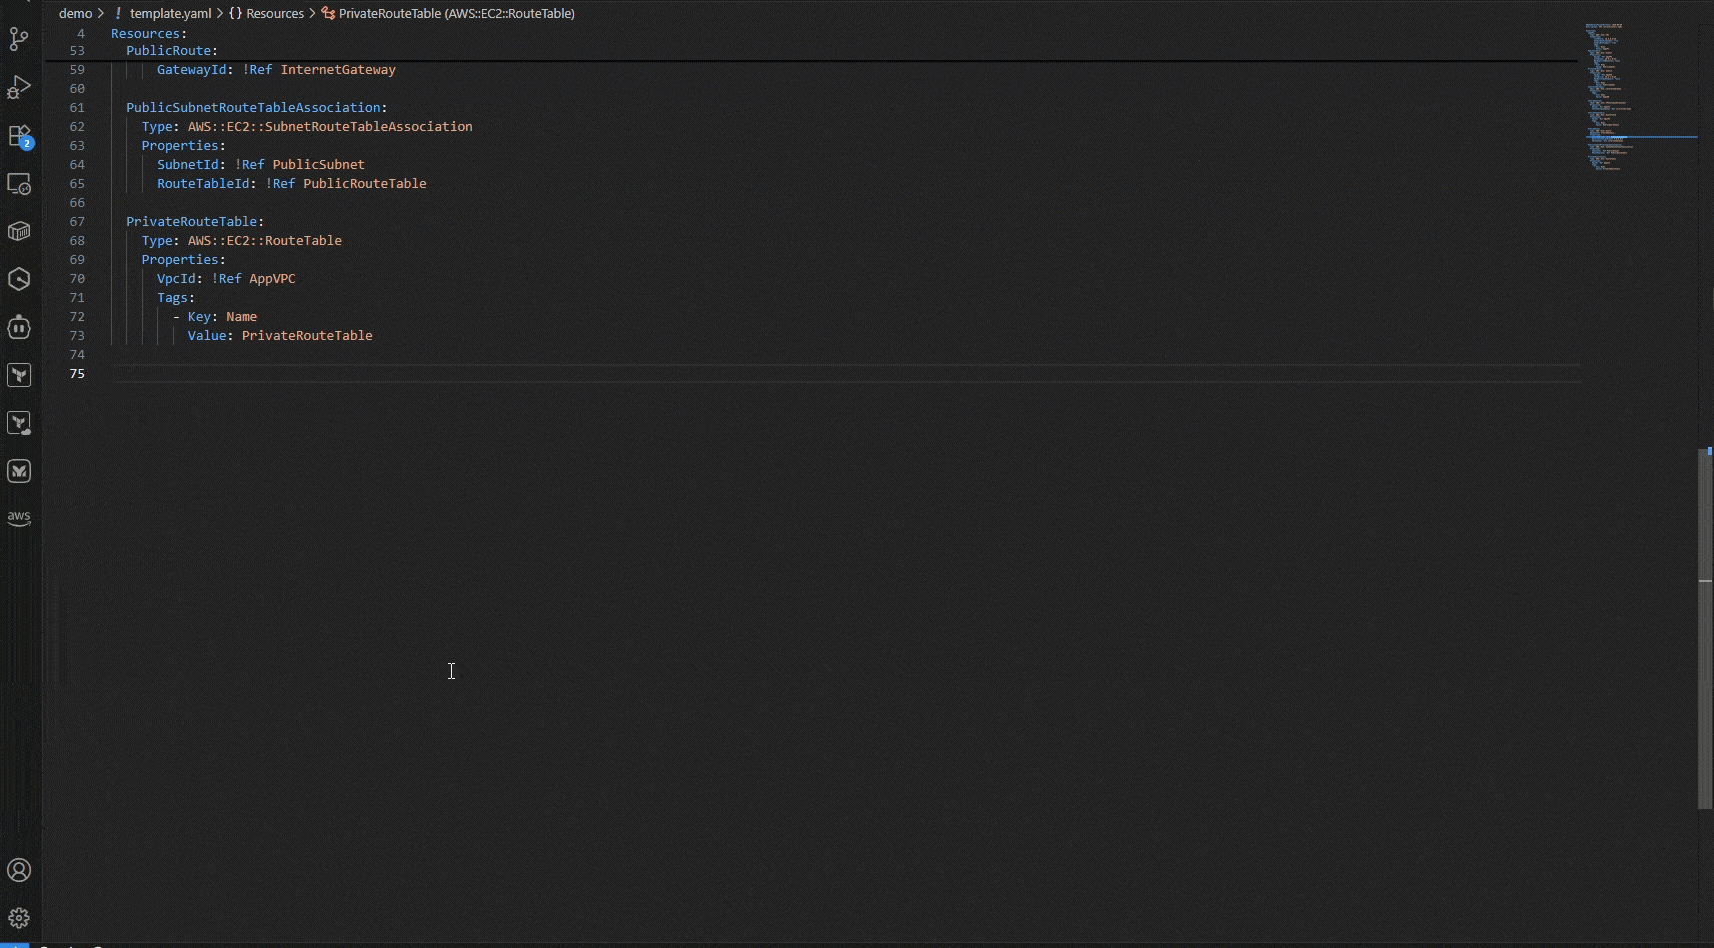
Figure 4: Automatically imported resource configuration from live AWS resources

Developer Experience Benefits

The CloudFormation IDE Experience delivers measurable improvements across productivity and quality:

Productivity Gains:

  • Reduced context switching: Keep your entire workflow in one place
  • Faster iteration cycles: Catch and fix issues in seconds, not minutes or hours
  • Shift-left validation: Identify problems before deployment, not after
  • Intelligent assistance: Spend less time in documentation, more time building

Quality Improvements:

  • Proactive error prevention: Multi-layer validation catches issues early
  • Security by default: Built-in compliance checks from CloudFormation Guard
  • Best practice enforcement: Automated guidance aligned with AWS recommendations
  • Deployment confidence: Pre-deployment validation reduces rollback scenarios

What previously took hours of troubleshooting and multiple deployment attempts now becomes a confident 30-minute development cycle.

“I will definitely use these features; they help to reduce the feedback loop and speed up the development of IaC templates.” – AWS Community Builder

Things to Know

Platform Support

The CloudFormation IDE Experience is available for:

  • Visual Studio Code: Full feature support
  • Kiro: Full feature support
  • Cursor: Full feature support
  • JetBrains IDEs: Complete integration across the IntelliJ family (Fast Follow)
  • Operating Systems: macOS (ARM), Linux (x64) and Windows(…)

Conclusion

The CloudFormation IDE Experience eliminates the context switching that fragments your workflow. Write, validate, and deploy all from one environment. What used to take hours of iteration now takes minutes.

Ready to get started? Install the CloudFormation extension from the AWS Toolkit for VS Code and experience the difference. For detailed setup instructions and feature documentation, see the CloudFormation IDE Experience guide.

About the Authors:

Damola Oluyemo

Damola Oluyemo is a Solutions Architect at Amazon Web Services focused on Enterprise customers. He helps customers design cloud solutions while exploring the potential of Infrastructure as Code and generative AI in software development.

Jehu Gray

Jehu Gray is a Prototyping Architect at Amazon Web Services where he helps customers design solutions that fits their needs. He enjoys exploring what’s possible with IaC.

Accelerating AWS Infrastructure Deployment: A Practical Guide to Console-to-Code

Post Syndicated from Damola Oluyemo original https://aws.amazon.com/blogs/devops/accelerating-aws-infrastructure-deployment-a-practical-guide-to-console-to-code/

In today’s cloud-first environment, Infrastructure as Code (IaC) has become crucial for managing cloud resources effectively. However, organizations often face significant challenges in adopting IaC practices, including steep learning curves, complex syntax requirements, and difficulty translating manual operations into code.  Amazon Q Developer‘s Console-to-Code feature addresses these challenges by providing an intuitive bridge between manual AWS Console operations and infrastructure as code. This innovative solution helps organizations accelerate their automation journey while maintaining consistency and reliability in AWS deployments.

Understanding Amazon Q Developer and Console-to-Code

Console-to-Code is a feature of Amazon Q Developer that helps automate AWS infrastructure by recording manual actions performed in the AWS Management Console and converting them into infrastructure-as-code (IaC). It leverages generative AI to generate automation-ready code, allowing users to transition from manual operations to repeatable deployments effortlessly. Console-to-Code provides multi-language support, offering code generation in AWS Cloud Development Kit (CDK) formats such as Java, Python, and TypeScript, as well as AWS CloudFormation in JSON and YAML formats.

Console-to-Code records your console actions, then uses generative AI to suggest code in your preferred language and format.

In this blog post, we’ll explore how Console-to-Code can help you:

  1. Transform manual console actions into reusable infrastructure code
  2. Improve operational efficiency and reduce human error
  3. Accelerate the transition from manual to automated deployments

Supported AWS Services

Console-to-Code currently supports automation for several essential AWS services. These include Amazon EC2, which allows for the provisioning and management of virtual machines; Amazon VPC, which enables configuration of networking components such as subnets, route tables, and gateways; and Amazon RDS, which facilitates the management of database instances, configurations, and scaling options

Potential Use Cases:

Now that we’ve covered the basics of Console-to-Code and its supported services, let’s explore some potential use cases for this feature.

DevOps and Agile Development

In the fast-paced world of DevOps and agile development, Console-to-Code enables teams to rapidly prototype and iterate on infrastructure configurations. The ability to quickly create and replicate consistent environments across development, staging, and production stages ensures infrastructure reliability while maintaining agile velocity.

Compliance-Focused Industries

Organizations in regulated industries benefit from Console-to-Code’s systematic approach to implementing and maintaining compliant infrastructure. By recording proven, compliant configurations, organizations ensure that all subsequent deployments maintain the same level of security and compliance, creating an automatic audit trail for regulatory requirements.

Step-by-Step Guide to Using Console-to-Code

Follow these steps to automate AWS services using Amazon Q Developer’s Console-to-Code feature:

Prerequisites

Before getting started with Amazon Q Developer’s Console-to-Code feature, ensure you have the following:

  • Service Access:
    • AWS Management Console access
    • Access and permissions to supported AWS services such as: Amazon EC2, Amazon VPC, and Amazon RDS
  • Required Permissions:
    • The q:GenerateCodeFromCommands permission for Amazon Q Developer to use Console-to-Code (added by default, no additional requirement from the user)
  • Subscription Tiers:

Free Tier:

    • No fixed monthly limit for recording console actions
    • No fixed monthly limit for generating CLI commands
    • Monthly limit applies to AWS CDK and CloudFormation code generation

Pro Tier:

    • Requires IAM Identity Center authentication
    • IAM Identity Center identity must be subscribed to Amazon Q Developer Pro
    • No fixed monthly limit for AWS CDK or CloudFormation code generation

For this demonstration the Free Tier would suffice.

  1. Supported Code Formats:

Console-to-Code can generate infrastructure-as-code in the following formats:

  • AWS CDK: Java, Python, and TypeScript
  • AWS CloudFormation: JSON and YAML

Getting Started

Step 1: Start Recording

To start recording with Console-to-Code, follow these steps:

  1. Sign in to the AWS Management Console.
  2. Navigate to the console of one of the supported services (Amazon VPC, Amazon RDS, or Amazon EC2)
  3. On the right edge of the browser window, choose the Console-to-Code icon.
  4. Click Start recording.

Note: While recording actions is free, you will still be charged for any AWS resources created during the recording process.

This gif shows the user opening the Console-to-Code panel and starting a recording session in the VPC console

Figure 1: Opening the Console-to-Code panel and starting a recording session in the VPC console.

Step 2: Perform Actions in AWS Console

  1. Go to the AWS service (e.g., EC2, S3) you want to automate.
  2. Perform desired actions such as launching an EC2 instance or creating an S3 bucket.

This gif demonstrates creating and configuring resources while Console-to-Code records all actions in real-time

Figure 2: Demonstration of creating and configuring resources while Console-to-Code records all actions in real-time.

The Console-to-Code panel will record all of these actions as you perform them. You can move between different service consoles (such as VPC and EC2) during a single recording session, allowing you to create a comprehensive recording that involves actions across multiple supported services

Step 3: Generate Code & Stop Recording

  1. In the Console-to-Code panel, review your recorded actions. You can filter the recorded actions using the dropdown, search box, or filter widget at the top of the Console-to-Code panel.
  2. Select the actions that you want to convert into code. Only the actions with checked boxes will be used in the following steps.
  3. Indicate the type of code that you want to generate. From the reverse dropdown menu at the lower right of the Console-to-Code panel, select the language and (if applicable) format of the code to be generated.
  4. Choose Generate chosen language. The generated code will appear, along with the equivalent CLI commands.

This gif shows the user stopping the recording, selecting desired actions, and generating infrastructure code in your preferred language through the Console-to-Code panel

Figure 3: Stopping the recording, selecting desired actions, and generating infrastructure code in your preferred language through the Console-to-Code panel.

Benefits of Using Console-to-Code

The implementation of Console-to-Code offers numerous advantages to AWS users. It increases time efficiency by reducing manual effort on repetitive console tasks and ensures consistency and compliance with organizational security and governance policies. The tool minimizes human errors through the generation of syntactically accurate infrastructure code, enables rapid prototyping for quick transitions from experimentation to production, and serves as a valuable learning resource for new AWS users to understand infrastructure-as-code best practices

Best Practices

Planning and Organization

Success with Console-to-Code requires thorough planning and organization. Document your infrastructure requirements comprehensively, establish clear naming conventions and tagging strategies, and maintain a systematic approach to version control for generated code.

Maintenance and Updates

Regular review and testing of generated code ensure continued reliability and efficiency. Implement a code review process for infrastructure changes and maintain comprehensive documentation of your deployment patterns and configurations.

Troubleshooting Guidelines

Common issues during recording sessions can often be resolved by using a single browser tab and ensuring proper permissions are in place. For code generation issues, validate service compatibility and review action sequences carefully. Clear browser cache and verify IAM permissions when encountering persistent issues.

Conclusion

Amazon Q Developer’s Console-to-Code represents a significant advancement in infrastructure automation, making IaC accessible to teams of all skill levels. By following the strategies and best practices outlined in this guide, organizations can effectively leverage this tool to accelerate their cloud journey while maintaining security, compliance, and operational excellence.

The future of infrastructure automation looks promising with tools like Console-to-Code, enabling organizations to focus more on innovation and less on manual operations. As AWS continues to enhance this feature, users can expect even more capabilities and integrations to support their infrastructure automation needs.

Ready to accelerate your infrastructure automation journey? Start exploring Console-to-Code today by signing into your AWS Management Console and recording your first infrastructure deployment. For additional resources and documentation, visit the AWS Console-to-Code documentation page.

About the Authors:

Adeogo Olajide

Adeogo is a Solutions Architect at AWS, where he supports GovTech customers and other public sector customers in their cloud transformation journey. He specializes in designing secure, scalable, and compliant architectures that help public sector organizations modernize their digital services. Outside of work, he enjoys playing and watching soccer.

Jehu Gray

Jehu Gray is a Prototyping Architect at Amazon Web Services where he helps customers design solutions that fits their needs. He enjoys exploring what’s possible with IaC.

Damola Oluyemo

Damola Oluyemo is a Solutions Architect at Amazon Web Services focused on Enterprise customers. He helps customers design cloud solutions while exploring the potential of Infrastructure as Code and generative AI in software development.

Abiola Olanrewaju

Abiola Olanrewaju is a Solutions Architect at AWS, specializing in helping Financial services customers implement scalable solutions that drive business outcomes. He has a keen interest in Data Analytics, Security and Generative AI.

Ibraheem Ojelade

Ibraheem Ojelade is a Solutions Architect at Amazon Web Services, focused on supporting Independent Software Vendors (ISVs). He partners with customers to accelerate their cloud adoption, optimize performance, and strengthen security. With a strong background in cybersecurity and cloud solutions, he helps ISVs design scalable architectures while exploring emerging technologies to drive innovation and growth.