All posts by Daniel Covey

Field Notes: Protecting Domain-Joined Workloads with CloudEndure Disaster Recovery

Post Syndicated from Daniel Covey original https://aws.amazon.com/blogs/architecture/field-notes-protecting-domain-joined-workloads-with-cloudendure-disaster-recovery/

Co-authored by Daniel Covey, Solutions Architect, at CloudEndure, an AWS Company and Luis Molina, Senior Cloud Architect at AWS. 

When designing a Disaster Recovery plan, one of the main questions we are asked is how Microsoft Active Directory will be handled during a test or failover scenario. In this blog, we go through some of the options for IT professionals who are using the CloudEndure Disaster Recovery (DR) tool, and how to best architect it in certain scenarios.

Overview of architecture

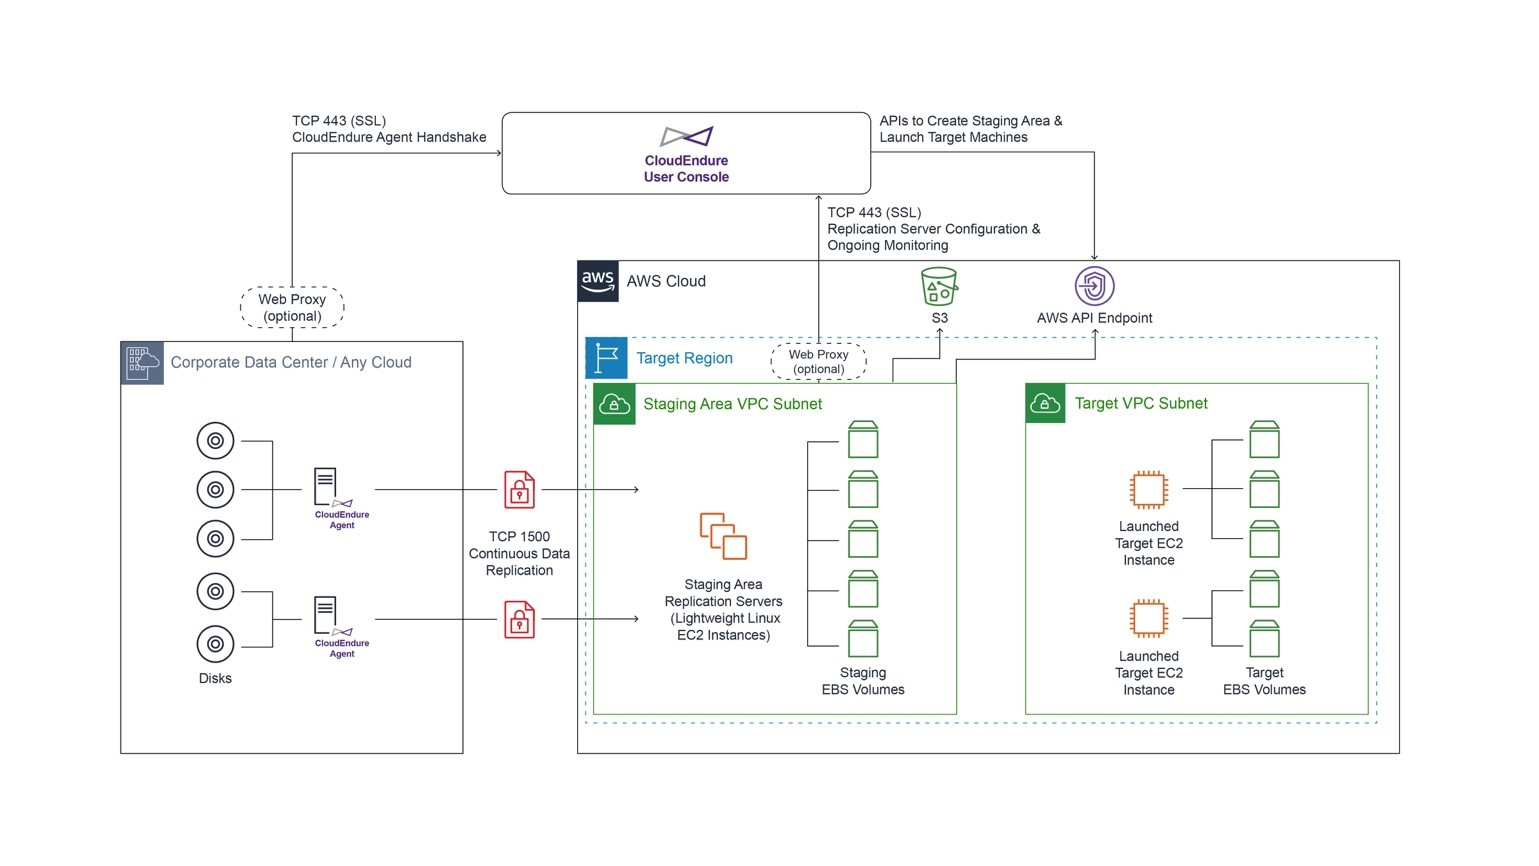
In the following architecture, we show how you can protect domain-joined workloads in the case of a disaster. You can instruct CloudEndure Disaster Recovery to automatically launch thousands of your machines in their fully provisioned state in minutes.

CloudEndure DR Architecture diagram

Scenario 1: Full Replication Failover

Walkthrough

In this scenario, we are performing a full stack Region to Region recovery including Microsoft Active Directory services.

Using CloudEndure Disaster Recovery  to protect Active Directory in Amazon EC2.

This will be a lift-and-shift style implementation. You take the on-premises Active Directory, and failover to another Region. Although not shown in this blog, this can be done from either on-premises, Cross-Region, or Cross-Cloud during DR or Testing.

Prerequisites

For this walkthrough, you should have the following:

  • An AWS account
  • A CloudEndure Account
  • A CloudEndure project configured, with agents installed and replicating in ‘Continuous Data Replication’ Mode
  • A CloudEndure Recovery Plan configured to boot the Active Directory Domain controller first, followed by remaining servers
  • An understanding of Active Directory
  • Two separate VPCs, with matching CIDR ranges, and no connection to the source infrastructure.

Configuration and Launch of Recovery Plan

1. Log in to the CloudEndure Console
2. Ensure the blueprint settings for each machine are configured to boot either in the Test VPC or Failover VPC, depending on the reason for booting,
a. These changes can be done either through the console, or by using the CloudEndure API operations.
b. To change blueprints on a mass scale, use the mass blueprint setter scripts (Zip file with instructions).
3. Open “Recovery Plans” section for the project
a. Create a new Recovery Plan following these steps
b. Tip: Add in a delay between the launch of the Active Directory server, and the following servers, to allow Active Directory services to come up before the rest of the infrastructure.
4. Once you have created the Recovery Plan, you can either launch it from the CloudEndure console, or use the CloudEndure API Operations.

*Note: there is full CloudEndure failover and failback documentation.

There are different ways to clean up resources, depending on whether this was a test launch, or true failover.

  • Test Launch – You can choose the “Delete x target machines” under the “Machines” tab.
    • This will delete all machines created by CloudEndure in the VPC they were launched into.
  • True failover – At this time, you can choose to failback as needed.
    • Once failback is completed, you can use the same preceding steps as to delete the infrastructure spun up by CloudEndure.

Scenario 2: Warm Site Recovery

Walkthrough

In this scenario, we perform a failover/recovery into a Region with a fully writeable and online Active Directory domain controller. This domain controller is running as an EC2 instance and is an extension of the on-premises, or cross cloud/region Active Directory infrastructure.

Prerequisites

For this walkthrough, you should have the following:

  • An AWS account
  • A CloudEndure Account
  • A CloudEndure project configured, with agents installed and replicating in Continuous Data Replication Mode
  • An understanding of Active Directory
  • A deployment of Active Directory with online writeable domain controller(s)

Preparing AWS and Active Directory:

For our example us-west-1 (California) will be the  source environment CloudEndure is protecting. We have specified us-east-1 (N.Virginia) as the target recovery Region aka “warm site”.

  • The source Region will consist of a VPC configured with public and private (AD domain) subnets and security groups
  • AD Domain Controllers are deployed in the source environment (DC1 and DC2)

Procedure:

1.     Set up a target recovery site/VPC in a Region of your choice. We refer to this as the warm site.

2.     Configure connectivity between the source environment you are protecting, and the warm site.

a.     This can be accomplished in multiple ways depending on whether your source environment is on-premises (VPN or Direct connect), an alternate cloud provider (VPN tunnel), or a different AWS Region (VPC peering). For our example the source environment we are protecting is in us-west-1, and the warm recovery site is in us-east-1, both regions VPCs are connected via VPC peering.

3.     Establish connectivity between the source environment and the warm site. This ensures that the appropriate routes, subnets and ACLs are configured to allow AD authentication and replication traffic to flow between the source and warm recovery site.

4.     Extend your Active Directory into the warm recovery site by deploying a domain controller (DC3) into the warm site. This domain controller will handle Active Directory authentication and DNS for machines that get recovered into the warm site.

5.     Next, create a new Active Directory site. Use the Active Directory Sites and Services MMC for the warm recovery site prepared in us-east-1, and DC3 will be its associated domain controller.

a.     Once the site is created, associate the warm recovery site VPC networks to it. This will enforce local Active Directory client affinity to DC3 so that any machines recovered into the warm site use DC3 rather than the source environment domain controllers.  Otherwise, this could introduce recovery delays if the source environment domain controllers are unreachable.

Screenshot of Active Directory sites

6.     Now, you set DHCP options for the warm site recovery VPC. This sets the warm site domain controller (DC3) as the primary DNS server for any machines that get recovered into the warm site, allowing for a seamless recovery/failover.

Screenshot of DHCP options

Test or Failover procedure:

Review the “Configuration and Launch of Recovery Plan” as provided earlier in this blog post.

Cleaning up

To avoid incurring future charges, delete all resources used in both scenarios.

Conclusion

In this blog, we have provided you a few ways to successfully configure and test domain-joined servers, with their Active Directory counterpart. Going forward, you can test and fine tune the CloudEndure Recovery Plans to limit the down time needed for failover. Further blog posts will go into other ways to failover domain-joined servers.

Field Notes provides hands-on technical guidance from AWS Solutions Architects, consultants, and technical account managers, based on their experiences in the field solving real-world business problems for customers.

Field Notes: Requirements for Successfully Installing CloudEndure

Post Syndicated from Daniel Covey original https://aws.amazon.com/blogs/architecture/field-notes-requirements-for-successfully-installing-cloudendure/

Customers have been using CloudEndure for their Migration and Disaster Recovery needs for many years. In 2019, CloudEndure was acquired by AWS, and provided the licensing for CloudEndure to all of their users free of charge for migration. During this time, AWS has identified the requirements for replication to complete successfully after initial agent install. Customers can use the following tips to facilitate a smooth transition to AWS.

In this blog, we look at four sections of the CloudEndure configuration process required for a successful installation:

  1. CloudEndure Port configuration
  2. CloudEndure JSON Policy Options
  3. CloudEndure Staging Area Configuration
  4. CloudEndure Configuration for Proxies

Required CloudEndure Ports

There are 2 required ports that CloudEndure uses. TCP Ports 1500 and 443 have particular configurations based on source or staging area. TCP 1500 is used for replication of data, and 443 is for agent communication with the CloudEndure Console.

Architecture Overview

The following graphic is a high level overview of the required ports for CloudEndure, both from the source infrastructure, and the staging subnet you will be replicating to.

network architecture

Steps

  1. Is 443 outbound open to console.cloudendure.com on the source infrastructure?
  • Check OS level firewall
  • Check proxy settings
  • Ensure there is no SSL intercept or Deep Packet Inspection being done to packets from that machine

        2. Is 443 outbound open to console.cloudendure.com in the AWS Security Group assigned to the replication subnet?

  • Check no NACLs are in place to prevent SSL traffic outbound from the subnet
  • Check the machines on this subnet can reach the EC2 endpoint for the region.
  • If you have any restrictions on accessing Amazon S3 buckets, you can have CloudEndure use a CloudFront distribution instead.
  • Review The CloudEndure documentation for how to do this

       3. Is 1500 outbound open to the Staging Subnet from the source infrastructure?

  • Check OS level firewall
  • Check proxy settings

4. Is 1500 inbound from the source infrastructure open on the Security Group assigned to the replication subnet?

  • Check no NACLs are in place preventing traffic.

CloudEndure JSON Policies 

CloudEndure uses one of these JSON policies attached to IAM Users. These policies give CloudEndure specific access to your AWS account resources. This launches specific resources needed to ensure the tool is working properly. CloudEndure JSON policies use tag filtering to limit the creation and deletion of resources.

For the JSON policy, CloudEndure expects a specific set of permissions, even in the case where we may not be using them. CloudEndure does a policy check first, to ensure all permissions are available. It is not recommended to change the JSON policies, as it can cause CloudEndure to fail initial replication configuration. Use one of the following three policies.

AWS to AWS

  • Best policy to use if you are doing Inter-AWS replication, such as Region-to-Region, or AZ-to-AZ replication

Default

  • Default JSON policy. Allows for access to any of the resources needed by CloudEndure

Tagging based

  • A more restrictive policy, for customers that need a more secure solution.

Staging Area Configuration

CloudEndure replicates to a “Staging Area”, where you control the Replication Server and the AWS EBS volumes attached to that server. You define which VPC and Subnet you want CloudEndure to replicate to, with the following considerations.

staging area

  1. Default Subnet
    • You designate your specific AWS Subnet to use for replication here. Leaving the option as “Default” uses the default subnet for the VPC, which is usually deleted by customers when first configuring their VPCs.

2. Default Security group

    • This is often created by the Cloudendure tool, cannot be changed, and will be added if replication disconnects. Any changes made to this SG will be reverted back to default rules.
    • If utilizing a proxy, it is advised to add a Security Group that also allows access to the proxy

Proxy Servers

Some customers utilize Proxy servers within their environment. Review the following guidance regarding specific changes to configurations within your environment needed for CloudEndure to operate effectively.

  1. Make sure to set proxy in replication settings
    • This can be either IP address, or an FQDN

       2. Note the following for either Windows or Linux

    • Windows – CloudEndure agent runs as System, so please ensure the System account is part of the allow list in the proxy.
    • Linux – CloudEndure Agent creates a linux user to run commands (named cloudendure), so this user will need to be part of the allow list in the proxy

       3. Make sure environment variables are set for the machines

  • Windows Steps
    • Control Panel > System and Security > System > Advanced system settings.
    • In the Advanced Tab of the System Properties dialog box, select Environment Variables 
    • On the System Variables section of the Environment Variables pane, select New to add the https_proxy environment variable or Edit if the variable already exists.
    • Enter https://PROXY_ADDR:PROXY_PORT/ in the Variable value field. Select OK.
    • If the agent was already installed, restart the service
  • Alternatively, you can open CMD as Administrator and enter the following command:

setx https_proxy https://<proxy ip>:<proxy port>/ /m

  • Linux Steps
    • Complete one of the following lines in the terminal
    • $ export http_proxy=http://server-ip:port/
    • $ export http_proxy=http://127.0.0.1:3128/
    • $ export http_proxy=http://proxy-server.mycorp.com:3128/ Please note to include the trailing /

Cleaning Up

After you have finished utilizing the CloudEndure tool, remove any resources you may no longer need.

Conclusion

In conclusion, I have showed how best to prepare your environment for installation of the CloudEndure tool. CloudEndure is utilized to protect your business, and mitigate downtime during your move to the cloud. By following the preceding steps, you set up the configuration for success. Visit the AWS landing page for CloudEndure, to get a deeper understanding of the tool, get started with CloudEndure, or take the free online technical training. Should you need assistance with other configurations, visit the CloudEndure Documentation Library, which includes every aspect of the tooling, as well as a helpful FAQ.

Field Notes provides hands-on technical guidance from AWS Solutions Architects, consultants, and technical account managers, based on their experiences in the field solving real-world business problems for customers.