OpenID Foundation’s AuthZEN Working Group is currently drafting a new specification (version 1.0, draft 03 at the time of publication) and associated standard mechanisms, protocols, and formats to communicate authorization-related information between components involved in access control and authorization.
Traditionally, application developers built their own authorization logic within the application code to evaluate access to resources. Reviewing the authorization rules requires reviewing the application code, and changing the authorization rules requires changing and deploying a new version of the application. Customers using this pattern often find it challenging to consistently enforce their authorization rules, track changes to these rules, and update rules as their application evolves.
To solve these challenges, modern application designs have shifted their authorization capabilities and decoupled them from application code. This strategy accelerates application development and grants fine-grained permissions within applications in a more repeatable and dynamic way that developers can apply consistently. Fine-grained permissions are typically designed based on:
Subject role assignments following role-based access control (RBAC)
Attribute values of the subject or the requested resources following attribute-based access control (ABAC)
Relationships between subjects and resources following relationship-based access control (ReBAC)
A hybrid model using a combination of the preceding methods
Expressions of these access control rules are called policies, which lead to the policy-based access control (PBAC) approach.
To support these access control approaches, customers implement solutions that follow the guidance of NIST SP 800-162 – A guide to ABAC.
Figure 1: Access control components and interactions
Figure 1 illustrates the architecture of an advanced access control mechanism that consists of several key components that work together to manage and enforce authorization policies.
At the heart of this system is the policy decision point (PDP), which serves as the rules or policy engine. The PDP is responsible for evaluating rules and policies to determine whether a particular access request should be allowed or denied. This component interacts closely with the policy enforcement point (PEP), which acts as the gatekeeper for resource access.
The PEP, typically integrated into your application, receives access requests for subjects (users or systems) and enforces the decisions made by the PDP. It either allows or denies access to the requested resource based on the PDP’s determination.
To make informed decisions, the PDP might need to retrieve additional metadata or attributes. A policy information point (PIP) acts as an interface to external data sources, such as subject attribute and resource attribute stores. These could include databases such as your HR system, providing crucial contextual information to aid in the decision-making process.
The diagram also shows other important elements:
The policy store, which stores the authorization policies.
The policy administration point (PAP), used for managing and updating policies in the policy store.
Environment conditions, which can influence access decisions based on factors like time, location, or system status.
All these components collaborate within the authorization services framework to provide a comprehensive and flexible access control system. The AuthZEN specification provides a standardized way to communicate authorization requests from the PEP to the PDP and to communicate authorization decisions from the PDP to the PEP.
Interoperability with Verified Permissions
Verified Permissions offers organizations a fully managed service that combines the roles of both a PDP engine and a policy store with a PAP. AWS manages the underlying infrastructure, scaling automatically with application demands and maintaining consistent performance across distributed systems.
Verified Permissions uses Cedar, an open-source policy language that brings mathematically provable access control. When integrated into an application’s architecture, Verified Permissions serves as the central decision-making engine for authorization requests sent through its IsAuthorized() API. Verified Permissions evaluates requests against defined policies while considering information such as principal attributes, resource properties, type of action, and environmental conditions. The service also offers the ability to group common authorization requests into one API call and to validate OAuth 2.0 JSON Web Token with the OpenID Connect provider that issued it when provided as principal information.
This reference implementation enables interoperability and seamless integration between OpenID’s AuthZEN protocol and Verified Permissions. It can help you standardize authorization patterns across different services hosted on AWS.
Architecture overview
The architecture of the proposed AuthZEN interface for Verified Permissions is illustrated in Figure 2.
Figure 2: Architecture overview
The workflow for this architecture is as follows:
The application, serving as PEP, makes an authenticated authorization API call for access requests in AuthZEN-compliant format.
Note: In this solution, you will manage access to the API using a secret generated by AWS Secrets Manager. Review your threat model and adopt additional authentication mechanisms that fit your workload such as OAuth 2.0 bearer tokens, client certificate authentication, or AWS Identity and Access Management (IAM) temporary credentials.
After successful authentication, API Gateway propagates the request to a Lambda function integration.
The Lambda function queries the entity store, which is a PIP, to retrieve additional metadata and attributes about the entities in the authorization request. The entities are representing the principals and the resources.
The Lambda function integration transforms the authorization requests in AuthZEN format into a Verified Permissions IsAuthorized() formatted request.
Verified Permissions evaluates the authorization request and returns the authorization decision, then a Lambda function transforms the authorization decision to an AuthZEN formatted decision back to the application.
Create a Verified Permissions policy store to store your authorization policies. You can create a new policy store using the AWS Management Console for Verified Permissions or deploy the sample policy store by using AWS CDK. The sample policy store contains Cedar policies and entities to support AuthZEN’s authorization scenarios.
To deploy the policy store stack using AWS CDK:
Navigate to the project root folder, bootstrap your environment, and deploy the policy store by using the following commands. Replace <account-id> and <region> with your AWS account number and the AWS Region you want to deploy in.
You then deploy a sample AuthZEN PDP interface that’s connected to the Verified Permissions policy store. The PDP includes the API Gateway REST API, the Lambda authorizer, and the Lambda function integration.
To deploy the PDP by using AWS CDK:
Deploy the PDP stack by using the following commands:
The PASS REQ results indicate this deployment has met AuthZEN interoperability test scenarios requirements. You can also view the latest results at OpenID AuthZEN Interop results summary site.
It’s your turn to build
In this post, we introduced an open-source AuthZEN interface for Amazon Verified Permissions that’s based on the OpenID Foundation’s AuthZEN working group specifications. This implementation provides developers with a transparent way to adopt industry-standard authorization practices while maintaining the security and scalability benefits of the managed authorization service provided by AWS.
If you’re interested in learning more about Cedar and Verified Permissions, see the following references:
If you have a customer facing application, you might want to enable self-service sign-up, which allows potential customers on the internet to create an account and gain access to your applications. While it’s necessary to allow valid users to sign up to your application, self-service options can open the door to unintended use or sign-ups. Bad actors might leverage the user sign-up process for unintended purposes, launching large-scale distributed denial of service (DDoS) attacks to disrupt access for legitimate users or committing a form of telecommunications fraud known as SMS pumping. SMS pumping is when bad actors purchase a block of high-rate phone numbers from a telecom provider and then coerces unsuspecting services into sending SMS messages to those numbers.
Amazon Cognito is a managed OpenID Connect (OIDC) identity provider (IdP) that you can use to add self-service sign-up, sign-in, and control access features to your web and mobile applications. AWS customers who use Cognito might encounter SMS pumping if SMS functions are enabled to send SMS messages, for example, perform user phone number verification during the registration process, to facilitate SMS multi-factor authentication (MFA) flows, or to support account recovery using SMS. In this blog post, we explore how SMS pumping may be perpetrated and options to reduce risks, including blocking unexpected user registration, detecting anomalies, and responding to risk events with your Cognito user pool.
Cognito user sign-up process
After a user has signed up in your application with an Amazon Cognito user pool, their account is placed in the Registered (unconfirmed) state in your user pool and the user won’t be able to sign in yet. You can use the Cognito-assisted verification and confirmation process to verify user-provided attributes (such as email or phone number) and then confirm the user’s status. This verified attribute is also used for MFA and account recovery purposes. If you choose to verify the user’s phone number, Cognito sends SMS messages with a one-time password (OTP). After a user has provided the correct OTP, their email or phone number is marked as verified and the user can sign in to your application.
Figure 1: Amazon Cognito sign-up process
If the sign-up process isn’t protected, bad actors can create scripts or deploy bots to sign up a large number of accounts, resulting in a significant volume of SMS messages sent in a short period of time. We dive deep into prevention, detection, and remediation mechanisms and strategies that you can apply to help protect against SMS pumping based on your use case.
Protect the sign-up flow
In this section, we review several prevention strategies to help protect against SMS sign-up frauds and help reduce the amount of SMS messages sent to bad actors.
Implement bot mitigation
Implementing bot mitigation techniques, such as CAPTCHA, can be very effective in preventing simple bots from pumping user creation flows. You can integrate a CAPTCHA framework on your application’s frontend and validate that the client initiating the sign-up request is operated by a human user. If the user has passed the verification, you then pass the CAPTCHA user response token in ClientMetadata together with user attributes to an Amazon Cognito SignUp API call. As part of the sign-up process, Cognito invokes an AWS Lambda function called pre sign-up Lambda trigger, which you can use to reject sign-up requests if there isn’t a valid CAPTCHA token presented. This will slow down bots and help reduce unintended account creation in your Cognito user pool.
Validate phone number before user sign-up
Another layer of mitigation is to identify the actor’s phone number early in your application’s sign-up process. You can validate the user provided phone number in the backend to catch incorrectly formatted phone numbers and add logic to help filter out unwanted phone numbers prior to sending text messages. Amazon Pinpoint offers a Phone Number Validate feature that can help you determine if a user-provided phone number is valid, determine phone number type (such as mobile, landline, or VoIP), and identify the country and service provider the phone number is associated with. The returned phone number metadata can be used to decide whether the user will continue the sign-up process and send an SMS message to that user. Note that there’s an additional charge for using the phone number validation service. For more information, see Amazon Pinpoint pricing.
To build this validation check into the Amazon Cognito sign-up process, you can customize the pre sign-up Lambda trigger, which Cognito uses to invoke your code before allowing users to sign-up and sending out an SMS OTP. The Lambda trigger invokes the Amazon Pinpoint phone number validate API, and based on the validation response, you can build a custom pattern that fits your application to continue or reject the user sign-up. For example, you can reject user sign-ups with VoIP numbers or reject users who provide a phone number that’s associated with countries that you don’t operate in, or even reject certain cellular service providers. After you reject a user sign-up using the Lambda trigger, Cognito will deny the user sign-up request and will not invoke user confirmation flow nor send out an SMS message.
When you send a request to the Amazon Pinpoint phone number validation service, it returns the following metadata about the phone number. The following example represents a valid mobile phone number data set:
Note that PhoneType includes type MOBILE, LANDLINE, VOIP, INVALID, or OTHER. INVALID phone numbers don’t include information about the carrier or location associated with the phone number and are unlikely to belong to actual recipients. This helps you decide when to reject user sign-ups and reduces SMS messages to undesired phone numbers. You can see details about other responses in the Amazon Pinpoint developer guide.
Example pre sign-up Lambda function to block user sign-up except with a valid MOBILE number
The following pre sign-up Lambda function example invokes the Amazon Pinpoint phone number validation service and rejects user sign-ups unless the validation service returns a valid mobile phone number.
import { PinpointClient, PhoneNumberValidateCommand } from "@aws-sdk/client-pinpoint"; // ES Modules import

const validatePhoneNumber = async (phoneNumber) => {
  const pinpoint = new PinpointClient();
  const input = { // PhoneNumberValidateRequest
    NumberValidateRequest: { // NumberValidateRequest
      PhoneNumber: phoneNumber,
    },
  };
  const command = new PhoneNumberValidateCommand(input);
  const response = await pinpoint.send(command);

  return response;
};

const handler = async (event, context, callback) => {

  const phoneNumber = event.request.userAttributes.phone_number;
  const validationResponse = await validatePhoneNumber(phoneNumber);

  if (validationResponse.NumberValidateResponse.PhoneType != "MOBILE") {
    var error = new Error("Cannot register users without a mobile number");
    // Return error to Amazon Cognito
    callback(error, event);
  }
  // Return to Amazon Cognito
  callback(null, event);
};

export { handler };
Use a custom user-initiated confirmation flow or alternative OTP delivery method
In your user pool configurations, you can opt out of using Amazon Cognito-assisted verification and confirmation to send SMS messages to confirm users. Instead, you can build a custom reverse OTP flow to ask your users to initiate the user confirmation process. For example, instead of automatically sending SMS messages to a user when they sign up, your application can display an OTP and direct the user to initiate the SMS conversation by texting the OTP to your service number. After your application has received the SMS message and confirmed the correct OTP is provided, invoke a service such as a Lambda function to call the AdminConfirmSignUp administrative API operation to confirm user, then call AdminUpdateUserAttributes to set the phone_number_verified attribute as true to indicate that the user phone number is verified.
You can also choose to deliver an OTP using other methods, such as email, especially if your application doesn’t require the user’s phone number. During the user sign-up process, you can configure a custom SMS sender Lambda trigger in Amazon Cognito to send a user verification code through email or another method. Additionally, you can use the Cognito email MFA feature to send MFA codes through email.
Detect SMS pumping
When you’re considering the various prevention options, it’s important to set up detection mechanisms to identify SMS pumping as they arise. In this section, we show you how to use AWS CloudTrail and Amazon CloudWatch to monitor your Amazon Cognito user pool and detect anomalies that could lead to SMS pumping. Note that building detection mechanism based on anomalies requires knowing your average or baseline traffic and the difference in metrics that represent regular activity and metrics that can indicate unauthorized or unintended activity.
Service quotas dashboard and CloudWatch alarms
Bad actors may attempt to leverage either the sign-up confirmation or the reset password functionality of Amazon Cognito. As shown previously in Figure 1, when a new user signs up to your Cognito user pool, the SignUp API operation is invoked. When the user provides the OTP confirmation code, the ConfirmSignUp API operation is invoked. The call rate of both APIs is tracked collectively under Rate of UserCreation requests under Amazon Cognito service in the service quotas dashboard.
You can set up Amazon CloudWatch alarms to monitor and issue notifications when you’re close to a quota value threshold. These alarms could be an early indication of a sudden usage increase, and you can use them to triage potential incidents.
Additionally, when your services are sending SMS messages, those transactions count towards the Amazon Simple Notification Service (Amazon SNS) service quota. You should set up alarms to monitor the Transactional SMS Message Delivery Rate per Second quota and the SMS Message Spending in USD quota.
CloudTrail event history
When bad actors plan SMS pumping, they are likely attempting to trick you to send as many SMS messages as possible rather than completing the user confirmation process. Under the context of a user sign-up event, you might notice in the CloudTrail event history that there are more SignUp and ResendConfirmationCode events—which send out SMS messages—than ConfirmSignUp operations; indicating a user has initiated but not completed the sign-up process. You can use Amazon Athena or CloudWatch Logs Insights to search and analyze your Amazon Cognito CloudTrail events and identify if there’s a significant reduction in finishing the user sign-up process.
Figure 2: SignUp API logged in CloudTrail event history
Similarly, you can apply this observability towards the user password reset flow by analyzing the ForgotPassword API and ConfirmForgotPassword API operations for deviations.
Note that the slight deviations in user completion flow in the CloudTrail event history alone might not be an indication of unauthorized activity, however a substantial deviation above the regular baseline might be a signal of unintended use.
Monitor excessive billing
Another opportunity for detecting and identifying unauthorized Amazon Cognito activity is by using AWS Cost Explorer. You can use this interface to visualize, understand, and manage your AWS costs and usage over time, which might assist by highlighting the source of excessive billing in your AWS account. Be aware that charges in your account can take up to 24 hours to be displayed, so while this method can help provide some assistance in identifying SMS pumping activity, it should only be used as a supplement to other detection methods.
In the navigation pane, under Cost Analysis, choose Cost Explorer.
In the Cost and Usage Report, under Report Parameters, select Date Range to include the start and end date of the time period that you want to apply a filter to. In Figure 3 that follows, we use an example date range between 2024-07-03 and 2024-07-17.
In the same Report Parameter area, under Filters, for Service, select SNS (Simple Notification Service). Because Amazon Cognito uses Amazon SNS for delivery of SMS messages, filtering on SNS can help you identify excessive billing.
Figure 3: Reviewing billing charges by service
Apply AWS WAF rules as mitigation approaches
It’s recommended that you apply AWS WAF with your Amazon Cognito user pool to protect against common threats. In this section, we show you a few advanced options using AWS WAF rules to block or throttle specific bad actor’s traffic when you have observed irregular sign-up attempts and suspect they were part of fraudulent activities.
Target a specific bad actor’s IP address
When building AWS WAF remediation strategies, you can start by building an IP deny list to block traffic from known malicious IP addresses. This method is straightforward and can be highly effective in preventing unwanted access. For detailed instructions on how to set up an IP deny list, see Creating an IP set.
Target a specific phone number area code regex pattern
In an SMS pumping scheme, bad actors often purchase blocks of cell phone numbers from a wireless service provider and use phone numbers with the same area code. If you observe a pattern and identify that these attempts use the same area code, you can apply an AWS WAF rule to block that specific traffic.
To configure an AWS WAF web ACL to block using an area code regex pattern:
Open the AWS WAF console.
In the navigation pane, under AWS WAF, choose WAF ACLs.
Choose Create web ACL. Under Web ACL details, select Regional resources, and select the AWS Region as your Amazon Cognito user pool. Under Associated AWS resources, select Add AWS resources, and choose your Cognito user pool. Choose Next.
On the Add rules and rule groups page, choose Add rules, Add my own rules and rule groups, and Rule builder.
Create a rule in Rule builder.
For If a request, select matches the statement.
For Inspect, select Body.
For Match type, select Matches regular expression.
For Regular expression, enter a match for the observed pattern. For example, the regular expression ^303|^\+1303|^001303 will match requests that include the digits 303, +1303, or 001303 at the beginning of any string in the body of a request:
Figure 4: Creating a web ACL
Under Action, choose Block. Then, choose Add rule.
Continue with Set rule priority and Configure metrics, then choose Create web ACL.
Be aware that this method will block all user sign-up requests that contain phone numbers matching the regex pattern for the target area code and could prevent legitimate users whose numbers match the defined pattern from signing up. For example, the rule above will apply to all users with phone numbers starting with 303, +1303, or 001303. You should consider implementing this method as an as-needed solution to address an ongoing SMS pumping attack.
Target a specific bad actor’s client fingerprint
Another method is to examine an actor’s TLS traffic. If your application UI is hosted using Amazon CloudFront or Application Load Balancer (ALB), you can build AWS WAF rules to match the client’s JA3 fingerprint. The JA3 fingerprint is a 32-character MD5 hash derived from the TLS three-way handshake when the client sends a ClientHello packet to the server. It serves as a unique identifier for the client’s TLS configuration because various attributes such as TLS version, cipher suites, and extensions are derived to calculate the fingerprint, allowing for the unique detection of clients even when the source IP and other commonly used identification information might have changed.
Fraudulent activities, such as SMS pumping, are typically carried out using automated tools and scripts. These tools often have a consistent SSL/TLS handshake pattern, resulting in a unique JA3 fingerprint. By configuring an AWS WAF web ACL rule to match the JA3 fingerprint associated with this traffic, you can identify clients with a high degree of accuracy, even if they change other attributes, such as IP addresses.
AWS WAF has introduced support for JA3 fingerprint matching, which you can use to identify and differentiate clients based on the way they initiate TLS connections, enabling you to inspect incoming requests for their JA3 fingerprints. You can build the remediation strategy by first evaluating AWS WAF logs to extract JA3 fingerprints for potential malicious hosts, then proceed with creating rules to block requests where the fingerprint matches the malicious JA3 fingerprint associated with previous attacks.
To configure an AWS WAF web ACL to block using JA3 fingerprint matching for CloudFront resources:
Open the AWS WAF console.
In the navigation pane, under AWS WAF, choose WAF ACLs.
Choose Create web ACL. Under Web ACL details, select Amazon CloudFront distributions. Under Associated AWS resources, select Add AWS resources, and select your CloudFront distribution. Choose Next.
On the Add rules and rule groups page, choose Add rules, Add my own rules and rule groups, and Rule builder.
In Rule builder:
For If a request, select matches the statement.
For Inspect, select JA3 fingerprint.
For Match type, keep Exactly matches string.
For String to match, enter the JA3 fingerprint that you want to block.
For Text transformation, choose None.
For Fallback for missing JA3 fingerprint, select a fallback match status for cases where no JA3 fingerprint is detected. We recommend choosing No match to prevent unintended traffic blocking.
If you need to block multiple JA3 fingerprints, include each one in the rule and for If a request select matches at least one of the statements (OR).
Figure 5: Creating an AWS WAF statement for a JA3 fingerprint
Under Action, select Block, and choose Add rule. You can choose other actions such as COUNT or CAPTCHA that suit your use case.
Continue with Set rule priority and Configure metrics, then choose Create web ACL.
Note that JA3 fingerprints can change over time due to the randomization of TLS ClientHello messages by modern browsers. It’s important to dynamically update your web ACL rules or manually review logs to update the JA3 fingerprint search string in your match rule when applicable.
AWS WAF remediation considerations
These AWS WAF remediation approaches help to block potential threats by providing mechanisms to filter out malicious traffic. It’s essential to continually review the effectiveness of these rules to minimize the risk of blocking legitimate sources and make dynamic adjustments to the rules when you detect new bad actors and patterns.
Summary
In this blog post, we introduced mechanisms that you can use to detect and protect your Amazon Cognito user pool against unintended user sign-up and SMS pumping. By implementing these strategies, you can enhance the security of your web and mobile applications and help to safeguard your services from potential abuse and financial loss. We suggest that you apply a combination of these prevention, detection, and mitigation approaches to protect your Cognito user pools.
If you have feedback about this post, submit comments in the Comments section below. If you have questions about this post, contact AWS Support.
With Amazon Cognito, you can implement customer identity and access management (CIAM) into your web and mobile applications. You can add user authentication and access control to your applications in minutes.
In this post, I introduce you to the new access token customization feature for Amazon Cognito user pools and show you how to use it. Access token customization is included in the advanced security features (ASF) of Amazon Cognito. Note that ASF is subject to additional pricing as described on the Amazon Cognito pricing page.
What is access token customization?
When a user signs in to your app, Amazon Cognito verifies their sign-in information, and if the user is authenticated successfully, returns the ID, access, and refresh tokens. The access token, which uses the JSON Web Token (JWT) format following the RFC7519 standard, contains claims in the token payload that identify the principal being authenticated, and session attributes such as authentication time and token expiration time. More importantly, the access token also contains authorization attributes in the form of user group memberships and OAuth scopes. Your applications or API resource servers can evaluate the token claims to authorize specific actions on behalf of users.
With access token customization, you can add application-specific claims to the standard access token and then make fine-grained authorization decisions to provide a differentiated end-user experience. You can refine the original scope claims to further restrict access to your resources and enforce the least privileged access. You can also enrich access tokens with claims from other sources, such as user subscription information stored in an Amazon DynamoDB table. Your application can use this enriched claim to determine the level of access and content available to the user. This reduces the need to build a custom solution to look up attributes in your application’s code, thereby reducing application complexity, improving performance, and smoothing the integration experience with downstream applications.
How do I use the access token customization feature?
Amazon Cognito works with AWS Lambda functions to modify your user pool’s authentication behavior and end-user experience. In this section, you’ll learn how to configure a pre token generation Lambda trigger function and invoke it during the Amazon Cognito authentication process. I’ll also show you an example function to help you write your own Lambda function.
Lambda trigger flow
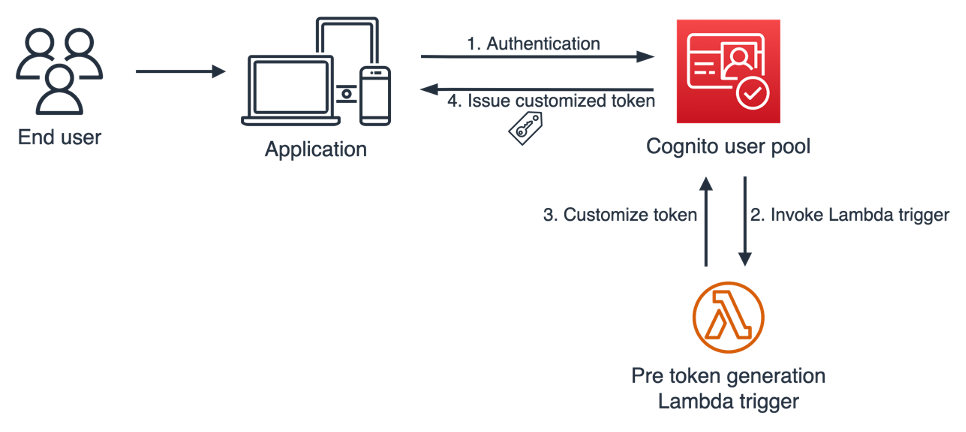
During a user authentication, you can choose to have Amazon Cognito invoke a pre token generation trigger to enrich and customize your tokens.
Figure 1: Pre token generation trigger flow
Figure 1 illustrates the pre token generation trigger flow. This flow has the following steps:
An end user signs in to your app and authenticates with an Amazon Cognito user pool.
After the user completes the authentication, Amazon Cognito invokes the pre token generation Lambda trigger, and sends event data to your Lambda function, such as userAttributes and scopes, in a pre token generation trigger event.
Your Lambda function code processes token enrichment logic, and returns a response event to Amazon Cognito to indicate the claims that you want to add or suppress.
Amazon Cognito vends a customized JWT to your application.
The pre token generation trigger flow supports OAuth 2.0 grant types, such as the authorization code grant flow and implicit grant flow, and also supports user authentication through the AWS SDK.
Enable access token customization
Your Amazon Cognito user pool delivers two different versions of the pre token generation trigger event to your Lambda function. Trigger event version 1 includes userAttributes, groupConfiguration, and clientMetadata in the event request, which you can use to customize ID token claims. Trigger event version 2 adds scope in the event request, which you can use to customize scopes in the access token in addition to customizing other claims.
In this section, I’ll show you how to update your user pool to trigger event version 2 and enable access token customization.
Choose the target user pool for token customization.
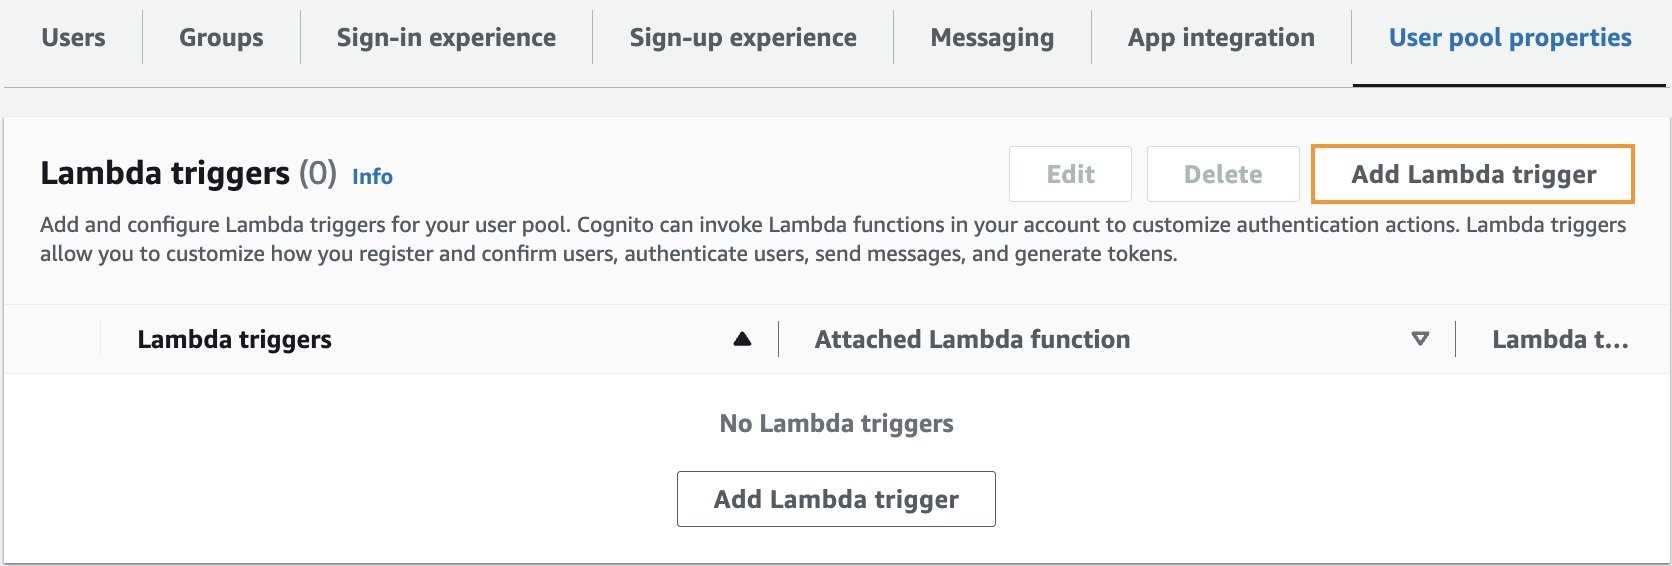
On the User pool properties tab, in the Lambda triggers section, choose Add Lambda trigger.
Figure 2: Add Lambda trigger
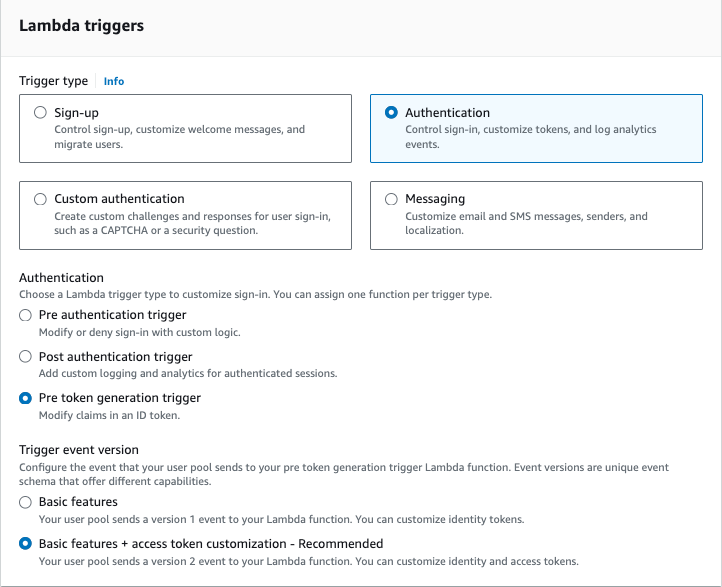
In the Lambda triggers section, do the following:
For Trigger type, select Authentication.
For Authentication, select Pre token generation trigger.
For Trigger event version, select Basic features + access token customization – Recommended. If this option isn’t available to you, make sure that you have enabled advanced security features. You must have advanced security features enabled to access this option.
Figure 3: Select Lambda trigger
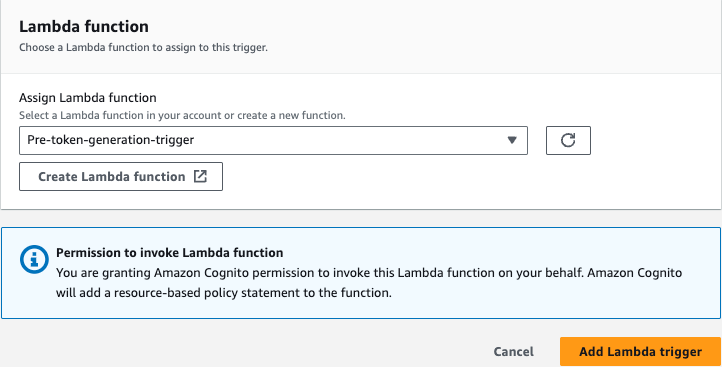
Select your Lambda function and assign it as the pre token generation trigger. Then choose Add Lambda trigger.
Figure 4: Add Lambda trigger
Example pre token generation trigger
Now that you have enabled access token customization, I’ll walk you through a code example of the pre token generation Lambda trigger, and the version 2 trigger event. This code example examines the trigger event request, and adds a new custom claim and a custom OAuth scope in the response for Amazon Cognito to customize the access token to suit various authorization scheme.
Here is an example version 2 trigger event. The event request contains the user attributes from the Amazon Cognito user pool, the original scope claims, and the original group configurations. It has two custom attributes—membership and location—which are collected during the user registration process and stored in the Cognito user pool.
In the following code example, I transformed the user’s location attribute and membership attribute to add a custom claim and a custom scope. I used the claimsToAddOrOverride field to create a new custom claim called demo:membershipLevel with a membership value of Premium from the event request. I also constructed a new scope with the value of membership:USA.Premium through the scopesToAdd claim, and added the new claim and scope in the event response.
With the preceding code, the Lambda trigger sends the following response back to Amazon Cognito to indicate the customization that was needed for the access tokens.
Your application can then use the newly-minted, custom scope and claim to authorize users and provide them with a personalized experience.
Considerations and best practices
There are four general considerations and best practices that you can follow:
Some claims and scopes aren’t customizable. For example, you can’t customize claims such as auth_time, iss, and sub, or scopes such as aws.cognito.signin.user.admin. For the full list of excluded claims and scopes, see the Excluded claims and scopes.
Work backwards from authorization. When you customize access tokens, you should start with your existing authorization schema and then decide whether to customize the scopes or claims, or both. Standard OAuth based authorization scenarios, such as Amazon API Gateway authorizers, typically use custom scopes to provide access. However, if you have complex or fine-grained authorization requirements, then you should consider using both scopes and custom claims to pass additional contextual data to the application or to a policy-based access control service such as Amazon Verified Permission.
Establish governance in token customization. You should have a consistent company engineering policy to provide nomenclature guidance for scopes and claims. A syntax standard promotes globally unique variables and avoids a name collision across different application teams. For example, Application X at AnyCompany can choose to name their scope as ac.appx.claim_name, where ac represents AnyCompany as a global identifier and appx.claim_name represents Application X’s custom claim.
Be aware of limits. Because tokens are passed through various networks and systems, you need to be aware of potential token size limitations in your systems. You should keep scope and claim names as short as possible, while still being descriptive.
Conclusion
In this post, you learned how to integrate a pre token generation Lambda trigger with your Amazon Cognito user pool to customize access tokens. You can use the access token customization feature to provide differentiated services to your end users based on claims and OAuth scopes. For more information, see pre token generation Lambda trigger in the Amazon Cognito Developer Guide.
If you have feedback about this post, submit comments in the Comments section below. If you have questions about this post, contact AWS Support.
Want more AWS Security news? Follow us on Twitter.
Update: An earlier version of this post was published on September 14, 2017, on the Front-End Web and Mobile Blog.
Amazon Cognito user pools offer a fully managed OpenID Connect (OIDC) identity provider so you can quickly add authentication and control access to your mobile app or web application. User pools scale to millions of users and add layers of additional features for security, identity federation, app integration, and customization of the user experience. Amazon Cognito is available in regions around the globe, processing over 100 billion authentications each month. You can take advantage of security features when using user pools in Cognito, such as email and phone number verification, multi-factor authentication, and advanced security features, such as compromised credentials detection, and adaptive authentications.
Many customers ask about the best way to migrate their existing users to Amazon Cognito user pools. In this blog post, we describe several different recommended approaches and provide step-by-step instructions on how to implement them.
Key considerations
The main consideration when migrating users across identity providers is maintaining a consistent end-user experience. Ideally, users can continue to use their existing passwords so that their experience is seamless. However, security best practices dictate that passwords should never be stored directly as cleartext in a user store. Instead, passwords are used to compute cryptographic hashes and verifiers that can later be used to verify submitted passwords. This means that you cannot securely export passwords in cleartext form from an existing user store and import them into a Cognito user pool. You might ask your users to choose a new password during the migration. Or, if you want to retain the existing passwords, you need to retain access to the existing hashes and verifiers, at least during the migration period.
A secondary consideration is the migration timeline. For example, do you need a faster migration timeline because your current identity store’s license is expiring? Or do you prefer a slow and steady migration because you are modernizing your current application, and it takes time to connect your existing systems to the new identity provider?
The following two methods define our recommended approaches for migrating existing users into a user pool:
Bulk user import – Export your existing users into a comma-separated (.csv) file, and then upload this .csv file to import users into a user pool. Your desired user attributes (except passwords) can be included and mapped to attributes in the target user pool. This approach requires users to reset their passwords when they sign in with Cognito. You can choose to migrate your existing user store entirely in a single import job or split users into multiple jobs for parallel or incremental processing.
Just-in-time user migration – Migrate users just in time into a Cognito user pool as they sign in to your mobile or web app. This approach allows users to retain their current passwords, because the migration process captures and verifies the password during the sign-in process, seamlessly migrating them to the Cognito user pool.
In the following sections, we describe the bulk user import and just-in-time user migration methods in more detail and then walk through the steps of each approach.
Bulk user import
You perform bulk import of users into an Amazon Cognito user pool by uploading a .csv file that contains user profile data, including usernames, email addresses, phone numbers, and other attributes. You can download a template .csv file for your user pool from Cognito, with a user schema structured in the template header.
Following is an example of performing bulk user import.
To create an import job
Open the Cognito user pool console and select the target user pool for migration.
On the Users tab, navigate to the Import users section, and choose Create import job.
Figure 1: Create import job
In the Create import job dialog box, download the template.csv file for user import.
Export your existing user data from your existing user directory or store your data into the .csv file
Match the user attribute types with column headings in the template. Each user must have an email address or a phone number that is marked as verified in the .csv file, in order to receive the password reset confirmation code.
Figure 2: Configure import job
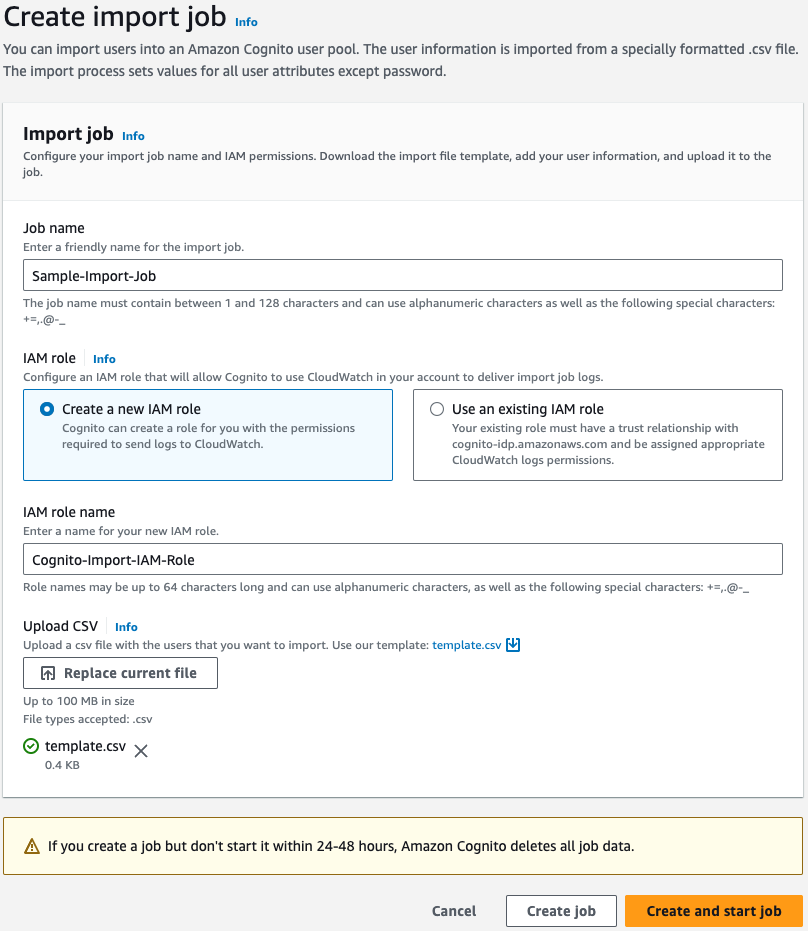
Go back to the Create import job dialog box (as shown in Figure 2) and do the following:
Enter a Job name.
Choose to Create a new IAM role or Use an existing IAM role. This role grants Amazon Cognito permission to write to Amazon CloudWatch Logs in your account, so that Cognito can provide logs for successful imports and errors for skipped or failed transactions.
Upload the .csv file that you have prepared, and choose Create and start job.
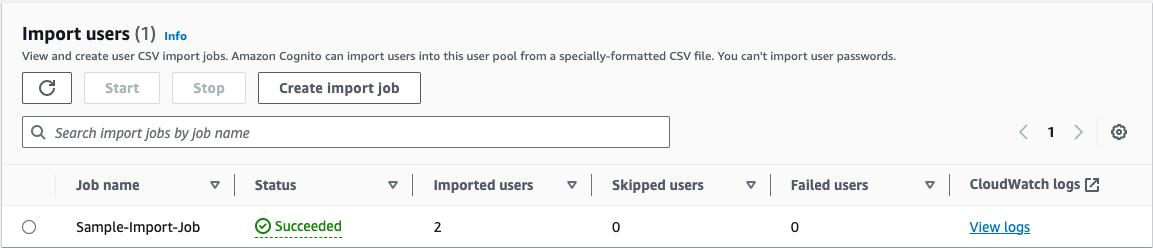
Depending on the size of the .csv file, the job can run for minutes or hours, and you can follow the status from that same page in the Amazon Cognito console.
Figure 3: Check import job status
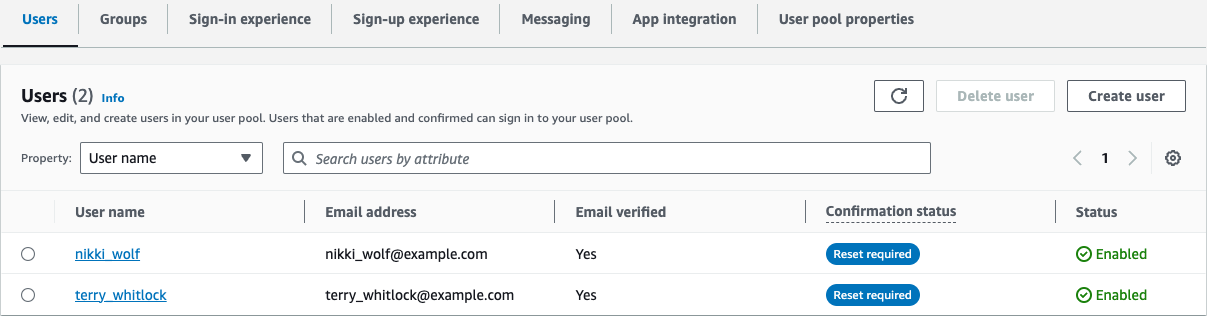
Cognito runs through the import job and imports users with a RESET_REQUIRED state. When users attempt to sign in, Cognito will return PasswordResetRequiredException from the sign-in API, and the app should direct the user into the ForgotPassword flow.
Figure 4: View imported user
The bulk import approach can also be used continuously to incrementally import users. You can set up an Extract-Transform-Load (ETL) batch job process to extract incremental changes to your existing user directories, such as the new sign-ups on the existing systems before you switch over to a Cognito user pool. Your batch job will transform the changes into a .csv file to map user attribute schemas, and load the .csv file as a Cognito import job through the CreateUserImportJob CLI or SDK operation. Then start the import job through the StartUserImportJob CLI or SDK operation. For more information, see Importing users into user pools in the Amazon Cognito Developer Guide.
Just-in-time user migration
The just-in-time (JIT) user migration method involves first attempting to sign in the user through the Amazon Cognito user pool. Then, if the user doesn’t exist in the Cognito user pool, Cognito calls your Migrate User Lambda trigger and sends the username and password to the Lambda trigger to sign the user in through the existing user store. If successful, the Migrate User Lambda trigger will also fetch user attributes and return them to Cognito. Then Cognito silently creates the user in the user pool with user attributes, as well as salts and password verifiers from the user-provided password. With the Migrate User Lambda trigger, your client app can start to use the Cognito user pool to sign in users who have already been migrated, and continue migrating users who are signing in for the first time towards the user pool. This just-in-time migration approach helps to create a seamless authentication experience for your users.
Cognito, by default, uses the USER_SRP_AUTH authentication flow with the Secure Remote Password (SRP) protocol. This flow doesn’t involve sending the password across the network, but rather allows the client to exchange a cryptographic proof with the Cognito service to prove the client’s knowledge of the password. For JIT user migration, Cognito needs to verify the username and password against the existing user store. Therefore, you need to enable a different Cognito authentication flow. You can choose to use either the USER_PASSWORD_AUTH flow for client-side authentication or the ADMIN_USER_PASSWORD_AUTH flow for server-side authentication. This will allow the password to be sent to Cognito over an encrypted TLS connection, and allow Cognito to pass the information to the Lambda function to perform user authentication against the original user store.
This JIT approach might not be compatible with existing identity providers that have multi-factor authentication (MFA) enabled, because the Lambda function cannot support multiple rounds of challenges. If the existing identity provider requires MFA, you might consider the alternative JIT migration approach discussed later in this blog post.
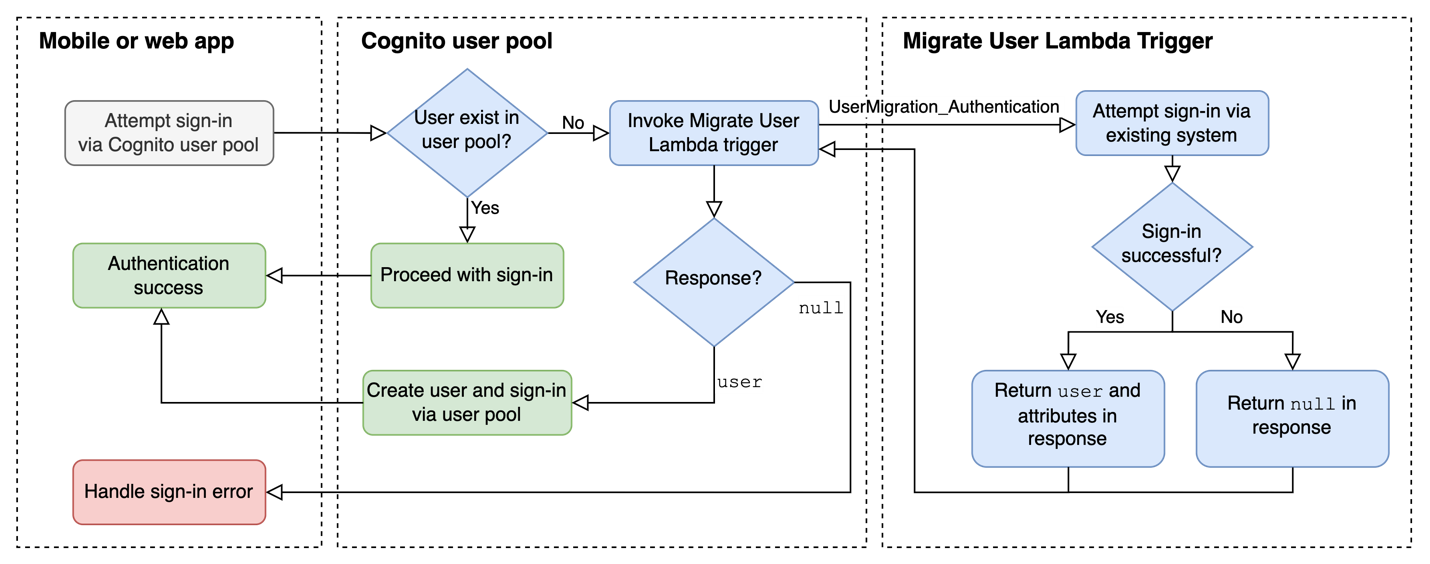
Figure 5 illustrates the steps for the JIT sign-in flow. The mobile or web app first tries to sign in the user in the user pool. If the user isn’t already in the user pool, Cognito handles user authentication and invokes the Migrate User Lambda trigger to migrate the user. This flow keeps the logic in the app simple and allows the app to use the Amazon Cognito SDK to sign in users in the standard way. The migration logic takes place in the Lambda function in the backend.
Figure 5: JIT migration user authentication flow
The flow in Figure 5 starts in the mobile or web app, which attempts to sign in the user by using the AWS SDK. If the user doesn’t exist in the user pool, the migration attempt starts. Cognito calls the Migrate User Lambda trigger with triggerSource set to UserMigration_Authentication, and passes the user’s username and password in the request in order to attempt to migrate the user.
This approach also works in the forgot password flow shown in Figure 6, where the user has forgotten their password and hasn’t been migrated yet. In this case, once the user makes a “Forgot Password” request, your mobile or web app will send a forgot password request to Cognito. Cognito invokes your Migrate User Lambda trigger with triggerSource set to UserMigration_ForgotPassword, and passes the username in the request in order to attempt user lookup, migrate the user profile, and facilitate the password reset process.
Figure 6: JIT migration forgot password flow
Just-in-time user migration sample code
In this section, we show sample source codes for a Migrate User Lambda trigger overall structure. We will fill in the commented sections with additional code, shown later in the section. When you set up your own Lambda function, configure a Lambda execution role to grant permissions for CloudWatch logs.
consthandler = async (event) => {
if (event.triggerSource == "UserMigration_Authentication") {
//***********************************************************************// Attempt to sign in the user or verify the password with existing identity store// (shown in the Section A – Migrate User of this post)//***********************************************************************
}
else if (event.triggerSource == "UserMigration_ForgotPassword") {
//***********************************************************************// Attempt to look up the user in your existing identity store// (shown in the section B – Forget Password of this post)//***********************************************************************
}
return event;
};
export { handler };
In the migration flow, the Lambda trigger will sign in the user and verify the user’s password in the existing user store. That may involve a sign-in attempt against your existing user store or a check of the password against a stored hash. You need to customize this step based on your existing setup. You can also create a function to fetch user attributes that you want to migrate. If your existing user store conforms to the OIDC specification, you can parse the ID Token claims to retrieve the user’s attributes. The following example shows how to set the username and attributes for the migrated user.
// Section A – Migrate Userif (event.triggerSource == "UserMigration_Authentication") {
// Attempt to sign in the user or verify the password with the existing user store.// Add an authenticateUser() functionbased on your existing user store setup.const user = awaitauthenticateUser(event.userName, event.request.password);
if (user) {
// Migrating user attributes from the source user store. You can migrate additional attributes as needed.
event.response.userAttributes = {
// Setting username and email address
username: event.userName,
email: user.emailAddress,
email_verified: "true",
};
// Setting user status to CONFIRMED to autoconfirm users so they can sign in to the user pool
event.response.finalUserStatus = "CONFIRMED";
// Setting messageAction to SUPPRESS to decline to send the welcome message that Cognito usually sends to new users
event.response.messageAction = "SUPPRESS";
}
}
The user is now migrated from the existing user store to the user pool, as well as the user’s attributes. Users will also be redirected to your application with the authorization code or JSON Web Tokens, depending on the OAuth 2.0 grant types you configured in the user pool.
Let’s look at the forgot password flow. Your Lambda function calls the existing user store and migrates other attributes in the user’s profile first, and then Lambda sets user attributes in the response to the Cognito user pool. Cognito initiates the ForgotPassword flow and sends a confirmation code to the user to confirm the password reset process. The user needs to have a verified email address or phone number migrated from the existing user store to receive the forgot password confirmation code. The following sample code demonstrates how to complete the ForgotPassword flow.
// Section B – Forgot Passwordelse if (event.triggerSource == "UserMigration_ForgotPassword") {
// Look up the user in your existing user store service.// Add a lookupUser() function based on your existing user store setup.const lookupResult = awaitlookupUser(event.userName);
if (lookupResult) {
// Setting user attributes from the source user store
event.response.userAttributes = {
username: event.userName,
// Required to set verified communication to receive password recovery code
email: lookupResult.emailAddress,
email_verified: "true",
};
event.response.finalUserStatus = "RESET_REQUIRED";
event.response.messageAction = "SUPPRESS";
}
}
Just-in-time user migration – alternative approach
Using the Migrate User Lambda trigger, we showed the JIT migration approach where the app switches to use the Cognito user pool at the beginning of the migration period, to interface with the user for signing in and migrating them from the existing user store. An alternative JIT approach is to maintain the existing systems and user store, but to silently create each user in the Cognito user pool in a backend process as users sign in, then switch over to use Cognito after enough users have been migrated.
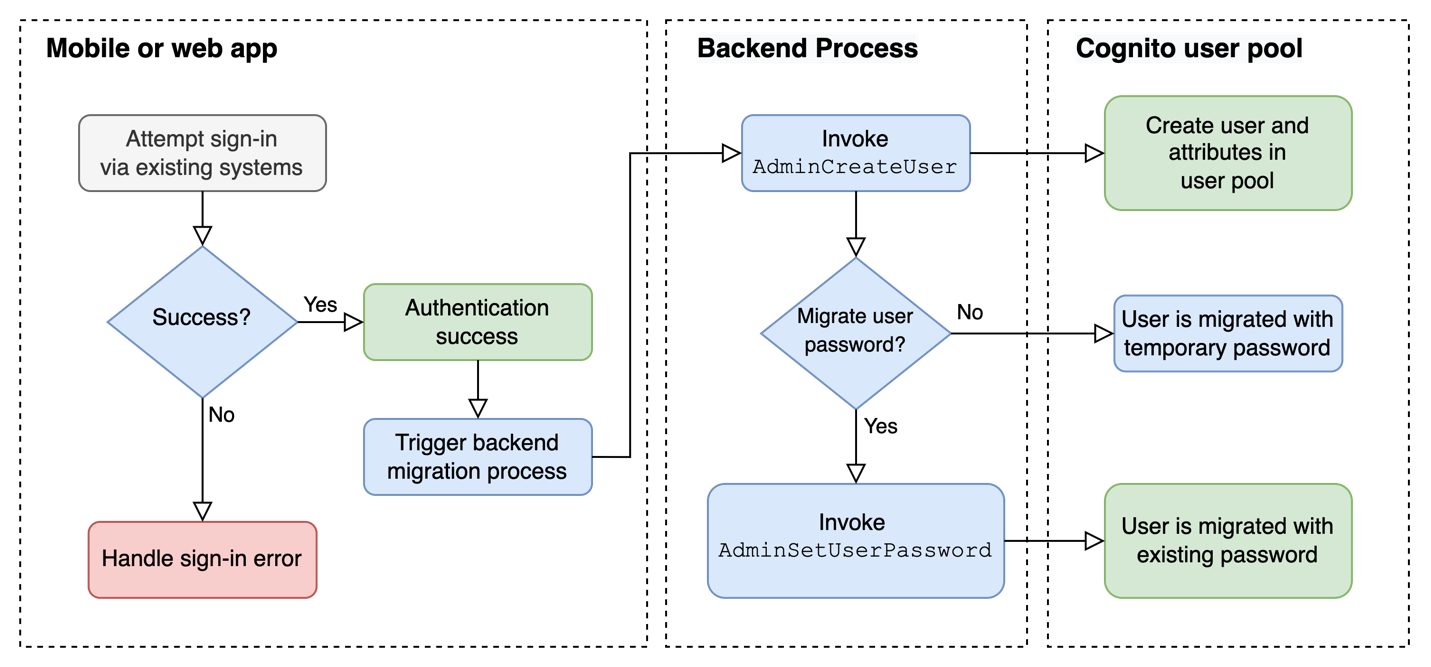
Figure 7: JIT migration alternative approach with backend process
Figure 7 shows this alternative approach in depth. When an end user signs in successfully in your mobile or web app, the backend migration process is initiated. This backend process first calls the Cognito admin API operation, AdminCreateUser, to create users and map user attributes in the destination user pool. The user will be created with a temporary password and be placed in FORCE_CHANGE_PASSWORD status. If you capture the user password during the sign-in process, you can also migrate the password by setting it permanently for the newly created user in the Cognito user pool using the AdminSetUserPassword API operation. This operation will also set the user status to CONFIRMED to allow the user to sign in to Cognito using the existing password.
Following is a code example for the AdminCreateUser function using the AWS SDK for JavaScript.
This alternative approach does not require the app to update its authentication codebase until a majority of users are migrated, but you need to propagate user attribute changes and new user signups from the existing systems to Cognito. If you are capturing and migrating passwords, you should also build a similar logic to capture password changes in existing systems and set the new password in the user pool to keep it synchronized until you perform a full switchover from the existing identity store to the Cognito user pool.
Summary and best practices
In this post, we described our two recommended approaches for migrating users into an Amazon Cognito user pool. You can decide which approach is best suited for your use case. The bulk method is simpler to implement, but it doesn’t preserve user passwords like the just-in-time migration does. The just-in-time migration is transparent to users and mitigates the potential attrition of users that can occur when users need to reset their passwords.
You could also consider a hybrid approach, where you first apply JIT migration as users are actively signing in to your app, and perform bulk import for the remaining less-active users. This hybrid approach helps provide a good experience for your active user communities, while being able to decommission existing user stores in a manageable timeline because you don’t need to wait for every user to sign in and be migrated through JIT migration.
We hope you can use these explanations and code samples to set up the most suitable approach for your migration project.
If you have feedback about this post, submit comments in the Comments section below. If you have questions about this post, contact AWS Support.
Want more AWS Security news? Follow us on Twitter.
The collective thoughts of the interwebz
Manage Consent
To provide the best experiences, we use technologies like cookies to store and/or access device information. Consenting to these technologies will allow us to process data such as browsing behavior or unique IDs on this site. Not consenting or withdrawing consent, may adversely affect certain features and functions.
Functional
Always active
The technical storage or access is strictly necessary for the legitimate purpose of enabling the use of a specific service explicitly requested by the subscriber or user, or for the sole purpose of carrying out the transmission of a communication over an electronic communications network.
Preferences
The technical storage or access is necessary for the legitimate purpose of storing preferences that are not requested by the subscriber or user.
Statistics
The technical storage or access that is used exclusively for statistical purposes.The technical storage or access that is used exclusively for anonymous statistical purposes. Without a subpoena, voluntary compliance on the part of your Internet Service Provider, or additional records from a third party, information stored or retrieved for this purpose alone cannot usually be used to identify you.
Marketing
The technical storage or access is required to create user profiles to send advertising, or to track the user on a website or across several websites for similar marketing purposes.