Tag Archives: Amazon Cognito User Pools

Use private key JWT authentication between Amazon Cognito user pools and an OIDC IdP

Post Syndicated from Martin Pagel original https://aws.amazon.com/blogs/security/use-private-key-jwt-authentication-between-amazon-cognito-user-pools-and-an-oidc-idp/

With Amazon Cognito user pools, you can add user sign-up and sign-in features and control access to your web and mobile applications. You can enable your users who already have accounts with other identity providers (IdPs) to skip the sign-up step and sign in to your application by using an existing account through SAML 2.0 or OpenID Connect (OIDC). In this blog post, you will learn how to extend the authorization code grant between Cognito and an external OIDC IdP with private key JSON Web Token (JWT) client authentication.

For OIDC, Cognito uses the OAuth 2.0 authorization code grant flow as defined by the IETF in RFC 6749 Section 1.3.1. This flow can be broken down into two steps: user authentication and token request. When a user needs to authenticate through an external IdP, the Cognito user pool forwards the user to the IdP’s login endpoint. After successful authentication, the IdP sends back a response that includes an authorization code, which concludes the authentication step. The Cognito user pool now uses this code, together with a client secret for client authentication, to retrieve a JWT from the IdP. The JWT consists of an access token and an identity token. Cognito ingests that JWT, creates or updates the user in the user pool, and returns a JWT it has created for the client’s session, to the client. You can find a more detailed description of this flow in the Amazon Cognito documentation.

Although this flow sufficiently secures the requests between Cognito and the IdP for most customers, those in the public sector, healthcare, and finance sometimes need to integrate with IdPs that enforce additional security measures as part of their security requirements. In the past, this has come up in conversations at AWS when our customers needed to integrate Cognito with, for example, the HelseID (healthcare sector, Norway), login.gov (public sector, USA), or GOV.UK One Login (public sector, UK) IdPs. Customers who are using Okta, PingFederate, or similar IdPs and want additional security measures as part of their internal security requirements, might also find adding further security requirements desirable as part of their own policies.

The most common additional requirement is to replace the client secret with an assertion that consists of a private key JWT as a means of client authentication during token requests. This method is defined through a combination of RFC 7521 and RFC 7523. Instead of a symmetric key (the client secret), this method uses an asymmetric key-pair to sign a JWT with a private key. The IdP can then verify the token request by validating the signature of that JWT using the corresponding public key. This helps to eliminate the exposure of the client secret with every request, thereby reducing the risk of request forgery, depending on the quality of the key material that was used and how access to the private key is secured. Additionally, the JWT has an expiry time, which further constrains the risk of replay attacks to a narrow time window.

A Cognito user pool does not natively support private key JWT client authentication when integrating with an external IdP. However, you can still integrate Cognito user pools with IdPs that support or require private key JWT authentication by using Amazon API Gateway and AWS Lambda.

This blog post presents a high-level overview of how you can implement this solution. To learn more about the underlying code, how to configure the included services, and what the detailed request flow looks like, check out the Deploy a demo section later in this post. Keep in mind that this solution does not cover the request flow between your own application and a Cognito user pool, but only the communication between Cognito and the IdP.

Solution overview

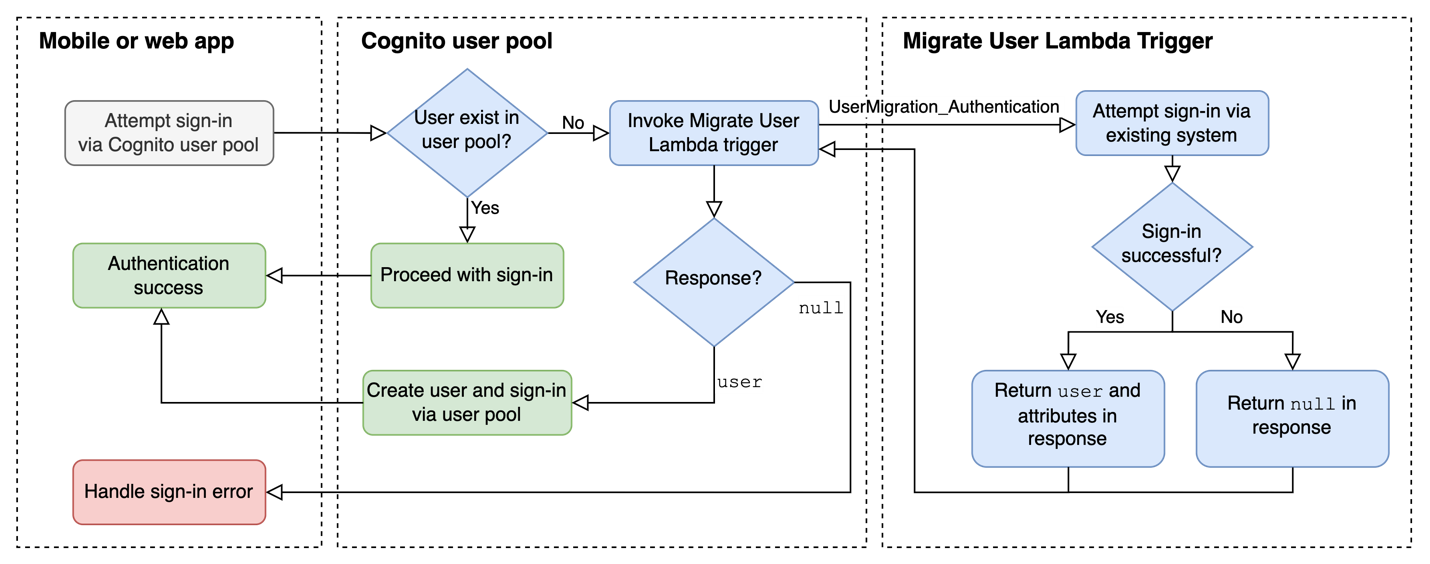
Following the technical implementation details of the previously mentioned RFCs, the required request flow between a Cognito user pool and the external OIDC IdP can be broken down into four simplified steps, shown in Figure 1.

Figure 1: Simplified UML diagram of the target implementation for using a private key JWT during the authorization code grant

Figure 1: Simplified UML diagram of the target implementation for using a private key JWT during the authorization code grant

In this example, we’re using the Cognito user pool hosted UI—because it already provides OAuth 2.0-aligned IdP integration—and extending it with the private key JWT. Figure 1 illustrates the following steps:

  1. The hosted UI forwards the user client to the /authorize endpoint of the external OIDC IdP with an HTTP GET request.
  2. After the user successfully logs into the IdP, the IdP‘s response includes an authorization code.
  3. The hosted UI sends this code in an HTTP POST request to the IdP’s /token endpoint. By default, the hosted UI also adds a client secret for client authentication. To align with the private key JWT authentication method, you need to replace the client secret with a client assertion and specify the client assertion type, as highlighted in the diagram and further described later.
  4. The IdP validates the client assertion by using a pre-shared public key.
  5. The IdP issues the user’s JWT, which Cognito ingests to create or update the user in the user pool.

As mentioned earlier, token requests between a Cognito user pool and an external IdP do not natively support the required client assertion. However, you can redirect the token requests to, for example, an Amazon API Gateway, which invokes a Lambda function to extend the request with the new parameters. Because you need to sign the client assertion with a private key, you also need a secure location to store this key. For this, you can use AWS Secrets Manager, which helps you to secure the key from unauthorized use. With the required flow and additional services in mind, you can create the following architecture.

Figure 2: Architecture diagram with Amazon API Gateway and Lambda to process token requests between Cognito and the OIDC identity provider

Figure 2: Architecture diagram with Amazon API Gateway and Lambda to process token requests between Cognito and the OIDC identity provider

Let’s have a closer look at the individual components and the request flow that are shown in Figure 2.

When adding an OIDC IdP to a Cognito user pool, you configure endpoints for Authorization, UserInfo, Jwks_uri, and Token. Because the private key is required only for the token request flow, you can configure resources to redirect and process requests, as follows (the step numbers correspond to the step numbering in Figure 2):

  1. Configure the endpoints for Authorization, UserInfo, and Jwks_Uri with the ones from the IdP.
  2. Create an API Gateway with a dedicated route for token requests (for example, /token) and add it as the Token endpoint in the IdP configuration in Cognito.
  3. Integrate this route with a Lambda function: When Cognito calls the API endpoint, it will automatically invoke the function.

Together with the original request parameters, which include the authorization code, this function does the following:

  1. Retrieves the private key from Secrets Manager.
  2. Creates and signs the client assertion.
  3. Makes the token request to the IdP token endpoint.
  4. Receives the response from the IdP.
  5. Returns the response to the Cognito IdP response endpoint.

The details of the function logic can be broken down into the following:

  • Decode the body of the original request—this includes the authorization code that was acquired during the authorize flow.
    import base64
    
    encoded_message = event["body"]
    decoded_message = base64.b64decode(encoded_message)
    decoded_message = decoded_message.decode("utf-8")
    

  • Retrieve the private key from Secrets Manager by using the GetSecretValue API or SDK equivalent or by using the AWS Parameters and Secrets Lambda Extension.
  • Create and sign the JWT.
    import jwt # third party library – requires a Lambda Layer
    import time
    
    instance = jwt.JWT()
    private_key_jwt = instance.encode({
        "iss": <Issuer. Contains IdP client ID>,
        "sub": <Subject. Contains IdP client ID>,
        "aud": <Audience. IdP token endpoint>,
        "iat": int(time.time()),
        "exp": int(time.time()) + 300
    },
        {<YOUR RETRIEVED PRIVATE KEY IN JWK FORMAT>},
        alg='RS256',
        optional_headers = {"kid": private_key_dict["kid"]}
    )
    

  • Modify the original body and make the token request, including the original parameters for grant_type, code, and client_id, with added client_assertion_type and the client_assertion. (The following example HTTP request has line breaks and placeholders in angle brackets for better readability.)
    POST /token HTTP/1.1
      Scheme: https
      Host: your-idp.example.com
      Content-Type: application/x-www-form-urlencoded
    
      grant_type=authorization_code&
        code=<the authorization code>&
        client_id=<IdP client ID>&
        client_assertion_type=
        urn%3Aietf%3Aparams%3Aoauth%3Aclient-assertion-type%3Ajwt-bearer&
        client_assertion=<signed JWT>
    

  • Return the IdP’ s response.

Note that there is no client secret needed in this request. Instead, you add a client assertion type as urn:ietf:params:oauth:client-assertion-type:jwt-bearer, and the client assertion with the signed JWT.

If the request is successful, the IdP’s response includes a JWT with the access token and identity token. On returning the response via the Lambda function, Cognito ingests the JWT and creates or updates the user in the user pool. It then responds to the original authorize request of the user client by sending its own authorization code, which can be exchanged for a Cognito issued JWT in your own application.

Deploy a demo

To deploy an example of this solution, see our GitHub repository. You will find the prerequisites and deployment steps there, as well as additional in-depth information.

Additional considerations

To further optimize this solution, you should consider checking the event details in the Lambda function before fully processing the requests. This way, you can, for example, check that all required parameters are present and valid. One option to do that, is to define a client secret when you create the IdP integration for the user pool. When Cognito sends the token request, it adds the client secret in the encoded body, so you can retrieve it and validate its value. If the validation fails, requests can be dropped early to improve exception handling and to prevent invalid requests from causing unnecessary function charges.

In this example, we used Secrets Manager to store the private key. You can explore other alternatives, like AWS Systems Manager Parameter Store or AWS Key Management Service (AWS KMS). To retrieve the key from the Parameter Store, you can use the SDK or the AWS Parameter and Secrets Lambda Extension. With AWS KMS, you can both create and store the private key as well as derive a public key through the service’s APIs, and you can also use the signing API to sign the JWT in the Lambda function.

Conclusion

By redirecting the IdP token endpoint in the Cognito user pool’s external OIDC IdP configuration to a route in an API Gateway, you can use Lambda functions to customize the request flow between Cognito and the IdP. In the example in this post, we showed how to change the client authentication mechanism during the token request from a client secret to a client assertion with a signed JWT (private key JWT). You can also apply the same proxy-like approach to customize the request flow even further—for example, by adding a Proof Key for Code Exchange (PKCE), for which you can find an example in the aws-samples GitHub repository.

If you have feedback about this post, submit comments in the Comments section below. If you have questions about this post, start a new thread on AWS re:Post for Amazon Cognito User Pools or contact AWS Support.

Want more AWS Security how-to content, news, and feature announcements? Follow us on Twitter.

Martin Pagel

Martin Pagel

Martin is a Solutions Architect in Norway who specializes in security and compliance, with a focus on identity. Before joining AWS, he walked in the shoes of a systems administrator and engineer, designing and implementing the technical side of a wide variety of compliance controls at companies in automotive, fintech, and healthcare. Today, he helps our customers across the Nordic region to achieve their security and compliance objectives.

Approaches for migrating users to Amazon Cognito user pools

Post Syndicated from Edward Sun original https://aws.amazon.com/blogs/security/approaches-for-migrating-users-to-amazon-cognito-user-pools/

Update: An earlier version of this post was published on September 14, 2017, on the Front-End Web and Mobile Blog.


Amazon Cognito user pools offer a fully managed OpenID Connect (OIDC) identity provider so you can quickly add authentication and control access to your mobile app or web application. User pools scale to millions of users and add layers of additional features for security, identity federation, app integration, and customization of the user experience. Amazon Cognito is available in regions around the globe, processing over 100 billion authentications each month. You can take advantage of security features when using user pools in Cognito, such as email and phone number verification, multi-factor authentication, and advanced security features, such as compromised credentials detection, and adaptive authentications.

Many customers ask about the best way to migrate their existing users to Amazon Cognito user pools. In this blog post, we describe several different recommended approaches and provide step-by-step instructions on how to implement them.

Key considerations

The main consideration when migrating users across identity providers is maintaining a consistent end-user experience. Ideally, users can continue to use their existing passwords so that their experience is seamless. However, security best practices dictate that passwords should never be stored directly as cleartext in a user store. Instead, passwords are used to compute cryptographic hashes and verifiers that can later be used to verify submitted passwords. This means that you cannot securely export passwords in cleartext form from an existing user store and import them into a Cognito user pool. You might ask your users to choose a new password during the migration. Or, if you want to retain the existing passwords, you need to retain access to the existing hashes and verifiers, at least during the migration period.

A secondary consideration is the migration timeline. For example, do you need a faster migration timeline because your current identity store’s license is expiring? Or do you prefer a slow and steady migration because you are modernizing your current application, and it takes time to connect your existing systems to the new identity provider?

The following two methods define our recommended approaches for migrating existing users into a user pool:

  • Bulk user import – Export your existing users into a comma-separated (.csv) file, and then upload this .csv file to import users into a user pool. Your desired user attributes (except passwords) can be included and mapped to attributes in the target user pool. This approach requires users to reset their passwords when they sign in with Cognito. You can choose to migrate your existing user store entirely in a single import job or split users into multiple jobs for parallel or incremental processing.
  • Just-in-time user migration – Migrate users just in time into a Cognito user pool as they sign in to your mobile or web app. This approach allows users to retain their current passwords, because the migration process captures and verifies the password during the sign-in process, seamlessly migrating them to the Cognito user pool.

In the following sections, we describe the bulk user import and just-in-time user migration methods in more detail and then walk through the steps of each approach.

Bulk user import

You perform bulk import of users into an Amazon Cognito user pool by uploading a .csv file that contains user profile data, including usernames, email addresses, phone numbers, and other attributes. You can download a template .csv file for your user pool from Cognito, with a user schema structured in the template header.

Following is an example of performing bulk user import.

To create an import job

  1. Open the Cognito user pool console and select the target user pool for migration.
  2. On the Users tab, navigate to the Import users section, and choose Create import job.
  3. Figure 1: Create import job

    Figure 1: Create import job

  4. In the Create import job dialog box, download the template.csv file for user import.
  5. Export your existing user data from your existing user directory or store your data into the .csv file
  6. Match the user attribute types with column headings in the template. Each user must have an email address or a phone number that is marked as verified in the .csv file, in order to receive the password reset confirmation code.
  7. Figure 2: Configure import job

    Figure 2: Configure import job

  8. Go back to the Create import job dialog box (as shown in Figure 2) and do the following:
    1. Enter a Job name.
    2. Choose to Create a new IAM role or Use an existing IAM role. This role grants Amazon Cognito permission to write to Amazon CloudWatch Logs in your account, so that Cognito can provide logs for successful imports and errors for skipped or failed transactions.
    3. Upload the .csv file that you have prepared, and choose Create and start job.

Depending on the size of the .csv file, the job can run for minutes or hours, and you can follow the status from that same page in the Amazon Cognito console.

Figure 3: Check import job status

Figure 3: Check import job status

Cognito runs through the import job and imports users with a RESET_REQUIRED state. When users attempt to sign in, Cognito will return PasswordResetRequiredException from the sign-in API, and the app should direct the user into the ForgotPassword flow.

Figure 4: View imported user

Figure 4: View imported user

The bulk import approach can also be used continuously to incrementally import users. You can set up an Extract-Transform-Load (ETL) batch job process to extract incremental changes to your existing user directories, such as the new sign-ups on the existing systems before you switch over to a Cognito user pool. Your batch job will transform the changes into a .csv file to map user attribute schemas, and load the .csv file as a Cognito import job through the CreateUserImportJob CLI or SDK operation. Then start the import job through the StartUserImportJob CLI or SDK operation. For more information, see Importing users into user pools in the Amazon Cognito Developer Guide.

Just-in-time user migration

The just-in-time (JIT) user migration method involves first attempting to sign in the user through the Amazon Cognito user pool. Then, if the user doesn’t exist in the Cognito user pool, Cognito calls your Migrate User Lambda trigger and sends the username and password to the Lambda trigger to sign the user in through the existing user store. If successful, the Migrate User Lambda trigger will also fetch user attributes and return them to Cognito. Then Cognito silently creates the user in the user pool with user attributes, as well as salts and password verifiers from the user-provided password. With the Migrate User Lambda trigger, your client app can start to use the Cognito user pool to sign in users who have already been migrated, and continue migrating users who are signing in for the first time towards the user pool. This just-in-time migration approach helps to create a seamless authentication experience for your users.

Cognito, by default, uses the USER_SRP_AUTH authentication flow with the Secure Remote Password (SRP) protocol. This flow doesn’t involve sending the password across the network, but rather allows the client to exchange a cryptographic proof with the Cognito service to prove the client’s knowledge of the password. For JIT user migration, Cognito needs to verify the username and password against the existing user store. Therefore, you need to enable a different Cognito authentication flow. You can choose to use either the USER_PASSWORD_AUTH flow for client-side authentication or the ADMIN_USER_PASSWORD_AUTH flow for server-side authentication. This will allow the password to be sent to Cognito over an encrypted TLS connection, and allow Cognito to pass the information to the Lambda function to perform user authentication against the original user store.

This JIT approach might not be compatible with existing identity providers that have multi-factor authentication (MFA) enabled, because the Lambda function cannot support multiple rounds of challenges. If the existing identity provider requires MFA, you might consider the alternative JIT migration approach discussed later in this blog post.

Figure 5 illustrates the steps for the JIT sign-in flow. The mobile or web app first tries to sign in the user in the user pool. If the user isn’t already in the user pool, Cognito handles user authentication and invokes the Migrate User Lambda trigger to migrate the user. This flow keeps the logic in the app simple and allows the app to use the Amazon Cognito SDK to sign in users in the standard way. The migration logic takes place in the Lambda function in the backend.

Figure 5: JIT migration user authentication flow

Figure 5: JIT migration user authentication flow

The flow in Figure 5 starts in the mobile or web app, which attempts to sign in the user by using the AWS SDK. If the user doesn’t exist in the user pool, the migration attempt starts. Cognito calls the Migrate User Lambda trigger with triggerSource set to UserMigration_Authentication, and passes the user’s username and password in the request in order to attempt to migrate the user.

This approach also works in the forgot password flow shown in Figure 6, where the user has forgotten their password and hasn’t been migrated yet. In this case, once the user makes a “Forgot Password” request, your mobile or web app will send a forgot password request to Cognito. Cognito invokes your Migrate User Lambda trigger with triggerSource set to UserMigration_ForgotPassword, and passes the username in the request in order to attempt user lookup, migrate the user profile, and facilitate the password reset process.

Figure 6: JIT migration forgot password flow

Figure 6: JIT migration forgot password flow

Just-in-time user migration sample code

In this section, we show sample source codes for a Migrate User Lambda trigger overall structure. We will fill in the commented sections with additional code, shown later in the section. When you set up your own Lambda function, configure a Lambda execution role to grant permissions for CloudWatch logs.

const handler = async (event) => {
    if (event.triggerSource == "UserMigration_Authentication") {
        //***********************************************************************
        // Attempt to sign in the user or verify the password with existing identity store
        // (shown in the Section A – Migrate User of this post)
        //***********************************************************************
    }
    else if (event.triggerSource == "UserMigration_ForgotPassword") {
       //***********************************************************************
       // Attempt to look up the user in your existing identity store
       // (shown in the section B – Forget Password of this post)
       //***********************************************************************
    }
    return event;
};
export { handler };

In the migration flow, the Lambda trigger will sign in the user and verify the user’s password in the existing user store. That may involve a sign-in attempt against your existing user store or a check of the password against a stored hash. You need to customize this step based on your existing setup. You can also create a function to fetch user attributes that you want to migrate. If your existing user store conforms to the OIDC specification, you can parse the ID Token claims to retrieve the user’s attributes. The following example shows how to set the username and attributes for the migrated user.

// Section A – Migrate User
if (event.triggerSource == "UserMigration_Authentication") {
// Attempt to sign in the user or verify the password with the existing user store.
// Add an authenticateUser() functionbased on your existing user store setup. 
    const user = await authenticateUser(event.userName, event.request.password);
    if (user) {
        // Migrating user attributes from the source user store. You can migrate additional attributes as needed.
        event.response.userAttributes = {
            // Setting username and email address
            username: event.userName,
            email: user.emailAddress,
            email_verified: "true",
        };
        // Setting user status to CONFIRMED to autoconfirm users so they can sign in to the user pool
        event.response.finalUserStatus = "CONFIRMED";
        // Setting messageAction to SUPPRESS to decline to send the welcome message that Cognito usually sends to new users
        event.response.messageAction = "SUPPRESS";
        }
    }

The user is now migrated from the existing user store to the user pool, as well as the user’s attributes. Users will also be redirected to your application with the authorization code or JSON Web Tokens, depending on the OAuth 2.0 grant types you configured in the user pool.

Let’s look at the forgot password flow. Your Lambda function calls the existing user store and migrates other attributes in the user’s profile first, and then Lambda sets user attributes in the response to the Cognito user pool. Cognito initiates the ForgotPassword flow and sends a confirmation code to the user to confirm the password reset process. The user needs to have a verified email address or phone number migrated from the existing user store to receive the forgot password confirmation code. The following sample code demonstrates how to complete the ForgotPassword flow.

// Section B – Forgot Password
else if (event.triggerSource == "UserMigration_ForgotPassword") {
        // Look up the user in your existing user store service.  
		// Add a lookupUser() function based on your existing user store setup. 
        const lookupResult = await lookupUser(event.userName);
        if (lookupResult) {
            // Setting user attributes from the source user store
            event.response.userAttributes = {
                username: event.userName,
                // Required to set verified communication to receive password recovery code
                email: lookupResult.emailAddress,
                email_verified: "true",
            };
            event.response.finalUserStatus = "RESET_REQUIRED";
            event.response.messageAction = "SUPPRESS";
        }
    }

Just-in-time user migration – alternative approach

Using the Migrate User Lambda trigger, we showed the JIT migration approach where the app switches to use the Cognito user pool at the beginning of the migration period, to interface with the user for signing in and migrating them from the existing user store. An alternative JIT approach is to maintain the existing systems and user store, but to silently create each user in the Cognito user pool in a backend process as users sign in, then switch over to use Cognito after enough users have been migrated.

Figure 7: JIT migration alternative approach with backend process

Figure 7: JIT migration alternative approach with backend process

Figure 7 shows this alternative approach in depth. When an end user signs in successfully in your mobile or web app, the backend migration process is initiated. This backend process first calls the Cognito admin API operation, AdminCreateUser, to create users and map user attributes in the destination user pool. The user will be created with a temporary password and be placed in FORCE_CHANGE_PASSWORD status. If you capture the user password during the sign-in process, you can also migrate the password by setting it permanently for the newly created user in the Cognito user pool using the AdminSetUserPassword API operation. This operation will also set the user status to CONFIRMED to allow the user to sign in to Cognito using the existing password.

Following is a code example for the AdminCreateUser function using the AWS SDK for JavaScript.

var params = {
    MessageAction: "SUPPRESS",
    UserAttributes: [{
        Name: "name",
        Value: "Nikki Wolf"
    },
    {
        Name: "email",
        Value: "[email protected]"
    },
    {
        Name: "email_verified",
        Value: "True"
    }
    ],
    UserPoolId: "us-east-1_EXAMPLE",
    Username: "nikki_wolf"
};
const cognito = new CognitoIdentityProviderClient();
const createUserCommand  = new AdminCreateUserCommand(params);
await cognito.send (createUserCommand);

The following is a code example for the AdminSetUserPassword function.

var params = {
    UserPoolId: 'us-east-1_EXAMPLE' ,
    Username: 'nikki_wolf' ,
    Password: 'ExamplePassword1$' ,
    Permanent: true
};
const cognito = new CognitoIdentityProviderClient();
const setUserPasswordCommand = new AdminSetUserPasswordCommand(params);
await cognito.send(setUserPasswordCommand);

This alternative approach does not require the app to update its authentication codebase until a majority of users are migrated, but you need to propagate user attribute changes and new user signups from the existing systems to Cognito. If you are capturing and migrating passwords, you should also build a similar logic to capture password changes in existing systems and set the new password in the user pool to keep it synchronized until you perform a full switchover from the existing identity store to the Cognito user pool.

Summary and best practices

In this post, we described our two recommended approaches for migrating users into an Amazon Cognito user pool. You can decide which approach is best suited for your use case. The bulk method is simpler to implement, but it doesn’t preserve user passwords like the just-in-time migration does. The just-in-time migration is transparent to users and mitigates the potential attrition of users that can occur when users need to reset their passwords.

You could also consider a hybrid approach, where you first apply JIT migration as users are actively signing in to your app, and perform bulk import for the remaining less-active users. This hybrid approach helps provide a good experience for your active user communities, while being able to decommission existing user stores in a manageable timeline because you don’t need to wait for every user to sign in and be migrated through JIT migration.

We hope you can use these explanations and code samples to set up the most suitable approach for your migration project.

If you have feedback about this post, submit comments in the Comments section below. If you have questions about this post, contact AWS Support.

Want more AWS Security news? Follow us on Twitter.

Edward Sun

Edward Sun

Edward is a Security Specialist Solutions Architect focused on identity and access management. He loves helping customers throughout their cloud transformation journey with architecture design, security best practices, migration, and cost optimizations. Outside of work, Edward enjoys hiking, golfing, and cheering for his alma mater, the Georgia Bulldogs.