All posts by Igor Alekseev

Compose your ETL jobs for MongoDB Atlas with AWS Glue

Post Syndicated from Igor Alekseev original https://aws.amazon.com/blogs/big-data/compose-your-etl-jobs-for-mongodb-atlas-with-aws-glue/

In today’s data-driven business environment, organizations face the challenge of efficiently preparing and transforming large amounts of data for analytics and data science purposes. Businesses need to build data warehouses and data lakes based on operational data. This is driven by the need to centralize and integrate data coming from disparate sources.

At the same time, operational data often originates from applications backed by legacy data stores. Modernizing applications requires a microservice architecture, which in turn necessitates the consolidation of data from multiple sources to construct an operational data store. Without modernization, legacy applications may incur increasing maintenance costs. Modernizing applications involves changing the underlying database engine to a modern document-based database like MongoDB.

These two tasks (building data lakes or data warehouses and application modernization) involve data movement, which uses an extract, transform, and load (ETL) process. The ETL job is a key functionality to having a well-structured process in order to succeed.

AWS Glue is a serverless data integration service that makes it straightforward to discover, prepare, move, and integrate data from multiple sources for analytics, machine learning (ML), and application development. MongoDB Atlas is an integrated suite of cloud database and data services that combines transactional processing, relevance-based search, real-time analytics, and mobile-to-cloud data synchronization in an elegant and integrated architecture.

By using AWS Glue with MongoDB Atlas, organizations can streamline their ETL processes. With its fully managed, scalable, and secure database solution, MongoDB Atlas provides a flexible and reliable environment for storing and managing operational data. Together, AWS Glue ETL and MongoDB Atlas are a powerful solution for organizations looking to optimize how they build data lakes and data warehouses, and to modernize their applications, in order to improve business performance, reduce costs, and drive growth and success.

In this post, we demonstrate how to migrate data from Amazon Simple Storage Service (Amazon S3) buckets to MongoDB Atlas using AWS Glue ETL, and how to extract data from MongoDB Atlas into an Amazon S3-based data lake.

Solution overview

In this post, we explore the following use cases:

  • Extracting data from MongoDB – MongoDB is a popular database used by thousands of customers to store application data at scale. Enterprise customers can centralize and integrate data coming from multiple data stores by building data lakes and data warehouses. This process involves extracting data from the operational data stores. When the data is in one place, customers can quickly use it for business intelligence needs or for ML.
  • Ingesting data into MongoDB – MongoDB also serves as a no-SQL database to store application data and build operational data stores. Modernizing applications often involves migration of the operational store to MongoDB. Customers would need to extract existing data from relational databases or from flat files. Mobile and web apps often require data engineers to build data pipelines to create a single view of data in Atlas while ingesting data from multiple siloed sources. During this migration, they would need to join different databases to create documents. This complex join operation would need significant, one-time compute power. Developers would also need to build this quickly to migrate the data.

AWS Glue comes handy in these cases with the pay-as-you-go model and its ability to run complex transformations across huge datasets. Developers can use AWS Glue Studio to efficiently create such data pipelines.

The following diagram shows the data extraction workflow from MongoDB Atlas into an S3 bucket using the AWS Glue Studio.

Extracting Data from MongoDB Atlas into Amazon S3

In order to implement this architecture, you will need a MongoDB Atlas cluster, an S3 bucket, and an AWS Identity and Access Management (IAM) role for AWS Glue. To configure these resources, refer to the prerequisite steps in the following GitHub repo.

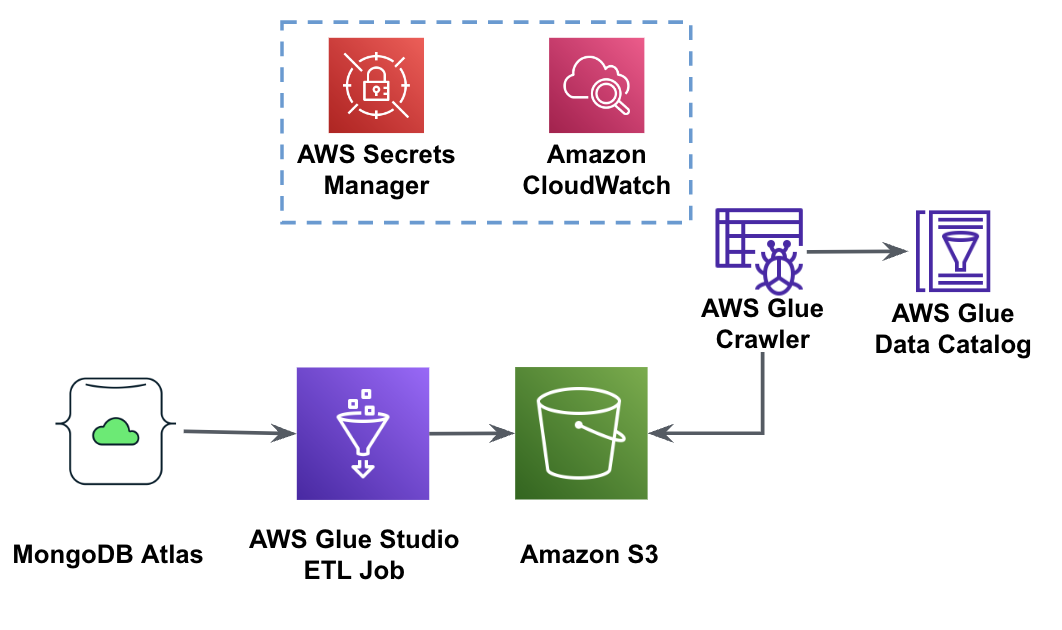
The following figure shows the data load workflow from an S3 bucket into MongoDB Atlas using AWS Glue.

Loading Data from Amazon S3 into MongoDB Atlas

The same prerequisites are needed here: an S3 bucket, IAM role, and a MongoDB Atlas cluster.

Load data from Amazon S3 to MongoDB Atlas using AWS Glue

The following steps describe how to load data from the S3 bucket into MongoDB Atlas using an AWS Glue job. The extraction process from MongoDB Atlas to Amazon S3 is very similar, with the exception of the script being used. We call out the differences between the two processes.

  1. Create a free cluster in MongoDB Atlas.
  2. Upload the sample JSON file to your S3 bucket.
  3. Create a new AWS Glue Studio job with the Spark script editor option.

Glue Studio Job Creation UI

  1. Depending on whether you want to load or extract data from the MongoDB Atlas cluster, enter the load script or extract script in the AWS Glue Studio script editor.

The following screenshot shows a code snippet for loading data into the MongoDB Atlas cluster.

Code snippet for loading data into MongoDB Atlas

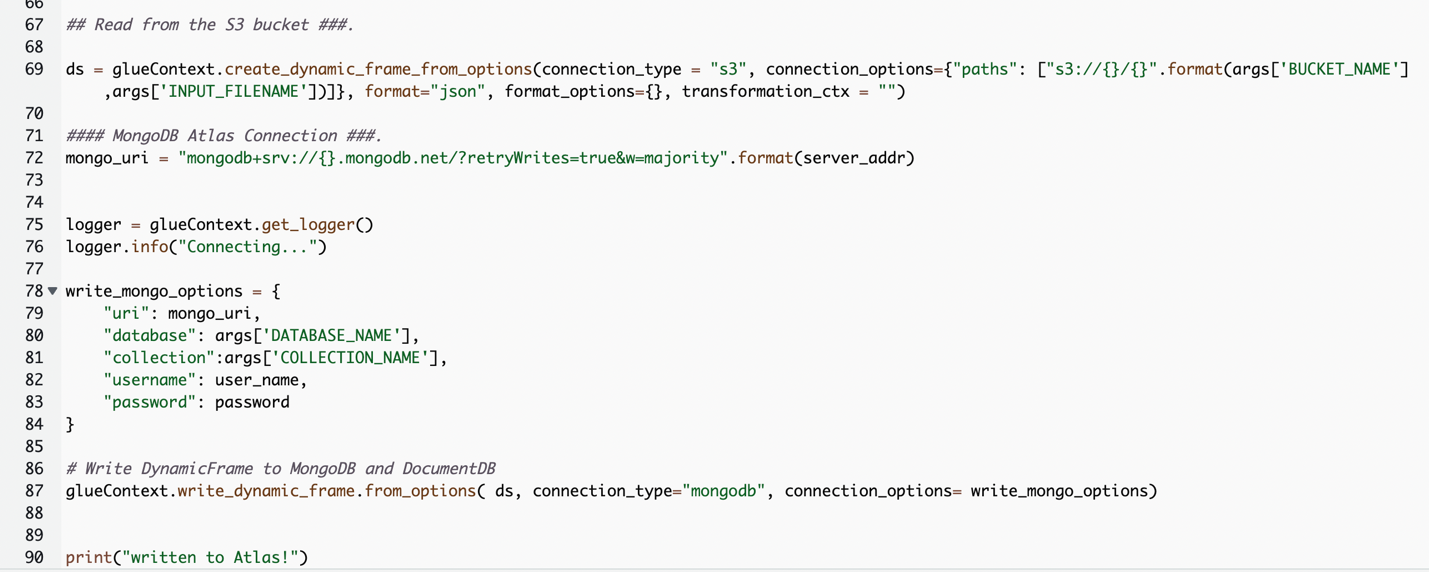
The code uses AWS Secrets Manager to retrieve the MongoDB Atlas cluster name, user name, and password. Then, it creates a DynamicFrame for the S3 bucket and file name passed to the script as parameters. The code retrieves the database and collection names from the job parameters configuration. Finally, the code writes the DynamicFrame to the MongoDB Atlas cluster using the retrieved parameters.

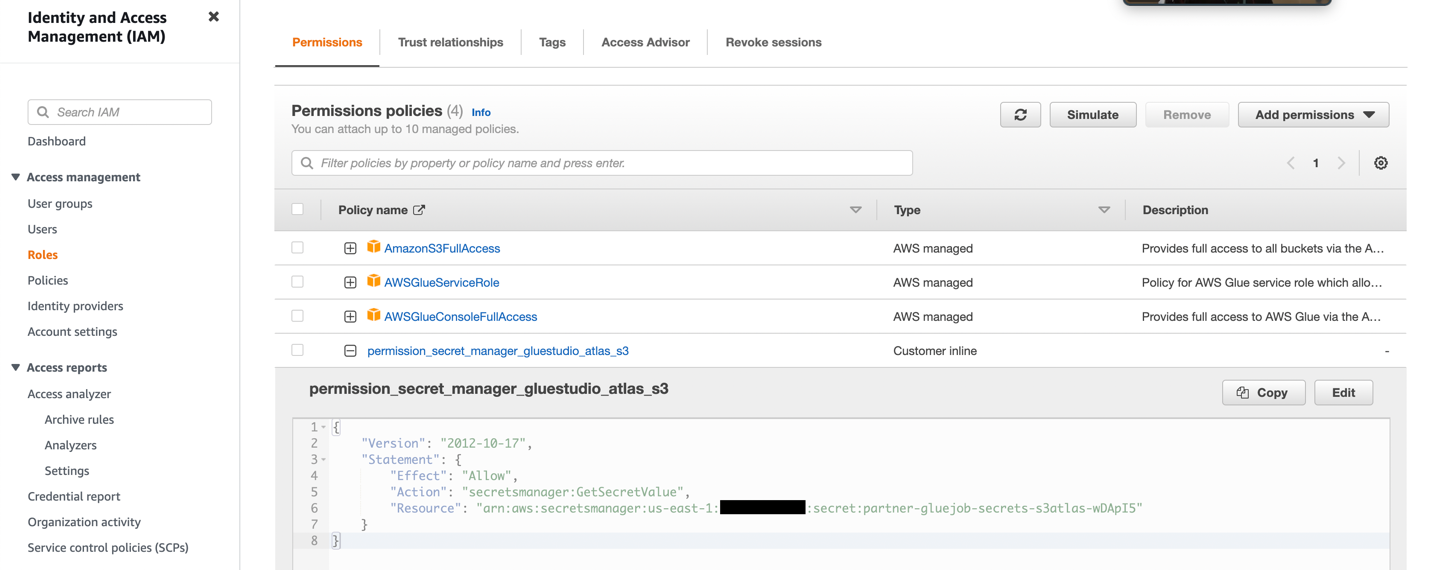
  1. Create an IAM role with the permissions as shown in the following screenshot.

For more details, refer to Configure an IAM role for your ETL job.

IAM Role permissions

  1. Give the job a name and supply the IAM role created in the previous step on the Job details tab.
  2. You can leave the rest of the parameters as default, as shown in the following screenshots.
    Job DetailsJob details continued
  3. Next, define the job parameters that the script uses and supply the default values.
    Job input parameters
  4. Save the job and run it.
  5. To confirm a successful run, observe the contents of the MongoDB Atlas database collection if loading the data, or the S3 bucket if you were performing an extract.

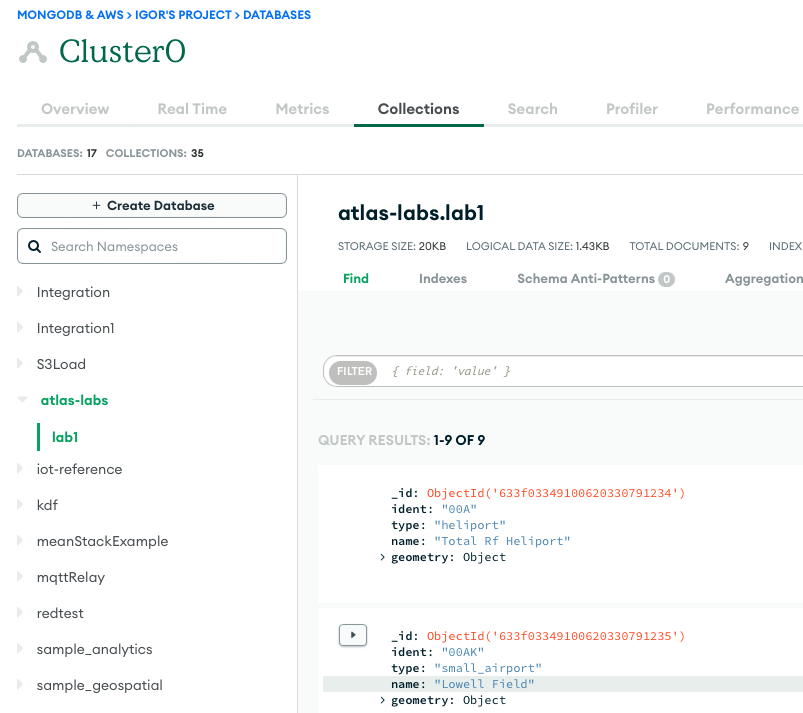
The following screenshot shows the results of a successful data load from an Amazon S3 bucket into the MongoDB Atlas cluster. The data is now available for queries in the MongoDB Atlas UI.
Data Loaded into MongoDB Atlas Cluster

  1. To troubleshoot your runs, review the Amazon CloudWatch logs using the link on the job’s Run tab.

The following screenshot shows that the job ran successfully, with additional details such as links to the CloudWatch logs.

Successful job run details

Conclusion

In this post, we described how to extract and ingest data to MongoDB Atlas using AWS Glue.

With AWS Glue ETL jobs, we can now transfer the data from MongoDB Atlas to AWS Glue-compatible sources, and vice versa. You can also extend the solution to build analytics using AWS AI and ML services.

To learn more, refer to the GitHub repository for step-by-step instructions and sample code. You can procure MongoDB Atlas on AWS Marketplace.


About the Authors

Igor Alekseev is a Senior Partner Solution Architect at AWS in Data and Analytics domain. In his role Igor is working with strategic partners helping them build complex, AWS-optimized architectures. Prior joining AWS, as a Data/Solution Architect he implemented many projects in Big Data domain, including several data lakes in Hadoop ecosystem. As a Data Engineer he was involved in applying AI/ML to fraud detection and office automation.


Babu Srinivasan
is a Senior Partner Solutions Architect at MongoDB. In his current role, he is working with AWS to build the technical integrations and reference architectures for the AWS and MongoDB solutions. He has more than two decades of experience in Database and Cloud technologies . He is passionate about providing technical solutions to customers working with multiple Global System Integrators(GSIs) across multiple geographies.

Introducing MongoDB Atlas metadata collection with AWS Glue crawlers

Post Syndicated from Igor Alekseev original https://aws.amazon.com/blogs/big-data/introducing-mongodb-atlas-metadata-collection-with-aws-glue-crawlers/

For data lake customers who need to discover petabytes of data, AWS Glue crawlers are a popular way to discover and catalog data in the background. This allows users to search and find relevant data from multiple data sources. Many customers also have data in managed operational databases such as MongoDB Atlas and need to combine it with data from Amazon Simple Storage Service (Amazon S3) data lakes to derive insights. AWS Glue crawlers now support MongoDB Atlas, making it simpler for you to understand MongoDB collections’ evolution and extract meaningful insights.

AWS Glue is a serverless data integration service that makes it simple to discover, prepare, move, and integrate data from multiple sources for analytics, machine learning (ML), and application development.

MongoDB Atlas is a developer data service from AWS technology partner MongoDB, Inc. The service combines transactional processing, relevance-based search, real-time analytics, and mobile-to-cloud data synchronization in an integrated architecture.

With today’s launch, you can create and schedule an AWS Glue crawler to crawl MongoDB Atlas. In the crawler setup, you can select MongoDB as a data source. You can then create an AWS Glue connection with MongoDB Atlas and provide the MongoDB Atlas cluster name and credentials. We walk you through this process in this post.

Solution overview

The following architecture illustrates how you can scan a MongoDB Atlas database and collections using AWS Glue.

With each run of the crawler, the crawler inspects specified collections and catalogs information, such as updates or deletes to MongoDB Atlas collections, views, and materialized views in the AWS Glue Data Catalog. In AWS Glue Studio, you can then use the AWS Glue Data Catalog as a source to pull data from MongoDB Atlas and populate an Amazon S3 target. Finally, this job can run and read data from MongoDB Atlas and write the results to Amazon S3, opening up possibilities to integrate with AWS services such as Amazon SageMaker, Amazon QuickSight, and more.

In the following sections, we describe how to create an AWS Glue crawler with MongoDB Atlas as a data source. We then create an AWS Glue connection and provide the MongoDB Atlas cluster information and credentials. Then we specify the MongoDB Atlas database and collections to crawl.

Prerequisites

To follow along with this post, you must have access to MongoDB Atlas and the AWS Management Console. We also assume you have access to a VPC with subnets preconfigured via Amazon Virtual Private Cloud (Amazon VPC). The crawler that we configure later in the post runs in the VPC and connects to MongoDB Atlas via an AWS PrivateLink endpoint.

Set up MongoDB Atlas

To configure MongoDB Atlas, complete the following steps:

  1. Configure a MongoDB cluster on AWS. For instructions, refer to How to Set Up a MongoDB Cluster.
  2. Configure PrivateLink by following the steps described in Connecting Applications Securely to a MongoDB Atlas Data Plane with AWS PrivateLink.

This allows us to simplify our networking architecture and make sure the traffic stays on the AWS network.

Next, we obtain the MongoDB cluster connection string from the Connect UI on the MongoDB Atlas console.

  1. On the MongoDB Atlas console, choose Connect, Private Endpoint, and Connection Method.
  2. Copy the SRV connection string.

We use this SRV connection string in the subsequent steps.

The following screenshot shows that we have loaded a sample collection in MongoDB Atlas, which we crawl over in the next steps. Note that the records in this collection include several arrays as well as nested data.

Set up the MongoDB Atlas connection with AWS Glue

Before we can configure the AWS Glue crawler, we need to create the MongoDB Atlas connection in AWS Glue.

  1. On the AWS Glue Studio console, choose Connectors in the navigation pane.
  2. Choose Create connection.

  1. When filling out the connection details, use the SRV connection string we obtained earlier in MongoDB Atlas.
  2. In the Network options section, the VPC and subnets must correspond to the PrivateLink settings you configured earlier.

Create a MongoDB crawler

After we create the connection, we can create an AWS Glue crawler.

  1. On the AWS Glue console, choose Crawlers in the navigation pane.
  2. Choose Create crawler.

  1. For Name, enter a name.
  2. For the data source, choose the MongoDB Atlas data source we configured earlier and supply the path that corresponds to the MongoDB Atlas database and collection.

  1. Configure your security settings, output, and scheduling.

  1. On the Crawlers page, choose Run crawler.

After the crawler finishes crawling the MongoDB collections, its status shows as Completed.

Review the MongoDB AWS Glue database and table

We can navigate to the AWS Glue Data Catalog to examine the tables that were created by the crawler.

Choose the table to view the schema and other metadata.

Note that the crawler captured nested data as a STRUCT and correctly listed the ARRAY fields.

Import MongoDB Atlas data to Amazon S3

Now we use the MongoDB Atlas-based AWS Glue Data Catalog table to perform a data import without writing code. We use AWS Glue Studio to build boilerplate code quickly. Alternatively, you can build the script in script editor.

  1. On the AWS Glue Studio console, choose Jobs in the navigation pane.
  2. Choose Create job.
  3. Select Visual with a source and target.
  4. Choose the Data Catalog table as the source and Amazon S3 as the target.

  1. In the AWS Glue Studio UI, supply additional parameters such as the S3 bucket name and choose the database and table from the drop-down menus.

  1. Next, review the generated script that is built by AWS Glue Studio. We now need to add a database and collection in the script as follows:
additional_options = {"database": "sample_airbnb","collection": "listingsAndReviews"},

When the ETL job is complete, the extracted data is available on Amazon S3.

  1. On the Amazon S3 console, choose Buckets in the navigation pane.
  2. Choose our bucket and folder containing the extracted files.
  3. Choose a file and on the Actions menu, choose Query with S3 Select to view the contents of the file.

Clean up

To avoid incurring charges for the services used in this walkthrough, complete the following steps to delete your resources:

  1. On the AWS Glue console, choose Crawlers in the navigation pane.
  2. Select your crawler and on the Action menu, choose Delete crawler.
  3. On the AWS Glue Studio console, choose View jobs.
  4. Select the job you created and on the Actions menu, choose Delete job(s).
  5. Return to the AWS Glue console and choose Tables in the navigation pane.
  6. Select your table and choose Delete.
  7. Choose Databases in the navigation pane.
  8. Select your database and choose Delete.
  9. On the Amazon VPC console, choose Endpoints in the navigation pane.
  10. Select the PrivateLink endpoint you created and on the Actions menu, choose Delete VPC endpoints.

Conclusion

In this post, we showed how to set up an AWS Glue crawler to crawl over a MongoDB Atlas collection, gathering metadata and creating table records in the AWS Glue Data Catalog. With the Data Catalog table, we created an ETL process using the AWS Glue Studio UI to extract data from the MongoDB Atlas collection to an S3 bucket without writing a single line of code.

You can try this yourself by configuring an AWS Glue crawler, creating an AWS Glue ETL job with AWS Glue Studio, and launching MongoDB Atlas from a QuickStart or from MongoDB Atlas on AWS Marketplace.

Special thanks to everyone who contributed to this crawler feature launch: Julio Montes de Oca, Mita Gavade, and Alex Prazma.


About the authors

Igor Alekseev is a Senior Partner Solution Architect at AWS in Data and Analytics domain. In his role Igor is working with strategic partners helping them build complex, AWS-optimized architectures. Prior joining AWS, as a Data/Solution Architect he implemented many projects in Big Data domain, including several data lakes in Hadoop ecosystem. As a Data Engineer he was involved in applying AI/ML to fraud detection and office automation.

Sandeep Adwankar is a Senior Technical Product Manager at AWS. Based in the California Bay Area, he works with customers around the globe to translate business and technical requirements into products that enable customers to improve how they manage, secure, and access data.

Build a serverless streaming pipeline with Amazon MSK Serverless, Amazon MSK Connect, and MongoDB Atlas

Post Syndicated from Igor Alekseev original https://aws.amazon.com/blogs/big-data/build-a-serverless-streaming-pipeline-with-amazon-msk-serverless-amazon-msk-connect-and-mongodb-atlas/

This post was cowritten with Babu Srinivasan and Robert Walters from MongoDB.

Amazon Managed Streaming for Apache Kafka (Amazon MSK) is a fully managed, highly available Apache Kafka service. Amazon MSK makes it easy to ingest and process streaming data in real time and use that data easily within the AWS ecosystem. With Amazon MSK Serverless, you can automatically provision and manage required resources to provide on-demand streaming capacity and storage for your applications.

Amazon MSK also supports integration of data sources such as MongoDB Atlas via Amazon MSK Connect. MSK Connect allows serverless integration of MongoDB data with Amazon MSK using the MongoDB Connector for Apache Kafka.

MongoDB Atlas Serverless provides database services that dynamically scale up and down with data size and throughput—and the cost scales accordingly. It’s best suited for applications with variable demands to be managed with minimal configuration. It provides high performance and reliability with automated upgrade, encryption, security, metrics, and backup features built in with the MongoDB Atlas infrastructure.

MSK Serverless is a type of cluster for Amazon MSK. Just like MongoDB Atlas Serverless, MSK Serverless automatically provisions and scales compute and storage resources. You can now create end-to-end serverless workflows. You can build a serverless streaming pipeline with serverless ingestion using MSK Serverless and serverless storage using MongoDB Atlas. In addition, MSK Connect now supports private DNS hostnames. This allows Serverless MSK instances to connect to Serverless MongoDB clusters via AWS PrivateLink, providing you with secure connectivity between platforms.

If you’re interested in using a non-serverless cluster, refer to Integrating MongoDB with Amazon Managed Streaming for Apache Kafka (MSK).

This post demonstrates how to implement a serverless streaming pipeline with MSK Serverless, MSK Connect, and MongoDB Atlas.

Solution overview

The following diagram illustrates our solution architecture.

Data flow between AWS MSK and MongoDB Atlas

The data flow starts with an Amazon Elastic Compute Cloud (Amazon EC2) client instance that writes records to an MSK topic. As data arrives, an instance of the MongoDB Connector for Apache Kafka writes the data to a collection in the MongoDB Atlas Serverless cluster. For secure connectivity between the two platforms, an AWS PrivateLink connection is created between the MongoDB Atlas cluster and the VPC containing the MSK instance.

This post walks you through the following steps:

  1. Create the serverless MSK cluster.
  2. Create the MongoDB Atlas Serverless cluster.
  3. Configure the MSK plugin.
  4. Create the EC2 client.
  5. Configure an MSK topic.
  6. Configure the MongoDB Connector for Apache Kafka as a sink.

Configure the serverless MSK cluster

To create a serverless MSK cluster, complete the following steps:

  1. On the Amazon MSK console, choose Clusters in the navigation pane.
  2. Choose Create cluster.
  3. For Creation method, select Custom create.
  4. For Cluster name, enter MongoDBMSKCluster.
  5. For Cluster type¸ select Serverless.
  6. Choose Next.Serverless MSK Cluster creation UI
  7. On the Networking page, specify your VPC, Availability Zones, and corresponding subnets.
  8. Note the Availability Zones and subnets to use later.Cluster settings showing VPC and Subnets
  9. Choose Next.
  10. Choose Create cluster.

When the cluster is available, its status becomes Active.

Cluster Available for Use

Create the MongoDB Atlas Serverless cluster

To create a MongoDB Atlas cluster, follow the Getting Started with Atlas tutorial. Note that for the purposes of this post, you need to create a serverless instance.

Create new cluster dialog

After the cluster is created, configure an AWS private endpoint with the following steps:

  1. On the Security menu, choose Network Access.Network Access location in the Security menu
  2. On the Private Endpoint tab, choose Serverless Instance.
    Serverless Instance network access
  3. Choose Create new endpoint.
  4. For Serverless Instance, choose the instance you just created.
  5. Choose Confirm.Create Private Endpoint UI
  6. Provide your VPC endpoint configuration and choose Next.VPC Endpoint Configuration UI
  7. When creating the AWS PrivateLink resource, make sure you specify the exact same VPC and subnets that you used earlier when creating the networking configuration for the serverless MSK instance.
  8. Choose Next.VPC Endpoint Subnet Configuration UI
  9. Follow the instructions on the Finalize page, then choose Confirm after your VPC endpoint is created.

Upon success, the new private endpoint will show up in the list, as shown in the following screenshot.

Network Access Confirmation Page

Configure the MSK Plugin

Next, we create a custom plugin in Amazon MSK using the MongoDB Connector for Apache Kafka. The connector needs to be uploaded to an Amazon Simple Storage Service (Amazon S3) bucket before you can create the plugin. To download the MongoDB Connector for Apache Kafka, refer to Download a Connector JAR File.

  1. On the Amazon MSK console, choose Customized plugins in the navigation pane.
  2. Choose Create custom plugin.
  3. For S3 URI, enter the S3 location of the downloaded connector.
  4. Choose Create custom plugin.

MSK plugin details

Configure an EC2 client

Next, let’s configure an EC2 instance. We use this instance to create the topic and insert data into the topic. For instructions, refer to the section Configure an EC2 client in the post Integrating MongoDB with Amazon Managed Streaming for Apache Kafka (MSK).

Create a topic on the MSK cluster

To create a Kafka topic, we need to install the Kafka CLI first.

  1. On the client EC2 instance, first install Java:

sudo yum install java-1.8.0

  1. Next, run the following command to download Apache Kafka:

wget https://archive.apache.org/dist/kafka/2.6.2/kafka_2.12-2.6.2.tgz

  1. Unpack the tar file using the following command:

tar -xzf kafka_2.12-2.6.2.tgz

The distribution of Kafka includes a bin folder with tools that can be used to manage topics.

  1. Go to the kafka_2.12-2.6.2 directory and issue the following command to create a Kafka topic on the serverless MSK cluster:

bin/kafka-topics.sh --create --topic sandbox_sync2 --bootstrap-server <BOOTSTRAP SERVER> --command-config=bin/client.properties --partitions 2

You can copy the bootstrap server endpoint on the View Client Information page for your serverless MSK cluster.

Bootstrap Server Connection Page

You can configure IAM authentication by following these instructions.

Configure the sink connector

Now, let’s configure a sink connector to send the data to the MongoDB Atlas Serverless instance.

  1. On the Amazon MSK console, choose Connectors in the navigation pane.
  2. Choose Create connector.
  3. Select the plugin you created earlier.
  4. Choose Next.Sink Connector UI
  5. Select the serverless MSK instance that you created earlier.
  6. Enter your connection configuration as the following code:
connector.class=com.mongodb.kafka.connect.MongoSinkConnector
key.converter.schema.enable=false
value.converter.schema.enable=false
database=MongoDBMSKDemo
collection=Sink
tasks.max=1
topics=MongoDBMSKDemo.Source
connection.uri=(MongoDB Atlas Connection String Gos Here) 
value.converter=org.apache.kafka.connect.storage.StringConverter 
key.converter=org.apache.kafka.connect.storage.StringConverter

Make sure that the connection to the MongoDB Atlas Serverless instance is through AWS PrivateLink. For more information, refer to Connecting Applications Securely to a MongoDB Atlas Data Plane with AWS PrivateLink.

  1. In the Access Permissions section, create an AWS Identity and Access Management (IAM) role with the required trust policy.
  2. Choose Next.IAM Role configuration
  3. Specify Amazon CloudWatch Logs as your log delivery option.
  4. Complete your connector.

When the connector status changes to Active, the pipeline is ready.

Connector Confirmation Page

Insert data into the MSK topic

On your EC2 client, insert data into the MSK topic using the kafka-console-producer as follows:

bin/kafka-console-producer.sh --topic sandbox_sync2 --bootstrap-server <BOOTSTRAP SERVER> --producer.config=bin/client.properties

To verify that data successfully flows from the Kafka topic to the serverless MongoDB cluster, we use the MongoDB Atlas UI.

MongoDB Atlas Browse Collections UI

If you run into any issues, be sure to check the log files. In this example, we used CloudWatch to read the events that were generated from Amazon MSK and the MongoDB Connector for Apache Kafka.

CloudWatch Logs UI

Clean up

To avoid incurring future charges, clean up the resources you created. First, delete the MSK cluster, connector, and EC2 instance:

  1. On the Amazon MSK console, choose Clusters in the navigation pane.
  2. Select your cluster and on the Actions menu, choose Delete.
  3. Choose Connectors in the navigation pane.
  4. Select your connector and choose Delete.
  5. Choose Customized plugins in the navigation pane.
  6. Select your plugin and choose Delete.
  7. On the Amazon EC2 console, choose Instances in the navigation pane.
  8. Choose the instance you created.
  9. Choose Instance state, then choose Terminate instance.
  10. On the Amazon VPC console, choose Endpoints in the navigation pane.
  11. Select the endpoint you created and on the Actions menu, choose Delete VPC endpoints.

Now you can delete the Atlas cluster and AWS PrivateLink:

  1. Log in to the Atlas cluster console.
  2. Navigate to the serverless cluster to be deleted.
  3. On the options drop-down menu, choose Terminate.
  4. Navigate to the Network Access section.
  5. Choose the private endpoint.
  6. Select the serverless instance.
  7. On the options drop-down menu, choose Terminate.Endpoint Termination UI

Summary

In this post, we showed you how to build a serverless streaming ingestion pipeline using MSK Serverless and MongoDB Atlas Serverless. With MSK Serverless, you can automatically provision and manage required resources on an as-needed basis. We used a MongoDB connector deployed on MSK Connect to seamlessly integrate the two services, and used an EC2 client to send sample data to the MSK topic. MSK Connect now supports Private DNS hostnames, enabling you to use private domain names between the services. In this post, the connector used the default DNS servers of the VPC to resolve the Availability Zone-specific private DNS name. This AWS PrivateLink configuration allowed secure and private connectivity between the MSK Serverless instance and the MongoDB Atlas Serverless instance.

To continue your learning, check out the following resources:


About the Authors

Igor Alekseev is a Senior Partner Solution Architect at AWS in Data and Analytics domain. In his role Igor is working with strategic partners helping them build complex, AWS-optimized architectures. Prior joining AWS, as a Data/Solution Architect he implemented many projects in Big Data domain, including several data lakes in Hadoop ecosystem. As a Data Engineer he was involved in applying AI/ML to fraud detection and office automation.

Kiran Matty is a Principal Product Manager with Amazon Web Services (AWS) and works with the Amazon Managed Streaming for Apache Kafka (Amazon MSK) team based out of Palo Alto, California. He is passionate about building performant streaming and analytical services that help enterprises realize their critical use cases.

 Babu Srinivasan is a Senior Partner Solutions Architect at MongoDB. In his current role, he is working with AWS to build the technical integrations and reference architectures for the AWS and MongoDB solutions. He has more than two decades of experience in Database and Cloud technologies . He is passionate about providing technical solutions to customers working with multiple Global System Integrators(GSIs) across multiple geographies.

Robert Walters is currently a Senior Product Manager at MongoDB. Previous to MongoDB, Rob spent 17 years at Microsoft working in various roles, including program management on the SQL Server team, consulting, and technical pre-sales. Rob has co-authored three patents for technologies used within SQL Server and was the lead author of several technical books on SQL Server. Rob is currently an active blogger on MongoDB Blogs.