Post Syndicated from Mohit Dawar original https://aws.amazon.com/blogs/big-data/automate-data-lineage-in-amazon-sagemaker-using-aws-glue-crawlers-supported-data-sources/
The next generation of Amazon SageMaker is the center for all your data, analytics, and AI. Bringing together widely adopted Amazon Web Services (AWS) machine learning (ML) and analytics capabilities, it delivers an integrated experience for analytics and AI with unified access to all your data. From Amazon SageMaker Unified Studio, a single data and AI development environment, you can access your data and use a suite of powerful tools for data processing, SQL analytics, model development, training and inference, and generative AI development.
With data lineage, now part of Amazon SageMaker Catalog, you can centralize lineage metadata of your data assets in a single place. You can track the flow of data over time, determining a clear understanding of where it originated, how it has changed, and its usage across the business. By providing this level of transparency, data lineage helps data consumers gain trust that the data is correct and compliant for their use cases. With data lineage captured at the table, column, and job level, data producers can conduct impact analysis of changes in their data pipelines and respond to data issues when needed, for example, when a column in the resulting dataset is missing the quality required by the business.
Data lineage is a powerful tool that can transform how organizations understand and manage their data flows. In this post, we explore its real-world impact through the lens of an ecommerce company striving to boost their bottom line.
To illustrate this practical application, we walk you through how you can use the prebuilt integration between SageMaker Catalog and AWS Glue crawlers to automatically capture lineage for data assets stored in Amazon Simple Storage Service (Amazon S3) and Amazon DynamoDB. Using this workflow, you can capture lineage automatically from additional data sources using AWS Glue crawlers. Refer to the Data lineage support matrix in the SageMaker Unified Studio User Guide for supported sources. We also use SageMaker Unified Studio to navigate these data assets and learn about their origin, transformations, and dependencies, thanks to the lineage metadata captured using the AWS Glue crawlers.
Key features of the SageMaker Catalog lineage graph
In SageMaker Unified Studio, you can explore and discover data assets of your organization suited for your use case. As you dive into these data assets, you can learn more about its business context, schema, quality, and lineage. When you decide to work with a subset of these assets, you can subscribe to them in a self-service fashion and start working with them. For more detail, visit Data discovery, subscription, and consumption in the SageMaker Unified Studio User Guide.
SageMaker Studio provides a visual lineage graph that shows how a data asset has evolved from its source through transformations to its final state. This helps data scientists, engineers, and analysts answer key questions such as:
- Where did this data come from?
- What transformations has it gone through?
- Which downstream assets will be impacted by a change?
With this level of visibility, teams can perform faster impact analysis, find the root cause of data quality issues, and ensure models are built on trusted data. It also supports better collaboration so users can confidently use and share data across the organization. The following screenshot shows how SageMaker Unified Studio visualizes data lineage, making it straightforward to trace data flow and understand dependencies.
- Column-level lineage – You can expand column-level lineage when available in dataset nodes. This automatically shows relationships with upstream or downstream dataset nodes if source column information is available.
- Column search – If the dataset has more than 10 columns, the node presents pagination to navigate to columns not initially presented. To quickly view a particular column, you can search on the dataset node that lists only the searched column.
- Details pane – Each lineage node captures and displays the following details:
- Every dataset node has three tabs: LINEAGE, SCHEMA, and HISTORY. The HISTORY tab lists the different versions of lineage event captured for that node.
- The job node has a details pane to display job details with the tabs Job info and History. The details pane also captures queries or expressions run as part of the job.
- View dataset nodes only – If you want to filter out the job nodes, you can choose the open view control icon in the graph viewer and toggle the display dataset nodes only, which will remove all the job nodes from the graph and let you navigate only the dataset nodes.
- Version tabs – All lineage nodes in Amazon DataZone data lineage will have versioning, captured as history, based on lineage events captured. You can view lineage at a selected timestamp that opens a new tab on the lineage page to help compare or contrast between the different timestamps.
You can try some of these features as you explore the data assets of this post. To learn more on data lineage in SageMaker, we encourage you to dive deep into the Data lineage in Amazon SageMaker Unified Studio.
Solution overview
Imagine a scenario where an ecommerce company aims to optimize conversion rates and enhance customer experience by gaining deeper insights into the customer journey. They need to connect the dots between user interactions and actual purchases, but with data scattered across multiple sources, where do they begin? This is where data lineage becomes invaluable. To perform their analysis, they need data from two primary sources:
- Clickstream data stored in Amazon S3 (in JSON or Parquet format)
- Transactional order data stored as items in Amazon DynamoDB
To make these datasets discoverable across the business, you need to:
- Create a project in SageMaker Unified Studio that will be used to source and manage the datasets
- Enable data lineage capture in the SageMaker Unified Studio project
- Set up the resources for this use case, which includes an AWS Glue data source (set up in SageMaker Unified Studio) and AWS Glue crawler (set up in AWS Glue)
- Run the AWS Glue crawler to catalog the datasets in AWS Glue Data Catalog
- Source the metadata of the data assets into the SageMaker Catalog by running the data source
- Use SageMaker Unified Studio to navigate through the lineage of the data assets and visualize their origin
- Understand how schema evolution is captured in the data asset’s lineage
Prerequisites
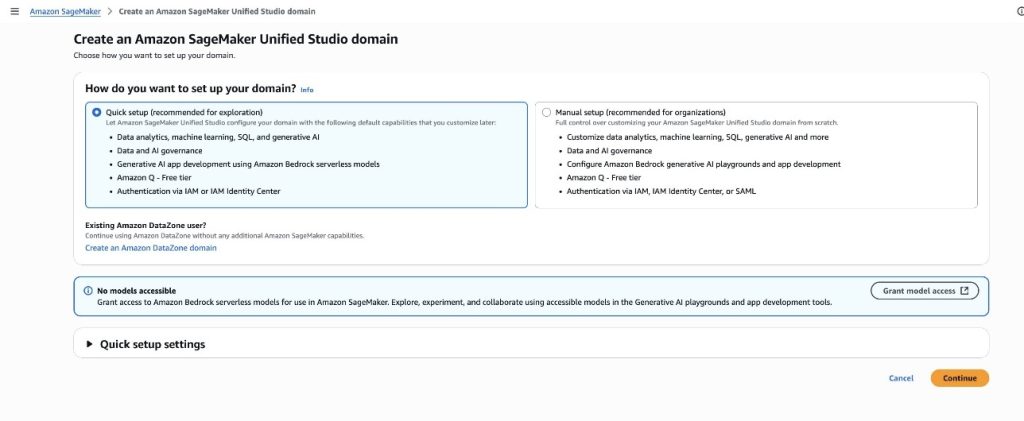
To complete the steps on this post, you need an SageMaker Unified Studio domain already deployed in your AWS account. To get started quickly in a testing environment, we suggest creating your SageMaker domain using the quick setup option as explained in Create an Amazon SageMaker Unified Studio domain – quick setup.
Solution steps
To capture data lineage for AWS Glue tables managed with AWS Glue crawlers using SageMaker Unified Studio, complete the steps in the following sections.
Set up a SageMaker project with SQL capability
In SageMaker Unified Studio, a project profile defines an uber template for projects in your Amazon SageMaker unified domain. By setting up a project with the right tooling (project profile), you will provision resources you can use to work with data, which might include cataloging it in SageMaker, transforming it into new data assets, analyzing it to drive business value, or even use it for ML or AI applications.
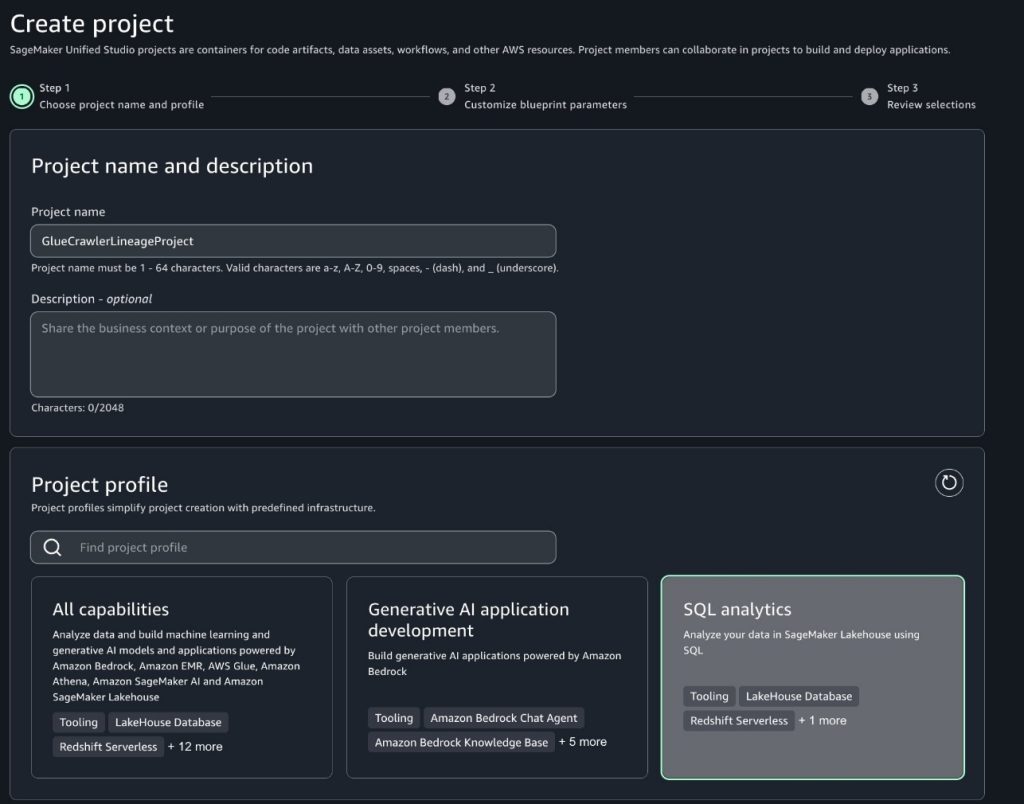
To demonstrate data lineage effectively, we use SageMaker SQL analytics project profile for a streamlined setup. Although this profile offers comprehensive data analytics capabilities, we focus specifically on two key components:
- AWS Glue database – A lakehouse for storing and managing technical metadata
- Data source job – Automatically collects and tracks metadata into SageMaker Catalog
We’ve chosen this profile to bypass complex manual configurations so we can focus on the core concepts of data lineage.
To create a new project in your SageMaker domain using the SQL analytics project profile, follow the steps detailed in SQL analytics project profile. Keep all default configurations when creating the project.
After creating your project in SageMaker Studio, you’ll unlock powerful data lineage capabilities that make tracking and understanding your data flows intuitive. Through the data sourcing feature, you can easily monitor how data moves from source to the AWS Glue database. This visibility becomes particularly valuable when debugging data issues—you can quickly trace data back to its source, understand how changes impact downstream processes, and identify affected analyses or reports. Next, populate the AWS Glue database with sample data to observe these features in action and demonstrate how they can streamline your data operations.
For further guidance on how to access the details of the new SageMaker project, refer to Get project details. After you access the data source details, in the Database name field, take note of the AWS Glue database name associated to the SageMaker project.
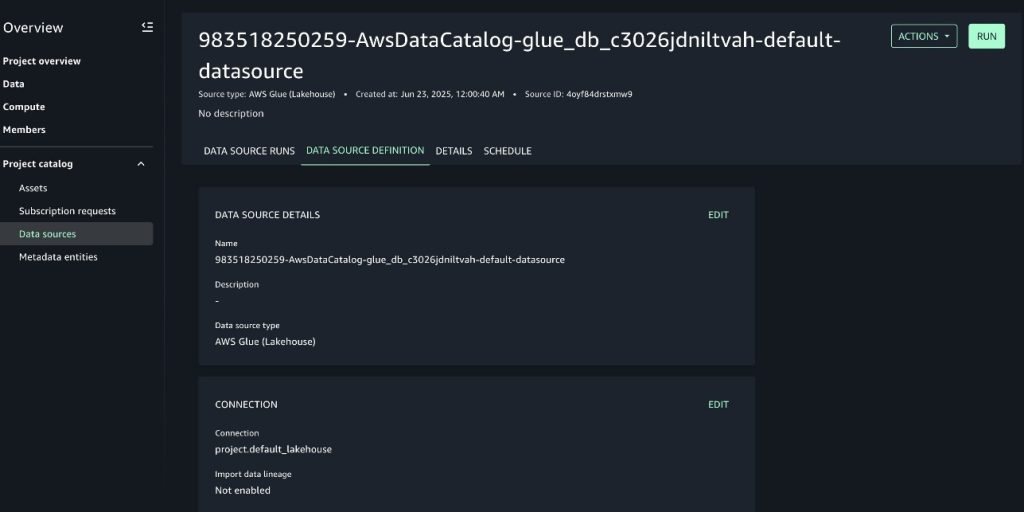
Enable data lineage capture in the SageMaker project’s data source
To enable lineage capture, follow these steps:
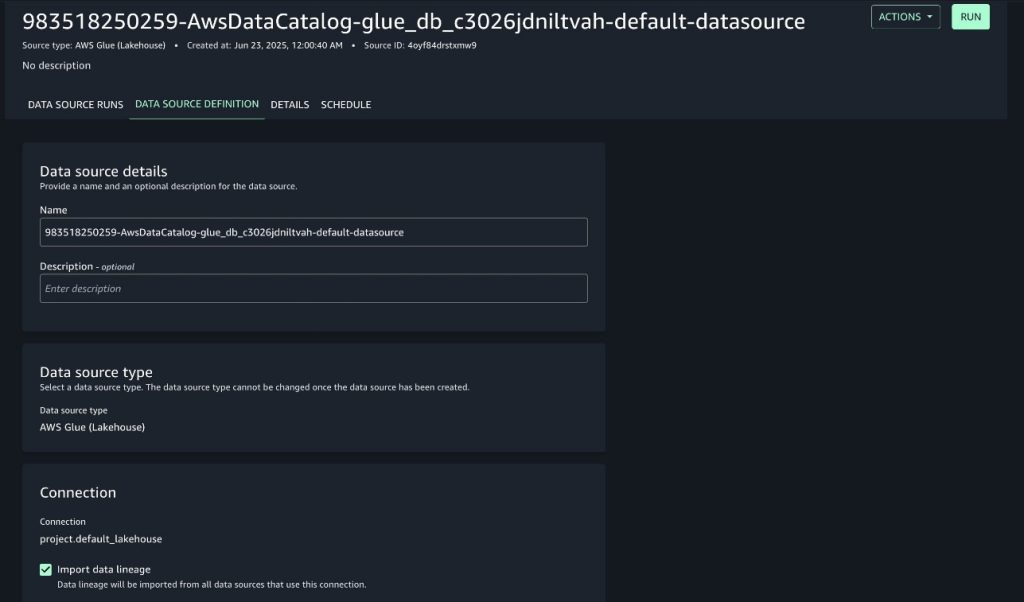
- Expand the Actions menu, then choose Edit data source.
- Go to the connections and select Import data lineage to configure lineage capture from the source, as shown in the following screenshot.
- Make other changes to the data source fields as desired, then choose Save.
Enabling lineage will make sure the data source job will capture lineage in the next run.
Deploy resources for the use case
Follow these steps:
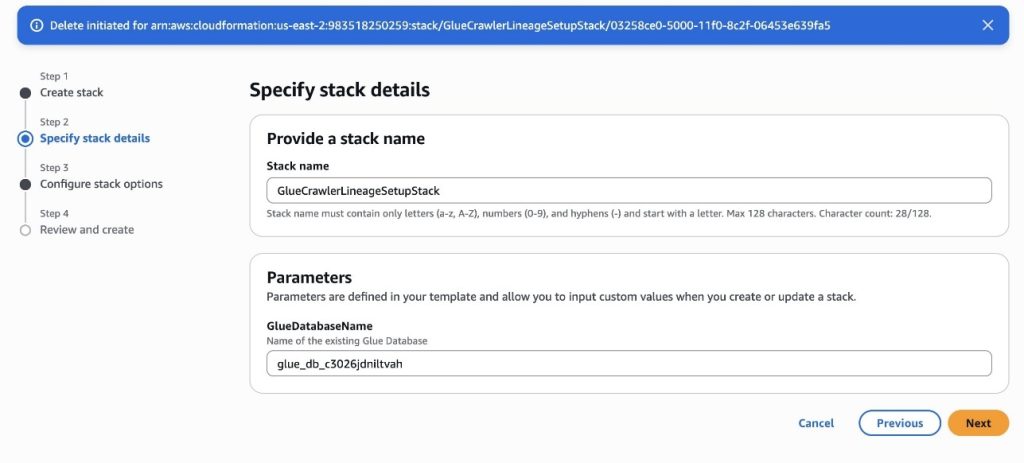
- To deploy the resources required for this post, download the AWS CloudFormation template amazon-datazone-examples in the AWS Samples GitHub repository. Deploy it in your AWS account.
For further guidance on how to deploy a CloudFormation stack, refer to Create a stack from the CloudFormation console. You need to provide a Stack name and the name of the AWS GlueDatabaseName associated to the project of your SageMaker domain, as shown in the following screenshot.
- Choose Next.
The template will deploy the following resources:
- A S3 bucket with a sample file of clickstream data. The bucket name and location of the file will follow the path pattern
s3://ecomm-analytics-<ACCOUNT_ID>-<REGION>/clickstream/<YYYY>/<MM>/<DD>/data.json. The file will contain a sample record with the following structure:
- A DynamoDB table with a sample item of order data (transactions). The table will be named
OrderTransactionTable. The sample item will have the following structure:
- An AWS Glue crawler configured to crawl the S3 bucket and DynamoDB table deployed as part of the stack and store the metadata in the AWS Glue database associated to the SageMaker project. You can access the crawler’s details in the AWS console, as shown in the following screenshot.
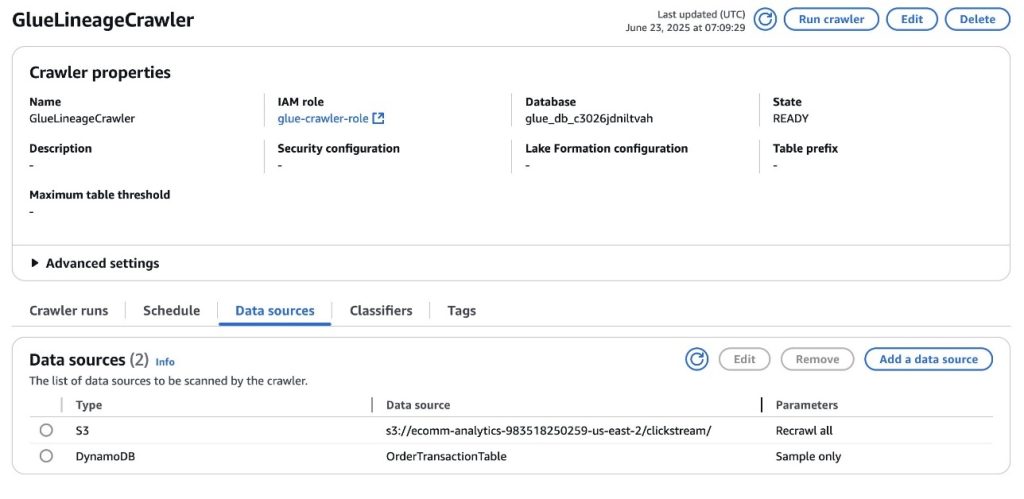
- Two AWS Identity and Access Management (IAM) roles for loading the source data into Amazon S3 and DynamoDB and to use when running the AWS Glue crawler.
Run the AWS Glue crawler
The AWS Glue crawler deployed in the previous step will allow you to capture metadata from the two data sources, Amazon S3 and DynamoDB, and store it in AWS Glue Data Catalog, specifically in the database associated to the SageMaker project. After the metadata is stored, it will be accessible to SageMaker.
Before running the crawler, you need to provide AWS Lake Formation permissions to the IAM role that the AWS Glue crawler will use to interact with your data source and target AWS Glue database. The following command will grant the permissions needed for the crawler to store metadata into the AWS Glue database of the SageMaker project.
To invoke this command, we recommend using AWS CloudShell on the AWS console as explained in AWS CloudShell Concepts. Update the <REGION>, <ACCOUNT_ID> and <GLUE_DATABASE_NAME> placeholders with the right values for your AWS Region, AWS account ID, and name of the AWS Glue database associated to the SageMaker project.
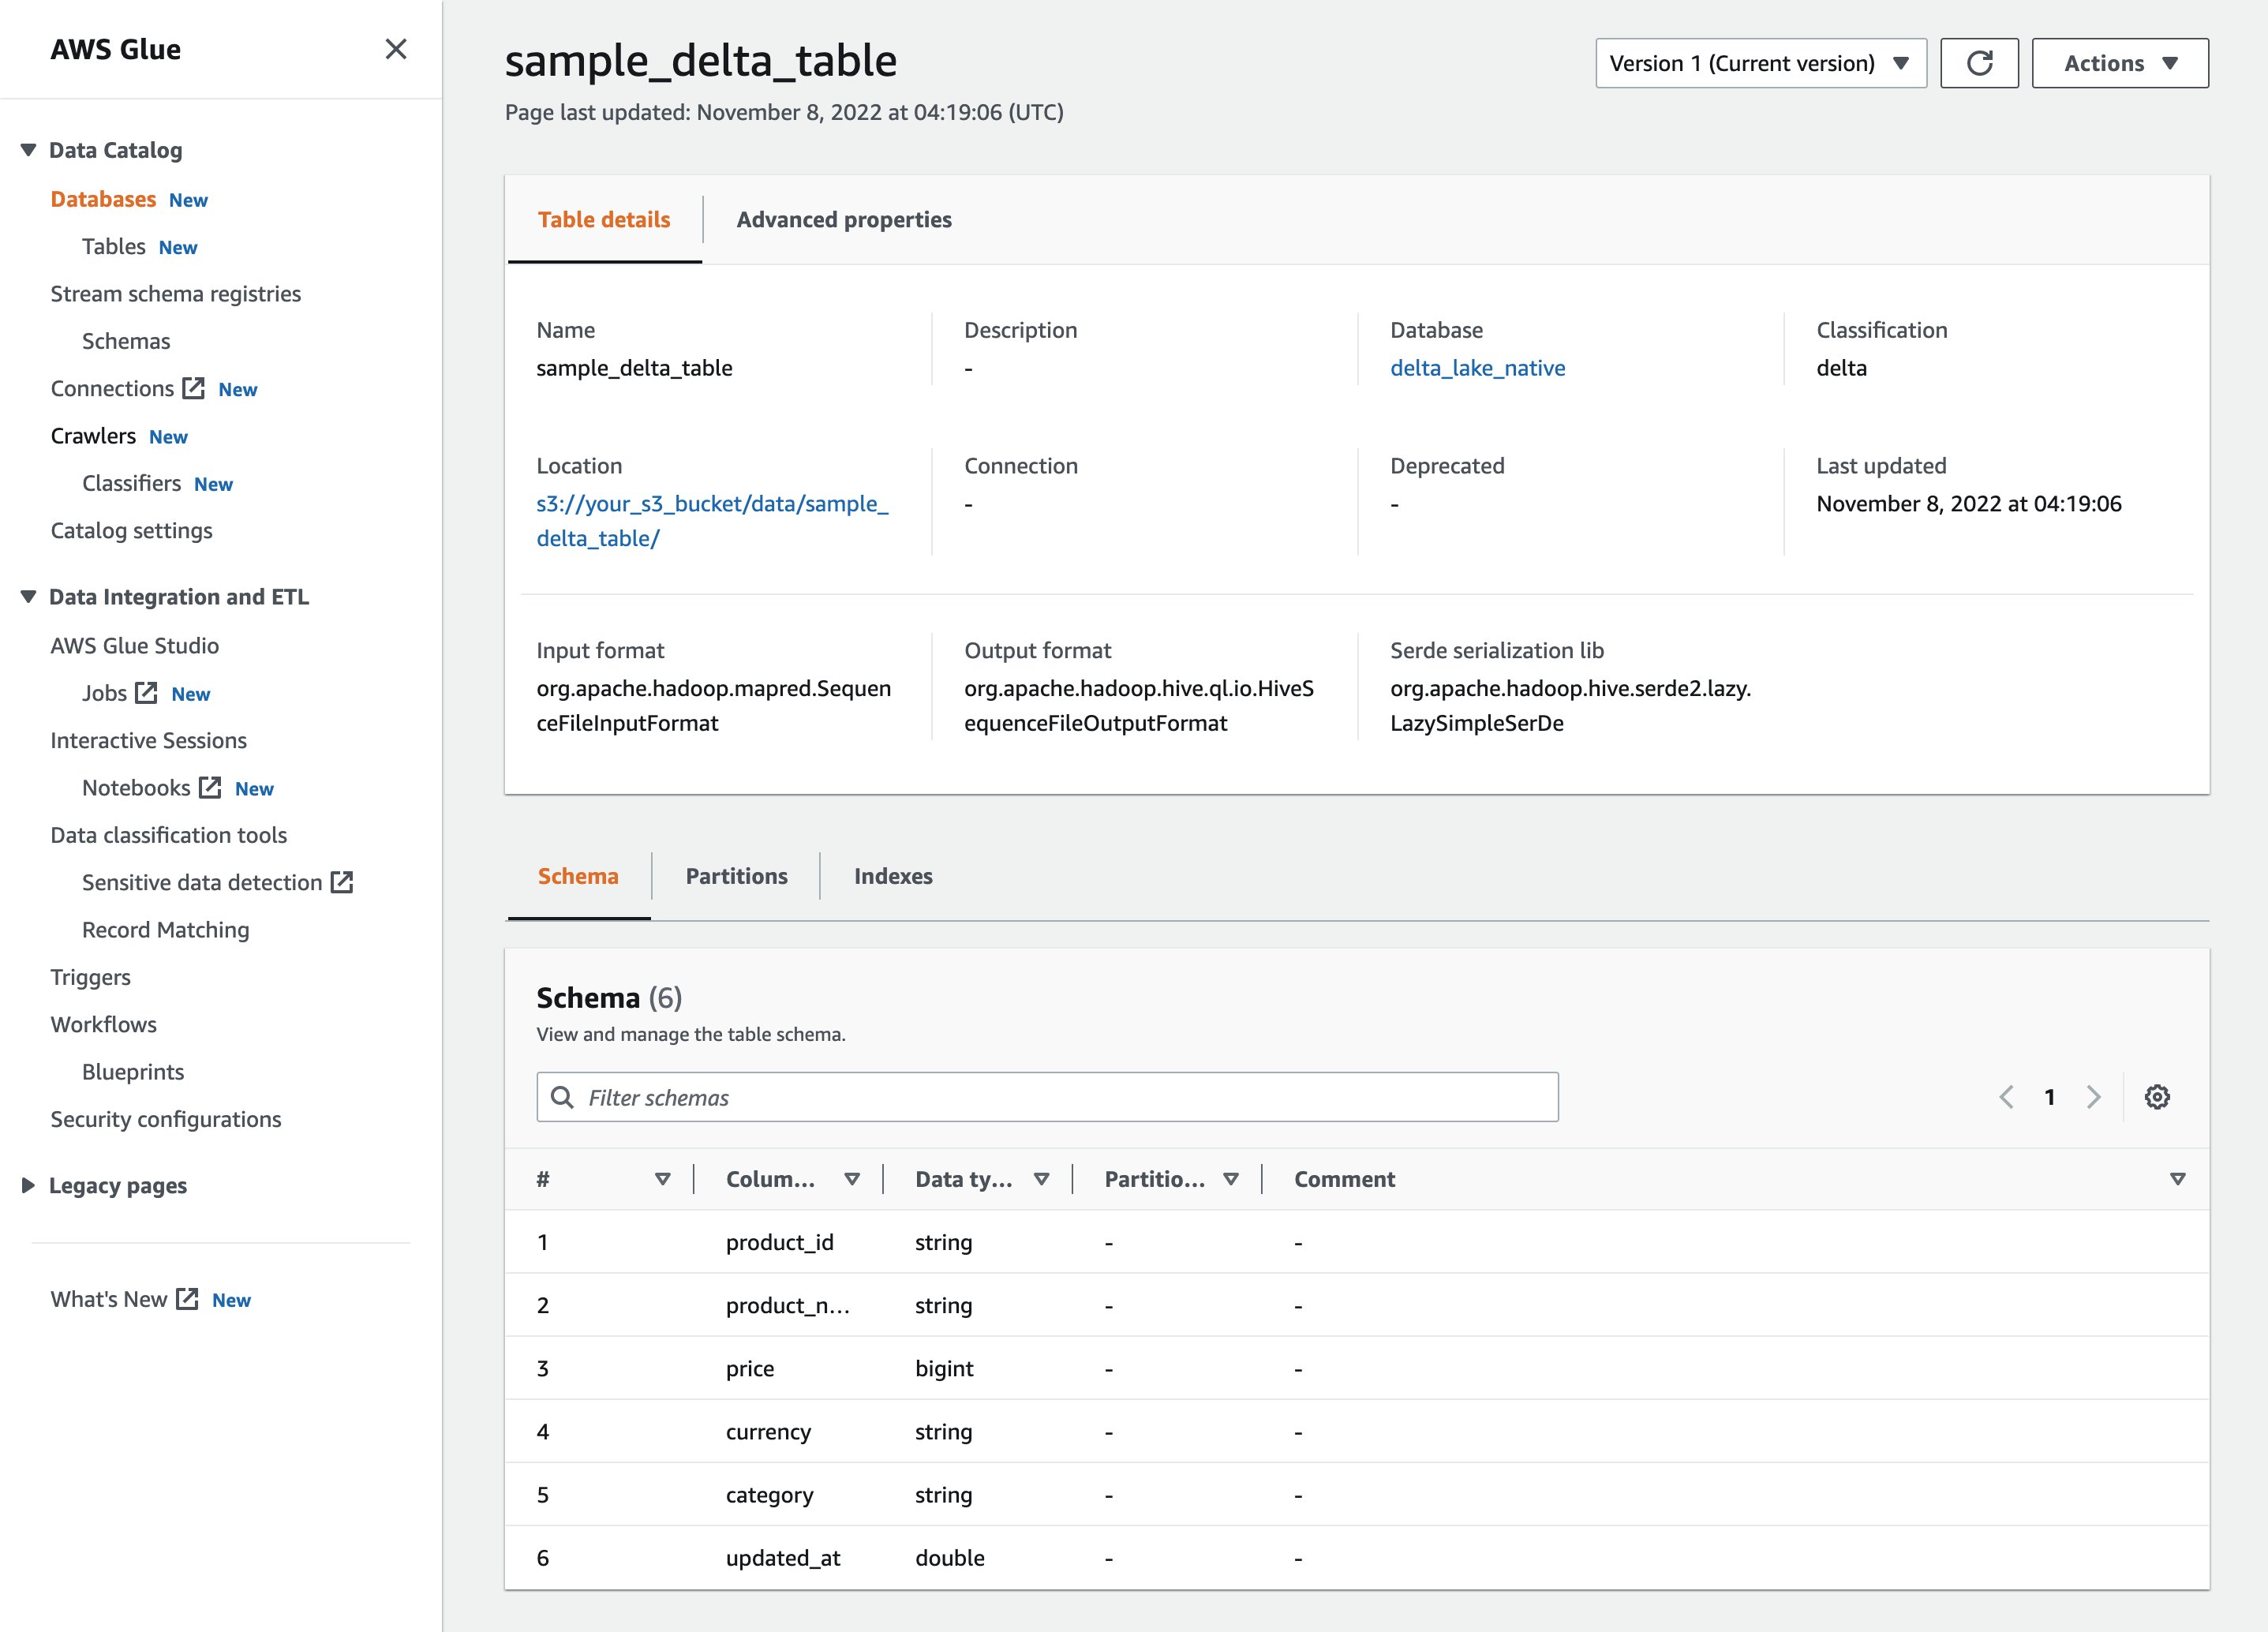
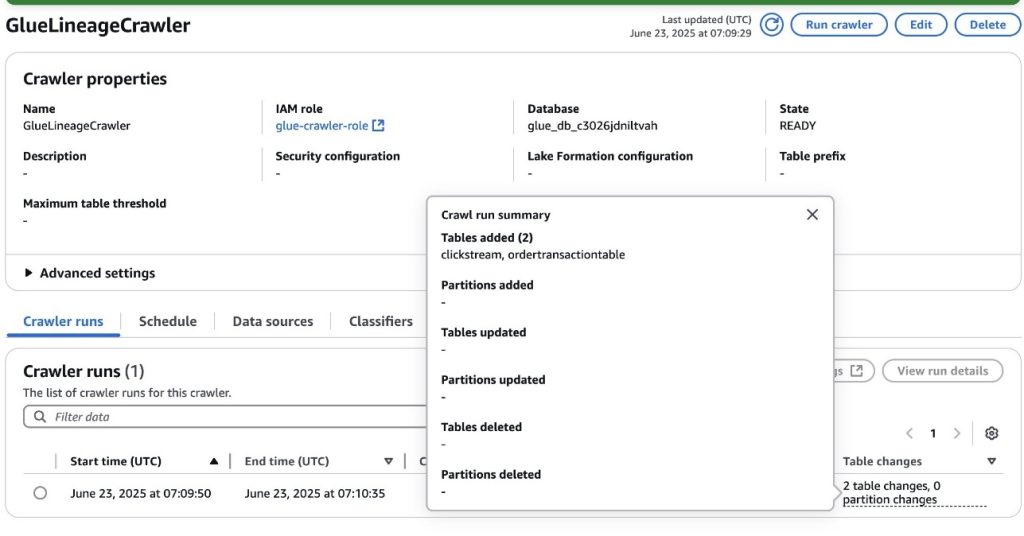
Next, run the AWS Glue Crawler on the AWS console. After the crawler successfully finishes, two new tables, clickstream and ordertransactiontable, will be created in the AWS Glue database associated to the SageMaker project. Refer to Viewing crawler results and details to learn more about AWS Glue crawler results.
Source metadata from the AWS Glue database into SageMaker
To source metadata from data assets in the AWS Glue database, including their lineage, into SageMaker, use the data source that was deployed as part of the SageMaker project creation.
- To run the data source, go to the data source details page.
- Choose Run. (Data sources can be scheduled to run as well, however, for this demonstration we trigger a manual run).
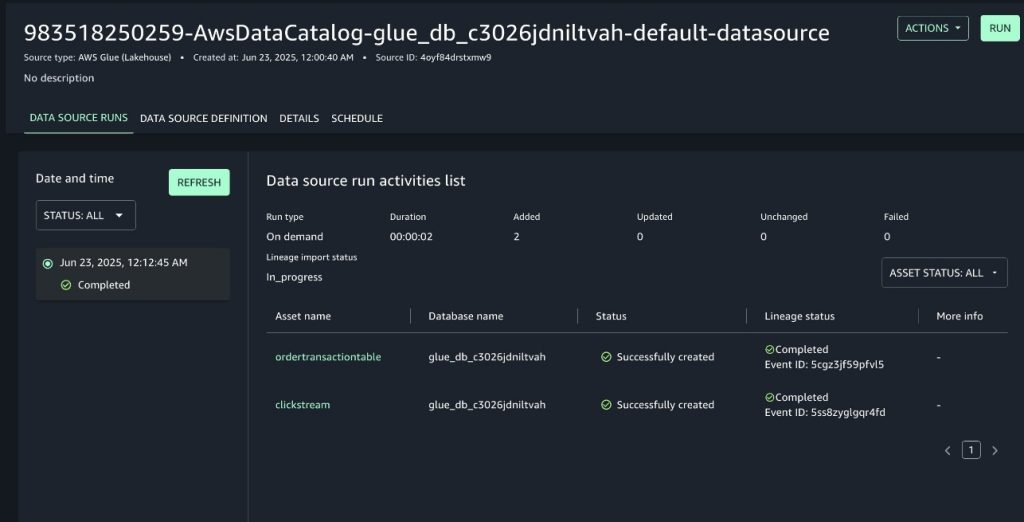
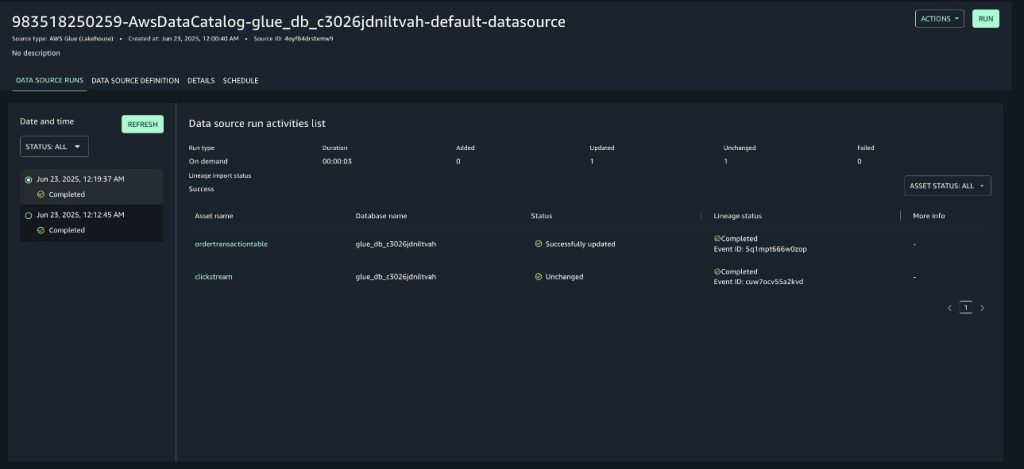
After the data source run is complete, metadata from both data assets in the AWS Glue database will be imported into the SageMaker domain as the project’s inventory assets. You can find the details of the data source run from within SageMaker Unified Studio, which include:
- The data assets from the AWS Glue database that were ingested into SageMaker.
- The status of the data lineage import for each data asset, which includes an event ID for traceability. This lineage event ID can be used to debug inconsistencies in the resulting lineage graph. You can use the GetLineageEvent API to retrieve the raw payload of the lineage event.
Visualizing the data lineage graph of the data assets in SageMaker Unified Studio
With SageMaker Unified Studio, you have a single place to manage and discover data assets. When accessing a data asset published in the SageMaker central catalog or in your project’s own inventory, you can dive into the asset’s metadata, which includes its schema, business description, custom metadata forms, quality, lineage, and more. To visualize the lineage graph of each data asset of this post, follow these steps:
- In SageMaker Studio, navigate to the Assets section of the SageMaker project details page and choose INVENTORY
- Select the asset that you want to explore. You can also access the asset directly from the data source run by selecting the asset name.
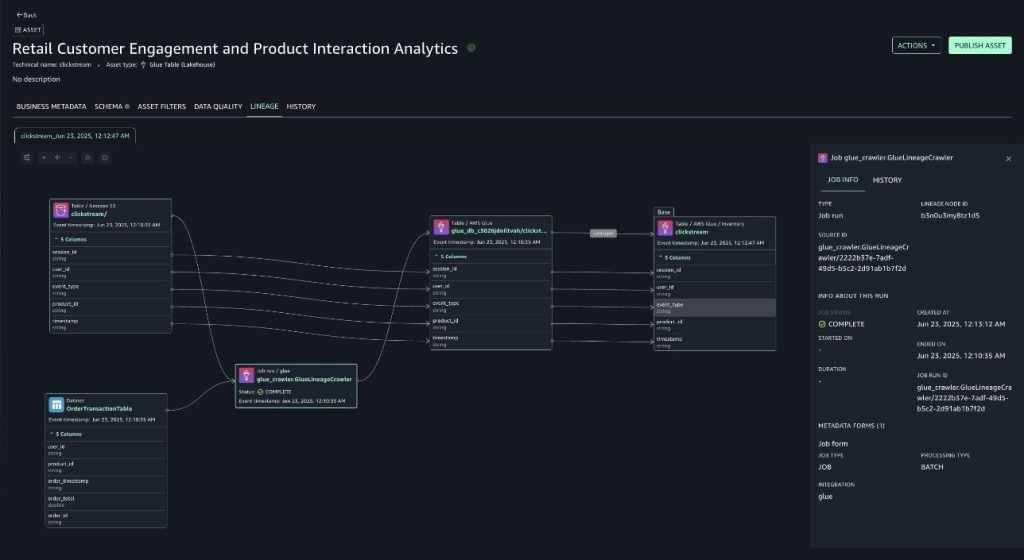
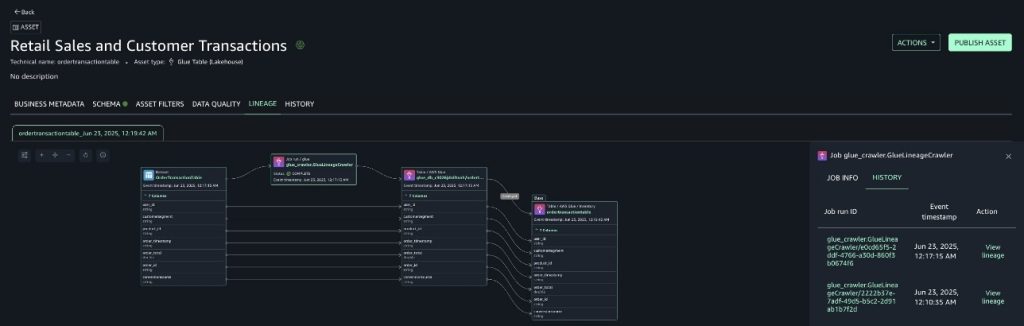
- To view the lineage graph of the data asset up to its origin, shown in the following screenshots, choose the LINEAGE tab.
- For clickstream table (Sourced from S3)

-
- For order transactions table (Sourced from DynamoDB)
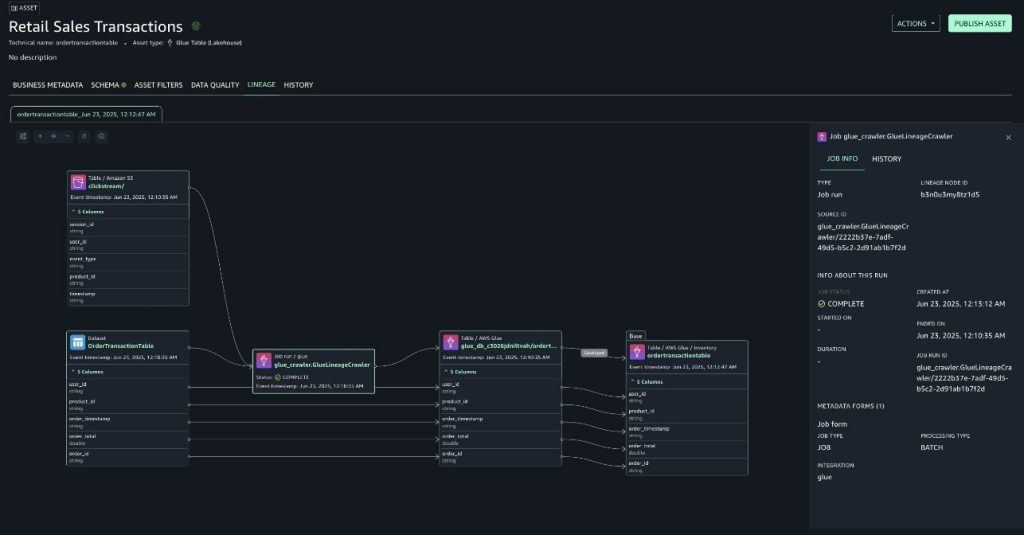
With lineage, you can now confirm that the data originated from sources such as Amazon S3 and Amazon DynamoDB and understand how it has been transformed along the way. Because of this end-to-end visibility, you can trust the data, make informed decisions, and provide compliance with confidence. The lineage graph captures essential metadata that forms the foundation of lineage tracking.
- This includes table schemas, column definitions and their data types.
- Column-level lineage becomes particularly powerful in this context. Imagine your clickstream’s AWS Glue table powers an Amazon QuickSight dashboard analyzing customer purchase patterns and notice discrepancies in your revenue reports. With column lineage, you can instantly trace the source of those columns.
- This granular visibility not only accelerates debugging but also proves invaluable during schema changes, as we show in the following section by changing the source schema.
- The crawler details such as
crawlerRunId(present in the source identifier of the lineage node) and crawler start and end times can be used to debug which crawler runs updated the table.
Understanding your data asset’s schema evolution through lineage in SageMaker Unified Studio
Imagine the order transactions source in DynamoDB was updated with new information. Because this source powers an Amazon QuickSight report for the customer using the AWS Glue database table, it’s important for consumers to know what changes in the data pipeline updated the report.
- Edit the DynamoDB table item with additional columns to learn how lineage graph can be used to view historical updates:
- Enter the
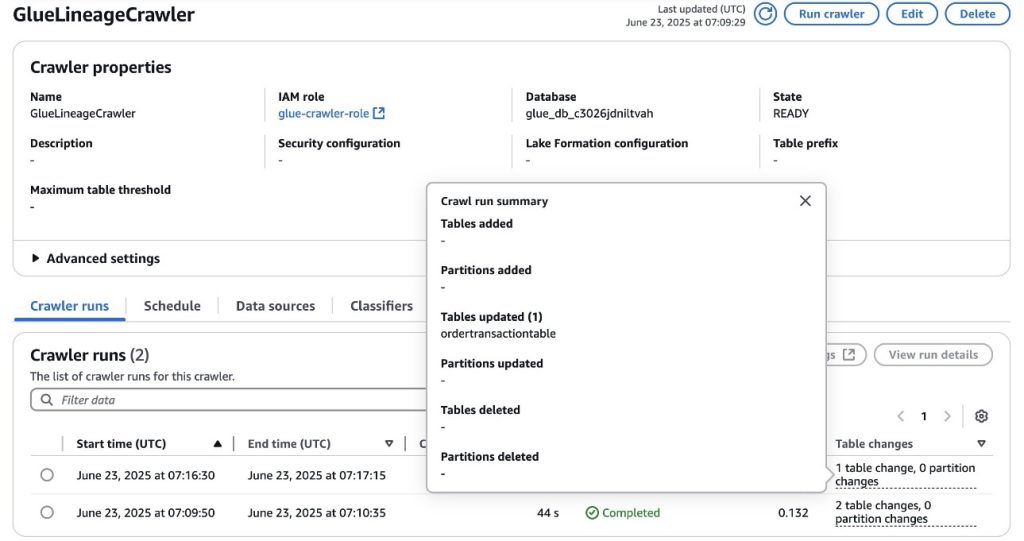
OrderTransactionsCrawlerGlue crawler again on the AWS console. After completion, you’ll notice that it updated theordertransactiontableAWS Glue table, as shown in the following screenshot.
- Run again the data source associated to the project in SageMaker Unified Studio to import the latest metadata into the SageMaker Catalog. After completion, you’ll notice the data source updated the
ordertransactiontabledata asset in the SageMaker Catalog, as shown in the following screenshot.
This section explores how lineage can be useful to track the updates.
Navigate to the ordertransactiontable data asset in SageMaker Catalog by selecting it from the data source run and choose the LINEAGE tab, as shown in the following screenshot.
Notice how the new columns are available in the lineage graph. A new crawler run ID is present as the source identifier of the crawler lineage node. The history tab shows multiple crawler runs. You can navigate to check the state of the system during the first run.
Cleanup
After you’re done, we recommend to cleaning up the resources created for this post to avoid unintended charges:
- Delete the inventory assets that were cataloged in the SageMaker project’s inventory, as explained in Delete an Amazon SageMaker Unified Studio asset.
- Delete the SageMaker project that was created as part of this post, as explained in Delete a project.
- Delete the CloudFormation stack that was deployed as part of this post, as explained in Delete a stack from the CloudFormation console.
- The S3 bucket created as part of the CloudFormation stack will remain after its deletion because it contains a data file in it. Empty and delete the bucket, as explained in Deleting a general purpose bucket.
Conclusion
In this post, you were able to explore the data lineage capabilities of Amazon SageMaker, specifically when working with AWS Glue crawlers. You learned how you can set up an AWS Glue crawler to infer metadata from data assets in multiple sources such as Amazon S3 and DynamoDB and store it the AWS Glue Data Catalog. You also imported this metadata, including data lineage, into Amazon SageMaker through the data source capability of a SageMaker project. Finally, you explored the resulting lineage graph of data assets in SageMaker Unified Studio and saw some of the functionalities available to understand the origin path of them, understand how columns are transformed, and what impact looks like when performing changes to any step of the pipeline.We encourage you to now test the capabilities you explored in this post with your own data. By following the pattern presented in this post, many customers have been able to achieve governance of their data lake and lakehouse platforms on top of Amazon SageMaker with data lineage and more.
About the authors
 Mohit Dawar is a Senior Software Engineer at Amazon Web Services (AWS) working on Amazon DataZone. Over the past 3 years, he has led efforts around the core metadata catalog, generative AI–powered metadata curation, and lineage visualization. He enjoys working on large-scale distributed systems, experimenting with AI to improve user experience, and building tools that make data governance feel effortless. Connect with him on LinkedIn: Mohit Dawar.
 Jose Romero is a Senior Solutions Architect for Startups at Amazon Web Services (AWS) based in Austin, TX, US. He is passionate about helping customers architect modern platforms at scale for data, AI, and ML. As a former senior architect in AWS Professional Services, he enjoys building and sharing solutions for common complex problems so that customers can accelerate their cloud journey and adopt best practices. Connect with him on LinkedIn: Jose Romero.


 Igor Alekseev is a Senior Partner Solution Architect at AWS in Data and Analytics domain. In his role Igor is working with strategic partners helping them build complex, AWS-optimized architectures. Prior joining AWS, as a Data/Solution Architect he implemented many projects in Big Data domain, including several data lakes in Hadoop ecosystem. As a Data Engineer he was involved in applying AI/ML to fraud detection and office automation.