Post Syndicated from Kaustubh Phatak original https://aws.amazon.com/blogs/security/customize-requests-and-responses-with-aws-waf/
In March 2021, AWS introduced support for custom responses and request header insertion with AWS WAF. This blog post will demonstrate how you can use these new features to customize your AWS WAF solution to improve the user experience and security posture of your applications.
HTTP response codes are standard responses sent by a server in response to a client request. When AWS WAF blocks a request, the default response code sent back to the client is HTTP 403 (Forbidden). The HTTP 403 response code is associated with a default error page built by the web server engine. This page is typically generic and not user-friendly. With the Custom Response feature, AWS WAF now allows you to modify the status code from HTTP 403 to HTTP 2xx, 3xx, 4xx, and 5xx, and to return a custom body when the request is blocked by AWS WAF. The custom responses unique to AWS WAF also allow you to differentiate blocked requests generated by AWS WAF or your server.
When inspected HTTP requests are allowed by AWS WAF, the request is passed through to the associated resource. Now you have the ability to insert custom HTTP request headers for each rule inside your web access control list (web ACL) set to allow or count, and you can create additional logic with your application by tagging these requests with the headers.
We will be outlining three different use cases to show how you can use these AWS WAF features.
Use case 1: Custom response code
In this example, you will use the custom response code feature to redirect a viewer request to a different webpage. You use HTTP 3xx response codes to redirect the incoming request, and use the HTTP header Location to specify the website URL for redirection. Figure 1 shows an overview of this workflow.
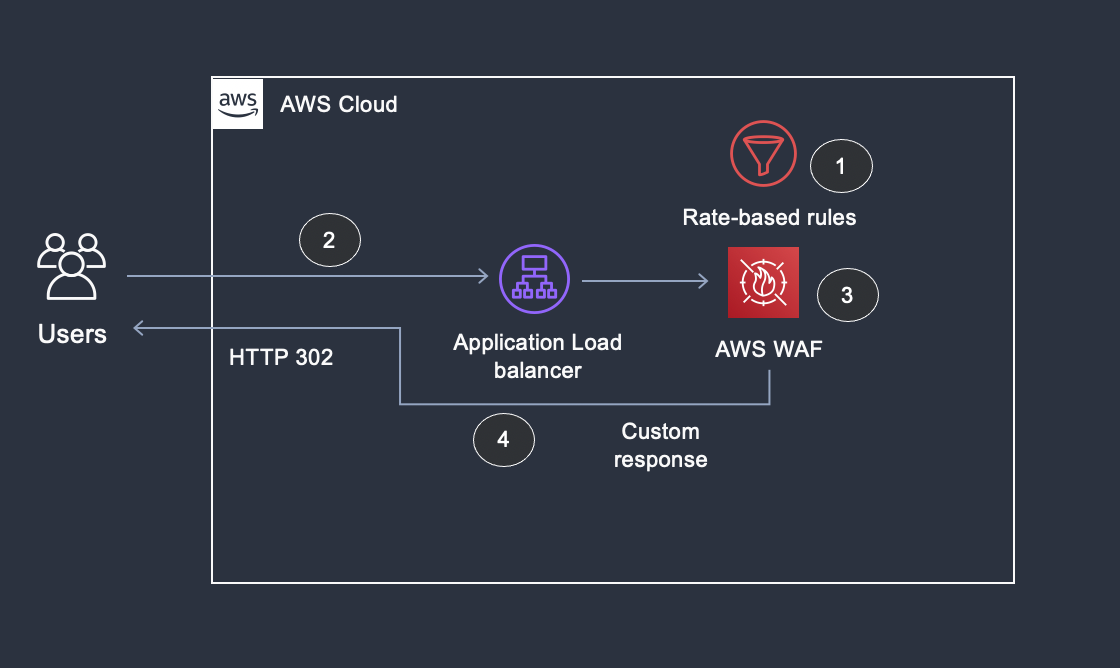
Figure 1: Overview of using custom response code to redirect the request
Figure 1 illustrates the following steps:
- AWS WAF has a rate-based rule to allow 100 requests every 5 minutes.
- A user sends multiple requests and breaches AWS WAF rate-based rules threshold.
- AWS WAF blocks any further requests from the user.
- The AWS WAF custom response code feature modifies the response code from HTTP 403 to HTTP 302 – Temporary Redirect with a Location header specifying the redirected URL.
Configure the AWS WAF web ACL and rule for custom response code
To create an Application Load Balancer and associate it to AWS WAF
- Follow the steps to configure a load balancer and a listener to create an internet-facing load balancer in the N.Virginia AWS Region.
- After the load balancer is created, open the AWS WAF console.
- In the navigation pane, choose Web ACLs, and then choose Create web ACL in US east (N.Virginia) Region.
- For Name, enter the name that you want to use to identify this web ACL.
- For Resource type, choose the Application Load Balancer that you created in Step 1 and choose Add.
- Choose Next.
- Choose Add rules and then choose Add my own rules and rule groups.
- For Name, enter the name that you want to use to identify this rule.
- For Rule type, choose Rate-based rule.
- For Rate limit, enter 100.
- Under Actions, keep the default action of Block and enable Custom response.
- Enter the response code as 302.
- Under Response headers, add a new custom header with Key as Location and Value as example.com
- Choose Add rule.
- Continue to choose Next to reach the summary page, and then choose Create new web ACL.
After the web ACL is created, you should see the web ACL configuration as shown in Figure 2.
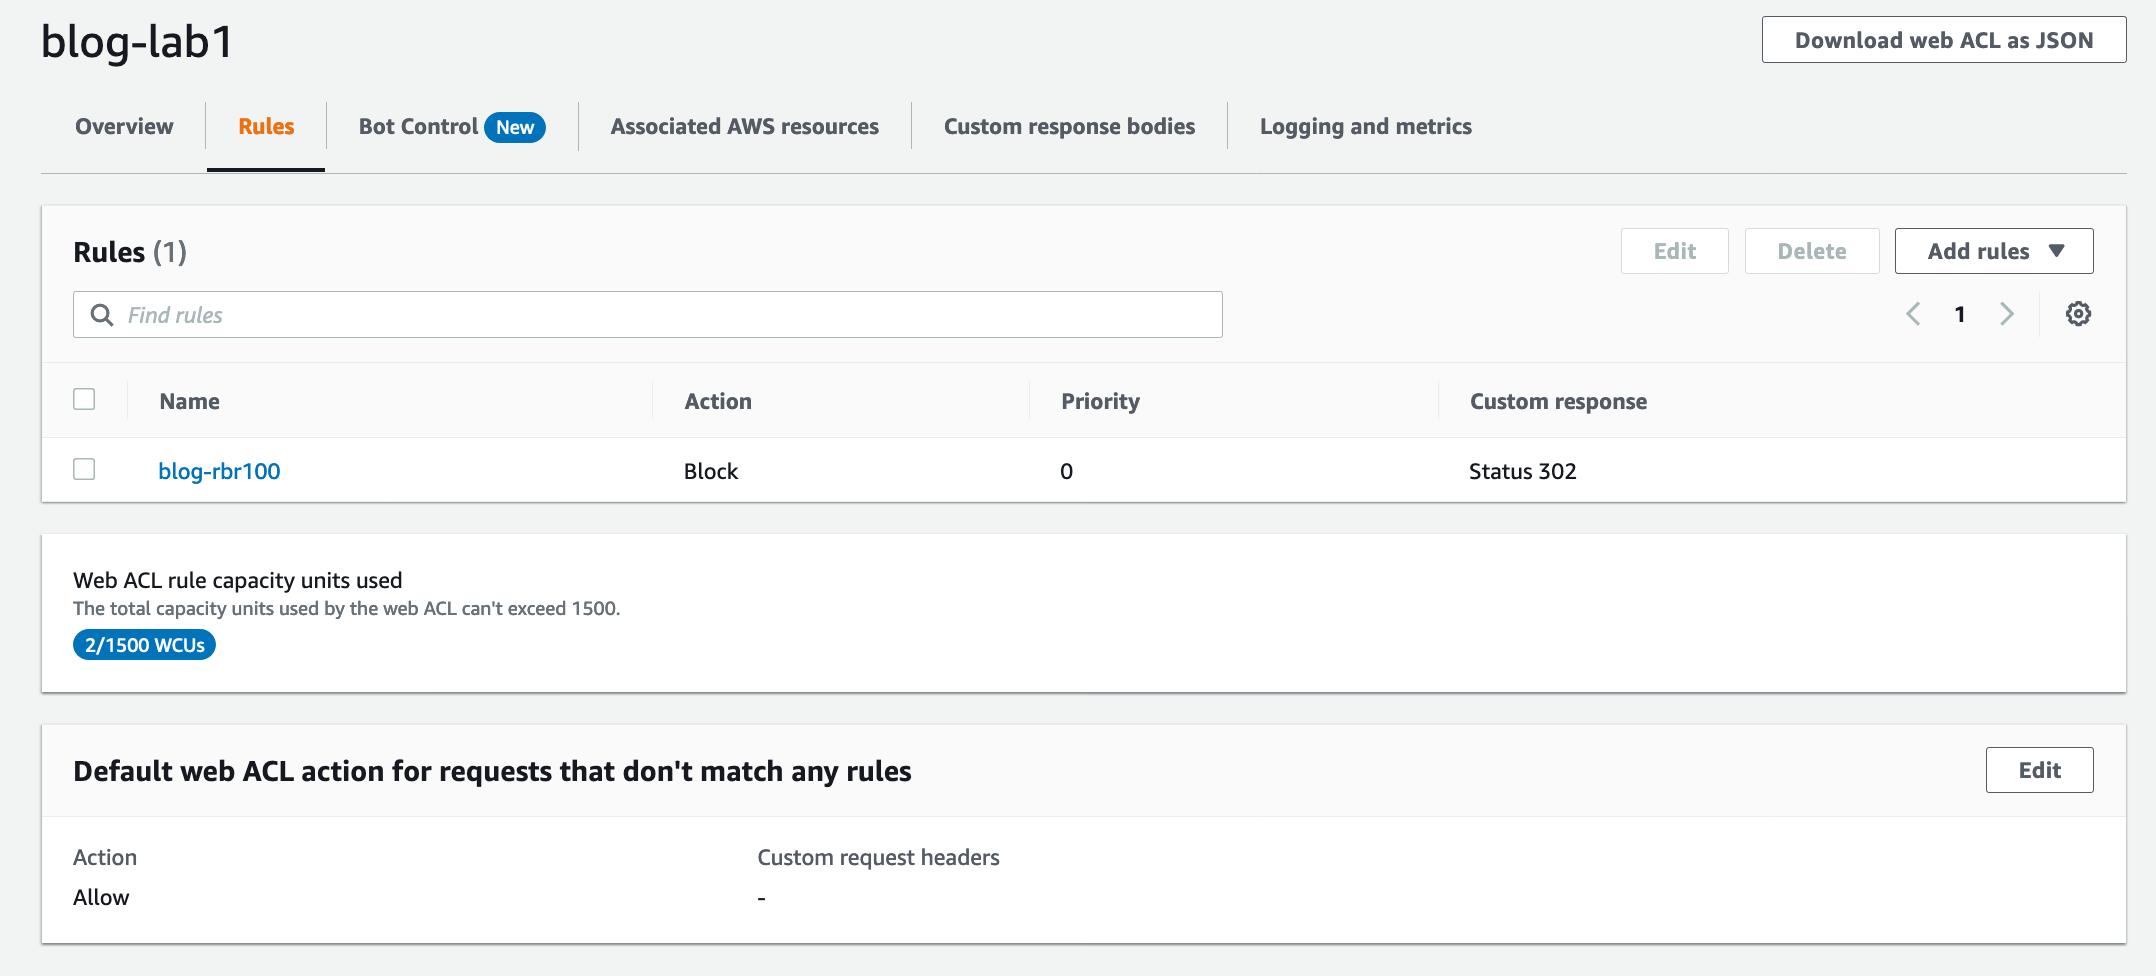
Figure 2: Custom Response – Web ACL configuration
Now, the setup is complete. You have a web ACL with a rate-based rule configured to redirect blocked requests to a different URL. To verify that the setup is working as expected, you can enable and analyze the AWS WAF logs for a test user that is sending more than 100 requests in a period of 5 minutes.
In Figure 3, you can see the custom response code of 302 being sent to the test user instance.
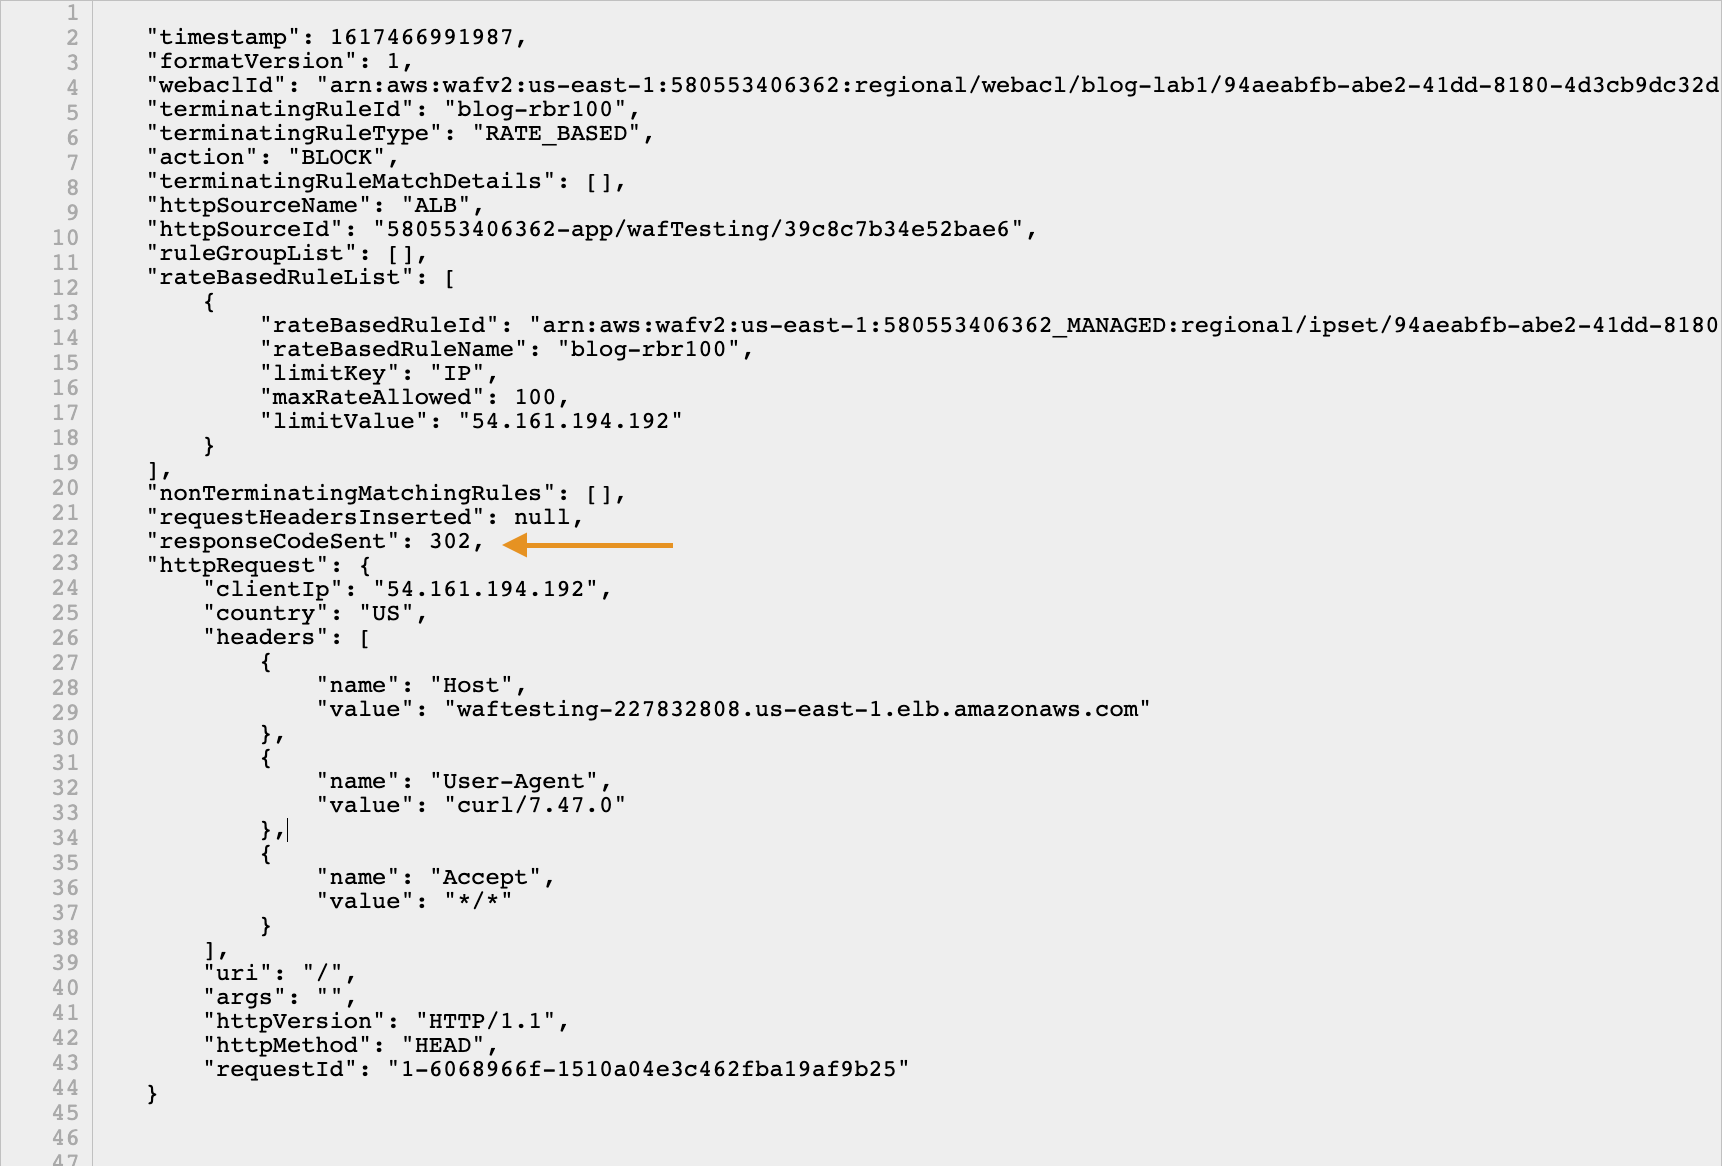
Figure 3: Verifying the AWS WAF logs for custom response
In the example in Figure 3, we tested our configuration by having a user send more than 100 requests from a PC to trigger a block. To verify the Location header, we analyzed the network traffic by using the developer tools of the browser. As you can see in Figure 4, the response includes the custom header Location with the configured redirect URL.
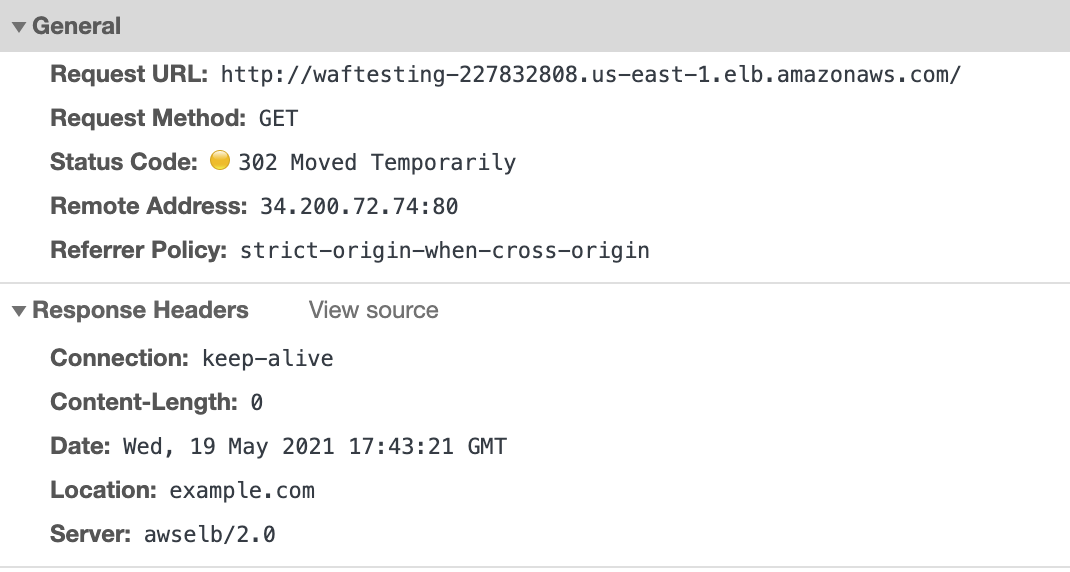
Figure 4: Verifying response in the browser tools for custom response
Use case 2: Custom error page
In this example, you will use the AWS WAF custom error page to route the request to a different error page, rather than the default web server error pages. As you can see in Figure 5, the workflow is similar to use case 1.
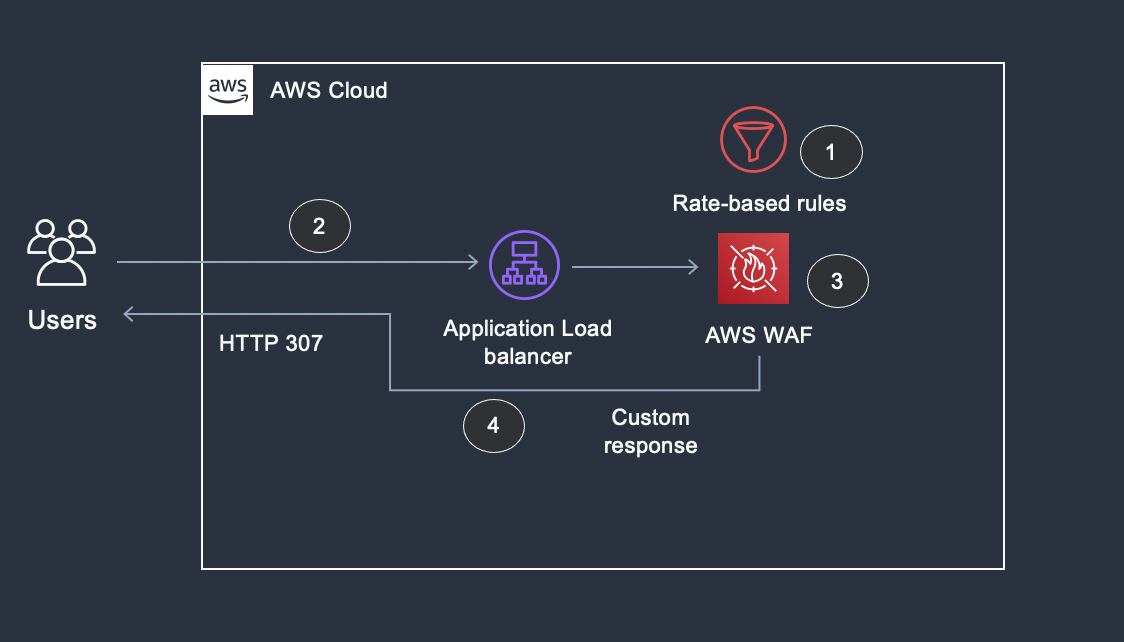
Figure 5: Overview of using custom error page to redirect the request
Figure 5 shows the following steps:
- AWS WAF has a rate-based rule to allow 100 requests every 5 minutes.
- A user sends multiple requests and breaches AWS WAF rate-based rules threshold.
- AWS WAF blocks any further requests from the user.
- AWS WAF custom response code feature modifies the response code to HTTP 307 – Temporary Redirect and responds with a custom error page with the message Too Many Requests.
To configure the AWS WAF web ACL and rule for custom error page
- In the AWS WAF console, in the navigation pane, choose Web ACLs, and then choose the web ACL that you created in use case 1.
- Click on Rules tab and choose Add rules and then choose Add my own rules and rule groups.
- For Name, enter the name that you want to use to identify this rule.
- For Rule type, choose Rate-based rule.
- For Rate limit, enter 100.
- Under Actions, keep the default action of Block and enable Custom response.
- For the response code, enter 307.
- For Choose how you would like to specify the response body, select Create a custom response body.
- A pop-up box will open. Enter a name for the Response body object name.
- For Content type, you can select JSON, HTML, or Plain Text. In this example, we select Plain Text.
- For Response body, enter any sample text. In this example, we enter This is a sample custom error page. Then choose Save.
- Choose Add Rule.
- For Set rule priority, move your new rule to the top so that this rule is processed first.
Figure 6 shows a summary of the rate based-rule created for use case 2.
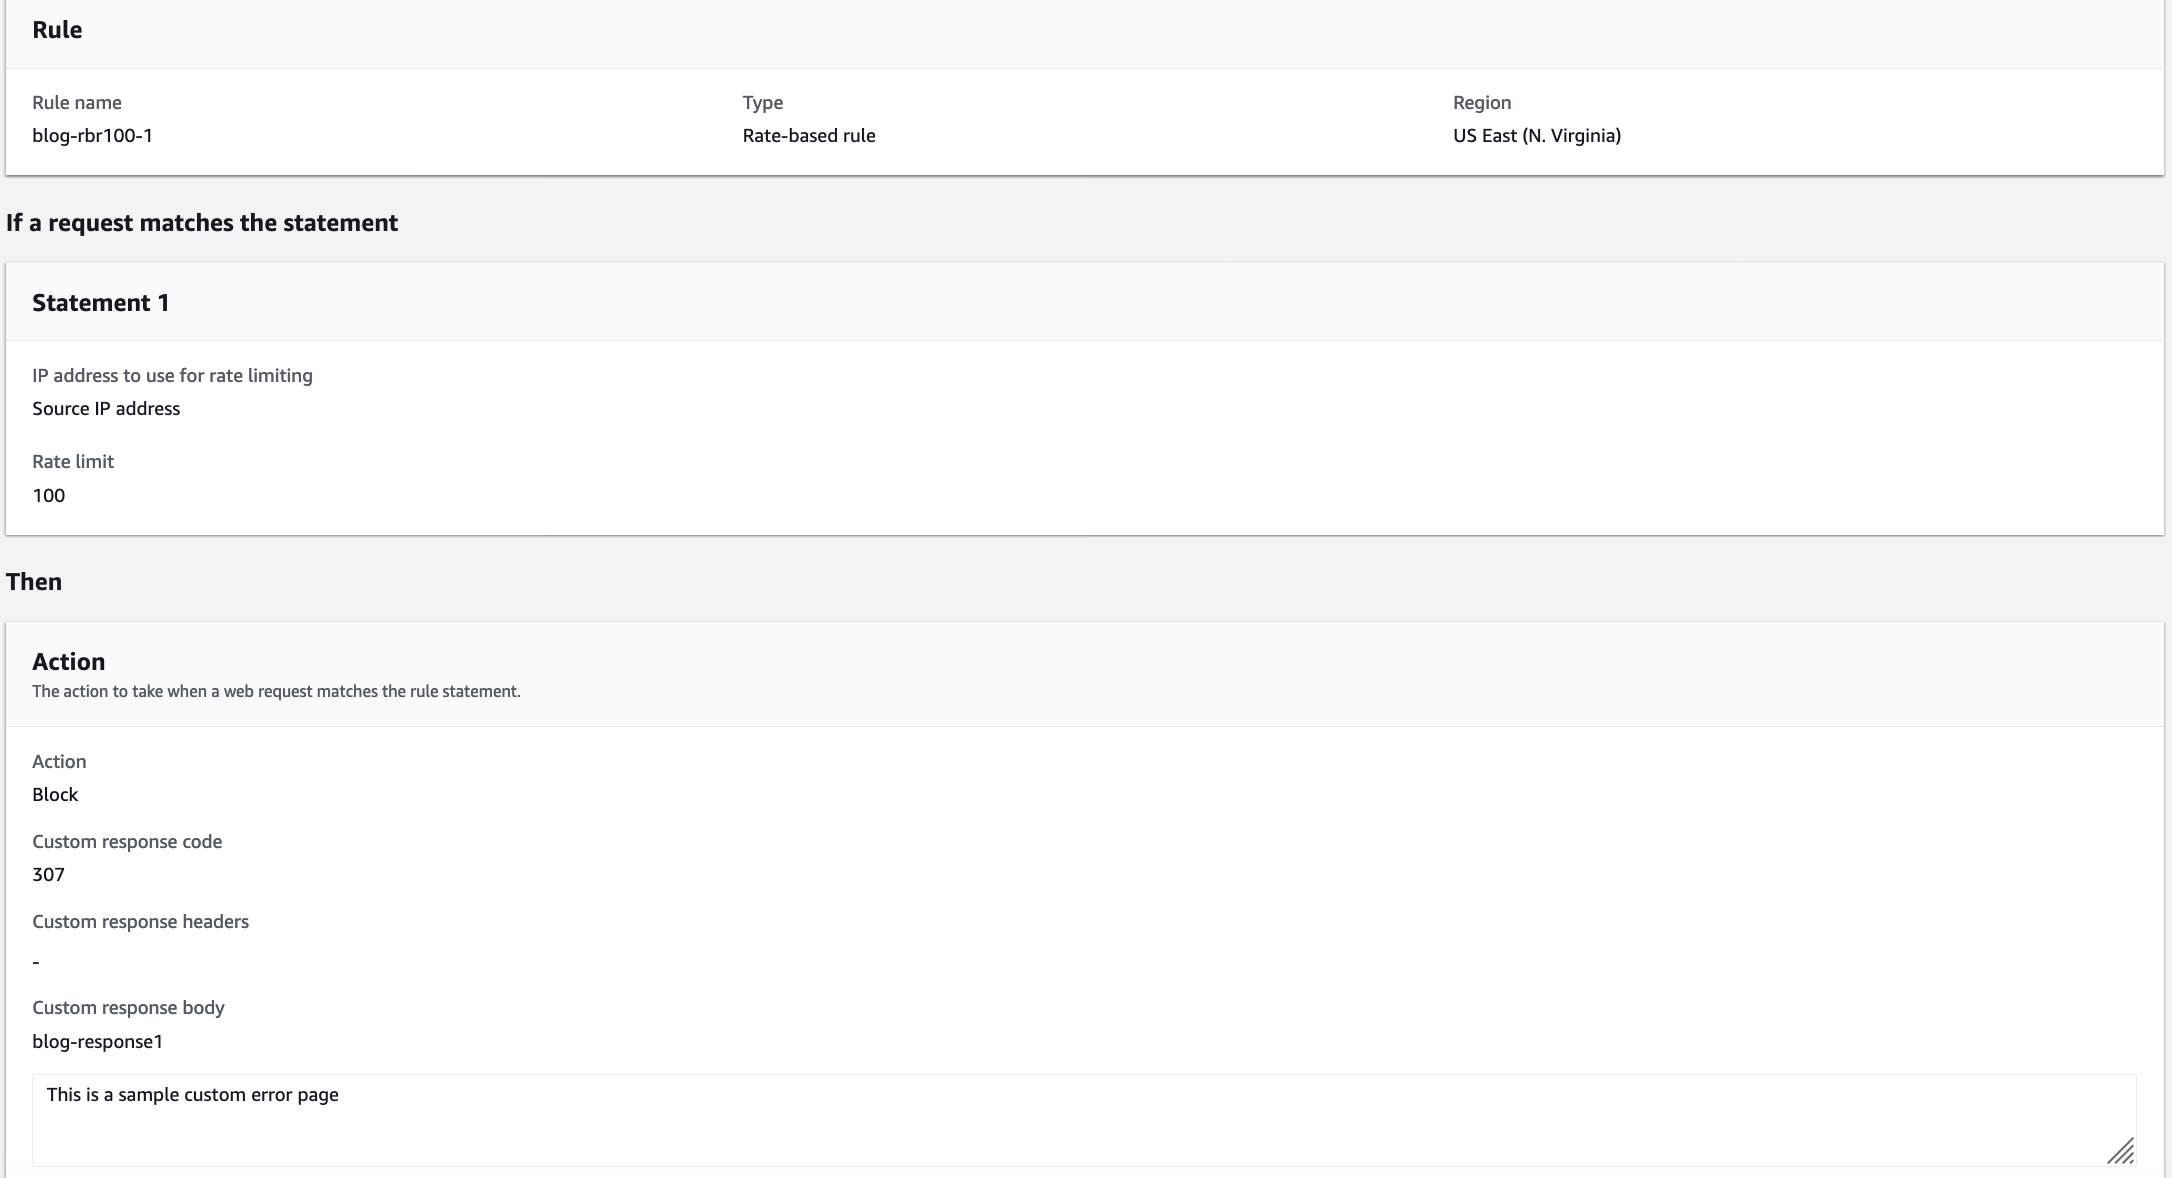
Figure 6: Custom error page – Web ACL configuration
Now, the setup is complete. You have a web ACL with a rate-based rule configured to redirect blocked requests to different URL. To verify the setup is working as expected, you can analyze the AWS WAF logs for a test user that is sending more than 100 requests in a period of 5 minutes. Figure 7 shows the custom response code of 307 being sent to our example test user instance.
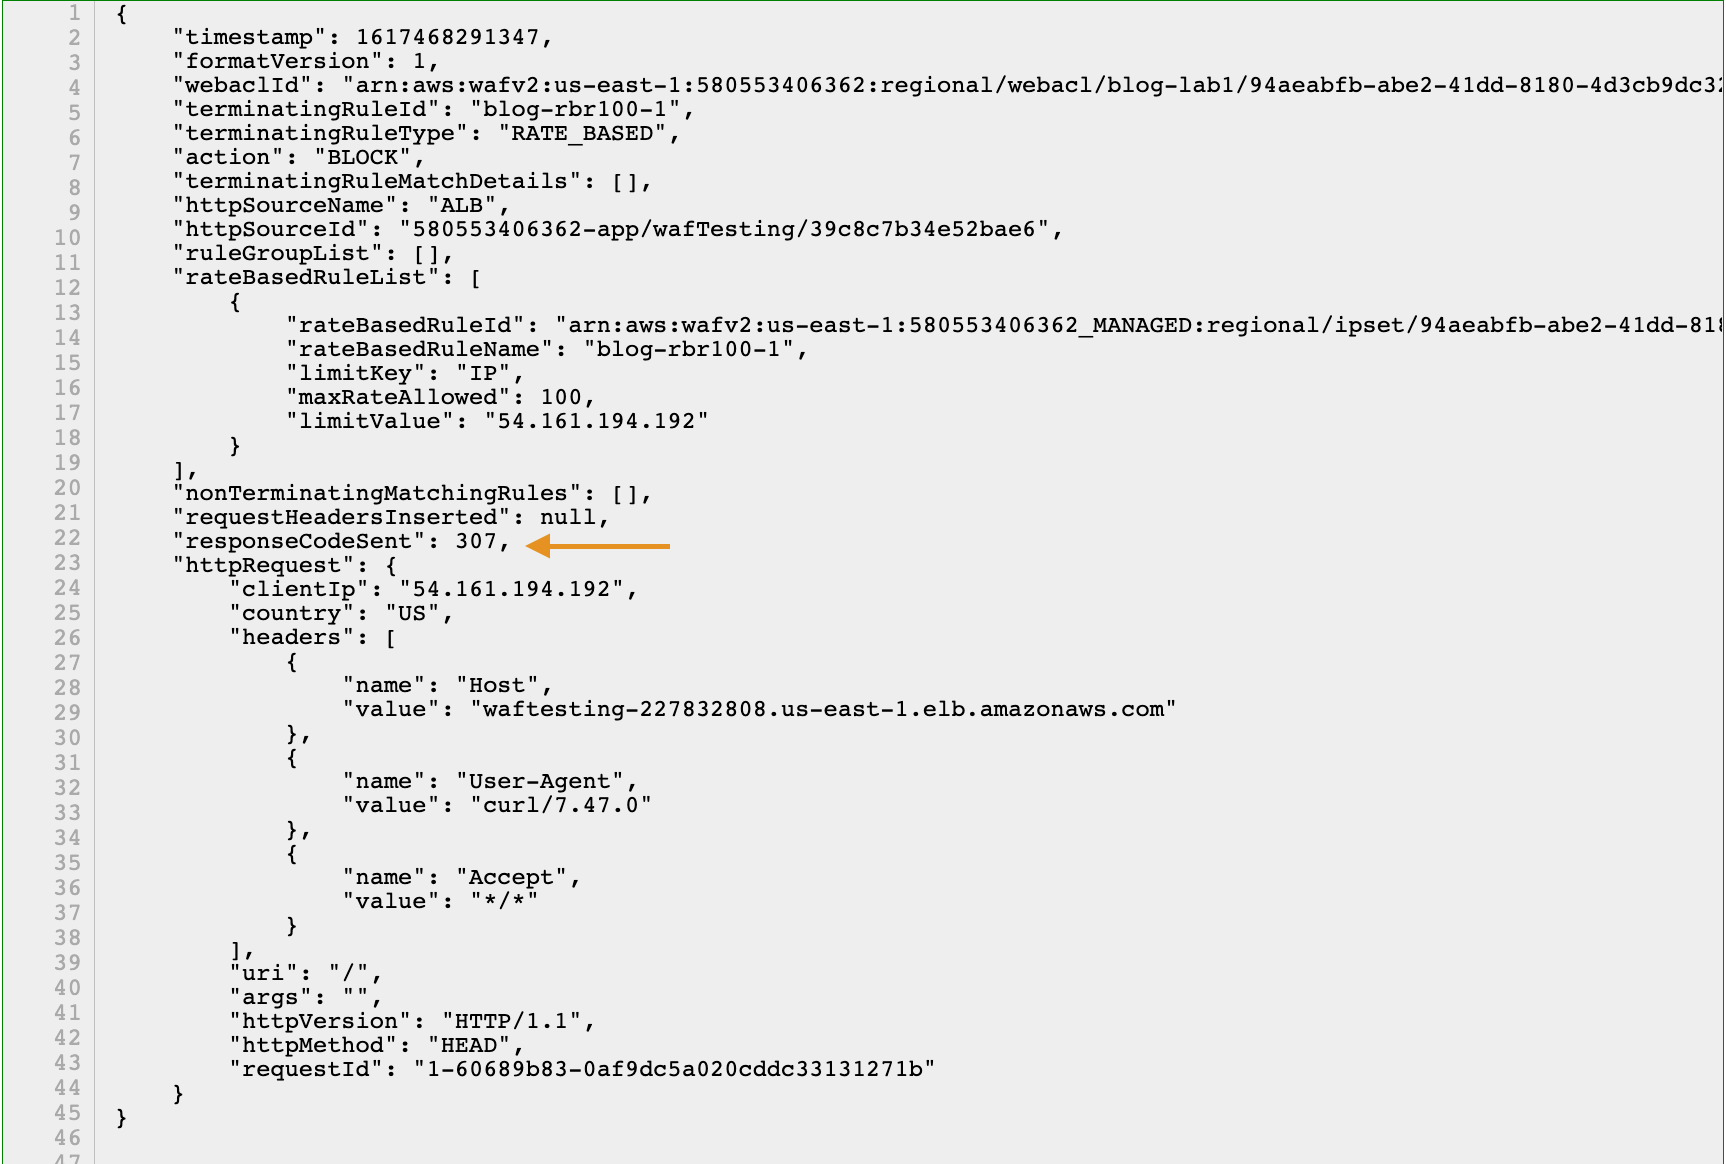
Figure 7: Verifying responseCodeSent in the AWS WAF logs
When you access the load balancer URL from your browser, you should see the custom error page similar to Figure 8.
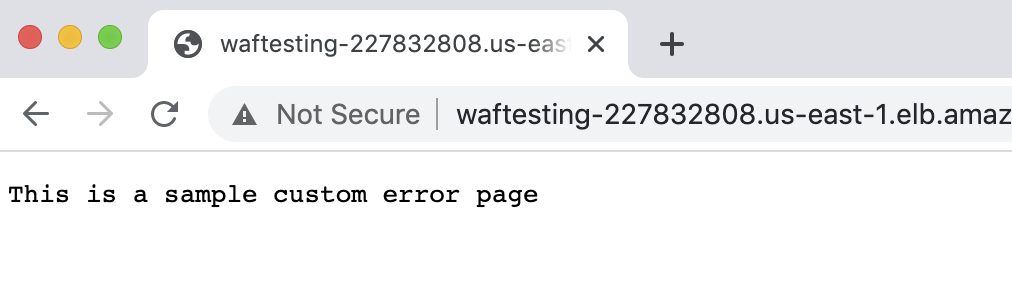
Figure 8: Verifying response using the browser
Use case 3: Header insertion for request tagging
This example demonstrates the AWS WAF header insertion capability to route the request based on geolocation. You will use the header country-check to notify the Application Load Balancer to route the request to a different target group, by using the Application Load Balancer advanced routing feature.

Figure 9: Overview of using request header insertion to tag the request to be processed downstream
Figure 9 shows the following steps:
- User sends request to the Application Load Balancer that is attached with AWS WAF.
- AWS WAF applies a geographic location rule that conditionally allows requests from unexpected countries in Count mode.
- AWS WAF adds a custom HTTP request header to tag this request.
- An Application Load Balancer listener rule is configured to route requests based on this header.
- Request tagged by AWS WAF with the custom header is routed to a separate target group.
To add a geographical location rule for request header insertion
- In the AWS WAF console, in the navigation pane, choose Web ACLs, and then choose the web ACL that you created in use case 1.
- On the Rules tab, choose Add rules and then choose Add my own rules and rule groups.
- For Name, enter the name that you want to use to identify this rule.
- For Rule type, choose Regular rule.
- For If a request, select doesn’t match the statement (NOT).
- For Inspect, select Originates from a country in.
- In this example, normal traffic originates from United States; so under Country codes, select United States – US.
- For IP address to use to determine the country of origin, Choose Source IP Address.
- For Action, choose Count. This will allow requests to be logged and tagged while processing other rules that follow.
- Expand Custom request, choose Add new custom header. For Key, choose country-check and for Value, choose true.
Note: custom request headers are prefixed with x-amzn-waf-
- Choose Save rule.
- Set rule priority, move your new rule to the top to allow this rule to be processed first.
- Choose Save.

Figure 10: Header insertion – Web ACL configuration
For this use-case, you set up a geographical location rule to check for requests that originate from countries outside of the normal traffic flow of your application (in this example, the United States). You do not want to block the requests right away, but instead tag the requests triggered by this AWS WAF rule for further validation downstream by the application logic. To route the tagged requests differently, you use ALB advanced request routing feature to route AWS WAF tagged traffic to a different target group.
You can verify the header inserted by the rule by enabling AWS WAF full logs and looking at the requestHeadersInserted log field, as shown in Figure 11.

Figure 11: Verifying the AWS WAF logs for header insertion
Conclusion
AWS WAF provides the ability to create a custom response for blocked requests by changing the status code and response body. The header insertion capability allows you to tag requests allowed by AWS WAF for your application to perform another action.
In this post, we showed you three basic use-cases to demonstrate how you can create a better user experience by redirecting users to another location instead of responding with a denied page. We showed you how you can create custom AWS WAF rules by tagging the request for your application logic to see it has been inspected, and how you can make a decision around this information.
If you’re new to AWS WAF, see Getting started with AWS WAF.
If you have feedback about this post, submit comments in the Comments section below. If you have questions about this post, start a new thread on the AWS WAF forum or contact AWS Support.
Want more AWS Security how-to content, news, and feature announcements? Follow us on Twitter.