Post Syndicated from Deborah Digges original https://github.blog/developer-skills/application-development/github-issues-search-now-supports-nested-queries-and-boolean-operators-heres-how-we-rebuilt-it/
Originally, Issues search was limited by a simple, flat structure of queries. But with advanced search syntax, you can now construct searches using logical AND/OR operators and nested parentheses, pinpointing the exact set of issues you care about.
Building this feature presented significant challenges: ensuring backward compatibility with existing searches, maintaining performance under high query volume, and crafting a user-friendly experience for nested searches. We’re excited to take you behind the scenes to share how we took this long-requested feature from idea to production.
Here’s what you can do with the new syntax and how it works behind the scenes
Issues search now supports building queries with logical AND/OR operators across all fields, with the ability to nest query terms. For example is:issue state:open author:rileybroughten (type:Bug OR type:Epic) finds all issues that are open AND were authored by rileybroughten AND are either of type bug or epic.

How did we get here?
Previously, as mentioned, Issues search only supported a flat list of query fields and terms, which were implicitly joined by a logical AND. For example, the query assignee:@me label:support new-project translated to “give me all issues that are assigned to me AND have the label support AND contain the text new-project.”
But the developer community has been asking for more flexibility in issue search, repeatedly, for nearly a decade now. They wanted to be able to find all issues that had either the label support or the label question, using the query label:support OR label:question. So, we shipped an enhancement towards this request in 2021, when we enabled an OR style search using a comma-separated list of values.
However, they still wanted the flexibility to search this way across all issue fields, and not just the labels field. So we got to work.
Technical architecture and implementation
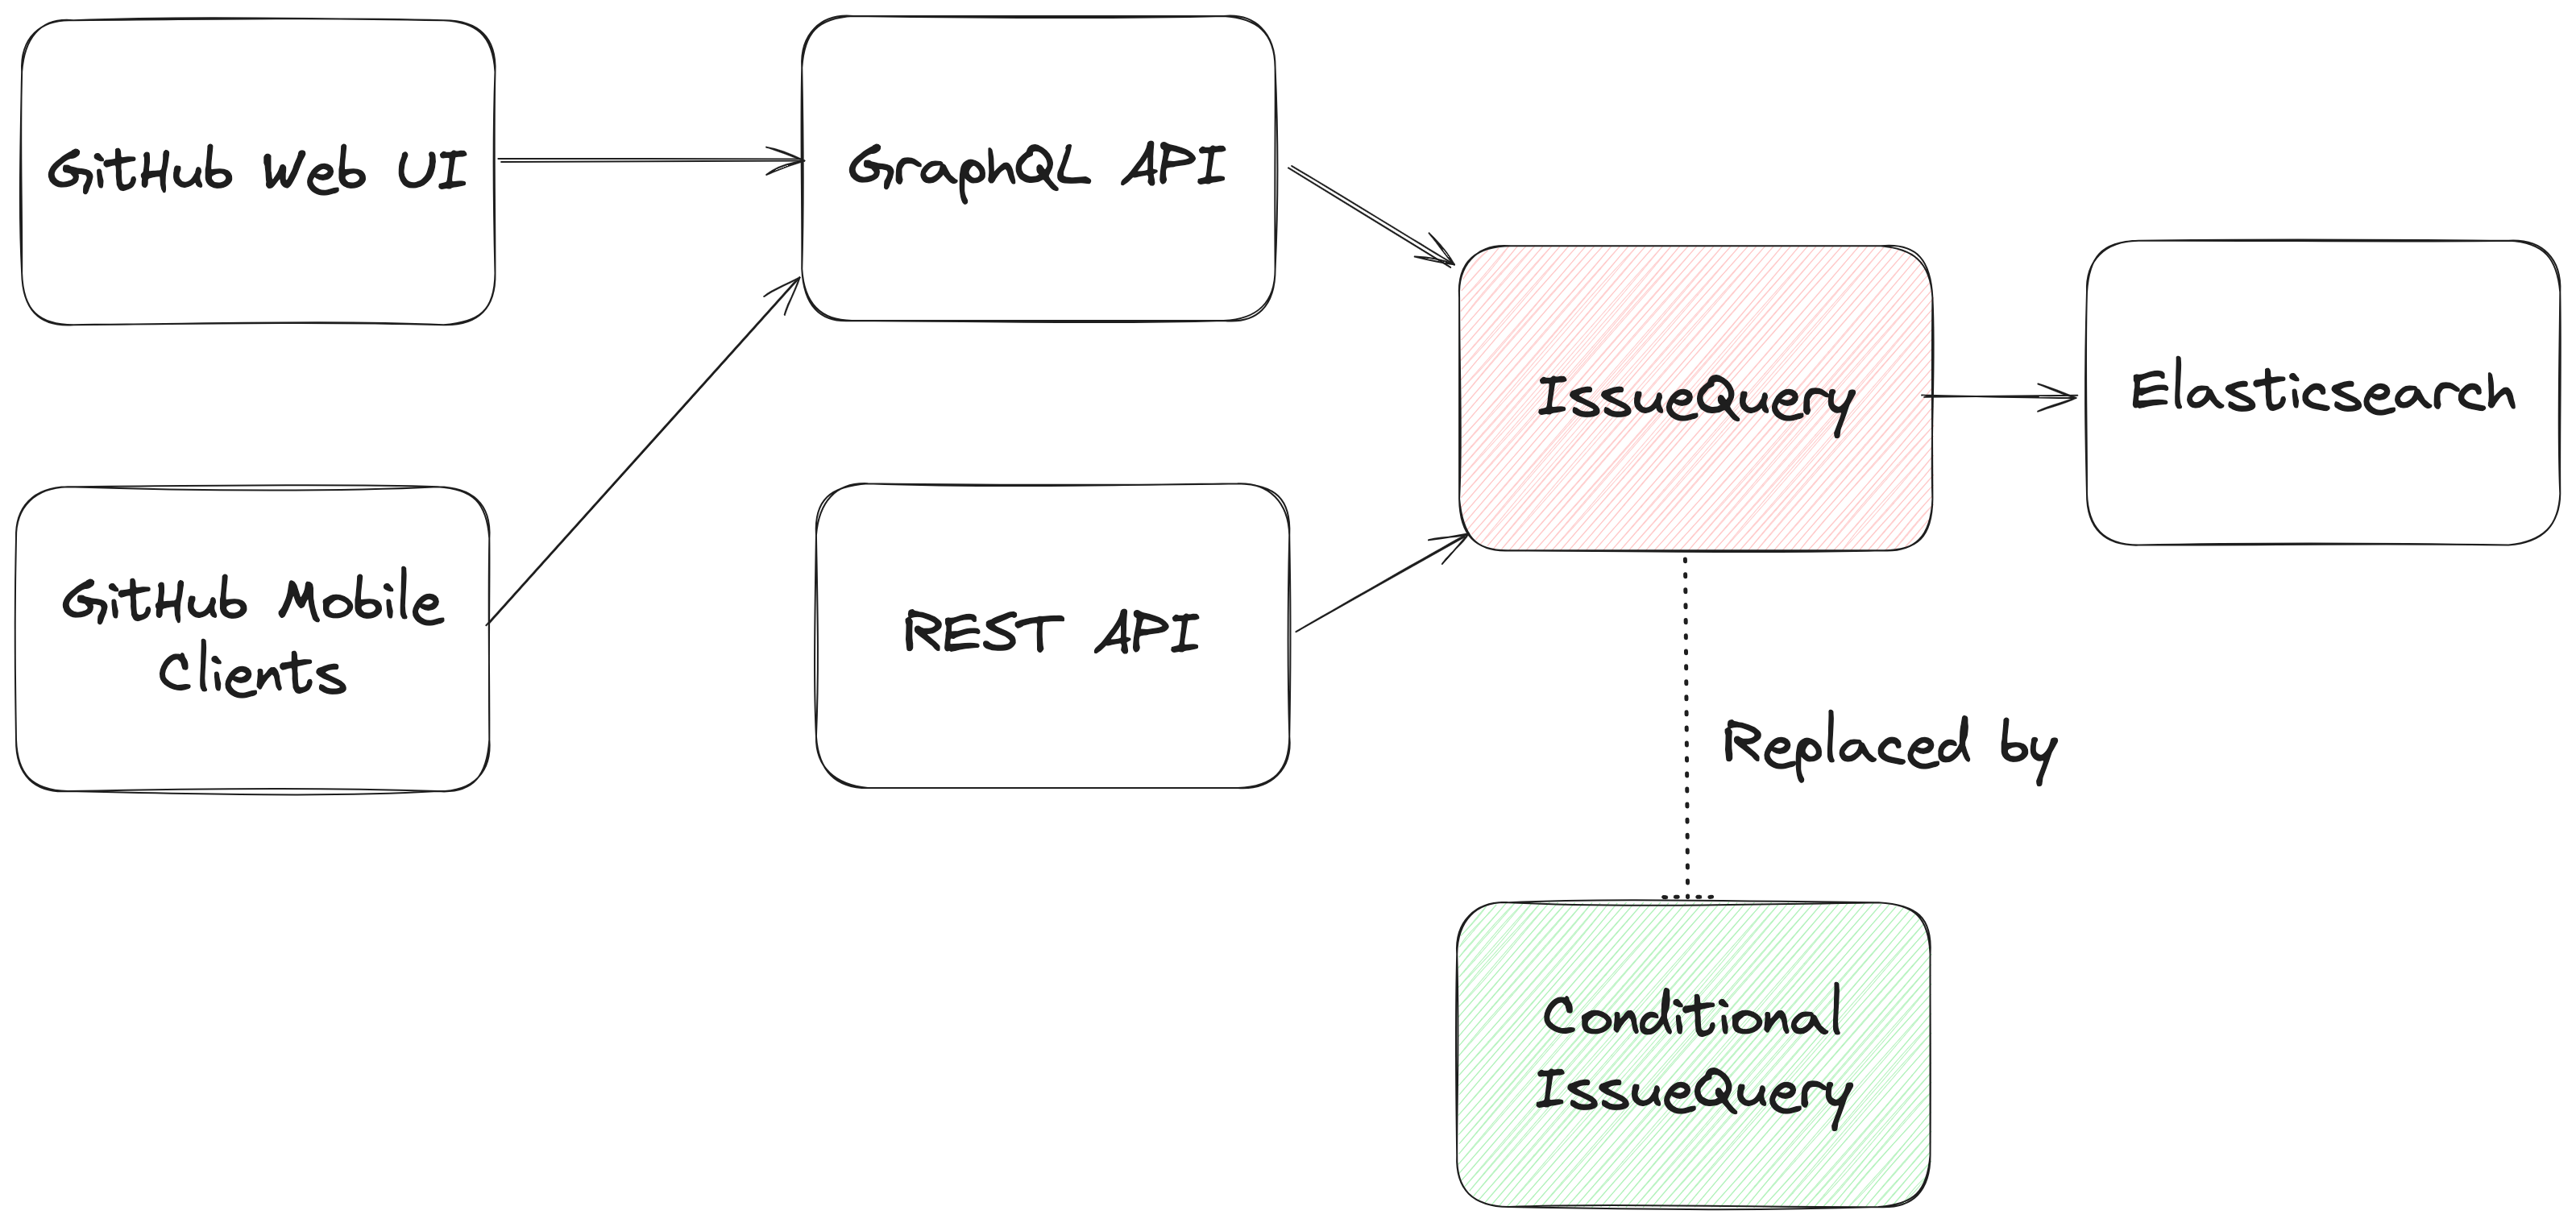
From an architectural perspective, we swapped out the existing search module for Issues (IssuesQuery), with a new search module (ConditionalIssuesQuery), that was capable of handling nested queries while continuing to support existing query formats.
This involved rewriting IssueQuery, the search module that parsed query strings and mapped them into Elasticsearch queries.

To build a new search module, we first needed to understand the existing search module, and how a single search query flowed through the system. At a high level, when a user performs a search, there are three stages in its execution:
- Parse: Breaking the user input string into a structure that is easier to process (like a list or a tree)
- Query: Transforming the parsed structure into an Elasticsearch query document, and making a query against Elasticsearch.
- Normalize: Mapping the results obtained from Elasticsearch (JSON) into Ruby objects for easy access and pruning the results to remove records that had since been removed from the database.
Each stage presented its own challenges, which we’ll explore in more detail below. The Normalize step remained unchanged during the re-write, so we won’t dive into that one.
Parse stage
The user input string (the search phrase) is first parsed into an intermediate structure. The search phrase could include:
- Query terms: The relevant words the user is trying to find more information about (ex: “models”)
- Search filters: These restrict the set of returned search documents based on some criteria (ex: “assignee:Deborah-Digges”)
Example search phrase:
- Find all issues assigned to me that contain the word “codespaces”:
is:issue assignee:@me codespaces
- Find all issues with the label documentation that are assigned to me:
assignee:@me label:documentation
The old parsing method: flat list
When only flat, simple queries were supported, it was sufficient to parse the user’s search string into a list of search terms and filters, which would then be passed along to the next stage of the search process.
The new parsing method: abstract syntax tree
As nested queries may be recursive, parsing the search string into a list was no longer sufficient. We changed this component to parse the user’s search string into an Abstract Syntax Tree (AST) using the parsing library parslet.
We defined a grammar (a PEG or Parsing Expression Grammar) to represent the structure of a search string. The grammar supports both the existing query syntax and the new nested query syntax, to allow for backward compatibility.
A simplified grammar for a boolean expression described by a PEG grammar for the parslet parser is shown below:
class Parser < Parslet::Parser
  rule(:space)  { match[" "].repeat(1) }
  rule(:space?) { space.maybe }

  rule(:lparen) { str("(") >> space? }
  rule(:rparen) { str(")") >> space? }

  rule(:and_operator) { str("and") >> space? }
  rule(:or_operator)  { str("or")  >> space? }

  rule(:var) { str("var") >> match["0-9"].repeat(1).as(:var) >> space? }

  # The primary rule deals with parentheses.
  rule(:primary) { lparen >> or_operation >> rparen | var }

  # Note that following rules are both right-recursive.
  rule(:and_operation) {
    (primary.as(:left) >> and_operator >>
      and_operation.as(:right)).as(:and) |
    primary }

  rule(:or_operation)  {
    (and_operation.as(:left) >> or_operator >>
      or_operation.as(:right)).as(:or) |
    and_operation }

  # We start at the lowest precedence rule.
  root(:or_operation)
end
For example, this user search string:is:issue AND (author:deborah-digges OR author:monalisa )
would be parsed into the following AST:
{
  "root": {
    "and": {
      "left": {
        "filter_term": {
          "attribute": "is",
          "value": [
            {
              "filter_value": "issue"
            }
          ]
        }
      },
      "right": {
        "or": {
          "left": {
            "filter_term": {
              "attribute": "author",
              "value": [
                {
                  "filter_value": "deborah-digges"
                }
              ]
            }
          },
          "right": {
            "filter_term": {
              "attribute": "author",
              "value": [
                {
                  "filter_value": "monalisa"
                }
              ]
            }
          }
        }
      }
    }
  }
}
Query
Once the query is parsed into an intermediate structure, the next steps are to:
- Transform this intermediate structure into a query document that Elasticsearch understands
- Execute the query against Elasticsearch to obtain results
Executing the query in step 2 remained the same between the old and new systems, so let’s only go over the differences in building the query document below.
The old query generation: linear mapping of filter terms using filter classes
Each filter term (Ex: label:documentation) has a class that knows how to convert it into a snippet of an Elasticsearch query document. During query document generation, the correct class for each filter term is invoked to construct the overall query document.
The new query generation: recursive AST traversal to generate Elasticsearch bool query
We recursively traversed the AST generated during parsing to build an equivalent Elasticsearch query document. The nested structure and boolean operators map nicely to Elasticsearch’s boolean query with the AND, OR, and NOT operators mapping to the must, should, and should_not clauses.
We re-used the building blocks for the smaller pieces of query generation to recursively construct a nested query document during the tree traversal.
Continuing from the example in the parsing stage, the AST would be transformed into a query document that looked like this:
{
  "query": {
    "bool": {
      "must": [
        {
          "bool": {
            "must": [
              {
                "bool": {
                  "must": {
                    "prefix": {
                      "_index": "issues"
                    }
                  }
                }
              },
              {
                "bool": {
                  "should": {
                    "terms": {
                      "author_id": [
                        "<DEBORAH_DIGGES_AUTHOR_ID>",
                        "<MONALISA_AUTHOR_ID>"
                      ]
                    }
                  }
                }
              }
            ]
          }
        }
      ]
    }
    // SOME TERMS OMITTED FOR BREVITY
  }
}
With this new query document, we execute a search against Elasticsearch. This search now supports logical AND/OR operators and parentheses to search for issues in a more fine-grained manner.
Considerations
Issues is one of the oldest and most heavily -used features on GitHub. Changing core functionality like Issues search, a feature with an average of nearly 2000 queries per second (QPS)—that’s almost 160M queries a day!—presented a number of challenges to overcome.
Ensuring backward compatibility
Issue searches are often bookmarked, shared among users, and linked in documents, making them important artifacts for developers and teams. Therefore, we wanted to introduce this new capability for nested search queries without breaking existing queries for users.
We validated the new search system before it even reached users by:
- Testing extensively: We ran our new search module against all unit and integration tests for the existing search module. To ensure that the GraphQL and REST API contracts remained unchanged, we ran the tests for the search endpoint both with the feature flag for the new search system enabled and disabled.
- Validating correctness in production with dark-shipping: For 1% of issue searches, we ran the user’s search against both the existing and new search systems in a background job, and logged differences in responses. By analyzing these differences we were able to fix bugs and missed edge cases before they reached our users.
- We weren’t sure at the outset how to define “differences,” but we settled on “number of results” for the first iteration. In general, it seemed that we could determine whether a user would be surprised by the results of their search against the new search capability if a search returned a different number of results when they were run within a second or less of each other.
Preventing performance degradation
We expected more complex nested queries to use more resources on the backend than simpler queries, so we needed to establish a realistic baseline for nested queries, while ensuring no regression in the performance of existing, simpler ones.
For 1% of Issue searches, we ran equivalent queries against both the existing and the new search systems. We used scientist, GitHub’s open source Ruby library, for carefully refactoring critical paths, to compare the performance of equivalent queries to ensure that there was no regression.
Preserving user experience
We didn’t want users to have a worse experience than before just because more complex searches were possible.
We collaborated closely with product and design teams to ensure usability didn’t decrease as we added this feature by:
- Limiting the number of nested levels in a query to five. From customer interviews, we found this to be a sweet spot for both utility and usability.
- Providing helpful UI/UX cues: We highlight the AND/OR keywords in search queries, and provide users with the same auto-complete feature for filter terms in the UI that they were accustomed to for simple flat queries.
Minimizing risk to existing users
For a feature that is used by millions of users a day, we needed to be intentional about rolling it out in a way that minimized risk to users.
We built confidence in our system by:
- Limiting blast radius: To gradually build confidence, we only integrated the new system in the GraphQL API and the Issues tab for a repository in the UI to start. This gave us time to collect, respond to, and incorporate feedback without risking a degraded experience for all consumers. Once we were happy with its performance, we rolled it out to the Issues dashboard and the REST API.
- Testing internally and with trusted partners: As with every feature we build at GitHub, we tested this feature internally for the entire period of its development by shipping it to our own team during the early days, and then gradually rolling it out to all GitHub employees. We then shipped it to trusted partners to gather initial user feedback.
And there you have it, that’s how we built, validated, and shipped the new and improved Issues search!
Feedback
Want to try out this exciting new functionality? Head to our docs to learn about how to use boolean operators and parentheses to search for the issues you care about!
If you have any feedback for this feature, please drop us a note on our community discussions.
Acknowledgements
Special thanks to AJ Schuster, Riley Broughten, Stephanie Goldstein, Eric Jorgensen Mike Melanson and Laura Lindeman for the feedback on several iterations of this blog post!
The post GitHub Issues search now supports nested queries and boolean operators: Here’s how we (re)built it appeared first on The GitHub Blog.