All posts by Nicole Perry

How to Back Up Old Email Accounts

Post Syndicated from Nicole Perry original https://www.backblaze.com/blog/how-to-back-up-old-email-accounts/

Growing up, a common conversation I overheard between my mom and grandma went like this: “Do you have that recipe from our great aunt?”

“Sure, I do. Let me email it to you. Also, I have some funny jokes to forward along.”

My mom, and I’m guessing many others too, have kept every email they’ve ever received from their parents, family, and friends because they don’t want to lose the funny jokes, family recipes, announcements, and more that they’ve sent back and forth over the years. In the moment, our email accounts can feel like a day-to-day concern, or worse, a repository of spam. But for most of us, every email account holds some amount of treasured memories.

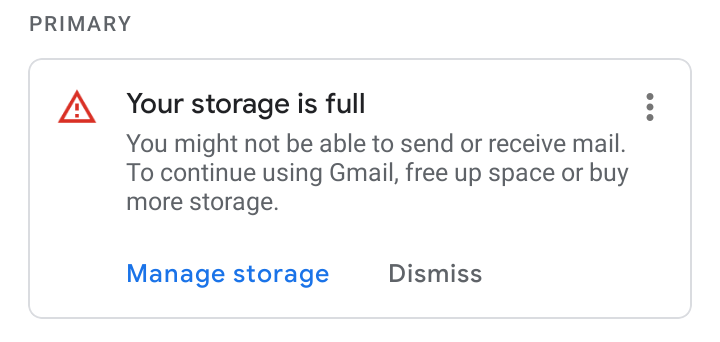
Nowadays, my mom has many different email accounts. But, she wanted to find a way to keep all of those emails she loved without having to keep the accounts themselves. She also found that she had so many emails in her inbox that she was running out of storage space.

Buying more storage can become expensive and doesn’t guarantee that those emails are safely backed up and remain accessible. One option is to download the emails, delete them in the client, and back them up somewhere reliable and accessible for the long term.

If you’re looking for a way to keep old emails or just want to clean up your inbox storage because you’re running out of space, this post walks you through the steps of how to download your data from various email platforms.

We’ve gathered a handful of guides to help you protect content across many different platforms—including social media, sync services, and more. We’re working on developing this list—please comment below if you’d like to see another platform covered.

Getting Started: How to Download One Email

If you know the exact email you want to make sure you have a copy of, it’s very easy to download it from any client.

For this example, we are going to use Gmail, but this should work for most email clients. If you run into an email client that it does not work with, feel free to note it in the comments below and we’ll update the guidance.

  1. Log in to the email address you would like to download a copy of the email from. (I’m using Gmail.)
  2. Find the email you would like to download. For this example, I will be downloading a family recipe sent by my mom.
  3. Select “Print” in the top right corner.
  4. When the print screen appears, save the email as a PDF on to your computer.
  5. And presto, you have a copy of that email you would like to save forever.

This process can be a bit tedious as you would have to download each email one at a time. It also can be tough if you don’t remember how to find the email you would like to save. If this is true, there are also ways that you can download all of your email data.

While there are other file formats you can download individual emails in, we strongly recommend that—if you want to be able to manage or search your old emails—you download all of your emails (which we explain how to do below). This provides the data in easily manageable formats and is far more time efficient.

Getting Serious: How to Download All of Your Emails

Below, I explain how to download your email data from two top free email websites. Don’t see the email platform you use? Leave a comment below and we’ll work to add material to help you!

How to Download Outlook Emails

A lot of people use Outlook for various reasons, often for work or school. If you downloaded Microsoft 365, then you also have access to Outlook email. To export your email from Outlook and save it as a PST file (don’t worry about what a PST file is quite yet, we’ll explain below), do the following:

  1. Sign in to your Outlook account.
  2. Click the gear button in the upper right corner.
  3. Scroll down on the settings panel to “View all Outlook settings.”
  4. Click on the button with a gear symbol labeled “General.”
  5. Select “Privacy and data” on the second panel that appears.
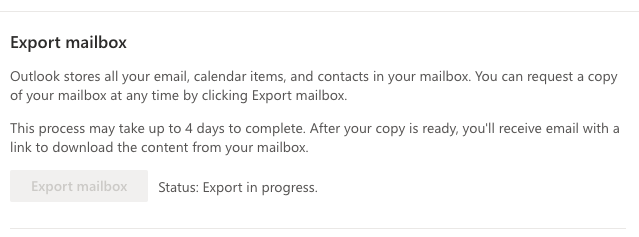
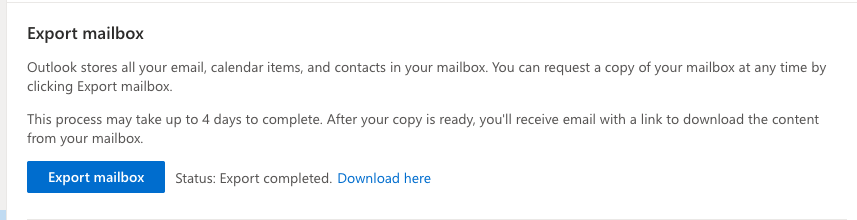
  6. On the right side, there will be a button labeled “Export mailbox.” Select this button.
  7. The button will grey out and a status update will appear to let you know the download is in progress.
  8. When the export is complete, we’ve found that Outlook may not notify your inbox. If this is the case, you will need to repeat steps one through five and navigate to the “Download here” button. This button will only appear once your emails are ready to download.
  9. Click “Download here” to download your PST file with all of your email data. (Scroll past the section on downloading Gmail data to learn what to do with this file type.)

How to Download Gmail Emails

In a previous post, we explained how to download all of your data from Google Drive. But, if you are just looking to download your Gmail data, here is a more detailed way to just do that.

  1. Log in to the Google Account you’d like to download your emails from.
  2. Once signed in, you will want to go to: myaccount.google.com.
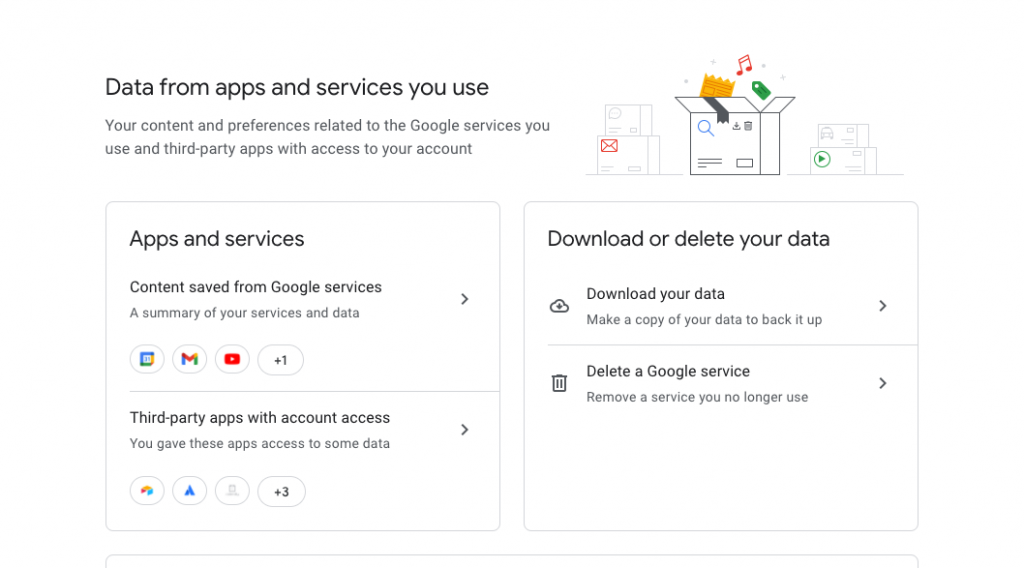
  3. Go to the “Privacy & personalization” section and select “Manage your data & privacy.”
  4. On the next screen it takes you to, you’ll want to scroll down to a section labeled “Data from apps and services you use.” Here, you’ll select “Download your data” in the “Download or delete your data” section.
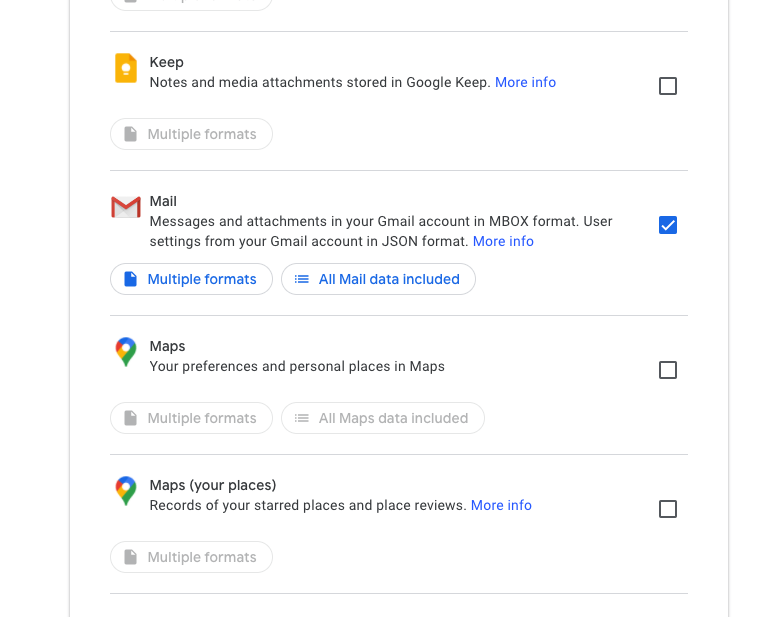
  5. From here, it’ll take you to the Google Takeout page. On this page, you’ll be given the option to select to download all of your Gmail emails and also your Google Chrome bookmarks, transactions from various Google services, locations stored in Google Maps, Google Drive contents, and other Google-related products you may use.
  6. If you want to download all your Google data, keep everything selected. If you just want a copy of your emails, deselect all and only select Google Mail to be downloaded.
  7. Click the next step on the bottom of the page.
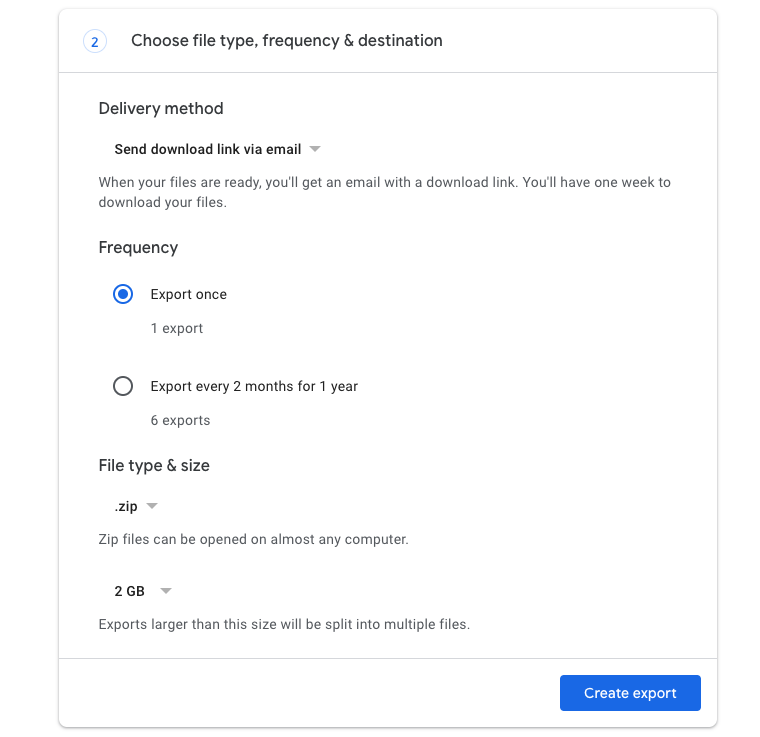
  8. On the next page, you’ll decide what file type you would like it sent as, the frequency you would like this action to happen (Example: If you would like your data to be downloaded every six months, this is where you can set that to happen.), and the destination you would like your data to be sent to. For this example, I picked a one time download.
  9. Select “Create export” and you’ll see an export in progress page.
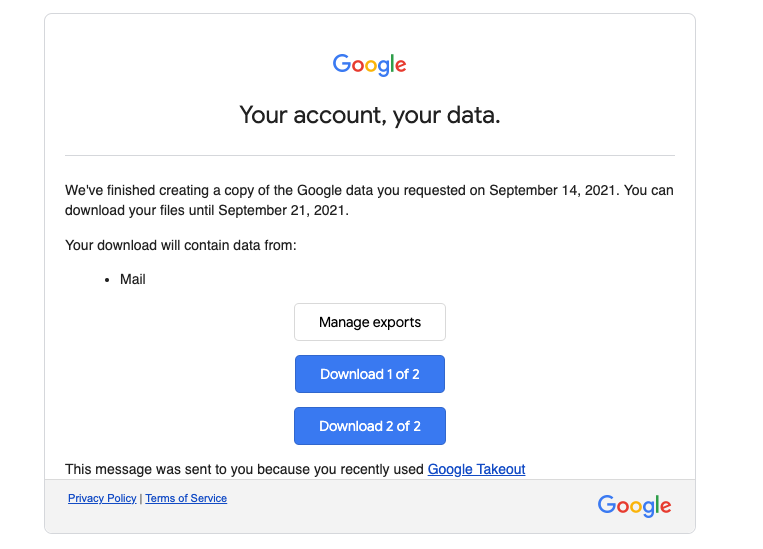
  10. An email will appear in a few minutes, hours, or a couple of days (depending on the size of data you are downloading), informing you that your Google data is ready to download. Once you have this email in your inbox, you have a week to download the data. Click the “Download your files” button in the email and you will have a ZIP file or a TGZ file (depending on what type of file you picked) on your computer with your Google data.
  11. When you open the ZIP, you will have all of your emails (including spam and trash) in an MBOX file.

What Is a PST File? What Is a MBOX File? How Do I Open Them?

A PST file is used by Microsoft programs to store data and items such as email messages, calendar events, and contacts. By moving items to an Outlook Data File (also known as a PST file) saved to your computer, you can free up storage space in the mailbox on your mail server. If you would like to make this file usable by other email clients, here’s a guide on how to convert your newly downloaded PST file to a MBOX file type.

An MBOX file is an email mailbox saved in a mail storage format used for organizing email messages in a single text file. It saves messages in a connected order where each message is stored after another, starting with the “From” header.

To open a MBOX file, you will need a third-party email program, such as Apple Mail or Mozilla Thunderbird. We recommend Mozilla Thunderbird, as it’s a free email client and it’s supported by both Macs and PCs.

This step is helpful if you would like to view the emails you downloaded. It also helps if you were looking to take the emails you downloaded and move them to a new inbox. For example, if you are afraid the email account you’ve used to sign up for everything over the past 10 years is vulnerable, you can download the emails from that inbox and move them to a new inbox using Apple Mail or Mozilla Thunderbird.

Great, now you’ve downloaded your emails. You’re not done yet! Read on to learn how to safely back up your emails so that you can hold on to them forever.

Use Backblaze B2 Cloud Storage Buckets to Keep an Organized Archive of Your Emails

Once you have your email data downloaded to your computer, it’s best practice to make sure that you have at least one copy of your data stored off-site in the cloud. Storing it in the cloud alongside two local copies ensures you never lose all those important emails.

A simple way to do this is with Backblaze B2, where you can upload and organize your files in buckets. To upload your files to a bucket, follow the steps below.

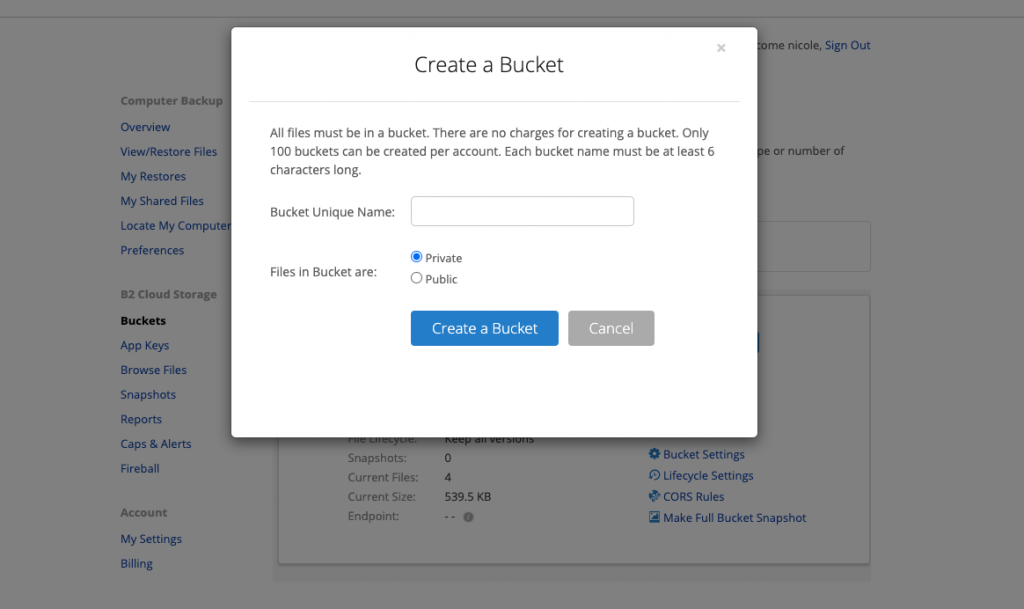
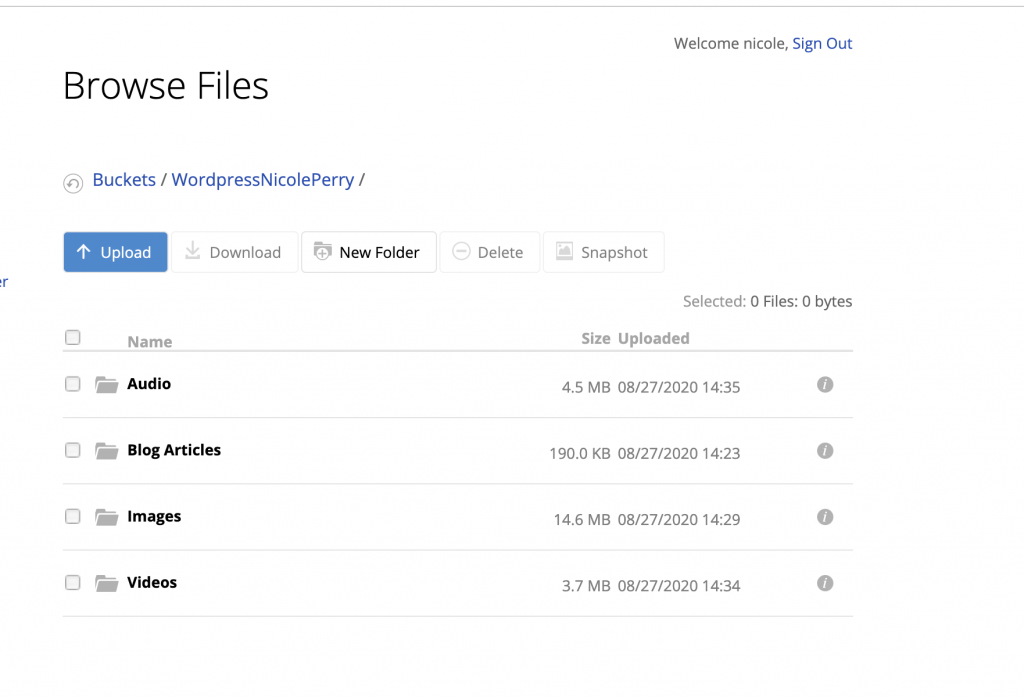
  1. Sign in to your Backblaze account.
  2. In the left hand column, select “Buckets” under the section “B2 Cloud Storage.”
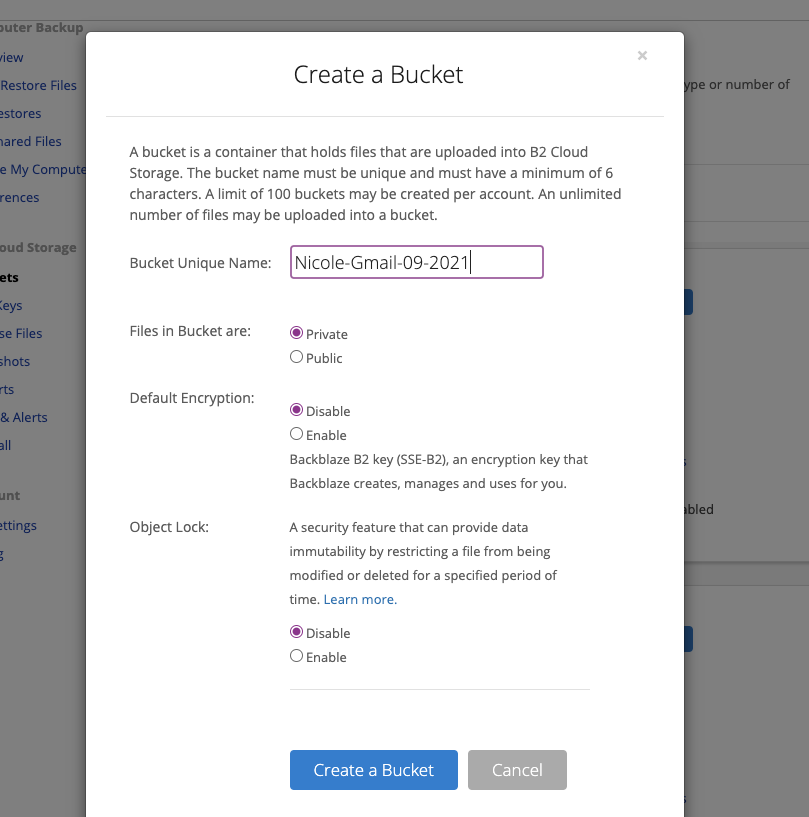
  3. Click on the button “Create a bucket.”
  4. In the next step, you will need to create a unique name for your bucket and select some settings for it, like if it will be public or private or if you would like to enable encryption.
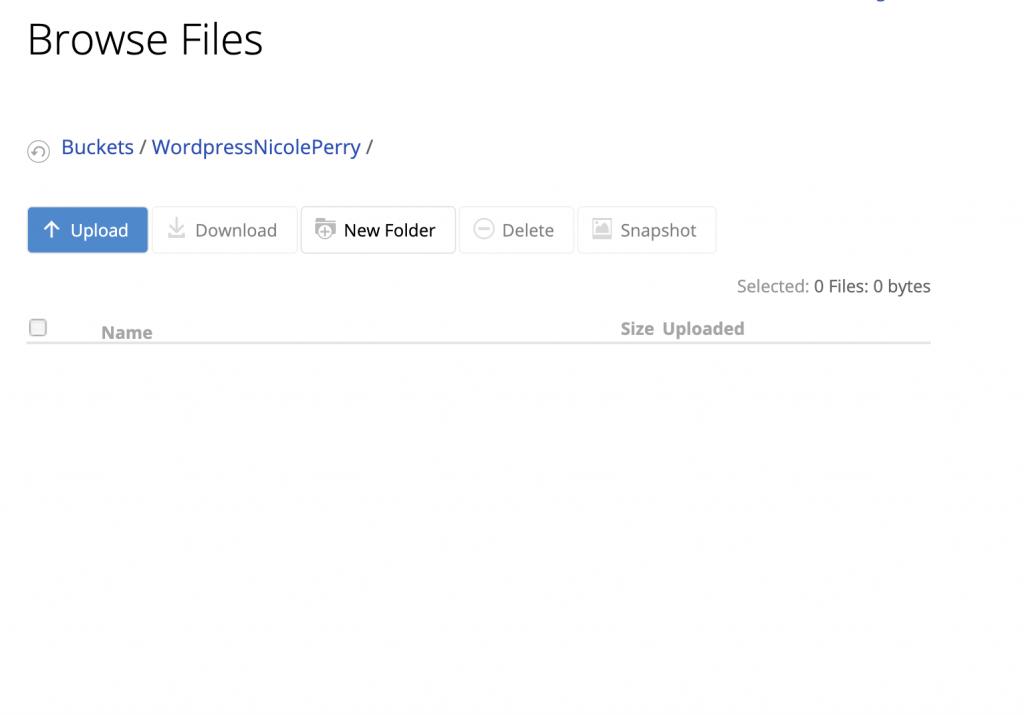
  5. Once the bucket is created, it will take you to a page where you can upload your files. You will want to drag and drop the email files you want to upload to it. If the MBOX file is too large to drag and drop into the bucket, you can use a third-party integration like Cyberduck to facilitate the upload. You can read the guide to using Cyberduck for Backblaze B2 bucket uploads here.

Alternatively, if you’re not worried about organizing or working with your email archives and just want to know they’re stored away safely, you can keep your downloaded files on your computer. If you follow this route, remember to sign up for a backup service that makes a copy of all of your computer’s files in the cloud. In the case of any data loss, a service like Backblaze Computer Backup would have a copy of all of your data ready for you to restore. If your email applications are locally stored on your computer, Backblaze will automatically back up your emails. You can learn more about how this works here. This approach will take up more room on your computer, but it’s a simple path to peace of mind.

From here, your MBOX file with all your emails from your family, friends, and reminders to yourself (We all have those!) will be safe in the cloud. If you ever want to pull out the archive and read the emails you saved, remember to use the third-party tools mentioned above. What’s important is that you have all your memories stored, safely with a provider who will ensure their redundancy and reliability.

Have questions or want to see a guide for an email client we didn’t mention above? Feel free to let us know in the comments!

The post How to Back Up Old Email Accounts appeared first on Backblaze Blog | Cloud Storage & Cloud Backup.

New Year, New Goals: Six Backup and Cloud Storage Tips for 2021

Post Syndicated from Nicole Perry original https://www.backblaze.com/blog/new-year-new-goals-six-backup-and-cloud-storage-tips-for-2021/

Are New Year’s resolutions still a thing after 2020? Given the way most of ours were blown out of the water in March of this past year, we’re not sure. At the least though, we learned that no matter our good intentions, the unexpected can still have its way with us. Thankfully we also learned new ways to plan and prepare (and we don’t mean buying 20 packs of toilet paper) to ensure that the unexpected isn’t quite as unpleasant as it might have been.

With this post, we want to help ensure that data loss is one challenge you can take OFF your list of potential unpleasantness in 2021. By preparing for accidental deletions and computer crashes with a computer backup or cloud storage plan, you can shelve at least one uncertainty for the rest of 2021 and beyond.

Best Practices for Starting Your Backup Plan

With the holiday season (and the sales that come with it) coming to an end, you may have updated to a new computer or need to set up a computer for one of your family members. If so, you may have heard about the importance of backup and want to know how to set it up yourself. First thing to know: It’s super easy!

To back up pictures and other files on your computer using a cloud backup system, you simply need to choose a service and install the software on your computer or laptop. Depending on what you choose, you may need to go through all of your files and folders and select what you’d like to protect. We’re partial to our backup service, however, which backs up everything on your machine for you. You don’t need to worry about anything getting missed. You won’t notice the Backblaze backup client is there, but it will store a backup of everything on your computer, and whenever you modify a file or add something, it will back that up, too. Other than ensuring your credit card is up to date and that you connect to the internet long enough for it to upload data, you don’t need to do anything else to keep the service rolling.

For many of us, accomplishing this first step is good enough to keep us feeling safe and sound for a long time. But if you’ve been reading about ransomware attacks, had a friend lose data, or you’ve ever lost data yourself, there are six more easy steps you can take to ensure MAXIMUM peace of mind going forward.

Top Six Things to Keep in Mind When Monitoring Your Backup and Cloud Storage Strategy in 2021

1. Lay Out Your Strategy.

When you’re just starting out, or even later on in your computer backup journey, it’s a good idea to have a basic backup strategy. Here are three questions to help you establish one:

What data needs to be backed up?

“Everything” might be your answer, but it’s a little more complex than that. Do you want to preserve every version of every file? Do you have external hard drives with data on them? Do you want to back up your social profiles or other data that doesn’t live on your machine? Make sure you’re truly considering everything.

How often should it be backed up?

Important files should be backed up at minimum once a week, preferably once every 24 hours. If your data changes less frequently, then scheduling a periodic backup might be better for you. If you have older hard drives you don’t use often, you might want to simply archive your backup for them, rather than needing to plug them in whenever you get close to the edge of your version history.

How should I continue to monitor my backup?

It can be devastating to find out that your data backup has been failing at the time when you may have lost your data. If your backup job has been running quietly for months, it is a good idea to check and make sure it’s doing its job. Testing the restore feature on your backup gives you the ability to check that all the data you deem important is going to still be there when you need it most.

Two Factor Verification via Auth Apps

2. Keep Data Security in Mind.

At the end of 2019, we shared six New Year’s resolutions to help protect your data, but we realize that some of your New Year’s resolutions may have been deferred. So here’s a little reminder that data security is always important! We’ll keep it simple: If you take one security step in 2021, make it to set two-factor authentication on all of your accounts.

Two-factor authentication notifies you whenever someone tries to log in to your account and will not give them access until you enter the second identification code. You can choose from many different delivery options to receive the code, like an SMS text, voicemail, or using an application like Google Authenticator (we recommend the latter as it’s the most secure).

Either way, two-factor authentication means that not only will hackers have to steal your credentials and password, they’ll also have to get access to one of your personal devices. Needless to say, this will greatly decrease the chances that your data will be compromised.

3. Know Where Your Data Lives.

Over the years, our data often becomes “scattered.” Bits and pieces of our data are strewn from place to place as we create new data on different platforms and services. Between new and old computers, multiple hard drives, sync services like Google Drive, all of your social profiles, and all the others, it’s easy to lose track of where your most important data is when you need it. Especially because many of these locations will not be covered by standard backup services.

Mapping out where your data lives will help you to track what’s being stored off of your computer (like on a hard drive or USB), what’s being synced to the cloud, and what data is being backed up.

Once you have an idea of where your data is, your backup strategy comes into play. If there are important files that are being synced or that live on a hard drive, you may want to think about moving those files to a device that is being backed up or to an archive. Once you do, you’ll never have to worry about them again!

4. Consider Which Retention Span Fits Best for You.

Backup retention—also known as data retention—is how long you would like your data to be archived. At Backblaze, you have three options for your data retention: 30 days (the default), 1 Year, or Forever Version History. Picking between the three can feel tricky but it really just depends on your needs. If you have a college student away at school for a year and want to make sure their data is retrievable in case of emergency (like a coffee spill on their computer in the library), then yearly may be the best option for you. If you are a writer who constantly needs to look back on past versions of material you have written, then forever version history may be the best option for you.

Any retention plan should work just fine as long as you are monitoring your backup and understand what data is still being retained.

How to Restore Lost Files

5. Testing Restores

There’s an old saying that “Data is only as good as your last backup, and your backup is only as good as your ability to restore it.” When data loss occurs, the first question that comes to mind is, “Who is responsible for restoring those backups?” and the answer is simple: you are!

Think of testing your restore as a fire drill. When you go through the steps to restore your data you want to make sure that you know what the steps are, what files are backed up when you want to recover them, and what options you have for restoring your data. When testing out your restore, this may clue you in on potential holes in your backup that you can fix before it’s too late.

6. Archive Your Data

Backups are great for things you are actively using on your computer, but when you’re done with a project or your computer starts underperforming due to the amount of data on it, you may want to think about archiving that data. In cloud storage and backup, an “archive” is a place to keep data for long term storage. This ensures your computer can run its best with some freed up storage space.

Archives can be used for space management on your computer and long term retention. The original data may (or may not be) deleted after the archive copy is made and stored—it’s up to you! You can always store another copy on a hard drive if you want to be extra careful.

With our Backblaze B2 Cloud Storage product, you can create an archive of your data in various different ways. You can experiment with setting up your own archive by creating a B2 Cloud Storage Bucket within your Backblaze Computer Backup account. It’s easy (we even outlined a step by step process on how to do it), and more importantly, free: Your first 10GB of data stored are on us!

These are some of the recommendations we have for utilizing your computer backup and cloud storage account. If you could just try one, three, or more, then you are starting 2021 out right!

The post New Year, New Goals: Six Backup and Cloud Storage Tips for 2021 appeared first on Backblaze Blog | Cloud Storage & Cloud Backup.

Churn Analysis: Go From Churning to Learning

Post Syndicated from Nicole Perry original https://www.backblaze.com/blog/churn-analysis-go-from-churning-to-learning/

Ever wonder if your feedback is heard when you tell a company why you are cancelling your subscription? Well, at Backblaze, customer feedback isn’t just heard—it’s read, considered, and used to improve the product over time.

Most companies seek to understand the reasons customers leave by setting up a formulated poll with a multiple choice style list of common reasons for why you may be leaving. We decided to manage this process a little differently by giving customers who decide they no longer want to use Backblaze Computer Backup an open forum.

This format allows people to be specific about their reasoning, and in some cases to vent about their frustrations. By sifting through these responses and grouping them under common causes, we gain insights into the customer experience that allow us to create a better product.

When customers choose to cancel our service, we send this email:

Over time, the responses to these messages have helped us enhance our Computer Backup product and add new features to it that we knew customers would like thanks to this process. Because our approach is somewhat unique, we wanted to illuminate it for you, both to be transparent and also for anyone that might find our model useful.

What Is Churn Analysis, and Why Is It Important?

When a customer leaves a service or cancels an account, it’s called “churn.” Churn can be calculated as the percentage of customers that stopped using your company’s product or service during a certain time frame. The churn rate calculation for subscription or service-based products is an excellent metric to gauge their performance.

As much as you wish it wouldn’t happen when running a business, customer churn is a real thing and important to keep an eye on. You may already know about some issues your service has that need to be addressed, but by tracking churn over time you can also identify new issues or discover that issues outside of your scope are more important than you thought. When these issues turn out to be easily fixable, they provide a direct path to decreasing churn and often also attract new business. This is churn analysis: identifying the reasons people are leaving and prioritizing their resolution.

The Nuts and Bolts of Churn Analysis at Backblaze

Every month, 10% of the customers that churn actually offer substantive responses for their departure. On the 10th day of each month, one hearty staffer sifts through all of the messages that we receive and adds them to a large spreadsheet. Unsurprisingly, every month, the reasons people cite for leaving are relatively similar, so she’s able to group the messages into 10–15 different categories. These categories range across different feature requests that we are tracking, like issues with our safety freeze feature, as well as trends with different accounts, like their desire for two-factor verification set up, and various other reasons.

When different reasons begin to gain or lose ground, it’s a sign that we need to do something. Depending on the reason, it might mean that we need to write a more informative FAQ, or that we need to work with Marketing to highlight a feature better, or that we need to notify engineers that there is something that needs to be fixed or built.

So Why Do People Churn From Backblaze?

To illustrate how we go from churn analysis to product development, we gathered the five top reasons customers churned from Backblaze, and what we’ve decided to do about it (or not).

Reason #1: “I No Longer Need My Data Backed Up”

Customers use Backblaze Computer Backup for various reasons. Some of them have long term needs, like wanting to protect the files on their home computer. Others may be thought of as temporary, like backing up freelance businesses or college projects. The former tend to stick around, while there’s not much we can do to convince the latter that they might want to rethink their approach.

As a result, “I don’t need it anymore” is one reason that’s always on our list. But that’s not to say we’re not doing anything about it. If you read this blog, you know that we’ll take any opportunity to remind people that there are more reasons for long term backups than most folks assume.

Financial documents, legal correspondence, essential application settings, system information, and all of the important data you’ve forgotten you have on your machine until it crashes are great reasons to second guess a spotty back up strategy. If you have a computer, you should have a backup in place to protect yourself from accidental or incidental data loss. In fact, we recommend a 3-2-1 backup strategy to ensure that you’re always covered.

Resolution #1: No specific response in product development, but a rigorous marketing campaign to argue against the premise of their departure.

Reason #2: “30 Day Deletion”

All Backblaze Computer Backup accounts have 30 Day Version History included with their backup license. That means you can go back in time for 30 days and retrieve older versions of your files or even files that you’ve deleted. For years, we had customers respond that they would continue to use Backblaze if we retained their files a little bit longer than 30 days.

We took that feedback and created the ability to keep updated, changed, and even deleted files in their backups for a longer period of time by extending Version History for the computers backing up in their accounts. We chose to build this feature because the engineering investment was easily offset by the number of customers we could retain and/or gain by offering some customized approaches to data retention.

Since 2013, customers who told us that they were cancelling due to our Version History being set to only 30 days hovered around 5.91% out of the total responses to reasons for leaving. Since we made a change in 2019, and started educating people that the feature exists, we’ve now seen a large number of people enabling Extended Version History. Reports of customers leaving for Version History reasons is now down to 3.37% for 2020 and is dropping quickly.

You can now increase your peace of mind by enabling Yearly or Forever Version History on your account—all thanks to the customers who wrote in and told us why it was important to them.

Resolution #2: Build a new feature set to answer a reasonable request with a reasonable offering.

Reason #3: “Leaving For a Sync Service”

There’s unfortunately still some confusion between backup (which Backblaze provides) and sync and share services, like Dropbox and iCloud.

So what’s the difference? We wrote a blog post to explain it, but to summarize: Sync services will synchronize folders on your computer or mobile device to folders on other machines, allowing users to access the same file, folder, or directory across different devices. This is great for collaboration and reducing the amount of data you’re holding on any number of devices. But it’s completely different from a backup. In a sync service, only the files, folders, or directories you add to the service are synced, leaving the rest of the data on your computer completely unprotected.

Backblaze’s cloud backup automatically backs up all user data with little or no setup, and no need for the dragging and dropping of files. If your friends tell you they are using a sync service to back up their personal data, let them know they may need a backup service as well—before they learn that lesson the hard way.

Resolution #3: Similar to resolution #1, the response to confusion about what different services do is: Education. Tens of thousands of folks have already read our post about the difference between sync and backup, so hopefully we see this reason decrease over time.

Reason #4: Too Expensive

We’ve all been there. We look in our bank account and realize we accidentally signed up for a few too many monthly services and we need to cut back to pay the essential bills. At Backblaze, we realize that times can get tough and occasionally you will need to cut back on expenses.

Keeping this in mind, we strive to be the most affordable unlimited online backup service for our customers. Over the course of 10+ years since Backblaze started backing up customer computers, we have only raised our prices once, by $1 (and wrote about how hard it was to do even that).

When deciding which monthly service to keep, we hope you consider the value of keeping all your files safe and protected and the cost of losing precious memories or important documents.

Resolution #4: Sometimes your product may be too expensive for people’s budget and they will leave. All you can do is work to be as affordable as possible and stress the value of your service.

Reason #5: Switched to Backblaze B2 Cloud Storage

“Hey Backblaze, we love your product but we are leaving to use B2 Cloud Storage!” Some Computer Backup customers occasionally write in with this response and we get a good chuckle from it… because B2 Cloud Storage is also a product of Backblaze. Backblaze B2 Cloud Storage was created to be a simple and flexible cloud storage platform and, with the help of integration partners, it can be a very nifty backup solution for more tech-savvy users!

We actually love when this reason pops up! It lets us know that people are moving on to the product that’s right for them. Backblaze B2 was created as a result of customers writing in and saying “I love your backup service, but I need a place to just store the data on my server or NAS device. Can you give me direct access to your cloud storage? Is that possible?” So we created a product that could do just that.

If you have been backing up your computer for a while, you may be curious about cloud storage or have heard about cloud storage and thought it might be too technical for you—don’t worry, we have all been there. We put together a quick starter guide that highlights how simple Backblaze B2 can be.

Resolution #5: When the customer starts to outgrow your starter product, guide them to the product that fits them best.

What Churn Responses Look Like Over the Years for Computer Backup

About 10% of our customers that leave respond to our “how can we do better” email after cancelling their accounts. This number tends to be pretty constant, but when it rises above that range it usually indicates that something unique happened that month.

An uptick in churn isn’t always a bad thing. We saw a rise in responses when we announced our first European data center because customers were switching their accounts to the EU region. It was a good sign that people were excited about the availability of different regions for storing their data.

Giving the option for customers to share personal responses also notifies us when a new issue arrives. This can help us identify and fix bugs in our system that might only be caught in very specific situations that may not be seen by our engineers in our initial testing.

They can also clue us in on world events. We started to see high trends of customers reporting COVID-19 related reasons for cancelling their accounts back in January 2020. This helped us assess in a timely manner how we could support our customers during a worldwide pandemic.

The following graph shows you how a few different reasons for leaving have changed over the past few years:

All Feedback Is Good Feedback

You may find it a bit crazy but there really is a person at the other end of your responses—reading your feedback and sharing it with the rest of the gang at Backblaze. That feedback has provided us useful updates, new features, and peace of mind knowing that our customers feel heard.

So, we want to say thank you to all the previous customers that took the time to write out why they were breaking up with Backblaze. Without that feedback, we wouldn’t be the company we are today.

To this day we are still updating our products to meet our customers’ needs and we love to hear what our customers hope to see as our next feature. Do you have a feature request? Share it in the comments below!

The post Churn Analysis: Go From Churning to Learning appeared first on Backblaze Blog | Cloud Storage & Cloud Backup.

Cloud Storage Vs. Backup: To B1, B2, or Both?

Post Syndicated from Nicole Perry original https://www.backblaze.com/blog/cloud-storage-vs-backup-to-b1-b2-or-both/

In the beginning there was the World Wide Web and, for us common folk, it was used to send electronic mail and instant messages. Then the internet became a place where the average user could share their voice, videos, and pretty much everything else. But how permanent are these things we share? When it comes to the memories we want to hold on to, will they always be there?

We’ve all lived through our own different phases of the internet age. There was the AIM phase, Napster phase, Wikipedia phase, Skype phase, and of course the boom of social media with Twitter, Facebook, Instagram, and more. Some of these websites and apps are still here, some look a little different, and some are not around anymore. (Like Vines, boy do we miss Vines!)

In 2019, it was reported that internet users spend an average of two hours and 22 minutes per day on social networking. If we are spending even a fraction of that time each day creating content to be shared with family and loved ones, don’t we want to make sure we have those creations forever?

We think so! And so we’ve developed a series of posts to help you retrieve your data from social media profiles, ranging from Facebook to Tiktok, and other services where the long term reliability of or your data might be in question. In this post we will go more in depth about best practices of how to back up this data once you’ve downloaded it.

Review: Retrieving Your Data

If you’re like most people, you probably have your data spread out across multiple platforms. Depending on where you like, share, and post, there are various ways to download your data to keep a copy of it on your computer. But how do you figure out how to do this for each platform? We’re glad you asked! Here’s our list of guides you can consult right now. We’ll work to grow this list over time, but don’t hesitate to reach out if you’d like to see different platforms covered.

  • Facebook: When your uncle saves the family’s treasured reunion photos only on Facebook, it’s time to consult this guide.
  • Google Drive: You know that college paper is going to be Pulitzer-worthy someday—make sure you have it backed up!

Due to the vast variety of options available on the internet, we may have missed a few you want to know about. While there’s not one solution for every platform, there are some typical steps that could help you with a service we haven’t covered yet:

Some websites and apps have an area in your account settings or privacy settings where you can request your data, like Twitter, which has built this feature into their user account section. If functionality like that isn’t immediately apparent, your next best option is to search the support FAQs to find the process for user data requests. Some platforms do not have this feature available at all yet, so you should be careful to understand the guidelines for retrieving data at any company before you start storing your photos, audio files, and more there.

Once you’ve downloaded your data successfully, the next challenge is safeguarding it for the future.

Now That It’s on My Computer, What Should I Do Next?

Downloading the internet memories you’d like to keep is step one. If you’re reading this, you probably already use Backblaze Computer Backup to safeguard the data on your PC or Mac. (If not, make sure your computer is backed up, preferably with a 3-2-1 backup strategy.) But just because you back up your data, that doesn’t mean you want to keep archival memories on the computer you use every day.

Depending on the size of the data you downloaded, you may now have a far larger quantity of files on your computer than you’d prefer. Those YouTube videos you made with your friends back in 2008 might be old, but they ain’t small. Your computer may be thinking the same thing. Even if you choose to store the memories on an external hard drive, remembering to plug in and back up multiple drives can be hard over the long term.

Backups are great for things you are actively using on your computer, but when you’re done with a project or want to store a memory safely, you may want to think about archiving that data. In cloud storage and backup, an “archive” is a place to keep data for long term storage. Most importantly for this post, an archive helps to protect data you want to retain, but don’t need regularly, while ensuring your computer can run its best with some freed up storage space.

Archives can be used for space management on your computer and long term retention. The original data may (or may not be) deleted after the archive copy is made and stored—it’s up to you! You can always store another copy on a hard drive if you want to be extra careful. This is the difference between computer backup and cloud storage. In both cases, data is stored in the cloud, but in backup, the data in the cloud is a copy of the data on your computer. In cloud storage, it’s just saved data—there’s no mirroring or versioning.

Our Backblaze B2 Cloud Storage product allows you to create an archive of your data in various different ways. You can experiment with setting up your own archive by creating a B2 Cloud Storage Bucket within your Backblaze Computer Backup account. It’s easy, and more importantly, free: your first 10GB of data stored are on us!

Creating a B2 Archive

For this example, I downloaded data from my personal blog, hosted on WordPress. My blog has various types of files (photos, videos, text, audio) so it’s a good example of the diverse set of files that are good candidates for storing in the cloud.

After downloading my data from WordPress and creating a new folder on my desktop filled with the files I want to archive, the next step is to sign into my Backblaze account. After signing in, I navigate to the left sidebar and select “Buckets” under the section “B2 Cloud Storage.”

On the B2 Cloud Storage Buckets page I select “Create a Bucket.” You can think of buckets as a folders feature when storing data in B2 Cloud Storage. There is no limit to the number of files you can keep in a bucket, but there is a limit of 100 buckets per account.

When I select “Create a Bucket” a pop-up appears, guiding me to create a unique bucket name and decide whether the bucket will be “private” or “public.” Setting the bucket to “private” means that every download requires an authorization token. Setting it to “public” means that everybody in my group (if your account is a group) is allowed to download the files in the bucket.

When I create a bucket, I get to pick the name. The name must be unique—never been used before by you or by anybody else. In other words, a bucket’s name is globally unique.

For my example, I named my bucket “WordpressNicolePerry” and set the bucket to private. Once the bucket is created you can start uploading files and folders.

When I click the button “Upload,” a pop-up appears, prompting me to drag and drop files or folders I want to upload to that bucket. And then, bazinga! Your files are now uploaded to the cloud!

Wow! Cloud Storage Is Easier Than I Expected

If you have been backing up your computer for a while, you may be curious about cloud storage or have heard about cloud storage and thought it was too technical for you—don’t worry, we have all been there. But, the internet and social media seemed hard at first and now look at where we are at! Play around with buckets in B2 Cloud Storage. If you feel like they’re the right spot to keep your memories, you can learn more about pricing and other functionality here.

At the end of the day, when it comes to making sure my long lost Vines, Facebook photos, and Google data are somewhere safe without gunking up my computer’s memory, I’ve found that the few bucks a month I put toward B2 Cloud Storage seem like a small price compared to juggling hard drives and other archiving practices.

Creating content for social media, whether for a business or personally, is an ever changing process as new platforms appear. So, keeping that data in an easily accessible place where I can download it and upload it to a new platform is worth the cost for me. But that’s one solution coming from this social media guru. How have you kept up with the times? We would love to hear your solutions in the comments below.

The post Cloud Storage Vs. Backup: To B1, B2, or Both? appeared first on Backblaze Blog | Cloud Storage & Cloud Backup.