Post Syndicated from Nuno Diegues original https://blog.cloudflare.com/from-ip-packets-to-http-the-many-faces-of-our-oxy-framework/

We have recently introduced Oxy, our Rust-based framework for proxies powering many Cloudflare services and products. Today, we will explain why and how it spans various layers of the OSI model, by handling directly raw IP packets, TCP connections and UDP payloads, all the way up to application protocols such as HTTP and SSH.
On-ramping IP packets
An application built on top of Oxy defines — in a configuration file — the on-ramps that will accept ingress traffic to be proxied to some off-ramp. One of the possibilities is to on-ramp raw IP packets. But why operate at that layer?
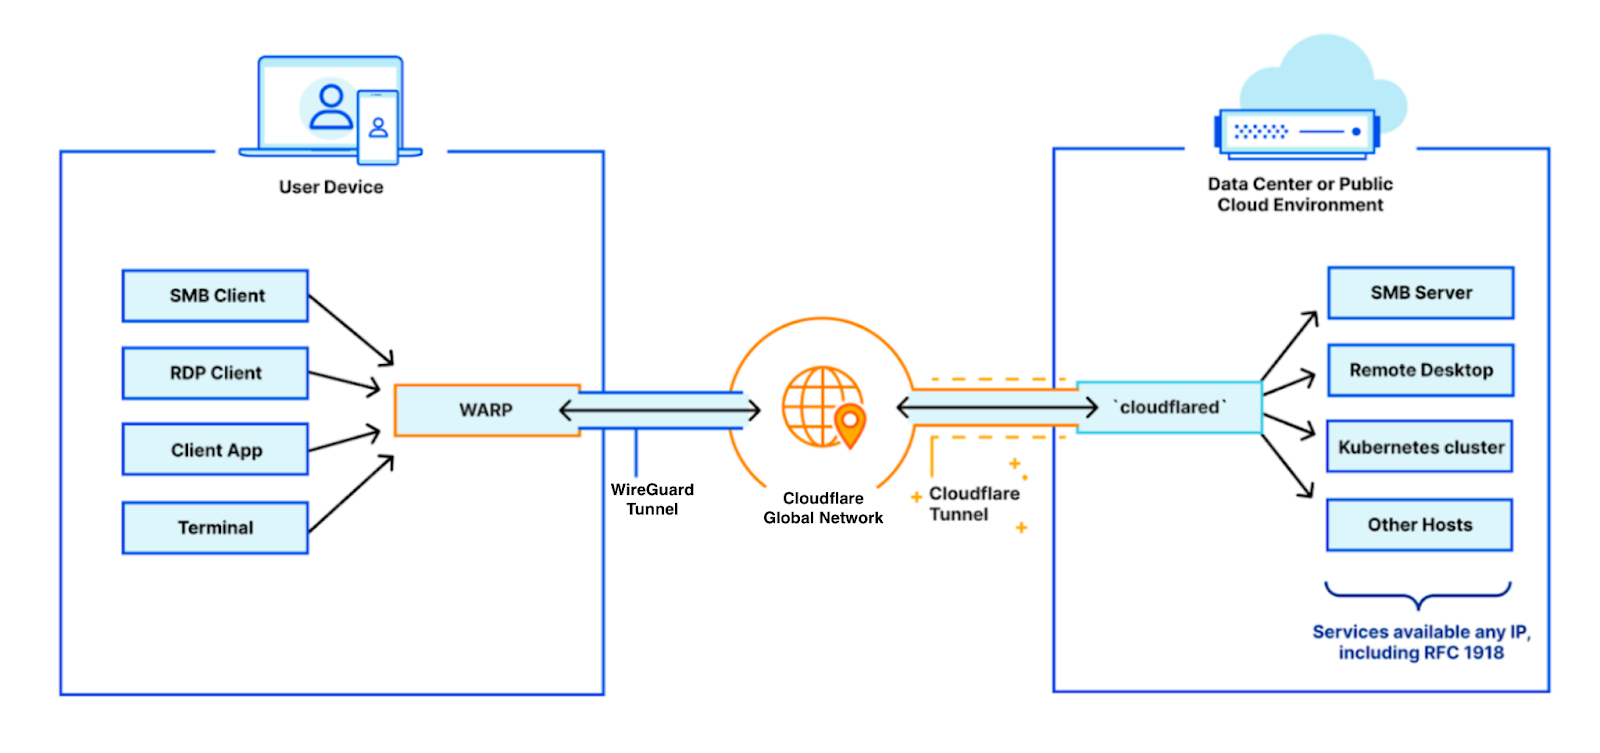
The answer is: to power Cloudflare One, our network offering for customers to extend their private networks — such as offices, data centers, cloud networks and roaming users — with the Cloudflare global network. Such private networks operate based on Zero Trust principles, which means every access is authenticated and authorized, contrasting with legacy approaches where you can reach every private service after authenticating once with the Virtual Private Network.
To effectively extend our customer’s private network into ours, we need to support arbitrary protocols that rely on the Internet Protocol (IP). Hence, we on-ramp Cloudflare One customers’ traffic at (OSI model) layer 3, as a stream of IP packets. Naturally, those will often encapsulate TCP streams and UDP sessions. But nothing precludes other traffic from flowing through.
IP tunneling
Cloudflare’s operational model dictates that every service, machine and network be operated in an homogeneous way, usable by every one of our customers the same way. We essentially have a gigantic multi-tenanted system. Simply on-ramping raw IP packets does not suffice: we must always move the IP packets within the scope of the tenant they belong to.
This is why we introduced the concept of IP tunneling in Oxy: every IP packet handled has context associated with it; at the very least, the tenant that it belongs to. Other arbitrary contexts can be added, but that is up to each application (built on top of Oxy) to define, parse and consume in its Oxy hooks. This allows applications to extend and customize Oxy’s behavior.
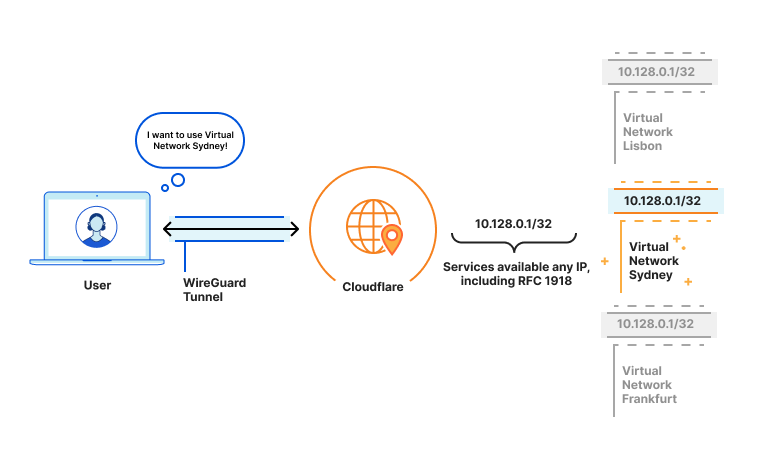
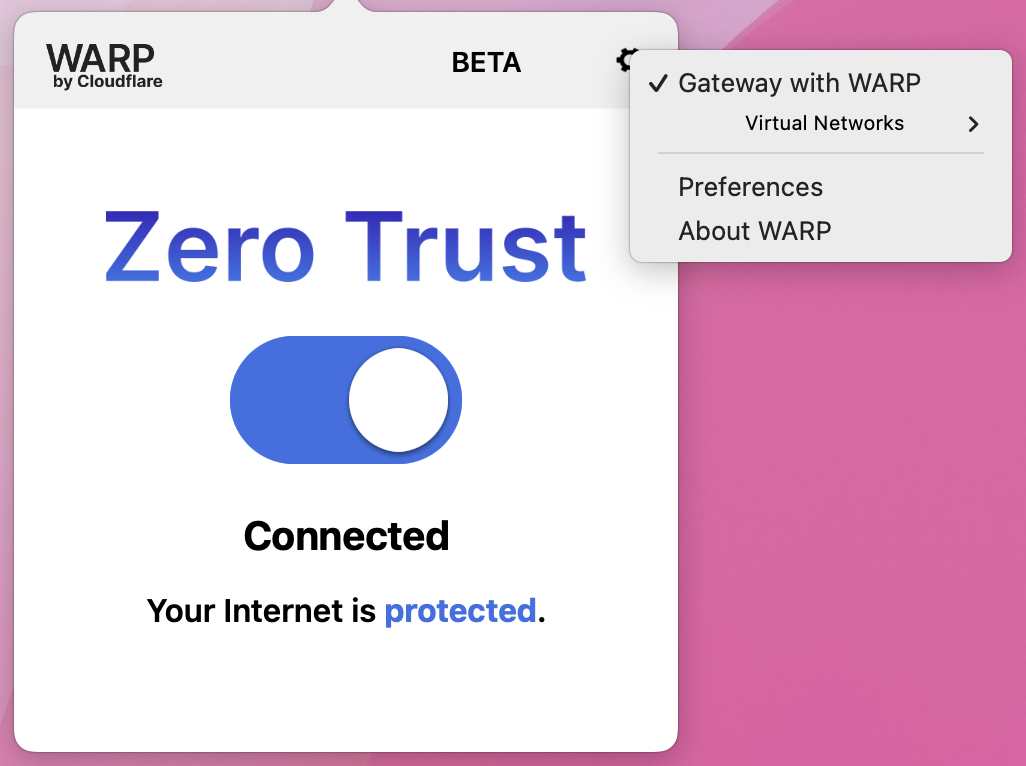
You have probably heard of (or even used!) Cloudflare Zero Trust WARP: a client software that you can install on your device(s) to create virtual private networks managed and handled by Cloudflare. You begin by authenticating with your Cloudflare One account, and then the software will on-ramp your device’s traffic through the nearest Cloudflare data center: either to be upstreamed to Internet public IPs, or to other Cloudflare One connectors, such as another WARP device.
Today, WARP routes the traffic captured in your device (e.g. your smartphone) via a WireGuard tunnel that is terminated in a server in the nearest Cloudflare data center. That server then opens an IP tunnel to an Oxy instance running on the same server. To convey context about that traffic, namely the identity of the tenant, some context must be attached to the IP tunnel.
For this, we use a Unix SOCK_SEQPACKET, which is a datagram-oriented socket exposing a connection-based interface with reliable and ordered delivery — it only accepts connections locally within the machine where it is bound to. Oxy receives the context in the first datagram, which the application parses — could be any format the application using Oxy desires. Then all subsequent datagrams are assumed to be raw self-describing IP packets, with no overhead whatsoever.
Another example are the on-ramps of Magic WAN, such as GRE or IPsec tunnels, which also bring raw IP packets from customer’s networks to Cloudflare data centers. Unlike WARP, where its IP packets are decapsulated in user space, for GRE and IPsec we rely on the Linux kernel to do the job for us. Hence, we have no state whatsoever between two consecutive IP packets coming from the same customer, as the Linux kernel is routing them independently.
To accommodate the differences between IP packet handling in user space and the kernel, Oxy differentiates two types of IP tunnels:
- Connected IP tunnels — as explained for WARP above, where the context is passed once, in the first datagram of the IP Tunnel SEQPACKET connection
- Unconnected IP tunnels — used by Magic WAN, where each IP packet is encapsulated (using GUE, i.e. Generic UDP Encapsulation) to accommodate the context and unconnected UDP sockets are used
Encapsulating every IP packet comes at the cost of extra CPU usage. But moving the packet around to and from an Oxy instance does not change much regardless of the encapsulation, as we do not have MTU limitations inside our data centers. This way we avoid causing IP packet fragmentation, whose reassembly takes a toll on CPU and Memory usage.
Tracking IP flows
Once IP packets arrive to Oxy, regardless of how they on-ramp, we must decide what to do with them. We decided to rely on the idea of IP flows, as that is inherent to most protocols: a point to point interaction will generally be bounded in time and follow some type of state machine, either known by the transport or by the application protocol.
We perform flow tracking to detect IP flows. When handling an on-ramped IP packet, we parse its IP header and possible transport (i.e. OSI Model layer 4) header. We use the excellent etherparse Rust crate for this purpose, which parses the flow signature, with a source and destination IP address, ports (optional) and protocol. We then look up whether there is already a known IP flow for that signature: if so, then the packet is proxied through the path already determined for that flow towards its off-ramp. If the flow is new, then its upstream route is computed and memoized for future packets. This is in essence what routers do, and to some extent Oxy handling of IP packets is meant to operate as a router.
The interesting thing about tracking IP flows is that we can now expose their lifetime events to the application built on top of Oxy, via its hooks. Applications can then use these events for interesting operations, such as:
- Applying Zero Trust principles before allowing the IP flow through, such as our Secure Web Gateway policies
- Emitting audit logs that collect the decisions taken at the start of the IP flow
- Collecting metadata about the traffic processed by the time the IP flow ends, e.g., to support billing calculations
- Computing routing decisions of where to send the IP flow next, e.g. to another Cloudflare product/service, or off-ramped to the Internet, or to another Cloudflare One connector
From an IP flow to a TCP stream
You would think that most applications do not handle IP packets directly. That is a good hunch, and also a fact at Cloudflare: many systems operate at the application layer (OSI Model layer 7) where they can inspect traffic in a way much closer to what the end user is perceiving.
To get closer to that reality, Oxy can upgrade an IP flow to the transport layer (OSI Model layer 4). We first consider what this means for the case of TCP traffic. The problem that we want to solve is to process a given stream of raw IP packets, with the same TCP flow signature initiating a TCP handshake, and obtain as a result a TCP connection streaming data. Hence, we need a TCP protocol implementation that can be used from userspace.
The best Rust-native implementation is the smoltcp crate. However, its stated objectives do not match our needs, as it does not implement many of the performance and reliability enhancements of TCP that are expected of a first-class TCP, therefore not sufficing for the sheer amount of traffic and demands we have.
Instead, we rely on the Linux kernel to help us here. After all, it has the most battle-tested TCP protocol implementation in the world.
To leverage that, we set up a TUN interface, and add an IP route to forward traffic to that interface (more details below as to what IPs to use). A TUN interface is a virtual network device whose network data is generated by user-programmable software, rather than a device driver for a physically-connected network adapter. But otherwise it looks and works like a physical network adapter for all purposes.
We write the IP packets — meant to be upgraded to a TCP stream — to the file descriptor backing the TUN interface. However, that’s not enough, as the kernel in our machines will drop those packets since customer’s IP addresses only make sense in their infrastructure.
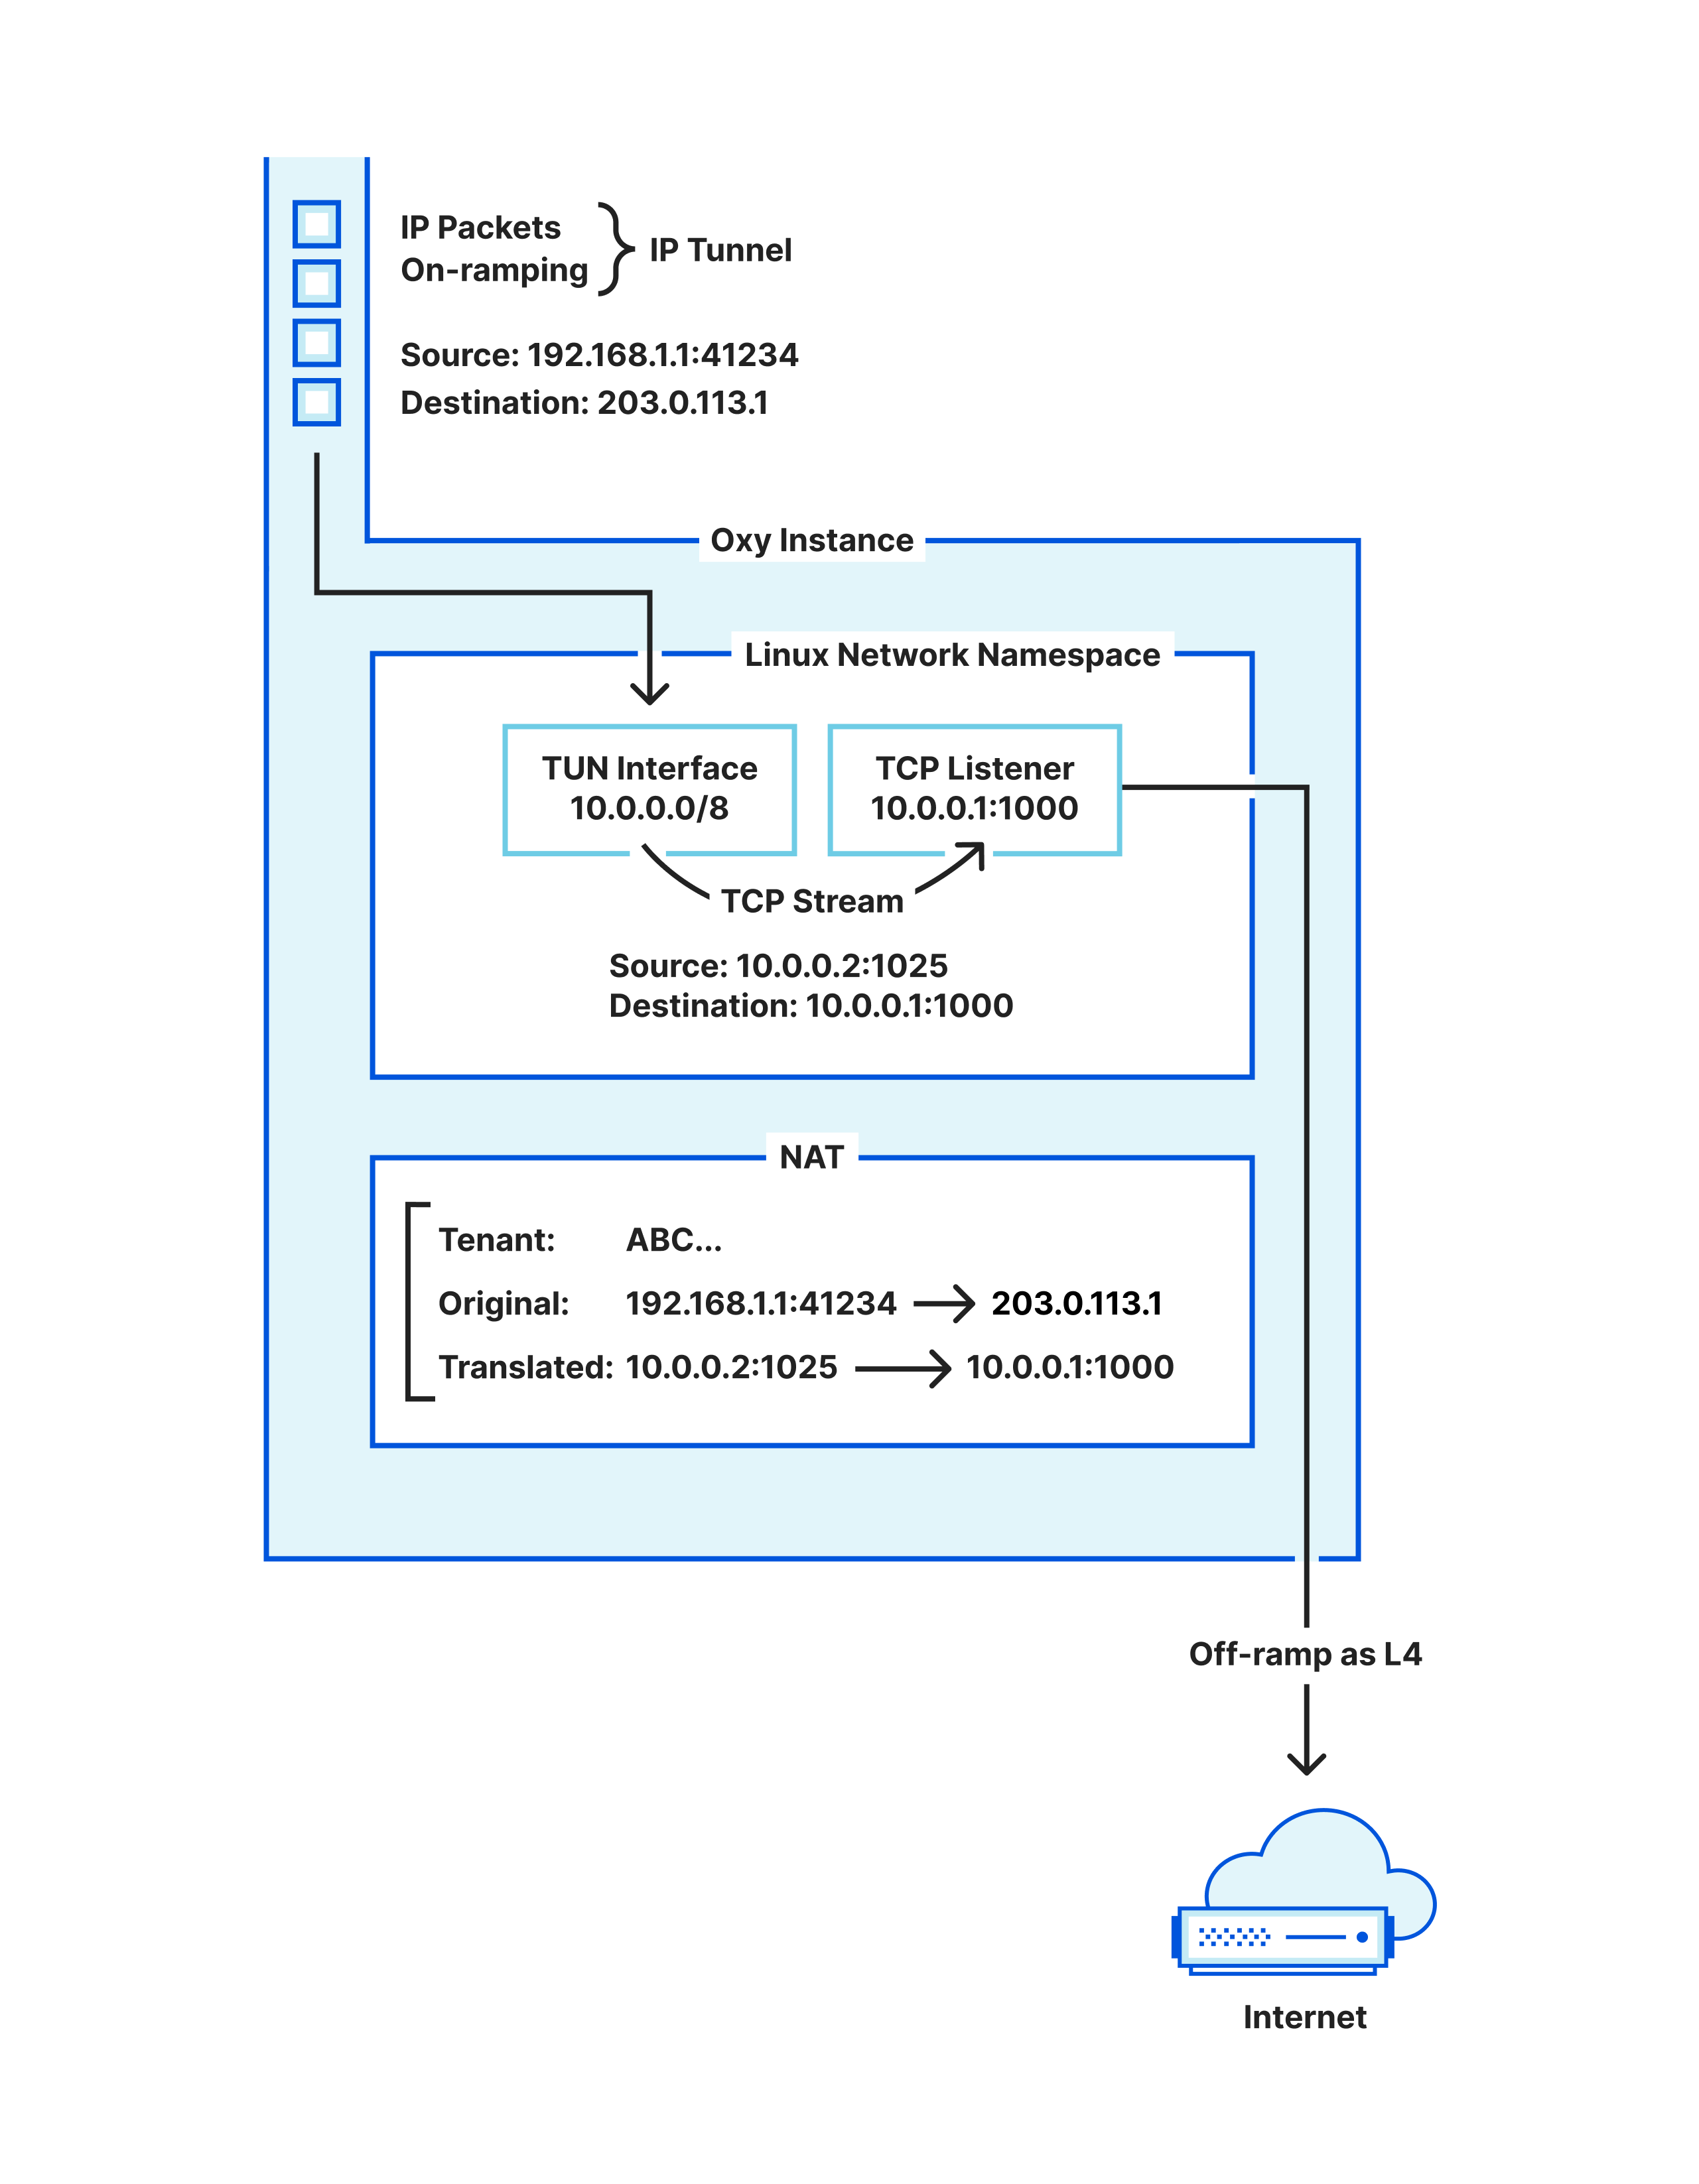
The step we are missing is that those packets must be transformed, i.e. Network Address Translated (NAT), so that the kernel routes them into the TUN interface. Hence, Oxy maintains its own stateful NAT: every IP flow desired to be upgraded to a TCP stream must claim a NAT slot (to be returned when the TCP stream finishes), and have its packets’ addresses rewritten for the IPs that the TUN interface route encompasses.
Once packets flow into the TUN interface with the right addresses, the kernel will process them as if they had entered the machine through your network card. This means that you can now bind a TCP listener to accept TCP connections in the IP address for which the NAT-ed IP packets are destined to, and voilà, we have our IP flows upgraded to TCP streams.
We are left with one question: what IP address should the NAT use? One option is to just reserve some machine-local IP address and hope that no other application running in that machine uses it, as otherwise unexpected traffic will show up in our TUN device.
Instead, we chose to not have to worry about that at all by relying on Linux network namespaces. A network namespace provides you with an isolated network in a machine, acting as a virtualization layer provided by the kernel. Even if you do not know what this is, you are likely using it, e.g. via Docker.
Hence, Oxy dynamically starts a network namespace to run its TUN interface for upgrading IP flows, where it can use all the local IP space and ports freely. After all, those TCP connections only matter locally, between Oxy’s NAT and Oxy’s L4 proxy.
An interesting aspect here is that the Oxy application itself runs in the default/root namespace, making it easily reachable for on-ramping traffic, and also able to off-ramp traffic to other services operating on the same machine in the default/root namespace. But that raises the question: how is Oxy able to operate simultaneously in the root namespace as well as in the namespace dedicated to upgrading IP flows to TCP connections? The trick is to:
- Run the Oxy-based process in the root namespace, without any special permissions (no elevated permissions required).
- That process calls clone into a new unnamed user and network namespace.
- The child (cloned) and parent (original) processes communicate via a paired pipe.
- The child brings up the TUN interface and establishes the IP routes to it.
- The child process binds a TCP listener on an IP address that is bound to the TUN interface and passes that file descriptor to the parent process using SCM_RIGHTS.
This way, the Oxy process will now have a TCP listener, to obtain the upgraded IP flow connections from, while running in the default namespace and despite that TCP listener — and any connections accepted from it — operating in an unnamed dynamically created namespace.
From a TCP stream to HTTP
Once Oxy has a TCP stream, it may also upgrade it, in a sense, to be handled as HTTP traffic. Again, the framework provides the capabilities, but it is up to the application (built on top of Oxy) to make the decision. Analogously to the IP flow, the TCP stream start also triggers a hook to let the application know about a new connection, and to let it decide what to do with it. One of the choices is to treat it as HTTP(S) traffic, at which point Oxy will pass the connection through a Hyper server (possibly also doing TLS if necessary). If you are curious about this part, then rest assured we will have a blog post focused just on that soon.
What about UDP
While we have been focusing on TCP so far, all of the capabilities implemented for TCP are also supported for UDP as well. We’ve glossed over it so far because it is easier to handle, since converting an IP packet to UDP payloads requires only stripping the IP and UDP headers. We do this in Oxy logic, in user space, thereby replacing the idea employed for TCP that relies on the TUN interface. Everything else works the same way across TCP and UDP, with UDP traffic potentially being HTTPS for the case of QUIC-based HTTP/3.
From TCP/UDP back to IP flow
We have been looking at IP packets on-ramping in Oxy and converting from IP flows to TCP/UDP. Eventually that traffic is sent to an upstream that will respond back, and so we ought to obtain resulting IP packets to send to the client. This happens quite naturally in the code base as we only need to revert the operation done in the upgrade:
- For UDP, we add the IP and UDP headers to the payload of each datagram and thereby obtain the IP packet to send to the client.
- For TCP, writing to the upgraded TCP socket causes the kernel to generate IP packets routed to the TUN interface. We read these packets from the TUN interface and undo the NAT operation explained above — applied to packets being written to the TUN interface — thereby obtaining the IP packet to send to the client.
More interestingly, the application built on top of Oxy may also define that TCP/UDP traffic (handled as layer 4) is to be downgraded to IP flow (i.e. layer 3). To imagine where this would be usable, consider another Cloudflare One example, where a WARP client establishes an SSH session to a remote WARP device (which is now possible) and has configured SSH command audit logging — in that case, we will have the following steps:
- On-ramp the IP packets from WARP client device into the Oxy application.
- Oxy tracks the IP flows; per application mandate, then Oxy checks if it is a TCP IP flow with destination port 22, and as such it upgrades to TCP connection.
- The application is given control of the TCP connection and, in this case, our Secure Web Gateway (an Oxy application) parses the traffic to perform the SSH command logging.
- Since the upstream is determined to be another WARP device, Oxy is mandated to downgrade the TCP connection to IP packets, so that they can be off-ramped to the upstream as such.
Therefore, we need to provide the capability to do step 4, which we haven’t described yet. For UDP the operation is trivial: add or remove the IP/UDP headers as necessary.
For TCP, we will again resort to (another) TUN interface. This is slightly more complicated than upgrading, because when upgrading we use a single TCP listener from the network namespace where all upgraded connections appear, whereas to downgrade we need a TCP client connection from the network namespace per downgraded connection. Therefore we need to interact with the network namespace to obtain these on-demand TCP client connections at runtime, as explained next, making the process to downgrade more convoluted.
To enable that, we rely on the paired pipe maintained between the Oxy (parent) process and the cloned (child) process that operates inside the dynamic namespace: it is used for requesting the TCP client socket for a specific IP flow. This entails the following steps:
- The Oxy process reserves a NAT mapping for that IP flow for downgrade.
- It requests (via a pipe sendmsg) the cloned child process to establish a TCP connection to the NAT-ed addresses.
- By doing so, the child process inherently makes the Linux kernel TCP implementation issue a TCP handshake to the upstream, causing a SYN IP packet to show up in the TUN interface.
- The Oxy process is consuming packets from the downgrading namespace’s TUN interface, and hence will consume that packet, for which it promptly reverts the NAT. The IP packet is then off-ramped as explained in the next section.
- In the meantime, the child process will have sent back (via the paired pipe) the file descriptor for the TCP client socket, again using SCM_RIGHTS. The Oxy application will now proxy the client TCP connection (meant to be downgraded) into that obtained TCP connection, to result in the raw IP packets read from the TUN interface.
Despite being elaborate, this is quite intuitive, particularly if you’ve read through the upgrade section earlier that is a simpler version of this idea.
The overall picture
In the sections above we have covered the life of an IP packet entering Oxy and what happens to it until exiting towards its upstream destination. This is summarized in the following diagram illustrating the life cycle of such packets.
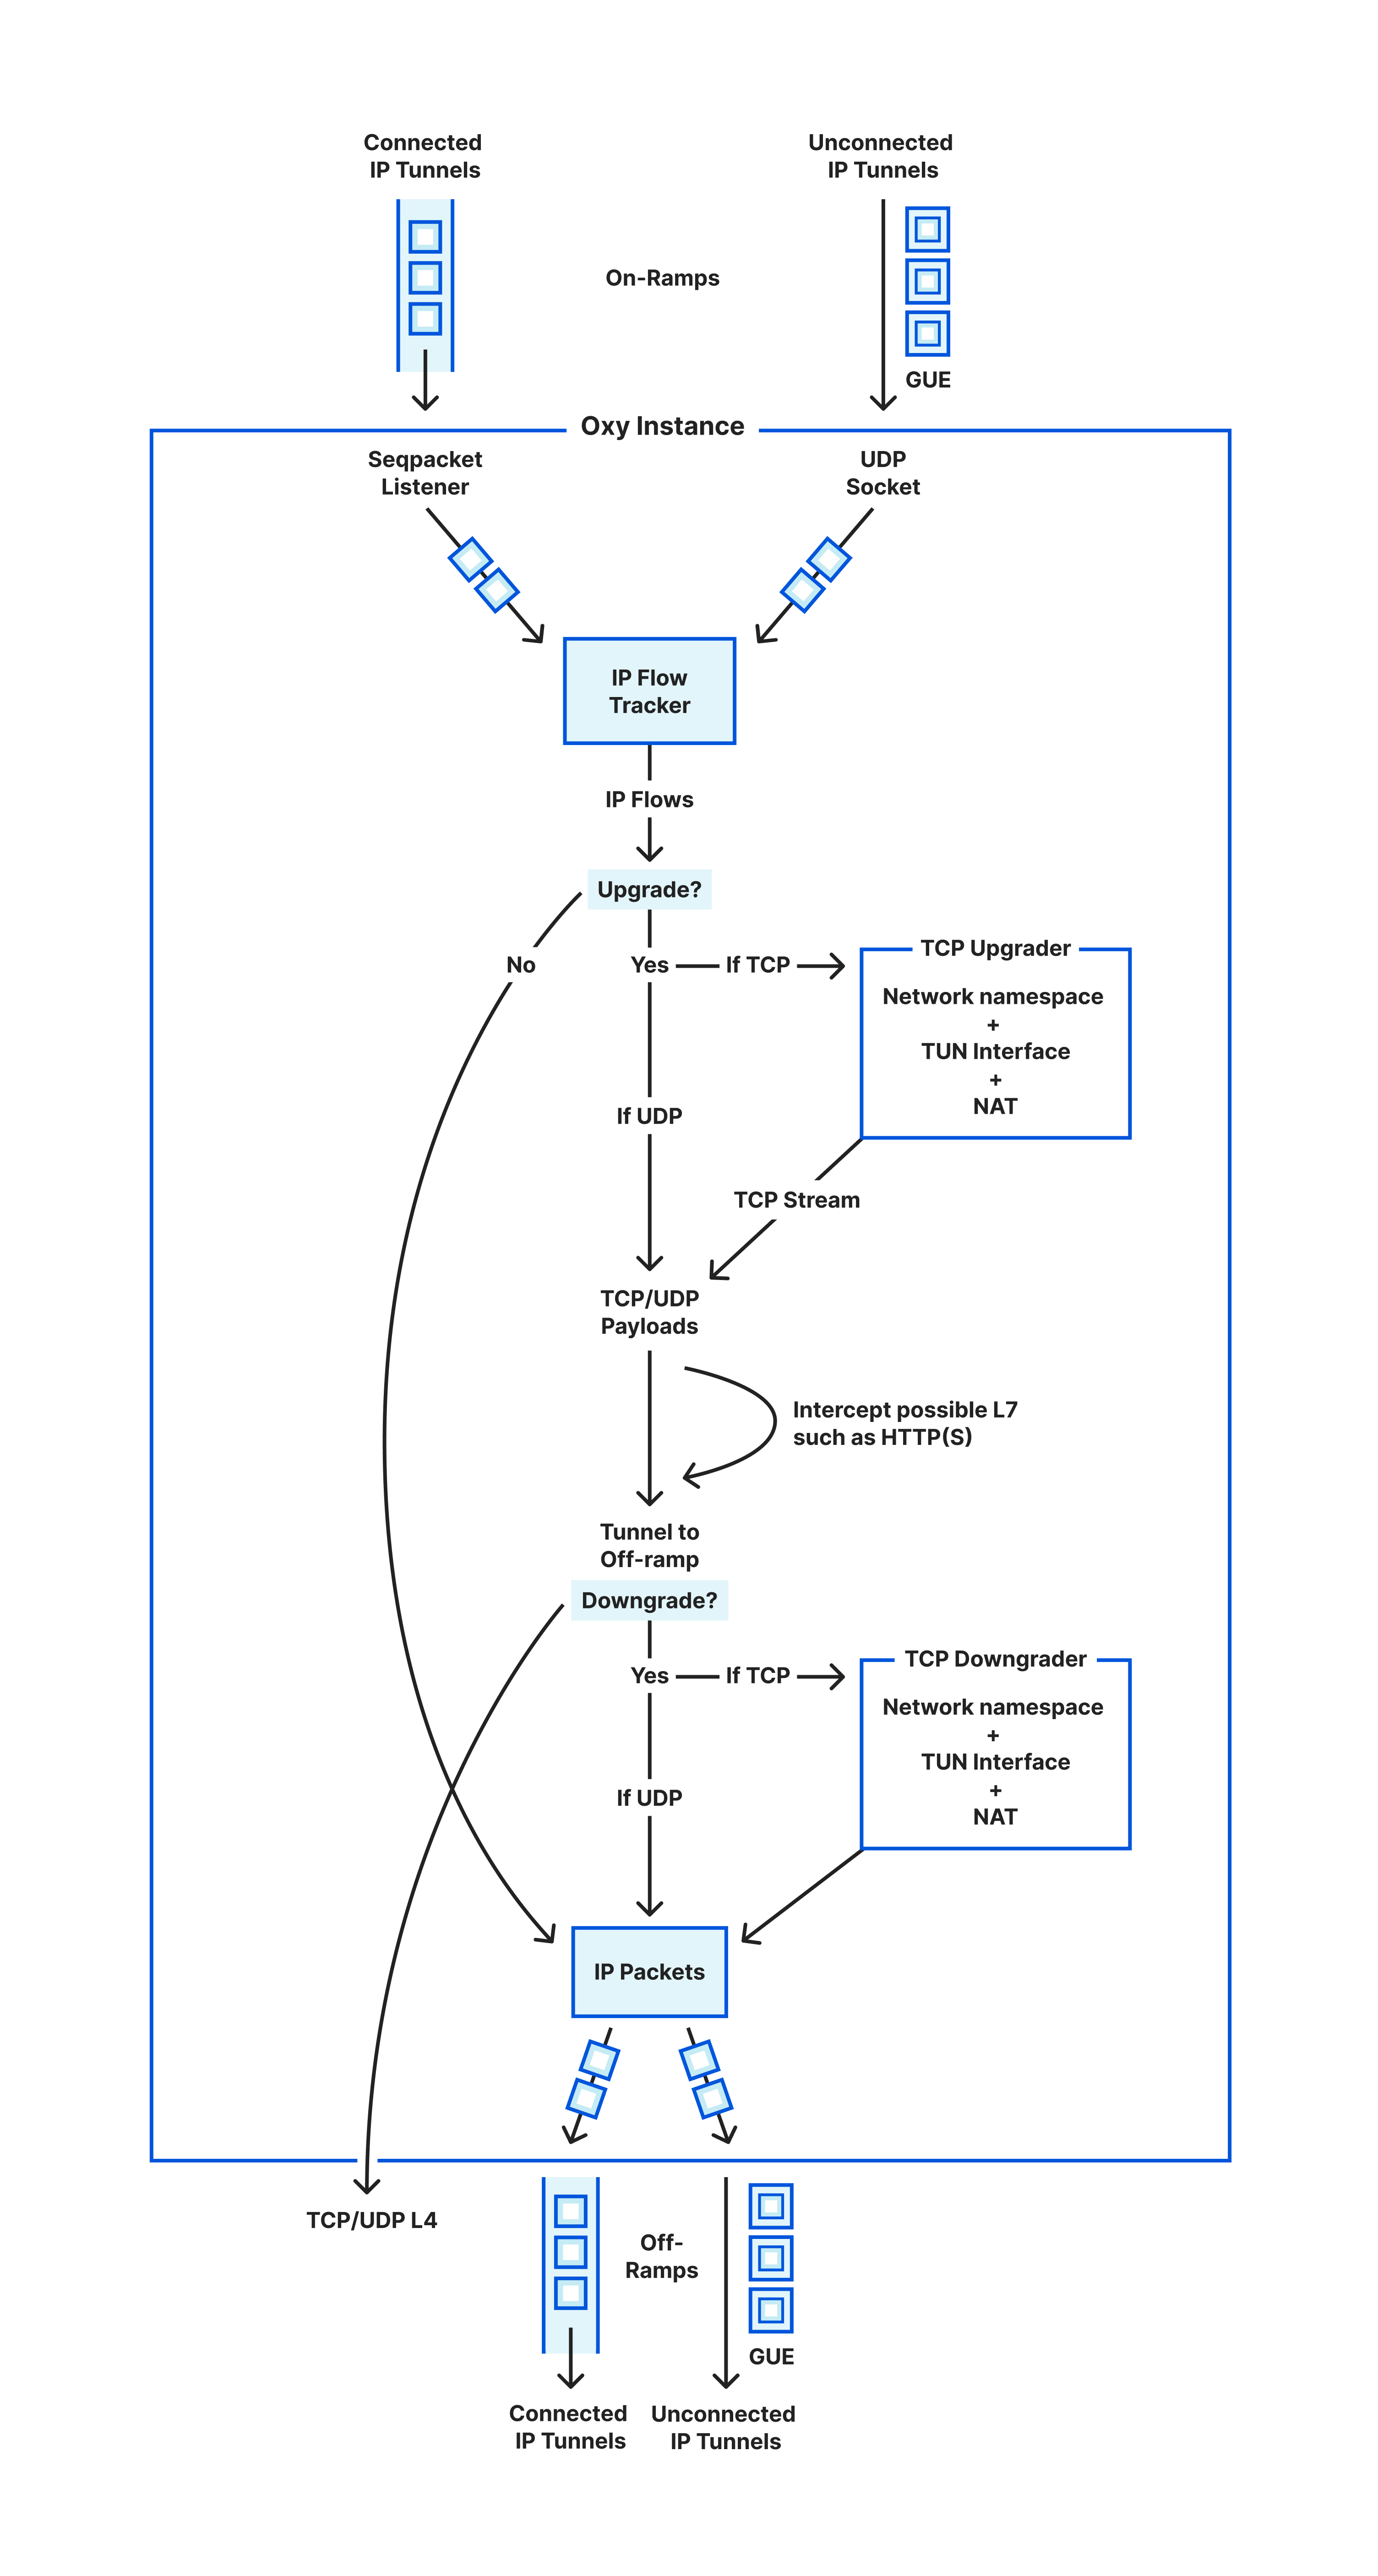
We are left with how to exit the traffic. Sending the proxied traffic towards its destination (referred to as upstream) is what we call off-ramping it. We support off-ramping traffic across the same OSI Model layers that we allow to on-ramp: that is, as IP packets, TCP or UDP sockets, or HTTP(S) directly.
It is up to the application logic (that uses the Oxy framework) to make that decision and instruct Oxy on which layer to use. There is a lot to be said about this part, such as what IPs to use when egressing to the Internet — so if you are curious for more details, then stay tuned for more blog posts about Oxy.
No software overview is complete without its tests. The one interesting thing to think about here is that, to test all of the above, we need to generate raw IP packets in our tests. That’s not ideal as one would like to just write plain Rust logic that establishes TCP connections towards the Oxy proxy. Hence, to simplify all of this, our tests actually reuse our internal library (described above) to create a dynamic network namespaces and downgrade/upgrade the TCP connections as necessary.
Therefore, our tests talk normal TCP against a TCP downgrader running together with the tests, which outputs raw IP packets that we pipe to the Oxy instance being tested. It is an elegant and simple way to work around the challenge while battle testing further the TUN interface logic.
Wrapping up
Covering proxying IP packets all the way to HTTP requests feels like an overly broad framework. We felt the same at first at Cloudflare, particularly because Oxy was not born in a day, and in fact it started first with HTTP proxying and then started to go down the OSI Model layers. In hindsight, doing it all feels the right decision: being able to upgrade and downgrade traffic as necessary has been very useful, and in fact our proxying logic shares the majority of code despite handling different layers (socket primitives, observability, security aspects, configurability, etc).
Today, all of the ideas above are powering Cloudflare One Zero Trust as well as plain WARP. This means they are battle-tested across millions of daily users exchanging most of their traffic (both to the Internet as well as towards private/corporate networks) through the Cloudflare global network.
If you’ve enjoyed reading this and are interested in working on similar challenges with Rust, then be sure to check our open positions as we continue to grow our team. Likewise, there will be more blog posts related to our learnings developing Oxy, so tag along the ride for more fun!