Post Syndicated from Pablo Pagani original https://aws.amazon.com/blogs/security/download-aws-security-hub-csv-report/
AWS Security Hub provides a comprehensive view of your security posture in Amazon Web Services (AWS) and helps you check your environment against security standards and best practices. In this post, I show you a solution to export Security Hub findings to a .csv file weekly and send an email notification to download the file from Amazon Simple Storage Service (Amazon S3). By using this solution, you can share the report with others without providing access to your AWS account. You can also use it to generate assessment reports and prioritize and build a remediation roadmap.
When you enable Security Hub, it collects and consolidates findings from AWS security services that you’re using, such as threat detection findings from Amazon GuardDuty, vulnerability scans from Amazon Inspector, S3 bucket policy findings from Amazon Macie, publicly accessible and cross-account resources from AWS Identity and Access Management Access Analyzer, and resources missing AWS WAF coverage from AWS Firewall Manager. Security Hub also consolidates findings from integrated AWS Partner Network (APN) security solutions.
Cloud security processes can differ from traditional on-premises security in that security is often decentralized in the cloud. With traditional on-premises security operations, security alerts are typically routed to centralized security teams operating out of security operations centers (SOCs). With cloud security operations, it’s often the application builders or DevOps engineers who are best situated to triage, investigate, and remediate security alerts.
This solution uses the Security Hub API, AWS Lambda, Amazon S3, and Amazon Simple Notification Service (Amazon SNS). Findings are aggregated into a .csv file to help identify common security issues that might require remediation action.
Solution overview
This solution assumes that Security Hub is enabled in your AWS account. If it isn’t enabled, set up the service so that you can start seeing a comprehensive view of security findings across your AWS accounts.
How the solution works
- An Amazon EventBridge time-based event invokes a Lambda function for processing.
- The Lambda function gets finding results from the Security Hub API and writes them into a .csv file.
- The API uploads the file into Amazon S3 and generates a presigned URL with a 24-hour duration, or the duration of the temporary credential used in Lambda, whichever ends first.
- Amazon SNS sends an email notification to the address provided during deployment. This email address can be updated afterwards through the Amazon SNS console.
- The email includes a link to download the file.
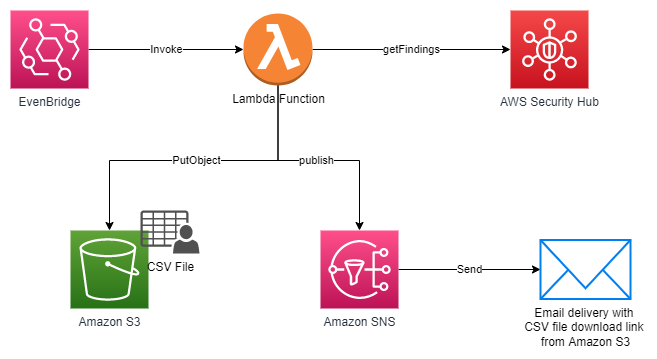
Figure 1: Solution overview, deployed through AWS CloudFormation
Fields included in the report:
- Finding ID
- Product ARN
- Product name
- Company name
- Generator ID
- Security control ID
- Created at
- Updated at
- Confidence
- Remediation text
- Remediation URL
- Source URL
- Compliance status
- Workflow status
- Record state
- Processed at
- Finding title
- Finding description
- Severity
- Region
- Account ID
- Resource type
- Resource ID
Note: You can extend the report by modifying the Lambda function to add fields as needed.
Solution resources
The solution provided with this blog post consists of an AWS CloudFormation template named security-hub-full-report-email.json that deploys the following resources:
- An Amazon SNS topic named SecurityHubRecurringFullReport and an email subscription to the topic.

Figure 2: SNS topic created by the solution
- The email address that subscribes to the topic is captured through a CloudFormation template input parameter. The subscriber is notified by email to confirm the subscription. After confirmation, the subscription to the SNS topic is created. Additional subscriptions can be added as needed to include additional emails or distribution lists.
Figure 3: SNS email subscription
- The SendSecurityHubFullReportEmail Lambda function queries the Security Hub API to get findings into a .csv file that’s written to Amazon S3. A pre-authenticated link to the file is generated and sends the email message to the SNS topic described above.
Figure 4: Lambda function created by the solution
- An IAM role for the Lambda function to be able to create logs in CloudWatch, get findings from Security Hub, publish messages to SNS, and put objects into an S3 bucket.

Figure 5: Permissions policy for the Lambda function
- An EventBridge rule that runs on a schedule named SecurityHubFullReportEmailSchedule used to invoke the Lambda function that generates the findings report. The default schedule is every Monday at 8:00 AM UTC. This schedule can be overwritten by using a CloudFormation input parameter. Learn more about creating cron expressions.

Figure 6: Example of the EventBridge schedule created by the solution


Deploy the solution
Use the following steps to deploy this solution in a single AWS account. If you have a Security Hub administrator account or are using Security Hub cross-Region aggregation, the report will get the findings from the linked AWS accounts and Regions.
To deploy the solution
- Download the CloudFormation template security-hub-full-report-email.json from our GitHub repository.
- Copy the template to an S3 bucket within your target AWS account and Region. Copy the object URL for the CloudFormation template .json file.
- On the AWS Management Console, go to the CloudFormation console. Choose Create Stack and select With new resources.
Figure 7: Create stack with new resources
- Under Specify template, in the Amazon S3 URL textbox, enter the S3 object URL for the .json file that you uploaded in step 1.
Figure 8: Specify S3 URL for CloudFormation template
- Choose Next. On the next page, do the following:
- Stack name: Enter a name for the stack.
- Email address: Enter the email address of the subscriber to the Security Hub findings email.
- RecurringScheduleCron: Enter the cron expression for scheduling the Security Hub findings email. The default is every Monday at 8:00 AM UTC. Learn more about creating cron expressions.
- SecurityHubRegion: Enter the Region where Security Hub is aggregating the findings.
Figure 9: Enter stack name and parameters
- Choose Next.
- Keep all defaults in the screens that follow and choose Next.
- Check the box I acknowledge that AWS CloudFormation might create IAM resources, and then choose Create stack.


Test the solution
You can send a test email after the deployment is complete. To do this, open the Lambda console and locate the SendSecurityHubFullReportEmail Lambda function. Perform a manual invocation with an event payload to receive an email within a few minutes. You can repeat this procedure as many times as you want.
Conclusion
In this post I’ve shown you an approach for rapidly building a solution for sending weekly findings report of the security posture of your AWS account as evaluated by Security Hub. This solution helps you to be diligent in reviewing outstanding findings and to remediate findings in a timely way based on their severity. You can extend the solution in many ways, including:
- Send a file to an email-enabled ticketing service, such as ServiceNow or another security information and event management (SIEM) that you use.
- Add links to internal wikis for workflows such as organizational exceptions to vulnerabilities or other internal processes.
- Extend the solution by modifying the filters, email content, and delivery frequency.
To learn more about how to set up and customize Security Hub, see these additional blog posts.
If you have feedback about this post, submit comments in the Comments section below. If you have any questions about this post, start a thread on the AWS Security Hub re:Post forum.
Want more AWS Security news? Follow us on Twitter.


