All posts by Praveen Krishnamoorthy Ravikumar

Efficient log management with Amazon OpenSearch Service data streams

Post Syndicated from Praveen Krishnamoorthy Ravikumar original https://aws.amazon.com/blogs/big-data/efficient-log-management-with-amazon-opensearch-service-data-streams/

Time series data workloads in Amazon OpenSearch Service can present unique challenges for organizations, especially when dealing with continuously growing datasets. Many customers struggle with heavily loaded single indices that lead to high query latency, degraded performance, and unnecessary costs. In this post, we show you how to implement data streams with Index State Management (ISM) in Amazon OpenSearch Service. This approach automatically manages your time series data lifecycle and optimizes both performance and costs. Data streams distribute incoming data across multiple backing indices, helping to reduce single-index bottlenecks, while ISM policies automate rollover, retention, and storage tiering to help manage costs.

The challenge

While Amazon OpenSearch Service has long provided tools like Index State Management (ISM) for time series data management, many organizations still struggle with implementing optimal patterns for their continuously growing datasets. Common challenges include:

  • Performance degradation from index growth: As single indices grow unbounded, query latency increases, you might find shard sizes more difficult to manage, and you might experience strain on your cluster resources.
  • Manual index management overhead: Without automation, you must invest significant operational effort to manage index lifecycles, rollover, and retention.
  • Complex setup: Coordinating index templates, aliases, and ISM policies manually can be error-prone.
  • Inefficient resource utilization: All data residing in hot storage regardless of access patterns, leading to unnecessarily high costs.

Solution overview

As illustrated in Figure 1, our solution uses Amazon OpenSearch Service data streams combined with Index State Management to automatically distribute data across multiple indices and manage the data lifecycle. A data stream is an abstraction layer that simplifies time series data ingestion. It provides a single, consistent endpoint for writes while automatically managing multiple backing indices behind the scenes. Instead of writing directly to individual indices, applications write to the data stream, which routes data to the appropriate backing index.

Here’s how it works:

  • Data streams provide a single write index when data is first ingested, which can help streamline time series data ingestion.
  • When the backing index ages or grows to meet your defined criteria, ISM automatically performs the rollover operation.
  • You can use ISM policies to automatically transition your aged data to different storage tiers based on rules you define and configure.
  • You can automate the entire process through rules you define in the index template and ISM policies.
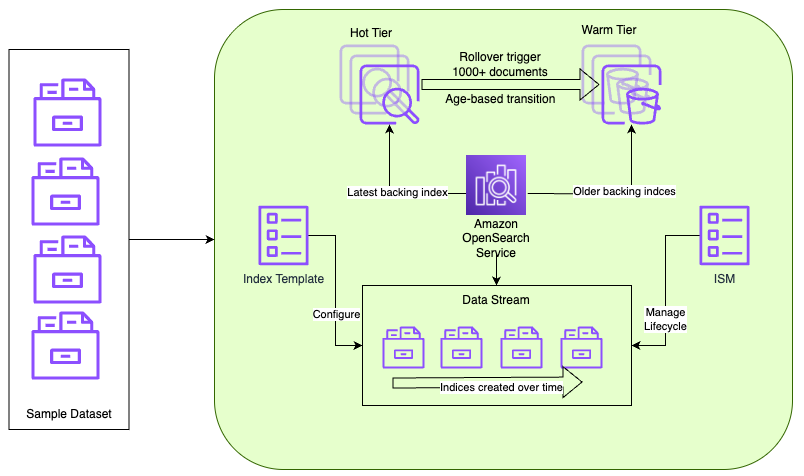
Architecture diagram showing time series data flowing into an Amazon OpenSearch Service data stream, which routes writes to multiple backing indices while ISM transitions aged indices from hot to UltraWarm storage

Figure 1 — Time series data workflow using Amazon OpenSearch Service data streams

Data ingests into an index according to your index template configuration. Over time, a data stream creates new indices automatically. Amazon OpenSearch Service manages the lifecycle, transitioning data from hot to warm storage according to the ISM policy configuration you define.

When to use this solution

This approach is ideal when:

Implementation steps

Prerequisites

Before you begin, make sure that you have the following:

The following steps walk through implementing a time series data solution, using a web server logs database as an example. You can run these steps using any of the following:

For this post, we use the Dev Tools Console in OpenSearch Dashboards. To access it:

  • Log in to OpenSearch Dashboards.
  • Navigate to Dev Tools (usually found on the menu under Management).
  • Use the interactive console to run the commands.

Section 1: Create data stream

  1. Create an ISM policy

First, create an ISM policy that defines the rules for index rollover and storage tier transitions. The following policy defines two states (hot and warm) and sets rules for when indices transition between them. The policy triggers a rollover when the document count reaches 1,000 and moves indices to warm storage after 2 minutes.

Note: The rollover and transitions configurations are only for demo purposes.

PUT _plugins/_ism/policies/ds-ism-policy
{
"policy": {
"description": "rollover policy when index is large",
"default_state": "hot",
"ism_template": [
{
"index_patterns": ["webserver-logs-data-stream*"],
"priority": 300
}
],
"states": [
{
"name": "hot",
"actions": [
{
"rollover": {
"min_doc_count": 1000
}
}
],
"transitions": [
{
"state_name": "warm",
"conditions": {
"min_index_age": "2m"
}
}
]
},
{
"name": "warm",
"actions": [
{
"retry": {
"count": 3,
"backoff": "exponential",
"delay": "1m"
},
"warm_migration": {}
}
]
}
]
}
}
  1. Create an index template for the data stream

An index template matches indices by a regex pattern and applies predefined settings and schema at index creation. The following template maps the required timestamp field for the data stream and associates matching indices with the ISM policy we created.

PUT _index_template/webserver-logs-data-stream-template
{
"index_patterns": ["webserver-logs-data-stream*"],
"data_stream": {
"timestamp_field": {
"name": "timestamp"
}
},
"template": {
"settings": {
"plugins.index_state_management.policy_id": "ds-ism-policy"
},
"mappings": {
"properties": {
"timestamp": {
"type": "date"
}
}
}
}
}
  1. Create data stream

In this step, you create the data stream that handles the time series data. The data stream provides a single, unified write target for ingesting data while managing multiple backing indices behind the scenes.

PUT _data_stream/webserver-logs-data-stream
  1. Validate ISM policy mapping

Verify that the ISM policy is correctly associated with the data stream that was created in the earlier step. This validation step confirms that automatic lifecycle management works as expected.

GET _plugins/_ism/explain/webserver-logs-data-stream

Output

Confirm that policy_id matches the ISM policy name you created earlier and that enabled is set to true.
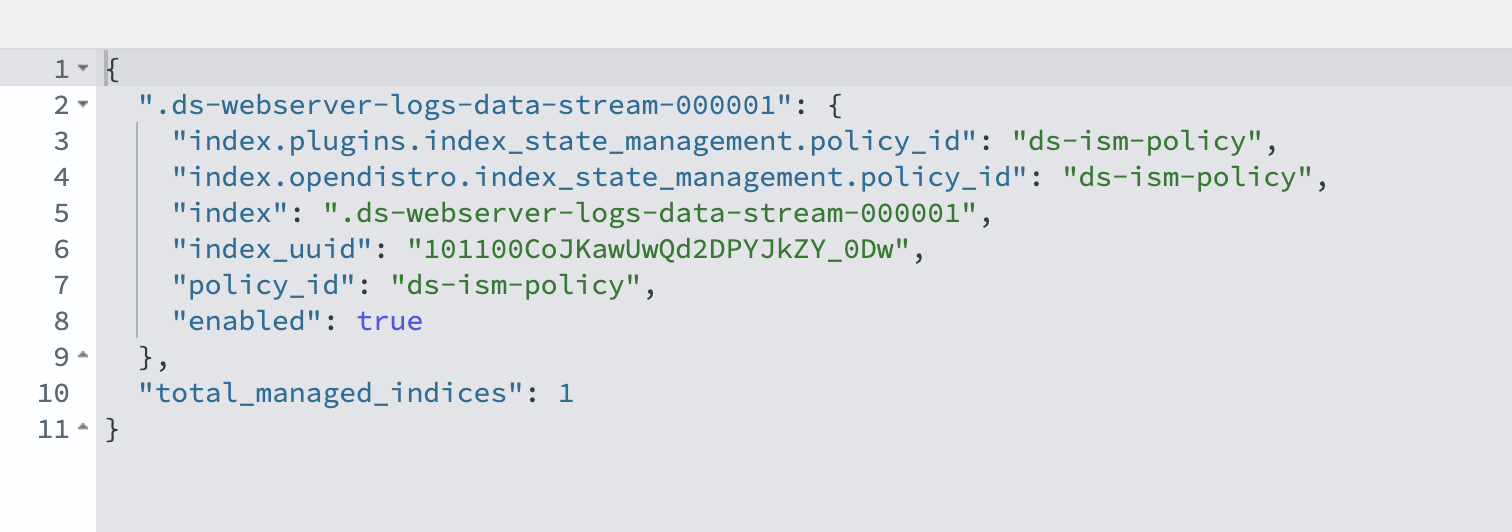
OpenSearch explain output showing the ISM policy_id mapped to the data stream with enabled set to true

Section 2: Ingesting data to data stream

In real-world scenarios, log data is typically collected and streamed directly to Amazon OpenSearch Service data streams. However, to demonstrate rollover and migration scenarios in this post, we take a different approach. We first load sample log data into a standard OpenSearch Service index, then reindex and migrate that data to a data stream.

To get started, run the commands in the Dev Tools console to create an index and populate it with sample log data.

  1. Reindex existing data

This step shows how to migrate existing data in a traditional index to the new data stream. The reindex operation includes a script that confirms each document has a valid timestamp field (timestamp). Documents without a timestamp field are skipped by the reindex operation to maintain data integrity.

POST _reindex
{
"source": {
"index": "webserver-logs"
},
"dest": {
"index": "webserver-logs-data-stream",
"op_type": "create"
},
"script": {
"source": """
try {
// Validate timestamp field exists and has a value
if (ctx._source.timestamp == null || ctx._source.timestamp.empty) {
ctx.op = 'noop';
}
} catch (Exception e) {
// Skip this document on any error
ctx.op = 'noop';
}
"""
},
"conflicts": "proceed"
}
  1. Monitor index rollover

As shown in Figure 2, after reindexing, monitor the creation of backing indices. The ISM policy evaluates indices every 5 minutes by default. Rollover occurs based on the defined conditions (1,000 documents or 2 minutes of age). Verify this using the following command.

GET _cat/indices/.ds-*?v&h=index,status,health,pri,rep,docs.count,store.size,creation.date&s=index

The output should look like the following:

_cat/indices output listing the .ds backing indices with their status, health, and document counts

You can also validate this from OpenSearch Dashboards by navigating to Index Management, Data streams, webserver-logs-data-stream.
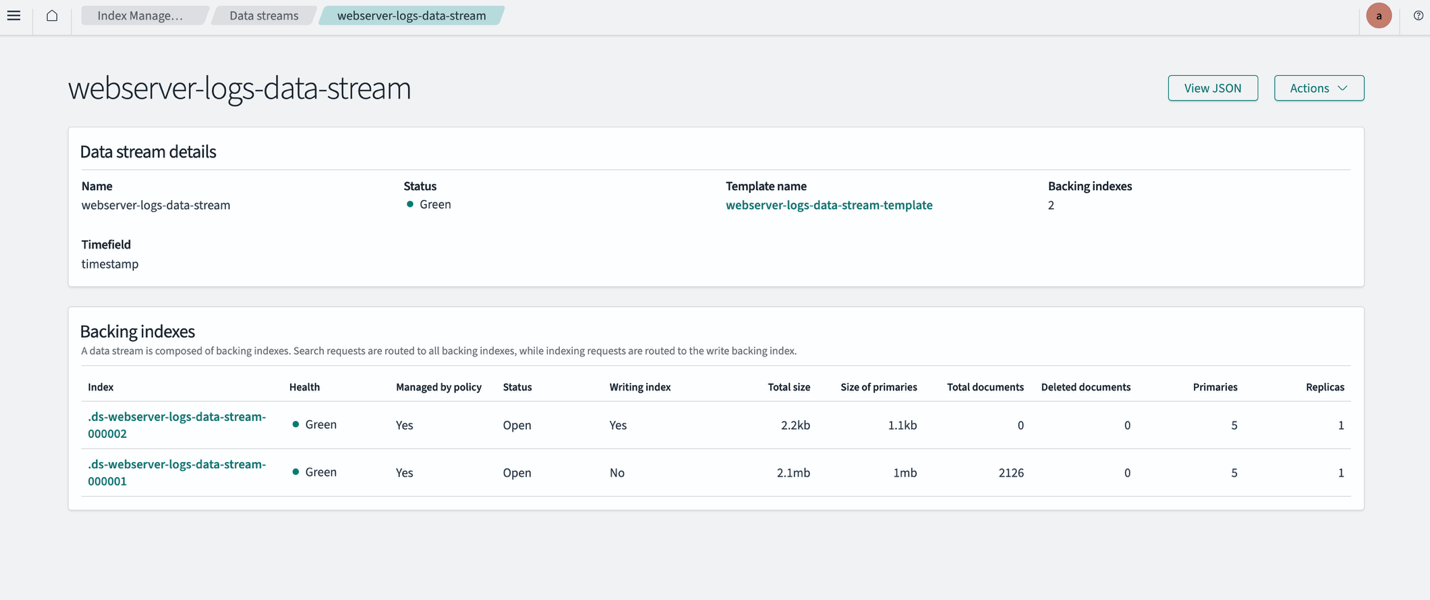
OpenSearch Dashboards Index Management page showing the webserver-logs-data-stream and its backing indices

*Figure 2 — Combined view of the _cat/indices CLI output and the OpenSearch Dashboards data stream details, showing a successful index rollover across multiple backing indices*

  1. Validate warm transition

Verify that indices are correctly transitioning from hot to warm storage based on the ISM policy conditions. You can monitor this through OpenSearch Dashboards or API queries in the Dev Tools console.
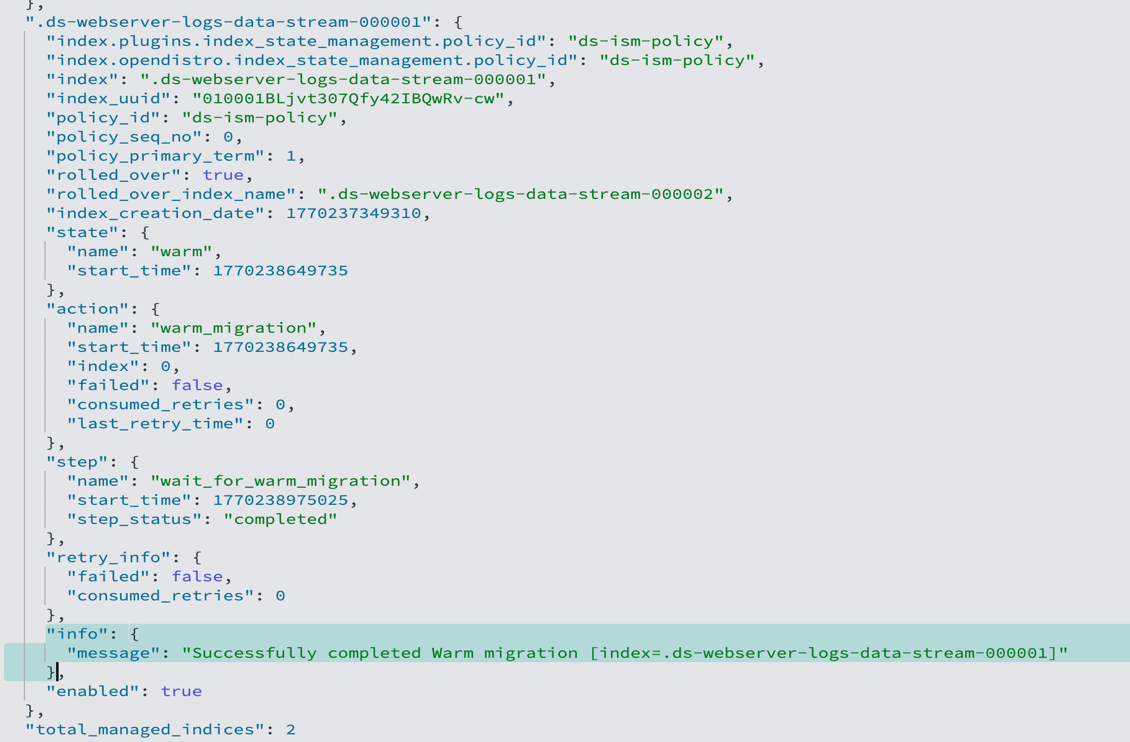
GET _plugins/_ism/explain/webserver-logs-data-stream

OpenSearch explain output showing backing indices transitioning from the hot state to the warm state

  1. Verify ingested data

Run a search against the data stream to confirm your documents were successfully indexed:

GET webserver-logs-data-stream/_search
{
"size": 1
}

Output

You should see your ingested documents returned in the hits.hits array, with the timestamp field and other fields you defined in the index template. A non-zero hits.total.value confirms data is flowing correctly through the data stream.
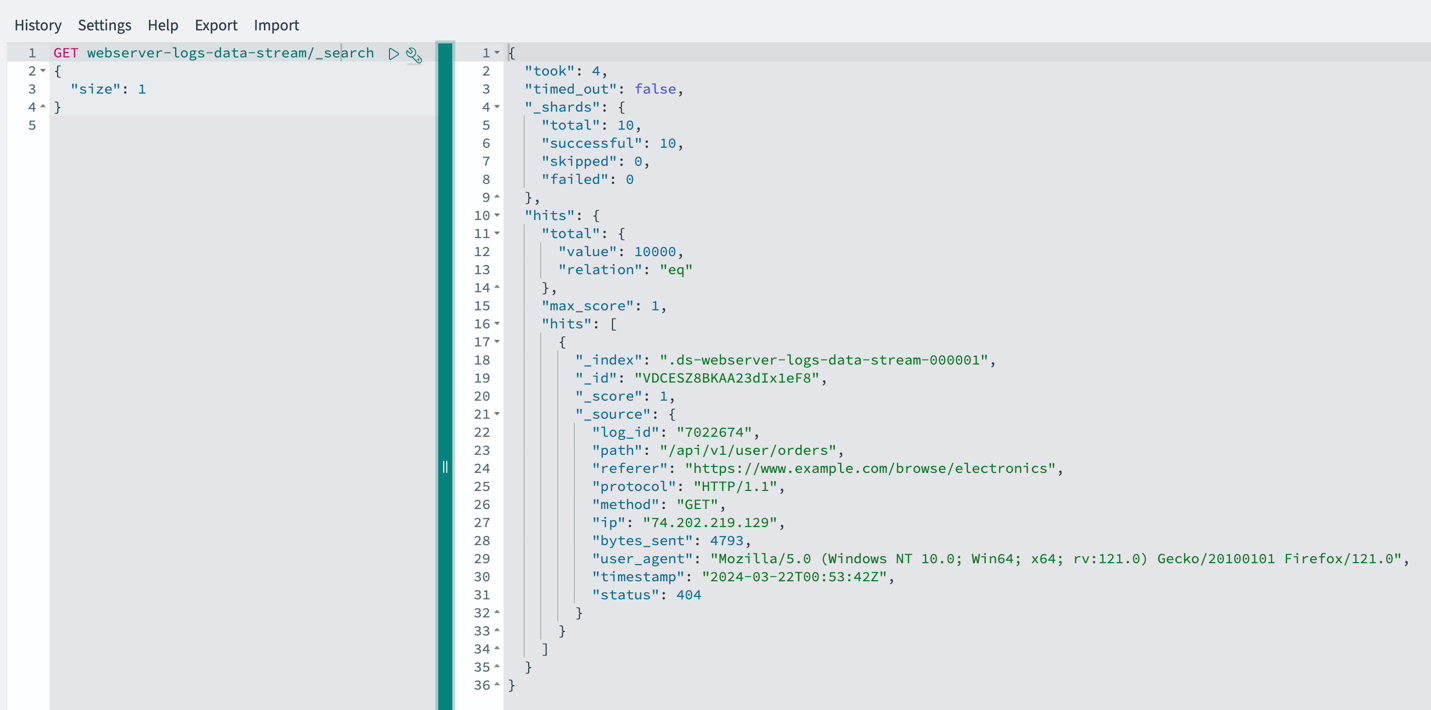
Search results showing an ingested document with the @timestamp field and a non-zero hits.total.value

  1. Clean up

If needed, these commands remove the data stream and its template.

DELETE _data_stream/webserver-logs-data-stream
DELETE _index_template/ webserver-logs-data-stream-template

Delete the sample data.

Conclusion

OpenSearch data streams with ISM offer capabilities for managing time series data at scale. Organizations that implement this approach can see improved query performance through distributed load and smaller, time-based backing indices that support efficient time-range queries. Automated index management reduces operational overhead. Storage tiering automatically moves aged data to UltraWarm storage, which significantly lowers costs without sacrificing access to historical data. Combined with better scalability for growing datasets, this solution simplifies index management while delivering improved performance and a more cost-effective, maintainable infrastructure.


About the authors

Praveen Krishnamoorthy Ravikumar

Praveen Krishnamoorthy Ravikumar

Praveen is an Analytics Specialist Solutions Architect at AWS. He helps customers design and implement modern data and analytics platforms that leverage the scalability, flexibility, and innovation of the cloud. He is passionate about solving complex data challenges and enabling organizations to unlock actionable insights from their data.

JP Boreddy

JP Boreddy

JP is a Senior Solutions Architect at Amazon Web Services, based in San Diego, California. He works with ISV customers in the security segment, helping them architect and optimize their workloads on AWS. JP specializes in AI/ML, containers, and cloud infrastructure, with a focus on enabling customers to build scalable, cost-effective solutions. He has been with AWS for over four years.

Aswin Vasudevan

Aswin Vasudevan

Aswin is a Senior Solutions Architect for Security, ISV at AWS. He is a big fan of generative AI and serverless architecture and enjoys collaborating and working with customers to build solutions that drive business value.

Kevin Fallis

Kevin is seasoned leader, architect, and developer with experience across many industry verticals and disciplines such as agriculture, ad tech, financial services, networking, security, telecommunications and of course search technologies. His passion helps others leverage the correct mix of AWS services and open-source solutions to achieve success for their business goals. His after-work activities include family, DIY projects, carpentry, horses, playing drums, and all things music.

Streaming Amazon DynamoDB data into a centralized data lake

Post Syndicated from Praveen Krishnamoorthy Ravikumar original https://aws.amazon.com/blogs/big-data/streaming-amazon-dynamodb-data-into-a-centralized-data-lake/

For organizations moving towards a serverless microservice approach, Amazon DynamoDB has become a preferred backend database due to its fully managed, multi-Region, multi-active durability with built-in security controls, backup and restore, and in-memory caching for internet-scale application. , which you can then use to derive near-real-time business insights. The data lake provides capabilities to business teams to plug in BI tools for analysis, and to data science teams to train models. .

This post demonstrates two common use cases of streaming a DynamoDB table into an Amazon Simple Storage Service (Amazon S3) bucket using Amazon Kinesis Data Streams, AWS Lambda, and Amazon Kinesis Data Firehose via Amazon Virtual Private Cloud (Amazon VPC) endpoints in the same AWS Region. We explore two use cases based on account configurations:

  • DynamoDB and Amazon S3 in same AWS account
  • DynamoDB and Amazon S3 in different AWS accounts

We use the following AWS services:

  • Kinesis Data Streams for DynamoDBKinesis Data Streams for DynamoDB captures item-level modifications in any DynamoDB table and replicates them to a Kinesis data stream of your choice. Your applications can access the data stream and view the item-level changes in near-real time. Streaming your DynamoDB data to a data stream enables you to continuously capture and store terabytes of data per hour. Kinesis Data Streams enables you to take advantage of longer data retention time, enhanced fan-out capability to more than two simultaneous consumer applications, and additional audit and security transparency. Kinesis Data Streams also gives you access to other Kinesis services such as Kinesis Data Firehose and Amazon Kinesis Data Analytics. This enables you to build applications to power real-time dashboards, generate alerts, implement dynamic pricing and advertising, and perform sophisticated data analytics, such as applying machine learning (ML) algorithms.
  • Lambda – Lambda lets you run code without provisioning or managing servers. It provides the capability to run code for virtually any type of application or backend service without managing servers or infrastructure. You can set up your code to automatically trigger from other AWS services or call it directly from any web or mobile app.
  • Kinesis Data Firehose – Kinesis Data Firehose helps to reliably load streaming data into data lakes, data stores, and analytics services. It can capture, transform, and deliver streaming data to Amazon S3 and other destinations. It’s a fully managed service that automatically scales to match the throughput of your data and requires no ongoing administration. It can also batch, compress, transform, and encrypt your data streams before loading, which minimizes the amount of storage used and increases security.

Security is the primary focus of our use cases, so the services used in both use server-side encryption at rest and VPC endpoints for securing the data in transit.

Use case 1: DynamoDB and Amazon S3 in same AWS account

In our first use case, our DynamoDB table and S3 bucket are in the same account. We have the following resources:

  • A Kinesis data stream is configured to use 10 shards, but you can change this as needed.
  • A DynamoDB table with Kinesis streaming enabled is a source to the Kinesis data stream, which is configured as a source to a Firehose delivery stream.
  • The Firehose delivery stream is configured to use a Lambda function for record transformation along with data delivery into an S3 bucket. The Firehose delivery stream is configured to batch records for 2 minutes or 1 MiB, whichever occurs first, before delivering the data to Amazon S3. The batch window is configurable for your use case. For more information, see Configure settings.
  • The Lambda function used for this solution transforms the DynamoDB item’s multi-level JSON structure to a single-level JSON structure. It’s configured to run in a private subnet of an Amazon VPC, with no internet access. You can extend the function to support more complex business transformations.

The following diagram illustrates the architecture of the solution.

The architecture uses the DynamoDB feature to capture item-level changes in DynamoDB tables using Kinesis Data Streams. This feature provides capabilities to securely stream incremental updates without any custom code or components.

Prerequisites

To implement this architecture, you need the following:

  • An AWS account
  • Admin access to deploy the needed resources

Deploy the solution

In this step, we create a new Amazon VPC along with the rest of the components.

We also create an S3 bucket with the following features:

You can extend the template to enable additional S3 bucket features as per your requirements.

For this post, we use an AWS CloudFormation template to deploy the resources. As part of best practices, consider organizing resources by lifecycle and ownership as needed.

We use an AWS Key Management Service (AWS KMS) key for server-side encryption to encrypt the data in Kinesis Data Streams, Kinesis Data Firehose, Amazon S3, and DynamoDB.

The Amazon CloudWatch log group data is always encrypted in CloudWatch Logs. If required, you can extend this stack to encrypt log groups using KMS CMKs.

  1. Click on Launch Stack button below to create a CloudFormation :
  2. On the CloudFormation console, accept default values for the parameters.
  3. Select I acknowledge that AWS CloudFormation might create IAM resources with custom names.
  4. Choose Create stack.

After stack creation is complete, note the value of the BucketName output variable from the stack’s Outputs tab. This is the S3 bucket name that is created as part of the stack. We use this value later to test the solution.

Test the solution

To test the solution, we insert a new item and then update the item in the DynamoDB table using AWS CloudShell and the AWS Command Line Interface (AWS CLI). We will also use the AWS Management Console to monitor and verify the solution.

  1. On the CloudShell console, verify that you’re in the same Region as the DynamoDB table (the default is us-east-1).
  2. Enter the following AWS CLI command to insert an item:
    aws dynamodb put-item \ 
    --table-name blog-srsa-ddb-table \ 
    --item '{ "id": {"S": "864732"}, "name": {"S": "Adam"} , "Designation": {"S": "Architect"} }' \ 
    --return-consumed-capacity TOTAL

  3. Enter the following command to update the item: We are updating the Designation from “Architect” to ” Senior Architect
    aws dynamodb put-item \ 
    --table-name blog-srsa-ddb-table \ 
    --item '{ "id": {"S": "864732"}, "name": {"S": "Adam"} , "Designation": {"S": "Senior Architect"} }' \ 
    --return-consumed-capacity TOTAL

All item-level modifications from the DynamoDB table are sent to a Kinesis data stream (blog-srsa-ddb-table-data-stream), which delivers the data to a Firehose delivery stream (blog-srsa-ddb-table-delivery-stream).

You can monitor the processing of updated records in the Firehose delivery stream on the Monitoring tab of the delivery stream.

You can verify the delivery of the updates to the data lake by checking the objects in the S3 bucket (BucketName value from the stack Outputs tab).

The Firehose delivery stream is configured to write records to Amazon S3 using a custom prefix which is based on the date the records are delivered to the delivery stream. This partitions the delivered records by date which helps improve query performance by limiting the amount of data that query engines need to scan in order to return the results for a specific query. For more information, see Custom Prefixes for Amazon S3 Objects.

The file is in JSON format. You can verify the data in the following ways:

Use case 2: DynamoDB and Amazon S3 in different AWS accounts

The solution for this use case uses two CloudFormation stacks: the producer stack (deployed in Account A) and the consumer stack (deployed in Account B).

The producer stack (Account A) deploys the following:

  • A Kinesis data stream is configured to use 10 shards, but you can change this as needed.
  • A DynamoDB table with Kinesis streaming is enabled as a source to the Kinesis data stream, and the data stream is configured as a source to a Firehose delivery stream.
  • The Firehose delivery stream is configured to use a Lambda function for record transformation along with data delivery into an S3 bucket in Account B. The delivery stream is configured to batch records for 2 minutes or 1 MiB, whichever occurs first, before delivering the data to Amazon S3. The batch window is configurable for your use case.
  • The Lambda function is configured to run in a private subnet of an Amazon VPC, with no internet access. For this solution, the function transforms the multi-level JSON structure to a single-level JSON structure. You can extend the function to support more complex business transformations.

The consumer stack (Account B) deploys an S3 bucket configured to receive the data from the Firehose delivery stream in Account A.

The following diagram illustrates the architecture of the solution.

The architecture uses the DynamoDB feature to capture item-level changes in DynamoDB tables using Kinesis Data Streams. This feature provides capabilities to securely stream incremental updates without any custom code or components. 

Prerequisites

For this use case, you need the following:

  • Two AWS accounts (for the producer and consumer)
    • If you already deployed the architecture for the first use case and want to use the same account, delete the stack from the previous use case before proceeding with this section
  • Admin access to deploy needed resources

Deploy the components in Account B (consumer)

This step creates an S3 bucket with the following features:

  • Encryption at rest using CMKs
  • Block Public Access
  • Bucket versioning

You can extend the template to enable additional S3 bucket features as needed.

We deploy the resources with a CloudFormation template. As part of best practices, consider organizing resources by lifecycle and ownership as needed.

We use the KMS key for server-side encryption to encrypt the data in Amazon S3.

The CloudWatch log group data is always encrypted in CloudWatch Logs. If required, you can extend the stack to encrypt log group data using KMS CMKs.

  1. Choose Launch Stack to create a CloudFormation stack in your account:
  2. For DDBProducerAccountID, enter Account A’s account ID.
  3. For KMSKeyAlias, the KMS key used for server-side encryption to encrypt the data in Amazon S3 is populated by default.
  4. Choose Create stack.

After stack creation is complete, note the value of the BucketName output variable. We use this value later to test the solution.

Deploy the components in Account A (producer)

In this step, we sign in to the AWS Management Console with Account A to deploy the producer stack. We use the KMS key for server-side encryption to encrypt the data in Kinesis Data Streams, Kinesis Data Firehose, Amazon S3, and DynamoDB. As with other stacks, the CloudWatch log group data is always encrypted in CloudWatch Logs, but you can extend the stack to encrypt log group data using KMS CMKs.

  1. Choose Launch Stack to create a CloudFormation stack in your account:
  2. For ConsumerAccountID, enter the ID of Account B.
  3. For CrossAccountDatalakeBucket, enter the bucket name for Account B, which you created in the previous step.
  4. For ArtifactBucket, the S3 bucket containing the artifacts required for deployment is populated by default.
  5. For KMSKeyAlias, the KMS key used for server-side encryption to encrypt the data in Amazon S3 is populated by default.
  6. For BlogTransformationLambdaFile, the Amazon S3 key for the Lambda function code to perform Amazon Firehose Data transformation is populated by default.
  7. Select I acknowledge that AWS CloudFormation might create IAM resources with custom names.
  8. Choose Create stack.

Test the solution

To test the solution, we sign in as Account A, insert a new item in the DynamoDB table, and then update that item. Make sure you’re in the same Region as your table.

  1. On the CloudShell console, enter the following AWS CLI command to insert an item:
    aws dynamodb put-item \ 
    --table-name blog-srca-ddb-table \ 
    --item '{ "id": {"S": "864732"}, "name": {"S": "Chris"} , "Designation": {"S": "Senior Consultant"} }' \ 
    --return-consumed-capacity TOTAL

  2. Update the existing item with the following code:
    aws dynamodb put-item \ 
    --table-name blog-srca-ddb-table \ 
    --item '{ "id": {"S": "864732"}, "name": {"S": "Chris"} , "Designation": {"S": "Principal Consultant"} }' \ 
    --return-consumed-capacity TOTAL

  3. Sign out of Account A and sign in as Account B to verify the delivery of records into the data lake.

All item-level modifications from an DynamoDB table are sent to a Kinesis data stream (blog-srca-ddb-table-data-stream), which delivers the data to a Firehose delivery stream (blog-srca-ddb-table-delivery-stream) in Account A.

You can monitor the processing of the updated records on the Monitoring tab of the Firehose delivery stream.

You can verify the delivery of updates to the data lake by checking the objects in the S3 bucket that you created in Account B.

The Firehose delivery stream is configured similarly to the previous use case.

You can verify the data (in JSON format) in the same ways:

  • Download the files
  • Run an AWS Glue crawler to create a table to query in Athena
  • Query the data using Amazon S3 Select

Clean up

To avoid incurring future charges, clean up all the AWS resources that you created using AWS CloudFormation. You can delete these resources on the console or via the AWS CLI. For this post, we walk through the steps using the console.

Clean up resources from use case 1

To clean up the DynamoDB and Amazon S3 resources in the same account, complete the following steps:

  1. On the Amazon S3 console, empty the S3 bucket and remove any previous versions of S3 objects.
  2. On the AWS CloudFormation console, delete the stack bdb1040-ddb-lake-single-account-stack.

You must delete the Amazon S3 resources before deleting the stack, or the deletion fails.

Clean up resources from use case 2

To clean up the DynamoDB and Amazon S3 resources in different accounts, complete the following steps:

  1. Sign in to Account A.
  2. On the AWS CloudFormation console, delete the stack bdb1040-ddb-lake-multi-account-stack.
  3. Sign in to Account B.
  4. On the Amazon S3 console, empty the S3 bucket and remove any pervious versions of S3 objects.
  5. On the AWS CloudFormation console, delete the stack bdb1040-ddb-lake-multi-account-stack.

Extend the solution

You can extend this solution to stream DynamoDB table data into cross-Region S3 buckets by setting up cross-Region replication (using the Amazon secured private channel) on the bucket where Kinesis Data Firehose delivers the data.

You can also perform a point-in-time initial load of the DynamoDB table into the data lake before setting up DynamoDB Kinesis streams. DynamoDB provides a no-coding required feature to achieve this. For more information, see Export Amazon DynamoDB Table Data to Your Data Lake in Amazon S3, No Code Writing Required.

To extend the usability scope of DynamoDB data in S3 buckets, you can crawl the location to create AWS Glue Data Catalog database tables. Registering the locations with AWS Lake Formation helps simplify permission management and allows you to implement fine-grained access control. You can also use Athena, Amazon Redshift, Amazon SageMaker, and Amazon QuickSight for data analysis, ML, and reporting services.

Conclusion

In this post, we demonstrated two solutions for streaming DynamoDB table data into Amazon S3 to build a data lake using a secured Amazon private channel.

The CloudFormation template gives you an easy way to set up the process, which you can be further modify to meet your specific use case needs.

Please let us know if you have comments about this post!


About the Authors

Praveen Krishnamoorthy Ravikumar is a Data Architect with AWS Professional Services Intelligence Practice. He helps customers implement big data and analytics platform and solutions.


Abhishek Gupta is a Data and ML Engineer with AWS Professional Services Practice.


Ashok Yoganand Sridharan is a Big Data Consultant with AWS Professional Services Intelligence Practice. He helps customers implement big data and analytics platform and solutions