Post Syndicated from Ram Konchada original https://aws.amazon.com/blogs/architecture/field-notes-how-to-back-up-a-database-with-kms-encryption-using-aws-backup/
An AWS security best practice from The 5 Pillars of the AWS Well-Architected Framework is to ensure that data is protected both in transit and at rest. One option is to use SSL/TLS to encrypt data in transit, and use cryptographic keys to encrypt data at rest. To meet your organization’s disaster recovery goals, periodic snapshots of databases should be scheduled and stored across Regions and across administrative accounts. This ensures quick Recovery Point Objective (RPO) and Recovery Time Objective (RTO).
From a security standpoint, these snapshots should also be encrypted. Consider a scenario where one administrative AWS account is used for running the Amazon Relational Database Service (Amazon RDS) instance and backups. In this scenario, you may discover a situation where data cannot be recovered either from production instance or backups if this AWS account is compromised. Amazon RDS snapshots encrypted using AWS managed customer master keys (CMKs) cannot be copied across accounts. Cross-account backup helps you avoid this situation.
This blog post presents a solution that helps you to perform cross-account backup using AWS Backup service and restore database instance snapshots encrypted using AWS Key Management Service (KMS) CMKs across the accounts. This can help you to meet your security, compliance, and business continuity requirements. Although the solution uses RDS as the database choice, it can be applied to other database services (with some limitations).
Architecture
Figure 1 illustrates the solution described in this blog post.
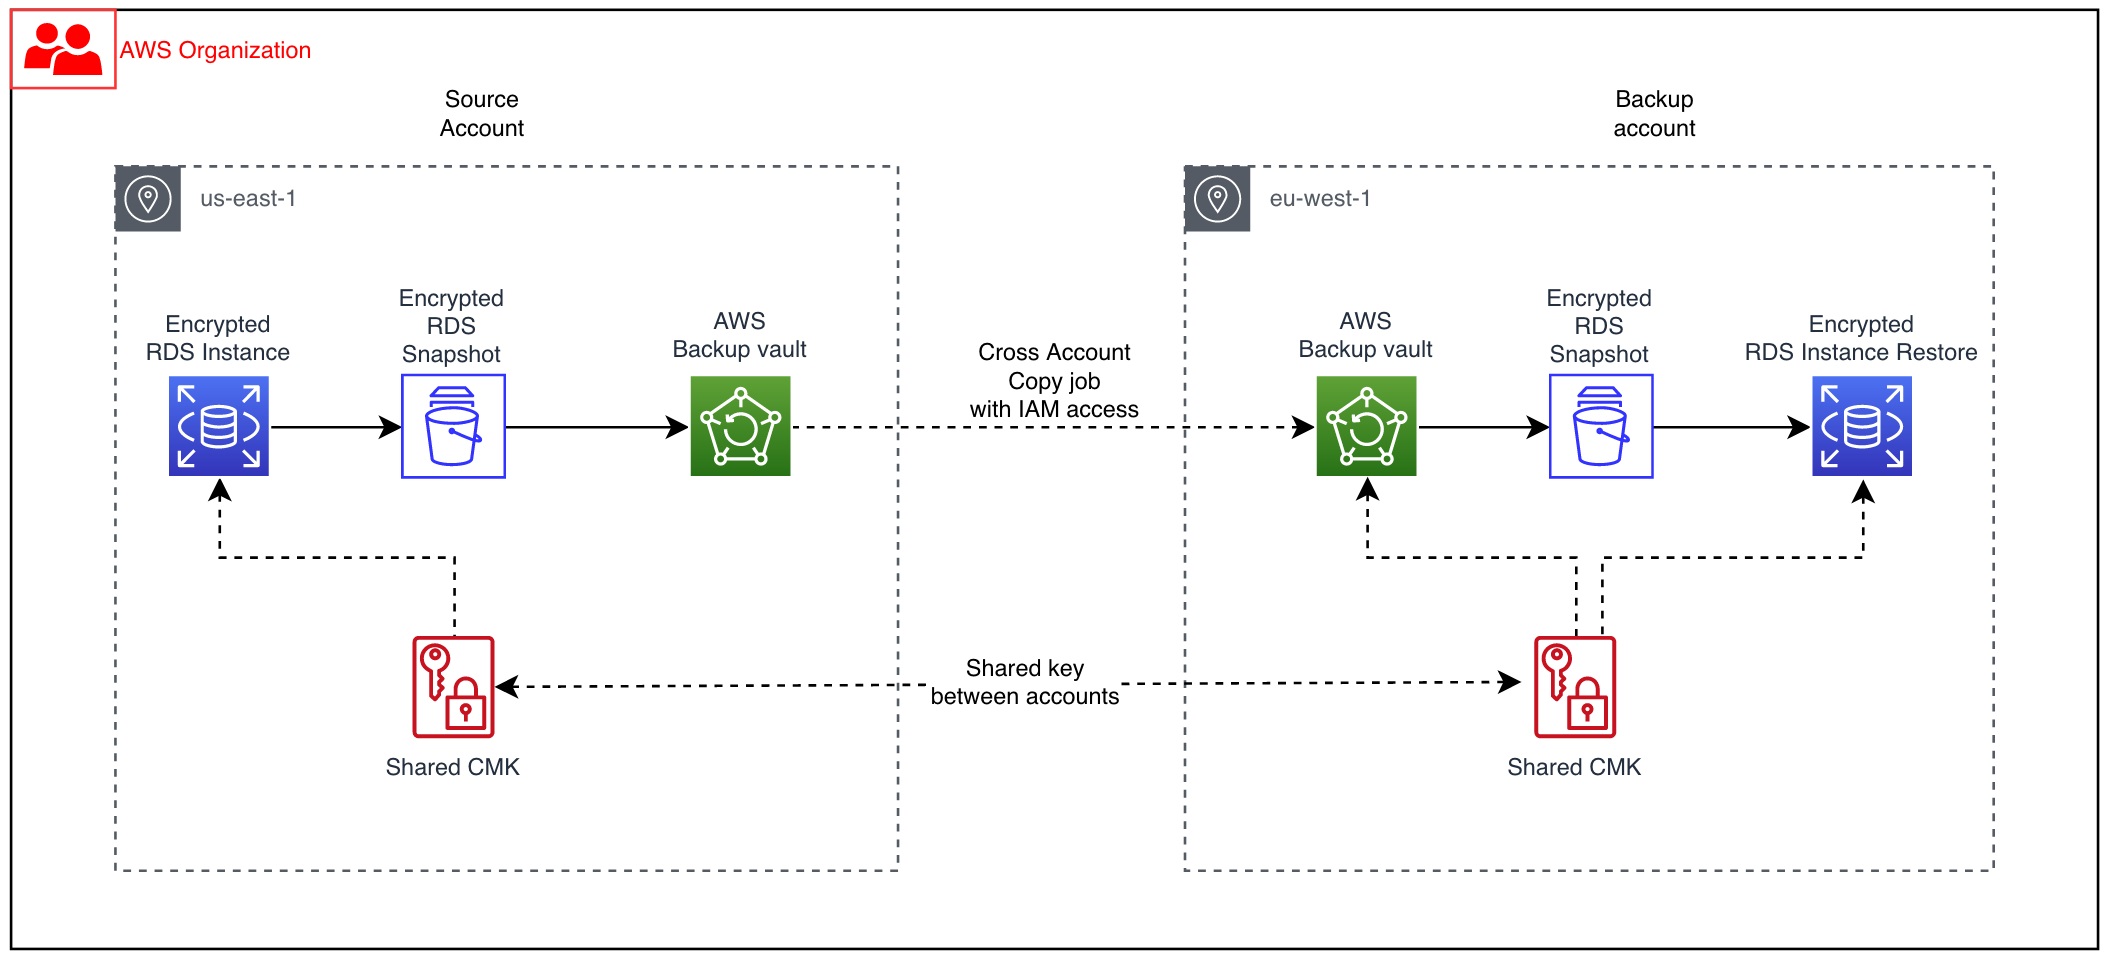
Figure 1: Reference architecture for Amazon RDS with AWS Backup using KMS over two different accounts
Solution overview
When your resources like Amazon RDS (including Aurora clusters) are encrypted, cross-account copy can only be performed if they are encrypted by AWS KMS customer managed customer master keys (CMK). The default vault is encrypted using Service Master Keys (SMK). Therefore, to perform cross-account backups, you must use CMK encrypted vaults instead of using your default backup vault.
- In the source account, create a backup of the Amazon RDS instance encrypted with customer managed key.
- Give the backup account access to the customer-managed AWS KMS encryption key used by the source account’s RDS instance.
- In the backup account, ensure that you have a backup vault encrypted using a customer-managed key created in the backup account. Also, make sure that this vault is shared with the different account using vault policy.
- Copy the encrypted snapshots to the target account. This will re-encrypt snapshots using the target vault account’s AWS KMS encryption keys in the target Region.
Prerequisites
- Ensure you are in the correct AWS Region of operation.
- Two AWS accounts within the same AWS Organization.
- Source account where you have a CMK encrypted Amazon RDS instance.
- Opt-in to cross-account backup.
- Backup account to which you will copy the encrypted snapshots.
- A backup vault encrypted with backup CMK (different from source CMK) in the backup account.
- An IAM role to perform cross-account backup. You can also use the AWSBackupDefaultServiceRole.
Solution
In this blog post, two accounts are used that are part of the same organization. Ensure that you update your account IDs accordingly.
Source account – 111222333444
AWS Backup account – 666777888999
Create a customer-managed key in the source account
Step 1 – Create CMKs
Create symmetric and asymmetric CMKs in the AWS Management Console. During this process, you will determine the cryptographic configuration of your CMK and the origin of its key material. You cannot change these properties after the CMK is created. You can also set the key policy for the CMK, which can be changed later. Follow key rotation best practices to ensure maximum security.
- Choose Create key.
- To create a symmetric CMK, for key type choose Symmetric. Use AWS KMS as the key material origin, and choose the single-region key for Regionality.
- Choose Next, and proceed with Step 2.
Step 2 – Add labels
- Type an alias for the CMK (alias cannot begin with aws/. The aws/ prefix is reserved by Amazon Web Services to represent AWS managed CMKs in your account).
- Add a description that identifies the key usage.
- Add tags based on an appropriate tagging strategy.
- Choose Next, and proceed with Step 3.
Step 3 – Key administrative permissions
Select the IAM users and roles that can administer the CMK. Ensure that least privilege design is implemented when assigning roles and permissions, in addition to following best practices.
Step 4 – Key usage permissions
Next, we will need to define the key usage and permissions. Complete the following steps:
- Select the IAM users and roles that can use the CMK for cryptographic operations.
- Within the Other AWS accounts section, type the 12-digit account number of the backup account.
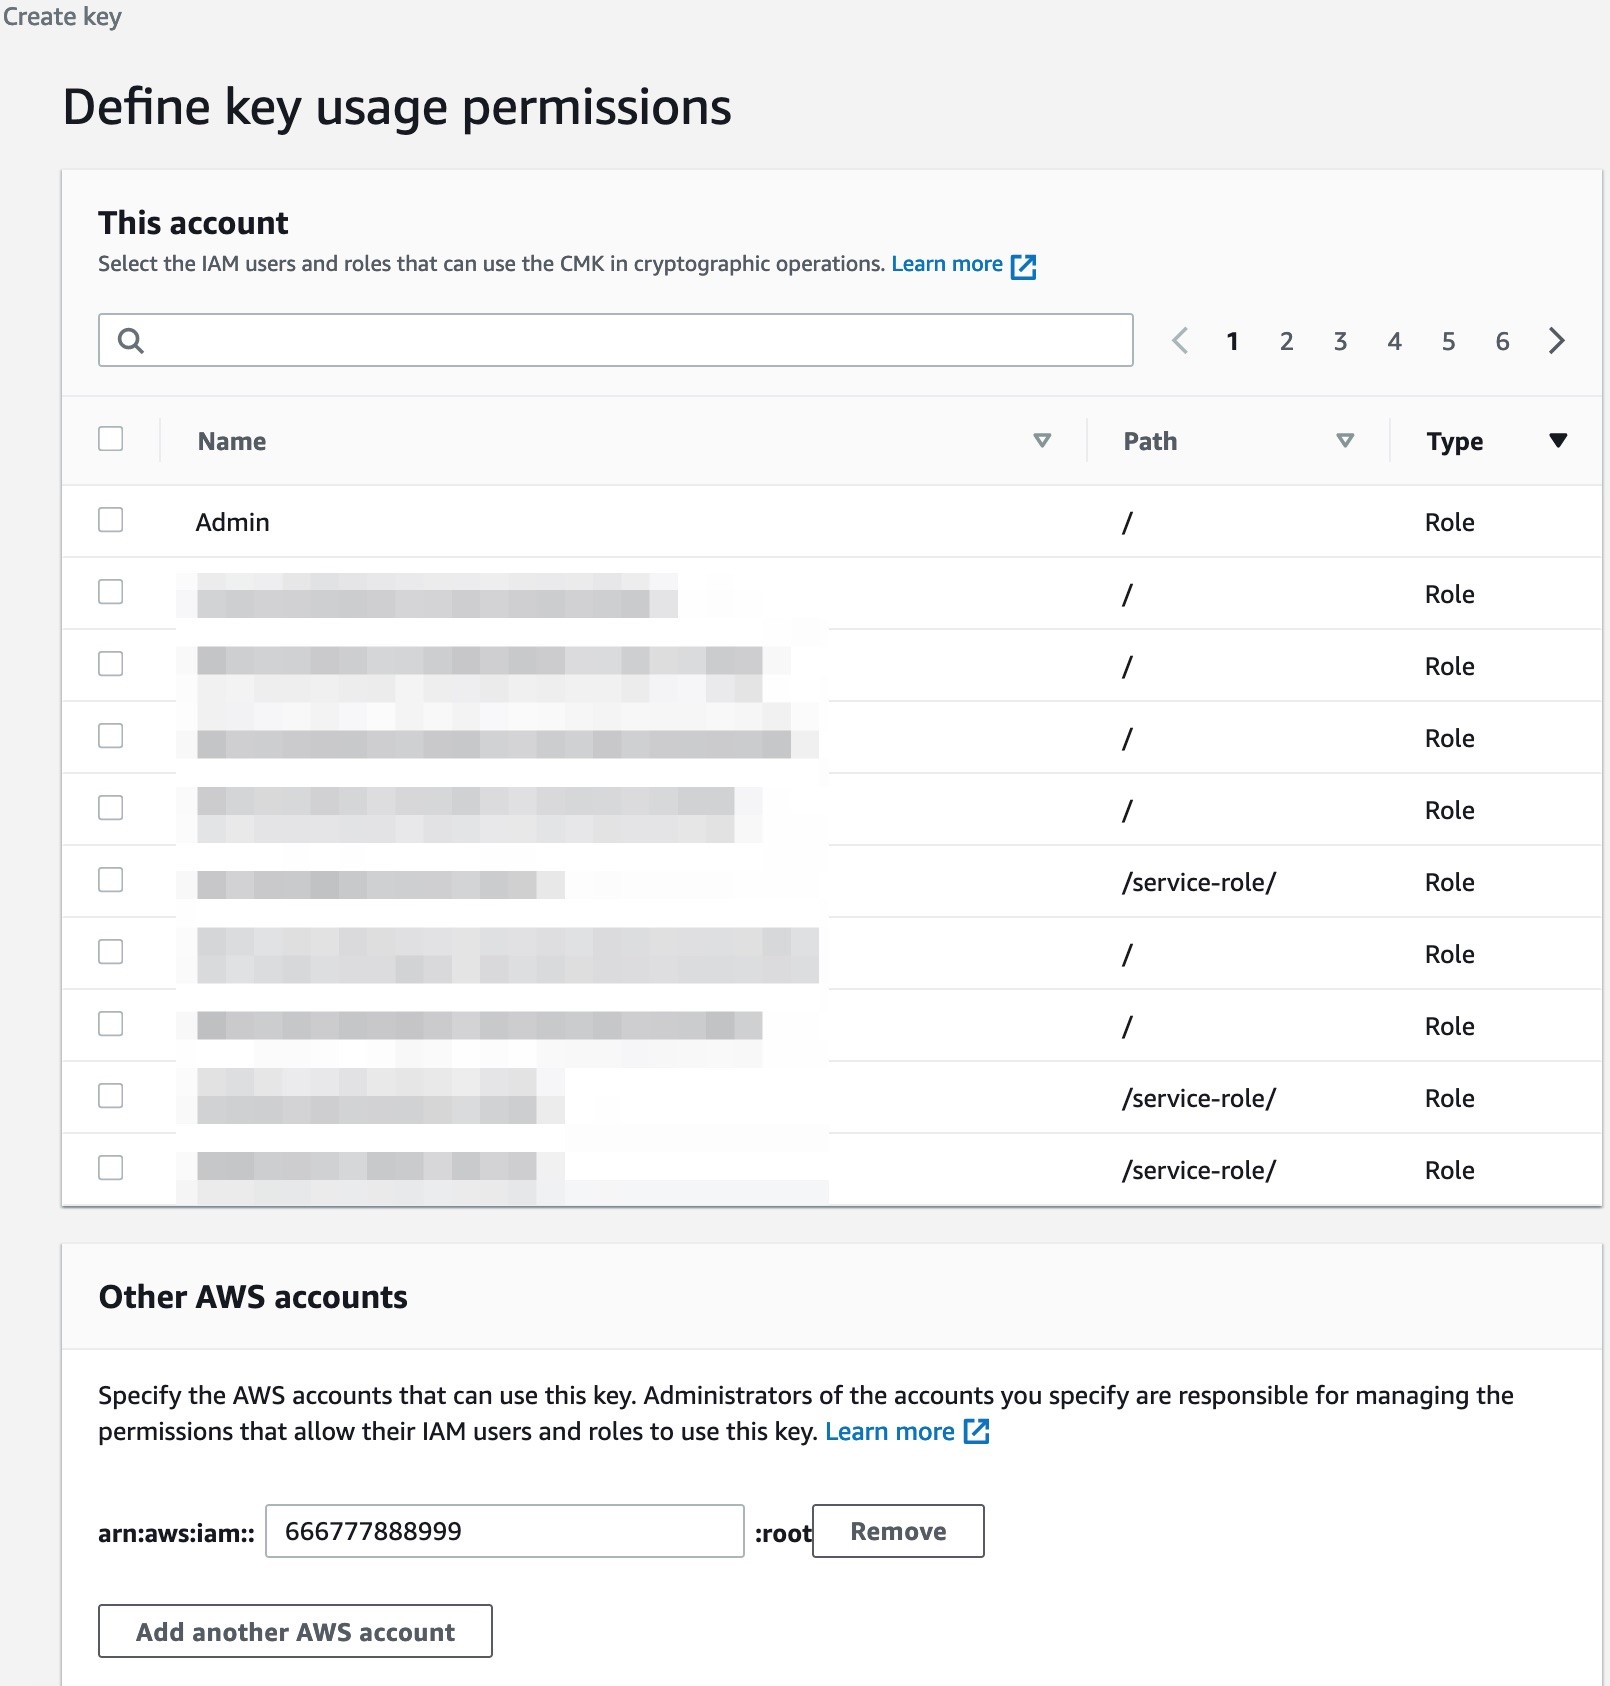
Figure 2: Key usage permissions
Step 5 – Key configuration
Review the chosen settings, and press the Finish button to complete key creation.
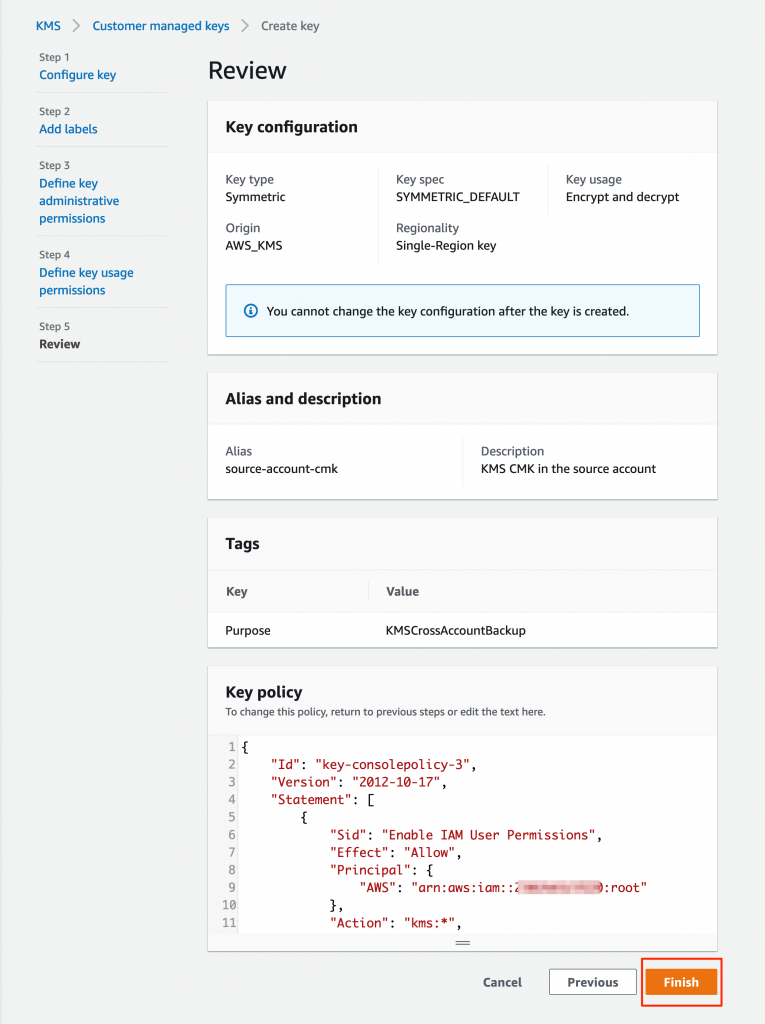
Figure 3: Key configuration
Cross-account access key policy
Read the blog post on sharing custom encryption keys more securely between accounts using AWS Key Management Service for more information.
Step 6 – CMK verification
Within the AWS KMS console page, verify that the CMK key has been successfully created and status is enabled.
Create an Amazon RDS database in source account
- Choose the correct AWS Region.
- Navigate to RDS through the console search option.
- Choose Create a Database option, and choose your Database type.
- In Database encryption settings, use the CMK key you created in the preceding steps.
- Create the database.
- Follow Amazon RDS security best practices.
- Automated backups are enabled
- Your data is protected (both in transit and at rest)
- Audit logs are enabled for your RDS
Create an AWS Backup vault in the source account
- On the AWS Backup service, navigate to AWS Backup > AWS Backup vault.
- Create a backup vault by specifying the name, and add tags based on an appropriate tagging strategy.
Create an on-demand AWS Backup in the source account
For the purpose of this solution, we will create an on-demand backup from the AWS Backup dashboard. You can also choose an existing snapshot if it is already available.
- Choose Create on-demand backup. Choose resource type as Amazon RDS, and select the appropriate database name. Choose the option to create backup now. Complete the setup by providing an appropriate IAM role and tag values (you can use the prepopulated default IAM role).
- Wait for the backup to be created, processed, and completed. This may take several hours, depending on the size of the database. If this step is too close to an existing scheduled backup time, you may see the following message on the console: Note – this step might fail if the on-demand backup window is too close to or overlapping the scheduled backup time determined by the Amazon RDS service. If this occurs, then create an on-demand backup after the scheduled backup is completed.
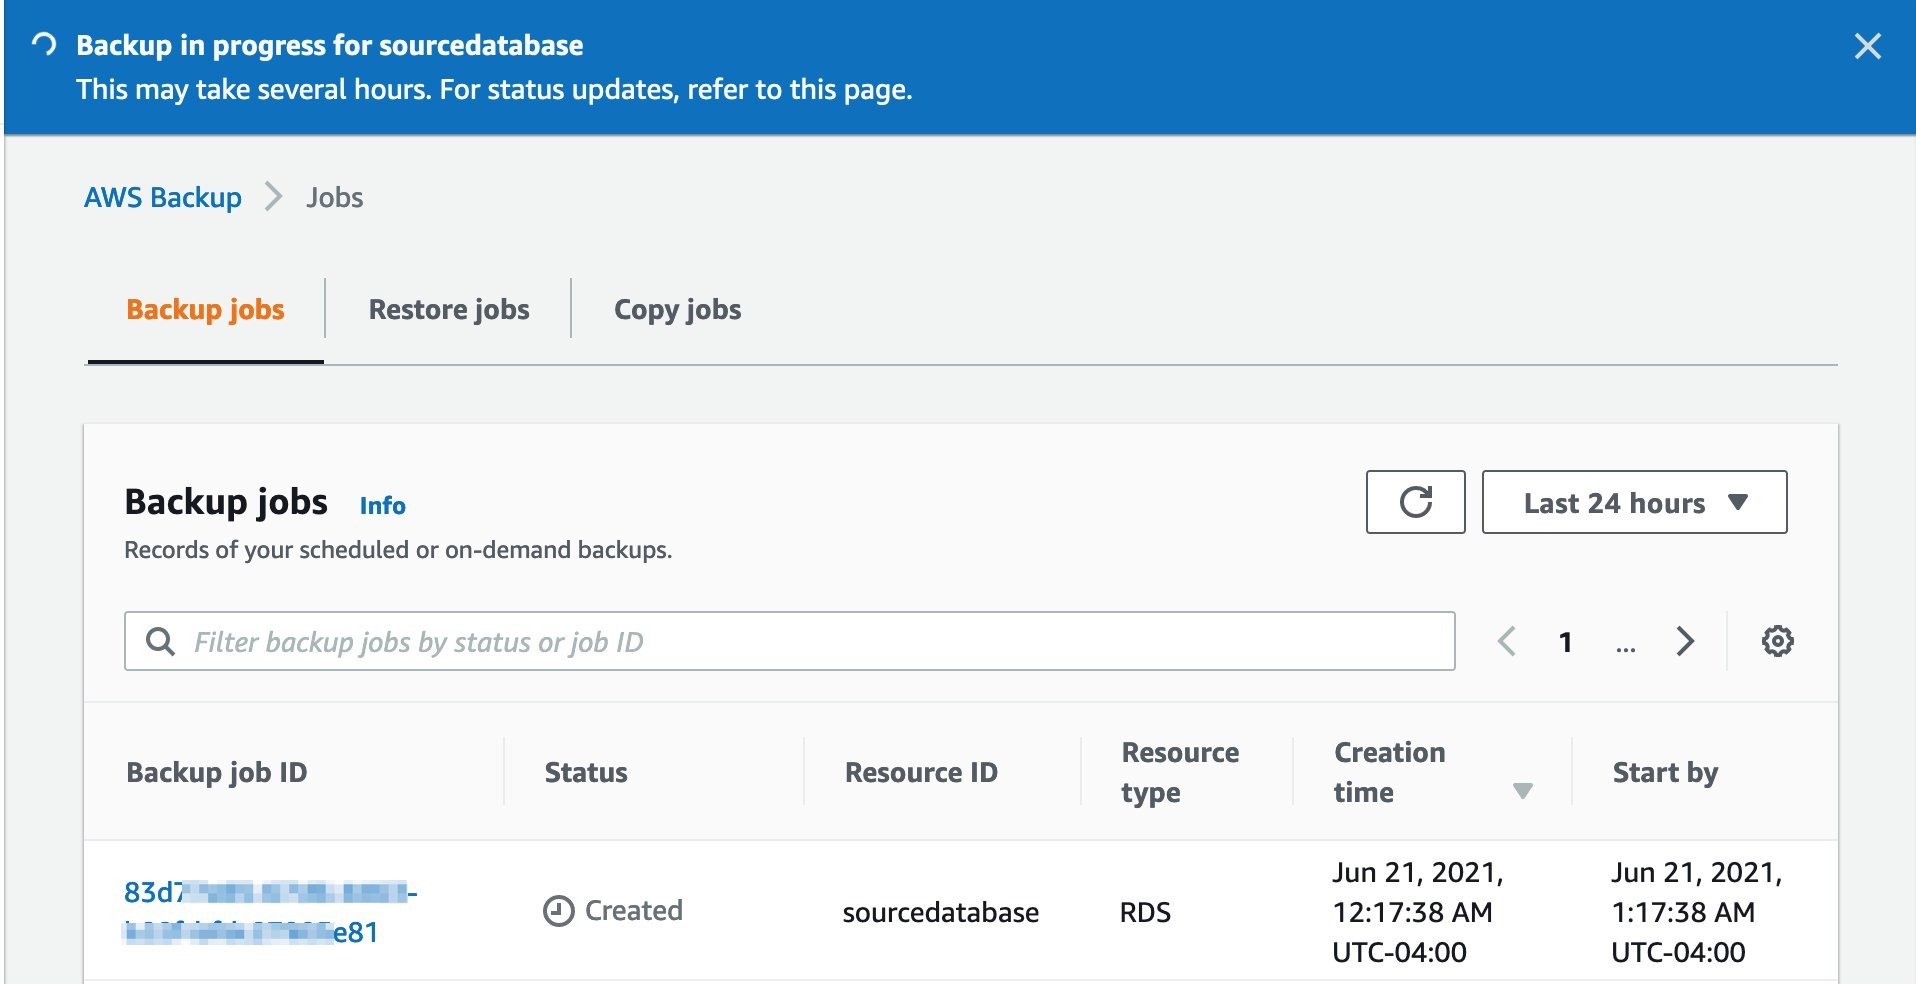
Figure 4: Create on-demand backup
- Confirm the status is completed once the backup process has finished.
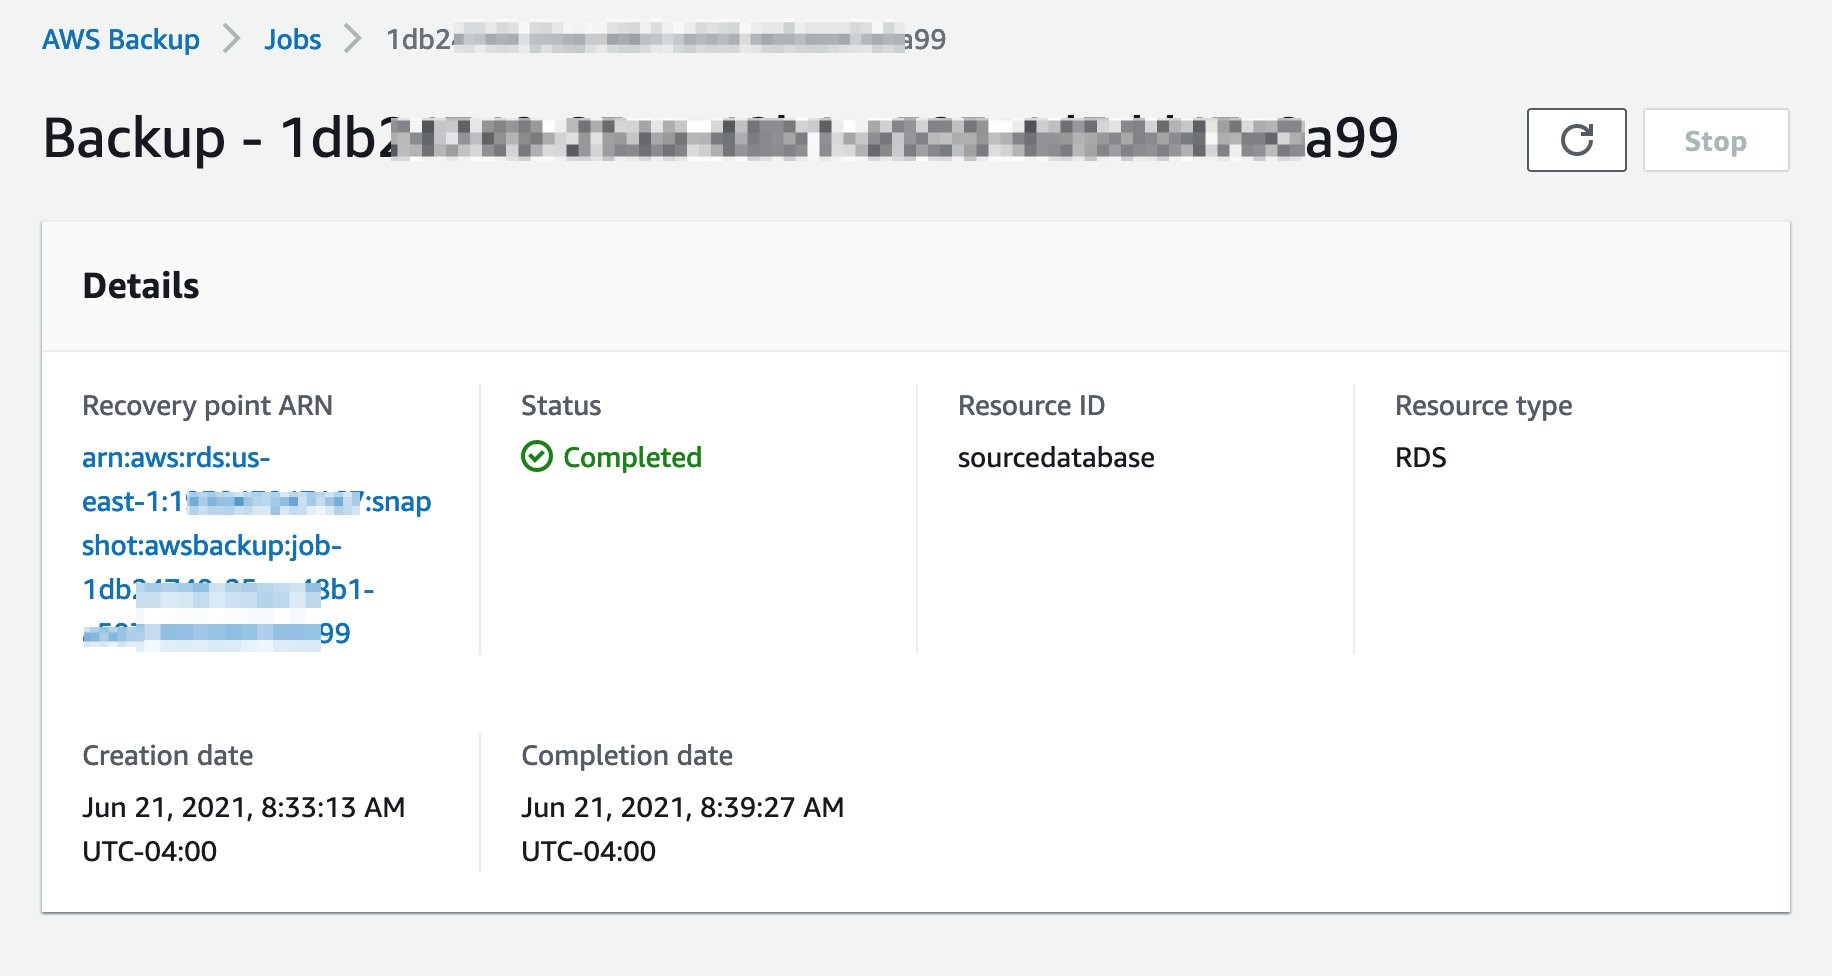
Figure 5: Completed on-demand backup
- If you navigate to the backup vault you should see the recovery point stored within the source account’s vault.
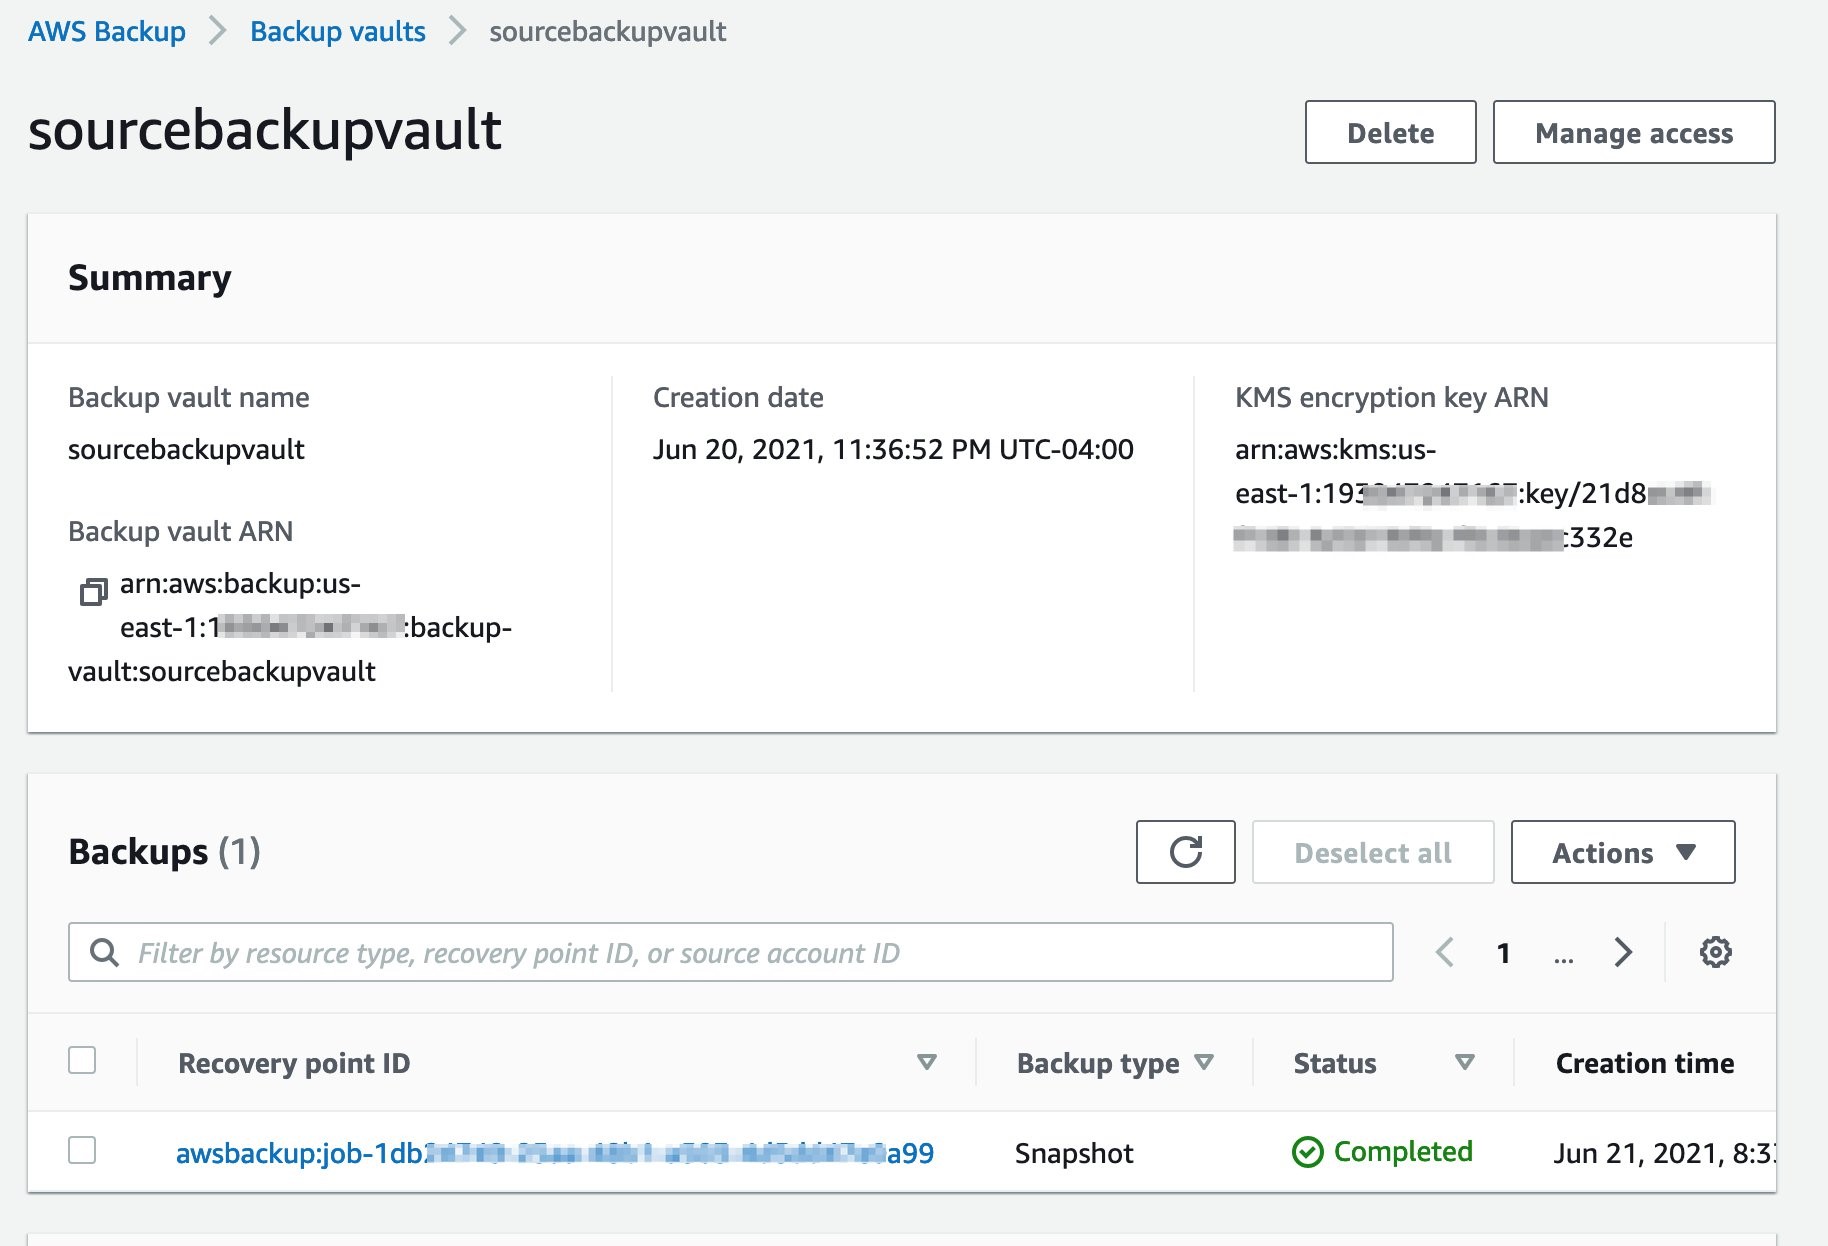
Figure 6: Backup vault
Prepare AWS Backup account (666777888999)
Create SYMMETRIC CMK in the backup account
Follow the same steps as before in creating a symmetric CMK in backup account. Ensure that you do not grant access to the source AWS account to this key.
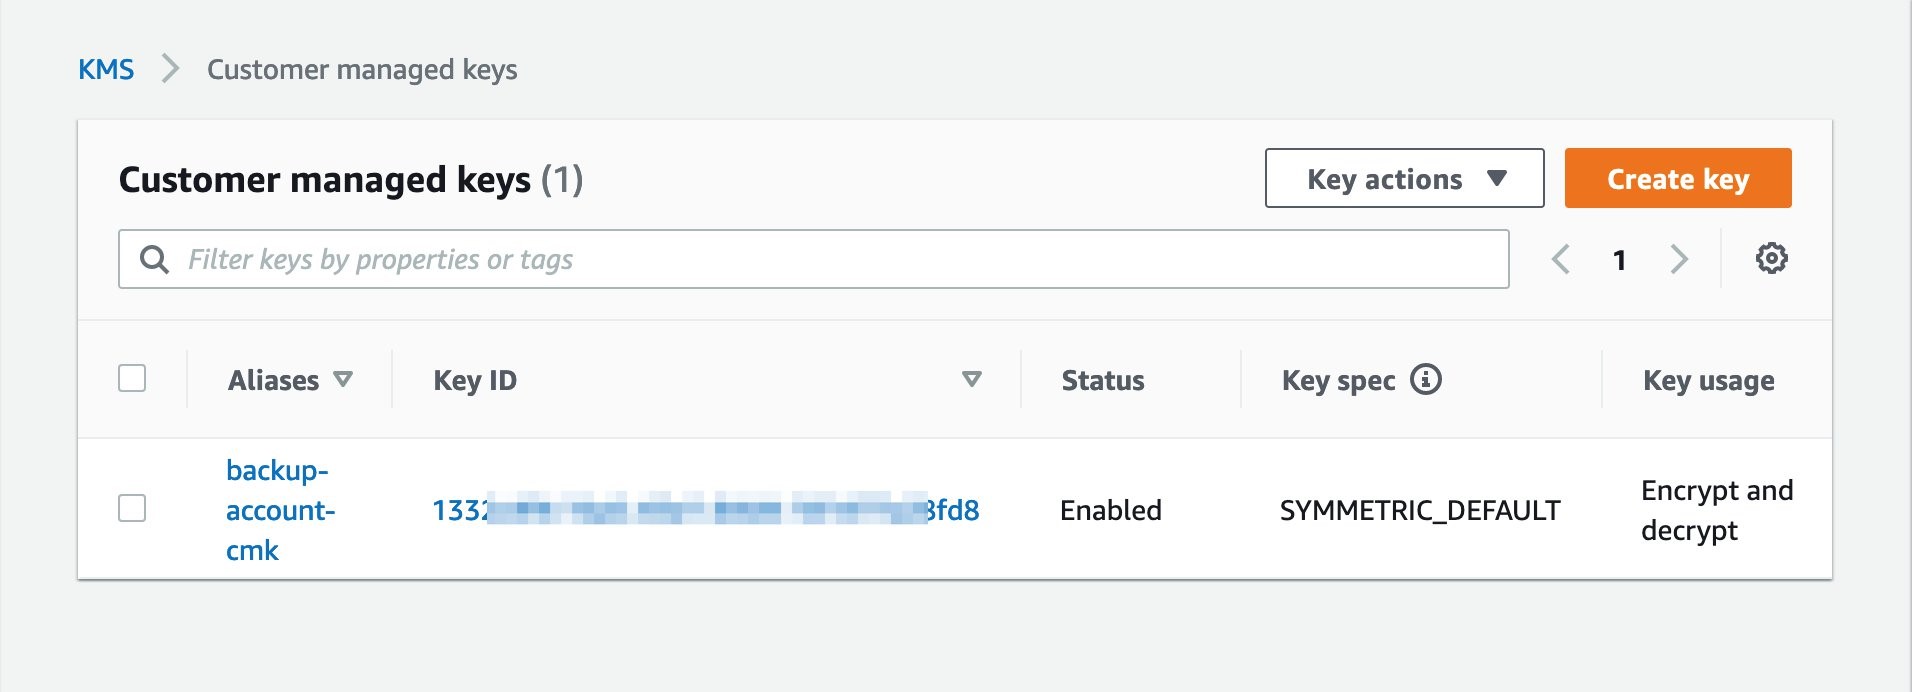
Figure 7: CMK in backup account
Add IAM policy to users and roles to use CMK created in source account
The key policy in the account, that owns the CMK, sets the valid range for permissions. But, users and roles in the external account cannot use the CMK until you attach IAM policies that delegate those permissions or use grants to manage access to the CMK. The IAM policies are set in the external account and follow the best practices for IAM policies. Review the blog post on sharing custom encryption keys more securely between accounts using AWS Key Management Service for more information.
Create an AWS Backup vault in backup account
In the backup account, navigate to the “Backup vaults” section on the AWS Backup service page, and choose Create Backup vault. Next, provide a backup vault name, and choose the CMK key you previously created. In addition, you can specify Backup vault tags. Finally, press the Create Backup vault button.
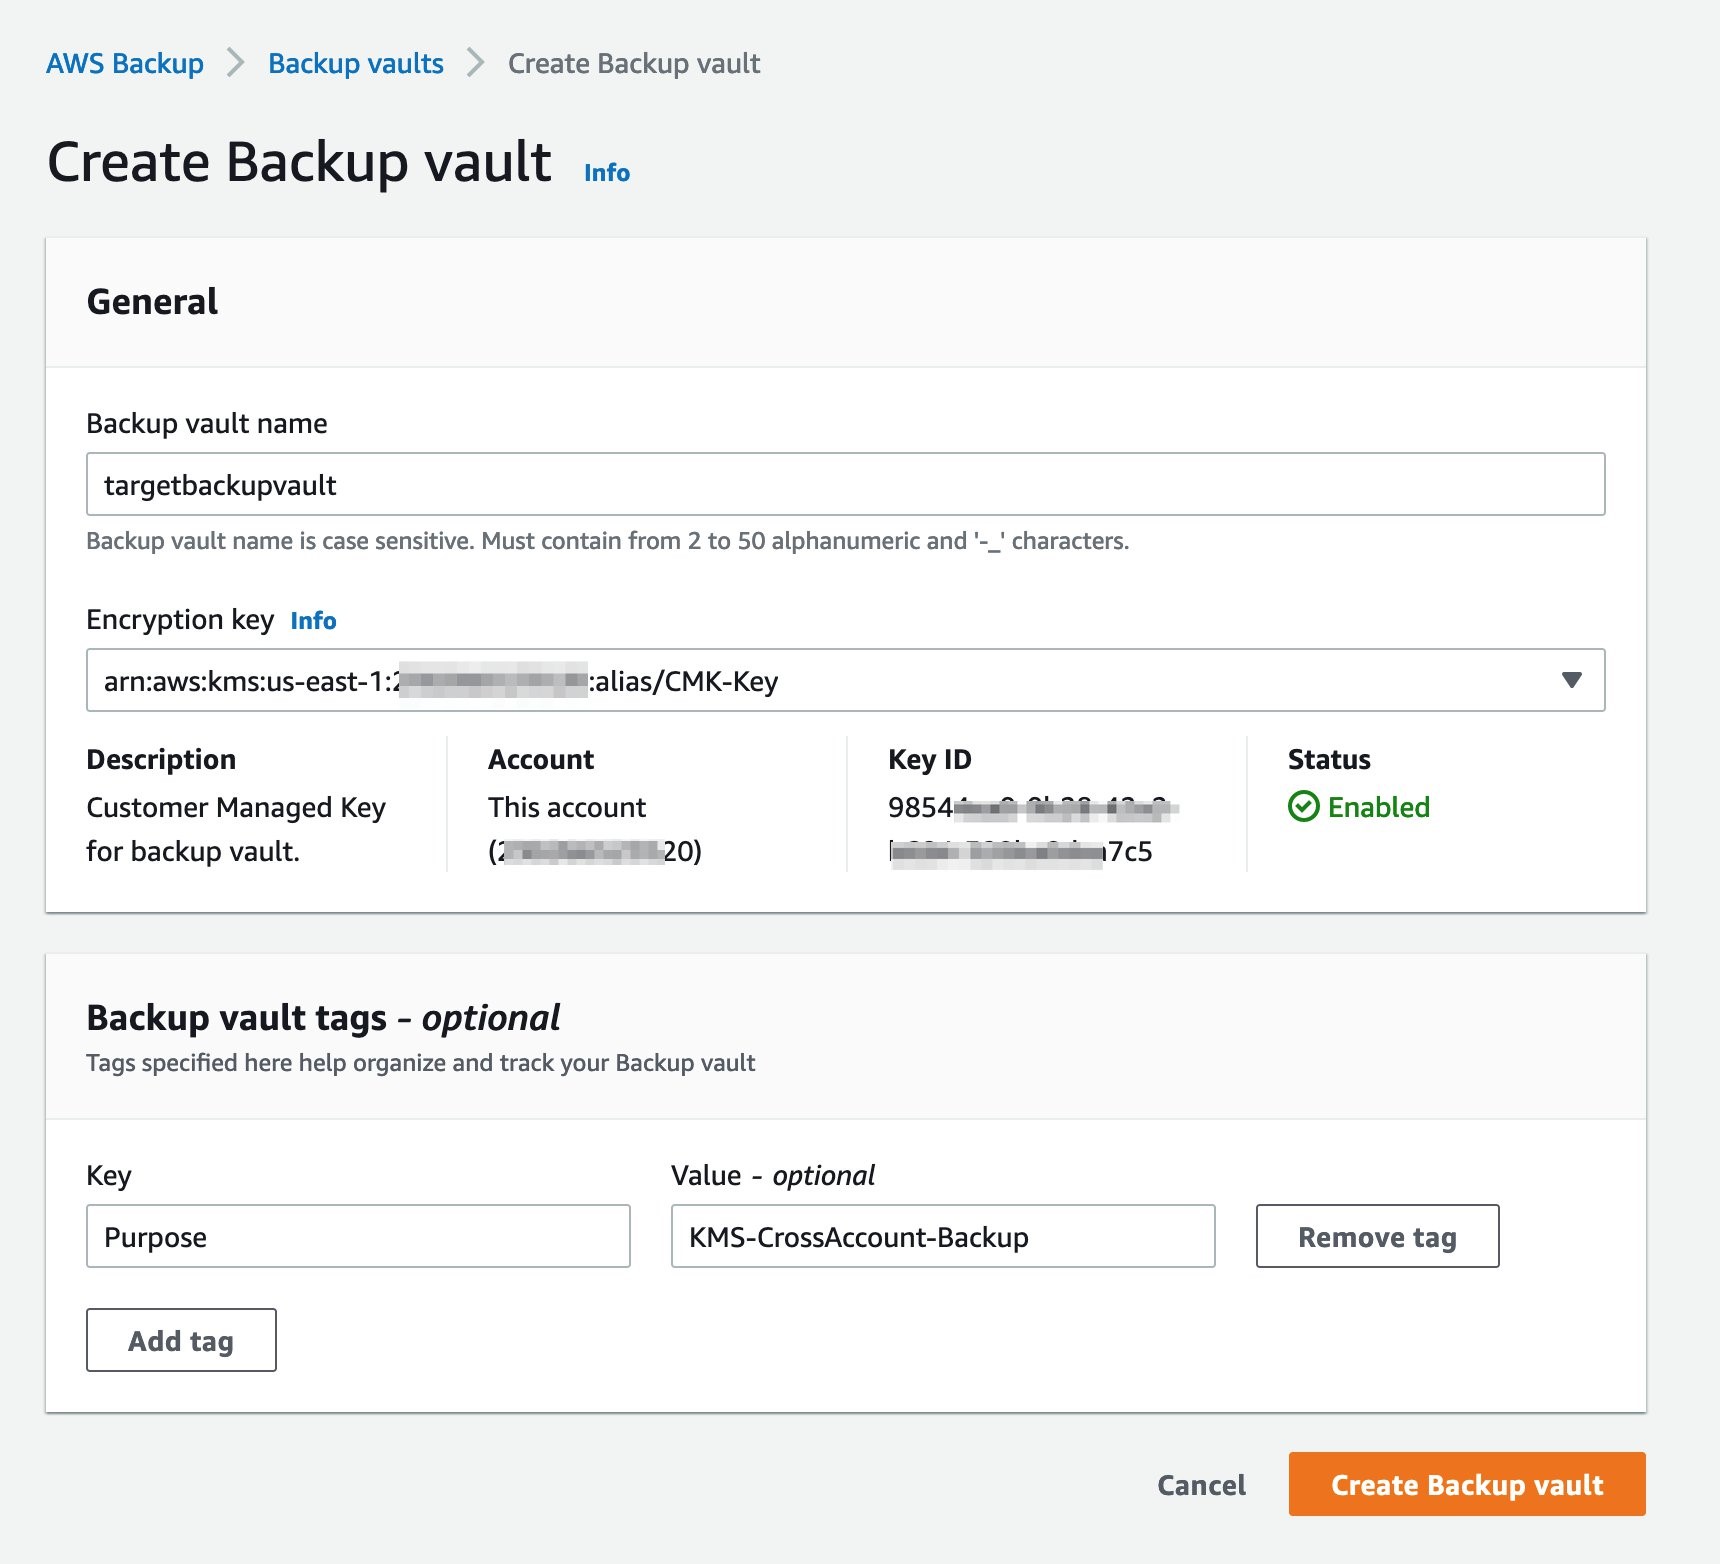
Figure 8: Create backup vault
Allow access to the backup vault from organization (or organizational unit)
This step will enable multiple accounts with the organization to store snapshots in the backup vault.
{
"Version": "2012-10-17",
"Statement": [
{
"Effect": "Allow",
"Principal": "*",
"Action": "backup:CopyIntoBackupVault",
"Resource": "*",
"Condition": {
"StringEquals": {
"aws:PrincipalOrgID": "o-XXXXXXXXXX"
}
}
}
]
}
Copy recovery point from source account vault to backup account vault
Initiate a recovery point copy by navigating to the backup vault in the source account, and create a copy job. Select the correct Region, provide the backup vault ARN, and press the Copy button.
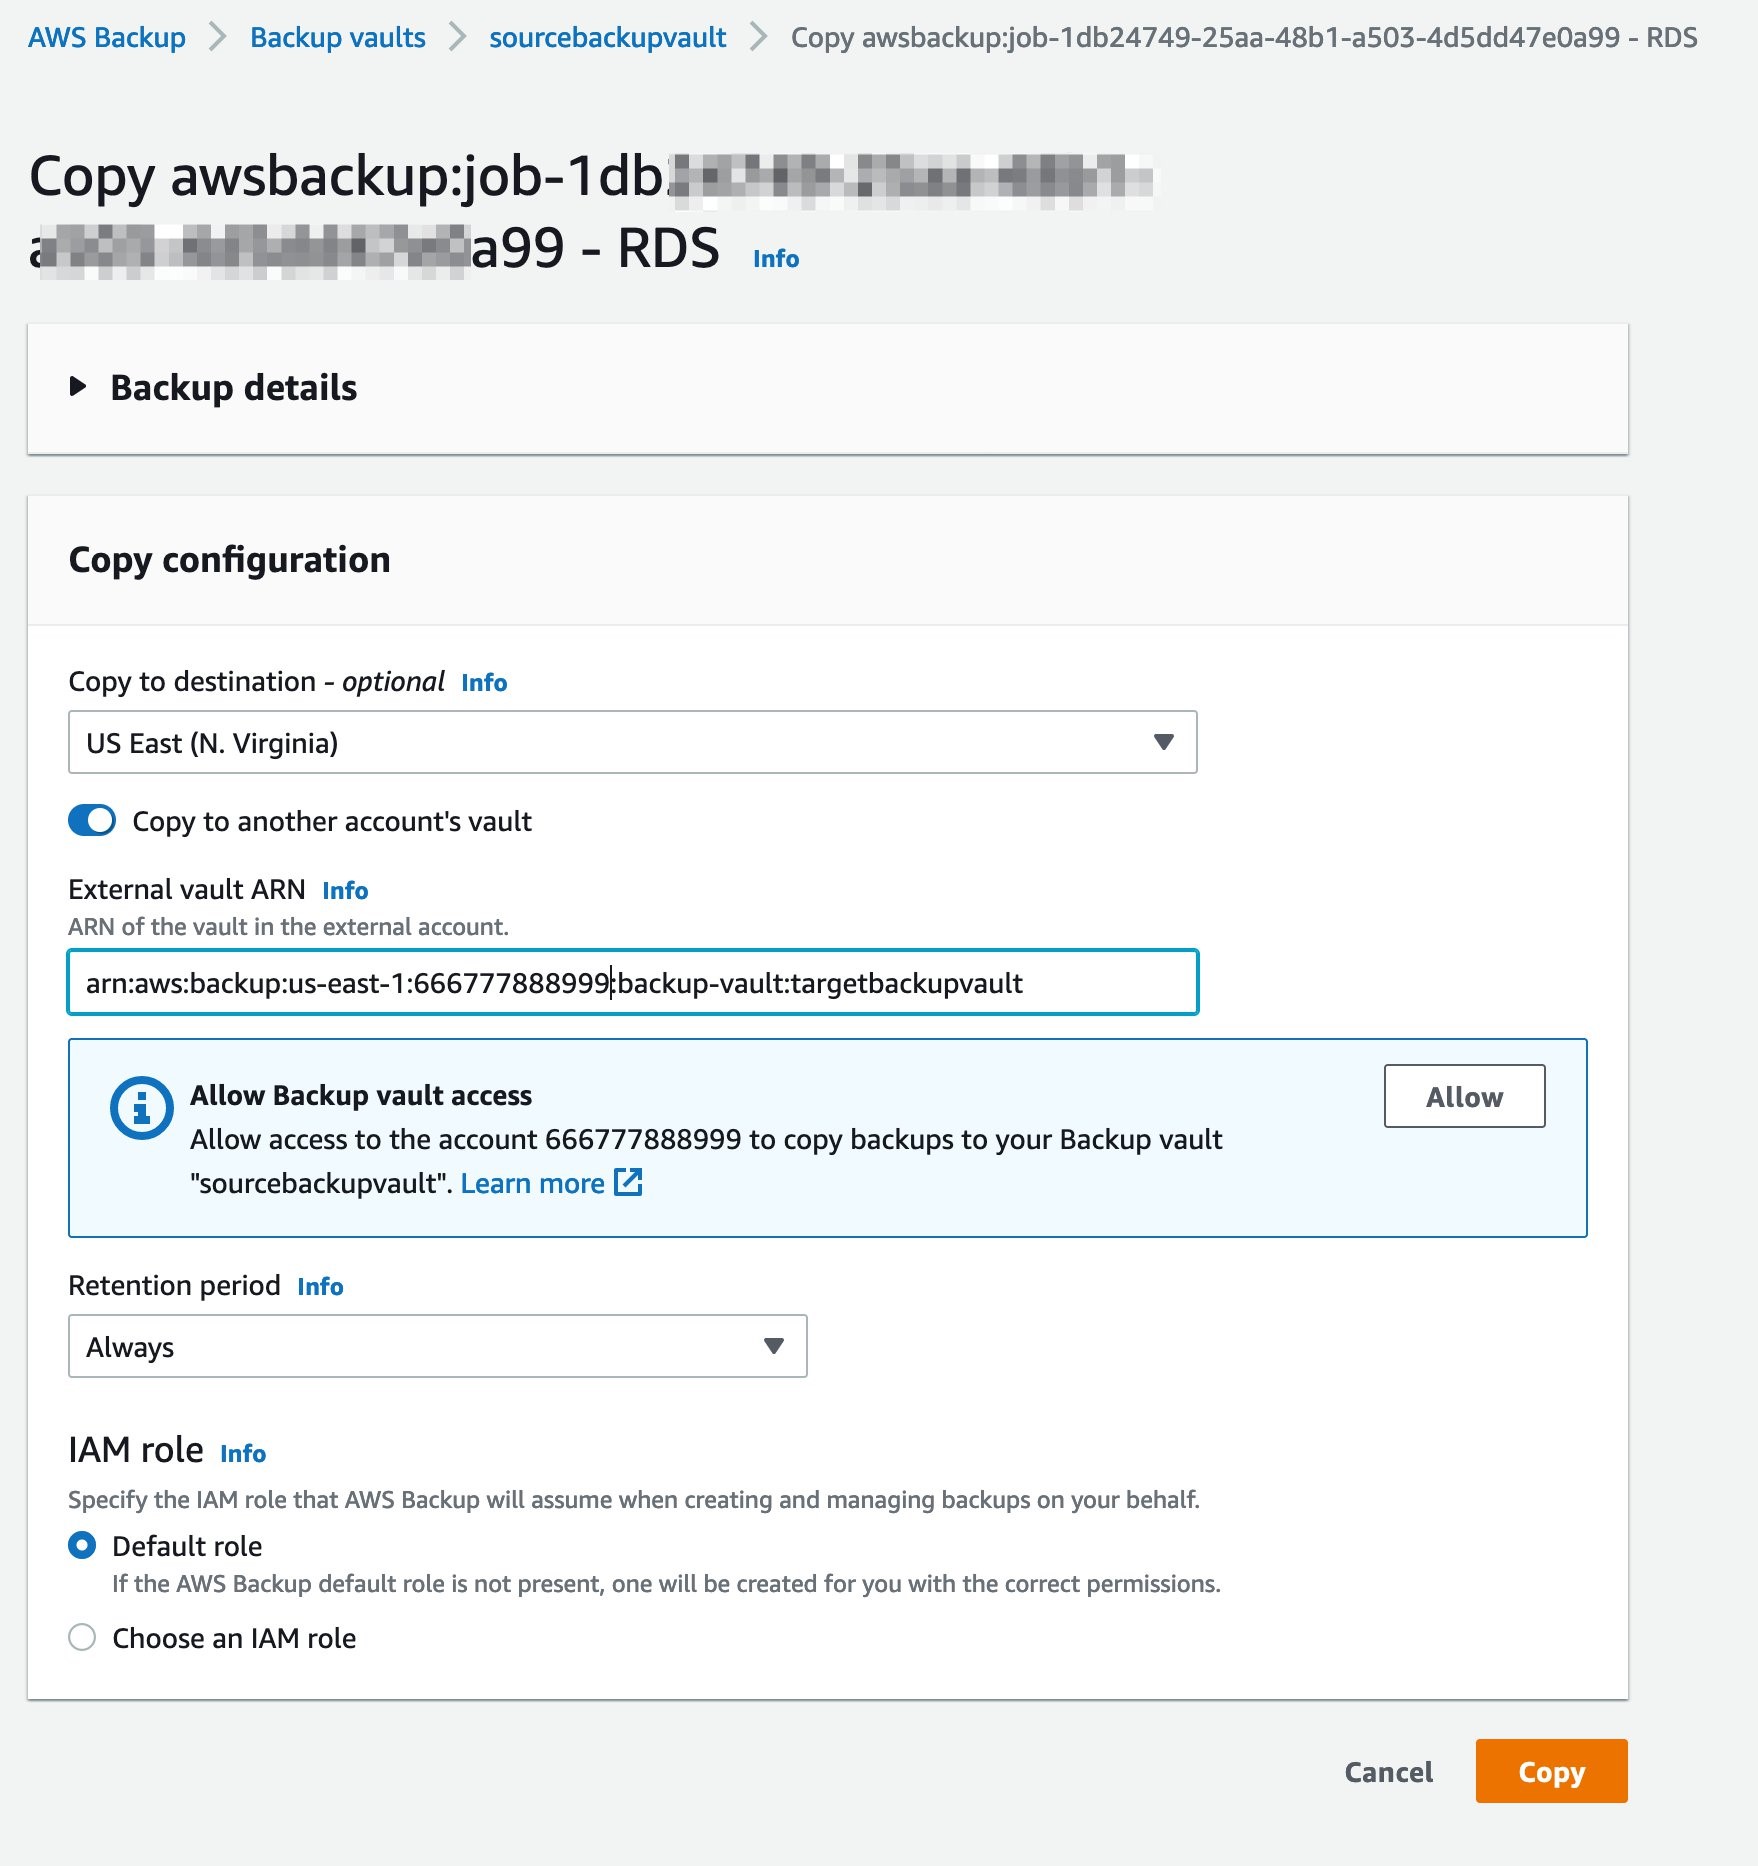
Figure 9: Copy job initiation
Next, allow the backup account to copy the data back into source account by adding permissions to your back vault “sourcebackupvault” access policy.
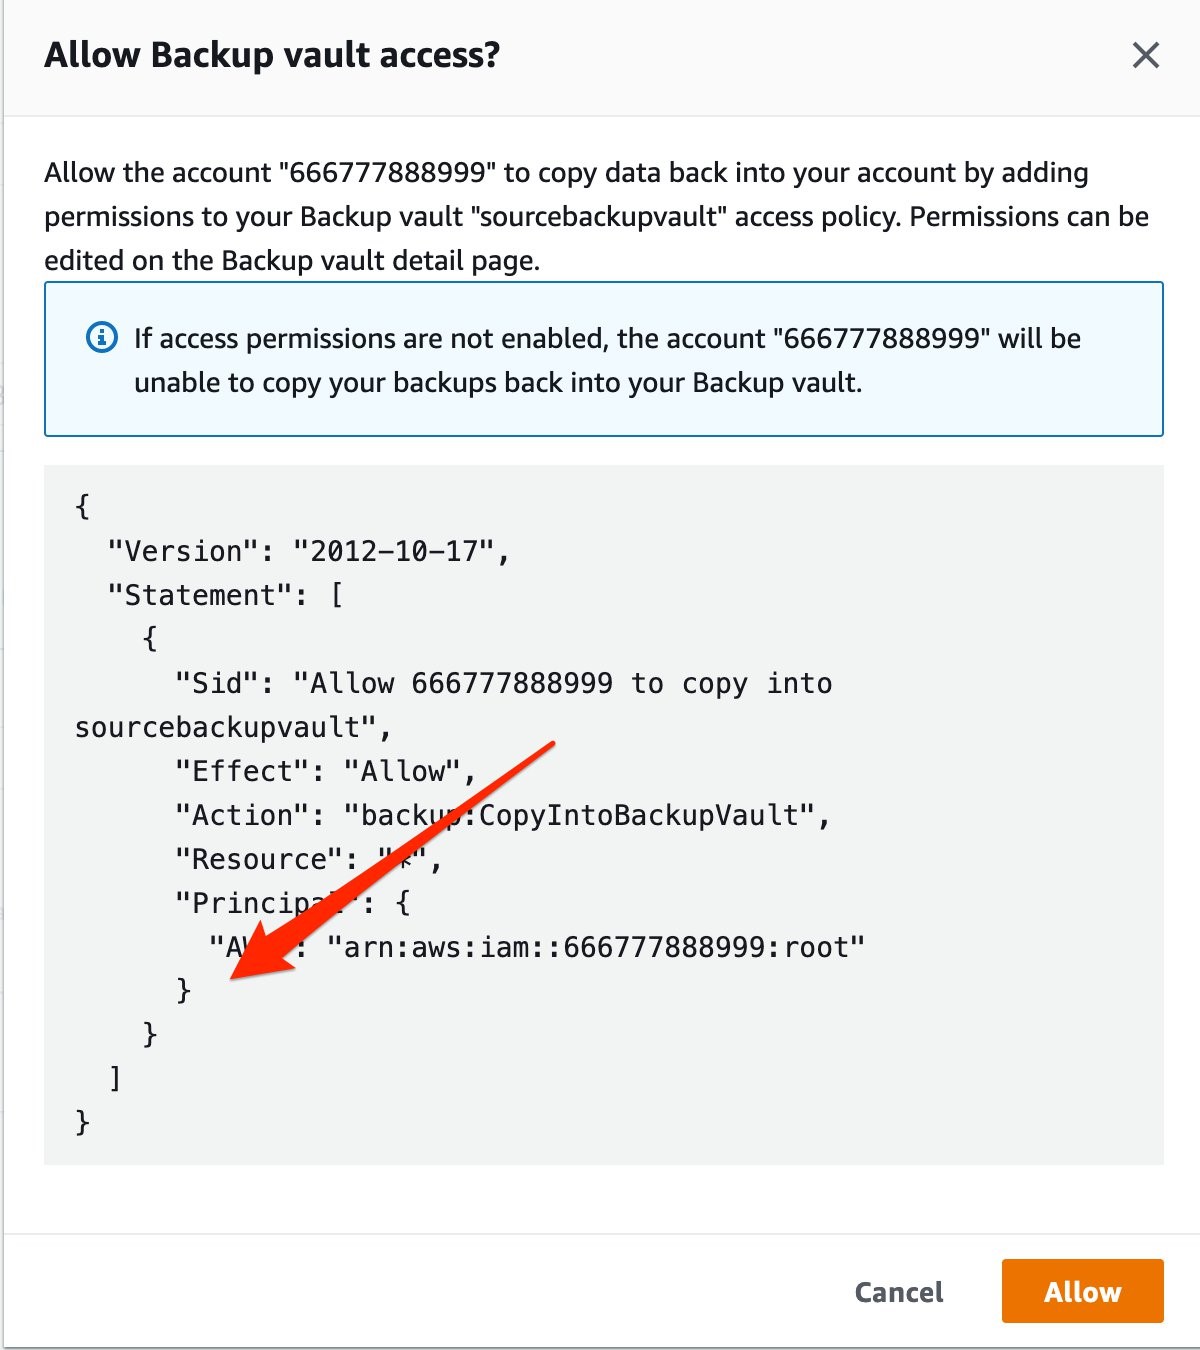
Figure 10: Allow AWS Backup vault access
Initiate copy job
From the backup vault in the source account, press the Copy button to copy a recovery point to the backup account (shown in Figure 11).
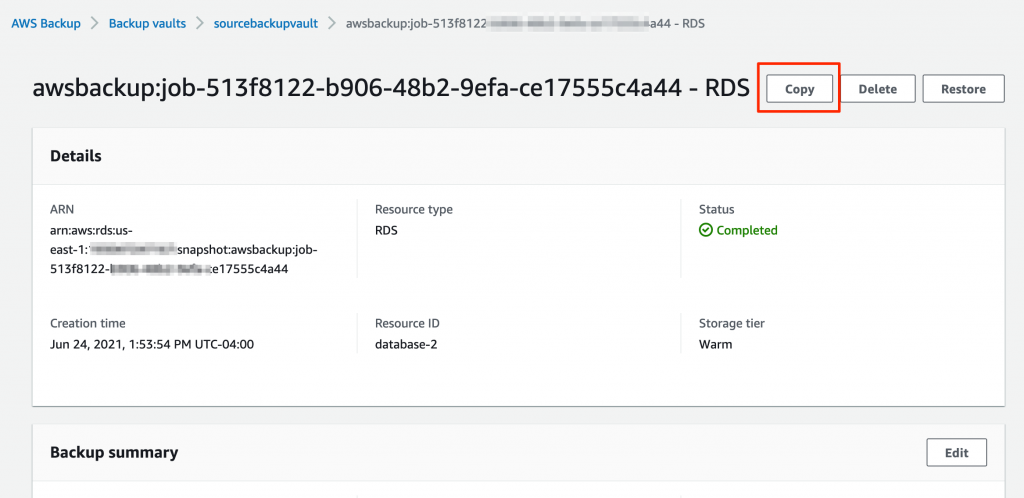
Figure 11: Initiate copy job
Verify copy job is successfully completed
Verify that the copy job is completed and the recovery point is copied successfully to the AWS Backup account vault.
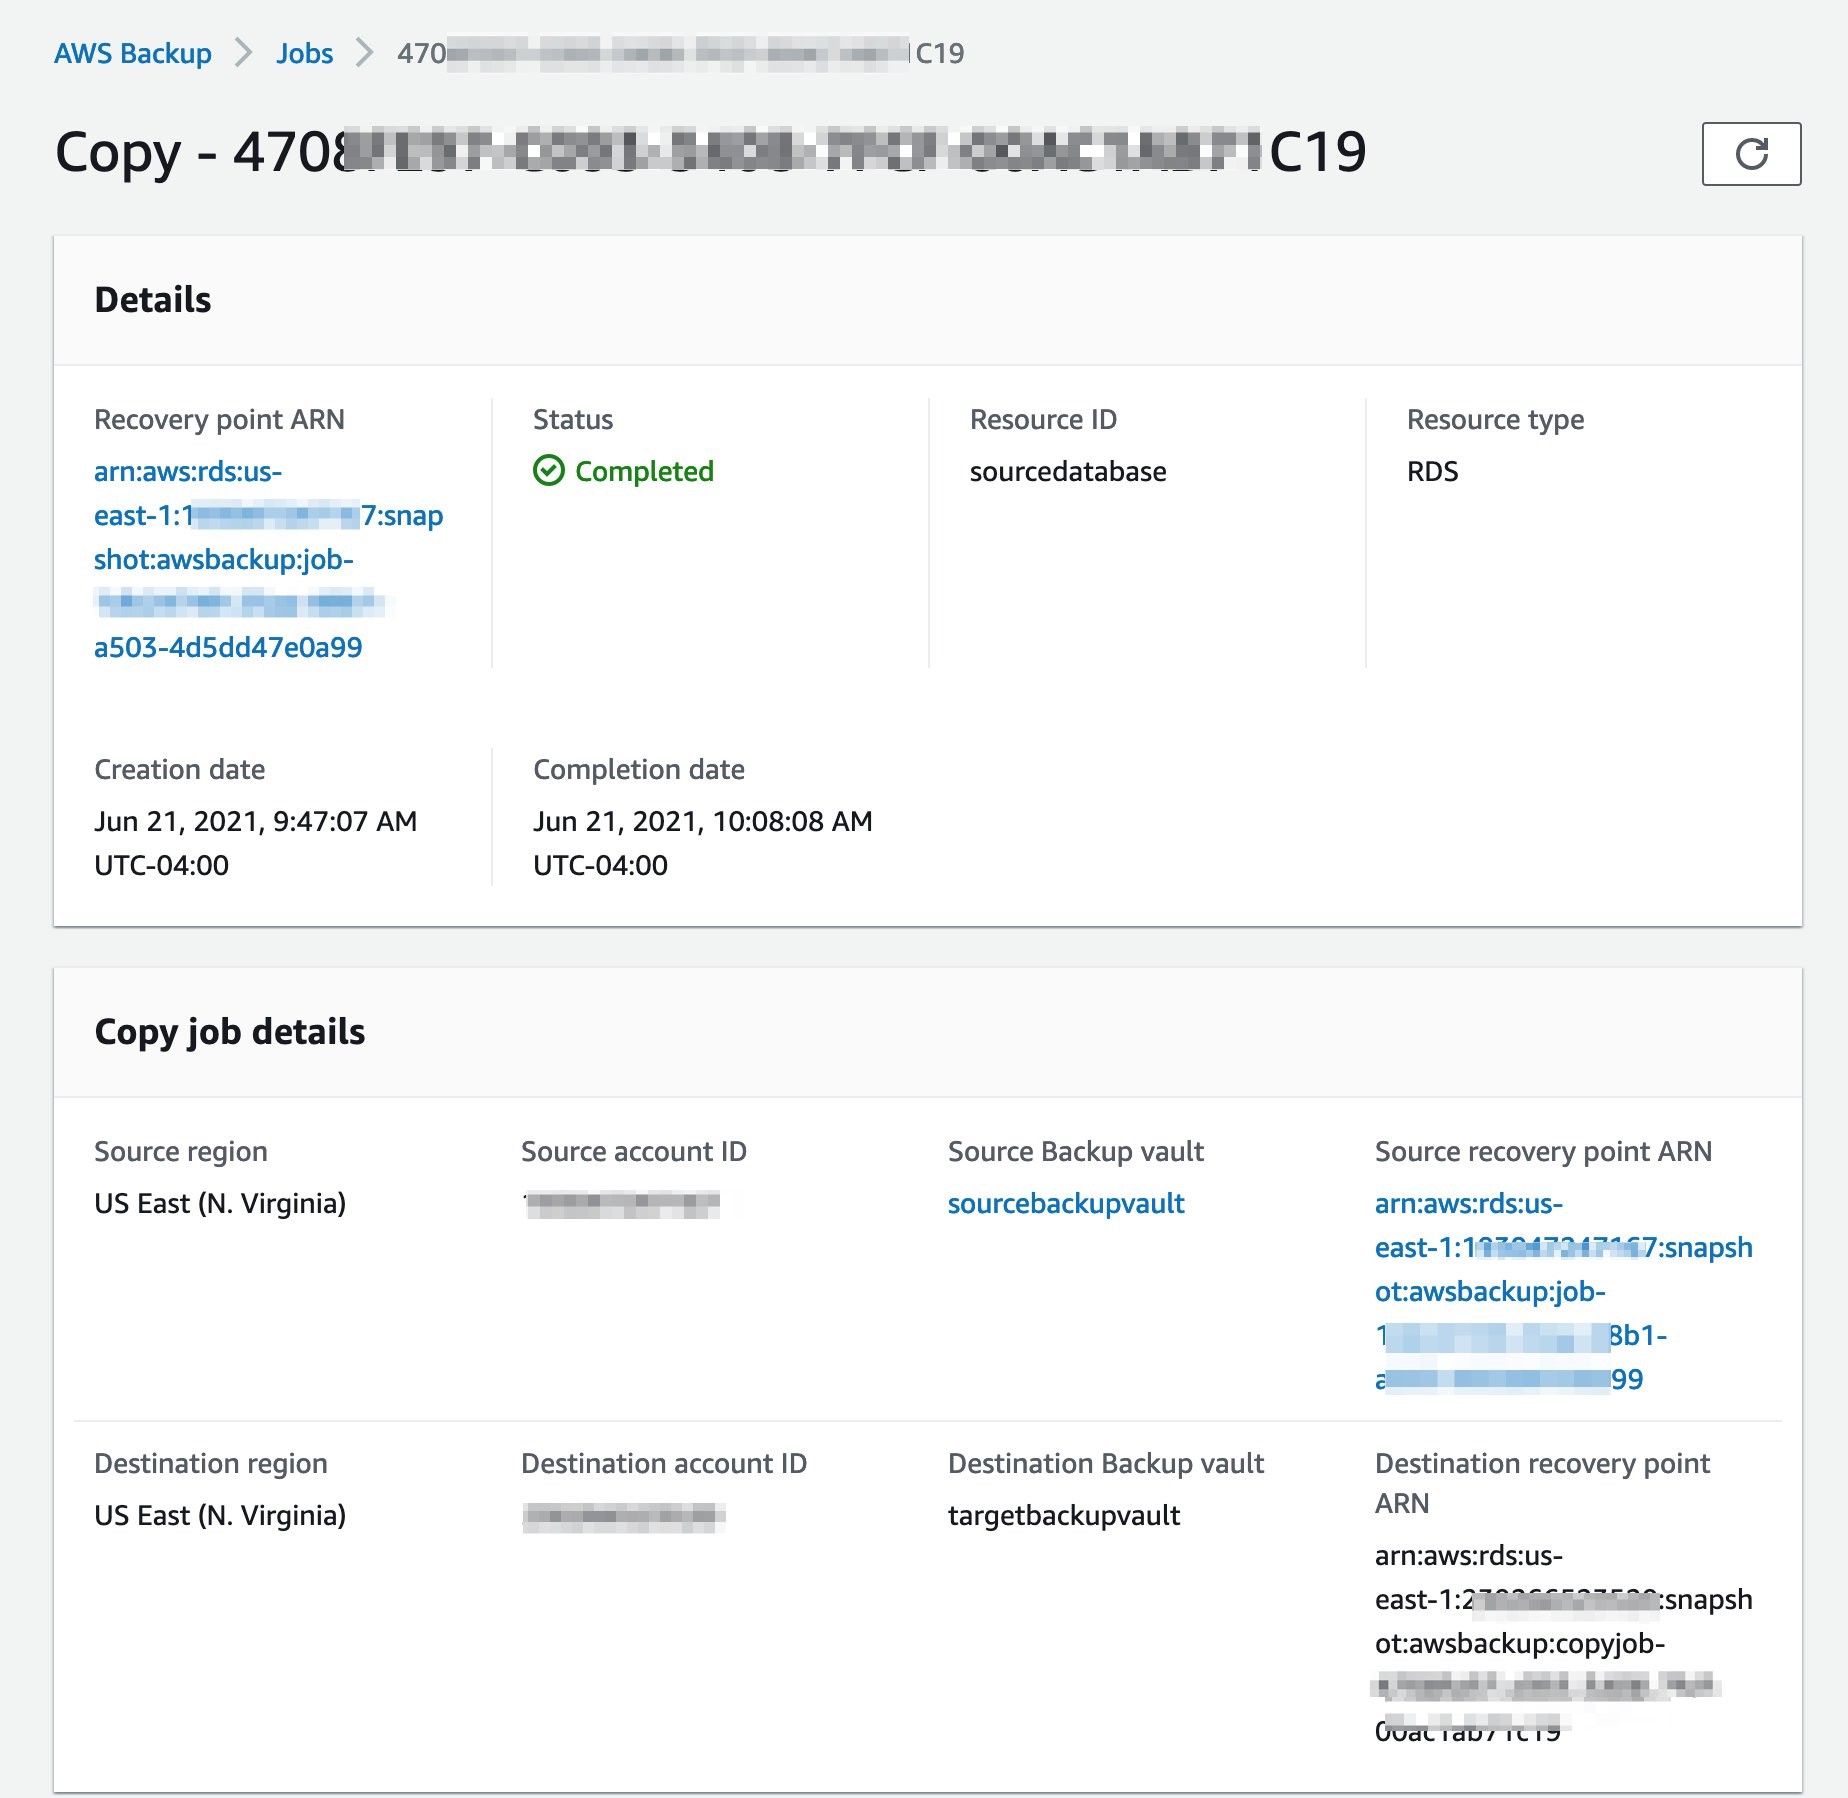
Figure 12: Copy job is completed
Restore Amazon RDS database in AWS Backup account
Initiate restore of recovery point
In the backup account, navigate to the backup vault on the AWS Backup service page. Push the Restore button to initiate the recovery job.
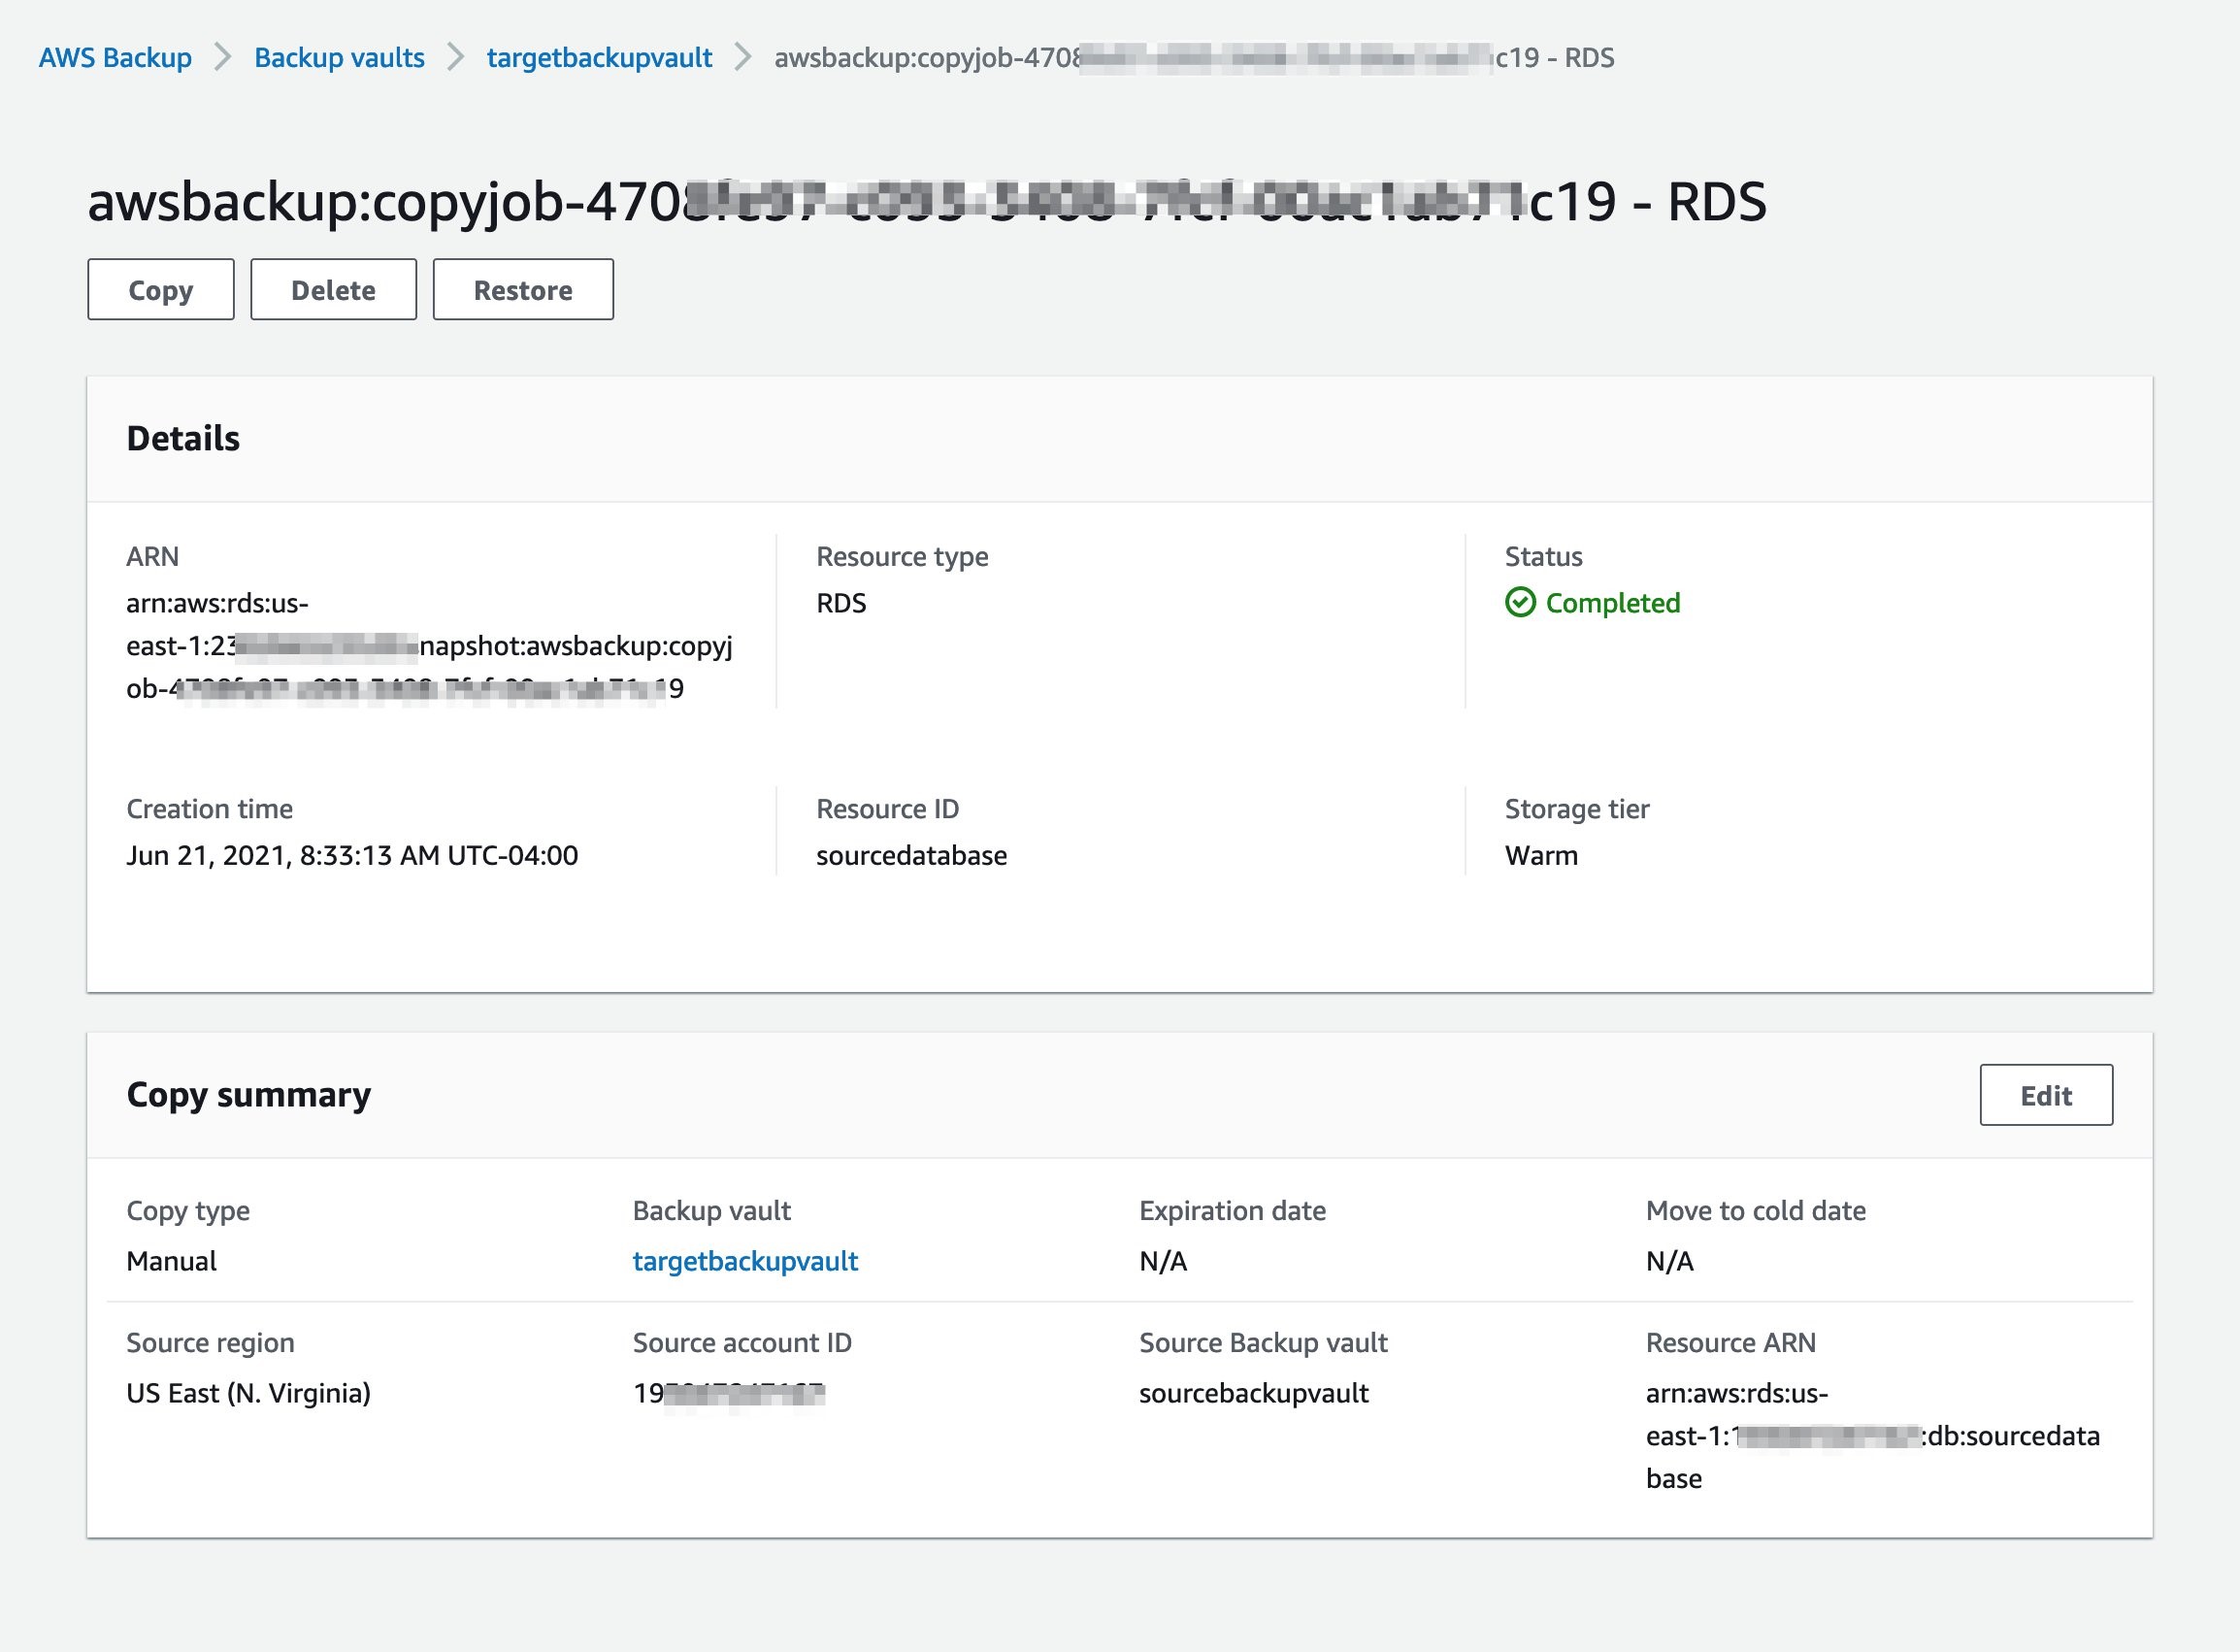
Figure 13: Restore recovery point
Restore AWS Backup
The process of restoring the AWS backup will automatically detect the database (DB) engine. Choose the DB instance class, storage type, and the Multi-AZ configuration based on your application requirements. Set the encryption key to the CMK created in the backup account.
Scroll down to bottom of the page, and press the Restore backup button.
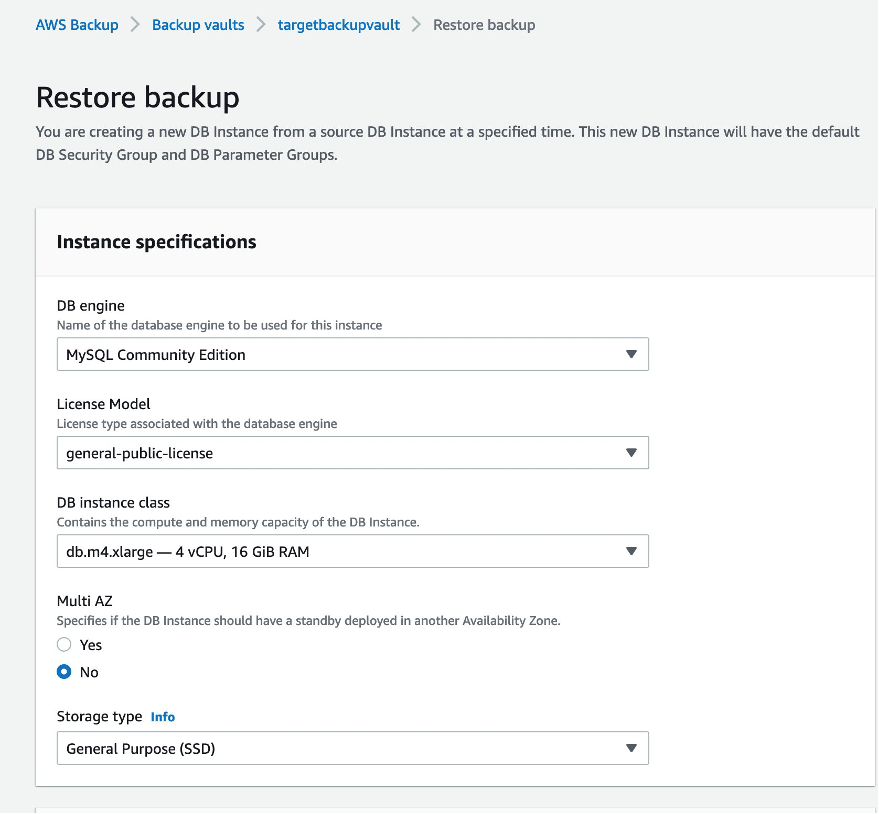
Figure 14: Restore backup
Restore job verification
Confirm that Restore job is completed in the Status field.
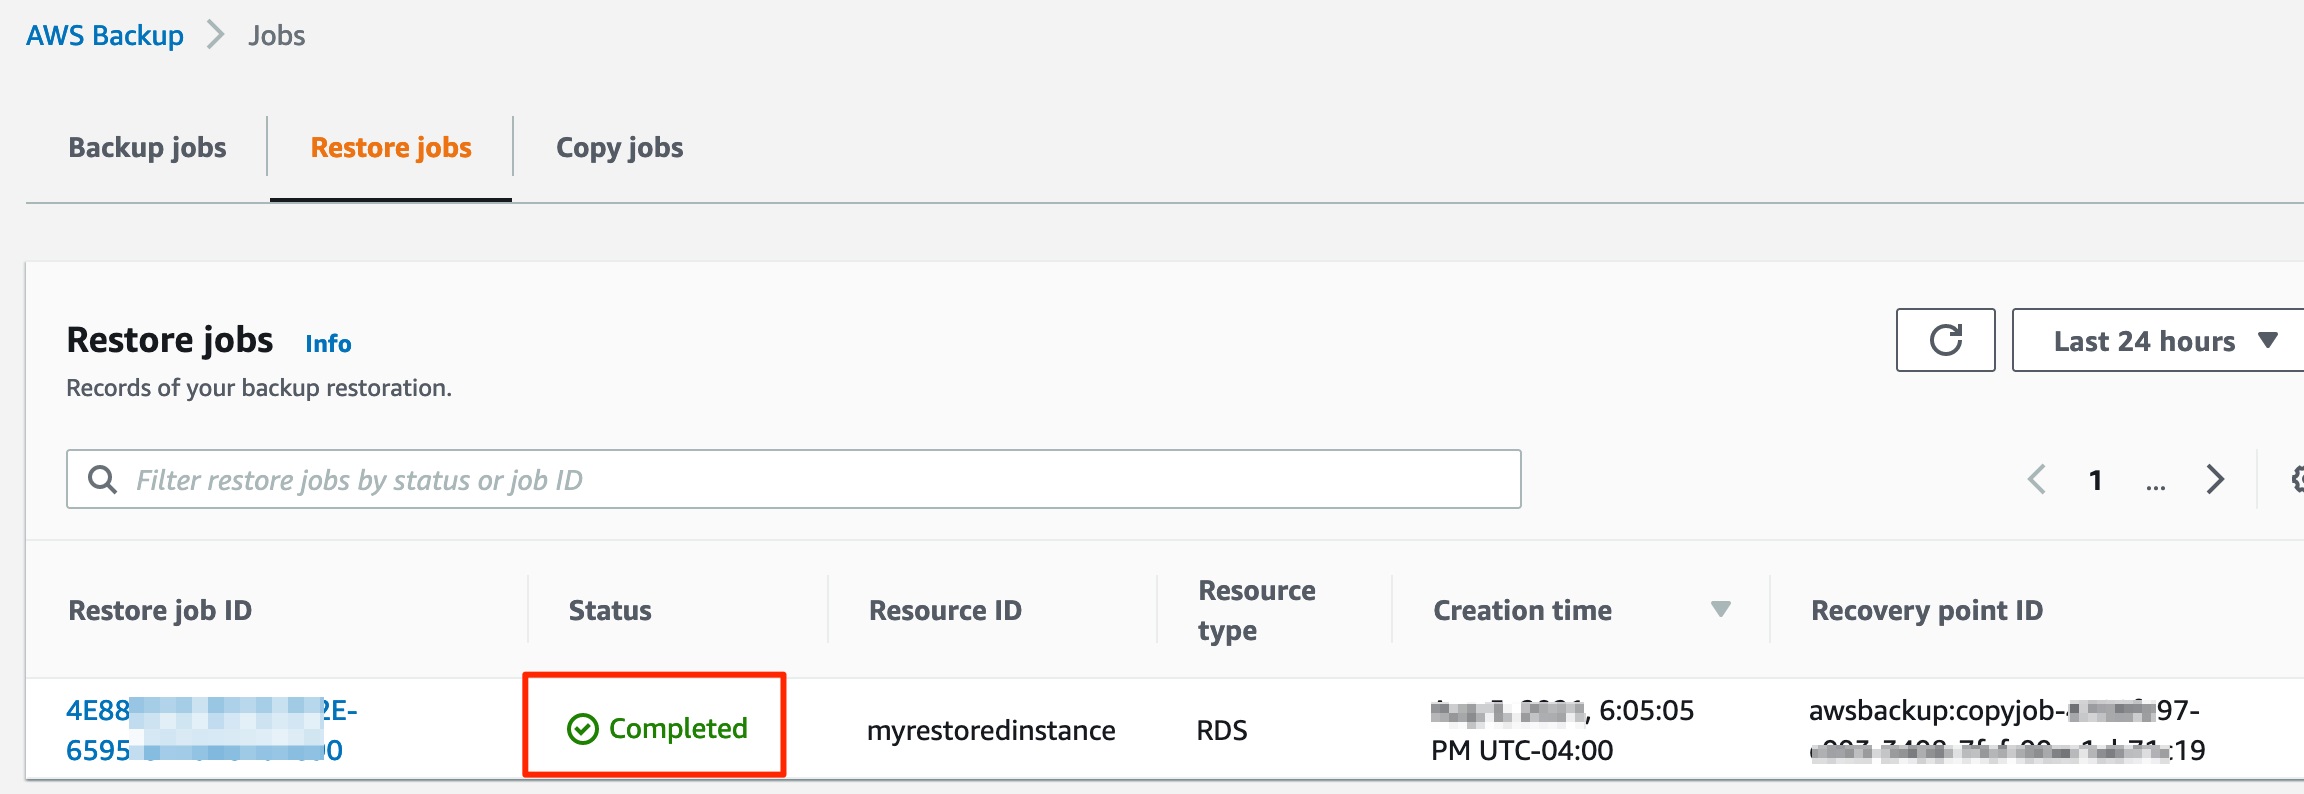
Figure 15: Restore job verification
Database verification
Once the job completes, the database is restored. This can be verified on the Management Console of the RDS service.
Conclusion
In this blog post, we showed you how to cross-account backup AWS KMS encrypted RDS instances using AWS Backup and CMK. We also verified the encryption keys used by the source and backup snapshots.
Using AWS Backup cross-account backup and cross-Region copy capabilities, you can quickly restore data to your backup accounts in your preferred AWS Region. This helps AWS Backup users to minimize business impact in the event of compromised accounts, unexpected disaster or service interruption. You can create consistent database snapshots and recover them across regions to meet your security, compliance, RTO and RPO requirements.
Thanks for reading this blog post. If you have any feedback or questions, please add them in the comments section.