Today, we’re announcing support for Amazon EKS in AWS Backup to provide the capability to secure Kubernetes applications using the same centralized platform you trust for your other Amazon Web Services (AWS) services. This integration eliminates the complexity of protecting containerized applications while providing enterprise-grade backup capabilities for both cluster configurations and application data. AWS Backup is a fully managed service to centralize and automate data protection across AWS and on-premises workloads. Amazon Elastic Kubernetes Service (Amazon EKS) is a fully managed Kubernetes service to manage availability and scalability of the Kubernetes clusters. With this new capability, you can centrally manage and automate data protection across your Amazon EKS environments alongside other AWS services.
Until now, for backups, customers relied on custom solutions or third-party tools to back up their EKS clusters, requiring complex scripting and maintenance for each cluster. The support for Amazon EKS in AWS Backup eliminates this overhead by providing a single, centralized, and policy-driven solution that protects both EKS clusters (Kubernetes deployments and resources) and stateful data (stored in Amazon Elastic Block Store (Amazon EBS), Amazon Elastic File System (Amazon EFS), and Amazon Simple Storage Service (Amazon S3) only) without the need to manage custom scripts across clusters. For restores, customers were previously required to restore their EKS backups to a target EKS cluster which was either the source EKS cluster, or a new EKS cluster, requiring that an EKS cluster infrastructure is provisioned ahead of time prior to the restore. With this new capability, during a restore of EKS cluster backups, customers also have the option to create a new EKS cluster based on previous EKS cluster configuration settings and restore to this new EKS cluster, with AWS Backup managing the provisioning of the EKS cluster on the customer’s behalf.
This support includes policy-based automation for protecting single or multiple EKS clusters. This single data protection policy provides a consistent experience across all services AWS Backup supports. It allows creation of immutable backups to prevent malicious or inadvertent changes, helping customers meet their regulatory compliance needs. In case there is a customer data loss or cluster downtime event, customers can easily recover their EKS cluster data from encrypted, immutable backups using an easy-to-use interface and maintain business continuity of running their EKS clusters at scale.
How it works Here’s how I set up support for on-demand backup of my EKS cluster in AWS Backup. First, I’ll show a walkthrough of the backup process, then demonstrate a restore of the EKS cluster.
Backup In the AWS Backup console, in the left navigation pane, I choose Settings and then Configure resources to opt in to enable protection of EKS clusters in AWS Backup.
Now that I’ve enabled Amazon EKS, in Protected resources I choose Create on-demand backup to create a backup for my already existing EKS cluster floral-electro-unicorn.
Enabling EKS in Settings ensures that it shows up as a Resource type when I create on-demand backup for the EKS cluster. I proceed to select the EKS resource type and the cluster.
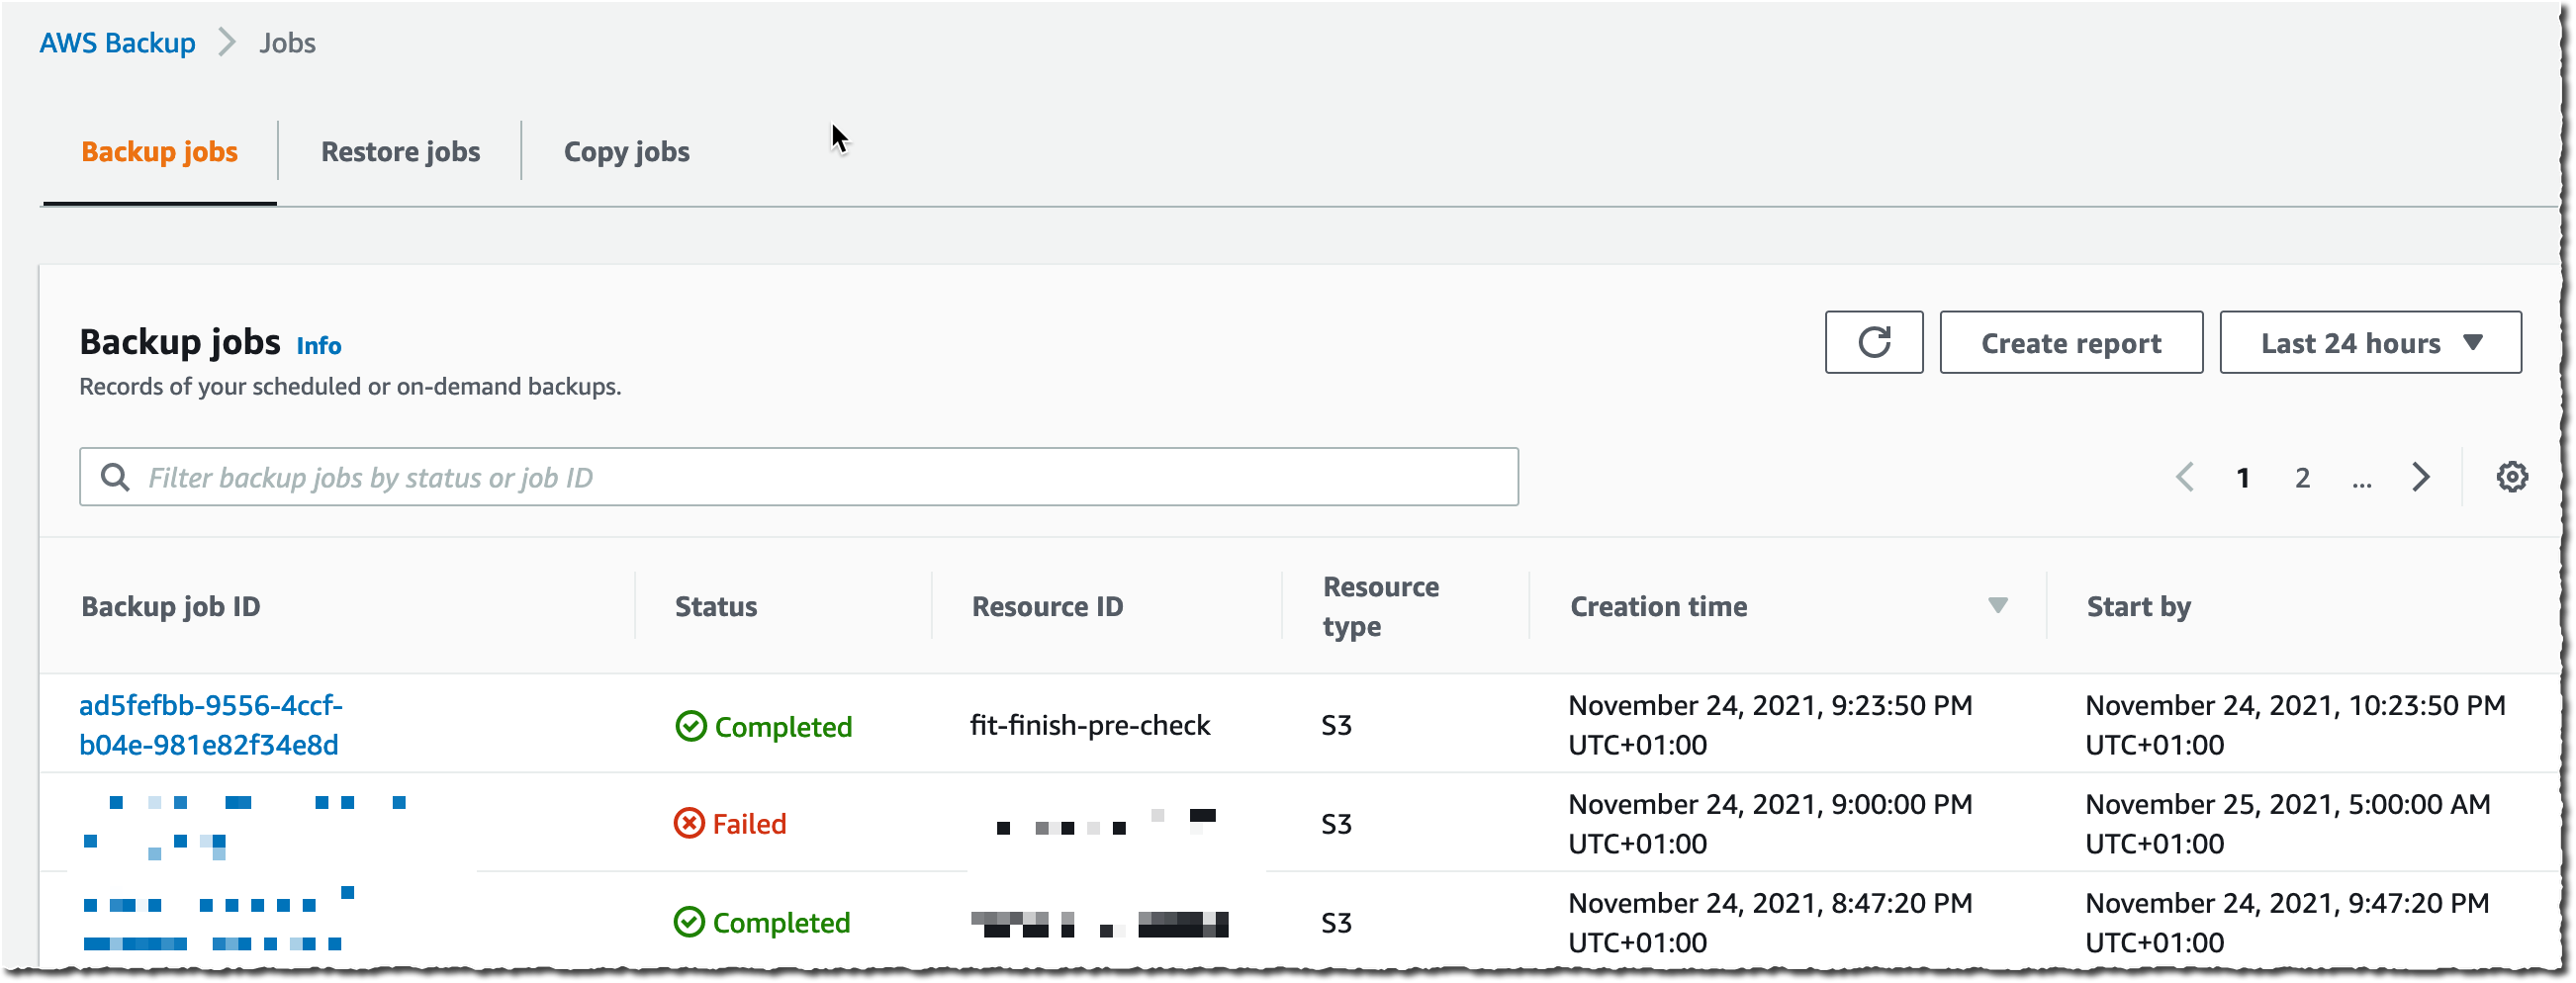
The job is initiated, and it will start running to back up both the EKS cluster state and the persistent volumes. If Amazon S3 buckets are attached to the backup, you’ll need to add the additional Amazon S3 backup permissions AWSBackupServiceRolePolicyForS3Backup to your role. This policy contains the permissions necessary for AWS Backup to back up any Amazon S3 bucket, including access to all objects in a bucket and any associated AWS KMS key.
The job is completed successfully and now EKS clusterfloral-electro-unicorn is backed up by AWS Backup.
Restore Using the AWS Backup Console, I choose the EKS backup composite recovery point to start the process of restoring the EKS cluster backups, then choose Restore.
I choose Restore full EKS cluster to restore the full EKS backup. To restore to an existing cluster, I Choose an existing cluster then select the cluster from the drop-down list. I choose the Default order as the order in which individual Kubernetes resources will be restored.
I then configure the restore for the persistent storage resources, that will be restored alongside my EKS clusters.
Next, I Choose an IAM role to execute the restore action. The Protected resource tags checkbox is selected by default and I’ll leave it as is, then choose Next.
I review all the information before I finalize the process by choosing Restore, to start the job.
Selecting the drop-down arrow gives details of the restore status for both the EKS cluster state and persistent volumes attached. In this walkthrough, all the individual recovery points are restored successfully. If portions of the backup fail, it’s possible to restore the successfully backed up persistent stores (for example, Amazon EBS volumes) and cluster configuration settings individually. However, it’s not possible to restore full EKS backup. The successfully backed up resources will be available for restore, listed as nested recovery points under the EKS cluster recovery point. If there’s a partial failure, there will be a notification of the portion(s) that failed.
Benefits Here are some of the benefits provided by the support for Amazon EKS in AWS Backup:
A fully managed multi-cluster backup experience, removing the overhead associated with managing custom scripts and third-party solutions.
Centralized, policy-based backup management that simplifies backup lifecycle management and makes it seamless to back up and recover your application data across AWS services, including EKS.
The ability to store and organize your backups with backup vaults. You assign policies to the backup vaults to grant access to users to create backup plans and on-demand backups but limit their ability to delete recovery points after they’re created.
Good to know The following are some helpful facts to know:
You can create secondary copies of your EKS backups across different accounts and AWS Regions to minimize risk of accidental deletion.
Restoration of EKS backups is available using the AWS Backup Console, API, or AWS CLI.
Restoring to an existing cluster will not override the Kubernetes versions, or any data as restores are non-destructive. Instead, there will be a restore of the delta between the backup and source resource.
Namespaces can only be restored to an existing cluster to ensure a successful restore as Kubernetes resources may be scoped at the cluster level.
Voice of the customer
Srikanth Rajan, Sr. Director of Engineering at Salesforce said “Losing a Kubernetes control plane because of software bugs or unintended cluster deletion can be catastrophic without a solid backup and restore plan. That’s why it’s exciting to see AWS rolling out the new EKS Backup and Restore feature, it’s a big step forward in closing a critical resiliency gap for Kubernetes platforms.”
Now available Support for Amazon EKS in AWS Backup is available today in all AWS commercial Regions (except China) and in the AWS GovCloud (US) where AWS Backup and Amazon EKS are available. Check the full Region list for future updates.
Try out this capability for protecting your EKS clusters in AWS Backup and let us know what you think by sending feedback to AWS re:Post for AWS Backup or through your usual AWS Support contacts.
Today, we’re announcing the general availability of a new capability that integrates AWS Backup logically air-gapped vaults with Multi-party approval to provide access to your backups even when your AWS account is inaccessible due to inadvertent or malicious events. AWS Backup is a fully managed service that centralizes and automates data protection across AWS services and hybrid workloads. It provides core data protection features, ransomware recovery capabilities, and compliance insights and analytics for data protection policies and operations.
As a backup administrator, you use AWS Backup logically air-gapped vaults to securely share backups across accounts and organizations, logically isolate your backup storage, and support direct restore to help reduce recovery time following an inadvertent or malicious event. However, if a bad or unintended actor gains root access to your backup account or the management account of your organization, your backups suddenly become inaccessible, even though they’re still safely stored in the logically air-gapped vault. While traditional account recovery involved working through support channels, AWS Backup with Multi-party approval delivers immediate access to recovery tools, empowering you with faster resolution times and greater control over your recovery timeline.
Multi-party approval for AWS Backup logically air-gapped vaults adds an additional layer of protection for you to recover your application data even when your AWS account becomes completely inaccessible. Using Multi-party approval, you can create approval teams which consist of highly trusted individuals in your organization, then associate them with your logically air-gapped vault. If you get locked out of your AWS accounts due to inadvertent or malicious actions, you can request your own approval team to authorize sharing of your vault from any account, even those outside your AWS Organizations account. Once approved, you gain authorized access to your backups and can begin your recovery process.
How it works Multi-party approval for AWS Backup logically air-gapped vaults combines the security of logically air-gapped vaults with the governance of Multi-party approval to create a recovery mechanism that works even when your AWS account is compromised. Here’s how it works:
1. Approval team creation First, you create an approval team in your AWS Organizations management account. If the management account is new, first create an AWS Identity and Access Management (IAM) Identity Center instance before creating the approval team. The approval team consists of trusted individuals (IAM Identity Center users) who will be authorized to approve vault sharing requests. Each approver receives an invitation to join the approval team through a new Approval portal.
2. Vault association When your approval team is active, you share it with accounts that own logically air-gapped vaults using AWS Resource Access Manager (AWS RAM) to safeguard against requests for approval from arbitrary accounts. Backup administrators can then associate this approval team with new or existing logically air-gapped vaults.
3. Protection against compromise If your AWS account becomes compromised or inaccessible, you can request access to your backups from a different account (a clean recovery account). This request includes the Amazon Resource Name (ARN) of the logically air-gapped vault in the format arn:aws:backup:<region>:<account>:backup-vault:<name> and an optional vault name and comment.
4. Multi-party approval The request is sent to the approval team, who review it through the approval portal. When the minimum required number of approvers authorize the request, the vault is automatically shared with the requesting account. All requests and approvals are comprehensively logged in AWS CloudTrail.
5. Recovery process With access granted, you can immediately start restoring or copying your data in the new recovery account without waiting for your compromised account to be remediated.
This approach provides an entirely separate authentication path to access and recover your backups, completely independent of your AWS account credentials. Even if the bad actor has root access to your account, they can’t prevent the approval team-based recovery process.
1. Create a new logically air-gapped vault To create a new logically air-gapped vault, provide a name, tags (optional), and vault lock properties. 2. Assign an approval team When the vault has been created, choose Assign approval team to assign it with an existing approval team.
Choose an existing approval team from the drop-down menu then select Submit to finalize the assignment.
Now your approval team is assigned to your logically air-gapped vault.
Good to know It’s essential to test your recovery process before an actual emergency:
From a different AWS account, use the AWS Backup console or API to request sharing of your logically air-gapped vault by providing the vault ID and ARN.
Request approval of your request from the approval team.
Once approved, verify that you can access and restore backups from the vault in your testing account.
As a best practice, monitor the health of your approval team regularly using AWS Backup Audit Manager to ensure they have sufficient active participants to meet your approval threshold.
Multi-party approval for enhanced cloud governance Today, we’re also announcing the general availability of a new capability that AWS account administrators can use to add Multi-party approval to their product offerings. As highlighted in this post, AWS Backup is the first service to integrate this capability. With Multi-party approval, administrators can enable application owners to guard sensitive service operations with a distributed review process.
Good to know Multi-party approval provides several significant security advantages:
Distributed decision-making, eliminating single points of failure
Full auditability through AWS CloudTrail integration
Protection against compromised credentials
Formal governance for compliance-sensitive operations
Consistent approval experience across integrated services
Now available
Multi-party approval is available today in all AWS Regions where AWS Organizations is available. Multi-party approval for AWS Backup logically air-gapped vaults is available in all AWS Regions where AWS Backup is available.
Amazon EBS Snapshots Archive in the AWS Backup console Snapshots Archive with AWS Backup is only available for snapshots with a backup frequency of one month or longer (28-day cron expression) and a retention of more than 90 days. This is a protective measure to ensure that you don’t archive snapshots, such as hourly snapshots that wouldn’t benefit from the transition to the cold tier.
The ability to archive Amazon EBS Snapshots is a new parameter of the Lifecycle section of the AWS Backup Plans. You must explicitly opt into moving your Amazon EBS Snapshots to cold storage, because this has different properties of our existing cold storage including:
Always converting an incremental backup to a full backup.
Longer recovery time objective (RTO) (up to 72 hours).
Limitations on the frequency of backups that can be transitioned to cold storage (monthly or greater).
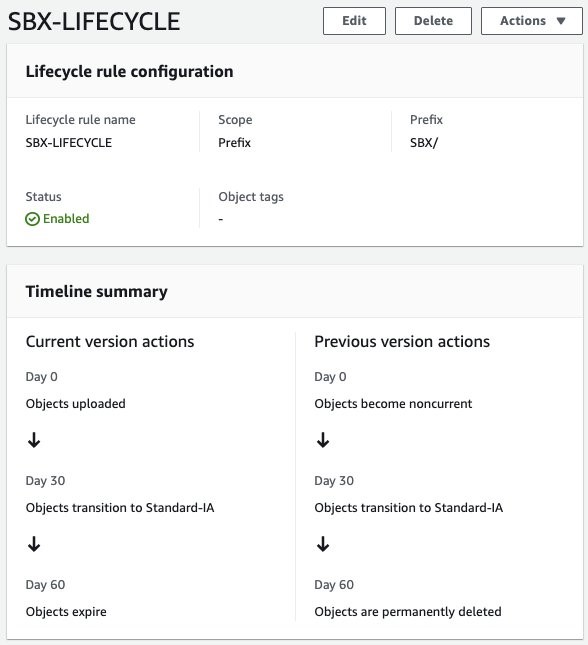
Time in warm storage indicates how long the backups will remain in warm storage before they are transitioned to cold storage. Total retention period is the total time the backups will be retained by AWS Backup, and its value is the sum of both warm and cold storage. For backups in cold storage, the minimum retention period is 90 days. This is why the default total retention is 98 days (8 days in warm + 90 days in cold). The bar graph shows the total retention of your backups and where the backups will reside during that time. In the example shown in this graph, 8 days is in warm storage (red bar), and 90 days is in cold storage (blue bar).
To restore or use the archived Amazon EBS snapshot today (outside of AWS Backup), you have to follow a two-step process:
Temporarily or permanently restore the snapshot from archive to standard tier.
Once it’s in standard tier, call the CreateVolumeAPI from the standard tier.
With this announcement, using either the AWS Backup console or the API to restore the archived Amazon EBS snapshot in AWS Backup, the following restore workflow applies:
Enter the number of days you want to temporarily restore your snapshot from cold to standard tier.
Choose your volume configuration.
The end result will be a restored EBS volume. You will not have to manually move the snapshot from cold to standard tier, then restore the volume, this will be done automatically for you.
Now available Amazon EBS Snapshots Archive with AWS Backup is available for you today in all AWS Regions except China and AWS GovCloud (US).
As usual, you pay as you go, with no minimum or fixed fees. There are two metrics that influence Amazon EBS Snapshots Archive billing: data storage and data retrieval. You are charged for a 90-day period at minimum. This means that if you delete a snapshot archive or permanently restore it less than 90 days after creation, then we charge for the full 90-day period. The AWS Backup pricing page has the details.
Performing automatic game day testing of all your critical resources is an important step in determining that you are prepared to respond to ransomware or any data loss event. This gives you the opportunity to take appropriate corrective actions based on the results and monitor results such as success or failure from these tests. Ultimately, you will be able to ascertain if the restore times meet your expected organization’s recovery time objective (RTO) goals, helping you develop improved recovery strategies.
Today, we’re announcing restore testing, a new capability in AWS Backup that allows you to perform restore testing of your AWS resources across storage, compute, and databases. With this feature, you can automate the entire restore testing process and avoid surprises later by determining now whether you can successfully recover using your backups in the event of a data loss such as ransomware. As an additional option, to demonstrate compliance with your organizational and regulatory data governance requirements, you can use the restore job results.
Earlier, I created EC2 instances and a backup of these instances. Then, I created my restore testing plan in the AWS Backup console.
In this General section, I enter the name of the plan, a test frequency, a Start time, and a Start within. Start time sets the time for the test to begin, for example, if you have a daily test frequency set, you specify what time the plan will run each day. Start within is the period of time in which the restore test is designated to begin. AWS Backup makes a best effort to commence all designated restore jobs during the Start within time window. You have a choice to keep this very minimal or very large based on your preference.
In the Recovery point selection section, I specify the vaults that the recovery points should come from, and a timeframe of eligible recovery points as part of this restore testing plan. I left the criteria for a recovery point at the default selection. I also didn’t opt to include recovery points generated by point-in-time recovery (PITR) in this restore testing plan.
Tagging is optional so for the purposes of this test I didn’t add a tag. I was then finished with setup, and it was time for me to choose Create restore testing plan to proceed with creating this restore testing plan.
Once the restore testing plan has been created, it is time to assign resources. I start by specifying the IAM role that AWS Backup will assume when running the restore test. In terms of retention period before cleanup, I kept the default selection of deleting the restored resources immediately, to optimize costs. Alternatively, by specifying a retention period I could have also configured to integrate my own tests (for example, AWS Lambda) using Amazon EventBridge (CloudWatch Events) and send back validation status using the new PutRestoreValidationResultAPI so that it is reported in the restore job.
I have EC2 instances that I created and backed up earlier, and I specify that this plan is for Amazon EC2 resource types. I include all protected resources of this EC2 resource type in the selection scope. I have very few resources, so I didn’t add the optional tags.
I opted to use the default instance type for the restore. I also didn’t specify any additional parameters. It’s then time to choose Assign resources.
Once the resources have been assigned, all information related to the restore testing plan will be presented in a summarized form where you’ll be able to see when the restore testing jobs have executed.
Once I have enough restores performed over time, I can also view the Restore time history for every resource restored from the Protectedresources tab.
Now available Restore testing in AWS Backup is available in all AWS Regions where AWS Backup is available except AWS China Regions, AWS GovCloud (US), and Israel (Tel Aviv). To learn more, visit the AWS Backup user guide. You can submit your questions to AWS re:Post for AWS Backup or through your usual AWS Support contacts.
Welcome to the fifth annual AWS Storage Day! This virtual event is happening today starting at 9:00 AM Pacific Time (12:00 PM Eastern Time) and is available for you to watch on the AWS On Air Twitch channel. The first AWS Storage Day was hosted in 2019, and this event has grown into an innovation day that we look forward to delivering to you every year. In last year’s Storage Day post, I wrote about the constant innovations in AWS Storage aimed at helping you put your data to work while keeping it secure and protected. This year, Storage Day is focused on storage for AI/ML, data protection and resiliency, and the benefits of moving to the cloud.
AWS Storage Day Key Themes When it comes to storage for AI/ML, data volumes are increasing at an unprecedented rate, exploding from terabytes to petabytes and even to exabytes. With a modern data architecture on AWS, you can rapidly build scalable data lakes, use a broad and deep collection of purpose-built data services, scale your systems at a low cost without compromising performance, share data across organizational boundaries, and manage compliance, security, and governance, allowing you to make decisions with speed and agility at scale. To train machine learning models and build Generative AI applications, you must have the right data strategy in place. So, I’m happy to see that, among the list of sessions to look forward to at the live event, the Optimize generative AI and ML with AWS Infrastructure session will discuss how you can transform your data into meaningful insights.
Whether you’re just getting started with the cloud, planning to migrate applications to AWS, or already building applications on AWS, we have resources to help you protect your data and meet your business continuity objectives. Our data protection and resiliency features and solutions can help you meet your business continuity goals and deliver disaster recovery during data loss events, across recovery point and time objectives (RPO and RTO). With the unprecedented data growth happening in the world today, determining where your data is stored, how it’s secured, and who has access to it is a higher priority than ever. Be sure to join the Protect data in AWS amid a rapidly evolving cyber landscape session to learn more.
When moving data to the cloud, you need to understand where you’re moving it for different use cases, the types of data you’re moving, and the network resources available, among other considerations. There are many reasons to move to the cloud, recently, Enterprise Strategy Group (ESG) validated that organizations reduced compute, networking, and storage costs by up to 66 percent by migrating on-premises workloads to AWS Cloud infrastructure. ESG confirmed that migrating on-premises workloads to AWS provides organizations with reduced costs, increased performance, improved operational efficiency, faster time to value, and improved business agility. We have a number of sessions that discuss how to move to the cloud, based on your use case. I’m most looking forward to the Hybrid cloud storage and edge compute: AWS, where you need it session, which will discuss considerations for workloads that can’t fully move to the cloud.
Well, it’s been 15 years since the launch of Amazon EBS was announced, and today we celebrate 15 years of this service. If you were one of the original users who put Amazon EBS to good use and provided us with the very helpful feedback that helped us invent and simplify, iterate and improve, I’m sure you can’t believe how time flies. Today, Amazon EBS handles more than 100 trillion I/O operations daily, and over 390 million EBS volumes are created every day.
If you’re new to Amazon EBS, join us for a fireside chat with Matt Garman, Senior Vice President, Sales, Marketing, and Global Services at AWS, and learn the strategy and customer challenges behind the launch of the service in 2008. You’ll also hear from long-term EBS customer, Stripe, about its growth with EBS since Stripe was launched 12 years ago.
Amazon EBS has continuously improved its scalability and performance to support more customer workloads as the direct storage attachment for Amazon EC2 instances. With the launch of Amazon EC2 M7i instances, powered by custom 4th Generation Intel Xeon Scalable processors, on August 2, you can attach up to 128 Amazon EBS volumes, an increase from 28 on a previous generation M6i instance. The higher number of volume attachments means you can increase storage density per instance and improve resource utilization, reducing total compute cost.
You can host up to 127 containers per instance for larger database applications and scale them more cost effectively before needing to provision more instances and only pay for resources you need. With a higher number of volume attachments, you can fully utilize the memory and vCPU available on these powerful M7i instances as your database storage footprint grows. EBS is also increasing the number of multi-volume snapshots you can create, for up to 128 EBS volumes attached to an instance, enabling you to create crash-consistent backups of all volumes attached to an instance.
Join the 15 years of innovations with Amazon EBS session for a discussion about how the original vision for Amazon EBS has evolved to meet your growing demands for cloud infrastructure.
Mountpoint for Amazon S3 Now generally available, Mountpoint for Amazon S3 is a new open source file client that delivers high throughput access, lowering compute costs for data lakes on Amazon S3. Mountpoint for Amazon S3 is a file client that translates local file system API calls to S3 object API calls. Using Mountpoint for Amazon S3, you can mount an Amazon S3 bucket as a local file system on your compute instance, to access your objects through a file interface with the elastic storage and throughput of Amazon S3. Mountpoint for Amazon S3 supports sequential and random read operations on existing files, and sequential write operations for creating new files.
The Deep dive and demo of Mountpoint for Amazon S3 session demonstrates how to use the file client to access objects in Amazon S3 using file APIs, making it easier to store data at scale and maximize the value of your data with analytics and machine learning workloads. Read this blog post to learn more about Mountpoint for Amazon S3 and how to get started, including a demo.
Put Cold Storage to Work Faster with Amazon S3 Glacier Flexible Retrieval Amazon S3 Glacier Flexible Retrieval improves data restore time by up to 85 percent, at no additional cost. Faster data restores automatically apply to the Standard retrieval tier when using Amazon S3 Batch Operations. These restores begin to return objects within minutes, so you can process restored data faster. Processing restored data in parallel with ongoing restores helps you accelerate data workflows and quickly respond to business needs. Now, whether you’re transcoding media, restoring operational backups, training machine learning models, or analyzing historical data, you can speed up your data restores from archive.
Join the Maximize the value of cold data with Amazon S3 Glacier session to learn how Amazon S3 Glacier is helping organizations of all sizes and from all industries transform their data archiving to unlock business value, increase agility, and save on storage costs. Read this blog post to learn more about the Amazon S3 Glacier Flexible Retrieval performance improvements and follow step-by-step guidance on how to get started with faster standard retrievals from S3 Glacier Flexible Retrieval.
Supporting a Broad Spectrum of File Workloads To serve a broad spectrum of use cases that rely on file systems, we offer a portfolio of file system services, each targeting a different set of needs. Amazon EFS is a serverless file system built to deliver an elastic experience for sharing data across compute resources. Amazon FSx makes it easier and cost-effective for you to launch, run, and scale feature-rich, high-performance file systems in the cloud, enabling you to move to the cloud with no changes to your code, processes, or how you manage your data.
Power ML research and big data analytics with Amazon EFS Amazon EFS offers serverless and fully scalable file storage, designed for high scalability in both storage capacity and throughput performance. Just last week, we announced enhanced support for faster read and write IOPS, making it easier to power more demanding workloads. We’ve improved the performance capabilities of Amazon EFS by adding support for up to 55,000 read IOPS and up to 25,000 write IOPS per file system. These performance enhancements help you to run more demanding workflows, such as machine learning (ML) research with KubeFlow, financial simulations with IBM Symphony, and big data processing with Domino Data Lab, Hadoop, and Spark.
Join the Build and run analytics and SaaS applications at scale session to hear how recent Amazon EFS performance improvements can help power more workloads.
Multi-AZ file systems on Amazon FSx for OpenZFS You can now use a multi-AZ deployment option when creating file systems on Amazon FSx for OpenZFS, making it easier to deploy file storage that spans multiple AWS Availability Zones to provide multi-AZ resilience for business-critical workloads. With this launch, you can take advantage of the power, agility, and simplicity of Amazon FSx for OpenZFS for a broader set of workloads, including business-critical workloads like database, line-of-business, and web-serving applications that require highly available shared storage that spans multiple AZs.
The new multi-AZ file systems are designed to deliver high levels of performance to serve a broad variety of workloads, including performance-intensive workloads such as financial services analytics, media and entertainment workflows, semiconductor chip design, and game development and streaming, up to 21 GB per second of throughput and over 1 million IOPS for frequently accessed cached data, and up to 10 GB per second and 350,000 IOPS for data accessed from persistent disk storage.
Join the Migrate NAS to AWS to reduce TCO and gain agility session to learn more about multi-AZs with Amazon FSx for OpenZFS.
New, Higher Throughput Capacity Levels on Amazon FSx for Windows File Server Performance improvements for Amazon FSx for Windows File Server help you accelerate time-to-results for performance-intensive workloads such as SQL Server databases, media processing, cloud video editing, and virtual desktop infrastructure (VDI).
We’re adding four new, higher throughput capacity levels to increase the maximum I/O available up to 12 GB per second from the previous I/O of 2 GB per second. These throughput improvements come with correspondingly higher levels of disk IOPS, designed to deliver an increase up to 350,000 IOPS.
In addition, by using FSx for Windows File Server, you can provision IOPS higher than the default 3 IOPS per GiB for your SSD file system. This allows you to scale SSD IOPS independently from storage capacity, allowing you to optimize costs for performance-sensitive workloads.
Join the Migrate NAS to AWS to reduce TCO and gain agility session to learn more about the performance improvements for Amazon FSx for Windows File Server.
Logically Air-Gapped Vault for AWS Backup AWS Backup is a fully managed, policy-based data protection solution that enables customers to centralize and automate backup restores across 19 AWS services (spanning compute, storage, and databases) and third-party applications such as VMware Cloud on AWS and on-premises, as well as SAP HANA on Amazon EC2.
Today, we’re announcing the preview of logically air-gapped vault as a new type of AWS Backup Vault that acts as an additional layer of protection to mitigate against malware events. With logically air-gapped vault, customers can recover their application data through a different trusted account.
Join the Deep dive on data recovery for ransomware events session to learn more about logically air-gapped vault for AWS Backup.
Copy Data to and from Other Clouds with AWS DataSync AWS DataSync is an online data movement and discovery service that simplifies data migration and helps you quickly, easily, and securely transfer your file or object data to, from, and between AWS storage services. In addition to support of data migration to and from AWS storage services, DataSync supports copying to and from other clouds such as Google Cloud Storage, Azure Files, and Azure Blob Storage. Using DataSync, you can move your object data at scale between Amazon S3 compatible storage on other clouds and AWS storage services such as Amazon S3. We’re now expanding the support of DataSync for copying data to and from other clouds to include DigitalOcean Spaces, Wasabi Cloud Storage, Backblaze B2 Cloud Storage, Cloudflare R2 Storage, and Oracle Cloud Storage.
Join the Identify and accelerate data migrations at scale session to learn more about this expanded support for DataSync.
Join Us Online Join us today for the AWS Storage Day virtual event on the AWS On Air channel on Twitch. The event will be live starting at 9:00 AM Pacific Time (12:00 PM Eastern Time) on August 9. All sessions will be available on demand approximately two days after Storage Day.
A new week starts, and Spring is almost here! If you’re curious about AWS news from the previous seven days, I got you covered.
Last Week’s Launches Here are the launches that got my attention last week:
Amazon S3 – Last week there was AWS Pi Day 2023 celebrating 17 years of innovation since Amazon S3 was introduced on March 14, 2006. For the occasion, the team released many new capabilities:
Amazon S3 has also simplified private connectivity from on-premises networks: with private DNS for S3, on-premises applications can use AWS PrivateLink to access S3 over an interface endpoint, while requests from your in-VPC applications access S3 using gateway endpoints.
We released Mountpoint for Amazon S3, a high performance open source file client. Read more in the blog. Note that Mountpoint isn’t a general-purpose networked file system, and comes with some restrictions on file operations.
Amazon Neptune – Now offers a graph summary API to help understand important metadata about property graphs (PG) and resource description framework (RDF) graphs. Neptune added support for Slow Query Logs to help identify queries that need performance tuning.
Amazon OpenSearch Service – The team introduced security analytics that provides new threat monitoring, detection, and alerting features. The service now supports OpenSearchversion 2.5 that adds several new features such as support for Point in Time Search and improvements to observability and geospatial functionality.
AWS Lake Formation and Apache Hive on Amazon EMR – Introduced fine-grained access controls that allow data administrators to define and enforce fine-grained table and column level security for customers accessing data via Apache Hive running on Amazon EMR.
Ransomware events have significantly increased over the past several years and captured worldwide attention. Traditional ransomware events affect mostly infrastructure resources like servers, databases, and connected file systems. However, there are also non-traditional events that you may not be as familiar with, such as ransomware events that target data stored in Amazon Simple Storage Service (Amazon S3). There are important steps you can take to help prevent these events, and to identify possible ransomware events early so that you can take action to recover. The goal of this post is to help you learn about the AWS services and features that you can use to protect against ransomware events in your environment, and to investigate possible ransomware events if they occur.
Ransomware is a type of malware that bad actors can use to extort money from entities. The actors can use a range of tactics to gain unauthorized access to their target’s data and systems, including but not limited to taking advantage of unpatched software flaws, misuse of weak credentials or previous unintended disclosure of credentials, and using social engineering. In a ransomware event, a legitimate entity’s access to their data and systems is restricted by the bad actors, and a ransom demand is made for the safe return of these digital assets. There are several methods actors use to restrict or disable authorized access to resources including a) encryption or deletion, b) modified access controls, and c) network-based Denial of Service (DoS) attacks. In some cases, after the target’s data access is restored by providing the encryption key or transferring the data back, bad actors who have a copy of the data demand a second ransom—promising not to retain the data in order to sell or publicly release it.
In the next sections, we’ll describe several important stages of your response to a ransomware event in Amazon S3, including detection, response, recovery, and protection.
After a bad actor has obtained credentials, they use AWS API actions that they iterate through to discover the type of access that the exposed IAM principal has been granted. Bad actors can do this in multiple ways, which can generate different levels of activity. This activity might alert your security teams because of an increase in API calls that result in errors. Other times, if a bad actor’s goal is to ransom S3 objects, then the API calls will be specific to Amazon S3. If access to Amazon S3 is permitted through the exposed IAM principal, then you might see an increase in API actions such as s3:ListBuckets, s3:GetBucketLocation, s3:GetBucketPolicy, and s3:GetBucketAcl.
Analysis
In this section, we’ll describe where to find the log and metric data to help you analyze this type of ransomware event in more detail.
When a ransomware event targets data stored in Amazon S3, often the objects stored in S3 buckets are deleted, without the bad actor making copies. This is more like a data destruction event than a ransomware event where objects are encrypted.
There are several logs that will capture this activity. You can enable AWS CloudTrail event logging for Amazon S3 data, which allows you to review the activity logs to understand read and delete actions that were taken on specific objects.
In addition, if you have enabled Amazon CloudWatch metrics for Amazon S3 prior to the ransomware event, you can use the sum of the BytesDownloaded metric to gain insight into abnormal transfer spikes.
Another way to gain information is to use the region-DataTransfer-Out-Bytes metric, which shows the amount of data transferred from Amazon S3 to the internet. This metric is enabled by default and is associated with your AWS billing and usage reports for Amazon S3.
Next, we’ll walk through how to respond to the unintended disclosure of IAM access keys. Based on the business impact, you may decide to create a second set of access keys to replace all legitimate use of those credentials so that legitimate systems are not interrupted when you deactivate the compromised access keys. You can deactivate the access keys by using the IAM console or through automation, as defined in your incident response plan. However, you also need to document specific details for the event within your secure and private incident response documentation so that you can reference them in the future. If the activity was related to the use of an IAM role or temporary credentials, you need to take an additional step and revoke any active sessions. To do this, in the IAM console, you choose the Revoke active session button, which will attach a policy that denies access to users who assumed the role before that moment. Then you can delete the exposed access keys.
In addition, you can use the AWS CloudTrail dashboard and event history (which includes 90 days of logs) to review the IAM related activities by that compromised IAM user or role. Your analysis can show potential persistent access that might have been created by the bad actor. In addition, you can use the IAM console to look at the IAM credential report (this report is updated every 4 hours) to review activity such as access key last used, user creation time, and password last used. Alternatively, you can use Amazon Athena to query the CloudTrail logs for the same information. See the following example of an Athena query that will take an IAM user Amazon Resource Number (ARN) to show activity for a particular time frame.
SELECT eventtime, eventname, awsregion, sourceipaddress, useragent
FROM cloudtrail
WHERE useridentity.arn = 'arn:aws:iam::1234567890:user/Name' AND
-- Enter timeframe
(event_date >= '2022/08/04' AND event_date <= '2022/11/04')
ORDER BY eventtime ASC
Recovery
After you’ve removed access from the bad actor, you have multiple options to recover data, which we discuss in the following sections. Keep in mind that there is currently no undelete capability for Amazon S3, and AWS does not have the ability to recover data after a delete operation. In addition, many of the recovery options require configuration upon bucket creation.
S3 Versioning
Using versioning in S3 buckets is a way to keep multiple versions of an object in the same bucket, which gives you the ability to restore a particular version during the recovery process. You can use the S3 Versioning feature to preserve, retrieve, and restore every version of every object stored in your buckets. With versioning, you can recover more easily from both unintended user actions and application failures. Versioning-enabled buckets can help you recover objects from accidental deletion or overwrite. For example, if you delete an object, Amazon S3 inserts a delete marker instead of removing the object permanently. The previous version remains in the bucket and becomes a noncurrent version. You can restore the previous version. Versioning is not enabled by default and incurs additional costs, because you are maintaining multiple copies of the same object. For more information about cost, see the Amazon S3 pricing page.
AWS Backup
Using AWS Backup gives you the ability to create and maintain separate copies of your S3 data under separate access credentials that can be used to restore data during a recovery process. AWS Backup provides centralized backup for several AWS services, so you can manage your backups in one location. AWS Backup for Amazon S3 provides you with two options: continuous backups, which allow you to restore to any point in time within the last 35 days; and periodic backups, which allow you to retain data for a specified duration, including indefinitely. For more information, see Using AWS Backup for Amazon S3.
Protection
In this section, we’ll describe some of the preventative security controls available in AWS.
S3 Object Lock
You can add another layer of protection against object changes and deletion by enabling S3 Object Lock for your S3 buckets. With S3 Object Lock, you can store objects using a write-once-read-many (WORM) model and can help prevent objects from being deleted or overwritten for a fixed amount of time or indefinitely.
AWS Backup Vault Lock
Similar to S3 Object lock, which adds additional protection to S3 objects, if you use AWS Backup you can consider enabling AWS Backup Vault Lock, which enforces the same WORM setting for all the backups you store and create in a backup vault. AWS Backup Vault Lock helps you to prevent inadvertent or malicious delete operations by the AWS account root user.
Amazon S3 Inventory
To make sure that your organization understands the sensitivity of the objects you store in Amazon S3, you should inventory your most critical and sensitive data across Amazon S3 and make sure that the appropriate bucket configuration is in place to protect and enable recovery of your data. You can use Amazon S3 Inventory to understand what objects are in your S3 buckets, and the existing configurations, including encryption status, replication status, and object lock information. You can use resource tags to label the classification and owner of the objects in Amazon S3, and take automated action and apply controls that match the sensitivity of the objects stored in a particular S3 bucket.
MFA delete
Another preventative control you can use is to enforce multi-factor authentication (MFA) delete in S3 Versioning. MFA delete provides added security and can help prevent accidental bucket deletions, by requiring the user who initiates the delete action to prove physical or virtual possession of an MFA device with an MFA code. This adds an extra layer of friction and security to the delete action.
Use IAM roles for short-term credentials
Because many ransomware events arise from unintended disclosure of static IAM access keys, AWS recommends that you use IAM roles that provide short-term credentials, rather than using long-term IAM access keys. This includes using identity federation for your developers who are accessing AWS, using IAM roles for system-to-system access, and using IAM Roles Anywhere for hybrid access. For most use cases, you shouldn’t need to use static keys or long-term access keys. Now is a good time to audit and work toward eliminating the use of these types of keys in your environment. Consider taking the following steps:
Create an inventory across all of your AWS accounts and identify the IAM user, when the credentials were last rotated and last used, and the attached policy.
Disable and delete all AWS account root access keys.
Rotate the credentials and apply MFA to the user.
Re-architect to take advantage of temporary role-based access, such as IAM roles or IAM Roles Anywhere.
Review attached policies to make sure that you’re enforcing least privilege access, including removing wild cards from the policy.
Server-side encryption with customer managed KMS keys
Another protection you can use is to implement server-side encryption with AWS Key Management Service (SSE-KMS) and use customer managed keys to encrypt your S3 objects. Using a customer managed key requires you to apply a specific key policy around who can encrypt and decrypt the data within your bucket, which provides an additional access control mechanism to protect your data. You can also centrally manage AWS KMS keys and audit their usage with an audit trail of when the key was used and by whom.
GuardDuty protections for Amazon S3
You can enable Amazon S3 protection in Amazon GuardDuty. With S3 protection, GuardDuty monitors object-level API operations to identify potential security risks for data in your S3 buckets. This includes findings related to anomalous API activity and unusual behavior related to your data in Amazon S3, and can help you identify a security event early on.
Conclusion
In this post, you learned about ransomware events that target data stored in Amazon S3. By taking proactive steps, you can identify potential ransomware events quickly, and you can put in place additional protections to help you reduce the risk of this type of security event in the future.
With Amazon Redshift, you can analyze data in the cloud at any scale. Amazon Redshift offers native data protection capabilities to protect your data using automatic and manual snapshots. This works great by itself, but when you’re using other AWS services, you have to configure more than one tool to manage your data protection policies.
To make this easier, I am happy to share that we added support for Amazon Redshift in AWS Backup. AWS Backup allows you to define a central backup policy to manage data protection of your applications and can now also protect your Amazon Redshift clusters. In this way, you have a consistent experience when managing data protection across all supported services. If you have a multi-account setup, the centralized policies in AWS Backup let you define your data protection policies across all your accounts within your AWS Organizations. To help you meet your regulatory compliance needs, AWS Backup now includes Amazon Redshift in its auditor-ready reports. You also have the option to use AWS Backup Vault Lock to have immutable backups and prevent malicious or inadvertent changes.
Let’s see how this works in practice.
Using AWS Backup with Amazon Redshift The first step is to turn on the Redshift resource type for AWS Backup. In the AWS Backup console, I choose Settings in the navigation pane and then, in the Service opt-in section, Configure resources. There, I toggle the Redshift resource type on and choose Confirm.
Now, I can create or update a backup plan to include the backup of all, or some, of my Redshift clusters. In the backup plan, I can define how often these backups should be taken and for how long they should be kept. For example, I can have daily backups with one week of retention, weekly backups with one month of retention, and monthly backups with one year of retention.
I can also create on-demand backups. Let’s see this with more details. I choose Protected resources in the navigation pane and then Create on-demand backup.
I select Redshift in the Resource type dropdown. In the Cluster identifier, I select one of my clusters. For this workload, I need two weeks of retention. Then, I choose Create on-demand backup.
My data warehouse is not huge, so after a few minutes, the backup job has completed.
I now see my Redshift cluster in the list of the resources protected by AWS Backup.
In the Protected resources list, I choose the Redshift cluster to see the list of the available recovery points.
When I choose one of the recovery points, I have the option to restore the full data warehouse or just a table into a new Redshift cluster.
I now have the possibility to edit the cluster and database configuration, including security and networking settings. I just update the cluster identifier, otherwise the restore would fail because it must be unique. Then, I choose Restore backup to start the restore job.
After some time, the restore job has completed, and I see the old and the new clusters in the Amazon Redshift console. Using AWS Backup gives me a simple centralized way to manage data protection for Redshift clusters as well as many other resources in my AWS accounts.
There is no additional cost for using AWS Backup compared to the native snapshot capability of Amazon Redshift. Your overall costs depend on the amount of storage and retention you need. For more information, see AWS Backup pricing.
To define the data protection policy of an application, you have to look at its components and find which ones store data that needs to be protected. Those are the stateful components of your application, such as databases and file systems. Other components don’t store data but need to be restored as well in case of issues. These are stateless components, such as containers and their network configurations.
When you manage your application using infrastructure as code (IaC), you have a single repository where all these components are described. Can we use this information to help protect your applications? Yes! AWS Backup now supports attaching an AWS CloudFormation stack to your data protection policies.
When you use CloudFormation as a resource, all stateful components supported by AWS Backup are backed up around the same time. The backup also includes the stateless resources in the stack, such as AWS Identity and Access Management (IAM) roles and Amazon Virtual Private Cloud (Amazon VPC) security groups. This gives you a single recovery point that you can use to recover the application stack or the individual resources you need. In case of recovery, you don’t need to mix automated tools with custom scripts and manual activities to recover and put the whole application stack back together. As you modernize and update an application managed with CloudFormation, AWS Backup automatically keeps track of changes and updates the data protection policies for you.
CloudFormation support for AWS Backup also helps you prove compliance of your data protection policies. You can monitor your application resources in AWS Backup Audit Manager, a feature of AWS Backup that enables you to audit and report on the compliance of data protection policies. You can also use AWS Backup Vault Lock to manage the immutability of your backups as required by your compliance obligations.
Let’s see how this works in practice.
Using AWS Backup Support for CloudFormation Stacks First, I need to turn on the CloudFormation resource type for AWS Backup. In the AWS Backup console, I choose Settings in the navigation pane and then, in the Service opt-in section, Configure resources. There, I toggle the CloudFormation resource type on and choose Confirm.
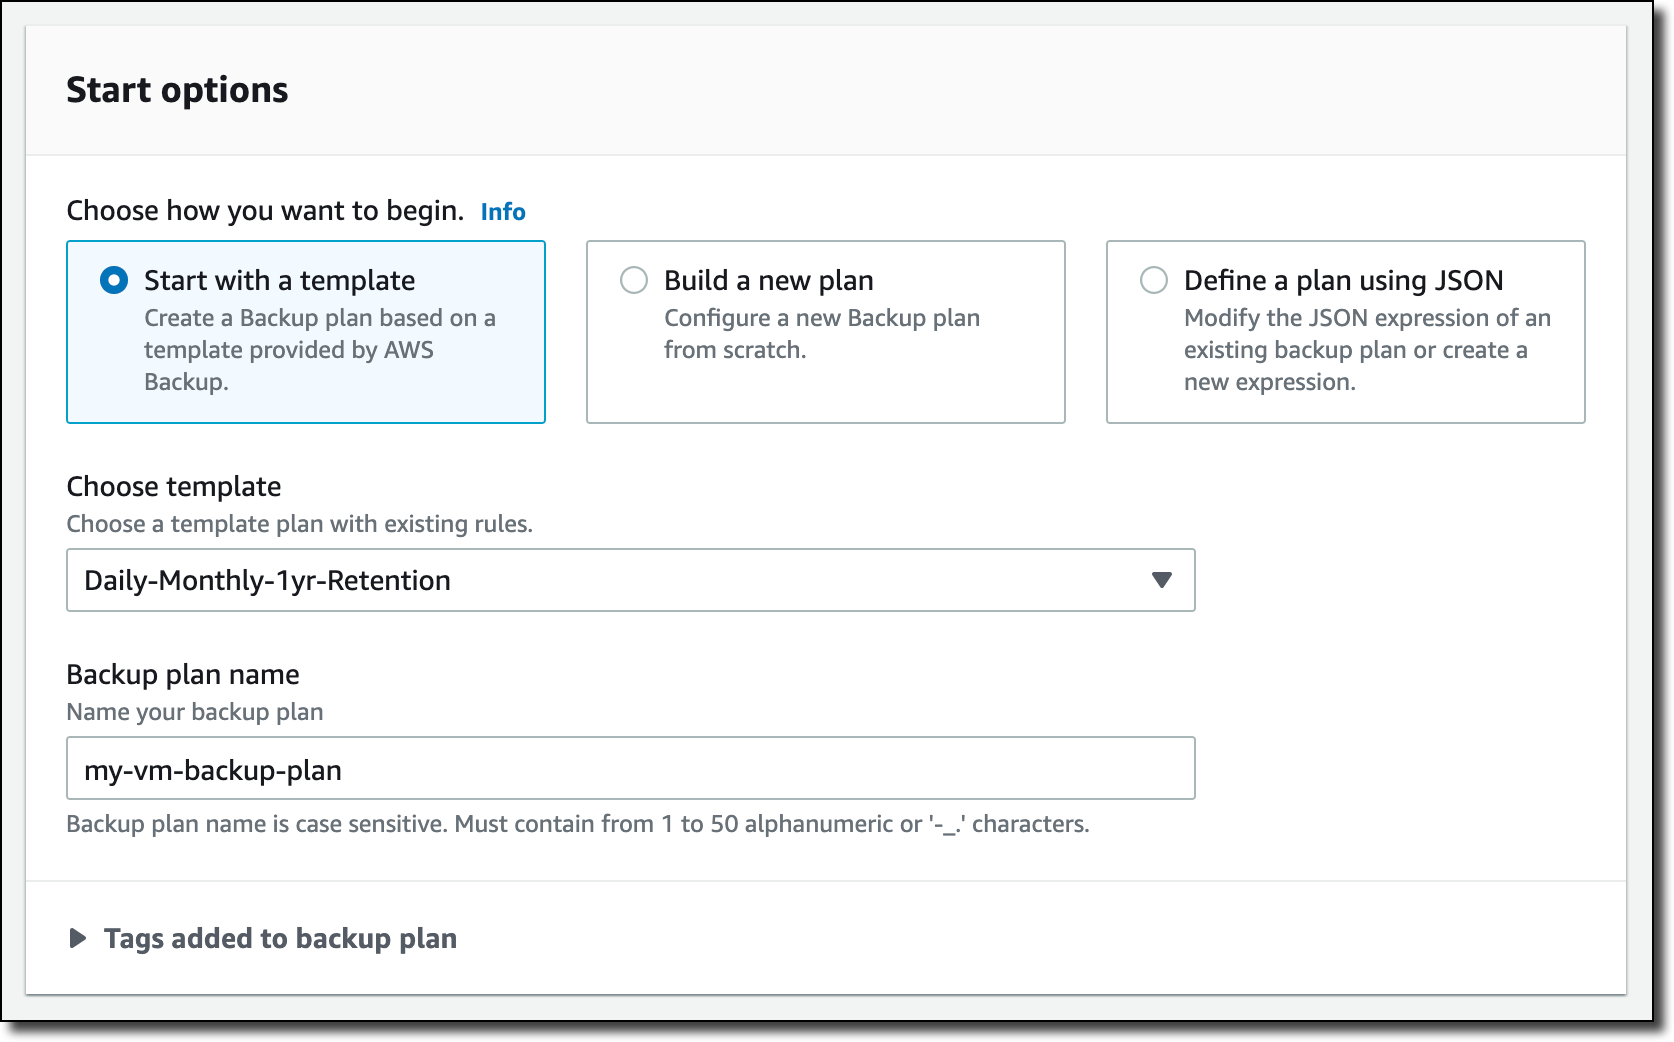
Now that CloudFormation support is enabled, I choose Dashboard in the navigation pane and then Create backup plan. I select the Start with a template option and then the Daily-35day-Retention template. As the name suggests, this template creates daily backups that are kept for 35 days before being automatically deleted. I enter a name for the backup plan and choose Create plan.
Now I can assign resources to my backup plan. I enter a resource assignment name and use the default IAM role that is automatically created with the correct permissions.
In the Resource selection, I can select Include all resource types to automatically protect all resource types that are enabled in my account. Because I’d like to show how CloudFormation support works, I select Include specific resource types and then CloudFormation in the Select resource types dropdown menu. In the Choose resources menu, I can use the All supported CloudFormation stacks option to have all my stacks protected. For simplicity, I choose to protect only one stack, the my-app stack.
I leave the other options at their default values and choose Assign resources. That’s all! Now the CloudFormation stack that I selected will be backed up daily with 35 days of retention. What does that mean? Let’s have a look at what happens when I create an on-demand backup of a CloudFormation stack.
Creating On-Demand Backups for CloudFormation Stacks I choose Protected resources in the navigation pane and then Create on-demand backup. The next steps are similar to what I did before when assigning resources to a backup plan. I select the CloudFormation resource type and the my-app stack. I use the Create backup now option to start the backup within one hour. I choose 7 days of retention and the Default backup vault. Backup vaults are logical containers that store and organize your backups. I select the default IAM role and choose Create on-demand backup.
Within a few minutes, the backup job is running. I expand the Backup job ID in the Backup jobs list to see the resources being backed up. The stateful resources (such as Amazon DynamoDB tables and Amazon Relational Database Service (RDS) databases) are listed with the current state of the backup job. The stateless resources in my stack (such as IAM roles, AWS Lambda functions, and VPC configurations) are backed up by the job with the CloudFormation resource type.
When the backup job has completed, I go back to the Protected resources page to see the list of resources that I can now restore. In the list, I see the IDs of the stateful resources (in this case, two DynamoDB tables and an Aurora database) and of the CloudFormation stack. If I choose each of the stateful resources, I see the available recovery points corresponding to the different points in time when that resource has been backed up.
If I choose the CloudFormation stack, I get a list of composite recovery points. Each composite recovery point includes all stateless and stateful resources in the stack. More specifically, the stateless resources are included in the CloudFormation template recovery point (the last one in the following screenshot).
Restoring a CloudFormation Backup Inside the composite recovery point, I select the recovery point of the CloudFormation stack and choose Restore. Restoring a CloudFormation stack backup creates a new stack with a change set that represents the backup. I enter the new stack and change set names and choose Restore backup. After a few minutes, the restore job is completed.
In the CloudFormation console, the new stack is under review. I need to apply the change set.
I choose the new stack and select the change set created by the restore job to apply the change set.
After some time, the resources in my original stack have been recreated in the new stack. The stateful resources have been recreated empty. To recover the stateful resources, I can go back to the list of recovery points, select the recovery point I need, and initiate a restore.
Availability and Pricing AWS Backup support for CloudFormation stacks is available today using the console, AWS Command Line Interface (CLI), and AWS SDKs in all AWS Regions where AWS Backup is offered. There is no additional cost for the stateless resources backed up and restored by AWS Backup. You only pay for the stateful resources such as databases, storage volumes, or file systems. For more information, see AWS Backup pricing.
You now have an automated solution to create and restore your applications with a simplified experience, eliminating the need to manage custom scripts.
Customers running Oracle databases on Amazon Elastic Compute Cloud (Amazon EC2) often take database and schema backups using Oracle native tools like Data Pump and Recovery Manager (RMAN) to satisfy data protection, disaster recovery (DR), and compliance requirements. A priority is to reduce backup time as the data grows exponentially and recover sooner in case of failure/disaster.
In Part 2, we provide a mechanism to use AWS Backup to create a full backup of the EC2 instance, including the OS image, Oracle binaries, logs, and data files. The mechanism also uses Oracle RMAN to perform archived redo log backup to Amazon Elastic File System (Amazon EFS). Then, we demonstrate the steps to restore a database to a specific point-in-time using AWS Backup and Oracle RMAN.
AWS Backup service to backup EC2 instance at regular intervals.
Amazon EFS for storing Oracle RMAN archive log backups.
Figure 1. Oracle Database in Amazon EC2 using AWS Backup and EFS for backup and restore
Prerequisites
An AWS account
Oracle database and AWS CLI in an EC2 instance
Access to configure AWS Backup
Access to configure EFS to store the Oracle RMAN archive log backups
1. Configure AWS Backup
Configure AWS Backup as detailed in Step 1 of Part 1.
Oracle RMAN archive log backup
While AWS Backup is now creating a daily backup of the EC2 instance, we also want to make sure we backup the archived log files to a protected location. This will let us do point-in-time restores and restore to more recent times than just the last daily EC2 backup. Below we provide the steps to backup archive log using RMAN to Amazon EFS.
Backup/restore archive logs to/from Amazon EFS
Backing up the Oracle Archive logs is an important part of the process. In this section, we will describe how you can backup their Oracle archive logs to Amazon EFS. One advantage of this option (as compared with using Oracle Secure Backup [detailed in Part 1 of this series]) is that it does not require any additional Oracle licensing.
2. Configure Amazon EFS
a. Create an Amazon EFS file system that will be used to store Oracle RMAN Archive log backups. The image below details the steps involved in creation of an Amazon EFS. Consider that a sample file system ID: fs-0123abcdef012345 is created and will be used to store RMAN archive log backup.
Figure 2. Configure Amazon EFS which is used to store Oracle RMAN archive log backups
b. Install the Amazon EFS Client and follow instructions to install EFS client on RHEL EC2 instance. Note: next steps were tested on RHEL 7.9.
sudo yum -y install git
sudo yum -y install rpm-build
git clone https://github.com/aws/efs-utils
cd efs-utils/
sudo yum -y install make
sudo make rpm
sudo yum -y install ./build/amazon-efs-utils*rpm
c. Mount the EFS file system on your EC2 instance. In this example, we show the steps to mount EFS filesystem on EC2 Instance (if the command requests to upgrade stunnel, refer to Upgrading stunnel. Ensure that the EC2 instance profile attached has necessary policies to access EFS. /rman for mount point and file system ID: fs-0123abcdef012345 are examples for EFS file system.
With Amazon EFS mounted on EC2 instance, we can configure Oracle RMAN archive log backups to EFS. In below commands oratst is used as an example of your ORACLE_SID.
a. Configure RMAN repository to take control file backup to Amazon EFS automatically.
CONFIGURE CONTROLFILE AUTOBACKUP FORMAT FOR DEVICE TYPE DISK TO '/rman/ctrl-D_%d_%F';
CONFIGURE CONTROLFILE AUTOBACKUP ON;
b. Create a script (for example, rman_archive.sh) with below commands and schedule using crontab (example entry: */5 * * * * rman_archive.sh) to run every 5 minutes. This will ensure that Oracle Archive logs are backed up to Amazon EFS (/rman) frequently, ensuring an recovery point objective (RPO) of 5 minutes.
dt=`date +%Y%m%d_%H%M%S`

rman target / log=/rman/rman_arch_bkup_oratst_${dt}.log <<EOF

RUN
{
    allocate channel c1_efs device type disk format '/rman/arch-D-%d_%T_s%s_p%p' MAXPIECESIZE 10G;
    BACKUP ARCHIVELOG ALL delete all input;
    release channel c1_efs;
}

EOF
4. Perform database point-in-time recovery
In event of a database crash/corruption, we can use AWS Backup service and Oracle RMAN archive log backup to recover database to a specific point-in-time.
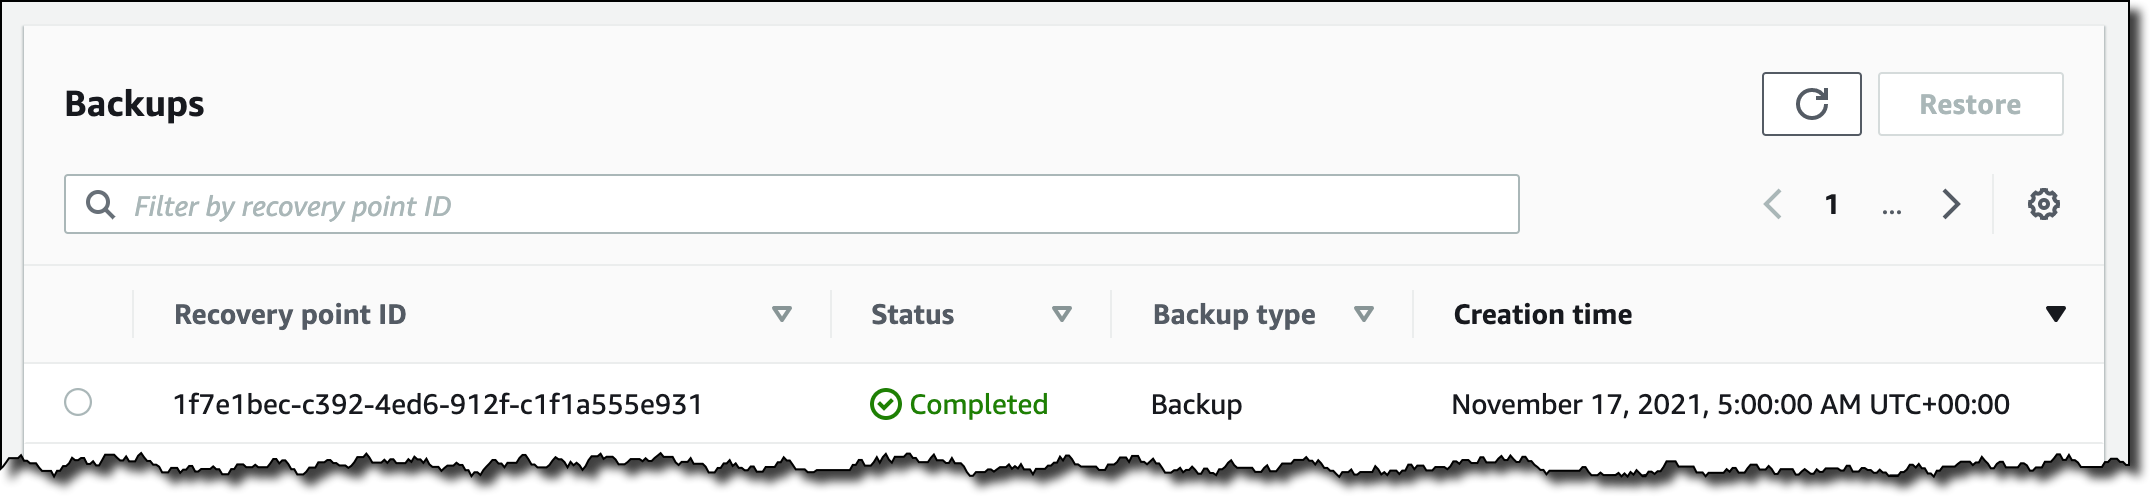
a. Typically, you would pick the most recent Recovery Point completed before the time to which you wish to recover. Using AWS Backup, identify the Recovery point ID to restore by following the steps from Restoring an Amazon EC2 instance. Note: when following the steps, be sure to set the “User data” settings as described in the next bulleted item.
After the EBS volumes are created from the snapshot, there is no need to wait for all of the data to transfer from Amazon S3 to your Amazon EBS volume before your attached instance can start accessing the volume. Amazon EBS Snapshots implement lazy loading, so that you can begin using them right away.
b. Ensure that database does not start automatically after restoring the EC2 instance, by renaming /etc/oratab. Use below command in “User data” section while restoring EC2 instance. After database recovery, we can rename it back to /etc/oratab.
#!/usr/bin/sh
sudo su -
mv /etc/oratab /etc/oratab_bk
c. Login to the EC2 instance once it is up and execute the RMAN recovery commands mentioned below. Identify the DBID from RMAN logs saved in the EFS. Below commands use database oratst as an example.
rman target /

RMAN> startup nomount

RMAN> set dbid DBID


# Below command is to restore the controlfile from autobackup

RMAN> RUN
{
    set controlfile autobackup format for device type disk to '/rman/ctrl-D_%d_%F';
    RESTORE CONTROLFILE FROM AUTOBACKUP;
    alter database mount;
}


#Identify the recovery point (sequence_number) by listing the backups available in catalog.

RMAN> list backup;
In Figure 3, the most recent archive log backed up is 460, so you can use this sequence number in the next set of RMAN commands.
RMAN> RUN
{
    allocate channel c1_efs device type disk format '/rman/arch-D-%d_%T_s%s_p%p';
    recover database until sequence sequence_number;
    ALTER DATABASE OPEN RESETLOGS;
    release channel c1_efs;
}
Figure 3. Sample output of Oracle RMAN “list backup” command
d. To avoid performance issues due to lazy loading, after the database is open, you can run below command to force a faster restoration of the blocks from S3 bucket to EBS volumes (below example allocates two channels and validates the entire database).
RMAN> RUN
{
  ALLOCATE CHANNEL c1 DEVICE TYPE DISK;
  ALLOCATE CHANNEL c2 DEVICE TYPE DISK;
  VALIDATE database section size 1200M;
}
e. This completes the recovery of database, and we can let the database to auto start by renaming file back to /etc/oratab.
mv /etc/oratab_bk /etc/oratab
5. Backup retention
Ensure that the AWS Backup Lifecycle policy match Oracle archive log backup retention. Also, follow documentation to configure Oracle backup retention and deleting expired backup. Below is a sample command for Oracle backup retention.
CONFIGURE BACKUP OPTIMIZATION ON;
CONFIGURE RETENTION POLICY TO RECOVERY WINDOW OF 31 DAYS;

RMAN> RUN
{
    allocate channel c1_efs device type disk format '/rman/arch-D-%d_%T_s%s_p%p';

    crosscheck backup;
    delete noprompt obsolete;
    delete noprompt expired backup;

    release channel c1_efs;
}
Cleanup
Follow below instructions to remove or cleanup the setup:
Remove the cron entry from the EC2 instance configured in Step 3b.
Delete the EFS that was created in Step 2 to store Oracle RMAN archive log backups.
Conclusion
In this post, we demonstrated the use for AWS Backup for EC2 snapshot and EFS as storage for Oracle RMAN archive log backups. With this strategy for backup, Oracle Database running on EC2 can be restored and recovered to a point-in-time faster than oracle native backup and recovery strategies. Also, by using EFS for Oracle RMAN archive log backups, we can avoid the additional licensing required to use Oracle Secure Backup, explained in Part 1. You can leverage this solution to facilitate restoring copies of your production database for development or testing purposes and to Recover from a user error that removes data or corrupts existing data.
Customers running Oracle databases on Amazon Elastic Compute Cloud (Amazon EC2) often take database and schema backups using Oracle native tools, like Data Pump and Recovery Manager (RMAN), to satisfy data protection, disaster recovery (DR), and compliance requirements. A priority is to reduce backup time as the data grows exponentially and recover sooner in case of failure/disaster.
In situations where RMAN backup is used as a DR solution, using AWS Backup to backup the file system and using RMAN to backup the archive logs are an efficient method to perform Oracle database point-in-time recovery in the event of a disaster.
Sample use cases:
Quickly build a copy of production database to test bug fixes or for a tuning exercise.
Recover from a user error that removes data or corrupts existing data.
A complete database recovery after a media failure.
There are two options to backup the archive logs using RMAN:
This is Part 1 of this two-part series, we provide a mechanism to use AWS Backup to create a full backup of the EC2 instance, including the OS image, Oracle binaries, logs, and data files. In this post, we will use Oracle RMAN to perform archived redo log backup to an Amazon S3 bucket. Then, we demonstrate the steps to restore a database to a specific point-in-time using AWS Backup and Oracle RMAN.
Solution overview
Figure 1 demonstrates the workflow:
Oracle database on Amazon EC2 configured with Oracle Secure Backup (OSB)
AWS Backup service to backup EC2 instance at regular intervals.
S3 bucket for storing Oracle RMAN archive log backups
Figure 1. Oracle Database in Amazon EC2 using AWS Backup and S3 for backup and restore
Prerequisites
For this solution, the following prerequisites are required:
An AWS account
Oracle database and AWS CLI in an EC2 instance
Access to configure AWS Backup
Acces to S3 bucket to store the RMAN archive log backup
1. Configure AWS Backup
You can choose AWS Backup to schedule daily backups of the EC2 instance. AWS Backup efficiently stores your periodic backups using backup plans. Only the first EBS snapshot performs a full copy from Amazon Elastic Block Storage (Amazon EBS) to Amazon S3. All subsequent snapshots are incremental snapshots, copying just the changed blocks from Amazon EBS to Amazon S3, thus, reducing backup duration and storage costs. Oracle supports Storage Snapshot Optimization, which takes third-party snapshots of the database without placing the database in backup mode. By default, AWS Backup now creates crash-consistent backups of Amazon EBS volumes that are attached to an EC2 instance. Customers no longer have to stop their instance or coordinate between multiple Amazon EBS volumes attached to the same EC2 instance to ensure crash-consistency of their application state.
You can create daily scheduled backup of EC2 instances. Figures 2, 3, and 4 are sample screenshots of the backup plan, associating an EC2 instance with the backup plan.
Figure 2. Configure backup rule using AWS Backup
Figure 3. Select EC2 instance containing Oracle Database for backup
Figure 4. Summary screen showing the backup rule and resources managed by AWS Backup
Oracle RMAN archive log backup
While AWS Backup is now creating a daily backup of the EC2 instance, we also want to make sure we backup the archived log files to a protected location. This will let us do point-in-time restores and restore to other recent times than just the last daily EC2 backup. Here, we provide the steps to backup archive log using RMAN to S3 bucket.
Backup/restore archive logs to/from Amazon S3 using OSB
Backing-up the Oracle archive logs is an important part of the process. In this section, we will describe how you can backup their Oracle Archive logs to Amazon S3 using OSB. Note: OSB is a separately licensed product from Oracle Corporation, so you will need to be properly licensed for OSB if you use this approach.
2. Setup S3 bucket and IAM role
Oracle Archive log backups can be scheduled using cron script to run at regular interval (for example, every 15 minutes). These backups are stored in an S3 bucket.
a. Create an S3 bucket with lifecycle policy to transition the objects to S3 Standard-Infrequent Access. b. Attach the following policy to the IAM Role of EC2 containing Oracle database or create an IAM role (ec2access) with the following policy and attach it to the EC2 instance. Update bucket-name with the bucket created in previous step.
After we have configured the backup of EC2 instance using AWS Backup, we setup OSB in the EC2 instance. In these steps, we show the mechanism to configure OSB.
a. Verify hardware and software prerequisites for OSB Cloud Module. b. Login to the EC2 instance with User ID owning the Oracle Binaries. c. Download Amazon S3 backup installer file (osbws_install.zip) d. Create Oracle wallet directory.
mkdir $ORACLE_HOME/dbs/osbws_wallet
e. Create a file (osbws.sh) in the EC2 instance with the following commands. Update IAM role with the one created/updated in Step 2b.
chmod 700 osbws.sh
./osbws.sh

Sample output: AWS credentials are valid.
Oracle Secure Backup Web Service wallet created in directory /u01/app/oracle/product/19.3.0.0/db_1/dbs/osbws_wallet.
Oracle Secure Backup Web Service initialization file /u01/app/oracle/product/19.3.0.0/db_1/dbs/osbwsoratst.ora created.
Downloading Oracle Secure Backup Web Service Software Library from file osbws_linux64.zip.
Download complete.
g. Set ORACLE_SID by executing below command:
. oraenv
h. Running the script – osbws.sh installs OSB libraries and creates a file called osbws<ORACLE_SID>.ora. i. Add/modify below with S3 bucket(bucket-name) and region(ex:us-west-2) created in Step 2a.
With OSB installed in the EC2 instance, you can backup Oracle archive logs to S3 bucket. These backups can be used to perform database point-in-time recovery in case of database crash/corruption . oratst is used as an example in below commands.
a. Configure RMAN repository. Example below uses Oracle 19c and Oracle Sid – oratst.
RMAN> configure channel device type sbt parms='SBT_LIBRARY=/u01/app/oracle/product/19.3.0.0/db_1/lib/libosbws.so,SBT_PARMS=(OSB_WS_PFILE=/u01/app/oracle/product/19.3.0.0/db_1/dbs/osbwsoratst.ora)';
b. Create a script (for example, rman_archive.sh) with below commands, and schedule using crontab (example entry: */5 * * * * rman_archive.sh) to run every 5 minutes. This will makes sure Oracle Archive logs are backed up to Amazon S3 frequently, thus ensuring an recovery point objective (RPO) of 5 minutes.
dt=`date +%Y%m%d_%H%M%S`

rman target / log=rman_arch_bkup_oratst_${dt}.log <<EOF

RUN
{
	allocate channel c1_s3 device type sbt
	parms='SBT_LIBRARY=/u01/app/oracle/product/19.3.0.0/db_1/lib/libosbws.so,SBT_PARMS=(OSB_WS_PFILE=/u01/app/oracle/product/19.3.0.0/db_1/dbs/osbwsoratst.ora)' MAXPIECESIZE 10G;

	BACKUP ARCHIVELOG ALL delete all input;
	Backup CURRENT CONTROLFILE;

release channel c1_s3;

}

EOF
c. Copy RMAN logs to S3 bucket. These logs contain the database identifier (DBID) that is required when we have to restore the database using Oracle RMAN.
In the event of a database crash/corruption, we can use AWS Backup service and Oracle RMAN Archive log backup to recover database to a specific point-in-time.
a. Typically, you would pick the most recent recovery point completed before the time you wish to recover. Using AWS Backup, identify the recovery point ID to restore by following the steps on restoring an Amazon EC2 instance. Note: when following the steps, be sure to set the “User data” settings as described in the next bullet item.
After the EBS volumes are created from the snapshot, there is no need to wait for all of the data to transfer from Amazon S3 to your EBS volume before your attached instance can start accessing the volume. Amazon EBS snapshots implement lazy loading, so that you can begin using them right away.
b. Be sure the database does not start automatically after restoring the EC2 instance, by renaming /etc/oratab. Use the following command in “User data” section while restoring EC2 instance. After database recovery, we can rename it back to /etc/oratab.
#!/usr/bin/sh
sudo su -
mv /etc/oratab /etc/oratab_bk
c. Login to the EC2 instance once it is up, and execute the RMAN recovery commands mentioned. Identify the DBID from RMAN logs saved in the S3 bucket. These commands use database oratst as an example:
rman target /

RMAN> startup nomount

RMAN> set dbid DBID

# Below command is to restore the controlfile from autobackup

RMAN> RUN
{
    allocate channel c1_s3 device type sbt
	parms='SBT_LIBRARY=/u01/app/oracle/product/19.3.0.0/db_1/lib/libosbws.so,SBT_PARMS=(OSB_WS_PFILE=/u01/app/oracle/product/19.3.0.0/db_1/dbs/osbwsoratst.ora)';

    RESTORE CONTROLFILE FROM AUTOBACKUP;
    alter database mount;

    release channel c1_s3;
}


#Identify the recovery point (sequence_number) by listing the backups available in catalog.

RMAN> list backup;
In Figure 5, the most recent archive log backed up is 380, so you can use this sequence number in the next set of RMAN commands.
Figure 5. Sample output of Oracle RMAN “list backup” command
RMAN> RUN
{
    allocate channel c1_s3 device type sbt
	parms='SBT_LIBRARY=/u01/app/oracle/product/19.3.0.0/db_1/lib/libosbws.so,SBT_PARMS=(OSB_WS_PFILE=/u01/app/oracle/product/19.3.0.0/db_1/dbs/osbwsoratst.ora)';

    recover database until sequence sequence_number;
    ALTER DATABASE OPEN RESETLOGS;
    release channel c1_s3;
}
d. To avoid performance issues due to lazy loading, after the database is open, run the following command to force a faster restoration of the blocks from S3 bucket to EBS volumes (this example allocates two channels and validates the entire database).
RMAN> RUN
{
  ALLOCATE CHANNEL c1 DEVICE TYPE DISK;
  ALLOCATE CHANNEL c2 DEVICE TYPE DISK;
  VALIDATE database section size 1200M;
}
e. This completes the recovery of database, and we can let the database automatically start by renaming file back to /etc/oratab.
mv /etc/oratab_bk /etc/oratab
6. Backup retention
Ensure that the AWS Backup lifecycle policy matches the Oracle Archive log backup retention. Also, follow documentation to configure Oracle backup retention and delete expired backups. This is a sample command for Oracle backup retention:
CONFIGURE BACKUP OPTIMIZATION ON;
CONFIGURE RETENTION POLICY TO RECOVERY WINDOW OF 31 DAYS;

RMAN> RUN
{
    allocate channel c1_s3 device type sbt
	parms='SBT_LIBRARY=/u01/app/oracle/product/19.3.0.0/db_1/lib/libosbws.so,SBT_PARMS=(OSB_WS_PFILE=/u01/app/oracle/product/19.3.0.0/db_1/dbs/osbwsoratst.ora)';

            crosscheck backup;
            delete noprompt obsolete;
            delete noprompt expired backup;

    release channel c1_s3;
}
Cleanup
Follow below instructions to remove or cleanup the setup:
Delete/Update IAM role (ec2access) to remove access from the S3 bucket used to store archive logs.
Remove the cron entry from the EC2 instance configured in Step 4b.
Delete the S3 bucket that was created in Step 2a to store Oracle RMAN archive log backups.
Conclusion
In this post, we demonstrate how to use AWS Backup and Oracle RMAN Archive log backup of Oracle databases running on Amazon EC2 can restore and recover efficiently to a point-in-time, without requiring an extra-step of restoring data files. Data files are restored as part of the AWS Backup EC2 instance restoration. You can leverage this solution to facilitate restoring copies of your production database for development or testing purposes, plus recover from a user error that removes data or corrupts existing data.
In Part 1 of this two-part series, we shared an overview of some of the most important 2021 Amazon Web Services (AWS) Security service and feature launches. In this follow-up, we’ll dive deep into additional launches that are important for security professionals to be aware of and understand across all AWS services. There have already been plenty in the first half of 2022, so we’ll highlight those soon, as well.
AWS Identity
You can use AWS Identity Services to build Zero Trust architectures, help secure your environments with a robust data perimeter, and work toward the security best practice of granting least privilege. In 2021, AWS expanded the identity source options, AWS Region availability, and support for AWS services. There is also added visibility and power in the permission management system. New features offer new integrations, additional policy checks, and secure resource sharing across AWS accounts.
AWS Single Sign-On
For identity management, AWS Single Sign-On (AWS SSO) is where you create, or connect, your workforce identities in AWS once and manage access centrally across your AWS accounts in AWS Organizations. In 2021, AWS SSO announced new integrations for JumpCloud and CyberArk users. This adds to the list of providers that you can use to connect your users and groups, which also includes Microsoft Active Directory Domain Services, Okta Universal Directory, Azure AD, OneLogin, and Ping Identity.
For access management, there have been a range of feature launches with AWS Identity and Access Management (IAM) that have added up to more power and visibility in the permissions management system. Here are some key examples.
IAM made it simpler to relate a user’s IAM role activity to their corporate identity. By setting the new source identity attribute, which persists through role assumption chains and gets logged in AWS CloudTrail, you can find out who is responsible for actions that IAM roles performed.
IAM added support for policy conditions, to help manage permissions for AWS services that access your resources. This important feature launch of service principal conditions helps you to distinguish between API calls being made on your behalf by a service principal, and those being made by a principal inside your account. You can choose to allow or deny the calls depending on your needs. As a security professional, you might find this especially useful in conjunction with the aws:CalledVia condition key, which allows you to scope permissions down to specify that this account principal can only call this API if they are calling it using a particular AWS service that’s acting on their behalf. For example, your account principal can’t generally access a particular Amazon Simple Storage Service (Amazon S3) bucket, but if they are accessing it by using Amazon Athena, they can do so. These conditions can also be used in service control policies (SCPs) to give account principals broader scope across an account, organizational unit, or organization; they need not be added to individual principal policies or resource policies.
Another very handy new IAM feature launch is additional information about the reason for an access denied error message. With this additional information, you can now see which of the relevant access control policies (for example, IAM, resource, SCP, or VPC endpoint) was the cause of the denial. As of now, this new IAM feature is supported by more than 50% of all AWS services in the AWS SDK and AWS Command Line Interface, and a fast-growing number in the AWS Management Console. We will continue to add support for this capability across services, as well as add more features that are designed to make the journey to least privilege simpler.
IAM Access Analyzer also launched the ability to generate fine-grained policies based on analyzing past AWS CloudTrail activity. This feature provides a great new capability for DevOps teams or central security teams to scope down policies to just the permissions needed, making it simpler to implement least privilege permissions. IAM Access Analyzer launched further enhancements to expand policy checks, and the ability to generate a sample least-privilege policy from past activity was expanded beyond the account level to include an analysis of principal behavior within the entire organization by analyzing log activity stored in AWS CloudTrail.
AWS Resource Access Manager
AWS Resource Access Manager (AWS RAM) helps you securely share your resources across unrelated AWS accounts within your organization or organizational units (OUs) in AWS Organizations. Now you can also share your resources with IAM roles and IAM users for supported resource types. This update enables more granular access using managed permissions that you can use to define access to shared resources. In addition to the default managed permission defined for each shareable resource type, you now have more flexibility to choose which permissions to grant to whom for resource types that support additional managed permissions. Additionally, AWS RAM added support for global resource types, enabling you to provision a global resource once, and share that resource across your accounts. A global resource is one that can be used in multiple AWS Regions; the first example of a global resource is found in AWS Cloud WAN, currently in preview as of this publication. AWS RAM helps you more securely share an AWS Cloud WAN core network, which is a managed network containing AWS and on-premises networks. With AWS RAM global resource sharing, you can use the Cloud WAN core network to centrally operate a unified global network across Regions and accounts.
AWS Directory Service
AWS Directory Service for Microsoft Active Directory, also known as AWS Managed Microsoft Active Directory (AD), was updated to automatically provide domain controller and directory utilization metrics in Amazon CloudWatch for new and existing directories. Analyzing these utilization metrics helps you quantify your average and peak load times to identify the need for additional domain controllers. With this, you can define the number of domain controllers to meet your performance, resilience, and cost requirements.
Amazon Cognito
Amazon Cognitoidentity pools (federated identities) was updated to enable you to use attributes from social and corporate identity providers to make access control decisions and simplify permissions management in AWS resources. In Amazon Cognito, you can choose predefined attribute-tag mappings, or you can create custom mappings using the attributes from social and corporate providers’ access and ID tokens, or SAML assertions. You can then reference the tags in an IAM permissions policy to implement attribute-based access control (ABAC) and manage access to your AWS resources. Amazon Cognito also launched a new console experience for user pools and now supports targeted sign out through refresh token revocation.
Governance, control, and logging services
There were a number of important releases in 2021 in the areas of governance, control, and logging services.
This approach provides a powerful new middle ground between the older security models of prevention (which provide developers only an access denied message, and often can’t distinguish between an acceptable and an unacceptable use of the same API) and a detect and react model (when undesired states have already gone live). The Cfn-Guard 2.0 model gives builders the freedom to build with IaC, while allowing central teams to have the ability to reject infrastructure configurations or changes that don’t conform to central policies—and to do so with completely custom error messages that invite dialog between the builder team and the central team, in case the rule is unnuanced and needs to be refined, or if a specific exception needs to be created.
For example, a builder team might be allowed to provision and attach an internet gateway to a VPC, but the team can do this only if the routes to the internet gateway are limited to a certain pre-defined set of CIDR ranges, such as the public addresses of the organization’s branch offices. It’s not possible to write an IAM policy that takes into account the CIDR values of a VPC route table update, but you can write a Cfn-Guard 2.0 rule that allows the creation and use of an internet gateway, but only with a defined and limited set of IP addresses.
AWS Systems Manager Incident Manager
An important launch that security professionals should know about is AWS Systems Manager Incident Manager. Incident Manager provides a number of powerful capabilities for managing incidents of any kind, including operational and availability issues but also security issues. With Incident Manager, you can automatically take action when a critical issue is detected by an Amazon CloudWatch alarm or Amazon EventBridge event. Incident Manager runs pre-configured response plans to engage responders by using SMS and phone calls, can enable chat commands and notifications using AWS Chatbot, and runs automation workflows with AWS Systems Manager Automation runbooks. The Incident Manager console integrates with AWS Systems Manager OpsCenter to help you track incidents and post-incident action items from a central place that also synchronizes with third-party management tools such as Jira Service Desk and ServiceNow. Incident Manager enables cross-account sharing of incidents using AWS RAM, and provides cross-Region replication of incidents to achieve higher availability.
Amazon Simple Storage Service (Amazon S3) is one of the most important services at AWS, and its steady addition of security-related enhancements is always big news. Here are the 2021 highlights.
Access Points aliases
Amazon S3 introduced a new feature, Amazon S3 Access Points aliases. With Amazon S3 Access Points aliases, you can make the access points backwards-compatible with a large amount of existing code that is programmed to interact with S3 buckets rather than access points.
To understand the importance of this launch, we have to go back to 2019 to the launch of Amazon S3 Access Points. Access points are a powerful mechanism for managing S3 bucket access. They provide a great simplification for managing and controlling access to shared datasets in S3 buckets. You can create up to 1,000 access points per Region within each of your AWS accounts. Although bucket access policies remain fully enforced, you can delegate access control from the bucket to its access points, allowing for distributed and granular control. Each access point enforces a customizable policy that can be managed by a particular workgroup, while also avoiding the problem of bucket policies needing to grow beyond their maximum size. Finally, you can also bind an access point to a particular VPC for its lifetime, to prevent access directly from the internet.
With the 2021 launch of Access Points aliases, Amazon S3 now generates a unique DNS name, or alias, for each access point. The Access Points aliases look and acts just like an S3 bucket to existing code. This means that you don’t need to make changes to older code to use Amazon S3 Access Points; just substitute an Access Points aliases wherever you previously used a bucket name. As a security team, it’s important to know that this flexible and powerful administrative feature is backwards-compatible and can be treated as a drop-in replacement in your various code bases that use Amazon S3 but haven’t been updated to use access point APIs. In addition, using Access Points aliases adds a number of powerful security-related controls, such as permanent binding of S3 access to a particular VPC.
S3 Bucket Keys were launched at the end of 2020, another great launch that security professionals should know about, so here is an overview in case you missed it. S3 Bucket Keys are data keys generated by AWS KMS to provide another layer of envelope encryption in which the outer layer (the S3 Bucket Key) is cached by S3 for a short period of time. This extra key layer increases performance and reduces the cost of requests to AWS KMS. It achieves this by decreasing the request traffic from Amazon S3 to AWS KMS from a one-to-one model—one request to AWS KMS for each object written to or read from Amazon S3—to a one-to-many model using the cached S3 Bucket Key. The S3 Bucket Key is never stored persistently in an unencrypted state outside AWS KMS, and so Amazon S3 ultimately must always return to AWS KMS to encrypt and decrypt the S3 Bucket Key, and thus, the data. As a result, you still retain control of the key hierarchy and resulting encrypted data through AWS KMS, and are still able to audit Amazon S3 returning periodically to AWS KMS to refresh the S3 Bucket Keys, as logged in CloudTrail.
Returning to our review of 2021, S3 Bucket Keys gained the ability to use Amazon S3 Inventory and Amazon S3 Batch Operations automatically to migrate objects from the higher cost, slightly lower-performance SSE-KMS model to the lower-cost, higher-performance S3 Bucket Keys model.
To understand this launch, we need to go in time to the origins of Amazon S3, which is one of the oldest services in AWS, created even before IAM was launched in 2011. In those pre-IAM days, a storage system like Amazon S3 needed to have some kind of access control model, so Amazon S3 invented its own: Amazon S3 access control lists (ACLs). Using ACLs, you could add access permissions down to the object level, but only with regard to access by other AWS account principals (the only kind of identity that was available at the time), or public access (read-only or read-write) to an object. And in this model, objects were always owned by the creator of the object, not the bucket owner.
After IAM was introduced, Amazon S3 added the bucket policy feature, a type of resource policy that provides the rich features of IAM, including full support for all IAM principals (users and roles), time-of-day conditions, source IP conditions, ability to require encryption, and more. For many years, Amazon S3 access decisions have been made by combining IAM policy permissions and ACL permissions, which has served customers well. But the object-writer-is-owner issue has often caused friction. The good news for security professionals has been that a deny by either type of access control type overrides an allow by the other, so there were no security issues with this bi-modal approach. The challenge was that it could be administratively difficult to manage both resource policies—which exist at the bucket and access point level—and ownership and ACLs—which exist at the object level. Ownership and ACLs might potentially impact the behavior of only a handful of objects, in a bucket full of millions or billions of objects.
With the features released in 2021, Amazon S3 has removed these points of friction, and now provides the features needed to reduce ownership issues and to make IAM-based policies the only access control system for a specified bucket. The first step came in 2020 with the ability to make object ownership track bucket ownership, regardless of writer. But that feature applied only to newly-written objects. The final step is the 2021 launch we’re highlighting here: the ability to disable at the bucket level the evaluation of all existing ACLs—including ownership and permissions—effectively nullifying all object ACLs. From this point forward, you have the mechanisms you need to govern Amazon S3 access with a combination of S3 bucket policies, S3 access point policies, and (within the same account) IAM principal policies, without worrying about legacy models of ACLs and per-object ownership.
Additional database and storage service features
AWS Backup Vault Lock
AWS Backup added an important new additional layer for backup protection with the availability of AWS Backup Vault Lock. A vault lock feature in AWS is the ability to configure a storage policy such that even the most powerful AWS principals (such as an account or Org root principal) can only delete data if the deletion conforms to the preset data retention policy. Even if the credentials of a powerful administrator are compromised, the data stored in the vault remains safe. Vault lock features are extremely valuable in guarding against a wide range of security and resiliency risks (including accidental deletion), notably in an era when ransomware represents a rising threat to data.
ACM Private CA achieved FedRAMP authorization for six additional AWS Regions in the US.
Additional certificate customization now allows administrators to tailor the contents of certificates for new use cases, such as identity and smart card certificates; or to securely add information to certificates instead of relying only on the information present in the certificate request.
Additional capabilities were added for sharing CAs across accounts by using AWS RAM to help administrators issue fully-customized certificates, or revoke them, from a shared CA.
Integration with Kubernetes provides a more secure certificate authority solution for Kubernetes containers.
Online Certificate Status Protocol (OCSP) provides a fully-managed solution for notifying endpoints that certificates have been revoked, without the need for you to manage or operate infrastructure yourself.
Network and application protection
We saw a lot of enhancements in network and application protection in 2021 that will help you to enforce fine-grained security policies at important network control points across your organization. The services and new capabilities offer flexible solutions for inspecting and filtering traffic to help prevent unauthorized resource access.
AWS WAF
AWS WAF launched AWS WAF Bot Control, which gives you visibility and control over common and pervasive bots that consume excess resources, skew metrics, cause downtime, or perform other undesired activities. The Bot Control managed rule group helps you monitor, block, or rate-limit pervasive bots, such as scrapers, scanners, and crawlers. You can also allow common bots that you consider acceptable, such as status monitors and search engines. AWS WAF also added support for custom responses, managed rule group versioning, in-line regular expressions, and Captcha. The Captcha feature has been popular with customers, removing another small example of “undifferentiated work” for customers.
AWS Shield Advanced
AWS Shield Advanced now automatically protects web applications by blocking application layer (L7) DDoS events with no manual intervention needed by you or the AWS Shield Response Team (SRT). When you protect your resources with AWS Shield Advanced and enable automatic application layer DDoS mitigation, Shield Advanced identifies patterns associated with L7 DDoS events and isolates this anomalous traffic by automatically creating AWS WAF rules in your web access control lists (ACLs).
Amazon CloudFront
In other edge networking news, Amazon CloudFront added support for response headers policies. This means that you can now add cross-origin resource sharing (CORS), security, and custom headers to HTTP responses returned by your CloudFront distributions. You no longer need to configure your origins or use custom Lambda@Edge or CloudFront Functions to insert these headers.
Following Route 53 Resolver’s much-anticipated launch of DNS logging in 2020, the big news for 2021 was the launch of its DNS Firewall capability. Route 53 Resolver DNS Firewall lets you create “blocklists” for domains you don’t want your VPC resources to communicate with, or you can take a stricter, “walled-garden” approach by creating “allowlists” that permit outbound DNS queries only to domains that you specify. You can also create alerts for when outbound DNS queries match certain firewall rules, allowing you to test your rules before deploying for production traffic. Route 53 Resolver DNS Firewall launched with two managed domain lists—malware domains and botnet command and control domains—enabling you to get started quickly with managed protections against common threats. It also integrated with Firewall Manager (see the following section) for easier centralized administration.
AWS Network Firewall and Firewall Manager
Speaking of AWS Network Firewall and Firewall Manager, 2021 was a big year for both. Network Firewall added support for AWS Managed Rules, which are groups of rules based on threat intelligence data, to enable you to stay up to date on the latest security threats without writing and maintaining your own rules. AWS Network Firewall features a flexible rules engine enabling you to define firewall rules that give you fine-grained control over network traffic. As of the launch in late 2021, you can enable managed domain list rules to block HTTP and HTTPS traffic to domains identified as low-reputation, or that are known or suspected to be associated with malware or botnets. Prior to that, another important launch was new configuration options for rule ordering and default drop, making it simpler to write and process rules to monitor your VPC traffic. Also in 2021, Network Firewall announced a major regional expansion following its initial launch in 2020, and a range of compliance achievements and eligibility including HIPAA, PCI DSS, SOC, and ISO.
Elastic Load Balancing now supports forwarding traffic directly from Network Load Balancer (NLB) to Application Load Balancer (ALB). With this important new integration, you can take advantage of many critical NLB features such as support for AWS PrivateLink and exposing static IP addresses for applications that still require ALB.
The AWS Networking team also made Amazon VPC private NAT gateways available in both AWS GovCloud (US) Regions. The expansion into the AWS GovCloud (US) Regions enables US government agencies and contractors to move more sensitive workloads into the cloud by helping them to address certain regulatory and compliance requirements.
Compute
Security professionals should also be aware of some interesting enhancements in AWS compute services that can help improve their organization’s experience in building and operating a secure environment.
Amazon Elastic Compute Cloud (Amazon EC2) launched the Global View on the console to provide visibility to all your resources across Regions. Global View helps you monitor resource counts, notice abnormalities sooner, and find stray resources. A few days into 2022, another simple but extremely useful EC2 launch was the new ability to obtain instance tags from the Instance Metadata Service (IMDS). Many customers run code on Amazon EC2 that needs to introspect about the EC2 tags associated with the instance and then change its behavior depending on the content of the tags. Prior to this launch, you had to associate an EC2 role and call the EC2 API to get this information. That required access to API endpoints, either through a NAT gateway or a VPC endpoint for Amazon EC2. Now, that information can be obtained directly from the IMDS, greatly simplifying a common use case.
Amazon EC2 launched sharing of Amazon Machine Images (AMIs) with AWS Organizations and Organizational Units (OUs). Previously, you could share AMIs only with specific AWS account IDs. To share AMIs within AWS Organizations, you had to explicitly manage sharing of AMIs on an account-by-account basis, as they were added to or removed from AWS Organizations. With this new feature, you no longer have to update your AMI permissions because of organizational changes. AMI sharing is automatically synchronized when organizational changes occur. This feature greatly helps both security professionals and governance teams to centrally manage and govern AMIs as you grow and scale your AWS accounts. As previously noted, this feature was also added to EC2 Image Builder. Finally, Amazon Data Lifecycle Manager, the tool that manages all your EBS volumes and AMIs in a policy-driven way, now supports automatic deprecation of AMIs. As a security professional, you will find this helpful as you can set a timeline on your AMIs so that, if the AMIs haven’t been updated for a specified period of time, they will no longer be considered valid or usable by development teams.
Looking ahead
In 2022, AWS continues to deliver experiences that meet administrators where they govern, developers where they code, and applications where they run. We will continue to summarize important launches in future blog posts. If you’re interested in learning more about AWS services, join us for AWS re:Inforce, the AWS conference focused on cloud security, identity, privacy, and compliance. AWS re:Inforce 2022 will take place July 26–27 in Boston, MA. Registration is now open. Register now with discount code SALxUsxEFCw to get $150 off your full conference pass to AWS re:Inforce. For a limited time only and while supplies last. We look forward to seeing you there!
To stay up to date on the latest product and feature launches and security use cases, be sure to read the What’s New with AWS announcements (or subscribe to the RSS feed) and the AWS Security Blog.
If you have feedback about this post, submit comments in the Comments section below. If you have questions about this post, contact AWS Support.
Want more AWS Security news? Follow us on Twitter.
This is the right place to quickly learn about recent AWS news from last week, in just about five minutes or less. This week, I have collected a couple of news items that might be of interest to you, the IT professionals, developers, system administrators, or any type of builders that have their hands on the AWS console, the CLI, or that are writing code.
Last Week’s Launches The launches that caught my attention last week are the following:
EC2 now supports NitroTPM and SecureBoot – A Trusted Platform Module is often a discrete chip in a computer where you can store secrets and release them to the operating system only when the system is in a known good state. You typically use TPM modules to store operating-system-level volume encryption keys, such as the ones used by BitLocker on Windows or LUKS. NitroTPM is a virtual TPM module available on selected instance families that allows you to deploy your workloads depending on TPM functionalities on EC2 instances.
Amazon EC2 Auto Scaling now backfills predictive scaling forecasts so you can quickly validate forecast accuracy. Auto Scaling Predictive Scaling is a capability of Auto Scaling that allows you to scale your fleet in and out based on observed usage patterns. It uses AI/ML to predict when your fleet needs more or less capacity. It allows you to scale a fleet in advance of the scaling event and have the fleet prepared at peak times. The new backfills shows you how predictive scaling would have scaled your fleet during the last 14 days. This allows you to quickly decide if the predictive scaling policy is accurate for your applications by comparing the demand and capacity forecasts against actual demand immediately after you create a predictive scaling policy.
AWS Backup adds support for two new managed file systems,Amazon FSx for OpenZFS and Amazon Fsx for NetApp ONTAP. These additions helps you meet your centralized data protection and regulatory compliance needs. You can now use AWS Backup’s policy-based capabilities to centrally protect Amazon FSx for NetApp ONTAP or Amazon Fsx for OpenZFS, along with the other AWS services for storage, database, and compute that AWS Backup supports.
AWS App Mesh now supports IPv6 – AWS App Mesh is a service mesh that provides application-level networking to make it easy for your services to communicate with each other across multiple types of compute infrastructure. The new support for IPv6 allows you to support workloads running in IPv6 networks and to invoke App Mesh APIs over IPv6. This helps you meet IPv6 compliance requirements, and removes the need for complex networking configuration to handle address translation between IPv4 and IPv6.
Amazon Chime SDK now supports video background replacement and blur on iOS and Android. When you want to integrate audio and video call capabilities in your mobile applications, the Chime SDK is the easiest way to get started. It provides an easy-to-use API that uses the scalable and robust Amazon Chime backend to power your communications. For example, Slack is using Chime as backend for the communications in their apps. The Chime SDK client libraries for iOS and Android now include video background replacement and blur, which developers can use to reduce visual distractions and help increase visual privacy for mobile users on iOS and Android.
Other AWS News Some other updates and news that you may have missed:
Amazon Redshift: Ten years of continuous reinvention. This is an Amazon Redshift research paper that will be presented at a leading international forum for database researchers. The authors reflect on how far the first petabyte-scale cloud data warehouse has advanced since it was announced ten years ago.
Improve Your Security at the Edge with AWS IoT Services is a new blog post on the IoT channel. We understand the risks associated with operating at the edge and that you need additional capabilities to ensure that your data is protected. AWS IoT services can help you with end-to-end data protection, device security, and device identification to create the foundation of an expanded information security model and confidently operate at the edge.
AWS Open Source News and Updates – Ricardo Sueiras, my colleague from the AWS Developer Relation team, runs this newsletter. It brings you all the latest open-source projects, posts, and more. Read edition #113 here.
The AWS Summit season is mostly over in Europe, but there are upcoming Summits in North America and the Asia Pacific Regions. Here are some virtual and in-person Summits that might be close to you:
You can register for re:MARS to get fresh ideas on topics such as machine learning, automation, robotics, and space. The conference will be in person in Las Vegas, June 21–24.
That’s all for this week. Check back next Monday for another Week in Review!
If you are a long-time reader of this blog, you know that I categorize some posts as “chocolate and peanut butter” in homage to an ancient (1970 or so) series of TV commercials for Reese’s Peanut Butter Cups. Today, I am happy to bring you the latest such post, combining AWS Backup and Amazon FSx for NetApp ONTAP. Before I dive into the specifics, let’s review each service:
Amazon FSx for NetApp ONTAP gives you the features, performance, and APIs of NetApp ONTAP file systems with the agility, scalability, security, and resiliency of AWS (again, read my post, New – Amazon FSx for NetApp ONTAP to learn more). ONTAP is an enterprise data management product that is designed to provide high-performance storage suitable for use with Oracle, SAP, VMware, Microsoft SQL Server, and so forth. Each file system supports multi-protocol access and can scale up to 176 PiB, along with inline data compression, deduplication, compaction, thin provisioning, replication, and point-in-time cloning. We launched with a multi-AZ deployment type, and introduced a single-AZ deployment type earlier this year.
Chocolate and Peanut Butter AWS Backup now supports Amazon FSx for NetApp ONTAP file systems. All of the existing AWS Backup features apply, and you can add this support to an existing backup plan or you can create a new one.
Suppose I have a couple of ONTAP file systems:
I go to the AWS Backup Console and click Create Backup plan to get started:
I decide to Start with a template, and choose Daily-Monthly-1yr-Retention, then click Create plan:
Next, I examine the Resource assignments section of my plan and click Assign resources:
I create a resource assignment (Jeff-ONTAP-Resources), and select the FSx resource type. I can leave the assignment as-is in order to include all of my Amazon FSx volumes in the assignment, or I can uncheck All file systems, and then choose volumes on the file systems that I showed you earlier:
I review all of my choices, and click Assign resources to proceed. My backups will be performed in accord with the backup plan.
I can also create an on-demand backup. To do this, I visit the Protected resources page and click Create on-demand backup:
I choose a volume, set a one week retention period for my on-demand backup, and click Create on-demand backup:
The backup job starts within seconds, and is visible on the Backup jobs page:
After the job completes I can examine the vault and see my backup. Then I can select it and choose Restore from the Actions menu:
To restore the backup, I choose one of the file systems from it, enter a new volume name, and click Restore backup.
Also of Interest We recently launched two new features for AWS Backup that you may find helpful. Both features can now be used in conjunction with Amazon FSx for ONTAP:
AWS Backup Vault Lock – This feature lets you prevent your backups from being accidentally or maliciously deleted, and also enhances protection against ransomware. You can use this feature to make selected backup values WORM (write-once-read-many) compliant. Once you have done this, the backups in the vault cannot be modified manually. You can also set minimum and maximum retention periods for each vault. To learn more, read Enhance the security posture of your backups with AWS Backup Vault Lock.
Available Now This new feature is available now and you can start using it today in all regions where AWS Backup and Amazon FSx for NetApp ONTAP are available.
Security is a shared responsibility between AWS and the customer. Customers have asked for ways to secure their backups in AWS. This post will guide you through a curated list of the top ten security best practices to secure your backup data and operations in AWS. While this blog post focuses on backup data and operations in AWS Backup service, the recommended security best practices can be leveraged by organizations that utilize other backup solutions, such as backup tools from the AWS Marketplace.
Since security practices constantly evolve to mitigate new risks, it’s important that you conduct regular risk assessments to determine the applicability of security controls, and implement multiple layers of controls to mitigate risks to your data.
#1 – Implement a backup strategy
A comprehensive backup strategy is an essential part of an organization’s data protection plan to withstand, recover, and reduce any impact that might be sustained due to a security event. You should create an extensive backup strategy that defines which data must be backed up, how often data must be backed up, and monitoring of backup and recovery tasks. When you develop a comprehensive strategy for backing up and restoring data, you should first identify interruptions that may occur, and their potential business impact.
Your objective should be building a recovery strategy that brings your workload back up or avoids downtime within the acceptable Recovery Time Objective (RTO) and Recovery Point Objective (RPO). RTO is the acceptable delay between the interruption of service and restoration of service, and RPO is the acceptable amount of time since the last data recovery point. You should consider a granular backup strategy that includes all of the following: continuous backup cadence, Point-in-Time Recovery (PITR), file-level recovery, application data–level recovery, volume-level recovery, instance-level recovery, etc.
A well-designed backup strategy should include actions that can protect and recover your resources from ransomware, with detailed recovery requirements for your applications and their data dependencies. For example, while you establish preventive and detective controls to mitigate the risk of ransomware, you should also design the appropriate level of granularity for cross-region and/or cross-account copy and restore patterns, to ensure that administrators do not restore corrupt backup data in the event of a security event.
In some industries, when developing a backup strategy, you must also consider the regulations for data retention requirements. You should make sure your backup strategy is designed with the necessary retention requirements (per data classification level and/or resource type) sufficient to meet your regulatory needs.
Consult your security compliance teams to validate whether your backup resources and operations should be included or segmented from the scope of your compliance programs. In my experience as a PCI DSS Qualified Security Assessor (QSA), I’ve seen successful/more mature customers include backup and recovery as critical parts of their security program. This helps them understand where data is across their environment and appropriately define compliance scope.
Disaster recovery (DR) is the process of preparing, responding, and recovering from a disaster. It is an important part of your resiliency strategy, and concerns how your workload responds when a disaster strikes. A disaster could be a technical failure, human action, or natural event. A Business Continuity Plan (BCP) outlines how an organization intends to continue normal business operations during an unplanned disruption.
Your disaster recovery plan should be a subset of your organization’s business continuity plan (BCP) and you should incorporate AWS Backup procedures in your enterprise business continuity plan. For example, a security event that affects production data might require you to invoke a disaster recovery plan that fails over to backup data from another AWS Region. You should ensure that your employees are familiar with and have practiced using AWS Backup along with your organizational procedures, so that if disaster strikes, your organization can continue its normal operations with little or no service disruption.
#3 – Automate backup operations
Organizations should configure their backup plans and resource assignments to reflect their enterprise data protection policies. Automating and deploying backup policies or organization-wide backup plans allows you to standardize and scale your backup strategy. You can leverage AWS Organizations to centrally automate backup policies to implement, configure, manage, and govern backup activity across supported AWS resources by scheduling backup operations.
You should consider implementing infrastructure as code (IaC) and event-driven architecture as essential parts of your digital transformation and backup strategy, to improve productivity and govern infrastructure operations across multi-account environments. Automating backups allows you to reduce manual overhead from time-consuming configuration of your backups, minimizes the risk for errors, provides visibility on drift detection, and enhances backup policy compliance across multiple AWS workloads or accounts.
Implementing backup policies as code can help you meet data protection regulations, by configuring different requirements for your resource types, scaling your enterprise data protection strategy, and implementing lifecycle rules to specify how long before a recovery point either transitions to cold storage or is deleted, which can help optimize your costs.
When automating your backup operations, you can scale resource assignment options using AWS Tags and Resource IDs to automatically identify the AWS resources that store data for your business-critical applications and protect your data using immutable backups. This can help you prioritize security controls, such as access permissions and backup plans or policies.
#4 – Implement access control mechanisms
When thinking about security in the cloud, your foundational strategy should begin with a strong identity foundation to ensure a user has the right permissions to access data. Appropriate authentication and authorization can mitigate the risk of security events. The shared responsibility model requires AWS customers to implement access control policies. You can use AWS Identity and Access Management (IAM) service to create and manage access policies at scale.
When configuring access rights and permissions, you should implement the principle of least privilege by ensuring each user or system accessing your backup data or Vault is only given the permissions necessary to fulfill their job duties. Using AWS Backup, you should implement access control policies by setting access policies on backup vaults to protect your cloud workloads.
For example, implementing access control policies allows you to grant users access to create backup plans and on-demand backups, but still limit their ability to delete recovery points once they’ve been created. Using vault access policies, you can share a destination backup vault with a source AWS Account, user, or IAM role, as required by your business needs. Access policy can also allow you to share a backup vault with one or multiple accounts, or with your entire organization in AWS Organizations.
As you scale your workloads or migrate into AWS, you may need to centrally manage permissions to your backup vaults and operations. You should use service control policies (SCPs) to implement centralized control over the maximum available permissions for all accounts in your organization. This offers defense in depth, and ensures your users stay within the defined access control guidelines. To learn more, read how you can secure your AWS Backup data and operations using service control policies (SCPs).
To mitigate security risks such as unintended access to your backup resources and data, use AWS IAM Access Analyzer to identify any AWS Backup IAM role shared with an external entity such as AWS account, a root user, an IAM user or role, a federated user, an AWS service, an anonymous user, or other entity that you can use to create a filter.
#5 – Encrypt backup data and vault
Organizations increasingly need to improve their data security strategy, and may be required to meet data protection regulations as they scale in the cloud. The correct implementation of encryption methods can provide an additional layer of protection above foundational access control mechanisms providing a mitigation if your primary access control policies fail.
For example, if you configure overly permissive access control policies on your Backup data, your key management system or process can mitigate the maximum impact of a security event, since there are separate authorization mechanisms to access your data and encryption key which means that the backup data is only viewable as cipher text.
To get the most from AWS cloud encryption, you should encrypt data both in transit and at rest. To protect data in transit, AWS uses published API calls to access AWS Backup through the network using Transport Layer Security (TLS) protocol to provide encryption between you, your application and the Backup service. To protect data at rest, AWS offers cloud-native options of using AWS Key Managed System (KMS) or AWS CloudHSM which leverages Advanced Encryption Standard (AES) with 256-bit keys (AES-256), a strong industry-adopted algorithm for encrypting data. You should evaluate your data governance and regulatory requirements, and select the appropriate encryption service to encrypt your cloud data and backup vaults.
Encryption configuration differs depending on the resource type and backup operations across accounts or Regions. Certain resource types support the ability to encrypt your backups using a separate encryption key from the key used to encrypt the source resource. Since you are responsible for managing access controls to determine who can access your Backup data or vault encryption keys and under which conditions, you should use the policy language offered by AWS KMS to define access controls on keys. You can also use AWS Backup Audit Manager to confirm that your backup is properly encrypted.
AWS KMS multi-Region keys allows you to replicate keys from one Region into another. Multi-Region keys are designed to simplify encryption management when your encrypted data has to be copied into other Regions for disaster recovery. You should evaluate the need to implement multi-region KMS keys as part of your overall backup strategy.
#6 – Safeguard backups using immutable storage
Immutable storage allows organizations to write data in a Write Once Read Many (WORM) state. While in a WORM state, data can be written one time, read and used as often as needed after it has been committed or written to the storage medium. Immutable storage ensures data integrity is maintained and provides protection against deletes, overwrites, inadvertent and unauthorized access, ransomware compromise etc. Immutable storage offers an efficient mechanism to address potential security events with real impacts on your business operations.
Immutable storage can be used for better governance when paired with strong SCP restrictions, or can be used in a compliance WORM mode when the letter of the law (such as a legal hold) requires access to immutable data.
You can maintain data availability and integrity with AWS Backup Vault Lock to protect your backups* such that unauthorized entities cannot erase, alter or corrupt your customer or business data during the required retention period. AWS Backup Vault Lock helps you meet your organization’s data protection policies by preventing deletions by privileged users (including the AWS account root user), changes to your backup lifecycle settings, and updates that alter your defined retention period.
AWS Backup Vault Lock ensures immutability and adds an additional layer of defense that protects backups (recovery points) in your Backup Vaults, especially in highly- regulated industries with stringent integrity needs for backups and archives. AWS Backup Vault Lock makes sure your data is preserved along with a backup to recover from in case of unintended or malicious actions.
*The feature has not yet been assessed for compliance with the Securities and Exchange Commission (SEC) rule 17a-4(f) and the Commodity Futures Trading Commission (CFTC) in regulation 17 C.F.R. 1.31(b)-(c).
#7 – Implement backup monitoring and alerting
Backup jobs can fail. A failed job, such as backup, restore, or copy task, may have impact on subsequent steps in a process. When the initial backup job fails, there’s a high probability that other succeeding tasks will also fail. In such a scenario, you can best understand the course of events through monitoring and notification.
Enabling and configuring notifications to generate emails to monitor AWS Backup jobs gives you awareness of your backup activities, ensures you meet critical service-level agreements (SLAs), enhances your business-as-usual monitoring, and helps you meet compliance obligations. You can implement backup monitoring for your workloads by integrating AWS Backup with other AWS services and ticketing systems to perform automated investigation and escalation flows.
For example, use Amazon CloudWatch to track metrics, create alarms, and view dashboards, Amazon EventBridge to monitor AWS Backup processes and events, AWS CloudTrail to monitor AWS Backup API calls with detailed information on the time, source IP, users, and accounts making those calls, and Amazon Simple Notification Service (Amazon SNS) to subscribe to AWS Backup-related topics such as backup, restore, and copy events. Monitoring and alerting can provide organizational awareness for your backup jobs, which helps you respond to backup failures.
You can use AWS Backup Audit Manager to automatically generate evidence of your daily backup audit reports per account and Region. You can also scale your backup monitoring across multiple accounts by using a set of automation templates and dashboards (known as the backup observer solution) to obtain aggregated daily cross-account multi-Region AWS Backup reporting.
#8 – Audit backup configuration
Organizations should audit the compliance of AWS Backup policies against defined controls such as defined backup frequency. You should continuously and automatically track your backup activity and generate automatic reports to find and investigate backup operations or resources which are not compliant with your business requirements.
AWS Backup Audit Manager provides built-in, customizable, compliance controls that align with your business compliance and regulatory requirements. AWS Backup Audit Manager provides five backup governance control templates, including backup resources protected by backup plans, backup plan with a minimum frequency and minimum retention, etc. If you leverage infrastructure-as-code automation, you can use AWS Backup Audit Manager with AWS CloudFormation.
AWS Security Hub provides you with a comprehensive view of your security state in AWS and helps you check your environment against security best practices and industry standards such as AWS Foundational Security Best Practices controls. If you leverage AWS Security Hub within your cloud environment, we recommend you enable the AWS Foundational Security Best Practices, as it includes detective controls that can help with securing backups in AWS. The detective controls in AWS Backup Audit Manager and Security Hub are also mostly available as AWS managed rules in AWS Config.
#9 – Test data recovery capabilities
Ideally, any data stored as a backup must be able to be successfully restored when required. Your backup strategy must include testing your backups. A backup strategy is not effective if backed up data cannot be restored. You should regularly test your ability to find certain recovery points and restore them. While AWS Backup automatically copies tags from the resources it protects to the recovery points, tags are not copied from recovery points to the corresponding restored resources. To scale your inventory management and locate recovery points, you should consider retaining your tags on resources created by AWS Backup restore jobs, using AWS Backup events to trigger a tag replication process.
You can start your data recovery workflow by establishing data recovery patterns and then regularly test them. You should create a simple and repeatable process that allows you to perform continuous data recovery testing to increase confidence in your ability to recover backup data. For example, you can create a pattern to test a cross-account, cross-region restore operation from a central DR backup vault encrypted with a customer-managed KMS key to a source account backup vault encrypted with a different customer-managed KMS key.
If you don’t frequently test such restore operations, you may find that your assumptions on KMS encryption for cross-account, cross-region operations are incorrect. Oftentimes, the only backup recovery pattern that actually works is the path you test frequently. Through routine testing of supported backup resource types, you can spot early warnings that could potentially cause future disturbances and loss of critical data. If possible, maintain a limited but feasible number of recovery paths and patterns to prevent wasted storage space, optimize costs, and save time. It’s easier to fix the problem when a recovery test fails than losing valuable or critical data.
#10 – Incorporate backup in incident response plan
Security Incident Response Simulations (SIRS) are internal events that provide a structured opportunity to practice your incident response plan and procedures during a realistic scenario. It’s valuable to test your backup data and operations in creative SIRS activities to test yourself against the unexpected. This helps you validate your organizational readiness and develop comfort with the rare and unexpected. Your simulations must be realistic, and should involve cross-functional organizational teams required to respond to events.
Start with basic and easy simulation exercises, and work towards a full, complex event. For example, you can build a realistic model that consists of an Amazon Virtual Private Cloud and associated resources that simulate inadvertent overexposure of information or a potential data breach due to changes to policies and access control lists. Document lessons learned to evaluate how well your incident response plan worked, and to identify improvements that need to be made to future response procedures.
You can use AWS Backup to set up automated instance-level backups as AMIs and volume-level backups as snapshots across multiple AWS accounts. This can help your incident response team enhance their forensic process such as automated forensic disk collection, by providing a restore point that could reduce the scope and impact of potential security events such as ransomware.
Conclusion
In this blog post, I showed you the top ten security best practices and controls to protect your backup data in AWS. I encourage you to use these best practices to design and implement a backup and recovery strategy and architecture with multiple layers of controls that scales and achieves your business needs. To learn more about AWS Backup, refer to the AWS Backup documentation.
If you have feedback about this post, submit comments in the Comments section below. If you have questions about this post, start a new thread on the AWS Backup forum or contact AWS Support.
Data is at the center of many applications. In this post, Part 2, we will look at AWS data services that offer native features to help get your data where it needs to be.
In Part 3, we’ll look at AWS application management and monitoring services to help you build, monitor, and maintain a multi-Region application.
Considerations with replicating data
Data replication across the AWS network can happen quickly, but we are still limited by the speed of light. For this reason, data consistency must be considered when building a multi-Region application. Generally speaking, the longer a physical distance is, the longer it will take the data to get there.
When building a distributed system, consider the consistency, availability, partition tolerance (CAP) theorem. This theorem states that an application can only pick 2 out of the 3, and tradeoffs should be considered.
Consistency – all clients always have the same view of data
Availability – all clients can always read and write data
Partition Tolerance – the system will continue to work despite physical partitions
Achieving consistency and availability is common for single-Region applications. For example, when an application connects to a single in-Region database. However, this becomes more difficult with multi-Region applications due to the latency added by transferring data over long distances. For this reason, highly distributed systems will typically follow an eventual consistency approach, favoring availability and partition tolerance.
Traditionally, each S3 bucket has its own single, Regional endpoint. To simplify connecting to and managing multiple endpoints, S3 Multi-Region Access Points create a single global endpoint spanning multiple S3 buckets in different Regions. When applications connect to this endpoint, it will route over the AWS network using AWS Global Accelerator to the bucket with the lowest latency. Failover routing is also automatically handled if the connectivity or availability to a bucket changes.
File and object replication should be expected to be eventually consistent. The rate at which a given dataset can transfer is a function of the amount of data, I/O bandwidth, network bandwidth, and network conditions.
Figure 1 shows how these data transfer services can be combined for each resource.
Figure 1. Storage replication services
Spanning non-relational databases across Regions
Amazon DynamoDBglobal tables provide multi-Region and multi-writer features to help you build global applications at scale. A DynamoDB global table is the only AWS managed offering that allows for multiple active writers in a multi-Region topology (active-active and multi-Region). This allows for applications to read and write in the Region closest to them, with changes automatically replicated to other Regions.
Global reads and fast recovery for Amazon DocumentDB (with MongoDB compatibility) can be achieved with global clusters. These clusters have a primary Region that handles write operations. Dedicated storage-based replication infrastructure enables low-latency global reads with a lag of typically less than one second.
Keeping in-memory caches warm with the same data across Regions can be critical to maintain application performance. Amazon ElastiCache for Redis offers global datastore to create a fully managed, fast, reliable, and secure cross-Region replica for Redis caches and databases. With global datastore, writes occurring in one Region can be read from up to two other cross-Region replica clusters – eliminating the need to write to multiple caches to keep them warm.
Spanning relational databases across Regions
For applications that require a relational data model, Amazon Auroraglobal database provides for scaling of database reads across Regions in Aurora PostgreSQL-compatible and MySQL-compatible editions. Dedicated replication infrastructure utilizes physical replication to achieve consistently low replication lag that outperforms the built-in logical replication database engines offer, as shown in Figure 2.
Figure 2. SysBench OLTP (write-only) stepped every 600 seconds on R4.16xlarge
With Aurora global database, one primary Region is designated as the writer, and secondary Regions are dedicated to reads. Aurora MySQL supports write forwarding, which forwards write requests from a secondary Region to the primary Region to simplify logic in application code. Failover testing can happen by utilizing managed planned failover, which will change the active write cluster to another Region while keeping the replication topology intact. All databases discussed in this post employ eventual consistency when used across Regions, but Aurora PostgreSQL has an option to set the maximum a replica lag allowed with managed recovery point objective (managed RPO).
Logical replication, which utilizes a database engine’s built-in replication technology, can be set up for Amazon Relational Database Service (Amazon RDS) for MariaDB, MySQL, Oracle, PostgreSQL, and Aurora databases. A cross-Region read replica will receive these changes from the writer in the primary Region. For applications built on RDS for Microsoft SQL Server, cross-Region replication can be achieved by utilizing the AWS Database Migration Service. Cross-Region replicas allow for quicker local reads and can reduce data loss and recovery times in the case of a disaster by being promoted to a standalone instance.
For situations where a longer RPO and recovery time objective (RTO) are acceptable, backups can be copied across Regions. This is true for all of the relational and non-relational databases mentioned in this post, except for ElastiCache for Redis. Amazon Redshift can also automatically do this for your data warehouse. Backup copy times will vary depending on size and change rates.
Figure 3. Purpose-built global database architecture
Summary
Data is at the center of almost every application. In this post, we reviewed AWS services that offer cross-Region data replication to get your data where it needs to be quickly. Whether you need faster local reads, an active-active database, or simply need your data durably stored in a second Region, we have a solution for you. In the 3rd and final post of this series, we’ll cover application management and monitoring features.
Modern workloads and systems are leveraging different storage options for different functionalities. In the 21st century, it is normal to build applications relying on non-relational and relational databases, shared file storage, and object storage, just to name of few. When operating and managing these applications, you told us that you wanted centralized protection and provable compliance for application data stored in S3 alongside other AWS services for storage, compute, and databases.
First, it lets you centrally manage your applications backups: AWS Backup provides an automated solution to centrally configure backup policies, thereby helping you simplify backup lifecycle management. This also makes it easy to ensure that your application data across AWS services (including S3) is centrally backed up.
Second, it lets you easily restore your data: AWS Backup provides a single-click-restore experience for your S3 data. This lets you perform point-in-time restores of your S3 buckets and objects to a new or existing S3 bucket.
Finally, it improves backup compliance: AWS Backup provides built-in dashboards that let you to track backup and restore operations for S3.
AWS Backup for S3 (Preview) lets you create continuous point-in-time backups along with periodic backups of S3 buckets, including object data, object tags, access control lists (ACLs), and user-defined metadata. The first backup is a full snapshot, while subsequent backups are incremental. If there is a data disruption event, then you choose a backup from the backup vault, and restore an S3 bucket (or individual S3 objects) to a new or existing S3 bucket. AWS Backup is integrated with AWS Organizations, which let you use a single policy across AWS accounts (within your Organizations) to automate backup creation and backup access management.
Furthermore, you can turn on AWS Backup Vault Lock to enable delete protection of the data that you protect with AWS Backup, and thereby improving protection of your immutable backups from accidental deletion or malicious re-encryption.
I must enable S3 in AWS Backup Settings when I use this feature for the first time. Using the AWS Management Console, I navigate to AWS Backup, then select Settings and Configure resources. I enable S3, and select Confirm. This is a one-time operation.
For this demo, I already have an existing backup plan, and I want to add an S3 bucket to this plan. If you want to create a new backup plan, then you can refer to AWS Backup‘s technical documentation.
To start including my S3 objects in my backup plan, I open the AWS Management Console, navigate to Backup plans, and select Assign resources.
I give a name to my Resource assignment. I select Include specific resources types, then I select S3 as Resource type and one or several S3 Bucket names. When I am done, I select Assign resources.
Alternatively, I may use tags or resource IDs to assign S3 resources.
If you have thousands of S3 buckets, I recommend using tags to assign the S3 buckets to a backup plan. AWS Backup matches the tags in S3 buckets to the ones assigned to the backup plan, and it centrally backs up the S3 resources along with other AWS services that your application uses.
The Bucket names list in the previous screenshot only shows the S3 buckets in the same Region.
Alternatively, I may also create on-demand backups. I navigate to the Protected resources section, and select Create on-demand backup.
I select S3 as the Resource type, and select the Bucket name. As per usual, I choose a Backup Window, a Retention period, a Backup vault, and an IAM role. Then, I select Create on-demand backup.
After a while, depending on the size of my bucket, the backup is Completed.
All of the backups are encrypted and stored securely in a backup vault that I selected in the backup plan.
A backup vault (or backup storage vault) is an encrypted logical construct in my AWS account that stores and organizes my backups (recovery points). I may create new backup vaults in every AWS Region where AWS Backup is available. I may enable AWS Backup Vault Lock (delete-protection capability) on the backup vault to avoid accidental deletions and prevent malicious actors from re-encrypting my data. AWS Backup stores my continuous backups and periodic snapshots in the backup vault of my preference, and it lets me browse and restore as per my requirements.
How to Restore Objects Let’s try to restore this backup.
The restore operation is very flexible. I may restore entire S3 buckets or individual S3 objects. I may restore the backups to the source S3 bucket, or to another existing bucket. Furthermore, I may create a new S3 bucket during restore. The S3 buckets must have Versioning enabled. Also, I may change the encryption key during restore.
I navigate to Backup vaults to restore the S3 bucket I just backed up. In the Backups section, I select the Recovery point ID that I want to restore, and I select Restore from the Actions menu.
Before starting the restore, I may select a few options:
The Restore time: I may restore my continuous backup to a point-in-time in the last 35 days, while I can restore my periodic backups to their original state.
The Restore type: I may choose to restore the entire bucket or a subset of objects within it.
The Restore destination: I may choose to restore on the same bucket, on another one, or create a new bucket during restore.
The Restored object encryption: this lets me select the key I want to use to encrypt the restored objects in the bucket.
I select Restore backup to start the restore.
I can monitor the progress in the Jobs section, under the Restore jobs tab.
When the status turns green to Completed, my objects are ready to use!
Generally, the most comprehensive data-protection strategies include regular testing and validation of your restore procedures before you need them. Testing your restores also helps to prepare and maintain recovery runbooks. In turn, that ensures operational readiness during a disaster recovery exercise, or an actual data loss scenario.
Availability and Pricing The preview is available in the US West (Oregon) Region only.
During the preview, there are no charges for creating and storing backups. You will pay the AWS charges for underlying resources, such as S3 storage, API usage, and versioning.
Send us an email at [email protected] including your AWS account ID to register for the preview.
Today, I am happy to announce AWS Backup support for VMware, a new capability that enables you to centralize and automate data protection of virtual machines (VMs) running on VMware on premises and VMware CloudTM on AWS. You can now use a single, centrally managed policy in AWS Backup to protect these VMware environments together with 12 AWS compute, storage, and database services already supported by AWS Backup. You can then use AWS Backup to restore VMware workloads to on-premises data centers and VMware Cloud on AWS.
Using AWS Backup Support for VMware There are three steps to back up VMware virtual machines (VMs) with AWS Backup:
Create a gateway to connect AWS Backup to your hypervisor.
Connect to your hypervisor through the gateway.
Assign virtual machines managed by your hypervisor to a backup plan.
On the left pane of the AWS Backup console, there is a new External resources section. There, I choose Gateways and then Create gateway. This AWS Backup gateway helps with discovery of the on-premises VMware environment and acts as a cloud gateway to send and receive data.
I download the Open Virtualization Format (OVF) file of the AWS Backup gateway and follow the instructions to deploy the gateway using the VMware vSphere client. I am using an internal test and development VMware environment for this walkthrough.
After deploying the gateway in my VMware environment, I come back to the AWS Backup console. I write a name for the gateway (for simplicity, I use the same name of the gateway VM) and the IP address of the gateway VM. Optionally, I can add tags to help organize and track my setup. I go on and create the gateway.
Now, I choose Add hypervisor. I write a name for the hypervisor and the IP address of the VMware vCenter server host.
I enter the username and password of a service account that I created for AWS Backup on the Active Directory domain. The username should include the domain (for example, username@domain). Then, I choose the encryption key to protect the service account credentials. If I don’t choose my own AWS Key Management Service (KMS) key, AWS Backup encrypts the username and password using a key that AWS owns and manages.
I select the gateway to connect to the hypervisor and choose Test gateway connection. This test helps ensure that the gateway can communicate with the hypervisor before I complete the configuration. Optionally, I can add tags to help organize and track my setup. I go on and add the hypervisor.
After a few minutes, the hypervisor is online, and I see the VMs managed by vCenter in the AWS Backup console. I can now use these virtual machines as resources in my backup plans in the same way as the other AWS compute, storage, and database resources supported by AWS Backup.
I create a new backup plan and start with a template. The rules of the template enforce daily backups with five weeks of retention and monthly backups with one year of retention. I can customize these rules based on my requirements.
Then, I choose to assign resources to the backup plan, and I select three VMs.
If you need, you can create an on-demand backup in the Protected resources section of the console. For example, here I am starting the on-demand backup for one of the VMs.
When a backup is complete, VMs are added to the list of the protected resources, and I can initiate a restore.
I select the backup and choose Restore. Then, I enter the restore location, which can be the same VMware environment I used for the backup or another (for example, on VMware Cloud on AWS). Below, I specify name, path, compute resource name, and datastore to use for the restore. Then, I choose Restore backup.
Availability and Pricing AWS Backup support for VMware is available in the US East (N. Virginia, Ohio), US West (N. California, Oregon), GovCloud (US-East, US-West), Canada (Central), Europe (Frankfurt, Ireland, London, Milan, Paris, Stockholm), South America (São Paulo), Asia Pacific (Hong Kong, Mumbai, Seoul, Singapore, Sydney, Tokyo, Osaka), Middle East (Bahrain), and Africa (Cape Town) Regions. Please see the AWS Regional Services List for more information.
AWS Backup supports VMware ESXi 6.7.x and 7.0.x VMs running on NFS, VMFS, and VSAN data stores on premises and in VMware Cloud on AWS. In addition, AWS Backup supports both SCSI Hot-Add and Network Block Device (NBD) transport modes for copying data from source VMs to AWS.
With AWS Backup support for VMware, you pay using the same dimensions that AWS Backup uses today: backup storage, restore, and cross-region data transfer. For more information, see the AWS Backup pricing page.
Your VM backups are stored in a backup vault. All backups stored and managed by AWS Backup are replicated to 3 Availability Zones (AZs) in the Region and designed for 99.999999999 percent (11 9s) durability and 99.99 percent (4 9s) of service availability.
AWS Backup supports first full, then incremental-forever, backups of VMs that you can create on-demand or via a schedule configured in your backup plan. AWS Backup always does full restores even though backups are stored as incremental, enabling you to benefit from storage efficiency cost savings while easily performing restores.
Centrally protect your VMware environments and your AWS compute, storage, and database resources with AWS Backup.
With the increased adoption of critical applications running in the cloud, customers often find themselves revisiting traditional strategies that were adopted for on-premises workloads. When it comes to IBM DB2, one of the first decisions to make is to decide what backup and restore method will be used.
In this blog post, we will show you how IT architects, database administrators, and cloud administrators can use AWS services such as Amazon Machine Images (AMIs) and Amazon Simple Storage Service (Amazon S3) to build on-demand disaster recovery. This is useful for organizations who are flexible in their Recovery Time Objective (RTO) to reduce cost by only provisioning the target environment when needed.
Architecture overview
Figure 1. Architecture of AWS services used in this blog post
Figure 1 shows the Amazon Elastic Compute Cloud (Amazon EC2) instance running the DB2 database in the primary Region (São Paulo, in this example) and performing backups to Amazon S3 by a script initiated by AWS Systems Manager. The backups in Amazon S3 are then replicated to the secondary Region (N. Virginia, in this example) by the S3 Cross-Region Replication (CRR) feature of Amazon S3.
AWS Backup provides automation by performing the AMI copy and in a similar fashion to the database backups, the AMIs are copied to the secondary Region as well. You can further enhance the backup mechanism by activating monitoring through Amazon CloudWatch and using Amazon Simple Notification Service (Amazon SNS) to send out alerts in the event of failures. The architectural considerations will be outlined in detail.
Configuring IBM DB2 native data backup to Amazon S3
Database backups are stored in Amazon S3, which replicates the backups inside a Region by default and can be replicated to another Region using CRR. Since version 11.1, IBM DB2 running on Linux natively supports data backups to Amazon S3. To create this architecture, follow these steps:
Log in to the Linux server and create a PKCS keystore to store the key and create a secret access key that will be used to transfer the data to Amazon S3. The remote storage credentials will be stored in this keystore.
Configure IBM DB2 to use the keystore with the KEYSTORE_LOCATION and KEYSTORE_TYPE parameters.
db2 "update dbm cfg using keystore_location /db2/db2<sid>/.keystore/db6-s3.p12 keystore_type pkcs12"
Validate that the parameters were successfully updated.
db2 get dbm cfg |grep -i KEYSTORE
 Keystore type                           (KEYSTORE_TYPE) = PKCS12
 Keystore location                   (KEYSTORE_LOCATION) = /db2/db2<sid>/.keystore/db6-s3.p12
Create an S3 bucket in the same Region where your EC2 instance running the IBM DB2 database is located. Ensure that all security best practices are followed for the creation of the bucket. This bucket will store the backup images. You can create different folders to store different objects. For example, you can store the configuration files in a different path, or separate backups from different IBM DB2 instances by folders inside one bucket.
Figure 2. Example bucket for storing backups
In this example, the primary folder for this database is SBX. The folder data will store the data backups, the folder config will store the configuration parameters, the folder keystore will store the backup of the keystore, and the folder logs will store the database logs.
A user with programmatic access is required, because the only method of authentication available is using an access key (access key ID and secret access key). Create the user with the proper S3 permissions (the best practice is to use the principle of least privilege) and note the access key ID and secret access key. Then, create an IBM DB2 storage access alias using the following syntax:
db2 "catalog storage access alias <alias_name> vendor S3 server <S3 endpoint> user '<access_key>' password '<secret_access_key>' container '<bucket_name>'"
Set the staging path to where the backups will be stored before moving to Amazon S3. This is done by defining the environment variable. Ensure this is set to avoid that the backup is written to an unwanted path.
Initiate the database backup either by the following command or with your backup script.
Note: make sure that the target is DB2REMOTE as follows:
db2 BACKUP DATABASE <instance> TO DB2REMOTE://<alias>//<path>/<additional path> compress without prompting
While the backup is running, you will see data being stored in the staging directory (for this example: /backup/staging/data), and then uploaded to Amazon S3.
The backup script can be integrated with AWS Systems Manager maintenance windows to run on schedule to allow control and visibility. When combined with Amazon SNS, you can send out notifications in case of success, failures, or both.
Set log and DB2 config backup to Amazon S3
There are different options when it comes to storing the database logs into Amazon S3. In this example, we’re using a very simple script initiated by AWS Systems Manager to sync the logs from the staging disk to Amazon S3. This, combined with CRR, increases the durability of the backup by replicating the logs to another Region of your choice. The same backup method for the logs is applied to the IBM DB2 configuration files (parameters and variables) and the keystore. Figure 3 shows the CRR configured on the target bucket, which is then automatically replicating the data to a secondary Region (us-east-1).
Figure 3. Example buckets for IBM DB2 backup and disaster recovery, respectively
Figure 4. Amazon S3 Replication rules configured from sa-east-1 to us-east-1 (São Paulo to N. Virginia)
Figure 5. IBM DB2 logs backed up in São Paulo (sa-east-1) and replicated to N. Virginia (us-east-1)
Amazon S3 Lifecycle policy
For this use case, we have defined a lifecycle policy to maintain the objects (full and log backups) stored as Amazon S3 Standard for 30 days, afterwards they will be moved from Amazon S3 Standard to Amazon S3 Standard-IA. After 30 days, any objects stored as Amazon S3 Standard-IA will be deleted. When used in the context of a database, this allows you to automatically manage the lifecycle of your backups. If you have compliance needs to store specific backups with longer retention times, you can backup to a separate folder (prefix) with a different lifecycle rule.
Figure 6. Amazon S3 Lifecycle policy configure for buckets in São Paulo (sa-east-1) and N. Virginia (us-east-1)
AMI to aid with automation
Up to this point, this blog post has covered how you can manage the backups for a better Recovery Point Objective (RPO). However, let’s consider what happens in case of a disaster or if you have issues with the server running the IBM DB2 database. The Recovery Time Objective (RTO) will be higher because you will have to launch an EC2 instance, prepare the server, install the IBM DB2 database, and restore the full data and log backups.
To reduce your RTO, we recommend using automated AMI backups for your EC2 instance. AWS Backup helps you generate automated AMIs based on tags and resource IDs. AWS Backup can ship the AMI backup generated from your instance to another Region, for a multi-Region disaster recovery strategy.
In this example, we have created an AWS Backup plan to run twice a day and to ship a copy of the AMI from São Paulo (sa-east-1) to N. Virginia (sa-east-1).
Figure 7. Automated AMIs copied from São Paulo (sa-east-1) to N. Virginia (us-east-1) by AWS Backup
Performance considerations
It is important to discuss the factors that impact overall backup and restore performance, and ultimately the RTO.
We recommend using VPC endpoints to ensure that the traffic from your EC2 to Amazon S3 does not traverse the internet, and to provide improved throughput for data upload. Another important factor is the type of EBS volumes used for storing the IBM DB2 data files. In this example, to cover a 170 GB database, the disk used was GP2 not striped in Logical Volume Manager (LVM). Because the degree of parallelism (number of tablespaces read in parallel by the IBM DB2 backup process) can increase CPU usage, caution is warranted when running online backups so as not to cause too much overhead on your database server. When considering optimization for EBS volumes, note the maximum throughput and IOPS that can be reached by instance type.
A test was run using AWS Command Line Interface to sync 100 GB of logs (100 files of 1 GB) from Amazon S3 to the newly created instance. It took 16 minutes. The amount of logs will vary depending on the backup schedule implemented. The Amazon S3 costs will vary depending on the lifecycle policies implemented. For further details, refer to Amazon S3 pricing.
Results
In our tests, the backup time for a 170 GB database took 38 minutes, with a restore time of 14 minutes.
The restore time can vary depending on the backup size, the amount of logs to roll forward, and disk type (mentioned previously in the Performance considerations section).
With the results of this test, the RTO was the restore time plus the time taken to launch the new server based off the AMI backup taken.
Table 1. Recovery test
Disk Type
DB Size
Instance Type (Backup)
Parallel Channels (Backup)
Backup Time
Instance Type (Restore)
Parallel Channels (Restore)
Restore Time
GP2
170 GB
m5.4xlarge
12
38 Minutes
m5.4xlarge
12
14 Minutes
Conclusion
To summarize, in this blog post we described how to configure IBM DB2 backups to Amazon S3, to build an on-demand strategy for backup and disaster recovery. By following these architecture design principles, you will continue to develop resilient business continuity. Let us know if you have any comments or questions. We value your feedback!
Field Notes provides hands-on technical guidance from AWS Solutions Architects, consultants, and technical account managers, based on their experiences in the field solving real-world business problems for customers.
I’m pleased to announce that the Defense Information Systems Agency (DISA) has authorized 17 additional Amazon Web Services (AWS) services and features in the AWS GovCloud (US) Regions, bringing the total to 105 services and major features that are authorized for use by the U.S. Department of Defense (DoD). AWS now offers additional services to DoD mission owners in these categories: business applications; computing; containers; cost management; developer tools; management and governance; media services; security, identity, and compliance; and storage.
Why does authorization matter?
DISA authorization of 17 new cloud services enables mission owners to build secure innovative solutions to include systems that process unclassified national security data (for example, Impact Level 5). DISA’s authorization demonstrates that AWS effectively implemented more than 421 security controls by using applicable criteria from NIST SP 800-53 Revision 4, the US General Services Administration’s FedRAMP High baseline, and the DoD Cloud Computing Security Requirements Guide.
Recently authorized AWS services at DoD Impact Levels (IL) 4 and 5 include the following:
AWS Marketplace – A digital catalog with thousands of software listings from independent software vendors that you can use to find, test, buy, and deploy software that runs on AWS
Amazon Textract – Extract printed text, handwriting, and data from virtually any document
Security, Identity & Compliance
Amazon Cognito – Secure user sign-up, sign-in, and access control
AWS Security Hub – Centrally view and manage security alerts and automate security checks
Storage
AWS Backup – Centrally manage and automate backups across AWS services
Figure 1 shows the IL 4 and IL 5 AWS services that are now authorized for DoD workloads, broken out into functional categories.
Figure 1: The AWS services newly authorized by DISA
To learn more about AWS solutions for the DoD, see our AWS solution offerings. Follow the AWS Security Blog for updates on our Services in Scope by Compliance Program. If you have feedback about this blog post, let us know in the Comments section below.
Want more AWS Security how-to content, news, and feature announcements? Follow us on Twitter.
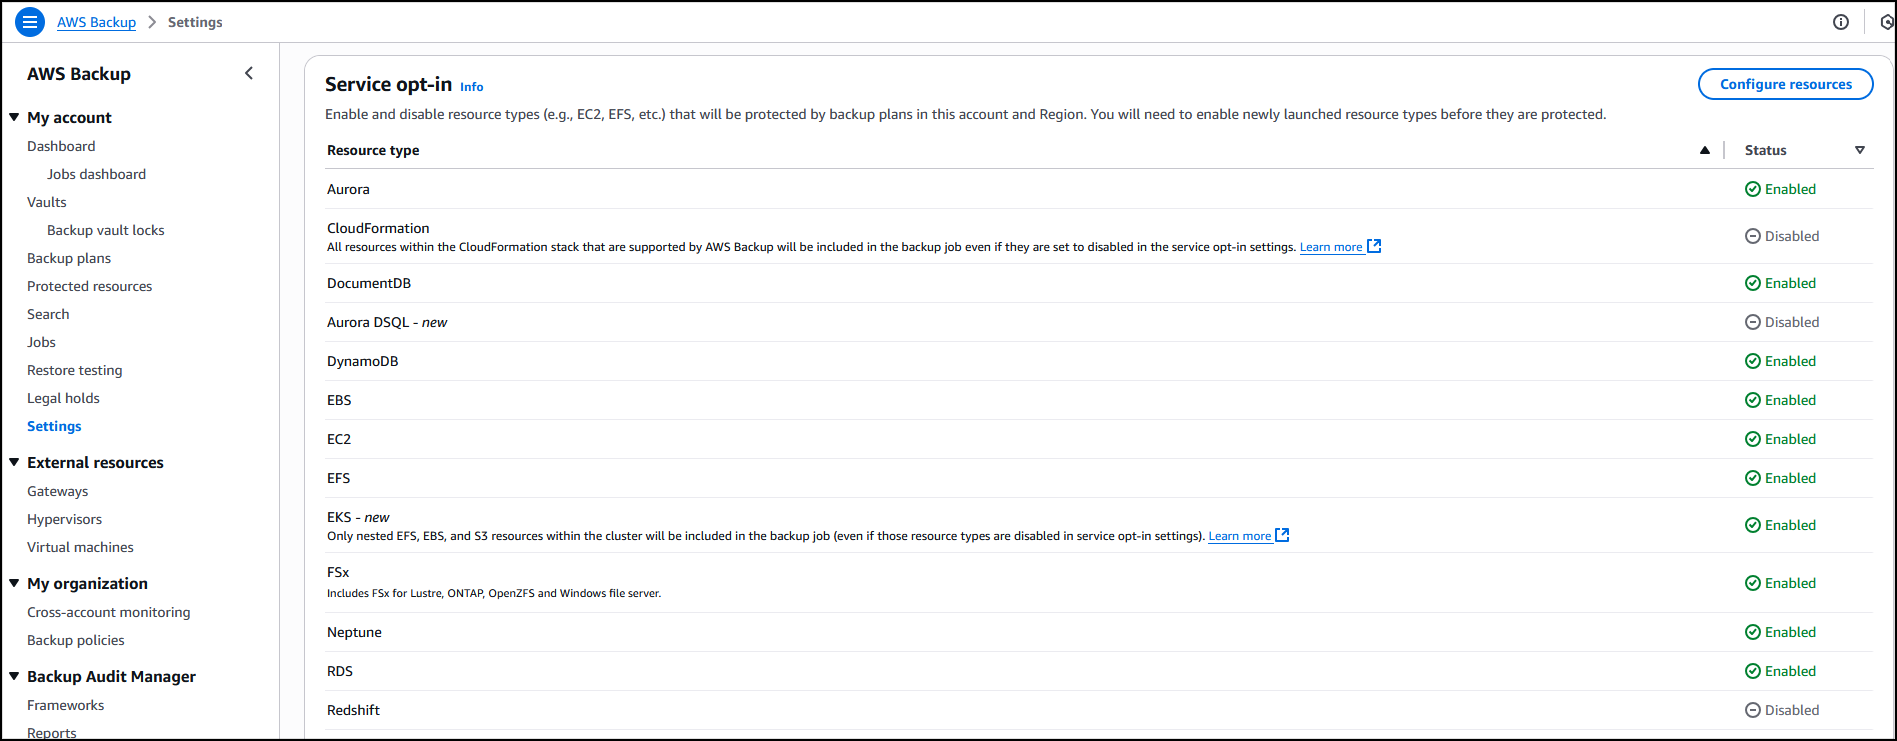
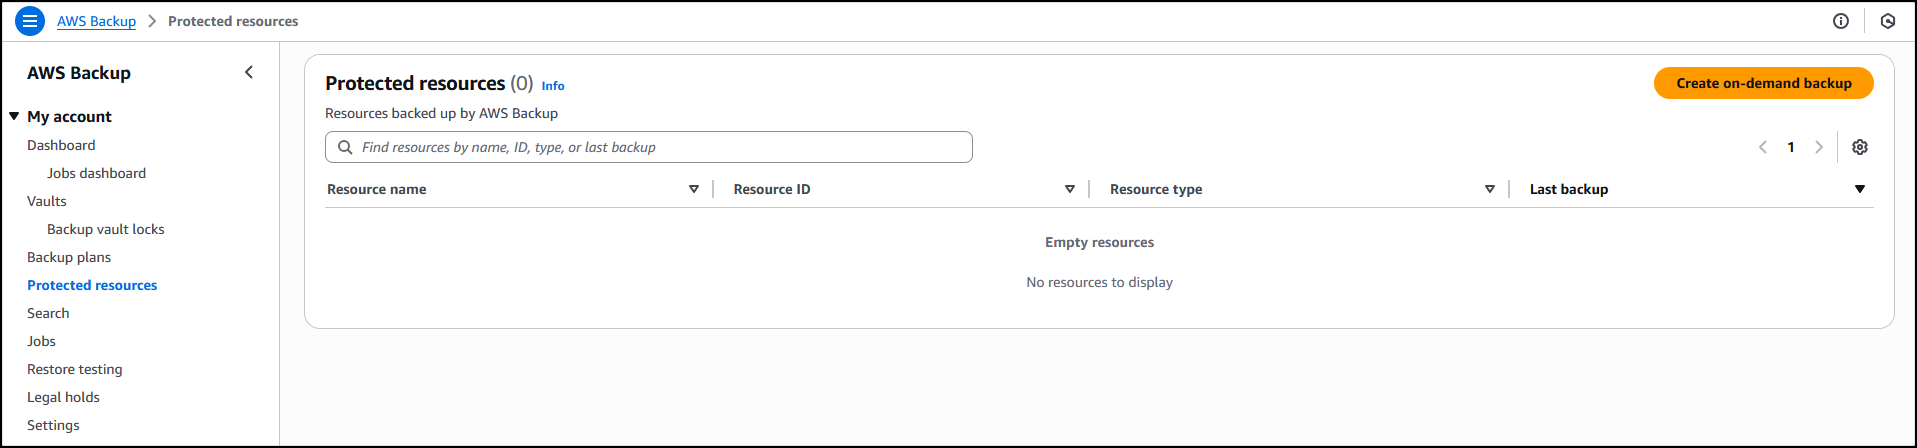
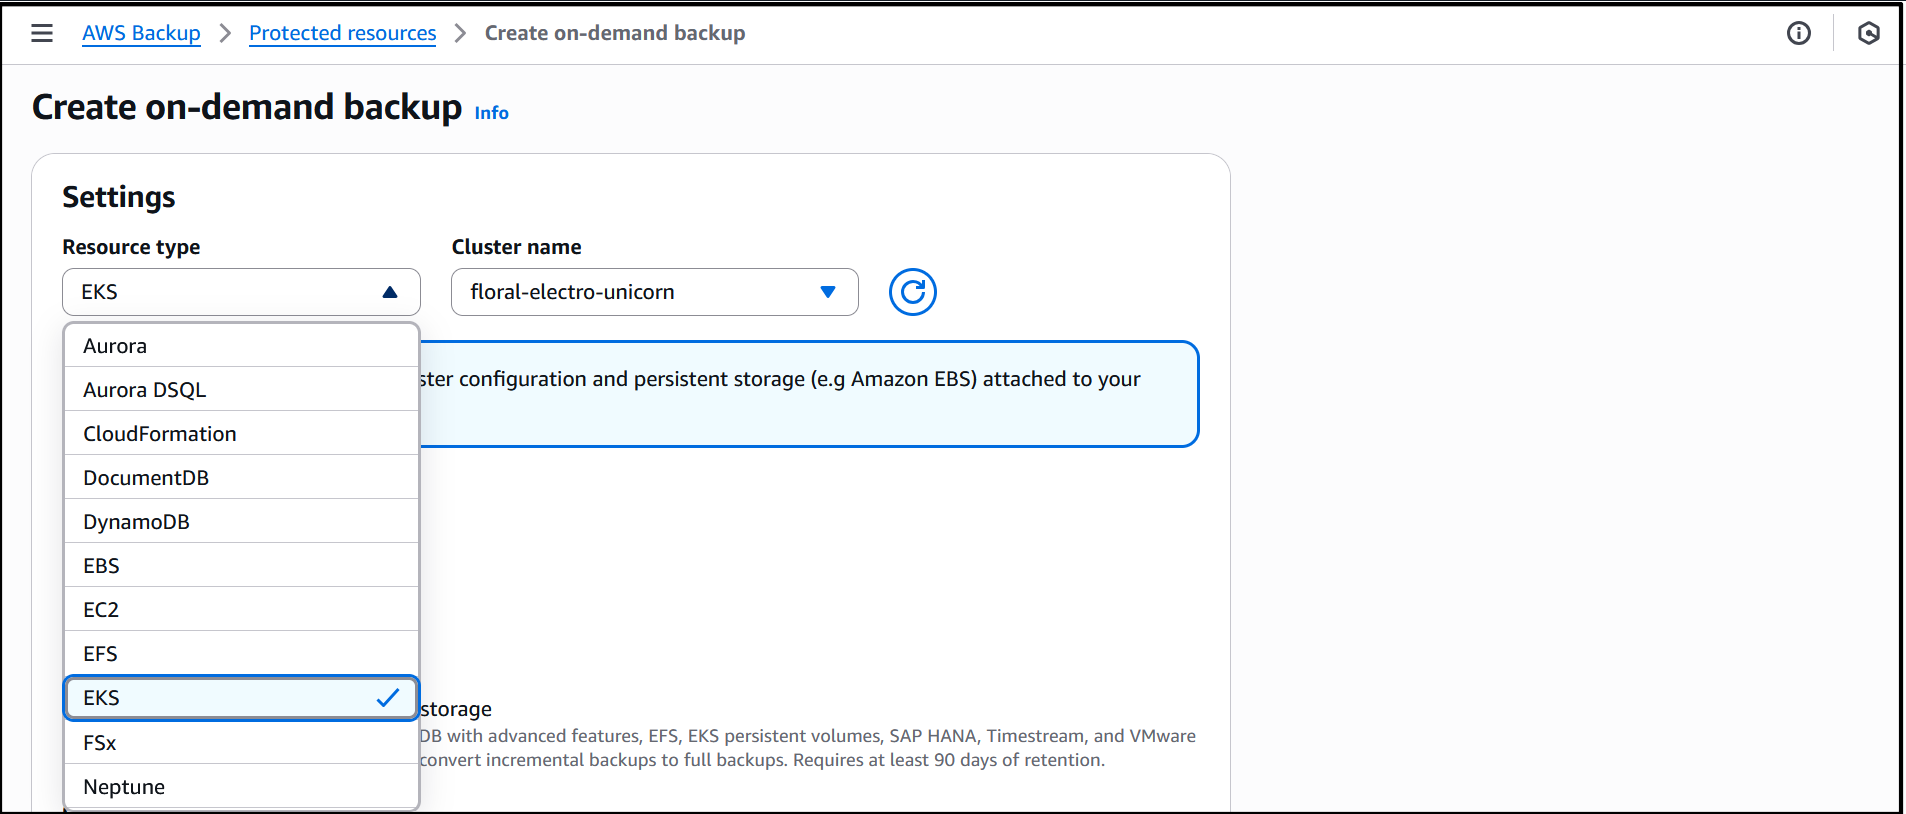
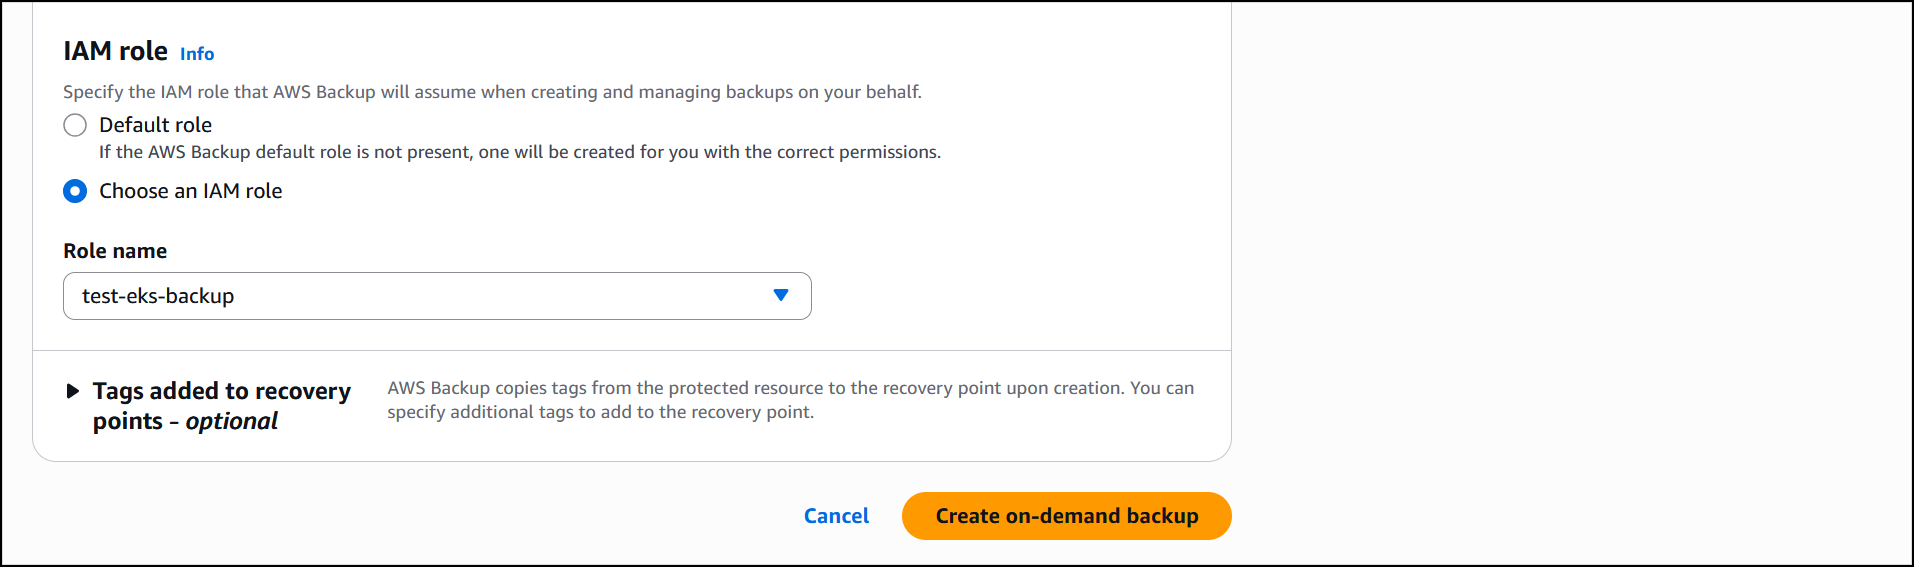
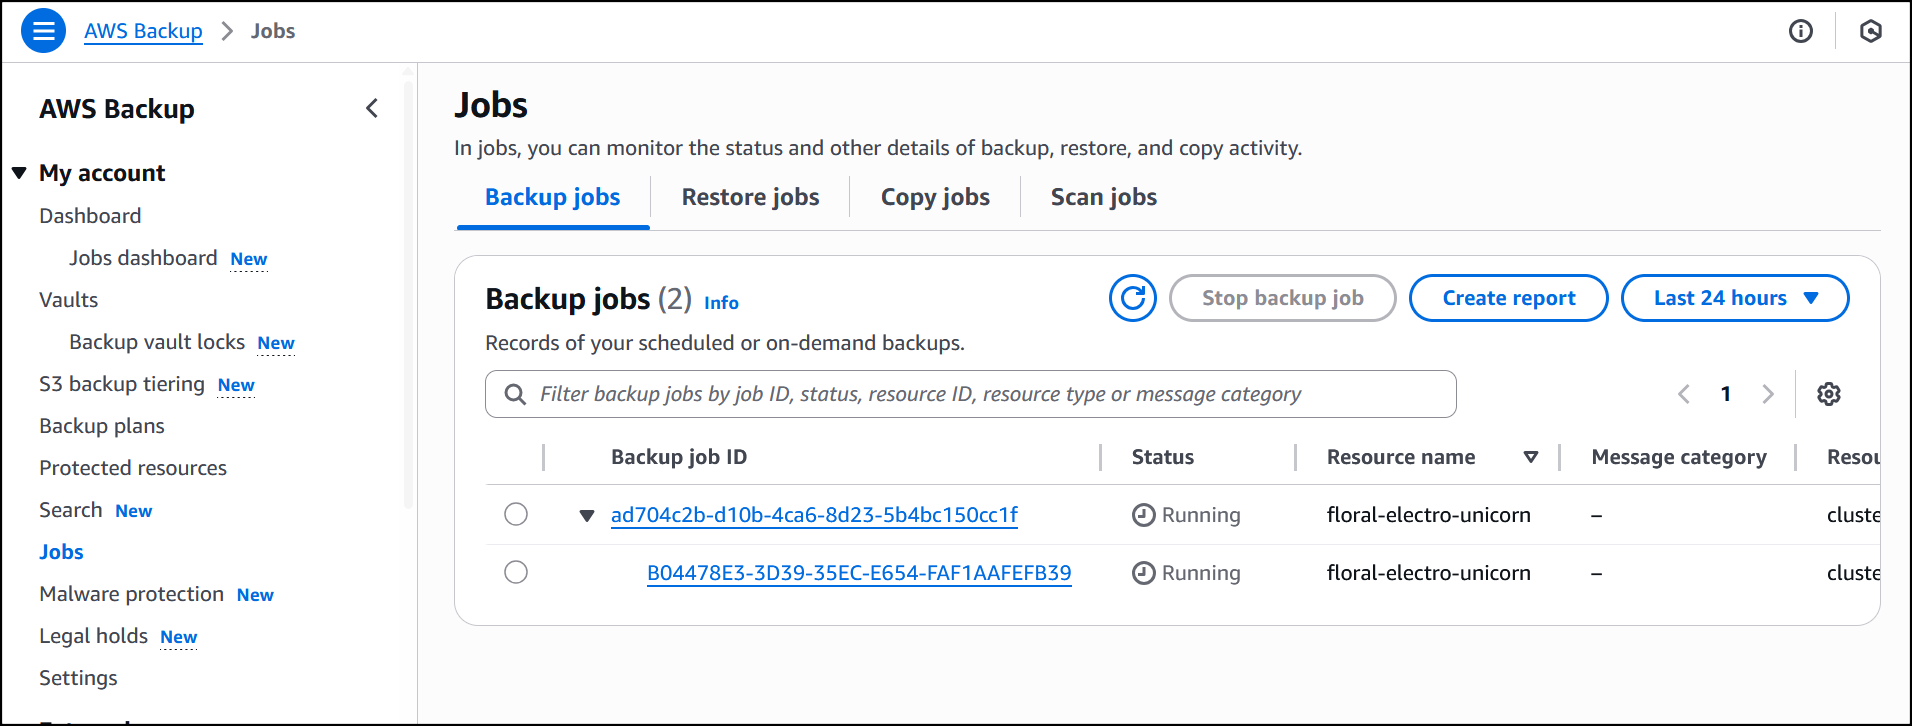
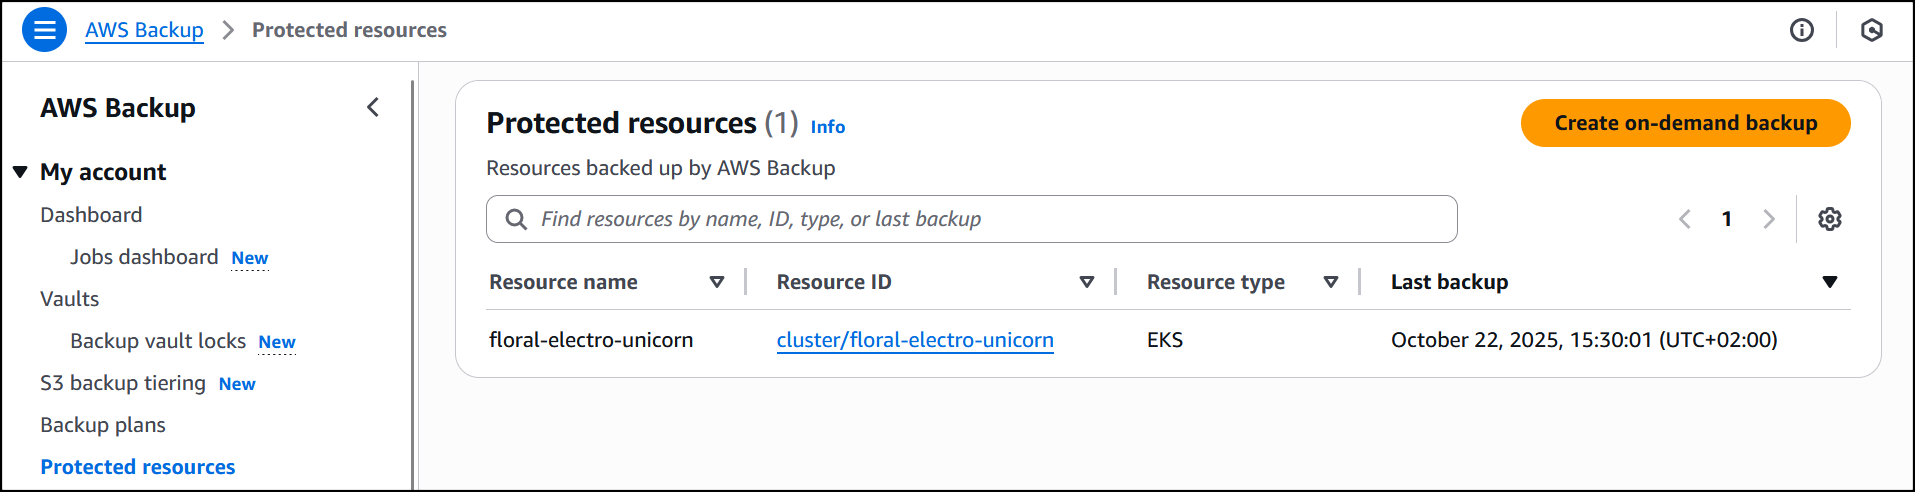
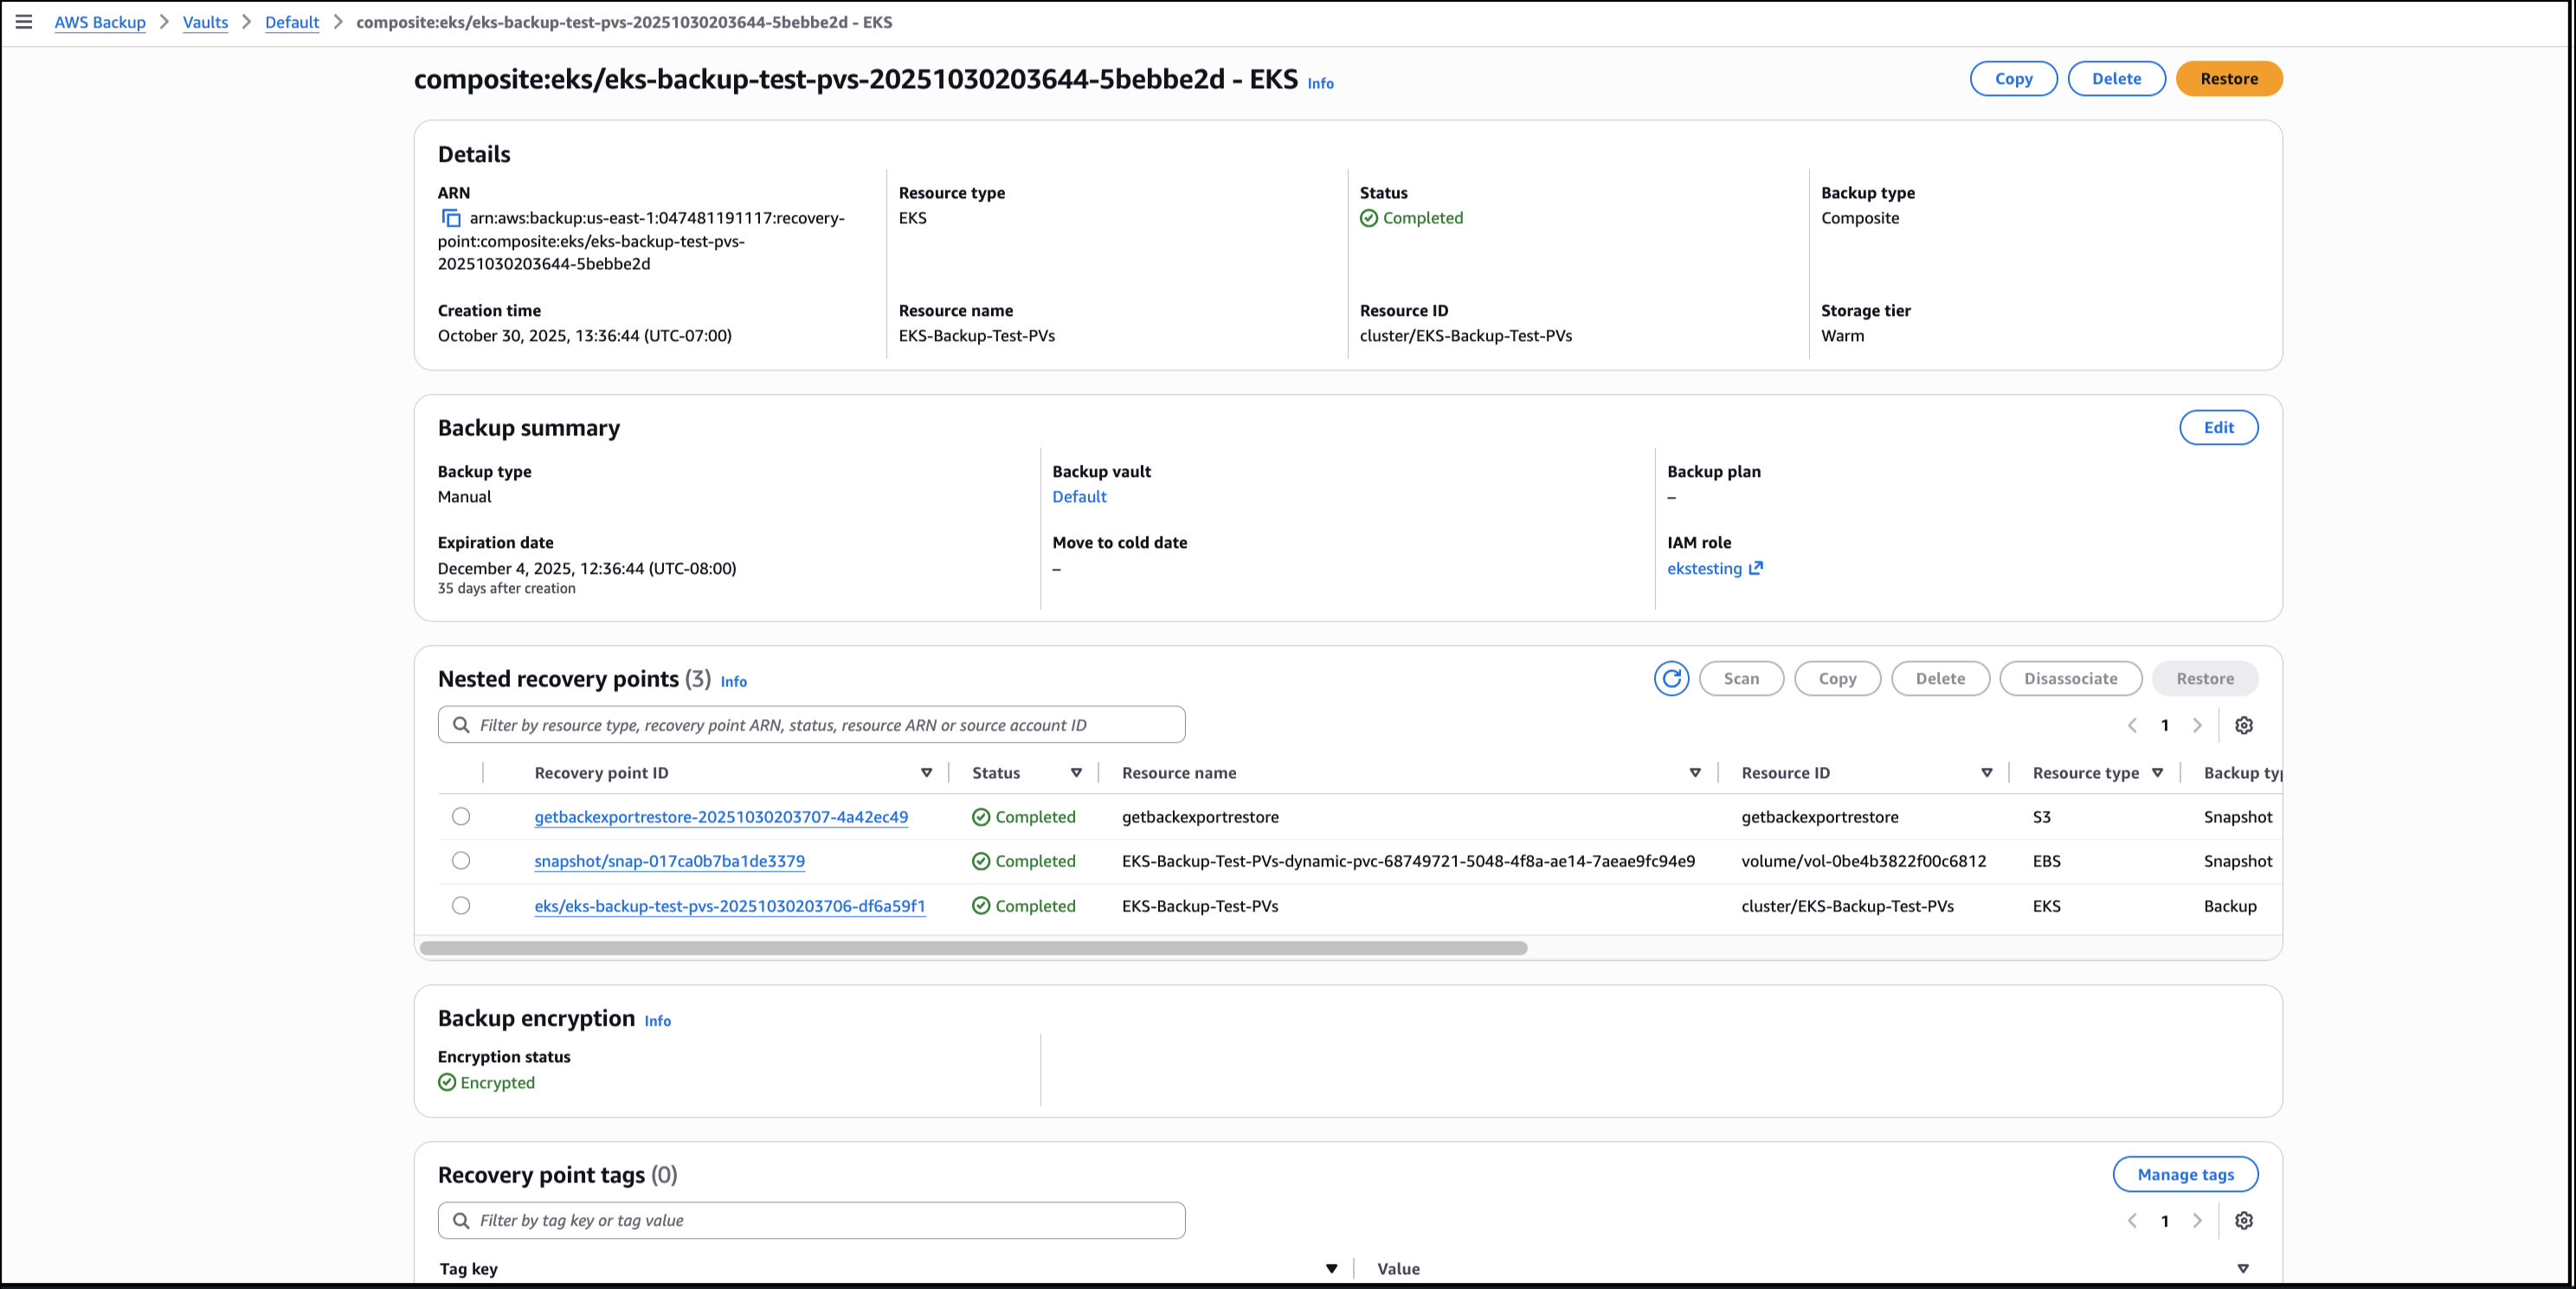

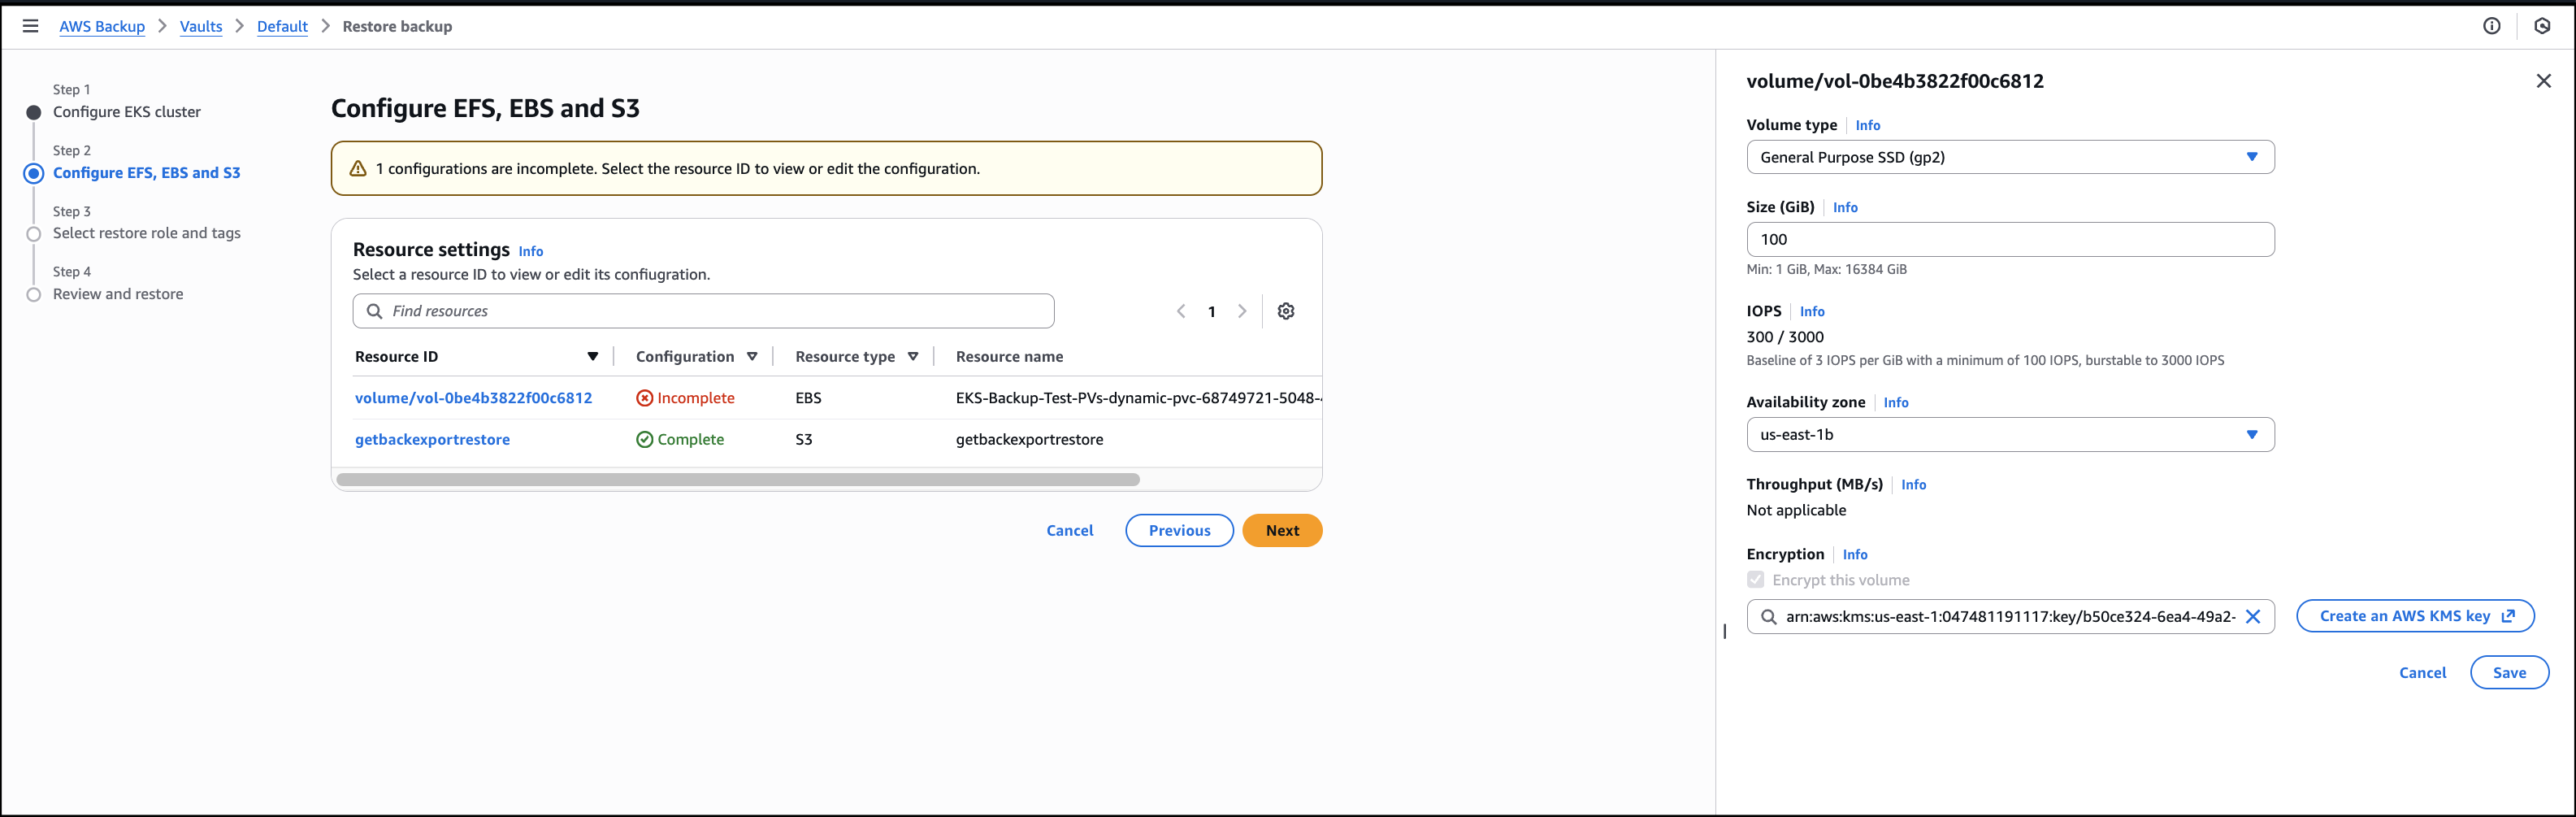

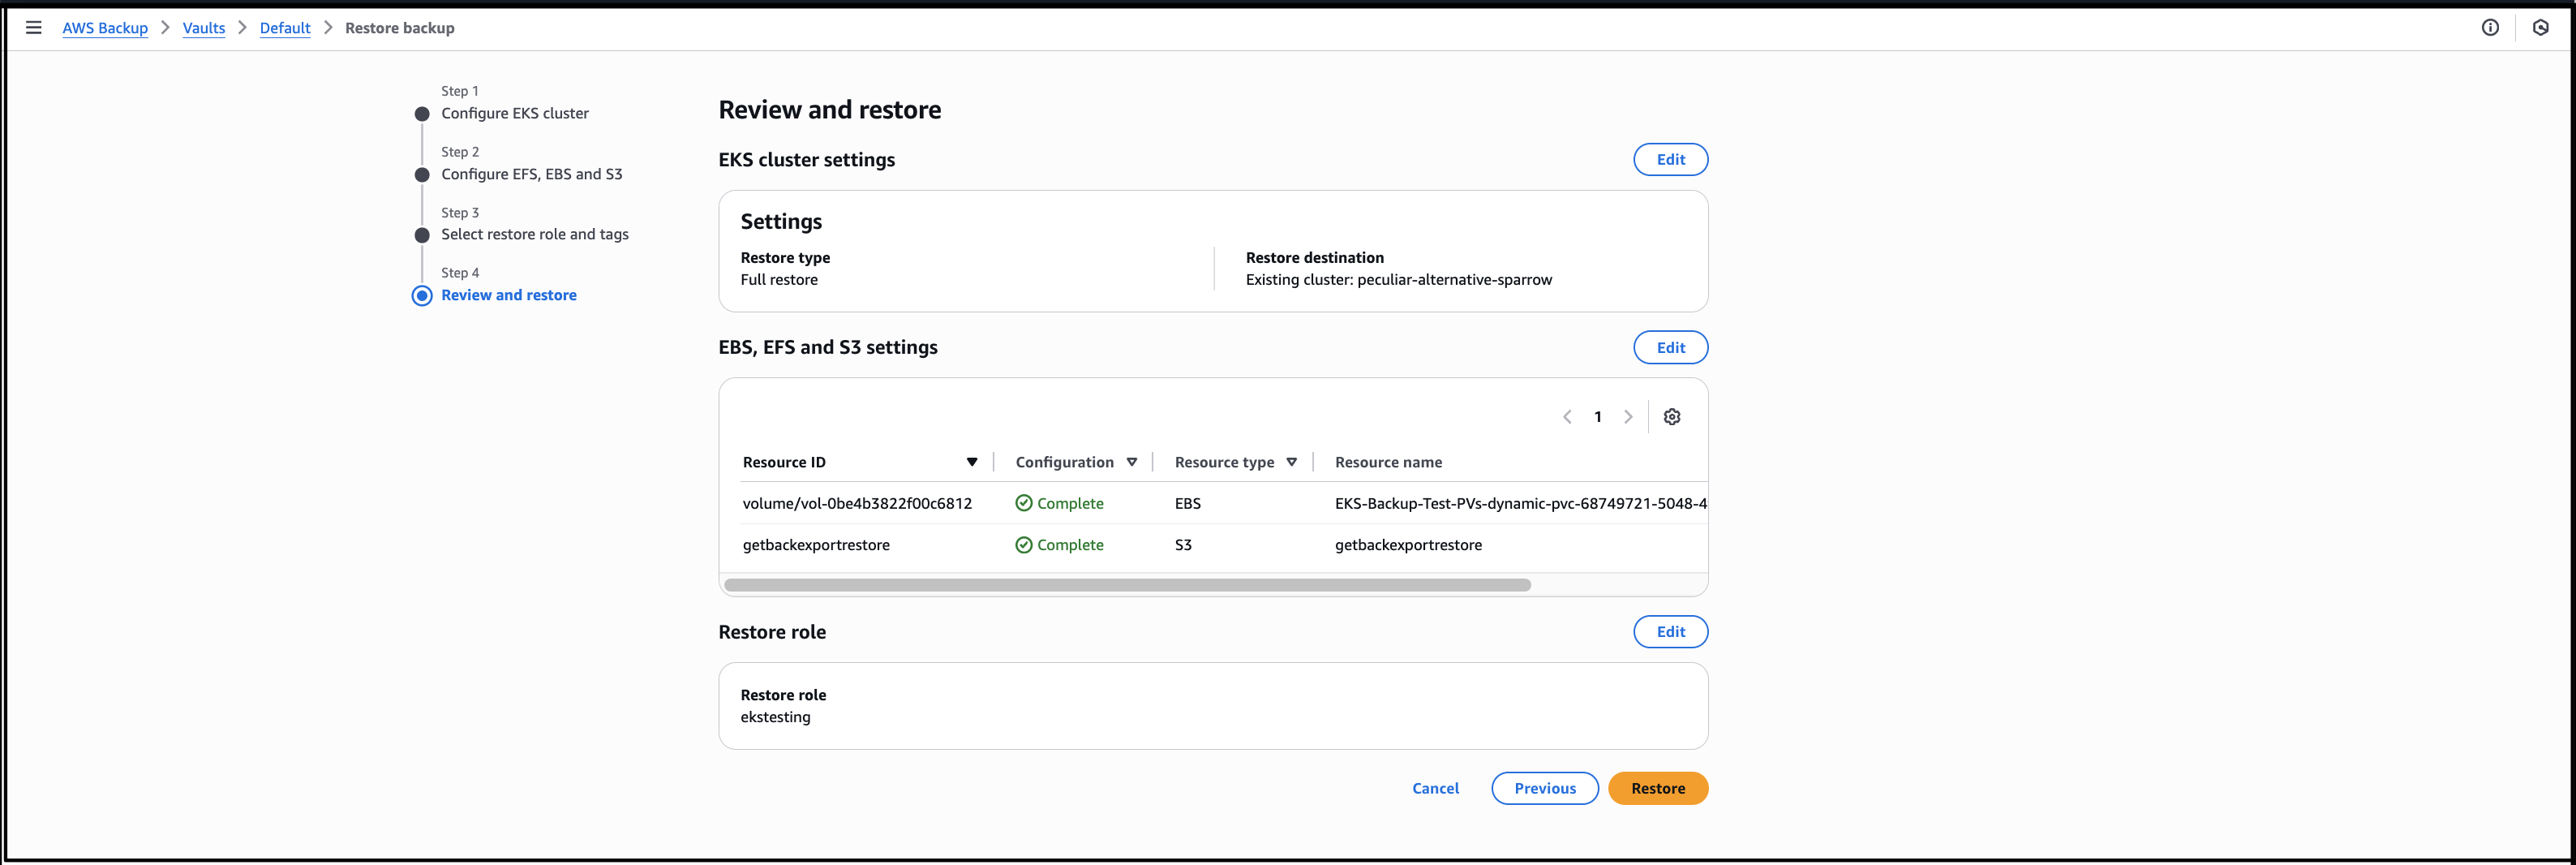
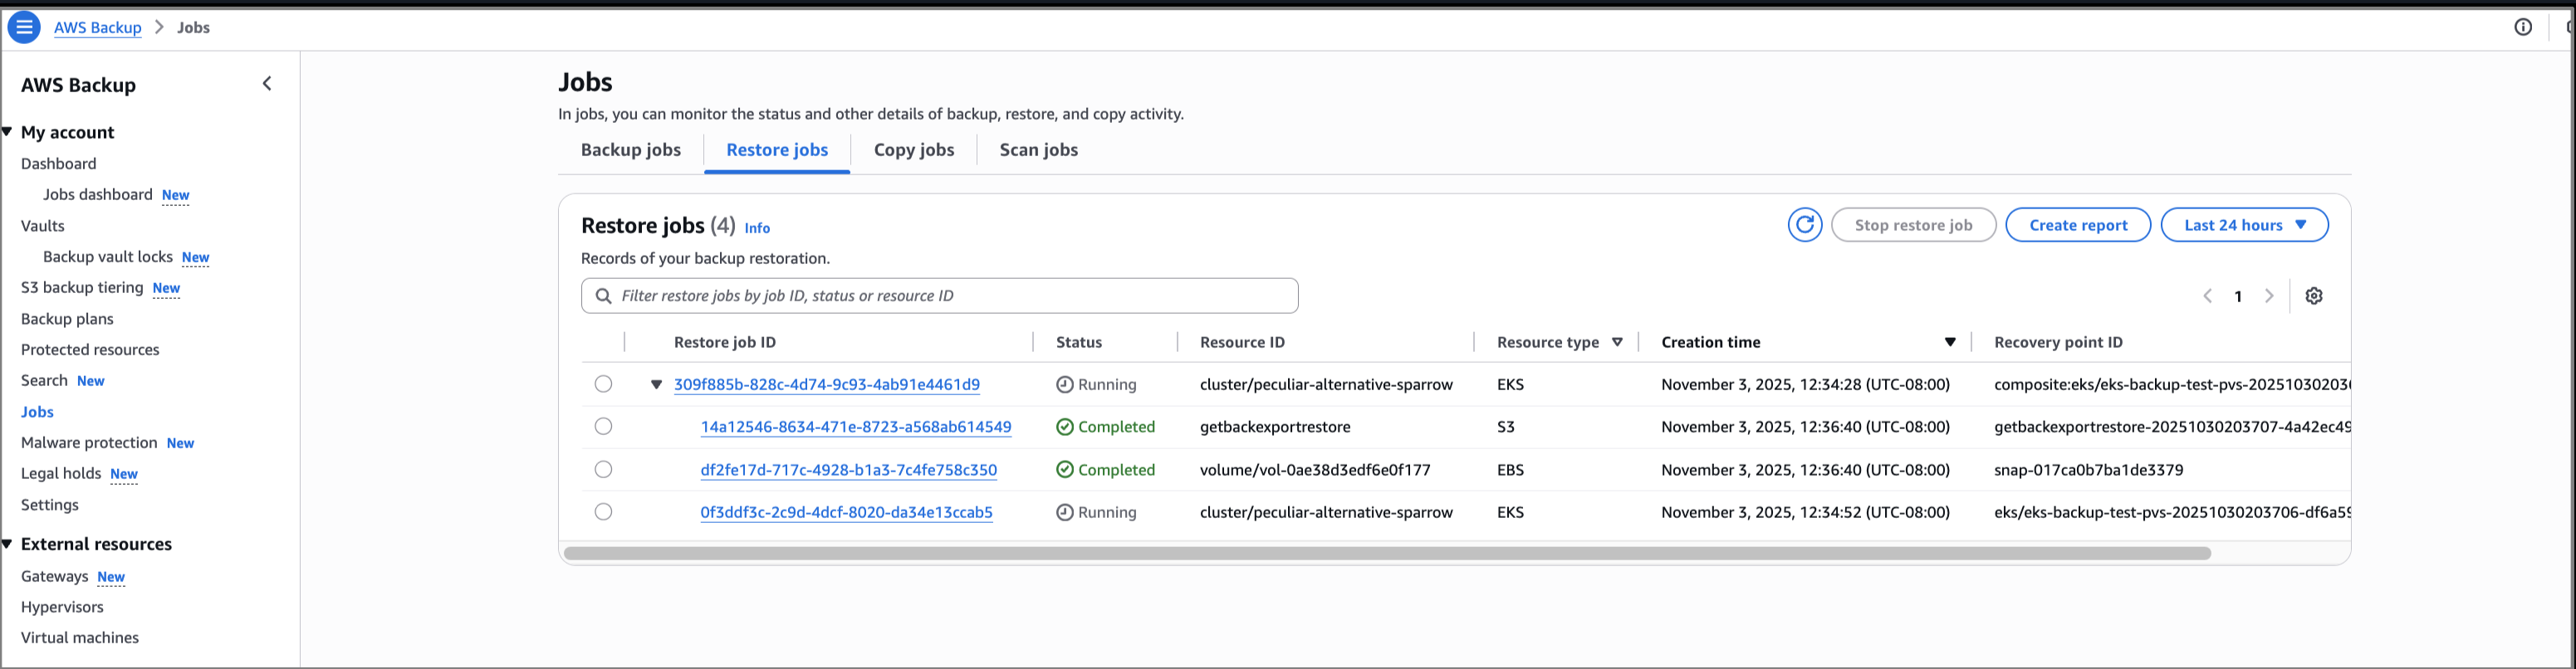


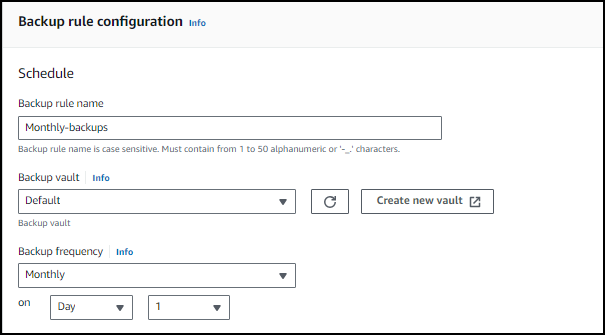
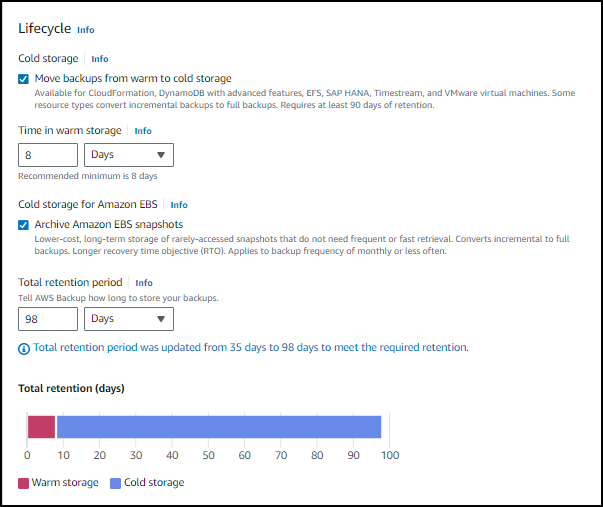


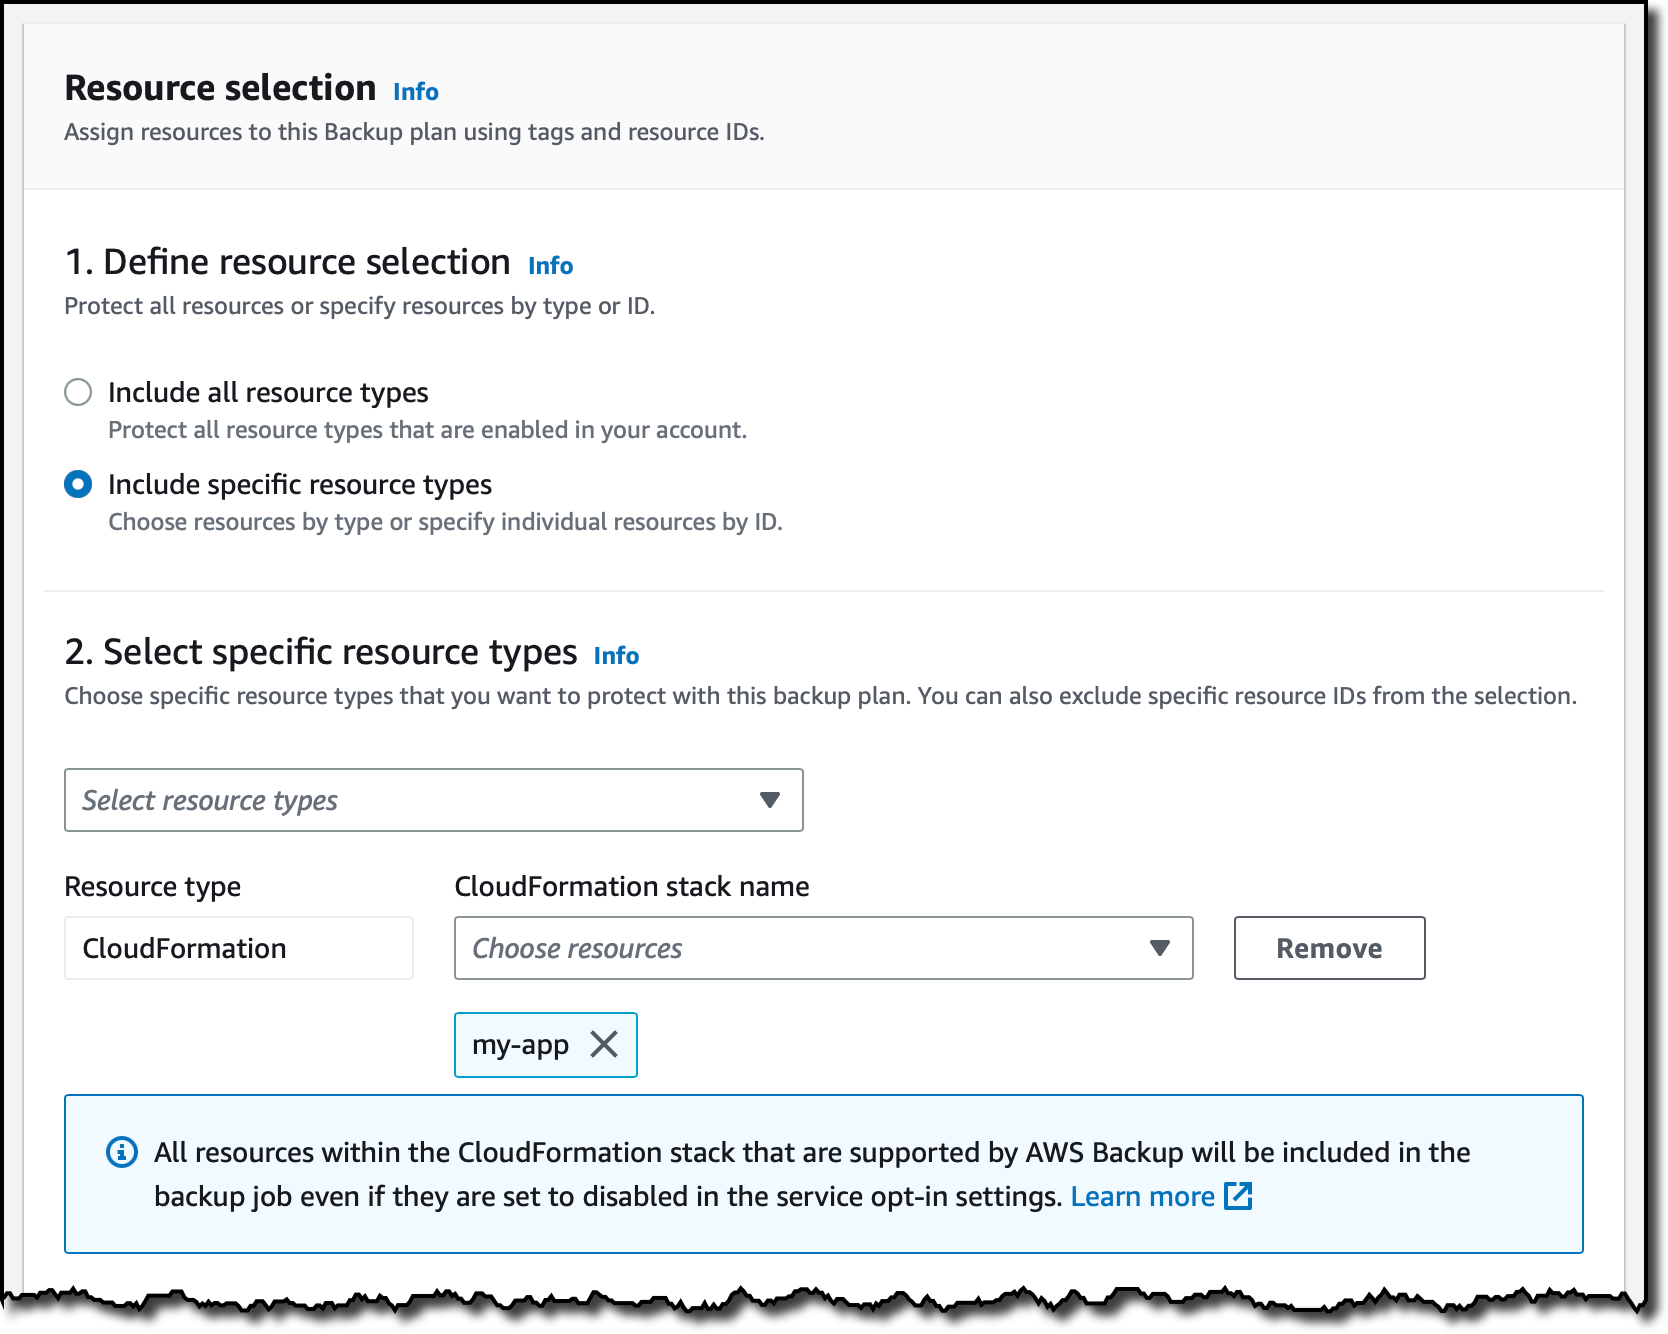


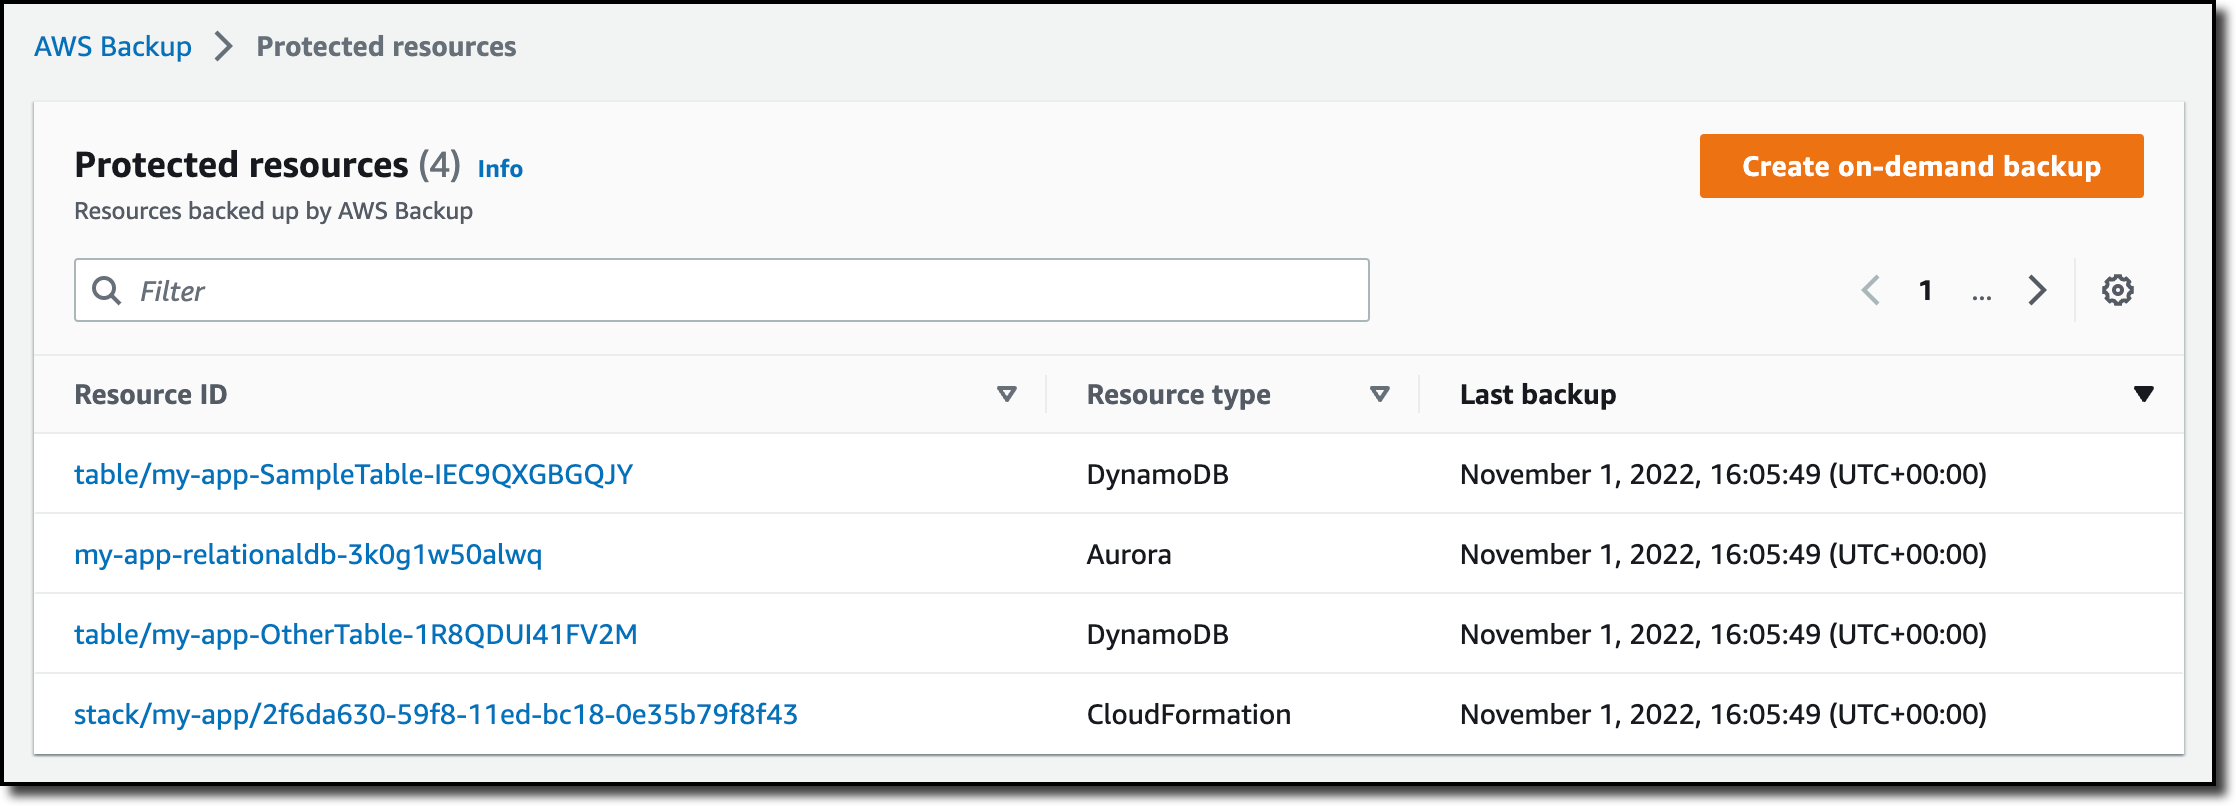


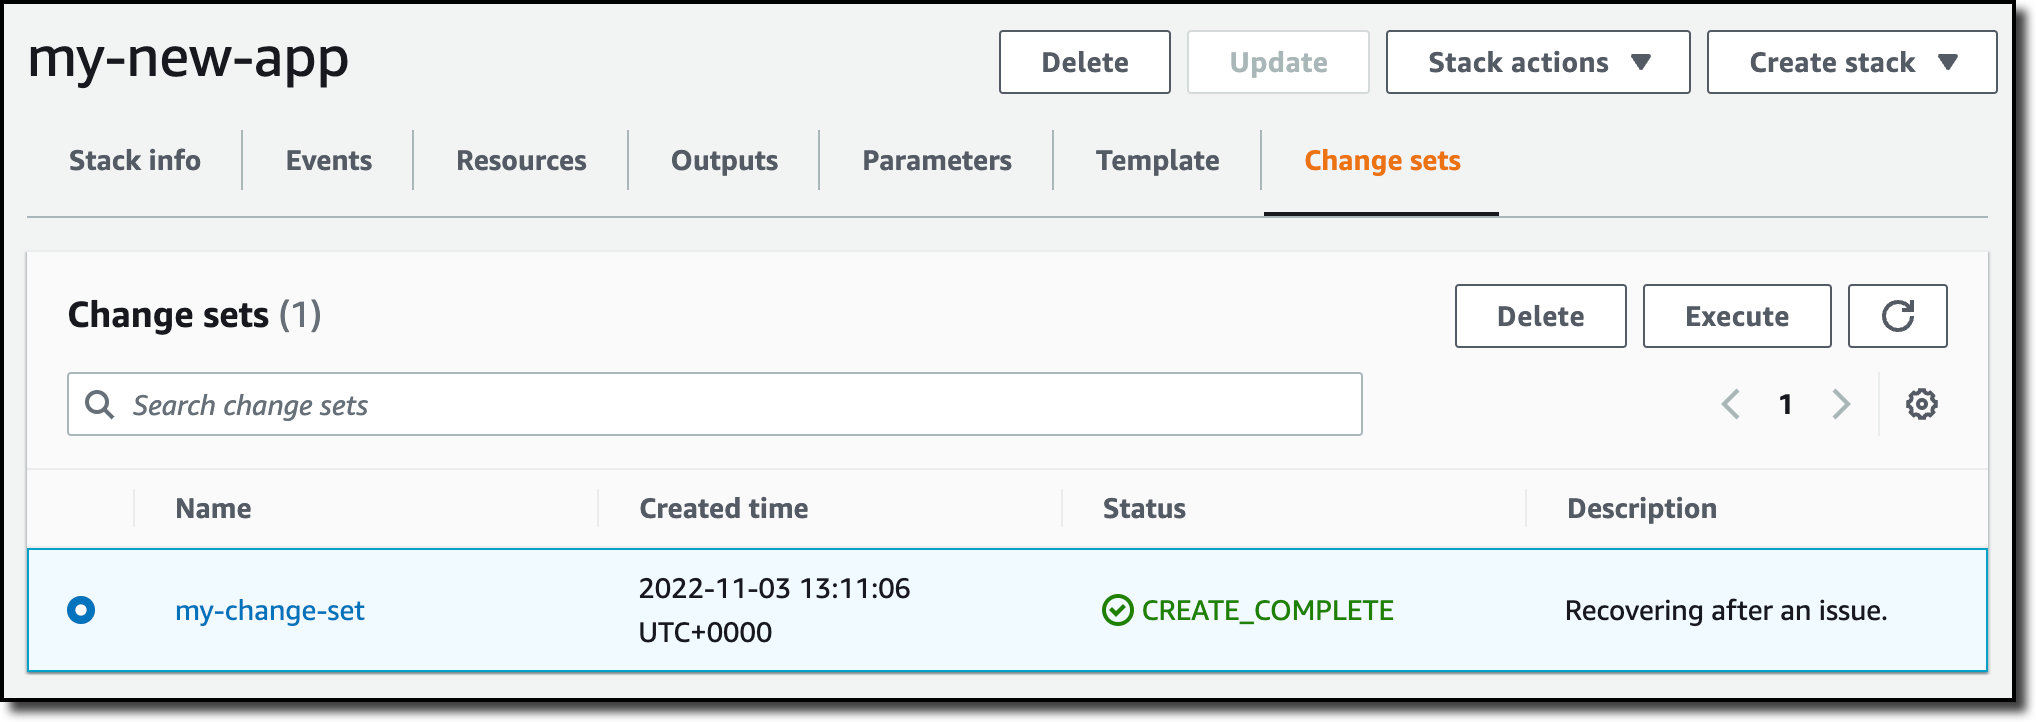


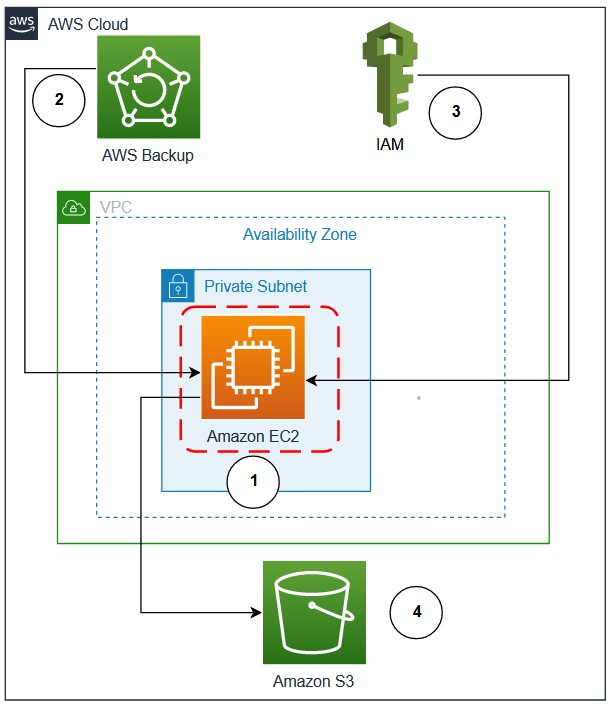
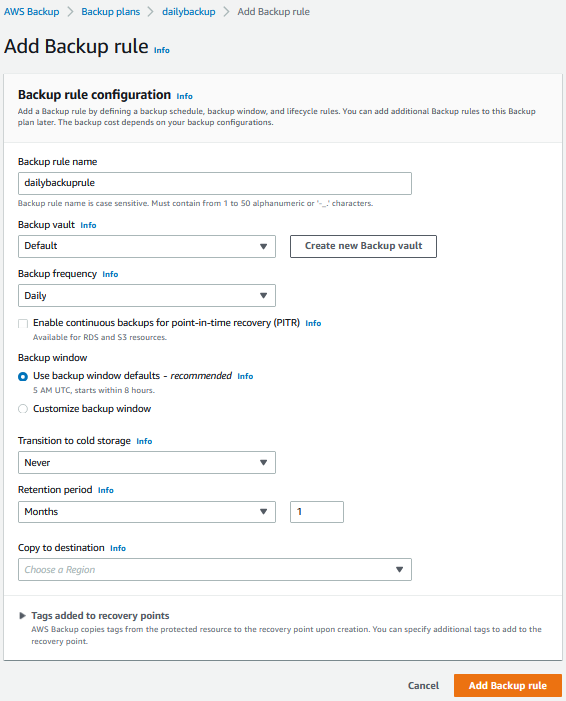
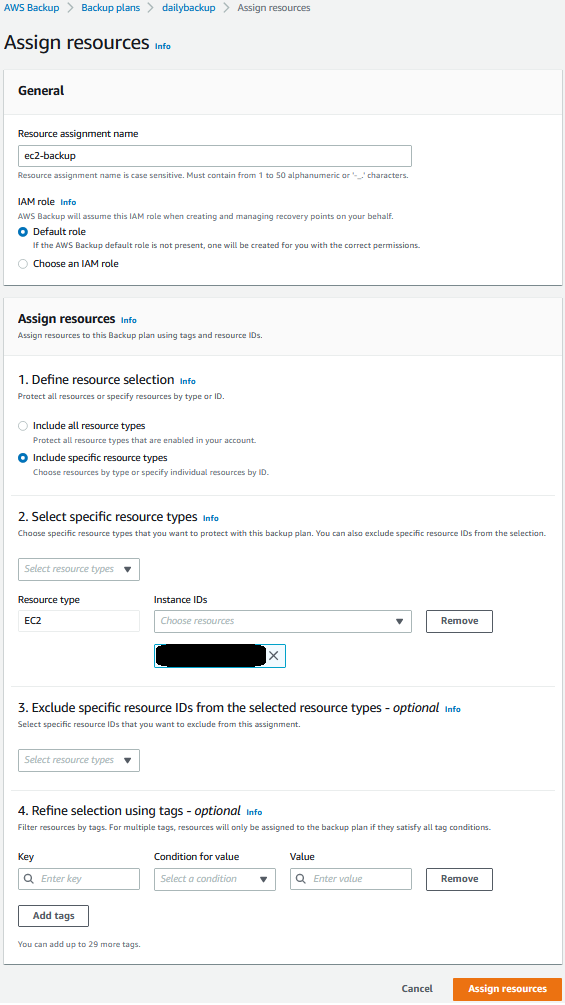
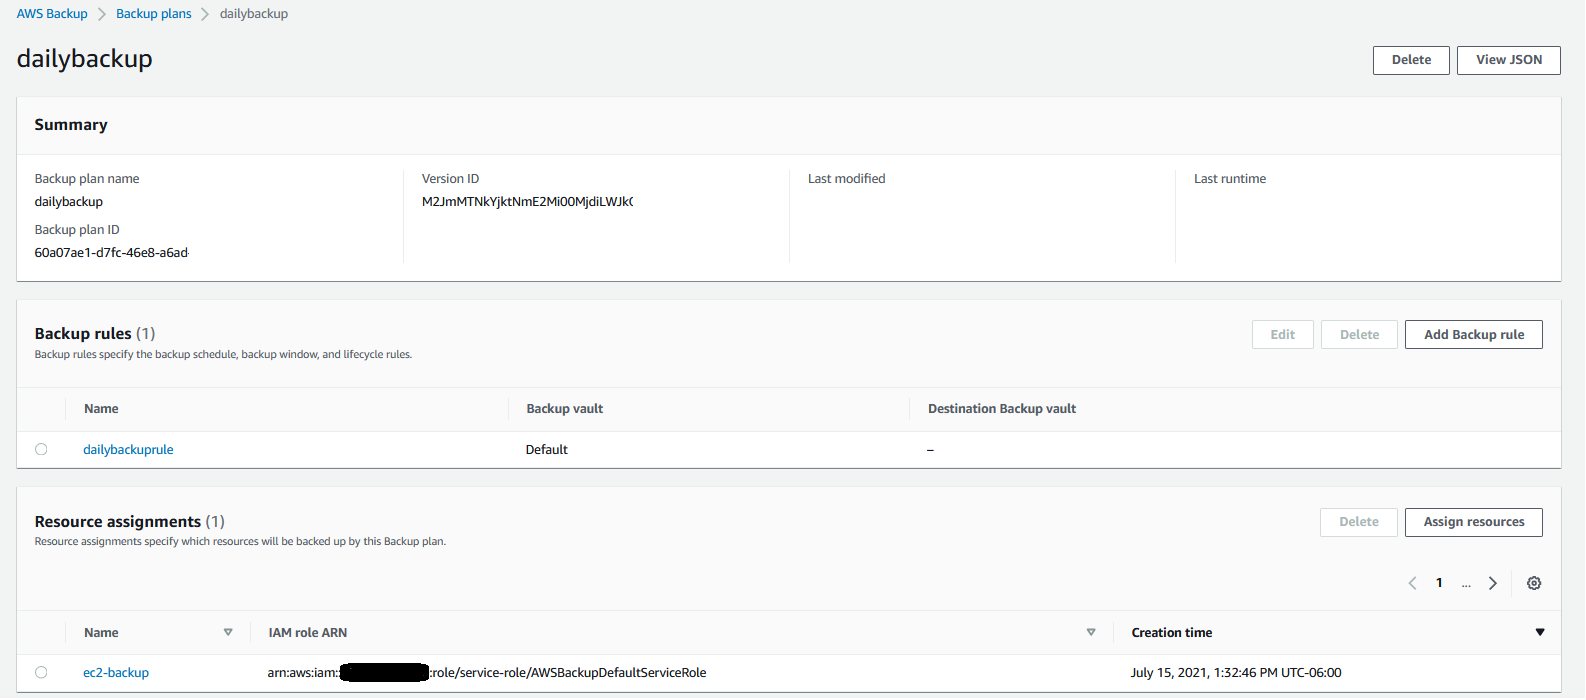
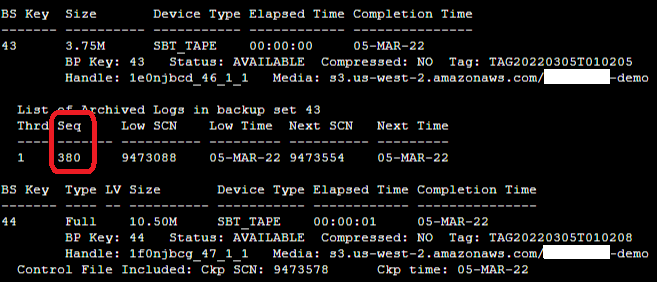

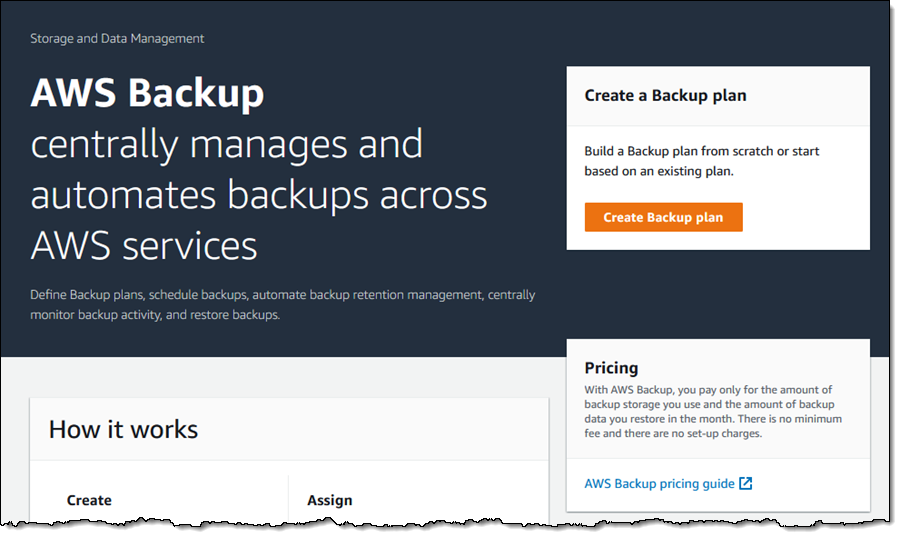
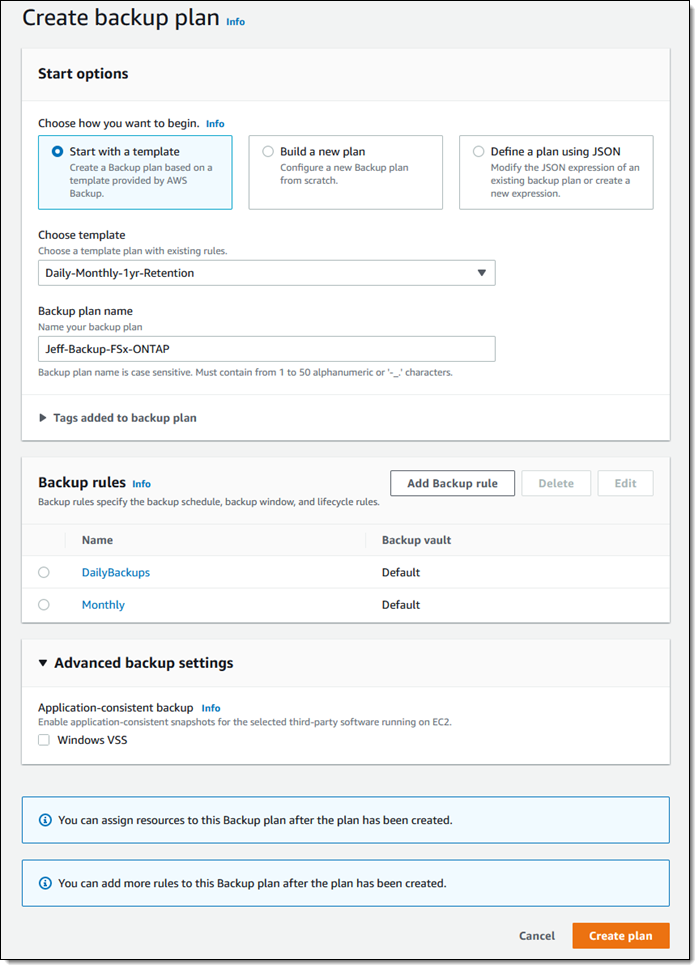
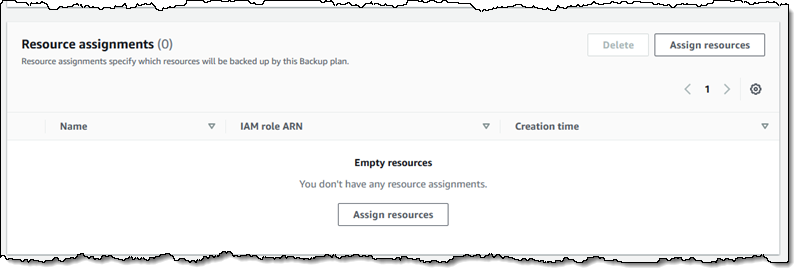


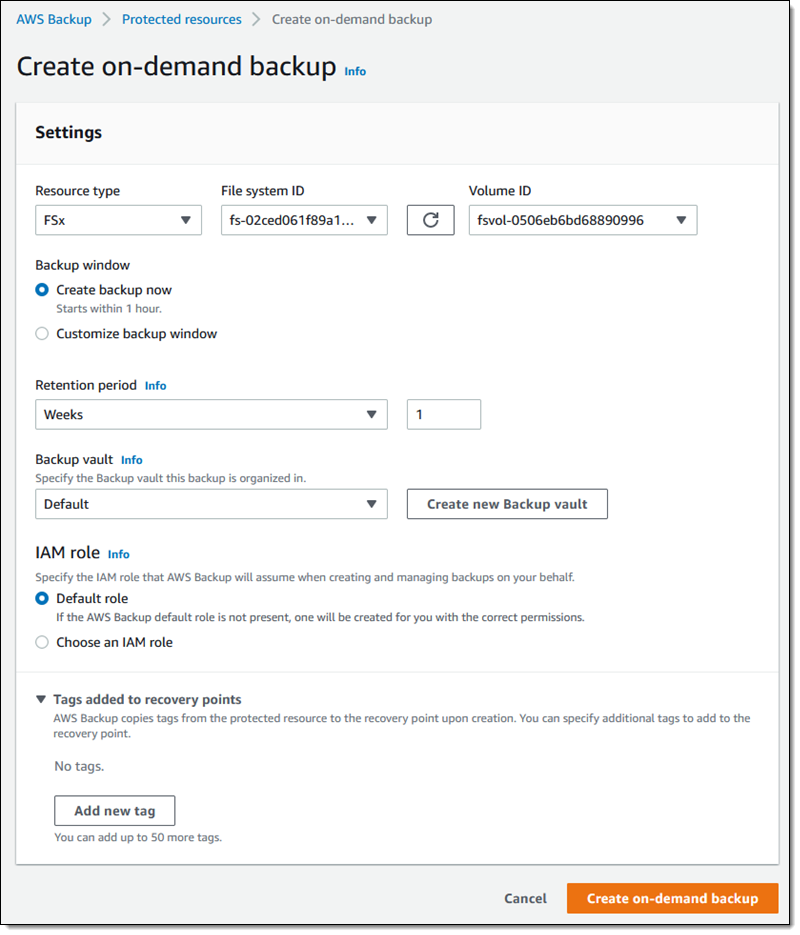

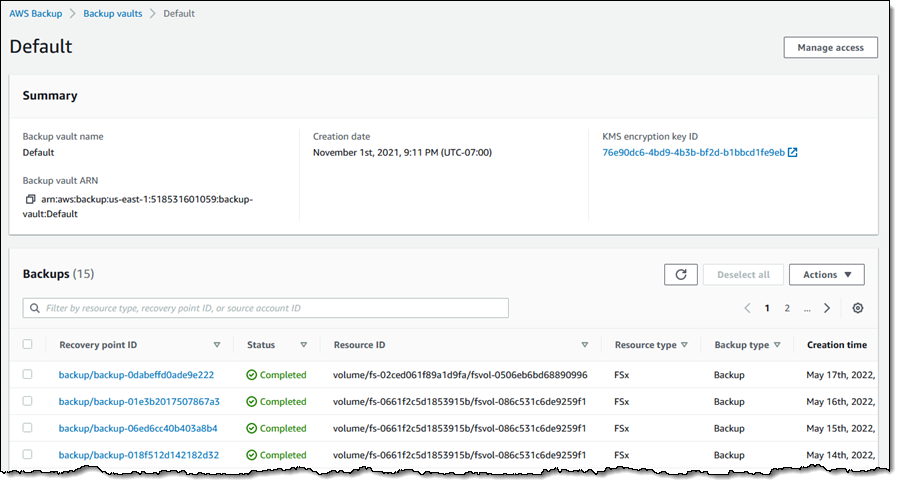


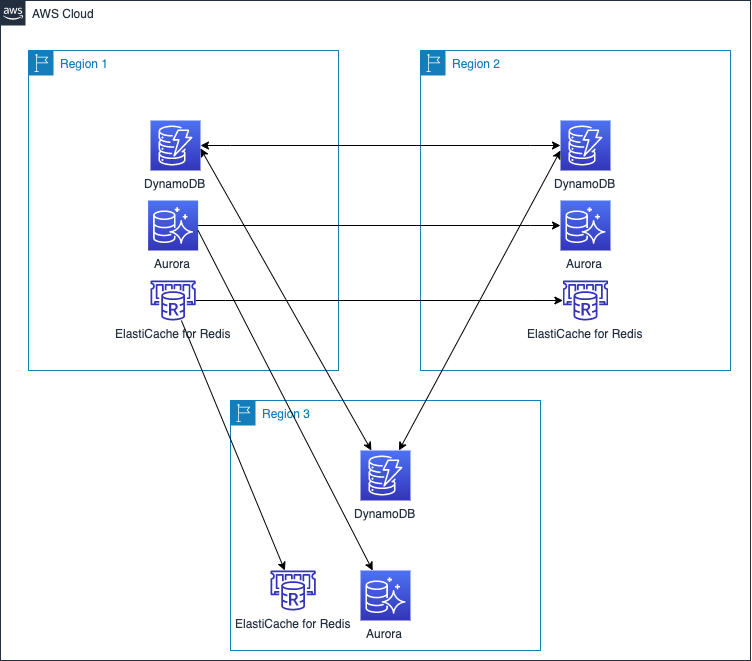
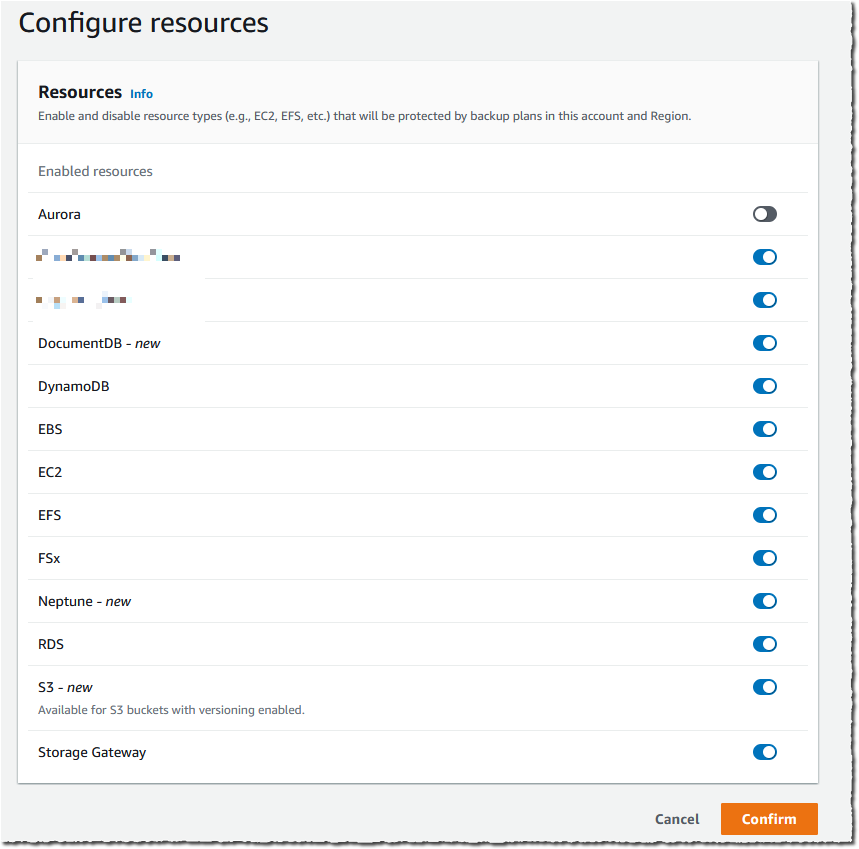
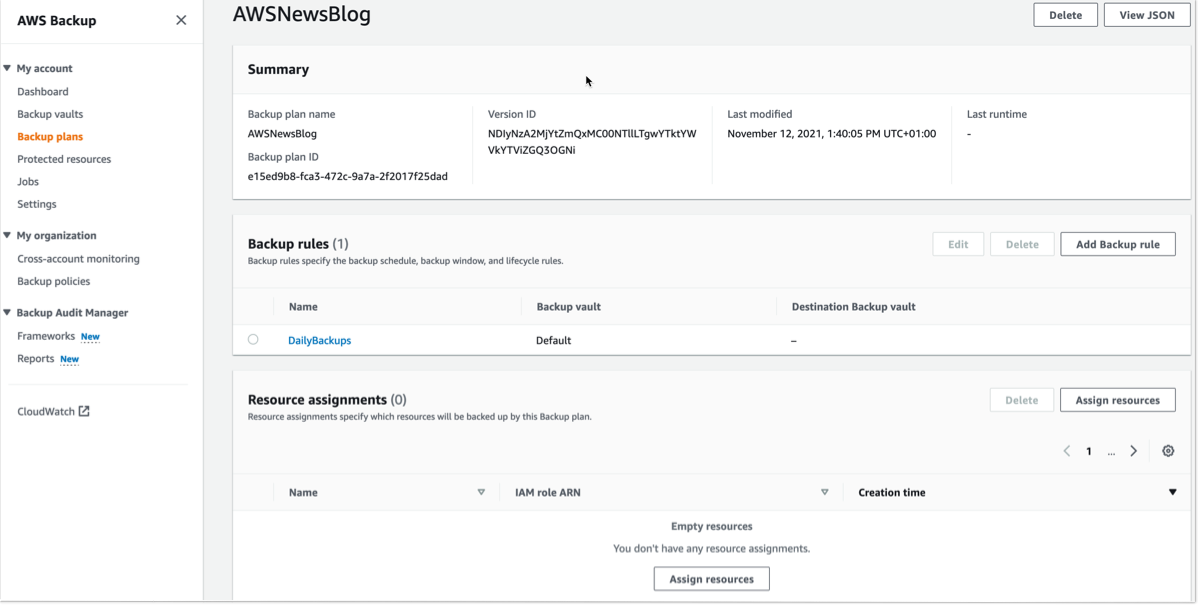
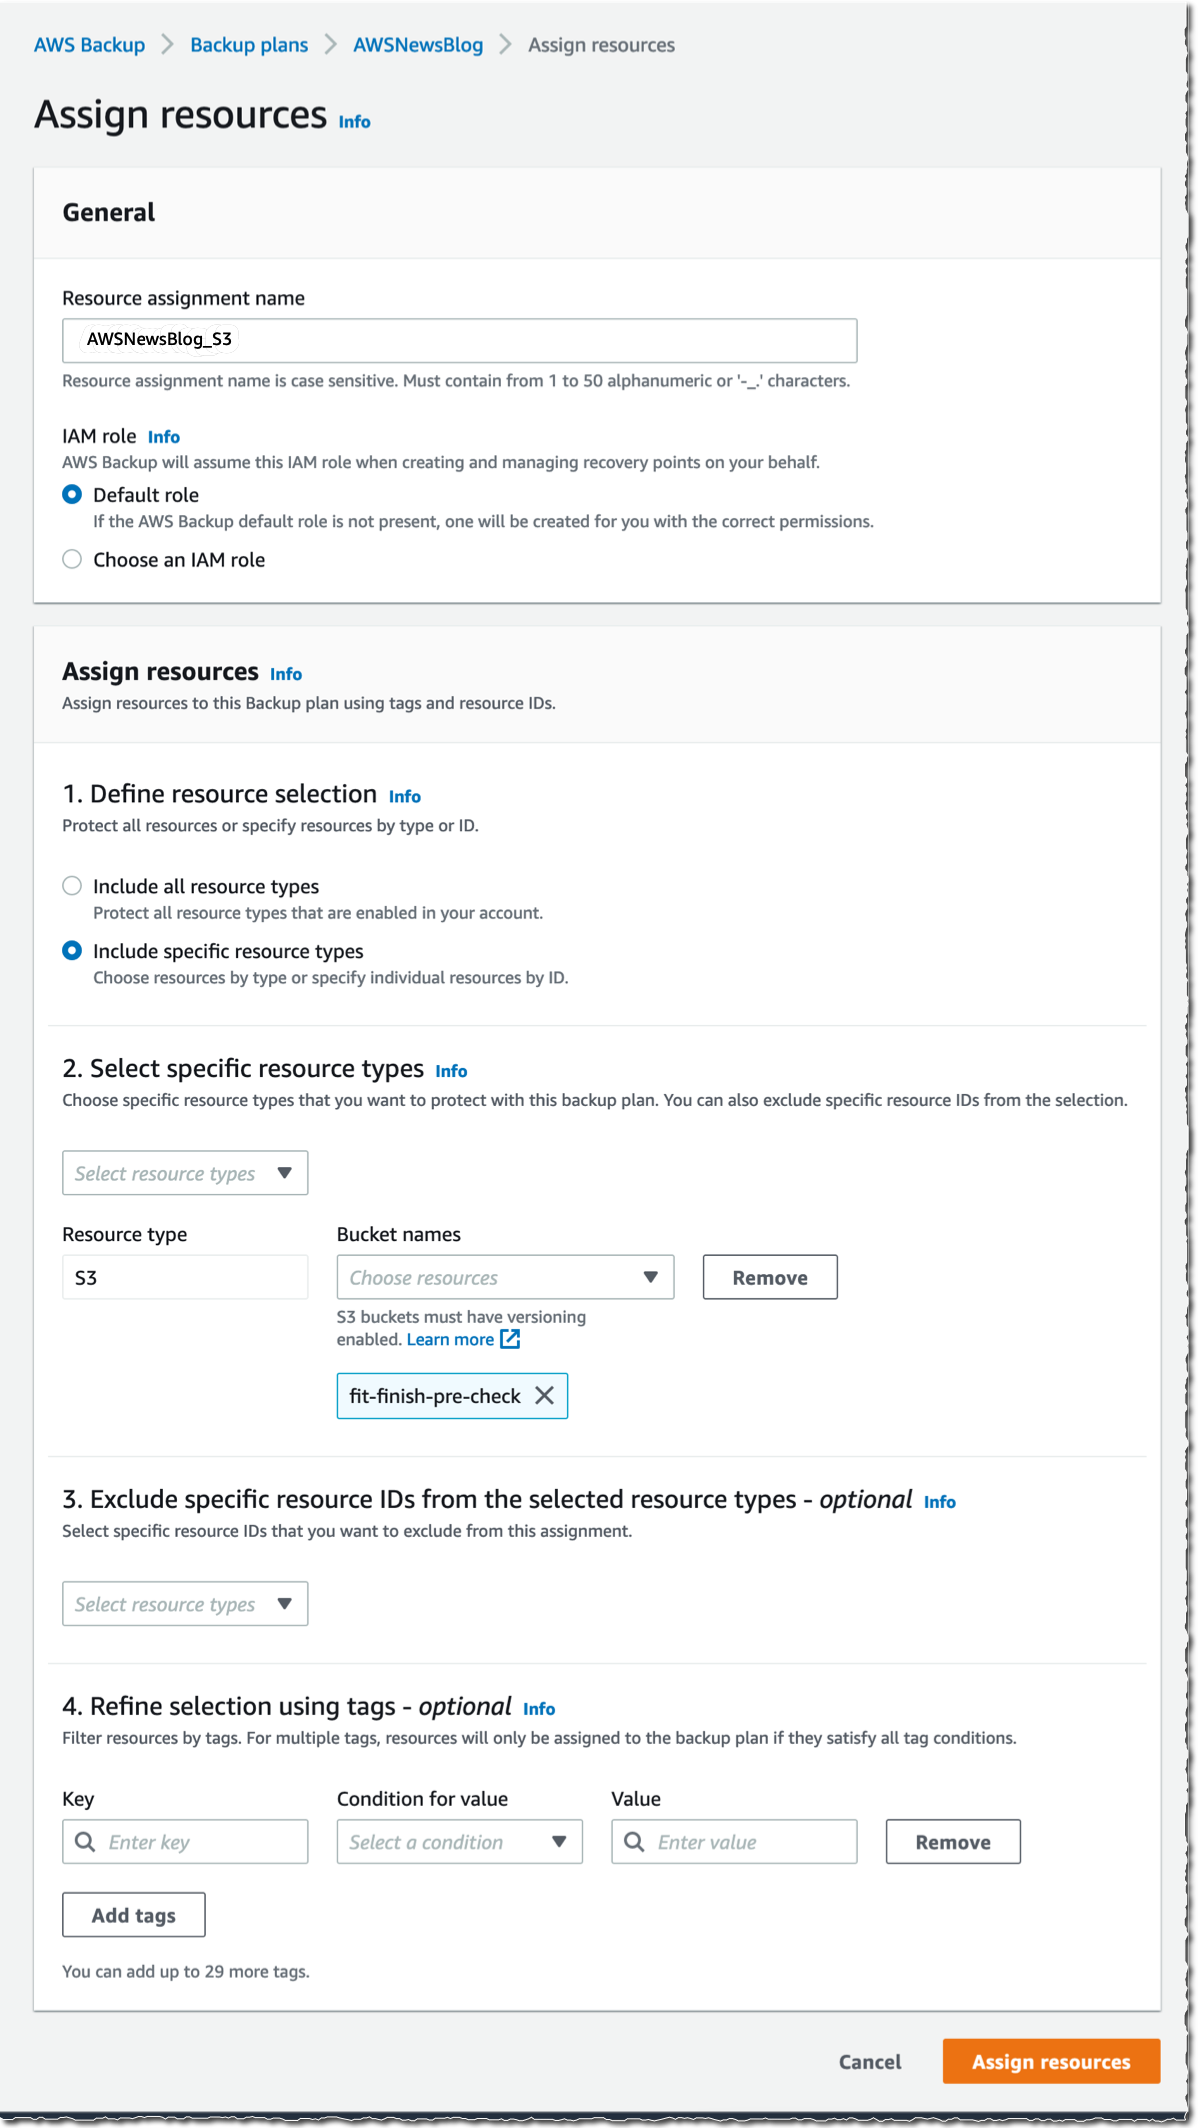

 Completed.