Post Syndicated from Roberto Migli original https://aws.amazon.com/blogs/security/access-aws-services-programmatically-using-trusted-identity-propagation/
With the introduction of trusted identity propagation, applications can now propagate a user’s workforce identity from their identity provider (IdP) to applications running in Amazon Web Services (AWS) and to storage services backing those applications, such as Amazon Simple Storage Service (Amazon S3) or AWS Glue. Since access to applications and data can now be granted directly to a workforce identity, a seamless single sign-on experience can be achieved, eliminating the need for users to be aware of different AWS Identity and Access Management (IAM) roles to assume to access data or use of local database credentials.
While AWS managed applications such as Amazon QuickSight, AWS Lake Formation, or Amazon EMR Studio offer a native setup experience with trusted identity propagation, there are use cases where custom integrations must be built. You might want to integrate your workforce identities into custom applications storing data in Amazon S3 or build an interface on top of existing applications using Java Database Connectivity (JDBC) drivers, allowing these applications to propagate those identities into AWS to access resources on behalf of their users. AWS resource owners can manage authorization directly in their AWS applications such as Lake Formation or Amazon S3 Access Grants.
This blog post introduces a sample command-line interface (CLI) application that enables users to access AWS services using their workforce identity from IdPs such as Okta or Microsoft Entra ID.
The solution relies on users authenticating with their chosen IdP using standard OAuth 2.0 authentication flows to receive an identity token. This token can then be exchanged against AWS Security Token Service (AWS STS) and AWS IAM Identity Center to access data on behalf of the workforce identity that was used to sign in to the IdP.
Finally, an integration with the AWS Command Line Interface (AWS CLI) is provided, enabling native access to AWS services on behalf of the signed-in identity.
In this post, you will learn how to build and use the CLI application to access data on S3 Access Grants, query Amazon Athena tables, and programmatically interact with other AWS services that support trusted identity propagation.
To set up the solution in this blog post, you should already be familiar with trusted identity propagation and S3 Access Grants concepts and features. If you are not, see the two-part blog post How to develop a user-facing data application with IAM Identity Center and S3 Access Grants (Part 1) and Part 2. In this post we guide you through a more hands-on setup of your own sample CLI application.
Architecture and token exchange flow
Before moving into the actual deployment, let’s talk about the architecture of the CLI and how it facilitates token exchange between different parties.
Users, such as developers and data scientists, run the CLI on their machine without AWS security credentials pre-configured. To perform a token exchange of the OAuth 2.0 credentials vended by a source IdP towards IAM Identity Center by using the CreateTokenWithIAM API, AWS security credentials are required. To fulfill this requirement, the solution uses IAM OpenID Connect (OIDC) federation to first create an IAM role session using the AssumeRoleWithWebIdentity API with the initial IdP token—because this API doesn’t require credentials—and then uses the resulting IAM role to request the necessary single sign-on OIDC token.
The process flow is shown in Figure 1:
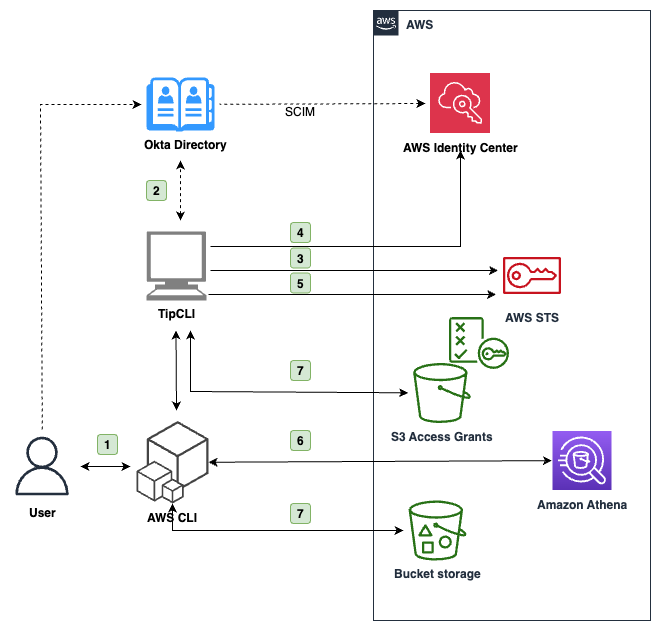
Figure 1: Architecture diagram of the application
At a high level, the interaction flow shown in Figure 1 is the following:
- The user interacts with the AWS CLI, which uses the CLI as a source credential provider.
- The user is asked to sign in through their browser with the source IdP they configured in the CLI, for example Okta.
- If the authorization is successful, the CLI receives a JSON Web Token (JWT) and uses it to assume an IAM role through OIDC federation using AssumeRoleWithWebIdentity.
- With this temporary IAM role session, the CLI exchanges the IdP token token with the IAM Identity Center customer managed application on behalf of the user for another token using the CreateTokenWithIAM API.
- If successful, the CLI uses the token returned from Identity Center to create an identity-enhanced IAM role session and returns the corresponding IAM credentials to the AWS CLI.
- The AWS CLI uses the credentials to call AWS services that support the trusted identity propagation that has been configured in the Identity Center customer managed application. For example, to query Athena. See Specify trusted applications in the Identity Center documentation to learn more.
- If you need access to S3 Access Grants, the CLI also provides automatic credentials requests to S3 GetDataAccess with the identity-enhanced IAM role session previously created.
Because both the Okta OAuth token and the identity-enhanced IAM role session credentials are short lived, the CLI provides functionality to refresh authentication automatically.
Figure 2 is a swimlane diagram of the requests described in the preceding flow and depicted in Figure 1.
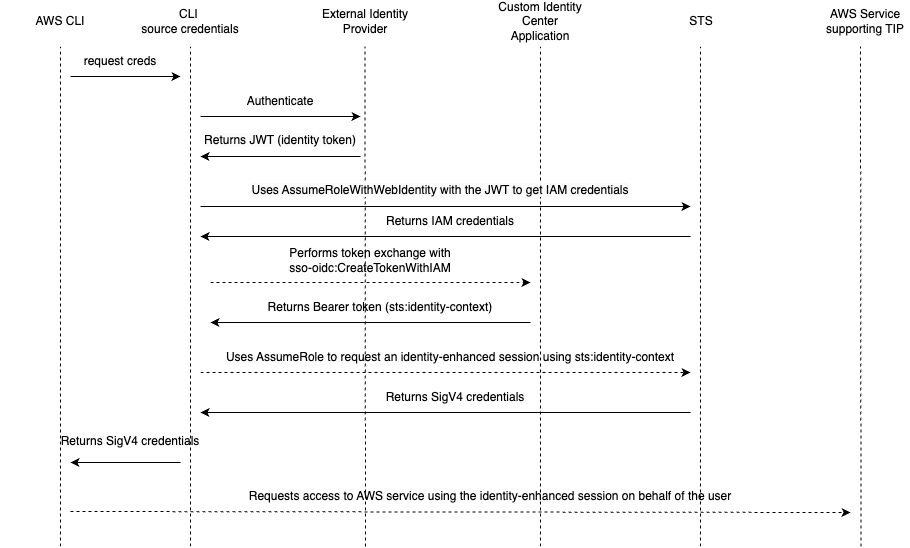
Figure 2: Swimlane diagram of the application token exchange. Dashed lines show SigV4 signed requests
Account prerequisites
In the following procedure, you will use two AWS accounts: one is the application account, where required IAM roles and OIDC federation will be deployed and where users will be granted access to Amazon S3 objects. This account already has S3 Access Grants and an Athena workgroup configured with IAM Identity Center. If you don’t have these already configured, see Getting started with S3 Access Grants and Using IAM Identity Center enabled Athena workgroups.
The other account is the Identity Center admin account which has IAM Identity Center set up with users and groups synchronized through SCIM with your IdP of choice, in this case Okta directory. The application also supports Entra ID and Amazon Cognito.
You don’t need to have permission sets configured with IAM Identity Center, because you will grant access through a customer managed application Identity Center. Users authenticate with the source IdP and don’t interact with an AWS account or IAM policy directly.
To configure this application, you’ll complete the following steps:
- Create an OIDC application in Okta
- Create a customer managed application in IAM Identity Center
- Install and configure the application with the AWS CLI
Create an OIDC application in Okta
Start by creating a custom application in Okta, which will act as the source IdP, and configuring it as a trusted token issuer in IAM Identity Center.
To create an OIDC application
- Sign in to your Okta administrator panel, go to the Applications section in the navigation pane, and choose Create App Integration. Because you’re using a CLI, select OIDC as the sign-in method and Native Application as the application type. Choose Next.

Figure 3: Okta screen to create a new application
- In the Grant Type section, the authorization code is selected by default. Make sure to also select Refresh Token. The CLI application uses the refresh tokens if available to generate new access tokens without requiring the user to re-authenticate. Otherwise, the users will have to authenticate again when the token expires.
- Change the sign-in redirect URIs to
http://localhost:8090/callback. The application uses OAuth 2.0 Authorization Code with PKCE Flow and waits for confirmation of authentication by listening locally on port 8090. The IdP will redirect your browser to this URL to send authentication information after successful sign-in. - Select the directory groups that you want to have access to this application. If you don’t want to restrict access to the application, choose Allow Everyone. Leave the remaining settings as-is.
Note: You must also assign and authorize users in AWS to allow access to the downstream AWS services.
Figure 4: Configure the general settings of the Okta application
- When done, choose Save and your Okta custom application will be created and you will see a detail page of your application. Note the Okta Client ID value to use in later steps.


Create a customer managed application in IAM Identity Center
After setting everything up in Okta, move on to creating the custom OAuth 2.0 application in IAM Identity Center. The CLI will use this application to exchange the tokens issued by Okta.
To create a customer managed application
- Sign in to the AWS Management Console of the account where you already have configured IAM Identity Center and go to the Identity Center console.
- In the navigation pane, select Applications under Application assignments.
- Choose Add application in the upper
- Select I have an application I want to set up and select the OAuth 2.0 type.
- Enter a display name and description.
- For User and group assignment method, select Do not require assignments (because you already configured your user and group assignments to this application in Okta). You can leave the Application URL field empty and select Not Visible under Application visibility in AWS access portal, because you won’t access the application from the Identity Center AWS access portal URL.
- On the next screen, select the Trusted Token Issuer you set up in the prerequisites, and enter your Okta client ID from the Okta application you created in the previous section as the Aud claim. This will make sure your Identity Center custom application only accepts tokens issued by Okta for your Okta custom application.
Note: Automatically refresh user authentication for active application sessions isn’t needed for this application because the CLI application already refreshes tokens with Okta.
Figure 5: Trusted token issuer configuration of the custom application
- Select Edit the application policy and edit the policy to specify the application account AWS Account ID as the allowed principal to perform the token exchange. You will update the application policy with the Amazon Resource Name (ARN) of the correct role after deploying the rest of the solution.
- Continue to the next page to review the application configuration and finalize the creation process.
Figure 6: Configuration of the application policy
- Grant the application permission to call other AWS services on the users’ behalf. This step is necessary because the application will use a custom application to exchange tokens that will then be used with specific AWS services. Select the Customer managed tab, browse to the application you just created, and choose Specify trusted applications at the bottom of the page.
- For this example, select All applications for service with same access, and then select Athena, S3 Access Grants, and Lake Formation and AWS Glue data catalog as trusted services because they’re supported by the sample application. If you don’t plan to use your CLI with S3 or Athena and Lake Formation, you can skip this step.
Figure 7: Configure application user propagation


You have completed the setup within IAM Identity Center. Switch to your application account to complete the next steps, which will deploy the backend application.
Application installation and configuration with the AWS CLI
The sample code for the application can be found on GitHub. Follow the instructions in the README file to install the command-line application. You can use the CLI to generate an AWS CloudFormation template to create the required IAM roles for the token exchange process.
To install and configure the application
- You will need your Okta OAuth issuer URI and your Okta application client ID. The issuer URI can be found by going to your Okta Admin page, and on the left navigation pane, go to the API page under the Security section. Here you will see your Authorization servers and their Issuer URI. The application client ID is the same as you used earlier for the Aud claim in IAM Identity Center.
- In your CLI, use the following commands to generate and deploy the CloudFormation template:
- After the template is created, update the customer managed application policy you configured in step 2 to allow only the IAM role that CloudFormation just created to use the application. You can find this in your CloudFormation console, or by using
aws cloudformation describe-stacks --stack-name tip-blog-iam-stackin your terminal. - Configure the CLI by running
tip-cli configure idpand entering the IAM roles’ ARN and Okta information. - Test your configuration by running the
tip-cli authcommand to start the authorization with the configured IdP by opening your default browser and requesting to sign in. In the background, the application will wait for Okta to callback the browser on port 8090 to retrieve the authentication information, and if successful request an Okta OAuth 2.0 token. - You can then run
tip-cli auth get-iam-credentialsto exchange the token through your trusted IAM role and your Identity Center application for a set of identity-enhanced IAM role session credentials. These expire in 1 hour by default, but you can configure the expiration period by configuring the IAM role used to create the identity-enhanced IAM session accordingly. After you test the setup, you won’t need the CLI anymore because authentication, token refresh, and credentials refresh will be managed automatically through the AWS CLI.
Note: Follow the README instructions on configuring your AWS CLI to use the tip-cli application to source credentials. The advantage of the solution is that the AWS CLI will automatically handle the refresh of tokens and credentials using this application.
Now that the AWS CLI is configured, you can use it to call AWS services representing your Okta identity. In the following examples, we configured the AWS CLI to use the application to source credentials for the AWS CLI profile my-tti-profile.
For example, you can query Athena tables through workgroups configured with trusted identity propagation and authorized through Lake Formation:
The IAM role used by the backend application to create the identity-enhanced IAM session is allowed by default to use only Athena and Amazon S3. You can extend it to allow access to other services, such as Amazon Q Business. After you create an Amazon Q Business application and assign users to it, you can update the custom application you created earlier in IAM Identity Center and enable trusted identity propagation to your Amazon Q Business application.
You can then, for example, retrieve conversations of the user for an Amazon Q business application with ID a1b2c3d4-5678-90ab-cdef-EXAMPLE11111 as follows:
The application also provides simplified access to S3 Access Grants. After you have configured the AWS CLI as documented in the README file, you can access S3 objects as follows:
In this example, the AWS CLI uses the custom credential source to request data access to a specific S3 URI to the account instance of S3 Access Grants you want to target. If there’s a matching grant for the requested URI and your user identity or group, S3 Access Grants will return a new set of short-lived IAM credentials. The tip-cli application will cache these credentials for you and prompt you to refresh them whenever needed. You can review the list of credentials generated by the application with the command tip-cli s3ag list-credentials, and clear them with the command tip-cli s3ag clear-credentials.
Conclusion
In this post we showed you how a sample CLI application using trusted identity propagation works, enabling business users to bring their workforce identities for delegated access into AWS without needing IAM credentials or cloud backends.
You set up custom applications within Okta (as the directory service) and IAM Identity Center and deployed the required application IAM roles and federation into your AWS account. You learned the architecture of this solution and how to use it in an application.
Through this setup, you can use the AWS CLI to interact with AWS services such as S3 Access Grants or Athena on behalf of the directory user without the having to configure an IAM user or credentials for them.
The code used in this post is also published as an AWS Sample, which can be found on GitHub and is meant to serve as inspiration for integrating custom or third-party applications with trusted identity propagation.
If you have feedback about this post, submit comments in the Comments section below. If you have questions about this post, contact AWS Support.


