The AWS Workbook for BNM RMiT, available through AWS Artifact, maps each RMiT provision to AWS Control Objectives (AWS responsibilities under the AWS Shared Responsibility Model) and AWS Well-Architected Framework best practices (your responsibilities). It tells you, for every RMiT requirement, what AWS is responsible for and what you implement.
The compliance guides published by AWS SAS over the past year provide implementation guidance for International Organization for Standardization (ISO) and International Electrotechnical Commission (IEC) standards that complements the workbook. These guides show how to implement controls that meet the requirements of specific standards and frameworks using AWS services, giving your technical and compliance teams a clear path from regulatory expectation to deployed architecture.
Malaysian financial institutions can now trace from BNM regulatory requirement, through AWS control implementation, to the evidence that demonstrates it: AWS third-party attestations for AWS-side controls, and your own workload evidence for customer-side controls. BNM expects this specificity in notification documentation.
AWS Workbook for BNM RMiT
The workbook is a structured Excel document available through AWS Artifact. For each of the 394 RMiT provisions, it identifies:
Whether the requirement is an AWS responsibility or a customer responsibility under the Shared Responsibility Model
The specific AWS Control Objective that addresses the requirement (where AWS is responsible)
The relevant AWS Well-Architected Framework best practice for customer implementation (where the customer is responsible)
Supporting information and references for each mapping
The following is a sample entry from the workbook:
RMiT Requirement
Responsibility
Source
AWS supporting information
10.49: A financial institution should ensure network resilience…
AWS
AWS Control Objectives
AWS Control Section: Network Security. AWS maintains redundant network connectivity with multiple tier-1 transit providers across each Availability Zone.
10.49: (Customer responsibility)
Customer
Well-Architected
REL 2: How do you plan your network topology? Implement multi-AZ deployments. Configure VPC flow logs and use AWS Network Firewall.
The workbook currently includes 394 rows across all RMiT appendix requirements, with 208 mapped to AWS responsibilities and 186 to customer responsibilities.
Why this matters now
BNM revised RMiT guidelines effective 28 November 2025, and updated them on 25 September 2026 to add requirements for National Critical Information Infrastructure (NCII) entities. Financial institutions operating under both BNM Outsourcing and BNM RMiT must demonstrate that their cloud service providers maintain controls aligned with regulatory expectations. Institutions preparing notification submissions for material cloud workloads need auditable evidence of this alignment.
The revised guidelines set higher expectations for evidence quality. Institutions submitting notifications without clear, structured control mapping evidence might face extended review cycles and requests for additional information from BNM. Workloads that could be deployed in weeks remain in governance queues for months when supporting documentation lacks the specificity regulators expect.
Compliance guides from AWS Security Assurance Services
Start with the RMiT workbook to identify which provisions AWS addresses and which you implement. Then use the following compliance guides to design and implement your customer-side controls. The guides are implementation guidance for your teams. Audit evidence comes from two places. For AWS-side controls, use AWS third-party attestations, such as ISO certificates and System and Organization Controls (SOC) reports, available in AWS Artifact. For your workload, use evidence from your own environment, including configurations, logs, and AWS Config conformance pack results. Auditors can also use the guides as a reference for how a control is typically implemented on AWS.
AWS SAS has published five compliance guides over the past year. Each guide provides control-level implementation guidance on the customer side of the Shared Responsibility Model, showing how AWS services can be configured to meet the requirements of specific standards and frameworks. These guides were written by AWS SAS practicing security assessors and auditors holding Payment Card Industry Qualified Security Assessor (PCI QSA), Certified Information Systems Security Professional (CISSP), Certified Information Security Manager (CISM), ISO 27001 Lead Auditor, and Certified Cloud Security Professional (CCSP) certifications, drawing on experience from hundreds of cloud security assessments across financial services globally.
The following is the list of guides AWS SAS practicing auditors have published, which include control mapping information relevant to BNM RMiT:
A Malaysian financial institution preparing a BNM notification can use these resources together:
The RMiT workbook identifies which RMiT provisions are AWS responsibilities and which are customer responsibilities.
For AWS responsibilities, the workbook references the specific AWS Control Objective.
AWS third-party reports in AWS Artifact, such as the AWS ISO/IEC 27001 certificate and SOC reports, attest to those AWS Control Objectives. For customer responsibilities, the ISO compliance guides show how to implement the corresponding controls using AWS services.
The ISO 31000 guide can inform the risk management methodology you apply to your cloud workloads.
Compliance teams across Association of Southeast Asian Nations (ASEAN) financial services have already begun referencing the AWS Guide to BNM RMiT and associated resources in their cloud risk assessment processes and BNM notification documentation.
Looking ahead: AI governance
For institutions deploying generative AI and machine learning, ISO/IEC 42001:2023 (Artificial Intelligence Management Systems) is relevant to BNM technology governance expectations. In November 2024, AWS became the first major cloud provider to announce ISO/IEC 42001 certification for AI services. AWS passed its first surveillance audit in November 2025 with zero findings. The ISO 42001 compliance guide published in May 2026 supports institutions building their own responsible AI systems on their side of the AWS Shared Responsibility Model.
How to get started
Access the RMiT workbook through AWS Artifact and review with your compliance lead to identify which provisions apply to your material cloud workloads.
Download the relevant ISO compliance guides to plan how you implement your customer-side controls. Download AWS ISO certificates and SOC reports from AWS Artifact for AWS-side evidence.
Map your workload-specific controls using the workbook as the RMiT baseline and the ISO guides as implementation guidance.
Engage your AWS account team or AWS SAS for additional guidance on implementing customer-side controls referenced in the workbook.
As BNM updates its regulatory expectations, AWS will update these resources to reflect revised requirements. Subscribe to the AWS Security Blog for update notifications.
Exciting news for AI governance! Rapid7 has achieved ISO/IEC 42001:2023 certification for our Artificial Intelligence Management System (AIMS). The certificate was issued by Schellman Compliance, LLC, an ANAB accredited certification body, following an independent audit of how we govern the AI systems we develop in our role as an AI provider.
What is ISO/IEC 42001?
ISO/IEC 42001 is the first international management system standard for artificial intelligence. Where ISO/IEC 27001 focuses on information security, ISO/IEC 42001 focuses on how an organization governs AI. What exactly does “governing AI” mean? Essentially, it means how AI risks and impacts are assessed, how data is managed, how systems are monitored once they’re in production, and how humans stay in the loop across the AI lifecycle.
This certification means an accredited third party has audited our AIMS and confirmed that it aligns to the standard. To note, this isn’t a one-time exercise, as the certification is maintained through annual surveillance audits. This means our AI governance program is held to the standard for as long as the certificate is active.
Why is ISO/IEC 42001 certification important?
AI is continually evolving how security teams work, and it’s also causing teams to reconsider the questions they ask their vendors. Where does the model come from? What data does it use? Who reviews its outputs? How do we maintain the integrity and quality of our AI products?
ISO/IEC 42001 certification gives customers independent evidence that Rapid7 has a management system in place to address those questions. It demonstrates that the in-scope AI systems are developed and operated under a structured program covering risk assessment, transparency, human oversight, and accountability.
It also supports customers in their own governance work. Many organizations are building AI risk into their third party risk programs and preparing for frameworks and regulations such as the NIST AI Risk Management Framework and the EU AI Act. A vendor’s certified AIMS doesn’t replace a customer’s own due diligence, but it provides a credible, audited starting point.
As with cloud security, AI follows a shared responsibility model. Rapid7 is certified in the role of an AI provider, meaning we’re accountable for how we design, build, and operate these AI systems. Customers remain in control of how they use AI outputs within their own security operations.
Which AI systems are in scope?
The certification covers the AIMS supporting the following AI systems developed within Rapid7 products:
Agentic AI Workflow for MDR (Managed Detection and Response)
AI Dashboard Summary Card (Managed Detection and Response)
AI-Generated Risk Summaries (Exposure Command and Surface Command)
ICS Runtime Event Story (InsightCloudSec / Cloud Runtime)
Most of these are capabilities customers use directly within the product. Agentic AI Workflow for MDR supports Rapid7’s own SOC analysts as they investigate and respond on behalf of MDR customers.
What’s next?
ISO/IEC 42001 certification joins Rapid7’s existing security and compliance program, which includes ISO/IEC 27001, SOC 2, FedRAMP, IRAP, ENS, BSI C5, as well as U.S. and international cybersecurity regulations. Each is independently assessed against its own defined scope, with details available in the Rapid7 Trust Center (reach out to your Account Executive for access).
As our AI capabilities grow, our AI governance program will grow with them. As such, we’ll update this post if the scope of certification changes.
Customers can request a copy of the certificate through their Account Executive or Rapid7 representative. The certificate can also be independently verified in Schellman’s public certificate directory.
On June 10, 2026, CISA issued Binding Operational Directive 26-04, “Prioritizing Security Updates Based on Risk.” Strip away the regulatory language and it reads like a single operational fact: for a vulnerability that is actively exploited, publicly reachable, and grants an attacker full control, you now have three calendar days to remediate it — and you must run a forensic investigation in parallel to determine whether you’ve already been breached.
The 2026 Verizon Data Breach Investigations Report puts the industry’s median full-remediation time at 43 days, adding that only 26% of Known Exploited Vulnerabilities were fully remediated in 2025, down from 38% the year before. That’s a 43-day reality vs. a 3-day mandate; a gap you don’t exactly just close by hiring more workers.
This blog aims to break down what BOD 26-04 actually requires, mapping each point to the Rapid7 capability that helps to make compliance operationally achievable for all.
What did CISA actually change?
BOD 26-04 supersedes and revokes two prior directives: BOD 19-02 (2019), which prioritized internet-facing vulnerabilities by static CVSS score, and BOD 22-01 (2021), which created the Known Exploited Vulnerabilities (KEV) Catalog but applied a 14-day patch deadline to every entry regardless of context.
Note that flat timeline: under BOD 22-01, an actively exploited bug on an air-gapped internal server carried the same 14-day urgency as one on a public-facing web server granting full admin control. Teams burned cycles patching low-risk systems to satisfy a checklist. BOD 26-04 replaces that with a dynamic model: prioritize what attackers are actually exploiting, and formally defer what they aren’t.
The four variables to BOD 26-04
BOD 26-04 abandons CVSS as the sole trigger and evaluates every vulnerability against four binary variables, derived from the SSVC decision framework (CMU CERT/CC and CISA):
Asset Exposure: Is the asset reachable by untrusted entities over a public network?
KEV Status: Is the CVE on CISA’s Known Exploited Vulnerabilities Catalog?
Exploit Automation: Can an attacker automate the full exploit chain, enabling mass exploitation?
Technical Impact: Does successful exploitation grant Total control (arbitrary code execution, full/admin privileges) or only Partial control (limited access, information exposure, denial of service)?
Asset exposure is the highest-leverage variable. If you remove an asset from public reach, you flip the exposure variable from Yes to No, and the required timeline relaxes accordingly. Rapid7 Labs data underscores why exposure dominates: half of the vulnerabilities actively exploited in the wild in Q1 2026 were zero-click, network-facing issues requiring no authentication, and by Q2 2026 nearly two-thirds required no user interaction at all. Attackers are going straight at exposed, unauthenticated surfaces.
CISA’s new remediation tiers
The four variables combine into a graduated timeline (CISA BOD 26-04, Appendix A, Table 1). The tiers, simplified:
Tier
Timeline
Core criteria
1 (Critical)
3 days + forensic triage
On KEV and Total control
2 (High)
3 days (no triage)
Publicly exposed + Automatable + Total control, not yet on KEV
3 (Accelerated)
14 days
KEV-listed without Total control; or exposed + Partial control
4 (Standard)
60 days
Internal, automatable, Partial control
5 (Deferred)
Fix on next system upgrade
Internal + not KEV + not automatable + Partial control
Note that these timelines are dynamic. If a dormant vulnerability is added to the KEV, its clock can compress from 60 days to 3 overnight. Conversely, if you isolate an exposed asset, its clock relaxes. CISA explicitly counts isolation, mitigation, and uninstalling the vulnerable software as valid remediation; as such, a compensating control is a legitimate, compliant way to buy time for a safe patch.
The forensic triage mandate
This is the first of the requirements to have no precedent in earlier directives. For Tier 1 vulnerabilities (KEV + Total control), you must not only patch within three days, but run a concurrent forensic investigation to determine whether the asset is already compromised. Why? When an attacker exploits an exposed edge device, they establish persistence within hours; thus, patching three days later closes the door with the intruder already inside.
CISA’s implementation guidance lays out a six-step, 72-hour protocol:
Phase
Window
What happens
1. Scoping
0–2 hrs
Identify in-scope devices; activate response team; open out-of-band comms
2. Preserve evidence
2–24 hrs
Capture volatile data (RAM, cache, registries) before any change
3. Patch & stabilize
2–24 hrs
Apply patches only after evidence is collected
4. Contain
6–24 hrs
Isolate infrastructure without tipping off the attacker
5. Triage analysis
24–48 hrs
Hunt IOCs; look for lateral movement and data staging
6. Escalation decision
48–72 hrs
Formal report; if compromised, report to CISA and pivot to full IR
Note the built-in tension between Step 2 and Step 3: patching reboots systems and overwrites the exact volatile memory that proves or disproves a compromise. You have to capture forensic evidence before you patch — at speed, across every affected endpoint. Doing that manually inside 72 hours is not always realistic.
Who CISA’s BOD 26-04 applies to
BOD 26-04 is compulsory for all Federal Civilian Executive Branch agencies. It excludes national security systems and DoD/Intelligence Community systems.
It reaches the private sector indirectly, but firmly. Agencies must review contracts and push compliance onto supply-chain partners. For FedRAMP and cloud offerings, agencies stay responsible for their hosted systems’ compliance, which forces CSPs handling federal data to adopt the same 3-day triage standard. If you’re a contractor or CSP touching federal data, treat this as your standard too.
Mapping Rapid7 to the directive
Meeting a 3-day clock with mandatory forensics is impossible through manual process. Here’s how the Rapid7 Command Platform maps to each requirement.
Variable 1 (Exposure) → Surface Command
You can’t calculate a timeline if you don’t know what’s exposed. Surface Command combines Cyber Asset Attack Surface Management (CAASM) with External Attack Surface Management (EASM), correlating continuous external scanning against an internal asset inventory ingested from your existing tools. The result is a single view of your true external attack surface — including the shadow IT attackers can see but your team can’t. When it flags an exposed asset carrying a KEV-listed CVE, you can sever exposure to flip Variable 1 and de-escalate the timeline while you test the patch.
Variables 2 & 3 (KEV + Automation) → InsightVM and Active Risk
InsightVM tracks the KEV Catalog natively in its Threat Feed Dashboard, continuously updating which assets carry actively targeted vulnerabilities. Its Active Risk score — a 0–1,000 scale — moves beyond static CVSS by ingesting exploit intelligence from Metasploit, ExploitDB, the CISA KEV list, and Rapid7 Labs research. That mirrors the directive’s own logic: a CVSS 7.5 bug with a weaponized Metasploit module will outrank a CVSS 9.8 bug with no known exploit — exactly the prioritization BOD 26-04 demands.
The NVD scoring gap → Exposure Command AI CVSS
The National Vulnerability Database can’t keep pace with disclosure volume, leaving many CVEs unscored — a blind spot when a zero-day drops and you need a timeline immediately. Exposure Command fills it with an AI model trained on historical NVD data. On its own the model returns the correct severity classification 76% of the time; combined with Active Risk, that rises to 87%, with any miss never more than one classification off. Exposure Command also enriches every asset with business criticality and threat telemetry, and its Remediation Hub surfaces the fixes that cut the most risk.
The forensic mandate → Velociraptor
Velociraptor — the open-source DFIR project Rapid7 acquired in April 2021 — is built for exactly the scale and speed the triage mandate requires. It maps directly to the protocol: agents capture volatile memory and running-process data across thousands of endpoints simultaneously (Step 2), and analysts use Velociraptor Query Language to hunt CISA-provided IOCs enterprise-wide in real time, returning only relevant artifacts instead of pulling full disk images over the network (Step 5). That lets you satisfy the evidentiary requirement without delaying the Step 3 patch.
From severity to dollars
BOD 26-04 shares a core idea with modern risk management: technical severity isn’t business impact. A high CVSS score doesn’t answer the board’s question of “how likely is this to cost us?”
The FAIR framework closes that gap by expressing risk as expected annual loss: Annualized Loss Expectancy = Loss Event Frequency × Loss Magnitude
BOD 26-04 is effectively a mechanism for pinning down Loss Event Frequency: by isolating vulnerabilities that are exploited (KEV), reachable (exposure), and scalable (automation), it identifies the ones statistically most likely to become a loss event. Feed Active Risk into the frequency side and FAIR into the cost side, and you can brief leadership in the language of capital, not CVE IDs.
Authentication bypass enabling full takeover of remote-management endpoints
High-value management assets; total control; added to KEV August 2026
Checks shipped via content release; Velociraptor hunted endpoint artifacts to satisfy triage
What’s next for federal agencies and contractors?
If you’re an FCEB agency or a contractor or CSP handling federal data, the following three moves matter most:
Get exposure right. Everything downstream depends on knowing what’s publicly reachable. Establish continuous external-plus-internal asset visibility now.
Wire KEV into prioritization, not a spreadsheet. The clock starts the moment CISA updates the catalog. Ingestion has to be automated and continuous.
Pre-stage forensics. Decide today how you’ll capture volatile evidence across endpoints inside 72 hours. If that’s a manual runbook, it will fail under a real Tier 1 event.
CISA BOD 26-04’s bottom line
BOD 26-04 retires “patch everything” in favor of operational precision: remediate the actively exploited, exposed, high-impact vulnerabilities in 72 hours, prove whether you’ve already been breached, and defer the rest. Meeting it takes continuous asset discovery, live threat intelligence, context-aware prioritization, and forensics at scale — which is precisely the shape of the Rapid7 Platform. For federal agencies it’s a mandate; for everyone else, it’s the clearest blueprint yet for risk-based vulnerability management.
Sources: CISA BOD 26-04 and its implementation guidance; 2026 Verizon DBIR; Rapid7 2026 Global Threat Landscape Report and Q1/Q2 2026 threat data; Rapid7 product documentation for InsightVM, Active Risk, Surface Command, Exposure Command, and Velociraptor.
Issued nearly four years ago, the U.S. Cybersecurity and Infrastructure Security Agency (CISA) Binding Operational Directive 22-01 (BOD 22-01) has been adopted across both public and private sector organizations as a framework to ensure timely remediation of vulnerabilities being exploited by adversaries. By establishing a catalog of known exploited vulnerabilities (KEVs) and emphasizing a risk-based, prioritized approach, it provides a clear model for organizations to strengthen their cybersecurity posture and reduce exposure to real-world threats.
InsightGovCloud, Rapid7’s FedRAMP-authorized suite of security solutions, helps organizations implement BOD 22-01 by providing automated vulnerability scanning, real-time alerts for KEVs, and reporting aligned with regulatory requirements. Public and private sector teams can quickly identify at-risk assets, prioritize remediation efforts based on active exploitation, and maintain an auditable record of compliance. By leveraging our secure, cloud-based platform, organizations gain continuous visibility, streamlined vulnerability management, and the confidence that remediation aligns with federal cybersecurity standards.
How InsightGovCloud stacks up against key BOD 22-01 requirements
Requirement 1: Maintain continuous inventory and visibility
InsightVM, included in the suite, supports continuous and automated discovery of both external and internal assets through Discovery Connections, which allow organizations to continuously poll network sources like Active Directory, AWS, and Azure to enumerate connected hosts and launch scans.
For cloud environments, Rapid7 InsightCloudSec will continuously inventory the entire environment for the creation of new resources and automatically scan and assess those resources against compliance frameworks.
Rapid7 also maintains up-to-date inventory of CISA KEVs with an industry leading 90% coverage for both on-premise and cloud based host vulnerabilities.
Requirement 2: Remediate CISA KEV findings on a prioritized schedule
Continuous ingestion of CISA KEV catalog by Rapid7 ensures that detection and prioritization of KEV’s can be streamlined and native to one platform.
Automatically detect and triage assets with KEVs across cloud and hybrid environments.
Prioritize CISA KEV’s across your entire environment and establish remediation projects to quickly and collaboratively remediate KEVs.
Requirement 3: Establish policies and enforcement
Collaborative remediation and compliance goals automatically track and assign vulnerabilities to the right teams with organizational defined timelines and real time dashboards to measure progress.
Requirement 4: Automate reporting
Rapid7 has predefined exports in Cyberscope XML reporting format for seamless ingestion into reports for CyberScope submissions as per CyberScope Automated Data Feeds Submission Manual published by the U.S. Office of Management and Budget.
Built-in audit trail to demonstrate adherence with BOD 22-01.
Why agencies and contractors choose InsightGovCloud
Rapid7 InsightGovCloud is designed to support the rigorous requirements of state and local government agencies. The benefits are many, but among the top are its deployment into a FedRAMP Authorized environment – meeting federal security and compliance requirements at every level – its seamless integration into an existing security ecosystem, and its out-of-the-box alignment with CISA and CMMC security mandates.
Agencies and contractors enjoy a future-proof tool in that Rapid7 is continuously updating against the ever-growing KEV catalog, as well as unmatched visibility and control through leadership-friendly reporting. Get to know the platform better here.
We continue to expand the scope of our assurance programs at Amazon Web Services (AWS) and are pleased to announce the successful completion of our first ever Cloud High (PBHH) security assessment with 172 assessed services and features. Completion of this assessment, effective September 18, 2026, makes AWS the first cloud service provider (CSP) in Canada to meet this high security bar and provide assurance to our valued customers. This assessment also reaffirms our commitment to helping public and commercial customers achieve and maintain the highest-grade security standard for workloads with increased sensitivity.
What is the Cloud High assessment and why is it important?
The Cloud High security profile (that is, PBHH) seeks to enhance the integrity and availability of customer organizational workloads that are considered to have an increased level of sensitivity. These are systems that the Government of Canada (GC) and its service providers use to support delivery of services at a national scale or that are determined to be significant for handling sensitive information. The profile is based on the Security and privacy controls and assurance activities catalogue (ITSP.10.033). The Cloud High (PBHH) profile includes all controls and enhancements contained within the Cloud Medium profile (PBMM), with additional controls and enhancements to address higher integrity and availability requirements. The Cloud Medium and Cloud High profiles establish baseline security requirements for cloud services. These services support GC workloads and information processing up to the Protected B level.
As of September 18, 2026, there are a total of 172 AWS services and features that were assessed by the Canadian Centre for Cyber Security (CCCS) under Cloud High security assessment. The assessment covers services and features that are available in both the Canada (Central) and Canada West (Calgary) AWS Regions.
How can you access the assessment?
The summary assessment is available through AWS Artifact. You can also learn more about the Cloud High and Medium assessment on the AWS CCCS assessment compliance webpage.
AWS strives to continually bring services into scope of its compliance programs to help you meet your architectural and regulatory needs. Please reach out to your AWS account team if you have questions or feedback about the Cloud High and Medium assessments.
To learn more about our compliance and security programs, refer to AWS Compliance Programs. As always, we value your feedback and questions; reach out to the AWS Compliance team through the Contact Us page.
For ten days, auditors appointed by the Korea Internet & Security Agency (KISA) sat together with us and worked through 80 controls. That is what it took for a company headquartered in the United States, operating a global network serving Korean users, to be certified in South Korea. Cloudflare has now obtained South Korea's Information Security Management System (ISMS) certification under the ISMS-P framework.
For customers in Korea, this is more than a compliance checkbox. It is evidence that Cloudflare's security and privacy program has been examined not only for whether our controls exist, but for how they operate in the context of Korean law, the Korean language, and the particular expectations of Korean regulators.
What a Korean user sees when they sign up
The most visible result of this work is the Cloudflare account sign-up page. In most parts of the world, the line that sits above the sign-up button reads: "By continuing, I agree to Cloudflare's terms, privacy policy, and cookie policy."
A user signing up from South Korea sees something different. The Korean experience is triggered by the country selected at sign-up and by IP geolocation from within South Korea, and it breaks the same agreement into four separately labeled items, each marked required or optional, each linking to its full text, with an option to agree to all of them at once:
모두 동의 (Agree to all)
[필수] 서비스 약관 ([Required] Terms of Service)
[필수] 개인정보 수집 및 이용 ([Required] Collection and use of personal information)
[필수] 제한된 범위의 개인정보 해외 이전 ([Required] Transfer of a limited amount of personal information overseas)
[선택] 제한된 범위의 개인정보 제3자 제공 ([Optional] Sharing a limited amount of personal information with marketing third parties)
The three required items are hard gates. The sign-up button stays disabled until all three are checked, so there is no path through the form that creates an account without an affirmative action on each one. The optional item governs marketing permission only, and leaving it unchecked has no effect on the account creation (it merely opts the user out of receiving marketing communications).
The hard part: sign-up paths that never show a form
Itemizing consent on a form we control is straightforward. The difficulty was the sign-up paths that skip that form entirely.
Globally, you can create a Cloudflare account with Google, Apple, or GitHub. Those flows hand the user to an identity provider and return with an authenticated identity, and they never render our own sign-up form, which is precisely where the four consent items live. There is no step in that handoff where we can present three required items, link each to its full Korean text, and require an affirmative action on each before the account exists. The identity provider's screen is not ours to change.
We could either build a separate post-authentication consent gate for one country, or remove the paths that bypass the gate we already had. We chose the second. Social sign-up is not offered in South Korea, so every account created there goes through Cloudflare’s sign-up form, which enforces the required consents.
The country signal is the same one available to any Cloudflare customer. Cloudflare derives a two-letter country code from the client IP address and exposes it on the request, as the CF-IPCountry header at the origin and as request.cf.country inside a Worker. Reduced to its essentials, the branch is a string comparison:
// Illustrative: the shape of the check, not Cloudflare's own dashboard code.
export default {
  async fetch(request) {
    // Two-letter country code derived from the client IP.
    // Same value as the CF-IPCountry request header.
    // Cloudflare's network populates this on the incoming request, so there is
    // no geolocation database, lookup service, or extra round trip of our own.
    const country = request.cf?.country;

    if (country === "KR") {
      return renderSignUp({
        locale: "ko-KR",
        consent: "itemized",  // four separate items, three of them required
        socialLogin: false,   // no path that skips the consent form
      });
    }

    return renderSignUp({ locale: "en-US", consent: "combined", socialLogin: true });
  },
};
What that does not show is why the country code is not the whole trigger. We document the limits of IP geolocation: it is an estimate rather than an exact science, addresses rotate and change ownership, and it should not be the only signal where the use case is critical to meeting the objectives of a local requirement. A Korean resident traveling abroad, or behind a VPN or a mobile carrier's NAT, may not arrive with a Korean address. So IP-based geolocation decides which form appears by default, but the country a user selects at sign-up overrides that and carries the decision from there. The IP address tells us where a request came from; only the user can tell us where they reside. Keeping those two apart is what makes the consent meaningful rather than presumed.
It is a small feature. It took a country-level product decision, and a change to the account creation path.
What ISMS is and why it matters
ISMS is a detailed, localized certification standard. It covers security policy, access control, authentication and permission management, encryption, incident response, risk management, and disaster recovery, all assessed against how personal data actually moves through an organization's systems, and against Korea's Personal Information Protection Act and its associated regulatory guidelines.
Certification requires an independent audit by an auditor appointed by KISA, a governmental institution affiliated with the Ministry of Science and ICT (MSIT), followed by review from a special committee. It is valid for three years, with an annual audit required to maintain it.
The ISMS certification is primarily established under Article 47 of Korea's Act on Promotion of Information and Communications Network Utilization and Information Protection, etc., with the certification criteria and procedure set out in its Enforcement Decree and in the public notification on ISMS certification issued by MSIT.
What the audit examined
Cloudflare is already certified against ISO/IEC 27001, ISO/IEC 27701, ISO/IEC 27017, ISO/IEC 27018 and many other globally recognized frameworks. ISMS does not replace any of them. It is a localization of the same principles, layered with Korean regulatory requirements, and that changes what auditors look for and how they look for it.
The controls in scope started with the review of data flows. We presented detailed data flow diagrams showing every path by which employees could access personal information that Cloudflare collects, processes, and stores. The flows themselves are not Korea-specific. What was different was the form the evidence had to take: the auditors were not willing to work from a narrative description of how data moves, they wanted diagrams they could read and interrogate. For each one, they examined every access control layer and tested its effectiveness, across our internal systems, our public-facing websites, event pages, and the Cloudflare dashboard, covering the full lifecycle of a user's data from first interaction through to destruction. Those diagrams are not published here due to confidentiality.
The audit also scrutinized the language and terminology of our consent collection: the exact wording at sign-up, the structure of each notification, and whether the items were presented separately and clearly. That is the kind of detail the ISMS framework is designed to surface.
Why the timeline ran to a year and a half
Part of the answer is how audit cycles work. An ISMS audit covers a single annual period, and all evidence, documentation, and systems must reflect that period. Our preparation ran past one audit year and into the next, which meant retranslating updated policies for the new audit year, re-collecting and reassessing evidence, republishing an updated privacy policy, and absorbing formatting and design changes our marketing and website teams had introduced in the meantime.
What the certificate covers
KISA defines the certified scope as a service boundary rather than as an enumerated list of in-scope products. The Statement of Scope submitted to KISA describes that boundary in three parts:
the organizational and operational perimeter: the Cloudflare entities, teams, and processes that operate the service;
the infrastructure perimeter: the network and platform the certified service runs on;
the information assets and personal information flows that fall inside the boundary under the ISMS control set.
If a customer-consumed Cloudflare product is delivered through that certified service boundary, meaning it runs on the same certified platform, is operated by the same certified teams, and is governed by the same ISMS, it is covered by the certificate. The certificate is held by Cloudflare, Inc.
That is a different shape from the reports most procurement teams work with. A SOC 2 report or an ISO 27001 certificate describes the system it covers and names the services included, so coverage is confirmed by finding the product in that list. The ISMS certificate carries no such list. Coverage follows the delivery path instead, whether or not a product is named anywhere.
What this means for customers
For organizations operating in Korea, this gives legal, security, and procurement teams a local assurance benchmark alongside Cloudflare's broader compliance portfolio. ISO/IEC 27001 and SOC 2 demonstrate a general security posture. ISMS reflects Korea-specific legal and regulatory expectations. That distinction matters in third-party risk reviews and in preparing for a team’s own compliance assessments.
Cloudflare’s entry can be found on KISA's public register of certified organizations, which is the independent, verifiable confirmation to cite in a risk review. Broader privacy and data protection material sits on the Cloudflare Trust Hub.
The question that usually stalls a vendor review of Cloudflare is whether a particular product in use is in scope. The certificate does not answer that by name, because it lists no products. It answers by boundary, meaning that the product is in scope if it is delivered through the certified service.
For multinational teams managing security across regions, the certification confirms that Cloudflare's program has been reviewed against local requirements in one of Asia's most important digital markets, not just designed for global scale.
Building a better Internet, for everyone
ISMS is not a harder certification than the other assurance audits we go through. It is a more nuanced one. It is built around the regulatory needs of one specific region, and it asks for genuine investment in understanding and embedding those needs, rather than mapping them onto a common control framework.
Going through it made Cloudflare more global, not less. It pushed us to think carefully about what it means to serve users in a specific local context, with local language, local consent expectations, and local data protection requirements, and to put that into how the product behaves rather than only into a document.
That is consistent with what we are working toward: helping build a better Internet for everyone, not just in the regions where regulatory requirements are straightforward, but everywhere.
To learn more about Cloudflare's compliance and assurance programs, visit our Trust Hub.
You want to set a cryptographic algorithm policy and stop non-compliant choices from being made in your Amazon Web Services (AWS) environment. This post shows you how. As you adopt post-quantum cryptography, one of the first decisions you face is which algorithms and parameter sets fit your business needs, balancing security against signature size, key size, and performance. Your cloud environment’s job is to let you express that decision and enforce it consistently, so an approved choice stays fully usable while an excluded one cannot be introduced. This post works through one concrete example on AWS: taking an organization’s cryptographic algorithm policy and turning it into preventive and detective controls. The same patterns apply to whatever your approved set is today and whatever it becomes as standards evolve.
This post is Part 2 of a two-part series on quantum-resistant signing on AWS. Part 1, Build a software supply chain with ML-DSA, is for builders and constructs an end-to-end ML-DSA signing pipeline for binaries, container images, and software bills of materials. This part is for the security, governance, and compliance teams who decide which algorithms that pipeline, and everything else in the organization, is permitted to use, and who need that decision enforced.
AWS Key Management Service (AWS KMS) supports the ML-DSA digital signature scheme (FIPS 204) through three parameter sets, ML-DSA-44, ML-DSA-65, and ML-DSA-87, targeting NIST security categories 2, 3, and 5. All three are strong, standardized choices. Each one trades signature size, key size, and speed against security margin, the amount of cryptographic strength a parameter set holds in reserve above its target security category. ML-DSA-44 is the most compact and fastest. ML-DSA-65 and ML-DSA-87 carry a larger security margin, which is what you want for signatures that must stay trustworthy over a long lifetime.
Throughout this post, the examples use the same example policy: an organization that has standardized on ML-DSA-65 and ML-DSA-87 and wants ML-DSA-44 kept out of its approved set. That is a standardization decision, not a judgment that ML-DSA-44 is insecure (see the following note). Wherever you see ML-DSA-44 in the controls that follow, read it as the variant your policy doesn’t include; the mechanics are identical for any allow/deny split you choose. The approved set here is also the one the Part 1 architecture deploys: ML-DSA-87 for the root certificate authority (CA) and ML-DSA-65 for the subordinate CA and the code-signing key. Part 1 makes the choice; this post makes it stick.
Note: ML-DSA-44 is a valid choice. ML-DSA-44 is a fully NIST-standardized parameter set (FIPS 204) at NIST security category 2, which targets roughly 128-bit-class classical security (category 2 is benchmarked against the collision resistance of SHA-256). It produces the smallest signatures and public keys of the three variants (a 1312-byte public key and 2420-byte signature) and is the fastest to sign and verify, which makes it a strong fit for constrained devices, high-volume signing, and bandwidth- or storage-sensitive workloads. You would choose ML-DSA-65 or ML-DSA-87 instead to gain extra security margin for long-lived signatures or to align with an internal standard, not because ML-DSA-44 is weak.
What success looks like
The approved variants (ML-DSA-65 and ML-DSA-87 in the example) remain fully usable throughout. What you want to rule out is the introduction of a variant outside the policy (here, ML-DSA-44). Concretely, within the AWS service surfaces in scope, principals shouldn’t be able to:
Create ML-DSA-44 key material
Use existing ML-DSA-44 keys for signing or verification
Stand up private certificate authorities (CAs) that would introduce ML-DSA-44.
And any drift from those settings should be detected.
Certificate material brought in through acm:ImportCertificate or iam:UploadServerCertificate is also not algorithm-aware (see the Private CA section). Other TLS-terminating or signing services (for example Amazon CloudFront and Amazon API Gateway) and AWS IAM Roles Anywhere aren’t covered in this post and should be assessed separately. (Part 1 of this series uses IAM Roles Anywhere with ML-DSA certificates; controls for that service are out of scope here.)
These controls are intended to be applied as defense in depth. You can apply all of them or only a subset, depending on how prescriptive you want to be:
A blanket SCP at the organization root prevents member accounts from creating or using ML-DSA-44 keys. (SCPs don’t apply to the management account, so workloads there aren’t restricted.)
An SCP at a production organizational unit (OU) restricts keys only in production accounts.
If you need flexibility inside an account, use IAM permission boundaries instead of account-wide settings enforced through an SCP.
Choose the combination that matches your operating model. The policy examples here are written to apply across all AWS Regions. If you need to scope a control to specific Regions, add an aws:RequestedRegion condition.
The policies in this post are illustrative starting points. Authoring, validating, and maintaining the specific SCPs, IAM policies, and permission boundaries for your environment is your responsibility. Test all policies in a non-production environment before deployment and adjust example values (such as policy names and key Amazon Resource Names (ARNs)) to match your organization’s approved standards.
A note on cryptographic agility
Your algorithm policy isn’t fixed forever, and these controls shouldn’t be either. The point of expressing the policy as AWS controls is that you can revise it as your needs and the relevant standards change, tightening, loosening, or swapping the approved set without re-architecting. Treat the examples here as a template you adjust to whatever your current policy is.
A deny-based control that names specific algorithms is, in effect, an allow-list of everything it does not name. The risk is default-allow: any parameter set you have not explicitly denied is permitted, so a newly introduced variant, including one you have not yet evaluated, becomes usable until you notice it and add it to the deny list. Deprecation of an already-approved variant is easy to handle in this model, because you simply add the deprecated variant to the deny list. What the model does not catch on its own is the arrival of something new. Review these controls periodically and pair the deny-list with detection so a variant outside your policy surfaces quickly rather than waiting to be discovered.
The alternative is to write the condition against the approved set rather than the excluded one. A Deny that uses StringNotEquals with a list of approved key specs fires when the request’s key spec matches none of them, so a new or not-yet-evaluated variant is blocked by default until you add it. That closes the default-allow gap, at the cost of a policy update before anyone can use a newly approved variant. The family-level SCP in Part 1 of this series takes this shape: it denies creation of any signing key whose key spec isn’t ML_DSA_*. The examples in this post take the other shape and name the excluded variant, so that approved variants stay usable without a policy change. Both are valid. Choose based on whether you would rather block something new first and approve it later, or notice it first and decide then.
The StringLike clause scopes the statement to ML-DSA key specs so it doesn’t affect other key types; the StringNotEquals clause denies any ML-DSA variant outside the approved list.
Just as algorithms and key sizes will be introduced over time, or move from approved to unapproved, so will AWS service operations. The set of operations through which an ML-DSA-44 key can be used today (AWS KMS Sign, Verify, and GetPublicKey) reflects current service capabilities and might expand as AWS releases new features. If your policy is to block use in addition to creation, you should periodically review the list of operations you restrict, because services evolve over time.
Background: Key spec compared to signing algorithm
AWS KMS support for ML-DSA introduces three key specs—ML_DSA_44, ML_DSA_65, and ML_DSA_87—that all use a single post-quantum signing algorithm: ML_DSA_SHAKE_256. This distinction drives which controls are effective.
kms:KeySpec: Reflects the KeySpec property of the key. It’s evaluated both on CreateKey (the requested key spec) and on AWS KMS key resource operations that act on a specific key, including Sign, Verify, and GetPublicKey. This makes kms:KeySpec a reliable lever for both preventing creation of ML-DSA-44 keys and restricting use of existing ones, because it can single out ML_DSA_44 from ML_DSA_65 and ML_DSA_87.
kms:SigningAlgorithm: Reflects the signing algorithm supplied on Sign and Verify, which is ML_DSA_SHAKE_256 for all three variants. It therefore can’t distinguish ML-DSA-44 from the approved variants and shouldn’t be used for this purpose.
The practical consequence: for keys held in AWS KMS, preventing ML-DSA-44 key material from being created is the most robust single control. If no ML-DSA-44 KMS keys exist, none can be used for signing through AWS KMS and none can become the subject key of a certificate. CA keys and TLS server keys are separate material: AWS Private CA generates and holds a CA’s key pair in its own HSMs, and ACM-issued, imported, or uploaded TLS certificates carry their own keys, so those surfaces are governed by the AWS Private CA and certificate controls later in this post. Where ML-DSA-44 KMS keys already exist, their use can additionally be restricted with kms:KeySpec.
Organization and account-level blocking using SCPs
SCPs can be applied at the organization root or to a specific OU to restrict ML-DSA-44. Placement determines the effective scope: it applies organization-wide when attached at the root; attached to an OU, it applies to the accounts within that OU. An SCP is the broadest-scope preventive control available.
Note that SCPs apply to member accounts and OUs but not to the organization’s management account, so avoid running ML-DSA-44-capable workloads in the management account, where an SCP will not restrict them.
The following example SCP denies both the creation of ML-DSA-44 keys (kms:CreateKey) and their use (kms:Sign, kms:Verify, kms:GetPublicKey), matching on the ML_DSA_44 key spec in each case. The creation deny stops new keys from being created; the usage deny covers keys that already exist, whether created before the SCP was attached or living in an account that later joins the OU, because kms:KeySpec is also evaluated at request time on those usage operations.SCPs are guardrails: a Deny in an SCP can’t be overridden by any IAM policy within member accounts.
Attach the following SCP at the organization root (or relevant OU):
Scope the usage deny to the three key-spec-aware actions. Limit the use of Deny to kms:Sign, kms:Verify, and kms:GetPublicKey (testing confirmed kms:KeySpec is evaluated on all three). Avoid a blanket kms:*: a wildcard that would also catch management operations such as DescribeKey, DisableKey, and ScheduleKeyDeletion, which you need to inspect or clean up those same keys, effectively locking you out of managing the keys you’re trying to remove. If you use multi-Region keys, also add kms:ReplicateKey to the creation deny: replicating an ML-DSA-44 primary key creates a new ML-DSA-44 key in another Region, and kms:KeySpec is evaluated on ReplicateKey as well.
Combining with a family-level guardrail. This SCP governs which ML-DSA parameter set is allowed; it says nothing about RSA or ECDSA. Part 1 of this series includes a complementary SCP that denies creation of any signing key whose key spec isn’t ML-DSA. Attached together, they require every new signing key to be ML-DSA and to be an approved variant.
Operational considerations. A blanket Deny at the organization root is the strongest control but has trade-offs: it removes any ability to create ML-DSA-44 keys anywhere in scope, with no exception path, which can block legitimate testing and might cause infrastructure as code (IaC) or pipeline runs that attempt ML-DSA-44 creation to fail. To preserve flexibility, consider scoping the Deny to a production OU and using IAM permission boundaries (see the following section) in build and non-production accounts.
What the caller sees. When an SCP denies a request, the caller receives an AccessDenied error indicating an explicit deny in a service control policy. For same-account and same-organization requests, the error includes the type of the denying policy and, as the enhanced error messages roll out across services, its ARN. The error doesn’t expose the SCP policy contents, and the user being blocked often can’t see the SCPs applied to their environment. Document the SCP ARN and its purpose internally so support teams can map an AccessDenied quickly.
Prevent ML-DSA-44 key creation in AWS KMS (principal-level)
The following IAM policy blocks ML-DSA-44 at the principal level. It is the identity-based counterpart to the SCP shown earlier, useful when you want per-account or per-role control rather than an organization-wide guardrail. Attach it to the IAM role or user you want to constrain.
The condition value is ML_DSA_44 (underscores, not hyphens).
This policy blocks CreateKey only. To also block use of existing ML-DSA-44 keys at the principal level, add the Sign, Verify, and GetPublicKey deny shown in the Restricting use of existing ML-DSA-44 keys section.
For comprehensive, non-overridable coverage, deploy as an SCP rather than relying solely on principal-level policies.
IAM permission boundaries
IAM permission boundaries set the maximum permissions an identity-based policy can grant to an IAM role or user and can be used as an alternative or complement to using SCPs. The effective permissions are the intersection of the identity-based policy and the boundary, and a Deny in a boundary can’t be overridden by an attached policy. Boundaries are useful where you want per-account or per-role flexibility (for example, in build or non-production accounts) rather than a blanket, multi-account deny.
Operational consideration. A permission boundary only takes effect on principals that have it attached. To rely on boundaries as a control, you need a mechanism to enforce the boundary on all IAM principals programmatically. One example enforcement mechanism would be an SCP that denies iam:CreateRole, iam:CreateUser, iam:PutRolePermissionsBoundary, and iam:PutUserPermissionsBoundary unless the approved boundary is set (using the iam:PermissionsBoundary condition key), and denies iam:DeleteRolePermissionsBoundary and iam:DeleteUserPermissionsBoundary outright so the boundary can’t be removed after the fact. You would also want to probe for non-conforming principals periodically and respond, perhaps by automatically attaching the PermissionsBoundary. IAM users shouldn’t be used, but the enforcement should account for the possibility that they exist.
Because a boundary only sets a ceiling and does not itself grant anything, it opens with Allow on all actions, then denies ML-DSA-44 key creation specifically. The following permission boundary denies creation of ML-DSA-44 keys:
To also block use of existing ML-DSA-44 keys for the principals carrying this boundary, add the Sign, Verify, and GetPublicKey deny statement shown in the following section (which also uses kms:KeySpec).
Restricting use of existing ML-DSA-44 keys
As described in the Background section, kms:KeySpec is also evaluated on Sign, Verify, and GetPublicKey, reflecting the KeySpec of the key being used. You can therefore deny those operations when kms:KeySpec equals ML_DSA_44 while continuing to permit ML_DSA_65 and ML_DSA_87. The IAM policy below, attached to an IAM principal, does exactly that.
This deny can also live in an AWS KMS key policy. The same kms:KeySpec deny can be placed directly in the key policy of an AWS KMS key. A key policy is a resource policy, so the statement must include a Principal element. Identity policies and SCPs do not name principals to which they apply. A deny in the key policy is a resource-side backstop that protects a specific key, while an SCP gives non-overridable organization-wide coverage. To turn the previous example into an AWS KMS key policy, add a Principal element to the statement (for example "Principal": {"AWS": "*"}, or a more specific principal), and keep the rest of it the same.
Additional approaches
Depending on your goals you might also want to remove the key material itself rather than only deny its use. Remember that it is difficult to know what data has been signed by a specific key, unless you track that somehow. Deleting a key that was used will make signature verification impossible. Take great care to make sure keys are not used before deleting them.
Disable or schedule deletion of the keys. Disabling stops key use immediately and is reversible. Key deletion is definitive but irreversible after the waiting period, so confirm before scheduling.
Deny Sign, Verify, and GetPublicKey by specific key ARN. You can target named keys rather than the whole key spec. To do this, you would list the exact key ARNs in the Resource element of the IAM policy (no condition key required). This is effective for targeting a single key specifically, but it is difficult to maintain lists of key ARNs. Use this strategy sparingly. If you’re considering using an IAM policy naming a key ARN, remember that a Deny in the key policy of the target key accomplishes the same goal and is attached to the key itself.
Finding existing keys (only needed if you disable or delete). A Deny in an IAM policy or SCP, based on kms:KeySpec, doesn’t require you to know which keys exist – it applies by key spec at request time. If you want to disable or delete existing ML-DSA-44 keys, you need to locate them. AWS KMS has no server-side filter for key spec, so you must enumerate keys with ListKeys and call DescribeKey and inspect each KeySpec. This client-side filtering pattern is common across AWS APIs and is well supported by pagination in the AWS SDKs. You can also use AWS Config to record and query KMS key resources.
Approved ML-DSA variants and control of AWS Private CA
AWS Private CA sets a certificate authority’s (CA’s) signing algorithm at creation time, in the CertificateAuthorityConfiguration parameter of CreateCertificateAuthority (valid values include ML_DSA_44, ML_DSA_65, and ML_DSA_87). There is currently no condition key for the algorithm, so an SCP cannot enforce signing algorithm. The approach in this section controls who can create CAs and pins the algorithm in that trusted path, backed by AWS CloudTrail-based detection.
Recommended approach
Restrict who can create CAs. Deny acm-pca:CreateCertificateAuthority broadly via SCP, and allow it only for a small set of trusted roles or an approved provisioning pipeline. This removes the ability for arbitrary principals to stand up a CA with an unapproved algorithm.
Pin the algorithm in the trusted path. Have that approved pipeline or infrastructure-as-code template hard-code SigningAlgorithm to ML_DSA_65 or ML_DSA_87 in CertificateAuthorityConfiguration. Because AWS Private CA exposes no algorithm condition key, this provisioning path is the enforcement point. Note that the CA’s algorithm pins the signature on the certificates it issues; the subject key in each certificate comes from the CSR, which AWS Private CA copies without validating its algorithm, so pin the CSR key algorithm in the same issuance pipeline.
Control the trust chain. On the PKI side, only add approved CAs to your trust stores and issuance hierarchies, and do not trust or subordinate CAs that could issue ML-DSA-44. This prevents an unapproved CA from being introduced into a trusted path.
Detect drift. Use CloudTrail to capture CreateCertificateAuthority calls and AWS Config to flag any CA whose configuration uses ML_DSA_44, so an unapproved CA is caught quickly.
Part 1 of this series shows what this looks like in practice: it creates an ML-DSA-87 root CA and an ML-DSA-65 subordinate CA with CreateCertificateAuthority, activates them, and distributes the resulting chain to verifiers. In the model described here, those are the calls that only your approved provisioning pipeline is allowed to make.
Setting the ML-DSA value in CertificateAuthorityConfiguration. The same variant goes in both the KeyAlgorithm and SigningAlgorithm fields (for example, KeyAlgorithm=ML_DSA_65 with SigningAlgorithm=ML_DSA_65). Note a difference in signing algorithms between AWS KMS and AWS Private CA. With AWS Private CA, the SigningAlgorithm takes the variant value directly (ML_DSA_44, ML_DSA_65, and ML_DSA_87), and doesn’t accept ML_DSA_SHAKE_256. In contrast, AWS KMS uses ML_DSA_SHAKE_256 as its signing algorithm. Be aware that some older AWS Command Line Interface (AWS CLI) builds omitted descriptions of the ML-DSA variants from the built-in CLI help, so don’t rely on the help in the AWS CLI to determine valid values. For more information, see CertificateAuthorityConfiguration API Reference.
Known limitation. Some surfaces have no algorithm condition key, so you enforce them through provisioning and detection rather than policy. acm-pca:CreateCertificateAuthority has no condition key for the algorithm, and acm:ImportCertificate and iam:UploadServerCertificate are not algorithm-aware, so a disallowed signature setting on a created, imported, or uploaded certificate cannot be blocked by an IAM policy or SCP condition. Govern these through your provisioning process, restrict who can call them, and deny the import and upload actions entirely where they are not required. The controls above remain the available mitigation.
In particular, iam:UploadServerCertificate doesn’t support any method to prevent use of particular algorithms, and AWS doesn’t recommend using this API to generate and upload certificates. This API predates ACM and exists mainly to cover AWS Regions or partitions where ACM is not yet available. While a new Region or partition is being built out, workloads can still need a TLS server certificate before ACM support has shipped there, and uploading a certificate to IAM gives you a place to store and reference it in the meantime. Once ACM is available in that Region, you should use ACM instead. Outside that narrow case, deny iam:UploadServerCertificate unless it is genuinely required.
ACM-issued leaf certificates. A CA’s own key and signing algorithm are separate from the leaf certificates that ACM issues from it. If you use ACM to request leaf certificates, you can constrain the leaf’s key algorithm with the acm:KeyAlgorithm condition key on acm:RequestCertificate. This lets you allow-list approved algorithms for leaf certificates using SCPs or IAM policies, similar to the AWS KMS examples earlier in this post. Be aware that, at the time of writing, ACM doesn’t offer ML-DSA leaf certificates. So a policy like this is a forward-looking defense-in-depth control rather than an immediate ML-DSA-44 risk. The IAM example below is illustrative (using example approved algorithms). Since this is an evolving part of the service, be sure to validate this in your environment before relying on it.
This example uses StringNotEqualsIfExists so it denies only requests that specify a disallowed algorithm. With plain StringNotEquals, a request that omits acm:KeyAlgorithm would also be denied, because the missing key makes the condition evaluate true. Choose the operator that matches whether you want to block requests that leave the algorithm unspecified.
Prevent ML-DSA-44 usage in TLS for NLB and ALB
Elastic Load Balancing, for both network load balancers (NLB) and application load balancers (ALB), terminates TLS on behalf of your applications. The certificates used by these listeners are requested through or imported into ACM, or uploaded to IAM. A listener’s configured security policy and its certificate determine what’s offered during negotiation. At the time of writing, ACM requests and imports accept RSA and ECDSA keys only, and NLB and ALB listeners accept RSA and ECDSA certificates only, so no ML-DSA certificate can be bound to a listener today. As with the ACM leaf-certificate policy earlier, the controls in this section are forward-looking defense in depth rather than a mitigation of an immediate ML-DSA-44 risk.
Certificate controls (the effective mechanism for ML-DSA-44)
Because the listener API calls reference a certificate only by ARN, you can’t write an SCP on CreateListener, ModifyListener, or AddListenerCertificates that inspects the certificate’s algorithm. IAM conditions can’t reference attributes of a separately-referenced resource. Keeping ML-DSA-44 out of TLS therefore relies on there being no ML-DSA-44 certificate material to associate:
Configure your private CA to issue only ML_DSA_65 or ML_DSA_87 certificates, and control who can create CAs.
Prevent ML-DSA-44 key creation in AWS KMS, so that no KMS-held ML-DSA-44 key can become the subject key of a certificate. TLS server keys for ACM-issued, imported, or uploaded certificates are not KMS keys; those are governed by items 1 and 3.
Control imported and uploaded certificates through your provisioning process or deny the import and upload actions where not required, as described in the AWS Private CA section.
Detective controls
CloudTrail records the certificate and listener API calls in this section: certificate creation and import (acm-pca:CreateCertificateAuthority, acm:ImportCertificate, iam:UploadServerCertificate) and listener configuration (CreateListener, ModifyListener, AddListenerCertificates). Whether the algorithm shows up in the event depends on what the call itself carries. Creation calls that take the algorithm as an input record it: kms:CreateKey logs the KeySpec, and acm-pca:CreateCertificateAuthority logs the signing algorithm. That makes CloudTrail effective for catching the creation of ML-DSA-44 key material or a CA. A listener binding references its certificate only by ARN, so the certificate’s algorithm does not appear in that event. To evaluate the algorithm of a bound or imported certificate, use AWS Config resource evaluation as the detective backstop.
Summary for TLS
The primary preventive control is the certificate material itself: with no ML-DSA-44 CA, no ML-DSA-44 KMS key, and certificate import and upload controlled, no ML-DSA-44 certificate can be issued or bound. Where you also operate an allow-list of permitted TLS security policies, the elasticloadbalancing:SecurityPolicy condition key (on CreateListener and ModifyListener) can additionally constrain which TLS policies listeners can use.
Summary of controls
The following table maps the example policy (allow ML-DSA-65 or ML-DSA-87, exclude ML-DSA-44) to the available controls. Modify the controls to limit use to the approved set of algorithms your policies require.
Area
Control
Status
Block ML-DSA-44 key creation (Organization-wide or for all accounts in an organization OU)
SCP on kms:CreateKey using kms:KeySpec
Fully supported via condition key
Block ML-DSA-44 key creation (per account or per role)
IAM policy or permission boundary using kms:KeySpec
Supported; requires programmatic enforcement of boundaries
Block use of existing ML-DSA-44 keys
Deny Sign, Verify, and GetPublicKey using kms:KeySpec (key policy, IAM, or SCP); optionally disable and delete keys
Supported using kms:KeySpec (not kms:SigningAlgorithm)
Only allow approved variants in Private CA
Restrict who can create CAs; pin ML_DSA_65 or ML_DSA_87 in provisioning path
No algorithm condition key; enforce using process and detection
Limit variants in imported or uploaded TLS certificates
Process controls, or deny import or upload APIs (prefer ACM over iam:UploadServerCertificate)
APIs aren’t algorithm-aware
Block use of ML-DSA-44 in TLS with network load balancers (NLB) and application load balancers (ALB)
Restrict TLS policy using elasticloadbalancing:SecurityPolicy; control cert material
TLS-policy restriction supported; no per-cert algorithm condition
Detect use of unapproved variants
CloudTrail (API-level) and AWS Config custom rules
Supported using custom AWS Config rules; not managed rules
Conclusion
In this post, you learned how to use ML-DSA as an example of turning a cryptographic algorithm policy into enforceable AWS controls. The key lever is the kms:KeySpec condition key: it keeps your approved parameter sets (ML-DSA-65 and ML-DSA-87) fully usable while preventing the creation and use of a parameter set you’ve excluded (ML-DSA-44) on the CreateKey, in addition to the Sign, Verify, and GetPublicKey operations, where kms:SigningAlgorithm can’t tell the variants apart. Applied as defense in depth across SCPs, IAM policies, permission boundaries, and KMS key policies, and extended to the surfaces that have no algorithm condition key (AWS Private CA, certificate import, and Elastic Load Balancing TLS) through provisioning controls plus AWS CloudTrail and AWS Config drift detection, these controls give you a consistent way to keep an unapproved variant out of your accounts.
The pattern isn’t specific to ML-DSA-44. Because your algorithm policy will change as standards and your own requirements evolve, treat these controls as a reusable template and re-point the same condition keys and guardrails at whatever your approved set becomes. This adaptability is the practical meaning of cryptographic agility: changing what you allow without re-engineering how you enforce it.
To see the workloads these controls govern, read Part 1 of this series, which builds a complete ML-DSA signing pipeline, from key creation and PKI through artifact signing and verification, using the approved set enforced here.
Software supply chain attacks have grown in both frequency and sophistication. Recent high-profile compromises of build systems and open source dependencies demonstrate that attackers increasingly target the trust mechanisms that verify software integrity. Those trust mechanisms rely on digital signature algorithms, and today many use traditional algorithms such as Rivest-Shamir-Adleman (RSA) and the Elliptic Curve Digital Signature Algorithm (ECDSA). If a sufficiently powerful quantum computer could forge these signatures, an attacker could potentially inject unauthorized code into signed artifacts, fabricate build attestations, or impersonate legitimate publishers. Using quantum-resistant signatures today defends against threats that might emerge in the future.
Since 2025, the Commercial National Security Algorithm Suite 2.0 (CNSA 2.0), published by the US National Security Agency (NSA), has required US National Security Systems (NSS) to “support and prefer” quantum-resistant signatures for software and firmware, with exclusive use mandated by 2030. The EU Cyber Resilience Act (CRA) takes full effect in December 2027. It requires manufacturers to maintain verifiable software integrity throughout a product’s lifecycle. Organizations that ship software to US federal agencies or sell products in the European market face converging deadlines that demand action now.
This post is Part 1 of a two-part series on adopting ML-DSA signatures, standardized in NIST FIPS 204 (ML-DSA) signatures, on AWS. As of Oct 2026, this series is the first end-to-end guide from any cloud provider for post-quantum signing across the software supply chain, from establishing an ML-DSA root of trust to enforcing algorithm policy across an organization. This part is for builders and walks through constructing and operating the signing pipeline. Part 2, Enforce your ML-DSA algorithm policy with SCPs and IAM, is for security and governance teams and shows how to turn the algorithm choices made here into preventive and detective controls across an organization.
Understanding the harvest now, forge later threat
After a cryptographically relevant quantum computer (CRQC) exists, the mathematical problems protecting today’s public-key cryptography can be solved efficiently. Attacks that are impractical today because of the computational complexity suddenly become practical using a CRQC. Most discussions of post-quantum cryptography (PQC) focus on the harvest now, decrypt later threat to data confidentiality. The asymmetric keys protecting data in transit can be efficiently derived using a CRQC, exposing the data that was meant to be protected. Digital signatures rely on the same asymmetric mathematical problems that a CRQC would break. This means that software supply chains face a parallel threat that targets integrity rather than confidentiality. An attacker who records signed artifacts today can forge those signatures in the future on a totally different artifact, using a CRQC.
Consider firmware signed with ECDSA P-256 and deployed to a fleet of embedded devices in 2026. These devices verify the firmware signature on every boot for their 15-year operational lifetime and can’t be recalled to re-sign after deployment. If a CRQC becomes operational in 2035, an attacker could produce a valid-looking signature over tampered firmware, and every device in the fleet would accept it as authentic on next restart. For organizations that rely on classical digital signatures as the primary mechanism for verifying software integrity, this weakens a critical link in the verification chain. This is why CNSA 2.0 specifies aggressive timelines for digital signatures: the artifacts you sign today must remain trustworthy for their full operational lifetime.
ML-DSA is designed to resist attacks from both classical and quantum computers. AWS KMS, AWS Private CA, and AWS IAM Roles Anywhere all support ML-DSA, making it possible to address the forge-later threat across your supply chain today without additional tooling.
Architecture overview: Five pillars of a quantum-resistant supply chain
The architecture comprises five trust pillars that together protect your software delivery pipeline:
ML-DSA key management in AWS KMS – All signing keys are generated and protected in FIPS 140-3 Security Level 3 hardware security modules (HSMs). Private keys never leave the HSM boundary.
ML-DSA public key infrastructure (PKI) throughAWS Private CA – A certificate hierarchy (root CA, subordinate CA, end-entity certificates) binds ML-DSA public keys to identities, establishing who signed what. CA private keys are generated and stored in hardware-protected HSMs managed by the service and never leave the HSM boundary.
Quantum-resistant workload identity (for external build agents) – For continuous integration and delivery (CI/CD) agents running outside AWS that authenticate through X.509 certificates, IAM Roles Anywhere with ML-DSA certificates ties the signer’s identity back to the same quantum-resistant root of trust.
ML-DSA SBOM integrity attestation – The SBOM for each release is wrapped in an in-toto Statement that names the artifact it describes by digest, and the Statement is signed with the same ML-DSA code-signing key. This provides quantum-resistant proof that the dependency manifest hasn’t been tampered with and that it belongs to the artifact it accompanies.
These pillars create a chain of trust: AWS Private CA protects the root CA key in its own HSMs, issues certificates that bind identities to AWS KMS code-signing keys, IAM Roles Anywhere uses those certificates to authenticate build agents, and authenticated agents sign every artifact and SBOM they produce.
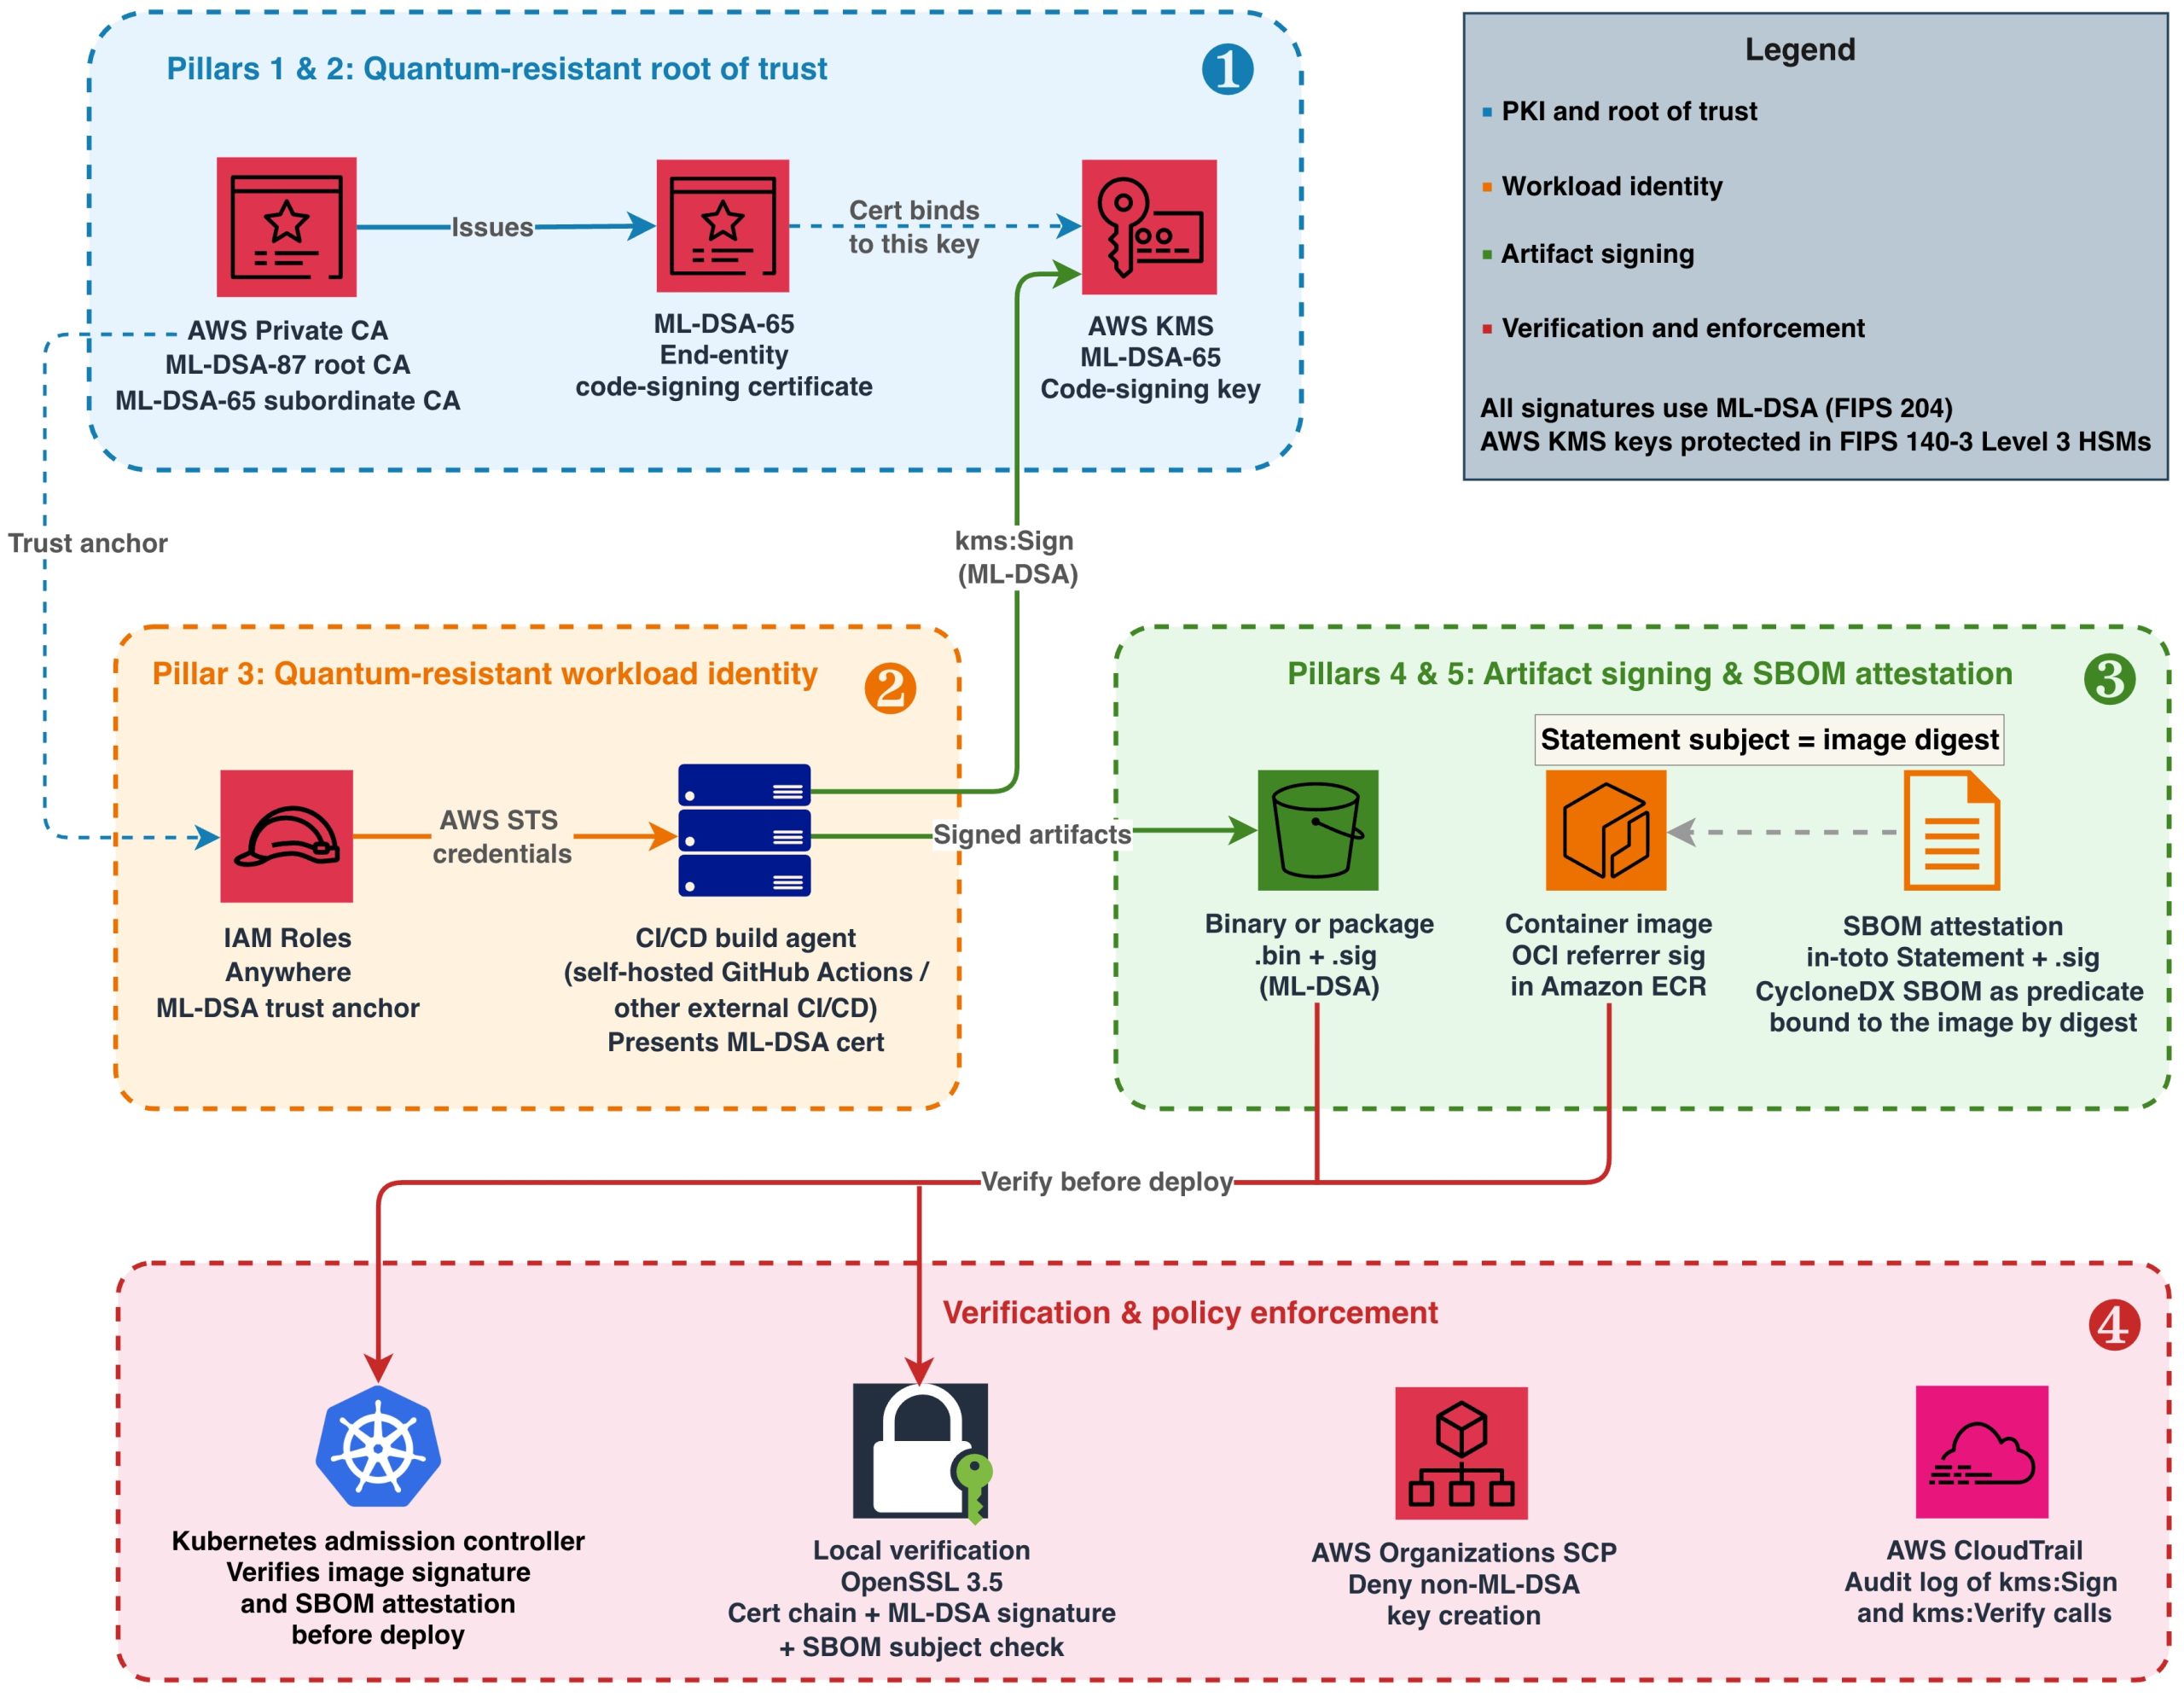
Figure 1: End-to-end quantum-resistant software supply chain on AWS
Figure 1 illustrates this architecture in four layers, numbered in the order you build them:
Root of trust (Pillars 1 and 2) – Establish your AWS Private CA hierarchy and create your code-signing key in AWS KMS.
Workload identity (Pillar 3) – Register the CA as an IAM Roles Anywhere trust anchor and issue ML-DSA certificates to build agents, ensuring the signer’s identity chains back to the same quantum-resistant root of trust.
Artifact signing (Pillars 4 and 5) – Sign binaries, container images, and SBOMs using the authenticated build agent.
Verification and enforcement – Validate signatures at deployment and enforce ML-DSA-only policies.
Prerequisites
To follow along, you need:
An AWS account with permissions to create resources in AWS KMS, AWS Private CA, IAM Roles Anywhere, and Amazon ECR.
IAM Roles Anywhere credential helper (aws_signing_helper) v1.8.0 or later, the first release that supports ML-DSA keys and certificates, for workload authentication. Download from the IAM Roles Anywhere documentation.
OpenSSL 3.5 or later (required for ML-DSA signature verification and mu computation).
ORAS CLI v1.2 or later (for attaching Open Container Initiative (OCI) referrer artifacts to container images). Alternatively, you can use the Notation CLI with a custom plugin or any OCI-compliant client that supports the OCI Referrers API.
jq, for constructing and parsing the in-toto Statements used for SBOM attestation and for parsing ORAS output.
Amazon Inspector SBOM Generator (Sbomgen), or another tool that produces a CycloneDX JSON SBOM, for the SBOM example. Sbomgen runs only on Linux (x86-64 and ARM64), so run that step on a Linux build agent or container. It uses the registry credentials that oras login stores in the Docker config file, and it also accepts them through --username or the INSPECTOR_SBOMGEN_USERNAME and INSPECTOR_SBOMGEN_PASSWORD environment variables.
Java 11 or later and Apache Maven, to run the diy-code-signing-kms-private-ca sample that produces the code-signing CSR in Step 4 of Building the ML-DSA PKI foundation.
A container image pushed to Amazon ECR (for the container signing example).
Building the ML-DSA PKI foundation
Start by creating the certificate hierarchy that will anchor your supply chain trust. AWS Private CA generates and stores its own CA signing keys internally in hardware-protected HSMs when you create a certificate authority. Use ML-DSA-87 (NIST security category 5, defined as at least as hard to break as exhaustive key search on AES-256) for the root CA because it protects the longest-lived trust anchor. Use ML-DSA-65 (NIST security category 3) for the subordinate CA to balance security with smaller signature sizes for frequently issued certificates.
The parameter sets used here, ML-DSA-87 and ML-DSA-65, are also the approved set in the example algorithm policy that Part 2 of this series turns into enforceable controls. If your organization has standardized on a different set, substitute it in the commands that follow; the build steps don’t change.
Step 1: Create the root CA in AWS Private CA
When you specify KeyAlgorithm: ML_DSA_87, Private CA generates an ML-DSA-87 key pair internally. You don’t need to create a separate AWS KMS key for the CA.
After creation, the root CA is in PENDING_CERTIFICATE state. Activate it by self-signing its certificate. This is where you set the root CA’s validity period (10 years is typical for a root):
After creation, the subordinate CA enters PENDING_CERTIFICATE state with no link to the root. Activate it by signing its certificate signing request (CSR) with the root CA:
# Retrieve the subordinate CA's certificate signing request
aws acm-pca get-certificate-authority-csr \
  --certificate-authority-arn <sub-ca-arn> \
  --output text > sub-ca.csr

# Sign the CSR using the root CA (this establishes the trust hierarchy)
SUB_CERT_ARN=$(aws acm-pca issue-certificate \
  --certificate-authority-arn <root-ca-arn> \
  --csr fileb://sub-ca.csr \
  --signing-algorithm ML_DSA_87 \
  --validity Value=1825,Type=DAYS \
  --template-arn arn:aws:acm-pca:::template/SubordinateCACertificate_PathLen0/V1 \
  --query CertificateArn --output text)

# Retrieve the signed certificate and import it to activate the subordinate CA
aws acm-pca get-certificate \
  --certificate-authority-arn <root-ca-arn> \
  --certificate-arn $SUB_CERT_ARN \
  --query Certificate --output text > sub-ca-cert.pem

aws acm-pca import-certificate-authority-certificate \
  --certificate-authority-arn <sub-ca-arn> \
  --certificate fileb://sub-ca-cert.pem \
  --certificate-chain fileb://root-ca-cert.pem
Step 3: Create the code-signing key in AWS KMS
Your build agents use this key to sign artifacts, so their IAM roles need the kms:Sign permission on it. The end-entity certificate issued by your subordinate CA binds an identity to this key’s public key.
Step 4: Issue the end-entity code signing certificate
To issue a certificate, you need a CSR. Because the ML-DSA private key never leaves the AWS KMS HSM, you can’t generate the CSR locally with OpenSSL. Instead, you construct the CSR’s TBS (to-be-signed) structure containing your subject name and public key, sign it remotely by calling aws kms sign, and assemble the final CSR from those components.
For a working implementation that assembles an ML-DSA CSR around a KMS-managed private key and signs it with AWS KMS, see Post-quantum (ML-DSA) code signing with AWS Private CA and AWS KMS and its diy-code-signing-kms-private-ca sample on GitHub (Java, built with Maven). There is no AWS CLI-only path for this step: the CSR must be constructed and signed in code, and the sample is the reference implementation.
After you have the code-signing.csr file, issue the certificate from your subordinate CA:
# Issue a code-signing certificate valid for one year, signed by the subordinate CA using ML-DSA-65.
# Replace <sub-ca-arn> with the ARN that create-certificate-authority returned for the subordinate CA in Step 2.
CODE_SIGNING_CERT_ARN=$(aws acm-pca issue-certificate \
  --certificate-authority-arn <sub-ca-arn> \
  --csr fileb://code-signing.csr \
  --signing-algorithm ML_DSA_65 \
  --validity Value=365,Type=DAYS \
  --template-arn arn:aws:acm-pca:::template/CodeSigningCertificate/V1 \
  --query CertificateArn --output text)

# Retrieve the issued certificate
aws acm-pca get-certificate \
  --certificate-authority-arn <sub-ca-arn> \
  --certificate-arn $CODE_SIGNING_CERT_ARN \
  --query Certificate --output text > code-signing-cert.pem
This certificate binds the signer identity to the AWS KMS code-signing key material. Note that the certificate validity period (365 days in this example) determines how long verifiers can validate signatures by checking the certificate alone. AWS Private CA lets you choose the validity period of an issued certificate, as long as it ends no later than the issuing CA’s own certificate; in this example the subordinate CA certificate from Step 2 is valid for 1,825 days, so the three-year option below fits inside it. For artifacts that must remain verifiable beyond the certificate’s expiry, consider these approaches:
Longer certificate validity – For private PKI, code-signing certificates are commonly issued with multi-year validity (for example, Value=1095,Type=DAYS for 3 years) because you control the issuance policy.
Trusted timestamping (RFC 3161) – Countersign each signature with an RFC 3161 timestamp from a Time Stamping Authority (TSA) at signing time. The timestamp proves the signature was created while the certificate was valid, allowing verification indefinitely. AWS doesn’t provide a managed TSA; use a third-party TSA or operate your own.
Re-signing – Before a certificate expires, re-sign active artifacts with a newly issued certificate.
Distribute the certificate chain (root CA certificate, subordinate CA certificate, and end-entity certificate) to systems that need to verify your signatures.
Signing artifacts with ML-DSA in your CI/CD pipeline
With the PKI hierarchy in place, integrate ML-DSA signing into your build process. The approach depends on artifact type. ML-DSA-65 signatures are 3,309 bytes (compared to 64 bytes for ECDSA P-256), and the latency of the AWS KMS Sign operation for ML-DSA is comparable to existing asymmetric operations. The larger signature size has negligible impact when stored alongside multi-megabyte container images or packages, but is worth accounting for in size-constrained environments like embedded device images transmitted over low-bandwidth links.
Binary and package signing
Most build outputs, including compiled binaries and packages, are far larger than the 4,096-byte limit that AWS KMS places on the message passed to aws kms sign. Make the EXTERNAL_MU method your pipeline’s default: compute the 64-byte message representative (mu) externally with OpenSSL 3.5, then pass only mu to AWS KMS. This handles an artifact of any size and never needs to change as your artifacts grow. AWS KMS also accepts content directly with --message-type RAW, up to 4,096 bytes. Use RAW only for inputs whose size is fixed by construction, such as the 71-character manifest digest in the container image example that follows. An artifact that fits today is likely to outgrow the limit later, and a pipeline that depends on RAW fails when it does. Both methods produce cryptographically identical signatures. The verifier doesn’t need to know which method was used; standard ML-DSA verification applies in either case.
# Retrieve the public key
aws kms get-public-key --key-id alias/pqc-code-signing \
  --query PublicKey --output text | base64 --decode > pk.der

# Extract raw public key bytes from the DER-encoded SubjectPublicKeyInfo.
# The BIT STRING starts at offset 17 for all ML-DSA key sizes.
# Expected output: 1,312 bytes (ML-DSA-44), 1,952 bytes (ML-DSA-65), or 2,592 bytes (ML-DSA-87).

openssl asn1parse -inform DER -in pk.der -strparse 17 -noout -out pk_raw.bin

# Compute mu per FIPS 204 Section 6.2
printf '\x00\x00' | cat - artifact.bin > m_prime.bin
openssl dgst -shake256 -xoflen 64 -binary pk_raw.bin > pk_hash.bin
cat pk_hash.bin m_prime.bin | openssl dgst -shake256 -xoflen 64 -binary > mu.bin

# Sign the mu value
aws kms sign \
  --key-id alias/pqc-code-signing \
  --message fileb://mu.bin \
  --message-type EXTERNAL_MU \
  --signing-algorithm ML_DSA_SHAKE_256 \
  --query Signature --output text | base64 --decode > artifact.bin.sig
Store the .sig file alongside the artifact in Amazon S3 or your package repository. Protect the integrity of both the artifact and its signature by enabling S3 Object Lock (WORM protection) or at minimum S3 Versioning with restricted write access. If an attacker can modify or delete either file, verification can’t be trusted. For comprehensive guidance, see Security best practices for Amazon S3.
Container image signing
For container image signing, use the OCI referrer pattern, defined in the OCI Image and Distribution Specifications v1.1. A referrer is an artifact, such as a signature or an SBOM, whose manifest names another image in its subject field. Registries that support the pattern, including Amazon ECR, return these artifacts when a client asks for an image’s referrers. This approach uses AWS KMS ML-DSA keys to generate the signature and stores it as a referrer of the image:
# Repository URI used by ORAS here and in the SBOM steps; replace the account ID and Region
ECR_URI=111122223333.dkr.ecr.us-east-1.amazonaws.com/myapp

# Authenticate ORAS to Amazon ECR
aws ecr get-login-password --region us-east-1 | \
  oras login --username AWS --password-stdin 111122223333.dkr.ecr.us-east-1.amazonaws.com

# Get the image manifest digest
IMAGE_DIGEST=$(aws ecr batch-get-image \
  --repository-name myapp \
  --image-ids imageTag=v1.2.0 \
  --query 'images[0].imageId.imageDigest' --output text)

# Sign the digest. It is a fixed 71 characters, so RAW is safe here (see Binary and package signing).
# AWS CLI v2 expects blob parameters to be base64, so write the digest to a file and pass it with fileb://
echo -n "$IMAGE_DIGEST" > digest.txt
aws kms sign \
  --key-id alias/pqc-code-signing \
  --message fileb://digest.txt \
  --message-type RAW \
  --signing-algorithm ML_DSA_SHAKE_256 \
  --query Signature --output text | base64 --decode > image.mldsa.sig

# Attach signature as OCI referrer using ORAS
oras attach $ECR_URI@$IMAGE_DIGEST \
  --artifact-type "application/vnd.example.mldsa-signature.v1" \
  image.mldsa.sig:application/octet-stream
At deployment time, your admission controller retrieves the referrer artifact and verifies the ML-DSA signature before allowing the image to run. See Verifying a container image signature before deployment later in this post for the full verification workflow and admission control implementation.
SBOM signing
A software bill of materials (SBOM) is a structured inventory of every component, library, and dependency included in a software release. It lists package names, versions, suppliers, and dependency relationships. Organizations use SBOMs to track vulnerabilities, verify license compliance, and respond quickly when a compromised component is disclosed.
Signing the SBOM file on its own proves that the inventory hasn’t been tampered with since it was signed, but not which artifact it describes. If the image signature and the SBOM signature are independent of each other, an attacker who holds a legitimately signed SBOM for a clean image can present it alongside a different signed image and claim that the two correspond. Attaching the SBOM to the image as an OCI referrer doesn’t close this gap by itself, because the subject field of a referrer manifest is set by whoever pushes the referrer; it’s a discovery mechanism, not a cryptographic binding. The binding must be inside the bytes that the signature covers.
To create that binding, wrap the SBOM in an in-toto Statement before signing it. A Statement names the artifacts it describes in its subject field, by digest, and carries the SBOM as its predicate. Because the image manifest digest is part of the signed content, a verifier can confirm that the SBOM in hand was issued for exactly the image it is about to deploy, and a swapped SBOM or a swapped digest fails verification. Embedding the SBOM in the image filesystem is another way to bind the two, because the image digest then covers the SBOM bytes. This post uses the Statement approach because it also works for SBOMs generated by scanning a finished image, for artifacts that have no filesystem such as binaries and firmware, and for images that are already in your registry, and because the SBOM stays readable from the registry without pulling the image.
Generate the SBOM with your preferred tool (such as Amazon Inspector SBOM Generator (Sbomgen) for container images), wrap it in a Statement, and sign the Statement with the same EXTERNAL_MU step you use for binaries:
# Scan the pushed image by digest so the inventory describes exactly the manifest you signed.
# Sbomgen reuses the registry login from the oras login step in the previous section.
inspector-sbomgen container --image $ECR_URI@$IMAGE_DIGEST -o sbom.json

# Wrap the SBOM in an in-toto Statement whose subject is the image manifest digest.
# This puts the digest inside the signed bytes, which binds this SBOM to this image.
jq -n \
  --arg name "$ECR_URI" \
  --arg digest "${IMAGE_DIGEST#sha256:}" \
  --slurpfile sbom sbom.json \
  '{
    "_type": "https://in-toto.io/Statement/v1",
    "subject": [{"name": $name, "digest": {"sha256": $digest}}],
    "predicateType": "https://cyclonedx.org/bom",
    "predicate": $sbom[0]
  }' > sbom.statement.json

# Sign using EXTERNAL_MU (same mu computation as binary signing above,
# with sbom.statement.json as the input)
# ... compute mu from sbom.statement.json ...
aws kms sign \
  --key-id alias/pqc-code-signing \
  --message fileb://mu.bin \
  --message-type EXTERNAL_MU \
  --signing-algorithm ML_DSA_SHAKE_256 \
  --query Signature --output text | base64 --decode > sbom.statement.json.sig

# Attach the Statement and its signature to the image as an OCI referrer so
# verifiers discover them alongside the image signature
oras attach $ECR_URI@$IMAGE_DIGEST \
  --artifact-type "application/vnd.example.mldsa-sbom-attestation.v1" \
  sbom.statement.json:application/vnd.in-toto+json \
  sbom.statement.json.sig:application/octet-stream
Ship the Statement and its .sig file together; the SBOM itself is the Statement’s predicate field, and verifiers extract it after verification. The same pattern binds an SBOM to a binary or package: set the subject digest to the SHA-256 of the file instead of an image manifest digest. The Verifying a binary or SBOM signature section later in this post walks through the full verification workflow, including the subject check that completes the binding.
Quantum-resistant workload identity for build agents
Signing artifacts with ML-DSA keys addresses the integrity of the artifacts themselves. Separately, build agents running outside AWS (on-premises Jenkins, self-hosted GitHub Actions runners, or third-party CI/CD systems) authenticate using X.509 certificates or OIDC tokens typically signed with RSA or ECDSA. These authentication credentials represent a classical cryptographic dependency in the pipeline. IAM Roles Anywhere with ML-DSA certificates replaces that dependency: the credential that the external build agent presents, and the CA that vouches for it, no longer rely on algorithms that are vulnerable to quantum attack. (The TLS connection that carries the request still authenticates the AWS endpoint with a traditional certificate, as public TLS does today; that is a transport concern separate from the signing identity this post is about.) Build agents running on AWS with an attached IAM role don’t have this dependency: their API requests are authenticated with AWS Signature Version 4 (SigV4), which uses a symmetric hash-based message authentication code (HMAC-SHA256). Symmetric schemes like this are already considered quantum-resistant, so no additional action is needed.
Step 1: Register a workload identity CA as a trust anchor
For this walkthrough, reuse the subordinate CA that you created earlier; that avoids the monthly charge for a second CA, and the commands that follow assume it. In production, use a dedicated subordinate CA for workload identity certificates, separate from your code-signing CA. This limits the blast radius if either CA is compromised and has to be revoked, and it lets you apply different issuance policies to the two certificate types.
# Use the ARN that create-certificate-authority returned when you created the
# subordinate CA earlier. If you no longer have it, list your CAs and copy the
# ARN of the SUBORDINATE one.
aws acm-pca list-certificate-authorities \
  --query "CertificateAuthorities[?Type=='SUBORDINATE'].[Arn,Status,CertificateAuthorityConfiguration.Subject.CommonName]" \
  --output table
SUB_CA_ARN=arn:aws:acm-pca:us-east-1:111122223333:certificate-authority/abc-123   # replace with yours

# Register the subordinate CA as an IAM Roles Anywhere trust anchor
aws rolesanywhere create-trust-anchor \
  --name "PQC-CI-CD-Trust-Anchor" \
  --source "sourceType=AWS_ACM_PCA,sourceData={acmPcaArn=$SUB_CA_ARN}" \
  --enabled
Step 2: Create the build agent role and a profile that references it
An IAM Roles Anywhere profile specifies which IAM roles a workload can assume after it authenticates with a certificate from your trust anchor. Create the role first. Its trust policy lets IAM Roles Anywhere assume it only through your trust anchor and only for a certificate whose subject common name identifies the build agent; without those conditions, any certificate that the trust anchor CA issues could assume the role. Its permissions policy grants only what signing requires, on only the code-signing key. Save the trust policy as build-agent-trust.json, replacing the trust anchor ARN with the one that create-trust-anchor returned in Step 1:
Save the permissions policy as build-agent-permissions.json, replacing the resource with your key’s ARN (aws kms describe-key --key-id alias/pqc-code-signing --query KeyMetadata.Arn --output text):
Step 3: Issue the build agent certificate and configure the credential helper
Generate the build agent’s ML-DSA-65 key pair and CSR locally with OpenSSL, have the subordinate CA issue a client authentication certificate for it, and then configure the IAM Roles Anywhere credential helper to present that certificate:
# Generate the build agent's key pair and CSR. The CN must match the
# aws:PrincipalTag/x509Subject/CN condition in the role's trust policy.
openssl genpkey -algorithm ML-DSA-65 -out build-agent-mldsa-key.pem
chmod 400 build-agent-mldsa-key.pem
openssl req -new -key build-agent-mldsa-key.pem \
  -subj "/C=US/O=Example Corp/CN=pqc-build-agent-01" \
  -out build-agent.csr

# Issue a 30-day client authentication certificate from the subordinate CA
# registered as the trust anchor in Step 1.
BUILD_AGENT_CERT_ARN=$(aws acm-pca issue-certificate \
  --certificate-authority-arn $SUB_CA_ARN \
  --csr fileb://build-agent.csr \
  --signing-algorithm ML_DSA_65 \
  --validity Value=30,Type=DAYS \
  --template-arn arn:aws:acm-pca:::template/EndEntityClientAuthCertificate/V1 \
  --query CertificateArn --output text)

aws acm-pca get-certificate \
  --certificate-authority-arn $SUB_CA_ARN \
  --certificate-arn $BUILD_AGENT_CERT_ARN \
  --query Certificate --output text > build-agent-mldsa.pem

# In production, store the private key in a TPM or HSM rather than as a plaintext file.
aws_signing_helper credential-process \
  --certificate build-agent-mldsa.pem \
  --private-key build-agent-mldsa-key.pem \
  --trust-anchor-arn arn:aws:rolesanywhere:us-east-1:111122223333:trust-anchor/ta-id \
  --profile-arn arn:aws:rolesanywhere:us-east-1:111122223333:profile/profile-id \
  --role-arn arn:aws:iam::111122223333:role/PQCBuildAgentRole
The helper produces short-lived AWS Security Token Service (AWS STS) credentials scoped to the build role, replacing long-lived AWS access keys. In production, protect the ML-DSA private key with hardware-backed storage such as a Trusted Platform Module (TPM), an HSM, or an encrypted credential store with restricted file permissions. The plaintext file path shown here is for demonstration purposes. The private key authorizes access to your code-signing infrastructure and should be treated with the same protection level as any signing key. On Linux build agents, at minimum restrict the file to chmod 400 owned by the service account and consider using a PKCS#11 provider to avoid storing the raw key on disk entirely.
Verification and policy enforcement
A signing architecture is only as strong as its verification. Producing signatures is half the story. The other half is giving the systems and people that deploy your artifacts, such as deployment pipelines, Kubernetes admission controllers, and engineers installing a package, a concrete way to verify those signatures and make trust decisions before an artifact is deployed or run.
Distributing your trust chain
Before any verifier can check a signature, it needs to trust the CA that issued the code-signing certificate. This trust is established through a trust store: a local collection of root CA certificates that a system treats as authoritative. Trust stores exist in operating systems (such as /etc/pki/ca-trust/ on Linux, Keychain on macOS), language run-times (Java cacerts), container base images, and custom application configurations.
For private PKI hierarchies like the one in this post, your root CA certificate isn’t in any default public trust store. You must explicitly add it to the trust stores of every system that will verify your signatures. Common approaches include:
Baking the root CA certificate into your container base images during the build process
Publishing it to an internal S3 bucket with versioning and access logging
Storing it as an OCI artifact in Amazon ECR alongside the images it protects
Treat trust store management with the same rigor as credential management. If an attacker can inject a rogue root certificate into your trust stores, they can make forged signatures appear valid. Restrict write access to trust stores and audit changes through AWS CloudTrail or your system-level audit logs.
Exporting your certificate chain requires exporting the root CA, and then any subordinate CAs that issue certificates that will be involved in verifying signatures:
# Export the root CA certificate
aws acm-pca get-certificate-authority-certificate \
  --certificate-authority-arn <root-ca-arn> \
  --query Certificate --output text > root-ca.pem

# Export the subordinate CA certificate. Select only the Certificate field: for a
# subordinate CA this call also returns CertificateChain, and --output text would
# print both on one tab-separated line, producing a file that OpenSSL can't parse.
aws acm-pca get-certificate-authority-certificate \
  --certificate-authority-arn <sub-ca-arn> \
  --query Certificate --output text > sub-ca.pem

# Bundle the full chain for verifiers
cat root-ca.pem sub-ca.pem > trust-chain.pem
Verifiers use this chain to confirm that the code-signing public key was issued by a CA they trust.
The CAs in this post are created without a revocation configuration, and the verification commands that follow don’t check revocation status, which keeps the walkthrough short. In production, configure a certificate revocation list (CRL) or an Online Certificate Status Protocol (OCSP) responder on the subordinate CA (see Plan your AWS Private CA certificate revocation method in the AWS Private CA User Guide; both work with ML-DSA CAs). If you use a CRL, distribute it alongside the trust chain and add -crl_check -CRLfile <crl-file> to the openssl verify command below, where <crl-file> is the CRL that AWS Private CA publishes to your S3 bucket, so that a revoked code-signing certificate fails verification.
Verifying a binary or SBOM signature
Verify the code-signing certificate against the trust chain, confirm that it is a code-signing certificate issued to the signer you expect, extract its public key, and then verify the signature with OpenSSL 3.5. The second check matters: a chain check alone accepts every certificate that the CA hierarchy has issued, including the build agent client certificates from the previous section, so pin the expected subject in your verifier configuration:
# Step 1: Verify that the code-signing certificate chains to the trusted root CA and carries the
# Code Signing extended key usage. -purpose codesign (OpenSSL 3.2 and later) rejects a certificate
# that chains correctly but was issued for another purpose, such as a build agent's client
# authentication certificate from the same subordinate CA.
# trust-chain.pem contains the root CA and subordinate CA certificates distributed in the previous section.
openssl verify -CAfile trust-chain.pem -purpose codesign code-signing-cert.pem
# Confirm that the certificate was issued to the signer you expect. Replace <signer-cn> with the
# common name in your code-signing certificate's subject.
openssl x509 -in code-signing-cert.pem -noout -subject -nameopt RFC2253 | grep -q "CN=<signer-cn>" || { echo "Unexpected signer"; exit 1; }

# Step 2: Extract the public key from the verified certificate.
openssl x509 -in code-signing-cert.pem -pubkey -noout > signing-key.pem

# Step 3: Verify the artifact signature using the trusted public key.
openssl pkeyutl -verify \
  -pubin -inkey signing-key.pem \
  -in artifact.bin \
  -sigfile artifact.bin.sig \
  -rawin
A successful verification prints Signature Verified Successfully and returns an exit status of 0. A failed verification prints Signature Verification Failure and returns a nonzero exit status. In shell scripts, check the exit status of each command, or run the block with set -e, so that a failed certificate chain check stops the script before signature verification and a failed signature check blocks downstream actions.
For an SBOM, run the same three steps with sbom.statement.json as the -in file and sbom.statement.json.sig as the -sigfile, then add a fourth: confirm that the subject digest inside the verified Statement is the digest of the artifact you are about to deploy. Signature verification proves the Statement is authentic; the subject check proves it describes this artifact and not another one. The digest you compare against must come from the artifact itself, resolved from the registry for an image or computed from the file for a binary, never from the Statement. For an image, this is the same digest you verify the image signature against, so the two checks together establish that this SBOM describes this signed image.
# Step 4 (SBOM only): the signed Statement must name the image being deployed.
# Resolve the digest from Amazon ECR, not from the Statement.
IMAGE_DIGEST=$(aws ecr batch-get-image \
  --repository-name myapp \
  --image-ids imageTag=v1.2.0 \
  --query 'images[0].imageId.imageDigest' --output text)
SUBJECT_DIGEST=$(jq -r '.subject[0].digest.sha256' sbom.statement.json)
[ "sha256:$SUBJECT_DIGEST" = "$IMAGE_DIGEST" ] || { echo "SBOM does not describe this image"; exit 1; }

# Only now extract the SBOM for downstream tooling
jq '.predicate' sbom.statement.json > sbom.json
For a binary, compare the subject digest to the output of sha256sum artifact.bin instead. Reject the SBOM if either the signature or the subject check fails.
Verifying a container image signature before deployment
Pull the ML-DSA signature from the OCI referrer artifact in Amazon ECR, then verify it against the image manifest digest:
# Pull the signature referrer. ORAS 1.2 lists referrers under "manifests";
# ORAS 1.3 and later list them under "referrers". The jq filter accepts either.
oras discover $ECR_URI@$IMAGE_DIGEST \
  --artifact-type "application/vnd.example.mldsa-signature.v1" --format json | \
  jq -r '(.referrers // .manifests)[0].digest' | \
  xargs -I{} oras pull $ECR_URI@{} -o /tmp/sig/

# Re-derive the image digest and verify
echo -n "$IMAGE_DIGEST" > /tmp/digest.txt
openssl pkeyutl -verify \
  -pubin -inkey signing-key.pem \
  -in /tmp/digest.txt \
  -sigfile /tmp/sig/image.mldsa.sig \
  -rawin

# Exit code 0 = image is authentic; non-zero = reject deployment
The same oras discover command with --artifact-type "application/vnd.example.mldsa-sbom-attestation.v1" retrieves the SBOM attestation and its signature; verify them as described in the previous section, including the subject check. The jq filter shown takes the first referrer of the requested type. Don’t rely on the order in which a registry lists referrers, and expect more than one after an image has been re-signed: a production verifier should check every referrer of that type and accept the image if at least one signature verifies against a certificate that chains to your trust store. Taking only the first can reject a correctly signed image, but it can never accept an unsigned one.
To enforce these checks at deployment time, run them in a Kubernetes admission controller, a component that the API server calls before it accepts a pod and that can reject the request. You can write one as a validating admission webhook (see Dynamic Admission Control in the Kubernetes documentation), or use Open Policy Agent (OPA) Gatekeeper, an admission webhook that enforces policies evaluated by the OPA policy engine, and package the verification steps as a Gatekeeper external data provider that a constraint calls. For a worked example of gating Amazon EKS deployments on image signatures, see Announcing Container Image Signing with AWS Signer and Amazon EKS, which verifies AWS Signer signatures at admission with Kyverno and discusses the Gatekeeper and custom webhook alternatives. The ML-DSA signature referrer in this post is a custom artifact type that those tools don’t verify out of the box, so the verification steps in this section run in code you supply. In either design, the controller runs before any pod is scheduled, rejecting images that lack a valid ML-DSA signature referrer in Amazon ECR or whose SBOM attestation doesn’t name the image being deployed.
Preventive and detective controls
Signature verification stops the use of an untrusted artifact at deployment. Organization-level controls apply earlier and more broadly: preventive controls stop teams from creating new traditional signing keys, and detective controls record every signing operation so you can audit which principal signed each artifact and when.
Preventive guardrails. Use an AWS OrganizationsService control policy (SCP) to block creation of traditional signing keys in security-critical accounts, forcing all new signing workloads to use ML-DSA:
This SCP prevents teams from creating new RSA or ECDSA signing keys, enforcing quantum-resistant signatures as the only option for new workloads. Note that this SCP constrains the algorithm family, not the parameter set: it would still permit an ML-DSA-44 key, which this architecture doesn’t use. Part 2 of this series picks up at exactly this point. It shows how to express a complete algorithm policy (in its example, approve ML-DSA-65 and ML-DSA-87 and exclude ML-DSA-44) as layered controls using the kms:KeySpec condition key in SCPs, IAM permission boundaries, and AWS KMS key policies; how to restrict the use of keys that already exist; and how to govern surfaces such as AWS Private CA that have no algorithm condition key. This SCP and the parameter-set SCP in Part 2 work together: attach both, and every new signing key must use an approved parameter set.
Audit trail.AWS CloudTrail logs every kms:Sign and kms:Verify API call, providing an immutable record of when each artifact was signed and by which principal. Use an organization trail and query its logs with Amazon Athena to analyze signing activity across accounts and correlate it with your deployment events.
Regulatory timeline and recommended actions
The following table maps regulatory milestones to specific actions you can take today using the architecture described in this post. This information is provided for general awareness only and does not constitute legal or compliance advice. Consult your legal and compliance teams to determine your organization’s specific obligations. For a broader overview of global PQC regulatory timelines, see Migrating to Post-Quantum Cryptography.
Regulation
Deadline
Regulatory language
Action on AWS
CNSA 2.0: Support and prefer
2025 (in effect)
CNSA 2.0 timeline (Sep 2022, FAQ v2.1 Dec 2024): Software and firmware signing must “support and prefer” CNSA 2.0 algorithms by 2025
Create ML-DSA keys in AWS KMS, begin signing artifacts with ML-DSA alongside existing traditional signatures
CNSA 2.0: New system acquisitions
January 2027
CNSA 2.0 FAQ v2.1 (Dec 2024): “All new NSS acquisitions must be CNSA 2.0 compliant at deployment, effective 1 January 2027”
Full ML-DSA PKI operational, IAM Roles Anywhere trust anchors using ML-DSA, all new builds carry ML-DSA signatures
EU Cyber Resilience Act
11 December 2027
Regulation (EU) 2024/2847, Annex I, Part I(2)(f): Products must “protect the integrity of stored, transmitted or otherwise processed data, personal or other, commands, programs and configuration against any manipulation or modification not authorised by the user, and report on corruptions”; Part II(7): Manufacturers must “provide for mechanisms to securely distribute updates”
ML-DSA code signing for all software updates shipped to EU markets, signed SBOMs accompany every release
CNSA 2.0: Exclusive use
2030
CNSA 2.0 timeline: Software and firmware signing must “exclusively use” CNSA 2.0 algorithms by 2030
Remove traditional signing keys from supply chain, SCP enforcement of ML-DSA-only key creation
PCI DSS 4.0 Req 12.3.3
Mandatory since March 2025
PCI DSS v4.0.1, Requirement 12.3.3: “Cryptographic cipher suites and protocols in use are documented and reviewed at least once every 12 months”, including an up-to-date inventory of the cipher suites and protocols in use
Document cryptographic inventory in AWS KMS, tag ML-DSA versus traditional keys, maintain migration progress tracking
Note for NSS customers and other CNSA 2.0 adopters: CNSA 2.0 is the quantum-resistant algorithm suite that the NSA requires for NSS, the federal systems that carry classified information or support intelligence, cryptologic, military command and control, and weapons functions. When ML-DSA is used for any signature purpose, including software and firmware signing, CNSA 2.0 permits only the ML-DSA-87 parameter set. (For software and firmware signing it also approves the stateful hash-based schemes LMS and XMSS, which this post doesn’t cover.) The ML-DSA-65 parameter set used in this post’s code-signing examples is appropriate for commercial workloads but isn’t permitted on NSS. CNSA 2.0 is binding only for NSS, but it’s followed voluntarily well beyond that boundary: by suppliers to the US defense and intelligence market, in the United States and allied countries, whose products must meet NSS requirements, and by commercial organizations in and outside the United States that adopt it as a conservative baseline because it specifies the highest NIST security category and removes the need to revisit parameter choices later. If your systems fall under CNSA 2.0 scope, or you’ve chosen to align with it, substitute ML-DSA-87 for all signing keys and certificates. Part 2 of this series shows how to make that substitution enforceable: the same kms:KeySpec controls that exclude ML-DSA-44 in its example can be pointed at ML_DSA_87 as the only approved key spec.
For organizations serving both US government and EU commercial markets, the January 2027 and December 2027 deadlines converge into a single migration window. Starting now provides margin for testing, key rotation planning, and certificate chain validation.
Clean up
You created a number of cryptographic resources in the prior steps and examples. AWS Private CA charges a monthly fee per CA and AWS KMS charges per key per month. To avoid ongoing charges, delete them if you aren’t actively using them. Start by listing what exists, so that you catch every resource you created, including duplicates from repeated runs. These commands list one Region; if you worked in more than one, repeat them with --region for each.
# List every private CA with its type, status, key algorithm, and subject.
# A CA you already deleted shows DELETED until its restoration window ends.
aws acm-pca list-certificate-authorities \
  --query 'CertificateAuthorities[].[Arn,Type,Status,CertificateAuthorityConfiguration.KeyAlgorithm,CertificateAuthorityConfiguration.Subject.CommonName]' \
  --output table

# List every ML-DSA key in AWS KMS with its state and creation date.
# A key already scheduled for deletion shows PendingDeletion.
for KEY_ID in $(aws kms list-keys --query 'Keys[].KeyId' --output text); do
  aws kms describe-key --key-id "$KEY_ID" \
    --query 'KeyMetadata.[KeyId,KeySpec,KeyState,CreationDate]' --output text
done | grep ML_DSA

# Show which alias points at which key. A key that no alias points at
# is usually a leftover from an earlier run.
aws kms list-aliases --query 'Aliases[].[AliasName,TargetKeyId]' --output text | grep -v '^alias/aws/'
AWS Private CA has no command that lists the certificates a CA has issued. If you need serial numbers for the revocation step that follows, generate an audit report with aws acm-pca create-certificate-authority-audit-report, which writes a list of every certificate the CA has issued or revoked to an S3 bucket that grants the service write access.
Delete each resource that you don’t need, including any extra copies that the listing revealed, then run the listing again to confirm that nothing is left:
# Revoke any issued end-entity certificates while the subordinate CA is still active
aws acm-pca revoke-certificate \
  --certificate-authority-arn <sub-ca-arn> \
  --certificate-serial <serial-number> \
  --revocation-reason CESSATION_OF_OPERATION

# Delete the IAM Roles Anywhere resources that reference the CA
aws rolesanywhere delete-profile --profile-id <profile-id>
aws rolesanywhere delete-trust-anchor --trust-anchor-id <trust-anchor-id>

# Delete the build agent role that the profile referenced, and the local copy of its private key
aws iam delete-role-policy --role-name PQCBuildAgentRole --policy-name pqc-code-signing
aws iam delete-role --role-name PQCBuildAgentRole
rm -f build-agent-mldsa-key.pem

# Delete the AWS KMS code-signing key (schedule 7-day waiting period).
# ScheduleKeyDeletion doesn't accept an alias, so resolve the key ID first.
KEY_ID=$(aws kms describe-key --key-id alias/pqc-code-signing \
  --query KeyMetadata.KeyId --output text)
aws kms schedule-key-deletion --key-id $KEY_ID --pending-window-in-days 7

# Remove the alias. It survives key deletion and would otherwise show up in the
# listing above on your next run.
aws kms delete-alias --alias-name alias/pqc-code-signing

# Disable and delete the subordinate CA
aws acm-pca update-certificate-authority \
  --certificate-authority-arn <sub-ca-arn> --status DISABLED
aws acm-pca delete-certificate-authority \
  --certificate-authority-arn <sub-ca-arn> --permanent-deletion-time-in-days 7

# Disable and delete the root CA
aws acm-pca update-certificate-authority \
  --certificate-authority-arn <root-ca-arn> --status DISABLED
aws acm-pca delete-certificate-authority \
  --certificate-authority-arn <root-ca-arn> --permanent-deletion-time-in-days 7
If you are adapting this for long-term use, plan for log retention. CloudTrail Event History keeps only the last 90 days of management events and is not a substitute for a trail. For the audit trail described earlier, create a trail that delivers to an S3 bucket with the lifecycle policy and access controls your retention requirements call for.
Conclusion
In this post, I showed you how to build a quantum-resistant software supply chain on AWS by combining ML-DSA signing in AWS KMS, ML-DSA certificate hierarchies in AWS Private CA, and ML-DSA workload authentication through IAM Roles Anywhere. The architecture covers the full pipeline; from authenticated build agents through signed binaries, container images, and SBOMs, to verification and policy enforcement at deployment.
Every ML-DSA capability used in this post is generally available. AWS Private CA and IAM Roles Anywhere support ML-DSA in all commercial AWS Regions, the AWS GovCloud (US) Regions, and the China Regions, and AWS KMS supports ML-DSA in commercial AWS Regions. You don’t need to wait for a standards body or third-party tool to finalize PQC support. The primitives are ready.
To get started, create your first ML-DSA key in AWS KMS and sign a test artifact. From there, extend to your PKI hierarchy, integrate IAM Roles Anywhere for your build agents, and add ML-DSA signatures to your container and SBOM workflows.
Building the pipeline is half the work. The other half is making sure the algorithm choices you made stay in force as accounts, teams, and standards change. That’s the subject of Part 2 of this series, Enforce your ML-DSA algorithm policy with SCPs and IAM, written for the security and governance teams who own that problem.
Most industries manage one major compliance framework. Universities might manage four simultaneously, each bringing with it unique requirements, enforcement mechanisms, and consequences for failure. Here’s what that actually looks like in practice.
In Part 1 of this series, we laid out the scale of the threat facing higher education: 4,388 cyberattacks per organization per week, a 24% year-over-year increase, and the fundamental architectural flaw of defending each campus independently. If the threat picture alone wasn’t enough to demand action, there’s a second crisis unfolding in parallel that is, if anything, more immediately consequential.
The regulatory environment for higher education has quietly become one of the most complex in any sector. Universities don’t just face the legal and reputational fallout of a data breach. They face simultaneous obligations under four distinct federal frameworks, each with its own definition of adequate security, its own reporting timelines, and its own set of penalties for non-compliance.
Managing those four frameworks across a single campus is hard. Managing them across a multi-campus system where each school operates its own IT environment, with its own tools, its own staff, and its own data governance practices, is a compounding nightmare that most institutions haven’t fully reckoned with yet.
Let’s walk through each framework from the ground-level.
FERPA: The 24-hour clock nobody talks about
The Family Educational Rights and Privacy Act (FERPA) has governed the privacy of student education records since 1974. Most university administrators are broadly familiar with it, whereby students have the right to access their own records, institutions have an obligation to protect those records from unauthorized disclosure, and violations can result in loss of federal funding.
Now, what has become far more operationally consequential in the age of sophisticated cyberattacks is the breach notification requirement for financial aid data.
When a breach compromises student financial aid information, institutions must notify the Department of Education’s Federal Student Aid office within 24 hours of discovering the incident. Not 72 hours, which is the standard under many commercial data breach frameworks. Not “as soon as practicable,” but twenty-four hours.
Think about what that timeline actually demands. A ransomware attack is discovered at 9 PM on a Friday. By 9 PM Saturday, your institution needs to have identified that student financial aid data was involved, determined the scope of the breach, and filed formal notification with federal regulators, while simultaneously managing the technical response, communicating with affected students and faculty, engaging legal counsel, and trying to figure out what else the attackers may have accessed.
That 24-hour window is not achievable through manual investigation. It requires automated detection capabilities that can identify the scope of a breach in real time, data classification that knows where financial aid information lives across your environment, and incident response processes that are tested, documented, and ready to execute under pressure at any hour of any day.
For most universities, especially those operating with fragmented, campus-by-campus security tooling, this capability simply doesn’t exist at the required level. The 24-hour clock starts ticking the moment you discover the breach. But in a complex, multi-campus environment, “discovery” often comes well after the actual compromise, and characterizing the scope of what was accessed can take days or weeks without unified visibility.
Repeated FERPA violations can result in loss of eligibility for federal student aid programs, a consequence that would be existential for most institutions.
GLBA: When a university becomes a financial institution
The Gramm-Leach-Bliley Act’s Safeguards Rule is probably the least intuitive compliance obligation for higher education administrators who don’t think of their institutions as financial entities. But universities have been clearly defined as financial institutions under GLBA since 2002, because they originate and service student loans and manage financial aid disbursements.
The Federal Trade Commission’s updated Safeguards Rule, which took full effect in 2023, significantly expanded the security requirements for covered institutions. Universities must now maintain a comprehensive written information security program that includes risk assessments, access controls, encryption, multi-factor authentication, incident response planning, and vendor oversight, all aligned to NIST 800-171.
More specifically, universities that handle Federal Tax Information (i.e. virtually every institution that processes FAFSA data) must treat that information as Controlled Unclassified Information. The CUI designation comes with its own set of handling requirements, access controls, and audit obligations that most institutions’ current security programs weren’t designed to address.
The incident reporting requirement under GLBA is particularly demanding. If a security event affects 500 or more consumers, institutions must provide notification to federal law enforcement immediately upon discovering the breach. In practice, regulators have interpreted “immediately” to mean within hours, not days. The operational requirement is essentially identical to FERPA’s 24-hour clock: you need to know what happened, who was affected, and what data was compromised before most human-driven investigation processes could possibly complete.
For multi-campus university systems, GLBA creates an additional structural challenge: financial aid data doesn’t necessarily stay within campus boundaries. Students who transfer between campuses within the same system carry their financial aid history with them. System-level financial aid administration often centralizes data from all campuses into shared databases. A breach that starts at one campus may quickly implicate financial aid data across the entire system. Moreover, the reporting obligation doesn’t scale by campus. If your system’s data is compromised, the institution as a whole is responsible for the response.
HIPAA: The healthcare dimension universities underestimate
The Health Insurance Portability and Accountability Act applies wherever protected health information is created, received, transmitted, or maintained. For universities, that means student health centers, counseling services, university hospitals, and any research program that involves human subjects data.
The size of this compliance surface is frequently underestimated. A mid-size university with a student health clinic, a counseling center, a physical therapy program, and a research lab conducting clinical trials is handling significant volumes of protected health information, often spanning across IT systems that were procured and managed by clinical departments independently of the central IT organization.
Under HIPAA, breaches affecting 500 or more individuals must be reported to the Department of Health and Human Services within 60 days of discovery, and affected individuals must be notified within the same timeframe. Breaches affecting 500 or more individuals in a single state also trigger media notification requirements. For institutions operating across multiple states, the geographic complexity multiplies quickly.
The HIPAA enforcement environment has become significantly more aggressive in recent years. The HHS Office for Civil Rights has levied multi-million dollar penalties against healthcare organizations with security programs that would be considered industry-standard in other sectors. Universities that have historically operated their health services with a degree of IT independence from the main campus security program are increasingly exposed.
The intersection of HIPAA with the multi-campus challenge is particularly acute. When a student health system shares infrastructure with academic IT, a breach that starts in the academic environment can propagate to health records, and the reporting obligations that apply to health data are more demanding than those for most other types of student information. Without unified visibility across all the environments where PHI might reside, institutions can’t even reliably determine whether a given incident triggers HIPAA notification requirements.
CMMC: The research funding stakes are getting higher
The Cybersecurity Maturity Model Certification framework was developed by the Department of Defense to ensure that contractors and subcontractors handling Controlled Unclassified Information meet a consistent baseline of cybersecurity practices. For most of its history, CMMC’s relevance to higher education was limited to a relatively small number of research universities with significant DoD contracts.
That’s changing. As the federal government has increased the scope and value of research contracts that involve sensitive national security applications — advanced materials, artificial intelligence, quantum computing, biotechnology — the number of universities with CMMC obligations has grown substantially. And the consequences of non-compliance are not administrative fines. They’re loss of contract eligibility. For research universities where federal funding constitutes a significant portion of total revenue, that exposure is existential.
CMMC Level 2 compliance requires demonstrating implementation of 110 security practices drawn from NIST 800-171, covering everything from access control and incident response to system and communications protection and risk assessment. At higher levels, institutions must undergo third-party assessment by a certified organization; there’s no self-certification option.
The practical challenge for universities is that research computing environments are often structurally separate from the main campus IT organization. Research labs build their own systems. Principal investigators make their own technology decisions. The research network may have evolved organically over decades without the kind of deliberate security architecture that CMMC requires. Bringing those environments into compliance while preserving the operational flexibility that researchers require is a genuinely difficult operational challenge.
The compounding reality: Four frameworks at once
The challenge isn’t just that each of these frameworks is demanding in its own right. It’s that they apply simultaneously, to the same institution, with overlapping (and sometimes conflicting) requirements and timelines.
A data breach at a large research university with a hospital and a student health center can simultaneously trigger FERPA notification obligations (24-hour window for financial aid data), GLBA notification requirements (immediate notification if 500+ consumers affected), HIPAA breach reporting (60 days, plus potential media notification), and CMMC incident reporting (if the affected systems touched CUI). Each notification goes to a different federal agency. Each has its own documentation requirements. Each creates its own legal exposure if the response is delayed, incomplete, or inaccurate.
Managing this in the aftermath of an active breach — while simultaneously running the technical response, communicating with campus leadership, engaging legal counsel, and trying to prevent further damage — is genuinely overwhelming. And it’s made dramatically more difficult when the security team doesn’t have unified visibility across the environments where all four categories of regulated data might reside.
This is the core operational argument for consolidated security in higher education. Not just the threat landscape. Not just the operational efficiency of managing fewer tools. The compliance exposure created by fragmented, campus-by-campus security program is a material risk that university boards and general counsels are only beginning to fully understand.
What compliance-ready security actually requires
Meeting these four frameworks simultaneously, across a multi-campus environment, with the speed that their reporting requirements demand, requires security capabilities that most university systems don’t currently have at the required level:
Automated detection that operates at machine speed. You cannot investigate your way to a 24-hour notification window. You need detection capabilities that identify the nature and scope of a breach in real time; not in the hours or days that manual investigation requires.
Unified data classification across all campuses. You cannot know whether a breach triggers FERPA, GLBA, HIPAA, or CMMC notification requirements unless you know where each category of regulated data lives, across every campus, every department, every research lab, and every shared service in the system.
Centralized compliance reporting that spans campus boundaries. Each campus maintaining its own compliance evidence, in its own format, with its own audit trails, makes system-level compliance reporting a manual, error-prone, and enormously time-consuming exercise. A breach that crosses campus boundaries requires a consolidated view of what happened, when, and to whose data.
Incident response processes that can execute at the required speed. The 24-hour clock doesn’t care that your legal team doesn’t work weekends. Pre-defined, pre-approved response playbooks that can be activated immediately are the only way to reliably meet notification deadlines that leave no room for deliberation.
The good news is that a security platform built for multi-campus university environments can address all of these requirements. And not as separate point solutions, but as integrated capabilities that support each other. In Part 3 of this series, we’ll look at exactly how that works and what it means for university security programs that are ready to move beyond the fragmented, campus-by-campus model.
Coming up in Part 3: The architecture, the open source intelligence advantage, the real-world outcomes, and why consolidated security isn’t just a better defense, but a smarter investment.
Rapid7 helps more than 11,000 organizations worldwide take command of their security. Learn more at rapid7.com/sled.
This post announces the availability of a new independent assessment report available on AWS Artifact analyzing how Landing Zone Accelerator on AWS (LZA) can automatically deploy multi-account environments in Amazon Web Services (AWS) with Australian Government Information Security Manual (ISM) security controls coverage at scale. The report includes findings from an independent third-party analysis conducted by AWS Partner gwi.digital. In addition to the report, we talk about ISM compliance applicability to LZA and a new testing mechanism for measuring configuration drift, which together can provide Australian customers with a documented and validated foundation to accelerate IRAP assessment readiness.
Background
Australian organizations in public sector, defense, and critical infrastructure agencies must build cloud environments that meet (ISM requirements. The ISM defines 1,081 security control requirements across 22 guideline chapters. Demonstrating compliance is central to achieving an IRAP assessment outcome, but assessments typically require months of preparation, evidence gathering, and testing.
In October 2025, we introduced the LZA Universal Configuration and LZA Compliance Workbook. LZA provisions a multi-account security architecture that automates the deployment of nearly 200 security controls based on AWS Well-Architected pillars and AWS security best practices. The LZA Compliance Workbook, available on AWS Artifact, documents how the Universal Configuration (UC) maps to technical security requirements from 17 global compliance frameworks, with more being added. LZA is an ideal solution for customers with security and compliance obligations—both existing and anticipated—because the guardrails it deploys are applied automatically to new accounts as environments grow.
What’s in the report
To see how LZA can help customers in Australia we teamed up with AWS Partner gwi.digital to run LZA as a customer would. gwi.digital is a consultancy partner specializing in cybersecurity and governance, risk, and compliance (GRC) and has deep experience in IRAP assessments and the ISM framework. The team conducted an independent analysis and evaluation of LZA UC against 1,081 ISM controls. The assessment was conducted in a greenfield AWS environment hosted in the ap-southeast-2 (Sydney) AWS Region, positioned within Phase 2 of the ASD Cloud Security Assessment and Authorization Framework and focused on cloud consumers building on already-authorized AWS services. It builds on existing AWS IRAP foundations: Underlying AWS services were most recently independently assessed at the PROTECTED level by CyberCX last year. While this report does not constitute an official IRAP authorization, certification, or accreditation, it provides a professional evaluation of evidence based on what LZA delivers out of the box (and what it does not), so organizations can make informed decisions.
What the assessment found
Of the 1,081 ISM controls, 256 are within the addressable scope of LZA and include the technical infrastructure controls that a solution like LZA can meaningfully address. Of those 256, LZA achieves Full or Partial coverage for 234 (91%). The remaining 825 controls are outside the scope of LZA: physical security, personnel, organizational governance, and classification-level exclusions. A key contribution for the assessment was analysis of the shared responsibility model that goes beyond the traditional AWS/customer binary. It considers a three-tier view—AWS (provided), LZA (enabled), and Customer (responsibility)—and further categorizes the 825 out-of-scope controls into subcategories so customers can quickly determine which controls require their attention compared to which are already addressed at the infrastructure level. By combining automated deployment, ISM-specific compliance mappings, independent validation, and continuous evidence generation, Australian customers can reduce IRAP assessment timelines while achieving more reliable compliance outcomes.
Note: Results are based on the configuration as-provisioned based on the LZA version and during the time of this assessment. Results may vary depending on customer implementation and configuration choices.
Continuous validation with CATS
Confirming controls are implemented and operating effectively across your environment is complex and often lacks complete coverage. To simplify testing your LZA deployment, we developed the Controls Acceptance Testing Suite (CATS). CATS is an automated compliance validation engine that runs purpose-built tests against the security configuration baseline deployed by LZA UC. For the ISM assessment, CATS executed over 3,600 individual tests across six AWS accounts, evaluating account structure, identity and access, network configuration, logging, encryption, and backup. For Australian customers, CATS enables:
Automated evidence generation: Machine-readable results may replace weeks of manual evidence collection
ISM-enriched reporting: gwi-digital developed a conversion script that maps CATS output to ISM control references, enabling auditors to interpret results from an ISM perspective
Continuous drift detection: Repeatable execution identifies when configurations deviate from the validated baseline between assessment cycles
Note: CATS availability is limited and currently accessible only through AWS Professional Services as a private beta solution and may be subject to change. Availability, features, and pricing are subject to change without notice. Contact your AWS account representative or reach out to a member of the LZA team for questions about CATS, or to provide feedback on the LZA ISM report.
ISM-optimized configuration
Through the assessment, gwi-digital identified configuration adjustments that elevate specific control ratings from Partial to Full, with minimal effort; for example, increasing the default password length from 14 to 15 characters or adjusting log retention to align with Australian Federal Disposal Authority standards. These recommendations have been communicated to the LZA UC team for inclusion in a future ISM-specific guidance section in LZA GitHub documentation.
Getting started
In addition to the LZA ISM report, you can also find the LZA Compliance Workbook available on AWS Artifact. It maps related ISM requirement identifiers to security implementation statements, giving you a starting point from which you can customize and enhance your compliance documentation for your unique use cases after deploying LZA.
Use the LZA Implementation Guide to see use cases, review pre-deployment considerations and then follow deployment steps.
Set-up a security compliance chat agent. Consider creating a knowledge base with Amazon Bedrock using the LZA Compliance Workbook, LZA Implementation Guide, web crawlers to the LZA GitHub, and your custom resources to set up your own chat agent.
The combination of ISM mappings in the LZA Compliance Workbook, the gwi-digital analysis report, and CATS evidence gives Australian customers a head start on IRAP assessments.
Weeks saved on scoping: Pre-determined control applicability significantly reduces upfront scoping effort
Documentation ready: Implementation statements and control requirement alignment reduce the documentation burden
Independent assurance: A third-party report that customers and their assessors can reference directly
Continuous evidence: CATS generates repeatable security evidence between assessment cycles, replacing periodic manual audits with ongoing assurance
Acknowledgements
The Landing Zone Accelerator team would like to thank Baden Hughes, Henrik Melkonyan, Iain Lindsay-German, and Ian Roderick from gwi.digital for their professionalism and expertise in performing an incredibly thorough assessment, helping us to make LZA better for customers, and for their contributions to this blog post.
If you have feedback about this post, submit comments in the Comments section below.
Organizations operating in Germany and across Europe increasingly need to demonstrate cloud security compliance under the Cloud Computing Compliance Criteria Catalogue (C5:2020), published by Germany’s Federal Office for Information Security (BSI). Last year, we introduced Landing Zone Accelerator on AWS support for digital sovereignty and today we’re announcing the availability of a new independent assessment report available on AWS Artifact which evaluates how the Landing Zone Accelerator (LZA) on AWS solution provides enhanced coverage for C5:2020 requirements by implementing nearly 200 native security controls. LZA is available using a standard multi-account configuration or as a container-based deployment option in the AWS European Sovereign Cloud, enabling customers with data residency requirements to use the same security configuration baseline.
How this accelerates your compliance journey
Security and compliance are a shared responsibility. LZA takes on part of this responsibility by defining a security architecture baseline and automatically provisioning your AWS environment that scales as your organization grows. Where AWS already provides C5 Type 2 attestation reports for “security of the cloud”, the LZA assessment report offers an independent opinion of how the security baseline LZA provisions aligns with C5:2020 criteria for “security in the cloud”. Instead of starting from scratch, you can deploy with LZA, evaluate the scope of coverage from the report, and use the LZA Compliance Workbook to build on and customize for your organization’s unique use case. These resources can help you reduce time in architecture design, evidence collection, and preparation for C5:2020 assessments. The free LZA Compliance Workbook available on AWS Artifact and open source Universal Configuration GitHub repository are also excellent sources to add to a knowledge base, enabling you to create a security compliance chat agent with Bedrock to assist your governance or assurance teams.
What’s in the report
AWS Partner Schellman, an independent third-party assessor, evaluated the LZA Universal Configuration architecture and security control baseline, which maps to C5:2020 controls in the LZA Compliance Workbook, to determine how the LZA infrastructure aligns to C5:2020 technical requirements. The report concluded that LZA can help implement 325 security controls in aggregate, aligning to technical requirements from eight C5:2020 control areas. It also describes the LZA architecture design, security best practices, and scoping considerations for C5:2020 assessments. This is the first installation of the independent C5 report for LZA, which will be updated in 2027 to evaluate coverage for the pending C5:2026 revision.
In addition to the LZA C5:2020 report, you can also find the LZA Compliance Workbook available on AWS Artifact. It maps C5:2020 requirement identifiers to security implementation statements, giving you a starting point from which you can customize and enhance your compliance documentation for your unique workloads or operational practices after deploying LZA.
Amazon Web Services (AWS) is pleased to announce that the Summer 2026 System and Organization Controls (SOC) 1 report is now available. The reports cover 185 services over the 12-month period from July 1, 2025–June 30, 2026, giving customers a full year of assurance. These reports demonstrate our continuous commitment to adhering to the heightened expectations of cloud service providers.
AWS strives to continuously bring services into the scope of its compliance programs to help customers meet their architectural and regulatory needs. You can view the current list of services in scope on our Services in Scope page. As an AWS customer, you can reach out to your AWS account team if you have any questions or feedback about SOC compliance.
The NHS DSPT is an assessment that allows organizations to measure their performance against the National Data Guardian’s 10 data security standards. All organizations that access NHS patient data and systems are expected to use the toolkit to demonstrate their compliance with safe data security standards. NHS DSPT covers standards regarding Personal Confidential Data, Continuity Planning, IT Protection, and more. AWS undergoes the assessment to provide customers with assurance that we are practicing good data security.
Security and compliance is a shared responsibility between AWS and the customer. When customers move their computer systems and data to the cloud, security responsibilities are shared between the customer and the cloud service provider. For more information, see the AWS Shared Security Responsibility Model.
We’re excited to announce that our Europe (London) AWS Region has renewed its accreditation for United Kingdom (UK) Police-Assured Secure Facilities (PASF) for Official-Sensitive data. Since 2017, the Amazon Web Services (AWS) Europe (London) Region has been accredited under the PASF program. This demonstrates our continuous commitment to adhere to the heightened expectations of customers with UK law enforcement workloads. Our UK law enforcement customers who require PASF can continue to run their applications in the PASF-accredited Europe (London) Region in confidence.
The PASF is a long-established assurance process, used by UK law enforcement, as a method for assuring the security of facilities such as data centers or other locations that house critical business applications that process or hold police data. PASF consists of a control set of security requirements, an on-site inspection, and an audit interview with representatives of the facility.
The Police Digital Service (PDS) confirmed the accreditation renewal for AWS on May 28, 2026. A confirmation letter can be found on AWS Artifact. The UK police force and law enforcement organizations can also obtain confirmation of the compliance status of AWS through the Police Digital Service.
We’re excited to announce that Amazon Web Services (AWS) has completed theCyberVadis assessment of its security posture with the highest score (Mature) in all assessed areas. This demonstrates our continued commitment to meet the heightened expectations for cloud service providers. Customers can now use the 2026 AWS CyberVadis report and scorecard to reduce their supplier due-diligence burden.
With the increasing adoption of cloud products and services across multiple sectors and industries, AWS is a critical component of customers’ third-party environments. Regulated customers, such as those in the financial services sector, are held to high standards by regulators and auditors when it comes to exercising effective due diligence on third parties.
Many customers use third-party risk management services such as CyberVadis to better manage risks from their evolving third-party environments and drive operational efficiencies. In support of these efforts, AWS has completed its annual CyberVadis security posture assessment, conducted by CyberVadis security analysts.
CyberVadis is a comprehensive third-party risk assessment process that combines the speed and scalability of automation with the certainty of analyst validation. CyberVadis assessments employ a dynamic and comprehensive approach to third-party risk assessment, replacing outdated static spreadsheets and the need for annual AWS assessment access requests. This cloud-based solution provides advanced capabilities by integrating AWS responses with analytics and sophisticated risk models to deliver an in-depth view of the security posture of AWS.
CyberVadis’s risk assessment methodology evaluates 20 topics covering the entire cybersecurity life cycle across four phases: Identify, Protect, Detect, and React. These topics include Data Privacy, Access Management, and Infrastructure Security. The assessment criteria are based on international information security standards, including ISO 2700x, NIST Cybersecurity Framework, Cybersecurity for ICS, PCI DSS, NIS2 and GDPR.
Customers can use CyberVadis results to map the assessment of AWS to commonly used industry frameworks and standards to instantly gain visibility into controls coverage.
AWS customers can download the complete 2026 AWS Assessment Report directly through CyberVadis’s portal using their own account, or through AWS Artifact.
To learn more about our other compliance and security programs, see AWS Compliance Programs.
As an AWS customer, you can reach out to your AWS account team if you have any questions or feedback.
If you have feedback about this post, submit comments in the Comments section below.
Amazon Web Services (AWS) is pleased to announce the successful completion of our Payment Card Industry (PCI) Data Security Standard (DSS) and Three Domain Secure (3DS) certifications. As part of this renewal, we have expanded the scope to include three additional AWS services and one additional AWS Region:
This certification means that customers can use these services while maintaining PCI DSS and PCI 3DS compliance, enabling innovation without compromising security. The full list of services can be found on the AWS Services in Scope by Compliance Program page.
The PCI DSS and PCI 3DS compliance packages include two key components for each certification:
Attestation of Compliance (AOC) – demonstrates that AWS was successfully validated against the PCI DSS and PCI 3DS standards.
AWS Responsibility Summary – provides guidance to help AWS customers understand their responsibility in developing and operating a highly secure environment on AWS for handling payment card data.
AWS was evaluated by Coalfire, a third-party Qualified Security Assessor (QSA).
This refreshed certification offers customers greater flexibility in deploying regulated workloads while reducing compliance overhead. Customers can access the PCI DSS and PCI 3DS report packages through AWS Artifact. This self-service portal provides on-demand access to AWS compliance reports, streamlining audit processes.
To learn more about our PCI programs and other compliance and security programs, see the AWS Compliance Programs page.
As always, we value your feedback and questions; reach out to the AWS Compliance team through the Compliance Support page.
If you have feedback about this post, submit comments in the Comments section below. If you have questions about this post, contact AWS Support.
The HIPAA Security Rule’s Technical Safeguards (§164.312) define five standards and nine implementation specifications covering access control, audit controls, integrity, authentication, and transmission security.
The guidance also covers the 2025 NPRM proposed changes,including encryption at rest and in transit becoming required, multi-factor authentication (MFA) becoming mandatory for all electronic Personal Health Information (ePHI) access, and new specifications for network segmentation, configuration management, anti-malware protection, patch management, software removal, incident response and breach notification.
Key topics included
Shared responsibility for HIPAA on AWS – A responsibility matrix mapping each §164.312 specification to what AWS manages nd what the customer must configure and operate.
ePHI boundary architecture – Guidance on establishing a defined ePHI boundary
ePHI data flow and encryption – A reference architecture tracing ePHI with the applicable §164.312 specification
Foundation checklist – Prerequisite recommendation before configuring individual Technical Safeguard controls.
This guidance is written for cloud architects, security engineers, CISOs, and compliance teams at covered entities and business associates building or operating AWS healthcare workloads. It assumes familiarity with AWS services and is intended as a practical implementation reference, not a legal or regulatory interpretation. This guidance focuses exclusively on Technical Safeguards.
HHS published a Notice of Proposed Rulemakingin January 2025, proposing significant updates to the HIPAA Security Rule—including eliminating the Addressable designation, making encryption, MFA, and asset inventory mandatory, and introducing new technical requirements not present in the current rule. As of June 2026, the final rule has not been published. This guidance covers both the current rule and the proposed changes and recommends treating all specifications as Required for new workloads.
For questions about HIPAA readiness on AWS, including Administrative Safeguards, Physical Safeguards, risk analysis, and assessment preparation, contact the AWS Security Assurance Services teamor your AWS account representative.
This guidance is provided by AWS Security Assurance Services, LLC, a HITRUST External Assessor Firm and PCI-QSAC along with contribution from AWS HCLS, AWS Compliance teams. It is for informational and guidance purposes only and does not constitute legal, regulatory, or compliance advice. Recipients are solely responsible for determining applicability to their specific environments and legal obligations.
If you have feedback about this post, submit comments in the Comments section below.
The new IRAP report includes four additional AWS services that are now assessed at the PROTECTED level under IRAP. This brings the total number of services assessed at the PROTECTED level to 167.
We have developed an IRAP documentation pack to help our Australian customers and their partners plan, architect, and assess risk for their workloads when they use AWS cloud services.
The IRAP pack on AWS Artifact also includes newly updated versions of the AWS Consumer Guide and the whitepaper Reference Architectures for ISM PROTECTED Workloads in the AWS Cloud.
Reach out to your AWS representatives to let us know which additional services you want to see in scope for upcoming IRAP assessments. We strive to bring more services into scope at the PROTECTED level under IRAP to support your requirements.
Compliance has become one of the biggest operational drains on modern security teams. CISOs are being asked to manage a growing sprawl of frameworks, prove control effectiveness more often, respond to more customer assurance requests, track risk across a growing web of third parties, and give executives and the board a clearer answer on whether cyber risk is actually going down.
Most of that pressure does not come from the frameworks themselves. It comes from the way compliance is still handled in many organizations, with security work happening in one set of tools and governance, risk, and compliance workflows managed somewhere else. Security teams detect exposures, investigate threats, validate risk, and drive remediation in active systems. Governance, Risk and Compliance (GRC) teams are often left managing controls, evidence, audits, third-party risk, and reporting in separate systems of record, which turns compliance into a constant reconciliation exercise rather than an extension of the security program.
That separation creates real drag. Skilled technical teams get pulled into repeated cycles of screenshots, exports, control validation, and spreadsheet updates, while CISOs are still left trying to answer the question that matters most: are our controls actually working right now?
Available today, Rapid7 Cyber GRC completely changes that model by connecting governance, risk, and compliance workflows to the security data and activity already happening across the environment. The result is a more connected way to reduce manual work, improve readiness, and turn security action into compliance proof.
Why compliance needs to move at the speed of security
For years, compliance work followed a familiar rhythm: prepare for the audit, gather evidence, prove the control, respond to findings, and start over when the next framework, customer review, or regulatory requirement arrives.
That rhythm works in conflict with how security teams operate today. Modern environments change continuously. Assets appear, cloud configurations drift, access permissions change, vulnerabilities emerge, vendors introduce risk, and remediation work is always in motion.
This leaves a widening gap between the state of the environment and the state of the evidence. A control that looked effective during the last audit may drift weeks later. A remediation effort may reduce risk, but the compliance record may not reflect it. A new exposure may change the risk tied to a control before the next review begins.
Boards and customers are asking for something more credible than periodic audit readiness. They want to understand whether security work is actually improving control health and reducing risk over time.
That is the shift from audit prep to continuous cyber assurance, built on better context and closer alignment between teams. As Bill Theissen, Managing Partner and VP of Consulting Services at Cyber Watch Systems, put it, “What excites me most about Rapid7 Cyber GRC is its ability to use existing security data, asset inventories, and API connectivity to produce more accurate, timely, and defensible risk reporting. Just as important, it helps bridge security engineering and GRC teams through a shared view of risk and a common language for communicating it.”
Cyber GRC is designed to support that shift by making governance, risk, and compliance part of how security teams prioritize, act, and prove progress. Compliance should not only document security activity after the fact – it should help show how that activity makes the business safer.
How Cyber GRC connects action to proof
Rapid7 Cyber GRC brings core GRC workflows into one place, including compliance program management, control monitoring, evidence collection, policy management, audit preparation, risk management, third-party risk management, exceptions, and reporting. Instead of managing those workflows in separate tools, teams can connect them to security context from the environment they are actively protecting.
Cyber GRC helps teams operationalize that model in a few practical ways:
Control monitoring helps teams see where requirements are being met and where gaps need attention.
Evidence workflows help teams collect, organize, and reuse proof across frameworks instead of rebuilding it for every audit.
Policy management helps link policies to controls, so teams can understand how documentation supports readiness.
Risk and issue workflows help teams assign ownership, track remediation, and prioritize work based on business and security context.
The value of that model is not just administrative efficiency. Security teams need confidence that controls are operating as intended, not simply that a control exists on paper. A policy may be in place without the control performing effectively. A remediation ticket may be closed without the underlying risk truly being reduced. Control testing and monitoring help close that gap by showing whether controls are functioning as expected, while issue and remediation workflows connect those findings to owners and next steps.
By connecting controls, evidence, risk, issues, policies, and remediation activity, Cyber GRC gives SecOps, IT, GRC, and compliance teams a shared view of where they stand and what needs to happen next.
Why third-party risk needs to be part of the same workflow
Third-party risk has become too significant to sit outside the rest of the security and compliance program. As organizations rely on more outside services, software, and vendors, they need a way to connect vendor risk to the same controls, evidence, remediation, and reporting workflows used internally. Verizon’s 2026 DBIR found that breaches involving third parties increased 60% from the previous year’s dataset and accounted for 48% of total breaches, which makes that connection harder to treat as optional.
Cyber GRC brings third-party risk management into the same operating picture by combining vendor oversight, control tracking, issue management, and evidence workflows in one place. That gives teams a more coherent way to assess external dependencies, understand where vendor risk affects control posture, and track action without creating yet another disconnected program.
Give leadership a better risk story
CISOs are under pressure to show progress in a way executives and boards can understand, and audit status alone does not tell the whole story.
Cyber GRC helps teams connect day-to-day security and compliance activity to higher-level reporting, including control health, readiness status, open risks, remediation progress, third-party dependencies, and evidence coverage. That gives leaders a clearer view of which gaps matter most, what is being done about them, and how security work is reducing risk. What makes that more useful is the quality of the underlying context. When controls, evidence, vulnerabilities, risk, and remediation are tied together, leadership gets a stronger basis for understanding not just whether the organization is compliant, but whether its controls are keeping pace with the way risk is actually developing.
Why Rapid7
Security leaders have an opportunity to make compliance more connected, more useful, and closely aligned to the work already happening across their security program.
Rapid7 approaches Cyber GRC as part of a broader security program. What makes that more useful is the quality of the underlying context. When controls, evidence, vulnerabilities, risk, and remediation are tied together, leadership gets a stronger basis for understanding not just whether the organization is compliant, but whether its controls are keeping pace with the way risk is actually developing.
That connection is at the core of what makes this solution different. Compliance proof is stronger when it is grounded in security context, not assembled after the fact from disconnected tools and static reports. With Rapid7 Cyber GRC, teams can move from documenting compliance activity to showing how security work is improving control health and reducing risk in real time.
See how Rapid7 Cyber GRC can help your team turn security operations into continuous cyber assurance.
AWS Security Assurance Services is announcing the release of the Cloud Security Alliance (CSA) Compliance Guide on Amazon Web Service (AWS), a new resource that maps the 17 control domains and 207 control objectives of the Cloud Controls Matrix v4.1 (CCM) to AWS services and recommended implementation practices. The guide is intended to help organizations using AWS plan, implement, and evidence the controls relevant to their CCM scope, including those pursuing or maintaining CSA STAR certification.
What is the Cloud Controls Matrix?
The Cloud Security Alliance is a not-for-profit organization dedicated to defining and raising awareness of best practices for cloud security. AWS maintains CSA STAR Level 2 certification, which couples the requirements of ISO/IEC 27001:2022 with the CCM. The CSA STAR documentation and the AWS Consensus Assessments Initiative Questionnaire (CAIQ) are available to AWS customers through AWS Artifact.
The CSA Cloud Controls Matrix is a cybersecurity controls framework developed by the CSA that provides a detailed set of security controls mapped across multiple domains (such as audit and assurance, identity and access management, and encryption and key management) specifically designed to assess and manage security risks in cloud computing environments. The CCM is cloud agnostic, designed to be applicable to any cloud service provider or deployment model, such as infrastructure as a service (IaaS), platform as a service (PaaS), and software as a service (SaaS), regardless of the underlying technology or vendor, providing universal security controls that organizations can apply across cloud platforms.
Responsibility models
CCM defines its own Shared Security Responsibility Model (SSRM) with three categories: Cloud service provider (CSP)-owned, customer-owned, and shared (independent or dependent). The guide recommends using the SSRM together with the AWS Shared Responsibility Model. For controls that AWS owns, the guide points to AWS attestations available through AWS Artifact (for example, SOC reports, ISO certificates, and the CSA STAR attestation) as inherited evidence. For controls that customers own or share, the guide describes how to implement and evidence them using AWS services. Using a CSA STAR–certified AWS service doesn’t by itself make a customer workload compliant. Customers remain responsible for configuring services, managing access, protecting data, and implementing additional controls based on their environment, risk assessments, and regulatory obligations. The guide is informational and doesn’t replace the AWS compliance documentation and certifications available through AWS Artifact.
What’s inside the guide
For each control, the guide states applicability, describes how organizations can implement the control on AWS, identifies common pitfalls, and lists examples that can be used as evidence during an assessment.
For further assistance, contact AWS Security Assurance Services. If you have feedback about this post, submit comments in the Comments section below.
The collective thoughts of the interwebz
Manage Consent
To provide the best experiences, we use technologies like cookies to store and/or access device information. Consenting to these technologies will allow us to process data such as browsing behavior or unique IDs on this site. Not consenting or withdrawing consent, may adversely affect certain features and functions.
Functional
Always active
The technical storage or access is strictly necessary for the legitimate purpose of enabling the use of a specific service explicitly requested by the subscriber or user, or for the sole purpose of carrying out the transmission of a communication over an electronic communications network.
Preferences
The technical storage or access is necessary for the legitimate purpose of storing preferences that are not requested by the subscriber or user.
Statistics
The technical storage or access that is used exclusively for statistical purposes.The technical storage or access that is used exclusively for anonymous statistical purposes. Without a subpoena, voluntary compliance on the part of your Internet Service Provider, or additional records from a third party, information stored or retrieved for this purpose alone cannot usually be used to identify you.
Marketing
The technical storage or access is required to create user profiles to send advertising, or to track the user on a website or across several websites for similar marketing purposes.