All posts by Sandeep Bajwa

Manage your data warehouse cost allocations with Amazon Redshift Serverless tagging

Post Syndicated from Sandeep Bajwa original https://aws.amazon.com/blogs/big-data/manage-your-data-warehouse-cost-allocations-with-amazon-redshift-serverless-tagging/

Amazon Redshift Serverless makes it simple to run and scale analytics without having to manage your data warehouse infrastructure. Developers, data scientists, and analysts can work across databases, data warehouses, and data lakes to build reporting and dashboarding applications, perform real-time analytics, share and collaborate on data, and even build and train machine learning (ML) models with Redshift Serverless.

Tags allows you to assign metadata to your AWS resources. You can define your own key and value for your resource tag, so that you can easily manage and filter your resources. Tags can also improve transparency and map costs to specific teams, products, or applications. This way, you can raise cost awareness and also make teams and users accountable for their own cost and usage.

You can now use tagging in Redshift Serverless to categorize the following resources based on your grouping needs:

  • Namespace – A collection of database objects and users
  • Workgroup – A collection of compute resources
  • Snapshot – Point-in-time backups of a cluster
  • Recovery point – Recovery points in Redshift Serverless are created every 30 minutes and saved for 24 hours

When using Redshift Serverless, you may have to manage data across many business departments, environments, and billing groups. In doing so, you’re usually faced with one of the following tasks:

  • Cost allocation and financial management – You want to know what you’re spending on AWS for a given project, line of business, or environment
  • Operations support and incident management – You want to send issues to the right teams and users
  • Access control – You want to constrain user access to certain resources
  • Security risk management – You want to group resources based on their level of security or data sensitivity and make sure proper controls are in place

In this post, we focus on tagging Redshift Serverless resources for cost allocation and reporting purposes. Knowing where you have incurred costs at the resource, workload, team, and organization level enhances your ability to budget and manage cost.

Solution overview

Let’s say that your company has two departments: marketing and finance. Each department has multiple cost centers and environments, as illustrated in the following figure. In AWS Cost Explorer, you want to create cost reports for Redshift Serverless by department, environment, and cost center.

We start with creating and applying user-defined tags to Amazon Serverless workgroups for respective departments, environments, and cost centers. You can use both the AWS Command Line Interface (AWS CLI) and Redshift Serverless console to tag serverless resources.

The high-level steps are as follows:

  1. Create tags.
  2. View and edit tags.
  3. Set up cost allocation tags.
  4. Create cost reports.

Create tags

To create tags, complete the following steps:

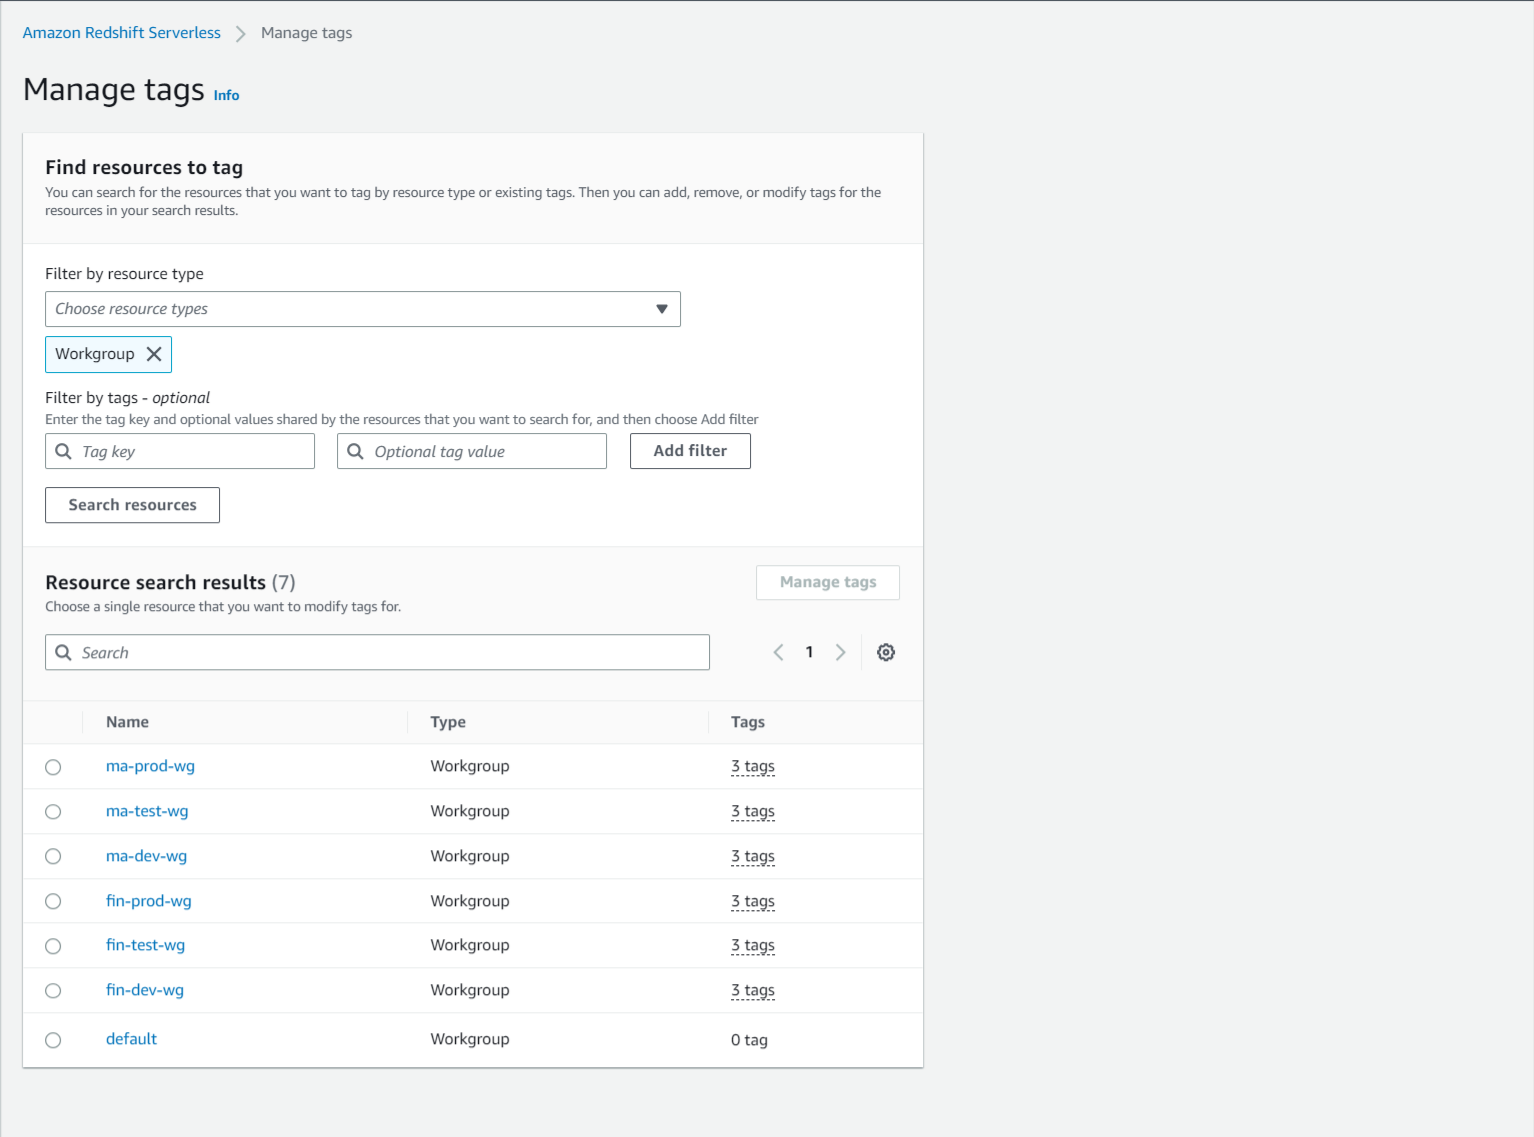
  1. On the Amazon Redshift console, choose Manage tags in the navigation pane.
    Amazon Redshift console
  2. For Filter by resource type, you can filter by Workgroup, Namespace, Snapshot, and Recovery Point.
  3. Optionally, you can search for resources by an existing tag by entering values for Tag key or Tag value. For this post, we don’t include any tag filters, so we can view all the resources across our account.
    search for resources by an existing tag by entering values
  4. Select your resource from the search results and choose Manage tags to customize the tag key and value parameters.

Here, you can add new tags, remove tags, save changes, and cancel your changes if needed.

  1. Because we want to allocate cost across the various departments, we add a new key called department and a new value called marketing.
  1. Choose Save changes.
    Save Changes
  2. Confirm the changes by choosing Apply changes.
    Apply changes

For more details on tagging, refer to Tagging resources overview.

View and edit tags

If you already have resources such as workgroups (listed on the Workgroup configuration page) or snapshots (listed on the Data backup page), you can create new tags or edit existing tags on the given resource. In the following example, we manage tags on an existing workgroup.

  1. On the Amazon Redshift console, choose Workgroup configuration in the navigation pane.
  2. Select your workgroup and on the Actions menu, choose Manage tags.
    Select your workgroup and on the Actions menu, choose Manage tags.

Now we can remove existing tags or add new tags. For our use case, let’s assume that the marketing department is no longer using the default workgroup, so we want to remove the current tag.

  1. Choose Remove next to the marketing tag.
    Choose Remove next to the marketing tag.

We are given the option to choose Undo if needed.

  1. Choose Save changes and then Apply the changes to confirm.
    Choose Save changes and then Apply the changes to confirm.

After we apply the tags, we can view the full list of resources. The number of tags applied to each resource is found in the Tags column.
view the full list of resources

Set up cost allocation tags

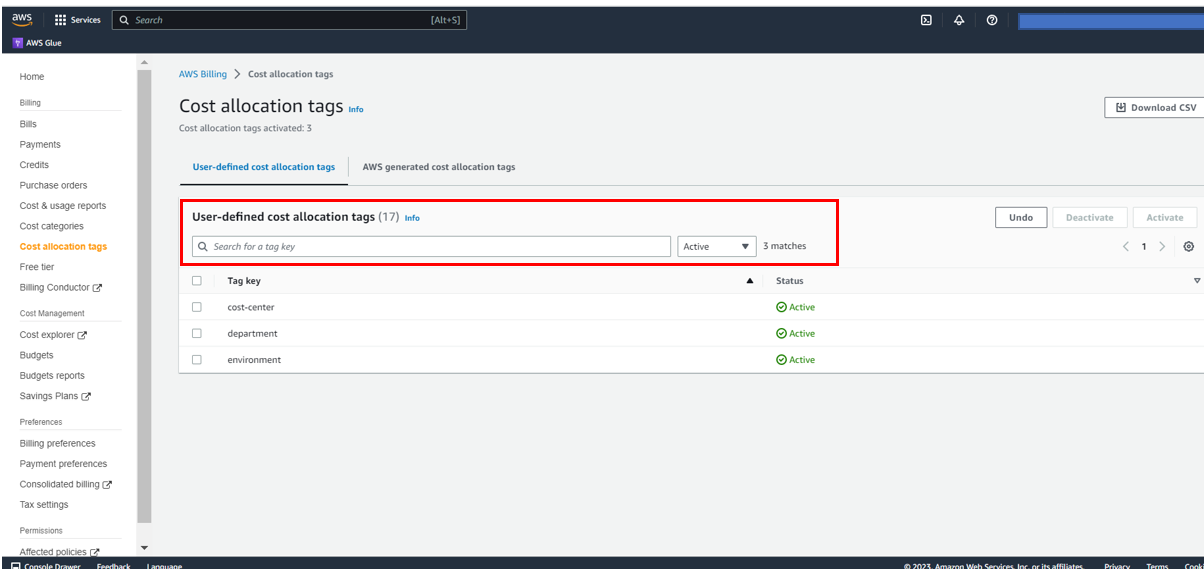
After you create and apply the user-defined tags to your Redshift Serverless workgroups, it can take up to 24 hours for the tags to appear on your cost allocation tags page for activation. You can activate tags by using the AWS Billing console for cost allocation tracking with the following steps:

  1. On the AWS Billing console, choose Cost allocation tags in the navigation pane.
  2. Under User-defined cost allocation tags¸ select the tags you created and applied (for this example, cost-center).
  3. Choose Activate.
    Choose Activate

After we activate all the tags we created, we can view the full list by choosing Active on the drop-down menu.

Create cost reports

After you activate the cost allocation tags, they appear on your cost allocation reports in Cost Explorer.

Cost Explorer helps you manage your AWS costs by giving you detailed insights into the line items in your bill. In Cost Explorer, you can visualize daily, monthly, and forecasted spend by combining an array of available filters. Filters allow you to narrow down costs according to AWS service type, linked accounts, and tags.

The following screenshot shows the preconfigured reports in Cost Explorer.
preconfigured reports in Cost Explorer.

To create custom reports for your cost and usage data, complete the following steps:

  1. On the AWS Cost Management console, choose Reports in the navigation pane.
  2. Choose Create new report.
  3. Select the report type you want to create (for this example, we select Cost and usage).
  4. Choose Create Report.
    Create Report
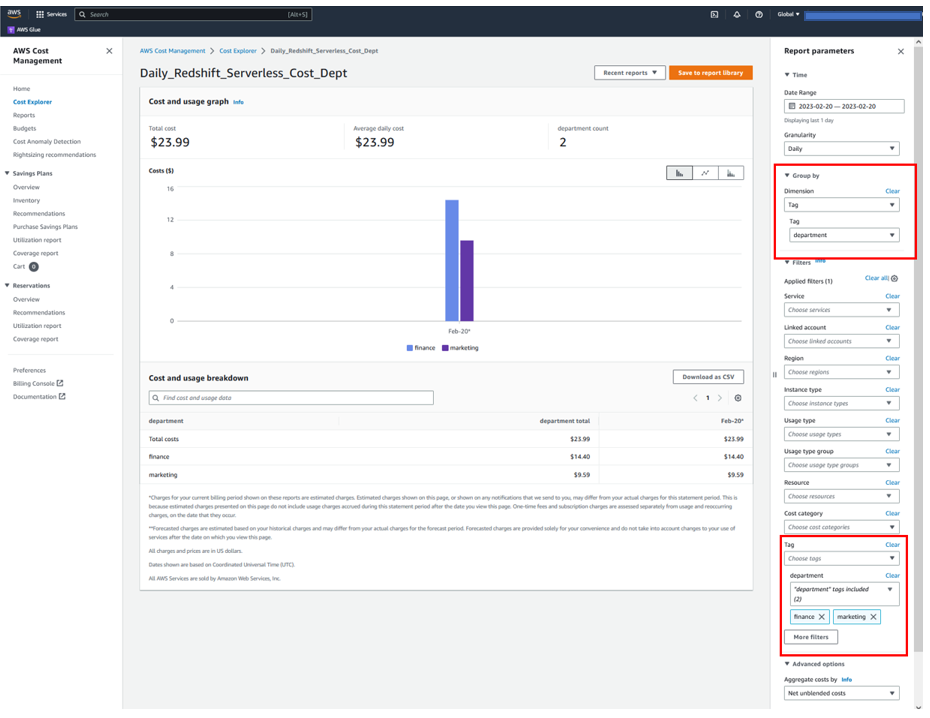
  5. To view weekly Redshift Serverless cost by cost center, choose the applicable settings in the Report parameters pane. For this post, we group data by the cost-center tag and filter data by the department tag.
  6. Save the report for later use by choosing Save to report library.
    Save the report for later use by choosing Save to report library.
  7. Enter a name for your report, then choose Save report.
    Save Report

The following screenshot shows a sample report for daily Redshift Serverless cost by department.

sample report for daily Redshift Serverless cost by department.

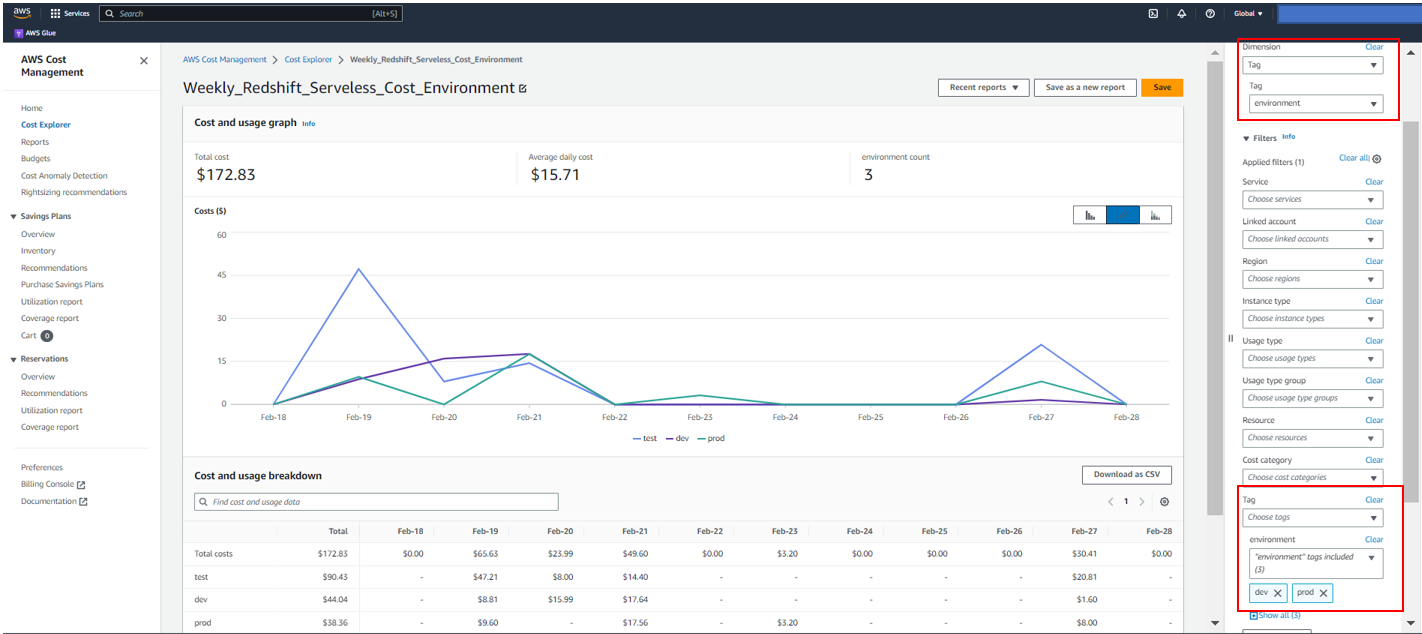
The following screenshot shows an example report of weekly Redshift Serverless cost by environment.

example report of weekly Redshift Serverless cost by environment.

Conclusion

Tagging resources in Amazon Redshift helps you maintain a central place to organize and view resources across the service for billing management. This feature saves you hours of manual work you would spend in grouping your Amazon Redshift resources via a spreadsheet or other manual alternatives.

For more tagging best practices, refer to Tagging AWS resources.


About the Authors

Sandeep Bajwa is a Sr. Analytics Specialist based out of Northern Virginia, specialized in the design and implementation of analytics and data lake solutions.

Michael Yitayew is a Product Manager for Amazon Redshift based out of New York. He works with customers and engineering teams to build new features that enable data engineers and data analysts to more easily load data, manage data warehouse resources, and query their data. He has supported AWS customers for over 3 years in both product marketing and product management roles.

Automate deployment of an Amazon QuickSight analysis connecting to an Amazon Redshift data warehouse with an AWS CloudFormation template

Post Syndicated from Sandeep Bajwa original https://aws.amazon.com/blogs/big-data/automate-deployment-of-an-amazon-quicksight-analysis-connecting-to-an-amazon-redshift-data-warehouse-with-an-aws-cloudformation-template/

Amazon Redshift is the most widely used data warehouse in the cloud, best suited for analyzing exabytes of data and running complex analytical queries. Amazon QuickSight is a fast business analytics service to build visualizations, perform ad hoc analysis, and quickly get business insights from your data. QuickSight provides easy integration with Amazon Redshift, providing native access to all your data and enabling organizations to scale their business analytics capabilities to hundreds of thousands of users. QuickSight delivers fast and responsive query performance by using a robust in-memory engine (SPICE).

As a QuickSight administrator, you can use AWS CloudFormation templates to migrate assets between distinct environments from development, to test, to production. AWS CloudFormation helps you model and set up your AWS resources so you can spend less time managing those resources and more time focusing on your applications that run in AWS. You no longer need to create data sources or analyses manually. You create a template that describes all the AWS resources that you want, and AWS CloudFormation takes care of provisioning and configuring those resources for you. In addition, with versioning, you have your previous assets, which provides the flexibility to roll back deployments if the need arises. For more details, refer to Amazon QuickSight resource type reference.

In this post, we show how to automate the deployment of a QuickSight analysis connecting to an Amazon Redshift data warehouse with a CloudFormation template.

Solution overview

Our solution consists of the following steps:

  1. Create a QuickSight analysis using an Amazon Redshift data source.
  2. Create a QuickSight template for your analysis.
  3. Create a CloudFormation template for your analysis using the AWS Command Line Interface (AWS CLI).
  4. Use the generated CloudFormation template to deploy a QuickSight analysis to a target environment.

The following diagram shows the architecture of how you can have multiple AWS accounts, each with its own QuickSight environment connected to its own Amazon Redshift data source. In this post, we outline the steps involved in migrating QuickSight assets in the dev account to the prod account. For this post, we use Amazon Redshift as the data source and create a QuickSight visualization using the Amazon Redshift sample TICKIT database.

The following diagram illustrates flow of the high-level steps.

Prerequisites

Before setting up the CloudFormation stacks, you must have an AWS account and an AWS Identity and Access Management (IAM) user with sufficient permissions to interact with the AWS Management Console and the services listed in the architecture.

The migration requires the following prerequisites:

Create a QuickSight analysis in your dev environment

In this section, we walk through the steps to set up your QuickSight analysis using an Amazon Redshift data source.

Create an Amazon Redshift data source

To connect to your Amazon Redshift data warehouse, you need to create a data source in QuickSight. As shown in the following screenshot, you have two options:

  • Auto-discovered
  • Manual connect

QuickSight auto-discovers Amazon Redshift clusters that are associated with your AWS account. These resources must be located in the same Region as your QuickSight account.

For more details, refer to Authorizing connections from Amazon QuickSight to Amazon Redshift clusters.

You can also manually connect and create a data source.

Create an Amazon Redshift dataset

The next step is to create a QuickSight dataset, which identifies the specific data in a data source you want to use.

For this post, we use the TICKIT database created in an Amazon Redshift data warehouse, which consists of seven tables: two fact tables and five dimensions, as shown in the following figure.

This sample database application helps analysts track sales activity for the fictional TICKIT website, where users buy and sell tickets online for sporting events, shows, and concerts.

  1. On the Datasets page, choose New dataset.
  2. Choose the data source you created in the previous step.
  3. Choose Use custom SQL.
  4. Enter the custom SQL as shown in the following screenshot.

The following screenshot shows our completed data source.

Create a QuickSight analysis

The next step is to create an analysis that utilizes this dataset. In QuickSight, you analyze and visualize your data in analyses. When you’re finished, you can publish your analysis as a dashboard to share with others in your organization.

  1. On the All analyses tab of the QuickSight start page, choose New analysis.

The Datasets page opens.

  1. Choose a dataset, then choose Use in analysis.

  1. Create a visual. For more information about creating visuals, see Adding visuals to Amazon QuickSight analyses.

Create a QuickSight template from your analysis

A QuickSight template is a named object in your AWS account that contains the definition of your analysis and references to the datasets used. You can create a template using the QuickSight API by providing the details of the source analysis via a parameter file. You can use templates to easily create a new analysis.

You can use AWS Cloud9 from the console to run AWS CLI commands.

The following AWS CLI command demonstrates how to create a QuickSight template based on the sales analysis you created (provide your AWS account ID for your dev account):

aws quicksight create-template --aws-account-id  <DEVACCOUNT>--template-id QS-RS-SalesAnalysis-Template --cli-input-json file://parameters.json

The parameter.json file contains the following details (provide your source QuickSight user ARN, analysis ARN, and dataset ARN):

{
    "Name": "QS-RS-SalesAnalysis-Temp",
    "Permissions": [
        {"Principal": "<QS-USER-ARN>", 
          "Actions": [ "quicksight:CreateTemplate",
                       "quicksight:DescribeTemplate",                   
                       "quicksight:DescribeTemplatePermissions",
                       "quicksight:UpdateTemplate"         
            ] } ] ,
     "SourceEntity": {
       "SourceAnalysis": {
         "Arn": "<QS-ANALYSIS-ARN>",
         "DataSetReferences": [
           {
             "DataSetPlaceholder": "sales",
             "DataSetArn": "<QS-DATASET-ARN>"
           }
         ]
       }
     },
     "VersionDescription": "1"
    }

You can use the AWS CLI describe-user, describe_analysis, and describe_dataset commands to get the required ARNs.

To upload the updated parameter.json file to AWS Cloud9, choose File from the tool bar and choose Upload local file.

The QuickSight template is created in the background. QuickSight templates aren’t visible within the QuickSight UI; they’re a developer-managed or admin-managed asset that is only accessible via the AWS CLI or APIs.

To check the status of the template, run the describe-template command:

aws quicksight describe-template --aws-account-id <DEVACCOUNT> --template-id "QS-RS-SalesAnalysis-Temp"

The following code shows command output:

Copy the template ARN; we need it later to create a template in the production account.

The QuickSight template permissions in the dev account need to be updated to give access to the prod account. Run the following command to update the QuickSight template. This provides the describe privilege to the target account to extract details of the template from the source account:

aws quicksight update-template-permissions --aws-account-id <DEVACCOUNT> --template-id “QS-RS-SalesAnalysis-Temp” --grant-permissions file://TemplatePermission.json

The file TemplatePermission.json contains the following details (provide your target AWS account ID):

[
  {
    "Principal": "arn:aws:iam::<TARGET ACCOUNT>",
    "Actions": [
      "quicksight:UpdateTemplatePermissions",
      "quicksight:DescribeTemplate"
    ]
  }
]

To upload the updated TemplatePermission.json file to AWS Cloud9, choose the File menu from the tool bar and choose Upload local file.

Create a CloudFormation template

In this section, we create a CloudFormation template containing our QuickSight assets. In this example, we use a YAML formatted template saved on our local machine. We update the following different sections of the template:

  • AWS::QuickSight::DataSource
  • AWS::QuickSight::DataSet
  • AWS::QuickSight::Template
  • AWS::QuickSight::Analysis

Some of the information required to complete the CloudFormation template can be gathered from the source QuickSight account via the describe AWS CLI commands, and some information needs to be updated for the target account.

Create an Amazon Redshift data source in AWS CloudFormation

In this step, we add the AWS::QuickSight::DataSource section of the CloudFormation template.

Gather the following information on the Amazon Redshift cluster in the target AWS account (production environment):

  • VPC connection ARN
  • Host
  • Port
  • Database
  • User
  • Password
  • Cluster ID

You have the option to create a custom DataSourceID. This ID is unique per Region for each AWS account.

Add the following information to the template:

Resources:
  RedshiftBuildQSDataSource:
    Type: 'AWS::QuickSight::DataSource'
    Properties:  
      DataSourceId: "RS-Sales-DW"      
      AwsAccountId: !Sub ${AWS::ACCOUNT ID}
      VpcConnectionProperties:
        VpcConnectionArn: <VPC-CONNECTION-ARN>      
      Type: REDSHIFT   
      DataSourceParameters:
        RedshiftParameters:     
          Host: "<HOST>"
          Port: <PORT>
          Clusterid: "<CLUSTER ID>"
          Database: "<DATABASE>"    
      Name: "RS-Sales-DW"
      Credentials:
        CredentialPair:
          Username: <USER>
          Password: <PASSWORD>
      Permissions:

Create an Amazon Redshift dataset in AWS CloudFormation

In this step, we add the AWS::QuickSight::DataSet section in the CloudFormation template to match the dataset definition from the source account.

Gather the dataset details and run the list-data-sets command to get all datasets from the source account (provide your source dev account ID):

aws quicksight list-data-sets  --aws-account-id <DEVACCOUNT>

The following code is the output:

Run the describe-data-set command, specifying the dataset ID from the previous command’s response:

aws quicksight describe-data-set --aws-account-id <DEVACCOUNT> --data-set-id "<YOUR-DATASET-ID>"

The following code shows partial output:

Based on the dataset description, add the AWS::Quicksight::DataSet resource in the CloudFormation template, as shown in the following code. Note that you can also create a custom DataSetID. This ID is unique per Region for each AWS account.

QSRSBuildQSDataSet:
    Type: 'AWS::QuickSight::DataSet'
    Properties:
      DataSetId: "RS-Sales-DW" 
      Name: "sales" 
      AwsAccountId: !Sub ${AWS::ACCOUNT ID}
      PhysicalTableMap:
        PhysicalTable1:          
          CustomSql:
            SqlQuery: "select sellerid, username, (firstname ||' '|| lastname) as name,city, sum(qtysold) as sales
              from sales, date, users
              where sales.sellerid = users.userid and sales.dateid = date.dateid and year = 2008
              group by sellerid, username, name, city
              order by 5 desc
              limit 10"
            DataSourceArn: !GetAtt RedshiftBuildQSDataSource.Arn
            Name"RS-Sales-DW"
            Columns:
            - Type: INTEGER
              Name: sellerid
            - Type: STRING
              Name: username
            - Type: STRING
              Name: name
            - Type: STRING
              Name: city
            - Type: DECIMAL
              Name: sales                                     
      LogicalTableMap:
        LogicalTable1:
          Alias: sales
          Source:
            PhysicalTableId: PhysicalTable1
          DataTransforms:
          - CastColumnTypeOperation:
              ColumnName: sales
              NewColumnType: DECIMAL
      Permissions:
        - Principal: !Join 
            - ''
            - - 'arn:aws:quicksight:'
              - !Ref QuickSightIdentityRegion
              - ':'
              - !Ref 'AWS::AccountId'
              - ':user/default/'
              - !Ref QuickSightUser
          Actions:
            - 'quicksight:UpdateDataSetPermissions'
            - 'quicksight:DescribeDataSet'
            - 'quicksight:DescribeDataSetPermissions'
            - 'quicksight:PassDataSet'
            - 'quicksight:DescribeIngestion'
            - 'quicksight:ListIngestions'
            - 'quicksight:UpdateDataSet'
            - 'quicksight:DeleteDataSet'
            - 'quicksight:CreateIngestion'
            - 'quicksight:CancelIngestion'
      ImportMode: DIRECT_QUERY

You can specify ImportMode to choose between Direct_Query or Spice.

Create a QuickSight template in AWS CloudFormation

In this step, we add the AWS::QuickSight::Template section in the CloudFormation template, representing the analysis template.

Use the source template ARN you created earlier and add the AWS::Quicksight::Template resource in the CloudFormation template:

QSTCFBuildQSTemplate:
    Type: 'AWS::QuickSight::Template'
    Properties:
      TemplateId: "QS-RS-SalesAnalysis-Temp"
      Name: "QS-RS-SalesAnalysis-Temp"
      AwsAccountId:!Sub ${AWS::ACCOUNT ID}
      SourceEntity:
        SourceTemplate:
          Arn: '<SOURCE-TEMPLATE-ARN>'          
      Permissions:
        - Principal: !Join 
            - ''
            - - 'arn:aws:quicksight:'
              - !Ref QuickSightIdentityRegion
              - ':'
              - !Ref 'AWS::AccountId'
              - ':user/default/'
              - !Ref QuickSightUser
          Actions:
            - 'quicksight:DescribeTemplate'
      VersionDescription: Initial version - Copied over from AWS account.

Create a QuickSight analysis

In this last step, we add the AWS::QuickSight::Analysis section in the CloudFormation template. The analysis is linked to the template created in the target account.

Add the AWS::Quicksight::Analysis resource in the CloudFormation template as shown in the following code:

QSRSBuildQSAnalysis:
    Type: 'AWS::QuickSight::Analysis'
    Properties:
      AnalysisId: 'Sales-Analysis'
      Name: 'Sales-Analysis'
      AwsAccountId:!Sub ${AWS::ACCOUNT ID}
      SourceEntity:
        SourceTemplate:
          Arn: !GetAtt  QSTCFBuildQSTemplate.Arn
          DataSetReferences:
            - DataSetPlaceholder: 'sales'
              DataSetArn: !GetAtt QSRSBuildQSDataSet.Arn
      Permissions:
        - Principal: !Join 
            - ''
            - - 'arn:aws:quicksight:'
              - !Ref QuickSightIdentityRegion
              - ':'
              - !Ref 'AWS::AccountId'
              - ':user/default/'
              - !Ref QuickSightUser
          Actions:
            - 'quicksight:RestoreAnalysis'
            - 'quicksight:UpdateAnalysisPermissions'
            - 'quicksight:DeleteAnalysis'
            - 'quicksight:DescribeAnalysisPermissions'
            - 'quicksight:QueryAnalysis'
            - 'quicksight:DescribeAnalysis'
            - 'quicksight:UpdateAnalysis'      

Deploy the CloudFormation template in the production account

To create a new CloudFormation stack that uses the preceding template via the AWS CloudFormation console, complete the following steps:

  1. On the AWS CloudFormation console, choose Create Stack.
  2. On the drop-down menu, choose with new resources (standard).
  3. For Prepare template, select Template is ready.
  4. For Specify template, choose Upload a template file.
  5. Save the provided CloudFormation template in a .yaml file and upload it.
  6. Choose Next.
  7. Enter a name for the stack. For this post, we use QS-RS-CF-Stack.
  8. Choose Next.
  9. Choose Next again.
  10. Choose Create Stack.

The status of the stack changes to CREATE_IN_PROGRESS, then to CREATE_COMPLETE.

Verify the QuickSight objects in the following table have been created in the production environment.

QuickSight Object Type Object Name (Dev) Object Name ( Prod)
Data Source RS-Sales-DW RS-Sales-DW
Dataset Sales Sales
Template QS-RS-Sales-Temp QS-RS-SalesAnalysis-Temp
Analysis Sales Analysis Sales-Analysis

The following example shows that Sales Analysis was created in the target account.

Conclusion

This post demonstrated an approach to migrate a QuickSight analysis with an Amazon Redshift data source from one QuickSight account to another with a CloudFormation template.

For more information about automating dashboard deployment, customizing access to the QuickSight console, configuring for team collaboration, and implementing multi-tenancy and client user segregation, check out the videos Virtual Admin Workshop: Working with Amazon QuickSight APIs and Admin Level-Up Virtual Workshop, V2 on YouTube.


About the author

Sandeep Bajwa is a Sr. Analytics Specialist based out of Northern Virginia, specialized in the design and implementation of analytics and data lake solutions.