Post Syndicated from Satheesh Kumar original https://aws.amazon.com/blogs/security/automate-aws-firewall-manager-onboarding-using-aws-centralized-waf-and-vpc-security-group-management-solution/
Many customers—especially large enterprises—run workloads across multiple AWS accounts and in multiple AWS regions. AWS Firewall Manager service, launched in April 2018, enables customers to centrally configure and manage AWS WAF rules, audit Amazon VPC security group rules across accounts and applications in AWS Organizations, and protect resources against distributed DDoS attacks.
In this blog post, we show you how to onboard your accounts and your AWS Organizations into the AWS Firewall Manager service and start centrally managing the security policies of your AWS Organizations member accounts. We also show you examples of how to perform operations on the Firewall Manager policies after you’ve deployed the solution, so you can adjust your security posture over time.
As more and more customers began using Firewall Manager for centralized management, they gave us feedback on how it could be improved. We heard that the process of defining policies and configuring rule sets can be challenging and time consuming, especially in a multi-account, multi-region scenario. We built the AWS Centralized WAF and VPC Security Group Management solution to make it easier and faster.
Solution overview
The AWS Centralized WAF and VPC Security Group Management solution fully automates the deployment of Firewall Manager with a set of opinionated defaults for the policies. We call it “opinionated,” because there’s no set of security rules that is right for absolutely every customer. We’re providing an example opinion, but you might have a different opinion, given your unique circumstance. Our examples block traffic that you might have a reason to allow. We install the following policies when you deploy this solution:
- AWS WAF global policy for Amazon CloudFront distributions and regional policy for Application Load Balancer and Amazon API Gateway: Both the AWS WAF policies include the following AWS Managed Rules for AWS WAF. You can further customize these rules to suit your WAF requirements.
- AWSManagedRulesCommonRuleSet
- AWSManagedRulesAdminProtectionRuleSet
- AWSManagedRulesKnownBadInputsRuleSet
- AWSManagedRulesSQLiRuleSet
- Amazon VPC security group usage audit and content audit policy: These policies flag security groups that are unused or redundant. Automatic remediation is turned off by default, but you can turn it on by customizing the solution.
- AWS Shield Advanced policy: If your account has enabled Shield Advanced, then Shield Advanced protection is enabled for CloudFront, Application Load Balancer, and Elastic IPs.
The core of the solution is the AWS CloudFormation template aws-centralized-waf-and-security-group-management. This template deploys the components shown in Figure 1:
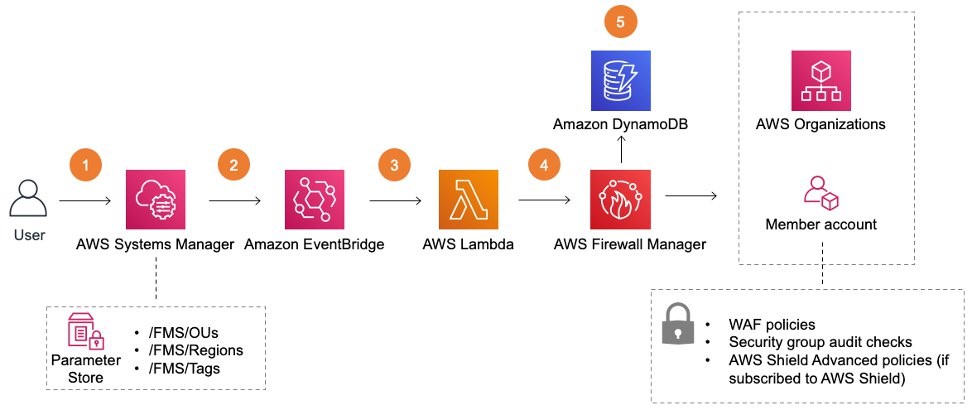
Figure 1: Main solutions template – aws-centralized-waf-and-vpc-security-group-management.template
- After deployment, you can update the three AWS Systems Manager parameters—/FMS/OUs, /FMS/Regions, and /FMS/Tags—with appropriate values to control the scope and applicability of the Firewall Manager security policies.
- On update of the values in the Systems Manager parameters, the Amazon EventBridge rule captures the parameter update event.
- Amazon EventBridge triggers an AWS Lambda function to deploy the Firewall Manager policies.
- The AWS Lambda function will deploy the Firewall manager security policies across the OUs and regions specified in step 1.
- The lambda function updates the Amazon DynamoDB table with Firewall manager policies metadata.
Configuring Prerequisites Automatically
There are a few important prerequisites that must be configured in your account before you deploy this solution. We have built a template called aws-fms-prereq that will launch the solution prerequisites.
When you execute the aws-fms-prereq template, the following things will happen:
- AWS Organizations will be enabled with all features, if not already enabled.
- A specific AWS account is designated as the firewall administrator account. (You provide this account number when you deploy the template.)
- AWS Config is enabled in all regions of all member accounts across the entire AWS Organization.
Note: If the Firewall Manager prerequisites described above are already met, you can skip this step and go directly to next step: Deploy the solution template.
If you run this prerequisite template in the Organization primary account that is also your Firewall Manager admin account, the solution template will be deployed automatically. If you do this, you can skip the step of deploying the solution template and jump straight to Manage your Firewall manager security policies.
Figure 2 shows how the prerequisite template creates a Lambda function. That function validates and installs the prerequisites and AWS CloudFormation stack sets to enable AWS Config across all member accounts in the organization.
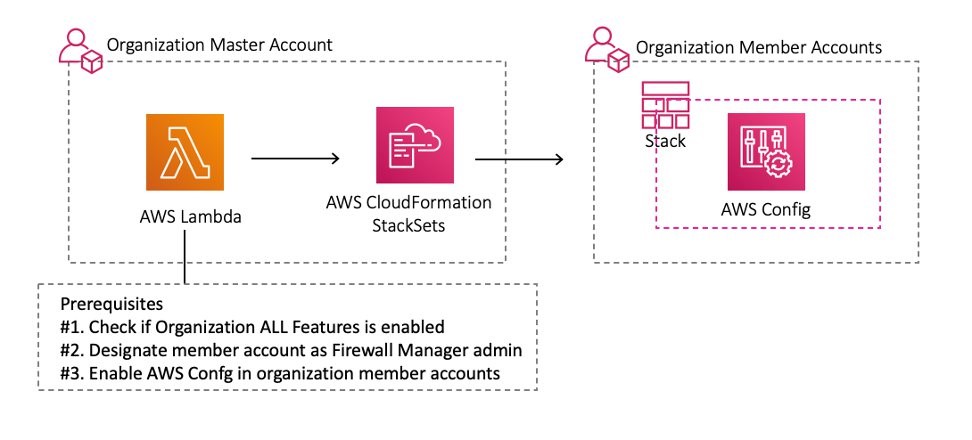
Figure 2: Solution prerequisites
Installing Prerequisites
If the Firewall Manager prerequisites are already met, skip this step and go directly to next step, below: Deploy the solution template.
- Install the AWS CLI
Note: If you already have the AWS Command Line Interface v2 installed on your workstation, you can skip this step.
The template deployment can be done using the AWS Management Console or the AWS CLI. This procedure uses the AWS CLI to do the deployment. To get started, install the AWS CLI and configure it with credentials that have the required IAM permissions to create resources.
- Deploy the prerequisite templateIf this is the first time you’re using Firewall Manager, download the aws-fms-prereq.template, and run the following AWS CLI command in the primary account of your AWS Organization to check for and complete the prerequisites.Replace the variable <your_FW_account_ID> with the account ID of your AWS Firewall Admin. This deployment typically takes 2–3 minutes, but sometimes a little longer if there are a large number of member accounts in your organization. If you want AWS Config to be enabled in your member accounts, then set the EnableConfig parameter to Yes; however, if AWS Config is already enabled, then set it to No.
Deploy the solution template
Deploy the solution using aws-centralized-waf-and-vpc-security-group-management.template—an AWS CloudFormation template—in your Firewall Manager admin account that was created by the prerequisite template.
This template deploys the AWS Centralized WAF and VPC Security Group Management solution shown in Figure 1, with all the resources and integrations.
The following AWS CLI command will deploy the solution template:
The command will print very basic output, simply identifying the stack’s name, as shown below.
You can run the following CLI command to check the status of the stack deployment. Once you see that “StackStatus” is set to “CREATE_COMPLETE” in the output, you can proceed to the next step.
Manage your Firewall manager security policies
Once the solution is deployed, you can deploy the Firewall Manager policies to the organization member accounts, which will be reflected in the Parameter Store. These changes to the Parameter Store are picked up by the EventBridge rule, which triggers the Lambda function to automatically create, delete, or modify the policies as required.
Note: All of the following commands must be executed in the Firewall manager admin account, which might not be the root account of your AWS Organization.
- Add OUs to the scope of Firewall Manager policiesTo begin, define the OUs that the Firewall Manager policies should apply to. Store the list of OUs in a parameter named /FMS/OUs. The following AWS CLI command stores a comma-separated list of OU IDs in the right parameter.
If it is successful, the output of the command will be a simple acknowledgement, like the following:
- Add AWS Regions to the scope of Firewall Manager policiesNext you need to add the AWS regions where you want these policies to be applied. In the AWS CLI command that follows, you can customize the AWS region list depending on where you run your workloads. If, for example, you want to use us-west-2, us-east-1, and eu-west-1, then you need to provide us-west-2,us-east-1,eu-west-1 as your value in the command below.
If it is successful, the output of the command will be a simple acknowledgement, like the following:
- (Optional) Add resource tagsPlease note that this is an optional step. Resource tags are a way to apply these Firewall Manager policies to some resources, but not others. Imagine that we only want to apply these policies to resources that have the tag Environment set to the value Prod. The following command will do that:
If it is successful, the output of the command will be a simple acknowledgement, like the following:
Test the solution
Test the solution by creating a global CloudFront distribution and an Amazon VPC security group in one of your member accounts, and configure these resources to be noncompliant with the policies enforced by Firewall Manager.
Deploy test resources in one of your member accounts
Run the following AWS CLI command to deploy the demo template in one of the member accounts to create a sample CloudFront distribution and an Amazon VPC security group that aren’t compliant with the default Firewall Manager policies.
Check for web ACL and security group audit results
To check the webACL resource association in the member account, follow these steps:
- Log in to your member account management console where you had deployed your demo-template and go to the WAF & Shield service page.
- You will see the WebACL with the prefix “FMManagedWebACLV2FMS-WAF-01“ , select that webACL.
- Go to the tab Associated AWS resources.
- You should see the newly created CloudFront distribution listed here.
To check the compliance status of the newly created security group, follow these steps:
- Log in to the Firewall manager admin account management console and go to the AWS Firewall Manager service page.
- In the Security policies section, you will find the FMS-SecGroup-02 policy. Select the policy FMS-SecGroup-02.
- You will see that the member account (where the demo template was deployed) is marked as non-compliant. Select the member account number to see the newly created security group along with the reason for the noncompliant finding.
Clean-up test resources in member account
Follow these steps to clean up the test resources that the demo template would have created in your member account:
- Log in to member account management console, and go to Cloudfront service page.
- Select the CloudFront distribution. (Origin would have the stack name as its prefix.)
- Go to “Behaviours,” select the one and select Edit.
- Remove the lambda function association and save changes.
- Run this CLI command to delete the stack that you had created earlier:
Customizing the solution’s source code
This solution deploys Firewall Manager policies with some opinionated default rules defined in the manifest.json file. They probably aren’t all that you will need. You could customize these policies to fit your own needs, but it takes a bit of development skill. Also, the steps are too long to include here. If, for example, you want to add another AWS WAF rule group to the default AWS WAF security policy, you’ll need to edit the manifest and redeploy the solution. See how to do this customization and several others.
(Optional) Clean-up resources
Once you’ve tried the solution, if you want to clean up the stack you can do so in two steps:
- Go to the Firewall Manager admin account management console, navigate to the Parameter Store, and update the /FMS/OU parameter with the value delete. This ensures that the Firewall Manager policies and their related resources are deleted.
- Run the following AWS CLI command in the Firewall manager admin account to delete the solution stack you deployed earlier:
Conclusion
The AWS Centralized WAF and VPC Security Group Management solution addresses the feedback we heard from you, our customer. You told us the process of defining policies and configuring rule sets is challenging and time consuming, so we wrote this to make it easier and faster. In this post, we showed you how to deploy the solution following a two-step process using AWS CloudFormation. We also showed you ways that you can use the solution to easily manage your Firewall Manager policies by updating values in Systems Manager Parameter Store. Updating the values automates the deployment based on your choice of OUs, Regions, and resources. Finally, we showed you how to further customize the solution to suit your needs.
This post is just an introduction to what is possible and the overall objective. Before you start using this solution for anything important, we recommend that you review the solution implementation guide. It contains step-by-step directions and more example use cases. The guide also includes security recommendations and some cost estimates for the various supported scenarios.
To learn more about other AWS solutions, visit the AWS Solutions Library.
If you have feedback about this post, submit comments in the Comments section below. If you have questions about this post, start a new thread on the AWS Firewall Manager forum or contact AWS Support.
Want more AWS Security how-to content, news, and feature announcements? Follow us on Twitter.