Today, I’m happy to announce AWS Shield network security director (preview), a capability that simplifies identification of configuration issues related to threats such as SQL injections and distributed denial of service (DDoS) events, and proposes remediations. This feature identifies and analyzes network resources, connections, and configurations. It compares them against AWS best practices to create a network topology that highlights resources requiring protection.
Organizations today face significant challenges in maintaining a robust network security posture. Security teams often struggle to efficiently discover all resources in their environments, understand how these resources are interconnected, and identify which security services are currently configured. Additionally, they find determining how well resources are configured relative to AWS best practices requires considerable expertise and effort. Many teams find it difficult to identify which network security services and rule sets would best protect their applications from common and emerging threats.
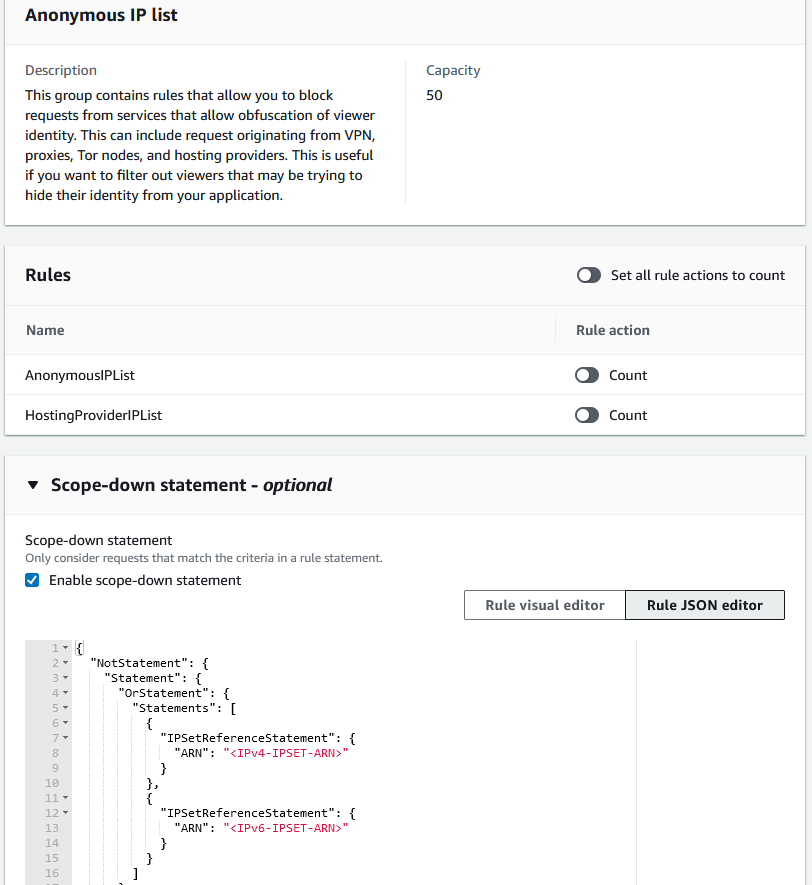
AWS Shield network security director addresses these challenges through three key capabilities. First, it performs comprehensive analysis to discover resources across your AWS accounts, identify connectivity between resources, and determine which network security services and configurations are currently in place. Second, it prioritizes resources by severity level based on AWS network security best practices and threat intelligence. Finally, it provides specific remediation recommendations such as step-by-step instructions for implementing the right AWS security services, including AWS WAF, Amazon Virtual Private Cloud (Amazon VPC)security groups, and Amazon VPC network access control lists (ACLs) to protect your resources.
The service supports critical network security use cases, including protecting applications against internet-born threats and controlling human access to resources based on port, protocol, or IP address range. It provides network analysis to discover assets and delivers analysis that eliminates time-consuming manual processes for identifying resources that need protection. The service offers resource prioritization by assigning security findings a severity level based on network context and adherence to AWS best practices, helping you focus on what matters most. Additionally, it supplies actionable recommendations with specific guidance on which services and configurations will address each security gap. You can also get answers, in natural language, from AWS Shield network security director from within Amazon Q Developer in the AWS Management Console and chat applications.
Getting started with AWS Shield network security director To use AWS Shield network security director, I need to initiate a network analysis of my AWS resources. I go to the AWS WAF & Shield console and choose Getting started under AWS Shield network security director in the navigation pane. I choose Get started, which takes me to the configuration page. On this page, I can choose how to perform my first network analysis: I can assess findings from across all supported Regions or from my current Region only. I select Start network analysis.
After the analysis is completed, the dashboard page shows a breakdown of resource types by severity level and the most common categories of network security findings associated with their resources. Resources are categorized by type and severity level (critical, high, medium, low, informational), making it easy to identify which areas need immediate attention.
Next, I explore the Resources section to understand the distribution of my assets and filter by severity level in my environment. I can use Resource overview to review a specific severity level, which will redirect me to the Resources under Network security director with the associated severity level filter. I choose the resources that have Medium severity level.
I choose a specific resource to view its network topology map showing how it connects to other resources and associated findings. This visualization helps me understand the potential impact of security configurations and identify exposed paths. I review detailed findings such as “Allows unrestricted inbound access (0.0.0.0/0) on all ports” with severity ratings.
Next, I go to Findings under Network security director, which shows common configuration issues. For each finding, I receive detailed information and recommended remediation steps. The service rates the severity of findings (high, medium, low) to help me prioritize my response. Critical-severity findings such as “CloudFront origin is also internet accessible without CloudFront protections” or high-severity findings such as “Allows unrestricted inbound access (0.0.0.0/0) on all ports” are presented first, followed by medium- and low-severity issues.
You can analyze your network security configurations, in natural language, with AWS Shield network security director within Amazon Q Developer in the AWS Management Console and chat applications. For example, you can say “Do I have any network security issues on my CloudFront distributions?” or “Are any of my resources vulnerable to bots and scrapers?” This integration helps security teams quickly understand their security posture and receive guidance on implementing best practices without having to navigate through extensive documentation.
To explore this capability, I ask “What are my most critical network security issues?” in the Explore with Amazon Q section. Amazon Q analyzes my network security configuration and generates a response based on the security assessment of my AWS environment.
With this comprehensive view of your network security, you can now make data-driven decisions to strengthen your defenses against emerging threats.
Join the preview AWS Shield network security director is available in the US East (N. Virginia) and Europe (Stockholm) Regions. The Amazon Q Developer capability to analyze network security configurations is available in preview in US East (N. Virginia). To begin strengthening your network security, visit the AWS Shield network security director console and initiate your first network security analysis.
Generative AI–based applications have grown in popularity in the last couple of years. Applications built with large language models (LLMs) have the potential to increase the value companies bring to their customers. In this blog post, we dive deep into network perimeter protection for generative AI applications. We’ll walk through the different areas of network perimeter protection you should consider, discuss how those apply to generative AI–based applications, and provide architecture patterns. By implementing network perimeter protection for your generative AI–based applications, you gain controls to help protect from unauthorized use, cost overruns, distributed denial of service (DDoS), and other threat actors or curious users.
Perimeter protection for LLMs
Network perimeter protection for web applications helps answer important questions, for example:
Who can access the app?
What kind of data is sent to the app?
How much data is the app is allowed to use?
For the most part, the same network protection methods used for other web apps also work for generative AI apps. The main focus of these methods is controlling network traffic that is trying to access the app, not the specific requests and responses the app creates. We’ll focus on three key areas of network perimeter protection:
Authentication and authorization for the app’s frontend
Using a web application firewall
Protection against DDoS attacks
The security concerns of using LLMs in these apps, including issues with prompt injections, sensitive information leaks, or excess agency, is beyond the scope of this post.
Frontend authentication and authorization
When designing network perimeter protection, you first need to decide whether you will allow certain users to access the application, based on whether they are authenticated (AuthN) and whether they are authorized (AuthZ) to ask certain questions of the generative AI–based applications. Many generative AI–based applications sit behind an authentication layer so that a user must sign in to their identity provider before accessing the application. For public applications that are not behind any authentication (a chatbot, for example), additional considerations are required with regard to AWS WAF and DDoS protection, which we discuss in the next two sections.
Let’s look at an example. Amazon API Gateway is an option for customers for the application frontend, providing metering of users or APIs with authentication and authorization. It’s a fully managed service that makes it convenient for developers to publish, maintain, monitor, and secure APIs at scale. With API Gateway, you create AWS Lambda authorizers to control access to APIs within your application. Figure 1 shows how access works for this example.
Figure 1: An API Gateway, Lambda authorizer, and basic filter in the signal path between client and LLM
The workflow in Figure 1 is as follows:
A client makes a request to your API that is fronted by the API Gateway.
When the API Gateway receives the request, it sends the request to a Lambda authorizer that authenticates the request through OAuth, SAML, or another mechanism. The Lambda authorizer returns an AWS Identity and Access Management (IAM) policy to the API Gateway, which will permit or deny the request.
If permitted, the API Gateway sends the API request to the backend application. In Figure 1, this is a Lambda function that provides additional capabilities in the area of LLM security, standing in for more complex filtering. In addition to the Lambda authorizer, you can configure throttling on the API Gateway on a per-client basis or on the application methods clients are accessing before traffic makes it to the backend application. Throttling can provide some mitigation against not only DDoS attacks but also model cloning and inversion attacks.
Finally, the application sends requests to your LLM that is deployed on AWS. In this example, the LLM is deployed on Amazon Bedrock.
The combination of Lambda authorizers and throttling helps support a number of perimeter protection mechanisms. First, only authorized users gain access to the application, helping to prevent bots and the public from accessing the application. Second, for authorized users, you limit the rate at which they can invoke the LLM to prevent excessive costs related to requests and responses to the LLM. Third, after users have been authenticated and authorized by the application, the application can pass identity information to the backend data access layer in order to restrict the data available to the LLM, aligning with what the user is authorized to access.
Besides API Gateway, AWS provides other options you can use to provide frontend authentication and authorization. AWS Application Load Balancer (ALB) supports OpenID Connect (OIDC) capabilities to require authentication to your OIDC provider prior to access. For internal applications, AWS Verified Access combines both identity and device trust signals to permit or deny access to your generative AI application.
AWS WAF
Once the authentication or authorization decision is made, the next consideration for network perimeter protection is on the application side. New security risks are being identified for generative AI–based applications, as described in the OWASP Top 10 for Large Language Model Applications. These risks include insecure output handling, insecure plugin design, and other mechanisms that cause the application to provide responses that are outside the desired norm. For example, a threat actor could craft a direct prompt injection to the LLM, which causes the LLM behave improperly. Some of these risks (insecure plugin design) can be addressed by passing identity information to the plugins and data sources. However, many of those protections fall outside the network perimeter protection and into the realm of security within the application. For network perimeter protection, the focus is on validating the users who have access to the application and supporting rules that allow, block, or monitor web requests based on network rules and patterns at the application level prior to application access.
In addition, bot traffic is an important consideration for web-based applications. According to Security Today, 47% of all internet traffic originates from bots. Bots that send requests to public applications drive up the cost of using generative AI–based applications by causing higher request loads.
To protect against bot traffic before the user gains access to the application, you can implement AWS WAF as part of the perimeter protection. Using AWS WAF, you can deploy a firewall to monitor and block the HTTP(S) requests that are forwarded to your protected web application resources. These resources exist behind Amazon API Gateway, ALB, AWS Verified Access, and other resources. From a web application point of view, AWS WAF is used to prevent or limit access to your application before invocation of your LLM takes place. This is an important area to consider because, in addition to protecting the prompts and completions going to and from the LLM itself, you want to make sure only legitimate traffic can access your application. AWS Managed Rules or AWS Marketplace managed rule groups provide you with predefined rules as part of a rule group.
Let’s expand the previous example. As your application shown in Figure 1 begins to scale, you decide to move it behind Amazon CloudFront. CloudFront is a web service that gives you a distributed ingress into AWS by using a global network of edge locations. Besides providing distributed ingress, CloudFront gives you the option to deploy AWS WAF in a distributed fashion to help protect against SQL injections, bot control, and other options as part of your AWS WAF rules. Let’s walk through the new architecture in Figure 2.
Figure 2: Adding AWS WAF and CloudFront to the client-to-model signal path
The workflow shown in Figure 2 is as follows:
A client makes a request to your API. DNS directs the client to a CloudFront location, where AWS WAF is deployed.
CloudFront sends the request through an AWS WAF rule to determine whether to block, monitor, or allow the traffic. If AWS WAF does not block the traffic, AWS WAF sends it to the CloudFront routing rules.
Note: It is recommended that you restrict access to the API Gateway so users cannot bypass the CloudFront distribution to access the API Gateway. An example of how to accomplish this goal can be found in the Restricting access on HTTP API Gateway Endpoint with Lambda Authorizer blog post.
CloudFront sends the traffic to the API Gateway, where it runs through the same traffic path as discussed in Figure 1.
To dive into more detail, let’s focus on bot traffic. With AWS WAF Bot Control, you can monitor, block, or rate limit bots such as scrapers, scanners, crawlers, status monitors, and search engines. Bot Control provides multiple options in terms of configured rules and inspection levels. For example, if you use the targeted inspection level of the rule group, you can challenge bots that don’t self-identify, making it harder and more expensive for malicious bots to operate against your generative AI–based application. You can use the Bot Control managed rule group alone or in combination with other AWS Managed Rules rule groups and your own custom AWS WAF rules. Bot Control also provides granular visibility on the number of bots that are targeting your application, as shown in Figure 3.
Figure 3: Bot control dashboard for bot requests and non-bot requests
How does this functionality help you? For your generative AI–based application, you gain visibility into how bots and other traffic are targeting your application. AWS WAF provides options to monitor and customize the web request handling of bot traffic, including allowing specific bots or blocking bot traffic to your application. In addition to bot control, AWS WAF provides a number of different managed rule groups, including baseline rule groups, use-case specific rule groups, IP reputation rules groups, and others. For more information, take a look at the documentation on both AWS Managed Rules rule groups and AWS Marketplace managed rule groups.
DDoS protection
The last topic we’ll cover in this post is DDoS with LLMs. Similar to threats against other Layer 7 applications, threat actors can send requests that consume an exceptionally high amount of resources, which results in a decline in the service’s responsiveness or an increase in the cost to run the LLMs that are handling the high number of requests. Although throttling can help support a per-user or per-method rate limit, DDoS attacks use more advanced threat vectors that are difficult to protect against with throttling.
AWS Shield helps to provide protection against DDoS for your internet-facing applications, both at Layer 3/4 with Shield standard or Layer 7 with Shield Advanced. For example, Shield Advanced responds automatically to mitigate application threats by counting or blocking web requests that are part of the exploit by using web access control lists (ACLs) that are part of your already deployed AWS WAF. Depending on your requirements, Shield can provide multiple layers of protection against DDoS attacks.
Figure 4 shows how your deployment might look after Shield is added to the architecture.
Figure 4: Adding Shield Advanced to the client-to-model signal path
The workflow in Figure 4 is as follows:
A client makes a request to your API. DNS directs the client to a CloudFront location, where AWS WAF and Shield are deployed.
CloudFront sends the request through an AWS WAF rule to determine whether to block, monitor, or allow the traffic. AWS Shield can mitigate a wide range of known DDoS attack vectors and zero-day attack vectors. Depending on the configuration, Shield Advanced and AWS WAF work together to rate-limit traffic coming from individual IP addresses. If AWS WAF or Shield Advanced don’t block the traffic, the services will send it to the CloudFront routing rules.
CloudFront sends the traffic to the API Gateway, where it will run through the same traffic path as discussed in Figure 1.
When you implement AWS Shield and Shield Advanced, you gain protection against security events and visibility into both global and account-level events. For example, at the account level, you get information on the total number of events seen on your account, the largest bit rate and packet rate for each resource, and the largest request rate for CloudFront. With Shield Advanced, you also get access to notifications of events that are detected by Shield Advanced and additional information about detected events and mitigations. These metrics and data, along with AWS WAF, provide you with visibility into the traffic that is trying to access your generative AI–based applications. This provides mitigation capabilities before the traffic accesses your application and before invocation of the LLM.
Considerations
When deploying network perimeter protection with generative AI applications, consider the following:
AWS provides multiple options, on both the frontend authentication and authorization side and the AWS WAF side, for how to configure perimeter protections. Depending on your application architecture and traffic patterns, multiple resources can provide the perimeter protection with AWS WAF and integrate with identity providers for authentication and authorization decisions.
You can also deploy more advanced LLM-specific prompt and completion filters by using Lambda functions and other AWS services as part of your deployment architecture. Perimeter protection capabilities are focused on preventing undesired traffic from reaching the end application.
Most of the network perimeter protections used for LLMs are similar to network perimeter protection mechanisms for other web applications. The difference is that additional threat vectors come into play compared to regular web applications. For more information on the threat vectors, see OWASP Top 10 for Large Language Model Applications and Mitre ATLAS.
Conclusion
In this blog post, we discussed how traditional network perimeter protection strategies can provide defense in depth for generative AI–based applications. We discussed the similarities and differences between LLM workloads and other web applications. We walked through why authentication and authorization protection is important, showing how you can use Amazon API Gateway to throttle through usage plans and to provide authentication through Lambda authorizers. Then, we discussed how you can use AWS WAF to help protect applications from bots. Lastly, we talked about how AWS Shield can provide advanced protection against different types of DDoS attacks at scale. For additional information on network perimeter protection and generative AI security, take a look at other blogs posts in the AWS Security Blog Channel.
If you have feedback about this post, submit comments in the Comments section below. If you have questions about this post, contact AWS Support.
At Amazon Web Services (AWS), security is our top priority. Security is deeply embedded into our culture, processes, and systems; it permeates everything we do. What does this mean for you? We believe customers can benefit from learning more about what AWS is doing to prevent and mitigate customer-impacting security events.
Since late August 2023, AWS has detected and been protecting customer applications from a new type of distributed denial of service (DDoS) event. DDoS events attempt to disrupt the availability of a targeted system, such as a website or application, reducing the performance for legitimate users. Examples of DDoS events include HTTP request floods, reflection/amplification attacks, and packet floods. The DDoS events AWS detected were a type of HTTP/2 request flood, which occurs when a high volume of illegitimate web requests overwhelms a web server’s ability to respond to legitimate client requests.
Between August 28 and August 29, 2023, proactive monitoring by AWS detected an unusual spike in HTTP/2 requests to Amazon CloudFront, peaking at over 155 million requests per second (RPS). Within minutes, AWS determined the nature of this unusual activity and found that CloudFront had automatically mitigated a new type of HTTP request flood DDoS event, now called an HTTP/2 rapid reset attack. Over those two days, AWS observed and mitigated over a dozen HTTP/2 rapid reset events, and through the month of September, continued to see this new type of HTTP/2 request flood. AWS customers who had built DDoS-resilient architectures with services like Amazon CloudFront and AWS Shield were able to protect their applications’ availability.
Figure 1. Global HTTP requests per second, September 13 – 16
Overview of HTTP/2 rapid reset attacks
HTTP/2 allows for multiple distinct logical connections to be multiplexed over a single HTTP session. This is a change from HTTP 1.x, in which each HTTP session was logically distinct. HTTP/2 rapid reset attacks consist of multiple HTTP/2 connections with requests and resets in rapid succession. For example, a series of requests for multiple streams will be transmitted followed up by a reset for each of those requests. The targeted system will parse and act upon each request, generating logs for a request that is then reset, or cancelled, by a client. The system performs work generating those logs even though it doesn’t have to send any data back to a client. A bad actor can abuse this process by issuing a massive volume of HTTP/2 requests, which can overwhelm the targeted system, such as a website or application.
Keep in mind that HTTP/2 rapid reset attacks are just a new type of HTTP request flood. To defend against these sorts of DDoS attacks, you can implement an architecture that helps you specifically detect unwanted requests as well as scale to absorb and block those malicious HTTP requests.
Building DDoS resilient architectures
As an AWS customer, you benefit from both the security built into the global cloud infrastructure of AWS as well as our commitment to continuously improve the security, efficiency, and resiliency of AWS services. For prescriptive guidance on how to improve DDoS resiliency, AWS has built tools such as the AWS Best Practices for DDoS Resiliency. It describes a DDoS-resilient reference architecture as a guide to help you protect your application’s availability. While several built-in forms of DDoS mitigation are included automatically with AWS services, your DDoS resilience can be improved by using an AWS architecture with specific services and by implementing additional best practices for each part of the network flow between users and your application.
For example, you can use AWS services that operate from edge locations, such as Amazon CloudFront, AWS Shield, Amazon Route 53, and Route 53 Application Recovery Controller to build comprehensive availability protection against known infrastructure layer attacks. These services can improve the DDoS resilience of your application when serving any type of application traffic from edge locations distributed around the world. Your application can be on-premises or in AWS when you use these AWS services to help you prevent unnecessary requests reaching your origin servers. As a best practice, you can run your applications on AWS to get the additional benefit of reducing the exposure of your application endpoints to DDoS attacks and to protect your application’s availability and optimize the performance of your application for legitimate users. You can use Amazon CloudFront (and its HTTP caching capability), AWS WAF, and Shield Advanced automatic application layer protection to help prevent unnecessary requests reaching your origin during application layer DDoS attacks.
Putting our knowledge to work for AWS customers
AWS remains vigilant, working to help prevent security issues from causing disruption to your business. We believe it’s important to share not only how our services are designed, but also how our engineers take deep, proactive ownership of every aspect of our services. As we work to defend our infrastructure and your data, we look for ways to help protect you automatically. Whenever possible, AWS Security and its systems disrupt threats where that action will be most impactful; often, this work happens largely behind the scenes. We work to mitigate threats by combining our global-scale threat intelligence and engineering expertise to help make our services more resilient against malicious activities. We’re constantly looking around corners to improve the efficiency and security of services including the protocols we use in our services, such as Amazon CloudFront, as well as AWS security tools like AWS WAF, AWS Shield, and Amazon Route 53 Resolver DNS Firewall.
In addition, our work extends security protections and improvements far beyond the bounds of AWS itself. AWS regularly works with the wider community, such as computer emergency response teams (CERT), internet service providers (ISP), domain registrars, or government agencies, so that they can help disrupt an identified threat. We also work closely with the security community, other cloud providers, content delivery networks (CDNs), and collaborating businesses around the world to isolate and take down threat actors. For example, in the first quarter of 2023, we stopped over 1.3 million botnet-driven DDoS attacks, and we traced back and worked with external parties to dismantle the sources of 230 thousand L7/HTTP DDoS attacks. The effectiveness of our mitigation strategies relies heavily on our ability to quickly capture, analyze, and act on threat intelligence. By taking these steps, AWS is going beyond just typical DDoS defense, and moving our protection beyond our borders. To learn more behind this effort, please read How AWS threat intelligence deters threat actors.
If you have feedback about this post, submit comments in the Comments section below. If you have questions about this post, contact AWS Support.
Want more AWS Security news? Follow us on Twitter.
Every day across the Amazon Web Services (AWS) cloud infrastructure, we detect and successfully thwart hundreds of cyberattacks that might otherwise be disruptive and costly. These important but mostly unseen victories are achieved with a global network of sensors and an associated set of disruption tools. Using these capabilities, we make it more difficult and expensive for cyberattacks to be carried out against our network, our infrastructure, and our customers. But we also help make the internet as a whole a safer place by working with other responsible providers to take action against threat actors operating within their infrastructure. Turning our global-scale threat intelligence into swift action is just one of the many steps that we take as part of our commitment to security as our top priority. Although this is a never-ending endeavor and our capabilities are constantly improving, we’ve reached a point where we believe customers and other stakeholders can benefit from learning more about what we’re doing today, and where we want to go in the future.
Global-scale threat intelligence using the AWS Cloud
With the largest public network footprint of any cloud provider, our scale at AWS gives us unparalleled insight into certain activities on the internet, in real time. Some years ago, leveraging that scale, AWS Principal Security Engineer Nima Sharifi Mehr started looking for novel approaches for gathering intelligence to counter threats. Our teams began building an internal suite of tools, given the moniker MadPot, and before long, Amazon security researchers were successfully finding, studying, and stopping thousands of digital threats that might have affected its customers.
MadPot was built to accomplish two things: first, discover and monitor threat activities and second, disrupt harmful activities whenever possible to protect AWS customers and others. MadPot has grown to become a sophisticated system of monitoring sensors and automated response capabilities. The sensors observe more than 100 million potential threat interactions and probes every day around the world, with approximately 500,000 of those observed activities advancing to the point where they can be classified as malicious. That enormous amount of threat intelligence data is ingested, correlated, and analyzed to deliver actionable insights about potentially harmful activity happening across the internet. The response capabilities automatically protect the AWS network from identified threats, and generate outbound communications to other companies whose infrastructure is being used for malicious activities.
Systems of this sort are known as honeypots—decoys set up to capture threat actor behavior—and have long served as valuable observation and threat intelligence tools. However, the approach we take through MadPot produces unique insights resulting from our scale at AWS and the automation behind the system. To attract threat actors whose behaviors we can then observe and act on, we designed the system so that it looks like it’s composed of a huge number of plausible innocent targets. Mimicking real systems in a controlled and safe environment provides observations and insights that we can often immediately use to help stop harmful activity and help protect customers.
Of course, threat actors know that systems like this are in place, so they frequently change their techniques—and so do we. We invest heavily in making sure that MadPot constantly changes and evolves its behavior, continuing to have visibility into activities that reveal the tactics, techniques, and procedures (TTPs) of threat actors. We put this intelligence to use quickly in AWS tools, such as AWS Shield and AWS WAF, so that many threats are mitigated early by initiating automated responses. When appropriate, we also provide the threat data to customers through Amazon GuardDuty so that their own tooling and automation can respond.
Three minutes to exploit attempt, no time to waste
Within approximately 90 seconds of launching a new sensor within our MadPot simulated workload, we can observe that the workload has been discovered by probes scanning the internet. From there, it takes only three minutes on average before attempts are made to penetrate and exploit it. This is an astonishingly short amount of time, considering that these workloads aren’t advertised or part of other visible systems that would be obvious to threat actors. This clearly demonstrates the voracity of scanning taking place and the high degree of automation that threat actors employ to find their next target.
As these attempts run their course, the MadPot system analyzes the telemetry, code, attempted network connections, and other key data points of the threat actor’s behavior. This information becomes even more valuable as we aggregate threat actor activities to generate a more complete picture of available intelligence.
Disrupting attacks to maintain business as usual
In-depth threat intelligence analysis also happens in MadPot. The system launches the malware it captures in a sandboxed environment, connects information from disparate techniques into threat patterns, and more. When the gathered signals provide high enough confidence in a finding, the system acts to disrupt threats whenever possible, such as disconnecting a threat actor’s resources from the AWS network. Or, it could entail preparing that information to be shared with the wider community, such as a computer emergency response team (CERT), internet service provider (ISP), a domain registrar, or government agency so that they can help disrupt the identified threat.
As a major internet presence, AWS takes on the responsibility to help and collaborate with the security community when possible. Information sharing within the security community is a long-standing tradition and an area where we’ve been an active participant for years.
In the first quarter of 2023:
We used 5.5B signals from our internet threat sensors and 1.5B signals from our active network probes in our anti-botnet security efforts.
We stopped over 1.3M outbound botnet-driven DDoS attacks.
We shared our security intelligence findings, including nearly a thousand botnet C2 hosts, with relevant hosting providers and domain registrars.
We traced back and worked with external parties to dismantle the sources of 230k L7/HTTP(S) DDoS attacks.
Three examples of MadPot’s effectiveness: Botnets, Sandworm, and Volt Typhoon
Recently, MadPot detected, collected, and analyzed suspicious signals that uncovered a distributed denial of service (DDoS) botnet that was using the domain free.bigbots.[tld] (the top-level domain is omitted) as a command and control (C2) domain. A botnet is made up of compromised systems that belong to innocent parties—such as computers, home routers, and Internet of Things (IoT) devices—that have been previously compromised, with malware installed that awaits commands to flood a target with network packets. Bots under this C2 domain were launching 15–20 DDoS attacks per hour at a rate of about 800 million packets per second.
As MadPot mapped out this threat, our intelligence revealed a list of IP addresses used by the C2 servers corresponding to an extremely high number of requests from the bots. Our systems blocked those IP addresses from access to AWS networks so that a compromised customer compute node on AWS couldn’t participate in the attacks. AWS automation then used the intelligence gathered to contact the company that was hosting the C2 systems and the registrar responsible for the DNS name. The company whose infrastructure was hosting the C2s took them offline in less than 48 hours, and the domain registrar decommissioned the DNS name in less than 72 hours. Without the ability to control DNS records, the threat actor could not easily resuscitate the network by moving the C2s to a different network location. In less than three days, this widely distributed malware and the C2 infrastructure required to operate it was rendered inoperable, and the DDoS attacks impacting systems throughout the internet ground to a halt.
MadPot is effective in detecting and understanding the threat actors that target many different kinds of infrastructure, not just cloud infrastructure, including the malware, ports, and techniques that they may be using. Thus, through MadPot we identified the threat group called Sandworm—the cluster associated with Cyclops Blink, a piece of malware used to manage a botnet of compromised routers. Sandworm was attempting to exploit a vulnerability affecting WatchGuard network security appliances. With close investigation of the payload, we identified not only IP addresses but also other unique attributes associated with the Sandworm threat that were involved in an attempted compromise of an AWS customer. MadPot’s unique ability to mimic a variety of services and engage in high levels of interaction helped us capture additional details about Sandworm campaigns, such as services that the actor was targeting and post-exploitation commands initiated by that actor. Using this intelligence, we notified the customer, who promptly acted to mitigate the vulnerability. Without this swift action, the actor might have been able to gain a foothold in the customer’s network and gain access to other organizations that the customer served.
For our final example, the MadPot system was used to help government cyber and law enforcement authorities identify and ultimately disrupt Volt Typhoon, the widely-reported state-sponsored threat actor that focused on stealthy and targeted cyber espionage campaigns against critical infrastructure organizations. Through our investigation inside MadPot, we identified a payload submitted by the threat actor that contained a unique signature, which allowed identification and attribution of activities by Volt Typhoon that would otherwise appear to be unrelated. By using the data lake that stores a complete history of MadPot interactions, we were able to search years of data very quickly and ultimately identify other examples of this unique signature, which was being sent in payloads to MadPot as far back as August 2021. The previous request was seemingly benign in nature, so we believed that it was associated with a reconnaissance tool. We were then able to identify other IP addresses that the threat actor was using in recent months. We shared our findings with government authorities, and those hard-to-make connections helped inform the research and conclusions of the Cybersecurity and Infrastructure Security Agency (CISA) of the U.S. government. Our work and the work of other cooperating parties resulted in their May 2023 Cybersecurity advisory. To this day, we continue to observe the actor probing U.S. network infrastructure, and we continue to share details with appropriate government cyber and law enforcement organizations.
Putting global-scale threat intelligence to work for AWS customers and beyond
At AWS, security is our top priority, and we work hard to help prevent security issues from causing disruption to your business. As we work to defend our infrastructure and your data, we use our global-scale insights to gather a high volume of security intelligence—at scale and in real time—to help protect you automatically. Whenever possible, AWS Security and its systems disrupt threats where that action will be most impactful; often, this work happens largely behind the scenes. As demonstrated in the botnet case described earlier, we neutralize threats by using our global-scale threat intelligence and by collaborating with entities that are directly impacted by malicious activities. We incorporate findings from MadPot into AWS security tools, including preventative services, such as AWS WAF, AWS Shield, AWS Network Firewall, and Amazon Route 53 Resolver DNS Firewall, and detective and reactive services, such as Amazon GuardDuty, AWS Security Hub, and Amazon Inspector, putting security intelligence when appropriate directly into the hands of our customers, so that they can build their own response procedures and automations.
But our work extends security protections and improvements far beyond the bounds of AWS itself. We work closely with the security community and collaborating businesses around the world to isolate and take down threat actors. In the first half of this year, we shared intelligence of nearly 2,000 botnet C2 hosts with relevant hosting providers and domain registrars to take down the botnets’ control infrastructure. We also traced back and worked with external parties to dismantle the sources of approximately 230,000 Layer 7 DDoS attacks. The effectiveness of our mitigation strategies relies heavily on our ability to quickly capture, analyze, and act on threat intelligence. By taking these steps, AWS is going beyond just typical DDoS defense, and moving our protection beyond our borders.
We’re glad to be able to share information about MadPot and some of the capabilities that we’re operating today. For more information, see this presentation from our most recent re:Inforce conference: How AWS threat intelligence becomes managed firewall rules, as well as an overview post published today, Meet MadPot, a threat intelligence tool Amazon uses to protect customers from cybercrime, which includes some good information about the AWS security engineer behind the original creation of MadPot. Going forward, you can expect to hear more from us as we develop and enhance our threat intelligence and response systems, making both AWS and the internet as a whole a safer place.
If you have feedback about this post, submit comments in the Comments section below. If you have questions about this post, contact AWS Support.
Want more AWS Security news? Follow us on Twitter.
Distributed denial of service (DDoS) events occur when a threat actor sends traffic floods from multiple sources to disrupt the availability of a targeted application. DDoS simulation testing uses a controlled DDoS event to allow the owner of an application to assess the application’s resilience and practice event response. DDoS simulation testing is permitted on Amazon Web Services (AWS), subject to Testing policy terms and conditions. In this blog post, we help you understand when it’s appropriate to perform a DDoS simulation test on an application running on AWS, and what options you have for running the test.
DDoS protection at AWS
Security is the top priority at AWS. AWS services include basic DDoS protection as a standard feature to help protect customers from the most common and frequently occurring infrastructure (layer 3 and 4) DDoS events, such as SYN/UDP floods, reflection attacks, and others. While this protection is designed to protect the availability of AWS infrastructure, your application might require more nuanced protections that consider your traffic patterns and integrate with your internal reporting and incident response processes. If you need more nuanced protection, then you should consider subscribing to AWS Shield Advanced in addition to the native resiliency offered by the AWS services you use.
AWS Shield Advanced is a managed service that helps you protect your application against external threats, like DDoS events, volumetric bots, and vulnerability exploitation attempts. When you subscribe to Shield Advanced and add protection to your resources, Shield Advanced provides expanded DDoS event protection for those resources. With advanced protections enabled on your resources, you get tailored detection based on the traffic patterns of your application, assistance with protecting against Layer 7 DDoS events, access to 24×7 specialized support from the Shield Response Team (SRT), access to centralized management of security policies through AWS Firewall Manager, and cost protections to help safeguard against scaling charges resulting from DDoS-related usage spikes. You can also configure AWS WAF (a web application firewall) to integrate with Shield Advanced to create custom layer 7 firewall rules and enable automatic application layer DDoS mitigation.
Acceptable DDoS simulation use cases on AWS
AWS is constantly learning and innovating by delivering new DDoS protection capabilities, which are explained in the DDoS Best Practices whitepaper. This whitepaper provides an overview of DDoS events and the choices that you can make when building on AWS to help you architect your application to absorb or mitigate volumetric events. If your application is architected according to our best practices, then a DDoS simulation test might not be necessary, because these architectures have been through rigorous internal AWS testing and verified as best practices for customers to use.
Using DDoS simulations to explore the limits of AWS infrastructure isn’t a good use case for these tests. Similarly, validating if AWS is effectively protecting its side of the shared responsibility model isn’t a good test motive. Further, using AWS resources as a source to simulate a DDoS attack on other AWS resources isn’t encouraged. Load tests are performed to gain reliable information on application performance under stress and these are different from DDoS tests. For more information, see the Amazon Elastic Compute Cloud (Amazon EC2) testing policy and penetration testing. Application owners, who have a security compliance requirement from a regulator or who want to test the effectiveness of their DDoS mitigation strategies, typically run DDoS simulation tests.
DDoS simulation tests at AWS
AWS offers two options for running DDoS simulation tests. They are:
A simulated DDoS attack in production traffic with an authorized pre-approved AWS Partner.
A synthetic simulated DDoS attack with the SRT, also referred to as a firedrill.
The motivation for DDoS testing varies from application to application and these engagements don’t offer the same value to all customers. Establishing clear motives for the test can help you choose the right option. If you want to test your incident response strategy, we recommend scheduling a firedrill with our SRT. If you want to test the Shield Advanced features or test application resiliency, we recommend that you work with an AWS approved partner.
DDoS simulation testing with an AWS Partner
AWS DDoS test partners are authorized to conduct DDoS simulation tests on customers’ behalf without prior approval from AWS. Customers can currently contact the following partners to set up these paid engagements:
Before contacting the partners, customers must agree to the terms and conditions for DDoS simulation tests. The application must be well-architected prior to DDoS simulation testing as described in AWS DDoS Best Practices whitepaper. AWS DDoS test partners that want to perform DDoS simulation tests that don’t comply with the technical restrictions set forth in our public DDoS testing policy, or other DDoS test vendors that aren’t approved, can request approval to perform DDoS simulation tests by submitting the DDoS Simulation Testing form at least 14 days before the proposed test date. For questions, please send an email to [email protected].
After choosing a test partner, customers go through various phases of testing. Typically, the first phase involves a discovery discussion, where the customer defines clear goals, assembles technical details, and defines the test schedule with the partner. In the next phase, partners run multiple simulations based on agreed attack vectors, duration, diversity of the attack vectors, and other factors. These tests are usually carried out by slowly ramping up traffic levels from low levels to desired high levels with an ability for an emergency stop. The final stage involves reporting, discussing observed gaps, identifying actionable tasks, and driving those tasks to completion.
These engagements are typically long-term, paid contracts that are planned over months and carried out over weeks, with results analyzed over time. These tests and reports are beneficial to customers who need to evaluate detection and mitigation capabilities on a large scale. If you’re an application owner and want to evaluate the DDoS resiliency of your application, practice event response with real traffic, or have a DDoS compliance or regulation requirement, we recommend this type of engagement. These tests aren’t recommended if you want to learn the volumetric breaking points of the AWS network or understand when AWS starts to throttle requests. AWS services are designed to scale, and when certain dynamic volume thresholds are exceeded, AWS detection systems will be invoked to block traffic. Lastly, it’s critical to distinguish between these tests and stress tests, in which meaningful packets are sent to the application to assess its behavior.
DDoS firedrill testing with the Shield Response Team
Shield Advanced service offers additional assistance through the SRT, this team can also help with testing incident response workflows. Customers can contact the SRT and request firedrill testing. Firedrill testing is a type of synthetic test that doesn’t generate real volumetric traffic but does post a shield event to the requesting customer’s account.
These tests are available for customers who are already on-boarded to Shield Advanced and want to test their Amazon CloudWatch alarms by invoking a DDoSDetected metric, or test their proactive engagement setup or their custom incident response strategy. Because this event isn’t based on real traffic, the customer won’t see traffic generated on their account or see logs that drive helpful reports.
These tests are intended to generate associated Shield Advanced metrics and post a DDoS event for a customer resource. For example, SRT can post a 14 Gbps UDP mock attack on a protected resource for about 15 minutes and customers can test their response capability during such an event.
Note: Not all attack vectors and AWS resource types are supported for a firedrill. Shield Advanced onboarded customers can contact AWS Support teams to request assistance with running a firedrill or understand more about them.
Conclusion
DDoS simulations and incident response testing on AWS through the SRT or an AWS Partner are useful in improving application security controls, identifying Shield Advanced misconfigurations, optimizing existing detection systems, and improving incident readiness. The goal of these engagements is to help you build a DDoS resilient architecture to protect your application’s availability. However, these engagements don’t offer the same value to all customers. Most customers can obtain similar benefits by following AWS Best Practices for DDoS Resiliency. AWS recommends architecting your application according to DDoS best practices and fine tuning AWS Shield Advanced out-of-the-box offerings to your application needs to improve security posture.
If you have feedback about this post, submit comments in the Comments section below. If you have questions about this post, contact AWS Support.
Want more AWS Security news? Follow us on Twitter.
This blog post helps customers in mitigating distributed denial-of-service (DDoS) using AWS Shield Advanced, AWS WAF, and data science. We explore how to use these services along with machine learning (ML) to detect and mitigate DDoS attacks.
Bad actors conduct DDoS attacks using botnets. Through botnets, attackers look for zero-day vulnerabilities—specifically on network devices such as routers—and make these devices a part of their network. Bots speared around the world are waiting for instructions from control servers.
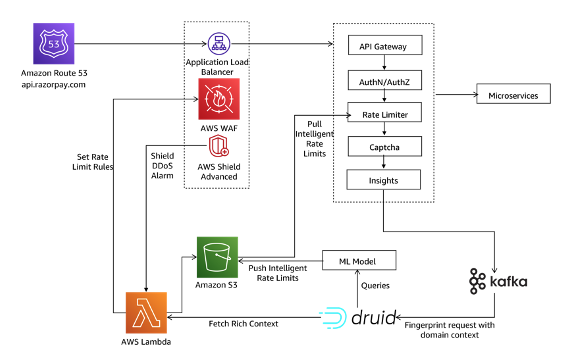
This post examines a real-world use case. Online payment solutions company Razorpay has a business-to-business (B2B) model where merchants invoke APIs for payments. Given the complex nature of B2B payments, the traffic patterns between small-scale merchants and large-scale merchants needs to be distinguished. This business model puts the company at risk for DDoS attacks, and here is how AWS helps them address this ongoing concern.
First, we will introduce an initial DDoS architecture approach and then how it was modified to meet specific Razorpay needs, as is possible for cross-industry client with varying requirements.
Basic DDoS recommendations
Let’s explore some out-of-the-box DDoS business solution recommendations for different resource categories:
Static websites:Amazon CloudFront is a content delivery network (CDN) service that is used to host static websites. The AWS WAF rate-limiting rule can be used to limit traffic on a CDN.
Dynamic websites: In this scenario, a standard WAF Rate Limit rule can be used on Application Load Balancer (ALB).
APIs with customer context: APIs receive these assets on behalf of other merchants (for example, an end-user places a food order from a food-delivery application, completes a payment, and the request is sent to api.razorpay.com. Razorpay understands that the end user is trying to make a payment toward the food app).
Figure 1 represents the difficulty levels and solutions for each resource category.
Figure 1. DDoS business solution resource category recommendations
DDoS response phases
We’ve discussed initial DDoS architectures, so now let’s explore the various DDoS response phases:
Phase 1– Automated inventory: Creating an automated inventory system capturing the list of APIs or websites exposed. The APIs are ranked by exposure and risk of an outage to create a list of assets that is ranked on the basis of risk.
Phase 2 – Bucketing assets into groups: Bucketing APIs and websites (static or dynamic) into groups. This phase also subgroups the assets into unauthenticated or authenticated, users and more. As we will discuss later in this post, most Razorpay APIs have a customer context requiring a multilayered defense mechanism.
Phase 3– Testing the solution: Simulating attack traffic to test the solution under different loads, origins, and more.
AWS DDoS solutions
AWS has two major out-of-the-box solutions when protecting against DDoS attacks: AWS Shield and AWS WAF.
AWS Shield has three important features for DDoS mitigation:
Alarms: Triggers an alarm when a DDoS attack is suspected, customized based on metrics such as total volume, error rates at the ALB, and response latency
Visibility: Provides top five important field values in real time, such as requesting client IPs, countries, user agents, referrer headers, and url routes to take action.
On-call support: Provides on-call support from the Shield Response team (SRT) to understand attack vectors and create AWS WAF rules based on insights.
AWS WAF has two rule types:
Blocking: Blocks requests matching expected variables, from individuals to a combination of fields such as IP, URL route, body, or country
Rate limiting: Tracks the rate of requests for each originating IP address, and triggers the rule action on IPs with rates that go over the limit. A scope-down statement can also be added to the rule, to only track and rate limit requests that match the scope-down statement. (We will soon discuss how Razorpay relies heavily on rate limiting it the AWS WAF and other microservice architecture solutions.)
Razorpay microservices protection architecture
Razorpay has two main layers protecting their internal microservices. The request to payment API api.razorpay.com goes from Amazon Route 53 to ALB. AWS WAF and AWS Shield Advanced are deployed on ALB. Requests are then forwarded to microservices fronted by API Gateway as in Figure 2.
An API Gateway is a critical piece of infrastructure for microservice architectures. Razorpay is a B2B organization that performs actions on behalf of merchants. To achieve this—and understand context about the merchants and end-users alike—a custom API Gateway:
Works at a high scale with very low latency
Understands merchant context to provide authentication and authorization
Provides security features around malicious traffic
Razorpay uses a self-managed API gateway called Edge. The API Gateway is the first system on the ingress path to understand Razorpay domain context that prior layers cannot. Every request goes through multiple layers of logic at the API Gateway before being forwarded to respective services.
Razorpay Edge and AWS solution insights
As Edge performs multiple computations on each request, Razorpay generates insights for each request to build intelligence and prevent DDoS attacks. These events are fed into a time-series database in near real time and generate insights using machine learning (ML) models. The insights:
Identify malicious patterns: Generating confidence percentage that helps in defining further action, verifies consumer authenticity, and serves the request. It also blocks malicious requests at the edge.
Derive pattern-based rate limits: Deriving rate limits based on a larger set of data—including consumer and IP address—by looking at weekly and monthly patterns. Once this information is available at Razorypay Edge, it can perform various operations to ensure only legit requests reach the service layer. Let’s explore the request flow to understand each stage’s contribution toward DDoS handling, as in Figure 3.
Figure 3. Razorpay Edge request flow for DDoS handling
All Razorpay requests flow through API Gateway. Here are some key recommendations:
Based on feedback data available, the gateway checks if the given request pattern falls in the malicious category. If the confidence percentage is high for a malicious request, block the request. A block rule is applied at the AWS WAF layer. If the confidence percentage is low, use CAPTCHA to check user authenticity.
Apply rate limit on pre-existing data in the request object using feedback from an ML model.
Perform authentication/identification and authorization.
Apply rate limit on data derived from request object, also using feedback from a ML model.
Request user CAPTCHA verification if the request is identified as malicious with low confidence.
As a best practice, publish generated insights for each request to Apache Kafka out of the request flow to avoid latency impact and reduce blast radius.
Conclusion
In this post, you learned about addressing DDoS attacks with ML models.
Organizations can use the insights data generated by an API Gateway to identify request patterns, categorize the patterns into various buckets, and perform the following depending on category:
Send feedback to an API Gateway for immediate action
Update the rate limits for Edge-based historical patterns
Update WAF rule for blocking/reducing rate limits
As discussed, using AWS WAF and AWS Shield Advanced along with ML helps detect and mitigate DDoS attacks.
This post is written by Madhu Singh (Solutions Architect), and Krupanidhi Jay (Solutions Architect).
Lambda function URLs is a dedicated HTTPs endpoint for a AWS Lambda function. You can configure a function URL to have two methods of authentication: IAM and NONE. IAM authentication means that you are restricting access to the function URL (and in-turn access to invoke the Lambda function) to certain AWS principals (such as roles or users). Authentication type of NONE means that the Lambda function URL has no authentication and is open for anyone to invoke the function.
This blog shows how to use Lambda function URLs with an authentication type of NONE and use custom authorization logic as part of the function code, and to only allow requests that present valid Amazon Cognito credentials when invoking the function. You also learn ways to protect Lambda function URL against common security threats like DDoS using AWS WAF and Amazon CloudFront.
Lambda function URLs provides a simpler way to invoke your function using HTTP calls. However, it is not a replacement for Amazon API Gateway, which provides advanced features like request validation and rate throttling.
Solution overview
There are four core components in the example.
1. A Lambda function with function URLs enabled
At the core of the example is a Lambda function with the function URLs feature enabled with the authentication type of NONE. This function responds with a success message if a valid authorization code is passed during invocation. If not, it responds with a failure message.
2. Amazon Cognito User Pool
Amazon Cognito user pools enable user authentication on websites and mobile apps. You can also enable publicly accessible Login and Sign-Up pages in your applications using Amazon Cognito user pools’ feature called the hosted UI.
In this example, you use a user pool and the associated Hosted UI to enable user login and sign-up on the website used as entry point. This Lambda function validates the authorization code against this Amazon Cognito user pool.
3. CloudFront distribution using AWS WAF
CloudFront is a content delivery network (CDN) service that helps deliver content to end users with low latency, while also improving the security posture for your applications.
AWS WAF is a web application firewall that helps protect your web applications or APIs against common web exploits and bots and AWS Shield is a managed distributed denial of service (DDoS) protection service that safeguards applications running on AWS. AWS WAF inspects the incoming request according to the configured Web Access Control List (web ACL) rules.
Adding CloudFront in front of your Lambda function URL helps to cache content closer to the viewer, and activating AWS WAF and AWS Shield helps in increasing security posture against multiple types of attacks, including network and application layer DDoS attacks.
4. Public website that invokes the Lambda function
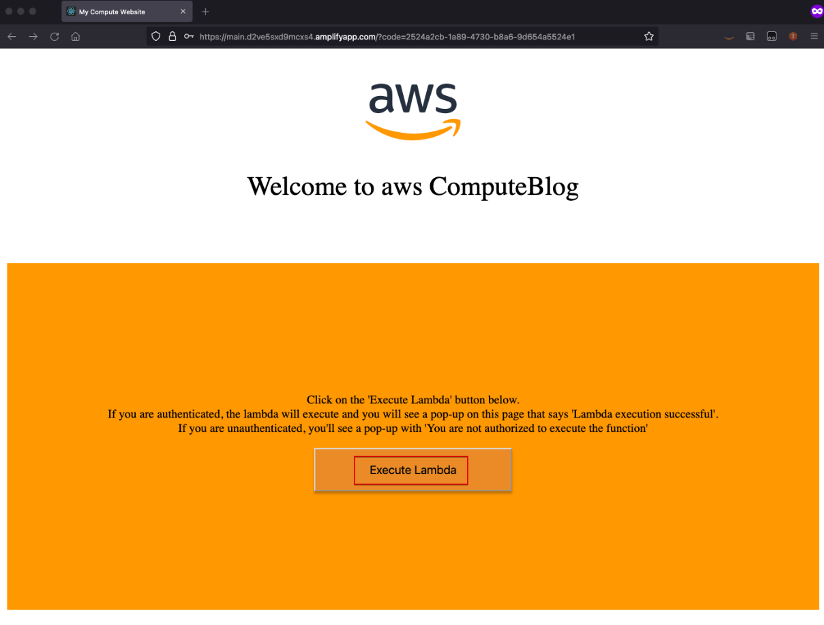
The example also creates a public website built on React JS and hosted in AWS Amplify as the entry point for the demo. This website works both in authenticated mode and in guest mode. For authentication, the website uses Amazon Cognito user pools hosted UI.
Solution architecture
This shows the architecture of the example and the information flow for user requests.
In the request flow:
The entry point is the website hosted in AWS Amplify. In the home page, when you choose “sign in”, you are redirected to the Amazon Cognito hosted UI for the user pool.
Upon successful login, Amazon Cognito returns the authorization code, which is stored as a cookie with the name “code”. The user is redirected back to the website, which has an “execute Lambda” button.
When the user choose “execute Lambda”, the value from the “code” cookie is passed in the request body to the CloudFront distribution endpoint.
The AWS WAF web ACL rules are configured to determine whether the request is originating from the US or Canada IP addresses and to determine if the request should be allowed to invoke Lambda function URL origin.
Allowed requests are forwarded to the CloudFront distribution endpoint.
CloudFront is configured to allow CORS headers and has the origin set to the Lambda function URL. The request that CloudFront receives is passed to the function URL.
This invokes the Lambda function associated with the function URL, which validates the token.
The function code does the following in order:
Exchange the authorization code in the request body (passed as the event object to Lambda function) to access_token using Amazon Cognito’s token endpoint (check the documentation for more details).
Amazon Cognito user pool’s attributes like user pool URL, Client ID and Secret are retrieved from AWS Systems Manager Parameter Store (SSM Parameters).
These values are stored in SSM Parameter Store at the time these resources are deployed via AWS CDK (see “how to deploy” section)
The access token is then verified to determine its authenticity.
If valid, the Lambda function returns a message stating user is authenticated as <username> and execution was successful.
If either the authorization code was not present, for example, the user was in “guest mode” on the website, or the code is invalid or expired, the Lambda function returns a message stating that the user is not authorized to execute the function.
The webpage displays the Lambda function return message as an alert.
Getting started
Pre-requisites:
Before deploying the solution, please follow the README from the GitHub repository and take the necessary steps to fulfill the pre-requisites.
Deploy the sample solution
1. From the code directory, download the dependencies:
$ npm install
2. Start the deployment of the AWS resources required for the solution:
$ cdk deploy
Note:
optionally pass in the –profile argument if needed
The deployment can take up to 15 minutes
3. Once the deployment completes, the output looks similar to this:
Open the amplifyAppUrl from the output in your browser. This is the URL for the demo website. If you don’t see the “Welcome to Compute Blog” page, the Amplify app is still building, and the website is not available yet. Retry in a few minutes. This website works either in an authenticated or unauthenticated state.
Test the authenticated flow
To test the authenticated flow, choose “Sign In”.
2. In the sign-in page, choose on sign-up (for the first time) and create a user name and password.
3. To use an existing an user name and password, enter those credentials and choose login.
4. Upon successful sign-in or sign up, you are redirected back to the webpage with “Execute Lambda” button.
5. Choose this button. In a few seconds, an alert pop-up shows the logged in user and that the Lambda execution is successful.
Testing the unauthenticated flow
1. To test the unauthenticated flow, from the Home page, choose “Continue”.
2. Choose “Execute Lambda” and in a few seconds, you see a message that you are not authorized to execute the Lambda function.
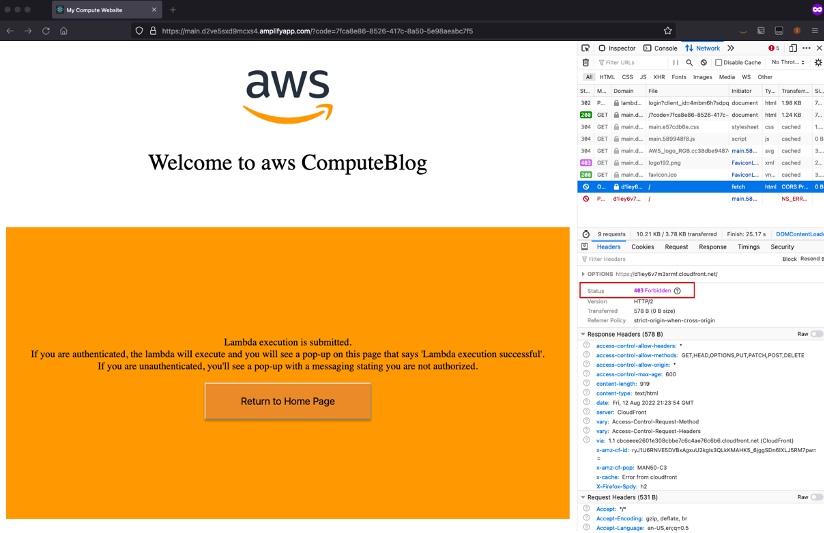
Testing the geo-block feature of AWS WAF
1. Access the website from a Region other than US or Canada. If you are physically in the US or Canada, you may use a VPN service to connect to a Region other than US or Canada.
2. Choose the “Execute Lambda” button. In the Network trace of browser, you can see the call to invoke Lambda function was blocked with Forbidden response.
3. To try either the authenticated or unauthenticated flow again, choose “Return to Home Page” to go back to the home page with “Sign In” and “Continue” buttons.
Cleaning up
To delete the resources provisioned, run the cdk destroy command from the AWS CDK CLI.
Conclusion
In this blog, you create a Lambda function with function URLs enabled with NONE as the authentication type. You then implemented a custom authentication mechanism as part of your Lambda function code. You also increased the security of your Lambda function URL by setting it as Origin for the CloudFront distribution and using AWS WAF Geo and IP limiting rules for protection against common web threats, like DDoS.
For more serverless learning resources, visit Serverless Land.
In 2016, we launched AWS Shield, a managed Distributed Denial of Service (DDoS) protection service that safeguards applications running on AWS. AWS Shield provides always-on detection and automatic inline mitigations that minimize application downtime and latency without needing to contact AWS Support.
There are two tiers of AWS Shield: Standard and Advanced. All AWS customers benefit from the automatic network layer protections of AWS Shield Standard and at no cost. AWS Shield Standard defends against the most common, frequently occurring network and transport layer (Layer 3 and 4) DDoS attacks to maximize the availability of AWS services.
For customized protection against sophisticated (Layer 3 to 7) threats targeting your applications, you can subscribe to AWS Shield Advanced. AWS Shield Advanced provides more sensitive detection and tailored mitigations against large and complex DDoS attacks, near real-time visibility into attacks, and integration with AWS WAF, a web application firewall for defense against Layer 7 attacks. AWS Shield Advanced also gives you 24-7 access to the AWS Shield Response Team (SRT) and cost protection against scaling costs stemming from DDoS attacks.
AWS Shield Advanced establishes a traffic baseline for each protected resource. Significant deviations from this baseline are flagged as DDoS events and trigger alerts through Amazon CloudWatch. However, mitigating these events still requires manually crafting an AWS WAF rule that isolates the malicious traffic, deploying it through the AWS WAF console or API, and evaluating the rule’s effectiveness. AWS Shield Advanced customers can utilize the SRT to create such AWS WAF rules or rely on their own expertise, but the process is time-consuming, which increases the time it takes to mitigate a DDoS attack and prevent availability impact to applications.
Today, we are announcing Automatic Application Layer DDoS Mitigation for AWS Shield Advanced. This is a new set of capabilities included for all Shield Advanced customers that automatically mitigate malicious web traffic that threatens to impact application availability. This feature automatically creates, tests, and deploys AWS WAF rules to mitigate layer 7 DDoS events on behalf of customers.
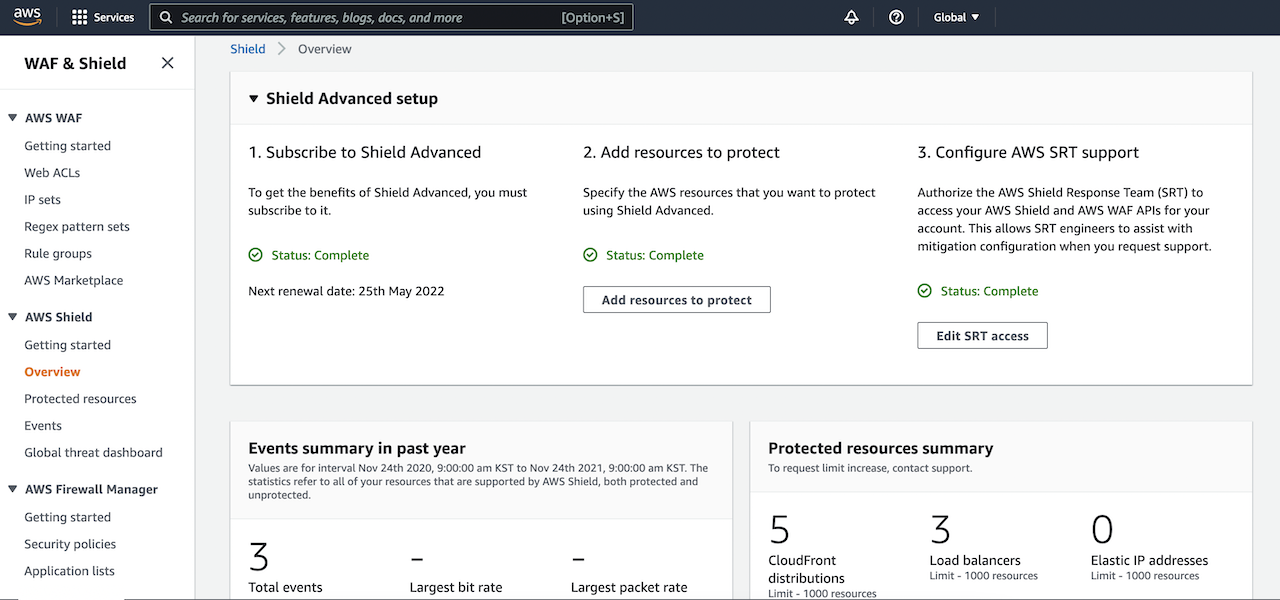
Enabling Automatic Application Layer DDoS Mitigation Visit the AWS Shield console to get started with automatic application layer DDoS mitigation. To get the benefits of Shield Advanced, you must subscribe to an annual subscription.
After you subscribe to AWS Shield Advanced, you specify the resources that you want to protect, configure a layer 7 DDoS mitigation, AWS SRT supports, and a dashboard in CloudWatch to monitor DDoS events. To learn more, see Getting started with AWS Shield Advanced in the AWS documentation.
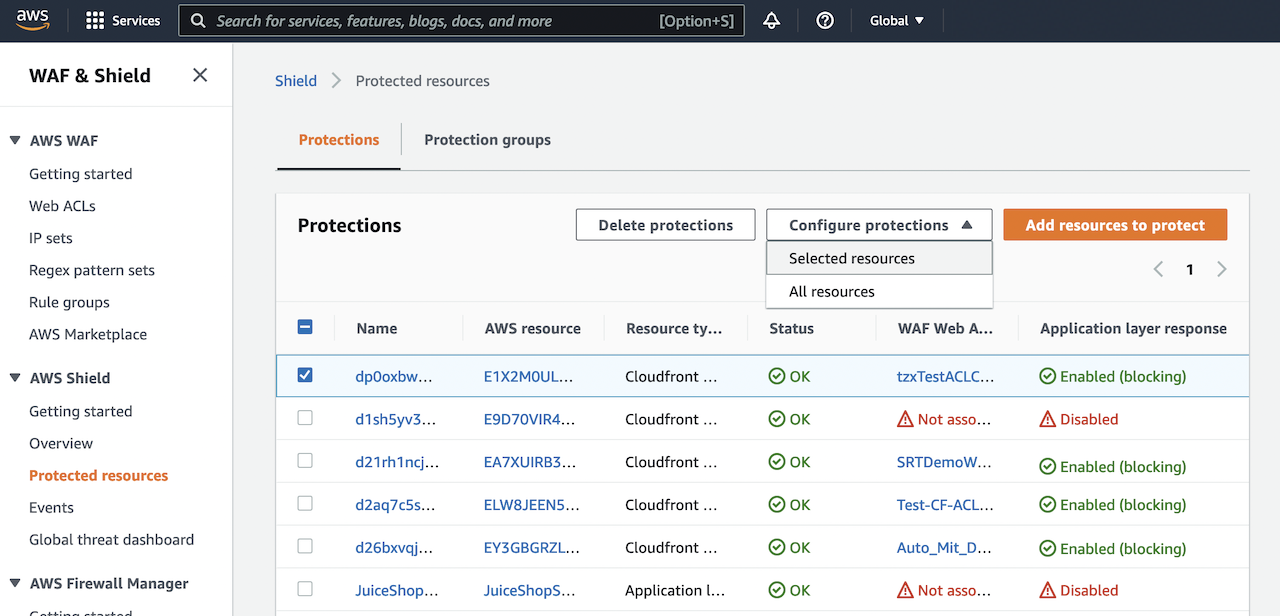
To enable Shield Advanced automatic application layer DDoS mitigation, select your layer 7 AWS resources (e.g. CloudFront), and choose Configure protections from the drop down list.
Next, in Edit protection, choose if you would like to enable automatic mitigation of layer 7 events and select if whether WAF rules should be created in Count or Block mode in Automatic response. Placing WAF rules in Count mode allows you to observe how resource traffic would be affected before deploying them in Block mode. Please note that a WebACL must be associated with a Shield protected resource in order to enable automatic layer 7 mitigation.
Mitigation actions can be changed to count or block mode at any time. Navigate to the Events tab of the console to view detected DDoS events, and select a detected event to see detection, mitigation, and top contributor metrics.
How to Mitigate Application Layer DDoS Automatically When you want to protect layer 7 resources, such as CloudFront distributions, AWS Shield Advanced will establish a 30-day traffic baseline into each protected resource.
When automatic mitigation is enabled, only then will we create a Shield managed rule group in which AWS Shield Advanced will create AWS WAF rules in response to DDoS events.
Traffic that significantly deviates from the established baseline will be flagged as a potential DDoS event. After an event is detected, Shield Advanced will attempt to identify a signature based on offending request patterns. If a signature is identified, WAF rules will be created to mitigate traffic with that signature.
Once rules are confirmed to be safe, they will be added to the Shield-managed rule group, and customers can choose whether the rules are deployed in count or block mode. Customers can also create CloudWatch alerts based on when requests are being blocked or counted.
Customers can change the action that automatic mitigation takes (count or block) or disable it entirely at any time. Shield Advanced will automatically remove AWS WAF rules after it has determined that an event has fully subsided. To learn more, see Shield Advanced automatic application layer DDoS mitigation in the AWS Shield Developer Guide.
Available Now Automatic Application Layer DDoS Mitigation is now available in all AWS regions where AWS Shield Advanced is available, and it can be enabled at no additional cost.
You can send feedback to the AWS forum for AWS Shield or through your usual AWS Support contacts.
In this post, we explain what the three most important AWS WAF rate-based rules are for proactively protecting your web applications against common HTTP flood events, and how to implement these rules. We share what the Shield Response Team (SRT) has learned from helping customers respond to HTTP floods and show how all AWS WAF customers can benefit from these learnings.
When you have business-critical applications that are internet-facing, you need to protect them from risks such as distributed denial of service (DDoS) attacks. AWS Shield Advanced is a managed DDoS protection service that safeguards applications that are running behind Amazon Web Services (AWS) internet-facing resources. The backend origin of your application can exist anywhere, including on premises, and Shield Advanced can protect it. Shield Advanced provides DDoS protection for Layers 3–7. It also includes 24/7 access to the SRT to help you quickly respond to sophisticated unauthorized activity scenarios that might be unique to your application. To learn more about what resource types are supported to associate AWS WAF, see AWS WAF.
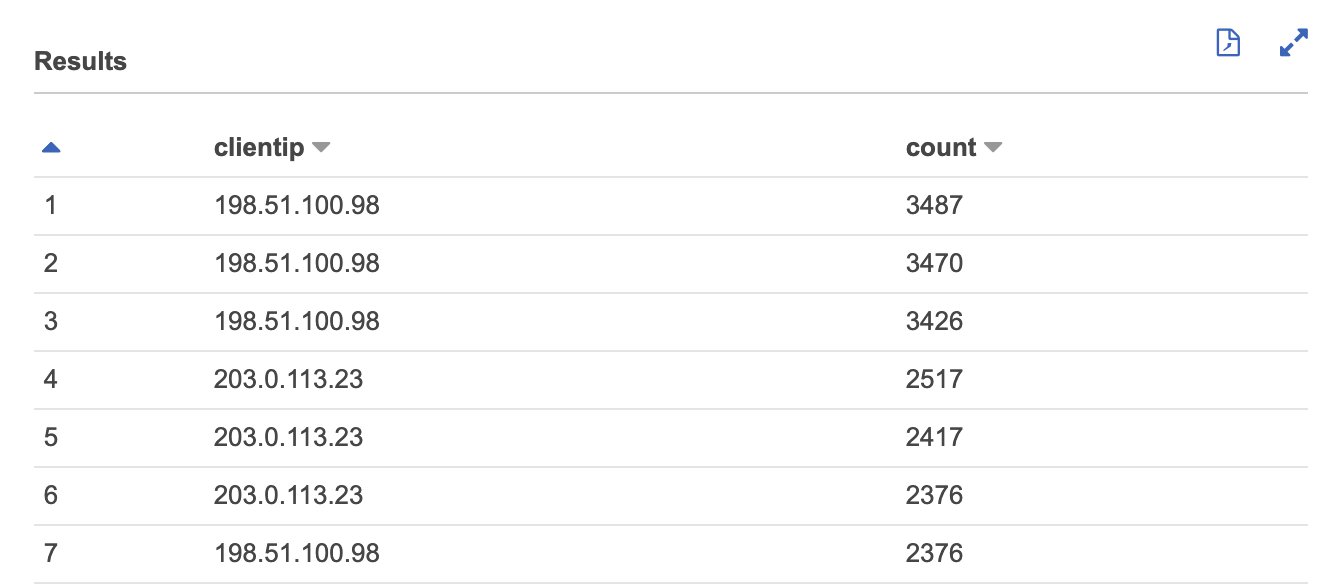
Increasingly, the SRT has been assisting customers in protecting against Layer 7 HTTP flood occurrences that negatively impact application availability or performance by overloading the application with an unusually high number of HTTP requests. In many cases, these malicious events can be automatically mitigated by using AWS WAF. In addition, AWS WAF has an easy-to-configure native rate-based rule capability, which detects source IP addresses that make large numbers of HTTP requests within a 5-minute time span, and automatically blocks requests from the offending source IP until the rate of requests falls below a set threshold. In this post, we show how you can pull insights from the AWS WAF logs to determine what your rate-based rule threshold should be.
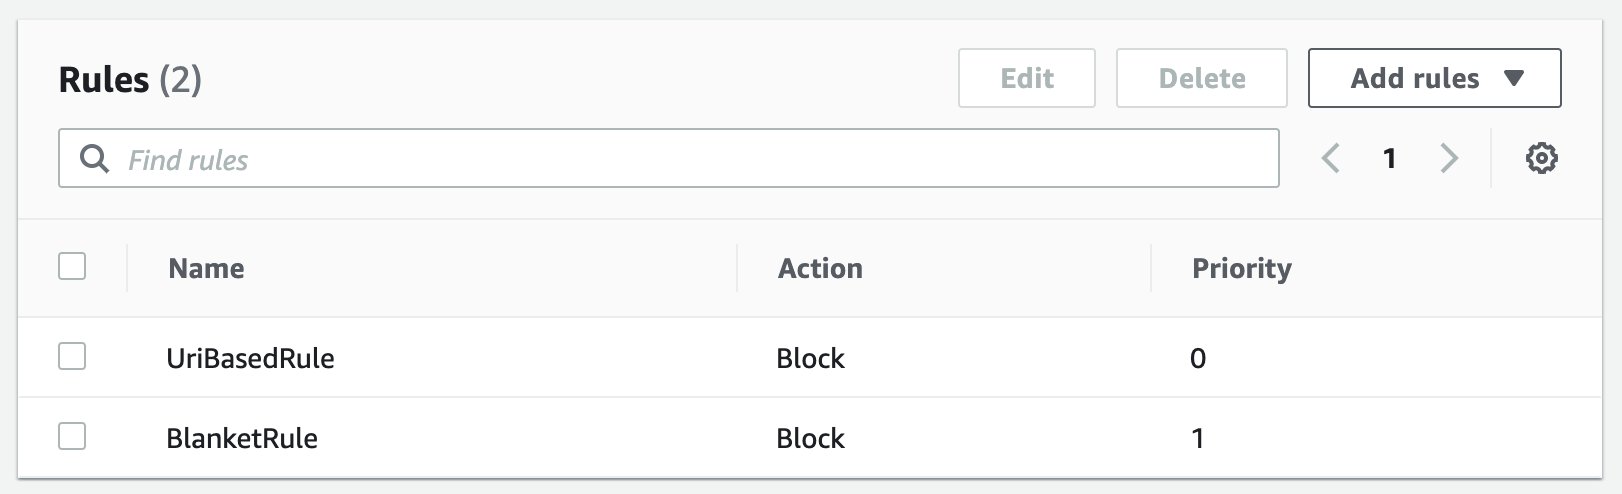
The top three most important AWS WAF rate-based rules are:
A blanket rate-based rule to protect your application from large HTTP floods.
A rate-based rule to protect specific URIs at more restrictive rates than the blanket rate-based rule.
A rate-based rule to protect your application against known malicious source IPs.
Solution overview
AWS WAF is a web application firewall that helps protect your web applications against common web exploits that might affect availability, compromise security, or consume excessive resources. AWS WAF gives you control over which web traffic reaches your applications. If you already know the request rates for your application, you have all the necessary information to start creating your AWS WAF rate-based rules. To learn more about how to create rules, see Creating a rule and adding conditions. However, if you don’t have this data and want to learn how to get started, this solution helps you determine appropriate rates for your applications, and how to create AWS WAF rate-based rules.
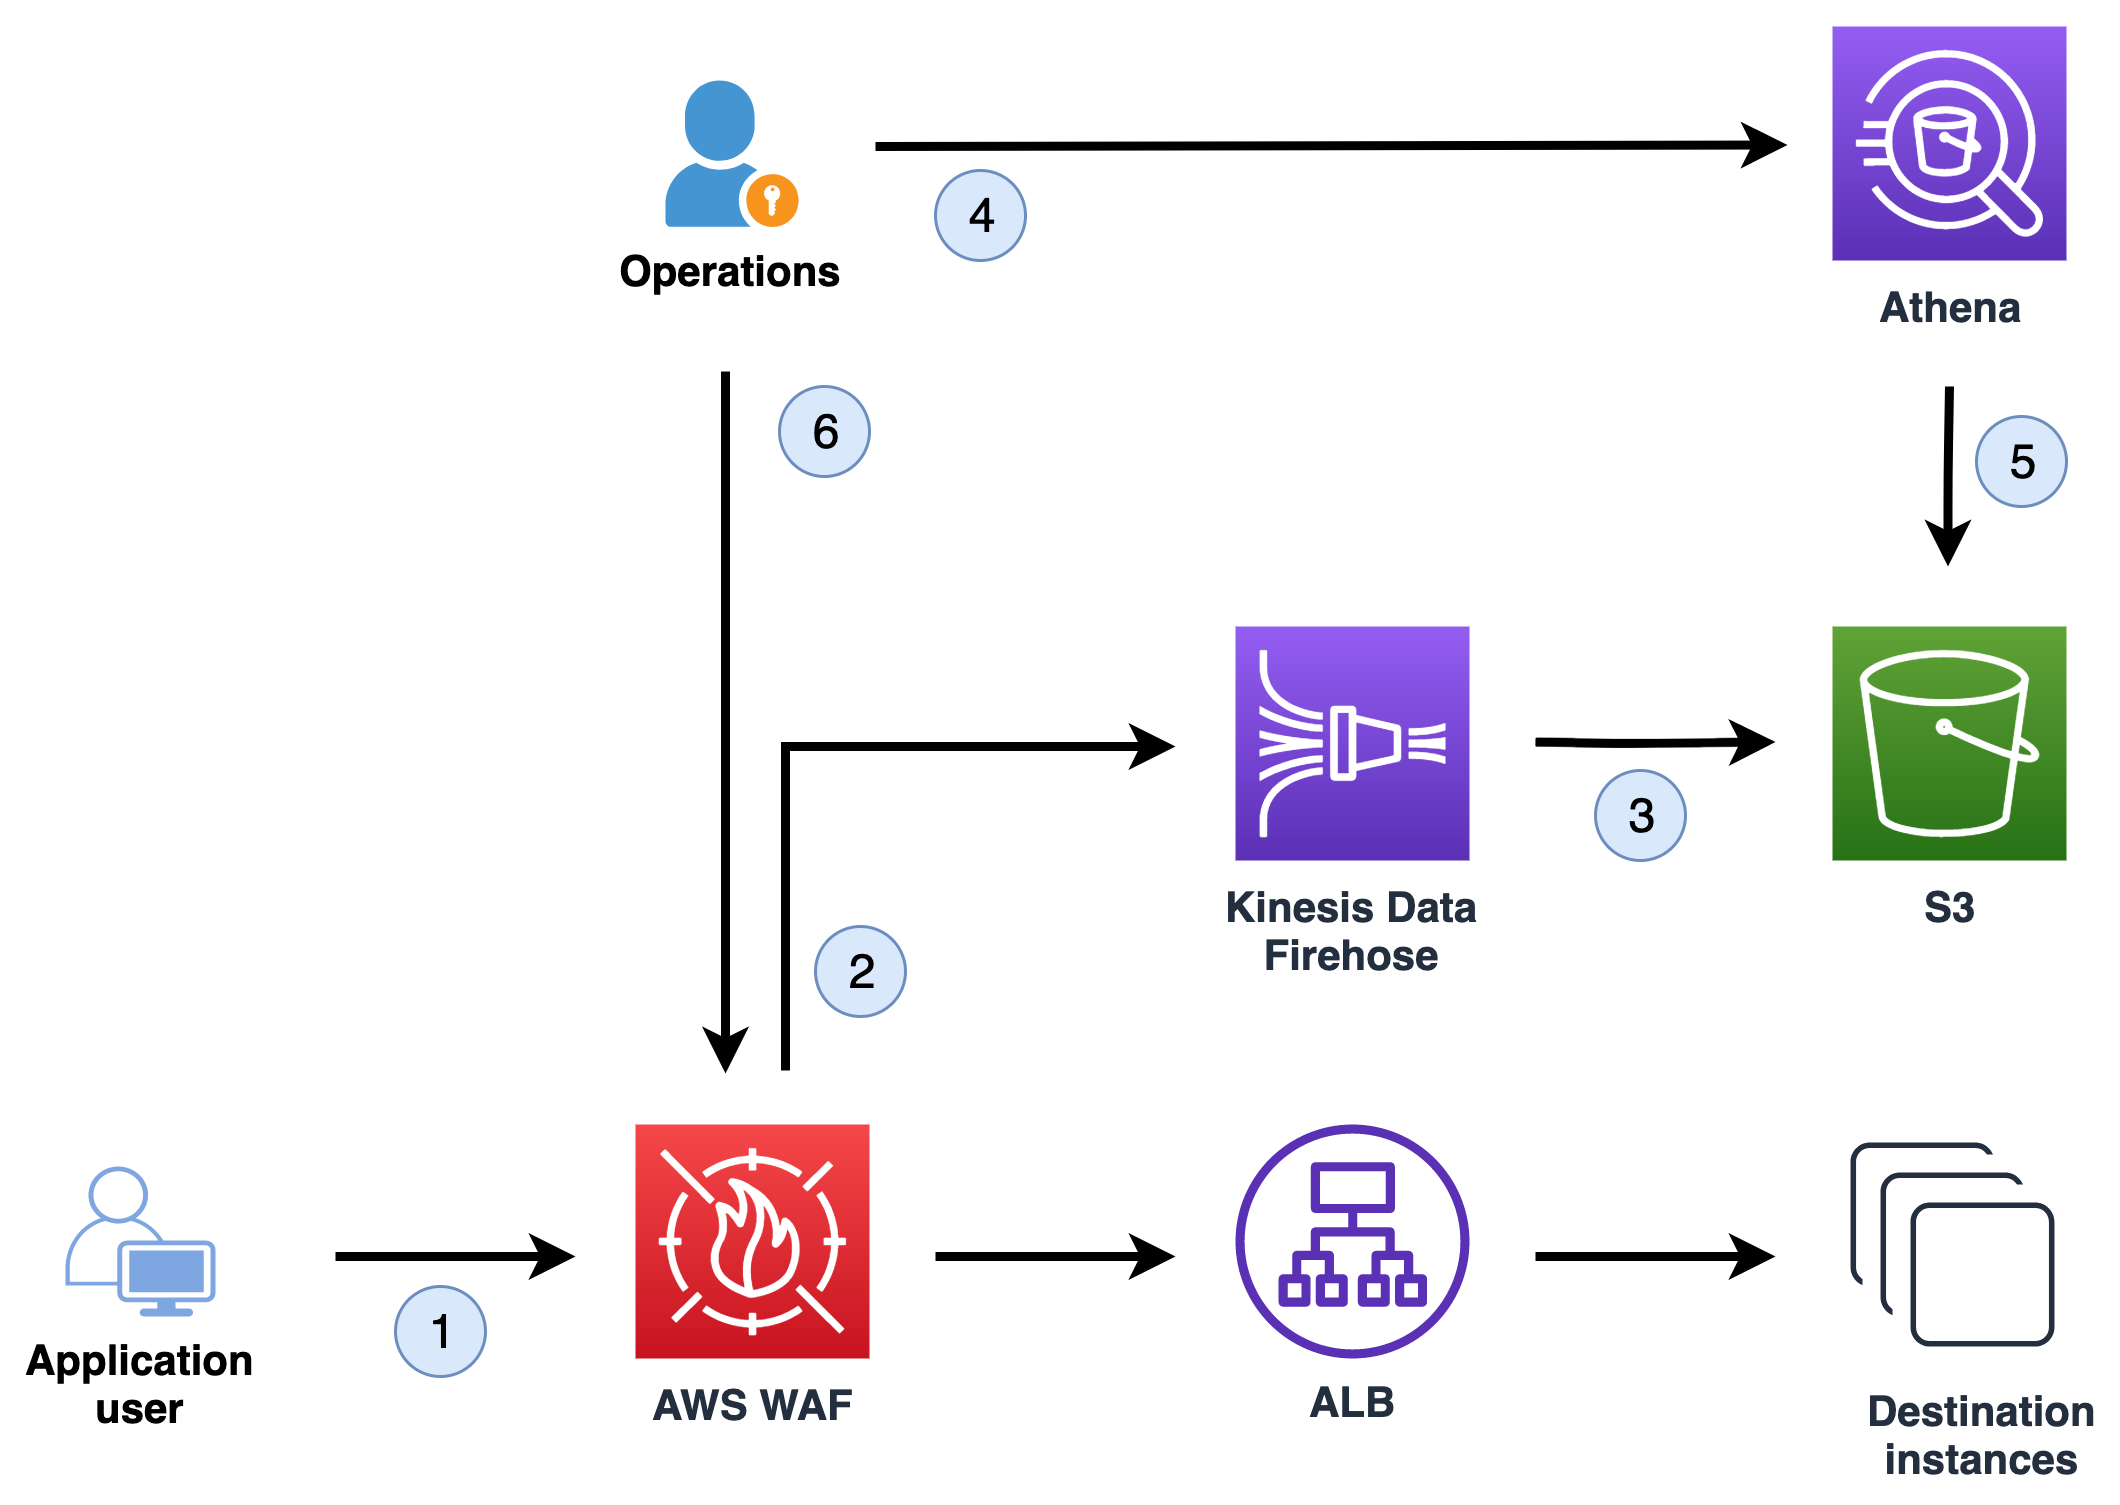
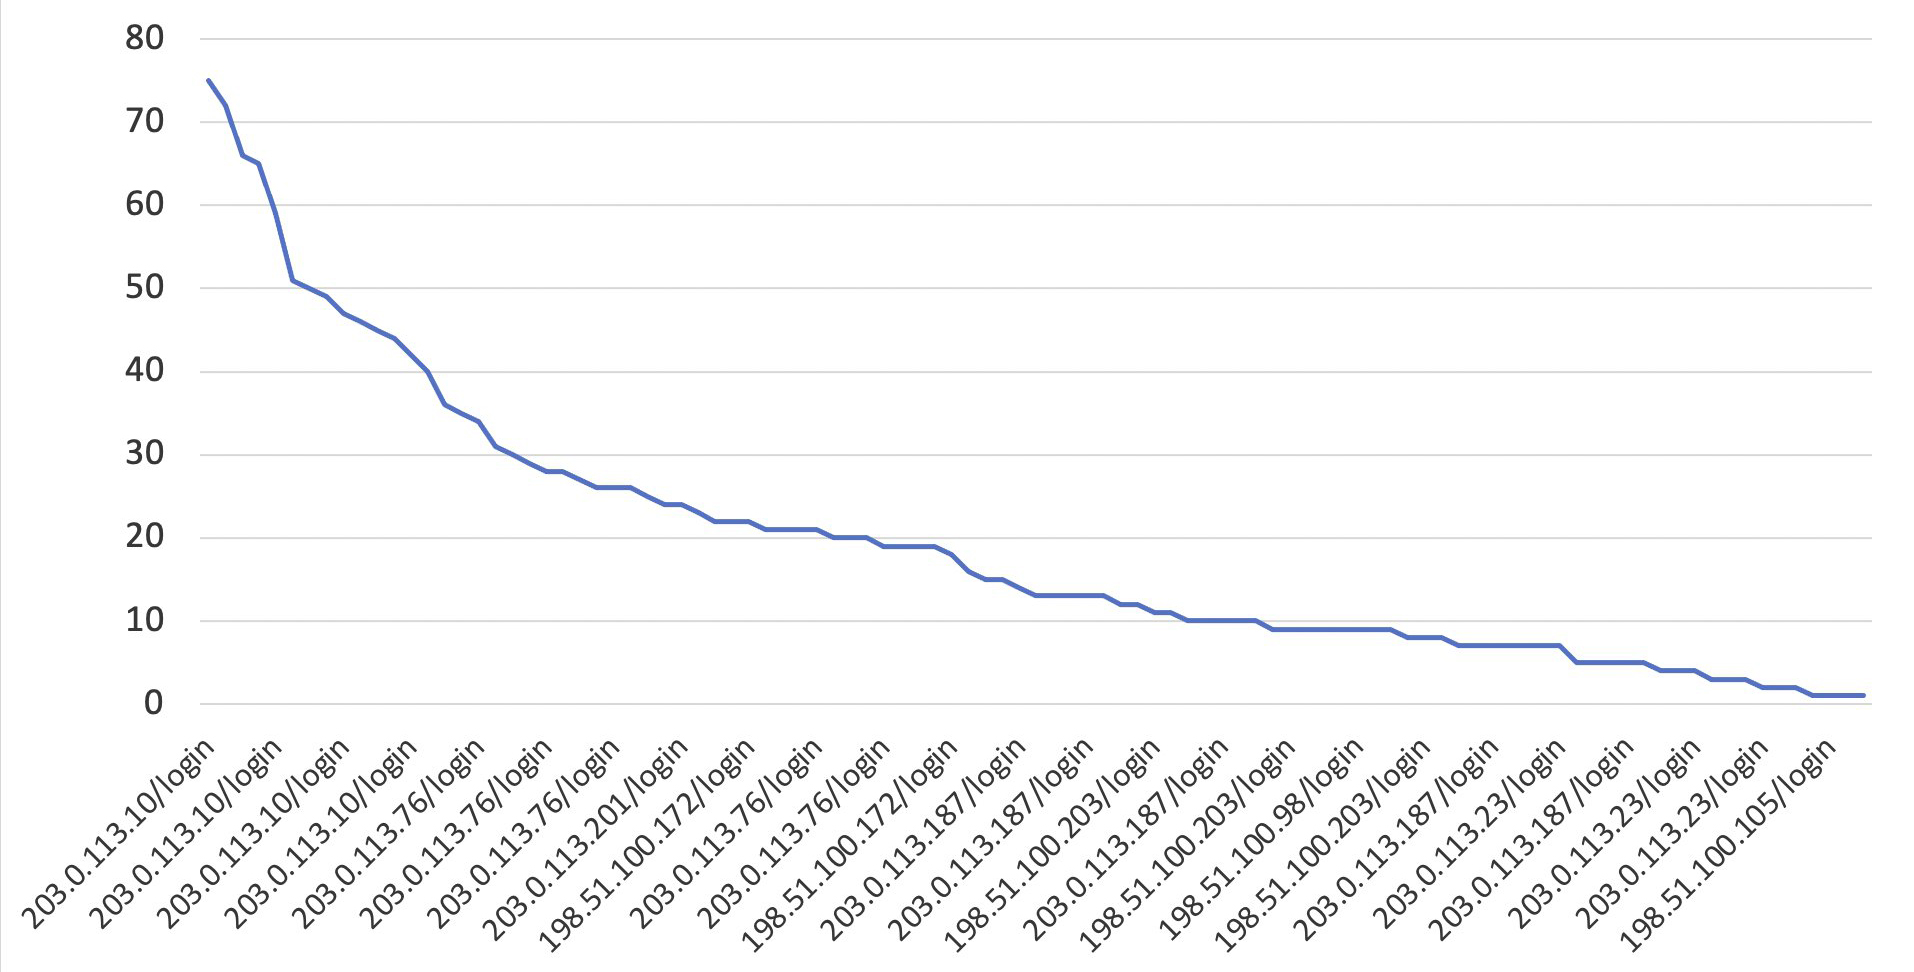
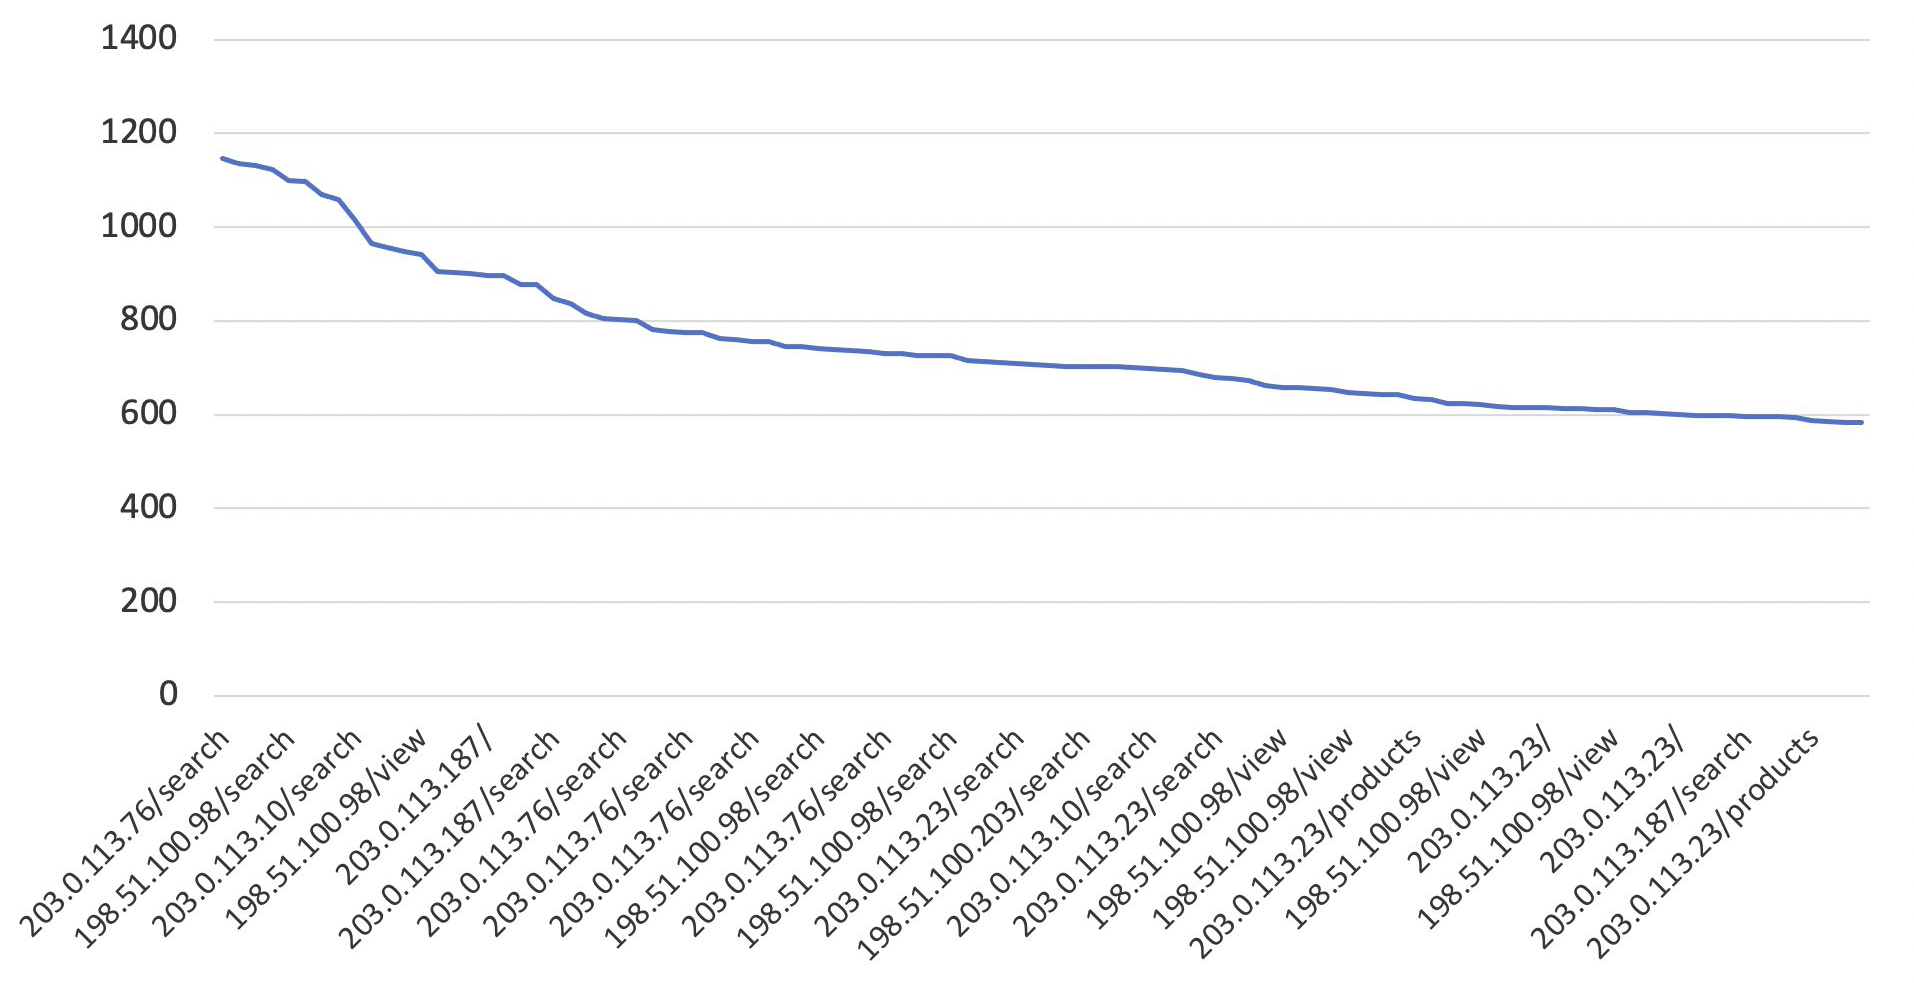
Figure 1 shows how incoming request information is captured so that the operations team can use it to determine rate-based rules.
Figure 1: The workflow to collect and query logs and apply rate-based rules
Let’s go through the flow to better understand what’s happening at each step:
An application user makes requests to the application.
The operations team uses Amazon Athena to analyze the logs with SQL queries.
Athena queries the logs in the S3 bucket and shows the query results.
The operations team uses the query results to determine the appropriate AWS WAF rate-based rule.
The three rate-based rules in detail
Each of the rules helps to protect web applications from unauthorized activity. Each of the rules focuses on a specific aspect of protection. The rules complement each other, and so when they’re combined, they can offer greater help in protecting your web application. We’ll look at each of the rules to understand what they do.
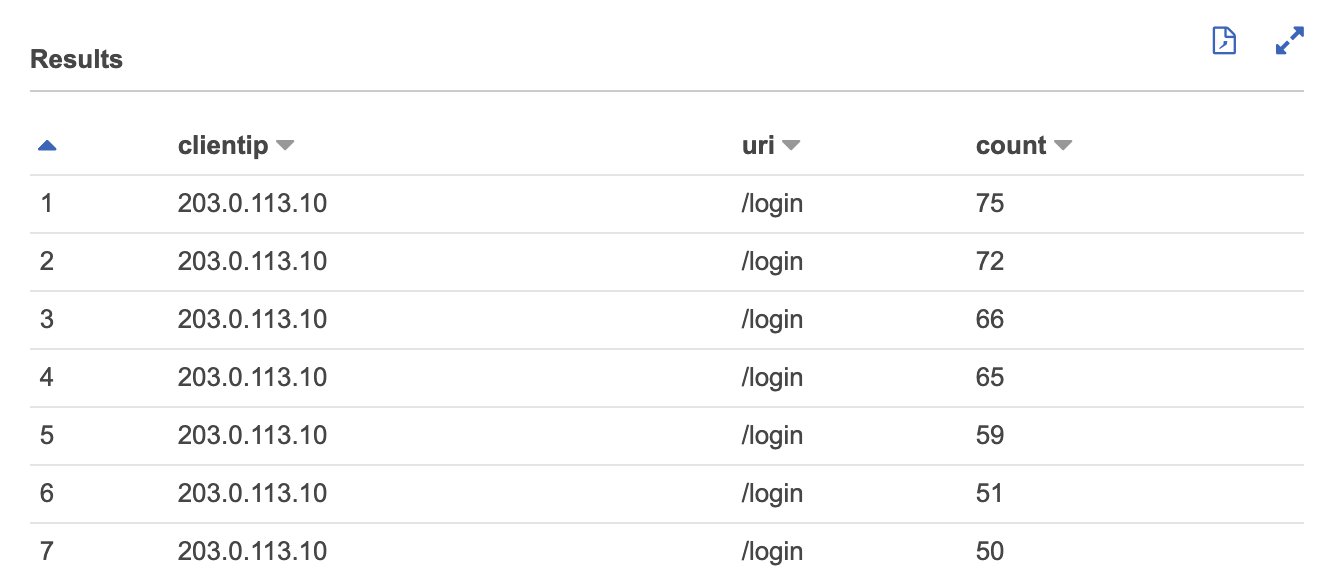
Blanket rate-based rule
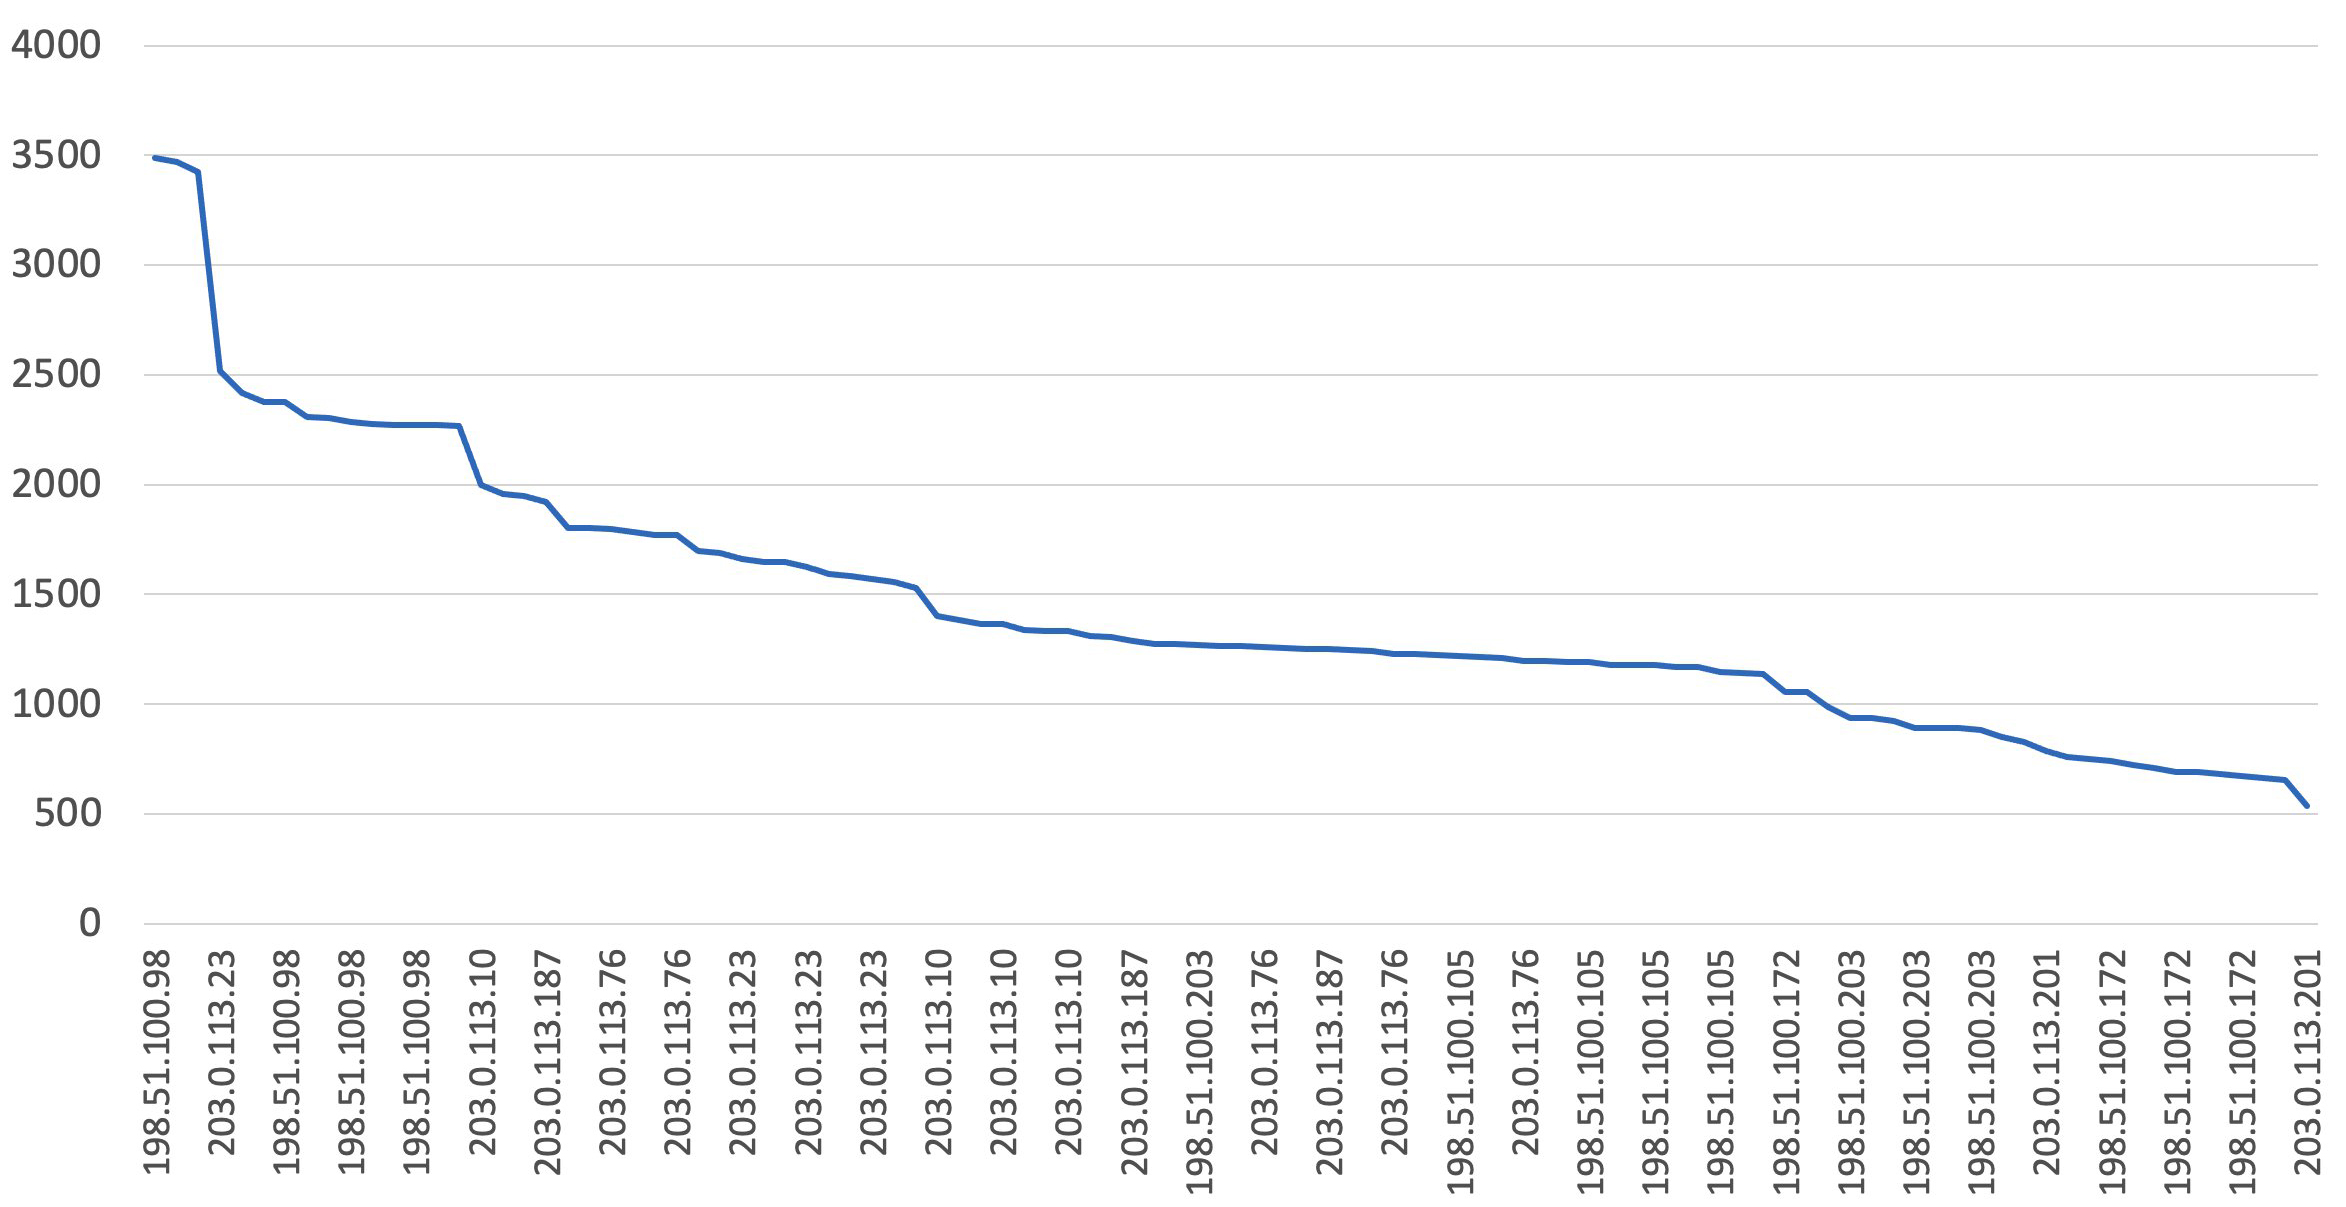
A blanket rate-based rule is designed to prevent any single source IP address from negatively impacting the availability of a website. For example, if the threshold for the rate-based rule is set to 2,000, the rule will block all IPs that are making more than 2,000 requests in a rolling 5-minute period. This is the most basic rate-based rule, and one of the most valuable for AWS WAF customers to implement. The SRT often helps customers who are actively under a DDoS attack to quickly implement this rule. In past experiences with HTTP flood cases, if this rule were proactively in place, the customer would have been protected and wouldn’t have needed to reach out to the SRT for assistance. The blanket rate-based rule would have automatically blocked the attempt without any human intervention.
URI-specific rate-based rule
Some application URI endpoints typically receive a high request volume, but for others it would be unusual and suspicious to see a high request count. For example, multiple requests in a 5-minute period to an application’s login page is suspicious and indicates a potential brute force or credential-stuffing attack against the application. A URI-specific rule can prevent a single source IP address from connecting to the login page as few as 100 times per 5-minute period, while still allowing a much higher request volume to the rest of the application. Some applications naturally have computationally expensive URIs that, when called, require considerably more resources to process the request. An example of this could be a database query or search function. If a bad actor targets these computationally expensive URIs, this can quickly lead to application performance or availability issues. If you assign a URI-specific rate-based rule to these portions of your site, you can configure a much lower threshold than the blanket rate-based rule. It’s beyond the scope of this blog post, but some customers use Application Load Balancer access logs and the target_processing_time information to determine precisely which portions of the site are the slowest to respond and might represent a computationally expensive call. These customers then put additional rate-based rule protections on calls that are made to these URIs.
IP reputation rate-based rule
Many of the DDoS events the SRT assists customers with include HTTP floods that originate from known malicious source IPs. The AWS WAF Security Automations solution provides AWS WAF customers with a subscription to four open-source threat intelligence lists. Rate-based rules with low thresholds can be applied to requests coming from these suspect sources. Some customers feel comfortable completely blocking web requests from these IPs, but at the very least, requests from these IPs should be rate-limited to protect the application from these well-known malicious sources.
It’s also common to see HTTP floods originate from IP addresses within certain countries. You can use AWS WAF geographical matching rules to assign lower rate-based rule thresholds to requests that originate from certain countries, or countries that don’t contain your web application’s primary user base. For example, suppose your application primarily serves users in the United States. In that case, it could be beneficial to create a rate-based rule with a low threshold for requests that come from any country other than the United States. HTTP floods are also commonly seen originating from IP addresses classified as cloud hosting provider IPs. You can use AWS WAF’s “HostingProviderIPList” Managed Rule to label these requests and then assign a lower rate-based rule threshold to them as well.
Prerequisites
Before you implement the solution, verify that:
AWS WAF is deployed in your AWS account and is associated with an Amazon CloudFront distribution or an Application Load Balancer.
Your AWS WAF default action is set to Block. When you create and configure a web ACL, you set the web ACL default action, which determines how AWS WAF handles web requests that don’t match any rules in the web ACL. To learn more about default action for a web ACL, see Deciding on the default action for a web ACL.
AWS WAF logging is configured and logs are being stored in an S3 bucket.
Amazon Athena is an interactive query service that you can use to analyze data in Amazon S3 by using standard SQL. For this solution, you’ll use Athena to connect to the S3 bucket where AWS WAF logs are stored and query the AWS WAF logs. The first step is to open the Athena console and create a database.
Note: The Athena database and table creation is a once-off configuration process. You can then come back and run the queries and see the query results based on your latest AWS WAF log data.
To create an Athena database, you’ll use a data definition language (DDL) statement. Paste the following query in the Athena query editor, replacing values as described here:
Replace <your-bucket-name> with the S3 bucket name that holds your AWS WAF logs.
For <bucket-prefix-if-exist>, if AWS WAF logs are stored in an S3 bucket prefix, replace with your prefix name. Otherwise, remove this part from the query, including the slash “/” at the end.
CREATE DATABASE IF NOT EXISTS wafrulesdb
  COMMENT 'AWS WAF logs'
  LOCATION 's3://<your-bucket-name>/<bucket-prefix-if-exist>/';
Choose Run query to run the query and create the database. Successful completion will be indicated by the query result, as shown below.
Results
Query successful.
Next, you’ll create a table inside the database. Paste the following query in the Athena query editor, replacing values as described here:
Replace <your-bucket-name> with the S3 bucket name that holds your AWS WAF logs.
For <bucket-prefix-if-exist>, if AWS WAF logs are stored in an S3 bucket prefix, replace with your prefix name. Otherwise, you can remove this part from the query, including the slash “/” at the end.
For has_encrypted_data, if your AWS WAF log data is encrypted at rest, change the value to true, otherwise false is the correct value.
Run the query in the Athena console. After the query completes, Athena registers the waftable table, which makes the data in it available for queries.
Run SQL queries to identify rate-based rule thresholds
Now that you have a table in Athena, know where the data is located, and have the correct schema, you can run SQL queries for each of the rate-based rules and see the query results.
Blanket rate-based rule for all application endpoints
You’ll start with a SQL query that identifies the blanket rule. The critical factor in determining the blanket rule is to run the query against AWS WAF logs data that represents a healthy high request volume. The following query defines a time window of 6 hours in the evening, expressed as 2020-12-01 16:00:00 and 2020-12-01 22:00:00. Time windows can span a few hours or several days; however, this time window must be a good representation of your traffic volume, which you will use as the basis to identify the threshold. For example, if your application is busier during certain periods, you should evaluate the log data for that time. In the example shown here, we limit the query results to the top 100 IPs in our SQL queries. You can adjust the limit to your needs by updating the LIMIT value.
SELECT
  httprequest.clientip,
  COUNT(*) AS "count"
FROM wafrulesdb.waftable
WHERE from_unixtime(timestamp/1000) BETWEEN TIMESTAMP '2020-12-01 16:00:00' AND TIMESTAMP '2020-12-01 22:00:00'
GROUP BY httprequest.clientip, FLOOR("timestamp"/(1000*60*5))
ORDER BY count DESC
LIMIT 100;
Update the time window to your needs and run the query in the Athena console. The results will show the top requesting IPs in any 5-minute period between two dates, as illustrated in Figure 2.
Figure 2: The top requesting IP in any 5-minute period between dates
You can visualize the results data to see a holistic view of the request count per IP. The chart in Figure 3 illustrates the SQL query results.
Figure 3: Chart: Top requesting IP in any 5-minute period between dates
The results are sorted by showing the IPs with the highest request volume for every 5-minute period. This means that the same IP could appear multiple times, if most of the requests were made within that 5-minute interval. In our example, looking at the result, an excellent first blanket rule would limit the request volume to about 7,000 requests within a 5-minute time period. You can either create the AWS WAF rule by using the following JSON and the JSON rule editor, or by using the AWS WAF visual rule editor and following these instructions. If you’re using the following JSON, make sure to replace the Limit value with the value that you identified by running the SQL query earlier.
Sometimes a client connects to an application through an HTTP proxy or a content delivery network (CDN), which obscures the client origin IP. It’s important to identify the client IP instead of the one from the proxy or CDN, because blocking source IPs can cause a wider unwanted impact. You can use many tools to help you identify whether the source IP might be a CDN. In this case, you would need to query and filter on the X-Forwarded-For, True-Client-IP, or other custom headers. CDN providers typically publish which headers they add to the requests, but X-Forwarded-For and True-Client-IP are common. The following query shows how you can reference these headers, illustrating with the X-Forwarded-For header, to write rate-based rules. You can replace X-Forwarded-For with the header you expect to hold the client IP.
SELECT
  header.value,
  COUNT(*) AS "count"
FROM wafrulesdb.waftable, UNNEST(httprequest.headers) as t(header)
WHERE
    from_unixtime(timestamp/1000) BETWEEN TIMESTAMP '2020-12-01 16:00:00' AND TIMESTAMP '2020-12-01 22:00:00'
  AND
    header.name = 'X-Forwarded-For'
GROUP BY header.value, FLOOR("timestamp"/(1000*60*5))
ORDER BY count DESC
LIMIT 100;
URI-based rule for specific application endpoints
Suppose that you want to further limit requests to the login page on your website. To do this, you could add the following string match condition to a rate-based rule:
The part of the request to filter on is URI
The Match Type is Starts with
A Value to match is /login (this needs to be whatever identifies the login page in the URI portion of the web request)
Next you have to identify what is a typical request volume to the /login URI for the application. The following SQL query does exactly that.
SELECT
  httprequest.clientip,
  httprequest.uri,
  COUNT(*) AS "count"
FROM wafrulesdb.waftable
WHERE
  from_unixtime(timestamp/1000) BETWEEN TIMESTAMP '2020-12-01 16:00:00' AND TIMESTAMP '2020-12-01 22:00:00'
AND
  httprequest.uri = '/login'
GROUP BY httprequest.clientip, httprequest.uri, FLOOR("timestamp"/(1000*60*5))
ORDER BY count DESC
LIMIT 100;
Replace the time window 2020-12-01 16:00:00 and 2020-12-01 22:00:00 and the httprequest.uri value, if applicable, and run the query in the Athena console. The results show the highest requesting IP and /login URI for every 5-minute period between dates, as illustrated in Figure 4.
Figure 4: The highest requesting IP and /login URI for every 5-minute period between dates
Figure 5 illustrates a chart based on the query results for the highest requesting IP and /login URI for every 5-minute period between dates.
Figure 5: Chart: The highest requesting IP and /login URI for every 5-minute period between dates
Based on the SQL query results, you would specify a rate limit of 150 requests per 5 minutes. Adding this rate-based rule to a web ACL will limit requests to your login page per IP address without affecting the rest of your site. Once again, you can either create the AWS WAF rule by using the following JSON and the JSON rule editor, or by using the AWS WAF visual rule editor and following these instructions. If you’re using the following JSON, make sure to replace the Limit value with the value that you identified by running the SQL query earlier.
AWS WAF rules with a lower value for Priority are evaluated before rules with a higher value. For the AWS WAF rules to work as expected (first evaluating the more specific rule—the URI-based rule, and only after that, the more general blanket rule) you have to set the AWS WAF rule priority. You can do that by updating the JSON and setting the Priority value to 1 for the blanket rule and 0 for the URI-based rule, or by using the AWS WAF visual rule editor. The expected AWS WAF rule priority should be as illustrated in Figure 6.
Figure 6: AWS WAF rules with priority for UriBasedRule
If you want to know the request volume across all application URIs, the following SQL will accomplish that.
SELECT
  httprequest.clientip,
  httprequest.uri,
  COUNT(*) AS "count"
FROM wafrulesdb.waftable
WHERE from_unixtime(timestamp/1000) BETWEEN TIMESTAMP '2020-12-01 16:00:00' AND TIMESTAMP '2020-12-01 22:00:00'
GROUP BY httprequest.clientip, httprequest.uri, FLOOR("timestamp"/(1000*60*5))
ORDER BY count DESC
LIMIT 100;
Figure 7 shows a chart of what the SQL query results might look like.
Figure 7: The highest requesting IP and URI for every 5-minute period between dates
IP reputation rule groups to block bots or other threats
You can use IP reputation rules to block requests based on their source. AWS WAF offers a wide selection of managed rule groups, and Amazon IP reputation list is the one that will help to reduce your exposure to bot traffic or exploitation attempts.
To add the Amazon IP reputation list rule to your web ACL
Open the AWS WAF console and navigate to the managed rule groups view.
Figure 8: The managed rule group view in AWS WAF
Expand AWS managed rule groups, and for Amazon IP reputation list, choose Add to web ACL.
Figure 9: Add the Amazon IP reputation list to the web ACL
Scroll to the bottom of the page and choose Add rule.
At this point, you should see the Set rule priority view. Move up the Amazon managed rule so that it has the highest priority. If a request originates from a bot, you want to deny the request as early as possible, and you achieve exactly that by assigning the highest priority to the Amazon IP reputation list rule. Your final AWS WAF rules order should be as shown in Figure 10.
Figure 10: Final AWS WAF rules ordered by priority
Considerations for rate-based rules
It’s important to note that the more specific AWS WAF rules should have a higher priority, because you want these rules to limit the request volume first. In our example, the rules strategy is first based on a specific URI, and then on a blanket rule that limits requests across the whole application.
The rate-based rules that we discussed here provide a solid foundation to help you protect your internet-facing applications from common basic HTTP request floods. However, the solution in this blog post shouldn’t be seen as a one-time setup but rather as an iterative activity.
You should determine a healthy time frame to rerun Amazon Athena queries to identify a new rate-based rule that aligns with the application’s growth and increasing request volume. Reviewing the rate-based rules on an iterative basis and incorporating it into your existing processes, such as software development life cycle, is a great way to schedule in the review process. Each AWS WAF rule can publish Amazon CloudWatch metrics, which can be used to trigger alerts before thresholds are crossed. You can use alerts to create tickets to operations teams based on thresholds you set. This alerts your operations teams to review the situation to see if it’s a DDoS attack being thwarted versus legitimate traffic being dropped.
After you define your request, add a buffer to allow for growth. Rate-based rules should have a reasonable buffer to account for near-future application growth. For instance, when an Athena query result shows a request volume of 500 requests, a rate-based rule with a limit of 1,000 requests gives a buffer for an additional 500 requests to account for application growth.
Summary
In this post, we introduced you to the top three most important AWS WAF rate-based rules to protect your web applications from common HTTP flood events. We also covered how to implement these rate-based rules and determined an appropriate request threshold for your application by using AWS WAF logs and Amazon Athena queries. To learn more about best practices that help you protect your websites and web applications against various attack vectors by using AWS WAF, see our whitepaper, Guidelines for Implementing AWS WAF.
If you have feedback about this post, submit comments in the Comments section below. If you have questions about this post, start a new thread on the AWS WAF forum or contact AWS Support.
Want more AWS Security how-to content, news, and feature announcements? Follow us on Twitter.
Note: This blog post describes how to automatically update AWS WAF IP sets with the most recent AWS IP ranges for AWS services. This related blog post describes how to perform a similar update for Amazon CloudFront IP ranges that are used in VPC Security Groups.
You can use AWS Managed Rules for AWS WAF to quickly create baseline protections for your web applications, including setting up lists of IP addresses to be blocked. In some cases, you might need to create an IP set in AWS WAF with the IP address ranges of Amazon Web Services (AWS) services that you use, so that traffic from these services is allowed. In this blog post, we provide a solution that automatically updates an AWS WAF IP set with the IP address ranges of the AWS services Amazon CloudFront, Amazon Route 53 health checks, and Amazon EC2 (and also the services that share the same IP address ranges, such as AWS Lambda, Amazon CloudWatch, and so on). These services are present in the AWS Managed Rules Anonymous IP list, and blocking them may cause inadvertent service impairment for applications that expect traffic from the services.
As an application owner, you can improve your security posture by using the Anonymous IP list in your AWS WAF web access control lists (web ACLs) to block source IP addresses from specific hosting providers and anonymization services, such as VPNs, proxies, and Tor nodes. Due to the generic nature of these rules, when you use the Anonymous IP list, you might want to exclude certain IPs from the list of IPs to be blocked, in order to allow web traffic from those sources. For example, you can allow traffic that originates from the AWS network.
Alternatively, you might want to permit only IP addresses from certain AWS services in a web ACL. This is a common requirement when you protect an Application Load Balancer by restricting all incoming traffic to CloudFront IP ranges. Creating your own custom list to allow expected traffic from the AWS network requires some effort, because you need to periodically update the list by using the IP ranges that we provide. With the solution we present here, you don’t have to manually manage the exclusion list. When the new AWS IP ranges are published, this solution will automatically fetch and update the list.
Note: This solution only works with AWS WAF, and will not work with AWS WAF Classic.
Solution overview
Figure 1 shows the solution architecture.
Figure 1: Automatic update process for service IPs
AWS sends Amazon Simple Notification Service (Amazon SNS) notifications to subscribers of the AmazonIPSpaceChanged SNS topic when updates are made to the public IP addresses for AWS services. This solution uses an AWS CloudFormation template to deploy an AWS Lambda function that is triggered by these SNS notifications. The function creates AWS WAF IP sets for IPv4 and IPv6 address ranges in your web ACL.
The solution workflow is as follows:
In the CloudFormation template, you select the services that you want the AWS WAF IP set to be updated with.
The template deploys the required AWS resources with the configuration that specifies what services to fetch from an AWS public IP address update.
AWS Lambda function is manually invoked one first time to populate AWS WAF IP sets with selected IPs from AWS IP range.
Once AWS IP range is updated, an Amazon SNS notification is sent to subscribers of the SNS topic.
SNS notification triggers the AWS Lambda function.
The Lambda function fetches the selected IP ranges and updates IP sets for IPv4 addresses and IPv6 addresses.
The application owner adds a custom AWS WAF web ACL rule that uses the IP sets to allow traffic from the AWS services that you’ve selected. This way, the web ACL makes reference to always updated AWS WAF IP sets with no further action required from your side.
Solution prerequisites
The solution is automatically created when you deploy the AWS CloudFormation template that is available on the solution’s GitHub page. There are three resources that you must have in place before you deploy the template:
The Python code that will be used as the Lambda function.
Download the update_aws_waf_ipset.py Python code from the project’s AWS Lambda directory in GitHub. This function is responsible for constantly checking AWS IPs and making sure that your AWS WAF IP sets are always updated with the most recent set of IPs in use by the AWS service of choice.
Compress the file to a .zip file and upload it to an Amazon Simple Storage Service (Amazon S3) bucket in the same AWS Region where you will deploy the template. For instructions on how to create an S3 bucket, see Creating a bucket.
An AWS WAF web ACL to filter requests that come in from trusted sources. The web ACL uses the IP sets that the solution creates and updates with the necessary IP addresses.
Create a new AWS WAF web ACL or use an existing one that is in the same Region where you will deploy the template.
Deploy the AWS CloudFormation template
The CloudFormation template deploys the required resources for this solution in your account. The following resources are deployed:
Two AWS WAF IP sets, IPv4Set and IPv6Set that are used to store IPv4 and IPv6 IP addresses from the services you’re interested in allowing. Those IP sets are visible in the AWS WAF console under the same Region where the template is deployed.
Note: The IP address 192.0.2.0/24 that appears in the template is a placeholder for the IP addresses that will be populated by the solution, and it is used for documentation purposes only.
The update_aws_waf_ipset.py Python code is used in an AWS Lambda function called UpdateWAFIPSet. This is the function that will read which services the solution should collects IPs from, and which IP sets should be populated. If you don’t change those parameters, the function will use default IP set suffixes. By default, the solution will select ROUTE53_HEALTHCHECKS and CLOUDFRONT as the services for which to download IPs. You can update the list of IP addresses as needed, by referring to the AWS IP JSON document for a list of service names and IP ranges.
A Lambda execution role with permissions restricted to least privilege required.
The Lambda function is automatically subscribed to the AmazonIPSpaceChanged SNS topic, which is responsible for monitoring changes in the list of AWS IPs.
A Lambda permission resource to allow the previously created SNS topic to invoke the template’s Lambda function.
Note: The Region that you use when you deploy the template is where resources will be created.
On the Specify stack details page, you can enter the stack name, which will be the name used as a reference for resources created by the template, as well as six other stack parameters, shown in Figure 2.
Figure 2: Template parameters
The parameters are as follows:
EC2REGIONS – This is the Region that the solution will use as a reference when it updates its list of IPs. Select all for all Regions, but you can also specify a Region of interest.
IPV4SetNameSuffix – The solution will create an AWS WAF IPv4 IP set with the stack name as its name, but you can also add a suffix of your choice to the name.
IPV6SetNameSuffix – Like the AWS WAF IPv4 IP set, the IPv6 IP set can also have a suffix of your choice.
LambdaCodeS3Bucket – As mentioned in the Prerequisites section, you need to have previously uploaded the Lambda function Python code to an Amazon S3 bucket in the same Region where you’re deploying the stack. Enter the bucket name here, for example, mybucket.
LambdaCodeS3Object – Enter the name of the .zip file of the compressed Lambda function in the S3 bucket, for example, myfunction.zip.
SERVICES – Enter the list of AWS services for which you want the IP addresses populated in the AWS WAF IP sets. By default, this solution uses ROUTE53_HEALTHCHECKS and CLOUDFRONT, but you can change this parameter and add any service name, according to the list in the AWS IP ranges JSON.
After you deploy the template, its status will change to CREATE_COMPLETE.
Solution deployment through the AWS CLI
You can also deploy the solution template through the AWS Command Line Interface (AWS CLI). On the solution’s GitHub page, in the Setup section, follow the instructions for deploying the solution by using AWS CLI commands.
After you successfully deploy the CloudFormation stack, it’s required that you run an initial Lambda invocation so that the AWS WAF IP sets are updated with AWS services IPs. This Lambda invocation is only required once, and after this initial call, the solution will handle future updates on your behalf.
To invoke this Lambda call through the AWS Management Console, open the Lambda console, select the Lambda function that was created by the template, and use the following event to create a test event. See Invoke the Lambda function in the AWS Lambda Developer Guide for step-by-step guidance on how to run a test event.
The success of the event will mean that the newly created AWS WAF IP sets now have the updated list of IPs from the services you’re working with.
You can also achieve Lambda function invocation through the AWS CLI by using the following command, where test_event.json is the test event I mentioned earlier.
After successful invocation, status code 200 is returned on the AWS CLI to illustrate that invocation happened as expected. At this point, the AWS WAF IP sets are updated.
Use the solution IP sets in your AWS WAF web ACL
Now the AWS WAF IPv4 and IPv6 IP sets are populated, and you can obtain the IP lists either by using the AWS WAF console, or by calling the GetIPSet API through the AWS CLI command get-ip-set.
To use AWS WAF IP sets in your web ACL, see Creating and managing an IP set in the AWS WAF Developer Guide. You can use these IP sets in the same web ACL or rule group that contains the AWS Managed Rules Anonymous IP list and is associated to the AWS resource that AWS WAF is protecting. AWS WAF evaluation order and solution positioning within WebACL will be discussed in later section.
To validate the solution, let’s consider a scenario where you would like to allow requests from CloudFront to come through, while blocking any other anonymous and hosting provider sources. In this scenario, consider the following requests that are filtered by AWS WAF.
In the first one, a customer has the AWSManagedRulesAnonymousIpList rule group, and a request coming from an Amazon EC2 instance IP is blocked.
To achieve this result, you need to edit AWSManagedRulesAnonymousIpList and add a scope-down statement so that the rule set only blocks requests that aren’t sent from sources within this solution’s IPv4 and IPv6 IP sets.
To create a scope-down statement for AWSManagedRulesAnonymousIpList
Select AWSManagedRulesAnonymousIpList rule set, and then choose Edit.
Choose the arrow next to Scope-down statement – optional. You will see two options, Rule visual editor and Rule JSON editor.
Choose Rule JSON editor and enter the following JSON. Replacing <IPv4-IPSET-ARN> and <IPv6-IPSET-ARN> with respective IP sets’ Amazon Resource Numbers (ARNs).
Note: You can use the AWS WAF ListIPSets action or the list-ip-sets CLI command to obtain the IP set Amazon Resource Numbers (ARNs) and enter that information in the provided JSON.
When you set the rule priority, consider using the AWSManagedRulesAnonymousIpList rule group with a lower priority than other rules within the web ACL. This causes that rule group to be evaluated prior to rules that are configured with terminating actions (that is, Allow and Block actions). The scope-down statement will match the request and allow traffic from the IP addresses within the IP set, and pass every other IP on to the next rule for further evaluation. Figure 4 shows an example of the suggested priority.
Figure 4: Example with suggested use of AWS WAF web ACL priority
Summary
This blog post provides you with a solution that is capable of automatically updating AWS WAF IP sets with the list of current IP ranges for one or more AWS services. You can use this solution in various ways, such as to allow requests from Amazon CloudFront when you’re using the AWS Managed Rules Anonymous IP List.
AWS Shield is a managed service that protects applications that are running on Amazon Web Services (AWS) against external threats, such as bots and distributed denial of service (DDoS) attacks. Shield detects network and web application-layer volumetric events that may indicate a DDoS attack, web content scraping, or other unauthorized non-human traffic that is interacting with AWS resources.
In this blog post, I’ll show you some of the volumetric event trends from network traffic and web request patterns that we observed in 2020 as more workloads moved to the cloud. It includes insights that are broadly applicable to cloud applications and insights that are specific to gaming applications. I will also share tips and best practices that you can follow to protect the availability of the applications that you run on AWS.
DDoS trends as more developers rely on the cloud
In 2020, we saw an increase in developers building applications on AWS and protecting their availability with AWS Shield Advanced, which includes AWS WAF at no additional cost. The DDoS threat vectors we observed were similar to the ones that were observed in 2019, but they occurred with greater frequency. Between February 2020 and April 2020, we observed a 72% increase in the monthly number of events that were detected by Shield.
TCP SYN floods and UDP reflection attacks, which attempt to reflect and amplify packets off legitimate services running on the internet, were among the most common infrastructure-layer events detected by AWS Shield in 2020. (In this blog post, we’ll use the term infrastructure layer to refer to Layers 3 and 4 of the OSI model.) These tactics attempt to affect the availability of an application by overwhelming its ability to process packets or establish new connections on behalf of legitimate users. One of the oldest UDP reflection vectors, DNS reflection, remains the most common, at 15.5% of all infrastructure-layer events detected by Shield. TCP SYN floods were the second most common at 13.8%. This is unsurprising, because web applications commonly rely upon both DNS and TCP traffic. Bad actors can find a consistent supply of systems on the internet that can be used as reflectors, due to the properties of these protocols, or system misconfiguration.
Bad actors may use application-layer requests, in isolation or together with infrastructure-layer attacks, in their attempt to affect the availability of an application. The most common application-layer attack observed by Shield in 2020 was the web request flood, an observation that is consistent with prior years. This vector gives a bad actor more leverage, meaning that they can have a greater effect with less traffic and effort. Instead of having to exhaust the capacity of a network path, device, or other lower-level component, they only need to send more web requests than the application is able to handle. This attack vector was a significant cause of increased volumetric events detected by Shield in the first half of 2020. For more information about events detected by Shield during 2020, see Figure 1.
Figure 1: Monthly number of volumetric events detected by AWS Shield in 2020
A closer look at web application-layer attacks
The request volume of web application-layer events that are detected by AWS Shield has increased, an indication that bad actors are making greater investments in tactics that are more challenging to detect and mitigate than infrastructure-layer events. Shield continuously monitors DDoS activity and alerts customers if there is an elevated threat at any point in time. In 2020, Shield reported elevated threats on 53 days, 33 of which were caused by high-volume web request floods. There were 55 events with a volume of greater than 500,000 requests per second (RPS), some of which reached millions of RPS. The RPS of the 99th percentile (P99) of the volume of web request floods detected by Shield nearly doubled between the first and second halves of the year. (The 99th percentile is the request volume in RPS, below which 99% of request floods were observed.). For more information about the volume of web request floods detected by Shield in 2020, see Figure 2.
Figure 2: Quarterly P90 and P99 volume of web request floods detected by AWS Shield in 2020
It’s important to protect web applications against DDoS attacks of any size. The more common request floods are relatively small, but smaller attacks can affect an application if it isn’t architected for DDoS resiliency. You can follow these best practices to help protect your web application against request floods and other DDoS attacks:
Protect internet-facing resources with AWS Shield Advanced. You can use AWS Shield Advanced to protect your applications that are running on AWS against most common, frequently occurring network and transport layer DDoS attacks. When you add protected resources in AWS Shield Advanced, network volumetric attacks against those resources are detected and mitigated more quickly. You also receive visibility into security events by using the AWS Shield console, API, or Amazon CloudWatch metrics. If you need assistance during an active event, you can quickly engage with AWS Shield experts or escalate to the AWS Shield Response Team (SRT).
Access greater network and request capacity with Amazon CloudFront and Amazon Route 53. You can use these services to serve static and dynamic web content, as well as DNS answers, by using the global network of AWS edge locations. This provides you with greater capacity to help mitigate large volumetric attacks. Applications that are fronted by Amazon CloudFront and Amazon Route 53 also benefit from inline mitigation that continually inspects all traffic and mitigates most infrastructure-layer DDoS attempts in less than one second. CloudFront and the AWS Shield DDoS mitigation systems use SYN cookies to verify new connections, which protects against SYN floods and other traffic floods that aren’t valid for the application. (A SYN cookie is a technique by which the Shield infrastructure encodes connection setup information into the SYN response (SYN-ACK packet) in such a way that the TCP connection resources are only consumed for legitimate clients who complete the TCP handshake.)
Use AWS WAF and rate-based rules to mitigate application-layer attacks. AWS Shield Advanced provides you with protection against infrastructure-layer attacks that can be mitigated with network-based DDoS mitigation systems. When you add Shield Advanced protection to CloudFront or Application Load Balancer (ALB) for serving web content, you receive AWS WAF at no additional cost. AWS Managed Rules for AWS WAF makes it easy to select and apply pre-configured rules, depending on your specific requirements. You also receive web request flood detection and can mitigate security events by configuring rate-based rules to match and temporarily block IP addresses that are sending traffic above a rate that you define. For larger applications, or applications that span multiple AWS accounts, you can use AWS Firewall Manager to deploy and manage rules across all of your resources.
Considerations unique to gaming use cases
On AWS, you can build and protect any kind of application. Internet-facing applications are more likely to receive DDoS attacks, particularly if a bad actor is motivated to disrupt the normal function of the application. We looked across AWS Shield data and found that one type of application stood out as the most likely to be targeted by DDoS attacks: gaming servers. Gaming servers host matches between players on their personal computers or gaming consoles. 16% of infrastructure-layer events detected by Shield in 2020 targeted gaming applications. The application might be targeted simply out of malice, or to gain an advantage in the game. Between Q1 2020 and Q2 2020, we observed a 46% increase in the frequency of events that were detected on behalf of gaming applications. This increase aligns with the increased use of residential internet networks during the same time.
There are unique considerations for protecting a gaming application against DDoS attacks. Many gaming applications rely upon UDP traffic, which makes it infeasible to block UDP as a countermeasure against the most common DDoS attacks, like UDP reflection attacks or UDP floods. You can nevertheless protect your gaming application and the experience of your players by using Elastic IP addresses and protecting these resources with AWS Shield Advanced. Shield Advanced has the ability to perform deep packet inspection of all traffic, even at extremely high PPS rates. Using that powerful tool, the AWS Shield Response Team (SRT) can work with you to understand your application and build a custom mitigation that allows only valid player traffic.
Reacting to extortion attempts
From August 2020 through November 2020, we saw a revival of DDoS extortion attempts, a tactic that is now more than six years old. Each extortion attempt reported by customers to the AWS SRT had familiar characteristics. A malicious actor would target an application that wasn’t running on AWS as a proof of concept and then threaten a larger, follow-on attack if a ransom wasn’t paid. Although it’s very uncommon for the follow-on attack to actually occur, application owners take these threats seriously and use the opportunity to assess their own protection and operational readiness. In approximately 90% of AWS support cases related to these attempts, the SRT assisted the application owners directly with their preparation. We also assisted Shield Advanced customers who weren’t directly targeted by extortion attempts but were aware of other extortion campaigns.
One question that we frequently hear is how AWS can help developers monitor their applications and take quick action if a possible DDoS attack is detected. When you protect your resources with AWS Shield Advanced, you have the option to associate an Amazon Route 53 health check. The status of the health check is used to improve the decisions that are made by the Shield detection system. If you have Shield Advanced proactive engagement enabled, the SRT is automatically engaged any time a Shield event corresponds to an unhealthy Route 53 health check that is associated to your protected resource. Based on the contact information provided in the Shield console, an SRT engineer will contact you to coordinate a response to the detected event. If you’re running a web application, you can choose to delegate access to your Shield Advanced and AWS WAF APIs to the SRT and provide the team with copies of your AWS WAF logs. During an escalation, an SRT engineer will evaluate your logs for DDoS signatures and robotic patterns and assist in building effective mitigations.
Summary
In this blog post, I shared some of the trends that were observed by AWS Shield in 2020, as well as steps that you can take to protect the availability of your applications against DDoS attacks. If you’d like to learn more about DDoS protection on AWS and configuring AWS Shield Advanced, check out the following resources:
If you have feedback about this post, submit comments in the Comments section below. If you have questions about this post, start a new thread on the AWS Shield forum or contact AWS Support.
Want more AWS Security how-to content, news, and feature announcements? Follow us on Twitter.
In this blog post, I show you how to improve the distributed denial of service (DDoS) resilience of your self-managed Domain Name System (DNS) service by using AWS Global Accelerator and AWS Shield Advanced. You can use those services to incorporate some of the techniques used by Amazon Route 53 to protect against DDoS attacks.
DNS routes users to your application by quickly translating a human-readable domain name to a machine-readable IP address. When protecting the availability of your application against DDoS attacks, it’s important to consider every part of the stack, including domain name resolution. The recommended best practice is to create hosted zones on Route 53, a scalable, highly available DNS service that’s protected against large DDoS attacks and query floods. Route 53 uses anycast routing to serve DNS queries from more than 150 edge locations around the globe. With anycast routing, DNS queries are served from locations that are closer to your users and the globally distributed DDoS mitigation capacity of Amazon Web Services (AWS) reduces the impact of attacks.
Optionally, you can also build your own DNS service on Amazon Elastic Compute Cloud (Amazon EC2). For example, you can run your own proprietary DNS server to take advantage of custom features that you wrote to integrate with an existing DNS service that isn’t running on AWS. When you register a domain name, you’re usually required to provide at least two name servers that can respond to queries from your users. It’s possible to build a DNS service on only two instances, but that provides limited DDoS resilience.
Solution overview
To protect your self-managed DNS service using this solution, you need a strong understanding of DNS and how to operate a distributed, self-managed DNS service on Amazon EC2. This solution improves upon an existing self-managed DNS service by significantly enhancing its ability to withstand DDoS attacks. There are two components that you add to your application:
You use Global Accelerator to provide your application with two static IP addresses that act as a fixed entry point to Amazon EC2 instances in multiple AWS Regions. Global Accelerator uses anycast to route your traffic to a point of entry close to the source of the traffic. In addition to providing availability and performance benefits, this gives you access to global DDoS mitigation capacity through AWS.
You use Shield Advanced to monitor the availability of your application and automatically engage the AWS Shield Response Team (SRT) if its availability is affected by a DDoS attack. When you associate a Route 53 health check to your protected resources, Shield Advanced uses the health of the application as an input for detection and as a signal to SRT to contact your operations center when needed. You can also engage with SRT to write custom mitigations for your application. For your self-managed DNS service use case, this can include mitigations like DNS packet validation and suspicion scoring that gives a higher priority to queries that are more likely to be legitimate traffic for your application.
As part of this solution, you will build a DNS canary that uses Amazon CloudWatch to update the status of a Route 53 health check if your self-managed DNS service stops responding to queries. An example architecture using Amazon EC2 based DNS behind Global Accelerator and Shield is shown in figure 1.
Figure 1: Amazon EC2 based DNS behind Global Accelerator and Shield
Create and configure an accelerator
To begin, create an accelerator and add your existing DNS servers as endpoints. The newly created accelerator will receive queries and forward them to your DNS service.
Starting with the TCP listener, enter the following in the form boxes for each Region specified in the previous step:
Endpoint type: SelectEC2 instance from the drop-down list.
Endpoint: Select a DNS instance from the drop-down list.
Weight: 128
If you have additional DNS instances in the Region, choose Add endpoint and repeat the preceding steps, but select a DNS instance that hasn’t been added as an endpoint.
Repeat all of the preceding steps for the UDP listener, then choose Create accelerator.
When you choose the Create accelerator button, you’re redirected to a Global Accelerator console page that lists all the accelerators in your account. On this page, you can view the global IPs and DNS name allocated to your newly created accelerator, in addition to the current status.
Wait until the status of the accelerators changes to Deployed before proceeding with any tests.
Configure Shield Advanced and Shield Advanced proactive engagement
Protect your accelerator with Shield Advanced, monitor the health of your application, and configure proactive engagement. When you turn on proactive engagement, the SRT will directly contact you if an Amazon Route 53 health check associated with your protected resource becomes unhealthy during an event that’s detected by Shield Advanced.
To configure proactive engagement
Step 1: Create a Route 53 health check
If you already have a Route 53 health check that monitors the health of your DNS service, you can proceed to step 2 of this section. If you don’t yet have a health check, you can use this AWS CloudFormation template to create one. The template will:
Create a Lambda function that queries your DNS server through the accelerator global IPs. This function posts metrics to CloudWatch to indicate whether the query was successful or not.
Create a CloudWatch alarm that will detect when DNS queries fail.
Create a Route 53 health check that tracks the CloudWatch alarm and changes status to unhealthy when the alarm changes to the Alarm state.
Step 2: Subscribe to Shield Advanced
Please note that with AWS Shield Advanced, you pay a monthly fee of $3,000 per month per organization. In addition, you also pay for AWS Shield Advanced Data Transfer usage fees for AWS resources enabled for advanced protection.
In the AWS Shield navigation bar, choose Getting started, and then choose Subscribe to Shield Advanced.
On the Subscribe to Shield Advanced page, read the terms of agreement, and then select all of the check boxes to indicate that you accept the terms.
Choose Subscribe to Shield Advanced.
Step 3: Add resources to protect
Do one of the following, depending on if you were already subscribed to Shield Advanced.
If you just subscribed to Shield Advanced by completing Step 2 above, choose Add resources to protect.
If you were already subscribed to Shield Advanced, open the Shield console and choose Protected Resources, and then choose Add resources to protect.
In the Choose resources to protect with Shield Advanced page, select the Regions and resource types that you want to protect, then choose Load resources.
Select the resources that you want to protect, and then choose Protect with Shield Advanced.
In the Configure health check based DDoS detection page, under the Protected resources section, select a Route 53 health check to add—either one that you created previously, or a health check created by the AWS CloudFormation template—as the Associated Health Check.
Choose Next until you reach the Review and configure DDoS mitigation and visibility page, and then review the settings and choose Finish configuration.
Step 4: Add contacts
Navigate to the Overview tab of the AWS Shield console.
In the Proactive engagements and contacts section, choose Edit under the Contacts heading.
In the Add contact form, add the contact’s Email, Phone number, and Notes.
Choose Save.
Step 5: Request proactive engagement
Choose Edit proactive engagement feature.
Select Enable.
Choose Save.
Step 6: Configuration review with the SRT
After you enable proactive engagement, the state will be Proactive engagement requested and pending.
SRT will contact you to schedule a configuration review. The review will include a review of your Route 53 health check configuration and a consultation about custom mitigations that can be configured to support your DNS use case. Following this review, SRT will complete your request to enable proactive engagement.
Summary
DNS is a foundational part of the user experience for any application that is accessed via a human readable domain name. Your DNS service should be highly available, DDoS resilient, and accessible to your users with minimal latency. If you run your own DNS service on Amazon EC2, you can improve the DDoS resiliency using Global Accelerator and Shield Advanced. This solution provides your users with a low latency path to your DNS service and provides you with some of the DDoS mitigation that protects Route 53. To learn more about DDoS best practices, see AWS Best Practices for DDoS Resiliency.
If you have feedback about this post, submit comments in the Comments section below. If you have questions about this post, start a new thread on the AWS Shield forum or contact AWS Support.
Want more AWS Security how-to content, news, and feature announcements? Follow us on Twitter.
When you build applications on Amazon Web Services (AWS), it’s a common security practice to isolate production resources from non-production resources by logically grouping them into functional units or organizational units. There are many benefits to this approach, such as making it easier to implement the principal of least privilege, or reducing the scope of adversely impactful activities that may occur in non-production environments. After building these applications, setting up monitoring for resource compliance and security risks, such as distributed denial of service (DDoS) attacks across your AWS accounts, is just as important. The recommended best practice to perform this type of monitoring involves using AWS Shield Advanced with AWS Firewall Manager, and integrating these with AWS Security Hub.
In this blog post, I show you how to set up centralized monitoring for Shield Advanced–protected resources across multiple AWS accounts by using Firewall Manager and Security Hub. This enables you to easily manage resources that are out of compliance from your security policy and to view DDoS events that are detected across multiple accounts in a single view.
Shield Advanced is a managed application security service that provides DDoS protection for your workloads against infrastructure layer (Layer 3–4) attacks, as well as application layer (Layer 7) attacks, by using AWS WAF. Firewall Manager is a security management service that enables you to centrally configure and manage firewall rules across your accounts and applications in an organization in AWS. Security Hub consumes, analyzes, and aggregates security events produced by your application running on AWS by consuming security findings. Security Hub integrates with Firewall Manager without the need for any action to be taken by you.
I’m going to cover two different scenarios that show you how to use Firewall Manager for:
Centralized visibility into Shield Advanced DDoS events
Automatic remediation of noncompliant resources
Scenario 1: Centralized visibility of DDoS detected events
This scenario represents a fully native and automated integration, where Shield Advanced DDoSDetected events (indicates whether a DDoS event is underway for a particular Amazon Resource Name (ARN)) are made visible as a security finding in Security Hub, through Firewall Manager.
Solution overview
Figure 1 shows the solution architecture for scenario 1.
The diagram illustrates a customer using AWS Organizations to isolate their production resources into the Production Organizational Unit (OU), with further separation into multiple accounts for each of the mission-critical applications. The resources in Account 1 are protected by Shield Advanced. The Security OU was created to centralize security functions across all AWS accounts and OUs, obscuring the visibility of the production environment resources from the Security Operations Center (SOC) engineers and other security staff. The Security OU is home to the designated administrator account for Firewall Manager and the Security Hub dashboard.
Scenario 1 implementation
You will be setting up Security Hub in an account that has the prerequisite services configured in it as explained below. Before you proceed, see the architecture requirements in the next section. Once Security Hub is enabled for your organization, you can simulate a DDoS event in strict accordance with the AWS DDoS Simulation Testing Policy or use one of AWS DDoS Test Partners.
Architecture requirements
In order to implement these steps, you must have the following:
AWS Config must be enabled in the accounts and Region where you have Shield Advanced–protected resources that you want to manage by using Firewall Manager. For managing Shield Advanced protected resources, you can choose to have AWS Config enabled on selected resource types, such as a Shield Advanced–supported resource.
Shield Advanced must be enabled in all accounts you want to monitor using Security Hub and Firewall Manager.
Once you have all these requirements completed, you can move on to enable Security Hub.
Enable Security Hub
Note: If you plan to protect resources with Shield Advanced across multiple accounts and in multiple Regions, we recommend that you use the AWS Security Hub Multiaccount Scripts from AWS Labs. Security Hub needs to be enabled in all the Regions and all the accounts where you have Shield protected resources. For global resources, like Amazon CloudFront, you should enable Security Hub in the us-east-1 Region.
To enable Security Hub
In the AWS Security Hub console, switch to the account you want to use as the designated Security Hub administrator account.
Select the security standard or standards that are applicable to your application’s use-case, and choose Enable Security Hub.
Figure 2: Enabling Security Hub
From the designated Security Hub administrator account, go to the Settings – Account tab, and add accounts by sending invites to all the accounts you want added as member accounts. The invited accounts become associated as member accounts once the owner of the invited account has accepted the invite and Security Hub has been enabled. It’s possible to upload a comma-separated list of accounts you want to send to invites to.
Figure 3: Designating a Security Hub administrator account by adding member accounts
View detected events in Shield and Security Hub
When Shield Advanced detects signs of DDoS traffic that is destined for a protected resource, the Events tab in the Shield console displays information about the event detected and provides a status on the mitigation that has been performed. Following is an example of how this looks in the Shield console.
Figure 4: Scenario 1 – The Events tab on the Shield console showing a Shield event in progress
If you’re managing multiple accounts, switching between these accounts to view the Shield console to keep track of DDoS incidents can be cumbersome. Using the Amazon CloudWatch metrics that Shield Advanced reports for Shield events, visibility across multiple accounts and Regions is easier through a custom CloudWatch dashboard or by consuming these metrics in a third-party tool. For example, the DDoSDetected CloudWatch metric has a binary value, where a value of 1 indicates that an event that might be a DDoS has been detected. This metric is automatically updated by Shield when the DDoS event starts and ends. You only need permissions to access the Security Hub dashboard in order to monitor all events on production resources. Following is an example of what you see in the Security Hub console.
Configure Shield event notification in Firewall Manager
In order to increase your visibility into possible Shield events across your accounts, you must configure Firewall Manager to monitor your protected resources by using Amazon Simple Notification Service (Amazon SNS). With this configuration, Firewall Manager sends you notifications of possible attacks by creating an Amazon SNS topic in Regions where you might have protected resources.
Under Amazon SNS Topic Configuration, select a Region.
Choose Configure SNS Topic.
Figure 6: The Firewall Manager Settings page for configuring SNS topics
Select an existing topic or create a new topic, and then choose Configure SNS Topic.
Figure 7: Configure an SNS topic in a Region
Scenario 2: Automatic remediation of noncompliant resources
The second scenario is an example in which a new production resource is created, and Security Hub has full visibility of the compliance state of the resource.
Solution overview
Figure 8 shows the solution architecture for scenario 2.
Figure 8: Scenario 2 – Visibility of Shield Advanced noncompliant resources in Security Hub
Firewall Manager identifies that the resource is out of compliance with the defined policy for Shield Advanced and posts a finding to Security Hub, notifying your operations team that a manual action is required to bring the resource into compliance. If configured, Firewall Manager can automatically bring the resource into compliance by creating it as a Shield Advanced–protected resource, and then update Security Hub when the resource is in a compliant state.
Scenario 2 implementation
The following steps describe how to use Firewall Manager to enforce Shield Advanced protection compliance of an application that is deployed to a member account within AWS Organizations. This implementation assumes that you set up Security Hub as described for scenario 1.
Create a Firewall Manager security policy for Shield Advanced protected resources
In this step, you create a Shield Advanced security policy that will be enforced by Firewall Manager. For the purposes of this walkthrough, you’ll choose to automatically remediate noncompliant resources and apply the policy to Application Load Balancer (ALB) resources.
In the left navigation pane, choose Security policies, and then choose Create a security policy.
Select AWS Shield Advanced as the policy type, and select the Region where your protected resources are. Choose Next.
Note: You will need to create a security policy for each Region where you have regional resources, such as Elastic Load Balancers and Elastic IP addresses, and a security policy for global resources such as CloudFront distributions.
Figure 9: Select the policy type and Region
On the Describe policy page, for Policy name, enter a name for your policy.
For Policy action, you have the option to configure automatic remediation of noncompliant resources or to only send alerts when resources are noncompliant. You can change this setting after the policy has been created. For the purposes of this blog post, I’m selecting Auto remediate any noncompliant resources. Select your option, and then choose Next.
Important: It’s a best practice to first identify and review noncompliant resources before you enable automatic remediation.
On the Define policy scope page, define the scope of the policy by choosing which AWS accounts, resource type, or resource tags the policy should be applied to. For the purposes of this blog post, I’m selecting to manage Application Load Balancer (ALB) resources across all accounts in my organization, with no preference for resource tags. When you’re finished defining the policy scope, choose Next.
Figure 10: Define the policy scope
Review and create the policy. Once you’ve reviewed and created the policy in the Firewall Manager designated administrator account, the policy will be pushed to all the Firewall Manager member accounts for enforcement. The new policy could take up to 5 minutes to appear in the console. Figure 11 shows a successful security policy propagation across accounts.
Figure 11: View security policies in an account
Test the Firewall Manager and Security Hub integration
You’ve now defined a policy to cover only ALB resources, so the best way to test this configuration is to create an ALB in one of the Firewall Manager member accounts. This policy causes resources within the policy scope to be added as protected resources.
To test the policy
Switch to the Security Hub administrator account and open the Security Hub console in the same Region where you created the ALB. On the Findings page, set the Title filter to Resource lacks Shield Advanced protection and set the Product name filter to Firewall Manager.
Figure 12: Security Hub findings filter
You should see a new security finding flagging the ALB as a noncompliant resource, according to the Shield Advanced policy defined in Firewall Manager. This confirms that Security Hub and Firewall Manager have been enabled correctly.
Figure 13: Security Hub with a noncompliant resource finding
With the automatic remediation feature enabled, you should see the “Updated at” time reflect exactly when the automatic remediation actions were completed. The completion of the automatic remediation actions can take up to 5 minutes to be reflected in Security Hub.
Figure 14: Security Hub with an auto-remediated compliance finding
Go back to the account where you created the ALB, and in the Shield Protected Resources console, navigate to the Protected Resources page, where you should see the ALB listed as a protected resource.
Figure 15: Shield console in the member account shows that the new ALB is a protected resource
Confirming that the ALB has been added automatically as a Shield Advanced–protected resource means that you have successfully configured the Firewall Manager and Security Hub integration.
(Optional): Send a custom action to a third-party provider
You can send all regional Security Hub findings to a ticketing system, Slack, AWS Chatbot, a Security Information and Event Management (SIEM) tool, a Security Orchestration Automation and Response (SOAR), incident management tools, or to custom remediation playbooks by using Security Hub Custom Actions.
Conclusion
In this blog post I showed you how to set up a Firewall Manager security policy for Shield Advanced so that you can monitor your applications for DDoS events, and their compliance to DDoS protection policies in your multi-account environment from the Security Hub findings console. In line with best practices for account governance, organizations should have a centralized security account that performs monitoring for multiple accounts. Security Hub and Firewall Manager provide a centralized solution to help you achieve your compliance and monitoring goals for DDoS protection.
If you’re interested in exploring how Shield Advanced and AWS WAF help to improve the security posture of your application, have a look at the following resources:
If you have feedback about this post, submit comments in the Comments section below. If you have questions about this post, start a new thread on the AWS Security Hub forum or contact AWS Support.
Want more AWS Security how-to content, news, and feature announcements? Follow us on Twitter.
Blog post contributors: Pablo Garbossa and Federico Alliani of Mercado Libre
Introduction
Mercado Libre (MELI) is the leading e-commerce and FinTech company in Latin America. We have a presence in 18 countries across Latin America, and our mission is to democratize commerce and payments to impact the development of the region.
We manage an ecosystem of more than 8,000 custom-built applications that process an average of 2.2 million requests per second. To support the demand, we run between 50,000 to 80,000 Amazon Elastic Cloud Compute (EC2) instances, and our infrastructure scales in and out according to the time of the day, thanks to the elasticity of the AWS cloud and its auto scaling features.
As a company, we expect our developers to devote their time and energy building the apps and features that our customers demand, without having to worry about the underlying infrastructure that the apps are built upon. To achieve this separation of concerns, we built Fury, our platform as a service (PaaS) that provides an abstraction layer between our developers and the infrastructure. Each time a developer deploys a brand new application or a new version of an existing one, Fury takes care of creating all the required components such as Amazon Virtual Private Cloud (VPC), Amazon Elastic Load Balancing (ELB), Amazon EC2 Auto Scaling group (ASG), and EC2) instances. Fury also manages a per-application Git repository, CI/CD pipeline with different deployment strategies, such like blue-green and rolling upgrades, and transparent application logs and metrics collection.
For those of us on the Cloud Security team, Fury represents an opportunity to enforce critical security controls across our stack in a way that’s transparent to our developers. For instance, we can dictate what Amazon Machine Images (AMIs) are vetted for use in production (such as those that align with the Center for Internet Security benchmarks). If needed, we can apply security patches across all of our fleet from a centralized location in a very scalable fashion.
But there are also other attack vectors that every organization that has a presence on the public internet is exposed to. The AWS recent Threat Landscape Report shows a 23% YoY increase in the total number of Denial of Service (DoS) events. It’s evident that organizations need to be prepared to quickly react under these circumstances.
The variety and the number of attacks are increasing, testing the resilience of all types of organizations. This is why we started working on a solution that allows us to contain application DoS attacks, and complements our perimeter security strategy, which is based on services such as AWS Shield and AWS Web Application Firewall (WAF). In this article, we will walk you through the solution we built to automatically detect and block these events.
The strategy we implemented for our solution, Network Behavior Anomaly Detection (NBAD), consists of four stages that we repeatedly execute:
Analyze the execution context of our applications, like CPU and memory usage
Learn their behavior
Detect anomalies, gather relevant information and process it
Respond automatically
Step 1: Establish a baseline for each application
End user traffic enters through different AWS CloudFront distributions that route to multiple Elastic Load Balancers (ELBs). Behind the ELBs, we operate a fleet of NGINX servers from where we connect back to the myriad of applications that our developers create via Fury.
We collect logs and metrics for each application that we ship to Amazon Simple Storage Service (S3) and Datadog. We then partition these logs using AWS Glue to make them available for consumption via Amazon Athena. On average, we send 3 terabytes (TB) of log files in parquet format to S3.
Based on this information, we developed processes that we complement with commercial solutions, such as Datadog’s Anomaly Detection, which allows us to learn the normal behavior or baseline of our applications and project expected adaptive growth thresholds for each one of them.
Step 2: Anomaly detection
When any of our apps receives a number of requests that fall outside the limits set by our anomaly detection algorithms, an Amazon Simple Notification Service (SNS) event is emitted, which triggers a workflow in the Anomaly Analyzer, a custom-built component of this solution.
Upon receiving such an event, the Anomaly Analyzer starts composing the so-called event context. In parallel, the Data Extractor retrieves vital insights via Athena from the log files stored in S3.
The output of this process is used as the input for the data enrichment process. This is responsible for consulting different threat intelligence sources that are used to further augment the analysis and determine if the event is an actual incident or not.
At this point, we build the context that will allow us not only to have greater certainty in calculating the score, but it will also help us validate and act quicker. This context includes:
Application’s owner
Affected business metrics
Error handling statistics of our applications
Reputation of IP addresses and associated users
Use of unexpected URL parameters
Distribution by origin of the traffic that generated the event (cloud providers, geolocation, etc.)
Known behavior patterns of vulnerability discovery or exploitation
Based on these analysis results we carry out a series of verifications in order to rule out false positives. Finally, we execute different actions based on the following criteria:
Manual review
If the outcome of the automatic analysis results in a medium risk scoring, we activate a manual review process:
We send a report to the application’s owners with a summary of the context. Based on their understanding of the business, they can activate the Incident Response Team (IRT) on-call and/or provide feedback that allows us to improve our automatic rules.
In parallel, our threat analysis team receives and processes the event. They are equipped with tools that allow them to add IP addresses, user-agents, referrers, or regular expressions into Amazon WAF to carry out temporary blocking of “bad actors” in situations where the attack is in progress.
Automatic response
If the analysis results in a high risk score, an automatic containment process is triggered. The event is sent to our block API, which is responsible for adding a temporary rule designed to mitigate the attack in progress. Behind the scenes, our block API leverages AWS WAF to create IPSets. We reference these IPsets from our custom rule groups in our web ACLs, in order to block IPs that source the malicious traffic. We found many benefits in the new release of AWS WAF, like support for Amazon Managed Rules, larger capacity units per web ACL as well as an easier to use API.
Conclusion
By leveraging the AWS platform and its powerful APIs, and together with the AWS WAF service team and solutions architects, we were able to build an automated incident response solution that is able to identify and block malicious actors with minimal operator intervention. Since launching the solution, we have reduced YoY application downtime over 92% even when the time under attack increased over 10x. This has had a positive impact on our users and therefore, on our business.
Not only was our downtime drastically reduced, but we also cut the number of manual interventions during this type of incident by 65%.
We plan to iterate over this solution to further reduce false positives in our detection mechanisms as well as the time to respond to external threats.
About the authors
Pablo Garbossa is an Information Security Manager at Mercado Libre. His main duties include ensuring security in the software development life cycle and managing security in MELI’s cloud environment. Pablo is also an active member of the Open Web Application Security Project® (OWASP) Buenos Aires chapter, a nonprofit foundation that works to improve the security of software.
Federico Alliani is a Security Engineer on the Mercado Libre Monitoring team. Federico and his team are in charge of protecting the site against different types of attacks. He loves to dive deep into big architectures to drive performance, scale operational efficiency, and increase the speed of detection and response to security events.
Many customers—especially large enterprises—run workloads across multiple AWS accounts and in multiple AWS regions. AWS Firewall Manager service, launched in April 2018, enables customers to centrally configure and manage AWS WAF rules, audit Amazon VPC security group rules across accounts and applications in AWS Organizations, and protect resources against distributed DDoS attacks.
In this blog post, we show you how to onboard your accounts and your AWS Organizations into the AWS Firewall Manager service and start centrally managing the security policies of your AWS Organizations member accounts. We also show you examples of how to perform operations on the Firewall Manager policies after you’ve deployed the solution, so you can adjust your security posture over time.
As more and more customers began using Firewall Manager for centralized management, they gave us feedback on how it could be improved. We heard that the process of defining policies and configuring rule sets can be challenging and time consuming, especially in a multi-account, multi-region scenario. We built the AWS Centralized WAF and VPC Security Group Management solution to make it easier and faster.
Solution overview
The AWS Centralized WAF and VPC Security Group Management solution fully automates the deployment of Firewall Manager with a set of opinionated defaults for the policies. We call it “opinionated,” because there’s no set of security rules that is right for absolutely every customer. We’re providing an example opinion, but you might have a different opinion, given your unique circumstance. Our examples block traffic that you might have a reason to allow. We install the following policies when you deploy this solution:
Amazon VPC security group usage audit and content audit policy: These policies flag security groups that are unused or redundant. Automatic remediation is turned off by default, but you can turn it on by customizing the solution.
AWS Shield Advanced policy: If your account has enabled Shield Advanced, then Shield Advanced protection is enabled for CloudFront, Application Load Balancer, and Elastic IPs.
The core of the solution is the AWS CloudFormation template aws-centralized-waf-and-security-group-management. This template deploys the components shown in Figure 1:
Figure 1: Main solutions template – aws-centralized-waf-and-vpc-security-group-management.template
After deployment, you can update the three AWS Systems Manager parameters—/FMS/OUs, /FMS/Regions, and /FMS/Tags—with appropriate values to control the scope and applicability of the Firewall Manager security policies.
On update of the values in the Systems Manager parameters, the Amazon EventBridge rule captures the parameter update event.
Amazon EventBridge triggers an AWS Lambda function to deploy the Firewall Manager policies.
The AWS Lambda function will deploy the Firewall manager security policies across the OUs and regions specified in step 1.
The lambda function updates the Amazon DynamoDB table with Firewall manager policies metadata.
Configuring Prerequisites Automatically
There are a few important prerequisites that must be configured in your account before you deploy this solution. We have built a template called aws-fms-prereq that will launch the solution prerequisites.
When you execute the aws-fms-prereq template, the following things will happen:
A specific AWS account is designated as the firewall administrator account. (You provide this account number when you deploy the template.)
AWS Config is enabled in all regions of all member accounts across the entire AWS Organization.
Note: If the Firewall Manager prerequisites described above are already met, you can skip this step and go directly to next step: Deploy the solution template.
If you run this prerequisite template in the Organization primary account that is also your Firewall Manager admin account, the solution template will be deployed automatically. If you do this, you can skip the step of deploying the solution template and jump straight to Manage your Firewall manager security policies.
Figure 2 shows how the prerequisite template creates a Lambda function. That function validates and installs the prerequisites and AWS CloudFormation stack sets to enable AWS Config across all member accounts in the organization.
Figure 2: Solution prerequisites
Installing Prerequisites
If the Firewall Manager prerequisites are already met, skip this step and go directly to next step, below: Deploy the solution template.
Install the AWS CLI
Note: If you already have the AWS Command Line Interface v2 installed on your workstation, you can skip this step.
The template deployment can be done using the AWS Management Console or the AWS CLI. This procedure uses the AWS CLI to do the deployment. To get started, install the AWS CLI and configure it with credentials that have the required IAM permissions to create resources.
Deploy the prerequisite templateIf this is the first time you’re using Firewall Manager, download the aws-fms-prereq.template, and run the following AWS CLI command in the primary account of your AWS Organization to check for and complete the prerequisites.Replace the variable <your_FW_account_ID> with the account ID of your AWS Firewall Admin. This deployment typically takes 2–3 minutes, but sometimes a little longer if there are a large number of member accounts in your organization. If you want AWS Config to be enabled in your member accounts, then set the EnableConfig parameter to Yes; however, if AWS Config is already enabled, then set it to No.
You can run the following CLI command to check the status of the stack deployment. Once you see that “StackStatus” is set to “CREATE_COMPLETE” in the output, you can proceed to the next step.
Once the solution is deployed, you can deploy the Firewall Manager policies to the organization member accounts, which will be reflected in the Parameter Store. These changes to the Parameter Store are picked up by the EventBridge rule, which triggers the Lambda function to automatically create, delete, or modify the policies as required.
Note: All of the following commands must be executed in the Firewall manager admin account, which might not be the root account of your AWS Organization.
Add OUs to the scope of Firewall Manager policiesTo begin, define the OUs that the Firewall Manager policies should apply to. Store the list of OUs in a parameter named /FMS/OUs. The following AWS CLI command stores a comma-separated list of OU IDs in the right parameter.
If it is successful, the output of the command will be a simple acknowledgement, like the following:
{
"Version": 2,
 "Tier": "Standard"
}
Add AWS Regions to the scope of Firewall Manager policiesNext you need to add the AWS regions where you want these policies to be applied. In the AWS CLI command that follows, you can customize the AWS region list depending on where you run your workloads. If, for example, you want to use us-west-2, us-east-1, and eu-west-1, then you need to provide us-west-2,us-east-1,eu-west-1 as your value in the command below.
If it is successful, the output of the command will be a simple acknowledgement, like the following:
{
"Version": 2,
 "Tier": "Standard"
}
(Optional) Add resource tagsPlease note that this is an optional step. Resource tags are a way to apply these Firewall Manager policies to some resources, but not others. Imagine that we only want to apply these policies to resources that have the tag Environment set to the value Prod. The following command will do that:
If it is successful, the output of the command will be a simple acknowledgement, like the following:
{
 "Version": 2,
 "Tier": "Standard"
}
Test the solution
Test the solution by creating a global CloudFront distribution and an Amazon VPC security group in one of your member accounts, and configure these resources to be noncompliant with the policies enforced by Firewall Manager.
Deploy test resources in one of your member accounts
Run the following AWS CLI command to deploy the demo template in one of the member accounts to create a sample CloudFront distribution and an Amazon VPC security group that aren’t compliant with the default Firewall Manager policies.
Check for web ACL and security group audit results
To check the webACL resource association in the member account, follow these steps:
Log in to your member account management console where you had deployed your demo-template and go to the WAF & Shield service page.
You will see the WebACL with the prefix “FMManagedWebACLV2FMS-WAF-01“ , select that webACL.
Go to the tab Associated AWS resources.
You should see the newly created CloudFront distribution listed here.
To check the compliance status of the newly created security group, follow these steps:
Log in to the Firewall manager admin account management console and go to the AWS Firewall Manager service page.
In the Security policies section, you will find the FMS-SecGroup-02 policy. Select the policy FMS-SecGroup-02.
You will see that the member account (where the demo template was deployed) is marked as non-compliant. Select the member account number to see the newly created security group along with the reason for the noncompliant finding.
Clean-up test resources in member account
Follow these steps to clean up the test resources that the demo template would have created in your member account:
Log in to member account management console, and go to Cloudfront service page.
Select the CloudFront distribution. (Origin would have the stack name as its prefix.)
Go to “Behaviours,” select the one and select Edit.
Remove the lambda function association and save changes.
Run this CLI command to delete the stack that you had created earlier:
This solution deploys Firewall Manager policies with some opinionated default rules defined in the manifest.json file. They probably aren’t all that you will need. You could customize these policies to fit your own needs, but it takes a bit of development skill. Also, the steps are too long to include here. If, for example, you want to add another AWS WAF rule group to the default AWS WAF security policy, you’ll need to edit the manifest and redeploy the solution. See how to do this customization and several others.
(Optional) Clean-up resources
Once you’ve tried the solution, if you want to clean up the stack you can do so in two steps:
Go to the Firewall Manager admin account management console, navigate to the Parameter Store, and update the /FMS/OU parameter with the value delete. This ensures that the Firewall Manager policies and their related resources are deleted.
Run the following AWS CLI command in the Firewall manager admin account to delete the solution stack you deployed earlier:
The AWS Centralized WAF and VPC Security Group Management solution addresses the feedback we heard from you, our customer. You told us the process of defining policies and configuring rule sets is challenging and time consuming, so we wrote this to make it easier and faster. In this post, we showed you how to deploy the solution following a two-step process using AWS CloudFormation. We also showed you ways that you can use the solution to easily manage your Firewall Manager policies by updating values in Systems Manager Parameter Store. Updating the values automates the deployment based on your choice of OUs, Regions, and resources. Finally, we showed you how to further customize the solution to suit your needs.
This post is just an introduction to what is possible and the overall objective. Before you start using this solution for anything important, we recommend that you review the solution implementation guide. It contains step-by-step directions and more example use cases. The guide also includes security recommendations and some cost estimates for the various supported scenarios.
If you have feedback about this post, submit comments in the Comments section below. If you have questions about this post, start a new thread on the AWS Firewall Manager forum or contact AWS Support.
Want more AWS Security how-to content, news, and feature announcements? Follow us on Twitter.
The collective thoughts of the interwebz
Manage Consent
To provide the best experiences, we use technologies like cookies to store and/or access device information. Consenting to these technologies will allow us to process data such as browsing behavior or unique IDs on this site. Not consenting or withdrawing consent, may adversely affect certain features and functions.
Functional
Always active
The technical storage or access is strictly necessary for the legitimate purpose of enabling the use of a specific service explicitly requested by the subscriber or user, or for the sole purpose of carrying out the transmission of a communication over an electronic communications network.
Preferences
The technical storage or access is necessary for the legitimate purpose of storing preferences that are not requested by the subscriber or user.
Statistics
The technical storage or access that is used exclusively for statistical purposes.The technical storage or access that is used exclusively for anonymous statistical purposes. Without a subpoena, voluntary compliance on the part of your Internet Service Provider, or additional records from a third party, information stored or retrieved for this purpose alone cannot usually be used to identify you.
Marketing
The technical storage or access is required to create user profiles to send advertising, or to track the user on a website or across several websites for similar marketing purposes.