Post Syndicated from Ian Olson original https://aws.amazon.com/blogs/security/aws-firewall-manager-retrofitting-harmonizing-central-security-with-application-team-flexibility/
AWS Firewall Manager is a powerful tool that organizations can use to define common AWS WAF rules with centralized security policies. These policies specify which accounts and resources are in scope. Firewall Manager creates a web access control list (web ACL) that adheres to the organization’s policy requirements and associates it with the in-scope resources. Figure 1 shows a Firewall Manager security policy and web ACL created in each in-scope account.

Figure 1: A Firewall Manager security policy and Firewall Manager created web ACLs in each in-scope account
In this post, we’ll talk about the benefits of retrofitting and how you can use this feature to allow Firewall Manager to manage existing web ACLs. When retrofitting is enabled, a Firewall Manager security policy doesn’t replace existing web ACLs. Instead, Firewall Manager adds the top and bottom rule sections to existing web ACLs associated with in-scope resources. For application teams, Firewall Manger no longer restricts how they configure and deploy AWS WAF. Teams can use either the AWS Management Console or infrastructure as code (IaC) tools to customize rules in web ACLs, even if those web ACLs are managed by Firewall Manager.
Firewall Manager before retrofitting
Firewall Manager offers significant benefits, but the existing approach results in several challenges:
- Compatibility with infrastructure as code (IaC): Firewall Manager creates and associates AWS WAF web ACLs with in-scope resources. IaC tools expect to create and manage resources (in other words, own their lifecycle). Application teams cannot use IaC to manage the WAF rules and other web ACL configuration components that are created by Firewall Manager; there are custom solutions that inject locally defined rules into Firewall Manager-created web ACLs, but these are complex and have risks such as drift. For AWS WAF customers and application teams, this introduces an operational challenge.
- Existing WAF migration: Customers who are already using AWS WAF must migrate existing rules to Firewall Manager-managed web ACLs.
- Application-specific rule complexity: Forcing all in-scope resources in the same account and AWS Region to use the same web ACL makes application-specific or exception-based rules more complex. In addition, changes to one application’s rules could impact others that share the same web ACL.
- Increased costs: When many applications share a single web ACL, application-specific rules are part of a single web ACL, which can increase total WAF capacity units (WCU) usage, sometimes resulting in higher AWS WAF request costs.
Firewall Manager with retrofitting addresses challenges
To address these challenges, Firewall Manager now offers the ability to retrofit existing web ACLs. Let’s get specific about when and how Firewall Manager retrofitting works:
- Firewall Manager will only retrofit a web ACL when all associated resources (for example, Application Load Balancers, API Gateways, and Amazon CloudFront distributions) are in scope. If a not-in-scope resource is also associated, Firewall Manager will not retrofit or update future security policy changes to a retrofitted web ACL. In that scenario, associated in-scope resources and the web ACL are marked noncompliant with security policies.
- Retrofitting only modifies customer-created web ACLs. Retrofitting will not act on web ACLs retrofitted by another security policy or managed by Firewall Manager. If either scenario occurs, the web ACL and associated resources are marked noncompliant with security policies.
- Retrofitting adds the following on top of an existing web ACL that is associated with one or more in-scope resources:
- Retrofitting adds first rule groups and last rule groups defined in a security policy to the web ACL. Existing rules within the web ACL are not changed. The order of rule evaluation changes is the following:
- Security policy–defined first rule group rules
- Security policy–defined last rule group rules
- Retrofitting adds a WAF logging configuration if one is defined by the security policy. If the web ACL already has a logging configuration, Firewall Manager does not replace the existing logging configuration and marks the web ACL noncompliant.
- Retrofitting does not verify or configure other attributes that are defined by the security policy. This includes the following properties: default action, custom request headers, web ACL Captcha or challenge configurations, and token domain list. These properties are used only when Firewall Manager creates a web ACL.
- Retrofitting adds first rule groups and last rule groups defined in a security policy to the web ACL. Existing rules within the web ACL are not changed. The order of rule evaluation changes is the following:
- If an in-scope resource that supports AWS WAF does not have a web ACL, Firewall Manager creates and associates a Firewall Manager-managed web ACL with that resource.
Figure 2 shows the rules and logging configuration before and after a Firewall Manager security policy retrofits a web ACL that is associated with in-scope resources.

Figure 2: Using retrofitting to update an existing web ACL
This new retrofitting capability solves the previous challenges in the following ways:
- IaC compatible: Application teams can provision and manage AWS WAF with IAC tools. Firewall Manager retrofits existing web ACLs by adding rules defined in the security policy to web ACLs created by IaC tools. Application teams can manage AWS WAF exactly the same as when Firewall Manager was not in use.
- Existing WAF integration: Customers with existing AWS WAF deployments can adopt Firewall Manager without the need to migrate existing WAF rules.
- Application-specific rules: Multiple resources in the same account can use separate web ACLs, which simplifies application-specific rules.
- Help prevent additional costs: Application-specific rules are applied only to the relevant web ACLs. This helps prevent increased AWS WAF request costs from shared web ACLs that have a high WCU usage.
By enhancing Firewall Manager to retrofit existing web ACLs, customers can use the power of centralized WAF management without restricting how AWS WAF is deployed and configured by application teams in member accounts.
Firewall Manager security policy for AWS WAF – Enabling retrofitting
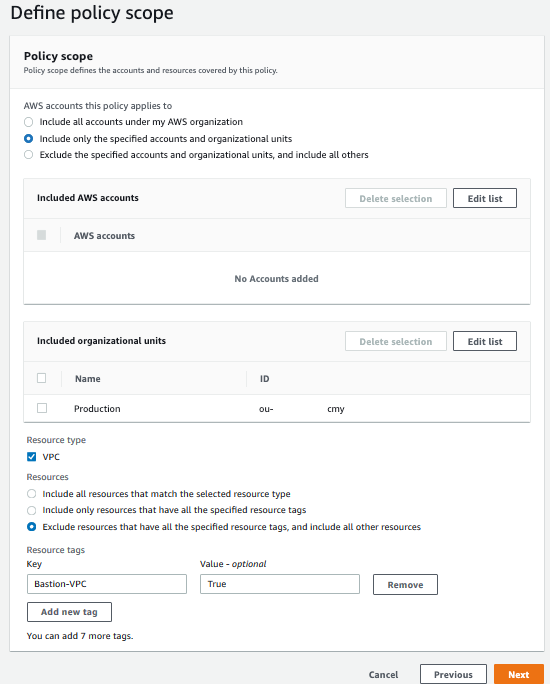
Figure 3 shows an example of a Firewall Manager security policy.

Figure 3: An example Firewall Manager security policy that uses the new Retrofit existing webACLs feature
This security policy defines WAF rules in the first rule group section. It applies to all Application Load Balancers (ALBs) across your organization in AWS Organizations in the Region where this security policy is created. The policy action is set to automatically remediate. Under Web ACL management, there is a new section, Managed web ACL source, with two options, Default and Retrofit existing webACLs. Default is the existing behavior: Firewall Manager creates and associates a Firewall Manager managed web ACL. Retrofit existing webACLs applies the WAF rules and logging configuration (if any) defined by a security policy to existing web ACLs when they are associated with an in-scope resource. This policy specifies Retrofit existing webACLs. If an in-scope resource does not have a web ACL, Firewall Manager still creates and associates a web ACL by default.
Retrofitting in action
Let’s walk through what happens when you set Managed web ACL source to Retrofit existing webACLs. Figure 4 shows two ALBs that are in-scope of our security policy, LoadBalancer1 and LoadBalancer2.

Figure 4: Two existing ALBs, one with an existing web ACL and the other without
LoadBalancer1 has the following characteristics:
- LoadBalancer1 does NOT have a web ACL associated.
- After the Firewall Manager security policy applies, LoadBalancer1 is associated with a Firewall Manager created web ACL, as shown in Figure 5.

Figure 5: LoadBalancer1 is now associated with a Firewall Manager managed and created web ACL
- The Firewall Manager-created web ACL contains the WAF rules defined in the security policy.

LoadBalancer2 has the following characteristics:
- LoadBalancer2 has an existing customer created web ACL associated with it, as shown in Figure 6.
Figure 6: LoadBalancer2 is associated with a customer-created web ACL
- This web ACL was created by the application team with an application-specific rule. The web ACL could have been created with the AWS Management Console, AWS CloudFormation, or other IaC tools like Terraform.
- After the Firewall Manager security policy takes effect, LoadBalancer2 remains associated with the existing customer-created web ACL MyCustomWebACL.
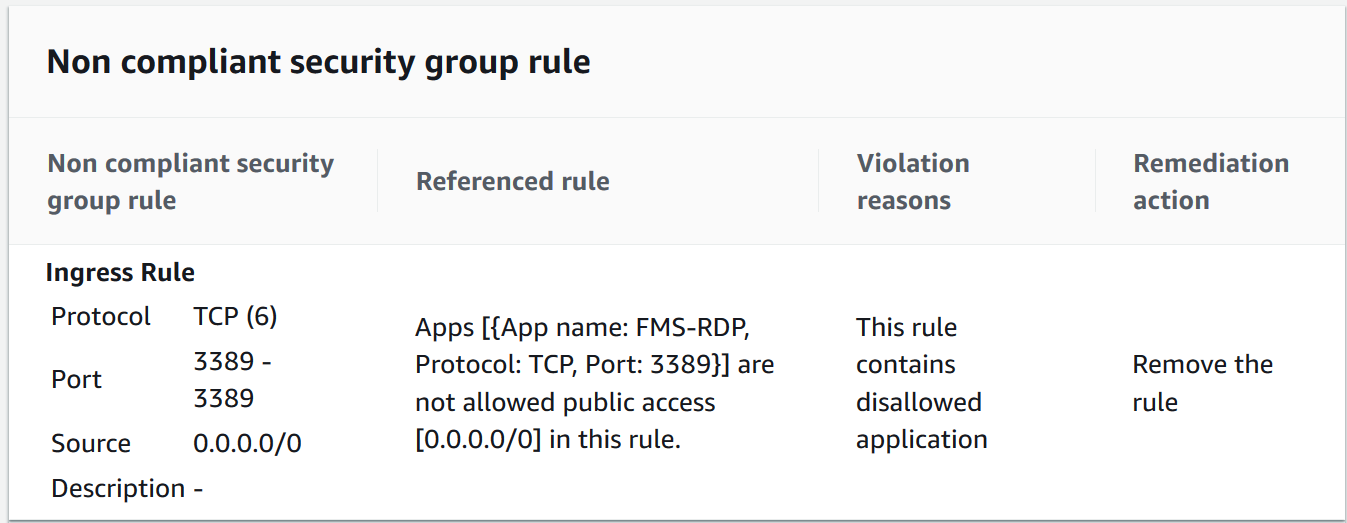
- Retrofitting adds WAF rules in the first rule group according to the security policy, as shown in Figure 7. Existing WAF rules are not changed, and rules and other aspects of the web ACL are not changed and can continue to be managed exactly as you would without Firewall Manager present.
Figure 7: Firewall Manager has retrofitted a customer-created web ACL and added the security policy–defined first rule groups rules


Figure 8 shows that both ALBs are now compliant with our security policy. LoadBalancer1 has a web ACL created by Firewall Manager; future ALBs that don’t have a web ACL associated would also become associated to this web ACL. LoadBalancer2 is associated with a web ACL the application team previously created. The application-defined WAF rules are not changed and the WAF rules defined by the security policy are added to this web ACL.

Figure 8: Multiple ALBs in scope for the same security policy
Associate a web ACL with Firewall Manager already in place
Let’s continue from our previous scenario. The application team for LoadBalancer1 now configures application-specific rules for their ALB by using the following process.
- The application team creates a web ACL and defines their own WAF rules. They might do this with the console, AWS CloudFormation, or other IaC tools like Terraform.
- The application team associates LoadBalancer1 with the custom web ACL.
Figure 9: From the web ACL, only LoadBalancer1 is associated with the app team’s web ACL
- After a moment, Firewall Manager detects the change to an in-scope resource (LoadBalancer1). Firewall Manager retrofits the application team’s web ACL AppTeamNewWebACL, making it align with the security policy.

Figure 10: Firewall Manager has retrofitted the app team–created web ACL and added the security policy–defined first rule group rules


The diagram in Figure 11 shows the workflow that happens when the application team creates their own web ACL and associates it with LoadBalancer1. Firewall Manager detects the association change and retrofits the application team’s web ACL again, bringing LoadBalancer1 into alignment with security policies.

Figure 11: Firewall Manager retrofitting a web ACL in response to being associated with an existing in-scope resource
Out-of-scope resources associated with a retrofitted web ACL
Let’s make a change to our security policy. In Figure 12, the policy scope has been updated to only apply to resources when they have the resource tag Tier: Production. Application teams add this tag to LoadBalancer1 and LoadBalancer2.

Figure 12: The Firewall Manager security policy scope has been updated to include a resource tag
Later, an application team creates LoadBalancer3 and associates it with AppTeamNewWebACL (Figure 13).

Figure 13: A new ALB associated with a custom WAF web ACL
The application team does not tag LoadBalancer3, making it out of scope with the security policy, as shown in Figure 14.

Figure 14: A new ALB that is out of scope with a security policy
This web ACL is currently retrofitted by our security policy and associated with LoadBalancer2 (in-scope), as shown in Figure 15.

Figure 15: A retrofitted web ACL associated with in-scope and out-of-scope ALBs
Firewall Manager detects that an out-of-scope resource is associated with a retrofitted web ACL. As shown in Figure 16, Firewall Manager marks the web ACL AppTeamNewWebACL noncompliant. It also marks LoadBalancer2 noncompliant.

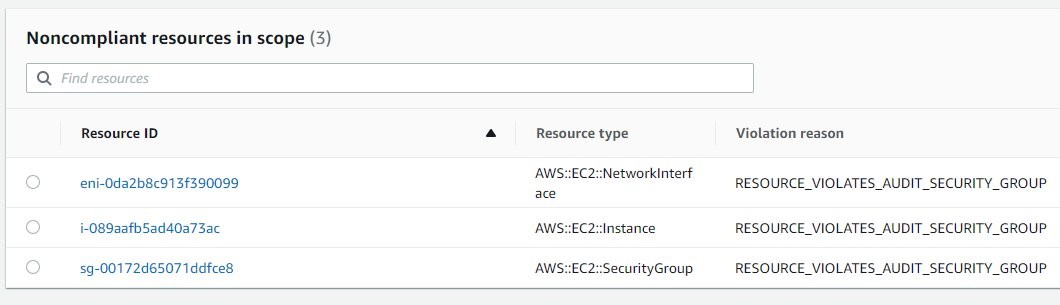
Figure 16: Shows retrofit-specific reasons a resource or web ACL will be marked noncompliant. In this case, a not-in-scope resource is associated with a web ACL where another associated resource is in-scope.
As long as the web ACL is noncompliant, Firewall Manager will not retrofit a non-retrofitted web ACL, and future security policy changes will not be applied to that web ACL. Existing retrofitted WAF rules for that web ACL are not modified or removed. When the web ACL later becomes compliant, it will again retrofit the latest state of the security policy. Figure 17 shows how Firewall Manager keeps the existing retrofitting but does not apply updates. Using our example, one of three things would need to happen for the web ACL to become compliant:
- LoadBalancer3 can be made in-scope with the current security policy. The application team can then add the resource tag Tier: Production to this ALB.
- The resource tag can be removed from the policy scope.
- LoadBalancer3 can be disassociated with the web ACL.
Note: We recommend that you promptly address not-in-scope resources associated with web ACLs that are shared by in-scope resources. For example, if the preceding scenario was not addressed and LoadBalancer3 was deleted three months later, Firewall Manager would at that point retrofit the web ACL (3 months later). This is not necessarily a problem, but could trigger unexpected changes to a web ACL’s rules.

Figure 17: Firewall Manager retains existing but not future changes as long as a not-in-scope resource is associated with this web ACL
In summary: Firewall Manager initially retrofits and will apply future updates to existing web ACLs while all associated resources are in-scope. When an out-of-scope resource is associated, an initial retrofit is delayed and security policy retrofit updates are paused until the out-of-scope resource is addressed.
Figure 18 demonstrates how Firewall Manager will not perform an initial retrofit of a web ACL associated with both in-scope and not-in-scope resources.

Figure 18: Firewall Manger will only perform an initial retrofit when only in-scope resources are associated with a web ACL
Conclusion
Firewall Manager verifies that in-scope resources adhere to relevant security policies or are marked noncompliant. You can enable retrofitting for Firewall Manager for AWS WAF to seamlessly enforce these security policies without changing how your application teams manage the configuration of their WAF rules.
Note: Retrofitting is only available for AWS Firewall Manager security policies for AWS WAF; it is not available for AWS WAF Classic.
If you have feedback about this post, submit comments in the Comments section below. If you have questions about this post, start a new thread on the AWS Firewall Manager re:Post or contact AWS Support.


 .
.