All posts by Shane Queeney

InsightAppSec: Improving Scan Speed and Performance

Post Syndicated from Shane Queeney original https://blog.rapid7.com/2024/01/31/insightappsec-improving-scan-speed-and-performance/

InsightAppSec: Improving Scan Speed and Performance

When scanning a web application in InsightAppSec, you might see it take several hours, if not several days, to run. This can be due to the size of your web app, but plenty of settings in your scan configuration can be modified to help scans complete faster.

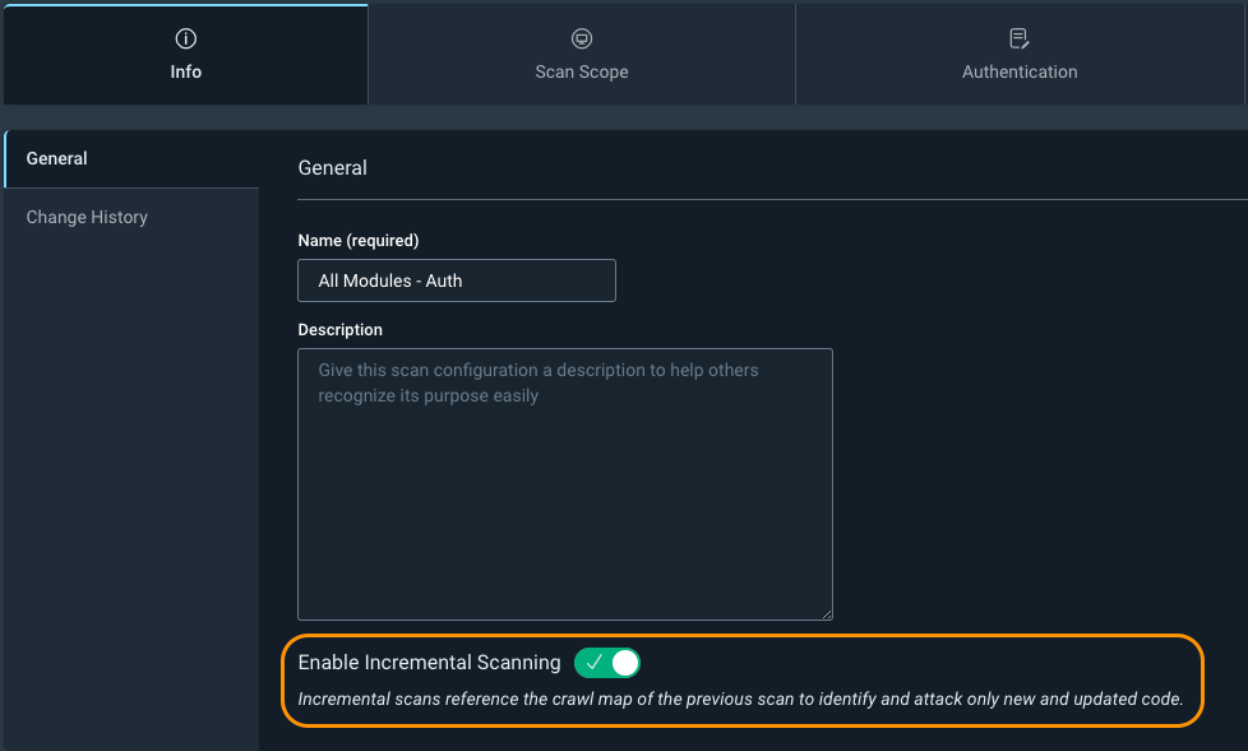
The first setting is Info -> Enable Incremental Scanning. Incremental scanning will take the crawl map of the previous scan and only hit new or updated web pages. It uses the crawl signature of a page, and if it doesn’t exist in the previous scan, or is different, then the scanner will attack it. This is especially useful if you have InsightAppsec as part of your CI/CD pipeline process, and you don’t need to run a full scan every time a new build gets created. Just be aware that you will see fewer vulnerabilities on your web app because we are scanning fewer pages. It is still recommended you run periodic full scans of your web app without incremental scanning enabled to ensure maximum visibility into the vulnerability findings.

https://docs.rapid7.com/insightappsec/scan-your-app/#scan-only-the-new-and-updated-links-since-the-last-scan

InsightAppSec: Improving Scan Speed and Performance

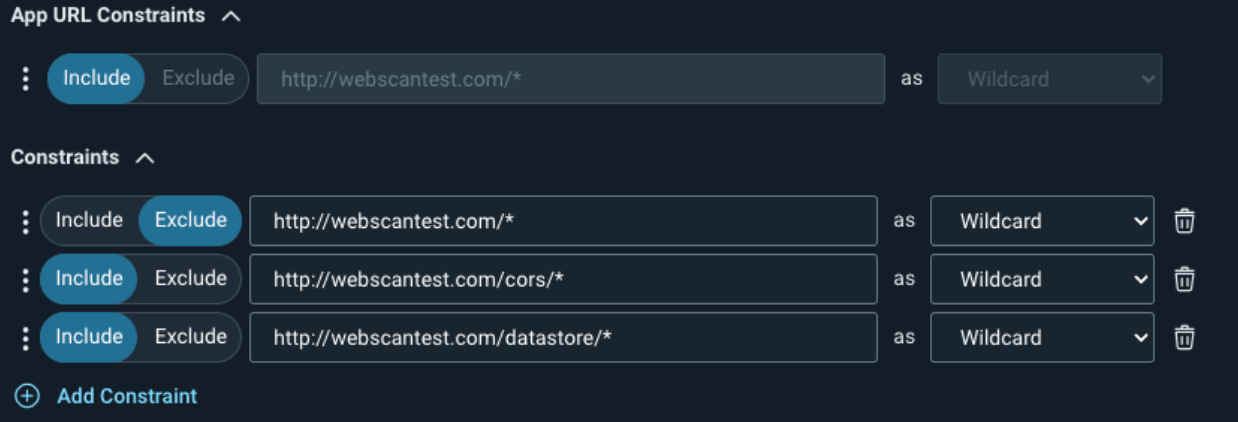
Your second option is Scan Scope -> Crawling Restrictions. This allows you to explicitly limit certain pages or directories from being crawled. For example, if you have product manuals in multiple languages, we don’t necessarily want to attack the same pages several times. We can explicitly allow one directory to be attacked while excluding another. In the example in the screenshot below, we are allowing the scan to hit the /manuals/EN/ directory while excluding all other directories under /manuals/.

https://docs.rapid7.com/insightappsec/scan-scope/#crawling-restrictions

InsightAppSec: Improving Scan Speed and Performance

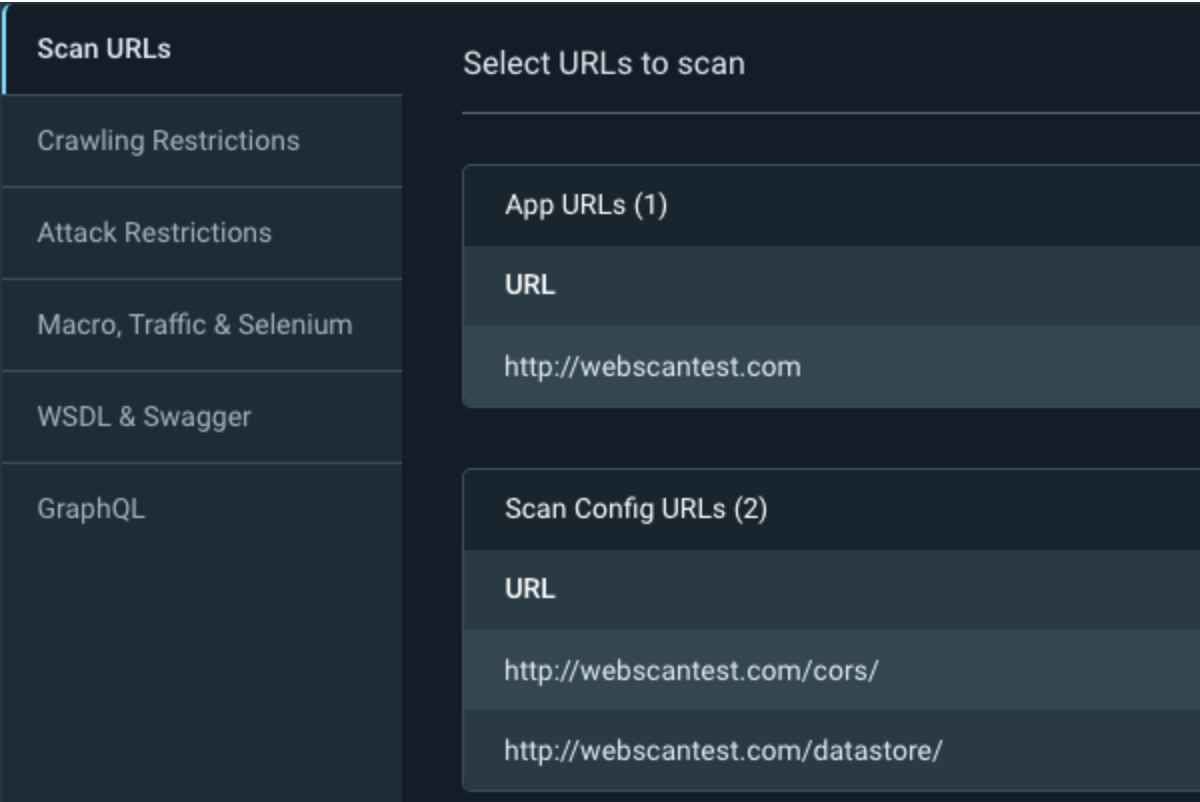
Another trick with the crawl restrictions is the ability to tell InsightAppSec to only scan specific pages or directories. First, add the directories to the Scan Config URLs under your scan scope, and then specify the target directory under the Crawling Restrictions.

You can optionally add the constraints to the Attack Restrictions so the scan still crawls the target pages, but doesn’t attack them.

If you have a very large web app, an advanced use case would be to create several scan configurations, specify different directories in each one, and kick off multiple scans against your application at the same time. Be careful because this will multiply the traffic being sent to your web server for each scan configuration you create.

https://docs.rapid7.com/insightappsec/how-to-configure-scan-scope/#scan-scope-configuration-example

InsightAppSec: Improving Scan Speed and Performance

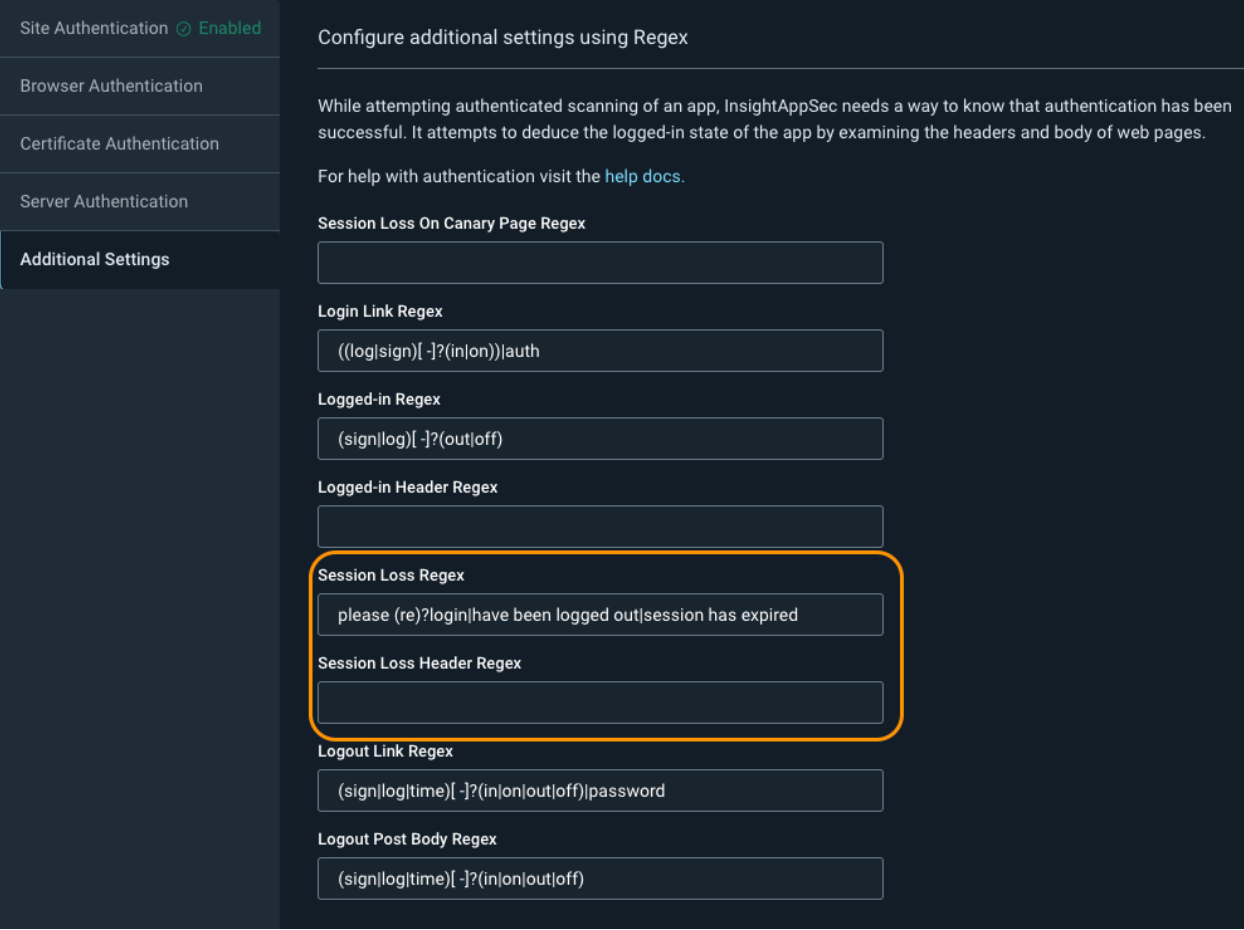
Next, we have Authentication -> Additional Settings. While you might not encounter this for all of your web applications, sometimes InsightAppSec will show that it was constantly detecting logouts in the scan logs. When this happens, the scan will attempt to log back in again, and if it keeps detecting these false session losses over and over, it can cause the scan to take a very long time to complete.

To fix this, we can adjust the Session Loss Regex or the Session Loss Header Regex depending on where the logs say the logout match was found, either in the response header or response body.

If the issue is in the header, it is recommended to delete the Session Loss Header Regex value and keep it blank. You can then change the Session Loss Regex to something that only exists on your login form. Some examples include: Remember my email|Forgot password?|Remember me|Keep me signed in|Stay signed in.

If the issue is in the body, you can remove the string that is causing the problem from the Session Loss Regex and add in additional strings from the example above for more accurate detection.

https://docs.rapid7.com/insightappsec/authentication/#configure-additional-settings-using-regex

InsightAppSec: Improving Scan Speed and Performance

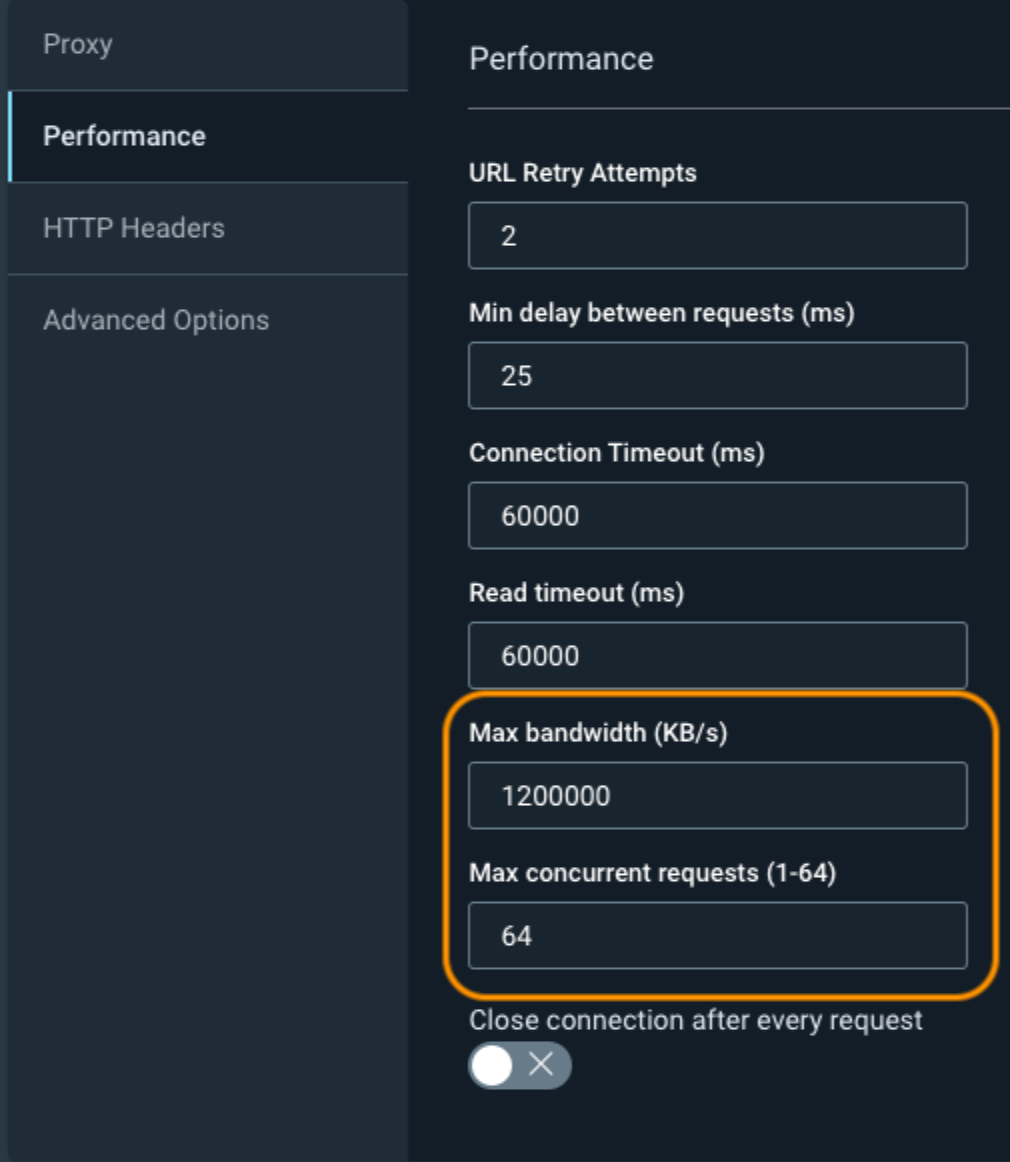
We now have Custom Options -> Performance, which you can adjust to increase the scan speed, but at the expense of hitting your web application harder. The two most common fields to adjust are the Max Bandwidth and Max Concurrent Requests.You should start by doubling these values and seeing how your web application responds to the increased traffic. If there are no issues, you can then continue to increase the values to what is shown in the screenshot below.

Optionally, you can adjust the URL Retry Attempts and the Min Delay Between Requests, but these have a much higher likelihood to cause problems for your web application or cause you to miss certain pages. Always work with your app developers to ensure that you don’t accidentally take down your application.

https://docs.rapid7.com/insightappsec/custom-options/#performance

InsightAppSec: Improving Scan Speed and Performance

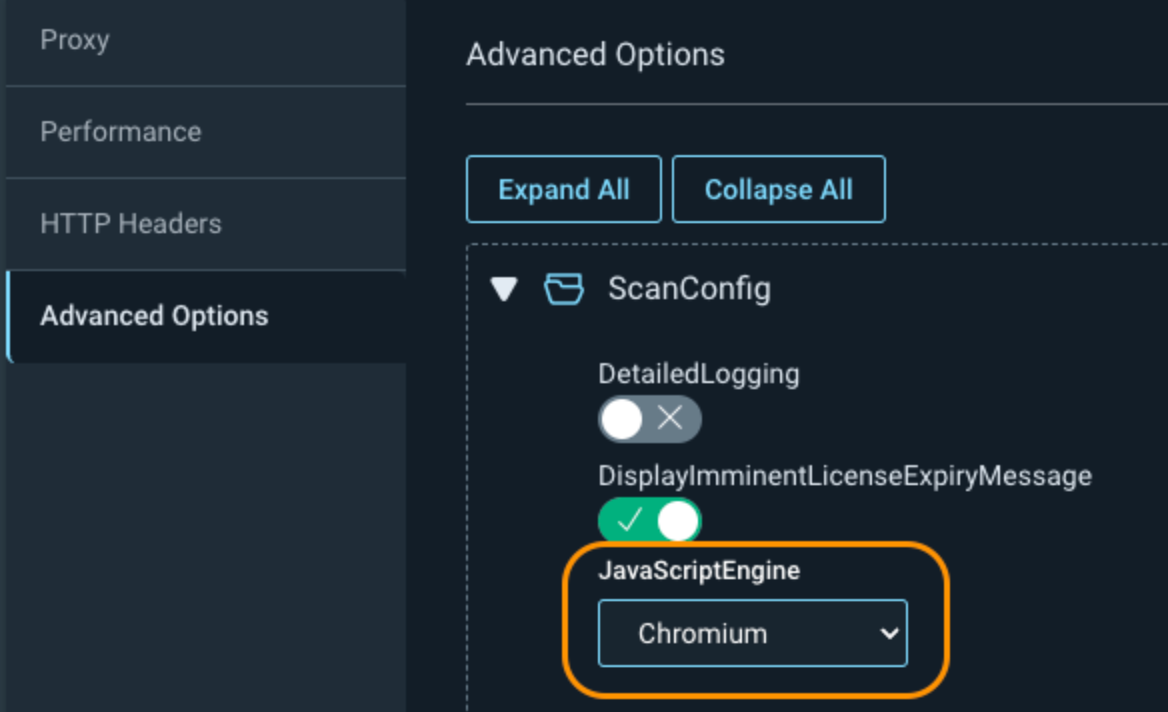
The next setting is under Custom Options -> Advanced Options -> ScanConfig -> JavaScriptEngine. This allows you to change the default engine that is used for your scan. Chrome is currently set by default, as it uses the older crawling engine. For faster and more accurate scanning, especially on modern web applications, this value should be switched to Chromium to benefit from Rapid7’s latest crawling engine.

https://docs.rapid7.com/insightappsec/advanced-options

https://docs.rapid7.com/insightappsec/advanced-options/#Engine-version-75

InsightAppSec: Improving Scan Speed and Performance

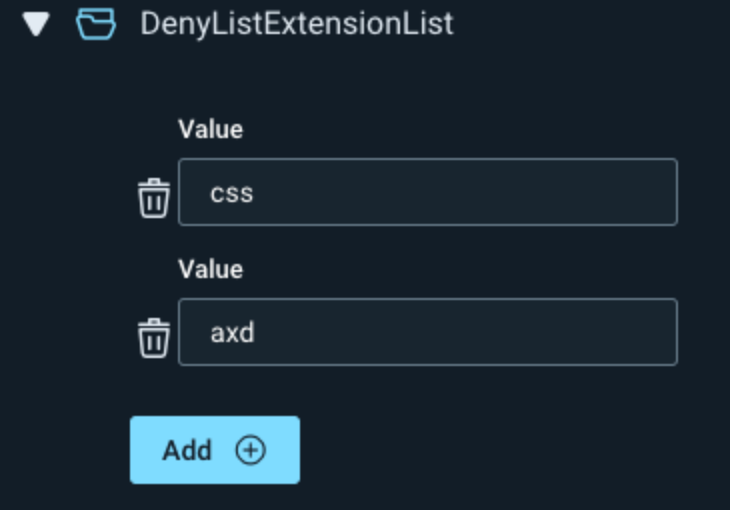
Also, under Advanced Options, if you don’t want to scan specific page extensions, you can add them under either CrawlConfig or AttackerConfig -> DenyListExtensionList.

InsightAppSec: Improving Scan Speed and Performance

Optionally, if your scans are still running too slow, you can further adjust the Crawl Configuration and Attacker Configuration under the Advanced Options. More info can be found at the link below.

https://docs.rapid7.com/insightappsec/common-crawling-issues/#how-can-i-increase-scan-speed

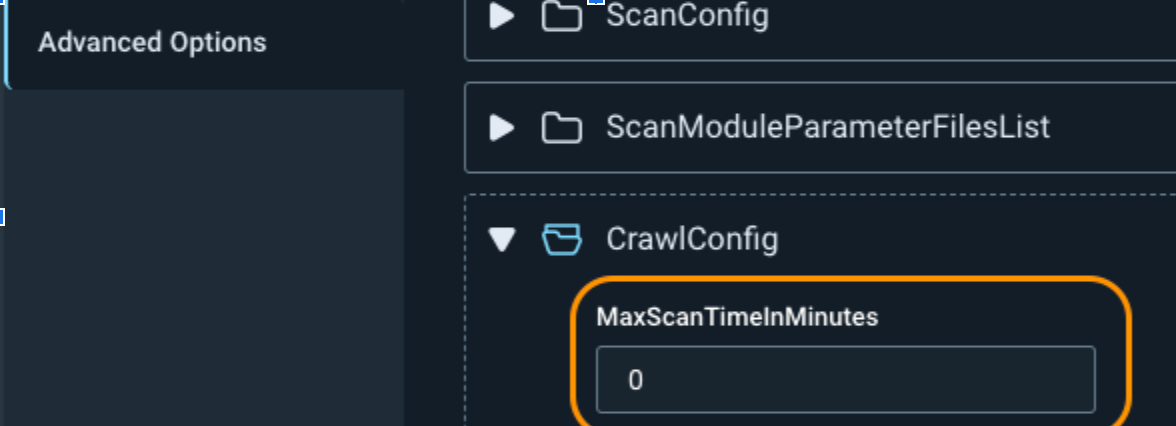
If you need to set a maximum amount of time for the scan to run, you can adjust the MaxScanTimeInMinutes under CrawlConfig. This stops the scan at a certain time, whether the scan is complete or not. This can cause your scan to miss directories and to not get a complete picture of your web application vulnerabilities, so only use it if absolutely necessary.

InsightAppSec: Improving Scan Speed and Performance

If you want to run faster validation scans, click into the scan results and click on Validate Scan, in the upper right, to only search for the vulnerabilities found during that scan. This has the added benefit of automatically adjusting the vulnerability status if the vulnerability is not found again. Just remember this isn’t running a full scan against your web application, so you won’t be discovering any new vulnerabilities.

https://docs.rapid7.com/insightappsec/scan-your-app/#test-vulnerability-remediation-by-re-running-a-scanv

https://docs.rapid7.com/insightappsec/test-vulnerability-remediation

InsightAppSec: Improving Scan Speed and Performance

There are many options for speeding up the amount of time it takes to run a scan. As always, if you continue to have issues with scan time or anything else scanning related, don’t hesitate to contact Rapid7 support for more assistance.

InsightAppSec Advanced Authentication Settings: Token Replacement

Post Syndicated from Shane Queeney original https://blog.rapid7.com/2023/08/01/insightappsec-advanced-authentication-settings-token-replacement/

InsightAppSec Advanced Authentication Settings: Token Replacement

There are many different ways to use InsightAppSec to authenticate to web apps, but sometimes you need to go deeper into the advanced settings to fully automate your logins, especially with API scanning. Today, we’ll cover one of those advanced settings: Token Replacement.

InsightAppSec Token Replacement can be used to capture and replay Bearer Authentication tokens, JWT Authentication tokens, or any other type of session token.

The token replacement values are under your scan configs in the following location: Custom Options > Advanced > AuthConfig > TokenReplacementList

When you press Add, the following values can be set.

Name Description Possible Values
ExtractionTokenLocation Where the token you want to extract is located. Request HeaderRequest BodyRequest URLResponse HeadersResponse Body
ExtractionTokenRegex Regex used to extract the token. Anything placed in brackets can be returned in the InjectionTokenRegex using @token@. Any regex, such as:”token”: ?”([^”]*)”access_token”: ?”([-a-f0-9]+)”[?]sessionId=([^&]*)
InjectionTokenLocation Where the captured token should be injected. Request URLRequest HeadersRequest Body
InjectionTokenRegex The format in which the token should be sent to the web app. @token@ is replaced with the value captured by ExtractionTokenLocation. Any string. @token@ is replaced with the captured value. Such as:Authorization: Bearer @token@Authorization: Token @token@&sessionId=@token@

InsightAppSec Advanced Authentication Settings: Token Replacement

Why Token Replacement?

Under Custom Options > HTTP Headers > Extra Header, you can manually pass an authentication token to your web app. While this is the easiest way to set up this form of authentication, unless you generate a token that will not expire, you will have to replace this token every scan. Automating this process using token replacement will save you time and effort in the long run, especially if you have multiple apps you need to generate tokens for.

For this example, we will be using the Rapid7 Hackazon web app. If you want to configure your own Hackazon instance, details around installation and setup can be found here.

Alternatively, there are free public test sites you can use instead, such as this one.

The main difference you’ll encounter when using the Hackazon web app is the API authentication does not have a UI, therefore we must record and pass a traffic file for InsightAppSec to authenticate.

We will use Postman to send the API request to the web app and Burp Suite to record the traffic. You could alternately use the Rapid7 Insight AppSec Toolkit, to record the traffic as well. Here is a video running through setup using the InsightAppSec Toolkit.

The first step is to set up your proxy settings. In Postman, you can go to Settings by clicking the gear icon in the upper right, and then clicking into the proxy settings. We’re going to set the proxy server to “localhost” and change the port to “5000”.

InsightAppSec Advanced Authentication Settings: Token Replacement

After setting the proxy in Postman, you must set it up in Burp Suite. In Burp, go to the Proxy tab, then click on Proxy Settings. Next, add a proxy listener, specifying port 5000 to match the setting in Postman. Then, set the interface to Loopback Only.

InsightAppSec Advanced Authentication Settings: Token Replacement

Go back to Postman, add your basic authentication, and then send the traffic. In Burp, click on the HTTP History tab, right click on the captured traffic, then click “Save Item”. Make sure you save the traffic as an xml file.

InsightAppSec Advanced Authentication Settings: Token Replacement

InsightAppSec Advanced Authentication Settings: Token Replacement

You can also record the traffic using the Rapid7 Insight AppSec Plugin, or from within the Chrome browser. Instructions for how to do this are located under Traffic Authentication or can be found here.

InsightAppSec Advanced Authentication Settings: Token Replacement

When recording using the Rapid7 Appsec Plugin, make sure that the recording includes the Bearer Auth or Token in the recorded details.

InsightAppSec Advanced Authentication Settings: Token Replacement

After recording the login, upload the traffic file to Site Authentication. Make sure you adjust the Logged-In Regex as well to make sure the scan doesn’t fail.

InsightAppSec Advanced Authentication Settings: Token Replacement

InsightAppSec Advanced Authentication Settings: Token Replacement

After authenticating to your web app and grabbing the token, the next step is to configure a regex to ensure the token is able to be extracted. There are a wide variety of ways to test the regex, but we will be using https://regex101.com/ for this example.

We will then grab the web app response containing the token info, paste it into the website, and configure a regular expression to ensure only the token is selected. In this use case, the expression “token”: ?”([^”]*) was successful in only highlighting the info we want to extract. We can ensure that only the token is selected in capture Group 1 as that will be returned when we specify @token@ under the InjectionTokenRegex.

InsightAppSec Advanced Authentication Settings: Token Replacement

Next, we want to configure the TokenReplacementList.

Name Value Reason
ExtractionTokenLocation Response Body The token appeared in the body after authenticating
ExtractionTokenRegex “token”: ?”([^”]*) This successfully isolated the auth token
InjectionTokenLocation Request Header Where the web app is expecting the token
InjectionTokenRegex Authorization: Token @token@ The header format the web app is expecting

InsightAppSec Advanced Authentication Settings: Token Replacement

Make sure you upload the swagger API file. You can either upload the file or point InsightAppSec to the specific URL. You can optionally restrict the scan to just the swagger file for more targeted scanning.

InsightAppSec Advanced Authentication Settings: Token Replacement

To ensure we were successful, click Download Additional Logs from the Scan Logs page after the scan is complete and open the Operation log file. You are looking for the log entry “[good]: Added imported token from response body”. Once you see this, you know the taken was imported into the scan properly and we were able to use it to log in to the API.

For further testing, you can look in the vulnerability traffic requests to ensure the Authorization: Token header has been passed successfully.

InsightAppSec Advanced Authentication Settings: Token Replacement

InsightAppSec Advanced Authentication Settings: Token Replacement

To detect if the token has expired, you can modify the sessionLossRegex and sessionLossHeaderRegex under Authentication > Additional Settings, or by using a CanaryPage if that has been set up. When configured correctly, the token replacement will grab the token again, ensuring we stay logged in to your API.

Further information on configuring Scan Authentication can be found here. When in doubt, please reach out to your web app developers and/or Rapid7 support for assistance.

Troubleshooting InsightAppSec Authentication Issues

Post Syndicated from Shane Queeney original https://blog.rapid7.com/2023/02/02/troubleshooting-insightappsec-authentication-issues/

Troubleshooting InsightAppSec Authentication Issues

For complete visibility into the vulnerabilities in your environment, proper authentication to web apps in InsightAppSec is essential. In this article, we’ll look at issues you might encounter with macro, traffic, and selenium authentication and how to troubleshoot them. Additionally, you’ll get practical and actionable tips on using InsightAppSec to its full potential.

The first step to troubleshooting InsightAppSec authentication is to look over the scan logs. The scan logs can be located under the scan in the upper left hand corner. The logs can give you useful information such as if the authentication fails, the website is unavailable, or if any other problems arose during the scan.

  • Event log will give you information about the scan itself.
  • Platform event log will give you information about the scan engine and if it encountered any issues during the scan.
  • Download additional logs: If you wanted to dive even deeper into what happened during the scan, you can to to look into the full scan logs.
Troubleshooting InsightAppSec Authentication Issues

Let’s look at some of the specific issues you might encounter with the different types of authentication noted above.

Macro Authentication

When a macro fails, the logs will give you the specific step where the macro had trouble. For example, in the image below, we can see that the macro failed on step 4, where it could not click on the specific object on the page. This could be caused by the page not loading quick enough, the name or ID of the element path changing, or the web app UI being different.

Troubleshooting InsightAppSec Authentication Issues

If you determine that the macro failed because the page isn’t loading fast enough, there are two ways you can slow the macro down.

The first way is to manually add a delay between the steps that are running too quickly. You can copy any of the delays that are currently in the macro, paste them into the spot that you want to slow down, and then change the step numbers. This way you can also set the specific duration for any delays you add into your macro.

Troubleshooting InsightAppSec Authentication Issues

The second way is to add additional delays throughout the macro, and change the Min Duration so the delays last longer. This is controlled via the export settings menu on the right. The default minimum duration is set to 3,000 milliseconds (3 seconds). Increasing the duration or adding delays will cause the macro to take longer to authenticate, but when running a scan overnight an extra few minutes to ensure the login works is a good tradeoff.

Troubleshooting InsightAppSec Authentication Issues

One other potential problem when recording a macro is when you have a password manager autofill the username and password. Anything that is automatically filled in will not be recorded by the macro. It is recommended to either turn off any password managers when recording a macro, or recording in Incognito/private browsing with all other plugins disabled to ensure nothing can modify or mess with the recording.

Lastly, if you have any events on your web app, such as a prompt to join a mailing list, that does not happen every time, you can mark that macro event as optional. If the event is not marked optional, then the macro will fail as it is unable to see the element on the page. Simply change the optional flag in the macro recording from 0 to 1 and you’re all set.

Troubleshooting InsightAppSec Authentication Issues

Traffic Authentication

While traffic authentication is usually successful when the login is working, there could still be some problems with playback. When traffic authentication fails, the scan logs don’t give you specific information like with macro authentication. Instead, the traffic authentication fails with the LoggedInRegex did not detect logged in state error. If you can’t get the traffic authentication working in the Rapid7 Appsec Plugin, you can always record the authentication within your browser.

For Chrome:

  • Click on the hamburger menu in the upper right.
  • Go to More Tools → Developer Options
  • Click on Network in the top tab
  • Make sure the dot in the upper left is red to signify you are recording.
  • Log in to your web app and when complete, right click on the recorded traffic and click Save all as HAR with content.

This will download the same .HAR file that the Appsec Plugin records, allowing you to use it for scanning.

Troubleshooting InsightAppSec Authentication Issues

Depending on how your web app responds, you might need to change the Use agent setting for how InsightAppsec interacts with your app.

Under your scan configuration, if you go to advanced options HTTP Headers User agent, you can then change what user agent is used to reach out to your web app. The latest version of Chrome should be fine for most modern web apps, but if you’re scanning a mobile app or an app that hasn’t been updated in a few years it might benefit from being changed.

Additional information can be found here.

Troubleshooting InsightAppSec Authentication Issues

Selenium Authentication

The third primary type of authentication is selenium. Selenium is similar to the macro authentication where you record all the actions to log in to your web app. Selenium is similar to traffic authentication where you will usually receive the LoggedInRegex did not detect logged in state error in the scan logs rather than specific information about the failure.

If the Selenium script could not find specific elements on the web page, you could also receive the Could not execute Selenium script error. This means there’s a problem with the script itself, the page didn’t load fast enough, or it couldn’t find the specific element on the web page. If this happens, try re-recording the script or adding a delay.

Troubleshooting InsightAppSec Authentication Issues

Using the plugin to record selenium scripts:

  • Click on the selenium plugin and Record a new test in a new project.
  • Give the project a name and enter in the base URL where you want recording to start.
  • In the new window that appears, log in to your web app. Once complete, close out of the window.
  • Before saving, you can click on the play icon to replay and test your selenium script.
  • Review the recording and then click on the save button in the upper right. You can then upload the .side file into InsightAppSec.
Troubleshooting InsightAppSec Authentication Issues

Just like macro authentication, if your website takes a while to load and the selenium script is running too fast, you can add additional delays to slow it down. There are implicit waits built into the IDE commands but if those don’t work for you, after running the authentication, you can add in wait for element commands to your selenium script.

  • Right click on the selenium recording and click insert new command
  • Set the command to wait for element visible
  • Set the target to the element you want to wait for. In this case, we’re waiting for id=email
  • By default the value is set to wait for 30,000 milliseconds (30 seconds)

Alternatively, you can use the pause command and set the value to how long you want the script to pause for. However, it is recommended to use the wait for element visible command if the web app responds at different times.

Additional information can be found here.

Troubleshooting InsightAppSec Authentication Issues

Logged-In Regex Errors

After ensuring the macro, traffic, and selenium files are working correctly, the next step in the authentication process is the logged-in regex. After the login is complete, InsightAppSec will look at the web page to find a logout button or look at the browser header for a session cookie. This can be modified by clicking into the scan configuration, navigating to the Authentication tab, and clicking on Additional Settings on the left.

Troubleshooting InsightAppSec Authentication Issues

Logged-in Regex

By default, the logged-in regex looks for sign out, sign off, log out and log off, with and without spaces between the words, on the web page.

One common problem is logged-in regex not seeing the logout button on the page before ending the authentication recording. If the logout button is on another page, or sometimes under a dropdown menu, the logged-in regex won’t detect it on the page, causing the authentication to fail.

Another common issue is if the logout button is an image or otherwise can’t be detected on the page. As the field is looking for a regular expression, you can use other words on the page to determine that the login was successful. You have to ensure that the word only appears on the page after logging in, such as the username. Otherwise the login might not actually be successful.

Troubleshooting InsightAppSec Authentication Issues

Logged-in Header Regex

Depending on how your web app is structured, you might need to use the logged-in header regex instead. For example, if there is no logout button, or if you have a single page web app that calls javascript files, the logged-in regex is more likely to fail. What you can do instead is grab the session ID cookie from the web browser, and if that is detected, then the regex will be successful.  

In Chrome:

  • Click on the three dots in the upper right corner
  • Then go to more tools and then developer options.
  • Click on the application tab at the top, then cookies on the left, and finally the web app cookie.
  • From there you want to find the session information cookie that only appears after logging in to the web app. Grab the name of the cookie and place that in the logged-in header regex.
Troubleshooting InsightAppSec Authentication Issues

The logged-in regex and logged-in header regex use AND logic, so if you put information in both fields, it will then need both to be successful in order for the login to work. Alternatively, if you remove the regex from both fields, it won’t run any post authentication checks, assuming the login is successful. It is recommended to do that as a last resort, you won’t be alerted if the login does start failing or if there are any other problems.

Troubleshooting InsightAppSec Authentication Issues

Other common issues and tricks

One issue you might encounter is where you start the authentication recording. For example, starting the recording after a page redirect. If your web app redirects to another page or SSO, and you start the authentication recording after the redirect, InsightAppSec won’t have the session information to properly redirect back to the target web app when it gets replayed during the scan. It is recommended to always start your recording on the root web app directory wherever possible.

You can also choose specific directories for scanning versus the entire web app. You want to remove the URL from the app Target URLs, and add it in specifically under the scan config. You can then set the target directory in the crawl and attack configs as literal, and then add a /* wildcard to hit any subdirectories.

Troubleshooting InsightAppSec Authentication Issues

Lastly, there is a way to restrict certain elements on a web page from being scanned. Under advanced options → CrawlConfig and AttackerConfig, there’s an option called ScopeConstraintList. This is where you can explicitly include or exclude specific pages from being scanned. You can take it a step further by adding a httpParameterList to explicitly exclude certain elements on the page from being scanned. For example, if you have a contact us page and you don’t want the scanner to hit the submit button, you can add it to the httpParameterList so it won’t be touched.

Below is an example of what the fields look like in the web page source code, and how it can be configured in IAS.

Email field source code: input type="email" name="contact_email"

Submit button source code: <button id="form-submit"

The entire site is in scope, and we are telling IAS not to hit the submit button or the email field.

Troubleshooting InsightAppSec Authentication Issues

You can find the Selenium and AppSec plugins below:

InsightVM: Best Practices to Improve Your Console

Post Syndicated from Shane Queeney original https://blog.rapid7.com/2022/09/12/insightvm-best-practices-to-improve-your-console/

InsightVM: Best Practices to Improve Your Console

Over the years, our recommendations and best practices for the InsightVM console have changed with the improvements and updates we’ve made to the system. Here are some of the most common improvements to help you get the most out of your InsightVM console in 2022.

Ensure everything is up to date

The first step to ensuring the health of your console is ensuring it is up to date. For InsightVM product updates, the typical release schedule is weekly on Wednesday, with the occasional out-of-band update. To stay on the latest version, you can set the update frequency to every 24 hours and set it to off-hours to perform that check. This will ensure the latest update is being applied and the console isn’t rebooting in the middle of the workday.

The InsightVM content updates include new vulnerabilities updated every 2 hours. As these don’t require a system reboot, it is recommended to leave them set to automatically update.

Make sure your scan engines are properly updated as well. As long as the scan engine has enough storage space and can reach the InsightVM console, it should be able to receive the latest update.

Unless you are on a Rapid7-hosted console, you are also in charge of updating the underlying operating system. That means not just applying the latest security patch, but also making sure the OS version itself is not end-of-life.

Lastly, you want to make sure you’re running the latest version of the InsightVM postgreSQL database — version 11.7. If you are still running version 9.4, this can cause some potential issues with the database, as well as general slowdown in the console and running reports.

With the latest InsightVM product updates, we also have a database auto-tune feature which automatically tunes based on the amount of RAM on the console server. This feature does not work if you are still on version 9.4. If you are on version 11.7, to activate it, go to Administration -> Run and then run the command tune assistant to make sure everything is tuned correctly. This will have a greater impact if you have 64GB RAM or above.

Check out this doc on tuning the PostgreSQL database for more detail. If you don’t feel comfortable tuning your own database, you can always contact Rapid7 support for assistance.

Reduce the number of sites

One of the largest improvements to the console is the increase in scan efficiency. Before October 2020, the discovery portion of the scan would only hit 1,024 assets simultaneously. Now, we are running discovery against 65,535 IPs at once. This leads to much faster discovery of larger IP ranges. Because of this, we recommend having fewer sites with larger IP scopes, such as /16 or /8 CIDR ranges.

The best way to organize these new, larger sites is based around function or geographical region – for example, having a separate site for all stores and one for all corporate ranges. Another example would be to break up the sites based on continents, or as large of a geographical region as possible.

Having fewer sites with a larger scope will help reduce the micromanagement of schedules and allow for ease of scalability when scanning more devices. For granular reporting, use asset groups, which are much more flexible than IP ranges and are designed to let you set the scope for reports and access management.

Prevent scan overlap

Besides having too many sites, the next-largest problem most consoles face is when scans overlap on the same scan engine. Having fewer sites helps with having fewer scheduled scans, but you should still be aware what scan engine is being used for those sites. Running a scan uses up RAM on the scan engine, and having too many scans running at once can cause scan slowdown or potentially engine crashes due to lack of memory.

The best-case scenario is to have one scan engine per site. That way, your sites can be scanned at the same time without any chance of them overloading a single engine. If you have some sites or locations that are much larger than others, you can always deploy more engines to that location and pool them together for even greater scan efficiency.

And remember, if you’re scanning more than 2,000 devices or have a segmented network, you should not be using the local scan engine, as that takes away resources from the console and PostgreSQL database.

Optimize scan templates

After making sure your scans aren’t overlapping on the same engine, the next step is to speed up the scans by optimizing your scan template. My colleague Landon Dalke wrote a great blog post documenting the best practices for your scan templates. Here are a few highlights from his post:

Assets scanned simultaneously per scan engine: Please use the following table for reference depending on how much CPU and RAM your scan engines have. Make sure your engines have a 1:4 ratio of CPU to memory for the best performance. Also, if your scan engines are virtual, make sure to reserve the allocated memory to avoid insufficient memory issues.

InsightVM: Best Practices to Improve Your Console

Send UDP packets to ports: We recommend disabling. It’s unlikely a device will be reachable that doesn’t respond to ICMP, ARP, or TCP but is somehow found only using UDP.

Do not treat TCP reset responses as live assets: We recommend enabling. This will help prevent “ghost assets” with no hostname or operating system from appearing, as some routers or IDS/IPS send TCP reset responses.

Nmap Services Detection: We recommend disabling this, as it can cause scans to take five to 10 times longer to run. Having a credential or agent on a device gives the same information.

Skip checks performed by the Insight Agent: We recommend enabling. If the agent is detected on a device, it will skip the vulnerability checks the agent is already performing, reducing scan time.

If all of your scan engines have the same resources, you can get away with needing one optimized scan template, reducing potential confusion and further simplifying your scan configurations.

After following these steps, your console should be in a much better place to reduce micromanagement and improve overall efficiency. If you need continued help and support, don’t hesitate to reach out to Rapid7 Support or your Customer Success Manager.

Additional reading:

NEVER MISS A BLOG

Get the latest stories, expertise, and news about security today.