All posts by Vara Bonthu

Run Apache Spark with Amazon EMR on EKS backed by Amazon FSx for Lustre storage

Post Syndicated from Vara Bonthu original https://aws.amazon.com/blogs/big-data/run-apache-spark-with-amazon-emr-on-eks-backed-by-amazon-fsx-for-lustre-storage/

Traditionally, Spark workloads have been run on a dedicated setup like a Hadoop stack with YARN or MESOS as a resource manager. Starting from Apache Spark 2.3, Spark added support for Kubernetes as a resource manager. The new Kubernetes scheduler natively supports the submission of Spark jobs to a Kubernetes cluster. Spark on Kubernetes provides simpler administration, better developer experience, easier dependency management with containers, a fine-grained security layer, and optimized resource allocation. As a result, Spark on Kubernetes gained much traction for high-performance and cost-effective ways of running big data and machine learning (ML) workloads.

In AWS, we offer a managed service, Amazon EMR on EKS, to run your Apache Spark workloads on Amazon Elastic Kubernetes Service (Amazon EKS) . This service uses the Amazon EMR runtime for Apache Spark, which increases the performance of your Spark jobs so that they run faster and cost less. EMR on EKS lets you run Spark applications alongside other application types on the same Amazon EKS cluster to improve resource utilization. In addition, EMR on EKS integrates with Amazon EMR Studio for authoring jobs and the Apache Spark UI for debugging out of the box to simplify infrastructure management.

For storage, EMR on EKS supports node ephemeral storage using hostPath where the storage is attached to individual nodes, and Amazon Elastic Block Store (Amazon EBS) volume per executor/driver pod using dynamic Persistent Volume Claims. However, some Spark users are looking for an HDFS-like shared file system to handle specific workloads like time-sensitive applications or streaming analytics. HDFS is best suited for jobs that requires highly interactive speed for a large number of files with random access reads, atomic rename operations, and sequential metadata requests.

Amazon FSx for Lustre is a fully managed shared storage option built on the world’s most popular high-performance file system. It offers highly scalable, cost-effective storage, which provides sub-millisecond latencies, millions of IOPS, and throughput of hundreds of gigabytes per second. Its popular use cases include high-performance computing (HPC), financial modeling, video rendering, and machine learning. FSx for Lustre supports two types of deployments:

  • Scratch file systems – These are designed for temporary or short-term storage where the data is not needed to replicate or persist if a file server fails
  • Persistent file systems – These are suitable for long-term storage where the file server is highly available and the data is replicated within the Availability Zone

In both deployment types, automatic data sync between the mounted file system and Amazon Simple Storage Service (Amazon S3) buckets is supported, helping you offload large volumes of cold and warm data for a better cost-efficient design. It makes multi-AZ or multi-region failover possible via Amazon S3 for businesses that require resiliency and availability.

This post demonstrates how to use EMR on EKS to submit Spark jobs with FSx for Lustre as the storage. It can be mounted on Spark driver and executor pods through static and dynamic PersistentVolumeClaims methods.

Static vs. dynamic provisioning

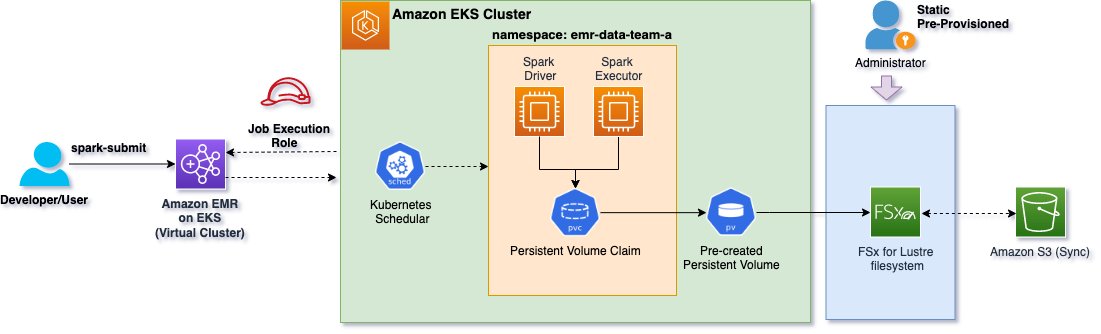
With static provisioning, the FSx for Lustre file system and PersistentVolume (PV) must be created in advance. The following diagram illustrates the static provisioning architecture. The Spark application driver and executor pods refer to an existing static PersistentVolumeClaim (PVC) to mount the FSx for Lustre file system.

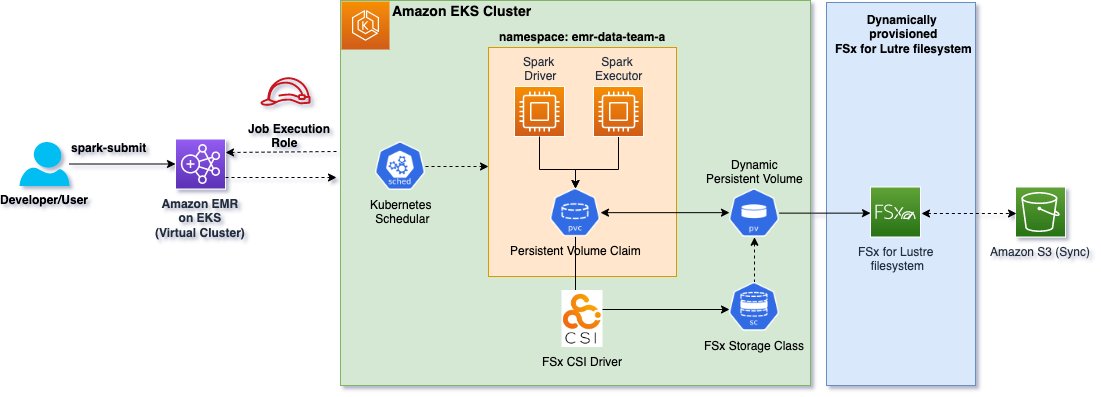
Unlike static provisioning, the FSx for Lustre file system and PV doesn’t need to be pre-created for dynamic provisioning. As shown in the following diagram, the FSx for Lustre CSI driver plugin is deployed to an Amazon EKS cluster to dynamically provision the FSx for Lustre file system with a given PVC. Dynamic provisioning only requires a PVC and the corresponding storage class. After the PVC is created in Kubernetes, the FSx for Lustre CSI driver identifies the storage class and creates the requested file system.

The Spark application driver and executor pods in the architecture refer to an existing dynamic PVC to mount the FSx for Lustre file system.

Solution overview

In this post, you provision the following resources with Amazon EKS Blueprints for Terraform to run Spark jobs using EMR on EKS:

Pre-requisites

Before you build the entire infrastructure, you must have the following prerequisites:

Now you’re ready to deploy the solution.

Clone the GitHub repo

Open your terminal window, change to the home directory, and clone the GitHub repo:

cd ~
git clone https://github.com/aws-ia/terraform-aws-eks-blueprints.git

Then, navigate to the following:

cd ~/terraform-aws-eks-blueprints/examples/analytics/emr-eks-fsx-lustre

Initialize Terraform

Initialize the project, which downloads plugins that allow Terraform to interact with AWS services:

terraform init

Run terraform plan

Run terraform plan to verify the resources created by this deployment:

export AWS_REGION="<enter-your-region>"
terraform plan

The terraform plan output shows the resources that are created by this plan.

Run terraform apply

Run terraform apply to deploy the resources:

terraform apply --auto-approve

This deployment may take up to 30 minutes to create all the resources.

Verify the resources

Verify the Amazon EKS cluster created by the deployment. This following command displays the cluster details in JSON format:

aws eks describe-cluster --name emr-eks-fsx-lustre

Let’s create a kubeconfig file for the EKS cluster with the following command. This command creates a new cluster context entry with certificate authority data under ~/.kube/config to authenticate with the EKS cluster:

aws eks --region <ENTER_YOUR_REGION> update-kubeconfig --name emr-eks-fsx-lustre

Verify the managed node groups:

aws eks list-nodegroups —cluster-name emr-eks-fsx-lustre

The output should show two node groups:

{
    "nodegroups": [
        "core-node-grp-<some_random_numbers>",
        "spark-node-grp-<some_random_numbers>"
    ]
}

List the pods created by the FSx for Lustre CSI driver. The following command shows two controllers and an fsx-csi-node daemonset pod for each node:

kubectl get pods -n kube-system | grep fsx

List the namespace created for emr-data-team-a:

kubectl get ns | grep emr-data-team-a

The output will display the active namespace.

List the FSx storage class, PV, and PVCs created by this deployment. You may notice that fsx-dynamic-pvc is in Pending status because this dynamic PVC is still creating the FSx for Lustre. The dynamic PV status changed to Bound after the file system was created.

#FSx Storage Class
kubectl get storageclasses | grep fsx
  emr-eks-fsx-lustre   fsx.csi.aws.com         Delete          Immediate              false                  109s

# Output of static persistent volume with name fsx-static-pv
kubectl get pv | grep fsx  
  fsx-static-pv                              1000Gi     RWX            Recycle          Bound    emr-data-team-a/fsx-static-pvc       fsx

# Output of static persistent volume claim with name fsx-static-pvc and fsx-dynamic-pvc
kubectl get pvc -n emr-data-team-a | grep fsx
  fsx-dynamic-pvc   Pending                                             fsx            4m56s
  fsx-static-pvc    Bound     fsx-static-pv   1000Gi     RWX            fsx            4m56s

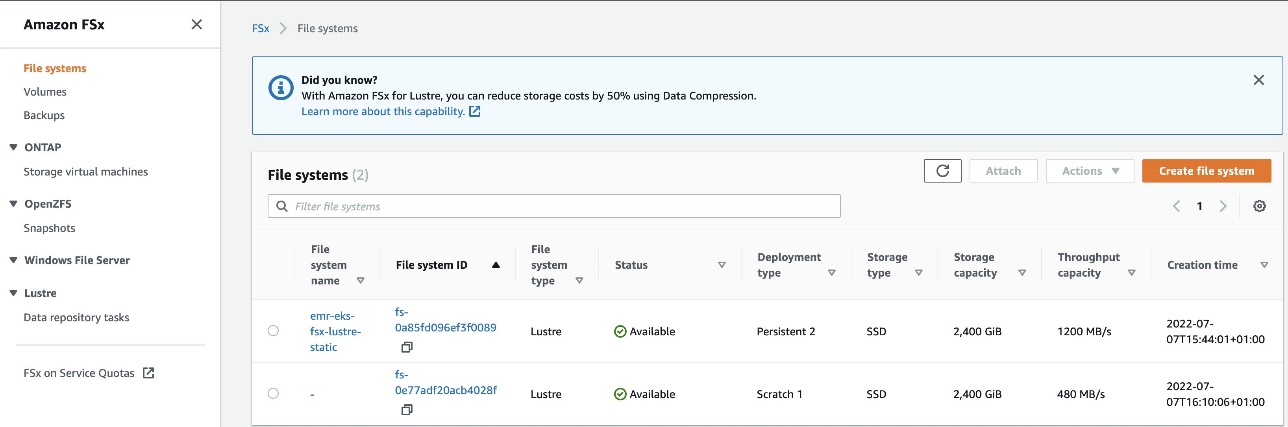
Log in to the FSx for Lustre console and verify the two file systems created by this deployment:

  • The first file system (emr-eks-fsx-lustre-static) is a persistent file system created with the Terraform resource
  • The second file system (fs-0e77adf20acb4028f) is created by the FSx for Lustre CSI driver dynamically with a dynamic PVC manifest

In this demo, we learn how to use a statically provisioned FSx for Lustre file system and dynamically provisioned FSx for Lustre file system in EMR on EKS Spark jobs.

Static provisioning

You can create an FSx for Lustre file system using the AWS CLI or any infrastructure as code (IaC) tool. In this example, we used Terraform to create the FSx for Lustre file system with deployment type as PERSISTENT_2. For static provisioning, we must create the FSx for Lustre file system first, followed by the PV and PVCs. After we create all three resources, we can mount the FSx for Lustre file system on a Spark driver and executor pod.

We use the following Terraform code snippet in the deployment to create the FSx for Lustre file system (2400 GB) and the file system association with the S3 bucket for import and export under the /data file system path. Note that this resource refers to a single subnet (single Availability Zone) for creating an FSx for Lustre file system. However, the Spark pods can use this file system across all Availability Zones, unlike the EBS volume, which is Availability Zone specific. In addition, the FSx for Lustre association with the S3 bucket creates a file system directory called /data. The Spark job driver and executor pod templates use this /data directory as a spark-local-dir for scratch space.

# New FSx for Lustre filesystem
resource "aws_fsx_lustre_file_system" "this" {
  deployment_type             = "PERSISTENT_2"
  storage_type                = "SSD"
  per_unit_storage_throughput = "500"
  storage_capacity            = 2400

  subnet_ids         = [module.vpc.private_subnets[0]]
  security_group_ids = [aws_security_group.fsx.id]
  log_configuration {
    level = "WARN_ERROR"
  }
  tags = merge({ "Name" : "${local.name}-static" }, local.tags)
}

# S3 bucket association with FSx for Lustre filesystem
resource "aws_fsx_data_repository_association" "example" {
  file_system_id       = aws_fsx_lustre_file_system.this.id
  data_repository_path = "s3://${aws_s3_bucket.this.id}"
  file_system_path     = "/data" # This directory will be used in Spark podTemplates under volumeMounts as subPath

  s3 {
    auto_export_policy {
      events = ["NEW", "CHANGED", "DELETED"]
    }

    auto_import_policy {
      events = ["NEW", "CHANGED", "DELETED"]
    }
  }
}

Persistent Volume

The following YAML template shows the definition of the PV created by this deployment. For example, running the command kubectl edit pv fsx-static-pv -n kube-system displays the manifest. PVs are a cluster scoped resource, therefore no namespace is defined in the template. The DevOps or cluster admin teams typically create this.

apiVersion: v1
kind: PersistentVolume
metadata:
  name: fsx-static-pv
spec:
  accessModes:
  - ReadWriteMany
  capacity:
    storage: 1000Gi
  claimRef:  # PV Claimed by fsx-static-pvc                
    apiVersion: v1
    kind: PersistentVolumeClaim             
    name: fsx-static-pvc
    namespace: emr-data-team-a
    resourceVersion: "5731"
    uid: 9110afc4-c605-440e-b022-190904866f0c
  csi:
    driver: fsx.csi.aws.com
    volumeAttributes:
      dnsname: fs-0a85fd096ef3f0089.fsx.eu-west-1.amazonaws.com # FSx DNS Name
      mountname: fz5jzbmv
    volumeHandle: fs-0a85fd096ef3f0089
  mountOptions:
  - flock
  persistentVolumeReclaimPolicy: Recycle

Persistent Volume Claim

The following YAML template shows the definition of the PVC created by this deployment. For example, running the command kubectl edit pvc fsx-static-pvc -n emr-data-team-a shows the deployed resource.

PVCs are namespace-specific resources typically created by the developers. The emr-data-team-a namespace is defined in the template.

apiVersion: v1
kind: PersistentVolumeClaim
metadata:
  name: fsx-static-pvc
  namespace: emr-data-team-a
spec:
  accessModes:
  - ReadWriteMany
  resources:
    requests:
      storage: 1000Gi
  storageClassName: fsx
  volumeMode: Filesystem
  volumeName: fsx-static-pv
status:
  accessModes:
  - ReadWriteMany
  capacity:
    storage: 1000Gi
  phase: Bound

Now that we have set up the static FSx for Lustre file system, we can use the PVC in EMR on EKS Spark jobs with pod templates. Key things to note in the template are that the volumes section in the following code is defined as persistentVolumeClaim with the claim name as fsx-static-pvc, and the containers section refers to the unique mountPath folder /static. We also use initContainers in the driver pod template to give correct permissions and ownership to the Hadoop users to be used by EMR on EKS driver executor pods. Finally, notice that data in the subPath is associated with the S3 bucket sync in the preceding Terraform resource.

We use the following driver pod template:

apiVersion: v1
kind: Pod
metadata:
  name: fsx-taxi-driver
  namespace: emr-data-team-a
spec:
  volumes:
    - name: spark-local-dir-ny-taxi
      persistentVolumeClaim:
        claimName: fsx-static-pvc # Static PVC pre-created by this example terraform template

  nodeSelector:
    NodeGroupType: spark

  containers:
    - name: spark-kubernetes-driver 
      volumeMounts:
        - name: spark-local-dir-ny-taxi
          mountPath: /static
          subPath: data # sub folder created in FSx for Lustre filesystem and mapped to s3 bucket sync and export
          readOnly: false
  initContainers:
    - name: spark-init-container-driver  
      image: public.ecr.aws/y4g4v0z7/busybox
      volumeMounts:
        - name: spark-local-dir-ny-taxi
          mountPath: /static
      command: ["sh", "-c", "chmod -R 777 /static", "chown -hR +999:+1000 /static/data"]

The executor pod template also refers to the same persistentVolumeClaim as fsx-static-pvc and volumeMounts with mountPath as /static. Notice that we don’t use the initContainers section in this template because the required permissions for the file system directory /static/data have been applied by the driver processes already. Because it’s a shared file system, the same permissions apply to the executor process as well.

apiVersion: v1
kind: Pod
metadata:
  name: fsx-taxi-exec
  namespace: emr-data-team-a
spec:
  volumes:
    - name: spark-local-dir-ny-taxi
      persistentVolumeClaim:
        claimName: fsx-static-pvc # Static PVC pre-created by this example terraform template

  nodeSelector:
    NodeGroupType: spark

  containers:
    - name: spark-kubernetes-executor # Don't change this name. EMR on EKS looking for this name
      volumeMounts:
        - name: spark-local-dir-ny-taxi
          mountPath: /static # mountPath name can be anything but this should match with Driver template as well
          subPath: data # sub folder created in FSx for Lustre filesystem and mapped to s3 bucket sync and export
          readOnly: false

Let’s run the sample PySpark script using the preceding pod templates. Navigate to the examples/spark-execute directory and run the shell script (fsx-static-spark.sh):

cd ~/terraform-aws-eks-blueprints/examples/analytics/emr-eks-fsx-lustre/examples/spark-execute

This shell script expects three input values. EMR_VIRTUAL_CLUSTER_ID and EMR_JOB_EXECUTION_ROLE_ARN can be extracted from the Terraform output values. Additionally, you create an S3 bucket with required permissions. This S3 bucket stores the sample PySpark scripts, pod templates, input and output data generated by this shell script, and the Spark job. Check out the shell script for more details.

EMR_VIRTUAL_CLUSTER_ID=$1     # Terraform output variable: emrcontainers_virtual_cluster_id    
S3_BUCKET=$2                  # This script requires s3 bucket as input parameter e.g., s3://<bucket-name>    
EMR_JOB_EXECUTION_ROLE_ARN=$3 # Terraform output variable: emr_on_eks_role_arn

Let’s run the fsx-static-spark.sh shell script. This job takes approximately 6 minutes by two executors, which processes 40 objects with a total size of 1.4 GB. Each object is around 36.4 MB. You can adjust the number of objects from 40 to any large number to process a large amount of data. This shell script downloads the public dataset (NY Taxi Trip Data) locally in your disk and uploads it to the S3 bucket using Amazon S3 sync. PySpark jobs read the data from the S3 buckets, apply GroupBy on a few fields, and write back to the S3 bucket to demonstrate the shuffling activity.

./fsx-static-spark.sh <EMR_VIRTUAL_CLUSTER_ID> \
s3://<YOUR_BUCKET_NAME> \
<EMR_JOB_EXECUTION_ROLE_ARN>

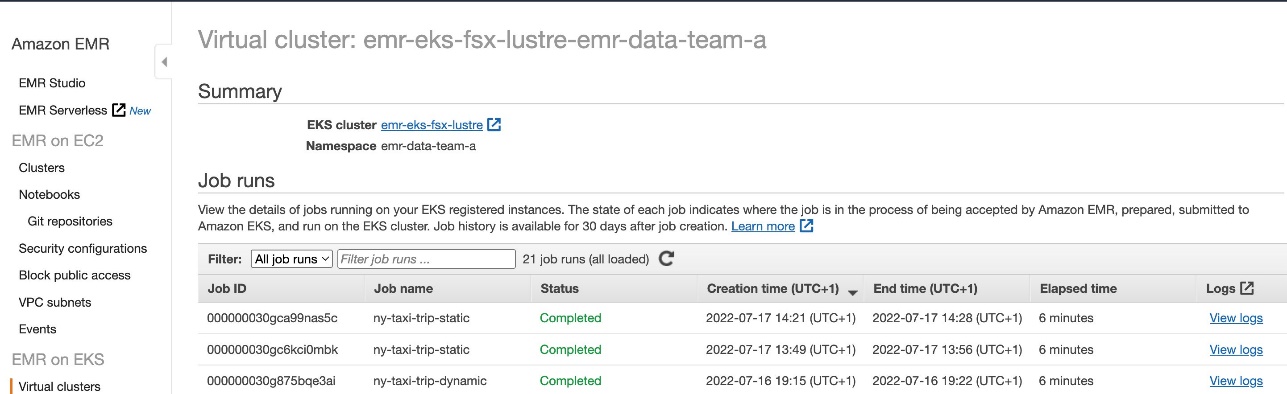
You can run the following queries to monitor the Spark job and the usage of the FSx for Lustre file system mounted on the driver and executor pods. Verify the job run events with the following command:

kubectl get pods --namespace=emr-data-team-a -w

You will notice one job object pod, a driver pod, and two executor pods. The Spark executor instances count can be updated in the Shell script.

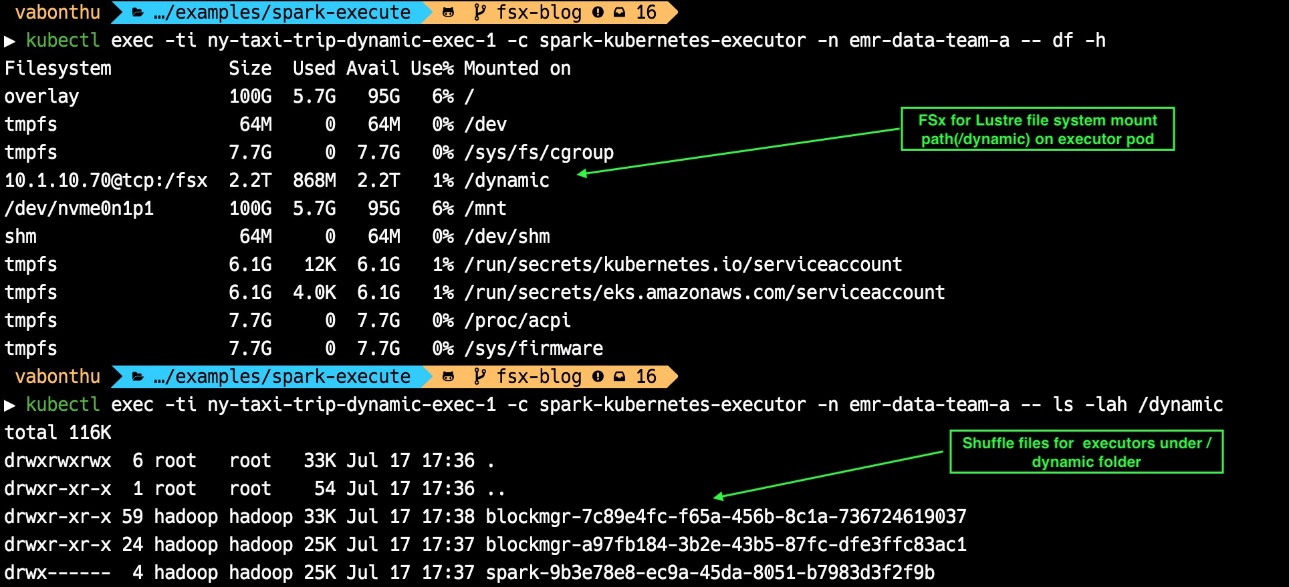
You can also query to monitor the usage of FSx for Lustre mounted file system size. The following command shows the size of the mounted file system growth during the test run:

# Verify the used FSx for Lustre filesystem disk size with executor1
kubectl exec -ti ny-taxi-trip-static-exec-1 -c spark-kubernetes-executor -n emr-data-team-a — df -h

# Verify the files created under /static/data FSx mount
kubectl exec -ti ny-taxi-trip-static-exec-1 -c spark-kubernetes-executor -n emr-data-team-a — ls -lah /static

# Verify the file sync from FSx to S3 bucket. 
aws s3 ls s3://<YOUR_SYNC_BUCKET_NAME_FROM_TERRAFORM_OUTPUT>/

The following diagram shows the output for the preceding commands. The files under the executor are the same as those under the S3 bucket. These files are the same because the S3 sync feature is enabled in the FSx for Lustre file system. This test uses the FSx for Lustre file system for scratch space, so the shuffle files will be deleted from the FSx for Lustre file system and S3 bucket when the test is complete.

This PySpark job is writing the aggregated and repartition output directly to an S3 bucket location. Instead, you can choose to write to the FSx for Lustre file system path, which syncs to an S3 bucket eventually. The FSx for Lustre file system provides low latency, high throughput, and high IOPS for reading and writing data by multiple Spark Jobs. In addition, the data stored in FSx disk is synced to an S3 bucket for durable storage.

You can monitor the FSx for Lustre file system using Amazon CloudWatch metrics. The following time series graph shows the average stats with a period of 30 seconds.

When the Spark job is complete, you can verify the results in the Spark Web UI from the EMR on EKS console.

You can also verify the FSx for Lustre file system data sync to an S3 bucket.

Dynamic provisioning

So far, we have looked at an FSx for Lustre statically provisioned file system example and its usage with Spark jobs.

We can also provision an FSx for Lustre file system on-demand using the FSx for Lustre CSI driver and Persistent Volume Claim. Whenever you create a PVC with a dynamic volume referring to an FSx storage class, the FSx for Lustre CSI driver automatically provisions the FSx for Lustre file system and the corresponding Persistent Volume. Admin teams (DevOps) are responsible for deploying the FSx for Lustre CSI driver and FSx storage class, and the developers and data engineers (DataOps) are responsible for deploying the PVC, which refers to the FSx storage class.

The following storage class is deployed to Amazon EKS by this Terraform deployment. This dynamic PVC example doesn’t use the Amazon S3 backup association. You can still do that, but it requires an Amazon S3 config in the storage class manifest. Check out Dynamic Provisioning with Data Repository to configure the FSx storage class with the S3 import/export path with the choice of deployment type (SCRATCH_1, SCRATCH_2 and PERSISTENT_1). We have also created a dedicated security group used in this manifest. For more information, refer to File System Access Control with Amazon VPC.

kind: StorageClass
apiVersion: storage.k8s.io/v1
metadata:
  name: fsx
provisioner: fsx.csi.aws.com
parameters:
  securityGroupIds: sg-0c8a656a0bbb17fe2
  subnetId: subnet-03cb3d850193b907b
reclaimPolicy: Delete
volumeBindingMode: Immediate

The following YAML template shows the definition of the dynamic PVC used in this deployment. Running the command kubectl edit pvc fsx-dynamic-pvc -n emr-data-team-a shows the deployed resource. PVCs are a namespace-specific resources typically created by the developers, therefore we define the emr-data-team-a namespace.

Spark can dynamically provision the PVC with claimName using SparkConf (for example, spark.kubernetes.driver.volumes.persistentVolumeClaim.data.options.claimName=OnDemand). However, we recommend deploying the PVC before the start of Spark jobs to avoid delays to provision the FSx for Lustre file system during the job run. The FSx for Lustre file system takes approximately 10–12 minutes to complete.

apiVersion: v1
kind: PersistentVolumeClaim
metadata:
  name: fsx-dynamic-pvc
  namespace: emr-data-team-a
spec:
  accessModes:
  - ReadWriteMany
  resources:
    requests:
      storage: 2000Gi
  storageClassName: fsx # PVC reference to Storage class created by Terraform
  volumeMode: Filesystem
  volumeName: pvc-0da5a625-03ba-48fa-b08e-3f74291c0e5e # Dynamically created Persistent Volume
status:
  accessModes:
  - ReadWriteMany
  capacity:
    storage: 2400Gi
  phase: Bound

Now that we have set up the dynamic FSx for Lustre file system, we can use this in EMR on EKS Spark jobs using pod templates. Key things to note in the following template are that the volumes section is defined as persistentVolumeClaim with the claim name as fsx-dynamic-pvc, and the containers section refers to the unique mountPath folder as /dynamic. We also use initContainers in the driver pod template to give correct permissions and ownership to the Hadoop users to be used by EMR on EKS driver executor processes.

The following is our driver pod template:

# NOTE: PVC created before the start of the Spark job to avoid waiting for 15 mins to create FSx for Lustre filesystem while the job is running
---
apiVersion: v1
kind: Pod
metadata:
  name: fsx-taxi-driver
  namespace: emr-data-team-a # Namespace used to submit the jobs
spec:
  volumes:
    - name: spark-local-dir-ny-taxi
      persistentVolumeClaim:
        claimName: fsx-dynamic-pvc  # Dynamic PVC pre-created by this example terraform template

  nodeSelector:
    NodeGroupType: spark

  containers:
    - name: spark-kubernetes-driver 
      volumeMounts:
        - name: spark-local-dir-ny-taxi
          mountPath: /dynamic # FSx SCRATCH_1 filesystem for executors scratch space
          readOnly: false
  initContainers:  # initContainer only used in Driver to set the permissions for dynamically created filesystem.
    - name: spark-init-container-driver  
      image: public.ecr.aws/y4g4v0z7/busybox
      volumeMounts:
        - name: spark-local-dir-ny-taxi
          mountPath: /dynamic # FSx Scratch 1 filesystem for executors scratch space
      command: ["sh", "-c", "chmod 777 /dynamic", "chown -hR +999:+1000 /dynamic"]

The executor pod template also refers to the same persistentVolumeClaim as fsx-dynamic-pvc and volumeMounts with mountPath as /dynamic:

apiVersion: v1
kind: Pod
metadata:
  name: fsx-taxi-exec
  namespace: emr-data-team-a
spec:
  volumes:
    - name: spark-local-dir-ny-taxi
      persistentVolumeClaim:
        claimName: fsx-dynamic-pvc  # Dynamic PVC pre-created by this example terraform template

  nodeSelector:
    NodeGroupType: spark

  containers:
    - name: spark-kubernetes-executor # Don't change this name. EMR on EKS looking for this name
      volumeMounts:
        - name: spark-local-dir-ny-taxi
          mountPath: /dynamic  # FSx Scratch 1 filesystem for executor’s scratch space
          readOnly: false

Let’s run the sample PySpark script using the preceding pod templates. Navigate to the examples/spark-execute directory and run the shell script (fsx-dynamic-spark.sh). This script is the same as the static provisioning example; the only difference is the pod templates, which refer to the dynamic volumes.

cd ~/terraform-aws-eks-blueprints/examples/analytics/emr-eks-fsx-lustre/examples/spark-execute

This shell script expects three input values: EMR_VIRTUAL_CLUSTER_ID, EMR_JOB_EXECUTION_ROLE_ARN, and your S3 bucket name. Use the same values used in the previous static provisioning example.

Let’s run the fsx-dynamic-spark.sh shell script:

./fsx-dynamic-spark.sh <EMR_VIRTUAL_CLUSTER_ID> \
s3://<YOUR_BUCKET_NAME> \
<EMR_JOB_EXECUTION_ROLE_ARN>

After the job is triggered, run the following commands to see the output of the job:

# Output of dynamic persistent volume claim fsx-dynamic-pvc
kubectl get pvc -n emr-data-team-a | grep fsx-dynamic-pvc

# Verify the used FSx for Lustre filesystem disk size with executor1
kubectl exec -ti ny-taxi-trip-dynamic-exec-1 -c spark-kubernetes-executor -n emr-data-team-a — df -h

# Verify the files created under /dynamic FSx mount
kubectl exec -ti ny-taxi-trip-dynamic-exec-1 -c spark-kubernetes-executor -n emr-data-team-a — ls -lah /dynamic

The following screenshot shows the file system mounted under the /dynamic path. We can also see the Spark shuffle files created in the /dynamic folder.

Clean up

To clean up your environment, destroy the Terraform modules in reverse order. Then, empty any S3 buckets created by this module and run the following commands:

cd ~/terraform-aws-eks-blueprints/examples/analytics/emr-eks-fsx-lustre

terraform destroy -target="module.eks_blueprints_kubernetes_addons" -auto-approve

terraform destroy -target="module.eks_blueprints" -auto-approve

terraform destroy -target="module.vpc" -auto-approve

# Finally, destroy any additional resources that are not in the above modules

terraform destroy -auto-approve

Furthermore, log in to the AWS Management Console and delete any S3 buckets or FSX for Lustre file systems created by this deployment to avoid unwanted charges to your AWS account.

Conclusion

In this post, we demonstrated how to mount an FSx for Lustre file system as a PVC to Spark applications with EMR on EKS. We showed two mounting methods: static provisioning and dynamic provisioning via the FSx for Lustre CSI driver. The HDFS-like storage can be used by Spark on a Kubernetes pattern to achieve optimal storage performance. You can use it either as a temporary scratch space to store intermediate data while processing, or as a shared, persistent file system to exchange data for multiple pods in a single job or between multiple Spark jobs.

If you want to try out the full solution or for more EMR on EKS examples, check out our open-sourced project on GitHub.


About the authors

Vara Bonthu is a Senior Open Source Engineer focused on data analytics and containers working with Strategic Accounts. He is passionate about open source, big data, Kubernetes, and has a substantial development, DevOps, and architecture background.

Karthik Prabhakar is a Senior Analytics Specialist Solutions Architect at AWS, helping strategic customers adopt and run AWS Analytics services.

Melody Yang is a Senior Big Data Solutions Architect for Amazon EMR at AWS. She is an experienced analytics leader working with AWS customers to provide best practice guidance and technical advice in order to assist their success in data transformation. Her areas of interests are open-source frameworks and automation, data engineering, and DataOps.

Building a serverless data quality and analysis framework with Deequ and AWS Glue

Post Syndicated from Vara Bonthu original https://aws.amazon.com/blogs/big-data/building-a-serverless-data-quality-and-analysis-framework-with-deequ-and-aws-glue/

With ever-increasing amounts of data at their disposal, large organizations struggle to cope with not only the volume but also the quality of the data they manage. Indeed, alongside volume and velocity, veracity is an equally critical issue in data analysis, often seen as a precondition to analyzing data and guaranteeing its value. High-quality data is commonly described as fit for purpose and a fair representation of the real-world constructs it depicts. Ensuring data sources meet these requirements is an arduous task that is best addressed through an automated approach and adequate tooling.

Challenges when running data quality at scale can include choosing the right data quality tools, managing the rules and constraints to apply on top of the data, and taking on the large upfront cost of setting up infrastructure in production.

Deequ, an open-source data quality library developed internally at Amazon, addresses these requirements by defining unit tests for data that it can then scale to datasets with billions of records. It provides multiple features, like automatic constraint suggestions and verification, metrics computation, and data profiling. For more information about how Deequ is used at Amazon, see Test data quality data at scale with Deequ.

You need to follow several steps to implement Deequ in production, including building the infrastructure, writing custom AWS Glue jobs, profiling the data, and generating rules before applying them. In this post, we introduce an open-source Data Quality and Analysis Framework (DQAF) that simplifies this process and its orchestration. Built on top of Deequ, this framework makes it easy to create the data quality jobs that you need, manage the associated constraints through a web UI, and run them on the data as you ingest it into your data lake.

Architecture

As illustrated in the following architecture diagram, the DQAF exclusively uses serverless AWS technology. It takes a database and tables in the AWS Glue Data Catalog as inputs to AWS Glue jobs, and outputs various data quality metrics into Amazon Simple Storage Service (Amazon S3). Additionally, it saves time by automatically generating constraints on previously unseen data. The resulting suggestions are stored in Amazon DynamoDB tables and can be reviewed and amended at any point by data owners in the AWS Amplify managed UI. Amplify makes it easy to create, configure, and implement scalable web applications on AWS. The orchestration of these operations is carried out by an AWS Step Functions workflow. The code, artifacts, and an installation guide are available in the GitHub repository.

As illustrated in the following architecture diagram, the DQAF exclusively uses serverless AWS technology.

In this post, we walk through a deployment of the DQAF using some sample data. We assume you have a database in the AWS Glue Data Catalog hosting one or more tables in the same Region where you deploy the framework. We use a legislators database with two tables (persons_json and organizations_json) referencing data about United States legislators. For more information about this database, see Code Example: Joining and Relationalizing Data.

In this post, we walk through a deployment of the DQAF using some sample data.

Deploying the solution

Click on the button below to launch an AWS CloudFormation stack that deploys the solution in your AWS account in the last Region that was used:

The process takes 10–15 minutes to complete. You can verify that the framework was successfully deployed by checking that the CloudFormation stacks show the status CREATE_COMPLETE.

You can verify that the framework was successfully deployed by checking that the CloudFormation stacks show the status CREATE_COMPLETE.

Testing the data quality and analysis framework

The next step is to understand (profile) your test data and set up data quality constraints. Constraints can be defined as a set of rules to validate whether incoming data meets specific requirements along various dimensions (such as completeness, consistency, or contextual accuracy). Creating these rules can be a painful process if you have lots of tables with multiple columns, but DQAF makes it easy by sampling your data and suggesting the constraints automatically.

On the Step Functions console, locate the data-quality-sm state machine, which represents the entry point to data quality in the framework. When you provide a valid input, it starts a series of AWS Glue jobs running Deequ. This step function can be called on demand, on a schedule, or based on an event. You run the state machine by entering a value in JSON format.

You run the state machine by entering a value in JSON format.

First pass and automatic suggestion of constraints

After the step function is triggered, it calls the AWS Glue controller job, which is responsible for determining the data quality checks to perform. Because the submitted tables were never checked before, a first step is to generate data quality constraints on attributes of the data. In Deequ, this is done through an automatic suggestion of constraints, a process where data is profiled and a set of heuristic rules is applied to suggest constraints. It’s particularly useful when dealing with large multi-column datasets. In the framework, this operation is performed by the AWS Glue suggestions job, which logs the constraints into the DataQualitySuggestions DynamoDB table and outputs preliminary quality check results based on those suggestions into Amazon S3 in Parquet file format.

AWS Glue suggestions job

The Deequ suggestions job generates constraints based on three major dimensions:

  • Completeness – Measures the presence of null values, for example isComplete("gender") or isComplete("name")
  • Consistency – Consistency of data types and value ranges, for example .isUnique("id") or isContainedIn("gender", Array("female", "male"))
  • Statistics – Univariate dimensions in the data, for example .hasMax("Salary", “90000”) or .hasSize(_>=10)

The following table lists the available constraints that can be manually added in addition to the automatically suggested ones.

Constraints Argument Semantics
Dimension Completeness
isComplete column Check that there are no missing values in a column
hasCompleteness column, udf Custom validation of missing values in a column
Dimension Consistency
isUnique column Check that there are no duplicates in a column
hasUniqueness column, udf Custom validation of the unique value ratio in a column
hasDistinctness column, udf Custom validation of the unique row ratio in a column
isInRange column, value range Validation of the fraction of values that are in a valid range
hasConsistentType column Validation of the largest fraction of values that have the same type
isNonNegative column Validation whether all the values in a numeric column are non-negative
isLessThan column pair Validation whether all the values in the first column are always less than the second column
satisfies predicate Validation whether all the rows match predicate
satisfiesIf predicate pair Validation whether all the rows matching first predicate also match the second predicate
hasPredictability column, column(s), udf User-defined validation of the predictability of a column
Statistics (can be used to verify dimension consistency)
hasSize udf Custom validation of the number of records
hasTypeConsistency column, udf Custom validation of the maximum fraction of the values of the same datatype
hastCountDistinct column Custom validation of the number of distinct non null values in a column
hasApproxCountDistinct column, udf Custom validation of the approximate number of distinct non-null values
hasMin column, udf Custom validation of the column’s minimum value
hasMax column, udf Custom validation of the column’s maximum value
hasMean column, udf Custom validation of the column’s mean value
hasStandardDeviation column, udf Custom validation of the column’s standard deviation value
hasApproxQuantile column,quantile,udf Custom validation of a particular quantile of a column (approximate)
hasEntropy column, udf Custom validation of the column’s entropy
hasMutualInformation column pair,udf Custom validation of the column pair’s mutual information
hasHistogramValues column, udf Custom validation of the column’s histogram
hasCorrelation column pair,udf Custom validation of the column pair’s correlation

The following screenshot shows the DynamoDB table output with suggested constraints generated by the AWS Glue job.

The following screenshot shows the DynamoDB table output with suggested constraints generated by the AWS Glue job.

AWS Glue data profiler job

Deequ also supports single-column profiling of data, and its implementation scales to large datasets with billions of rows. As a result, we get a profile for each column in the data, which allows us to inspect the completeness of the column, the approximate number of distinct values, and the inferred datatype.

The controller triggers an AWS Glue data profiler job in parallel to the suggestions job. This profiler Deequ process runs three passes over the data and avoids any shuffles in order to easily scale to large datasets. Results are stored as Parquet files in the S3 data quality bucket.

When the controller job is complete, the second step in the data quality state machine is to crawl the Amazon S3 output data into a data_quality_db database in the AWS Glue Data Catalog, which is then immediately available to be queried in Amazon Athena. The following screenshot shows the list of tables created by this AWS Glue framework and a sample output from the data profiler results.

The following screenshot shows the list of tables created by this AWS Glue framework and a sample output from the data profiler results.

Reviewing and verifying data quality constraints

As good as Deequ is at suggesting data quality rules, the data stewards should first review the constraints before applying them in production. Because it may be cumbersome to edit large tables in DynamoDB directly, we have created a web app that enables you to add or amend the constraints. The changes are updated in the relevant DynamoDB tables in the background.

Accessing the web front end

To access the user interface, on the AWS Amplify console, choose the deequ-constraints app. Choosing the URL (listed as https://<env>.<appsync_app_id>.amplifyapp.com) opens the data quality constraints front end. After you complete the registration process with Amazon Cognito (create an account) and sign in, you see a UI similar to the following screenshot.

After you complete the registration process with Amazon Cognito (create an account) and sign in, you see a UI similar to the following screenshot.

It lists data quality constraint suggestions produced by the AWS Glue job in the previous step. Data owners can add or remove and enable or disable these constraints at any point via the UI. Suggestions are not enabled by default. This makes sure all constraints are human reviewed before they are processed. Choosing the check box enables a constraint.

Data analyzer (metric computations)

Alongside profiling, Deequ can also generate column-level statistics called data analyzer metrics (such as completeness, maximum, and correlation). They can help uncover data quality problems, for example by highlighting the share of null values in a primary key or the correlation between two columns.

The following table lists the metrics that you can apply to any column.

Metric Semantics
Dimension Completeness
Completeness Fraction of non-missing values in a column
Dimension Consistency
Size Number of records
Compliance Ratio of columns matching predicate
Uniqueness Unique value ratio in a column
Distinctness Unique row ratio in a column
ValueRange Value range verification for a column
DataType Data type inference for a column
Predictability Predictability of values in a column
Statistics (can be used to verify dimension consistency)
Minimum Minimal value in a column
Maximum Maximal value in a column
Mean Mean value in a column
StandardDeviation Standard deviation of the value distribution in a column
CountDistinct Number of distinct values in a column
ApproxCountDistinct Number of distinct values in a column
ApproxQuantile Approximate quantile of the value in a column
Correlation Correlation between two columns
Entropy Entropy of the value distribution in a column
Histogram Histogram of an optionally binned column
MutualInformation Mutual information between two columns

In the web UI, you can add these metrics on the Analyzers tab. In the following screenshot, we add an ApproxCountDistinct metric on an id column. Choosing Create analyzer inserts the record into the DataQualityAnalyzer table in DynamoDB and enables the constraint.

In the following screenshot, we add an ApproxCountDistinct metric on an id column.

AWS Glue verification job

We’re now ready to put our rules into production and can use Athena to look at the resultsYou can start running the step function with the same JSON as input:

{
  "glueDatabase": "legislators",
  "glueTables": "persons_json, organizations_json"
}

This time the AWS Glue verification job is triggered by the controller. This job performs two actions: it verifies the suggestion constraints and performs metric computations. You can immediately query the results in Athena under the constraints_verification_results table.

The following screenshot shows the verification output.

The following screenshot shows the verification output.

The following screenshot shows the metric computation results.

The following screenshot shows the metric computation results.

Summary

Dealing with large, real-world datasets requires a scalable and automated approach to data quality. Deequ is the tool of choice at Amazon when it comes to measuring the quality of large production datasets. It’s used to compute data quality metrics, suggest and verify constraints, and profile data.

This post introduced an open-source, serverless Data Quality and Analysis Framework that aims to simplify the process of deploying Deequ in production by setting up the necessary infrastructure and making it easy to manage data quality constraints. It enables data owners to generate automated data quality suggestions on previously unseen data that can then be reviewed and amended in a UI. These constraints serve as inputs to various AWS Glue jobs in order to produce data quality results queryable via Athena. Try this framework on your data and leave suggestions on how to improve it on our open-source GitHub repo.


About the Authors

Vara Bonthu is a Senior BigData/DevOps Architect for ProServe working with the Global Accounts team. He is passionate about big data and Kubernetes. He helps customers all over the world design, build, and migrate end-to-end data analytics and container-based solutions. In his spare time, he develops applications to help educate his 7-year-old autistic son.


Abdel Jaidi is a Data & Machine Learning Engineer for AWS Professional Services. He works with customers on Data & Analytics projects, helping them shorten their time to value and accelerate business outcomes. In his spare time, he enjoys participating in triathlons and walking dogs in parks in and around London.