Tag Archives: Argo Tunnel

Many services, one cloudflared

Post Syndicated from Adam Chalmers original https://blog.cloudflare.com/many-services-one-cloudflared/

Many services, one cloudflared
Route many different local services through many different URLs, with only one cloudflared

Many services, one cloudflared

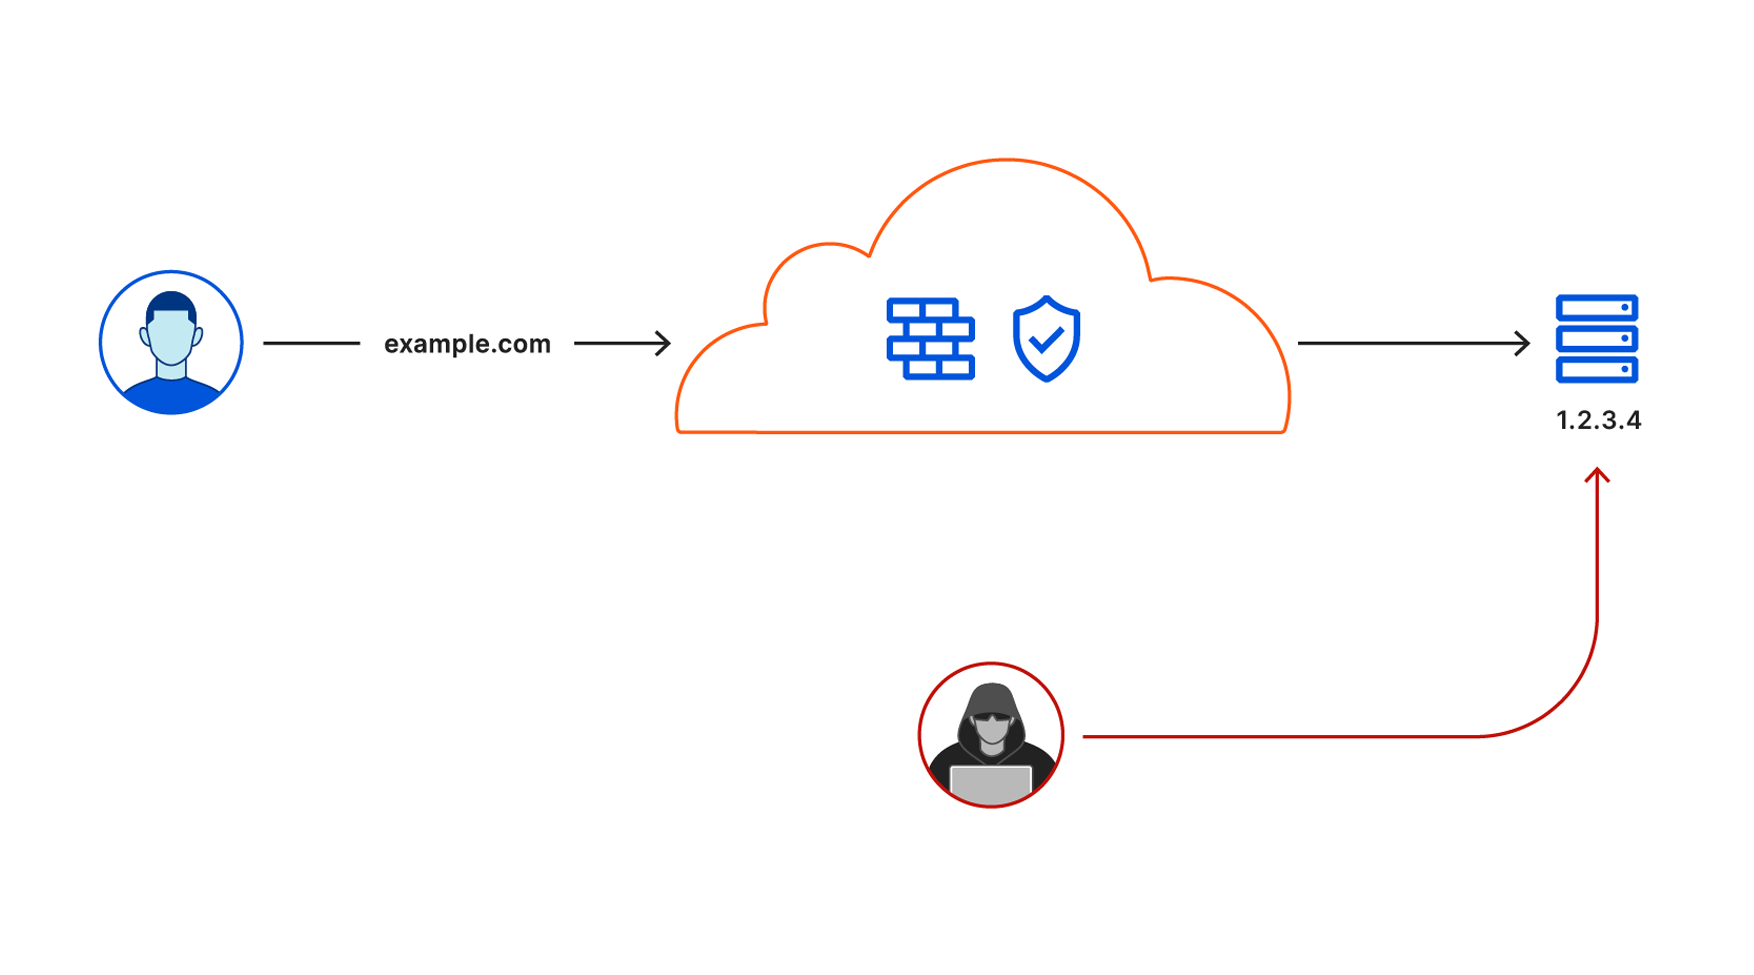
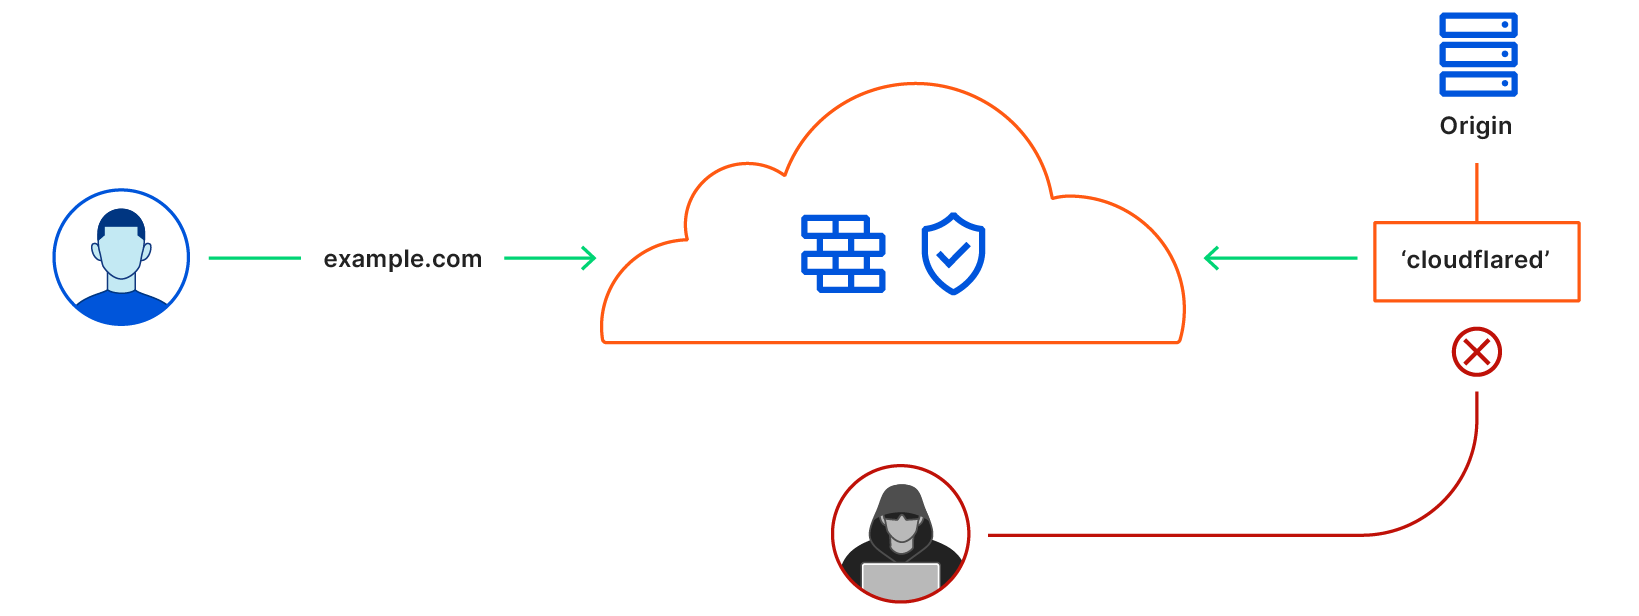
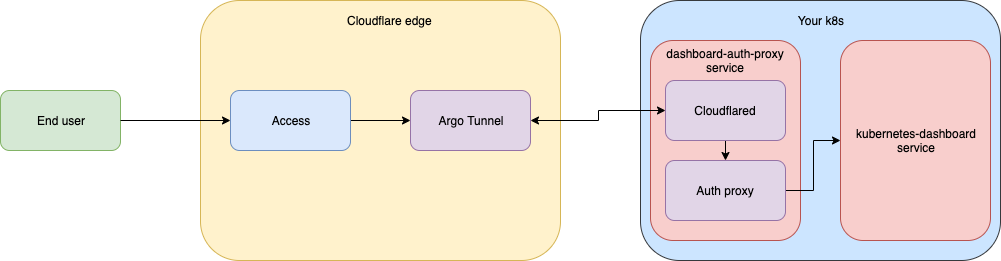
I work on the Argo Tunnel team, and we make a program called cloudflared, which lets you securely expose your web service to the Internet while ensuring that all its traffic goes through Cloudflare.

Say you have some local service (a website, an API, a TCP server, etc), and you want to securely expose it to the internet using Argo Tunnel. First, you run cloudflared, which establishes some long-lived TCP connections to the Cloudflare edge. Then, when Cloudflare receives a request for your chosen hostname, it proxies the request through those connections to cloudflared, which in turn proxies the request to your local service. This means anyone accessing your service has to go through Cloudflare, and Cloudflare can do caching, rewrite parts of the page, block attackers, or build Zero Trust rules to control who can reach your application (e.g. users with a @corp.com email). Previously, companies had to use VPNs or firewalls to achieve this, but Argo Tunnel aims to be more flexible, more secure, and more scalable than the alternatives.

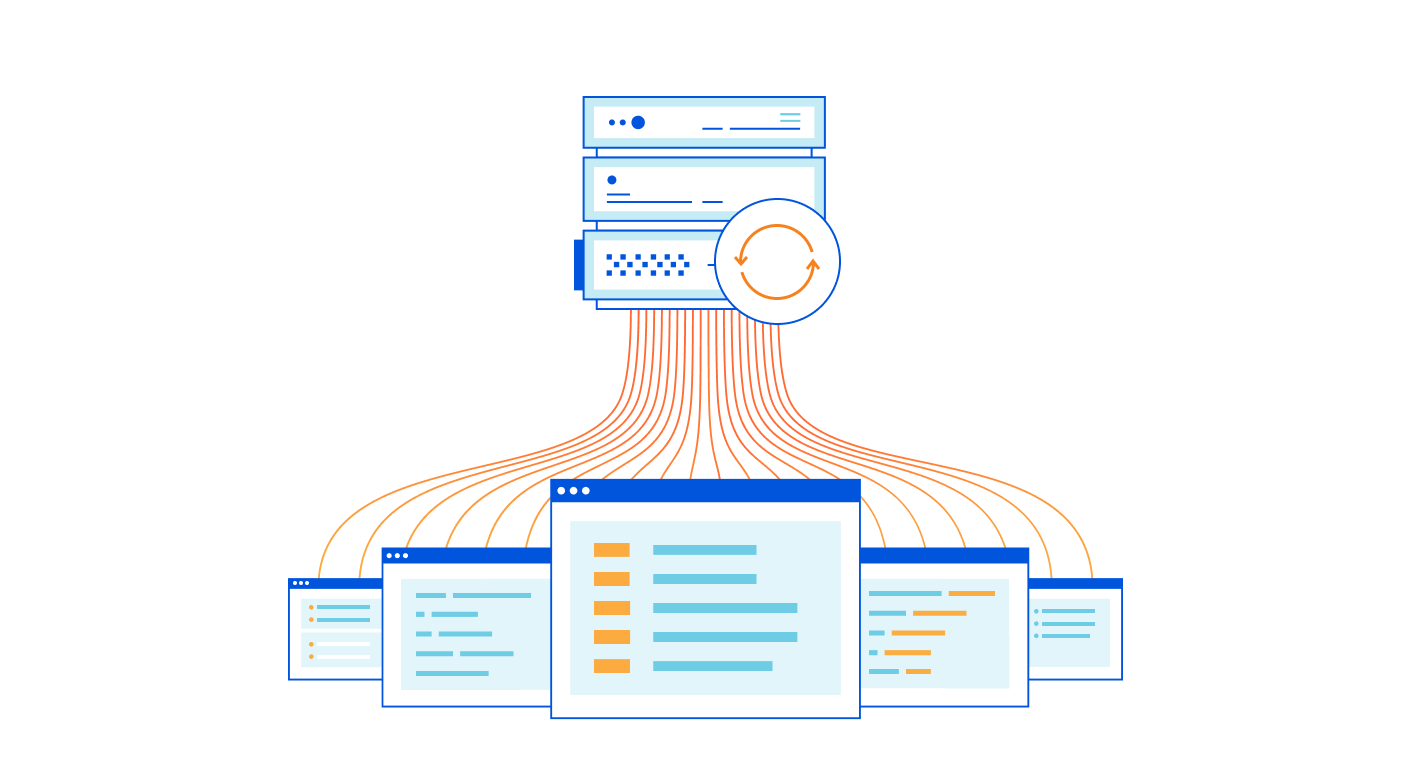
Some of our larger customers have deployed hundreds of services with Argo Tunnel, but they’re consistently experiencing a pain point with these larger deployments. Each instance of cloudflared can only proxy a single service. This means if you want to put, say, 100 services on the internet, you’ll need 100 instances of cloudflared running on your server. This is inefficient (because you’re using 100x as many system resources) and, even worse, it’s a pain to manage 100 long-lived services!

Today, we’re thrilled to announce our most-requested feature: you can now expose unlimited services using one cloudflared. Any customer can start using this today, at no extra cost, using the Named Tunnels we released a few months ago.

Named Tunnels

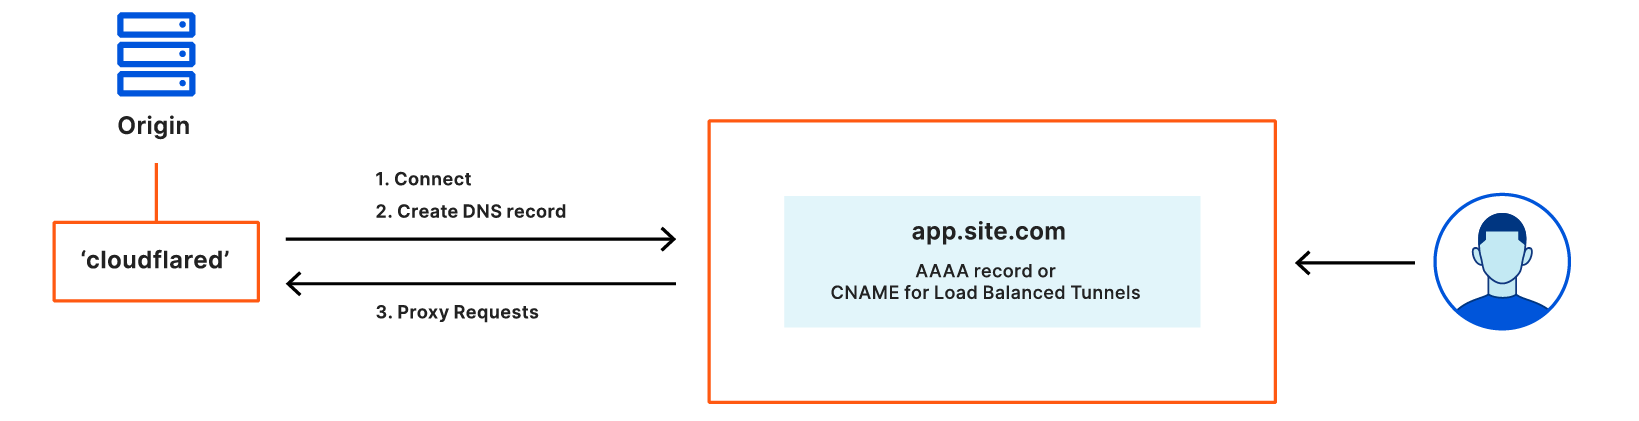
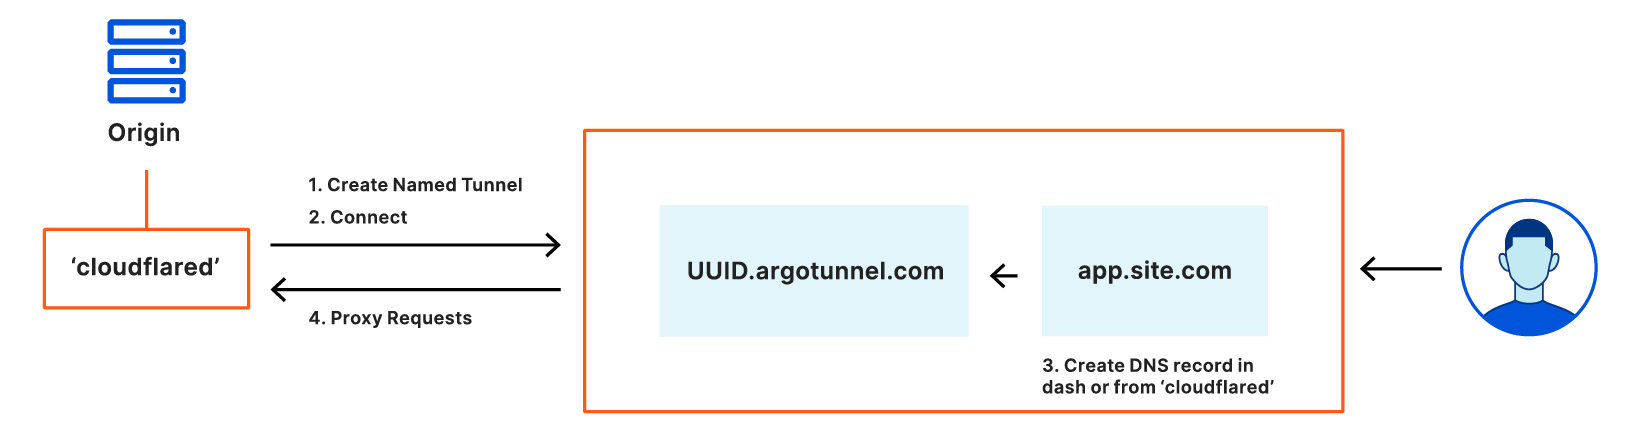
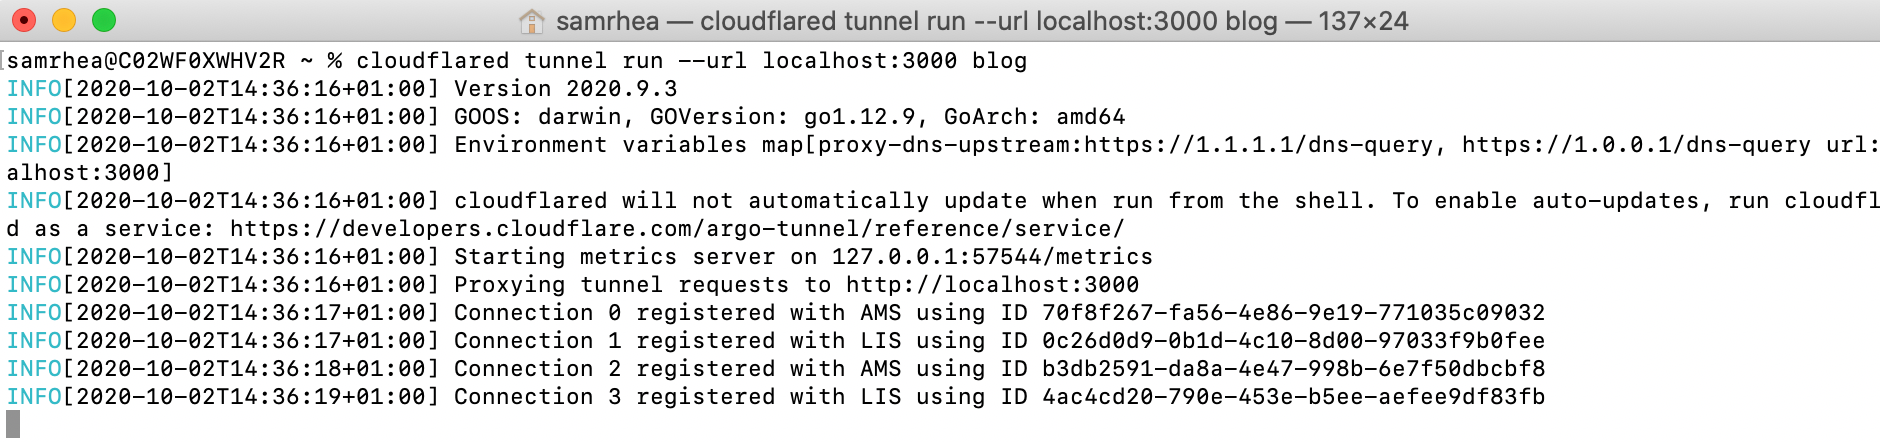
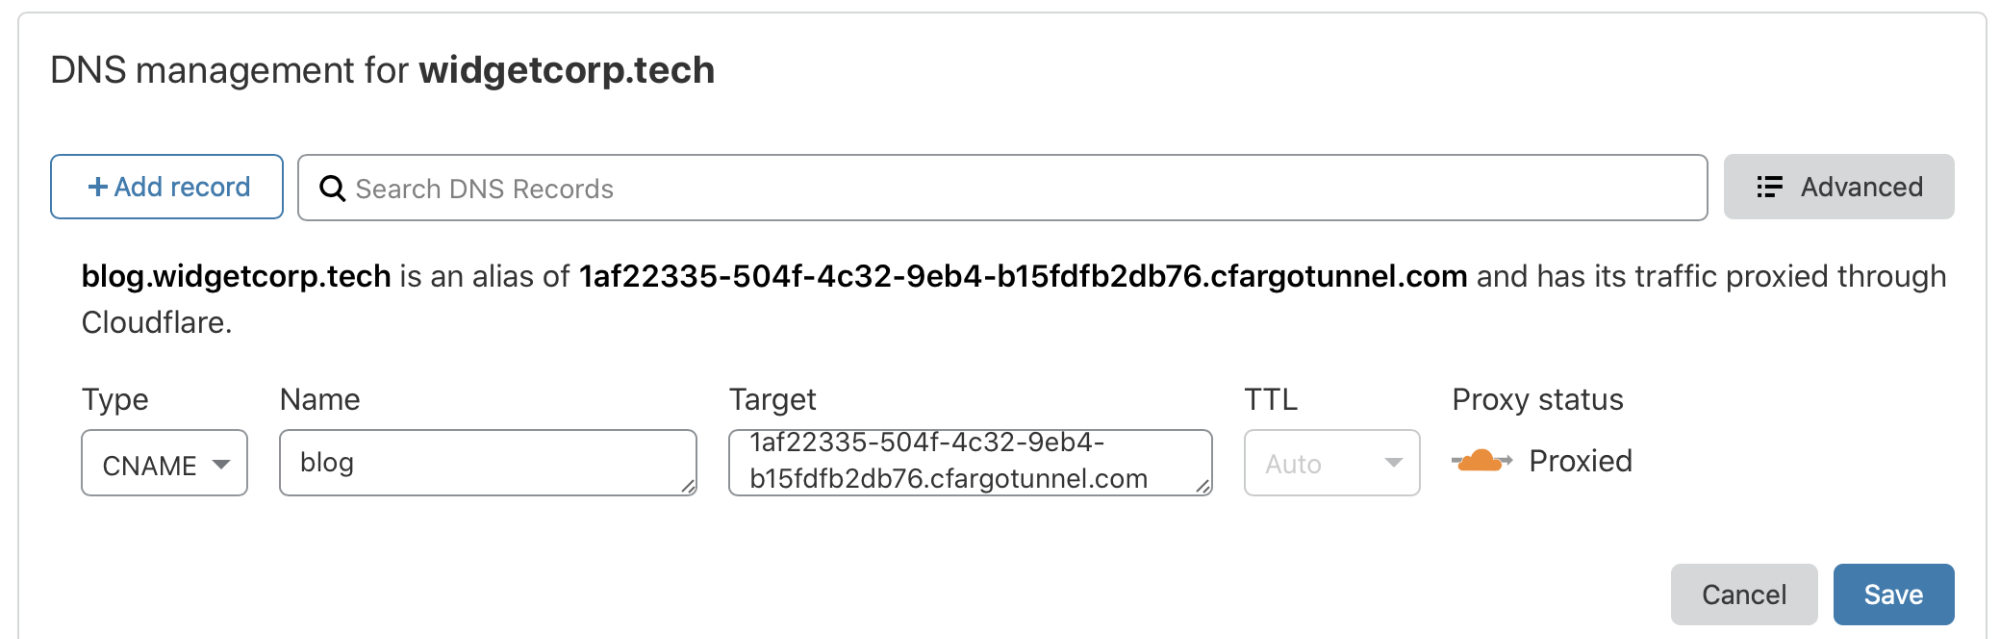
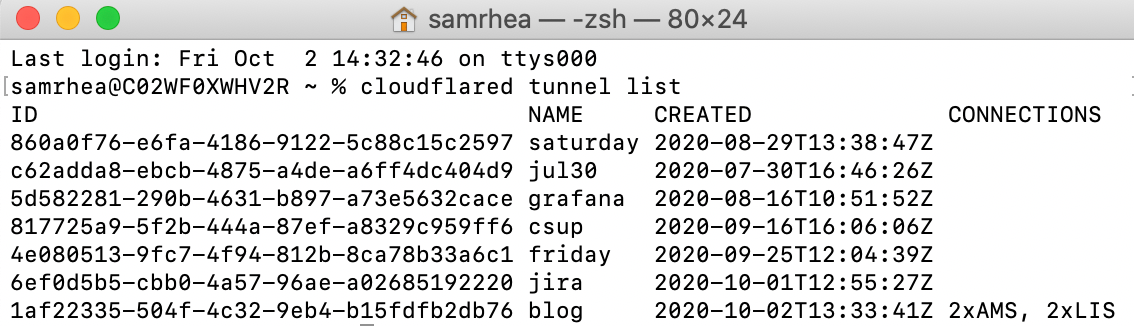
Earlier this year, we announced Named Tunnels—tunnels with immutables ID that you can run and stop as you please. You can route traffic into the tunnel by adding a DNS or Cloudflare Load Balancer record, and you can route traffic from the tunnel into your local services by running cloudflared.

Many services, one cloudflared

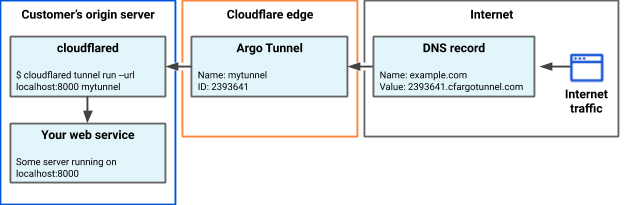
You can create a tunnel by running $ cloudflared tunnel create my_tunnel_name. Once you’ve got a tunnel, you can use DNS records or Cloudflare Load Balancers to route traffic into the tunnel. Once traffic is routed into the tunnel, you can use our new ingress rules to map traffic to local services.

Map traffic with ingress rules

An ingress rule basically says “send traffic for this internet URL to this local service.” When you invoke cloudflared it’ll read these ingress rules from the configuration file. You write ingress rules under the ingress key of your config file, like this:

$ cat ~/cloudflared_config.yaml

tunnel: my_tunnel_name
credentials-file: .cloudflared/e0000000-e650-4190-0000-19c97abb503b.json
ingress:
 # Rules map traffic from a hostname to a local service:
 - hostname: example.com
   service: https://localhost:8000
 # Rules can match the request's path to a regular expression:
 - hostname: static.example.com
   path: /images/*\.(jpg|png|gif)
   service: https://machine1.local:3000
 # Rules can match the request's hostname to a wildcard character:
 - hostname: "*.ssh.foo.com"
   service: ssh://localhost:2222
 # You can map traffic to the built-in “Hello World” test server:
 - hostname: foo.com
   service: hello_world
 # This “catch-all” rule doesn’t have a hostname/path, so it matches everything
 - service: http_status:404

This example maps traffic to three different local services. But cloudflared can map traffic to more than just addresses: it can respond with a given HTTP status (as in the last rule) or with the built-in Hello World test server (as in the second-last rule). See the docs for a full list of supported services.

You can match traffic using the hostname, a path regex, or both. If you don’t use any filters, the ingress rule will match everything (so if you have DNS records from different zones routing into the tunnel, the rule will match all their URLs). Traffic is matched to rules from top to bottom, so in this example, the last rule will match anything that wasn’t matched by an earlier rule. We actually require the last rule to match everything; otherwise, cloudflared could receive a request and not know what to respond with.

Testing your rules

To make sure all your rules are valid, you can run

$ cat ~/cloudflared_config_invalid.yaml

ingress:
 - hostname: example.com
   service: https://localhost:8000

$ cloudflared tunnel ingress validate
Validating rules from /usr/local/etc/cloudflared/config.yml
Validation failed: The last ingress rule must match all URLs (i.e. it should not have a hostname or path filter)

This will check that all your ingress rules use valid regexes and map to valid services, and it’ll ensure that your last rule (and only your last rule) matches all traffic. To make sure your ingress rules do what you expect them to do, you can run

$ cloudflared tunnel ingress rule https://static.example.com/images/dog.gif
Using rules from ~/cloudflared_config.yaml
Matched rule #2
        Hostname: static.example.com
        path: /images/*\.(jpg|png|gif)

This will check which rule matches the given URL, almost like a dry run for the ingress rules (no tunnels are run and no requests are actually sent). It’s helpful for making sure you’re routing the right URLs to the right services!

Per-rule configuration

Whenever cloudflared gets a request from the internet, it proxies that request to the matching local service on your origin. Different services might need different configurations for this request; for example, you might want to tweak the timeout or HTTP headers for a certain origin. You can set a default configuration for all your local services, and then override it for specific ones, e.g.

ingress:
  # Set configuration for all services
  originRequest:
    connectTimeout: 30s
 # This service inherits all the default (root-level) configuration
 - hostname: example.com
   service: https://localhost:8000
 # This service overrides the default configuration
 - service: https://localhost:8001
   originRequest:
     connectTimeout: 10s
     disableChunkedEncoding: true

For a full list of configuration options, check out the docs.

What’s next?

We really hope this makes Argo Tunnel an even easier way to deploy services onto the Internet. If you have any questions, file an issue on our GitHub. Happy developing!

Argo Tunnels that live forever

Post Syndicated from Sam Rhea original https://blog.cloudflare.com/argo-tunnels-that-live-forever/

Argo Tunnels that live forever

Cloudflare secures your origin servers by proxying requests to your DNS records through our anycast network and to the external IP of your origin. However, external IP addresses can provide attackers with a path around Cloudflare security if they discover those destinations.

Argo Tunnels that live forever

We launched Argo Tunnel as a secure way to connect your origin to Cloudflare without a publicly routable IP address. With Tunnel, you don’t send traffic to an external IP. Instead, a lightweight daemon runs in your infrastructure and creates outbound-only connections to Cloudflare’s edge. With Argo Tunnel, you can quickly deploy infrastructure in a Zero Trust model by ensuring all requests to your resources pass through Cloudflare’s security filters.

Argo Tunnels that live forever

Originally, your Argo Tunnel connection corresponded to a DNS record in your account. Requests to that hostname hit Cloudflare’s network first and our edge sends those requests over the Argo Tunnel to your origin. Since these connections are outbound-only, you no longer need to poke holes in your infrastructure’s firewall. Your origins can serve traffic through Cloudflare without being vulnerable to attacks that bypass Cloudflare.

However, fitting an outbound-only connection into a reverse proxy creates some ergonomic and stability hurdles. The original Argo Tunnel architecture attempted to both manage DNS records and create connections. When connections became disrupted, Argo Tunnel would recreate the entire deployment. Additionally, Argo Tunnel connections could not be treated like regular origin servers in Cloudflare’s control plane and had to be managed directly from the server-side software.

Today, we’re introducing a new architecture that treats Argo Tunnel connections like a true origin server without the risk of exposure to the rest of the Internet. Now, when you create a Tunnel connection, you can point DNS records for any hostname in your account, or load balancer pools, to that connection from the Cloudflare dashboard. You can also run Argo Tunnel connections without the need for leaving certificates and service tokens on your servers.

Keeping persistent objects persistent

Argo Tunnel has objects that tend to stay persistent (DNS records) and objects that deliberately change and recreate (connections from `cloudflared` to Cloudflare). Argo Tunnel previously conflated the two categories, which led to some issues.

The edge vs. the control plane

Cloudflare as a whole consists of two components: the edge network and the control plane that manages the configuration of that network.

The data centers in 200 cities around the world that proxy traffic to your origin make up the edge network. These data centers are highly available and, thanks to Anycast IP routing, can gracefully handle traffic if one or more data centers go offline.

When you make a change to something in Cloudflare (whether via the UI in Cloudflare’s dashboard, or the API) our control plane receives it, authenticates it, and then pushes it to our edge.

If the control plane goes down, the edge should not be degraded – traffic will continue to be served using the most recent configuration. At launch, Argo Tunnel muddled the two in some places, which meant that control plane issues could become edge issues for Tunnel users.

Starting every Tunnel from scratch

Regardless of whether a Tunnel is connecting for the first time or the 100th, the operation repeated a series of high-level steps in the original architecture:

  1. cloudflared connects to an Argo Tunnel service running in Cloudflare’s control plane. That service registers your Tunnel and its connections.
  2. cloudflared creates a public DNS record for your hostname which points to a randomly generated CNAME record for load balanced Tunnels or an IPv6 for traditional Tunnels. The ephemeral CNAME record represents your Tunnel.
  3. The control plane then tells Cloudflare’s edge about these DNS entries and where the CNAME or IP address should send traffic. Traffic can now be routed to cloudflared.
  4. If the Tunnel disconnects, for any reason, the Argo Tunnel service unregistered the Tunnel and deleted the DNS record.

The last step is an issue. In most cases, you create an Argo Tunnel for a service meant to run indefinitely. The DNS record should stay persistent – it’s an app that you manage that should not change. However, a simple restart or disconnection meant that cloudflared had to follow every step and start itself from scratch. If any of those upstream services were degraded, the Tunnel would fail to reconnect.

This model also introduces other shortcomings. You cannot gracefully change the DNS record of a Tunnel; instead, you had to stop cloudflared and rerun the service. Visibility was limited. Load balancing introduced complications with how origins were counted.

Phase 1: Improving stability

The team started by reducing the impact of those dependencies. Over the last year, Argo Tunnel has quietly replaced single points of failure with distributed systems that are more fault tolerant.

Tunnels now live longer. Argo Tunnel has migrated to Cloudflare’s Unimog platform, which has increased the average life of a connection from minutes to days. When connections live longer, they restart less, and are then subject to fewer upstream hiccups.

Additionally, some Tunnels no longer need to follow the entire creation flow. If your Tunnel reconnects, we opportunistically try to reestablish it with the records already at our edge.

These changes have dramatically improved the stability of Argo Tunnel as a platform, but still left a couple of core problems: Tunnel reconnections were treated like new connections and managing those connections added friction.

Phase 2: Named Tunnels that outlive connections

Starting today, Argo Tunnel’s architecture distinguishes between the persistent objects (DNS records, cloudflared) from the ephemeral objects (the connections). To do that, this release introduces the concept of a permanent name that you assign to a Tunnel.

In the old model, cloudflaredcreated both the DNS record entries and established the connections from the server to Cloudflare’s network. DNS records became tied to those connections and could not be changed. Even worse, each time cloudflared restarted, we treated it like a new Tunnel and had to propagate this information into DNS and Load Balancer systems. If those had delays, the restart could become an outage.

Argo Tunnels that live forever

Today’s release separates DNS creation from connection creation to make tunnels more stable and more simple to manage. In this model, you can use `cloudflared` to create an Argo Tunnel that has a persistent, stable name, that can be entirely unrelated to the hostname.

Once created, you can point DNS records in your account to a stable subdomain that relies on a UUID tied to that persistent name. Since the name and UUID do not change, your DNS record never needs to be cleaned up or recreated when Argo Tunnel restarts. In the event of a restart, the enrolled instance of cloudflared connects back to that UUID address.

Argo Tunnels that live forever

You can also treat named Argo Tunnels like origin servers in this architecture – except these origins can only be connected to via a DNS record in your account. You can delete a DNS record and create a new one that points to the UUID address and traffic will be served – all without touching cloudflared.

How it works

You can begin using this new architecture today with the following steps. First, you’ll need to upgrade to the latest version of cloudflared.

1. Login to Cloudflare from `cloudflared`

Run cloudflared tunnel login and authenticate to your Cloudflare account. This step will generate a cert.pem file. That certificate contains a token that gives your instance of cloudflared the ability to create Named Tunnels in your account, as well as the ability to eventually point DNS records to them.

Argo Tunnels that live forever

2. Create your Tunnel

You can now create a Tunnel that has a persistent name. Run cloudflared tunnel create <name> to do so. The name does not have to be a hostname. For example, you can assign a name that represents the application, the particular server, or the cloud environment where it runs.

cloudflared will create a Tunnel with the name that you give it and a UUID. This name will be associated with your account. Only DNS records in your account will proxy traffic to the connection. Additionally, the name will not be removed unless you actively delete it. The connections can stop and restart and will use the same name and UUID.

Argo Tunnels that live forever

Creating a named Tunnel also generates a credentials file that is distinct from the cert.pem issued during the login. You only need the credentials file to run the Tunnel. If you do not want to create additional named Tunnels or DNS records from cloudflared, you can delete the cert.pem file to avoid leaving API tokens and certificates in your environment.

3. Configure Tunnel details

Configure your instance of cloudflared, including the URL that cloudflared will proxy traffic to in the configuration file. Alternatively, you can run the Tunnel in an ad hoc mode from the command line using the steps below.

4. Run your Tunnel

You can begin running the Tunnel with the command, cloudflared tunnel run <name> or cloudflared tunnel run <UUID> and it will start proxying traffic. If you are running the Tunnel without the cert.pem file and only the credentials file, you must use cloudflared tunnel run <UUID>.

Argo Tunnels that live forever

5. Send traffic to your Tunnel

You can now decide how to send traffic to this persistent Tunnel. If you want to create a long-lived DNS record in the Cloudflare dashboard, you can point it to the Tunnel UUID subdomain in the format UUID.cfargotunnel.com. You can do the same in the Cloudflare Load Balancer panel to add this object to a load balanced pool where it will be treated as just one additional origin.

Argo Tunnels that live forever

Alternatively, you can continue to create DNS records from cloudflared. Run the following command, cloudflared tunnel route dns <name> <hostname> or cloudflared tunnel route dns <UUID> <hostname> to associate the DNS record with the Tunnel address. You will only be able to create a DNS record from cloudflared for the zone name you selected when authenticating. Unlike the previous architecture, this DNS record will not be deleted if the Tunnel disconnects.

When this instance of cloudflared restarts, the name, UUID, and DNS record will not need to be recreated. The connection will reestablish and begin serving traffic.

[Optional] Check what Tunnels exist

You can also use this architecture to see your active Tunnels. Run cloudflared tunnel list to view the Tunnels created and their connection status. You can delete Tunnels, as well, by running cloudflared tunnel delete <name> or cloudflare tunnel delete <UUID>. To delete Tunnels, you do need the cert.pem file.

Argo Tunnels that live forever

Credential and cert management

Once you have created a named Tunnel, you no longer need the cert.pem file to run that Tunnel and connect it to Cloudflare’s network. If you’re running the tunnel on a remote server or in a container, you can copy the credential file without sharing cert.pem outside your computer.

Similarly, if you want to let another person on your team run the Tunnel, you can send them the credentials file without sharing the cert.pem file as well. The cert.pem file is still required to create additional Tunnels, list existing tunnels, manage DNS records, or delete Tunnels.

The credentials file contains a secret scoped to the specific Tunnel UUID which establishes a connection from cloudflared to Cloudflare’s network. cloudflared operates like a client and establishes a TLS connection from your infrastructure to Cloudflare’s edge.

What’s next?

The new Argo Tunnel architecture is available today. You’ll need cloudflared version 2020.9.3 or later to begin using these features. The latest version of cloudflared is backwards compatible with the legacy model of Argo Tunnel. Additional documentation is available here.

How Argo Tunnel engineering uses Argo Tunnel

Post Syndicated from Chung-Ting Huang original https://blog.cloudflare.com/how-argo-tunnel-engineering-uses-argo-tunnel/

How Argo Tunnel engineering uses Argo Tunnel

Whether you are managing a fleet of machines or sharing a private site from your localhost, Argo Tunnel is here to help. On the Argo Tunnel team we help make origins accessible from the Internet in a secure and seamless manner. We also care deeply about productivity and developer experience for the team, so naturally we want to make sure we have a development environment that is reliable, easy to set up and fast to iterate on.

A brief history of our development environment (dev-stack)

Docker compose

When our development team was still small, we used a docker-compose file to orchestrate the services needed to develop Argo Tunnel. There was no native support for hot reload, so every time an engineer made a change, they had to restart their dev-stack.

We could hack around it to hot reload with docker-compose, but when that failed, we had to waste time debugging the internals of Docker. As the team grew, we realized we needed to invest in improving our dev stack.

At the same time Cloudflare was in the process of migrating from Marathon to kubernetes (k8s). We set out to find a tool that could detect changes in source code and automatically upgrade pods with new images.

Skaffold + Minikube

Initially Skaffold seemed to match the criteria. It watches for change in source code, builds new images and deploys applications onto any k8s. Following Skaffold’s tutorial, we picked minikube as the local k8s, but together they didn’t meet our expectations. Port forwarding wasn’t stable, we got frequent connections refused or timeout.

In addition, iteration time didn’t improve, because spinning up minikube takes a long time and it doesn’t use the host’s docker registry and so it can’t take advantage of caching. At this point we considered reverting back to using docker compose, but the k8s ecosystem is booming, so we did some more research.

Tilt + Docker for mac k8s

Eventually we found a great blog post from Tilt comparing different options for local k8s, and they seem to be solving the exact problem we are having. Tilt is a tool that makes local development on k8s easier. It detects changes in local sources and updates your deployment accordingly.

In addition, it supports live updates without having to rebuild containers, a process that used to take around 20 minutes. With live updates, we can copy the newest source into the container, run cargo build within the container, and restart the service without building a new image. Following Tilt’s blog post, we switched to Docker for Mac’s built-in k8s. Combining Tilt and Docker for Mac k8s, we finally have a development environment that meets our needs.

Rust services that could take 20 minutes to rebuild now take less than a minute.

Collaborating with a distributed team

We reached a much happier state with our dev-stack, but one problem remained: we needed a way to share it. As our teams became distributed with people in Austin, Lisbon and Seattle, we needed better ways to help each other.

One day, I was helping our newest member understand an error observed in cloudflared, Argo Tunnel’s command line interface (CLI) client. I knew the error could either originate from the backend service or a mock API gateway service, but I couldn’t tell for sure without looking at logs.

To get them, I had to ask our new teammate to manually send me the logs of the two services. By the time I discovered the source of the error, reviewed the deployment manifest, and determined the error was caused by a secret set as an empty string, two full hours had elapsed!

I could have solved this in minutes if I had remote access to her development environment. That’s exactly what Argo Tunnel can do! Argo Tunnel provides remote access to development environments by creating secure outbound-only connections to Cloudflare’s edge network from a resource exposing it to the Internet. That model helps protect servers and resources from being vulnerable to attack by an exposed IP address.

I can use Argo Tunnel to expose a remote dev environment, but the information stored is sensitive. Once exposed, we needed a way to prevent users from reaching it unless they are an authenticated member of my team. Cloudflare Access solves that challenge. Access sits in front of the hostname powered by Argo Tunnel and checks for identity on every request. I can combine both services to share the dev-stack details with the rest of the team in a secure deployment.

The built-in k8s dashboard gives a great overview of the dev-stack, with the list of pods, deployments, services, config maps, secrets, etc. It also allows us to inspect pod logs and exec into a container. By default, it is secured by a token that changes every time the service restarts. To avoid the hassle of distributing the service token to everyone on the team, we wrote a simple reverse proxy that injects the service token in the authorization header before forwarding requests to the dashboard service.

Then we run Argo Tunnel as a sidecar to this reverse proxy, so it is accessible from the Internet. Finally, to make sure no random person can see our dashboard, we put an Access policy that only allows team members to access the hostname.

The request flow is eyeball -> Access -> Argo Tunnel -> reverse proxy -> dashboard service

How Argo Tunnel engineering uses Argo Tunnel

Working example

Your team can use the same model to develop remotely. Here’s how to get started.

  1. Start a local k8s cluster. https://docs.tilt.dev/choosing_clusters.html offers great advice in choosing a local cluster based on your OS and experience with k8s
How Argo Tunnel engineering uses Argo Tunnel

2. Enable dashboard service:

How Argo Tunnel engineering uses Argo Tunnel

3. Create a reverse proxy that will inject the service token of the kubernetes-dashboard service account in the Authorization header before forwarding requests to kubernetes dashboard service

package main
 
import (
   "crypto/tls"
   "fmt"
   "net/http"
   "net/http/httputil"
   "net/url"
   "os"
)
 
func main() {
   config, err := loadConfigFromEnv()
   if err != nil {
       panic(err)
   }
   reverseProxy := httputil.NewSingleHostReverseProxy(config.proxyURL)
   // The default Director builds the request URL. We want our custom Director to add Authorization, in
   // addition to building the URL
   singleHostDirector := reverseProxy.Director
   reverseProxy.Director = func(r *http.Request) {
       singleHostDirector(r)
       r.Header.Add("Authorization", fmt.Sprintf("Bearer %s", config.token))
       fmt.Println("request header", r.Header)
       fmt.Println("request host", r.Host)
       fmt.Println("request ULR", r.URL)
   }
   reverseProxy.Transport = &http.Transport{
       TLSClientConfig: &tls.Config{
           InsecureSkipVerify: true,
       },
   }
   server := http.Server{
       Addr:    config.listenAddr,
       Handler: reverseProxy,
   }
   server.ListenAndServe()
}
 
type config struct {
   listenAddr string
   proxyURL   *url.URL
   token      string
}
 
func loadConfigFromEnv() (*config, error) {
   listenAddr, err := requireEnv("LISTEN_ADDRESS")
   if err != nil {
       return nil, err
   }
   proxyURLStr, err := requireEnv("DASHBOARD_PROXY_URL")
   if err != nil {
       return nil, err
   }
   proxyURL, err := url.Parse(proxyURLStr)
   if err != nil {
       return nil, err
   }
   token, err := requireEnv("DASHBOARD_TOKEN")
   if err != nil {
       return nil, err
   }
   return &config{
       listenAddr: listenAddr,
       proxyURL:   proxyURL,
       token:      token,
   }, nil
}
 
func requireEnv(key string) (string, error) {
   result := os.Getenv(key)
   if result == "" {
       return "", fmt.Errorf("%v not provided", key)
   }
   return result, nil
}

4. Create an Argo Tunnel sidecar to expose this reverse proxy

apiVersion: apps/v1
kind: Deployment
metadata:
 name: dashboard-auth-proxy
 namespace: kubernetes-dashboard
 labels:
   app: dashboard-auth-proxy
spec:
 replicas: 1
 selector:
   matchLabels:
     app: dashboard-auth-proxy
 template:
   metadata:
     labels:
       app: dashboard-auth-proxy
   spec:
     containers:
       - name: dashboard-tunnel
         # Image from https://hub.docker.com/r/cloudflare/cloudflared
         image: cloudflare/cloudflared:2020.8.0
         command: ["cloudflared", "tunnel"]
         ports:
           - containerPort: 5000
         env:
           - name: TUNNEL_URL
             value: "http://localhost:8000"
           - name: NO_AUTOUPDATE
             value: "true"
           - name: TUNNEL_METRICS
             value: "localhost:5000"
       # dashboard-proxy is a proxy that injects the dashboard token into Authorization header before forwarding
       # the request to dashboard_proxy service
       - name: dashboard-auth-proxy
         image: dashboard-auth-proxy
         ports:
           - containerPort: 8000
         env:
           - name: LISTEN_ADDRESS
             value: localhost:8000
           - name: DASHBOARD_PROXY_URL
             value: https://kubernetes-dashboard
           - name: DASHBOARD_TOKEN
             valueFrom:
               secretKeyRef:
                 name: ${TOKEN_NAME}
                 key: token

5. Find out the URL to access your dashboard from Tilt’s UI

How Argo Tunnel engineering uses Argo Tunnel

6. Share the URL with your collaborators so they can access your dashboard anywhere they are through the tunnel!

How Argo Tunnel engineering uses Argo Tunnel

You can find the source code for the example in https://github.com/cloudflare/argo-tunnel-examples/tree/master/sharing-k8s-dashboard

If this sounds like a team you want to be on, we are hiring!