Where does sensitive data live? Who has access to that data? How do I know if that data has been improperly shared or leaked? These questions keep many IT and security administrators up at night. The goal of data loss prevention (DLP) is to give administrators the desired visibility and control over their sensitive data.
We shipped the general availability of DLP in September 2022, offering Cloudflare One customers better protection of their sensitive data. With DLP, customers can identify sensitive data in their corporate traffic, evaluate the intended destination of the data, and then allow or block it accordingly — with details logged as permitted by your privacy and sovereignty requirements. We began by offering customers predefined detections for identifier numbers (e.g. Social Security #s) and financial information (e.g. credit card #s). Since then, nearly every customer has asked:
“When can I build my own detections?”
Most organizations care about credit card numbers, which use standard patterns that are easily detectable. But the data patterns of intellectual property or trade secrets vary widely between industries and companies, so customers need a way to detect the loss of their unique data. This can include internal project names, unreleased product names, or unannounced partner names.
As of today, your organization can build custom detections to identify these types of sensitive data using Cloudflare One. That’s right, today you are able to build Custom DLP Profile using the same regular expression approach that is used in policy building across our platform.
How to use it
Cloudflare’s DLP is embedded in our secure web gateway (SWG) product, Cloudflare Gateway, which routes your corporate traffic through Cloudflare for fast, safe Internet browsing. As your traffic passes through Cloudflare, you can inspect that HTTP traffic for sensitive data and apply DLP policies.
Building DLP custom profiles follows the same intuitive approach you’ve come to expect from Cloudflare.
First, once within the Zero Trust dashboard, navigate to the DLP Profiles tab under Gateway:
Here you will find any available DLP profiles, either predefined or custom:
Select to Create Profile to begin a new one. After providing a name and description, select Add detection entry to add a custom regular expression. A regular expression, or regex, is a sequence of characters that specifies a search pattern in text, and is a standard way for administrators to achieve the flexibility and granularity they need in policy building.
Cloudflare Gateway currently supports regexes in HTTP policies using the Rust regex crate. For consistency, we used the same crate to offer custom DLP detections. For documentation on our regex support, see our documentation.
Regular expressions can be used to build custom PII detections of your choosing, such as email addresses, or to detect keywords for sensitive intellectual property.
Provide a name and a regex of your choosing. Every entry in a DLP profile is a new detection that you can scan for in your corporate traffic. Our documentation provides resources to help you create and test Rust regexes.
Below is an example of regex to detect a simple email address:
When you are done, you will see the entry in your profile. You can turn entries on and off in the Status field for easier testing.
The custom profile can then be applied to traffic using an HTTP policy, just like a predefined profile. Here both a predefined and custom profile are used in the same policy, blocking sensitive traffic to dlptest.com:
Our DLP roadmap
This is just the start of our DLP journey, and we aim to grow the product exponentially in the coming quarters. In Q4 we delivered:
Expanded Predefined DLP Profiles
Custom DLP Profiles
PDF scanning support
Upgraded file name logging
Over the next quarters, we will add a number of features, including:
Data at rest scanning with Cloudflare CASB
Minimum DLP match counts
Microsoft Sensitivity Label support
Exact Data Match (EDM)
Context analysis
Optical Character Recognition (OCR)
Even more predefined DLP detections
DLP analytics
Many more!
Each of these features will offer you new data visibility and control solutions, and we are excited to bring these features to customers very soon.
How do I get started?
DLP is part of Cloudflare One, our Zero Trust network-as-a-service platform that connects users to enterprise resources. Our GA blog announcement provides more detail about using Cloudflare One to onboard traffic to DLP.
Using async Rust libraries is usually easy. It’s just like using normal Rust code, with a little async or .await here and there. But writing your own async libraries can be hard. The first time I tried this, I got really confused by arcane, esoteric syntax like T: ?Unpin and Pin<&mut Self>. I had never seen these types before, and I didn’t understand what they were doing. Now that I understand them, I’ve written the explainer I wish I could have read back then. In this post, we’re gonna learn
What Futures are
What self-referential types are
Why they were unsafe
How Pin/Unpin made them safe
Using Pin/Unpin to write tricky nested futures
What are Futures?
A few years ago, I needed to write some code which would take some async function, run it and collect some metrics about it, e.g. how long it took to resolve. I wanted to write a type TimedWrapper that would work like this:
// Some async function, e.g. polling a URL with [https://docs.rs/reqwest]
// Remember, Rust functions do nothing until you .await them, so this isn't
// actually making a HTTP request yet.
let async_fn = reqwest::get("http://adamchalmers.com");

// Wrap the async function in my hypothetical wrapper.
let timed_async_fn = TimedWrapper::new(async_fn);

// Call the async function, which will send a HTTP request and time it.
let (resp, time) = timed_async_fn.await;
println!("Got a HTTP {} in {}ms", resp.unwrap().status(), time.as_millis())
I like this interface, it’s simple and should be easy for the other programmers on my team to use. OK, let’s implement it! I know that, under the hood, Rust’s async functions are just regular functions that return aFuture. The Future trait is pretty simple. It just means a type which:
Can be polled
When it’s polled, it might return “Pending” or “Ready”
If it’s pending, you should poll it again later
If it’s ready, it responds with a value. We call this “resolving”.
Here’s a really easy example of implementing a Future. Let’s make a Future that returns a random u16.
use std::{future::Future, pin::Pin, task::Context}

/// A future which returns a random number when it resolves.
#[derive(Default)]
struct RandFuture;

impl Future for RandFuture {
	// Every future has to specify what type of value it returns when it resolves.
	// This particular future will return a u16.
	type Output = u16;

	// The `Future` trait has only one method, named "poll".
fn poll(self: Pin<&mut Self>, _cx: &mut Context) -> Poll<Self::Output  {
		Poll::ready(rand::random())
	}
}
Not too hard! I think we’re ready to implement TimedWrapper.
OK, so a TimedWrapper is generic over a type Fut, which must be a Future. And it will store a future of that type as a field. It’ll also have a start field which will record when it first was first polled. Let’s write a constructor:
Nothing too complicated here. The new function takes a future and wraps it in the TimedWrapper. Of course, we have to set start to None, because it hasn’t been polled yet. So, let’s implement the poll method, which is the only thing we need to implement Future and make it .awaitable.
impl<Fut: Future> Future for TimedWrapper<Fut> {
	// This future will output a pair of values:
	// 1. The value from the inner future
	// 2. How long it took for the inner future to resolve
	type Output = (Fut::Output, Duration);

	fn poll(self: Pin<&mut Self>, cx: &mut Context) -> Poll<Self::Output> {
		// Call the inner poll, measuring how long it took.
		let start = self.start.get_or_insert_with(Instant::now);
		let inner_poll = self.future.poll(cx);
		let elapsed = self.elapsed();

		match inner_poll {
			// The inner future needs more time, so this future needs more time too
			Poll::Pending => Poll::Pending,
			// Success!
			Poll::Ready(output) => Poll::Ready((output, elapsed)),
		}
	}
}
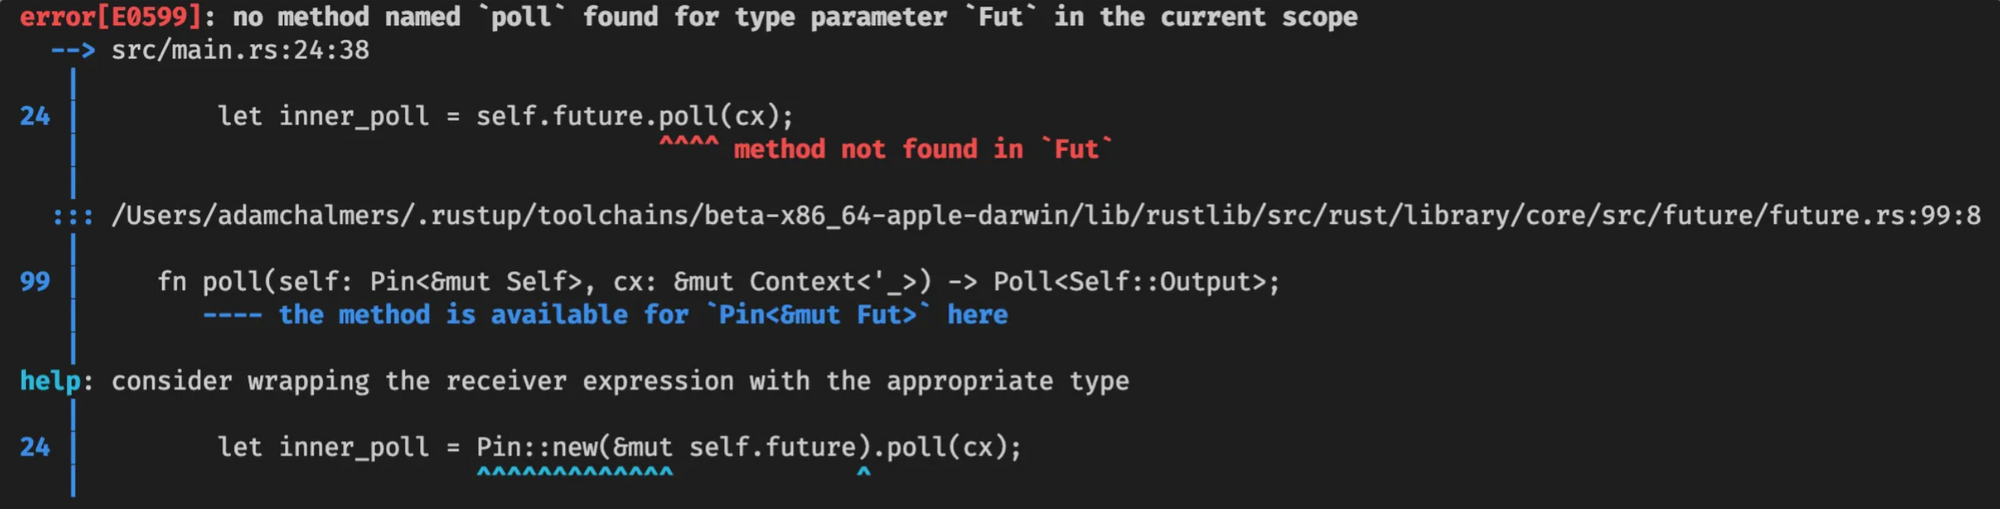
OK, that wasn’t too hard. There’s just one problem: this doesn’t work.
So, the Rust compiler reports an error on self.future.poll(cx), which is “no method named poll found for type parameter Fut in the current scope”. This is confusing, because we know Fut is a Future, so surely it has a poll method? OK, but Rust continues: Fut doesn’t have a poll method, but Pin<&mut Fut> has one. What is this weird type?
Well, we know that methods have a “receiver”, which is some way it can access self. The receiver might be self, &self or &mut self, which mean “take ownership of self,” “borrow self,” and “mutably borrow self” respectively. So this is just a new, unfamiliar kind of receiver. Rust is complaining because we have Fut and we really need a Pin<&mut Fut>. At this point I have two questions:
What is Pin?
If I have a T value, how do I get a Pin<&mut T>?
The rest of this post is going to be answering those questions. I’ll explain some problems in Rust that could lead to unsafe code, and why Pin safely solves them.
Self-reference is unsafe
Pin exists to solve a very specific problem: self-referential datatypes, i.e. data structures which have pointers into themselves. For example, a binary search tree might have self-referential pointers, which point to other nodes in the same struct.
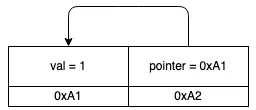
Self-referential types can be really useful, but they’re also hard to make memory-safe. To see why, let’s use this example type with two fields, an i32 called val and a pointer to an i32 called pointer.
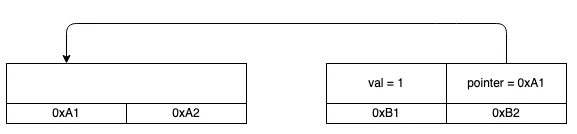
So far, everything is OK. The pointer field points to the val field in memory address A, which contains a valid i32. All the pointers are valid, i.e. they point to memory that does indeed encode a value of the right type (in this case, an i32). But the Rust compiler often moves values around in memory. For example, if we pass this struct into another function, it might get moved to a different memory address. Or we might Box it and put it on the heap. Or if this struct was in a Vec<MyStruct>, and we pushed more values in, the Vec might outgrow its capacity and need to move its elements into a new, larger buffer.
When we move it, the struct’s fields change their address, but not their value. So the pointer field is still pointing at address A, but address A now doesn’t have a valid i32. The data that was there was moved to address B, and some other value might have been written there instead! So now the pointer is invalid. This is bad — at best, invalid pointers cause crashes, at worst they cause hackable vulnerabilities. We only want to allow memory-unsafe behaviour in unsafe blocks, and we should be very careful to document this type and tell users to update the pointers after moves.
Unpin and !Unpin
To recap, all Rust types fall into two categories.
Types that are safe to move around in memory. This is the default, the norm. For example, this includes primitives like numbers, strings, bools, as well as structs or enums entirely made of them. Most types fall into this category!
Types in category (1) are totally safe to move around in memory. You won’t invalidate any pointers by moving them around. But if you move a type in (2), then you invalidate pointers and can get undefined behaviour, as we saw before. In earlier versions of Rust, you had to be really careful using these types to not move them, or if you moved them, to use unsafe and update all the pointers. But since Rust 1.33, the compiler can automatically figure out which category any type is in, and make sure you only use it safely.
Any type in (1) implements a special auto trait calledUnpin. Weird name, but its meaning will become clear soon. Again, most “normal” types implement Unpin, and because it’s an auto trait (like Send or Sync or Sized1), so you don’t have to worry about implementing it yourself. If you’re unsure if a type can be safely moved, just check it on docs.rs and see if it impls Unpin!
Types in (2) are creatively named !Unpin (the ! in a trait means “does not implement”). To use these types safely, we can’t use regular pointers for self-reference. Instead, we use special pointers that “pin” their values into place, ensuring they can’t be moved. This is exactly what thePin type does.
Pin wraps a pointer and stops its value from moving. The only exception is if the value impls Unpin — then we know it’s safe to move. Voila! Now we can write self-referential structs safely! This is really important, because as discussed above, many Futures are self-referential, and we need them for async/await.
Using Pin
So now we understand why Pin exists, and why our Future poll method has a pinned &mut self to self instead of a regular &mut self. So let’s get back to the problem we had before: I need a pinned reference to the inner future. More generally: given a pinned struct, how do we access its fields?
The solution is to write helper functions which give you references to the fields. These references might be normal Rust references like &mut, or they might also be pinned. You can choose whichever one you need. This is called projection: if you have a pinned struct, you can write a projection method that gives you access to all its fields.
Projecting is really just getting data into and out of Pins. For example, we get the start: Option<Duration> field from the Pin<&mut self>, and we need to put the future: Fut into a Pin so we can call its poll method). If you read thePin methods you’ll see this is always safe if it points to an Unpin value, but requires unsafe otherwise.
// Putting data into Pin
pub        fn new          <P: Deref<Target:Unpin>>(pointer: P) -> Pin<P>;
pub unsafe fn new_unchecked<P>                     (pointer: P) -> Pin<P>;

// Getting data from Pin
pub        fn into_inner          <P: Deref<Target: Unpin>>(pin: Pin<P>) -> P;
pub unsafe fn into_inner_unchecked<P>                      (pin: Pin<P>) -> P;
I know unsafe can be a bit scary, but it’s OK to write unsafe code! I think of unsafe as the compiler saying “hey, I can’t tell if this code follows the rules here, so I’m going to rely on you to check for me.” The Rust compiler does so much work for us, it’s only fair that we do some of the work every now and then. If you want to learn how to write your own projection methods, I can highly recommend this fasterthanli.me blog post on the topic. But we’re going to take a little shortcut.
Using pin-project instead
So, OK, look, it’s time for a confession: I don’t like using unsafe. I know I just explained why it’s OK, but still, given the option, I would rather not.
I didn’t start writing Rust because I wanted to carefully think about the consequences of my actions, damnit, I just want to go fast and not break things. Luckily, someone sympathized with me and made a crate which generates totally safe projections! It’s called pin-project and it’s awesome. All we need to do is change our definition:
#[pin_project::pin_project] // This generates a `project` method
pub struct TimedWrapper<Fut: Future> {
	// For each field, we need to choose whether `project` returns an
	// unpinned (&mut T) or pinned (Pin<&mut T>) reference to the field.
	// By default, it assumes unpinned:
	start: Option<Instant>,
	// Opt into pinned references with this attribute:
	#[pin]
	future: Fut,
}
For each field, you have to choose whether its projection should be pinned or not. By default, you should use a normal reference, just because they’re easier and simpler. But if you know you need a pinned reference — for example, because you want to call .poll(), whose receiver is Pin<&mut Self> — then you can do that with #[pin].
Now we can finally poll the inner future!
fn poll(self: Pin<&mut Self>, cx: &mut Context) -> Poll<Self::Output> {
	// This returns a type with all the same fields, with all the same types,
	// except that the fields defined with #[pin] will be pinned.
	let mut this = self.project();

    // Call the inner poll, measuring how long it took.
	let start = this.start.get_or_insert_with(Instant::now);
	let inner_poll = this.future.as_mut().poll(cx);
	let elapsed = start.elapsed();

	match inner_poll {
		// The inner future needs more time, so this future needs more time too
		Poll::Pending => Poll::Pending,
		// Success!
		Poll::Ready(output) => Poll::Ready((output, elapsed)),
	}
}
Finally, our goal is complete — and we did it all without any unsafe code.
Summary
If a Rust type has self-referential pointers, it can’t be moved safely. After all, moving doesn’t update the pointers, so they’ll still be pointing at the old memory address, so they’re now invalid. Rust can automatically tell which types are safe to move (and will auto impl the Unpin trait for them). If you have a Pin-ned pointer to some data, Rust can guarantee that nothing unsafe will happen (if it’s safe to move, you can move it, if it’s unsafe to move, then you can’t). This is important because many Future types are self-referential, so we need Pin to safely poll a Future. You probably won’t have to poll a future yourself (just use async/await instead), but if you do, use the pin-project crate to simplify things.
I hope this helped — if you have any questions, please ask me on Twitter. And if you want to get paid to talk to me about Rust and networking protocols, my team at Cloudflare is hiring, so be sure to visit careers.cloudflare.com.
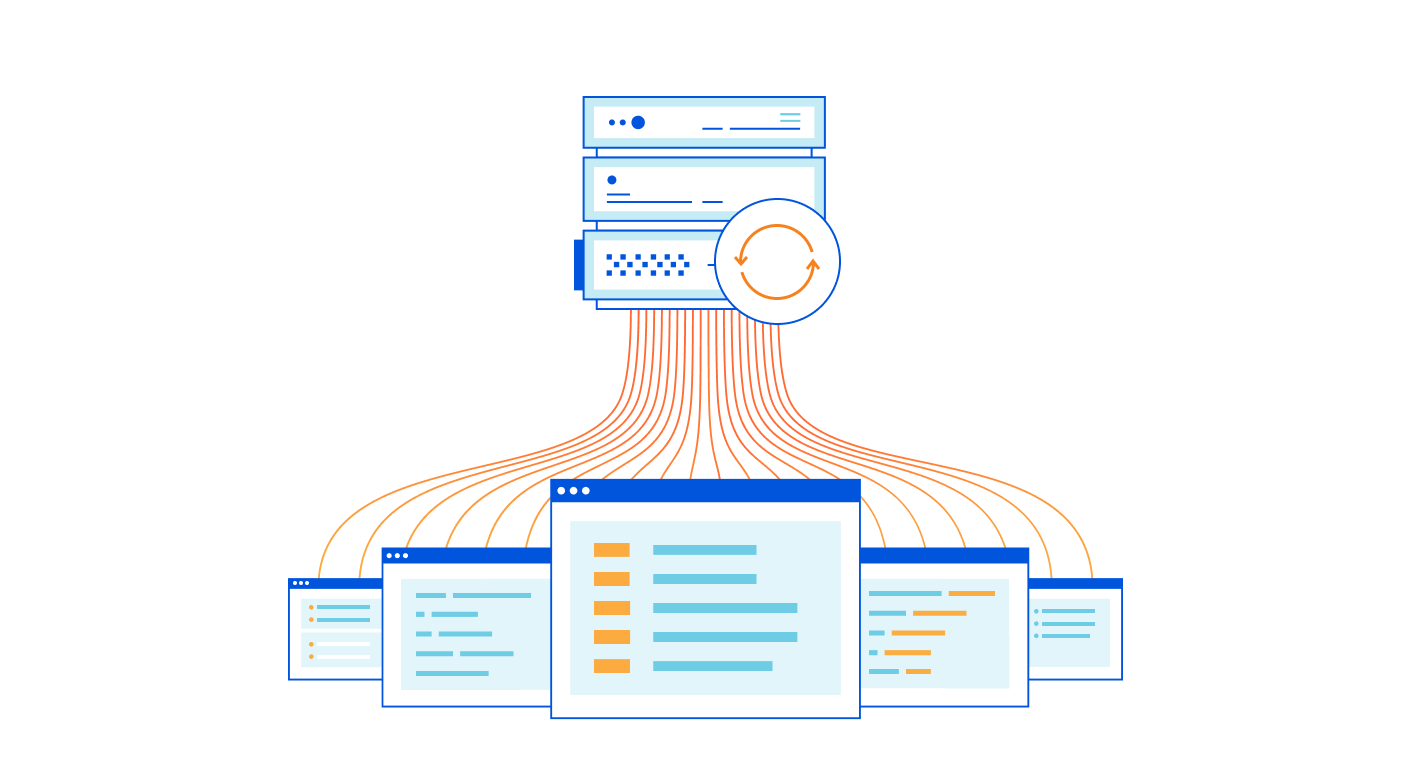
Route many different local services through many different URLs, with only one cloudflared
I work on the Argo Tunnel team, and we make a program called cloudflared, which lets you securely expose your web service to the Internet while ensuring that all its traffic goes through Cloudflare.
Say you have some local service (a website, an API, a TCP server, etc), and you want to securely expose it to the internet using Argo Tunnel. First, you run cloudflared, which establishes some long-lived TCP connections to the Cloudflare edge. Then, when Cloudflare receives a request for your chosen hostname, it proxies the request through those connections to cloudflared, which in turn proxies the request to your local service. This means anyone accessing your service has to go through Cloudflare, and Cloudflare can do caching, rewrite parts of the page, block attackers, or build Zero Trust rules to control who can reach your application (e.g. users with a @corp.com email). Previously, companies had to use VPNs or firewalls to achieve this, but Argo Tunnel aims to be more flexible, more secure, and more scalable than the alternatives.
Some of our larger customers have deployed hundreds of services with Argo Tunnel, but they’re consistently experiencing a pain point with these larger deployments. Each instance of cloudflared can only proxy a single service. This means if you want to put, say, 100 services on the internet, you’ll need 100 instances of cloudflaredrunning on your server. This is inefficient (because you’re using 100x as many system resources) and, even worse, it’s a pain to manage 100 long-lived services!
Today, we’re thrilled to announce our most-requested feature: you can now expose unlimited services using one cloudflared. Any customer can start using this today, at no extra cost, using the Named Tunnels we released a few months ago.
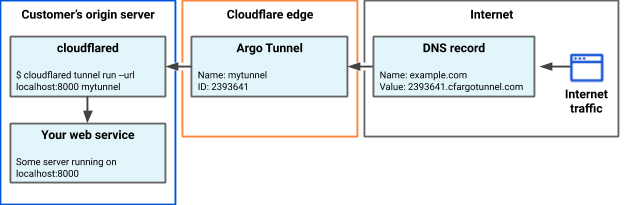
Named Tunnels
Earlier this year, we announced Named Tunnels—tunnels with immutables ID that you can run and stop as you please. You can route traffic into the tunnel by adding a DNS or Cloudflare Load Balancer record, and you can route traffic from the tunnel into your local services by running cloudflared.
You can create a tunnel by running $ cloudflared tunnel create my_tunnel_name. Once you’ve got a tunnel, you can use DNS records or Cloudflare Load Balancers to route traffic into the tunnel. Once traffic is routed into the tunnel, you can use our new ingress rules to map traffic to local services.
Map traffic with ingress rules
An ingress rule basically says “send traffic for this internet URL to this local service.” When you invoke cloudflared it’ll read these ingress rules from the configuration file. You write ingress rules under the ingresskey of your config file, like this:
$ cat ~/cloudflared_config.yaml

tunnel: my_tunnel_name
credentials-file: .cloudflared/e0000000-e650-4190-0000-19c97abb503b.json
ingress:
 # Rules map traffic from a hostname to a local service:
 - hostname: example.com
   service: https://localhost:8000
 # Rules can match the request's path to a regular expression:
 - hostname: static.example.com
   path: /images/*\.(jpg|png|gif)
   service: https://machine1.local:3000
 # Rules can match the request's hostname to a wildcard character:
 - hostname: "*.ssh.foo.com"
   service: ssh://localhost:2222
 # You can map traffic to the built-in “Hello World” test server:
 - hostname: foo.com
   service: hello_world
 # This “catch-all” rule doesn’t have a hostname/path, so it matches everything
 - service: http_status:404
This example maps traffic to three different local services. But cloudflaredcan map traffic to more than just addresses: it can respond with a given HTTP status (as in the last rule) or with the built-in Hello World test server (as in the second-last rule). See the docs for a full list of supported services.
You can match traffic using the hostname, a path regex, or both. If you don’t use any filters, the ingress rule will match everything (so if you have DNS records from different zones routing into the tunnel, the rule will match all their URLs). Traffic is matched to rules from top to bottom, so in this example, the last rule will match anything that wasn’t matched by an earlier rule. We actually require the last rule to match everything; otherwise, cloudflaredcould receive a request and not know what to respond with.
Testing your rules
To make sure all your rules are valid, you can run
$ cat ~/cloudflared_config_invalid.yaml

ingress:
 - hostname: example.com
   service: https://localhost:8000

$ cloudflared tunnel ingress validate
Validating rules from /usr/local/etc/cloudflared/config.yml
Validation failed: The last ingress rule must match all URLs (i.e. it should not have a hostname or path filter)
This will check that all your ingress rules use valid regexes and map to valid services, and it’ll ensure that your last rule (and only your last rule) matches all traffic. To make sure your ingress rules do what you expect them to do, you can run
$ cloudflared tunnel ingress rule https://static.example.com/images/dog.gif
Using rules from ~/cloudflared_config.yaml
Matched rule #2
        Hostname: static.example.com
        path: /images/*\.(jpg|png|gif)
This will check which rule matches the given URL, almost like a dry run for the ingress rules (no tunnels are run and no requests are actually sent). It’s helpful for making sure you’re routing the right URLs to the right services!
Per-rule configuration
Whenever cloudflaredgets a request from the internet, it proxies that request to the matching local service on your origin. Different services might need different configurations for this request; for example, you might want to tweak the timeout or HTTP headers for a certain origin. You can set a default configuration for all your local services, and then override it for specific ones, e.g.
ingress:
  # Set configuration for all services
  originRequest:
    connectTimeout: 30s
 # This service inherits all the default (root-level) configuration
 - hostname: example.com
   service: https://localhost:8000
 # This service overrides the default configuration
 - service: https://localhost:8001
   originRequest:
     connectTimeout: 10s
     disableChunkedEncoding: true
For a full list of configuration options, check out the docs.
What’s next?
We really hope this makes Argo Tunnel an even easier way to deploy services onto the Internet. If you have any questions, file an issue on our GitHub. Happy developing!
The collective thoughts of the interwebz
Manage Consent
To provide the best experiences, we use technologies like cookies to store and/or access device information. Consenting to these technologies will allow us to process data such as browsing behavior or unique IDs on this site. Not consenting or withdrawing consent, may adversely affect certain features and functions.
Functional
Always active
The technical storage or access is strictly necessary for the legitimate purpose of enabling the use of a specific service explicitly requested by the subscriber or user, or for the sole purpose of carrying out the transmission of a communication over an electronic communications network.
Preferences
The technical storage or access is necessary for the legitimate purpose of storing preferences that are not requested by the subscriber or user.
Statistics
The technical storage or access that is used exclusively for statistical purposes.The technical storage or access that is used exclusively for anonymous statistical purposes. Without a subpoena, voluntary compliance on the part of your Internet Service Provider, or additional records from a third party, information stored or retrieved for this purpose alone cannot usually be used to identify you.
Marketing
The technical storage or access is required to create user profiles to send advertising, or to track the user on a website or across several websites for similar marketing purposes.