Tag Archives: Cloudflare for Teams

An exposed apt signing key and how to improve apt security

Post Syndicated from Jeff Hiner original https://blog.cloudflare.com/dont-use-apt-key/

An exposed apt signing key and how to improve apt security

An exposed apt signing key and how to improve apt security

Recently, we received a bug bounty report regarding the GPG signing key used for pkg.cloudflareclient.com, the Linux package repository for our Cloudflare WARP products. The report stated that this private key had been exposed. We’ve since rotated this key and we are taking steps to ensure a similar problem can’t happen again. Before you read on, if you are a Linux user of Cloudflare WARP, please follow these instructions to rotate the Cloudflare GPG Public Key trusted by your package manager. This only affects WARP users who have installed WARP on Linux. It does not affect Cloudflare customers of any of our other products or WARP users on mobile devices.

But we also realized that the impact of an improperly secured private key can have consequences that extend beyond the scope of one third-party repository. The remainder of this blog shows how to improve the security of apt with third-party repositories.

The unexpected impact

At first, we thought that the exposed signing key could only be used by an attacker to forge packages distributed through our package repository. However, when reviewing impact for Debian and Ubuntu platforms we found that our instructions were outdated and insecure. In fact, we found the majority of Debian package repositories on the Internet were providing the same poor guidance: download the GPG key from a website and then either pipe it directly into apt-key or copy it into /etc/apt/trusted.gpg.d/. This method adds the key as a trusted root for software installation from any source. To see why this is a problem, we have to understand how apt downloads and verifies software packages.

How apt verifies packages

In the early days of Linux, package maintainers wanted to make sure users could trust that the software being installed on their machines came from a trusted source.

Apt has a list of places to pull packages from (sources) and a method to validate those sources (trusted public keys). Historically, the keys were stored in a single keyring file: /etc/apt/trusted.gpg. Later, as third party repositories became more common, apt could also look inside /etc/apt/trusted.gpg.d/ for individual key files.

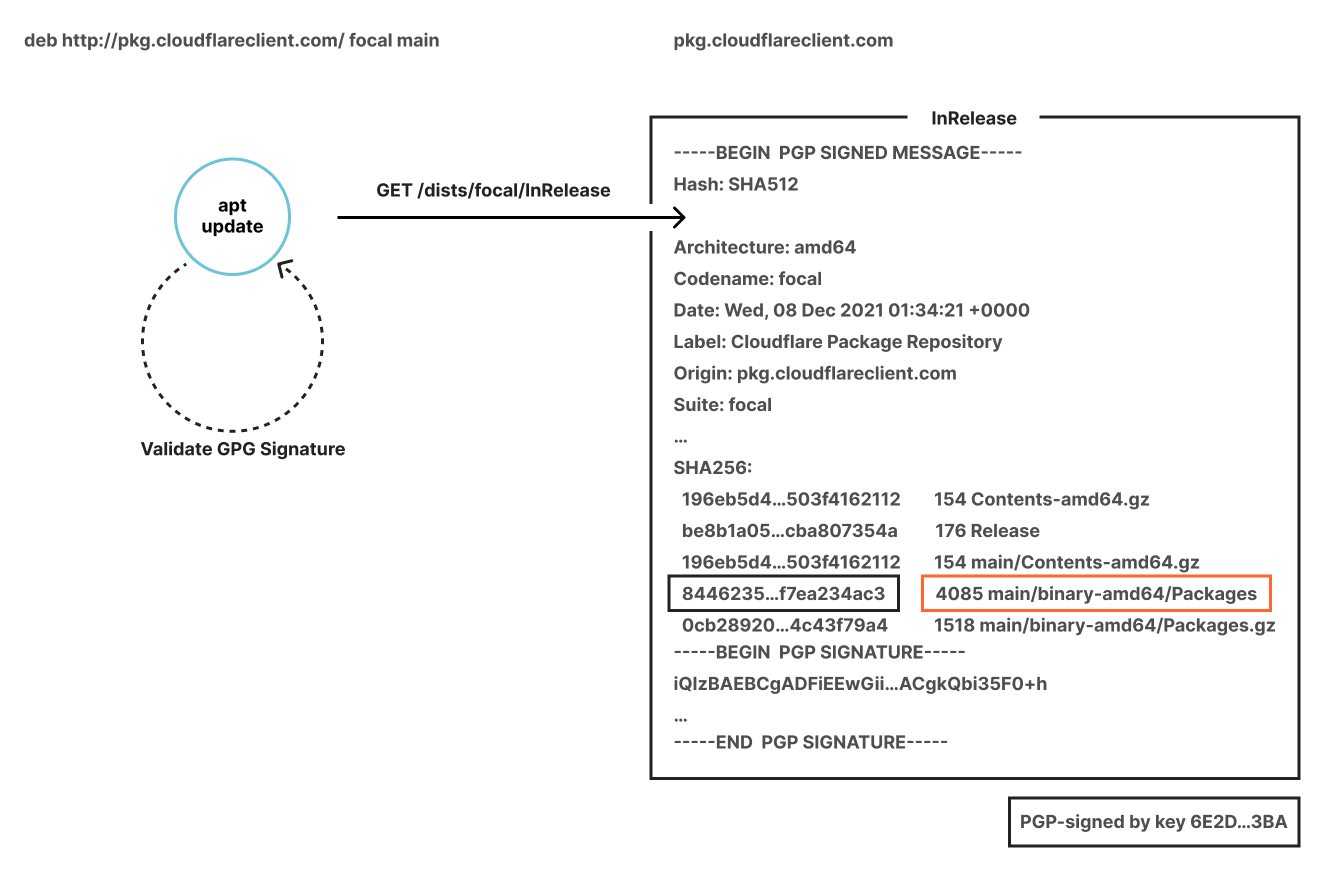
What happens when you run apt update? First, apt fetches a signed file called InRelease from each source. Some servers supply separate Release and signature files instead, but they serve the same purpose. InRelease is a file containing metadata that can be used to cryptographically validate every package in the repository. Critically, it is also signed by the repository owner’s private key. As part of the update process, apt verifies that the InRelease file has a valid signature, and that the signature was generated by a trusted root. If everything checks out, a local package cache is updated with the repository’s contents. This cache is directly used when installing packages. The chain of signed InRelease files and cryptographic hashes ensures that each downloaded package hasn’t been corrupted or tampered with along the way.
An exposed apt signing key and how to improve apt security

A typical third-party repository today

For most Ubuntu/Debian users today, this is what adding a third-party repository looks like in practice:

  1. Add a file in /etc/apt/sources.list.d/ telling apt where to look for packages.
  2. Add the gpg public key to /etc/apt/trusted.gpg.d/, probably via apt-key.

If apt-key is used in the second step, the command typically pops up a deprecation warning, telling you not to use apt-key. There’s a good reason: adding a key like this trusts it for any repository, not just the source from step one. This means if the private key associated with this new source is compromised, attackers can use it to bypass apt’s signature verification and install their own packages.

What would this type of attack look like? Assume you’ve got a stock Debian setup with a default sources list1:

deb http://deb.debian.org/debian/ bullseye main non-free contrib
deb http://security.debian.org/debian-security bullseye-security main contrib non-free

At some point you installed a trusted key that was later exposed, and the attacker has the private key. This key was added alongside a source pointing at https, assuming that even if the key is broken an attacker would have to break TLS encryption as well to install software via that route.

You’re enjoying a hot drink at your local cafe, where someone nefarious has managed to hack the router without your knowledge. They’re able to intercept http traffic and modify it without your knowledge. An auto-update script on your laptop runs apt update. The attacker pretends to be deb.debian.org, and because at least one source is configured to use http, the attacker doesn’t need to break https. They return a modified InRelease file signed with the compromised key, indicating that a newer update of the bash package is available. apt pulls the new package (again from the attacker) and installs it, as root. Now you’ve got a big problem2.

A better way

It seems the way most folks are told to set up third-party Debian repositories is wrong. What if you could tell apt to only trust that GPG key for a specific source? That, combined with the use of https, would significantly reduce the impact of a key compromise. As it turns out, there’s a way to do that! You’ll need to do two things:

  1. Make sure the key isn’t in /etc/apt/trusted.gpg or /etc/apt/trusted.gpg.d/ anymore. If the key is its own file, the easiest way to do this is to move it to /usr/share/keyrings/. Make sure the file is owned by root, and only root can write to it. This step is important, because it prevents apt from using this key to check all repositories in the sources list.
  2. Modify the sources file in /etc/apt/sources.list.d/ telling apt that this particular repository can be “signed by” a specific key. When you’re done, the line should look like this:

deb [signed-by=/usr/share/keyrings/cloudflare-client.gpg] https://pkg.cloudflareclient.com/ bullseye main

Some source lists contain other metadata indicating that the source is only valid for certain architectures. If that’s the case, just add a space in the middle, like so:

deb [amd64 signed-by=/usr/share/keyrings/cloudflare-client.gpg] https://pkg.cloudflareclient.com/ bullseye main

We’ve updated the instructions on our own repositories for the WARP Client and Cloudflare with this information, and we hope others will follow suit.

If you run apt-key list on your own machine, you’ll probably find several keys that are trusted far more than they should be. Now you know how to fix them!

For those running your own repository, now is a great time to review your installation instructions. If your instructions tell users to curl a public key file and pipe it straight into sudo apt-key, maybe there’s a safer way. While you’re in there, ensuring the package repository supports https is a great way to add an extra layer of security (and if you host your traffic via Cloudflare, it’s easy to set up, and free. You can follow this blog post to learn how to properly configure Cloudflare to cache Debian packages).


1RPM-based distros like Fedora, CentOS, and RHEL also use a common trusted GPG store to validate packages, but since they generally use https by default to fetch updates they aren’t vulnerable to this particular attack.
2The attack described above requires an active on-path network attacker. If you are using the WARP client or Cloudflare for Teams to tunnel your traffic to Cloudflare, your network traffic cannot be tampered with on local networks.


Secure how your servers connect to the Internet today

Post Syndicated from Sam Rhea original https://blog.cloudflare.com/secure-how-your-servers-connect-to-the-internet-today/

Secure how your servers connect to the Internet todaySecure how your servers connect to the Internet today

The vulnerability disclosed yesterday in the Java-based logging package, log4j, allows attackers to execute code on a remote server. We’ve updated Cloudflare’s WAF to defend your infrastructure against this 0-day attack. The attack also relies on exploiting servers that are allowed unfettered connectivity to the public Internet. To help solve that challenge, your team can deploy Cloudflare One today to filter and log how your infrastructure connects to any destination.

Securing traffic inbound and outbound

You can read about the vulnerability in more detail in our analysis published earlier today, but the attack starts when an attacker adds a specific string to input that the server logs. Today’s updates to Cloudflare’s WAF block that malicious string from being sent to your servers. We still strongly recommend that you patch your instances of log4j immediately to prevent lateral movement.

If the string has already been logged, the vulnerability compromises servers by tricking them into sending a request to a malicious LDAP server. The destination of the malicious server could be any arbitrary URL. Attackers who control that URL can then respond to the request with arbitrary code that the server can execute.

At the time of this blog, it does not appear any consistent patterns of malicious hostnames exist like those analyzed in the SUNBURST attack. However, any server or network with unrestricted connectivity to the public Internet is a risk for this specific vulnerability and others that rely on exploiting that open window.

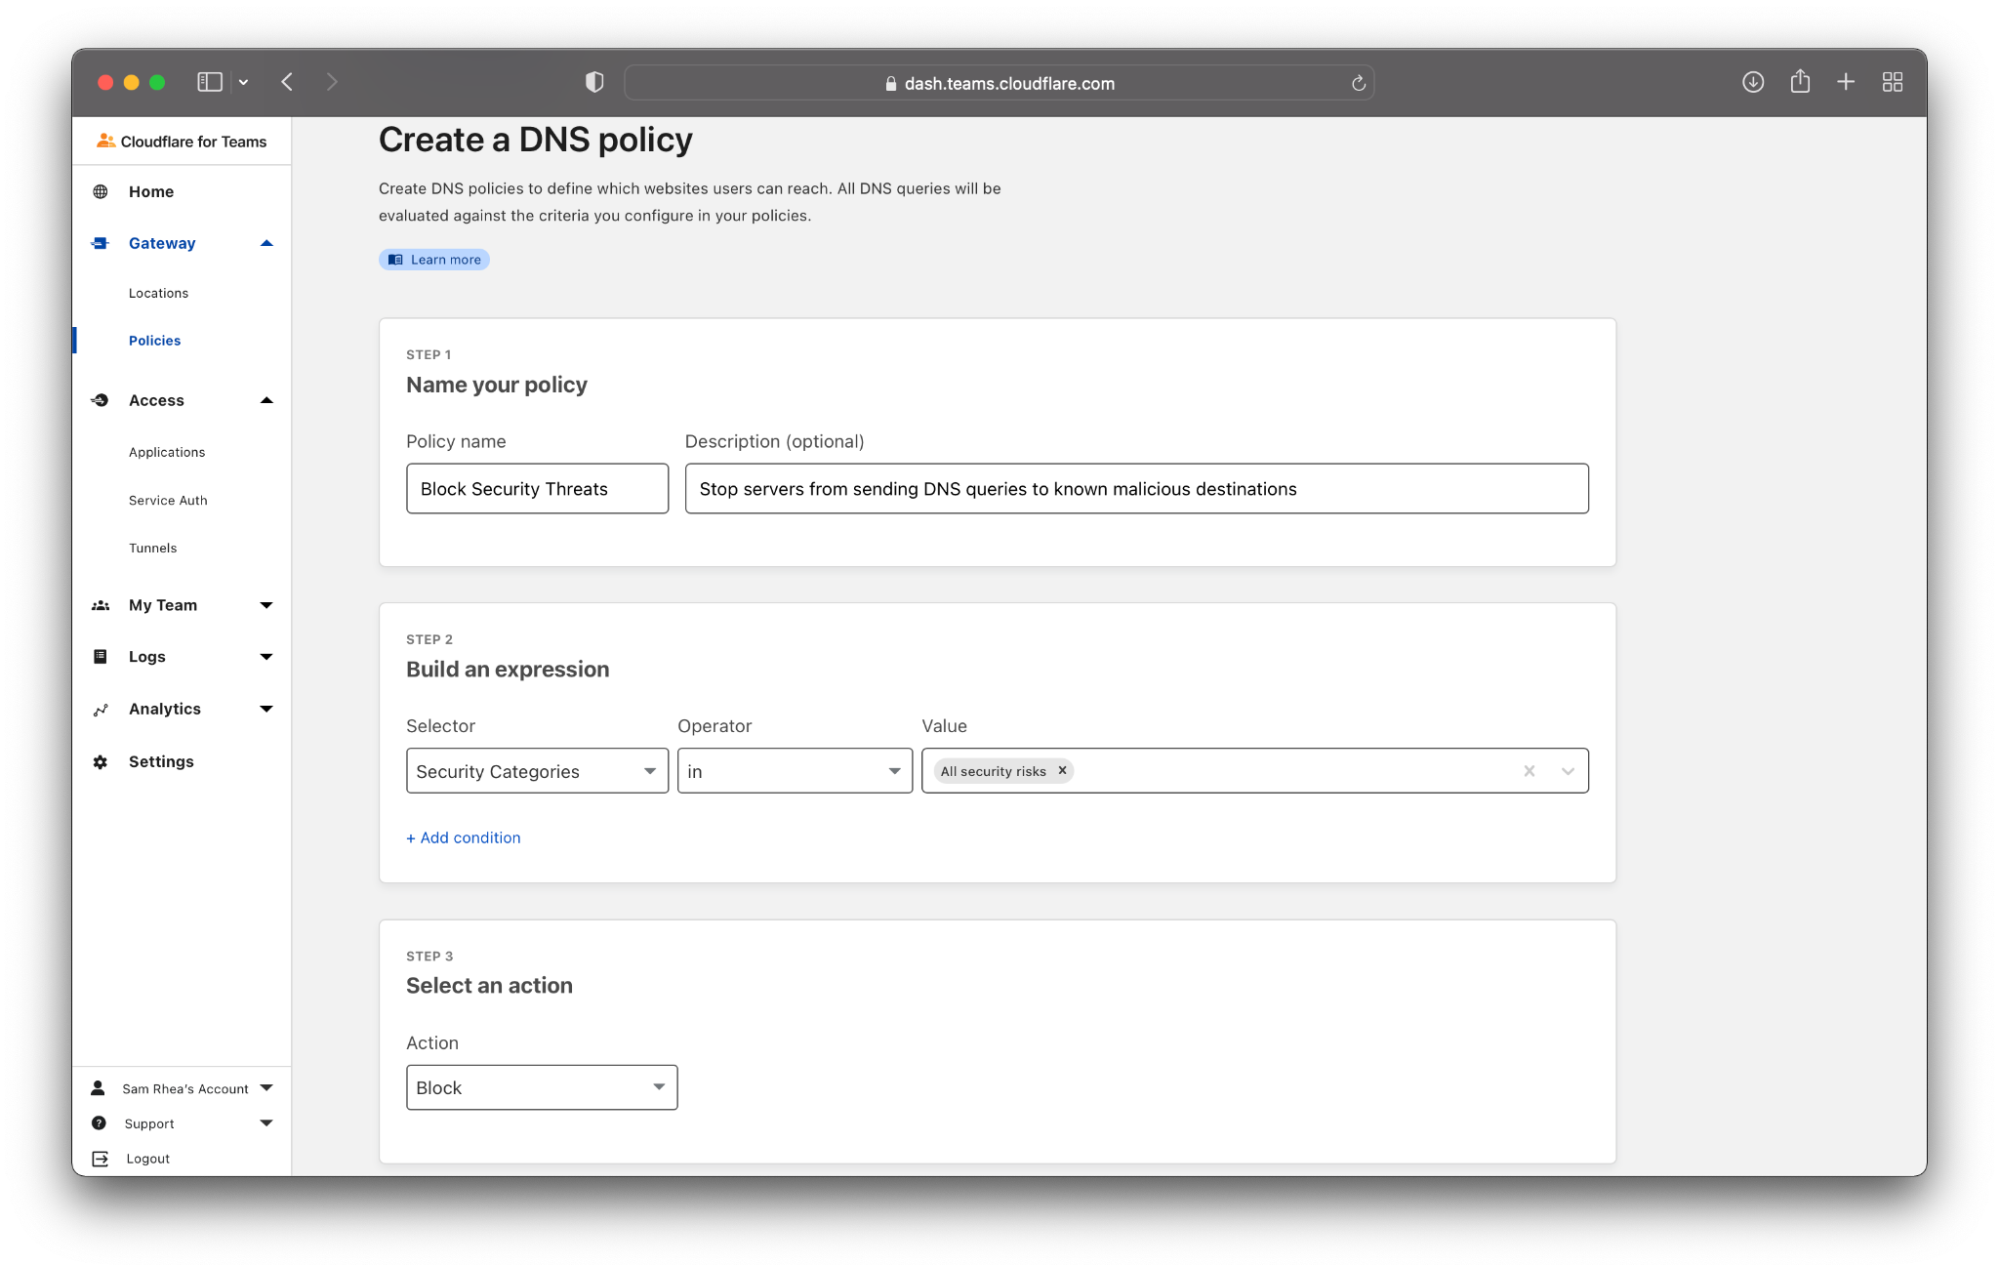
First, filter and log DNS queries with two-clicks

From what we’re observing in early reports, the vulnerability mostly relies on connectivity to IP addresses. Cloudflare’s network firewall, the second step in this blog, focuses on that level of security. However, your team can adopt a defense-in-depth strategy by deploying Cloudflare’s protective DNS resolver today to apply DNS filtering to add security and visibility in minutes to any servers that need to communicate out to the Internet.

If you configure Cloudflare Gateway as the DNS resolver for those servers, any DNS query they make to find the IP address of a given host, malicious or not, will be sent to a nearby Cloudflare data center first. Cloudflare runs the world’s fastest DNS resolver so that you don’t have to compromise performance for this level of added safety and logging. When that query arrives, Cloudflare’s network can then:

  • filter your DNS queries to block the resolution of queries made to known malicious destinations, and
  • log every query if you need to investigate and audit after potential events.
Secure how your servers connect to the Internet today

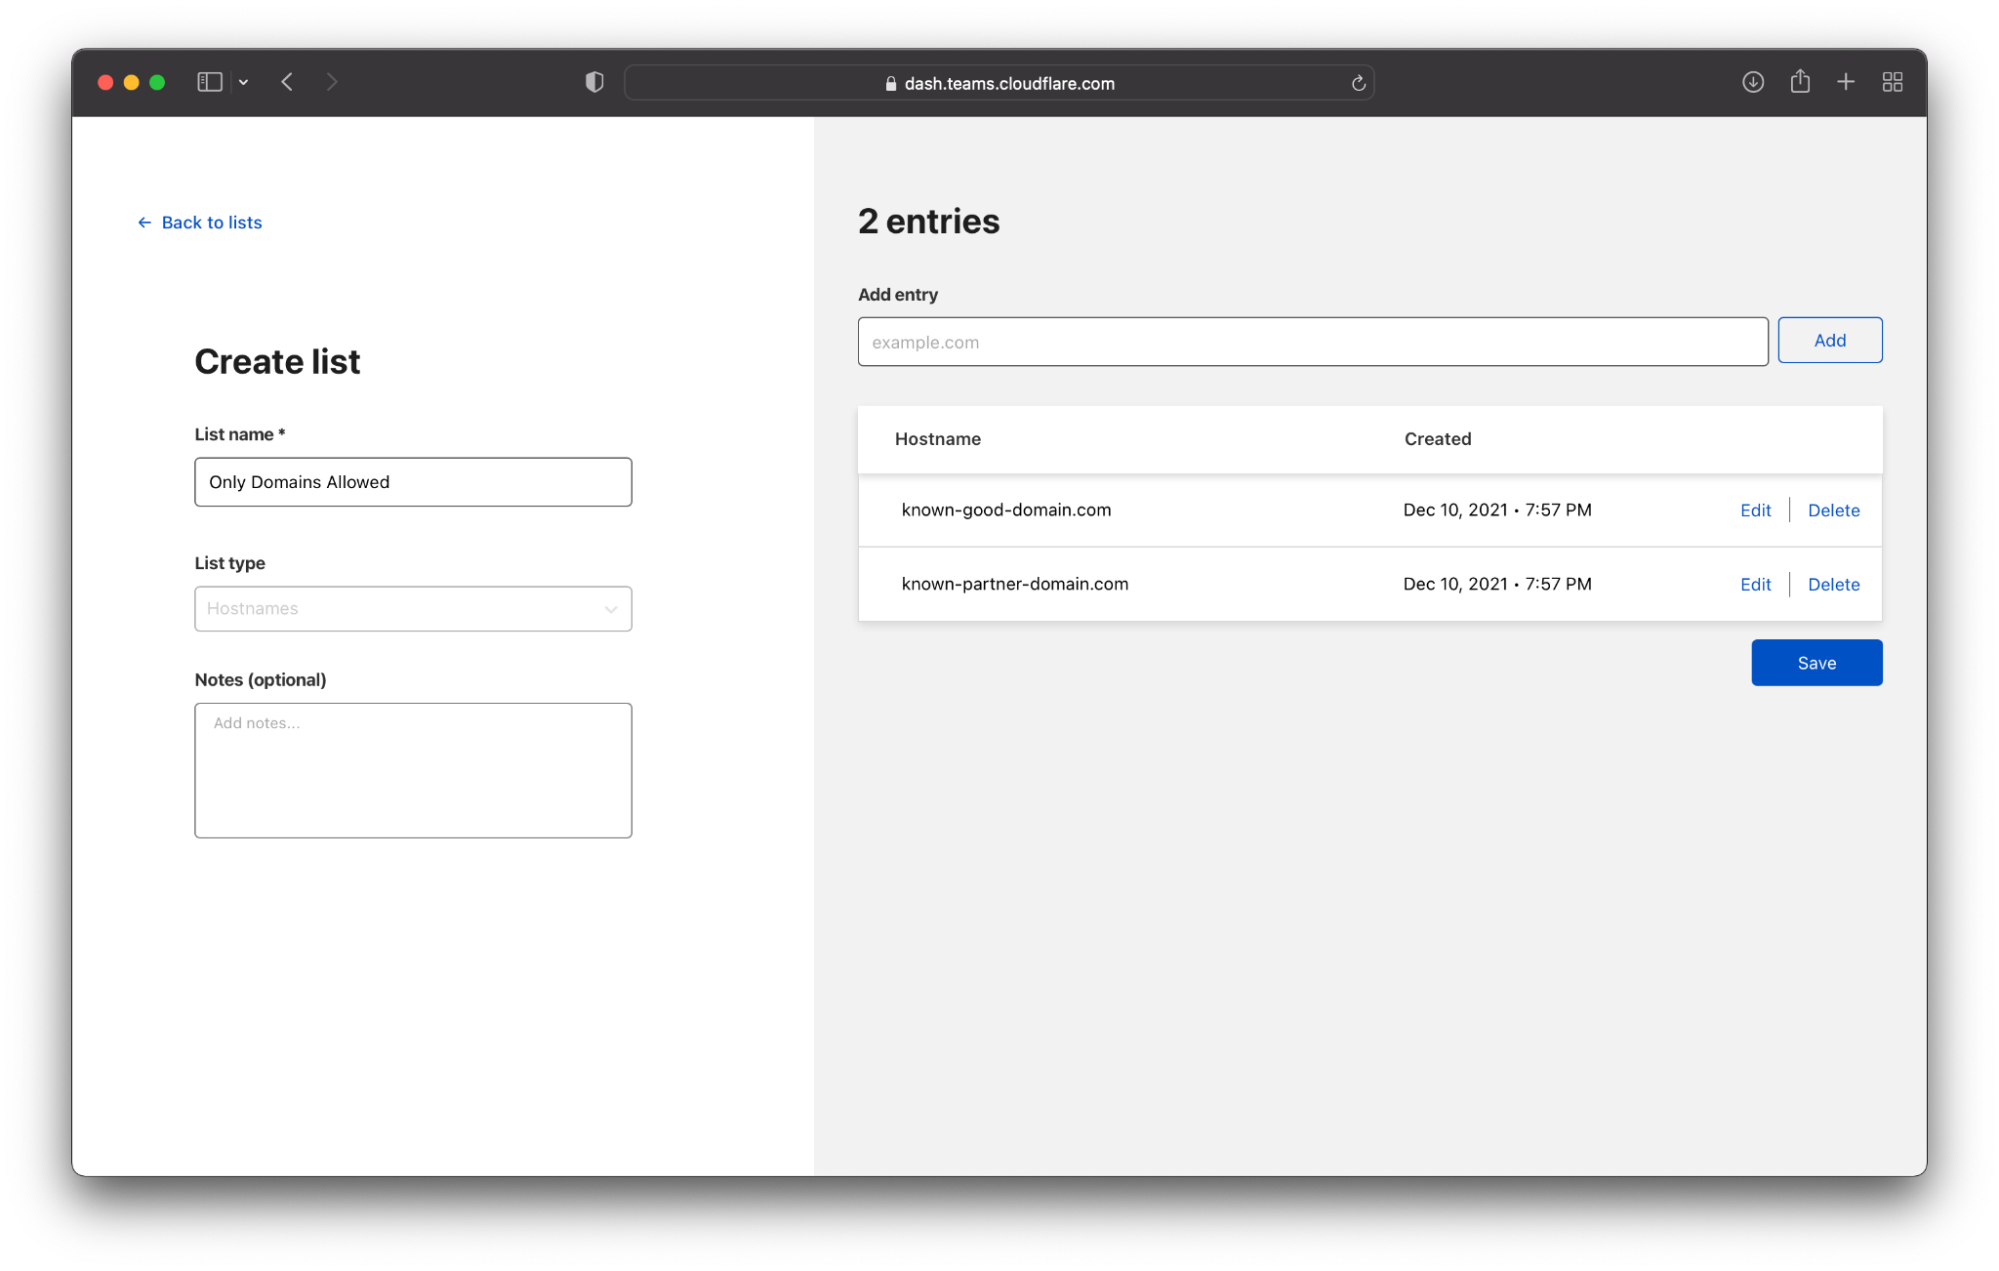
Alternatively, if you know every host that your servers need to connect to, you can create a positive security model with Cloudflare Gateway. In this model, your resource can only send DNS queries to the domains that you provide. Queries to any other destinations, including new and arbitrary ones like those that could be part of this attack, will be blocked by default.

> Ready to get started today? You can begin filtering and logging all of the DNS queries made by your servers or your entire network with these instructions here.

Second, secure network traffic leaving your infrastructure

Protective DNS filtering can add security and visibility in minutes, but bad actors can target all of the other ways that your servers communicate out to the rest of the Internet. Historically, organizations deployed network firewalls in their data centers to filter the traffic entering and exiting their network. Their teams ran capacity planning exercises, purchased the appliances, and deployed hardware. Some of these appliances eventually moved to the cloud, but the pain of deployment stayed mostly the same.

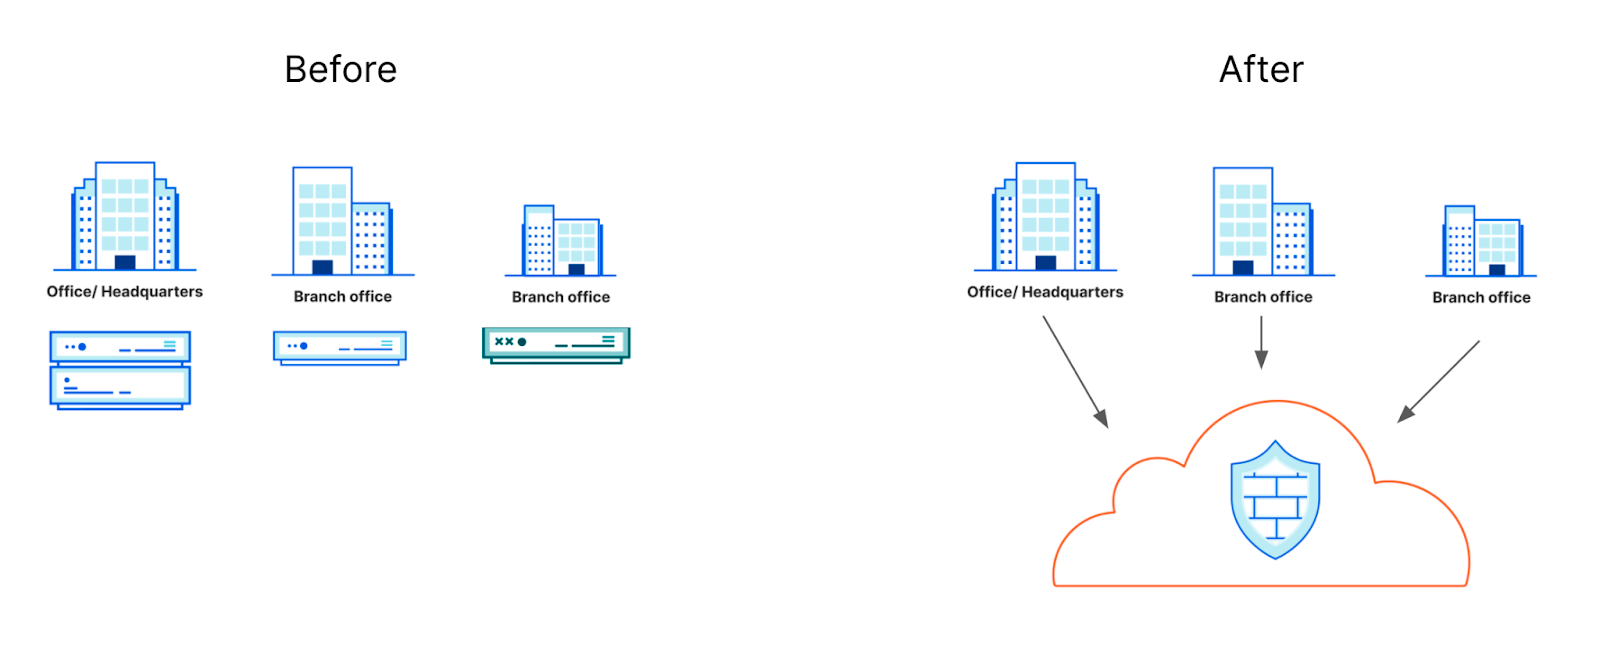
Cloudflare One’s network firewall helps your team secure all of your network’s traffic through a single, cloud-native, solution that does not require that you need to manage any hardware or any virtual appliances. Deploying this level of security only requires that you decide how you want to send traffic to Cloudflare. You can connect your network through multiple on-ramp options, including network layer (GRE or IPsec tunnels), direct connections, and a device client.

Secure how your servers connect to the Internet today

Once connected, traffic leaving your network will first route through a Cloudflare data center. Cloudflare’s network will apply filters at layers 3 through 5 of the OSI model. Your administrators can then create policies based on IP, port, protocol in both stateless and stateful options. If you want to save even more time, Cloudflare uses the data we have about threats on the Internet to create managed lists for you that you can block with a single click.

Similar to DNS queries, if you know that your servers and services in your network only need to reach specific IPs or ports, you can build a positive security model with allow-list rules that restrict connections and traffic to just the destinations you specify. In either model, Cloudflare’s network will handle logging for you. Your team can export these logs to your SIEM for audit retention or additional analysis if you need to investigate a potential attack.

> Ready to get started securing your network? Follow the guide here and tell us you’d like to get started and we’ll be ready to help your team.

Third, inspect and filter HTTP traffic

Some attacks will rely on convincing your servers and endpoints to send HTTP requests to specific destinations, leaking data or grabbing malware to download in your infrastructure. To help solve that challenge, you can layer HTTP inspection, virus scanning, and logging in Cloudflare’s network.

If you completed Step Two above, you can use the same on-ramp that you configured to upgrade UPD and TCP traffic where Cloudflare’s Secure Web Gateway can apply HTTP filtering and logging to the requests leaving your network. If you need more granular control, you can deploy Cloudflare’s client software to build rules that only apply to specific endpoints in your infrastructure.

Like every other layer in this security model, you can also only allow your servers to connect to an approved list of destinations. Cloudflare’s Secure Web Gateway will allow and log those requests and block attempts to reach any other destinations.

Secure how your servers connect to the Internet today

> Ready to begin inspecting and filtering HTTP traffic? Follow the instructions here to get started today.

What’s next?

Deploying filtering and logging today will help protect against the next attack or attempts to continue to exploit today’s vulnerability, but we’re encouraging everyone to start by patching your deployments of log4j immediately.

As we write this, we’re updating existing managed rulesets to include reports of destinations used to attempt to exploit today’s vulnerability. We’ll continue to update those policies as we learn more information.

Cloudflare announces integrations with MDM companies

Post Syndicated from Ravina Singh original https://blog.cloudflare.com/mdm-partnerships/

Cloudflare announces integrations with MDM companies

Cloudflare announces integrations with MDM companies

At Cloudflare, we are continuously thinking about ways to make the Internet more secure, more reliable and more performant for consumers and businesses of all sizes. Connecting devices safely to applications is critical for the safety of enterprise applications and for the peace of mind of a CIO.

Last January, we launched our Zero Trust platform, Cloudflare for Teams, that protects users, their devices, and their data by replacing legacy security perimeters with Cloudflare’s global edge network. Cloudflare for Teams makes security solutions like Zero Trust Network Access and Secure Web Gateway more accessible, for all companies, regardless of size, scale, or resources. This means building products that are more user-friendly, easier to deploy, and less cumbersome to manage.

The Cloudflare WARP agent encrypts traffic from devices to Cloudflare’s network, and many customers use it as a critical component to extend default-deny controls to where their users are. Today, Cloudflare is rolling out richer documentation on how to deploy WARP with these partners, so your administrators have a streamlined, easy-to-follow process to enroll your entire device fleet.

And we’re excited to announce new integrations with mobile device management vendors Microsoft Intune, Ivanti, JumpCloud, Kandji, and Hexnode to make it even easier to deploy and install Cloudflare WARP.

Cloudflare announces integrations with MDM companies

What is MDM?

Mobile Device Management (MDM), sometimes also called Unified Endpoint Management (UEM) tools, offers a simple solution to an increasingly challenging problem in an era of distributed working — managing all of an organization’s devices from a single platform.

Take a fictional healthcare consultancy firm. Suppose when starting her firm, the CEO hires largely in her home state of Colorado and allows employees to use their own personal phones and laptops to access emails and other data. This bring-your-own-device (BYOD) policy has been convenient to get the company off the ground.

Then, her firm starts landing higher profile clients with larger-scale projects, and to service this increased demand, our CEO begins hiring across the United States and rolling out corporate devices. Moreover, these clients have more rigorous standards around handling confidential patient data.

Our consultancy feels the pressure to level up its security. But with a mixed device fleet dispersed nationwide, how can our CEO improve visibility across managed and unmanaged devices; to check that they are properly updated, not compromised or lost? If lost or compromised, how can those devices be wiped remotely, so that client or company information does not leak?

MDM solutions can help answer these questions. They were made specifically to configure policies for what users can do on a device, roll out operating systems updates, and install new software — all while providing a unified view of a device fleet for IT teams. While these problems used to be solved by stopping by an IT desk, they can now be addressed remotely, at scale.

Streamlining deployment of our device client

Cloudflare recognizes that organizations like the healthcare consultancy above will be looking to enhance security and visibility across their dispersed users. Our device client, WARP, helps with this by enabling identity and device posture-aware policy enforcement at the endpoint.

We have optimized our client to enable diverse deployment approaches, so organizations have the flexibility they need to roll the Zero Trust capabilities of Cloudflare for Teams with ease. For example, WARP works across all major operating systems (e.g., Windows, MacOS, Linux, chrome OS, iOS, and Android). And regardless of the deployment mechanism, WARP uses a common set of parameters, so your admins have a consistent experience.

To show this streamlined deployment in action, here are some common scenarios on how to deploy our client on Windows with only some minor tweaks through the command line:

1. If you want to use HTTP filtering rules, Browser Isolation or do anything with device posture, the most important thing is to get your user authenticated to a Teams Organization and send their traffic over WARP:

Cloudflare_WARP_Release-x64.msi /quiet ORGANIZATION="exampleorg" SERVICE_MODE="warp"

2. If you don’t care about identity and just want a silent install with the same scenario above, use service tokens and disable the initial client UI:

Cloudflare_WARP_Release-x64.msi /quiet ORGANIZATION="exampleorg" SERVICE_MODE="warp” AUTH_CLIENT_ID=”” AUTH_CLIENT_SECRET=”” ONBOARDING=”false” 

3. Do your employees sometimes travel to countries or locations where encrypting traffic in a tunnel isn’t allowed? You can let them turn off WARP while still being subject to your company’s DNS rules:

Cloudflare_WARP_Release-x64.msi /quiet ORGANIZATION="exampleorg" SERVICE_MODE="warp” MODE_SWITCH=”true”

Our Partnerships

Cloudflare recognizes that many organizations rely on MDM solutions to deploy software like our client, and when they do deploy, they deserve a process that makes life simpler. To that end, we are partnering with leading MDM organizations that you already rely on to ensure our software is compatible and has purpose-built documentation to protect your users.

“The close collaboration and deep integration between Cloudflare and Microsoft helps strengthen the security posture of our joint customers and ensure people stay productive as Zero Trust remains top of mind for every organizational leader. ”
Ann Johnson, Corporate Vice President of Security, Compliance, Identity, and Management, Business Development at Microsoft.

“ZTNA is no longer a choice for enterprises to loom over, it has become a necessity. As a global solution for enterprise endpoint management, Hexnode sees this partnership with Cloudflare as a great step towards the future. “
– Sahad M, CTO, Hexnode

“Zero Trust is a mindset and culture that every organization needs to not only adopt, but accelerate with the various devices employees use to access corporate data and systems. Our partnership with Cloudflare will not only improve the experience of IT teams, but the employee experience in the Everywhere Workplace as well. This partnership is another proof point of Ivanti’s commitment to secure users and manage devices.”
– Nayaki Nayyar, President and Chief Product Officer, Ivanti

“The bedrock of a zero trust approach is a combination of securing the identity, the device, and the network. By partnering with Cloudflare, we are creating a best-in-class approach for securing today’s modern organization.”
– Chase Doelling, Principal Strategist at JumpCloud

“Kandji and Cloudflare’s partnership will help IT teams to quickly deploy Cloudflare’s network security solutions across their Apple fleet. Using device management software like Kandji to install, enable, and enforce Cloudflare for Teams will allow IT teams to manage their security posture at any scale.”
– Weldon Dodd, SVP, Product Strategy, Kandji

What’s next?

Click below to get started with deploying Cloudflare for Teams:

Don’t see the MDM tool you use today or interested in partnering with us to ensure our mutual customers can hit the ground running? Fill out the contact form on our MDM Partnerships page.

Shadow IT: make it easy for users to follow the rules

Post Syndicated from Kenny Johnson original https://blog.cloudflare.com/shadow-it/

Shadow IT: make it easy for users to follow the rules

Shadow IT: make it easy for users to follow the rules

SaaS application usage has exploded over the last decade. According to Gartner, global spending on SaaS in 2021 was $145bn and is forecasted to reach $171bn in 2022. A key benefit of SaaS applications is that they are easy to get started with and either free or low cost. This is great for both users and leaders — it’s easy to try out new tools with no commitment or procurement process. But this convenience also presents a challenge to CIOs and security teams. Many SaaS applications are great for a specific task, but lack required security controls or visibility. It can be easy for employees to start using SaaS applications for their everyday job without IT teams noticing — these “unapproved” applications are popularly referred to as Shadow IT.

CIOs often have no visibility over what applications their SaaS employees are using. Even when they do, they may not have an easy way to block users from using unapproved applications, or on the contrary, to provide easy access to approved ones.

Visibility into application usage

In an office, it was easier for CIOs and their teams to monitor application usage in their organization. Mechanisms existed to inspect outbound DNS and HTTP traffic over office Wi-Fi equipment and detect unapproved applications. In an office setting, IT teams could also notice colleagues using new SaaS applications or maybe hear them mention these new applications. When users moved to remote work due to COVID-19 and other factors, this was no longer possible, and network-driven logging became ineffective. With no central network, the focus of application monitoring needed to shift to user’s devices.

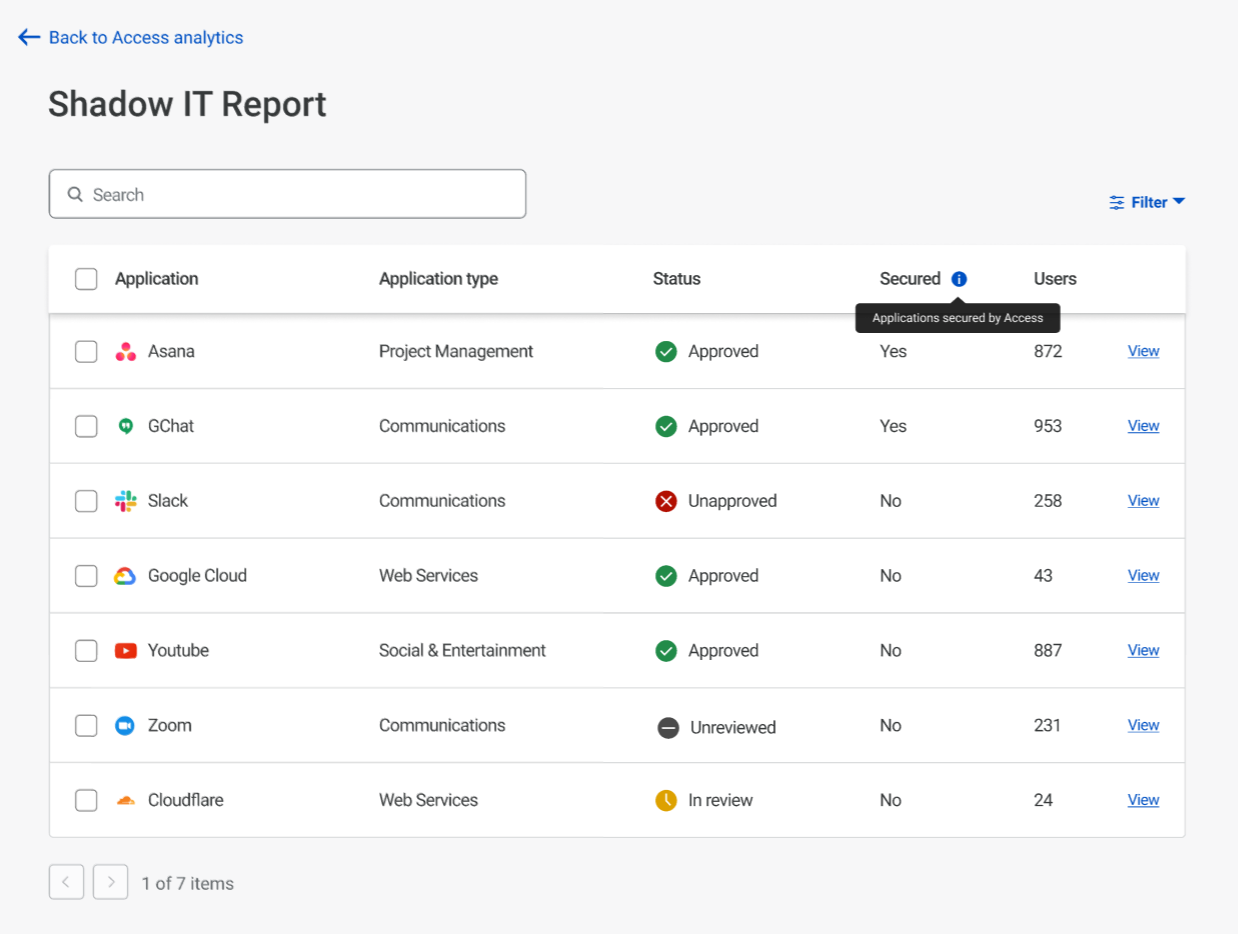
We’re excited to announce updates to Cloudflare for Teams that address Shadow IT challenges. Our Zero Trust platform provides a framework to identify new applications, block applications and provide a single location for approved applications. Cloudflare Gateway allows admins to monitor user traffic and detect new application usage. Our Shadow IT report then presents a list of new applications and allows for approval or rejection of each application.

Shadow IT: make it easy for users to follow the rules

This gives CIOs in-depth understanding of what applications are being used across their business, and enables them to come up with a plan to allow and block applications based on their approval status in the organization.

Blocking the right applications

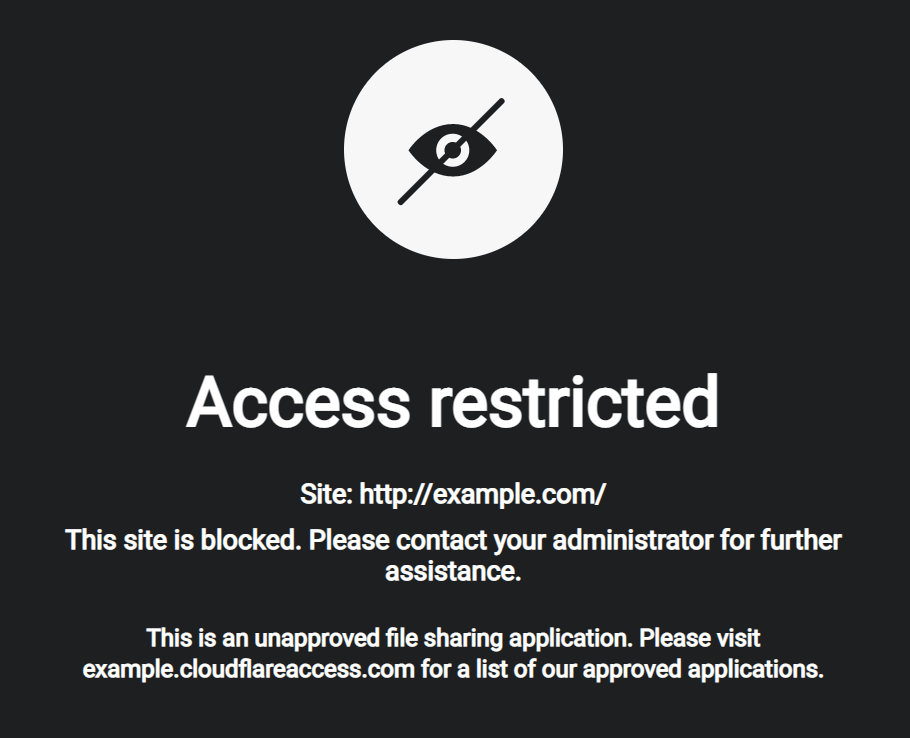
Once the list of “shadow” applications is known, the next step is to block these applications with a meaningful error message to steer the user toward an approved application. The point should not be to make the user feel like they have done something wrong, but to encourage and provide them with the right application to leverage.

Shadow IT: make it easy for users to follow the rules

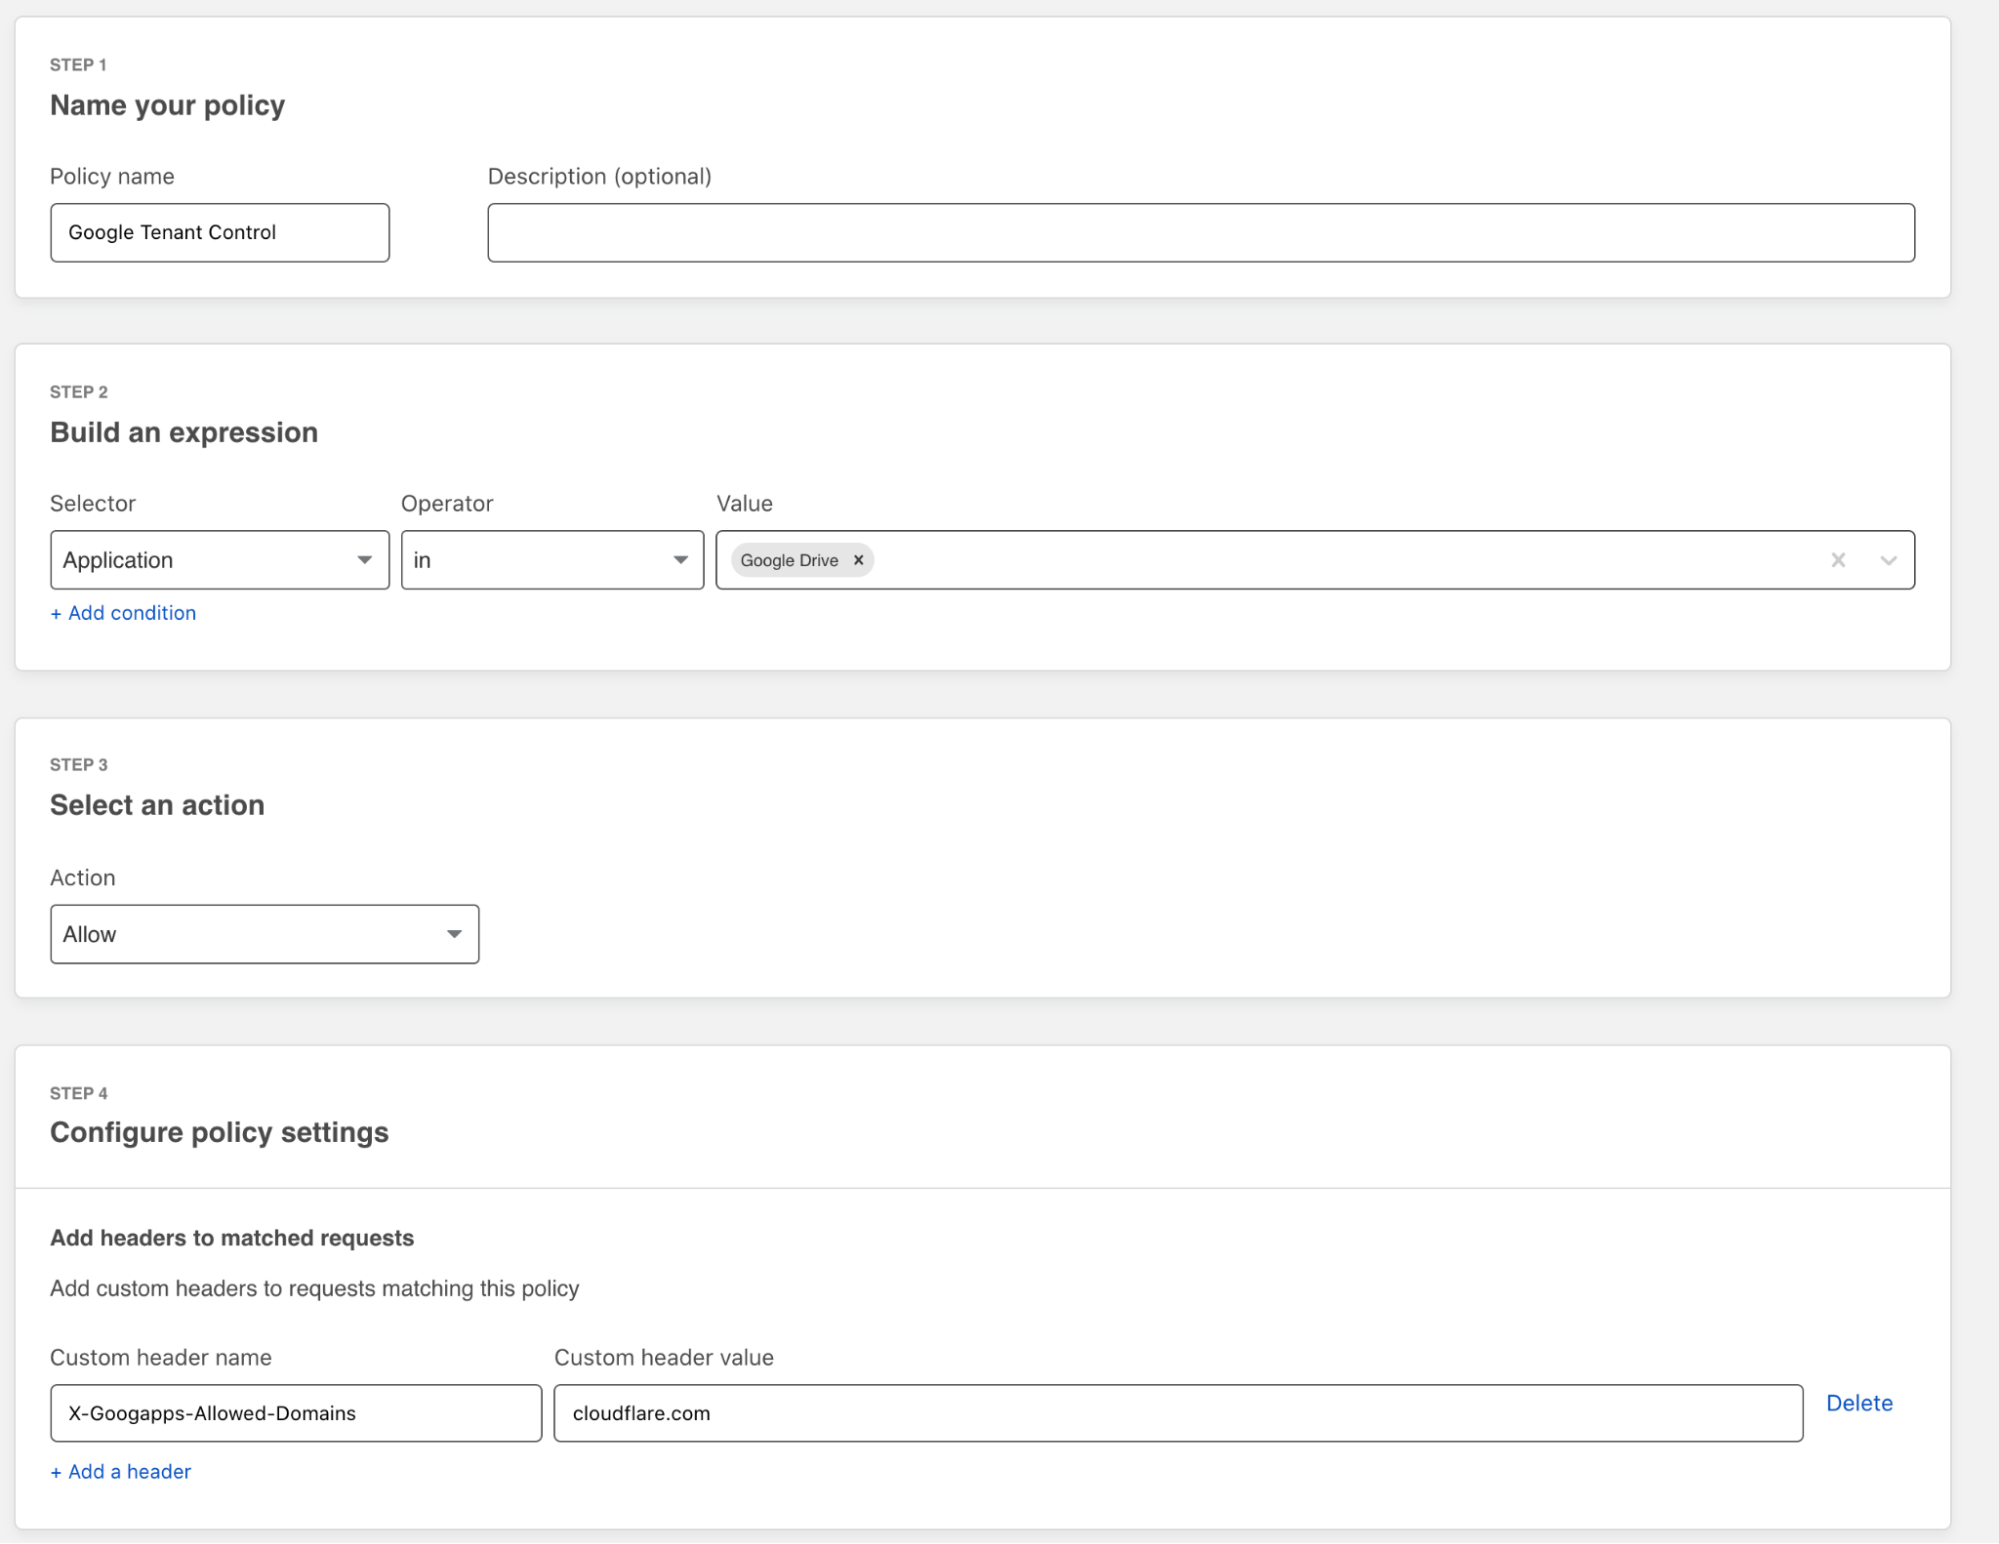
Cloudflare Gateway allows teams to configure policies to block unapproved applications and provide clear instructions to a user about what their alternatives are to that application. In Gateway, administrators can configure application-specific policies like “block all file sharing applications except Google Drive.” Tenant control can be utilized to restrict access to specific instances of a given application to prevent personal account usage of these tools.

Protect your approved applications

The next step is to protect the application you do want your users to use. In order to fully protect your SaaS applications, it is important to secure the initial authorization and maintain a clear audit trail of user activity. Cloudflare Access for SaaS allows administrators to protect the front door of their SaaS applications and verify user identity, multi-factor authentication, device posture and location before allowing access. Gateway then provides a clear audit trail of all user activity within the application to provide a clear picture in the case of a breach or other security events.

This allows CIOs and their teams to define which users may or may not access specific applications. Instead of creating broad access lists, they can define exactly which users need a specific tool to complete their job. This is beneficial for both security and licensing costs.

Show your users the applications they need

The final challenge is making it clear to users which applications they do and do not have access to. New employees often spend their first few weeks discovering new applications that would have helped them get up to speed more quickly.

We wanted to make it easy to provide a single place for users to access all of their approved applications. We added bookmarks and application visibility control to the Access application launcher to make this even easier.

Shadow IT: make it easy for users to follow the rules

Once all your applications are available through the application launcher, we log all user activity across these applications. And even better, many of these applications are hosted on Cloudflare which leads to performance improvements overall.

Getting started with the Access application launcher is easy and free for the first 50 users! Get started today from the Cloudflare for Teams dashboard.

Control input on suspicious sites with Cloudflare Browser Isolation

Post Syndicated from Tim Obezuk original https://blog.cloudflare.com/phishing-protection-browser/

Control input on suspicious sites with Cloudflare Browser Isolation

Control input on suspicious sites with Cloudflare Browser Isolation

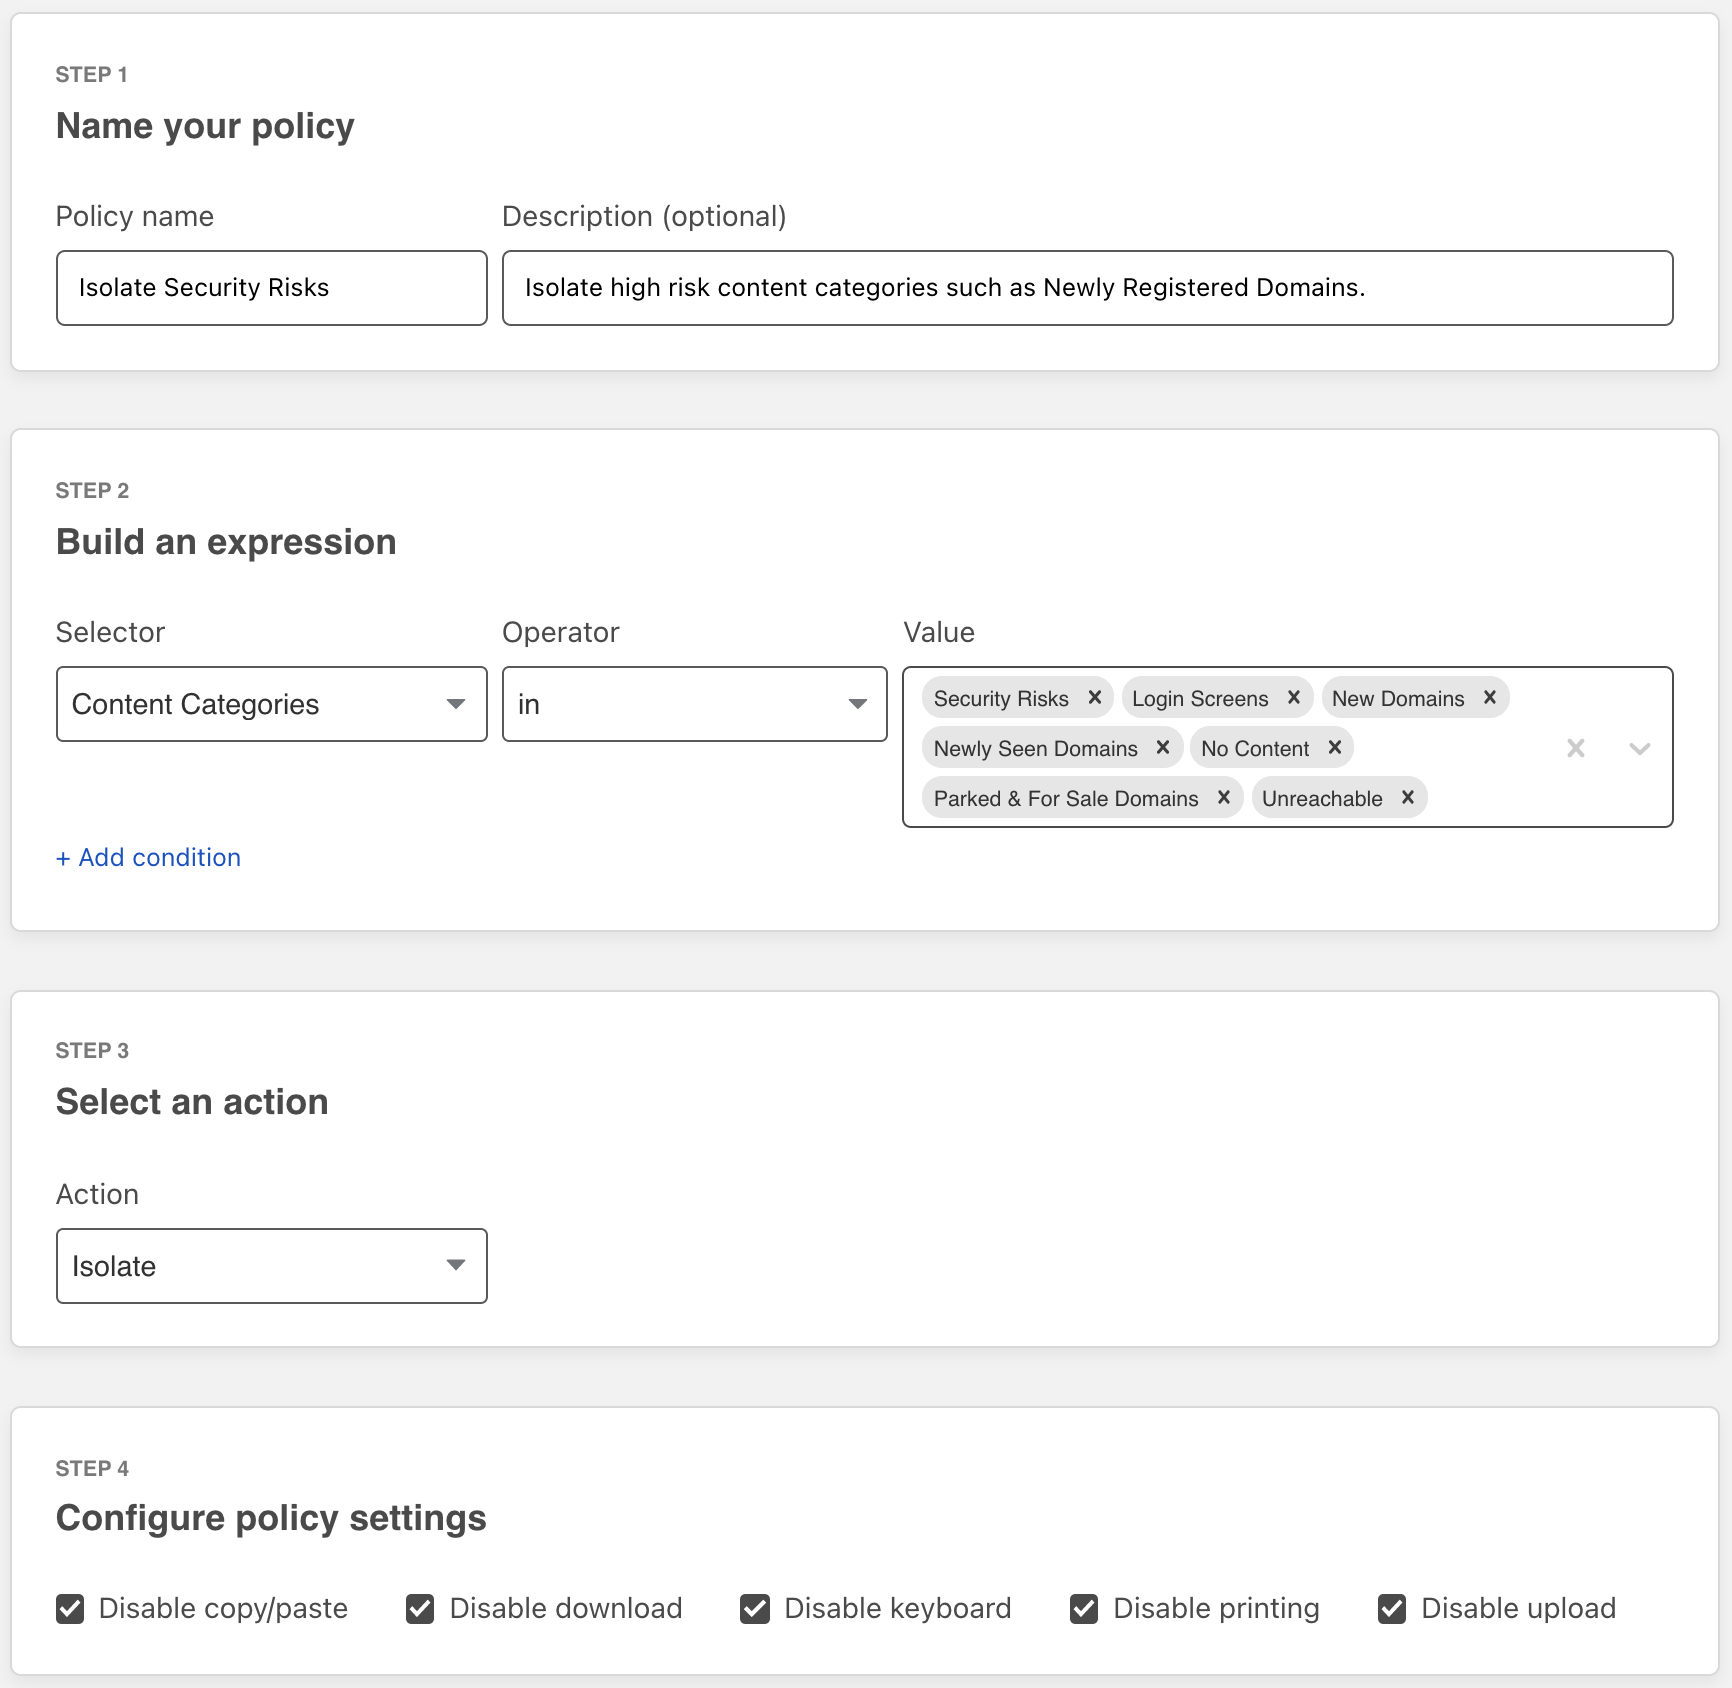
Your team can now use Cloudflare’s Browser Isolation service to protect against phishing attacks and credential theft inside the web browser. Users can browse more of the Internet without taking on the risk. Administrators can define Zero Trust policies to prohibit keyboard input and transmitting files during high risk browsing activity.

Earlier this year, Cloudflare Browser Isolation introduced data protection controls that take advantage of the remote browser’s ability to manage all input and outputs between a user and any website. We’re excited to extend that functionality to apply more controls such as prohibiting keyboard input and file uploads to avert phishing attacks and credential theft on high risk and unknown websites.

Challenges defending against unknown threats

Administrators protecting their teams from threats on the open Internet typically implement a Secure Web Gateway (SWG) to filter Internet traffic based on threat intelligence feeds. This is effective at mitigating known threats. In reality, not all websites fit neatly into malicious or non-malicious categories.

For example, a parked domain with typo differences to an established web property could be legitimately registered for an unrelated product or become weaponized as a phishing attack. False-positives are tolerated by risk-averse administrators but come at the cost of employee productivity. Finding the balance between these needs is a fine art, and when applied too aggressively it leads to user frustration and the increased support burden of micromanaging exceptions for blocked traffic.

Legacy secure web gateways are blunt instruments that provide security teams limited options to protect their teams from threats on the Internet. Simply allowing or blocking websites is not enough, and modern security teams need more sophisticated tools to fully protect their teams without compromising on productivity.

Intelligent filtering with Cloudflare Gateway

Cloudflare Gateway provides a secure web gateway to customers wherever their users work. Administrators can build rules that include blocking security risks, scanning for viruses, or restricting browsing based on SSO group identity among other options. User traffic leaves their device and arrives at a Cloudflare data center close to them, providing security and logging without slowing them down.

Unlike the blunt instruments of the past, Cloudflare Gateway applies security policies based on the unique magnitude of data Cloudflare’s network processes. For example, Cloudflare sees just over one trillion DNS queries every day. We use that data to build a comprehensive model of what “good” DNS queries look like — and which DNS queries are anomalous and could represent DNS tunneling for data exfiltration, for example. We use our network to build more intelligent filtering and reduce false positives. You can review that research as well with Cloudflare Radar.

However, we know some customers want to allow users to navigate to destinations in a sort of “neutral” zone. Domains that are newly registered, or newly seen by DNS resolvers, can be the home of a great new service for your team or a surprise attack to steal credentials. Cloudflare works to categorize these as soon as possible, but in those initial minutes users have to request exceptions if your team blocks these categories outright.

Safely browsing the unknown

Cloudflare Browser Isolation shifts the risk of executing untrusted or malicious website code from the user’s endpoint to a remote browser hosted in a low-latency data center. Rather than aggressively blocking unknown websites, and potentially impacting employee productivity, Cloudflare Browser Isolation provides administrators control over how users can interact with risky websites.

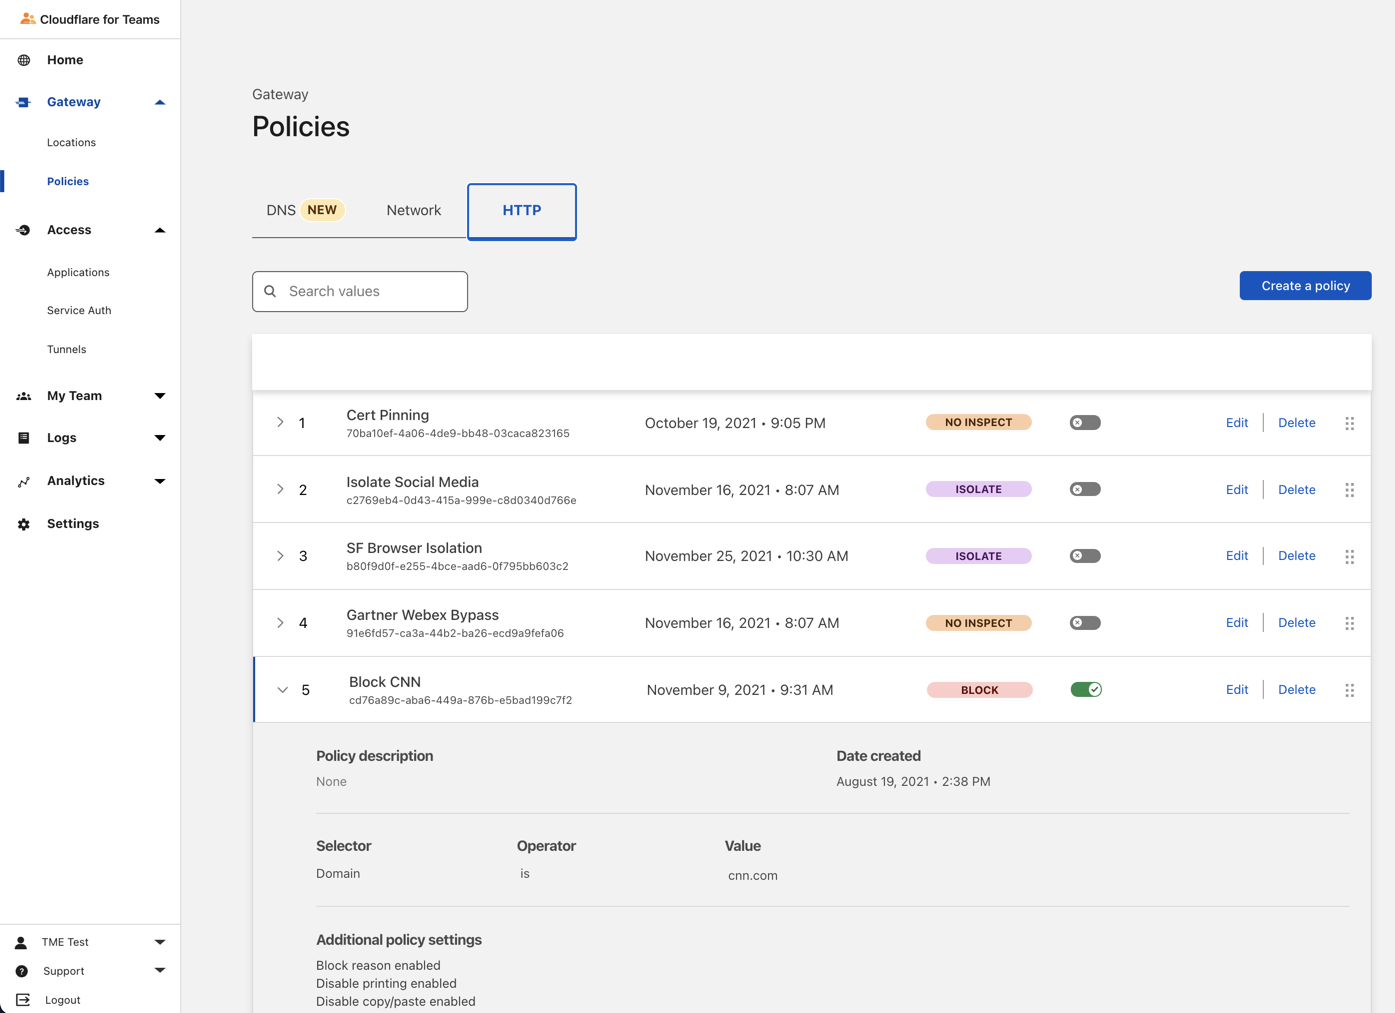
Cloudflare’s network intelligence tracks higher risk Internet properties such as Typosquatting and New Domains. Websites in these categories could be benign websites, or phishing attacks waiting to be weaponized. Risk-averse administrators can protect their teams without introducing false-positives by isolating these websites and serving the website in a read-only mode by disabling file uploads, downloads and keyboard input.

Control input on suspicious sites with Cloudflare Browser Isolation

Users are able to safely browse the unknown website without risk of leaking credentials, transmitting files and falling victim to a phishing attack. Should the user have a legitimate reason to interact with an unknown website they are advised to contact their administrator to obtain elevated permissions while browsing the website.

See our developer documentation to learn more about remote browser policies.

Getting started

Cloudflare Browser Isolation is integrated natively into Cloudflare’s Secure Web Gateway and Zero Trust Network Access services, and unlike legacy remote browser isolation solutions does not require IT teams to piece together multiple disparate solutions or force users to change their preferred web browser.

The Zero Trust threat and data protection that Browser Isolation provides make it a natural extension for any company trusting a secure web gateway to protect their business. We’re currently including it with our Cloudflare for Teams Enterprise Plan at no additional charge.1 Get started at our Zero Trust web page.


1. For the first 2,000 seats until 31 Dec 2021

Five Great (free!) Ways to Get Started With Cloudflare

Post Syndicated from John Engates original https://blog.cloudflare.com/five-free-ways-to-get-started-with-cloudflare/

Five Great (free!) Ways to Get Started With Cloudflare

Five Great (free!) Ways to Get Started With Cloudflare

I joined Cloudflare a few weeks ago, and as someone new to the company, there’s a ton of information to absorb. I have always learned best by doing, so I decided to use Cloudflare like a brand-new user. Cloudflare customers range from individuals with a simple website to companies in the Fortune 100. I’m currently exploring Cloudflare from the perspective of the individual, so I signed up for a free account and logged into the dashboard. Just like getting into a new car, I want to turn all the dials and push all the buttons. I looked for things that would be fun and easy to do and would deliver some immediate value. Now I want to share the best ones with you.

Here are my five ways to get started with Cloudflare. These should be easy for anyone, and they’re free. You’ll likely even save some money and improve your privacy and security in the process. Let’s go!

1. Transfer or register a domain with Cloudflare Registrar

If you’re like me, you’ve acquired a few (dozen) Internet domains for things like personalizing your email address, a web page for your nature photography hobby, or maybe a side business. You probably registered them at one or more of the popular domain name registrars, and you pay around $15 per year for each domain. I did an audit and found I was spending a shocking amount each year to maintain my domains, and they were spread across three different registrars.

Cloudflare makes it easy to transfer domains from other registrars and doesn’t charge a markup for domain registrar services. Let me say that again; there is zero price markup for domain registration with Cloudflare Registrar. You’ll pay exactly what Cloudflare pays. For example, a .com domain registered with Cloudflare currently costs half of what I was paying at other registrars.

Not only will you save on the domain registration, but Cloudflare doesn’t nickel-and-dime you like registrars who charge extra for WHOIS privacy and transfer lock and then sneakily bundle their website hosting services. It all adds up.

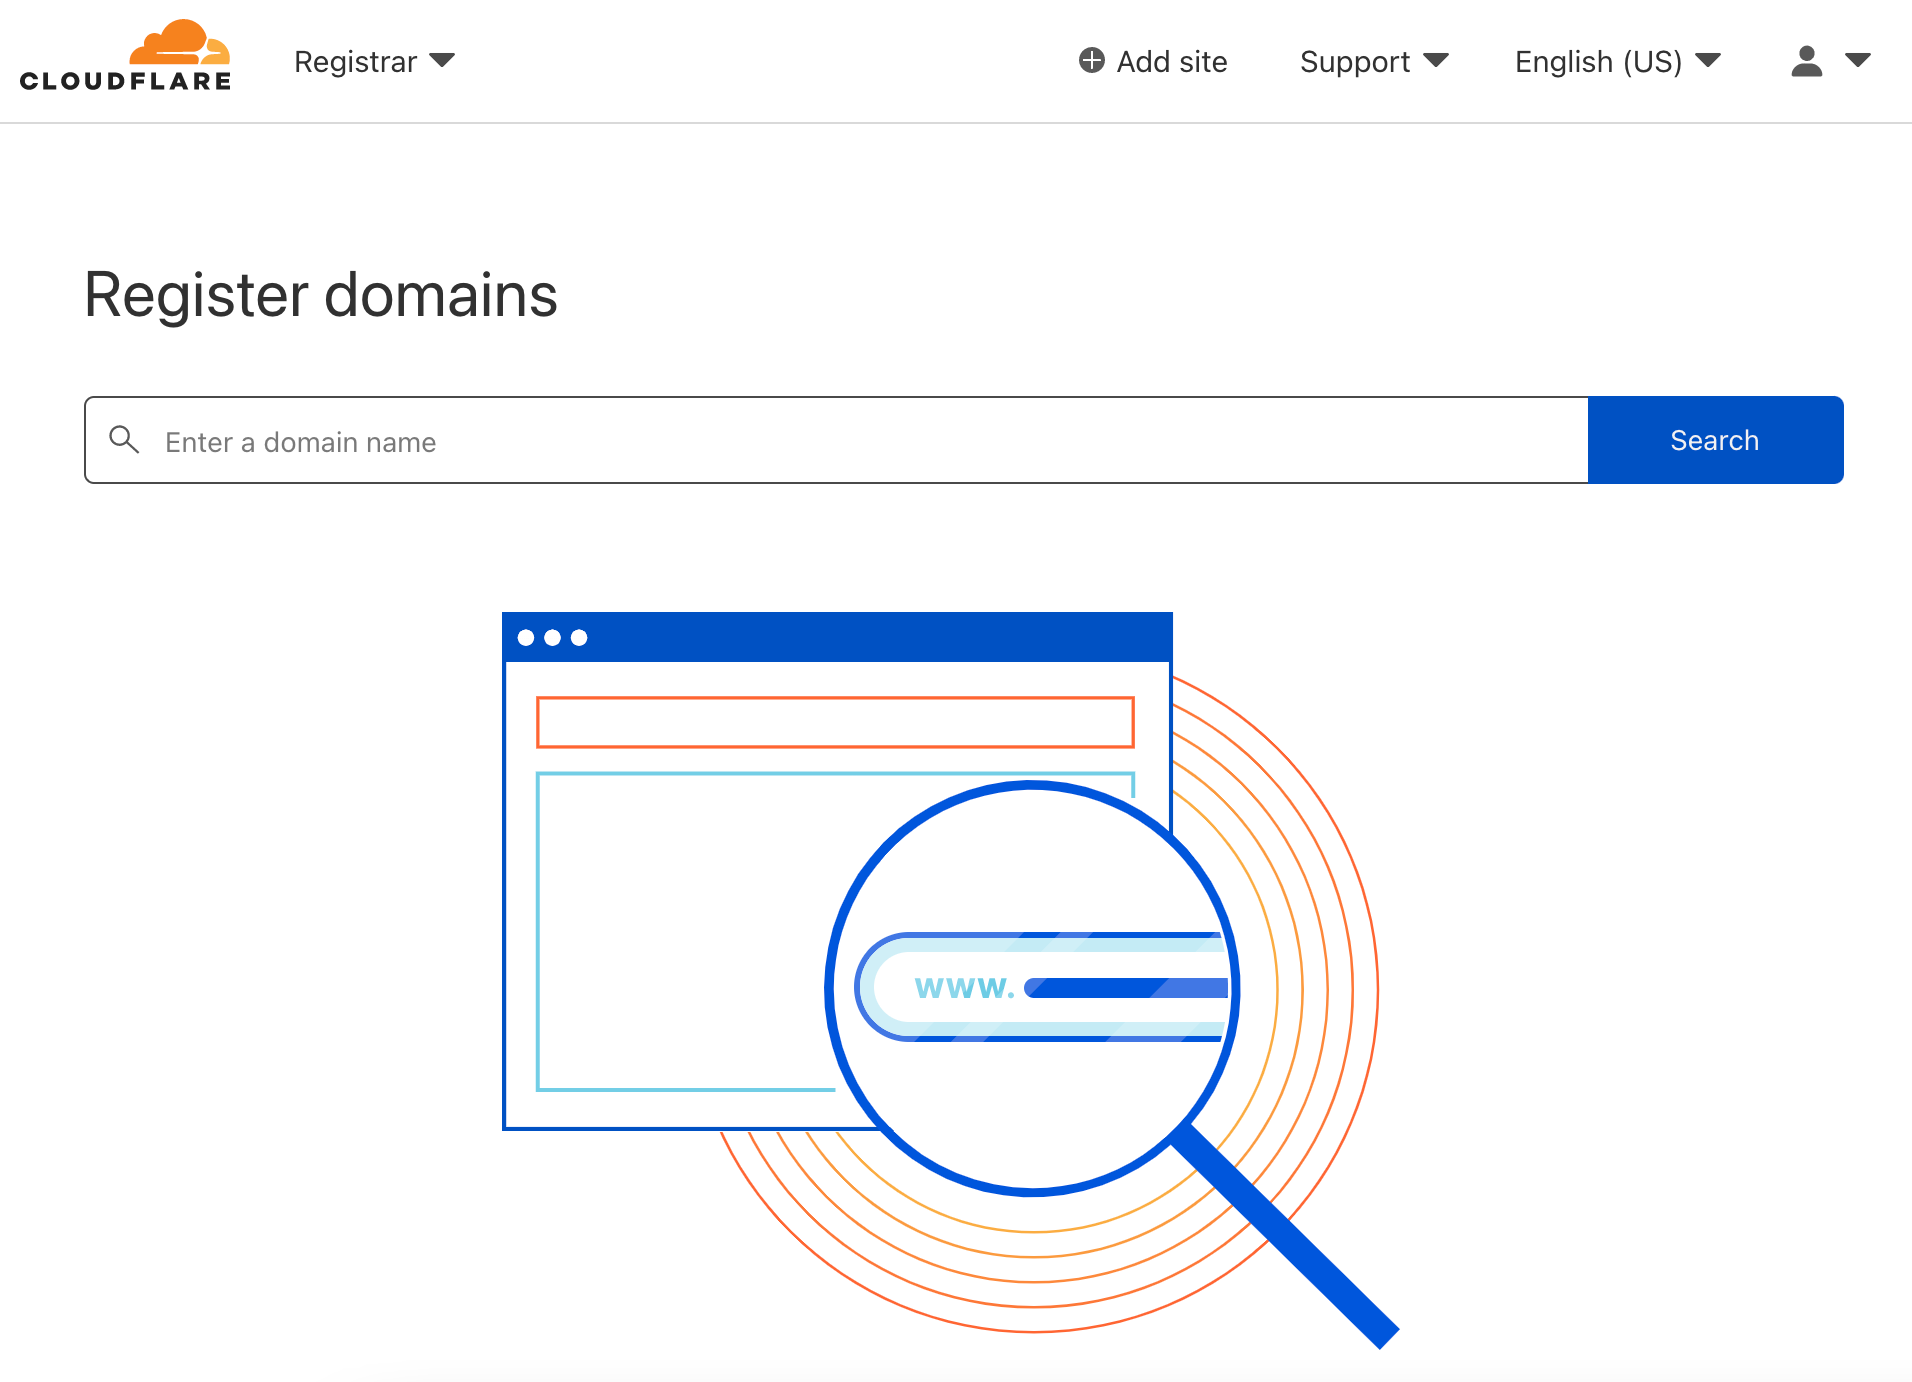
To get started registering or transferring a domain, log into the Cloudflare Dashboard, click “Add a Site,” and bring your domains to Cloudflare.

Five Great (free!) Ways to Get Started With Cloudflare

2. Configure DNS on Cloudflare DNS

DNS servers do the work of translating hostnames into IP addresses. To put a domain name to use on the Internet, you can create DNS records to point to your website and email provider. Every time someone wants to put a website or Internet application online, this process must happen so the rest of us can find it. Cloudflare’s DNS dashboard makes it simple to configure DNS records. For transfers, Cloudflare will even copy records from your existing DNS service to prevent any disruption.

Five Great (free!) Ways to Get Started With Cloudflare

The Cloudflare DNS dashboard will also improve security on your domains with DNSSEC, protect your domains from email spoofing with DMARC, and enforce other DNS best practices.

I’ve now moved all my domains to Cloudflare DNS, which is a big win for me for security and simplicity. I can see them all in one place, and I’m more confident with the increased level of control and protection I have for my domains.

3. Set up a blog with Cloudflare Pages

Once I moved my domains, I was eager to set up a new website. I have been thinking lately it would be fun to have a place to post my photos where they can stand out and won’t get lost in the stream of social media. It’s been a while since I’ve built a website from scratch, but it’s fun getting back to basics. In the old days, to host a website you’d set up a dedicated web server or use a shared web host to serve your site. Today, many web hosts provide ready-to-go templates for websites and make hosting as easy as one click to set up a new site.

I wanted to learn by doing, so I took the do-it-yourself route. What I discovered in the process is an architecture called Jamstack. It’s a bit different from the traditional way of building and hosting websites. With Jamstack, your site doesn’t live at a traditional hosting provider, nor is it dynamically generated from CGI scripts and a database. Your content is now stored on a code repository like GitHub. The site is pre-generated as a static site and then deployed and delivered directly from Cloudflare’s network.

I used a Jamstack static site generator called Hugo to build my photo blog, pushed it to GitHub, and used Cloudflare Pages to generate the content and host my site. Now that it’s configured, there’s zero work necessary to maintain it. Jamstack, combined with Pages, alleviates the regular updates required to keep up with security patches, and there are no web servers or database services to break. Delivered from Cloudflare’s edge network, the site scales effortlessly, and it’s blazingly fast from a user perspective.

By the way, you don’t need to register a domain to deploy to Pages. Cloudflare will generate a pages.dev site that you can use.

For extra credit, have a look at the Cloudflare Workers serverless platform. Workers will allow you to write and deploy even more advanced custom code and run it across Cloudflare’s globally distributed network.

4. Protect your network with Cloudflare for Teams

At first, it wasn’t evident to me how I was going to use Cloudflare for Teams. I initially thought it was only for larger organizations. After all, I’m sitting here in my home office, and I’m just a team of one. Digging into the product more, it became clear that Teams is about privacy and security for groups of any size.

We’ve discussed the impressive Cloudflare DNS infrastructure, and you can take advantage of the Cloudflare DNS resolver for your devices at home by simply configuring them to point to Cloudflare 1.1.1.1 DNS servers. But for more granular control and detailed logging, you should try the DNS infrastructure built into the Cloudflare for Teams Gateway feature.

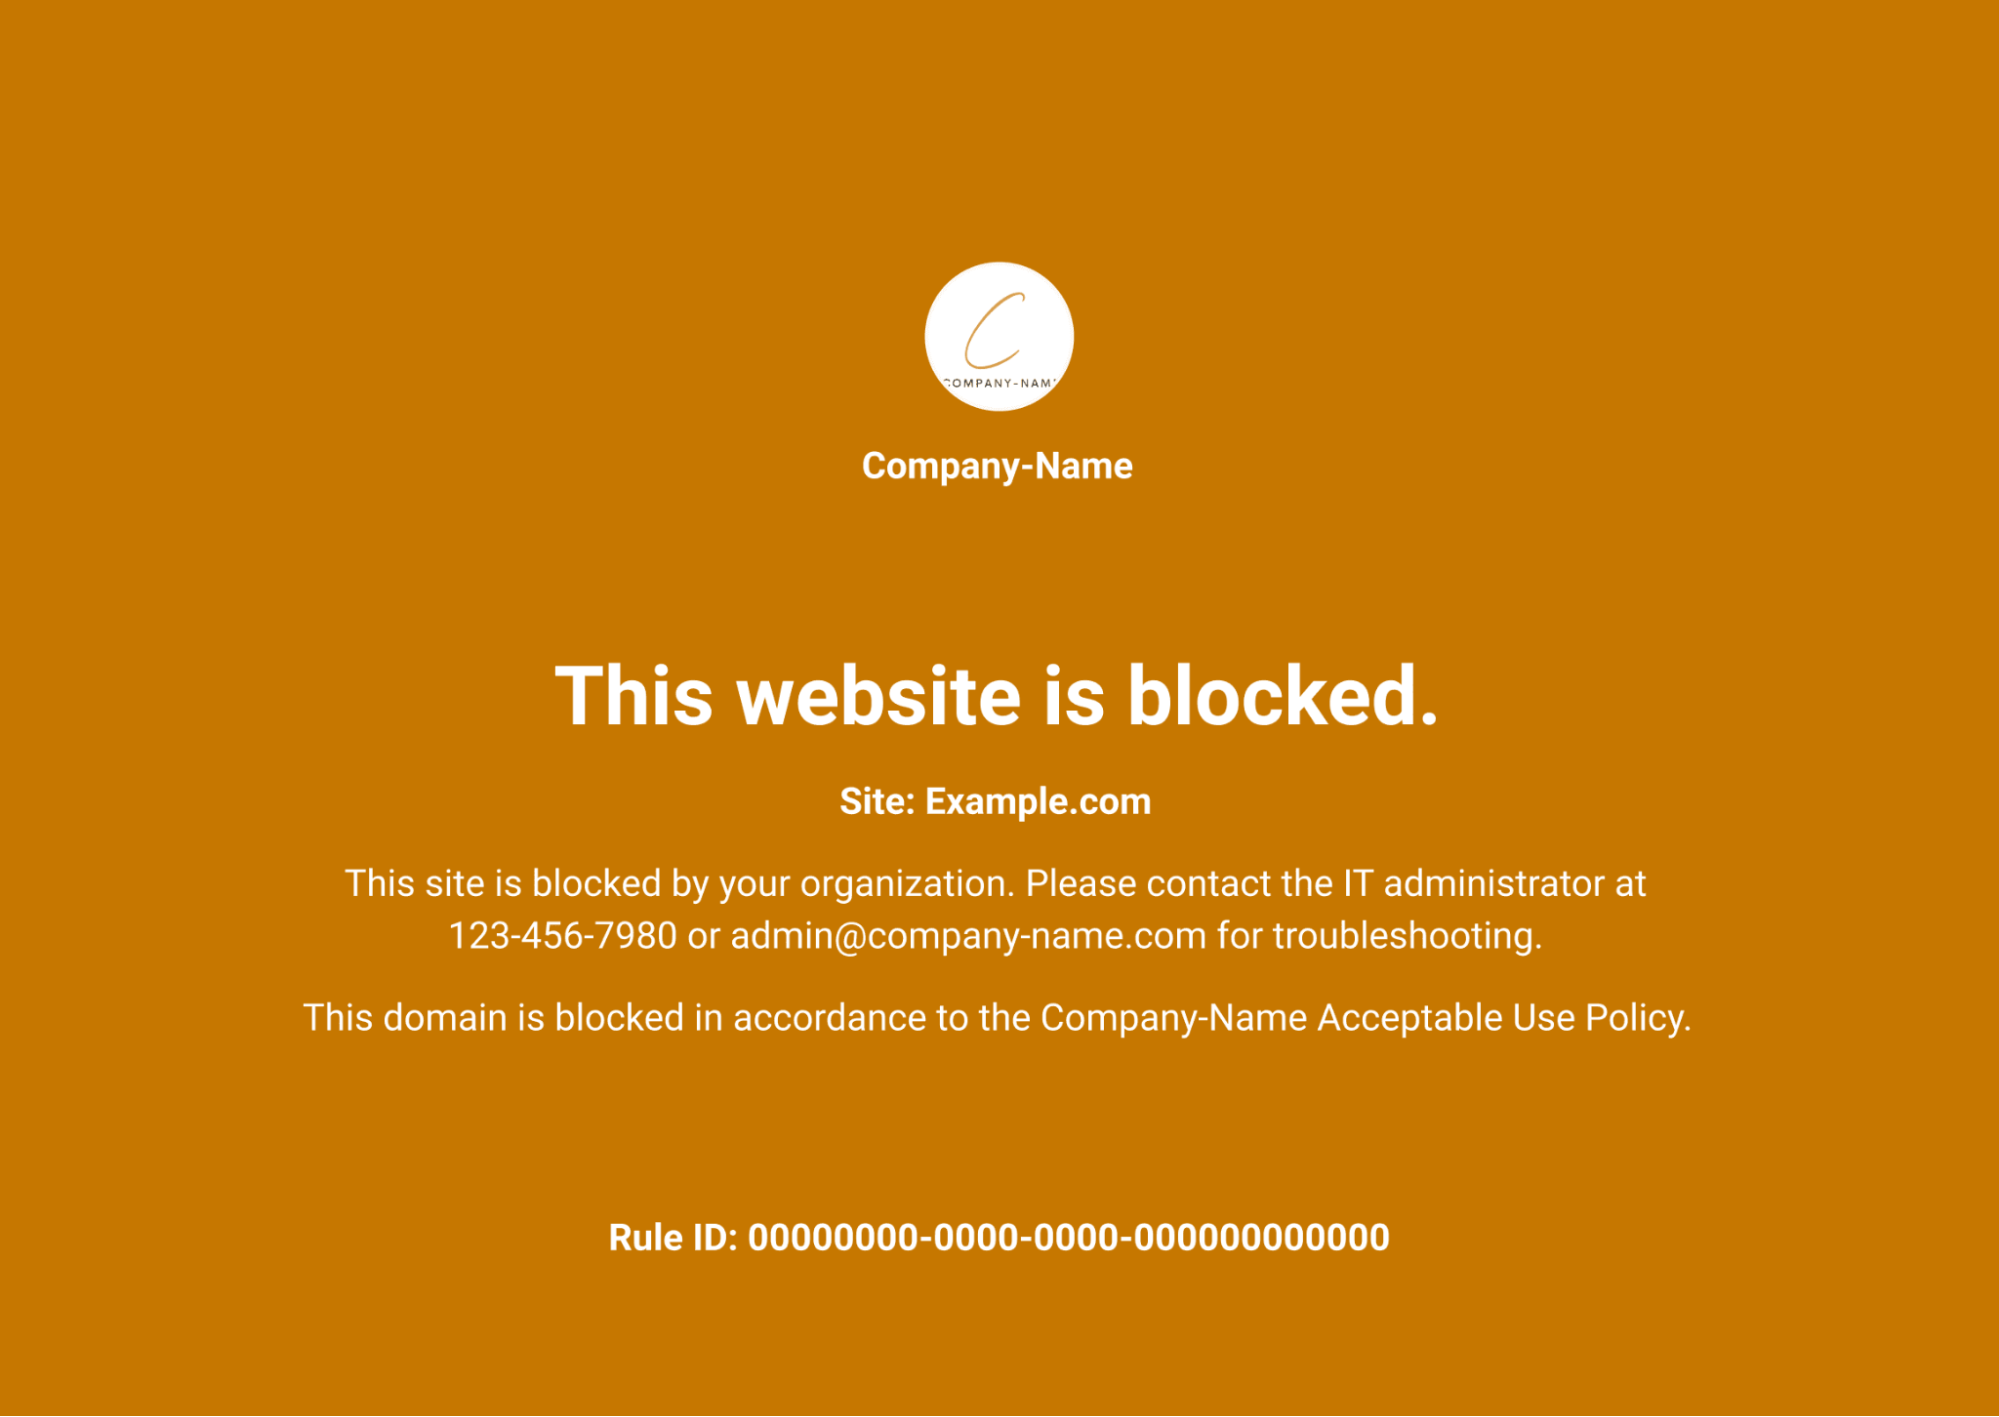
When you point your home network to Cloudflare for Teams DNS servers, your dashboard will populate with logs of all DNS requests coming from your network. You can set up rules to block DNS requests for various categories, including known malware, phishing, adult sites, and other questionable content. You’ll see the logs instantly and can add or remove categories as needed. If you trigger one of the rules, Cloudflare will display a page that shows you’ve hit one of these blocked sites.

Five Great (free!) Ways to Get Started With Cloudflare

Malware can bypass DNS, so filtering DNS is no silver bullet. Think of DNS filtering as another layer of defense that may help you avoid nefarious sites in the first place. For example, known phishing sites sent as URLs via email won’t resolve and will be blocked before they affect you. Additionally, DNS logs should give you visibility into what’s happening on the network and that may lead you to implement even better security in other areas.

Five Great (free!) Ways to Get Started With Cloudflare

There’s so much more to Cloudflare for Teams than DNS filtering, but I wanted to give you just a little taste of what you can do with it quickly and for free.

5. Secure your traffic with the Cloudflare 1.1.1.1 app and WARP

Finally, let’s discuss the challenge of securing Internet communications on your mobile phones, tablets, and devices at home and while traveling. We know that the SSL/TLS encryption on secure websites provides a degree of protection, but the apps you use and sites you visit are still visible to your ISP and upstream network operators. Some providers sell this data or use it to target you with ads.

If you install the 1.1.1.1 app, Cloudflare will create an always-on, encrypted tunnel from your device to the nearest Cloudflare data center and secure your Internet traffic. We call this Cloudflare WARP. WARP not only encrypts your traffic but can even help accelerate it by routing intelligently across the Cloudflare network.

WARP is a compelling VPN replacement without the risks associated with some shady VPN providers who may also want to sell your data. Remember, Cloudflare will never sell your data!

The Cloudflare WARP client combined with Cloudflare for Teams gives you enhanced visibility into DNS queries and unlocks some advanced traffic management and filtering capabilities. And it’s all free for small teams.

Five Great (free!) Ways to Get Started With Cloudflare

Hopefully, my exploration of the Cloudflare product portfolio gives you some ideas of what you can do to make your life a little easier or your team more secure. I’m just scratching the surface, and I’m excited to keep learning what’s possible with Cloudflare. I’ll continue to share what I learn, and I encourage you to experiment with some of these capabilities yourself and let me know how it goes.

Cloudflare Tunnel for Content Teams

Post Syndicated from Alice Bracchi original https://blog.cloudflare.com/cloudflare-tunnel-for-content-teams/

Cloudflare Tunnel for Content Teams

Cloudflare Tunnel for Content Teams

A big part of the job of a technical writer is getting feedback on the content you produce. Writing and maintaining product documentation is a deeply collaborative and cyclical effort — through constant conversation with product managers and engineers, technical writers ensure the content is clear and serves the user in the most effective way. Collaboration with other technical writers is also important to keep the documentation consistent with Cloudflare’s content strategy.

So whether we’re documenting a new feature or overhauling a big portion of existing documentation, sharing our writing with stakeholders before it’s published is quite literally half the work.

In my experience as a technical writer, the feedback I’ve received has been exponentially more impactful when stakeholders could see my changes in context. This is especially true for bigger and more strategic changes. Imagine I’m changing the structure of an entire section of a product’s documentation, or shuffling the order of pages in the navigation bar. It’s hard to guess the impact of those changes just by looking at the markdown files.

We writers check those changes in context by building a development server on our local machines. But sharing what we see locally with our stakeholders has always been a pain point for us. We’ve sent screenshots (hardly a good idea). We’ve recorded our screens. We’ve asked stakeholders to check out our branches locally and build a development server on their own. Lately, we’ve added a GitHub action to our open-source cloudflare-docs repo that allows us to generate a preview link for all pull requests with a certain label. However, that requires us to open a pull request with our changes, and that is not ideal if we’re documenting a feature that’s yet to be announced, or if our work is still in its early stages.

So the question has always been: could there be a way for someone else to see what we see, as easily as we see it?

Enter Cloudflare Tunnel

I was working on a complete refresh of Cloudflare Tunnel’s documentation when I realized the product could very well answer that question for us as a technical writing team.

If you’re not familiar with the product, Cloudflare Tunnel provides a secure way to connect your local resources to the Cloudflare network without poking holes in your firewall. By running cloudflared in your environment, you can create outbound-only connections to Cloudflare’s edge, and ensure all traffic to your origins goes through Cloudflare and is protected from outside interference.

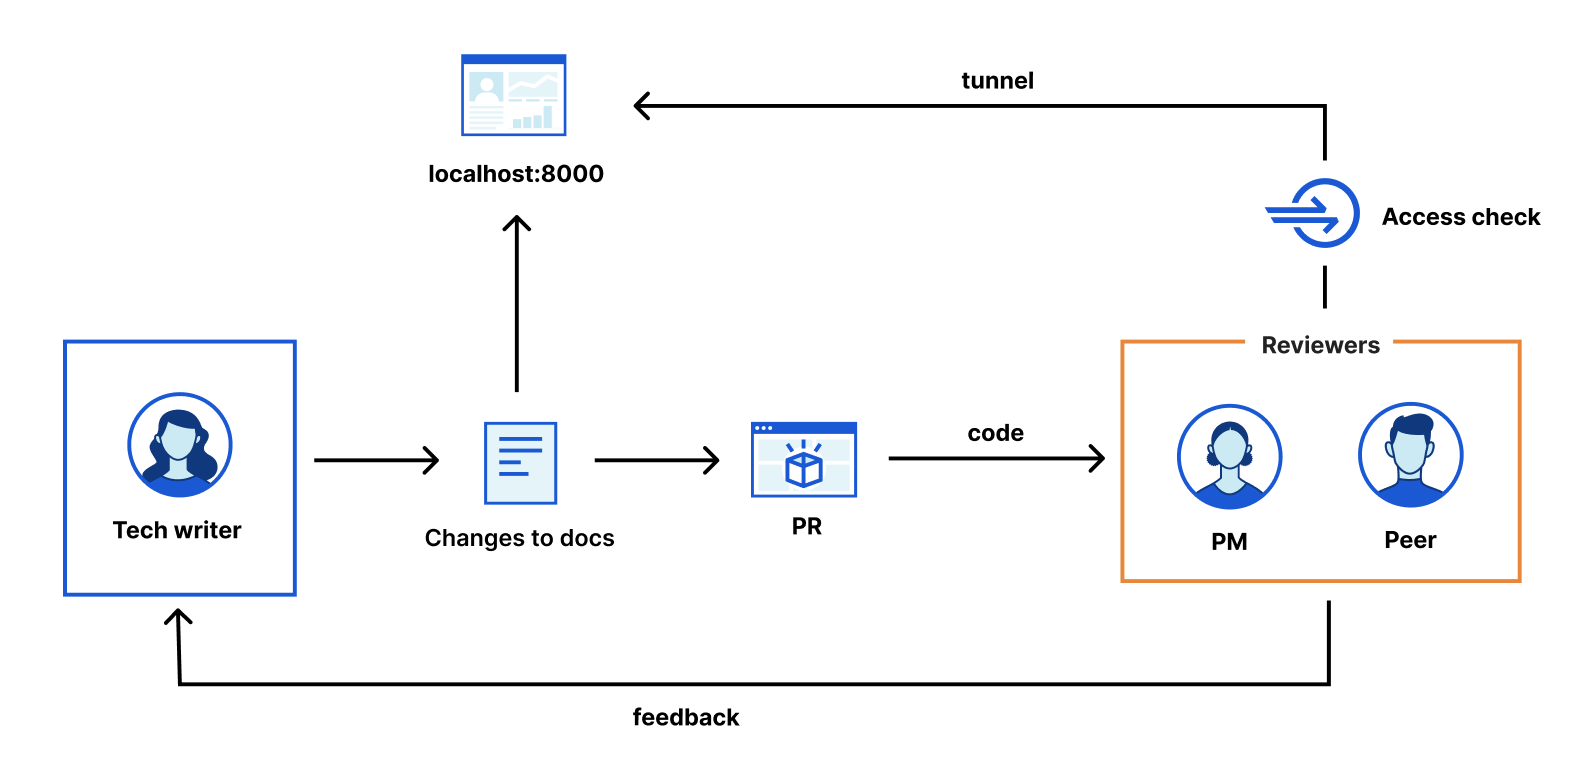
For our team, Cloudflare Tunnel could offer a way for our stakeholders to interact with what’s on our local environments in real-time, just like a customer would if the changes were published. To do that, we could expose our local environment to the edge through a tunnel, assign a DNS record to that tunnel, and then share that URL with our stakeholders.

So if each member in the technical writing team had their own tunnel that they could spin up every time they needed to get feedback, that would pretty much solve our long-standing problem.

Cloudflare Tunnel for Content Teams

Setting up the tunnel

To test out that this would work, I went ahead and tried it for myself.

First, I made sure to create a local branch of the cloudflare-docs repo, make local changes, and run a development server locally on port 8000.

Since I already had cloudflared installed on my machine, the next thing I needed to do was log into my team’s Cloudflare account, pick the zone I wanted to create tunnels for (I picked developers.cloudflare.com), and authorize Cloudflare Tunnel for that zone.

$ cloudflared login

Next, it was time to create the Named Tunnel.

$ cloudflared tunnel create alice
Tunnel credentials written to /Users/alicebracchi/.cloudflared/0e025819-6f12-4f49-8183-c678273feef4.json. cloudflared chose this file based on where your origin certificate was found. Keep this file secret. To revoke these credentials, delete the tunnel.

Created tunnel alice with id 0e025819-6f12-4f49-8183-c678273feef4

Alright, tunnel created. Next, I needed to assign a DNS record to it. I wanted it to be something readable and easily shareable with stakeholders (like abracchi.developers.cloudflare.com), so I ran the following command and specified the tunnel name first and then the desired subdomain:

$ cloudflared tunnel route dns alice abracchi

Next, I needed a way to tell the tunnel to serve traffic to my localhost:8000 port. For that, I created a configuration file in my default cloudflared directory and specified the following fields:

url: https://localhost:8000
tunnel: 0e025819-6f12-4f49-8183-c678273feef4
credentials-file: /Users/alicebracchi/.cloudflared/0e025819-6f12-4f49-8183-c678273feef4
.json  

Time to run the tunnel. The following command established connections between my origin and the Cloudflare edge, telling the tunnel to serve traffic to my origin according to the parameters I’d specified in the config file:

$ cloudflared tunnel --config /Users/alicebracchi/.cloudflared/config.yml run alice
2021-10-18T09:39:54Z INF Starting tunnel tunnelID=0e025819-6f12-4f49-8183-c678273feef4
2021-10-18T09:39:54Z INF Version 2021.9.2
2021-10-18T09:39:54Z INF GOOS: darwin, GOVersion: go1.16.5, GoArch: amd64
2021-10-18T09:39:54Z INF Settings: map[cred-file:/Users/alicebracchi/.cloudflared/0e025819-6f12-4f49-8183-c678273feef4.json credentials-file:/Users/alicebracchi/.cloudflared/0e025819-6f12-4f49-8183-c678273feef4.json url:http://localhost:8000]
2021-10-18T09:39:54Z INF Generated Connector ID: 90a7e3a9-9d59-4d26-9b87-4b94ebf4d2a0
2021-10-18T09:39:54Z INF cloudflared will not automatically update when run from the shell. To enable auto-updates, run cloudflared as a service: https://developers.cloudflare.com/argo-tunnel/reference/service/
2021-10-18T09:39:54Z INF Initial protocol http2
2021-10-18T09:39:54Z INF Starting metrics server on 127.0.0.1:64193/metrics
2021-10-18T09:39:55Z INF Connection 13bf4c0c-b35b-4f9a-b6fa-f0a3dd001951 registered connIndex=0 location=MAD
2021-10-18T09:39:56Z INF Connection 38510c22-5256-45f2-abf8-72f1207ca242 registered connIndex=1 location=LIS
2021-10-18T09:39:57Z INF Connection 9ab0ea06-b1cf-483c-bd48-64a067a87c39 registered connIndex=2 location=MAD
2021-10-18T09:39:58Z INF Connection df079efe-8246-4e93-85f5-10caf8b7c354 registered connIndex=3 location=LIS

And sure enough, at abracchi.developers.cloudflare.com, my teammates could see what I was seeing on localhost:8000.

Securing the tunnel

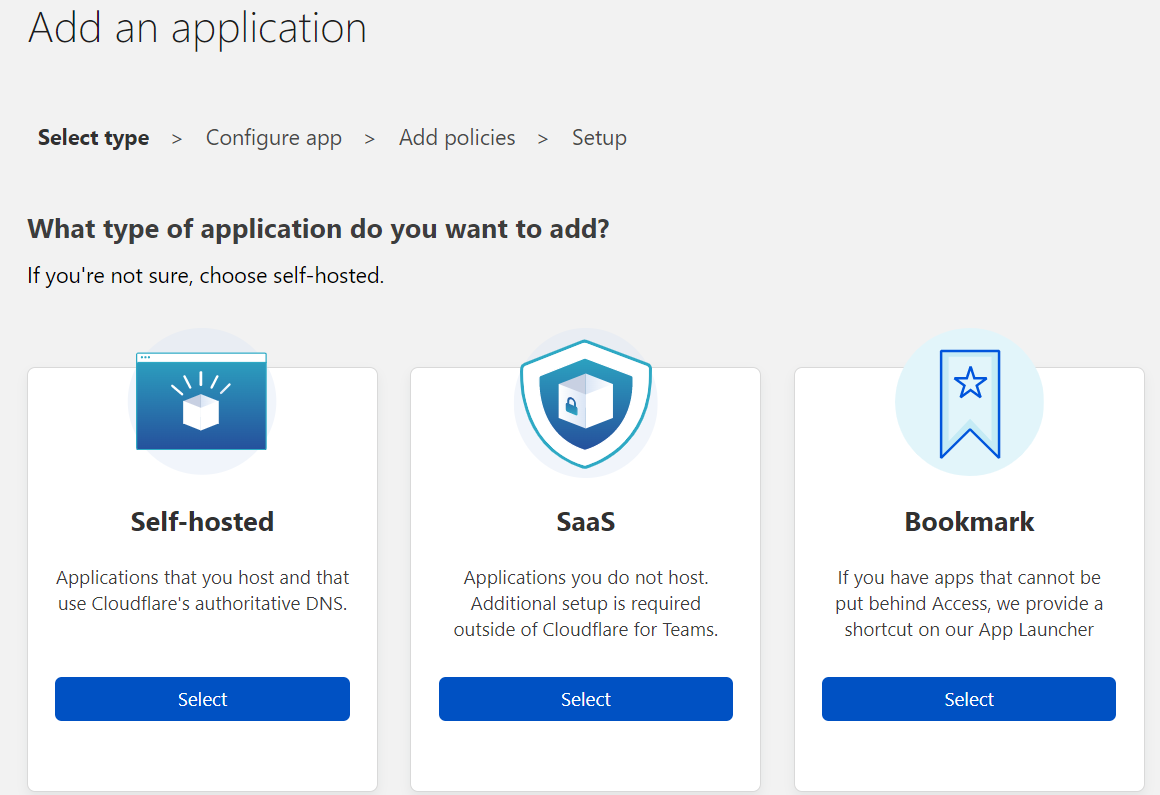
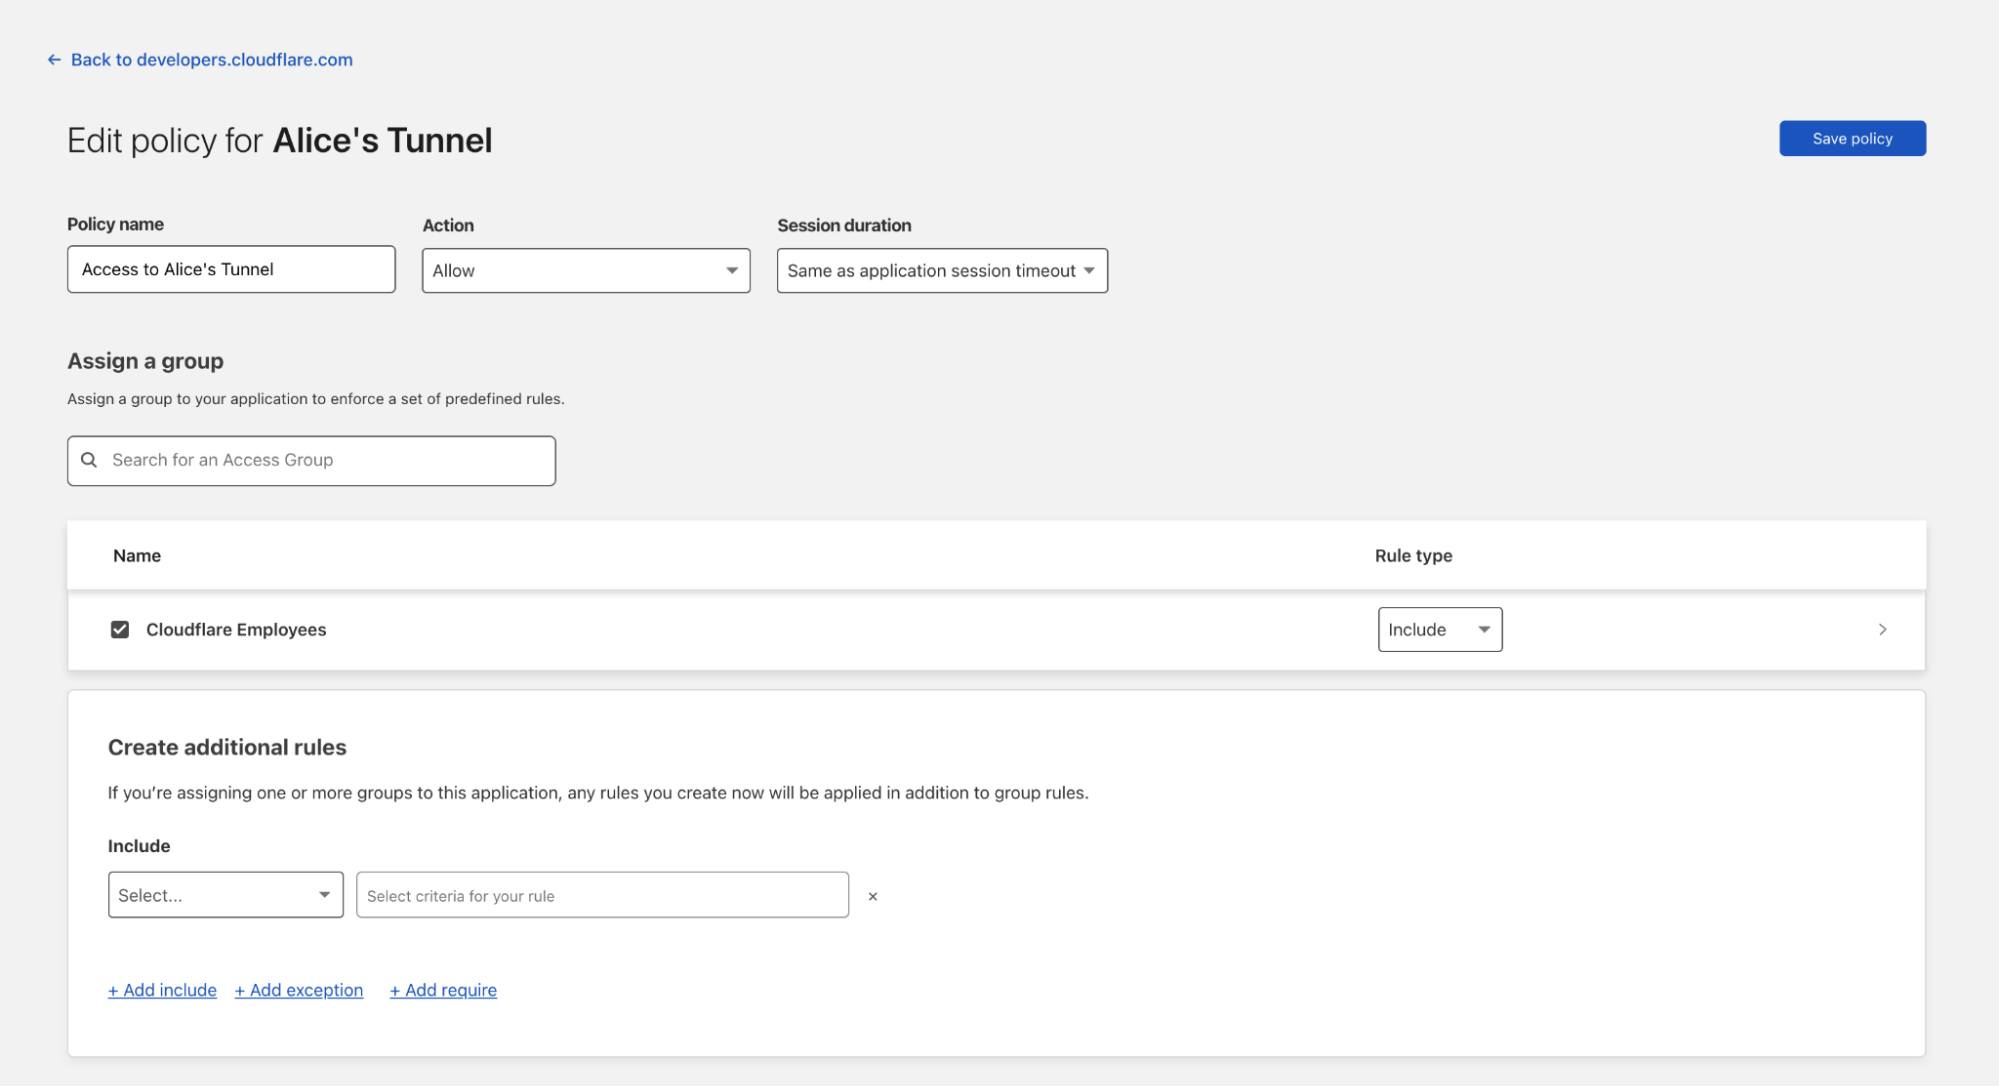
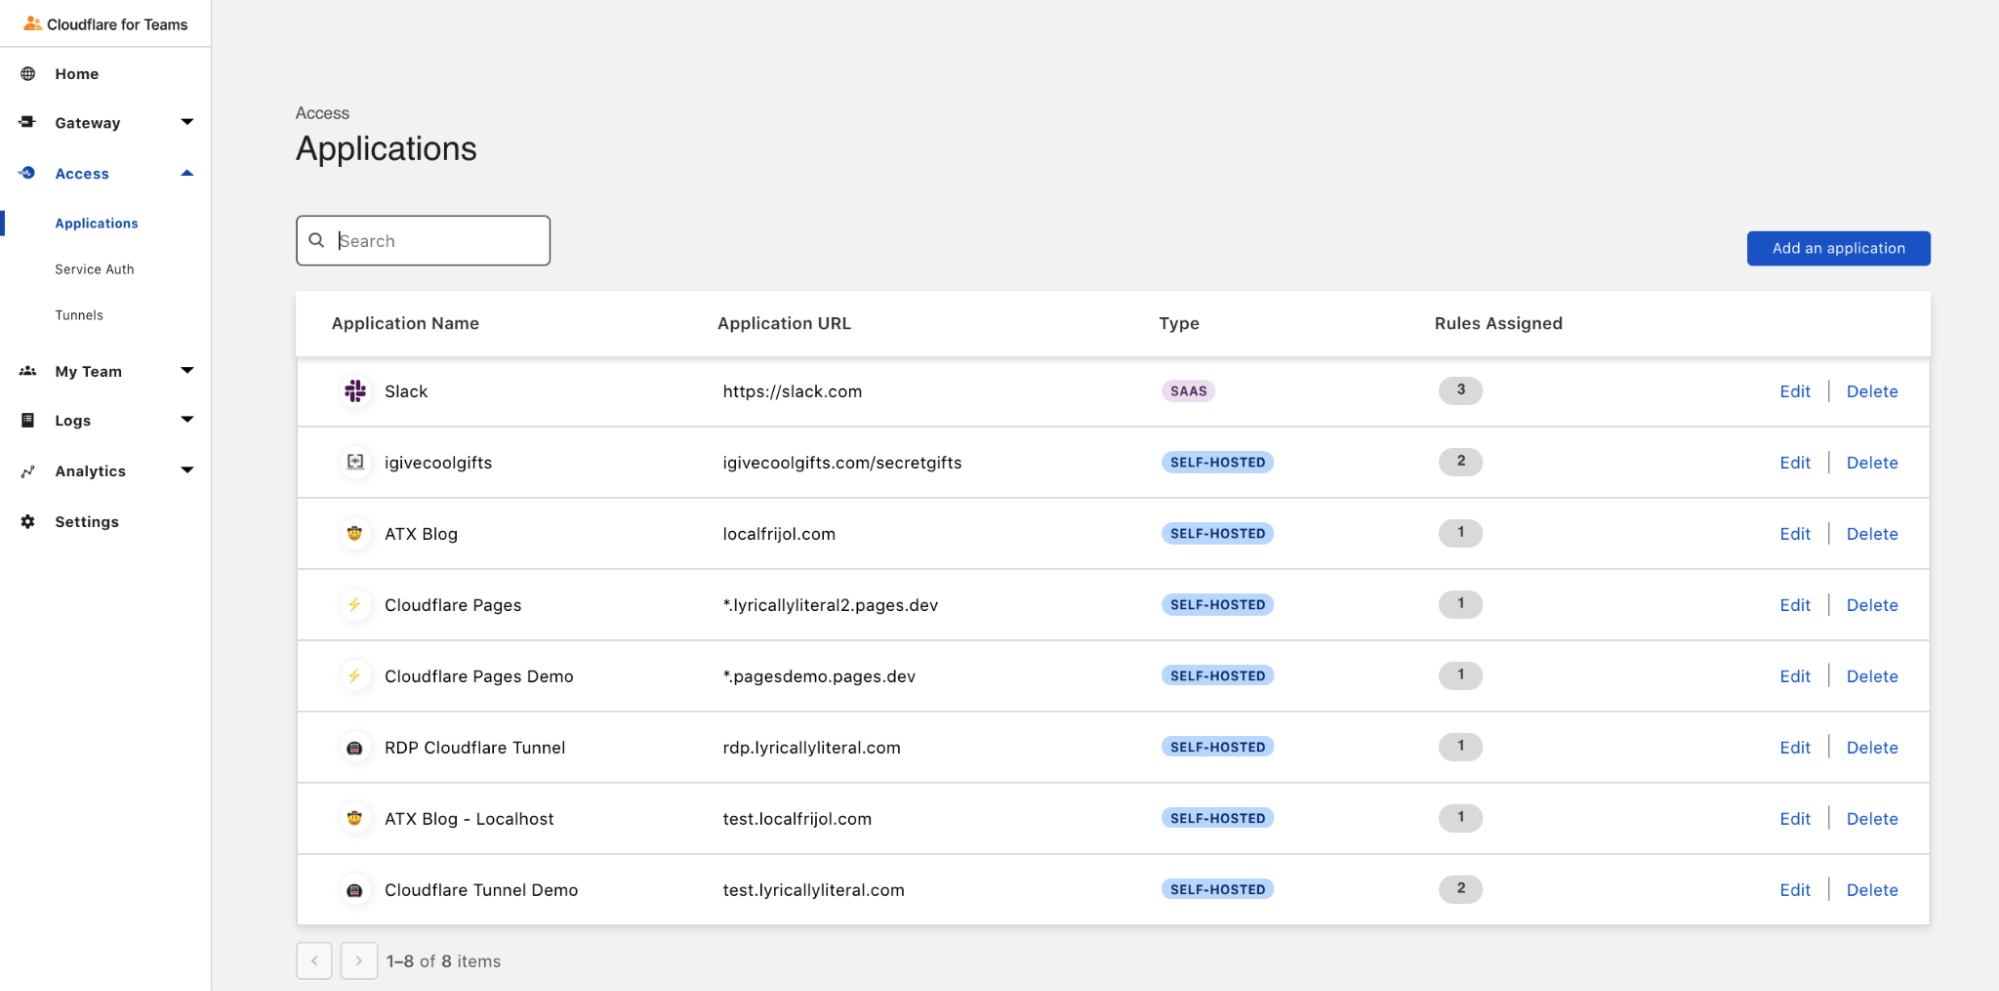
After creating the tunnel, I needed to make sure only people within Cloudflare could access that tunnel. As it was, anyone with access to abracchi.developers.cloudflare.com could see what was in my local environment. To fix this, I set up an Access self-hosted application by navigating to Access > Applications on the Teams Dashboard. For this application, I then created a policy that restricts access to the tunnel to a user group that includes only Cloudflare employees and requires authentication via Google or One-time PIN (OTP).

This makes applications like my tunnel easily shareable between colleagues, but also safe from potential vulnerabilities.

Cloudflare Tunnel for Content Teams

Et voilà!

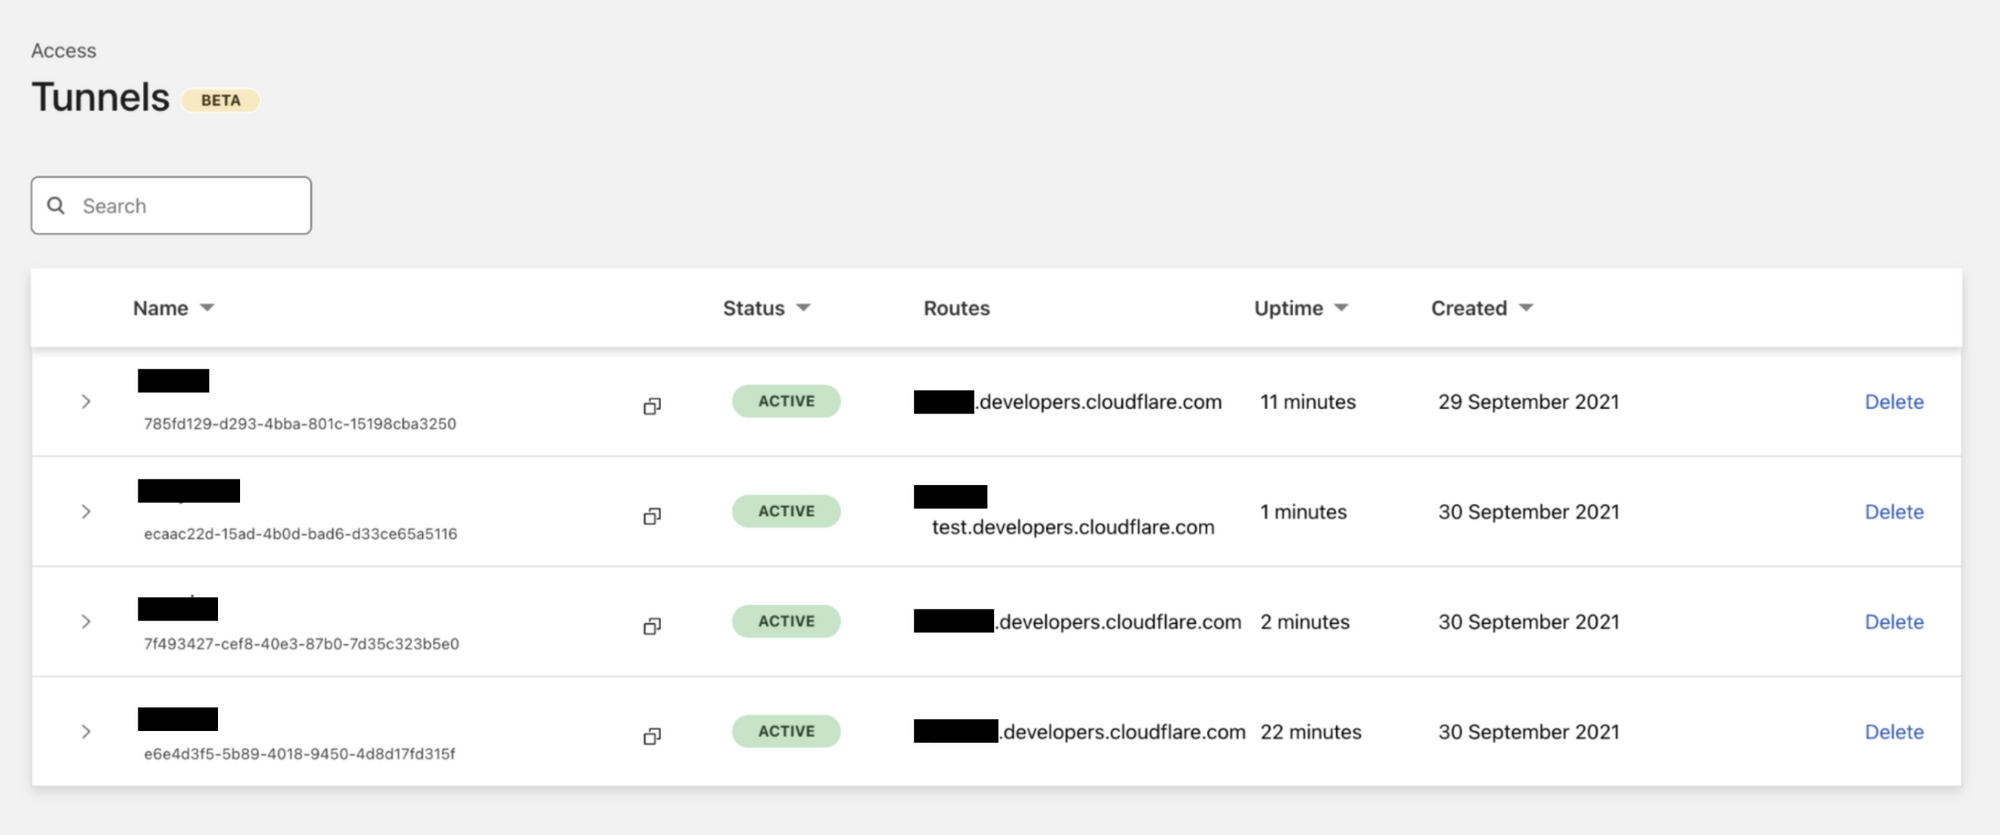
Back to the Tunnels page, this is what the content team’s Cloudflare Tunnel setup looks like after each writer completed the process I’ve outlined above. Every writer has their personal tunnel set up and their local environment exposed to the Cloudflare Edge:

Cloudflare Tunnel for Content Teams

What’s next

The team is now seamlessly sharing visual content with their stakeholders, but there’s still room for improvement. Cloudflare Tunnel is just the first step towards making the feedback loop easier for everyone involved. We’re currently exploring ways we can capture integrated feedback directly at the URL that’s shared with the stakeholders, to avoid back-and-forth on separate channels.

We’re also looking into bringing in Cloudflare Pages to make the entire deployment process faster. Stay tuned for future updates, and in the meantime, check out our developer docs.

Tunnel: Cloudflare’s Newest Homeowner

Post Syndicated from Abe Carryl original https://blog.cloudflare.com/observe-and-manage-cloudflare-tunnel/

Tunnel: Cloudflare’s Newest Homeowner

Cloudflare Tunnel connects your infrastructure to Cloudflare. Your team runs a lightweight connector in your environment, cloudflared, and services can reach Cloudflare and your audience through an outbound-only connection without the need for opening up holes in your firewall.

Tunnel: Cloudflare’s Newest Homeowner

Whether the services are internal apps protected with Zero Trust policies, websites running in Kubernetes clusters in a public cloud environment, or a hobbyist project on a Raspberry Pi — Cloudflare Tunnel provides a stable, secure, and highly performant way to serve traffic.

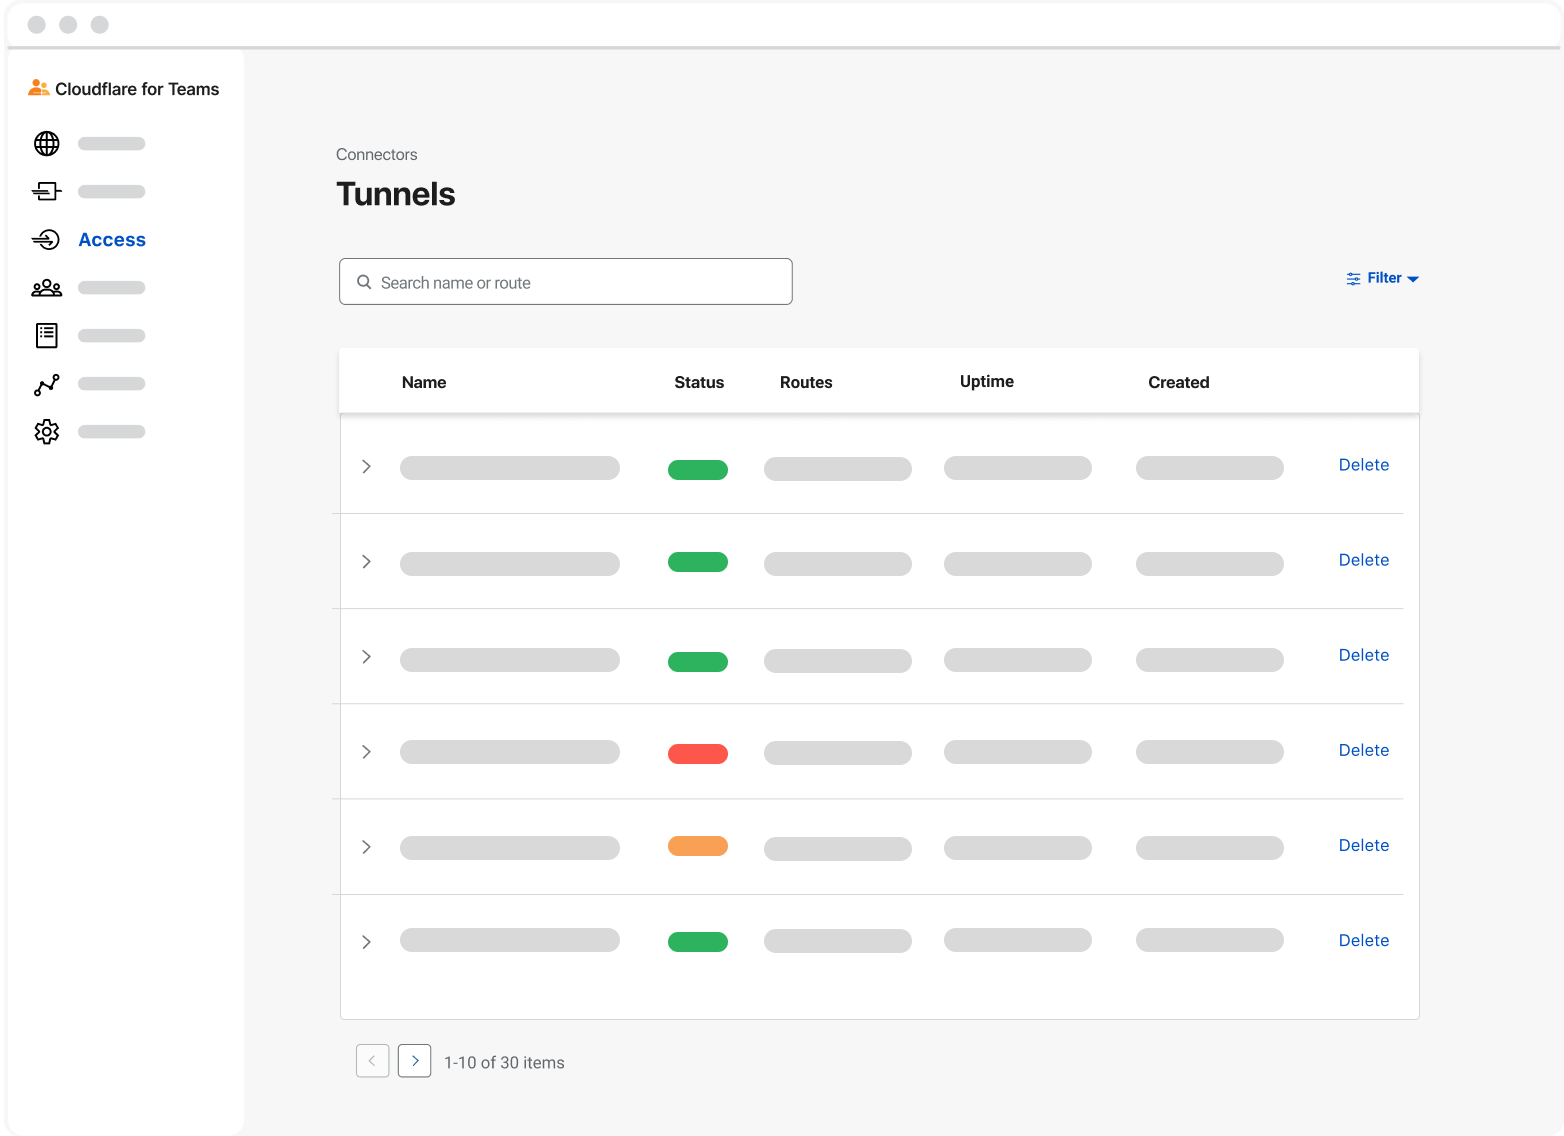
Starting today, with our new UI in the Cloudflare for Teams Dashboard, users who deploy and manage Cloudflare Tunnel at scale now have easier visibility into their tunnels’ status, routes, uptime, connectors, cloudflared version, and much more. On the Teams Dashboard you will also find an interactive guide that walks you through setting up your first tunnel.  

Getting Started with Tunnel

Tunnel: Cloudflare’s Newest Homeowner

We wanted to start by making the tunnel onboarding process more transparent for users. We understand that not all users are intimately familiar with the command line nor are they deploying tunnel in an environment or OS they’re most comfortable with. To alleviate that burden, we designed a comprehensive onboarding guide with pathways for MacOS, Windows, and Linux for our two primary onboarding flows:

  1. Connecting an origin to Cloudflare
  2. Connecting a private network via WARP to Tunnel

Our new onboarding guide walks through each command required to create, route, and run your tunnel successfully while also highlighting relevant validation commands to serve as guardrails along the way. Once completed, you’ll be able to view and manage your newly established tunnels.

Managing your tunnels

Tunnel: Cloudflare’s Newest Homeowner

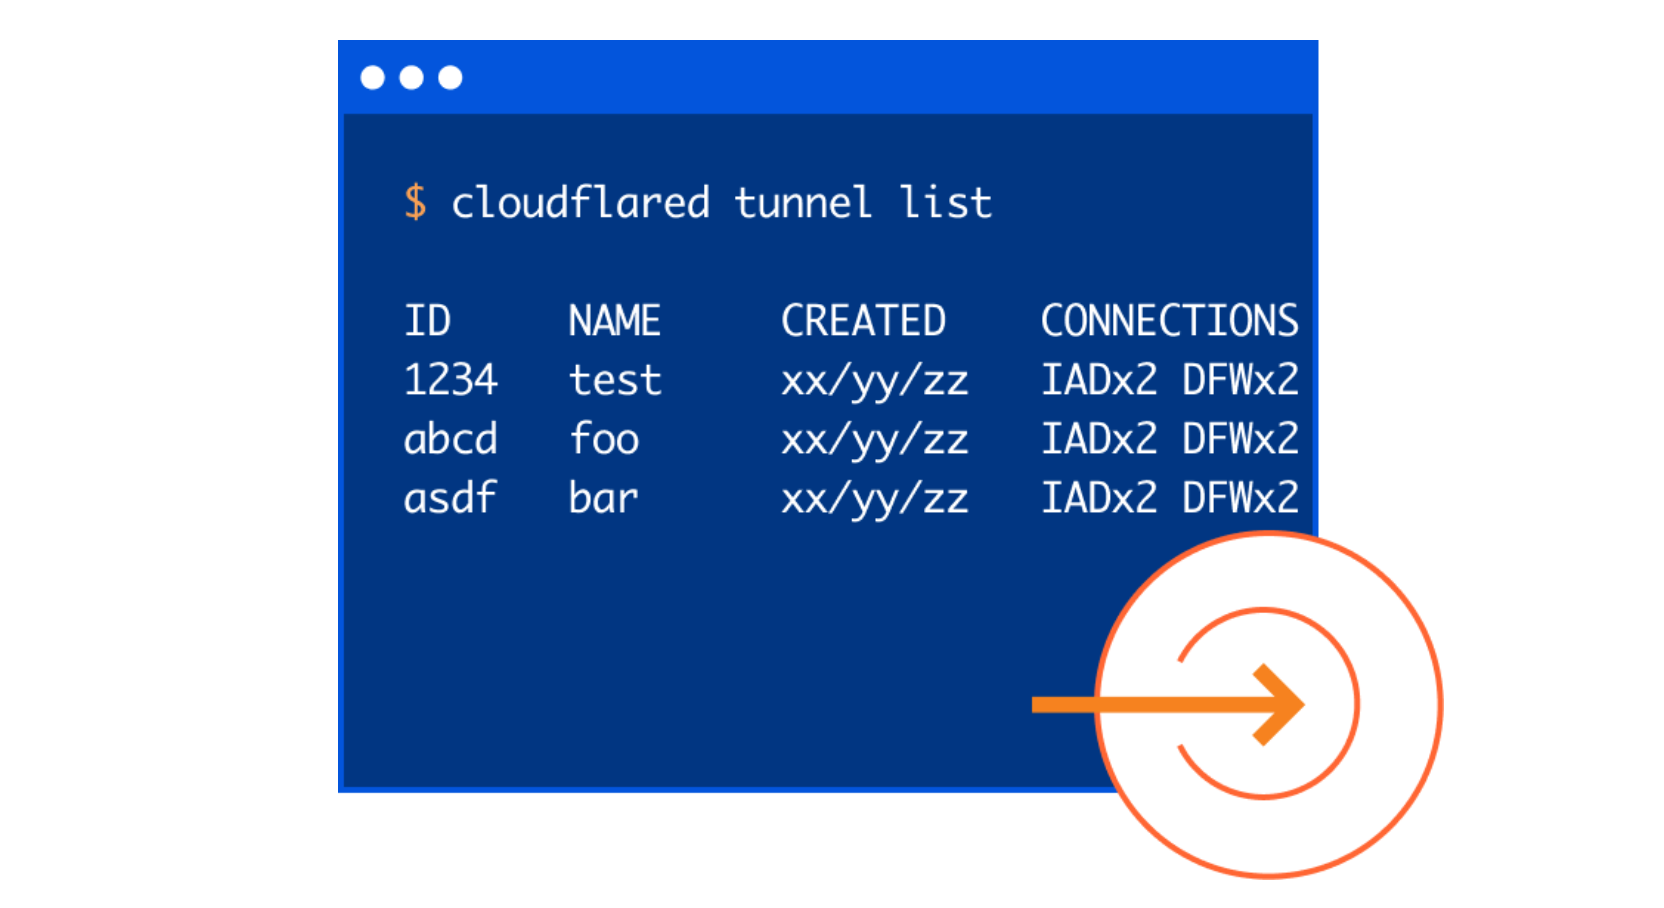
When thinking about the new user interface for tunnel we wanted to concentrate our efforts on how users gain visibility into their tunnels today. It was important that we provide the same level of observability, but through the lens of a visual, interactive dashboard. Specifically, we strove to build a familiar experience like the one a user may see if they were to run cloudflared tunnel list to show all of their tunnels, or cloudflared tunnel info if they wanted to better understand the connection status of a specific tunnel.

Tunnel: Cloudflare’s Newest Homeowner

In the interface, you can quickly search by name or filter by name, status, uptime, or creation date. This allows users to easily identify and manage the tunnels they need, when they need them. We also included other key metrics such as Status and Uptime.

A tunnel’s status depends on the health of its connections:

  • Active: This means your tunnel is running and has a healthy connection to the Cloudflare network.
  • Inactive: This means your tunnel is not running and is not connected to Cloudflare.
  • Degraded: This means one or more of your four long-lived TCP connections to Cloudflare have been disconnected, but traffic is still being served to your origin.

A tunnel’s uptime is also calculated by the health of its connections. We perform this calculation by determining the UTC timestamp of when the first (of four) long-lived TCP connections is established with the Cloudflare Edge. In the event this single connection is terminated, we will continue tracking uptime as long as one of the other three connections continues to serve traffic. If no connections are active, Uptime will reset to zero.

Tunnel Routes and Connectors

Last year, shortly after the announcement of Named Tunnels, we released a new feature that allowed users to utilize the same Named Tunnel to serve traffic to many different services through the use of Ingress Rules. In the new UI, if you’re running your tunnels in this manner, you’ll be able to see these various services reflected by hovering over the route’s value in the dashboard. Today, this includes routes for DNS records, Load Balancers, and Private IP ranges.

Even more recently, we announced highly available and highly scalable instances of cloudflared, known more commonly as “cloudflared replicas.” To view your cloudflared replicas, select and expand a tunnel. Then you will identify how many cloudflared replicas you’re running for a given tunnel, as well as the corresponding connection status, data center, IP address, and version. And ultimately, when you’re ready to delete a tunnel, you can do so directly from the dashboard as well.

What’s next

Moving forward, we’re excited to begin incorporating more Cloudflare Tunnel analytics into our dashboard. We also want to continue making Cloudflare Tunnel the easiest way to connect to Cloudflare. In order to do that, we will focus on improving our onboarding experience for new users and look forward to bringing more of that functionality into the Teams Dashboard. If you have things you’re interested in having more visibility around in the future, let us know below!

Cloudflare for Offices

Post Syndicated from James Allworth original https://blog.cloudflare.com/cloudflare-for-offices/

Cloudflare for Offices

Cloudflare for Offices

Cloudflare’s network is one of the biggest, most connected, and fastest in the world. It extends to more than 250 cities. In those cities, we’re often present in multiple data centers in order to connect to as many networks and bring our services as close to as many users as possible. We’re always asking ourselves: how can we get closer to even more of the world’s Internet users?

Today, we’re taking a big step toward that goal.

Introducing Cloudflare for Offices. We are creating strategic partnerships that will enable us to extend Cloudflare’s network into over 1,000 of the world’s busiest office buildings and multi-dwelling units. These buildings span the globe, and are where millions of people work every day; now, they’re going to be microseconds away from our global network. Our first deployments will include 30 Hudson Yards, 4 Times Square, and 520 Madison in New York; Willis Tower in Chicago; John Hancock Tower in Boston; and the Embarcadero Center and Salesforce Tower in San Francisco.

And we’re not done. We’ve built custom secure hardware and partnered with fiber providers to scale this model globally. It will bring a valuable new resource to the literal doorstep of building tenants.

Cloudflare has built a mutually beneficial relationship with the world’s ISPs by reducing their operational costs and improving customer performance. Similarly, we expect a mutually beneficial relationship as we roll out Cloudflare for Offices. Real estate operators & service offices upgraded with this amenity increase the value and occupancy of their portfolio. IT teams can enforce a consistent security posture while enabling flexible work environments from any location their employees prefer. And employees in these smart spaces, experiencing faster Internet performance, can be more productive, seamlessly working as they choose, be it at the office, at home, or on the go.

Why offices?

There’s no disputing the fact that the nature of work has undergone a tremendous shift over the past 18 months. While we still don’t know what the future of work will look like exactly, here’s what we do know: it’s going to require more flexibility, all while maintaining security and performance standards that are a prerequisite for operating on today’s Internet. Enabling flexibility, and improving performance AND security (as opposed to trading one off for the other) has been a long held belief of Cloudflare. Alongside, of course, driving value for organizations.

Cloudflare for Offices — by connecting directly with enterprises — enables us to now do that for commercial office space.

No More Band-Aid Boxes in the Basement

There are a variety of advantages to Cloudflare for Offices. First and foremost, it eliminates the need to rely on the costly, rigid hardware solutions and multiple, regional, third parties that are often required to provide secure and performant branch office connectivity. Businesses have maintained expensive and hardware-intensive office networks since the dawn of the modern Internet.

Never have they gotten less return on that investment than through the pandemic.

The hybrid future of work will only exacerbate the high costs and complexity of maintaining and securing this outdated infrastructure. MPLS links. WANs. Hardware firewalls. VPNs. All these remain mainstays of the modern office. In the same way that we look back on maintaining server rooms for compute and storage as complete anachronisms, so too will we soon look back on maintaining all these boxes in an office. We’ve spoken to customers who now have over half of their workforce remote, and who are considering giving up their office space or increasing their presence in shared workspaces. Some are being hamstrung because of a need for MPLS to make their network operate securely. But it’s not just customers. This is a problem that we ourselves have been facing. Setting up new offices, or securing and optimizing shared workspaces, is a huge lift, physically as well as technologically.

Cloudflare for Offices simplifies this: a direct connection to Cloudflare’s network puts all office traffic behind Cloudflare’s services. Now, creating an office is as simple as plugging a cable into our box, and all the security and performance features that an office typically needs are microseconds away. It also enables the creation of custom topologies on Cloudflare’s network, dramatically increasing the flexibility of your physical footprint.

“Throughout the pandemic, we’ve supported our over 12,000 employees to work safely and seamlessly from home or from our offices. Cloudflare solutions have been critical, and we’re excited to continue to partner on efficient and strong solutions.”
Mark Papermaster, CTO and Executive Vice President, Technology and Engineering, AMD

Zero (Trust) to 100 performance

COVID-19 hasn’t just driven a paradigm shift in where people work, however. It’s also driven a paradigm shift in how organizations think about IT security.

The old model — castle and moat — was designed during the desktop era, when most computing happened on premises. Everyone within the walls of the enterprise was considered authenticated; if you were outside the office, you needed to “tunnel” in through the moat in the castle of the office. As more and more users entered the portable era — through laptops and smartphones — then more tunnels were created.

The pandemic made it so that everyone was outside the moat, tunneling into an empty castle. Nobody was in the office anymore. The paradigm has been stretched to a parody.

Google was one of the first organizations to start to think about how things could be done differently: it proposed a model called BeyondCorp, which treated internal employees to an organization similar to how it treated external customers or suppliers to an organization. To put it simply: nobody is trusted, no matter if they’re in the office or not. If you want access to something, be prepared to prove you are who you say you are.

Fast-forward to 2021, and this model — otherwise known as Zero Trust — has become the gold standard of enterprise security, to which more and more organizations are implementing. Cloudflare’s Zero Trust solution — Cloudflare for Teams — has become increasingly popular for not just its advanced functionality and its ease of use, but because, when coupled with our enterprise connectivity offerings, allows you to run more and more of your traffic across Cloudflare’s network. We call this holistic solution Cloudflare One, and it provides your organization a virtual private network in the cloud, with all the associated security and visibility benefits.

Cloudflare for Offices

Cloudflare for Offices is the onramp for offices onto Cloudflare One. It’s a fast, private onramp for your office network traffic straight onto the Cloudflare network — with all the security and visibility benefits that running your traffic over our network provides.

We also realize that for many organizations, Zero Trust is a journey. Not every customer is ready to go from MPLS and built-out networks to trusting the public Internet overnight. Cloudflare for Offices is a great start in the journey — by building out your own networks on top of Cloudflare, you reduce your threat vectors while being able to keep your existing topologies. This gives you the privacy and security of Cloudflare One, but with the flexibility to build Zero Trust any way you choose.

But security and visibility are not the only benefits. One of the common complaints we hear from customers about competing solutions is that performance can be extremely variable. The proximity Cloudflare has to so many people around the world is important because when employees connect using a Zero Trust solution, at least a subset (but often all) the traffic going from an end-user device needs to connect to the Zero Trust provider. Having Cloudflare equipment close means that the performance of the user device will be vastly increased as opposed to having to connect to a far off data center. You’ve probably read about what happens when Cloudflare takes control of your Last Mile connectivity and your network to your data centers. And you know that connecting to a Cloudflare data center in the same city increases performance, but imagine what happens when you’re connecting to Cloudflare in your office basement. And when you think about all the employees that you have are running on a zero trust model, that performance difference sums up to a lot of additional employee productivity.

Up until now, something like this has been extremely expensive, complicated, and oftentimes, slow.

“We see a lot of potential in the way Cloudflare is bringing its network directly to our office locations. It’s critical that we empower our employees to work productively and securely, and this makes it that much easier for us to do so no matter where our teams are working from in the future–and reducing our network costs along the way.”
Aaron Dearinger, Edge Architect, Garmin International

Cloudflare for Offices allows for customers to choose their Network as a Service: let us manage your footprint and build your network out however you like.

Living on the Edge

But it’s not just zero trust that gets a boost. Workers, Cloudflare’s serverless platform, runs on the edge from the nearest data center to the user making the request. As you might have already read: it’s fast. With more and more business and application logic being moved to Workers, your end users stand to benefit.

But it does beg the question: just how fast are we talking?

Cloudflare for Offices
Photo by Denys Nevozhai on Unsplash

One example building we’re planning to enable is Salesforce Tower, in San Francisco. It’s 1,070 feet tall. A light signal running from the top of the building to the basement along a single-mode fiber cable would take no more than 6 µs (6 microseconds) to complete its journey. This puts customers fractions of a millisecond away from Cloudflare’s network.

The edge is becoming indistinguishable in performance from local compute.

Built for Purpose

We’ve written many times before about how Cloudflare designs our hardware. But deploying Cloudflare hardware outside of data centers — and into office basements — presented a new set of challenges. Cooling, energy efficiency, and resiliency were even more important in the design. Similarly, these are going to be deployed to offices all over the world; they needed to be cost-effective. Finally, and perhaps most importantly, there is also a security aspect to this: we could not assume the same level of access control inside a building as we could inside a data center.

Cloudflare for Offices

This is where the inherent advantages of designing and owning the hardware come to the fore. Because of it, we’re able to build exactly what we need for the environment: ranging from how resilient these devices need to be, to an appropriate level of security given where they’re going to be operating. In fact, we have been working on hardware security for the last five years in anticipation of the launch of Cloudflare for Offices. We’re starting with switching, and we plan to add compute and storage capabilities in short order. Stay tuned for more details.

Join the Revolution

If you’re an organization (tenant) in a large office building, an owner/operator of multi-tenant (or multi-dwelling) real estate, or a co-working space looking to bring Cloudflare to your doorstep — with all the flexibility, performance and security enhancements, and cost savings that would entail — then we’d love for you to get in touch with us.

Quick Tunnels: Anytime, Anywhere

Post Syndicated from Rishabh Bector original https://blog.cloudflare.com/quick-tunnels-anytime-anywhere/

Quick Tunnels: Anytime, Anywhere

Quick Tunnels: Anytime, Anywhere

My name is Rishabh Bector, and this summer, I worked as a software engineering intern on the Cloudflare Tunnel team. One of the things I built was quick Tunnels and before departing for the summer, I wanted to write a blog post on how I developed this feature.

Over the years, our engineering team has worked hard to continually improve the underlying architecture through which we serve our Tunnels. However, the core use case has stayed largely the same. Users can implement Tunnel to establish an encrypted connection between their origin server and Cloudflare’s edge.

This connection is initiated by installing a lightweight daemon on your origin, to serve your traffic to the Internet without the need to poke holes in your firewall or create intricate access control lists. Though we’ve always centered around the idea of being a connector to Cloudflare, we’ve also made many enhancements behind the scenes to the way in which our connector operates.

Typically, users run into a few speed bumps before being able to use Cloudflare Tunnel. Before they can create or route a tunnel, users need to authenticate their unique token against a zone on their account. This means in order to simply spin up a Tunnel testing environment, users need to first create an account, add a website, change their nameservers, and wait for DNS propagation.

Starting today, we’re excited to fix that. Cloudflare Tunnel now supports a free version that includes all the latest features and does not require any onboarding to Cloudflare. With today’s change, you can begin experimenting with Tunnel in five minutes or less.

Introducing Quick Tunnels

When administrators start using Cloudflare Tunnel, they need to perform four specific steps:

  1. Create the Tunnel
  2. Configure the Tunnel and what services it will represent
  3. Route traffic to the Tunnel
  4. And finally… run the Tunnel!

These steps give you control over how your services connect to Cloudflare, but they are also a chore. Today’s change, which we are calling quick Tunnels, not only removes some onboarding requirements, we’re also condensing these into a single step.

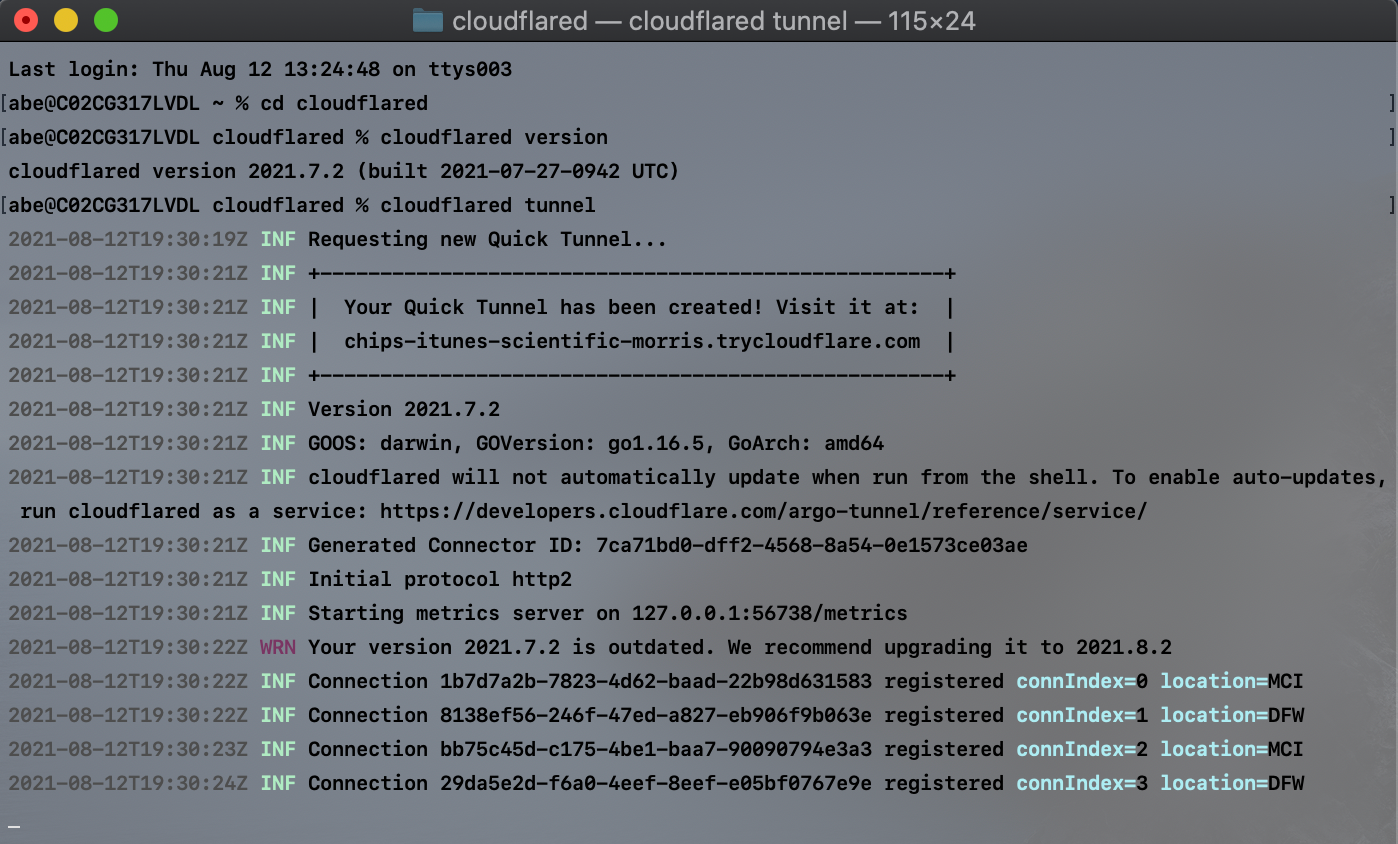
If you have a service running locally that you want to share with teammates or an audience, you can use this single command to connect your service to Cloudflare’s edge. First, you need to install the Cloudflare connector, a lightweight daemon called cloudflared. Once installed, you can run the command below.

cloudflared tunnel

Quick Tunnels: Anytime, Anywhere

When run, cloudflared will generate a URL that consists of a random subdomain of the website trycloudflare.com and point traffic to localhost port 8080. If you have a web service running at that address, users who visit the subdomain generated will be able to visit your web service through Cloudflare’s network.

Configuring Quick Tunnels

We built this feature with the single command in mind, but if you have services that are running at different default locations, you can optionally configure your quick Tunnel to support that.

One example is if you’re building a multiplayer game that you want to share with friends. If that game is available locally on your origin, or even your laptop, at localhost:3000, you can run the command below.

cloudflared tunnel ---url localhost:3000

You can do this with IP addresses or URLs, as well. Anything that cloudflared can reach can be made available through this service.

How does it work?

Cloudflare quick Tunnels is powered by Cloudflare Workers, giving us a serverless compute deployment that puts Tunnel management in a Cloudflare data center closer to you instead of a centralized location.

When you run the command cloudflared tunnel, your instance of cloudflared initiates an outbound-only connection to Cloudflare. Since that connection was initiated without any account details, we treat it as a quick Tunnel.

A Cloudflare Worker, which we call the quick Tunnel Worker, receives a request that a new quick Tunnel should be created. The Worker generates the random subdomain and returns that to the instance of cloudflared. That instance of cloudflared can now establish a connection for that subdomain.

Meanwhile, a complementary service running on Cloudflare’s edge receives that subdomain and the identification number of the instance of cloudflared. That service uses that information to create a DNS record in Cloudflare’s authoritative DNS which maps the randomly-generated hostname to the specific Tunnel you created.

The deployment also relies on the Workers Cron Trigger feature to perform clean up operations. On a regular interval, the Worker looks for quick Tunnels which have been disconnected for more than five minutes. Our Worker classifies these Tunnels as abandoned and proceeds to delete them and their associated DNS records.

What about Zero Trust policies?

By default, all the quick Tunnels that you create are available on the public Internet at the randomly generated URL. While this might be fine for some projects and tests, other use cases require more security.

Quick Tunnels: Anytime, Anywhere

If you need to add additional Zero Trust rules to control who can reach your services, you can use Cloudflare Access alongside Cloudflare Tunnel. That use case does require creating a Cloudflare account and adding a zone to Cloudflare, but we’re working on ideas to make that easier too.

Where should I notice improvements?

We first launched a version of Cloudflare Tunnel that did not require accounts over two years ago. While we’ve been thrilled that customers have used this for their projects, Cloudflare Tunnel evolved significantly since then. Specifically, Cloudflare Tunnel relies on a new architecture that is more redundant and stable than the one used by that older launch. While all Tunnels that migrated to this new architecture, which we call Named Tunnels, enjoyed those benefits, the users on this option that did not require an account were left behind.

Today’s announcement brings that stability to quick Tunnels. Tunnels are now designed to be long-lived, persistent objects. Unless you delete them, Tunnels can live for months, an improvement over the average lifespan measured in hours before connectivity issues disrupted a Tunnel in the older architecture.

These quick Tunnels run on this same, resilient architecture not only expediting time-to-value, but also improving the overall tunnel quality of life.

What’s next?

Today’s quick Tunnels add a powerful feature to Cloudflare Tunnels: the ability to create a reliable, resilient tunnel in a single command, without the hassle of creating an account first. We’re excited to help your team build and connect services to Cloudflare’s network and on to your audience or teammates. If you have additional questions, please share them in this community post here.

Data protection controls with Cloudflare Browser Isolation

Post Syndicated from Tim Obezuk original https://blog.cloudflare.com/data-protection-browser/

Data protection controls with Cloudflare Browser Isolation

Data protection controls with Cloudflare Browser Isolation

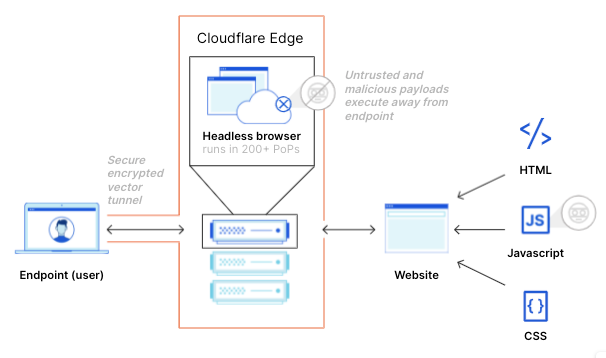
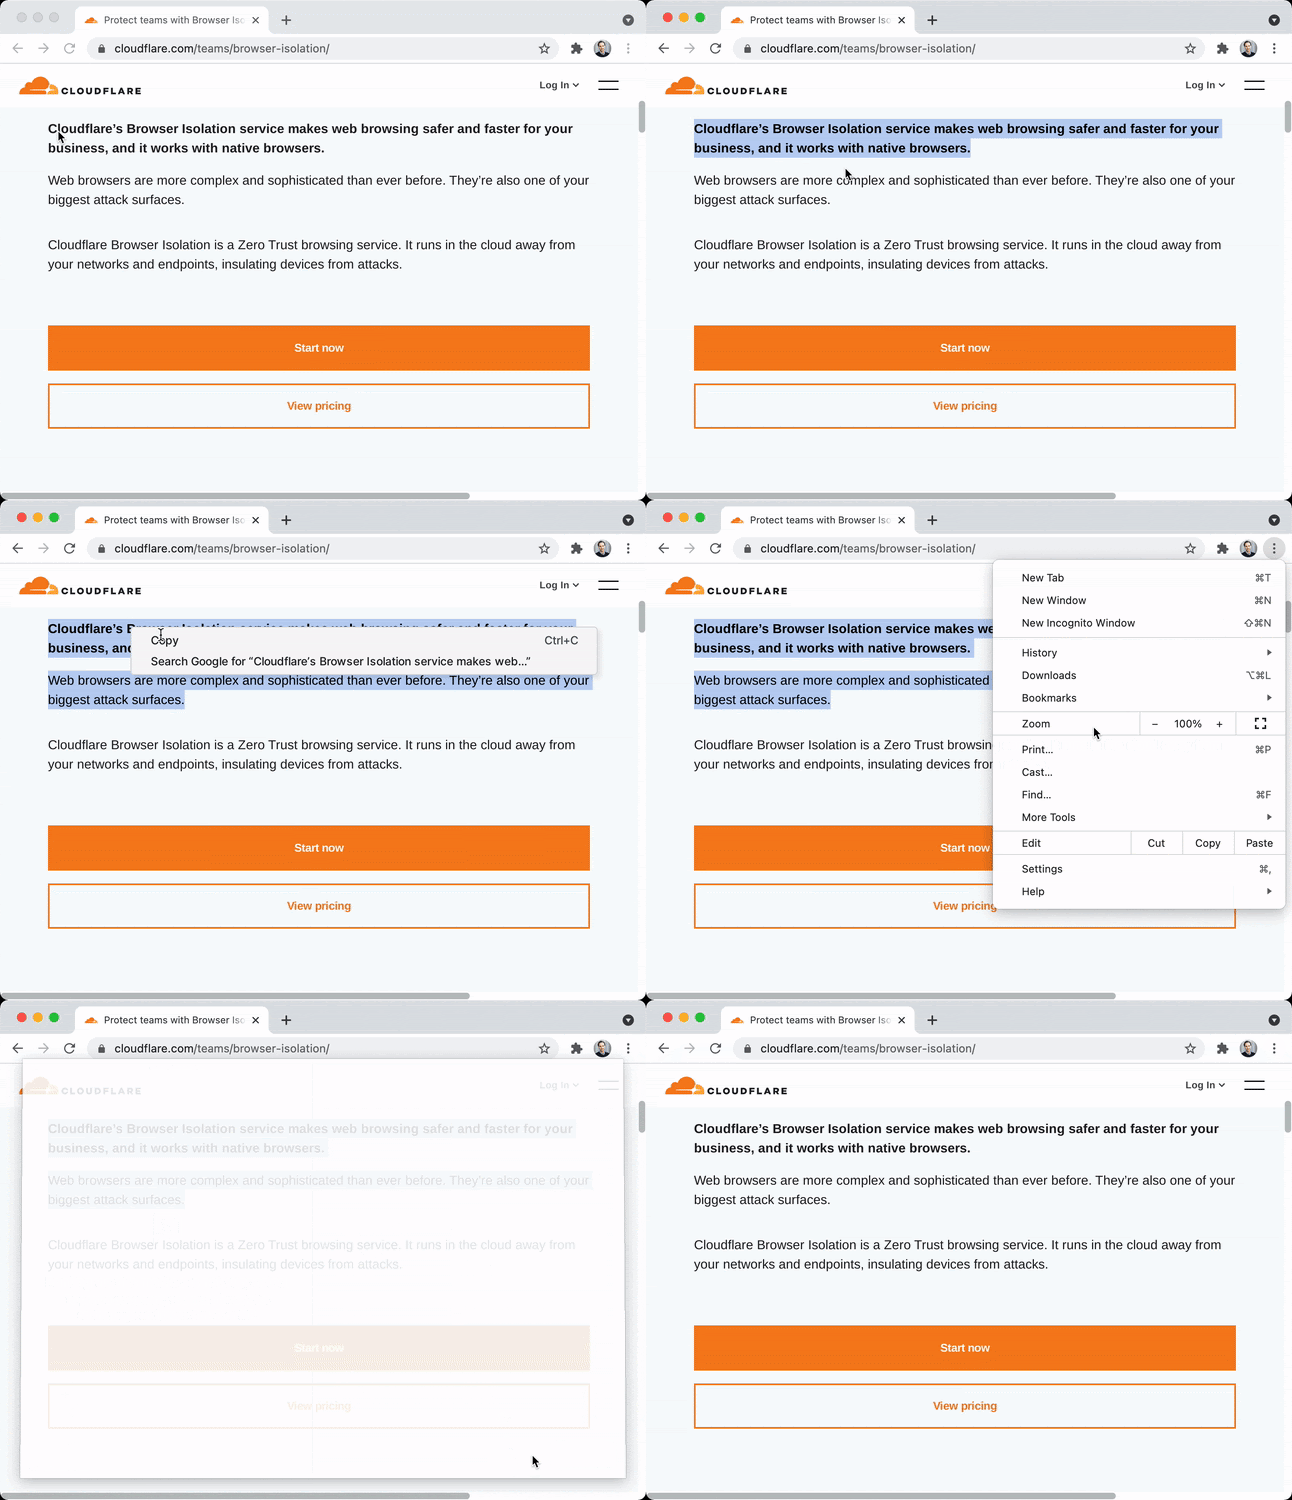
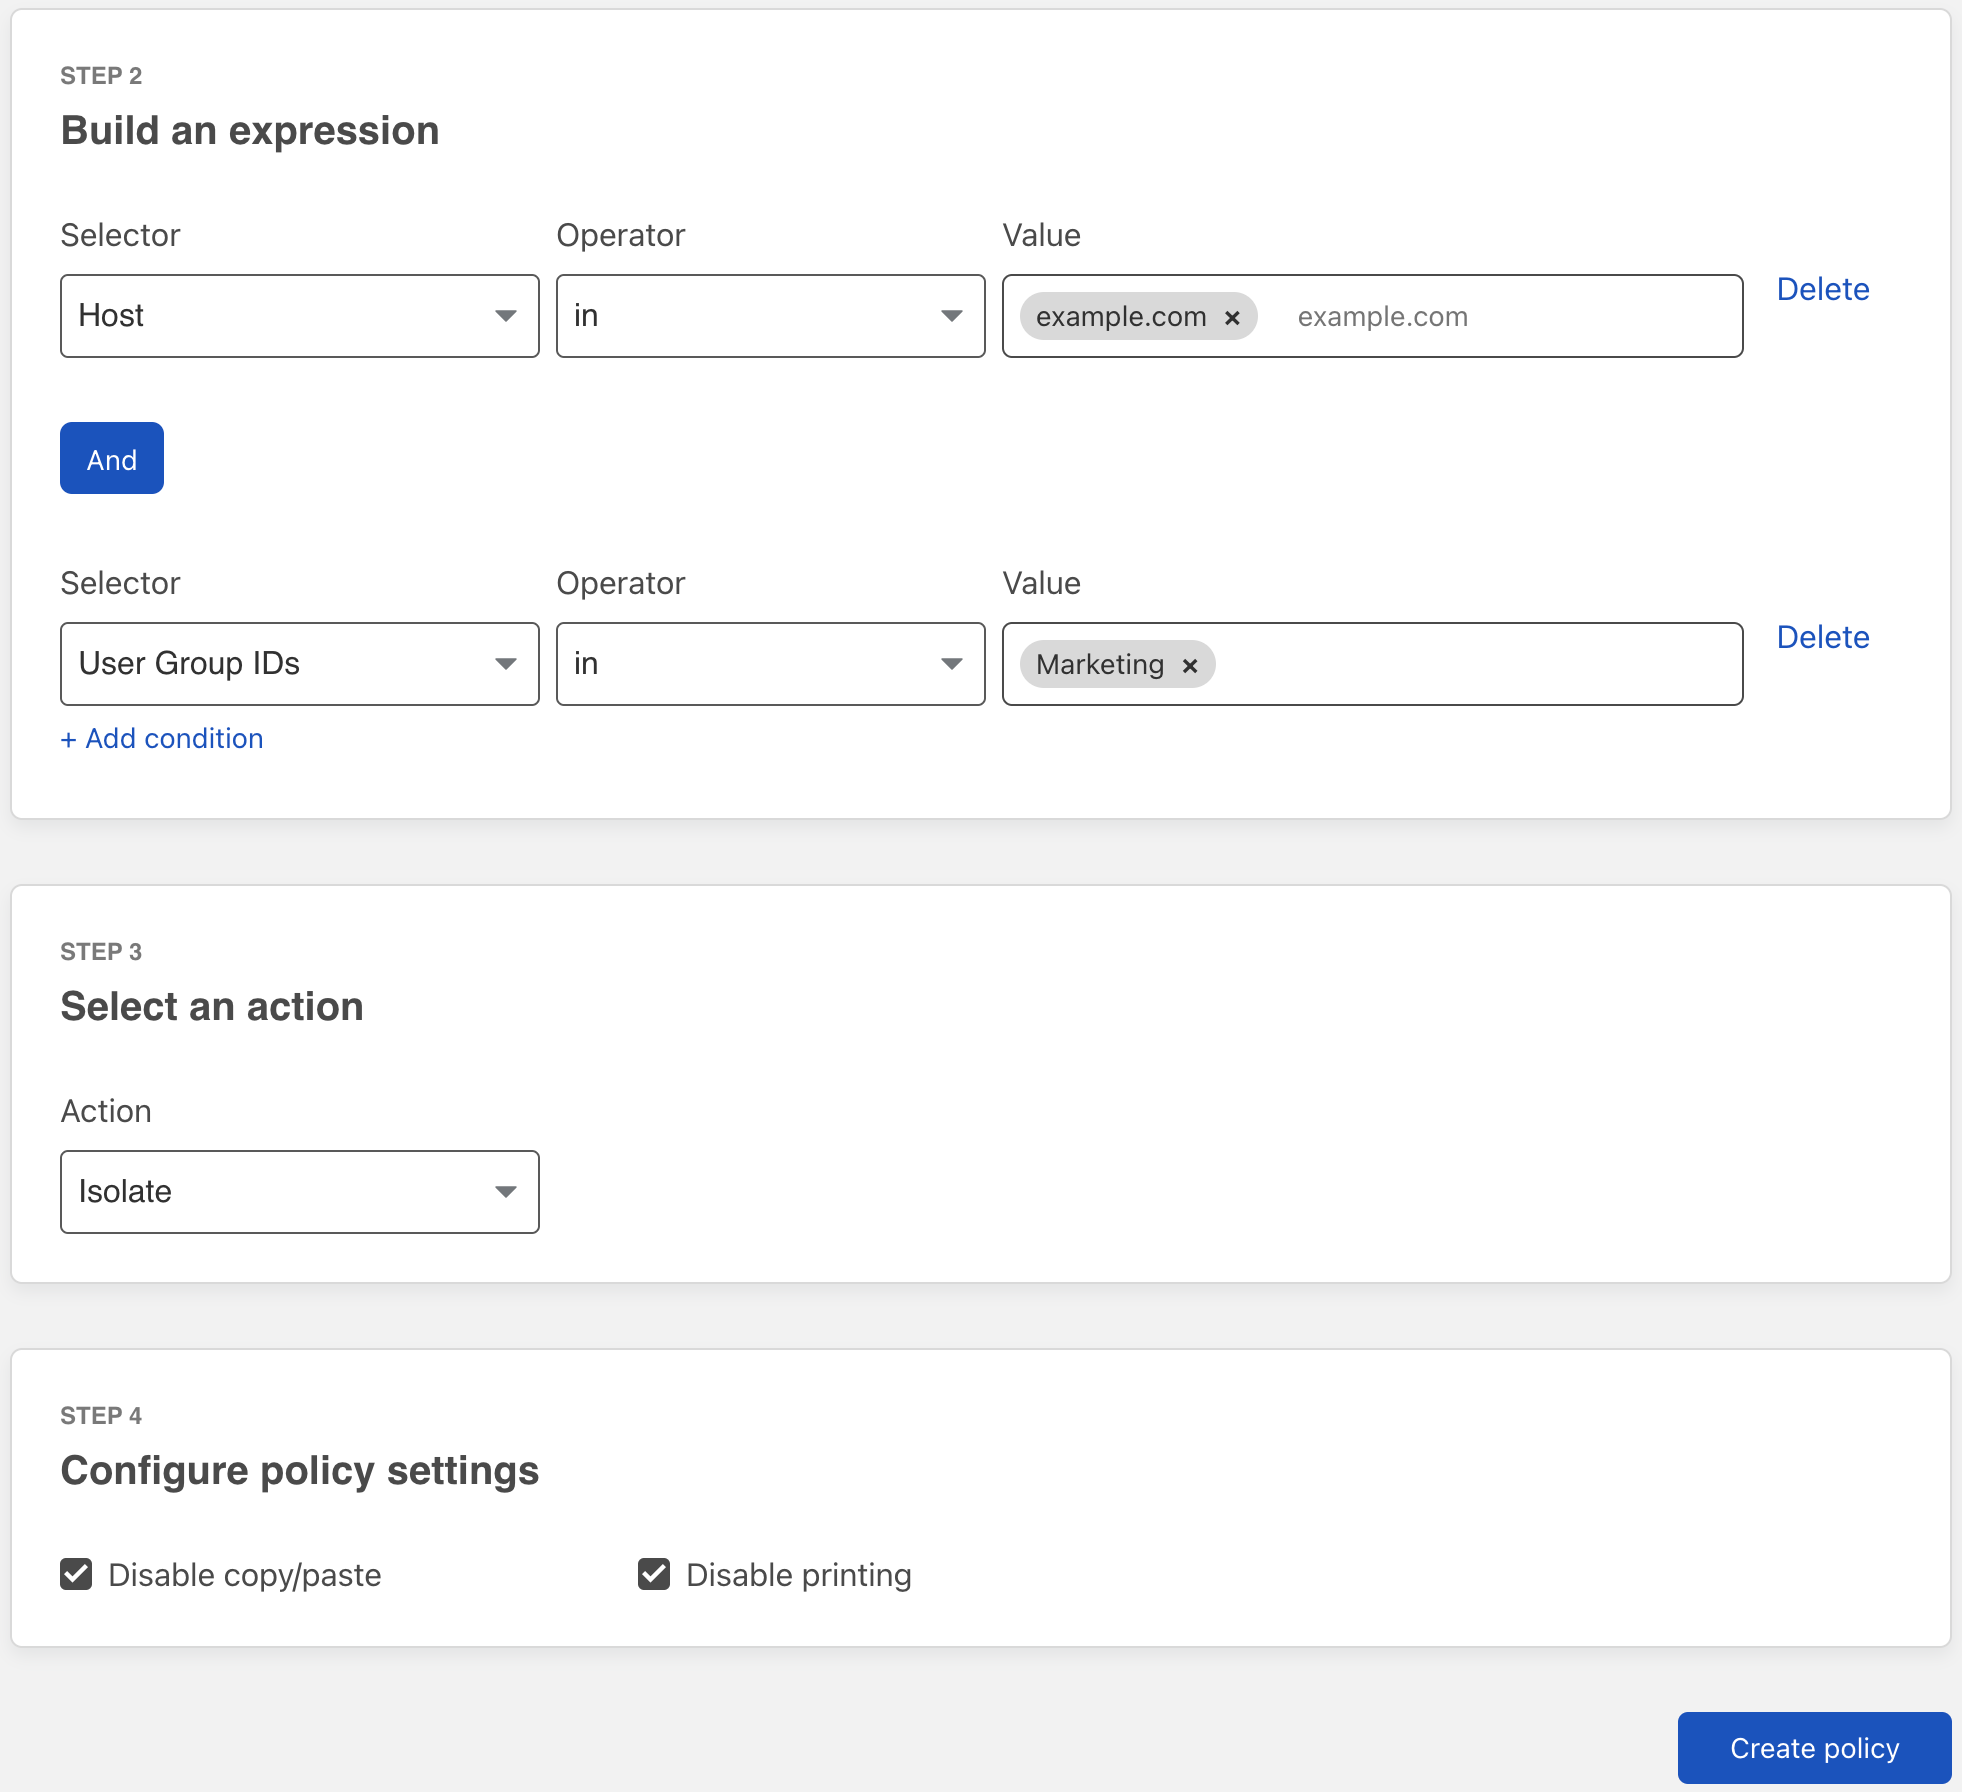
Starting today, your team can use Cloudflare’s Browser Isolation service to protect sensitive data inside the web browser. Administrators can define Zero Trust policies to control who can copy, paste, and print data in any web based application.

In March 2021, for Security Week, we announced the general availability of Cloudflare Browser Isolation as an add-on within the Cloudflare for Teams suite of Zero Trust application access and browsing services. Browser Isolation protects users from browser-borne malware and zero-day threats by shifting the risk of executing untrusted website code from their local browser to a secure browser hosted on our edge.

And currently, we’re democratizing browser isolation for any business by including it with our Teams Enterprise Plan at no additional charge.1

A different approach to zero trust browsing

Web browsers, the same tool that connects users to critical business applications, is one of the most common attack vectors and hardest to control.

Browsers started as simple tools intended to share academic documents over the Internet and over time have become sophisticated platforms that replaced virtually every desktop application in the workplace. The dominance of web-based applications in the workplace has created a challenge for security teams who race to stay patch zero-day vulnerabilities and protect sensitive data stored in self-hosted and SaaS based applications.

In an attempt to protect users and applications from web based attacks, administrators have historically relied on DNS or HTTP inspection to prevent threats from reaching the browser. These tools, while useful for protecting against known threats, are difficult to tune without false-positives (negatively impacting user productivity and increasing IT support burden) and ineffective against zero day vulnerabilities.

Browser isolation technologies mitigate risk by shifting the risk of executing foreign code from the endpoint to a secure environment. Historically administrators have had to make a compromise between performance and security when adopting such a solution. They could either:

  • Prioritize security by choosing a solution that relies on pixel pushing techniques to serve a visual representation to users. This comes at the cost of performance by introducing latency, graphical artifacts and heavy bandwidth usage.

OR

  • Prioritize performance by choosing a solution that relies on code scrubbing techniques to unpack, inspect and repack the webpage. This model is fragile (often failing to repack leading to a broken webpage) and insecure by allowing undetected threats to compromise users.

At Cloudflare, we know that security products do not need to come at the expense of performance. We developed a third option that delivers a remote browsing experience without needing to compromise on performance and security for users.

  • Prioritize security by never sending foreign code to the endpoint and executing it in a secure remote environment.
  • Prioritize performance sending light-weight vector instructions (rather than pixels) over the wire and minimize remote latency on our global edge network.
Data protection controls with Cloudflare Browser Isolation

This unique approach delivers an isolated browser without the security or performance challenges faced by legacy solutions.

Data control through the browser

Malware and zero-day threats are not the only security challenges administrators face with web browsers. The mass adoption of SaaS products has made the web browser the primary tool used to access data. Lack of control over both the application and the browser has left administrators little control over their data once it is delivered to an endpoint.

Data loss prevention tools typically rely on pattern recognition to partially or completely redact the transmission of sensitive data values. This model is useful for protecting against an unexpected breach of PII and PCI data, such as locations and financial information but comes at the loss of visibility.

The redaction model falls short when sensitive data does not fit into easily recognizable patterns, and the end-users require visibility to do their job. In industries such as health care, redacting sensitive data is not feasible as medical professions require visibility of patient notes and appointment data.

Once data lands in the web browser it is trivial for a user to copy-paste and print sensitive data into another website, application, or physical location. These seemingly innocent actions can lead to data being misplaced by naive users leading to a data breach. Administrators have had limited options to protect data in the browser, some even going so far as to deploy virtual desktop services to control access to a SaaS based customer relationship management (CRM) tool. This increased operating costs, and frustrated users who had to learn how to use computer-in-a-computer just to use a website.

One-click to isolate data in the browser

Cloudflare Browser Isolation executes all website code (including HTML) in the remote browser. Since page content remains on the remote browser and draw instructions are only sent to the browser, Cloudflare Browser Isolation is in a powerful position to protect sensitive data on any website or SaaS application.

Administrators can now control copy-paste, and printing functionality with per-rule granularity with one click in the Cloudflare for Teams Dashboard. For example, now administrators can build rules that prevent users from copying information from your CRM or that stop team members from printing data from your ERP—without blocking their attempts to print from external websites where printing does not present a data loss risk.

From the user’s perspective websites look and behave normally until the user performs a restricted action.

Data protection controls with Cloudflare Browser Isolation

Copy-paste and printing control can be configured for both new and existing HTTP policies in the Teams Dashboard.

  1. Navigate to the Cloudflare for Teams dashboard.
  2. Navigate to Gateway → Policies → HTTP.
  3. Create/update an HTTP policy with an Isolate action (docs).
  4. Configure policy settings.
Data protection controls with Cloudflare Browser Isolation

Administrators have flexibility with data protection controls and can enable/disable browser behaviours based on application, hostname, user identity and security risk.

What’s next?

We’re just getting started with zero trust browsing controls. We’re hard at work building controls to protect against phishing attacks, further protect data by controlling file uploading and downloading without needing to craft complex network policies as well as support for a fully clientless browser isolation experience.

Democratizing browser isolation for any business

Historically, only large enterprises had justified the cost to add on remote browser isolation to their existing security deployments. And the resulting loosely-integrated solution fell short of achieving Zero Trust due to poor end-user experiences. Cloudflare has already solved these challenges, so businesses achieve full Zero Trust security including browser-based data protection controls without performance tradeoffs.

Yet it’s not always enough to democratize Zero Trust browser isolation for any business, so we’re currently including it with our Teams Enterprise Plan at no additional charge.1 Get started here.

…….
1. For up to 2000 seats until 31 Dec 2021

Announcing Tenant Control in Cloudflare Gateway

Post Syndicated from Alyssa Wang original https://blog.cloudflare.com/gateway-tenant-control/

Announcing Tenant Control in Cloudflare Gateway

Announcing Tenant Control in Cloudflare Gateway

The tools we use at work are starting to look like the apps we use in our personal lives. We send emails for our jobs using Google Workspace and respond to personal notes in Gmail. We download PDFs from our team’s Dropbox and then upload images to our personal account. This can lead to confusion and mistakes—made worse by remote work when we forget to log off for the day.

Today, we’re excited to announce Tenant Control in Cloudflare Gateway, a new feature that helps keep our work at work. Organizations can deploy Cloudflare Gateway to their corporate devices and apply rules ensuring that employees can only log in to the corporate version of the tools they need. Now, teams can prevent users from logging in to the wrong instance of popular applications. What’s more, they can make sure corporate data stays within corporate accounts.

Controlling the application, alone, isn’t sufficient

Cloudflare Gateway provides security from threats on the Internet by sending all traffic leaving a device to Cloudflare’s network where it can be filtered. Organizations send traffic to Cloudflare by deploying the WARP agent, a WireGuard-based client built on feedback from our popular consumer app.

Announcing Tenant Control in Cloudflare Gateway

Cloudflare Gateway can be deployed in several modes, but most customers start with DNS filtering which only sends DNS queries to Cloudflare. Cloudflare runs the world’s fastest DNS resolver, 1.1.1.1, and on top of that we’ve built a DNS filtering solution where we help prevent users from visiting sites that contain malware or serve phishing attacks.

When organizations are ready to add more security to their deployment, they go beyond DNS filtering by adding HTTP filtering as well. Cloudflare inspects the HTTP traffic leaving the device which provides more granular control than just DNS filtering over destinations and events that happen inside the traffic, like blocking file uploads to certain destinations.

Customers use the HTTP filtering to filter and control SaaS application usage. For example, if your team uses OneDrive, you can block all file uploads to Google Drive to avoid data leaving the tenants you control. Cloudflare provides the classification of what hostnames and URLs constitute an application and make it possible to build rules with just two clicks. However, what happens when you aren’t using two different applications — you’re using two different instances of the same one?

Applying control to the SaaS tenant

Today, you can enable tenant control using Gateway HTTP policies in Cloudflare Gateway. Administrators can begin by adding a new type of rule in Gateway that prompts them to input a specific value provided by the SaaS application. For example, an administrator can gather the tenant ID for their Microsoft 365 deployment.

Once the rule is enabled, Cloudflare Gateway will append a specific header and, if enabled, the specific tenant ID as part of the appended header to your request. Depending on the SaaS application, these will either block all consumer or personal usage or block all logins to accounts that are not part of that tenant ID. The SaaS application is aware of the specific header it relies on to enforce this rule and, when received, responds accordingly.

Traditionally, these headers are injected by corporate VPNs or proxy servers maintained on-premises and accessed by backhauling user traffic. Cloudflare Gateway provides customers with filtering and inspection in our data centers closer to your users and, combined with our ability to accelerate traffic, delivers your users to their destination without the performance consequences of legacy backhaul approaches.

Enforcing Corporate Tenant Access

You can begin configuring these rules today in the Cloudflare for Teams dashboard. To enforce tenant control with Gateway, you can configure an HTTP policy in the Teams Dashboard. For example, you can prevent users from authenticating to GSuite with their personal account and uploading documents to Google Drive account by using the following policy (GSuite uses the “X-GooGApps-Allowed-Domains” header):

Announcing Tenant Control in Cloudflare Gateway

As requests get filtered by Gateway’s firewall, allowed requests are proxied to their respective upstream servers. Before sending them upstream, we preprocess the request and append our own trace headers — these include things that are useful for debugging, like request ID headers. Now you can specify your own custom headers to be added onto these requests, which is what enables customers to enforce tenant control for their organizations.

What’s Next

Controlling data usage in your organization is a multistep process. Today, Cloudflare Gateway gives your teams control of what applications you use, where you can upload or download files, and when to block copy-paste and printing in our isolated browser. We’re excited to introduce tenant control into that portfolio to add another layer of security.

That said, we’re just getting started. We’ll be introducing new scanning features on top of this existing functionality as we continue to build Cloudflare’s data control features. If you want to be the first to know about the next wave of these features, follow this link to sign up today.

Building a Pet Cam using a Raspberry Pi, Cloudflare Tunnels and Teams

Post Syndicated from Mohak Kataria original https://blog.cloudflare.com/building-a-pet-cam-using-a-raspberry-pi-cloudflare-tunnels-and-teams/

Building a Pet Cam using a Raspberry Pi, Cloudflare Tunnels and Teams

Building a Pet Cam using a Raspberry Pi, Cloudflare Tunnels and Teams

I adopted Ziggy in late 2020. It took me quite a while to get used to his routine and mix it with mine. He consistently jumped on the kitchen counter in search of food, albeit only when no one was around. And I only found out when he tossed the ceramic butter box. It shattered and made a loud bang in the late hours of the night. Thankfully, no one was asleep yet.

This got me thinking that I should keep an eye on his mischievous behaviour, even when I’m not physically at home. I briefly considered buying a pet cam, but I remembered I had bought a Raspberry Pi a few months before. It was hardly being used, and it had a case (like this) allowing a camera module to be added. I hadn’t found a use for the camera module — until now.

This was a perfect weekend project: I would set up my own pet cam, connect it to the Internet, and make it available for me to check from anywhere in the world. I also wanted to ensure that only I could access it and that it had some easy way to login, possibly using my Google account. The solution? Cloudflare Tunnel and Teams. Cloudflare would help me expose a service running in an internal network using Tunnel while providing a security solution on top of it to keep it secure. Teams on the other hand, would help me by adding access control in the form of Google authentication.

Building a Pet Cam using a Raspberry Pi, Cloudflare Tunnels and Teams

So all I am left to do is configure my Raspberry Pi to be able to run a camera as a web service. That weekend, I started researching for it and made a list of things I needed:

  • A Raspberry Pi with a compatible camera module. I used a Raspberry Pi 4 model B with camera module v2.
  • Linux knowledge.
  • A domain name I could make changes to.
  • Understanding of how DNS works.
  • A Cloudflare account with Cloudflare for Teams+Tunnel access.
  • Internet connection.

In this blog post, I’ll walk you through the process I followed to set everything up for the pet cam. To keep things simple and succinct, I will not cover how to set up your Raspberry Pi, but you should make sure it has Internet access and that you can run shell commands on it, either via SSH or using a VNC connection.

Setup

The first thing we need to do is connect the camera module to the Raspberry Pi. For more detailed instructions, follow the official guide, steps 1 to 3.

Building a Pet Cam using a Raspberry Pi, Cloudflare Tunnels and Teams

After setting up the camera and testing that it works, we need to set it up as a camera with a web server. This is so we can access it at a URL such as https://192.168.0.2:8080 within the local network, to which the Raspberry Pi is also connected. To do that, we will use Motion, a program for setting up the camera module v2 as a web server.

To install Motion, input these commands:

$ sudo apt-get update && sudo apt-get upgrade
$ sudo apt install autoconf automake build-essential pkgconf libtool git libzip-dev libjpeg-dev gettext libmicrohttpd-dev libavformat-dev libavcodec-dev libavutil-dev libswscale-dev libavdevice-dev default-libmysqlclient-dev libpq-dev libsqlite3-dev libwebp-dev
$ sudo wget https://github.com/Motion-Project/motion/releases/download/release-4.3.1/pi_buster_motion_4.3.1-1_armhf.deb
$ sudo dpkg -i pi_buster_motion_4.3.1-1_armhf.deb

The above commands will update the local packages with new versions from the repositories and then install that version of Motion from Motion’s GitHub project.

Next, we need to configure Motion using:

$ sudo vim /etc/motion/motion.conf
# Find the following lines and update them to following:
# daemon on
# stream_localhost off
# save and exit

After that, we need to set Motion up as a daemon, so it runs whenever the system is restarted:

$ sudo vim /etc/default/motion
# and change the following line 
# start_motion_daemon=yes
# save and exit and run the next command
$ sudo service motion start

Great. Now that we have Motion set up, we can see the live feed from our camera in a browser on Raspberry Pi module at the default URL: http://localhost:8081 (the port can be changed in the config edit step above). Alternatively, we can open it on another machine within the same network by replacing 0.0.0.0 with the IP of the Raspberry Pi in the network.

For now, the camera web server is available only within our local network. However, I wanted to keep an eye on Ziggy no matter where I am, as long as I have Internet access and a browser. This is perfect for Cloudflare Tunnel. An alternative would be to open a port in the firewall on the router in my home network, but I hate that idea of having to mess with the router configuration. I am not really an expert at that, and if I leave a backdoor open to my internal network, it can get scary quickly!

The Cloudflare Tunnel documentation takes us through its installation. The only issue is that the architecture of the Raspberry Pi is based on armv7l (32-bit) and there is no package for it in the remote repositories. We could build cloudflared from source if we wanted as it’s an open source project, but an easier route is to wget it.

$ wget https://bin.equinox.io/c/VdrWdbjqyF/cloudflared-stable-linux-arm.tgz
# a quick check of version shall confirm if it installed correctly
$ cloudflared -v 
cloudflared version 2021.5.10 (built 2021-05-26-1355 UTC)

Let’s set up our Tunnel now:

$ cloudflared tunnel create camera
Tunnel credentials written to /home/pi/.cloudflared/5f8182ba-906c-4910-98c3-7d042bda0594.json. cloudflared chose this file based on where your origin certificate was found. Keep this file secret. To revoke these credentials, delete the tunnel.

Created tunnel camera with id 5f8182ba-906c-4910-98c3-7d042bda0594

Now we need to configure the Tunnel to forward the traffic to the Motion webcam server:

$ vim /home/pi/.cloudflared/config.yaml 
# And add the following.
tunnel: 5f8182ba-906c-4910-98c3-7d042bda0594
credentials-file: /home/pi/.cloudflared/5f8182ba-906c-4910-98c3-7d042bda0594.json 

ingress:
  - hostname: camera.imohak.com
    service: http://0.0.0.0:9095
  - service: http_status:404

The Tunnel uuid should be the one created with the command above and so should the path of the credential file. The ingress should have the domain we want to use. In my case I have set up camera.imohak.com as my domain and 404 as the fallback rule.

Next, we need to route the DNS to this Tunnel:

$ cloudflared tunnel route dns 5f8182ba-906c-4910-98c3-7d042bda0594 camera.imohak.com

This adds a DNS CNAME record, which can be verified from the Cloudflare dashboard as shown here:

Building a Pet Cam using a Raspberry Pi, Cloudflare Tunnels and Teams

Let’s test the Tunnel!

$ cloudflared tunnel run camera
2021-06-15T21:44:41Z INF Starting tunnel tunnelID=5f8182ba-906c-4910-98c3-7d042bda0594
2021-06-15T21:44:41Z INF Version 2021.5.10
2021-06-15T21:44:41Z INF GOOS: linux, GOVersion: go1.16.3, GoArch: arm
2021-06-15T21:44:41Z INF Settings: map[cred-file:/home/pi/.cloudflared/5f8182ba-906c-4910-98c3-7d042bda0594.json credentials-file:/home/pi/.cloudflared/5f8182ba-906c-4910-98c3-7d042bda0594.json]
2021-06-15T21:44:41Z INF cloudflared will not automatically update when run from the shell. To enable auto-updates, run cloudflared as a service: https://developers.cloudflare.com/argo-tunnel/reference/service/
2021-06-15T21:44:41Z INF Generated Connector ID: 7e38566e-0d33-426d-b64d-326d0592486a
2021-06-15T21:44:41Z INF Initial protocol http2
2021-06-15T21:44:41Z INF Starting metrics server on 127.0.0.1:43327/metrics
2021-06-15T21:44:42Z INF Connection 6e7e0168-22a4-4804-968d-0674e4c3b4b1 registered connIndex=0 location=DUB
2021-06-15T21:44:43Z INF Connection fc83017d-46f9-4cee-8fc6-e4ee75c973f5 registered connIndex=1 location=LHR
2021-06-15T21:44:44Z INF Connection 62d28eee-3a1e-46ef-a4ba-050ae6e80aba registered connIndex=2 location=DUB
2021-06-15T21:44:44Z INF Connection 564164b1-7d8b-4c83-a920-79b279659491 registered connIndex=3 location=LHR

Next, we go to the browser and open the URL camera.imohak.com.

Voilà. Or, not quite yet.

Locking it Down

We still haven’t put any requirement for authentication on top of the server. Right now, anyone who knows about the domain can just open it and look at what is happening inside my house. Frightening, right? Thankfully we have two options now:

Building a Pet Cam using a Raspberry Pi, Cloudflare Tunnels and Teams
  1. Use Motion’s inbuilt authentication mechanisms. However, we shall not choose this option as it’s just another username/password to remember which one can easily forget and who knows if in the future, there is a vulnerability found in the way motion authenticates and my credentials are leaked? We are looking for an SSO using Google which is easy and quick to use and gives us a secure login based on google credentials.
  2. Use Cloudflare Access. Access gives us the ability to create policies based on IP addresses and email addresses, and it lets us integrate different types of authentication methods, such as OTP or Google. In our case, we require authentication through Google.

To take advantage of this Cloudflare Access functionality, the first step is to set up Cloudflare for Teams. Visit https://dash.teams.cloudflare.com/, follow the setup guide and choose a team name(imohak in my case).

Building a Pet Cam using a Raspberry Pi, Cloudflare Tunnels and Teams

After this, we have two things left to do: add a login method and add an application. Let’s cover how we add a login method first. Navigate to Configuration > Authentication and click on +Add, under the Login tab. The Dashboard will show us a list of identity providers to choose from. Select Google — follow this guide for a walkthrough of how to set up a Google Cloud application, get a ClientID and Client Secret, and use them to configure the identity provider in Teams.

After adding a login method and testing it, we should see a confirmation page like this:

Building a Pet Cam using a Raspberry Pi, Cloudflare Tunnels and Teams

The last thing we need to do is to add the pet-cam subdomain as an application protected behind Teams. This enables us to enforce the Google authentication requirement we have configured before. To do that, navigate to Access > Applications, click on Add an application, and select Self-hosted.

On the next page, we specify a name, session duration and also the URL at which the application should be accessible. We add the subdomain camera.imohak.com and also name the app ‘camera’ to keep it simple.

Building a Pet Cam using a Raspberry Pi, Cloudflare Tunnels and Teams

Next, we select Google as an identity provider for this application. Given that we are not choosing multiple authentication methods, I can also enable Instant Auth — this means we don’t need to select Google when we open the URL.

Building a Pet Cam using a Raspberry Pi, Cloudflare Tunnels and Teams

Now we add policies to the application. Here, we add an email check so that after the Google authentication, a check is made to ensure the specified email address is the only one who is able to access the URL. If needed, we can choose to configure other, more complex rules. At this point, we click on Next and finish the setup.

Building a Pet Cam using a Raspberry Pi, Cloudflare Tunnels and Teams

The Result

The setup is now complete. Time to test everything! After opening the browser and entering my URL, voilà. Now, when I visit this URL, I see a Google authentication page and, after logging in, Ziggy eating his dinner.

Building a Pet Cam using a Raspberry Pi, Cloudflare Tunnels and Teams

Zero Trust controls for your SaaS applications

Post Syndicated from Kenny Johnson original https://blog.cloudflare.com/access-saas-integrations/

Zero Trust controls for your SaaS applications

Zero Trust controls for your SaaS applications

Most teams start that journey by moving the applications that lived on their private networks into this Zero Trust model. Instead of a private network where any user on the network is assumed to be trusted, the applications that use Cloudflare Access now check every attempt against the rules you create. For your end users, this makes these applications just feel like regular SaaS apps, while your security teams have full control and logs.

However, we kept hearing from teams that wanted to use their Access control plane to apply consistent security controls to their SaaS apps, and consolidate logs from self-hosted and SaaS in one place.

We’re excited to give your team the tools to solve that challenge. With Access in front of your SaaS applications, you can build Zero Trust rules that determine who can reach your SaaS applications in the same place where your rules for self-hosted applications and network access live. To make that easier, we are launching guided integrations with the Amazon Web Services (AWS) management console, Zendesk, and Salesforce. In just a few minutes, your team can apply a Zero Trust layer over every resource you use and ensure your logs never miss a request.

How it works

Cloudflare Access secures applications that you host by becoming the authoritative DNS for the application itself. All DNS queries, and subsequent HTTP requests, hit Cloudflare’s network first. Once there, Cloudflare can apply the types of identity-aware and context-driven rules that make it possible to move to a Zero Trust model. Enforcing these rules in our network means your application doesn’t need to change. You can secure it on Cloudflare, integrate your single sign-on (SSO) provider and other systems like Crowdstrike and Tanium, and begin building rules.

Zero Trust controls for your SaaS applications

SaaS applications pose a different type of challenge. You do not control where your SaaS applications are hosted — and that’s a big part of the value. You don’t need to worry about maintaining the hardware or software of the application.

However, that also means that your team cannot control how users reach those resources. In most cases, any user on the Internet can attempt to log in. Even if you incorporate SSO authentication or IP-based allowlisting, you might not have the ability to add location or device rules. You also have no way to centrally capture logs of user behavior on a per-request basis. Logging and permissions vary across SaaS applications — some are quite granular while others have non-existent controls and logging.

Cloudflare Access for SaaS solves that problem by injecting Zero Trust checks into the SSO flow for any application that supports SAML authentication. When users visit your SaaS application and attempt to log in, they are redirected through Cloudflare and then to your identity provider. They authenticate with your identity provider and are sent back to Cloudflare, where we layer on additional rules like device posture, multi factor method, and country of login. If the user meets all the requirements, Cloudflare converts the user’s authentication with your identity provider into a SAML assertion that we send to the SaaS application.

Zero Trust controls for your SaaS applications

We built support for SaaS applications by using Workers to take the JWT and convert its content into SAML assertions that are sent to the SaaS application. The application thinks that Cloudflare Access is the identity provider, even though we’re just aggregating identity signals from your SSO provider and other sources into the JWT, and sending that summary to the app via SAML. All of this leverages Cloudflare’s global network and ensures users do not see a performance penalty.

Enforcing managed devices and Gateway for SaaS applications

COVID-19 made it commonplace for employees to work from anywhere and, more concerning, from any device. Many SaaS applications contain sensitive data that should only be accessed with a corporately managed device. A benefit of SaaS tools is that they’re readily available from any device, it’s up to security administrators to enforce which devices can be used to log in.

Once Access for SaaS has been configured as the SSO provider for SaaS applications, policies that verify a device can be configured. You can then lock a tool like Salesforce down to only users with a device that has a known serial number, hard auth key plugged in, an up to date operating system and much more.

Zero Trust controls for your SaaS applications

Cloudflare Gateway keeps your users and data safe from threats on the Internet by filtering Internet-bound connections that leave laptops and offices. Gateway gives administrators the ability to block, allow, or log every connection and request to SaaS applications.

However, users are connecting from personal devices and home WiFi networks, potentially bypassing Internet security filtering available on corporate networks. If users have their password and MFA token, they can bypass security requirements and reach into SaaS applications from their own, unprotected devices at home.
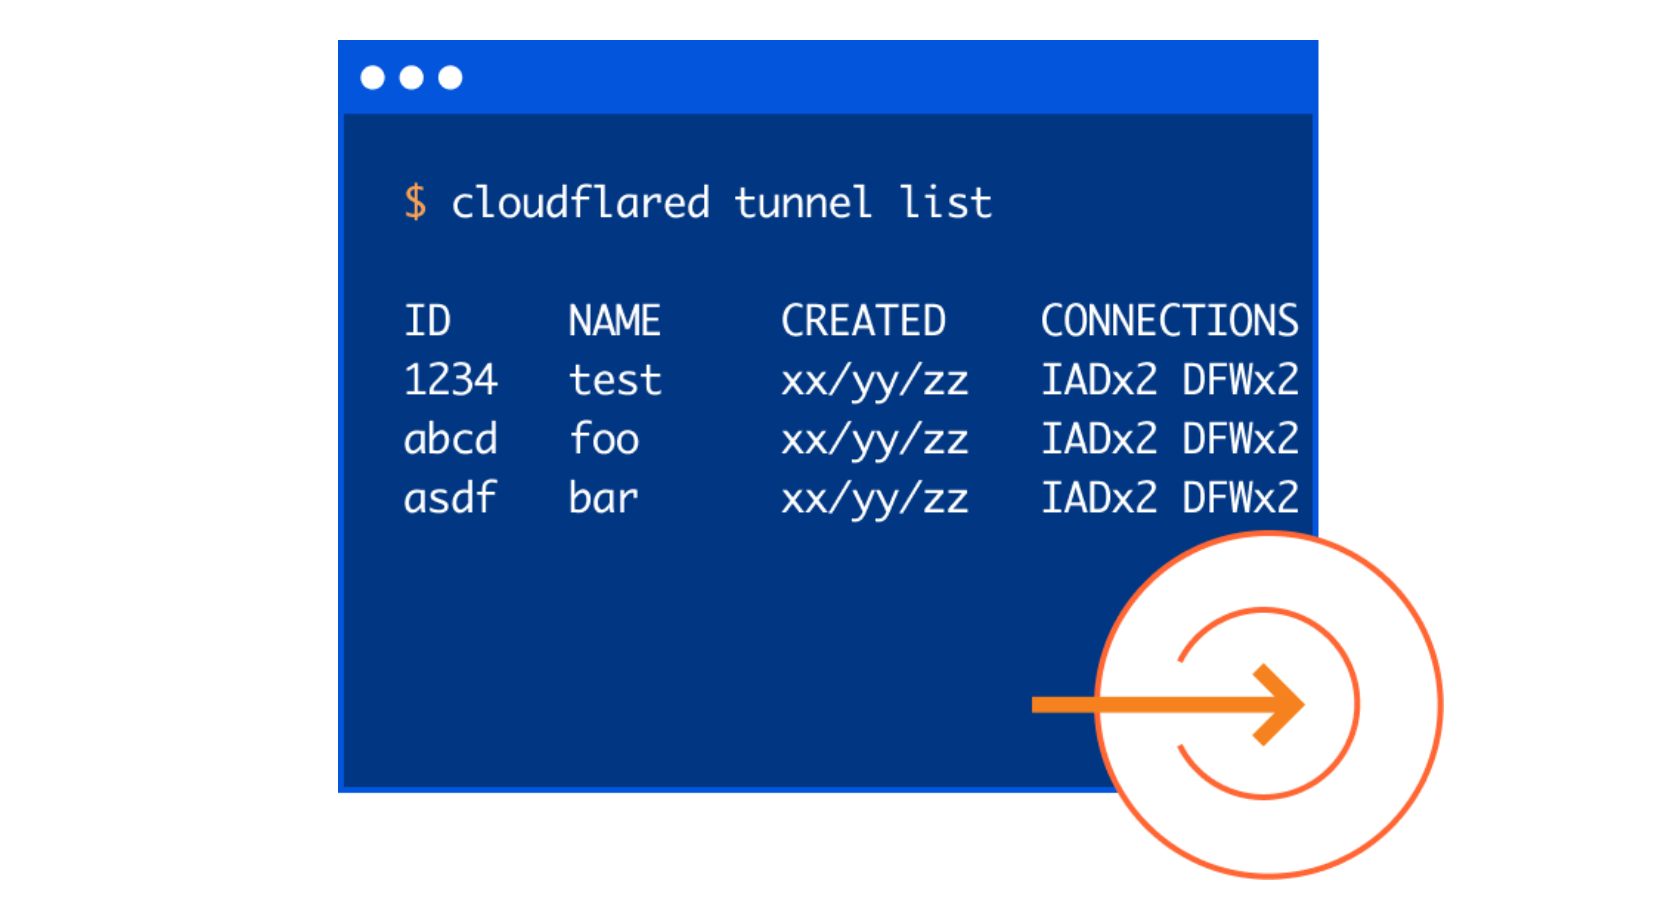
Zero Trust controls for your SaaS applications

To ensure traffic to your SaaS apps only connects over Gateway-protected devices, Cloudflare Access will add a new rule type that requires Gateway when users login to your SaaS applications. Once enabled, users will only be able to connect to your SaaS applications when they use Cloudflare Gateway. Gateway will log those connections and provide visibility into every action within SaaS apps and the Internet.

Getting started and what’s next

It’s easy to get started with setting up Access for SaaS application. Visit the Cloudflare for Teams Dashboard and follow one of our published guides.

We will make it easier to protect SaaS applications and will soon be supporting configuration via metadata files. We will also continue to publish SaaS app specific integration guides. Are there specific applications you’ve been trying to integrate? Let us know in the community!

Capturing Purpose Justification in Cloudflare Access

Post Syndicated from Molly Cinnamon original https://blog.cloudflare.com/access-purpose-justification/

Capturing Purpose Justification in Cloudflare Access

The digital world often takes its cues from the real world. For example, there’s a standard question every guard or agent asks when you cross a border—whether it’s a building, a neighborhood, or a country: “What’s the purpose of your visit?” It’s a logical question: sure, the guard knows some information—like who you are (thanks to your ID) and when you’ve arrived—but the context of “why” is equally important. It can set expectations around behavior during your visit, as well as what spaces you should or should not have access to.

Capturing Purpose Justification in Cloudflare Access
The purpose justification prompt appears upon login, asking users to specify their use case before hitting submit and proceeding.

Digital access follows suit. Recent data protection regulations, such as the GDPR, have formalized concepts of purpose limitation and data proportionality: people should only access data necessary for a specific stated reason. System owners know people need access to do their job, but especially for particularly sensitive applications, knowing why a login was needed is just as vital as knowing who, when, and how.

Starting today, Cloudflare for Teams administrators can prompt users to enter a justification for accessing an application prior to login. Administrators can add this prompt to any existing or new Access application with just two clicks, giving them the ability to:

  • Log and review employee justifications for accessing sensitive applications
  • Add additional layers of security to applications they deem sensitive
  • Customize modal text to communicate data use & sharing principles
  • Help meet regulatory requirements for data access control (such as GDPR)

Starting with Zero Trust access control

Cloudflare Access has been built with access management at its core: rather than trusting anyone on a private network, Access checks for identity, context and device posture every time someone attempts to reach an application or resource.

Behind the scenes, administrators build rules to decide who should be able to reach the tools protected by Access. When users need to connect to those tools, they are prompted to authenticate with one of the identity provider options. Cloudflare Access checks their login against the list of allowed users and, if permitted, allows the request to proceed.

Some applications and workflows contain data so sensitive that the user should have to prove who they are and why they need to reach that service. In this next phase of Zero Trust security, access to data should be limited to specific business use cases or needs, rather than generic all-or-nothing access.

Deploying Zero Trust purpose justification

We created this functionality because we, too, wanted to make sure we had these provisions in place at Cloudflare. We have sensitive internal tools that help our team members serve our customers, and we’ve written before about how we use Cloudflare Access to lock down those tools in a Zero Trust manner.

However, we were not satisfied with just restricting access in the least privileged model. We are accountable to the trust our customers put in our services, and we feel it is important to always have an explicit business reason when connecting to some data sets or tools.

We built purpose justification capture in Cloudflare Access to solve that problem. When team members connect to certain resources, Access prompts them to justify why. Cloudflare’s network logs that rationale and allows the user to proceed.

Purpose justification capture in Access helps fulfill policy requirements, but even for enterprises who don’t need to comply with specific regulations, it also enables a thoughtful privacy and security framework for access controls. Prompting employees to justify their use case helps solve the data management challenge of balancing transparency with security — helping to ensure that sensitive data is used the right way.

Capturing Purpose Justification in Cloudflare Access
Purpose justification capture adds an additional layer of context for enterprise administrators.

Distinguishing Sensitive Domains

So how do you distinguish if something is sensitive? There are two main categories of  applications that may be considered “sensitive.” First: does it contain personally identifiable information or sensitive financials? Second, do all the employees who have access actually need access? The flexibility of the configuration of Access policies helps effectively distinguish sensitive domains for specific user groups.

Purpose justification in Cloudflare Access enables Teams administrators to configure the language of the prompt itself by domain. This is a helpful place to remind employees of the sensitivity of the data, such as, “This application contains PII. Please be mindful of company policies and provide a justification for access,” or “Please enter the case number corresponding to your need for access.” The language can proactively ensure that employees with access to an internal tool are using it as intended.

Additionally, Access identity management allows Teams customers to configure purpose capture for only specific, more sensitive employee groups. For example, some employees need daily access to an application and should be considered “trusted.” But other employees may still have access, but should only rarely need to use the tool— security teams or data protection officers may view their access as higher risk. The policies enable flexible logical constructions that equate to actions such as “ask everyone but the following employees for a purpose.”

This distinction of sensitive applications and “trusted” employees enables friction to the benefit of data protection, rather than a loss of efficiency for employees.

Capturing Purpose Justification in Cloudflare Access
Purpose justification is configurable as an Access policy, allowing for maximum flexibility in configuring and layering rules to protect sensitive applications.

Auditing justification records

As a Teams administrator, enterprise data protection officer, or security analyst, you can view purpose justification logs for a specific application to better understand how it has been accessed and used. Auditing the logs can reveal insights about security threats, the need for improved data classification training, or even potential application development to more appropriately address employees’ use cases.

The justifications are seamlessly integrated with other Access audit logs — they are viewable in the Teams dashboard as an additional column in the table of login events, and exportable to a SIEM for further data analysis.

Capturing Purpose Justification in Cloudflare Access
Teams administrators can review the purpose justifications submitted upon application login by their employees.

Getting started

You can start adding purpose justification prompts to your application access policies in Cloudflare Access today. The purpose justification feature is available in all plans, and with the Cloudflare for Teams free plan, you can use it for up to 50 users at no cost.

We’re excited to continue adding new features that give you more flexibility over purpose justification in Access… Have feedback for us? Let us know in this community post.

6 New Ways to Validate Device Posture

Post Syndicated from Kyle Krum original https://blog.cloudflare.com/6-new-ways-to-validate-device-posture/

6 New Ways to Validate Device Posture

6 New Ways to Validate Device Posture

Cloudflare for Teams gives your organization the ability to build rules that determine who can reach specified resources. When we first launched, those rules primarily relied on identity. This helped our customers replace their private networks with a model that evaluated every request for who was connecting, but this lacked consideration for how they were connecting.

In March, we began to change that. We announced new integrations that give you the ability to create rules that consider the device as well. Starting today, we’re excited to share that you can now build additional rules that consider several different factors about the device, like its OS, patch status, and domain join or disk encryption status. This has become increasingly important over the last year as more and more people began connecting from home. Powered by the Cloudflare WARP agent, your team now has control over more health factors about the devices that connect to your applications.

Zero Trust is more than just identity

With Cloudflare for Teams, administrators can replace their Virtual Private Networks (VPNs), where users on the network were trusted, with an alternative that does not trust any connection by default—also known as a Zero Trust model.

Customers start by connecting the resources they previously hosted on a private network to Cloudflare’s network using Cloudflare Tunnel. Cloudflare Tunnel uses a lightweight connector that creates an outbound-only connection to Cloudflare’s edge, removing the need to poke holes in your existing firewall.

Once connected, administrators can build rules that apply to each and every resource and application, or even a part of an application. Cloudflare’s Zero Trust network evaluates every request and connection against the rules that an administrator created before the user is ever allowed to reach that resource.

For example, an administrator can create a rule that limits who can reach an internal reporting tool to users in a specific Okta group, connecting from an approved country, and only when they log in with a hardkey as their second factor. Cloudflare’s global network enforces those rules close to the user, in over 200 cities around the world, to make a comprehensive rule like the outlined above feel seamless to the end-user.

Today’s launch adds new types of signals your team can use to define these rules. By definition, a Zero Trust model considers every request or connection to be “untrusted.” Only the rules that you create determine what is considered trusted and allowed. Now, we’re excited to let users take this a step further and create rules that not only focus on trusting the user, but also the security posture of the device they are connecting from.

More (and different) factors are better

Building rules based on device posture covers a blind spot for your applications and data. If I’m allowed to reach a particular resource, without any consideration for the device I’m using, then I could log in with my corporate credentials from a personal device running an unpatched or vulnerable version of an operating system. I might do that because it is convenient, but I am creating a much bigger problem for my team if I then download data that could be compromised because of that device.

That posture can also change based on the destination. For example, maybe you are comfortable if a team member uses any device to review a new splash page for your marketing campaign. However, if a user is connecting to an administrative tool that manages customer accounts, you want to make sure that device complies with your security policies for customer data that include factors like disk encryption status. With Cloudflare for Teams, you can apply rules that contain multiple and different factors with that level of per-resource granularity.

Today, we are thrilled to announce six additional posture types on top of the ones you can already set:

  1. Endpoint Protection Partners — Verify that your users are running one of our Endpoint Protection Platform providers (Carbon Black, CrowdStrike, SentinelOne, Tanium)
  2. Serial Number — Allow devices only from your known inventory pool
  3. Cloudflare WARP’s proxy — Determine if your users are connected via our encrypted WARP tunnel (Free, Paid or any Teams account)
  4. Cloudflare’s secure web gateway — Determine if your users are connecting from a device managed by your HTTP FIltering policies
  5. (NEW) Application Check — Verify any program of your choice is running on the device
  6. (NEW) File Check — Ensure a particular file is present on the device (such as an updated signature, OS patch, etc.)
  7. (NEW) Disk Encryption — Ensure all physical disks on the device are encrypted
  8. (NEW) OS Version — Confirm users have upgraded to a specific operating system version
  9. (NEW) Firewall — Check that a firewall is configured on the device
  10. (NEW) Domain Joined — Verify that your Windows devices must be joined to the corporate directory

Device rules should be as simple as identity rules

Cloudflare for Teams device rules can be configured in the same place that you control identity-based rules. Let’s use the Disk Encryption posture check as an example. You may want to create a rule that enforces the Disk Encryption check when your users need to download and store files on their devices locally.

To build that rule, first visit the Cloudflare for Teams dashboard and navigate to the Devices section of the “My Team” page. Then, choose “Disk Encryption” as a new attribute to add.

6 New Ways to Validate Device Posture

You can enter a descriptive name for this attribute. For example, this rule should require Windows disk encryption, while others might require encryption on other platforms.

6 New Ways to Validate Device Posture

To save time, you can also create reusable rules, called Groups, to include multiple types of device posture check for reference in new policies later on.

6 New Ways to Validate Device Posture

Now that you’ve created your group, you can create a Zero Trust Require rule to apply your Disk Encryption checks. To do that, navigate to Access > Applications and create a new application. If you already have your application in place, simply edit your application to add a new rule. In the Assign a group section you will see the group you just created—select it and choose a Require rule type. And finally, save the rule to begin enforcing granular, zero trust device posture checks on every request in your environment.
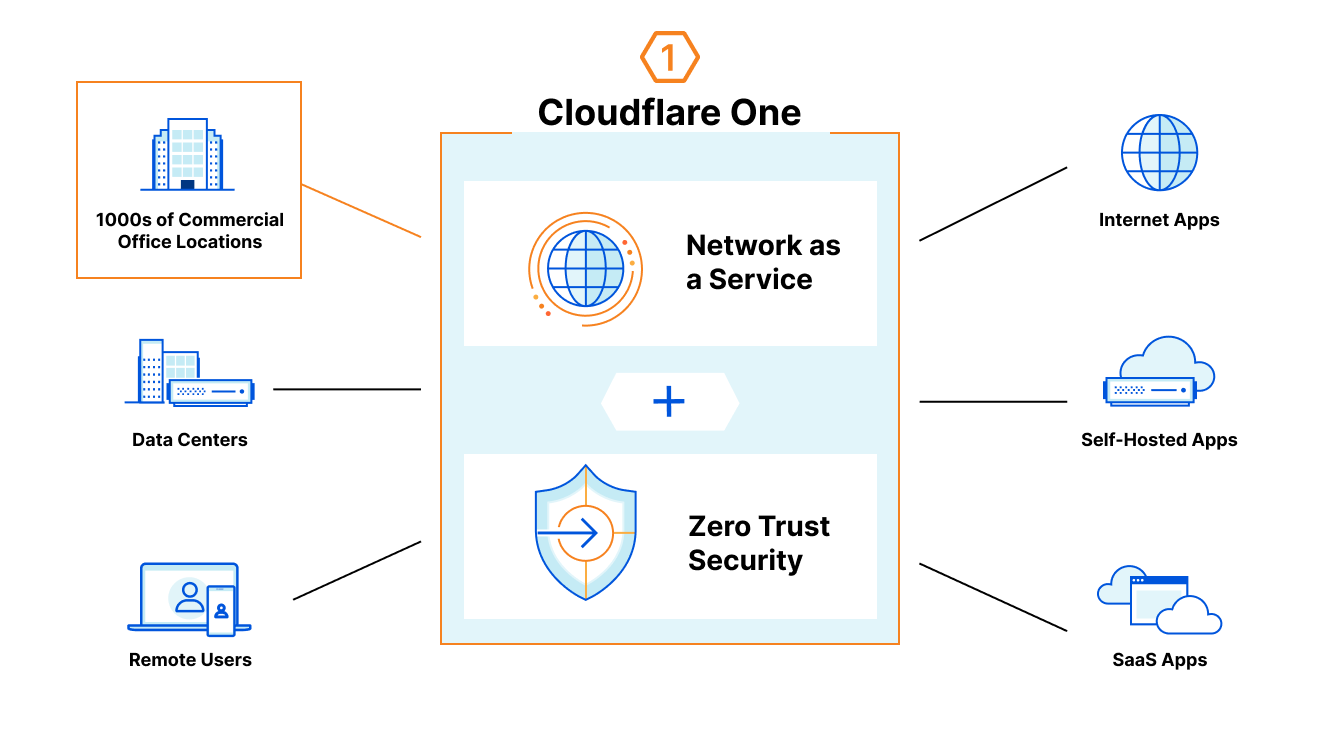
6 New Ways to Validate Device Posture

What’s next

Get started with exploring all device posture attributes in our developer docs. Note that not all posture types are currently available on operating systems and some operating systems don’t support them.

Is there a posture type we’re missing that you’d love to have? We’d love to hear from you in the Community.

Introducing Shadow IT Discovery

Post Syndicated from Abe Carryl original https://blog.cloudflare.com/introducing-shadow-it-discovery/

Introducing Shadow IT Discovery

Introducing Shadow IT Discovery

Your team likely uses more SaaS applications than you realize. The time your administrators spend vetting and approving applications sanctioned for use can suddenly be wasted when users sign up for alternative services and store data in new places. Starting today, you can use Cloudflare for Teams to detect and block unapproved SaaS applications with just two clicks.

Increasing Shadow IT usage

SaaS applications save time and budget for IT departments. Instead of paying for servers to host tools — and having staff ready to monitor, upgrade, and troubleshoot those tools — organizations can sign up for a SaaS equivalent with just a credit card and never worry about hosting or maintenance again.

That same convenience causes a data control problem. Those SaaS applications sit outside any environment that you control; the same reason they are easy for your team is also a potential liability now that your sensitive data is kept by third parties. Most organizations keep this in check through careful audits of the SaaS applications being used. Depending on industry and regulatory impact, IT departments evaluate, approve, and catalog the applications they use.

However, users can intentionally or accidentally bypass those approvals. For example, if your organization relies on OneDrive but a user is more comfortable with Google Drive, that user might decide to store work files in Google Drive instead. IT has no visibility into this happening and the user might think it’s fine. That user begins sharing files with other users in your organization, who also sign up with Google Drive, and suddenly an unsanctioned application holds sensitive information. This is “Shadow IT” and these applications inherently obfuscate the controls put in place by your organization.

Detecting Shadow IT

Cloudflare Gateway routes all Internet bound traffic to Cloudflare’s network to enforce granular controls for your users to block them from unknown security threats. Now, it also provides your team added assurance with a low-effort, high-visibility overview into the SaaS applications being used in your environment.

By simply turning on Gateway, all HTTP requests for your organization are aggregated in your Gateway Activity Log for audit and security purposes. Within the activity log, we surface pertinent information about the user, action, and request. These records include data about the application and application type. In the example above, the application type would be Collaboration and Online Meeting and the application would be Google Drive.

From there, Gateway analyzes your HTTP request in the Activity Log and surfaces your Shadow IT, by categorizing and sorting these seemingly miscellaneous applications into actionable insights without any additional lift from your team.

Introducing Shadow IT Discovery

Introducing Shadow IT Discovery

With Shadow IT Discovery, Cloudflare for Teams first catalogs all applications used in your organization. The feature runs in an “observation” mode first – all applications are analyzed, but default to “unreviewed.”

Your team can then review the applications found and, with just a couple clicks, designate applications approved or unapproved — either for a single application or in bulk.

This allows administrators to easily track the top approved and unapproved applications their users are accessing to better profile their security posture. When drilling down into a more detailed view, administrators can take bulk actions to move multiple newly discovered applications at once. In this view, users can also filter on application type to easily identify redundancies in their organization.

Another feature we wanted to add was the ability to quickly highlight if an application being used by your organization has already been secured by Cloudflare Access. You can find this information in the column titled Secured. If an application is not Secured by Access, you can start that process today as well with Access for SaaS. (We added two new tutorials this week!)

Introducing Shadow IT Discovery

When you mark an application unapproved, Cloudflare for Teams does not block it outright. We know some organizations need to label an application unapproved and check in with the users before they block access to it altogether. If your team is ready, you can then apply a Gateway rule to block access to it going forward.

Saving IT cost

While we’re excited to help IT teams stop worrying about unapproved apps, we also talked to teams who feared they were overspending for certain approved applications.

We want to help here too. Today’s launch counts the number of unique users who access any one application over different time intervals. IT teams can use this data to check usage against licenses and right size as needed.

Without this feature, many administrators and our own internal IT department were losing sleep each night wondering if their users were circumventing their controls and putting them at risk of attack. Additionally, many administrators are financially impacted as they procure software licenses for their entire organization. With Shadow IT Discovery, we empower your team to anticipate popular applications and begin the assessment process earlier in the procurement lifecycle.

What’s next

We’re excited to announce Shadow IT and can’t wait to see what you’ll do with it. To get started, deploy HTTP filtering for your organization with the Cloudflare for Teams client. In the future, we’ll also be adding automation to block unapproved applications in Gateway, but we can’t wait to hear what else you’d like to see out of this feature.

The Cloudflare Startup Enterprise Plan: helping new startups bootstrap

Post Syndicated from Jade Q. Wang original https://blog.cloudflare.com/the-cloudflare-startup-enterprise-plan-helping-new-startups-bootstrap/

The Cloudflare Startup Enterprise Plan: helping new startups bootstrap

The Cloudflare Startup Enterprise Plan: helping new startups bootstrap

Early in the life of most startups, there is a time of incredible hustle, creative problem solving, and making the impossible possible through out-of-the-box thinking and elbow grease. Grizzled veterans, who have lived through those days of running on coffee and shoestring budgets, look back on that time and fascinate the newcomers with war stories of back in the day, of adventures and first wins, when they kept the lights on by sheer force of will.

To help early stage startups get going, Cloudflare is giving away one year of the Startup Enterprise plan to all early stage startups in participating accelerator programs. That early stage time is special for product development, and entrepreneurs unlock worlds of possibilities when they have advanced tools on their hands, such as the power of the Cloudflare network.

What’s included in the Startup Enterprise plan?

In addition to the core offerings in the Pro and Business plans (e.g., CDN, DNS, WAF, custom SSL cert, 50 page rules), when founders sign up for the Startup Enterprise plan they’ll get special access to:

  • Cloudflare Workers: 50 million requests / month.
    • Deploy serverless code instantly across the globe to give it exceptional performance, reliability, and scale.
  • Cloudflare for Teams: 50 seats.
    • Zero Trust security platform, unified network security as-a-service built natively into the Cloudflare network
  • Cloudflare Stream: 500K min/month; 100K minutes storage.
    • An affordable, scalable, on-demand video platform with simple, comprehensive APIs.

Additionally, when there are new Cloudflare products that are still in early access, participants on the Startup Enterprise plan can tell us about their use case for the product managers’ consideration for early access.

What startups are eligible for the Startup Enterprise plan?

To be eligible for the Startup Enterprise plan, a startup must be currently enrolled in a participating accelerator program or be a recent graduate. Additional eligibility criteria will be listed on the vendor perk info page of the accelerator program.

Get started

  • If you are a founder in a participating accelerator program, find the Cloudflare perk from your program’s vendor perk page and follow the instructions there.
  • If you are a founder in a program that is not yet a partner, drop us a line at [email protected], or ask the folks who run the vendor perk program at your accelerator program to drop us a line at [email protected].If you run or work for an accelerator program, or are friends with folks who do, do drop us a line at [email protected]. We’d love to make our tools available to your portfolio companies.

Browser VNC with Zero Trust Rules

Post Syndicated from Kenny Johnson original https://blog.cloudflare.com/browser-vnc-with-zero-trust-rules/

Browser VNC with Zero Trust Rules

Browser VNC with Zero Trust Rules

Starting today, we’re excited to share that you can now shift another traditional client-driven use case to a browser. Teams can now provide their users with a Virtual Network Computing (VNC) client fully rendered in the browser with built-in Zero Trust controls.

Like the SSH flow, this allows users to connect from any browser on any device, with no client software needed. The feature runs in every one of our data centers in over 200 cities around the world, bringing the experience closer to your end users. We also built the experience using Cloudflare Workers, to offer nearly instant start times. In the future we will support full auditability of user actions in their VNC and SSH sessions.

A quick refresher on VNC

VNC is a desktop sharing platform built on top of the Remote Frame Buffer protocol that allows for a GUI on any server. It is built to be platform-independent and provides an easy way for administrators to make interfaces available to users that are less comfortable with a command-line to work with a remote machine. Or to complete work better suited for a visual interface.

In my case, the most frequent reason I use VNC is to play games that have compatibility issues. Using a virtual machine to run a Windows Server was much cheaper than buying a new laptop.

In most business use cases, VNC isn’t used to play games, it’s driven by security or IT management requirements. VNC can be beneficial to create a “clean room” style environment for users to interact with secure information that cannot be moved to their personal machine.

How VNC is traditionally deployed

Typically, VNC deployments require software to be installed onto a user’s machine. This software allows a user to establish a VNC connection and render the VNC server’s GUI. This comes with challenges of operating system compatibility (remember how VNC was supposed to be platform independent?), security, and management overhead.

Managing software like a VNC viewer typically requires Mobile Device Management (MDM) software or users making individual changes to their machines. This is further complicated by contractors and external users requiring access via VNC.

Challenges with VNC deployments

VNC is often used to create an environment for a user to interact with sensitive data. However, it can be very difficult to monitor when a user makes a connection to a VNC server and then what they do during their session, without significant network configuration.

On top of the security concerns, software installed on a user’s machine, like a VNC viewer, is generally difficult to manage — think compatibility issues with operating systems, security updates, and many other problems.

Unlike SSH, where the majority of servers and clients predominantly use OpenSSH, there are numerous commercial and free VNC servers / clients in various states of quality and cost.

We wanted to fix this!

It was time for Browser VNC

One major challenge of rendering a GUI is latency — if a user’s mouse or keystrokes are slow, the experience is almost unusable. Using Cloudflare Tunnel, we can deliver the VNC connection at our edge, meaning we’re less than <50 ms away from 99% of Internet users.

To do this we built a full VNC viewer implementation that runs in a web browser. Something like this would normally require running a server-side TCP → WebSocket proxy (eg. websockify since TCP connections are not natively supported in browsers today). Since we already have exactly this with cloudflared + Cloudflare Tunnel, we can connect to existing TCP tunnels and provide an entirely in-browser VNC experience. Because the server-side proxy happens at the TCP level, the VNC session is end-to-end encrypted between the web client and the VNC server within your network.

Browser VNC with Zero Trust Rules

Once we establish a connection, we use noVNC to render any VNC server natively in the browser.

All of this is delivered using Cloudflare Workers. We were able to build this entire experience on our serverless platform to render the VNC experience at our edge.

The final step is to authenticate the traffic going to the Tunnel established with your VNC server. For this, we can use Cloudflare Access, as it allows us to verify a user’s identity and enforce additional security checks. Once a user is properly authenticated, they are presented with a cookie that is then checked on every request made to the VNC server.

Browser VNC with Zero Trust Rules

And then a user can use their VNC terminal!

Browser VNC with Zero Trust Rules

Why Browser Based is the future

First and foremost, a browser-based experience is straightforward for users. All they need is an Internet connection and URL to access their SSH and VNC instances. Previously they needed software like a puTTY client and RealVNC.

Legacy applications, including VNC servers, serve as another attack vector for malicious users because they are difficult to monitor and keep patched with security updates. VNC based in the browser means that we can push security updates instantly. As well as taking advantage of built-in security features of modern browsers (e.g. chromium sandboxing).

Visibility is another major improvement. In future releases, we will support screen recording and network request logging to provide detailed information on exactly what was completed during a VNC session. We already provide clear logs on any time a user accesses their VNC or SSH server via the browser.

Browser VNC with Zero Trust Rules

We’re just getting started!

Browser VNC is available now in every Cloudflare for Teams plan. You can get started for up to 50 users at no cost here.

Soon we’ll be announcing our plans to support additional protocols only available in on-prem deployments. Let us know in the Community if there are particular protocols you would like us to consider!

If you have questions about getting started, feel free to post in the community. If you would like to get started today, follow our step-by-step tutorial.

Announcing WARP for Linux and Proxy Mode

Post Syndicated from Kyle Krum original https://blog.cloudflare.com/announcing-warp-for-linux-and-proxy-mode/

Announcing WARP for Linux and Proxy Mode

Announcing WARP for Linux and Proxy Mode

Last October we released WARP for Desktop, bringing a safer and faster way to use the Internet to billions of devices for free. At the same time, we gave our enterprise customers the ability to use WARP with Cloudflare for Teams. By routing all an enterprise’s traffic from devices anywhere on the planet through WARP, we’ve been able to seamlessly power advanced capabilities such as Secure Web Gateway and Browser Isolation and, in the future, our Data Loss Prevention platforms.

Today, we are excited to announce Cloudflare WARP for Linux and, across all desktop platforms, the ability to use WARP with single applications instead of your entire device.

What is WARP?

WARP was built on the philosophy that even people who don’t know what “VPN” stands for should be able to still easily get the protection a VPN offers. It was also built for those of us who are unfortunately all too familiar with traditional corporate VPNs, and need an innovative, seamless solution to meet the challenges of an always-connected world.

Enter our own WireGuard implementation called BoringTun.

The WARP application uses BoringTun to encrypt traffic from your device and send it directly to Cloudflare’s edge, ensuring that no one in between is snooping on what you’re doing. If the site you are visiting is already a Cloudflare customer, the content is immediately sent down to your device. With WARP+, we use Argo Smart Routing to use the shortest path through our global network of data centers to reach whomever you are connecting to.

Combined with the power of 1.1.1.1 (the world’s fastest public DNS resolver), WARP keeps your traffic secure, private and fast. Since nearly everything you do on the Internet starts with a DNS request, choosing the fastest DNS server across all your devices will accelerate almost everything you do online.

Bringing WARP to Linux

When we built out the foundations of our desktop client last year, we knew a Linux client was something we would deliver. If you have ever shipped software at this scale, you’ll know that maintaining a client across all major operating systems is a daunting (and error-prone) task. To avoid these pitfalls, we wrote the core of the product in Rust, which allows for 95% of the code to be shared across platforms.

Internally we refer to this common code as the shared Daemon (or Service, for Windows folks), and it allows our engineers to spend less time duplicating code across multiple platforms while ensuring most quality improvements hit everyone at the same time. The really cool thing about this is that millions of existing WARP users have already helped us solidify the code base for Linux!

The other 5% of code is split into two main buckets: UI and quirks of the operating system. For now, we are forgoing a UI on Linux and instead working to support three distributions:

  • Ubuntu
  • Red Hat Enterprise Linux
  • CentOS

We want to add more distribution support in the future, so if your favorite distro isn’t there, don’t despair — the client may in fact already work with other Debian and Redhat based distributions, so please give it a try. If we missed your favorite distribution, we’d love to hear from you in our Community Forums.

So without a UI — what’s the mechanism for controlling WARP? The command line, of course! Keen observers may have noticed an executable that already ships with each client called the warp-cli. This platform-agnostic interface is already the preferred mechanism of interacting with the daemon by some of our engineers and is the main way you’ll interact with WARP on Linux.

Installing Cloudflare WARP for Linux

Seasoned Linux developers can jump straight to https://pkg.cloudflareclient.com/install. After linking our repository, get started with either sudo apt install cloudflare-warp or sudo yum install cloudflare-warp, depending on your distribution.

For more detailed installation instructions head over to our WARP Client documentation.

Using the CLI

Once you’ve installed WARP, you can begin using the CLI with a single command:

warp-cli --help

The CLI will display the output below.

~$ warp-cli --help
WARP 0.2.0
Cloudflare
CLI to the WARP service daemon
 
USAGE:
    warp-cli [FLAGS] [SUBCOMMAND]
 
FLAGS:
        --accept-tos    Accept the Terms of Service agreement
    -h, --help          Prints help information
    -l                  Stay connected to the daemon and listen for status changes and DNS logs (if enabled)
    -V, --version       Prints version information
 
SUBCOMMANDS:
    register                    Registers with the WARP API, will replace any existing registration (must be run
                                before first connection)
    teams-enroll                Enroll with Cloudflare for Teams
    delete                      Deletes current registration
    rotate-keys                 Generates a new key-pair, keeping the current registration
    status                      Asks the daemon to send the current status
    warp-stats                  Retrieves the stats for the current WARP connection
    settings                    Retrieves the current application settings
    connect                     Asks the daemon to start a connection, connection progress should be monitored with
                                -l
    disconnect                  Asks the daemon to stop a connection
    enable-always-on            Enables always on mode for the daemon (i.e. reconnect automatically whenever
                                possible)
    disable-always-on           Disables always on mode
    disable-wifi                Pauses service on WiFi networks
    enable-wifi                 Re-enables service on WiFi networks
    disable-ethernet            Pauses service on ethernet networks
    enable-ethernet             Re-enables service on ethernet networks
    add-trusted-ssid            Adds a trusted WiFi network, for which the daemon will be disabled
    del-trusted-ssid            Removes a trusted WiFi network
    allow-private-ips           Exclude private IP ranges from tunnel
    enable-dns-log              Enables DNS logging, use with the -l option
    disable-dns-log             Disables DNS logging
    account                     Retrieves the account associated with the current registration
    devices                     Retrieves the list of devices associated with the current registration
    network                     Retrieves the current network information as collected by the daemon
    set-mode                    
    set-families-mode           
    set-license                 Attaches the current registration to a different account using a license key
    set-gateway                 Forces the app to use the specified Gateway ID for DNS queries
    clear-gateway               Clear the Gateway ID
    set-custom-endpoint         Forces the client to connect to the specified IP:PORT endpoint
    clear-custom-endpoint       Remove the custom endpoint setting
    add-excluded-route          Adds an excluded IP
    remove-excluded-route       Removes an excluded IP
    get-excluded-routes         Get the list of excluded routes
    add-fallback-domain         Adds a fallback domain
    remove-fallback-domain      Removes a fallback domain
    get-fallback-domains        Get the list of fallback domains
    restore-fallback-domains    Restore the fallback domains
    get-device-posture          Get the current device posture
    override                    Temporarily override MDM policies that require the client to stay enabled
    set-proxy-port              Set the listening port for WARP proxy (127.0.0.1:{port})
    help                        Prints this message or the help of the given subcommand(s)

You can begin connecting to Cloudflare’s network with just two commands. The first command, register, will prompt you to authenticate. The second command, connect, will enable the client, creating a WireGuard tunnel from your device to Cloudflare’s network.

~$ warp-cli register
Success
~$ warp-cli connect
Success

Once you’ve connected the client, the best way to verify it is working is to run our trace command:

~$ curl https://www.cloudflare.com/cdn-cgi/trace/

And look for the following output:

warp=on

Want to switch from encrypting all traffic in WARP to just using our 1.1.1.1 DNS resolver? Use the warp-cli set-mode command:

~$ warp-cli help set-mode
warp-cli-set-mode 
 
USAGE:
    warp-cli set-mode [mode]
 
FLAGS:
    -h, --help       Prints help information
    -V, --version    Prints version information
 
ARGS:
    <mode>     [possible values: warp, doh, warp+doh, dot, warp+dot, proxy]
~$ warp-cli set-mode doh
Success

Protecting yourself against malware with 1.1.1.1 for Families is just as easy, and it can be used with either WARP enabled or in straight DNS mode:

~$ warp-cli set-families-mode --help
warp-cli-set-families-mode 
 
USAGE:
    warp-cli set-families-mode [mode]
 
FLAGS:
    -h, --help       Prints help information
    -V, --version    Prints version information
 
ARGS:
    <mode>     [possible values: off, malware, full]
~$ warp-cli set-families-mode malware
Success

A note on Cloudflare for Teams support

Cloudflare for Teams support is on the way, and just like our other clients, it will ship in the same package. Stay tuned for an in-app update or reach out to your Account Executive to be notified when a beta is available.

We need feedback

If you encounter an error, send us feedback with the sudo warp-diag feedback command:

~$ sudo warp-diag feedback

For all other functionality check out warp-cli --help or see our documentation here.

WARP as a Local Proxy

When WARP launched in 2019, one of our primary goals was ease of use. You turn WARP on and all traffic from your device is encrypted to our edge. Through all releases of the client, we’ve kept that as a focus. One big switch to turn on and you are protected.

However, as we’ve grown, so have the requirements for our client. Earlier this year we released split tunnel and local domain fallback as a way for our Cloudflare for Teams customers to exclude certain routes from WARP. Our consumer customers may have noticed this stealthily added in the last release as well. We’ve heard from customers who want to deploy WARP in one additional mode: Single Applications. Today we are also announcing the ability for our customers to run WARP in a local proxy mode in all desktop clients.

When WARP is configured as a local proxy, only the applications that you configure to use the proxy (HTTPS or SOCKS5) will have their traffic sent through WARP. This allows you to pick and choose which traffic is encrypted (for instance, your web browser or a specific app), and everything else will be left open over the Internet.

Because this feature restricts WARP to just applications configured to use the local proxy, leaving all other traffic unencrypted over the Internet by default, we’ve hidden it in the advanced menu. To turn it on:

1. Navigate to Preferences -> Advanced and click the Configure Proxy button.

2. On the dialog that opens, check the box and configure the port you want to listen on.

Announcing WARP for Linux and Proxy Mode

3. This will enable a new mode you can select from:

Announcing WARP for Linux and Proxy Mode

To configure your application to use the proxy, you want to specify 127.0.0.1 for the address and the value you specified for a port (40000 by default). For example, if you are using Firefox, the configuration would look like this:

Announcing WARP for Linux and Proxy Mode

Download today

You can start using these capabilities right now by visiting https://one.one.one.one. We’re super excited to hear your feedback.