Tag Archives: Connector

Getting Cloudflare Tunnels to connect to the Cloudflare Network with QUIC

Post Syndicated from Sudarsan Reddy original https://blog.cloudflare.com/getting-cloudflare-tunnels-to-connect-to-the-cloudflare-network-with-quic/

Getting Cloudflare Tunnels to connect to the Cloudflare Network with QUIC

Getting Cloudflare Tunnels to connect to the Cloudflare Network with QUIC

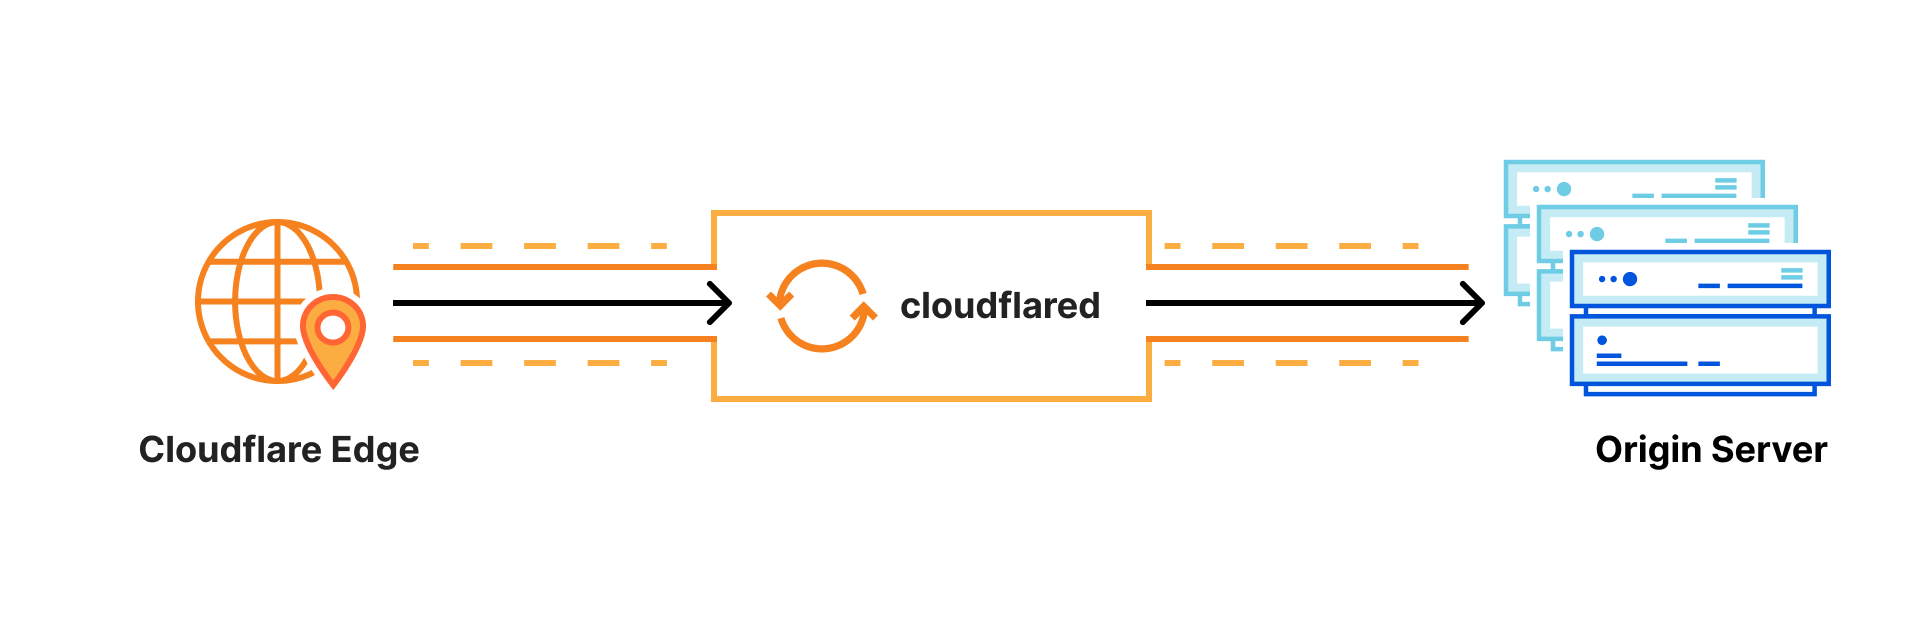
I work on Cloudflare Tunnel, which lets customers quickly connect their private services and networks through the Cloudflare network without having to expose their public IPs or ports through their firewall. Tunnel is managed for users by cloudflared, a tool that runs on the same network as the private services. It proxies traffic for these services via Cloudflare, and users can then access these services securely through the Cloudflare network.

Recently, I was trying to get Cloudflare Tunnel to connect to the Cloudflare network using a UDP protocol, QUIC. While doing this, I ran into an interesting connectivity problem unique to UDP. In this post I will talk about how I went about debugging this connectivity issue beyond the land of firewalls, and how some interesting differences between UDP and TCP came into play when sending network packets.

How does Cloudflare Tunnel work?

Getting Cloudflare Tunnels to connect to the Cloudflare Network with QUIC

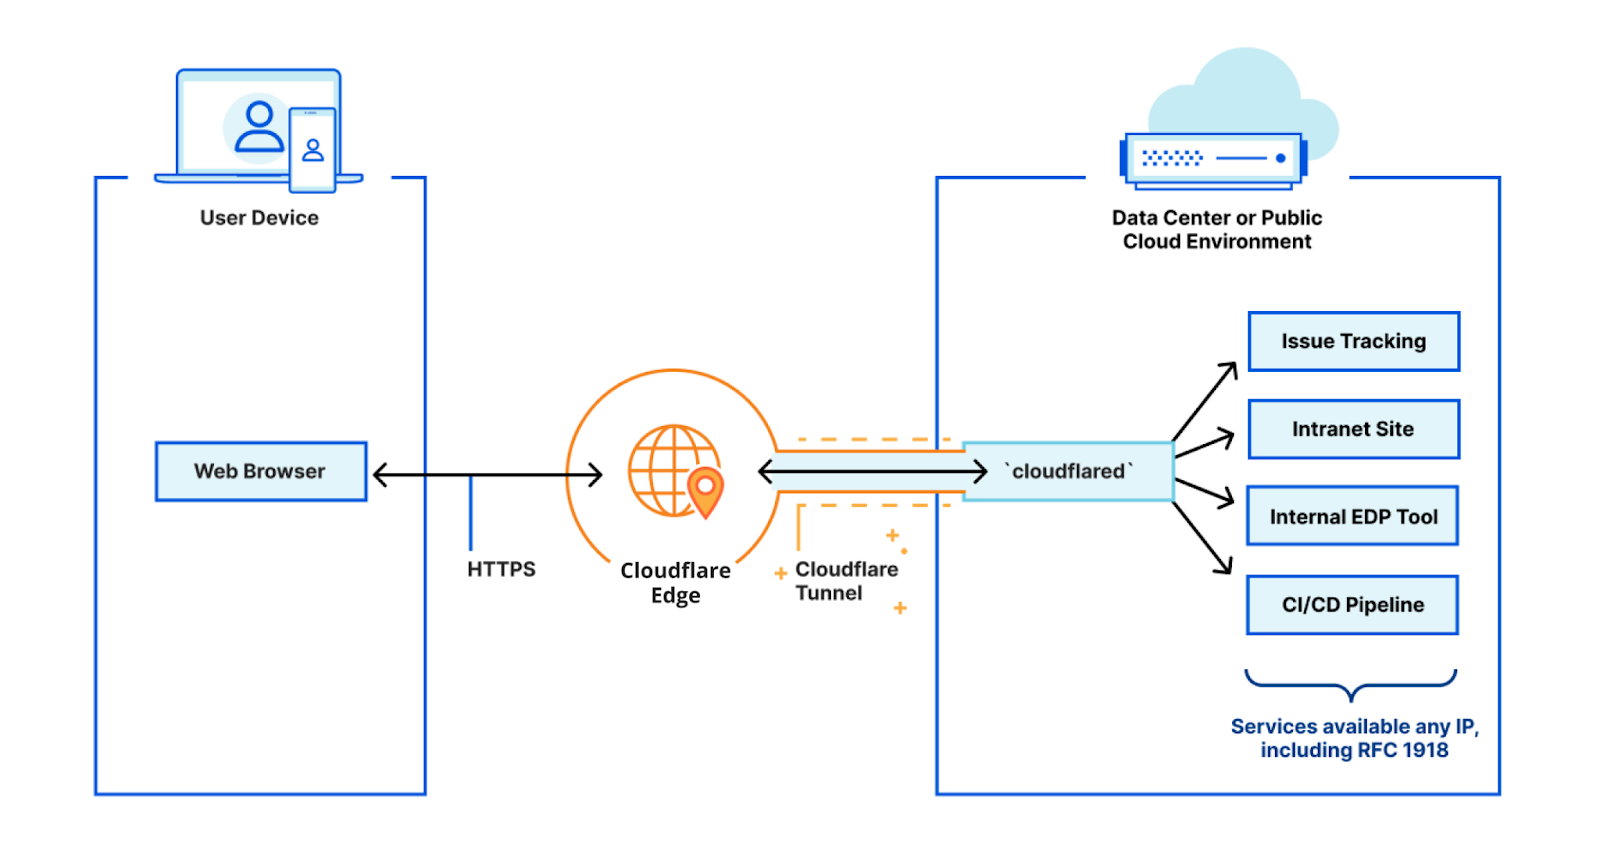
cloudflared works by opening several connections to different servers on the Cloudflare edge. Currently, these are long-lived TCP-based connections proxied over HTTP/2 frames. When Cloudflare receives a request to a hostname, it is proxied through these connections to the local service behind cloudflared.

While our HTTP/2 protocol mode works great, we’d like to improve a few things. First, TCP traffic sent over HTTP/2 is susceptible to Head of Line (HoL) blocking — this affects both HTTP traffic and traffic from WARP routing. Additionally, it is currently not possible to initiate communication from cloudflared’s HTTP/2 server in an efficient way. With the current Go implementation of HTTP/2, we could use Server-Sent Events, but this is not very useful in the scheme of proxying L4 traffic.

The upgrade to QUIC solves possible HoL blocking issues and opens up avenues that allow us to initiate communication from cloudflared to a different cloudflared in the future.

Naturally, QUIC required a UDP-based listener on our edge servers which cloudflared could connect to. We already connect to a TCP-based listener for the existing protocols, so this should be nice and easy, right?

Failed to dial to the edge

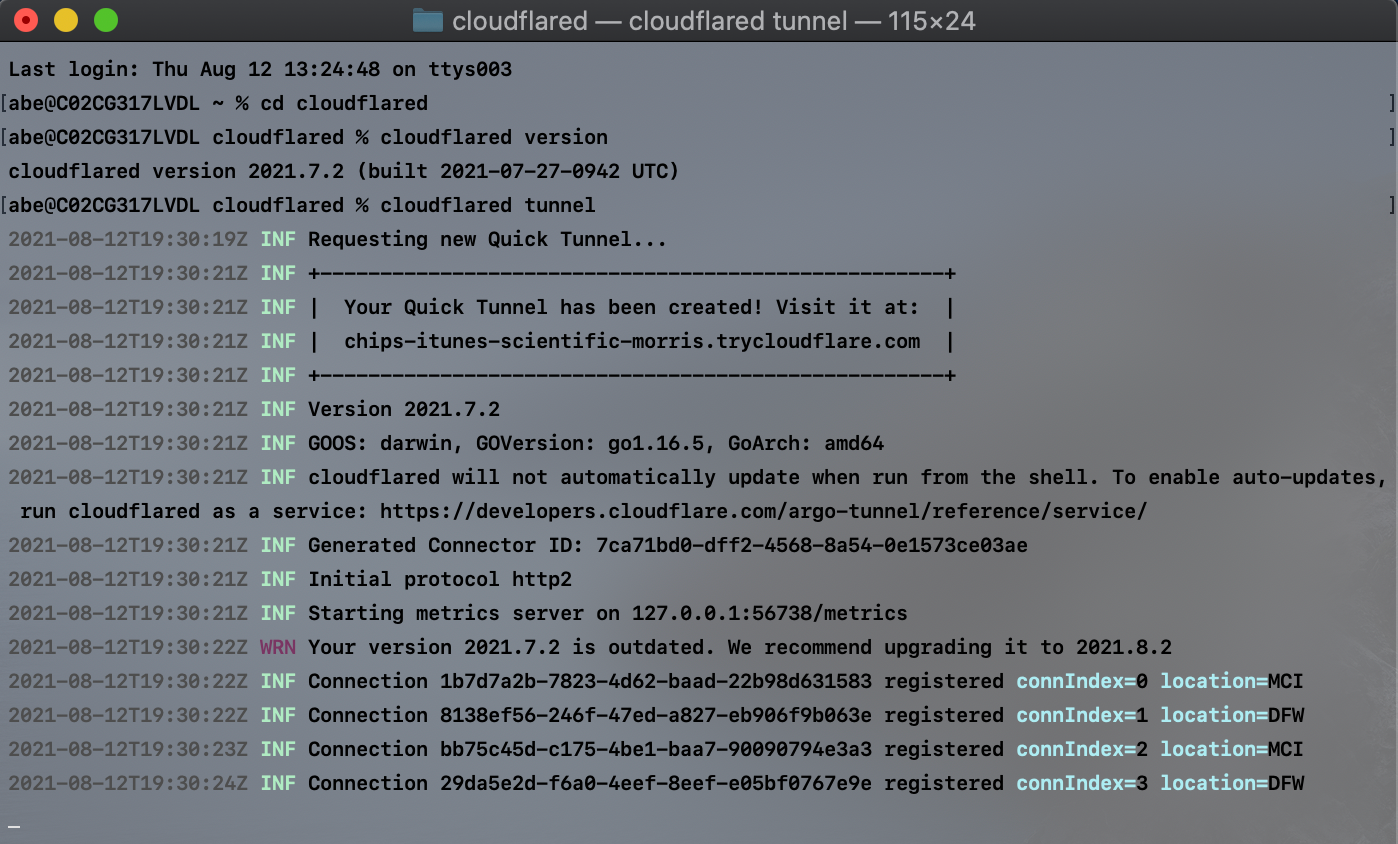
Things weren’t as straightforward as they first looked. I added a QUIC listener on the edge, and the ability for cloudflared to connect to this new UDP-based listener. I tried to run my brand new QUIC tunnel and this happened.

$  cloudflared tunnel run --protocol quic my-tunnel
2021-09-17T18:44:11Z ERR Failed to create new quic connection, err: failed to dial to edge: timeout: no recent network activity

cloudflared wasn’t even establishing a connection to the edge. I started looking at the obvious places first. Did I add a firewall rule allowing traffic to this port? Check. Did I have iptables rules ACCEPTing or DROPping appropriate traffic for this port? Check. They seemed to be in order. So what else could I do?

tcpdump all the packets

I started by logging for UDP traffic on the machine my server was running on to see what could be happening.

$  sudo tcpdump -n -i eth0 port 7844 and udp
tcpdump: verbose output suppressed, use -v or -vv for full protocol decode
listening on eth0, link-type EN10MB (Ethernet), capture size 262144 bytes
14:44:27.742629 IP 173.13.13.10.50152 > 198.41.200.200.7844: UDP, length 1252
14:44:27.743298 IP 203.0.113.0.7844 > 173.13.13.10.50152: UDP, length 37

Looking at this tcpdump helped me understand why I had no connectivity! Not only was this port getting UDP traffic but I was also seeing traffic flow out. But there seemed to be something strange afoot. Incoming packets were being sent to 198.41.200.200:7844 while responses were being sent back from 203.0.113.0:7844 (this is an example IP used for illustration purposes)  instead.

Why is this a problem? If a host (in this case, the server) chooses an address from a network unable to communicate with a public Internet host, it is likely that the return half of the communication will never arrive. But wait a minute. Why is some other IP getting prioritized over a source address my packets were already being sent to? Let’s take a deeper look at some IP addresses. (Note that I’ve deliberately oversimplified and scrambled results to minimally illustrate the problem)

$  ip addr list
eth0: <BROADCAST,MULTICAST,UP,LOWER_UP> mtu 1600 qdisc noqueue state UP group default qlen 1000
inet 203.0.113.0/32 scope global eth0
inet 198.41.200.200/32 scope global eth0 

$ ip route show
default via 203.0.113.0 dev eth0

So this was clearly why the server was working fine on my machine but not on the Cloudflare edge servers. It looks like I have multiple IPs on the interface my service is bound to. The IP that is the default route is being sent back as the source address of the packet.

Why does this work for TCP but not UDP?

Connection-oriented protocols, like TCP, initiate a connection (connect()) with a three-way handshake. The kernel therefore maintains a state about ongoing connections and uses this to determine the source IP address at the time of a response.

Because UDP (unless SOCK_SEQPACKET is involved) is connectionless, the kernel cannot maintain state like TCP does. The recvfrom  system call is invoked from the server side and tells who the data comes from. Unfortunately, recvfrom  does not tell us which IP this data is addressed for. Therefore, when the UDP server invokes the sendto system call to respond to the client, we can only tell it which address to send the data to. The responsibility of determining the source-address IP then falls to the kernel. The kernel has certain heuristics that it uses to determine the source address. This may or may not work, and in the ip routes example above, these heuristics did not work. The kernel naturally (and wrongly) picks the address of the default route to respond with.

Telling the kernel what to do

I had to rely on my application to set the source address explicitly and therefore not rely on kernel heuristics.

Linux has some generic I/O system calls, namely recvmsg  and sendmsg. Their function signatures allow us to both read or write additional out-of-band data we can pass the source address to. This control information is passed via the msghdr struct’s msg_control field.

ssize_t sendmsg(int socket, const struct msghdr *message, int flags)
ssize_t recvmsg(int socket, struct msghdr *message, int flags);
 
struct msghdr {
     void    *   msg_name;   /* Socket name          */
     int     msg_namelen;    /* Length of name       */
     struct iovec *  msg_iov;    /* Data blocks          */
     __kernel_size_t msg_iovlen; /* Number of blocks     */
     void    *   msg_control;    /* Per protocol magic (eg BSD file descriptor passing) */
    __kernel_size_t msg_controllen; /* Length of cmsg list */
     unsigned int    msg_flags;
};

We can now copy the control information we’ve gotten from recvmsg back when calling sendmsg, providing the kernel with information about the source address.The library I used (https://github.com/lucas-clemente/quic-go) had a recent update that did exactly this! I pulled the changes into my service and gave it a spin.

But alas. It did not work! A quick tcpdump showed that the same source address was being sent back. It seemed clear from reading the source code that the recvmsg and sendmsg were being called with the right values. It did not make sense.

So I had to see for myself if these system calls were being made.

strace all the system calls

strace is an extremely useful tool that tracks all system calls and signals sent/received by a process. Here’s what it had to say. I’ve removed all the information not relevant to this specific issue.

17:39:09.130346 recvmsg(3, {msg_name={sa_family=AF_INET6,
sin6_port=htons(35224), inet_pton(AF_INET6, "::ffff:171.54.148.10", 
&sin6_addr), sin6_flowinfo=htonl(0), sin6_scope_id=0}, msg_namelen=112->28, msg_iov=
[{iov_base="_\5S\30\273]\275@\34\24\322\243{2\361\312|\325\n\1\314\316`\3
03\250\301X\20", iov_len=1452}], msg_iovlen=1, msg_control=[{cmsg_len=36, 
cmsg_level=SOL_IPV6, cmsg_type=0x32}, {cmsg_len=28, cmsg_level=SOL_IP, 
cmsg_type=IP_PKTINFO, cmsg_data={ipi_ifindex=if_nametoindex("eth0"),
ipi_spec_dst=inet_addr("198.41.200.200"),ipi_addr=inet_addr("198.41.200.200")}},
{cmsg_len=17, cmsg_level=SOL_IP, 
cmsg_type=IP_TOS, cmsg_data=[0]}], msg_controllen=96, msg_flags=0}, 0) = 28 <0.000007>
17:39:09.165160 sendmsg(3, {msg_name={sa_family=AF_INET6, 
sin6_port=htons(35224), inet_pton(AF_INET6, "::ffff:171.54.148.10", 
&sin6_addr), sin6_flowinfo=htonl(0), sin6_scope_id=0}, msg_namelen=28, 
msg_iov=[{iov_base="Oe4\37:3\344 &\243W\10~c\\\316\2640\255*\231 
OY\326b\26\300\264&\33\""..., iov_len=1302}], msg_iovlen=1, msg_control=
[{cmsg_len=28, cmsg_level=SOL_TCP, cmsg_type=0x8}], msg_controllen=28, 
msg_flags=0}, 0) = 1302 <0.000054>

Let’s start with recvmsg . We can clearly see that the ipi_addr for the source is being passed correctly: ipi_addr=inet_addr(“172.16.90.131”). This part works as expected. Looking at sendmsg  almost instantly tells us where the problem is. The field we want, ip_spec_dst is not being set as we make this system call. So the kernel continues to make wrong guesses as to what the source address may be.

This turned out to be a bug where the library was using IPROTO_TCP instead of IPPROTO_IPV4 as the control message level while making the sendmsg call. Was that it? Seemed a little anticlimactic. I submitted a slightly more typesafe fix and sure enough, straces now showed me what I was expecting to see.

18:22:08.334755 sendmsg(3, {msg_name={sa_family=AF_INET6, 
sin6_port=htons(37783), inet_pton(AF_INET6, "::ffff:171.54.148.10", 
&sin6_addr), sin6_flowinfo=htonl(0), sin6_scope_id=0}, msg_namelen=28, 
msg_iov=
[{iov_base="Ki\20NU\242\211Y\254\337\3107\224\201\233\242\2647\245}6jlE\2
70\227\3023_\353n\364"..., iov_len=33}], msg_iovlen=1, msg_control=
[{cmsg_len=28, cmsg_level=SOL_IP, cmsg_type=IP_PKTINFO, cmsg_data=
{ipi_ifindex=if_nametoindex("eth0"), 
ipi_spec_dst=inet_addr("198.41.200.200"),ipi_addr=inet_addr("0.0.0.0")}}
], msg_controllen=32, msg_flags=0}, 0) =
33 <0.000049>

cloudflared is now able to connect with UDP (QUIC) to the Cloudflare network from anywhere in the world!

$  cloudflared tunnel --protocol quic run sudarsans-tunnel
2021-09-21T11:37:30Z INF Starting tunnel tunnelID=a72e9cb7-90dc-499b-b9a0-04ee70f4ed78
2021-09-21T11:37:30Z INF Version 2021.9.1
2021-09-21T11:37:30Z INF GOOS: darwin, GOVersion: go1.16.5, GoArch: amd64
2021-09-21T11:37:30Z INF Settings: map[p:quic protocol:quic]
2021-09-21T11:37:30Z INF Initial protocol quic
2021-09-21T11:37:32Z INF Connection 3ade6501-4706-433e-a960-c793bc2eecd4 registered connIndex=0 location=AMS

While the programmatic bug causing this issue was a trivial one, the journey into systematically discovering the issue and understanding how Linux internals worked for UDP along the way turned out to be very rewarding for me. It also reiterated my belief that tcpdump and strace are indeed invaluable tools in anybody’s arsenal when debugging network problems.

What’s next?

You can give this a try with the latest cloudflared release at https://github.com/cloudflare/cloudflared/releases/latest. Just remember to set the protocol flag to quic. We plan to leverage this new mode to roll out some exciting new features for Cloudflare Tunnel. So upgrade away and keep watching this space for more information on how you can take advantage of this.

Tunnel: Cloudflare’s Newest Homeowner

Post Syndicated from Abe Carryl original https://blog.cloudflare.com/observe-and-manage-cloudflare-tunnel/

Tunnel: Cloudflare’s Newest Homeowner

Cloudflare Tunnel connects your infrastructure to Cloudflare. Your team runs a lightweight connector in your environment, cloudflared, and services can reach Cloudflare and your audience through an outbound-only connection without the need for opening up holes in your firewall.

Tunnel: Cloudflare’s Newest Homeowner

Whether the services are internal apps protected with Zero Trust policies, websites running in Kubernetes clusters in a public cloud environment, or a hobbyist project on a Raspberry Pi — Cloudflare Tunnel provides a stable, secure, and highly performant way to serve traffic.

Starting today, with our new UI in the Cloudflare for Teams Dashboard, users who deploy and manage Cloudflare Tunnel at scale now have easier visibility into their tunnels’ status, routes, uptime, connectors, cloudflared version, and much more. On the Teams Dashboard you will also find an interactive guide that walks you through setting up your first tunnel.  

Getting Started with Tunnel

Tunnel: Cloudflare’s Newest Homeowner

We wanted to start by making the tunnel onboarding process more transparent for users. We understand that not all users are intimately familiar with the command line nor are they deploying tunnel in an environment or OS they’re most comfortable with. To alleviate that burden, we designed a comprehensive onboarding guide with pathways for MacOS, Windows, and Linux for our two primary onboarding flows:

  1. Connecting an origin to Cloudflare
  2. Connecting a private network via WARP to Tunnel

Our new onboarding guide walks through each command required to create, route, and run your tunnel successfully while also highlighting relevant validation commands to serve as guardrails along the way. Once completed, you’ll be able to view and manage your newly established tunnels.

Managing your tunnels

Tunnel: Cloudflare’s Newest Homeowner

When thinking about the new user interface for tunnel we wanted to concentrate our efforts on how users gain visibility into their tunnels today. It was important that we provide the same level of observability, but through the lens of a visual, interactive dashboard. Specifically, we strove to build a familiar experience like the one a user may see if they were to run cloudflared tunnel list to show all of their tunnels, or cloudflared tunnel info if they wanted to better understand the connection status of a specific tunnel.

Tunnel: Cloudflare’s Newest Homeowner

In the interface, you can quickly search by name or filter by name, status, uptime, or creation date. This allows users to easily identify and manage the tunnels they need, when they need them. We also included other key metrics such as Status and Uptime.

A tunnel’s status depends on the health of its connections:

  • Active: This means your tunnel is running and has a healthy connection to the Cloudflare network.
  • Inactive: This means your tunnel is not running and is not connected to Cloudflare.
  • Degraded: This means one or more of your four long-lived TCP connections to Cloudflare have been disconnected, but traffic is still being served to your origin.

A tunnel’s uptime is also calculated by the health of its connections. We perform this calculation by determining the UTC timestamp of when the first (of four) long-lived TCP connections is established with the Cloudflare Edge. In the event this single connection is terminated, we will continue tracking uptime as long as one of the other three connections continues to serve traffic. If no connections are active, Uptime will reset to zero.

Tunnel Routes and Connectors

Last year, shortly after the announcement of Named Tunnels, we released a new feature that allowed users to utilize the same Named Tunnel to serve traffic to many different services through the use of Ingress Rules. In the new UI, if you’re running your tunnels in this manner, you’ll be able to see these various services reflected by hovering over the route’s value in the dashboard. Today, this includes routes for DNS records, Load Balancers, and Private IP ranges.

Even more recently, we announced highly available and highly scalable instances of cloudflared, known more commonly as “cloudflared replicas.” To view your cloudflared replicas, select and expand a tunnel. Then you will identify how many cloudflared replicas you’re running for a given tunnel, as well as the corresponding connection status, data center, IP address, and version. And ultimately, when you’re ready to delete a tunnel, you can do so directly from the dashboard as well.

What’s next

Moving forward, we’re excited to begin incorporating more Cloudflare Tunnel analytics into our dashboard. We also want to continue making Cloudflare Tunnel the easiest way to connect to Cloudflare. In order to do that, we will focus on improving our onboarding experience for new users and look forward to bringing more of that functionality into the Teams Dashboard. If you have things you’re interested in having more visibility around in the future, let us know below!

Quick Tunnels: Anytime, Anywhere

Post Syndicated from Rishabh Bector original https://blog.cloudflare.com/quick-tunnels-anytime-anywhere/

Quick Tunnels: Anytime, Anywhere

Quick Tunnels: Anytime, Anywhere

My name is Rishabh Bector, and this summer, I worked as a software engineering intern on the Cloudflare Tunnel team. One of the things I built was quick Tunnels and before departing for the summer, I wanted to write a blog post on how I developed this feature.

Over the years, our engineering team has worked hard to continually improve the underlying architecture through which we serve our Tunnels. However, the core use case has stayed largely the same. Users can implement Tunnel to establish an encrypted connection between their origin server and Cloudflare’s edge.

This connection is initiated by installing a lightweight daemon on your origin, to serve your traffic to the Internet without the need to poke holes in your firewall or create intricate access control lists. Though we’ve always centered around the idea of being a connector to Cloudflare, we’ve also made many enhancements behind the scenes to the way in which our connector operates.

Typically, users run into a few speed bumps before being able to use Cloudflare Tunnel. Before they can create or route a tunnel, users need to authenticate their unique token against a zone on their account. This means in order to simply spin up a Tunnel testing environment, users need to first create an account, add a website, change their nameservers, and wait for DNS propagation.

Starting today, we’re excited to fix that. Cloudflare Tunnel now supports a free version that includes all the latest features and does not require any onboarding to Cloudflare. With today’s change, you can begin experimenting with Tunnel in five minutes or less.

Introducing Quick Tunnels

When administrators start using Cloudflare Tunnel, they need to perform four specific steps:

  1. Create the Tunnel
  2. Configure the Tunnel and what services it will represent
  3. Route traffic to the Tunnel
  4. And finally… run the Tunnel!

These steps give you control over how your services connect to Cloudflare, but they are also a chore. Today’s change, which we are calling quick Tunnels, not only removes some onboarding requirements, we’re also condensing these into a single step.

If you have a service running locally that you want to share with teammates or an audience, you can use this single command to connect your service to Cloudflare’s edge. First, you need to install the Cloudflare connector, a lightweight daemon called cloudflared. Once installed, you can run the command below.

cloudflared tunnel

Quick Tunnels: Anytime, Anywhere

When run, cloudflared will generate a URL that consists of a random subdomain of the website trycloudflare.com and point traffic to localhost port 8080. If you have a web service running at that address, users who visit the subdomain generated will be able to visit your web service through Cloudflare’s network.

Configuring Quick Tunnels

We built this feature with the single command in mind, but if you have services that are running at different default locations, you can optionally configure your quick Tunnel to support that.

One example is if you’re building a multiplayer game that you want to share with friends. If that game is available locally on your origin, or even your laptop, at localhost:3000, you can run the command below.

cloudflared tunnel ---url localhost:3000

You can do this with IP addresses or URLs, as well. Anything that cloudflared can reach can be made available through this service.

How does it work?

Cloudflare quick Tunnels is powered by Cloudflare Workers, giving us a serverless compute deployment that puts Tunnel management in a Cloudflare data center closer to you instead of a centralized location.

When you run the command cloudflared tunnel, your instance of cloudflared initiates an outbound-only connection to Cloudflare. Since that connection was initiated without any account details, we treat it as a quick Tunnel.

A Cloudflare Worker, which we call the quick Tunnel Worker, receives a request that a new quick Tunnel should be created. The Worker generates the random subdomain and returns that to the instance of cloudflared. That instance of cloudflared can now establish a connection for that subdomain.

Meanwhile, a complementary service running on Cloudflare’s edge receives that subdomain and the identification number of the instance of cloudflared. That service uses that information to create a DNS record in Cloudflare’s authoritative DNS which maps the randomly-generated hostname to the specific Tunnel you created.

The deployment also relies on the Workers Cron Trigger feature to perform clean up operations. On a regular interval, the Worker looks for quick Tunnels which have been disconnected for more than five minutes. Our Worker classifies these Tunnels as abandoned and proceeds to delete them and their associated DNS records.

What about Zero Trust policies?

By default, all the quick Tunnels that you create are available on the public Internet at the randomly generated URL. While this might be fine for some projects and tests, other use cases require more security.

Quick Tunnels: Anytime, Anywhere

If you need to add additional Zero Trust rules to control who can reach your services, you can use Cloudflare Access alongside Cloudflare Tunnel. That use case does require creating a Cloudflare account and adding a zone to Cloudflare, but we’re working on ideas to make that easier too.

Where should I notice improvements?

We first launched a version of Cloudflare Tunnel that did not require accounts over two years ago. While we’ve been thrilled that customers have used this for their projects, Cloudflare Tunnel evolved significantly since then. Specifically, Cloudflare Tunnel relies on a new architecture that is more redundant and stable than the one used by that older launch. While all Tunnels that migrated to this new architecture, which we call Named Tunnels, enjoyed those benefits, the users on this option that did not require an account were left behind.

Today’s announcement brings that stability to quick Tunnels. Tunnels are now designed to be long-lived, persistent objects. Unless you delete them, Tunnels can live for months, an improvement over the average lifespan measured in hours before connectivity issues disrupted a Tunnel in the older architecture.

These quick Tunnels run on this same, resilient architecture not only expediting time-to-value, but also improving the overall tunnel quality of life.

What’s next?

Today’s quick Tunnels add a powerful feature to Cloudflare Tunnels: the ability to create a reliable, resilient tunnel in a single command, without the hassle of creating an account first. We’re excited to help your team build and connect services to Cloudflare’s network and on to your audience or teammates. If you have additional questions, please share them in this community post here.