Tag Archives: Cloudflare Tunnel

Introducing WARP Connector: paving the path to any-to-any connectivity

Post Syndicated from Abe Carryl original https://blog.cloudflare.com/introducing-warp-connector-paving-the-path-to-any-to-any-connectivity-2


In the ever-evolving domain of enterprise security, CISOs and CIOs have to tirelessly build new enterprise networks and maintain old ones to achieve performant any-to-any connectivity. For their team of network architects, surveying their own environment to keep up with changing needs is half the job. The other is often unearthing new, innovative solutions which integrate seamlessly into the existing landscape. This continuous cycle of construction and fortification in the pursuit of secure, flexible infrastructure is exactly what Cloudflare’s SASE offering, Cloudflare One, was built for.

Cloudflare One has progressively evolved based on feedback from customers and analysts.,  Today, we are thrilled to introduce the public availability of the Cloudflare WARP Connector, a new tool that makes bidirectional, site-to-site, and mesh-like connectivity even easier to secure without the need to make any disruptive changes to existing network infrastructure.

Bridging a gap in Cloudflare’s Zero Trust story

Cloudflare’s approach has always been focused on offering a breadth of products, acknowledging that there is no one-size-fits-all solution for network connectivity. Our vision is simple: any-to-any connectivity, any way you want it.

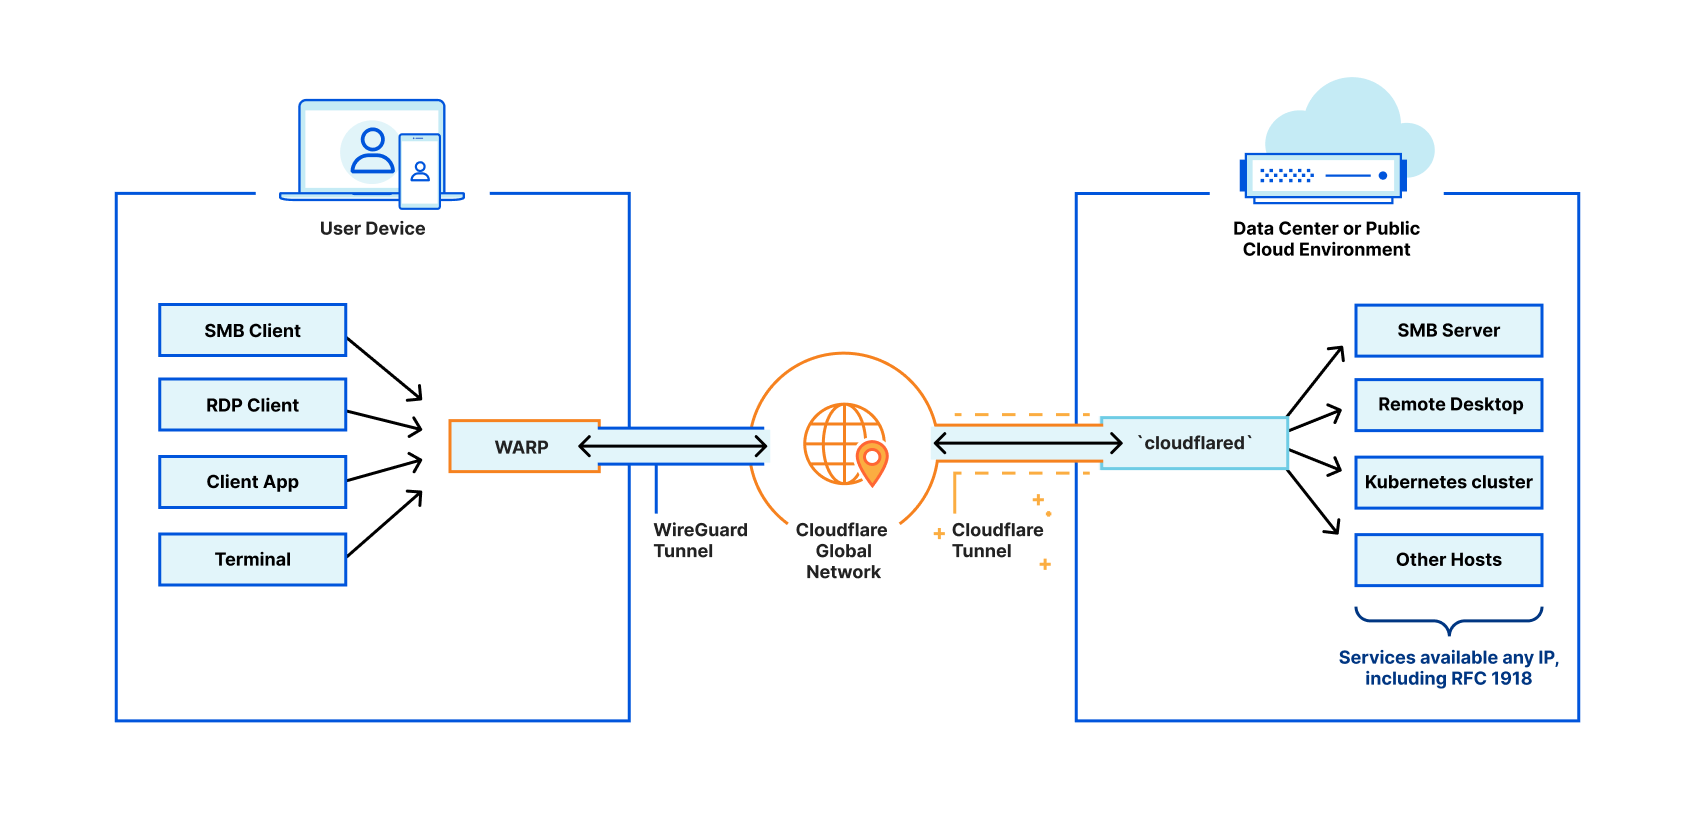
Prior to the WARP Connector, one of the easiest ways to connect your infrastructure to Cloudflare, whether that be a local HTTP server, web services served by a Kubernetes cluster, or a private network segment, was through the Cloudflare Tunnel app connector, cloudflared. In many cases this works great, but over time customers began to surface a long tail of use cases which could not be supported based on the underlying architecture of cloudflared. This includes situations where customers utilize VOIP phones, necessitating a SIP server to establish outgoing connections to user’s softphones, or a CI/CD server sending notifications to relevant stakeholders for each stage of the CI/CD pipelines. Later in this blog post, we explore these use cases in detail.

As clouflared proxies at Layer 4 of the OSI model, its design was optimized specifically to proxy requests to origin services — it was not designed to be an active listener to handle requests from origin services. This design trade-off means that cloudflared needs to source NAT all requests it proxies to the application server. This setup is convenient for scenarios where customers don’t need to update routing tables to deploy cloudflared in front of their original services. However, it also means that customers can’t see the true source IP of the client sending the requests. This matters in scenarios where a network firewall is logging all the network traffic, as the source IP of all the requests will be cloudflared’s IP address, causing the customer to lose visibility into the true client source.

Build or borrow

To solve this problem, we identified two potential solutions: start from scratch by building a new connector, or borrow from an existing connector, likely in either cloudflared or WARP.

The following table provides an overview of the tradeoffs of the two approaches:

Features

Build in cloudflared

Borrow from WARP 

Bidirectional traffic flows

As described in the earlier section, limitations of Layer 4 proxying.

This does proxying at 

Layer 3, because of which it can act as default gateway for that subnet, enabling it to support traffic flows from both directions.

User experience

For Cloudflare One customers, they have to work with two distinct products (cloudflared and WARP) to connect their services and users.

For Cloudflare One customers, they just have to get familiar with a single product to connect their users as well as their networks.

Site-to-site connectivity between branches, data centers (on-premise and cloud) and headquarters.

Not recommended

For sites where running  agents on each device is not feasible, this could easily connect the sites to users running WARP clients in other sites/branches/data centers. This would work seamlessly where the underlying tunnels are all the same.

Visibility into true source IP

It does source NATting.

Since it acts as the default gateway, it preserves the true source IP address for any traffic flow.

High availability

Inherently reliable by design and supports replicas for failover scenarios.

Reliability specifications are very different for a default gateway use case vs endpoint device agent. Hence, there is opportunity to innovate here. 

Introducing WARP Connector

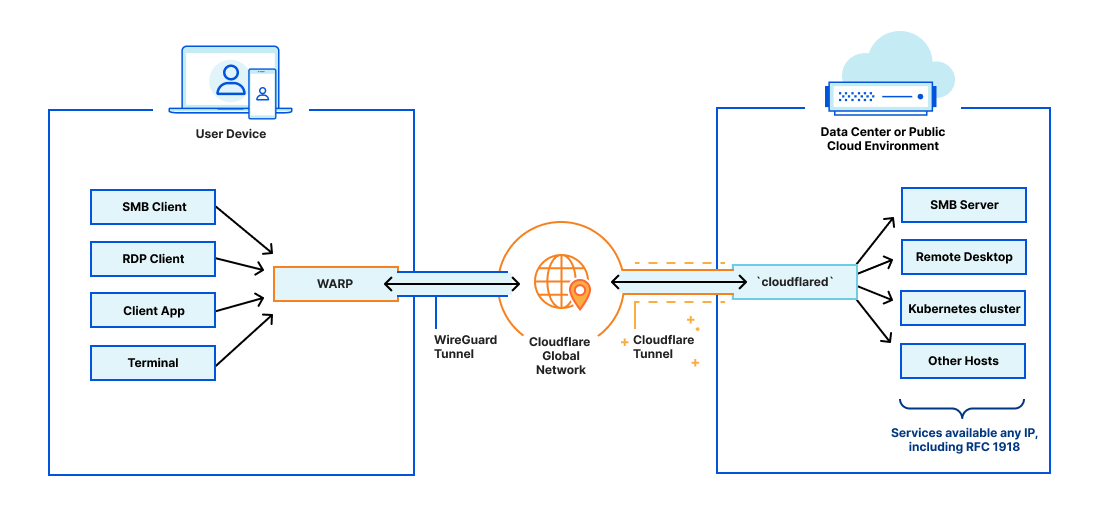
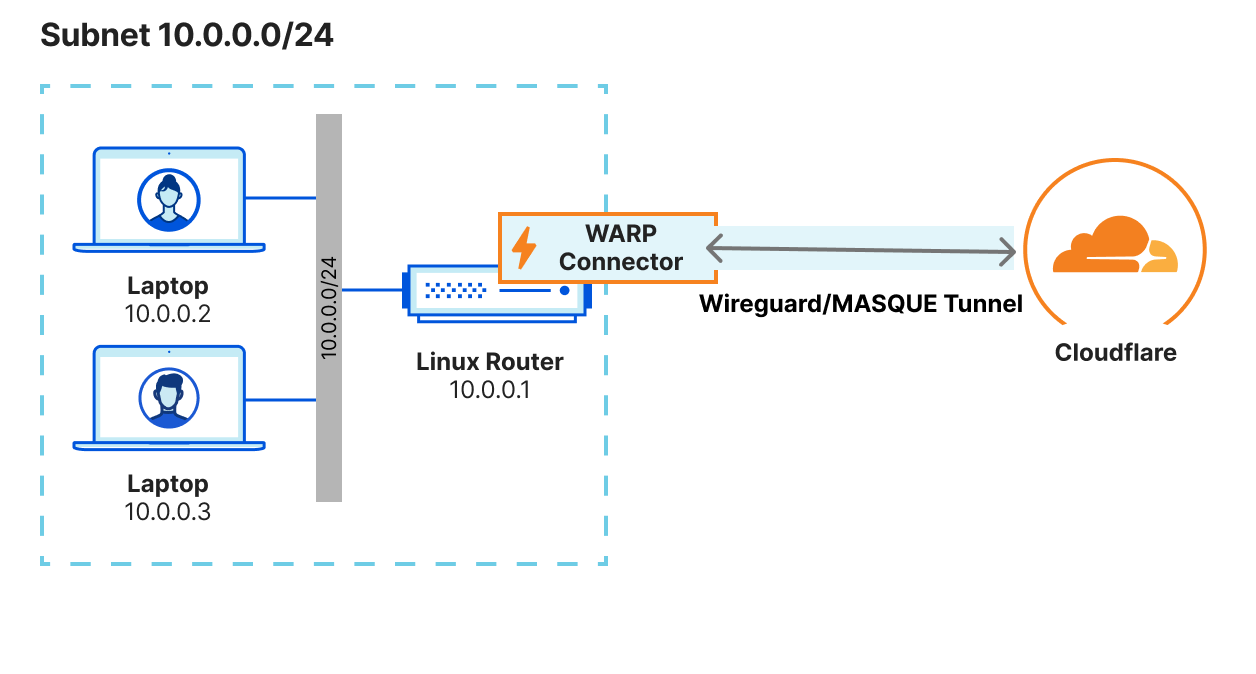
Starting today, the introduction of WARP Connector opens up new possibilities: server initiated (SIP/VOIP) flows; site-to-site connectivity, connecting branches, headquarters, and cloud platforms; and even mesh-like networking with WARP-to-WARP. Under the hood, this new connector is an extension of warp-client that can act as a virtual router for any subnet within the network to on/off-ramp traffic through Cloudflare.

By building on WARP, we were able to take advantage of its design, where it creates a virtual network interface on the host to logically subdivide the physical interface (NIC) for the purpose of routing IP traffic. This enables us to send bidirectional traffic through the WireGuard/MASQUE tunnel that’s maintained between the host and Cloudflare edge. By virtue of this architecture, customers also get the added benefit of visibility into the true source IP of the client.

WARP Connector can be easily deployed on the default gateway without any additional routing changes. Alternatively, static routes can be configured for specific CIDRs that need to be routed via WARP Connector, and the static routes can be configured on the default gateway or on every host in that subnet.
Private network use cases

Here we’ll walk through a couple of key reasons why you may want to deploy our new connector, but remember that this solution can support numerous services, such as Microsoft’s System Center Configuration Manager (SCCM), Active Directory server updates, VOIP and SIP traffic, and developer workflows with complex CI/CD pipeline interaction. It’s also important to note this connector can either be run alongside cloudflared and Magic WAN, or can be a standalone remote access and site-to-site connector to the Cloudflare Global network.

Softphone and VOIP servers
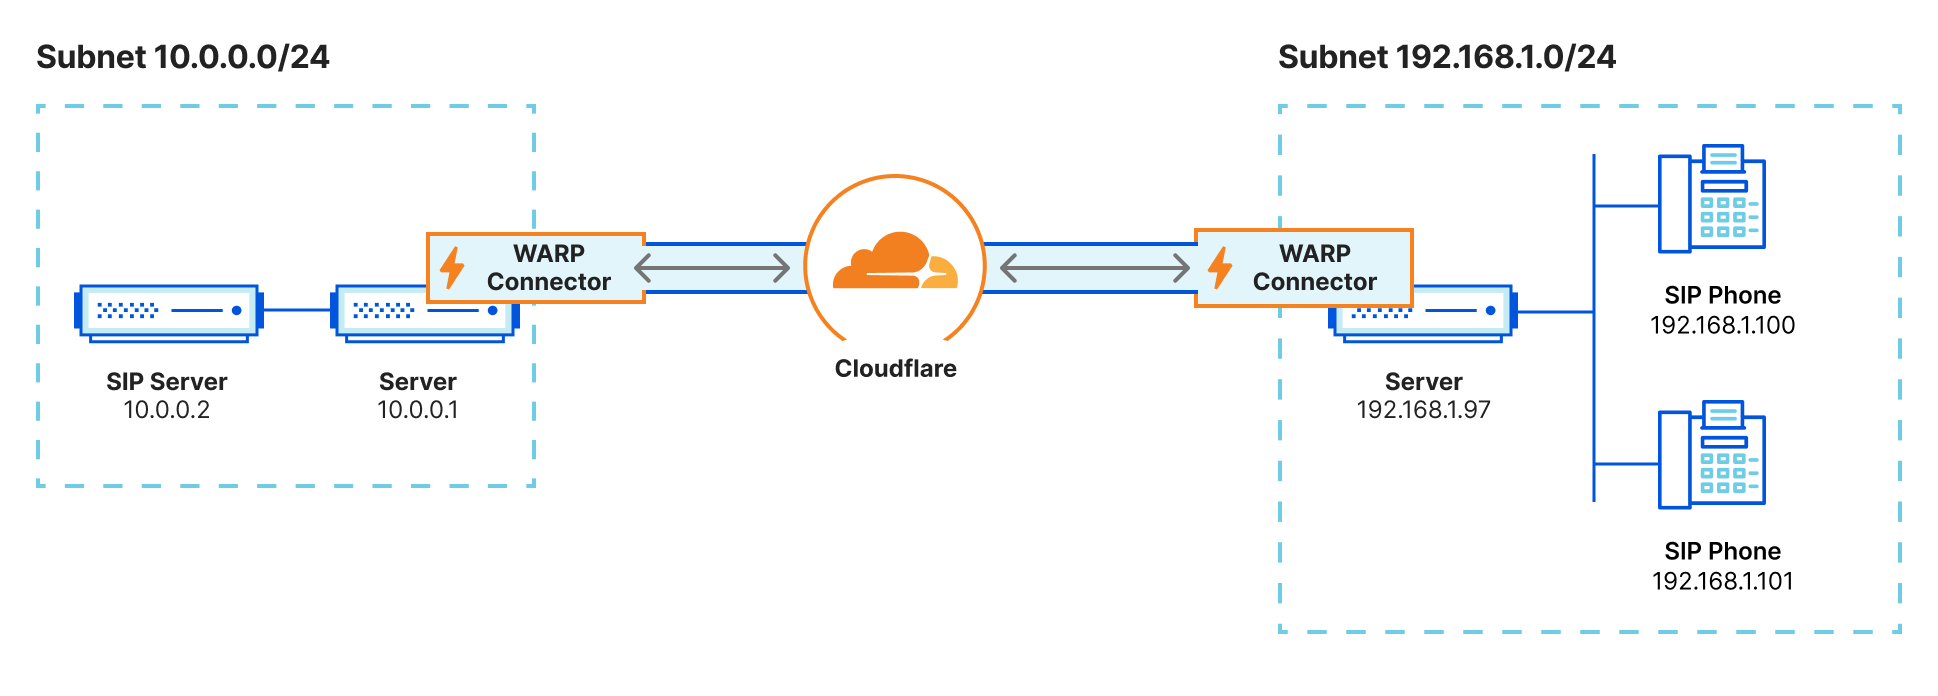
For users to establish a voice or video call over a VOIP software service, typically a SIP server within the private network brokers the connection using the last known IP address of the end-user. However, if traffic is proxied anywhere along the path, this often results in participants only receiving partial voice or data signals. With the WARP Connector, customers can now apply granular policies to these services for secure access, fortifying VOIP infrastructure within their Zero Trust framework.

Securing access to CI/CD pipeline
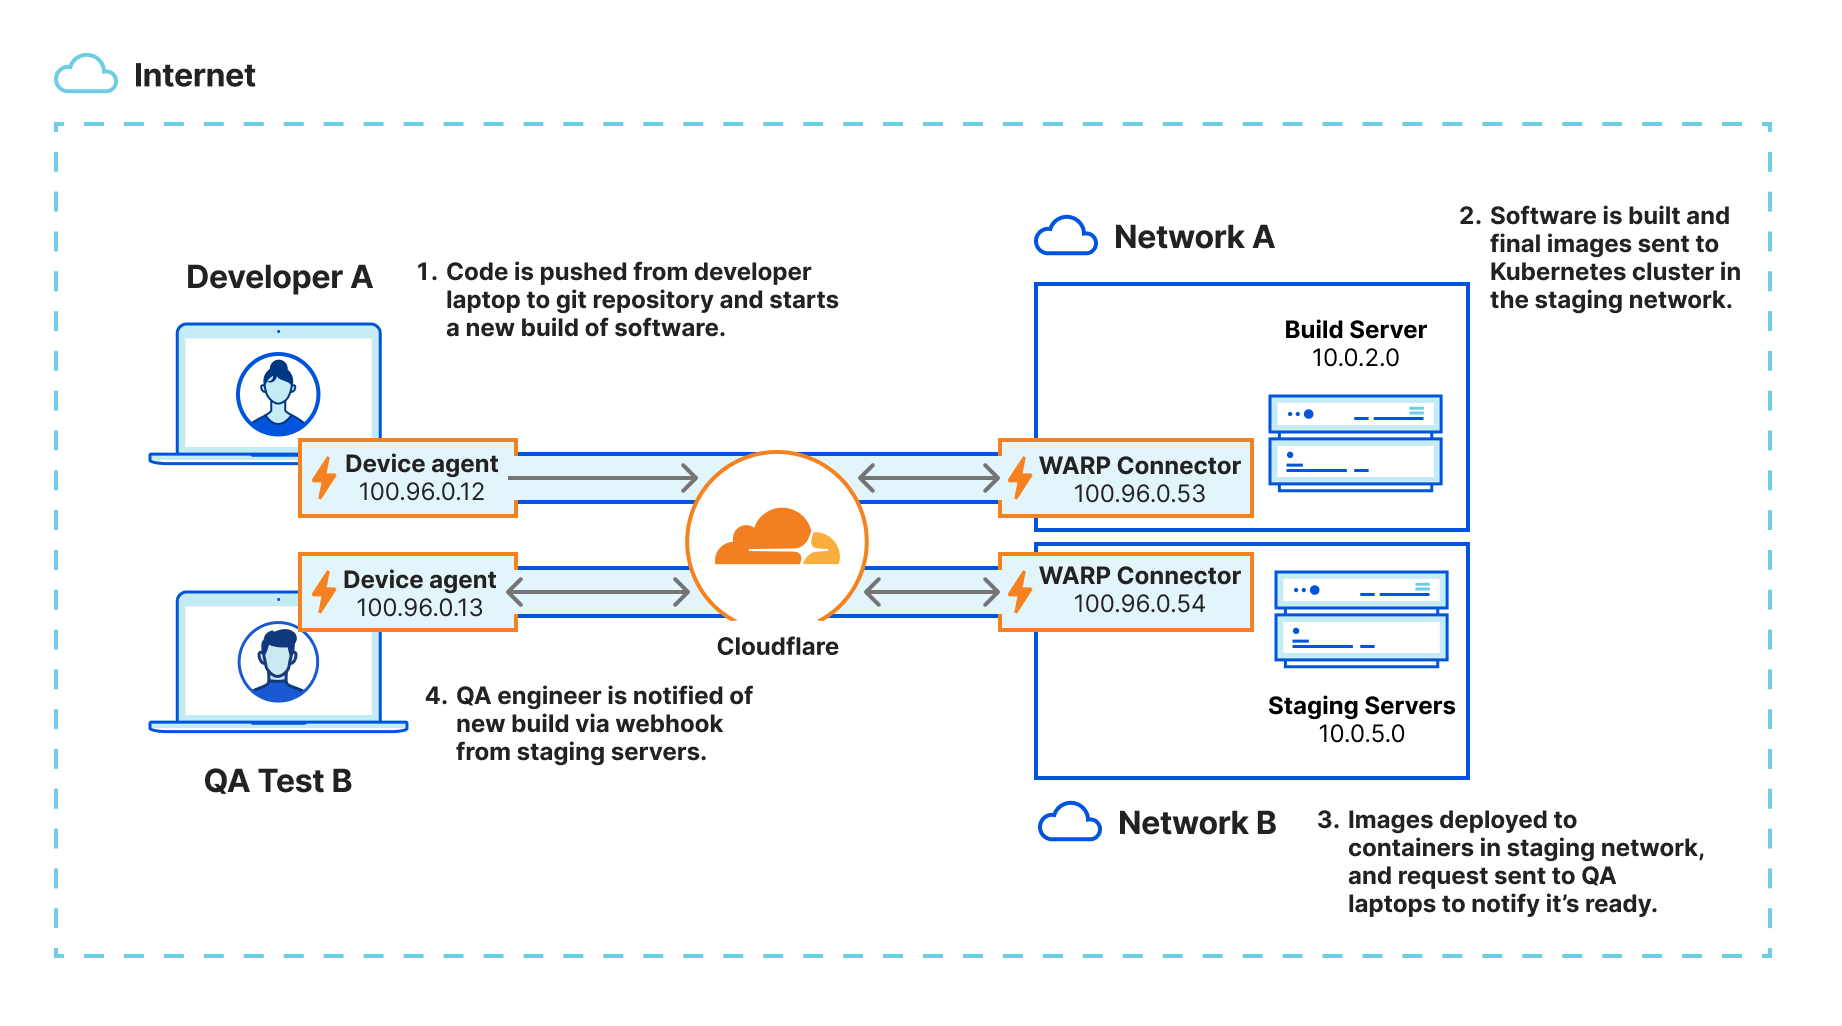
An organization’s DevOps ecosystem is generally built out of many parts, but a CI/CD server such as Jenkins or Teamcity is the epicenter of all development activities. Hence, securing that CI/CD server is critical. With the WARP Connector and WARP Client, organizations can secure the entire CI/CD pipeline and also streamline it easily.

Let’s look at a typical CI/CD pipeline for a Kubernetes application. The environment is set up as depicted in the diagram above, with WARP clients on the developer and QA laptops and a WARP Connector securely connecting the CI/CD server and staging servers on different networks:

  1. Typically, the CI/CD pipeline is triggered when a developer commits their code change, invoking a webhook on the CI/CD server.
  2. Once the images are built, it’s time to deploy the code, which is typically done in stages: test, staging and production.
  3. Notifications are sent to the developer and QA engineer to notify them when the images are ready in the test/staging environments.
  4. QA engineers receive the notifications via webhook from the CI/CD servers to kick-start their monitoring and troubleshooting workflow.

With WARP Connector, customers can easily connect their developers to the tools in the DevOps ecosystem by keeping the ecosystem private and not exposing it to the public. Once the DevOps ecosystem is securely connected to Cloudflare, granular security policies can be easily applied to secure access to the CI/CD pipeline.

True source IP address preservation

Organizations running Microsoft AD Servers or non-web application servers often need to identify the true source IP address for auditing or policy application. If these requirements exist, WARP Connector simplifies this, offering solutions without adding NAT boundaries. This can be useful to rate-limit unhealthy source IP addresses, for ACL-based policies within the perimeter, or to collect additional diagnostics from end-users.

Getting started with WARP Connector

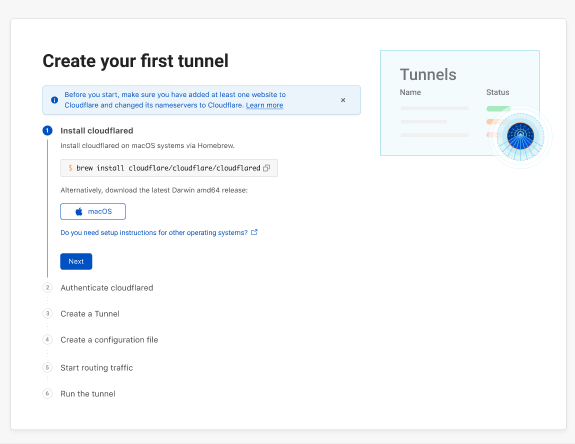
As part of this launch, we’re making some changes to the Cloudflare One Dashboard to better highlight our different network on/off ramp options. As of today, a new “Network” tab will appear on your dashboard. This will be the new home for the Cloudflare Tunnel UI.

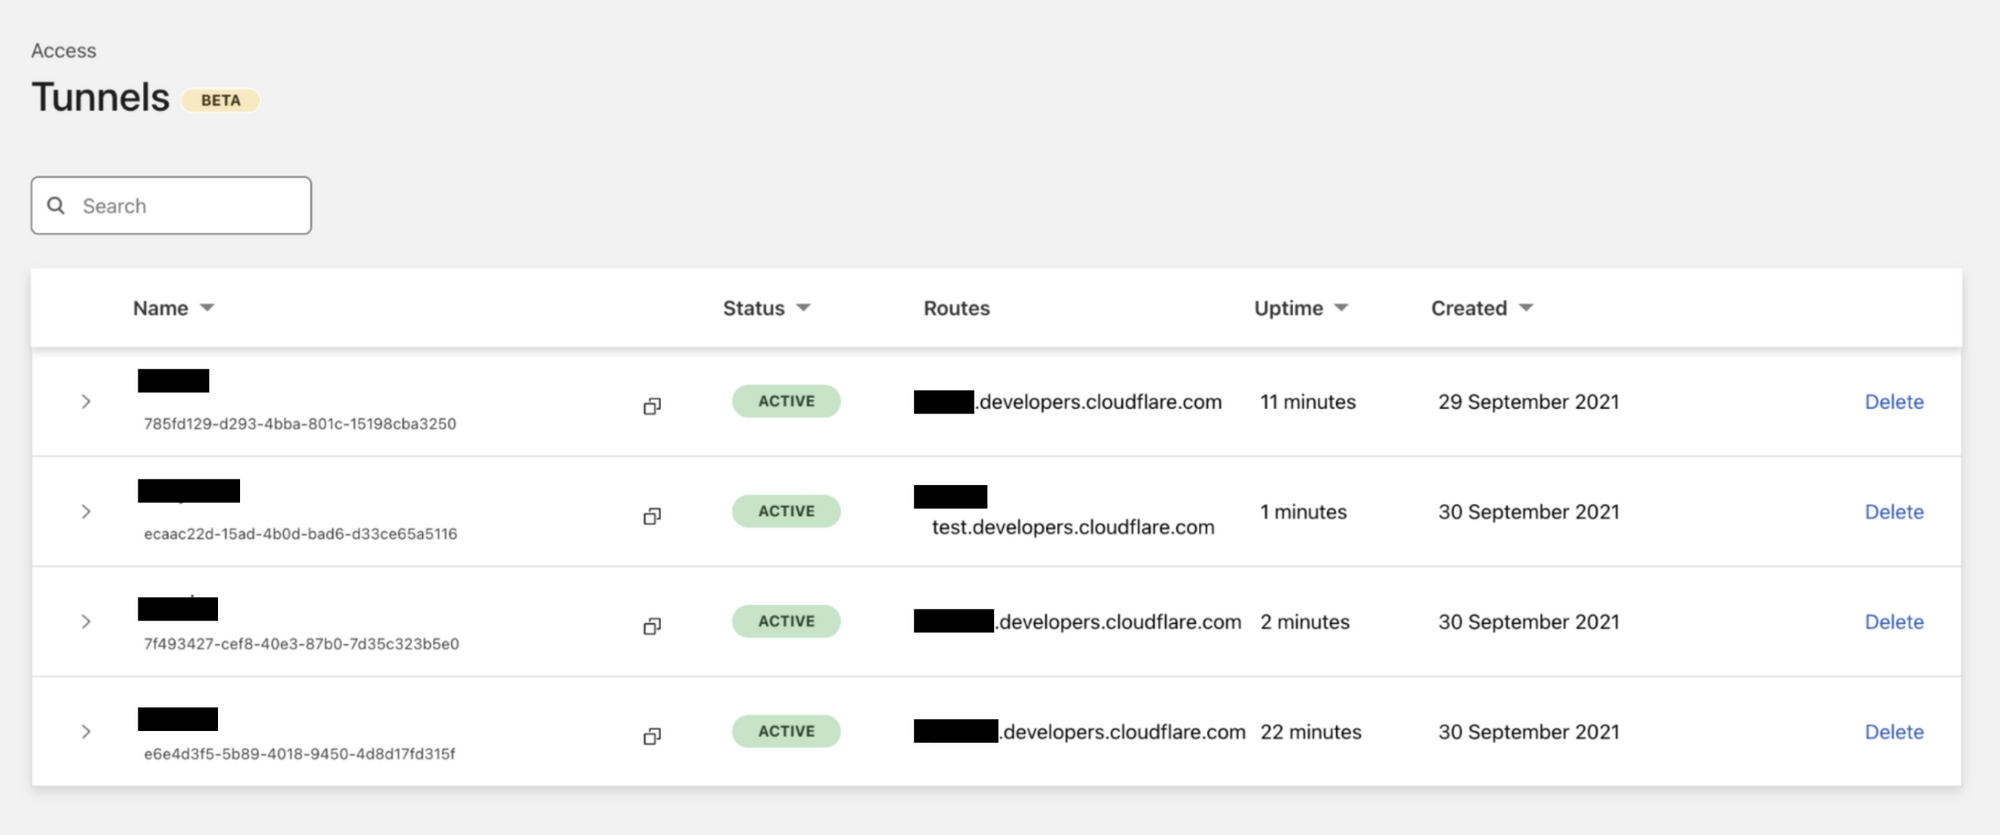
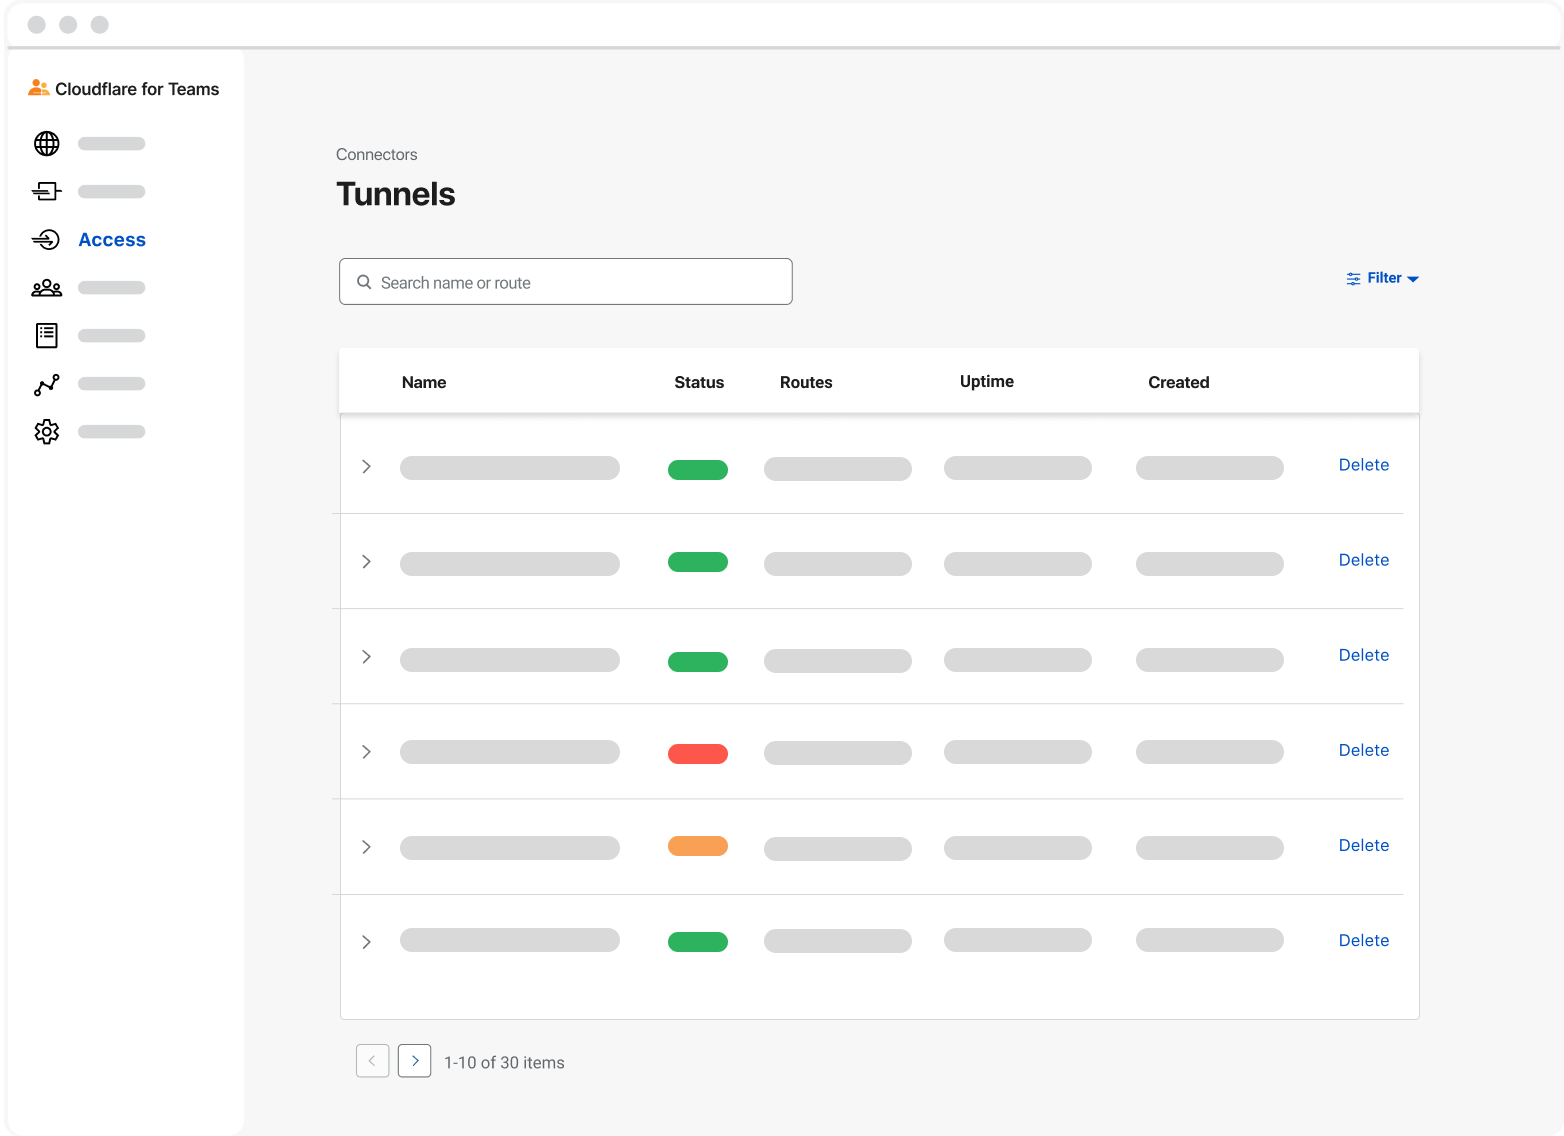
We are also introducing the new “Routes” tab next to “Tunnels”. This page will present an organizational view of customer’s virtual networks, Cloudflare Tunnels, and routes associated with them. This new page helps answer a customer’s questions pertaining to their network configurations, such as: “Which Cloudflare Tunnel has the route to my host 192.168.1.2 ” or “If a route for CIDR 192.168.2.1/28 exists, how can it be accessed” or “What are the overlapping CIDRs in my environment and which VNETs do they belong to?”. This is extremely useful for customers who have very complex enterprise networks that use the Cloudflare dashboard for troubleshooting connectivity issues.

Embarking on your WARP Connector journey is straightforward. Currently deployable on Linux hosts, users can select “create a Tunnel” and pick from either cloudflared or WARP to deploy straight from the dashboard. Follow our developer documentation to get started in a few easy steps. In the near future we will be adding support for more platforms where WARP Connectors can be deployed.

What’s next?

Thank you to all of our private beta customers for their invaluable feedback. Moving forward, our immediate focus in the coming quarters is on simplifying deployment, mirroring that of cloudflared, and enhancing high availability through redundancy and failover mechanisms.

Stay tuned for more updates as we continue our journey in innovating and enhancing the Cloudflare One platform. We’re excited to see how our customers leverage WARP Connector to transform their connectivity and security landscape.

Elevate load balancing with Private IPs and Cloudflare Tunnels: a secure path to efficient traffic distribution

Post Syndicated from Brian Batraski original http://blog.cloudflare.com/elevate-load-balancing-with-private-ips-and-cloudflare-tunnels-a-secure-path-to-efficient-traffic-distribution/

Elevate load balancing with Private IPs and Cloudflare Tunnels: a secure path to efficient traffic distribution

Elevate load balancing with Private IPs and Cloudflare Tunnels: a secure path to efficient traffic distribution

In the dynamic world of modern applications, efficient load balancing plays a pivotal role in delivering exceptional user experiences. Customers commonly leverage load balancing, so they can efficiently use their existing infrastructure resources in the best way possible. Though, load balancing is not a ‘one-size-fits-all, out of the box’ solution for everyone. As you go deeper into the details of your traffic shaping requirements and as your architecture becomes more complex, different flavors of load balancing are usually required to achieve these varying goals, such as steering between datacenters for public traffic, creating high availability for critical internal services with private IPs, applying steering between servers in a single datacenter, and more. We are extremely excited to announce a new addition to our Load Balancing solution, Local Traffic Management (LTM) with deep integrations with Zero Trust!

A common problem businesses run into is that almost no providers can satisfy all these requirements, resulting in a growing list of vendors to manage disparate data sources to get a clear view of your traffic pipeline, and investment into incredibly expensive hardware that is complicated to set up and maintain. Not having a single source of truth to dwindle down ‘time to resolution’ and a single partner to work with in times when things are not operating within the ideal path can be the difference between a proactive, healthy growing business versus one that is reactive and constantly having to put out fires. The latter can result in extreme slowdown to developing amazing features/services, reduction in revenue, tarnishing of brand trust, decreases in adoption – the list goes on!

For eight years, we have provided top-tier global traffic load balancing (GTM) capabilities to thousands of customers across the globe. But why should the steering intelligence, failover, and reliability we guarantee stop at the front door of the selected datacenter and only operate with public traffic? We came to the conclusion that we should go even further. Today is the start of a long series of new features that allow traffic steering, failover, session persistence, SSL/TLS offloading and much more to take place between servers after datacenter selection has occurred! Instead of relying only on the relative weight to determine which server traffic should be sent to, you can now bring the same intelligent steering policies, such as least outstanding requests steering or hash steering, to any of your many data centers. This also means you have a single partner for all of your load balancing initiatives and a single pane of glass to inform business decisions! Cloudflare is thrilled to introduce the powerful combination of private IP support for Load Balancing with Cloudflare Tunnels and Local Traffic Management, offering customers a solution that blends unparalleled efficiency, security, flexibility, and privacy.

What is a load balancer?

Elevate load balancing with Private IPs and Cloudflare Tunnels: a secure path to efficient traffic distribution
A Cloudflare load balancer directs a request from a user to the appropriate origin pool within a data center

Load balancing — functionality that’s been around for the last 30 years to help businesses leverage their existing infrastructure resources. Load balancing works by proactively steering traffic away from unhealthy origin servers and — for more advanced solutions — intelligently distributing traffic load based on different steering algorithms. This process ensures that errors aren’t served to end users and empowers businesses to tightly couple overall business objectives to their traffic behavior. Cloudflare Load Balancing has made it simpler and easier to securely and reliably manage your traffic across multiple data centers around the world. With Cloudflare Load Balancing, your traffic will be directed reliably regardless of the scale of traffic or where it originates with customizable steering, affinity and failover. This clearly has an advantage over a physical load balancer since it can be configured easily and traffic doesn’t have to reach one of your data centers to be routed to another location, introducing single points of failure and significant latency. When compared with other global traffic management load balancers, Cloudflare’s Load Balancing offering is easier to set up, simpler to understand, and is fully integrated with the Cloudflare platform as one single product for all load balancing needs.

What are Cloudflare Tunnels?

Elevate load balancing with Private IPs and Cloudflare Tunnels: a secure path to efficient traffic distribution
Origins and servers of various types can be connected to Cloudflare using Cloudflare Tunnel. Users can also secure their traffic using WARP, allowing traffic to be secured and managed end to end through Cloudflare.‌ ‌

In 2018, Cloudflare introduced Cloudflare Tunnels, a private, secure connection between your data center and Cloudflare. Traditionally, from the moment an Internet property is deployed, developers spend an exhaustive amount of time and energy locking it down through access control lists, rotating IP addresses, or more complex solutions like GRE tunnels. We built Tunnel to help alleviate that burden. With Tunnels, users can create a private link from their origin server directly to Cloudflare without exposing your services directly to the public internet or allowing incoming connections in your data center’s firewall. Instead, this private connection is established by running a lightweight daemon, cloudflared, in your data center, which creates a secure, outbound-only connection. This means that only traffic that you’ve configured to pass through Cloudflare can reach your private origin.

Unleashing the potential of Cloudflare Load Balancing with Cloudflare Tunnels

Elevate load balancing with Private IPs and Cloudflare Tunnels: a secure path to efficient traffic distribution
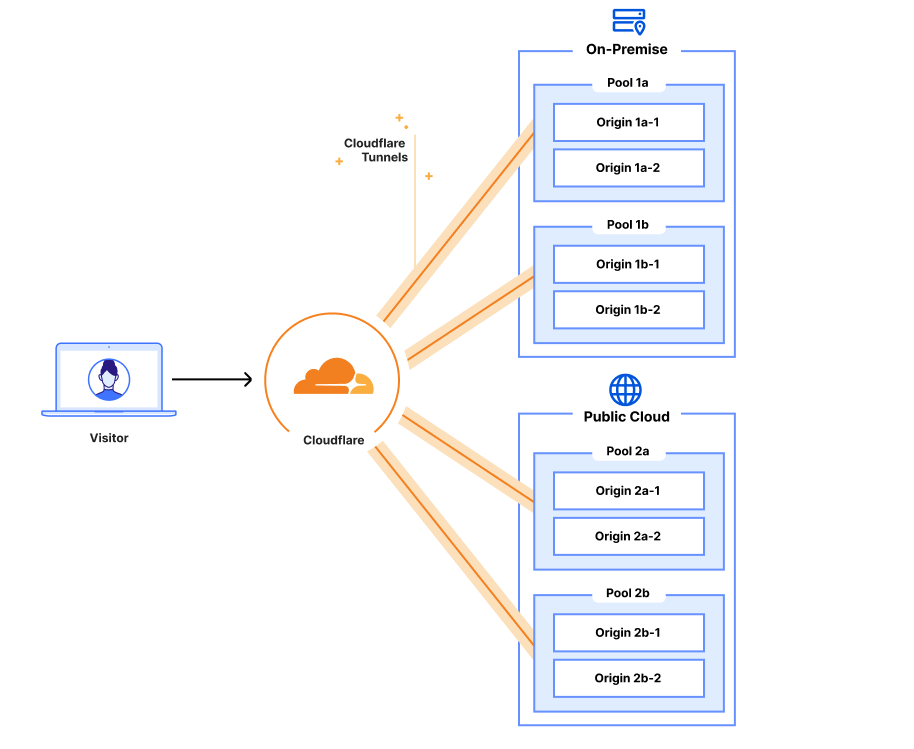
Cloudflare Load Balancing can easily and securely direct a user’s request to a specific origin within your private data center or public cloud using Cloudflare Tunnels

Combining Cloudflare Tunnels with Cloudflare Load Balancing allows you to remove your physical load balancers from your data center and have your Cloudflare load balancer reach out to your servers directly via their private IP addresses with health checks, steering, and all other Load Balancing features currently available. Instead of configuring your on-premise load balancer to expose each service and then updating your Cloudflare load balancer, you can configure it all in one place. This means that from the end-user to the server handling the request, all your configuration can be done in a single place – the Cloudflare dashboard. On top of this, you can say goodbye to the multi hundred thousand dollar price tag to hardware appliances, the incredible management overhead and investing in a solution that has a time limit for its delivered value.

Load Balancing serves as the backbone for online services, ensuring seamless traffic distribution across servers or data centers. Traditional load balancing techniques often require exposing services on a data center’s public IP addresses, forcing organizations to create complex configurations vulnerable to security risks and potential data exposure. By harnessing the power of private IP support for Load Balancing in conjunction with Cloudflare Tunnels, Cloudflare is revolutionizing the way businesses protect and optimize their applications. With clear steps to install the cloudflared agent to connect your private network to Cloudflare’s network via Cloudflare Tunnels, directly and securely routing traffic into your data centers becomes easier than ever before!

Publicly exposing services in private data centers is complicated

Elevate load balancing with Private IPs and Cloudflare Tunnels: a secure path to efficient traffic distribution
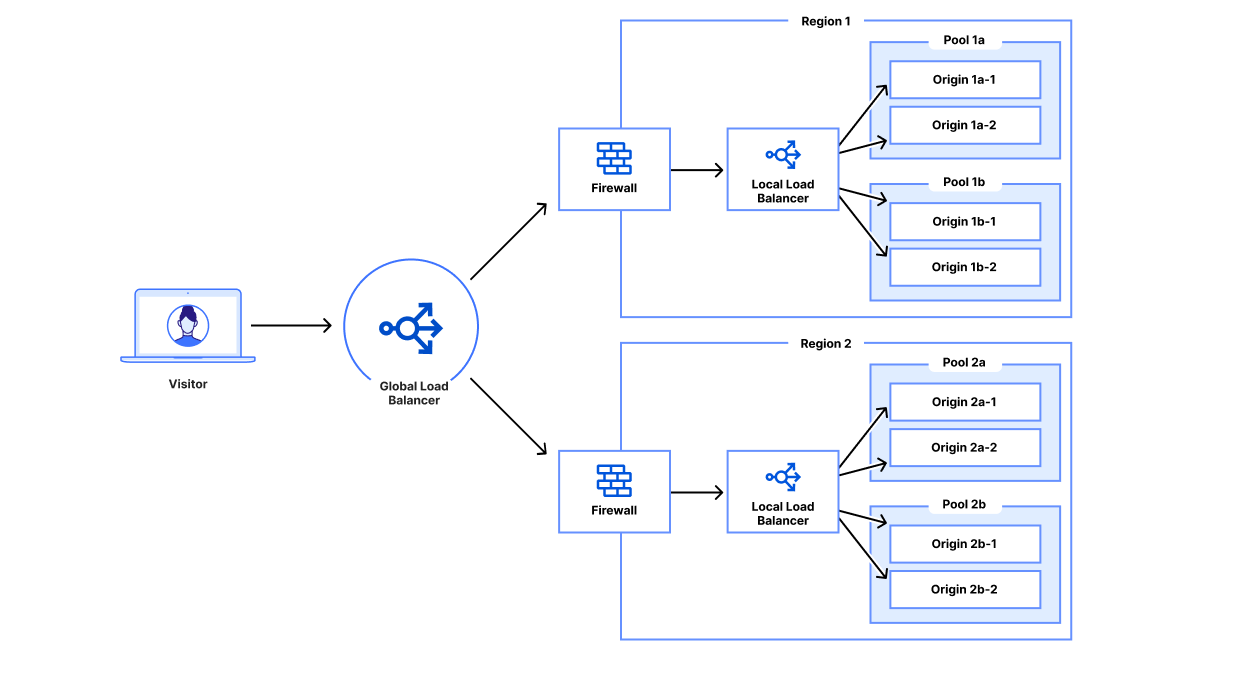
A visitor’s request hits a global traffic management (GTM) load balancer directing the request to a data center, then a firewall, then a local traffic management (LTM) load balancer and then an origin

Load balancing within a private data center can be expensive and difficult to manage. The idea of keeping security first while ensuring ease of use and flexibility for your internal workforce is a tricky balance to strike. It’s not only the ‘how’ of securely exposing internal services, but how to best balance traffic between servers at a single location within your private network!

In a private data center, even a very simple website can be fairly complex in terms of networking and configuration. Let’s walk through a simple example of a customer device connecting to a website. A customer device performs a DNS lookup for the business’s website and receives an IP address corresponding to a customer data center. The customer then makes an HTTPS request to that IP address, passing the original hostname via Server Name Indication (SNI). That load balancer forwards that request to the corresponding origin server and returns the response to the customer device.

This example doesn’t have any advanced functionality and the stack is already difficult to configure:

  • Expose the service or server on a private IP.
  • Configure your data center’s networking to expose the LB on a public IP or IP range.
  • Configure your load balancer to forward requests for that hostname and/or public IP to your server’s private IP.
  • Configure a DNS record for your domain to point to your load balancer’s public IP.

In large enterprises, each of these configuration changes likely requires approval from several stakeholders and modified through different repositories, websites and/or private web interfaces. Load balancer and networking configurations are often maintained as complex configuration files for Terraform, Chef, Puppet, Ansible or a similar infrastructure-as-code service. These configuration files can be syntax checked or tested but are rarely tested thoroughly prior to deployment. Each deployment environment is often unique enough that thorough testing is often not feasible given the time and hardware requirements needed to do so. This means that changes to these files can negatively affect other services within the data center. In addition, opening up an ingress to your data center widens the attack surface for varying security risks such as DDoS attacks or catastrophic data breaches. To make things worse, each vendor has a different interface or API for configuring their devices or services. For example, some registrars only have XML APIs while others have JSON REST APIs. Each device configuration may have different Terraform providers or Ansible playbooks. This results in complex configurations accumulating over time that are difficult to consolidate or standardize, inevitably resulting in technical debt.

Now let’s add additional origins. For each additional origin for our service, we’ll have to go set up and expose that origin and configure the physical load balancer to use our new origin. Now let’s add another data center. Now we need another solution to distribute across our data centers. This results in a separate global traffic management system and local traffic management system. These solutions have in the past come from different vendors and will have to be configured in different ways even though they should serve the same purpose: load balancing. This makes managing your web traffic unnecessarily difficult. Why should you have to configure your origins in two different load balancers? Why can’t you manage all the traffic for all the origins for a service in the same place?

Simpler and better: Load Balancing with Tunnels

Elevate load balancing with Private IPs and Cloudflare Tunnels: a secure path to efficient traffic distribution
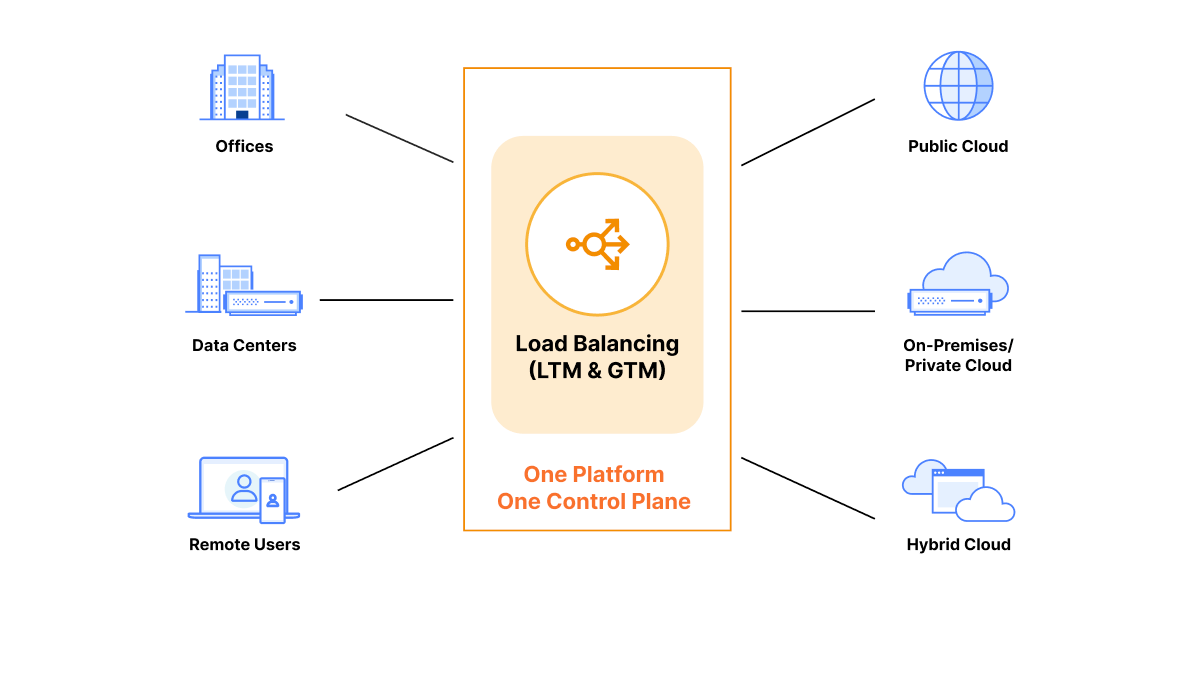
Cloudflare Load Balancing can manage traffic for all your offices, data centers, remote users, public clouds, private clouds and hybrid clouds in one place‌ ‌

With Cloudflare Load Balancing and Cloudflare Tunnel, you can manage all your public and private origins in one place: the Cloudflare dashboard. Cloudflare load balancers can be easily configured using the Cloudflare dashboard or the Cloudflare API. There’s no need to SSH or open a remote desktop to modify load balancer configurations for your public or private servers. All configurations can be done through the dashboard UI or Cloudflare API, with full parity between the two.

With Cloudflare Tunnel set up and running in your data center, everything is ready to connect your origin server to Cloudflare network and load balancers. You do not need to configure any ingress to your data center since Cloudflare Tunnel operates only over outbound connections and can securely reach out to privately addressed services inside your data center. To expose your service to Cloudflare, you just set up your private IP range to be routed over that tunnel. Then, you can create a Cloudflare load balancer and input the corresponding private IP address and virtual network ID into your origin pool. After that, Cloudflare manages the DNS and load balancing across your private servers. Now your origin is receiving traffic exclusively via Cloudflare Tunnel and your physical load balancer is no longer needed!

This groundbreaking integration enables organizations to deploy load balancers while keeping their applications securely shielded from the public Internet. The customer’s traffic passes through Cloudflare’s data centers, allowing customers to continue to take full advantage of Cloudflare’s security and performance services. Also, by leveraging Cloudflare Tunnels, traffic between Cloudflare and customer origins remains isolated within trusted networks, bolstering privacy, security, and peace of mind.

The advantages of Private IP support with Cloudflare Tunnels

Elevate load balancing with Private IPs and Cloudflare Tunnels: a secure path to efficient traffic distribution
Cloudflare Load Balancing works in conjunction with all the security and privacy products that Cloudflare has to offer including DDoS protection, Web Application Firewall and Bot Managment

Combining Global and Local Traffic Management: All the features and ease of use that were part of Cloudflare Load Balancing for Global Traffic Management are also available with Local Traffic Management. You can configure your public and private origins in one dashboard as opposed to several services and vendors. Now, all your private origins can benefit from the features that Cloudflare Load Balancing is known for: instant failover, customizable steering between data centers, ease of use, custom rules and configuration updates in a matter of seconds. They will also benefit from our newer features including least connection steering, least outstanding request steering, and session affinity by header. This is just a small subset of the expansive feature set for Load Balancing. See our dev docs for more features and details on the offering.

Enhanced Security: By combining private IP support with Cloudflare Tunnels, organizations can fortify their security posture and protect sensitive data. With private IP addresses and encrypted connections via Cloudflare Tunnel, the risk of unauthorized access and potential attacks is significantly reduced – traffic remains within trusted networks. You can also configure Cloudflare Access to add single sign-on support for your application and restrict your application to a subset of authorized users. In addition, you still benefit from Firewall rules, Rate Limiting rules, Bot Management, DDoS protection and all the other Cloudflare products available today allowing comprehensive security configurations.

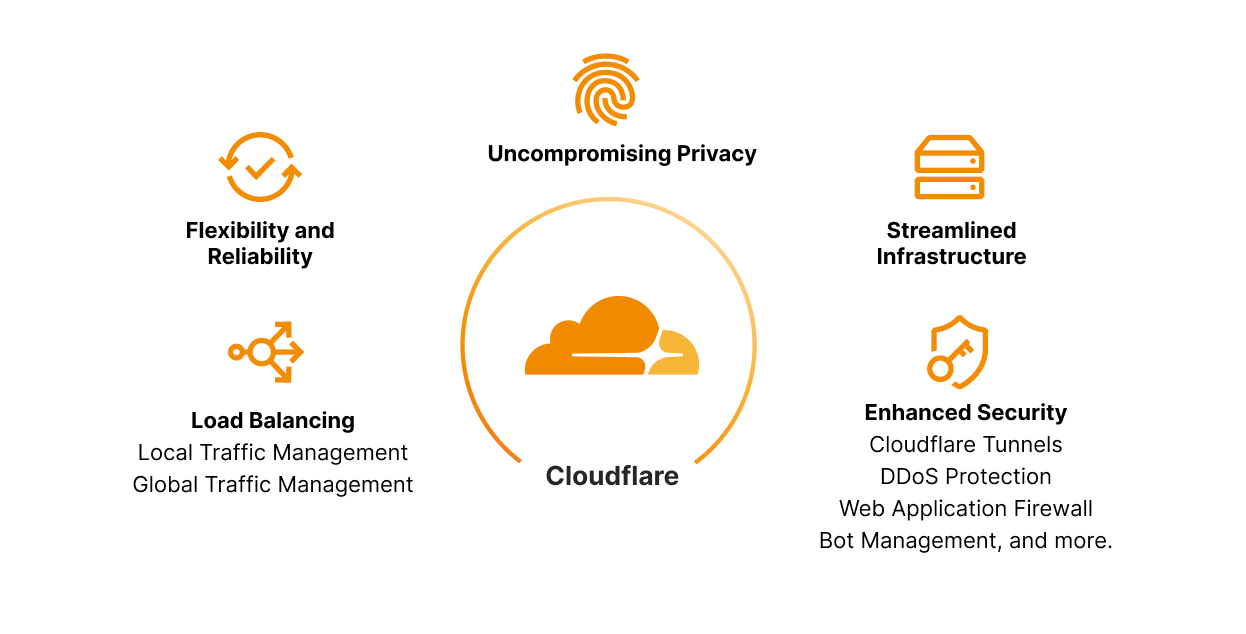
Uncompromising Privacy: As data privacy continues to take center stage, businesses must ensure the confidentiality of user information. Cloudflare's private IP support with Cloudflare Tunnels enables organizations to segregate applications and keep sensitive data within their private network boundaries. Custom rules also allow you to direct traffic for specific devices to specific data centers. For example, you can use custom rules to direct traffic from Eastern and Western Europe to your European data centers, so you can easily keep those users’ data within Europe. This minimizes the exposure of data to external entities, preserving user privacy and complying with strict privacy regulations across different geographies.

Flexibility & Reliability: Scale and adaptability are some of the major foundations of a well-operating business. Implementing solutions that fit your business’ needs today is not enough. Customers must find solutions that meet their needs for the next three or more years. The blend of Load Balancing with Cloudflare Tunnels within our Zero Trust solution lends to the very definition of flexibility and reliability! Changes to load balancer configurations propagate around the world in a matter of seconds, making load balancers an effective way to respond to incidents. Also, instant failover, health monitoring, and steering policies all help to maintain high availability for your applications, so you can deliver the reliability that your users expect. This is all in addition to best in class Zero Trust capabilities that are deeply integrated such as, but not limited to Secure Web Gateway (SWG), remote browser isolation, network logs. Data loss prevention.

Streamlined Infrastructure: Organizations can consolidate their network architecture and establish secure connections across distributed environments. This unification reduces complexity, lowers operational overhead, and facilitates efficient resource allocation. Whether you need to apply a global traffic manager to intelligently direct traffic between datacenters within your private network, or steer between specific servers after datacenter selection has taken place, there is now a clear, single lens to manage your global and local traffic, regardless of whether the source or destination of the traffic is public or private. Complexity can be a large hurdle in achieving and maintaining fast, agile business units. Consolidating into a single provider, like Cloudflare, that provides security, reliability, and observability will not only save significant cost but allows your teams to move faster and focus on growing their business, enhancing critical services, and developing incredible features, rather than taping together infrastructure that may not work in a few years. Leave the heavy lifting to us, and let us empower you and your team to focus on creating amazing experiences for your employees and end-users.

The lack of agility, flexibility, and lean operations of hardware appliances for Local Traffic Management does not justify the hundreds of thousands of dollars spent on them, along with the huge overhead of managing CPU, memory, power, cooling, etc. Instead, we want to help businesses move this logic to the cloud by abstracting away the needless overhead and bringing more focus back to teams to do what they do best, building amazing experiences, and allowing Cloudflare to do what we do best, protecting, accelerating, and building heightened reliability. Stay tuned for more updates on Cloudflare's Local Traffic Manager and how it can reduce architecture complexity while bringing more insight, security, and control to your teams. In the meantime, check out our new whitepaper!

Looking to the future

Cloudflare's impactful solution, private IP support for Load Balancing with Cloudflare Tunnels as part of the Zero Trust solution, reaffirms our commitment to providing cutting-edge tools that prioritize security, privacy, and performance. By leveraging private IP addresses and secure tunnels, Cloudflare empowers businesses to fortify their network infrastructure while ensuring compliance with regulatory requirements. With enhanced security, uncompromising privacy, and streamlined infrastructure, load balancing becomes a powerful driver of efficient and secure public or private services.

As a business grows and its systems scale up, they'll need the features that Cloudflare Load Balancing is known for: health monitoring, steering, and failover. As availability requirements increase due to growing demands and standards from end-users, customers can add health checks, enabling automatic failover to healthy servers when an unhealthy server begins to fail. When the business begins to receive more traffic from around the world, they can create new pools for different regions and use dynamic steering to reduce latency between the user and the server. For intensive or long-running requests, such as complex datastore queries, customers can benefit from leveraging least outstanding requests steering to reduce the number of concurrent requests per server. Before, this could all be done with publicly addressable IPs, but it is now available for pools with public IPs, private servers, or combinations of the two. Private IP Load Balancing along with Local Traffic Management is live and ready to use today! Check out our dev docs for instructions on how to get started.

Stay tuned for our next addition to add new Load Balancing onramp support for Spectrum and WARP with Cloudflare Tunnels with private IPs for your Layer 4 traffic, allowing us to support TCP and UDP applications in your private data centers!

Cloudflare is deprecating Railgun

Post Syndicated from Sam Rhea original http://blog.cloudflare.com/deprecating-railgun/

Cloudflare is deprecating Railgun

Cloudflare is deprecating Railgun

Cloudflare will deprecate the Railgun product on January 31, 2024. At that time, existing Railgun deployments and connections will stop functioning. Customers have the next eight months to migrate to a supported Cloudflare alternative which will vary based on use case.

Cloudflare first launched Railgun more than ten years ago. Since then, we have released several products in different areas that better address the problems that Railgun set out to solve. However, we shied away from the work to formally deprecate Railgun.

That reluctance led to Railgun stagnating and customers suffered the consequences. We did not invest time in better support for Railgun. Feature requests never moved. Maintenance work needed to occur and that stole resources away from improving the Railgun replacements. We allowed customers to deploy a zombie product and, starting with this deprecation, we are excited to correct that by helping teams move to significantly better alternatives that are now available in Cloudflare’s network.

We know that this will require migration effort from Railgun customers over the next eight months. We want to make that as smooth as possible. Today’s announcement features recommendations on how to choose a replacement, how to get started, and guidance on where you can reach us for help.

What is Railgun?

Cloudflare’s reverse proxy secures and accelerates your applications by placing a Cloudflare data center in over 285+ cities between your infrastructure and your audience. Bad actors attempting to attack your applications hit our network first where products like our WAF and DDoS mitigation service stop them. Your visitors and users connect to our data centers where our cache can serve them content without the need to reach all the way back to your origin server.

For some customers, your infrastructure also runs on Cloudflare’s network in the form of Cloudflare Workers. Others maintain origin servers running on anything from a Raspberry Pi to a hyperscale public cloud. In those cases, Cloudflare needs to connect to that infrastructure to grab new content that our network can serve from our cache to your audience.

However, some content cannot be cached. Dynamically-generated or personalized pages can change for every visitor and every session. Cloudflare Railgun aimed to solve that by determining what was the minimum amount of content that changed and attempting to only send that difference in an efficient transfer – a form of delta compression. By reducing the amount of content that needed to be sent to Cloudflare’s network, we could accelerate page loads for end users.

Railgun accomplishes this goal by running a piece of software inside the customer’s environment, the Railgun listener, and a corresponding service running in Cloudflare’s network, the Railgun sender. The pair establish a permanent TCP connection. The listener keeps track of the most recent version of a page that was requested. When a request arrives for a known page, the listener sends an HTTP request to the origin server, determines what content changed, and then compresses and sends only the delta to the sender in Cloudflare’s network.

Why deprecate a product?

The last major release of Railgun took place eight years ago in 2015. However, products should not be deprecated just because active development stops. We believe that a company should retire a product only when:

  • the maintenance impacts the ability to focus on solving new problems for customers and
  • when improved alternatives exist for customers to adopt in replacement.

Hundreds of customers still use Railgun today and the service has continued to run over the last decade without too much involvement from our team. That relative stability deterred us from pushing customers to adopt newer technologies that solved the same problems. As a result, we kept Railgun in a sort of maintenance mode for the last few years.

Why deprecate Railgun now?

Cloudflare’s network has evolved in the eight years since the last Railgun release. We deploy hardware and run services in more than 285 cities around the world, nearly tripling the number of cities since Railgun was last updated. The hardware itself also advanced, becoming more efficient and capable.

The software platform of Cloudflare’s network developed just as fast. Every data center in Cloudflare’s network can run every service that we provide to our customers. These services range from our traditional reverse proxy products to forward proxy services like Zero Trust to our compute and storage platform Cloudflare Workers. Supporting such a broad range of services requires a platform that can adapt to the requirements of the evolving needs of these products.

Maintaining Railgun, despite having better alternatives, creates a burden on our ability to continue investing in new solutions. Some of these tools that power Railgun are themselves approaching an end of life state. Others will likely present security risks that we are not comfortable accepting in the next few years.

We considered several options before deciding on deprecation. First, we could accept the consequences of inaction, leaving our network in a worse state and our Railgun customers in purgatory. Second, we could run Railgun on dedicated infrastructure and silo it from the rest of our network. However, that would violate our principle that every piece of hardware in Cloudflare runs every service.

Third, we could spin up a new engineering team and rebuild Railgun from scratch in a modern way. Doing so would take away from resources we could otherwise invest in newer technologies. We also believe that existing, newer products from Cloudflare solve the same problems that Railgun set out to address. Rebuilding Railgun would take away from our ability to keep shipping and would duplicate better features already released in other products. As a result, we have decided to deprecate Railgun.

What alternatives are available?

Railgun addressed a number of problems for our customers at launch. Today, we have solutions available that solve the same range of challenges in significantly improved ways.

We do not have an exact like-for-like successor for Railgun. The solutions that solve the same set of problems have also evolved with our customers. Different use cases that customers deploy Railgun to address will map to different solutions available in Cloudflare today. We have broken out some of the most common reasons that customers used Railgun and where we recommend they consider migrating.

“I use Railgun to maintain a persistent, secure connection to Cloudflare’s network without the need for a static publicly available IP address.”
Customers can deploy Cloudflare Tunnel to connect their infrastructure to Cloudflare’s network without the need to expose a public IP address. Cloudflare Tunnel software runs in your environment, similar to the Railgun listener, and creates an outbound-only connection to Cloudflare’s network. Cloudflare Tunnel is available at no cost.

“I use Railgun to front multiple services running in my infrastructure.”
Cloudflare Tunnel can be deployed in this type of bastion mode to support multiple services running behind it in your infrastructure. You can use Tunnel to support services beyond just HTTP servers, and you can deploy replicas of the Cloudflare Tunnel connector for high availability.

“I use Railgun for performance improvements.”
Cloudflare has invested significantly in performance upgrades in the eight years since the last release of Railgun. This list is not comprehensive, but highlights some areas where performance can be significantly improved by adopting newer services relative to using Railgun.

  • Cloudflare Tunnel features Cloudflare’s Argo Smart Routing technology, a service that delivers both “middle mile” and last mile optimization, reducing round trip time by up to 40%. Web assets using Argo perform, on average, 30% faster overall.
  • Cloudflare Network Interconnect (CNI) gives customers the ability to directly connect to our network, either virtually or physically, to improve the reliability and performance of the connection between Cloudflare’s network and your infrastructure. CNI customers have a dedicated on-ramp to Cloudflare for their origins.

“I use Railgun to reduce the amount of data that egresses from my infrastructure to Cloudflare.”
Certain public cloud providers charge egregious egress fees for you to move your own data outside their environment. We believe that degrades an open Internet and locks in customers. We have spent the last several years investing in ways to reduce or eliminate these altogether.

  • Members of the Bandwidth Alliance mutually agree to waive transfer fees. If your infrastructure runs in Oracle Cloud, Microsoft Azure, Google Cloud, Backblaze and more than a dozen other providers you pay zero cost to send data to Cloudflare.
  • Cloudflare’s R2 storage product requires customers to pay zero egress fees as well. R2 provides global object storage with an S3-compatible API and easy migration to give customers the ability to build multi-cloud architectures.

What is the timeline?

From the time of this announcement, customers have eight months available to migrate away from Railgun. January 31, 2024, will be the last day that Railgun connections will be supported. Starting on February 1, 2024, existing Railgun connections will stop functioning.

Over the next few days we will prevent new Railgun deployments from being created. Zones with Railgun connections already established will continue to function during the migration window.

How can I get help?

Contract customers can reach out to their Customer Success team to discuss additional questions or migration plans. Each of Cloudflare’s regions has a specialist available to help guide teams who need additional help during the migration.

Customers can also raise questions and provide commentary in this dedicated forum room. We will continue to staff that discussion and respond to questions as customers share them.

What’s next?

Railgun customers will also receive an email notice later today about the deprecation plan and timeline. We will continue sending email notices multiple times over the next eight months leading up to the deprecation.

We are grateful to the Railgun customers who first selected Cloudflare to accelerate the applications and websites that power their business. We are excited to share the latest Cloudflare features with them that will continue to make them faster as they reach their audience.

Protect your key server with Keyless SSL and Cloudflare Tunnel integration

Post Syndicated from Dina Kozlov original https://blog.cloudflare.com/protect-your-key-server-with-keyless-ssl-and-cloudflare-tunnel-integration/

Protect your key server with Keyless SSL and Cloudflare Tunnel integration

Protect your key server with Keyless SSL and Cloudflare Tunnel integration

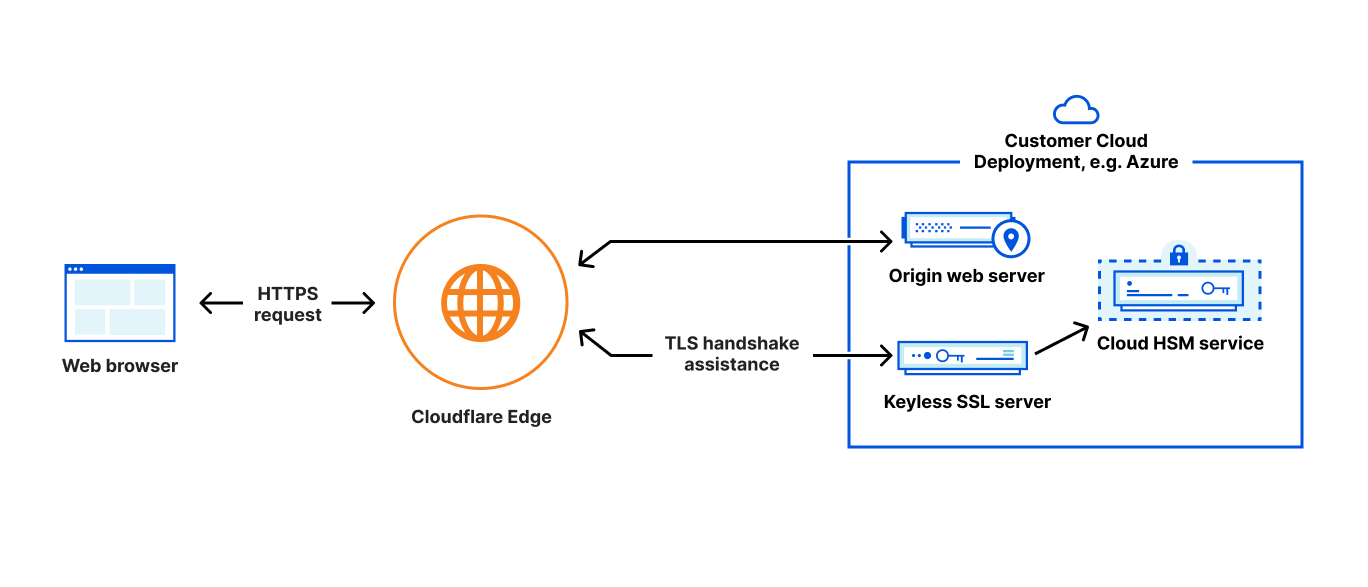
Today, we’re excited to announce a big security enhancement to our Keyless SSL offering. Keyless SSL allows customers to store their private keys on their own hardware, while continuing to use Cloudflare’s proxy services. In the past, the configuration required customers to expose the location of their key server through a DNS record – something that is publicly queryable. Now, customers will be able to use our Cloudflare Tunnels product to send traffic to the key server through a secure channel, without publicly exposing it to the rest of the Internet.

A primer on Keyless SSL

Security has always been a critical aspect of online communication, especially when it comes to protecting sensitive information. Today, Cloudflare manages private keys for millions of domains which allows the data communicated by a client to stay secure and encrypted. While Cloudflare adopts the strictest controls to secure these keys, certain industries such as financial or medical services may have compliance requirements that prohibit the sharing of private keys.In the past, Cloudflare required customers to upload their private key in order for us to provide our L7 services. That was, until we built out Keyless SSL in 2014, a feature that allows customers to keep their private keys stored on their own infrastructure while continuing to make use of Cloudflare’s services.

While Keyless SSL is compatible with any hardware that support PKCS#11 standard, Keyless SSL users frequently opt to secure their private keys within HSMs (Hardware Security Modules), which are specialized machines designed to be tamper proof and resistant to to unauthorized access or manipulation, secure against attacks, and optimized to efficiently execute cryptographic operations such as signing and decryption. To make it easy for customers to set this up, during Security Week in 2021, we launched integrations between Keyless SSL and HSM offerings from all major cloud providers.

Protect your key server with Keyless SSL and Cloudflare Tunnel integration

Strengthening the security of key servers even further

In order for Cloudflare to communicate with a customer’s key server, we have to know the IP address associated with it. To configure Keyless SSL, we ask customers to create a DNS record that indicates the IP address of their keyserver. As a security measure, we ask customers to keep this record under a long, random hostname such as “11aa40b4a5db06d4889e48e2f738950ddfa50b7349d09b5f.example.com”. While it adds a layer of obfuscation to the location of the key server, it does expose the IP address of the keyserver to the public Internet, allowing anyone to send requests to that server. We lock the connection between Cloudflare and the Keyless server down through Mutual TLS, so that the Keyless server should only accept the request if a Cloudflare client certificate associated with the Keyless client is served. While this allows the key server to drop any requests with an invalid or missing client certificate, the key server is still publicly exposed, making it susceptible to attacks.

Protect your key server with Keyless SSL and Cloudflare Tunnel integration

Instead, Cloudflare should be the only party that knows about this key server’s location, as it should be the only party making requests to it.

Enter: Cloudflare Tunnel

Instead of re-inventing the wheel, we decided to make use of an existing Cloudflare product that our customers use to protect the connections between Cloudflare and their origin servers — Cloudflare Tunnels!

Protect your key server with Keyless SSL and Cloudflare Tunnel integration

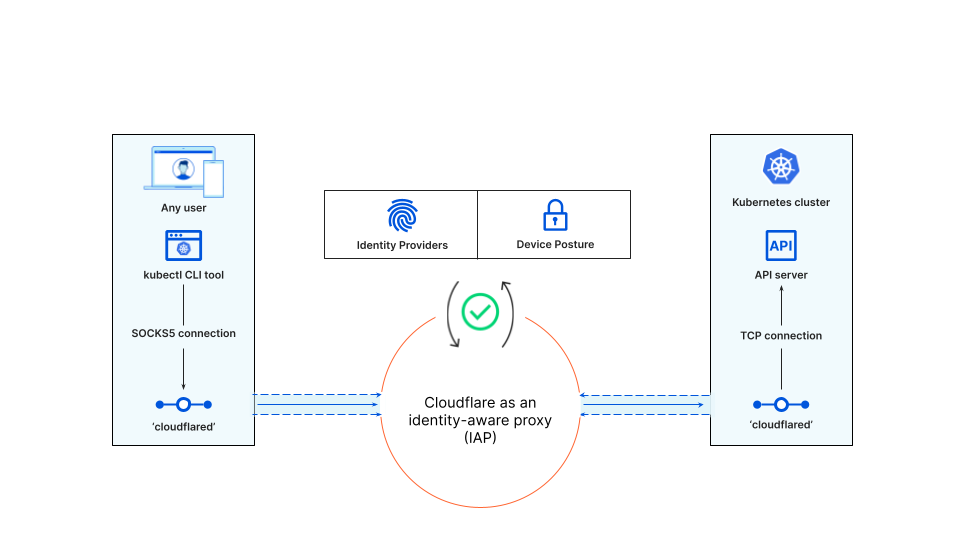
Cloudflare Tunnel gives customers the tools to connect incoming traffic to their private networks without exposing those networks to the Internet through a public hostname. It works by having customers install a Cloudflare daemon, called “cloudflared” which Cloudflare’s client will then connect to.

Now, customers will be able to use the same functionality but for connections made to their key server.

Getting started

Protect your key server with Keyless SSL and Cloudflare Tunnel integration

To set this up, customers will need to configure a virtual network on Cloudflare – this is where customers will tell us the IP address or hostname of their key server. Then, when uploading a Keyless certificate, instead of telling us the public hostname associated with the key server, customers will be able to tell us the virtual network that resolves to it. When making requests to the key server, Cloudflare’s gokeyless client will automatically connect to the “cloudflared” server and will continue to use Mutual TLS as an additional security layer on top of that connection. For more instructions on how to set this up , check out our Developer Docs.

If you’re an Enterprise customer and are interested in using Keyless SSL in conjunction with Cloudflare Tunnels, reach out to your account team today to get set up.

Give us a ping. (Cloudflare) One ping only

Post Syndicated from Abe Carryl original https://blog.cloudflare.com/the-most-exciting-ping-release/

Give us a ping. (Cloudflare) One ping only

Give us a ping. (Cloudflare) One ping only

Ping was born in 1983 when the Internet needed a simple, effective way to measure reachability and distance. In short, ping (and subsequent utilities like traceroute and MTR)  provides users with a quick way to validate whether one machine can communicate with another. Fast-forward to today and these network utility tools have become ubiquitous. Not only are they now the de facto standard for troubleshooting connectivity and network performance issues, but they also improve our overall quality of life by acting as a common suite of tools almost all Internet users are comfortable employing in their day-to-day roles and responsibilities.

Making network utility tools work as expected is very important to us, especially now as more and more customers are building their private networks on Cloudflare. Over 10,000 teams now run a private network on Cloudflare. Some of these teams are among the world’s largest enterprises, some are small crews, and yet others are hobbyists, but they all want to know – can I reach that?

That’s why today we’re excited to incorporate support for these utilities into our already expansive troubleshooting toolkit for Cloudflare Zero Trust. To get started, sign up to receive beta access and start using the familiar debugging tools that we all know and love like ping, traceroute, and MTR to test connectivity to private network destinations running behind Tunnel.

Cloudflare Zero Trust

With Cloudflare Zero Trust, we’ve made it ridiculously easy to build your private network on Cloudflare. In fact, it takes just three steps to get started. First, download Cloudflare’s device client, WARP, to connect your users to Cloudflare. Then, create identity and device aware policies to determine who can reach what within your network. And finally, connect your network to Cloudflare with Tunnel directly from the Zero Trust dashboard.

Give us a ping. (Cloudflare) One ping only

We’ve designed Cloudflare Zero Trust to act as a single pane of glass for your organization. This means that after you’ve deployed any part of our Zero Trust solution, whether that be ZTNA or SWG, you are clicks, not months, away from deploying Browser Isolation, Data Loss Prevention, Cloud Access Security Broker, and Email Security. This is a stark contrast from other solutions on the market which may require distinct implementations or have limited interoperability across their portfolio of services.

It’s that simple, but if you’re looking for more prescriptive guidance watch our demo below to get started:

To get started, sign-up for early access to the closed beta. If you’re interested in learning more about how it works and what else we will be launching in the future, keep scrolling.

So, how do these network utilities actually work?

Ping, traceroute and MTR are all powered by the same underlying protocol, ICMP. Every ICMP message has 8-bit type and code fields, which define the purpose and semantics of the message. While ICMP has many types of messages, the network diagnostic tools mentioned above make specific use of the echo request and echo reply message types.

Every ICMP message has a type, code and checksum. As you may have guessed from the name, an echo reply is generated in response to the receipt of an echo request, and critically, the request and reply have matching identifiers and sequence numbers. Make a mental note of this fact as it will be useful context later in this blog post.

Give us a ping. (Cloudflare) One ping only

A crash course in ping, traceroute, and MTR

As you may expect, each one of these utilities comes with its own unique nuances, but don’t worry. We’re going to provide a quick refresher on each before getting into the nitty-gritty details.

Ping

Ping works by sending a sequence of echo request packets to the destination. Each router hop between the sender and destination decrements the TTL field of the IP packet containing the ICMP message and forwards the packet to the next hop. If a hop decrements the TTL to 0 before reaching the destination, or doesn’t have a next hop to forward to, it will return an ICMP error message – “TTL exceeded” or “Destination host unreachable” respectively – to the sender. A destination which speaks ICMP will receive these echo request packets and return matching echo replies to the sender. The same process of traversing routers and TTL decrementing takes place on the return trip. On the sender’s machine, ping reports the final TTL of these replies, as well as the roundtrip latency of sending and receiving the ICMP messages to the destination. From this information a user can determine the distance between themselves and the origin server, both in terms of number of network hops and time.

Traceroute and MTR

As we’ve just outlined, while helpful, the output provided by ping is relatively simple. It does provide some useful information, but we will generally want to follow up this request with a traceroute to learn more about the specific path to a given destination. Similar to ping, traceroutes start by sending an ICMP echo request. However, it handles TTL a bit differently. You can learn more about why that is the case in our Learning Center, but the important takeaway is that this is how traceroutes are able to map and capture the IP address of each unique hop on the network path. This output makes traceroute an incredibly powerful tool to understanding not only if a machine can connect to another, but also how it will get there! And finally, we’ll cover MTR. We’ve grouped traceroute and MTR together for now as they operate in an extremely similar fashion. In short, the output of an MTR will provide everything traceroute can, but with some additional, aggregate statistics for each unique hop. MTR will also run until explicitly stopped allowing users to receive a statistical average for each hop on the path.

Checking connectivity to the origin

Now that we’ve had a quick refresher, let’s say I cannot connect to my private application server. With ICMP support enabled on my Zero Trust account, I could run a traceroute to see if the server is online.

Here is simple example from one of our lab environments:

Give us a ping. (Cloudflare) One ping only

Then, if my server is online, traceroute should output something like the following:

traceroute -I 172.16.10.120
traceroute to 172.16.10.120 (172.16.10.120), 64 hops max, 72 byte packets
 1  172.68.101.57 (172.68.101.57)  20.782 ms  12.070 ms  15.888 ms
 2  172.16.10.100 (172.16.10.100)  31.508 ms  30.657 ms  29.478 ms
 3  172.16.10.120 (172.16.10.120)  40.158 ms  55.719 ms  27.603 ms

Let’s examine this a bit deeper. Here, the first hop is the Cloudflare data center where my Cloudflare WARP device is connected via our Anycast network. Keep in mind this IP may look different depending on your location. The second hop will be the server running cloudflared. And finally, the last hop is my application server.

Conversely, if I could not connect to my app server I would expect traceroute to output the following:

traceroute -I 172.16.10.120
traceroute to 172.16.10.120 (172.16.10.120), 64 hops max, 72 byte packets
 1  172.68.101.57 (172.68.101.57)  20.782 ms  12.070 ms  15.888 ms
 2  * * *
 3  * * *

In the example above, this means the ICMP echo requests are not reaching cloudflared. To troubleshoot, first I will make sure cloudflared is running by checking the status of the Tunnel in the ZeroTrust dashboard. Then I will check if the Tunnel has a route to the destination IP. This can be found in the Routes column of the Tunnels table in the dashboard. If it does not, I will add a route to my Tunnel to see if this changes the output of my traceroute.

Once I have confirmed that cloudflared is running and the Tunnel has a route to my app server, traceroute will show the following:

raceroute -I 172.16.10.120
traceroute to 172.16.10.120 (172.16.10.120), 64 hops max, 72 byte packets
 1  172.68.101.57 (172.68.101.57)  20.782 ms  12.070 ms  15.888 ms
 2  172.16.10.100 (172.16.10.100)  31.508 ms  30.657 ms  29.478 ms
 3  * * *

However, it looks like we still can’t quite reach the application server. This means the ICMP echo requests reached cloudflared, but my application server isn’t returning echo replies. Now, I can narrow down the problem to my application server, or communication between cloudflared and the app server. Perhaps the machine needs to be rebooted or there is a firewall rule in place, but either way we have what we need to start troubleshooting the last hop. With ICMP support, we now have many network tools at our disposal to troubleshoot connectivity end-to-end.

Note that the route cloudflared to origin is always shown as a single hop, even if there are one or more routers between the two. This is because cloudflared creates its own echo request to the origin, instead of forwarding the original packets. In the next section we will explain the technical reason behind it.

What makes ICMP traffic unique?

A few quarters ago, Cloudflare Zero Trust extended support for UDP end-to-end as well. Since UDP and ICMP are both datagram-based protocols, within the Cloudflare network we can reuse the same infrastructure to proxy both UDP and ICMP traffic. To do this, we send the individual datagrams for either protocol over a QUIC connection using QUIC datagrams between Cloudflare and the cloudflared instances within your network.

With UDP, we establish and maintain a session per client/destination pair, such that we are able to send only the UDP payload and a session identifier in datagrams. In this way, we don’t need to send the IP and port to which the UDP payload should be forwarded with every single packet.

However, with ICMP we decided that establishing a session like this is far too much overhead, given that typically only a handful of ICMP packets are exchanged between endpoints. Instead, we send the entire IP packet (with the ICMP payload inside) as a single datagram.

What this means is that cloudflared can read the destination of the ICMP packet from the IP header it receives. While this conveys the eventual destination of the packet to cloudflared, there is still work to be done to actually send the packet. Cloudflared cannot simply send out the IP packet it receives without modification, because the source IP in the packet is still the original client IP, and not a source that is routable to the cloudflared instance itself.

To receive ICMP echo replies in response to the ICMP packets it forwards, cloudflared must apply a source NAT to the packet. This means that when cloudflared receives an IP packet, it must complete the following:

  • Read the destination IP address of the packet
  • Strip off the IP header to get the ICMP payload
  • Send the ICMP payload to the destination, meaning the source address of the ICMP packet will be the IP of a network interface to which cloudflared can bind
  • When cloudflared receives replies on this address, it must rewrite the destination address of the received packet (destination because the direction of the packet is reversed) to the original client source address

Network Address Translation like this is done all the time for TCP and UDP, but is much easier in those cases because ports can be used to disambiguate cases where the source and destination IPs are the same. Since ICMP packets do not have ports associated with them, we needed to find a way to map packets received from the upstream back to the original source which sent cloudflared those packets.

For example, imagine that two clients 192.0.2.1 and 192.0.2.2 both send an ICMP echo request to a destination 10.0.0.8. As we previously outlined, cloudflared must rewrite the source IPs of these packets to a source address to which it can bind. In this scenario, when the echo replies come back, the IP headers will be identical: source=10.0.0.8 destination=<cloudflared’s IP>. So, how can cloudflared determine which packet needs to have its destination rewritten to 192.0.2.1 and which to 192.0.2.2?

To solve this problem, we use fields of the ICMP packet to track packet flows, in the same way that ports are used in TCP/UDP NAT. The field we’ll use for this purpose is the Echo ID. When an echo request is received, conformant ICMP endpoints will return an echo reply with the same identifier as was received in the request. This means we can send the packet from 192.0.2.1 with ID 23 and the one from 192.0.2.2 with ID 45, and when we receive replies with IDs 23 and 45, we know which one corresponds to each original source.

Of course this strategy only works for ICMP echo requests, which make up a relatively small percentage of the available ICMP message types. For security reasons, however, and owing to the fact that these message types are sufficient to implement the ubiquitous ping and traceroute functionality that we’re after, these are the only message types we currently support. We’ll talk through the security reasons for this choice in the next section.

How to proxy ICMP without elevated permissions

Generally, applications need to send ICMP packets through raw sockets. Applications have control of the IP header using this socket, so it requires elevated privileges to open. Whereas the IP header for TCP and UDP packets are added on send and removed on receive by the operating system. To adhere to security best-practices, we don’t really want to run cloudflared with additional privileges. We needed a better solution. To solve this, we found inspiration in the ping utility, which you’ll note can be run by any user, without elevated permissions. So then, how does ping send ICMP echo requests and listen for echo replies as a normal user program? Well, the answer is less satisfying: it depends (on the platform). And as cloudflared supports all the following platforms, we needed to answer this question for each.

Linux

On linux, ping opens a datagram socket for the ICMP protocol with the syscall socket(PF_INET, SOCK_DGRAM, PROT_ICMP). This type of socket can only be opened if the group ID of the user running the program is in /proc/sys/net/ipv4/ping_group_range, but critically, the user does not need to be root. This socket is “special” in that it can only send ICMP echo requests and receive echo replies. Great! It also has a conceptual “port” associated with it, despite the fact that ICMP does not use ports. In this case, the identifier field of echo requests sent through this socket are rewritten to the “port” assigned to the socket. Reciprocally, echo replies received by the kernel which have the same identifier are sent to the socket which sent the request.

Therefore, on linux cloudflared is able to perform source NAT for ICMP packets simply by opening a unique socket per source IP address. This rewrites the identifier field and source address of the request. Replies are delivered to this same socket meaning that cloudflared can easily rewrite the destination IP address (destination because the packets are flowing to the client) and echo identifier back to the original values received from the client.

Darwin

On Darwin (the UNIX-based core set of components which make up macOS), things are similar, in that we can open an unprivileged ICMP socket with the same syscall socket(PF_INET, SOCK_DGRAM, PROT_ICMP). However, there is an important difference. With Darwin the kernel does not allocate a conceptual “port” for this socket, and thus, when sending ICMP echo requests the kernel does not rewrite the echo ID as it does on linux. Further, and more importantly for our purposes, the kernel does not demultiplex ICMP echo replies to the socket which sent the corresponding request using the echo identifier. This means that on macOS, we effectively need to perform the echo ID rewriting manually. In practice, this means that when cloudflared receives an echo request on macOS, it must choose an echo ID which is unique for the destination. Cloudflared then adds a key of (chosen echo ID, destination IP) to a mapping it then maintains, with a value of (original echo ID, original source IP). Cloudflared rewrites the echo ID in the echo request packet to the one it chose and forwards it to the destination. When it receives a reply, it is able to use the source IP address and echo ID to look up the client address and original echo ID and rewrite the echo ID and destination address in the reply packet before forwarding it back to the client.

Windows

Finally, we arrived at Windows which conveniently provides a Win32 API IcmpSendEcho that sends echo requests and returns echo reply, timeout or error. For ICMPv6 we just had to use Icmp6SendEcho. The APIs are in C, but cloudflared can call them through CGO without a problem. If you also need to call these APIs in a Go program, checkout our wrapper for inspiration.

And there you have it! That’s how we built the most exciting ping release since 1983. Overall, we’re thrilled to announce this new feature and can’t wait to get your feedback on ways we can continue improving our implementation moving forward.

What’s next

Support for these ICMP-based utilities is just the beginning of how we’re thinking about improving our Zero Trust administrator experience. Our goal is to continue providing tools which make it easy to identify issues within the network that impact connectivity and performance.

Looking forward, we plan to add more dials and knobs for observability with announcements like Digital Experience Monitoring across our Zero Trust platform to help users proactively monitor and stay alert to changing network conditions. In the meantime, try applying Zero Trust controls to your private network for free by signing up today.

Using Cloudflare R2 as an apt/yum repository

Post Syndicated from Sudarsan Reddy original https://blog.cloudflare.com/using-cloudflare-r2-as-an-apt-yum-repository/

Using Cloudflare R2 as an apt/yum repository

Using Cloudflare R2 as an apt/yum repository

In this blog post, we’re going to talk about how we use Cloudflare R2 as an apt/yum repository to bring cloudflared (the Cloudflare Tunnel daemon) to your Debian/Ubuntu and CentOS/RHEL systems and how you can do it for your own distributable in a few easy steps!

I work on Cloudflare Tunnel, a product which enables customers to quickly connect their private networks and services through the Cloudflare global network without needing to expose any public IPs or ports through their firewall. Cloudflare Tunnel is managed for users by cloudflared, a tool that runs on the same network as the private services. It proxies traffic for these services via Cloudflare, and users can then access these services securely through the Cloudflare network.

Our connector, cloudflared, was designed to be lightweight and flexible enough to be effectively deployed on a Raspberry Pi, a router, your laptop, or a server running on a data center with applications ranging from IoT control to private networking. Naturally, this means cloudflared comes built for a myriad of operating systems, architectures and package distributions: You could download the appropriate package from our GitHub releases, brew install it or apt/yum install it (https://pkg.cloudflare.com).

In the rest of this blog post, I’ll use cloudflared as an example of how to create an apt/yum repository backed by Cloudflare’s object storage service R2. Note that this can be any binary/distributable. I simply use cloudflared as an example because this is something we recently did and actually use in production.

How apt-get works

Let’s see what happens when you run something like this on your terminal.

$ apt-get install cloudflared

Let’s also assume that apt sources were already added like so:

  $ echo 'deb [signed-by=/usr/share/keyrings/cloudflare-main.gpg] https://pkg.cloudflare.com/cloudflared buster main' | sudo tee /etc/apt/sources.list.d/cloudflared.list


$ apt-get update

From the source.list above, apt first looks up the Release file (or InRelease if it’s a signed package like cloudflared, but we will ignore this for the sake of simplicity).

A Release file contains a list of supported architectures and their md5, sha1 and sha256 checksums. It looks something like this:

$ curl https://pkg.cloudflare.com/cloudflared/dists/buster/Release
Origin: cloudflared
Label: cloudflared
Codename: buster
Date: Thu, 11 Aug 2022 08:40:18 UTC
Architectures: amd64 386 arm64 arm armhf
Components: main
Description: apt repository for cloudflared - buster
MD5Sum:
 c14a4a1cbe9437d6575ae788008a1ef4 549 main/binary-amd64/Packages
 6165bff172dd91fa658ca17a9556f3c8 374 main/binary-amd64/Packages.gz
 9cd622402eabed0b1b83f086976a8e01 128 main/binary-amd64/Release
 5d2929c46648ea8dbeb1c5f695d2ef6b 545 main/binary-386/Packages
 7419d40e4c22feb19937dce49b0b5a3d 371 main/binary-386/Packages.gz
 1770db5634dddaea0a5fedb4b078e7ef 126 main/binary-386/Release
 b0f5ccfe3c3acee38ba058d9d78a8f5f 549 main/binary-arm64/Packages
 48ba719b3b7127de21807f0dfc02cc19 376 main/binary-arm64/Packages.gz
 4f95fe1d9afd0124a32923ddb9187104 128 main/binary-arm64/Release
 8c50559a267962a7da631f000afc6e20 545 main/binary-arm/Packages
 4baed71e49ae3a5d895822837bead606 372 main/binary-arm/Packages.gz
 e472c3517a0091b30ab27926587c92f9 126 main/binary-arm/Release
 bb6d18be81e52e57bc3b729cbc80c1b5 549 main/binary-armhf/Packages
 31fd71fec8acc969a6128ac1489bd8ee 371 main/binary-armhf/Packages.gz
 8fbe2ff17eb40eacd64a82c46114d9e4 128 main/binary-armhf/Release
SHA1:
…
SHA256:
…

Depending on your system’s architecture, Debian picks the appropriate Packages location. A Packages file contains metadata about the binary apt wants to install, including location and its checksum. Let’s say it’s an amd64 machine. This means we’ll go here next:

$ curl https://pkg.cloudflare.com/cloudflared/dists/buster/main/binary-amd64/Packages
Package: cloudflared
Version: 2022.8.0
License: Apache License Version 2.0
Vendor: Cloudflare
Architecture: amd64
Maintainer: Cloudflare <[email protected]>
Installed-Size: 30736
Homepage: https://github.com/cloudflare/cloudflared
Priority: extra
Section: default
Filename: pool/main/c/cloudflared/cloudflared_2022.8.0_amd64.deb
Size: 15286808
SHA256: c47ca10a3c60ccbc34aa5750ad49f9207f855032eb1034a4de2d26916258ccc3
SHA1: 1655dd22fb069b8438b88b24cb2a80d03e31baea
MD5sum: 3aca53ccf2f9b2f584f066080557c01e
Description: Cloudflare Tunnel daemon

Notice the Filename field. This is where apt gets the deb from before running a dpkg command on it. What all of this means is the apt repository (and the yum repositories too) is basically a structured file system of mostly plaintext files and a deb.

The deb file is a Debian software package that contains two things: installable data (in our case, the cloudflared binary) and metadata about the installable.

Building our own apt repository

Now that we know what happens when an apt-get install runs, let’s work our way backwards to construct the repository.

Create a deb file out of the binary

Note: It is optional but recommended one signs the packages. See the section about how apt verifies packages here.

Debian files can be built by the dpkg-buildpackage tool in a linux or Debian environment. We use a handy command line tool called fpm (https://fpm.readthedocs.io/en/v1.13.1/) to do this because it works for both rpm and deb.

$ fpm -s <dir> -t deb -C /path/to/project -name <project_name> –version <version>

This yields a .deb file.

Create plaintext files needed by apt to lookup downloads

Again, these files can be built by hand, but there are multiple tools available to generate this:

We use reprepro.

Using it is as simple as

$ reprepro buster includedeb <path/to/the/deb>

reprepro neatly creates a bunch of folders in the structure we looked into above.

Upload them to Cloudflare R2

We use Cloudflare R2 to now be the host for this structured file system. R2 lets us upload and serve objects in this structured format. This means, we just need to upload the files in the same structure reprepro created them.

Here is a copyable example of how we do it for cloudflared.

Serve them from an R2 worker

For fine-grained control, we’ll write a very lightweight Cloudflare Worker to be the service we talk to and serve as the front-end API for apt to talk to. For an apt repository, we only need it to perform the GET function.

Here’s an example on how-to do this: https://developers.cloudflare.com/r2/examples/demo-worker/

Putting it all together

Here is a handy script we use to push cloudflared to R2 ready for apt/yum downloads and includes signing and publishing the pubkey.

And that’s it! You now have your own apt/yum repo without needing a server that needs to be maintained, there are no egress fees for downloads, and it is on the Cloudflare global network, protecting it against high request volumes. You can automate many of these steps to make it part of a release process.

Today, this is how cloudflared is distributed on the apt and yum repositories: https://pkg.cloudflare.com/

Introducing Private Network Discovery

Post Syndicated from Abe Carryl original https://blog.cloudflare.com/introducing-network-discovery/

Introducing Private Network Discovery

Introducing Private Network Discovery

With Cloudflare One, building your private network on Cloudflare is easy. What is not so easy is maintaining the security of your private network over time. Resources are constantly being spun up and down with new users being added and removed on a daily basis, making it painful to manage over time.

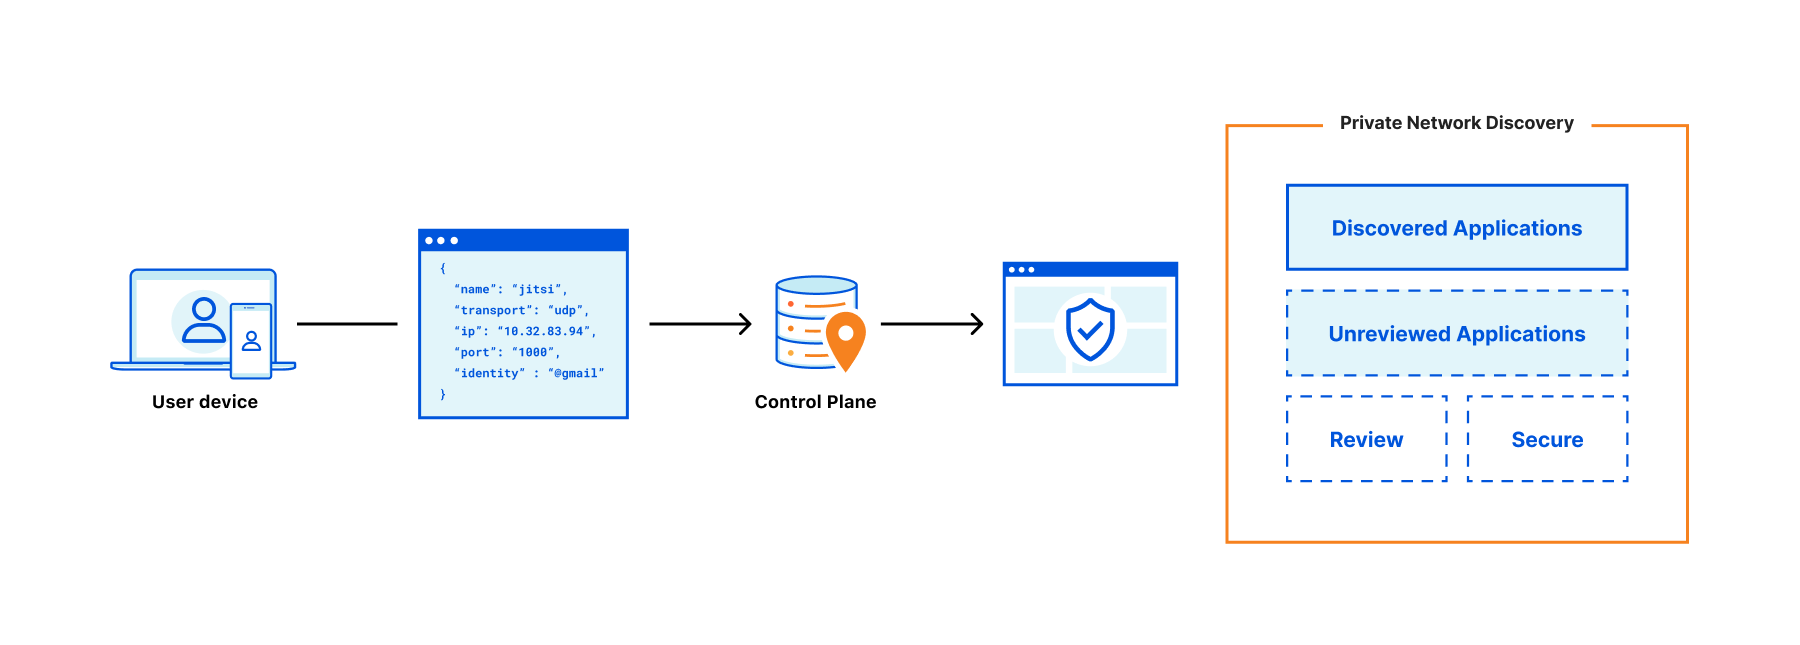
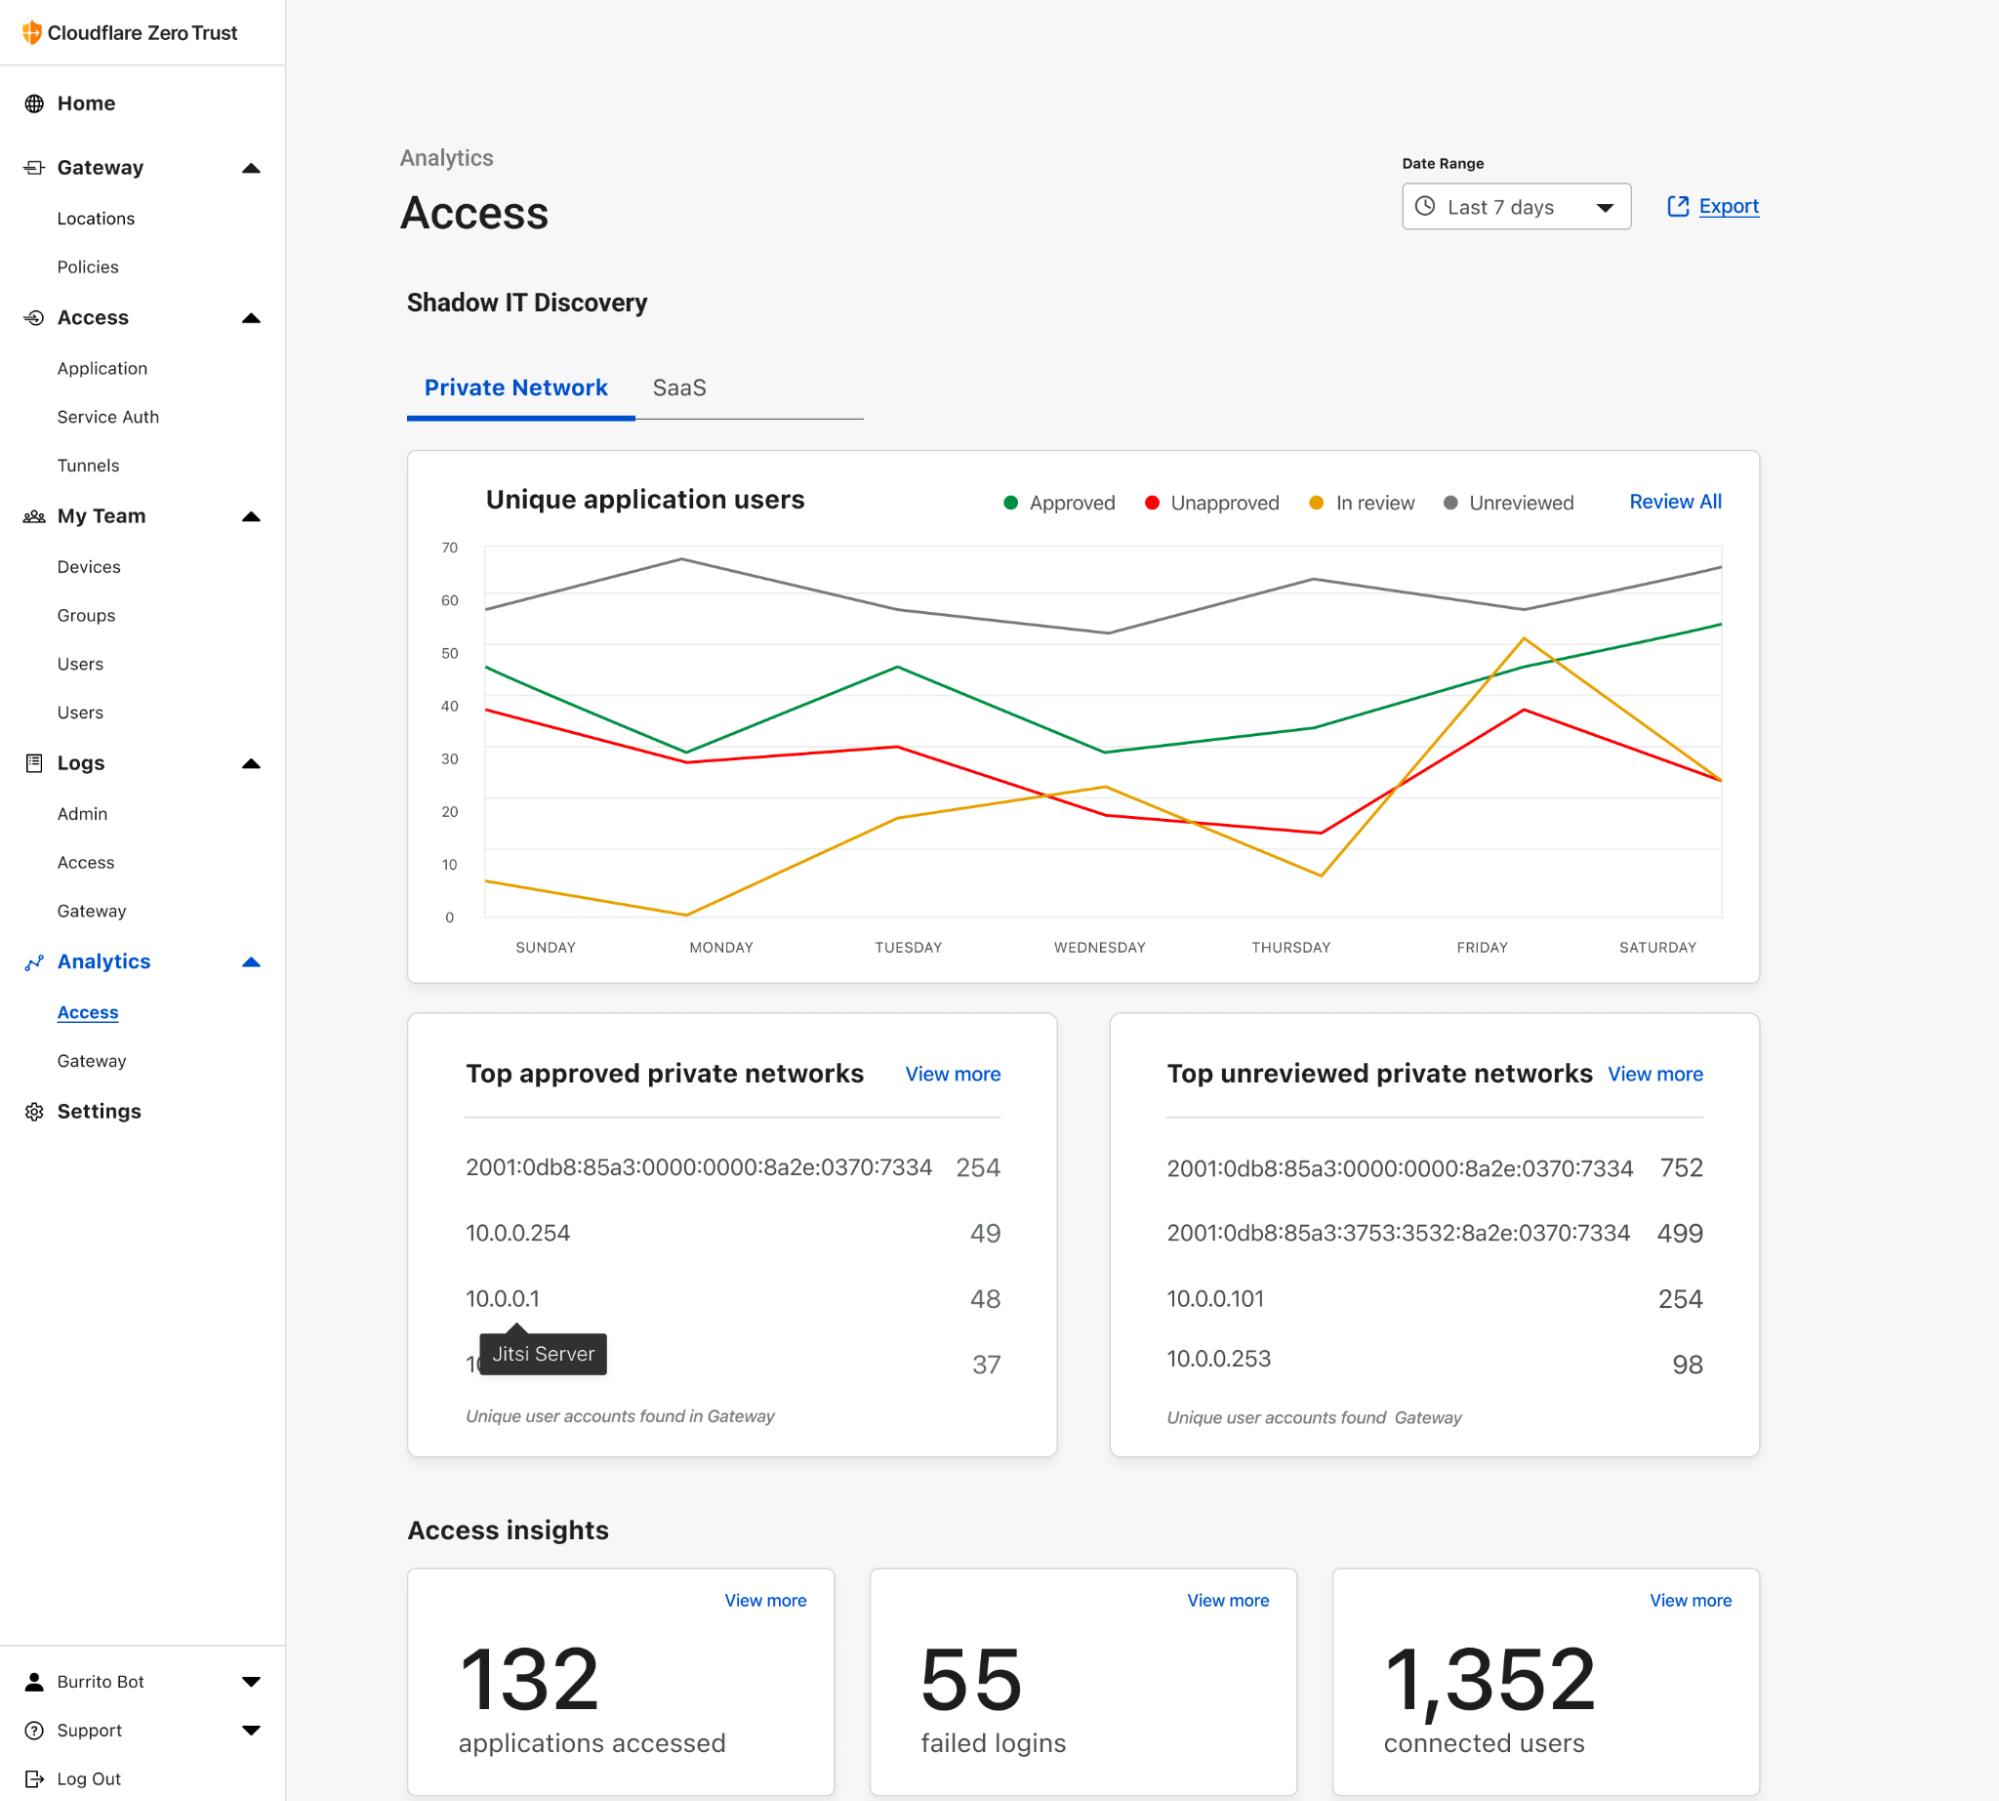
That’s why today we’re opening a closed beta for our new Zero Trust network discovery tool. With Private Network Discovery, our Zero Trust platform will now start passively cataloging both the resources being accessed and the users who are accessing them without any additional configuration required. No third party tools, commands, or clicks necessary.

To get started, sign-up for early access to the closed beta and gain instant visibility into your network today. If you’re interested in learning more about how it works and what else we will be launching in the future for general availability, keep scrolling.

One of the most laborious aspects of migrating to Zero Trust is replicating the security policies which are active within your network today. Even if you do have a point-in-time understanding of your environment, networks are constantly evolving with new resources being spun up dynamically for various operations. This results in a constant cycle to discover and secure applications which creates an endless backlog of due diligence for security teams.

That’s why we built Private Network Discovery. With Private Network Discovery, organizations can easily gain complete visibility into the users and applications that live on their network without any additional effort on their part. Simply connect your private network to Cloudflare, and we will surface any unique traffic we discover on your network to allow you to seamlessly translate them into Cloudflare Access applications.

Building your private network on Cloudflare

Building out a private network has two primary components: the infrastructure side, and the client side.

The infrastructure side of the equation is powered by Cloudflare Tunnel, which simply connects your infrastructure (whether that be a single application, many applications, or an entire network segment) to Cloudflare. This is made possible by running a simple command-line daemon in your environment to establish multiple secure, outbound-only links to Cloudflare. Simply put, Tunnel is what connects your network to Cloudflare.

On the other side of this equation, you need your end users to be able to easily connect to Cloudflare and, more importantly, your network. This connection is handled by our robust device agent, Cloudflare WARP. This agent can be rolled out to your entire organization in just a few minutes using your in-house MDM tooling, and it establishes a secure connection from your users’ devices to the Cloudflare network.

Introducing Private Network Discovery

Now that we have your infrastructure and your users connected to Cloudflare, it becomes easy to tag your applications and layer on Zero Trust security controls to verify both identity and device-centric rules for each and every request on your network.

How it works

As we mentioned earlier, we built this feature to help your team gain visibility into your network by passively cataloging unique traffic destined for an RFC 1918 or RFC 4193 address space. By design, this tool operates in an observability mode whereby all applications are surfaced, but are tagged with a base state of “Unreviewed.”

Introducing Private Network Discovery

The Network Discovery tool surfaces all origins within your network, defined as any unique IP address, port, or protocol. You can review the details of any given origin and then create a Cloudflare Access application to control access to that origin. It’s also worth noting that Access applications may be composed of more than one origin.

Let’s take, for example, a privately hosted video conferencing service, Jitsi. I’m using this example as our team actually uses this service internally to test our new features before pushing them into production. In this scenario, we know that our self-hosted instance of Jitsi lives at 10.0.0.1:443. However, as this is a video conferencing application, it communicates on both tcp:10.0.0.1:443 and udp:10.0.0.1:10000. Here we would select one origin and assign it an application name.

As a note, during the closed beta you will not be able to view this application in the Cloudflare Access application table. For now, these application names will only be reflected in the discovered origins table of the Private Network Discovery report. You will see them reflected in the Application name column exclusively. However, when this feature goes into general availability you’ll find all the applications you have created under Zero Trust > Access > Applications as well.

After you have assigned an application name and added your first origin, tcp:10.0.0.1:443, you can then follow the same pattern to add the other origin, udp:10.0.0.1:10000, as well. This allows you to create logical groupings of origins to create a more accurate representation of the resources on your network.

Introducing Private Network Discovery

By creating an application, our Network Discovery tool will automatically update the status of these individual origins from “Unreviewed” to “In-Review.” This will allow your team to easily track the origin’s status. From there, you can drill further down to review the number of unique users accessing a particular origin as well as the total number of requests each user has made. This will help equip your team with the information it needs to create identity and device-driven Zero Trust policies. Once your team is comfortable with a given application’s usage, you can then manually update the status of a given application to be either “Approved” or “Unapproved”.

What’s next

Our closed beta launch is just the beginning. While the closed beta release supports creating friendly names for your private network applications, those names do not currently appear in the Cloudflare Zero Trust policy builder.

As we move towards general availability, our top priority will be making it easier to secure your private network based on what is surfaced by the Private Network Discovery tool. With the general availability launch, you will be able to create Access applications directly from your Private Network Discovery report, reference your private network applications in Cloudflare Access and create Zero Trust security policies for those applications, all in one singular workflow.

As you can see, we have exciting plans for this tool and will continue investing in Private Network Discovery in the future. If you’re interested in gaining access to the closed beta, sign-up here and be among the first users to try it out!

Ridiculously easy to use Tunnels

Post Syndicated from Abe Carryl original https://blog.cloudflare.com/ridiculously-easy-to-use-tunnels/

Ridiculously easy to use Tunnels

Ridiculously easy to use Tunnels

A little over a decade ago, Cloudflare launched at TechCrunch Disrupt. At the time, we talked about three core principles that differentiated Cloudflare from traditional security vendors: be more secure, more performant, and ridiculously easy to use. Ease of use is at the heart of every decision we make, and this is no different for Cloudflare Tunnel.

That’s why we’re thrilled to announce today that creating tunnels, which previously required up to 14 commands in the terminal, can now be accomplished in just three simple steps directly from the Zero Trust dashboard.

If you’ve heard enough, jump over to sign-up/teams to unplug your VPN and start building your private network with Cloudflare. If you’re interested in learning more about our motivations for this release and what we’re building next, keep scrolling.

Our connector

Cloudflare Tunnel is the easiest way to connect your infrastructure to Cloudflare, whether that be a local HTTP server, web services served by a Kubernetes cluster, or a private network segment. This connectivity is made possible through our lightweight, open-source connector, cloudflared. Our connector offers high-availability by design, creating four long-lived connections to two distinct data centers within Cloudflare’s network. This means that whether an individual connection, server, or data center goes down, your network remains up. Users can also maintain redundancy within their own environment by deploying multiple instances of the connector in the event a single host goes down for one reason or another.

Historically, the best way to deploy our connector has been through the cloudflared CLI. Today, we’re thrilled to announce that we have launched a new solution to remotely create, deploy, and manage tunnels and their configuration directly from the Zero Trust dashboard. This new solution allows our customers to provide their workforce with Zero Trust network access in 15 minutes or less.

CLI? GUI? Why not both

Command line interfaces are exceptional at what they do. They allow users to pass commands at their console or terminal and interact directly with the operating system. This precision grants users exact control over the interactions they may have with a given program or service where this exactitude is required.

However, they also have a higher learning curve and can be less intuitive for new users. This means users need to carefully research the tools they wish to use prior to trying them out. Many users don’t have the luxury to perform this level of research, only to test a program and find it’s not a great fit for their problem.

Conversely, GUIs, like our Zero Trust dashboard, have the flexibility to teach by doing. Little to no program knowledge is required to get started. Users can be intuitively led to their desired results and only need to research how and why they completed certain steps after they know this solution fits their problem.

When we first released Cloudflare Tunnel, it had less than ten distinct commands to get started. We now have far more than this, as well as a myriad of new use cases to invoke them. This has made what used to be an easy-to-navigate CLI library into something more cumbersome for users just discovering our product.

Simple typos led to immense frustration for some users. Imagine, for example, a user needs to advertise IP routes for their private network tunnel. It can be burdensome to remember cloudflared tunnel route ip add <IP/CIDR>. Through the Zero Trust dashboard, you can forget all about the semantics of the CLI library. All you need to know is the name of your tunnel and the network range you wish to connect through Cloudflare. Simply enter my-private-net (or whatever you want to call it), copy the installation script, and input your network range. It’s that simple. If you accidentally type an invalid IP or CIDR block, the dashboard will provide an actionable, human-readable error and get you on track.

Whether you prefer the CLI or GUI, they ultimately achieve the same outcome through different means. Each has merit and ideally users get the best of both worlds in one solution.

Ridiculously easy to use Tunnels

Eliminating points of friction

Tunnels have typically required a locally managed configuration file to route requests to their appropriate destinations. This configuration file was never created by default, but was required for almost every use case. This meant that users needed to use the command line to create and populate their configuration file using examples from developer documentation. As functionality has been added into cloudflared, configuration files have become unwieldy to manage. Understanding the parameters and values to include as well as where to include them has become a burden for users. These issues were often difficult to catch with the naked eye and painful to troubleshoot for users.

We also wanted to improve the concept of tunnel permissions with our latest release. Previously, users were required to manage two distinct tokens: The cert.pem and the Tunnel_UUID.json file. In short, cert.pem, issued during the cloudflared tunnel login command, granted the ability to create, delete, and list tunnels for their Cloudflare account through the CLI. Tunnel_UUID.json, issued during the cloudflared tunnel create <NAME> command, granted the ability to run a specified tunnel. However, since tunnels can now be created directly from your Cloudflare account in the Zero Trust dashboard, there is no longer a requirement to authenticate your origin prior to creating a tunnel. This action is already performed during the initial Cloudflare login event.

With today’s release, users no longer need to manage configuration files or tokens locally. Instead, Cloudflare will manage this for you based on the inputs you provide in the Zero Trust dashboard. If users typo a hostname or service, they’ll know well before attempting to run their tunnel, saving time and hassle. We’ll also manage your tokens for you, and if you need to refresh your tokens at some point in the future, we’ll rotate the token on your behalf as well.

Client or clientless Zero Trust

We commonly refer to Cloudflare Tunnel as an “on-ramp” to our Zero Trust platform. Once connected, you can seamlessly pair it with WARP, Gateway, or Access to protect your resources with Zero Trust security policies, so that each request is validated against your organization’s device and identity based rules.

Clientless Zero Trust

Users can achieve a clientless Zero Trust deployment by pairing Cloudflare Tunnel with Access. In this model, users will follow the flow laid out in the Zero Trust dashboard. First, users name their tunnel. Next, users will be provided a single installation script tailored to the origin’s operating system and system architecture. Finally, they’ll create either public hostnames or private network routes for their tunnel. As outlined earlier, this step eliminates the need for a configuration file. Public hostname values will now replace ingress rules for remotely managed tunnels. Simply add the public hostname through which you’d like to access your private resource. Then, map the hostname value to a service behind your origin server. Finally, create a Cloudflare Access policy to ensure only those users who meet your requirements are able to access this resource.

Client-based Zero Trust

Alternatively, users can pair Cloudflare Tunnel with WARP and Gateway if they prefer a client-based approach to Zero Trust. Here, they’ll follow the same flow outlined above but instead of creating a public hostname, they’ll add a private network. This step replaces the cloudflared tunnel route ip add <IP/CIDR> step from the CLI library. Then, users can navigate to the Cloudflare Gateway section of the Zero Trust dashboard and create two rules to test private network connectivity and get started.

  1. Name: Allow <current user> for <IP/CIDR>
    Policy: Destination IP in <IP/CIDR> AND User Email is <Current User Email>
    Action: Allow
  2. Name: Default deny for <IP/CIDR>
    Policy: Destination IP in <IP/CIDR>
    Action: Block

It’s important to note, with either approach, most use cases will only require a single tunnel. A tunnel can advertise both public hostnames and private networks without conflicts. This helps make orchestration simple. In fact, we suggest starting with the least number of tunnels possible and using replicas to handle redundancy rather than additional tunnels. This, of course, is dependent on each user’s environment, but generally it’s smart to start with a single tunnel and create more only when there is a need to keep networks or services logically separated.

What’s next

Since we launched Cloudflare Tunnel, hundreds of thousands of tunnels have been created. That’s many tunnels that need to be migrated over to our new orchestration method. We want to make this process frictionless. That’s why we’re currently building out tooling to seamlessly migrate locally managed configurations to Cloudflare managed configurations. This will be available in a few weeks.

At launch, we also will not support global configuration options listed in our developer documentation. These parameters require case-by-case support, and we’ll be adding these commands incrementally over time. Most notably, this means the best way to adjust your cloudflared logging levels will still be by modifying the Cloudflare Tunnel service start command and appending the --loglevel flag into your service run command. This will become a priority after releasing the migration wizard.

As you can see, we have exciting plans for the future of remote tunnel management and will continue investing in this as we move forward. Check it out today and deploy your first Cloudflare Tunnel from the dashboard in three simple steps.

Guest Blog: k8s tunnels with Kudelski Security

Post Syndicated from Guest Author original https://blog.cloudflare.com/guest-blog-zero-trust-access-kubernetes/

Guest Blog: k8s tunnels with Kudelski Security

Guest Blog: k8s tunnels with Kudelski Security

Today, we’re excited to publish a blog post written by our friends at Kudelski Security, a managed security services provider. A few weeks back, Romain Aviolat, the Principal Cloud and Security Engineer at Kudelski Security approached our Zero Trust team with a unique solution to a difficult problem that was powered by Cloudflare’s Identity-aware Proxy, which we call Cloudflare Tunnel, to ensure secure application access in remote working environments.

We enjoyed learning about their solution so much that we wanted to amplify their story. In particular, we appreciated how Kudelski Security’s engineers took full advantage of the flexibility and scalability of our technology to automate workflows for their end users. If you’re interested in learning more about Kudelski Security, check out their work below or their research blog.

Zero Trust Access to Kubernetes

Over the past few years, Kudelski Security’s engineering team has prioritized migrating our infrastructure to multi-cloud environments. Our internal cloud migration mirrors what our end clients are pursuing and has equipped us with expertise and tooling to enhance our services for them. Moreover, this transition has provided us an opportunity to reimagine our own security approach and embrace the best practices of Zero Trust.

So far, one of the most challenging facets of our Zero Trust adoption has been securing access to our different Kubernetes (K8s) control-plane (APIs) across multiple cloud environments. Initially, our infrastructure team struggled to gain visibility and apply consistent, identity-based controls to the different APIs associated with different K8s clusters. Additionally, when interacting with these APIs, our developers were often left blind as to which clusters they needed to access and how to do so.

To address these frictions, we designed an in-house solution leveraging Cloudflare to automate how developers could securely authenticate to K8s clusters sitting across public cloud and on-premise environments. Specifically, for a given developer, we can now surface all the K8s services they have access to in a given cloud environment, authenticate an access request using Cloudflare’s Zero Trust rules, and establish a connection to that cluster via Cloudflare’s Identity-aware proxy, Cloudflare Tunnel.

Most importantly, this automation tool has enabled Kudelski Security as an organization to enhance our security posture and improve our developer experience at the same time. We estimate that this tool saves a new developer at least two hours of time otherwise spent reading documentation, submitting IT service tickets, and manually deploying and configuring the different tools needed to access different K8s clusters.

In this blog, we detail the specific pain points we addressed, how we designed our automation tool, and how Cloudflare helped us progress on our Zero Trust journey in a work-from-home friendly way.

Challenges securing multi-cloud environments

As Kudelski Security has expanded our client services and internal development teams, we have inherently expanded our footprint of applications within multiple K8s clusters and multiple cloud providers. For our infrastructure engineers and developers, the K8s cluster API is a crucial entry point for troubleshooting. We work in GitOps and all our application deployments are automated, but we still frequently need to connect to a cluster to pull logs or debug an issue.

However, maintaining this diversity creates complexity and pressure for infrastructure administrators. For end users, sprawling infrastructure can translate to different credentials, different access tools for each cluster, and different configuration files to keep track of.

Such a complex access experience can make real-time troubleshooting particularly painful. For example, on-call engineers trying to make sense of an unfamiliar K8s environment may dig through dense documentation or be forced to wake up other colleagues to ask a simple question. All this is error-prone and a waste of precious time.

Common, traditional approaches of securing access to K8s APIs presented challenges we knew we wanted to avoid. For example, we felt that exposing the API to the public internet would inherently increase our attack surface, that’s a risk we couldn’t afford. Moreover, we did not want to provide broad-based access to our clusters’ APIs via our internal networks and condone the risks of lateral movement. As Kudelski continues to grow, the operational costs and complexity of deploying VPNs across our workforce and different cloud environments would lead to scaling challenges as well.

Instead, we wanted an approach that would allow us to maintain small, micro-segmented environments, small failure domains, and no more than one way to give access to a service.

Leveraging Cloudflare’s Identity-aware Proxy for Zero Trust access

To do this, Kudelski Security’s engineering team opted for a more modern approach: creating connections between users and each of our K8 clusters via an Identity-aware proxy (IAP). IAPs  are flexible to deploy and add an additional layer of security in front of our applications by verifying the identity of a user when an access request is made. Further, they support our Zero Trust approach by creating connections from users to individual applications — not entire networks.

Each cluster has its own IAP and its own sets of policies, which check for identity (via our corporate SSO) and other contextual factors like the device posture of a developer’s laptop. The IAP doesn’t replace the K8s cluster authentication mechanism, it adds a new one on top of it, and thanks to identity federation and SSO this process is completely transparent for our end users.

In our setup, Kudelski Security is using Cloudflare’s IAPs as a component of Cloudflare Access — a ZTNA solution and one of several security services unified by Cloudflare’s Zero Trust platform.

Guest Blog: k8s tunnels with Kudelski Security

For many web-based apps, IAPs help create a frictionless experience for end users requesting access via a browser. Users authenticate via their corporate SSO or identity provider before reaching the secured app, while the IAP works in the background.

That user flow looks different for CLI-based applications because we cannot redirect CLI network flows like we do in a browser. In our case, our engineers want to use their favorite K8s clients which are CLI-based like kubectl or k9s. This means our Cloudflare IAP needs to act as a SOCKS5 proxy between the CLI client and each K8s cluster.

To create this IAP connection, Cloudflare provides a lightweight server-side daemon called cloudflared that connects infrastructure with applications. This encrypted connection runs on Cloudflare’s global network where Zero Trust policies are applied with single-pass inspection.

Without any automation, however, Kudelski Security’s infrastructure team would need to distribute the daemon on end user devices, provide guidance on how to set up those encrypted connections, and take other manual, hands-on configuration steps and maintain them over time. Plus, developers would still lack a single pane of visibility across the different K8s clusters that they would need to access in their regular work.

Guest Blog: k8s tunnels with Kudelski Security

Our automated solution: k8s-tunnels!

To solve these challenges, our infrastructure engineering team developed an internal tool — called ‘k8s-tunnels’ — that embeds complex configuration steps which make life easier for our developers. Moreover, this tool automatically discovers all the K8s clusters that a given user has access to based on the Zero Trust policies created. To enable this functionality, we embedded the SDKs of some major public cloud providers that Kudelski Security uses. The tool also embeds the cloudflared daemon, meaning that we only need to distribute a single tool to our users.

Guest Blog: k8s tunnels with Kudelski Security

All together, a developer who launches the tool goes through the following workflow: (we assume that the user already has valid credentials otherwise the tool would open a browser on our IDP to obtain them)

1. The user selects one or more cluster to

Guest Blog: k8s tunnels with Kudelski Security

2. k8s-tunnel will automatically open the connection with Cloudflare and expose a local SOCKS5 proxy on the developer machine

3. k8s-tunnel amends the user local kubernetes client configuration by pushing the necessary information to go through the local SOCKS5 proxy

4. k8s-tunnel switches the Kubernetes client context to the current connection

Guest Blog: k8s tunnels with Kudelski Security

5. The user can now use his/her favorite CLI client to access the K8s cluster

The whole process is really straightforward and is being used on a daily basis by our engineering team. And, of course, all this magic is made possible through the auto-discovery mechanism we’ve built into k8s-tunnels. Whenever new engineers join our team, we simply ask them to launch the auto-discovery process and get started.

Here is an example of the auto-discovery process in action.

  1. k8s-tunnels will connect to our different cloud providers APIs and list the K8s clusters the user has access to
  2. k8s-tunnels will maintain a local config file on the user machine of those clusters so this process does not be run more than once
Guest Blog: k8s tunnels with Kudelski Security

Automation enhancements

For on-premises deployments, it was a bit trickier as we didn’t have a simple way to store the K8s clusters metadata like we do with resource tags with public cloud providers. We decided to use Vault as a Key-Value-store to mimic public-cloud resource tags for on-prem. This way we can achieve auto-discovery of on-prem clusters following the same process as with a public-cloud provider.

Maybe you saw that in the previous CLI screenshot, the user can select multiple clusters at the same time! We quickly realized that our developers often needed to access multiple environments at the same time to compare a workload running in production and in staging. So instead of opening and closing tunnels every time they needed to switch clusters, we designed our tool such that they can now simply open multiple tunnels in parallel within a single k8s-tunnels instance and just switch the destination K8s cluster on their laptop.

Last but not least, we’ve also added the support for favorites and notifications on new releases, leveraging Cloudflare Workers, but that’s for another blog post.

What’s Next

In designing this tool, we’ve identified a couple of issues inside Kubernetes client libraries when used in conjunction with SOCKS5 proxies, and we’re working with the Kubernetes community to fix those issues, so everybody should benefit from those patches in the near future.

With this blog post, we wanted to highlight how it is possible to apply Zero Trust security for complex workloads running on multi-cloud environments, while simultaneously improving the end user experience.

Although today our ‘k8s-tunnels’ code is too specific to Kudelski Security, our goal is to share what we’ve created back with the Kubernetes community, so that other organizations and Cloudflare customers can benefit from it.

Extending Cloudflare’s Zero Trust platform to support UDP and Internal DNS

Post Syndicated from Abe Carryl original https://blog.cloudflare.com/extending-cloudflares-zero-trust-platform-to-support-udp-and-internal-dns/

Extending Cloudflare’s Zero Trust platform to support UDP and Internal DNS

Extending Cloudflare’s Zero Trust platform to support UDP and Internal DNS

At the end of 2020, Cloudflare empowered organizations to start building a private network on top of our network. Using Cloudflare Tunnel on the server side, and Cloudflare WARP on the client side, the need for a legacy VPN was eliminated. Fast-forward to today, and thousands of organizations have gone on this journey with us — unplugging their legacy VPN concentrators, internal firewalls, and load balancers. They’ve eliminated the need to maintain all this legacy hardware; they’ve dramatically improved speeds for end users; and they’re able to maintain Zero Trust rules organization-wide.

We started with TCP, which is powerful because it enables an important range of use cases. However, to truly replace a VPN, you need to be able to cover UDP, too. Starting today, we’re excited to provide early access to UDP on Cloudflare’s Zero Trust platform. And even better: as a result of supporting UDP, we can offer Internal DNS — so there’s no need to migrate thousands of private hostnames by hand to override DNS rules. You can get started with Cloudflare for Teams for free today by signing up here; and if you’d like to join the waitlist to gain early access to UDP and Internal DNS, please visit here.

The topology of a private network on Cloudflare

Building out a private network has two primary components: the infrastructure side, and the client side.

The infrastructure side of the equation is powered by Cloudflare Tunnel, which simply connects your infrastructure (whether that be a singular application, many applications, or an entire network segment) to Cloudflare. This is made possible by running a simple command-line daemon in your environment to establish multiple secure, outbound-only, load-balanced links to Cloudflare. Simply put, Tunnel is what connects your network to Cloudflare.

On the other side of this equation, we need your end users to be able to easily connect to Cloudflare and, more importantly, your network. This connection is handled by our robust device client, Cloudflare WARP. This client can be rolled out to your entire organization in just a few minutes using your in-house MDM tooling, and it establishes a secure, WireGuard-based connection from your users’ devices to the Cloudflare network.

Extending Cloudflare’s Zero Trust platform to support UDP and Internal DNS

Now that we have your infrastructure and your users connected to Cloudflare, it becomes easy to tag your applications and layer on Zero Trust security controls to verify both identity and device-centric rules for each and every request on your network.

Up until now though, only TCP was supported.

Extending Cloudflare Zero Trust to support UDP

Over the past year, with more and more users adopting Cloudflare’s Zero Trust platform, we have gathered data surrounding all the use cases that are keeping VPNs plugged in. Of those, the most common need has been blanket support for UDP-based traffic. Modern protocols like QUIC take advantage of UDP’s lightweight architecture — and at Cloudflare, we believe it is part of our mission to advance these new standards to help build a better Internet.

Today, we’re excited to open an official waitlist for those who would like early access to Cloudflare for Teams with UDP support.

What is UDP and why does it matter?

UDP is a vital component of the Internet. Without it, many applications would be rendered woefully inadequate for modern use. Applications which depend on near real time communication such as video streaming or VoIP services are prime examples of why we need UDP and the role it fills for the Internet. At their core, however, TCP and UDP achieve the same results — just through vastly different means. Each has their own unique benefits and drawbacks, which are always felt downstream by the applications that utilize them.

Here’s a quick example of how they both work, if you were to ask a question to somebody as a metaphor. TCP should look pretty familiar: you would typically say hi, wait for them to say hi back, ask how they are, wait for their response, and then ask them what you want.

UDP, on the other hand, is the equivalent of just walking up to someone and asking what you want without checking to make sure that they’re listening. With this approach, some of your question may be missed, but that’s fine as long as you get an answer.

Like the conversation above, with UDP many applications actually don’t care if some data gets lost; video streaming or game servers are good examples here. If you were to lose a packet in transit while streaming, you wouldn’t want the entire stream to be interrupted until this packet is received — you’d rather just drop the packet and move on. Another reason application developers may utilize UDP is because they’d prefer to develop their own controls around connection, transmission, and quality control rather than use TCP’s standardized ones.

For Cloudflare, end-to-end support for UDP-based traffic will unlock a number of new use cases. Here are a few we think you’ll agree are pretty exciting.

Internal DNS Resolvers

Most corporate networks require an internal DNS resolver to disseminate access to resources made available over their Intranet. Your Intranet needs an internal DNS resolver for many of the same reasons the Internet needs public DNS resolvers. In short, humans are good at many things, but remembering long strings of numbers (in this case IP addresses) is not one of them. Both public and internal DNS resolvers were designed to solve this problem (and much more) for us.

In the corporate world, it would be needlessly painful to ask internal users to navigate to, say, 192.168.0.1 to simply reach Sharepoint or OneDrive. Instead, it’s much easier to create DNS entries for each resource and let your internal resolver handle all the mapping for your users as this is something humans are actually quite good at.

Under the hood, DNS queries generally consist of a single UDP request from the client. The server can then return a single reply to the client. Since DNS requests are not very large, they can often be sent and received in a single packet. This makes support for UDP across our Zero Trust platform a key enabler to pulling the plug on your VPN.

Thick Client Applications

Another common use case for UDP is thick client applications. One benefit of UDP we have discussed so far is that it is a lean protocol. It’s lean because the three-way handshake of TCP and other measures for reliability have been stripped out by design. In many cases, application developers still want these reliability controls, but are intimately familiar with their applications and know these controls could be better handled by tailoring them to their application. These thick client applications often perform critical business functions and must be supported end-to-end to migrate. As an example, legacy versions of Outlook may be implemented through thick clients where most of the operations are performed by the local machine, and only the sync interactions with Exchange servers occur over UDP.

Again, UDP support on our Zero Trust platform now means these types of applications are no reason to remain on your legacy VPN.

And more…

A huge portion of the world’s Internet traffic is transported over UDP. Often, people equate time-sensitive applications with UDP, where occasionally dropping packets would be better than waiting — but there are a number of other use cases, and we’re excited to be able to provide sweeping support.

How can I get started today?

You can already get started building your private network on Cloudflare with our tutorials and guides in our developer documentation. Below is the critical path. And if you’re already a customer, and you’re interested in joining the waitlist for UDP and Internal DNS access, please skip ahead to the end of this post!

Connecting your network to Cloudflare

First, you need to install cloudflared on your network and authenticate it with the command below:

cloudflared tunnel login

Next, you’ll create a tunnel with a user-friendly name to identify your network or environment.

cloudflared tunnel create acme-network

Finally, you’ll want to configure your tunnel with the IP/CIDR range of your private network. By doing this, you’re making the Cloudflare WARP agent aware that any requests to this IP range need to be routed to our new tunnel.

cloudflared tunnel route ip add 192.168.0.1/32

Then, all you need to do is run your tunnel!

Connecting your users to your network

To connect your first user, start by downloading the Cloudflare WARP agent on the device they’ll be connecting from, then follow the steps in our installer.

Next, you’ll visit the Teams Dashboard and define who is allowed to access our network by creating an enrollment policy. This policy can be created under Settings > Devices > Device Enrollment. In the example below, you can see that we’re requiring users to be located in Canada and have an email address ending @cloudflare.com.

Once you’ve created this policy, you can enroll your first device by clicking the WARP desktop icon on your machine and navigating to preferences > Account > Login with Teams.

Last, we’ll remove the IP range we added to our Tunnel from the Exclude list in Settings > Network > Split Tunnels. This will ensure this traffic is, in fact, routed to Cloudflare and then sent to our private network Tunnel as intended.

In addition to the tutorial above, we also have in-product guides in the Teams Dashboard which go into more detail about each step and provide validation along the way.

To create your first Tunnel, navigate to the Access > Tunnels.

To enroll your first device into WARP, navigate to My Team > Devices.

What’s Next

We’re incredibly excited to release our waitlist today and even more excited to launch this feature in the coming weeks. We’re just getting started with private network Tunnels and plan to continue adding more support for Zero Trust access rules for each request to each internal DNS hostname after launch. We’re also working on a number of efforts to measure performance and to ensure we remain the fastest Zero Trust platform — making using us a delight for your users, compared to the pain of using a legacy VPN.

Cloudflare Tunnel for Content Teams

Post Syndicated from Alice Bracchi original https://blog.cloudflare.com/cloudflare-tunnel-for-content-teams/

Cloudflare Tunnel for Content Teams

Cloudflare Tunnel for Content Teams

A big part of the job of a technical writer is getting feedback on the content you produce. Writing and maintaining product documentation is a deeply collaborative and cyclical effort — through constant conversation with product managers and engineers, technical writers ensure the content is clear and serves the user in the most effective way. Collaboration with other technical writers is also important to keep the documentation consistent with Cloudflare’s content strategy.

So whether we’re documenting a new feature or overhauling a big portion of existing documentation, sharing our writing with stakeholders before it’s published is quite literally half the work.

In my experience as a technical writer, the feedback I’ve received has been exponentially more impactful when stakeholders could see my changes in context. This is especially true for bigger and more strategic changes. Imagine I’m changing the structure of an entire section of a product’s documentation, or shuffling the order of pages in the navigation bar. It’s hard to guess the impact of those changes just by looking at the markdown files.

We writers check those changes in context by building a development server on our local machines. But sharing what we see locally with our stakeholders has always been a pain point for us. We’ve sent screenshots (hardly a good idea). We’ve recorded our screens. We’ve asked stakeholders to check out our branches locally and build a development server on their own. Lately, we’ve added a GitHub action to our open-source cloudflare-docs repo that allows us to generate a preview link for all pull requests with a certain label. However, that requires us to open a pull request with our changes, and that is not ideal if we’re documenting a feature that’s yet to be announced, or if our work is still in its early stages.

So the question has always been: could there be a way for someone else to see what we see, as easily as we see it?

Enter Cloudflare Tunnel

I was working on a complete refresh of Cloudflare Tunnel’s documentation when I realized the product could very well answer that question for us as a technical writing team.

If you’re not familiar with the product, Cloudflare Tunnel provides a secure way to connect your local resources to the Cloudflare network without poking holes in your firewall. By running cloudflared in your environment, you can create outbound-only connections to Cloudflare’s edge, and ensure all traffic to your origins goes through Cloudflare and is protected from outside interference.

For our team, Cloudflare Tunnel could offer a way for our stakeholders to interact with what’s on our local environments in real-time, just like a customer would if the changes were published. To do that, we could expose our local environment to the edge through a tunnel, assign a DNS record to that tunnel, and then share that URL with our stakeholders.

So if each member in the technical writing team had their own tunnel that they could spin up every time they needed to get feedback, that would pretty much solve our long-standing problem.

Cloudflare Tunnel for Content Teams

Setting up the tunnel

To test out that this would work, I went ahead and tried it for myself.

First, I made sure to create a local branch of the cloudflare-docs repo, make local changes, and run a development server locally on port 8000.

Since I already had cloudflared installed on my machine, the next thing I needed to do was log into my team’s Cloudflare account, pick the zone I wanted to create tunnels for (I picked developers.cloudflare.com), and authorize Cloudflare Tunnel for that zone.

$ cloudflared login

Next, it was time to create the Named Tunnel.

$ cloudflared tunnel create alice
Tunnel credentials written to /Users/alicebracchi/.cloudflared/0e025819-6f12-4f49-8183-c678273feef4.json. cloudflared chose this file based on where your origin certificate was found. Keep this file secret. To revoke these credentials, delete the tunnel.

Created tunnel alice with id 0e025819-6f12-4f49-8183-c678273feef4

Alright, tunnel created. Next, I needed to assign a DNS record to it. I wanted it to be something readable and easily shareable with stakeholders (like abracchi.developers.cloudflare.com), so I ran the following command and specified the tunnel name first and then the desired subdomain:

$ cloudflared tunnel route dns alice abracchi

Next, I needed a way to tell the tunnel to serve traffic to my localhost:8000 port. For that, I created a configuration file in my default cloudflared directory and specified the following fields:

url: https://localhost:8000
tunnel: 0e025819-6f12-4f49-8183-c678273feef4
credentials-file: /Users/alicebracchi/.cloudflared/0e025819-6f12-4f49-8183-c678273feef4
.json  

Time to run the tunnel. The following command established connections between my origin and the Cloudflare edge, telling the tunnel to serve traffic to my origin according to the parameters I’d specified in the config file:

$ cloudflared tunnel --config /Users/alicebracchi/.cloudflared/config.yml run alice
2021-10-18T09:39:54Z INF Starting tunnel tunnelID=0e025819-6f12-4f49-8183-c678273feef4
2021-10-18T09:39:54Z INF Version 2021.9.2
2021-10-18T09:39:54Z INF GOOS: darwin, GOVersion: go1.16.5, GoArch: amd64
2021-10-18T09:39:54Z INF Settings: map[cred-file:/Users/alicebracchi/.cloudflared/0e025819-6f12-4f49-8183-c678273feef4.json credentials-file:/Users/alicebracchi/.cloudflared/0e025819-6f12-4f49-8183-c678273feef4.json url:http://localhost:8000]
2021-10-18T09:39:54Z INF Generated Connector ID: 90a7e3a9-9d59-4d26-9b87-4b94ebf4d2a0
2021-10-18T09:39:54Z INF cloudflared will not automatically update when run from the shell. To enable auto-updates, run cloudflared as a service: https://developers.cloudflare.com/argo-tunnel/reference/service/
2021-10-18T09:39:54Z INF Initial protocol http2
2021-10-18T09:39:54Z INF Starting metrics server on 127.0.0.1:64193/metrics
2021-10-18T09:39:55Z INF Connection 13bf4c0c-b35b-4f9a-b6fa-f0a3dd001951 registered connIndex=0 location=MAD
2021-10-18T09:39:56Z INF Connection 38510c22-5256-45f2-abf8-72f1207ca242 registered connIndex=1 location=LIS
2021-10-18T09:39:57Z INF Connection 9ab0ea06-b1cf-483c-bd48-64a067a87c39 registered connIndex=2 location=MAD
2021-10-18T09:39:58Z INF Connection df079efe-8246-4e93-85f5-10caf8b7c354 registered connIndex=3 location=LIS

And sure enough, at abracchi.developers.cloudflare.com, my teammates could see what I was seeing on localhost:8000.

Securing the tunnel

After creating the tunnel, I needed to make sure only people within Cloudflare could access that tunnel. As it was, anyone with access to abracchi.developers.cloudflare.com could see what was in my local environment. To fix this, I set up an Access self-hosted application by navigating to Access > Applications on the Teams Dashboard. For this application, I then created a policy that restricts access to the tunnel to a user group that includes only Cloudflare employees and requires authentication via Google or One-time PIN (OTP).

This makes applications like my tunnel easily shareable between colleagues, but also safe from potential vulnerabilities.

Cloudflare Tunnel for Content Teams

Et voilà!

Back to the Tunnels page, this is what the content team’s Cloudflare Tunnel setup looks like after each writer completed the process I’ve outlined above. Every writer has their personal tunnel set up and their local environment exposed to the Cloudflare Edge:

Cloudflare Tunnel for Content Teams

What’s next

The team is now seamlessly sharing visual content with their stakeholders, but there’s still room for improvement. Cloudflare Tunnel is just the first step towards making the feedback loop easier for everyone involved. We’re currently exploring ways we can capture integrated feedback directly at the URL that’s shared with the stakeholders, to avoid back-and-forth on separate channels.

We’re also looking into bringing in Cloudflare Pages to make the entire deployment process faster. Stay tuned for future updates, and in the meantime, check out our developer docs.

Getting Cloudflare Tunnels to connect to the Cloudflare Network with QUIC

Post Syndicated from Sudarsan Reddy original https://blog.cloudflare.com/getting-cloudflare-tunnels-to-connect-to-the-cloudflare-network-with-quic/

Getting Cloudflare Tunnels to connect to the Cloudflare Network with QUIC

Getting Cloudflare Tunnels to connect to the Cloudflare Network with QUIC

I work on Cloudflare Tunnel, which lets customers quickly connect their private services and networks through the Cloudflare network without having to expose their public IPs or ports through their firewall. Tunnel is managed for users by cloudflared, a tool that runs on the same network as the private services. It proxies traffic for these services via Cloudflare, and users can then access these services securely through the Cloudflare network.

Recently, I was trying to get Cloudflare Tunnel to connect to the Cloudflare network using a UDP protocol, QUIC. While doing this, I ran into an interesting connectivity problem unique to UDP. In this post I will talk about how I went about debugging this connectivity issue beyond the land of firewalls, and how some interesting differences between UDP and TCP came into play when sending network packets.

How does Cloudflare Tunnel work?

Getting Cloudflare Tunnels to connect to the Cloudflare Network with QUIC

cloudflared works by opening several connections to different servers on the Cloudflare edge. Currently, these are long-lived TCP-based connections proxied over HTTP/2 frames. When Cloudflare receives a request to a hostname, it is proxied through these connections to the local service behind cloudflared.

While our HTTP/2 protocol mode works great, we’d like to improve a few things. First, TCP traffic sent over HTTP/2 is susceptible to Head of Line (HoL) blocking — this affects both HTTP traffic and traffic from WARP routing. Additionally, it is currently not possible to initiate communication from cloudflared’s HTTP/2 server in an efficient way. With the current Go implementation of HTTP/2, we could use Server-Sent Events, but this is not very useful in the scheme of proxying L4 traffic.

The upgrade to QUIC solves possible HoL blocking issues and opens up avenues that allow us to initiate communication from cloudflared to a different cloudflared in the future.

Naturally, QUIC required a UDP-based listener on our edge servers which cloudflared could connect to. We already connect to a TCP-based listener for the existing protocols, so this should be nice and easy, right?

Failed to dial to the edge

Things weren’t as straightforward as they first looked. I added a QUIC listener on the edge, and the ability for cloudflared to connect to this new UDP-based listener. I tried to run my brand new QUIC tunnel and this happened.

$  cloudflared tunnel run --protocol quic my-tunnel
2021-09-17T18:44:11Z ERR Failed to create new quic connection, err: failed to dial to edge: timeout: no recent network activity

cloudflared wasn’t even establishing a connection to the edge. I started looking at the obvious places first. Did I add a firewall rule allowing traffic to this port? Check. Did I have iptables rules ACCEPTing or DROPping appropriate traffic for this port? Check. They seemed to be in order. So what else could I do?

tcpdump all the packets

I started by logging for UDP traffic on the machine my server was running on to see what could be happening.

$  sudo tcpdump -n -i eth0 port 7844 and udp
tcpdump: verbose output suppressed, use -v or -vv for full protocol decode
listening on eth0, link-type EN10MB (Ethernet), capture size 262144 bytes
14:44:27.742629 IP 173.13.13.10.50152 > 198.41.200.200.7844: UDP, length 1252
14:44:27.743298 IP 203.0.113.0.7844 > 173.13.13.10.50152: UDP, length 37

Looking at this tcpdump helped me understand why I had no connectivity! Not only was this port getting UDP traffic but I was also seeing traffic flow out. But there seemed to be something strange afoot. Incoming packets were being sent to 198.41.200.200:7844 while responses were being sent back from 203.0.113.0:7844 (this is an example IP used for illustration purposes)  instead.

Why is this a problem? If a host (in this case, the server) chooses an address from a network unable to communicate with a public Internet host, it is likely that the return half of the communication will never arrive. But wait a minute. Why is some other IP getting prioritized over a source address my packets were already being sent to? Let’s take a deeper look at some IP addresses. (Note that I’ve deliberately oversimplified and scrambled results to minimally illustrate the problem)

$  ip addr list
eth0: <BROADCAST,MULTICAST,UP,LOWER_UP> mtu 1600 qdisc noqueue state UP group default qlen 1000
inet 203.0.113.0/32 scope global eth0
inet 198.41.200.200/32 scope global eth0 

$ ip route show
default via 203.0.113.0 dev eth0

So this was clearly why the server was working fine on my machine but not on the Cloudflare edge servers. It looks like I have multiple IPs on the interface my service is bound to. The IP that is the default route is being sent back as the source address of the packet.

Why does this work for TCP but not UDP?

Connection-oriented protocols, like TCP, initiate a connection (connect()) with a three-way handshake. The kernel therefore maintains a state about ongoing connections and uses this to determine the source IP address at the time of a response.

Because UDP (unless SOCK_SEQPACKET is involved) is connectionless, the kernel cannot maintain state like TCP does. The recvfrom  system call is invoked from the server side and tells who the data comes from. Unfortunately, recvfrom  does not tell us which IP this data is addressed for. Therefore, when the UDP server invokes the sendto system call to respond to the client, we can only tell it which address to send the data to. The responsibility of determining the source-address IP then falls to the kernel. The kernel has certain heuristics that it uses to determine the source address. This may or may not work, and in the ip routes example above, these heuristics did not work. The kernel naturally (and wrongly) picks the address of the default route to respond with.

Telling the kernel what to do

I had to rely on my application to set the source address explicitly and therefore not rely on kernel heuristics.

Linux has some generic I/O system calls, namely recvmsg  and sendmsg. Their function signatures allow us to both read or write additional out-of-band data we can pass the source address to. This control information is passed via the msghdr struct’s msg_control field.

ssize_t sendmsg(int socket, const struct msghdr *message, int flags)
ssize_t recvmsg(int socket, struct msghdr *message, int flags);
 
struct msghdr {
     void    *   msg_name;   /* Socket name          */
     int     msg_namelen;    /* Length of name       */
     struct iovec *  msg_iov;    /* Data blocks          */
     __kernel_size_t msg_iovlen; /* Number of blocks     */
     void    *   msg_control;    /* Per protocol magic (eg BSD file descriptor passing) */
    __kernel_size_t msg_controllen; /* Length of cmsg list */
     unsigned int    msg_flags;
};

We can now copy the control information we’ve gotten from recvmsg back when calling sendmsg, providing the kernel with information about the source address.The library I used (https://github.com/lucas-clemente/quic-go) had a recent update that did exactly this! I pulled the changes into my service and gave it a spin.

But alas. It did not work! A quick tcpdump showed that the same source address was being sent back. It seemed clear from reading the source code that the recvmsg and sendmsg were being called with the right values. It did not make sense.

So I had to see for myself if these system calls were being made.

strace all the system calls

strace is an extremely useful tool that tracks all system calls and signals sent/received by a process. Here’s what it had to say. I’ve removed all the information not relevant to this specific issue.

17:39:09.130346 recvmsg(3, {msg_name={sa_family=AF_INET6,
sin6_port=htons(35224), inet_pton(AF_INET6, "::ffff:171.54.148.10", 
&sin6_addr), sin6_flowinfo=htonl(0), sin6_scope_id=0}, msg_namelen=112->28, msg_iov=
[{iov_base="_\5S\30\273]\275@\34\24\322\243{2\361\312|\325\n\1\314\316`\3
03\250\301X\20", iov_len=1452}], msg_iovlen=1, msg_control=[{cmsg_len=36, 
cmsg_level=SOL_IPV6, cmsg_type=0x32}, {cmsg_len=28, cmsg_level=SOL_IP, 
cmsg_type=IP_PKTINFO, cmsg_data={ipi_ifindex=if_nametoindex("eth0"),
ipi_spec_dst=inet_addr("198.41.200.200"),ipi_addr=inet_addr("198.41.200.200")}},
{cmsg_len=17, cmsg_level=SOL_IP, 
cmsg_type=IP_TOS, cmsg_data=[0]}], msg_controllen=96, msg_flags=0}, 0) = 28 <0.000007>
17:39:09.165160 sendmsg(3, {msg_name={sa_family=AF_INET6, 
sin6_port=htons(35224), inet_pton(AF_INET6, "::ffff:171.54.148.10", 
&sin6_addr), sin6_flowinfo=htonl(0), sin6_scope_id=0}, msg_namelen=28, 
msg_iov=[{iov_base="Oe4\37:3\344 &\243W\10~c\\\316\2640\255*\231 
OY\326b\26\300\264&\33\""..., iov_len=1302}], msg_iovlen=1, msg_control=
[{cmsg_len=28, cmsg_level=SOL_TCP, cmsg_type=0x8}], msg_controllen=28, 
msg_flags=0}, 0) = 1302 <0.000054>

Let’s start with recvmsg . We can clearly see that the ipi_addr for the source is being passed correctly: ipi_addr=inet_addr(“172.16.90.131”). This part works as expected. Looking at sendmsg  almost instantly tells us where the problem is. The field we want, ip_spec_dst is not being set as we make this system call. So the kernel continues to make wrong guesses as to what the source address may be.

This turned out to be a bug where the library was using IPROTO_TCP instead of IPPROTO_IPV4 as the control message level while making the sendmsg call. Was that it? Seemed a little anticlimactic. I submitted a slightly more typesafe fix and sure enough, straces now showed me what I was expecting to see.

18:22:08.334755 sendmsg(3, {msg_name={sa_family=AF_INET6, 
sin6_port=htons(37783), inet_pton(AF_INET6, "::ffff:171.54.148.10", 
&sin6_addr), sin6_flowinfo=htonl(0), sin6_scope_id=0}, msg_namelen=28, 
msg_iov=
[{iov_base="Ki\20NU\242\211Y\254\337\3107\224\201\233\242\2647\245}6jlE\2
70\227\3023_\353n\364"..., iov_len=33}], msg_iovlen=1, msg_control=
[{cmsg_len=28, cmsg_level=SOL_IP, cmsg_type=IP_PKTINFO, cmsg_data=
{ipi_ifindex=if_nametoindex("eth0"), 
ipi_spec_dst=inet_addr("198.41.200.200"),ipi_addr=inet_addr("0.0.0.0")}}
], msg_controllen=32, msg_flags=0}, 0) =
33 <0.000049>

cloudflared is now able to connect with UDP (QUIC) to the Cloudflare network from anywhere in the world!

$  cloudflared tunnel --protocol quic run sudarsans-tunnel
2021-09-21T11:37:30Z INF Starting tunnel tunnelID=a72e9cb7-90dc-499b-b9a0-04ee70f4ed78
2021-09-21T11:37:30Z INF Version 2021.9.1
2021-09-21T11:37:30Z INF GOOS: darwin, GOVersion: go1.16.5, GoArch: amd64
2021-09-21T11:37:30Z INF Settings: map[p:quic protocol:quic]
2021-09-21T11:37:30Z INF Initial protocol quic
2021-09-21T11:37:32Z INF Connection 3ade6501-4706-433e-a960-c793bc2eecd4 registered connIndex=0 location=AMS

While the programmatic bug causing this issue was a trivial one, the journey into systematically discovering the issue and understanding how Linux internals worked for UDP along the way turned out to be very rewarding for me. It also reiterated my belief that tcpdump and strace are indeed invaluable tools in anybody’s arsenal when debugging network problems.

What’s next?

You can give this a try with the latest cloudflared release at https://github.com/cloudflare/cloudflared/releases/latest. Just remember to set the protocol flag to quic. We plan to leverage this new mode to roll out some exciting new features for Cloudflare Tunnel. So upgrade away and keep watching this space for more information on how you can take advantage of this.

Tunnel: Cloudflare’s Newest Homeowner

Post Syndicated from Abe Carryl original https://blog.cloudflare.com/observe-and-manage-cloudflare-tunnel/

Tunnel: Cloudflare’s Newest Homeowner

Cloudflare Tunnel connects your infrastructure to Cloudflare. Your team runs a lightweight connector in your environment, cloudflared, and services can reach Cloudflare and your audience through an outbound-only connection without the need for opening up holes in your firewall.

Tunnel: Cloudflare’s Newest Homeowner

Whether the services are internal apps protected with Zero Trust policies, websites running in Kubernetes clusters in a public cloud environment, or a hobbyist project on a Raspberry Pi — Cloudflare Tunnel provides a stable, secure, and highly performant way to serve traffic.

Starting today, with our new UI in the Cloudflare for Teams Dashboard, users who deploy and manage Cloudflare Tunnel at scale now have easier visibility into their tunnels’ status, routes, uptime, connectors, cloudflared version, and much more. On the Teams Dashboard you will also find an interactive guide that walks you through setting up your first tunnel.  

Getting Started with Tunnel

Tunnel: Cloudflare’s Newest Homeowner

We wanted to start by making the tunnel onboarding process more transparent for users. We understand that not all users are intimately familiar with the command line nor are they deploying tunnel in an environment or OS they’re most comfortable with. To alleviate that burden, we designed a comprehensive onboarding guide with pathways for MacOS, Windows, and Linux for our two primary onboarding flows:

  1. Connecting an origin to Cloudflare
  2. Connecting a private network via WARP to Tunnel

Our new onboarding guide walks through each command required to create, route, and run your tunnel successfully while also highlighting relevant validation commands to serve as guardrails along the way. Once completed, you’ll be able to view and manage your newly established tunnels.

Managing your tunnels

Tunnel: Cloudflare’s Newest Homeowner

When thinking about the new user interface for tunnel we wanted to concentrate our efforts on how users gain visibility into their tunnels today. It was important that we provide the same level of observability, but through the lens of a visual, interactive dashboard. Specifically, we strove to build a familiar experience like the one a user may see if they were to run cloudflared tunnel list to show all of their tunnels, or cloudflared tunnel info if they wanted to better understand the connection status of a specific tunnel.

Tunnel: Cloudflare’s Newest Homeowner

In the interface, you can quickly search by name or filter by name, status, uptime, or creation date. This allows users to easily identify and manage the tunnels they need, when they need them. We also included other key metrics such as Status and Uptime.

A tunnel’s status depends on the health of its connections:

  • Active: This means your tunnel is running and has a healthy connection to the Cloudflare network.
  • Inactive: This means your tunnel is not running and is not connected to Cloudflare.
  • Degraded: This means one or more of your four long-lived TCP connections to Cloudflare have been disconnected, but traffic is still being served to your origin.

A tunnel’s uptime is also calculated by the health of its connections. We perform this calculation by determining the UTC timestamp of when the first (of four) long-lived TCP connections is established with the Cloudflare Edge. In the event this single connection is terminated, we will continue tracking uptime as long as one of the other three connections continues to serve traffic. If no connections are active, Uptime will reset to zero.

Tunnel Routes and Connectors

Last year, shortly after the announcement of Named Tunnels, we released a new feature that allowed users to utilize the same Named Tunnel to serve traffic to many different services through the use of Ingress Rules. In the new UI, if you’re running your tunnels in this manner, you’ll be able to see these various services reflected by hovering over the route’s value in the dashboard. Today, this includes routes for DNS records, Load Balancers, and Private IP ranges.

Even more recently, we announced highly available and highly scalable instances of cloudflared, known more commonly as “cloudflared replicas.” To view your cloudflared replicas, select and expand a tunnel. Then you will identify how many cloudflared replicas you’re running for a given tunnel, as well as the corresponding connection status, data center, IP address, and version. And ultimately, when you’re ready to delete a tunnel, you can do so directly from the dashboard as well.

What’s next

Moving forward, we’re excited to begin incorporating more Cloudflare Tunnel analytics into our dashboard. We also want to continue making Cloudflare Tunnel the easiest way to connect to Cloudflare. In order to do that, we will focus on improving our onboarding experience for new users and look forward to bringing more of that functionality into the Teams Dashboard. If you have things you’re interested in having more visibility around in the future, let us know below!

Quick Tunnels: Anytime, Anywhere

Post Syndicated from Rishabh Bector original https://blog.cloudflare.com/quick-tunnels-anytime-anywhere/

Quick Tunnels: Anytime, Anywhere

Quick Tunnels: Anytime, Anywhere

My name is Rishabh Bector, and this summer, I worked as a software engineering intern on the Cloudflare Tunnel team. One of the things I built was quick Tunnels and before departing for the summer, I wanted to write a blog post on how I developed this feature.

Over the years, our engineering team has worked hard to continually improve the underlying architecture through which we serve our Tunnels. However, the core use case has stayed largely the same. Users can implement Tunnel to establish an encrypted connection between their origin server and Cloudflare’s edge.

This connection is initiated by installing a lightweight daemon on your origin, to serve your traffic to the Internet without the need to poke holes in your firewall or create intricate access control lists. Though we’ve always centered around the idea of being a connector to Cloudflare, we’ve also made many enhancements behind the scenes to the way in which our connector operates.

Typically, users run into a few speed bumps before being able to use Cloudflare Tunnel. Before they can create or route a tunnel, users need to authenticate their unique token against a zone on their account. This means in order to simply spin up a Tunnel testing environment, users need to first create an account, add a website, change their nameservers, and wait for DNS propagation.

Starting today, we’re excited to fix that. Cloudflare Tunnel now supports a free version that includes all the latest features and does not require any onboarding to Cloudflare. With today’s change, you can begin experimenting with Tunnel in five minutes or less.

Introducing Quick Tunnels

When administrators start using Cloudflare Tunnel, they need to perform four specific steps:

  1. Create the Tunnel
  2. Configure the Tunnel and what services it will represent
  3. Route traffic to the Tunnel
  4. And finally… run the Tunnel!

These steps give you control over how your services connect to Cloudflare, but they are also a chore. Today’s change, which we are calling quick Tunnels, not only removes some onboarding requirements, we’re also condensing these into a single step.

If you have a service running locally that you want to share with teammates or an audience, you can use this single command to connect your service to Cloudflare’s edge. First, you need to install the Cloudflare connector, a lightweight daemon called cloudflared. Once installed, you can run the command below.

cloudflared tunnel

Quick Tunnels: Anytime, Anywhere

When run, cloudflared will generate a URL that consists of a random subdomain of the website trycloudflare.com and point traffic to localhost port 8080. If you have a web service running at that address, users who visit the subdomain generated will be able to visit your web service through Cloudflare’s network.

Configuring Quick Tunnels

We built this feature with the single command in mind, but if you have services that are running at different default locations, you can optionally configure your quick Tunnel to support that.

One example is if you’re building a multiplayer game that you want to share with friends. If that game is available locally on your origin, or even your laptop, at localhost:3000, you can run the command below.

cloudflared tunnel ---url localhost:3000

You can do this with IP addresses or URLs, as well. Anything that cloudflared can reach can be made available through this service.

How does it work?

Cloudflare quick Tunnels is powered by Cloudflare Workers, giving us a serverless compute deployment that puts Tunnel management in a Cloudflare data center closer to you instead of a centralized location.

When you run the command cloudflared tunnel, your instance of cloudflared initiates an outbound-only connection to Cloudflare. Since that connection was initiated without any account details, we treat it as a quick Tunnel.

A Cloudflare Worker, which we call the quick Tunnel Worker, receives a request that a new quick Tunnel should be created. The Worker generates the random subdomain and returns that to the instance of cloudflared. That instance of cloudflared can now establish a connection for that subdomain.

Meanwhile, a complementary service running on Cloudflare’s edge receives that subdomain and the identification number of the instance of cloudflared. That service uses that information to create a DNS record in Cloudflare’s authoritative DNS which maps the randomly-generated hostname to the specific Tunnel you created.

The deployment also relies on the Workers Cron Trigger feature to perform clean up operations. On a regular interval, the Worker looks for quick Tunnels which have been disconnected for more than five minutes. Our Worker classifies these Tunnels as abandoned and proceeds to delete them and their associated DNS records.

What about Zero Trust policies?

By default, all the quick Tunnels that you create are available on the public Internet at the randomly generated URL. While this might be fine for some projects and tests, other use cases require more security.

Quick Tunnels: Anytime, Anywhere

If you need to add additional Zero Trust rules to control who can reach your services, you can use Cloudflare Access alongside Cloudflare Tunnel. That use case does require creating a Cloudflare account and adding a zone to Cloudflare, but we’re working on ideas to make that easier too.

Where should I notice improvements?

We first launched a version of Cloudflare Tunnel that did not require accounts over two years ago. While we’ve been thrilled that customers have used this for their projects, Cloudflare Tunnel evolved significantly since then. Specifically, Cloudflare Tunnel relies on a new architecture that is more redundant and stable than the one used by that older launch. While all Tunnels that migrated to this new architecture, which we call Named Tunnels, enjoyed those benefits, the users on this option that did not require an account were left behind.

Today’s announcement brings that stability to quick Tunnels. Tunnels are now designed to be long-lived, persistent objects. Unless you delete them, Tunnels can live for months, an improvement over the average lifespan measured in hours before connectivity issues disrupted a Tunnel in the older architecture.

These quick Tunnels run on this same, resilient architecture not only expediting time-to-value, but also improving the overall tunnel quality of life.

What’s next?

Today’s quick Tunnels add a powerful feature to Cloudflare Tunnels: the ability to create a reliable, resilient tunnel in a single command, without the hassle of creating an account first. We’re excited to help your team build and connect services to Cloudflare’s network and on to your audience or teammates. If you have additional questions, please share them in this community post here.

Building a Pet Cam using a Raspberry Pi, Cloudflare Tunnels and Teams

Post Syndicated from Mohak Kataria original https://blog.cloudflare.com/building-a-pet-cam-using-a-raspberry-pi-cloudflare-tunnels-and-teams/

Building a Pet Cam using a Raspberry Pi, Cloudflare Tunnels and Teams

Building a Pet Cam using a Raspberry Pi, Cloudflare Tunnels and Teams

I adopted Ziggy in late 2020. It took me quite a while to get used to his routine and mix it with mine. He consistently jumped on the kitchen counter in search of food, albeit only when no one was around. And I only found out when he tossed the ceramic butter box. It shattered and made a loud bang in the late hours of the night. Thankfully, no one was asleep yet.

This got me thinking that I should keep an eye on his mischievous behaviour, even when I’m not physically at home. I briefly considered buying a pet cam, but I remembered I had bought a Raspberry Pi a few months before. It was hardly being used, and it had a case (like this) allowing a camera module to be added. I hadn’t found a use for the camera module — until now.

This was a perfect weekend project: I would set up my own pet cam, connect it to the Internet, and make it available for me to check from anywhere in the world. I also wanted to ensure that only I could access it and that it had some easy way to login, possibly using my Google account. The solution? Cloudflare Tunnel and Teams. Cloudflare would help me expose a service running in an internal network using Tunnel while providing a security solution on top of it to keep it secure. Teams on the other hand, would help me by adding access control in the form of Google authentication.

Building a Pet Cam using a Raspberry Pi, Cloudflare Tunnels and Teams

So all I am left to do is configure my Raspberry Pi to be able to run a camera as a web service. That weekend, I started researching for it and made a list of things I needed:

  • A Raspberry Pi with a compatible camera module. I used a Raspberry Pi 4 model B with camera module v2.
  • Linux knowledge.
  • A domain name I could make changes to.
  • Understanding of how DNS works.
  • A Cloudflare account with Cloudflare for Teams+Tunnel access.
  • Internet connection.

In this blog post, I’ll walk you through the process I followed to set everything up for the pet cam. To keep things simple and succinct, I will not cover how to set up your Raspberry Pi, but you should make sure it has Internet access and that you can run shell commands on it, either via SSH or using a VNC connection.

Setup

The first thing we need to do is connect the camera module to the Raspberry Pi. For more detailed instructions, follow the official guide, steps 1 to 3.

Building a Pet Cam using a Raspberry Pi, Cloudflare Tunnels and Teams

After setting up the camera and testing that it works, we need to set it up as a camera with a web server. This is so we can access it at a URL such as https://192.168.0.2:8080 within the local network, to which the Raspberry Pi is also connected. To do that, we will use Motion, a program for setting up the camera module v2 as a web server.

To install Motion, input these commands:

$ sudo apt-get update && sudo apt-get upgrade
$ sudo apt install autoconf automake build-essential pkgconf libtool git libzip-dev libjpeg-dev gettext libmicrohttpd-dev libavformat-dev libavcodec-dev libavutil-dev libswscale-dev libavdevice-dev default-libmysqlclient-dev libpq-dev libsqlite3-dev libwebp-dev
$ sudo wget https://github.com/Motion-Project/motion/releases/download/release-4.3.1/pi_buster_motion_4.3.1-1_armhf.deb
$ sudo dpkg -i pi_buster_motion_4.3.1-1_armhf.deb

The above commands will update the local packages with new versions from the repositories and then install that version of Motion from Motion’s GitHub project.

Next, we need to configure Motion using:

$ sudo vim /etc/motion/motion.conf
# Find the following lines and update them to following:
# daemon on
# stream_localhost off
# save and exit

After that, we need to set Motion up as a daemon, so it runs whenever the system is restarted:

$ sudo vim /etc/default/motion
# and change the following line 
# start_motion_daemon=yes
# save and exit and run the next command
$ sudo service motion start

Great. Now that we have Motion set up, we can see the live feed from our camera in a browser on Raspberry Pi module at the default URL: http://localhost:8081 (the port can be changed in the config edit step above). Alternatively, we can open it on another machine within the same network by replacing 0.0.0.0 with the IP of the Raspberry Pi in the network.

For now, the camera web server is available only within our local network. However, I wanted to keep an eye on Ziggy no matter where I am, as long as I have Internet access and a browser. This is perfect for Cloudflare Tunnel. An alternative would be to open a port in the firewall on the router in my home network, but I hate that idea of having to mess with the router configuration. I am not really an expert at that, and if I leave a backdoor open to my internal network, it can get scary quickly!

The Cloudflare Tunnel documentation takes us through its installation. The only issue is that the architecture of the Raspberry Pi is based on armv7l (32-bit) and there is no package for it in the remote repositories. We could build cloudflared from source if we wanted as it’s an open source project, but an easier route is to wget it.

$ wget https://bin.equinox.io/c/VdrWdbjqyF/cloudflared-stable-linux-arm.tgz
# a quick check of version shall confirm if it installed correctly
$ cloudflared -v 
cloudflared version 2021.5.10 (built 2021-05-26-1355 UTC)

Let’s set up our Tunnel now:

$ cloudflared tunnel create camera
Tunnel credentials written to /home/pi/.cloudflared/5f8182ba-906c-4910-98c3-7d042bda0594.json. cloudflared chose this file based on where your origin certificate was found. Keep this file secret. To revoke these credentials, delete the tunnel.

Created tunnel camera with id 5f8182ba-906c-4910-98c3-7d042bda0594

Now we need to configure the Tunnel to forward the traffic to the Motion webcam server:

$ vim /home/pi/.cloudflared/config.yaml 
# And add the following.
tunnel: 5f8182ba-906c-4910-98c3-7d042bda0594
credentials-file: /home/pi/.cloudflared/5f8182ba-906c-4910-98c3-7d042bda0594.json 

ingress:
  - hostname: camera.imohak.com
    service: http://0.0.0.0:9095
  - service: http_status:404

The Tunnel uuid should be the one created with the command above and so should the path of the credential file. The ingress should have the domain we want to use. In my case I have set up camera.imohak.com as my domain and 404 as the fallback rule.

Next, we need to route the DNS to this Tunnel:

$ cloudflared tunnel route dns 5f8182ba-906c-4910-98c3-7d042bda0594 camera.imohak.com

This adds a DNS CNAME record, which can be verified from the Cloudflare dashboard as shown here:

Building a Pet Cam using a Raspberry Pi, Cloudflare Tunnels and Teams

Let’s test the Tunnel!

$ cloudflared tunnel run camera
2021-06-15T21:44:41Z INF Starting tunnel tunnelID=5f8182ba-906c-4910-98c3-7d042bda0594
2021-06-15T21:44:41Z INF Version 2021.5.10
2021-06-15T21:44:41Z INF GOOS: linux, GOVersion: go1.16.3, GoArch: arm
2021-06-15T21:44:41Z INF Settings: map[cred-file:/home/pi/.cloudflared/5f8182ba-906c-4910-98c3-7d042bda0594.json credentials-file:/home/pi/.cloudflared/5f8182ba-906c-4910-98c3-7d042bda0594.json]
2021-06-15T21:44:41Z INF cloudflared will not automatically update when run from the shell. To enable auto-updates, run cloudflared as a service: https://developers.cloudflare.com/argo-tunnel/reference/service/
2021-06-15T21:44:41Z INF Generated Connector ID: 7e38566e-0d33-426d-b64d-326d0592486a
2021-06-15T21:44:41Z INF Initial protocol http2
2021-06-15T21:44:41Z INF Starting metrics server on 127.0.0.1:43327/metrics
2021-06-15T21:44:42Z INF Connection 6e7e0168-22a4-4804-968d-0674e4c3b4b1 registered connIndex=0 location=DUB
2021-06-15T21:44:43Z INF Connection fc83017d-46f9-4cee-8fc6-e4ee75c973f5 registered connIndex=1 location=LHR
2021-06-15T21:44:44Z INF Connection 62d28eee-3a1e-46ef-a4ba-050ae6e80aba registered connIndex=2 location=DUB
2021-06-15T21:44:44Z INF Connection 564164b1-7d8b-4c83-a920-79b279659491 registered connIndex=3 location=LHR

Next, we go to the browser and open the URL camera.imohak.com.

Voilà. Or, not quite yet.

Locking it Down

We still haven’t put any requirement for authentication on top of the server. Right now, anyone who knows about the domain can just open it and look at what is happening inside my house. Frightening, right? Thankfully we have two options now:

Building a Pet Cam using a Raspberry Pi, Cloudflare Tunnels and Teams
  1. Use Motion’s inbuilt authentication mechanisms. However, we shall not choose this option as it’s just another username/password to remember which one can easily forget and who knows if in the future, there is a vulnerability found in the way motion authenticates and my credentials are leaked? We are looking for an SSO using Google which is easy and quick to use and gives us a secure login based on google credentials.
  2. Use Cloudflare Access. Access gives us the ability to create policies based on IP addresses and email addresses, and it lets us integrate different types of authentication methods, such as OTP or Google. In our case, we require authentication through Google.

To take advantage of this Cloudflare Access functionality, the first step is to set up Cloudflare for Teams. Visit https://dash.teams.cloudflare.com/, follow the setup guide and choose a team name(imohak in my case).

Building a Pet Cam using a Raspberry Pi, Cloudflare Tunnels and Teams

After this, we have two things left to do: add a login method and add an application. Let’s cover how we add a login method first. Navigate to Configuration > Authentication and click on +Add, under the Login tab. The Dashboard will show us a list of identity providers to choose from. Select Google — follow this guide for a walkthrough of how to set up a Google Cloud application, get a ClientID and Client Secret, and use them to configure the identity provider in Teams.

After adding a login method and testing it, we should see a confirmation page like this:

Building a Pet Cam using a Raspberry Pi, Cloudflare Tunnels and Teams

The last thing we need to do is to add the pet-cam subdomain as an application protected behind Teams. This enables us to enforce the Google authentication requirement we have configured before. To do that, navigate to Access > Applications, click on Add an application, and select Self-hosted.

On the next page, we specify a name, session duration and also the URL at which the application should be accessible. We add the subdomain camera.imohak.com and also name the app ‘camera’ to keep it simple.

Building a Pet Cam using a Raspberry Pi, Cloudflare Tunnels and Teams

Next, we select Google as an identity provider for this application. Given that we are not choosing multiple authentication methods, I can also enable Instant Auth — this means we don’t need to select Google when we open the URL.

Building a Pet Cam using a Raspberry Pi, Cloudflare Tunnels and Teams

Now we add policies to the application. Here, we add an email check so that after the Google authentication, a check is made to ensure the specified email address is the only one who is able to access the URL. If needed, we can choose to configure other, more complex rules. At this point, we click on Next and finish the setup.

Building a Pet Cam using a Raspberry Pi, Cloudflare Tunnels and Teams

The Result

The setup is now complete. Time to test everything! After opening the browser and entering my URL, voilà. Now, when I visit this URL, I see a Google authentication page and, after logging in, Ziggy eating his dinner.

Building a Pet Cam using a Raspberry Pi, Cloudflare Tunnels and Teams

Modernizing a familiar approach to REST APIs, with PostgreSQL and Cloudflare Workers

Post Syndicated from Kristian Freeman original https://blog.cloudflare.com/modernizing-a-familiar-approach-to-rest-apis-with-postgresql-and-cloudflare-workers/

Modernizing a familiar approach to REST APIs, with PostgreSQL and Cloudflare Workers

Postgres is a ubiquitous open-source database technology. It contains a vast number of features and offers rock-solid reliability. It’s also one of the most popular SQL database tools in the industry. As the industry builds “modern” developer experience tools—real-time and highly interactive—Postgres has also served as a great foundation. Projects like Hasura, which offers a real-time GraphQL engine, and Supabase, an open-source Firebase alternative, use Postgres under the hood. This makes Postgres a technology that every developer should know, and consider using in their applications.

For many developers, REST APIs serve as the primary way we interact with our data. Language-specific libraries like pg allow developers to connect with Postgres in their code, and directly interact with their databases. Yet in almost every case, developers reinvent the wheel, building the same connection logic on an app-by-app basis.

Many developers building applications with Cloudflare Workers, our serverless functions platform, have asked how they can use Postgres in Workers functions. Today, we’re releasing a new tutorial for Workers that shows how to connect to Postgres inside Workers functions. Built on PostgREST, you’ll write a REST API that communicates directly with your database, on the edge.

This means that you can entirely build applications on Cloudflare’s edge — using Workers as a performant and globally-distributed API, and Cloudflare Pages, our Jamstack deployment platform, as the host for your frontend user interface. With Workers, you can add new API endpoints and handle authentication in front of your database without needing to alter your Postgres configuration. With features like Workers KV and Durable Objects, Workers can provide globally-distributed caching in front of your Postgres database. Features like WebSockets can be used to build real-time interactions for your applications, without having to migrate from Postgres to a new database-as-a-service platform.

PostgREST is an open-source tool that generates a standards-compliant REST API for your Postgres databases. Many growing database-as-a-service startups like Retool and Supabase use PostgREST under the hood. PostgREST is fast and has great defaults, allowing you to access your Postgres data using standard REST conventions.

It’s great to be able to access your database directly from Workers, but do you really want to expose your database directly to the public Internet? Luckily, Cloudflare has a solution for this, and it works great with PostgREST: Cloudflare Tunnel. Cloudflare Tunnel is one of my personal favorite products at Cloudflare. It creates a secure tunnel between your local server and the Cloudflare network. We want to expose our PostgREST endpoint, without making our entire database available on the public internet. Cloudflare Tunnel allows us to do that securely.

Modernizing a familiar approach to REST APIs, with PostgreSQL and Cloudflare Workers

By using PostgREST with Postgres, we can build REST API-based applications. In particular, it’s an excellent fit for Cloudflare Workers, our serverless function platform. Workers is a great place to build REST APIs. With the open-source JavaScript library postgrest-js, we can interact with a PostgREST endpoint from inside our Workers function, using simple JS-based primitives.

By the way — if you haven’t built a REST API with Workers yet, check out our free video course with Egghead: “Building a Serverless API with Cloudflare Workers”.

Scaling applications built on Postgres is an incredibly common problem that developers face. Often, this means duplicating your Postgres database and distributing reads between your primary database, and a fleet of “read replicas”. With PostgREST and Workers, we can begin to explore a different approach to solving the scaling problem. Workers’ unique architecture allows us to deploy hyper-performant functions in front of Postgres databases. With tools like Workers KV and Durable Objects, exposed in Workers as basic JavaScript APIs, we can build intelligent caches for our databases, without sacrificing performance or developer experience.

If you’d like to learn more about building REST APIs in Cloudflare Workers using PostgREST, check out our new tutorial! We’ve also provided two open-source libraries to help you get started. cloudflare/postgres-postgrest-cloudflared-example helps you set up a Cloudflare Tunnel-backed Postgres + PostgREST endpoint. postgrest-worker-example is an example of using postgrest-js inside of Cloudflare Workers, to build REST APIs with your Postgres databases.

Modernizing a familiar approach to REST APIs, with PostgreSQL and Cloudflare Workers

With postgrest-js, you can build dynamic queries and request data from your database using the JS primitives you know and love:

// Get all users with at least 100 followers
const { data: users, error } = await client
.from('users')
.select(‘*’)
.gte('followers', 100)

You can also join our Cloudflare Developers Discord community! Learn more about what you can build with Cloudflare Workers, and meet our wonderful community of developers from around the world. Get your invite link here.