Post Syndicated from Jon Handler original https://aws.amazon.com/blogs/security/get-started-with-fine-grained-access-control-in-amazon-elasticsearch-service/
Amazon Elasticsearch Service (Amazon ES) provides fine-grained access control, powered by the Open Distro for Elasticsearch security plugin. The security plugin adds Kibana authentication and access control at the cluster, index, document, and field levels that can help you secure your data. You now have many different ways to configure your Amazon ES domain to provide access control. In this post, I offer basic configuration information to get you started.
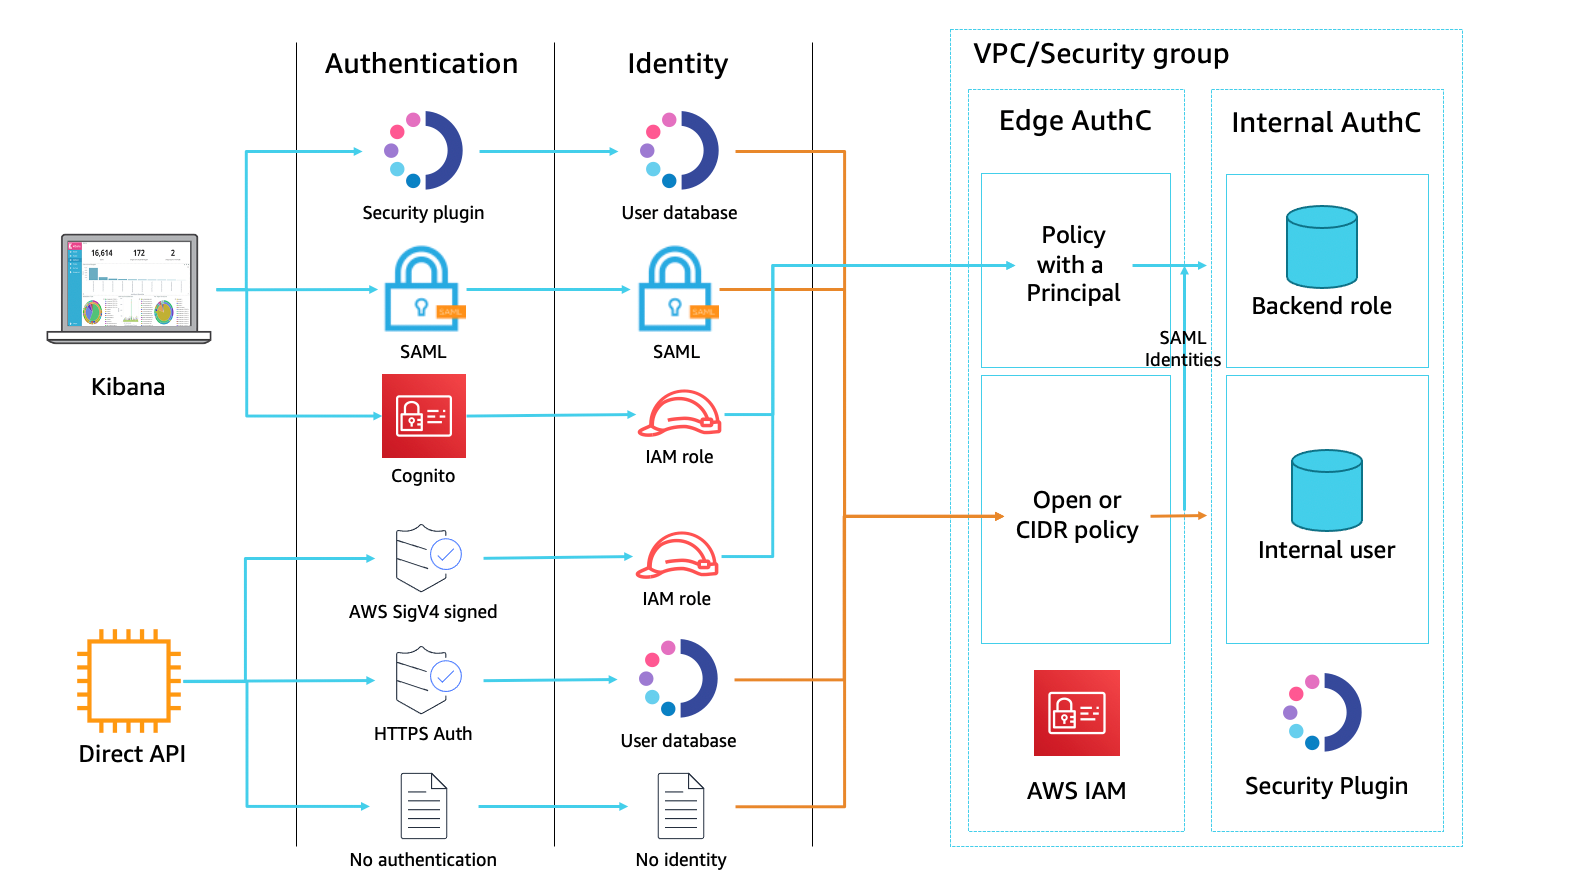
Figure 1: A high-level view of data flow and security
Figure 1 details the authentication and access control provided in Amazon ES. The left half of the diagram details the different methods of authenticating. Looking horizontally, requests originate either from Kibana or directly access the REST API. When using Kibana, you can use a login screen powered by the Open Distro security plugin, your SAML identity provider, or Amazon Cognito. Each of these methods results in an authenticated identity: SAML providers via the response, Amazon Cognito via an AWS Identity and Access Management (IAM) identity, and Open Distro via an internal user identity. When you use the REST API, you can use AWS Signature V4 request signing (SigV4 signing), or user name and password authentication. You can also send unauthenticated traffic, but your domain should be configured to reject all such traffic.
The right side of the diagram details the access control points. You can consider the handling of access control in two phases to better understand it—authentication at the edge by IAM and authentication in the Amazon ES domain by the Open Distro security plugin.
First, requests from Kibana or direct API calls have to reach your domain endpoint. If you follow best practices and the domain is in an Amazon Virtual Private Cloud (VPC), you can use Amazon Elastic Compute Cloud (Amazon EC2) security groups to allow or deny traffic based on the originating IP address or security group of the Amazon EC2 instances. Best practice includes least privilege based on subnet ACLs and security group ingress and egress restrictions. In this post, we assume that your requests are legitimate, meet your access control criteria, and can reach your domain.
When a request reaches the domain endpoint—the edge of your domain—, it can be anonymous or it can carry identity and authentication information as described previously. Each Amazon ES domain carries a resource-based IAM policy. With this policy, you can allow or deny traffic based on an IAM identity attached to the request. When your policy specifies an IAM principal, Amazon ES evaluates the request against the allowed Actions in the policy and allows or denies the request. If you don’t have an IAM identity attached to the request (SAML assertion, or user name and password) you should leave the domain policy open and pass traffic through to fine-grained access control in Amazon ES without any checks. You should employ IAM security best practices and add additional IAM restrictions for direct-to-API access control once your domain is set up.
The Open Distro for Elasticsearch security plugin has its own internal user database for user name and password authentication and handles access control for all users. When traffic reaches the Elasticsearch cluster, the plugin validates any user name and password authentication information against this internal database to identify the user and grant a set of permissions. If a request comes with identity information from either SAML or an IAM role, you map that backend role onto the roles or users that you have created in Open Distro security.
Amazon ES documentation and the Open Distro for Elasticsearch documentation give more information on all of these points. For this post, I walk through a basic console setup for a new domain.
Console set up
The Amazon ES console provides a guided wizard that lets you configure—and reconfigure—your Amazon ES domain. Step 1 offers you the opportunity to select some predefined configurations that carry through the wizard. In step 2, you choose the instances to deploy in your domain. In Step 3, you configure the security. This post focuses on step 3. See also these tutorials that explain using an IAM master user and using an HTTP-authenticated master user.
Note: At the time of writing, you cannot enable fine-grained access control on existing domains; you must create a new domain and enable the feature at domain creation time. You can use fine-grained access control with Elasticsearch versions 6.8 and later.
Set your endpoint
Amazon ES gives you a DNS name that resolves to an IP address that you use to send traffic to the Elasticsearch cluster in the domain. The IP address can be in the IP space of the public internet, or it can resolve to an IP address in your VPC. While—with fine-grained access control—you have the means of securing your cluster even when the endpoint is a public IP address, we recommend using VPC access as the more secure option. Shown in Figure 2.

Figure 2: Select VPC access
With the endpoint in your VPC, you use security groups to control which ports accept traffic and limit access to the endpoints of your Amazon ES domain to IP addresses in your VPC. Make sure to use least privilege when setting up security group access.
Enable fine-grained access control
You should enable fine-grained access control. Shown in Figure 3.
Figure 3: Enabled fine-grained access control
Set up the master user
The master user is the administrator identity for your Amazon ES domain. This user can set up additional users in the Amazon ES security plugin, assign roles to them, and assign permissions for those roles. You can choose user name and password authentication for the master user, or use an IAM identity. User name and password authentication, shown in Figure 4, is simpler to set up and—with a strong password—may provide sufficient security depending on your use case. We recommend you follow your organization’s policy for password length and complexity. If you lose this password, you can return to the domain’s dashboard in the AWS Management Console and reset it. You’ll use these credentials to log in to Kibana. Following best practices on choosing your master user, you should move to an IAM master user once setup is complete.
Note: Password strength is a function of length, complexity of characters (e.g., upper and lower case letters, numbers, and special characters), and unpredictability to decrease the likelihood the password could be guessed or cracked over a period of time.

Figure 4: Setting up the master username and password
Do not enable Amazon Cognito authentication
When you use Kibana, Amazon ES includes a login experience. You currently have three choices for the source of the login screen:
- The Open Distro security plugin
- Amazon Cognito
- Your SAML-compliant system
You can apply fine-grained access control regardless of how you log in. However, setting up fine-grained access control for the master user and additional users is most straightforward if you use the login experience provided by the Open Distro security plugin. After your first login, and when you have set up additional users, you should migrate to either Cognito or SAML for login, taking advantage of the additional security they offer. To use the Open Distro login experience, disable Amazon Cognito authentication, as shown in Figure 5.
Figure 5: Amazon Cognito authentication is not enabled
If you plan to integrate with your SAML identity provider, check the Prepare SAML authentication box. You will complete the set up when the domain is active.

Figure 6: Choose Prepare SAML authentication if you plan to use it
Use an open access policy
When you create your domain, you attach an IAM policy to it that controls whether your traffic must be signed with AWS SigV4 request signing for authentication. Policies that specify an IAM principal require that you use AWS SigV4 signing to authenticate those requests. The domain sends your traffic to IAM, which authenticates signed requests to resolve the user or role that sent the traffic. The domain and IAM apply the policy access controls and either accept the traffic or reject it based on the commands. This is done down to the index level for single-index API calls.
When you use fine-grained access control, your traffic is also authenticated by the Amazon ES security plugin, which makes the IAM authentication redundant. Create an open access policy, as shown in Figure 7, which doesn’t specify a principal and so doesn’t require request signing. This may be acceptable, since you can choose to require an authenticated identity on all traffic. The security plugin authenticates the traffic as above, providing access control based on the internal database.

Figure 7: Selected open access policy
Encrypted data
Amazon ES provides an option to encrypt data in transit and at rest for any domain. When you enable fine-grained access control, you must use encryption with the corresponding checkboxes automatically checked and not changeable. These include Transport Layer Security (TLS) for requests to the domain and for traffic between nodes in the domain, and encryption of data at rest through AWS Key Management Service (KMS). Shown in Figure 8.
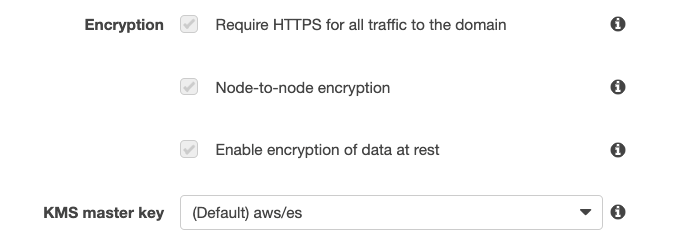
Figure 8: Enabled encryption
Accessing Kibana
When you complete the domain creation wizard, it takes about 10 minutes for your domain to activate. Return to the console and the Overview tab of your Amazon ES dashboard. When the Domain Status is Active, select the Kibana URL. Since you created your domain in your VPC, you must be able to access the Kibana endpoint via proxy, VPN, SSH tunnel, or similar. Use the master user name and password that you configured earlier to log in to Kibana, as shown in Figure 9. As detailed above, you should only ever log in as the master user to set up additional users—administrators, users with read-only access, and others.

Figure 9: Kibana login page
Conclusion
Congratulations, you now know the basic steps to set up the minimum configuration to access your Amazon ES domain with a master user. You can examine the settings for fine-grained access control in the Kibana console Security tab. Here, you can add additional users, assign permissions, map IAM users to security roles, and set up your Kibana tenancy. We’ll cover those topics in future posts.
If you have feedback about this post, submit comments in the Comments section below. If you have questions about this post, start a new thread on the Amazon Elasticsearch Service forum or contact AWS Support.
Want more AWS Security how-to content, news, and feature announcements? Follow us on Twitter.