Post Syndicated from Rob Sutter original https://aws.amazon.com/blogs/compute/optimizing-lambda-functions-packaged-as-container-images/
AWS Lambda launched support for packaging and deploying functions as container images at re:Invent 2020. In this post you learn how to build container images that reduce image size as well as build, deployment, and update time. Lambda container images have unique characteristics to consider for optimization. This means that the techniques you use to optimize container images for Lambda functions are slightly different from those you use for other environments.
To understand how to optimize container images, it helps to understand how container images are packaged, as well as how the Lambda service retrieves, caches, deploys, and retires container images.
Pre-requisites and assumptions
This post assumes you have access to an IAM user or role in an AWS account and a version of the tar utility on your machine. You must also install Docker and the AWS SAM CLI and start Docker.
Lambda container image packaging
Lambda container images are packaged according to the Open Container Initiative (OCI) Image Format specification. The specification defines how programs build and package individual layers into a single container image. To explore an example of the OCI Image Format, open a terminal and perform the following steps:
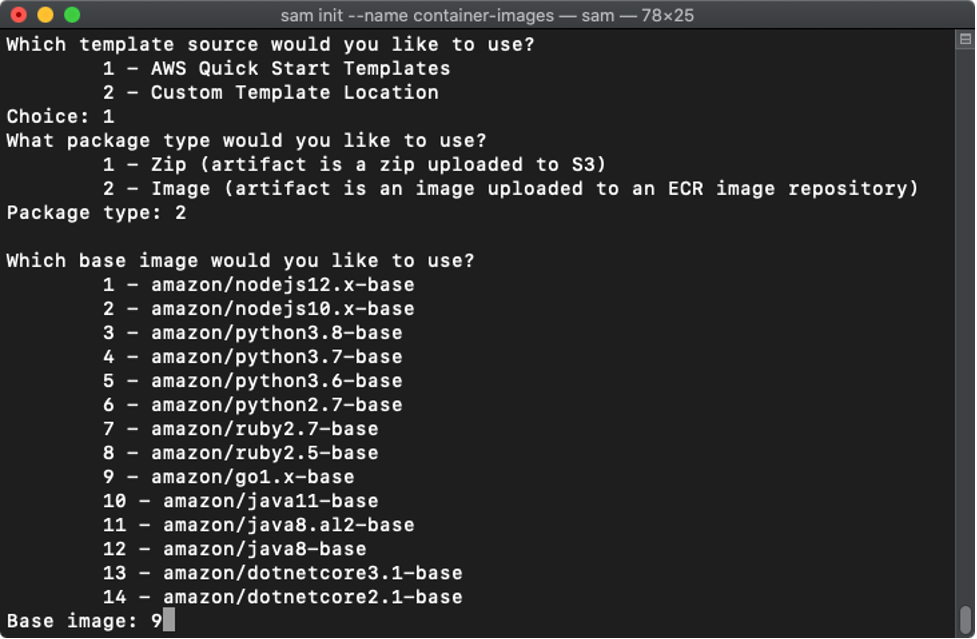
- Create an AWS SAM application.
sam init –name container-images - Choose 1 to select an AWS quick start template, then choose 2 to select container image as the packaging format, and finally choose 9 to use the amazon-go1.x-base image.

- After the AWS SAM CLI generates the application, enter the following commands to change into the new directory and build the Lambda container image
cd container-images sam build - AWS SAM builds your function and packages it as helloworldfunction:go1.x-v1. Export this container image to a tar archive and extract the filesystem into a new directory to explore the image format.
docker save helloworldfunction:go1.x-v1 > oci-image.tar
mkdir -p image
tar xf oci-image.tar -C image
The image directory contains several subdirectories, a container metadata JSON file, a manifest JSON file, and a repositories JSON file. Each subdirectory represents a single layer, and contains a version file, its own metadata JSON file, and a tar archive of the files that make up the layer.
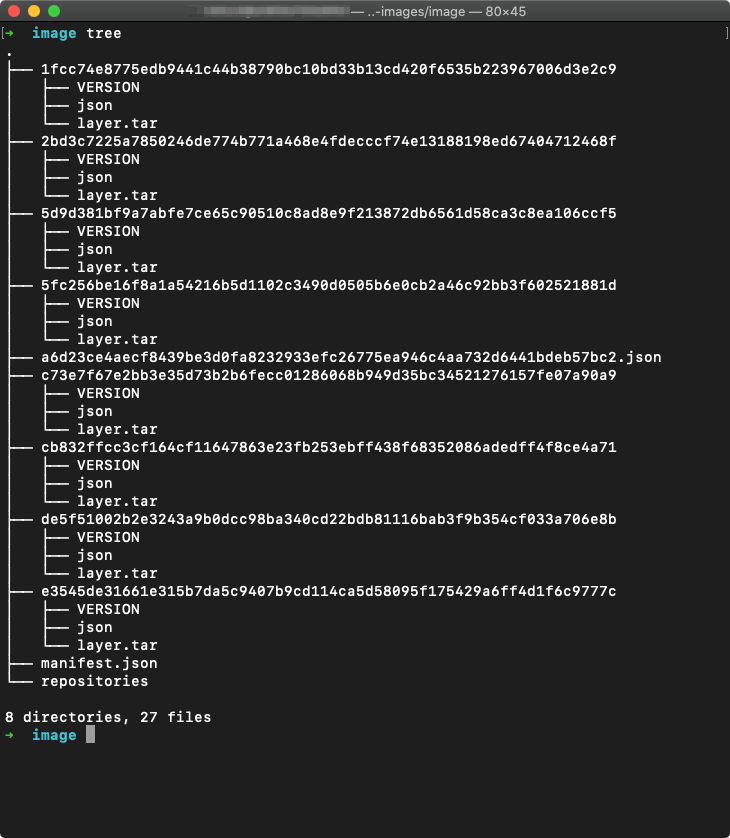
The manifest.json file contains a single JSON object with the name of the container metadata file, a list of repository tags, and a list of included layers. The list of included layers is ordered according to the build order in your Dockerfile. The metadata JSON file in each subfolder also contains a mapping from each layer to its parent layer or final container.
Your function should have layers similar to the following. A separate layer is created any time files are added to the container image. This includes FROM, RUN, ADD, and COPY statements in your Dockerfile and base image Dockerfiles. Note that the specific layer IDs, layer sizes, number, and composition of layers may change over time.
| ID | Size | Description | Your function’s Dockerfile step |
5fc256be… |
641 MB | Amazon Linux | |
c73e7f67… |
320 KB | Third-party licenses | |
de5f5100… |
12 KB | Lambda entrypoint script | |
2bd3c722… |
7.8 MB | AWS Lambda RIE | |
5d9d381b… |
10.0 MB | AWS Lambda runtime | |
cb832ffc… |
12 KB | Bootstrap link | |
1fcc74e8… |
560 KB | Lambda runtime library | FROM public.ecr.aws/lambda/go:1 |
acb8dall… |
9.6 MB | Function code | COPY –from=build-image /go/bin/ /var/task/ |
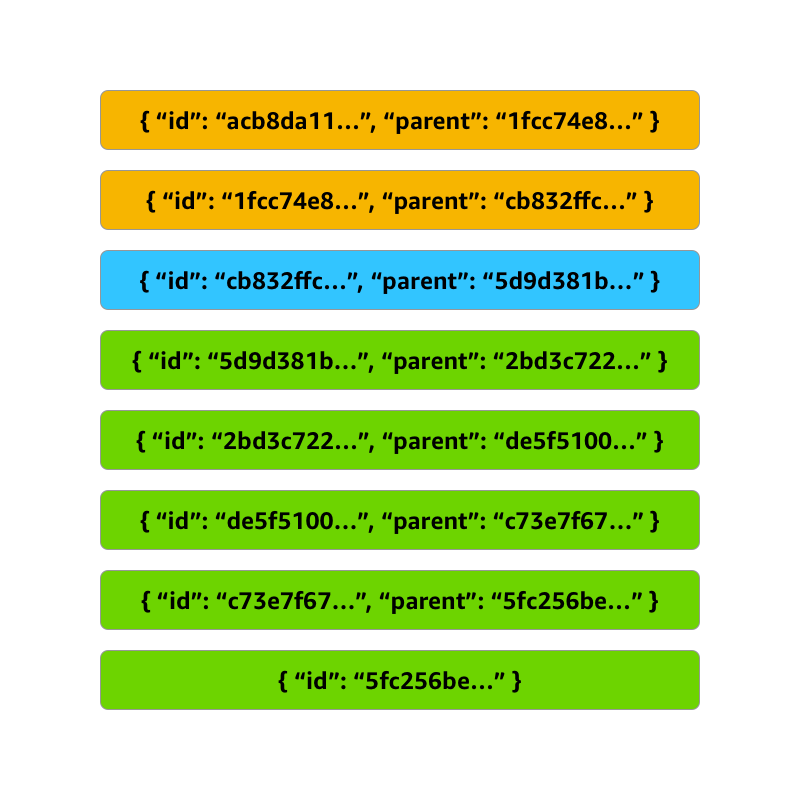
Runtimes generate a filesystem image by destructively overlaying each image layer over its parent. This means that any changes to one layer require all child layers to be recreated. In the following example, if you change the layer cb832ffc... then the layers 1fcc74e8… and acb8da111… are also considered “dirty” and must be recreated from the new parent image. This results in a new container image with eight layers, the first five the same as the original image, and the last three newly built, each with new IDs and parents.
The layered structure of container images informs several decisions you make when optimizing your container images.
Strategies for optimizing container images
There are four main strategies for optimizing your container images. First, wherever possible, use the AWS-provided base images as a starting point for your container images. Second, use multi-stage builds to avoid adding unnecessary layers and files to your final image. Third, order the operations in your Dockerfile from most stable to most frequently changing. Fourth, if your application uses one or more large layers across all of your functions, store all of your functions in a single repository.
Use AWS-provided base images
If you have experience packaging traditional applications for container runtimes, using AWS-provided base images may seem counterintuitive. The AWS-provided base images are typically larger than other minimal container base images. For example, the AWS-provided base image for the Go runtime public.ecr.aws/lambda/go:1 is 670 MB, while alpine:latest, a popular starting point for building minimal container images, is only 5.58 MB. However, using the AWS-provided base images offers three advantages.
First, the AWS-provided base images are cached pro-actively by the Lambda service. This means that the base image is either nearby in another upstream cache or already in the worker instance cache. Despite being much larger, the deployment time may still be shorter when compared to third-party base images, which may not be cached. For additional details on how the Lambda service caches container images, see the re:Invent 2021 talk Deep dive into AWS Lambda security: Function isolation.
Second, the AWS-provided base images are stable. As the base image is at the bottom layer of the container image, any changes require every other layer to be rebuilt and redeployed. Fewer changes to your base image mean fewer rebuilds and redeployments, which can reduce build cost.
Finally, the AWS-provided base images are built on Amazon Linux and Amazon Linux 2. Depending on your chosen runtime, they may already contain a number of utilities and libraries that your functions may need. This means that you do not need to add them in later, saving you from creating additional layers that can cause more build steps leading to increased costs.
Use multi-stage builds
Multi-stage builds allow you to build your code in larger preliminary images, copy only the artifacts you need into your final container image, and discard the preliminary build steps. This means you can run any arbitrarily large number of commands and add or copy files into the intermediate image, but still only create one additional layer in your container image for the artifact. This reduces both the final size and the attack surface of your container image by excluding build-time dependencies from your runtime image.
AWS SAM CLI generates Dockerfiles that use multi-stage builds.
FROM golang:1.14 as build-image
WORKDIR /go/src
COPY go.mod main.go ./
RUN go build -o ../bin

FROM public.ecr.aws/lambda/go:1
COPY --from=build-image /go/bin/ /var/task/

# Command can be overwritten by providing a different command in the template directly.
CMD ["hello-world"]
This Dockerfile defines a two-stage build. First, it pulls the golang:1.14 container image and names it build-image. Naming intermediate stages is optional, but it makes it easier to refer to previous stages when packaging your final container image. Note that the golang:1.14 image is 810 MB, is not likely to be cached by the Lambda service, and contains a number of build tools that you should not include in your production images. The build-image stage then builds your function and saves it in /go/bin.
The second and final stage begins from the public.ecr.aws/lambda/go:1 base image. This image is 670 MB, but because it is an AWS-provided image, it is more likely to be cached on worker instances. The COPY command copies the contents of /go/bin from the build-image stage into /var/task in the container image, and discards the intermediate stage.
Build from stable to frequently changing
Any time a layer in an image changes, all layers that follow must be rebuilt, repackaged, redeployed, and recached by the Lambda service. In practice, this means that you should make your most frequently occurring changes as late in your Dockerfile as possible.
For example, if you have a stable Lambda function that uses a frequently updated machine learning model to make predictions, add your function to the container image before adding the machine learning model. However, if you have a function that changes frequently but relies on a stable Lambda extension, copy the extension into the image first.
If you put the frequently changing component early in your Dockerfile, all the build steps that follow must be re-run every time that component changes. If one of those actions is costly, for example, compiling a large library or running a complex simulation, these repetitions add unnecessary time and cost to your deployment pipeline.
Use a single repository for functions with large layers
When you create an application with multiple Lambda functions, you either store the container images in a single Amazon ECR repository or in multiple repositories, one for each function. If your application uses one or more large layers across all of your functions, store all of your functions in a single repository.
ECR repositories compare each layer of a container image when it is pushed to avoid uploading and storing duplicates. If each function in your application uses the same large layer, such as a custom runtime or machine learning model, that layer is stored exactly once in a shared repository. If you use a separate repository for each function, that layer is duplicated across repositories and must be uploaded separately to each one. This costs you time and network bandwidth.
Conclusion
Packaging your Lambda functions as container images enables you to use familiar tooling and take advantage of larger deployment limits. In this post you learn how to build container images that reduce image size as well as build, deployment, and update time. You learn some of the unique characteristics of Lambda container images that impact optimization. Finally, you learn how to think differently about image optimization for Lambda functions when compared to packaging traditional applications for container runtimes.
For more information on how to build serverless applications, including source code, blogs, videos, and more, visit the Serverless Land website.