Tag Archives: Git

Highlights from Git 2.35

Post Syndicated from Taylor Blau original https://github.blog/2022-01-24-highlights-from-git-2-35/

The open source Git project just released Git 2.35, with features and bug fixes from over 93 contributors, 35 of them new. We last caught up with you on the latest in Git back when 2.34 was released. To celebrate this most recent release, here’s GitHub’s look at some of the most interesting features and changes introduced since last time.

  • When working on a complicated change, it can be useful to temporarily discard parts of your work in order to deal with them separately. To do this, we use the git stash tool, which stores away any changes to files tracked in your Git repository.

    Using git stash this way makes it really easy to store all accumulated changes for later use. But what if you only want to store part of your changes in the stash? You could use git stash -p and interactively select hunks to stash or keep. But what if you already did that via an earlier git add -p? Perhaps when you started, you thought you were ready to commit something, but by the time you finished staging everything, you realized that you actually needed to stash it all away and work on something else.

    git stash‘s new --staged mode makes it easy to stash away what you already have in the staging area, and nothing else. You can think of it like git commit (which only writes staged changes), but instead of creating a new commit, it writes a new entry to the stash. Then, when you’re ready, you can recover your changes (with git stash pop) and keep working.

    [source]

  • git log has a rich set of --format options that you can use to customize the output of git log. These can be handy when sprucing up your terminal, but they are especially useful for making it easier to script around the output of git log.

    In our blog post covering Git 2.33, we talked about a new --format specifier called %(describe). This made it possible to include the output of git describe alongside the output of git log. When it was first released, you could pass additional options down through the %(describe) specifier, like matching or excluding certain tags by writing --format=%(describe:match=<foo>,exclude=<bar>).

    In 2.35, Git includes a couple of new ways to tweak the output of git describe. You can now control whether to use lightweight tags, and how many hexadecimal characters to use when abbreviating an object identifier.

    You can try these out with %(describe:tags=<bool>) and %(describe:abbrev=<n>), respectively. Here’s a goofy example that gives me the git describe output for the last 8 commits in my copy of git.git, using only non-release-candidate tags, and uses 13 characters to abbreviate their hashes:

    $ git log -8 --format='%(describe:exclude=*-rc*,abbrev=13)'
    v2.34.1-646-gaf4e5f569bc89
    v2.34.1-644-g0330edb239c24
    v2.33.1-641-g15f002812f858
    v2.34.1-643-g2b95d94b056ab
    v2.34.1-642-gb56bd95bbc8f7
    v2.34.1-203-gffb9f2980902d
    v2.34.1-640-gdf3c41adeb212
    v2.34.1-639-g36b65715a4132
    

    Which is much cleaner than this alternative way to combine git log and git describe:

    $ git log -8 --format='%H' | xargs git describe --exclude='*-rc*' --abbrev=13
    

    [source]

  • In our last post, we talked about SSH signing: a new feature in Git that allows you to use the SSH key you likely already have in order to sign certain kinds of objects in Git.

    This release includes a couple of new additions to SSH signing. Suppose you use SSH keys to sign objects in a project you work on. To track which SSH keys you trust, you use the allowed signers file to store the identities and public keys of signers you trust.

    Now suppose that one of your collaborators rotates their key. What do you do? You could update their entry in the allowed signers file to point at their new key, but that would make it impossible to validate objects signed with the older key. You could store both keys, but that would mean that you would accept new objects signed with the old key.

    Git 2.35 lets you take advantage of OpenSSH’s valid-before and valid-after directives by making sure that the object you’re verifying was signed using a signature that was valid when it was created. This allows individuals to rotate their SSH keys by keeping track of when each key was valid without invalidating any objects previously signed using an older key.

    Git 2.35 also supports new key types in the user.signingKey configuration when you include the key verbatim (instead of storing the path of a file that contains the signing key). Previously, the rule for interpreting user.signingKey was to treat its value as a literal SSH key if it began with “ssh-“, and to treat it as filepath otherwise. You can now specify literal SSH keys with keytypes that don’t begin with “ssh-” (like ECDSA keys).

    [source, source]

  • If you’ve ever dealt with a merge conflict, you know that accurately resolving conflicts takes some careful thinking. You may not have heard of Git’s merge.conflictStyle setting, which makes resolving conflicts just a little bit easier.

    The default value for this configuration is “merge”, which produces the merge conflict markers that you are likely familiar with. But there is a different mode, “diff3”, which shows the merge base in addition to the changes on either side.

    Git 2.35 introduces a new mode, “zdiff3”, which zealously moves any lines in common at the beginning or end of a conflict outside of the conflicted area, which makes the conflict you have to resolve a little bit smaller.

    For example, say I have a list with a placeholder comment, and I merge two branches that each add different content to fill in the placeholder. The usual merge conflict might look something like this:

    1,
    foo,
    bar,
    <<<<<<< HEAD
    =======
    quux,
    woot,
    >>>>>>> side
    baz,
    3,
    

    Trying again with diff3-style conflict markers shows me the merge base (revealing a comment that I didn’t know was previously there) along with the full contents of either side, like so:

    1,
    <<<<<<< HEAD
    foo,
    bar,
    baz,
    ||||||| 60c6bd0
    # add more here
    =======
    foo,
    bar,
    quux,
    woot,
    baz,
    >>>>>>> side
    3,
    

    The above gives us more detail, but notice that both sides add “foo” and, “bar” at the beginning and “baz” at the end. Trying one last time with zdiff3-style conflict markers moves the “foo” and “bar” outside of the conflicted region altogether. The result is both more accurate (since it includes the merge base) and more concise (since it handles redundant parts of the conflict for us).

    1,
    foo,
    bar,
    <<<<<<< HEAD
    ||||||| 60c6bd0
    # add more here
    =======
    quux,
    woot,
    >>>>>>> side
    baz,
    3,
    

    [source]

  • You may (or may not!) know that Git supports a handful of different algorithms for generating a diff. The usual algorithm (and the one you are likely already familiar with) is the Myers diff algorithm. Another is the --patience diff algorithm and its cousin --histogram. These can often lead to more human-readable diffs (for example, by avoiding a common issue where adding a new function starts the diff by adding a closing brace to the function immediately preceding the new one).

    In Git 2.35, --histogram got a nice performance boost, which should make it faster in many cases. The details are too complicated to include in full here, but you can check out the reference below and see all of the improvements and juicy performance numbers.

    [source]

  • If you’re a fan of performance improvements (and diff options!), here’s another one you might like. You may have heard of git diff‘s --color-moved option (if you haven’t, we talked about it back in our Highlights from Git 2.17). You may not have heard of the related --color-moved-ws, which controls how whitespace is or isn’t ignored when colorizing diffs. You can think of it like the other space-ignoring options (like --ignore-space-at-eol, --ignore-space-change, or --ignore-all-space), but specifically for when you’re running diff in the --color-moved mode.

    Like the above, Git 2.35 also includes a variety of performance improvement for --color-moved-ws. If you haven’t tried --color-moved yet, give it a try! If you already use it in your workflow, it should get faster just by upgrading to Git 2.35.

    [source]

  • Way back in our Highlights from Git 2.19, we talked about how a new feature in git grep allowed the git jump addon to populate your editor with the exact locations of git grep matches.

    In case you aren’t familiar with git jump, here’s a quick refresher. git jump populates Vim’s quickfix list with the locations of merge conflicts, grep matches, or diff hunks (by running git jump merge, git jump grep, or git jump diff, respectively).

    In Git 2.35, git jump merge learned how to narrow the set of merge conflicts using a pathspec. So if you’re working on resolving a big merge conflict, but you only want to work on a specific section, you can run:

    $ git jump merge -- foo
    

    to only focus on conflicts in the foo directory. Alternatively, if you want to skip conflicts in a certain directory, you can use the special negative pathspec like so:

    # Skip any conflicts in the Documentation directory for now.
    $ git jump merge -- ':^Documentation'
    

    [source]

  • You might have heard of Git’s “clean” and “smudge” filters, which allow users to specify how to “clean” files when staging, or “smudge” them when populating the working copy. Git LFS makes extensive use of these filters to represent large files with stand-in “pointers.” Large files are converted to pointers when staging with the clean filter, and then back to large files when populating the working copy with the smudge filter.

    Git has historically used the size_t and unsigned long types relatively interchangeably. This is understandable, since Git was originally written on Linux where these two types have the same width (and therefore, the same representable range of values).

    But on Windows, which uses the LLP64 data model, the unsigned long type is only 4 bytes wide, whereas size_t is 8 bytes wide. Because the clean and smudge filters had previously used unsigned long, this meant that they were unable to process files larger than 4GB in size on platforms conforming to LLP64.

    The effort to standardize on the correct size_t type to represent object length continues in Git 2.35, which makes it possible for filters to handle files larger than 4GB, even on LLP64 platforms like Windows1.

    [source]

  • If you haven’t used Git in a patch-based workflow where patches are emailed back and forth, you may be unaware of the git am command, which extracts patches from a mailbox and applies them to your repository.

    Previously, if you tried to git am an email which did not contain a patch, you would get dropped into a state like this:

    $ git am /path/to/mailbox
    Applying: [...]
    Patch is empty.
    When you have resolved this problem, run "git am --continue".
    If you prefer to skip this patch, run "git am --skip" instead.
    To restore the original branch and stop patching, run "git am --abort".
    

    This can often happen when you save the entire contents of a patch series, including its cover letter (the customary first email in a series, which contains a description of the patches to come but does not itself contain a patch) and try to apply it.

    In Git 2.35, you can specify how git am will behave should it encounter an empty commit with --empty=<stop|drop|keep>. These options instruct am to either halt applying patches entirely, drop any empty patches, or apply them as-is (creating an empty commit, but retaining the log message). If you forgot to specify an --empty behavior but tried to apply an empty patch, you can run git am --allow-empty to apply the current patch as-is and continue.

    [source]

  • Returning readers may remember our discussion of the sparse index, a Git features that improves performance in repositories that use sparse-checkout. The aforementioned link describes the feature in detail, but the high-level gist is that it stores a compacted form of the index that grows along with the size of your checkout rather than the size of your repository.

    In 2.34, the sparse index was integrated into a handful of commands, including git status, git add, and git commit. In 2.35, command support for the sparse index grew to include integrations with git reset, git diff, git blame, git fetch, git pull, and a new mode of git ls-files.

    [source, source, source]

  • Speaking of sparse-checkout, the git sparse-checkout builtin has deprecated the git sparse-checkout init subcommand in favor of using git sparse-checkout set. All of the options that were previously available in the init subcommand are still available in the set subcommand. For example, you can enable cone-mode sparse-checkout and include the directory foo with this command:

    $ git sparse-checkout set --cone foo
    

    [source]

  • Git stores references (such as branches and tags) in your repository in one of two ways: either “loose” as a file inside of .git/refs (like .git/refs/heads/main) or “packed” as an entry inside of the file at .git/packed_refs.

    But for repositories with truly gigantic numbers of references, it can be inefficient to store them all together in a single file. The reftable proposal outlines the alternative way that JGit stores references in a block-oriented fashion. JGit has been using reftable for many years, but Git has not had its own implementation.

    Reftable promises to improve reading and writing performance for repositories with a large number of references. Work has been underway for quite some time to bring an implementation of reftable to Git, and Git 2.35 comes with an initial import of the reftable backend. This new backend isn’t yet integrated with the refs, so you can’t start using reftable just yet, but we’ll keep you posted about any new developments in the future.

    [source]

The rest of the iceberg

That’s just a sample of changes from the latest release. For more, check out the release notes for 2.35, or any previous version in the Git repository.


  1. Note that these patches shipped to Git for Windows via its 2.34 release, so technically this is old news! But we’ll still mention it anyway. 

Highlights from Git 2.34

Post Syndicated from Taylor Blau original https://github.blog/2021-11-15-highlights-from-git-2-34/

The open source Git project just released Git 2.34 with features and bug fixes from over 109 contributors, 29 of them new. We last caught up with you on the latest in Git back when 2.33 was released. To celebrate this most recent release, here’s GitHub’s look at some of the most interesting features and changes introduced since last time.

Sparse index

In the past, we’ve talked about new Git features to make it possible to work with large repositories, like partial clones and sparse-checkout. For a complete description, check out the linked blog posts. But as a refresher, these two features work together to allow you to:

  • Fetch or clone only part of a repository’s objects, and
  • Only populate part of your working copy, typically scoped to a set of
    sub-directories.

This pair of features is designed to create the illusion that you are working in a much smaller repository than you actually are. For instance, if your work takes place in an all-encompassing monorepo, your local copy only needs to contain the parts of the repository that you frequently work in.

But often, this illusion falls short. Why? The answer is the index. The index is the data structure Git uses to track what will be written the next time you run git commit, as well as to track the state of every file in your repository at the current point in history.

As you can imagine, even if you are working in a small corner of a large repository, the index still has to keep track of the repository’s entire contents, not just the parts that you are working in. Unfortunately, that overhead adds up: every time Git needs work with the index, it needs to parse and write out a lot of data that doesn’t affect the parts of your repository outside of your sparse checkout.

That’s changing in this release with the addition of a sparse-enabled index. Unlike the index of previous versions, this release enables the index to only track the parts of your repository that you care about. Specifically, it only contains entries for parts of your repository that are either in your sparse checkout, or at the boundary between your sparse checkout and the rest of the repository.

Collapsing to a sparse index

Triangles represent trees and boxes represent blobs. Left: a representation of a non-sparse index’s contents. Right: a sparse-ified index.

The high-level details here are that the index format now understands that specially marked directories indicate the boundary between the contents of your sparse checkout and the parts of your repository that you don’t have checked out. But the process of implementing this new format, teaching sub-commands how to use it, and making sure that the sparse index can be expanded to a full index is much more detailed.

For all of the details behind this exciting new feature, check out a comprehensive blog post published by Derrick Stolee last week: Making your monorepo feel small with Git’s sparse index.

[source, source, source, source, source, source, source, source]

Multi-pack reachability bitmaps

In a previous blog post, we talked about a new feature to enable reachability bitmaps to keep track of objects stored in multiple packs within your object store.

This release of Git contains the remaining components described in that blog post. If you haven’t read it, here’s a summary. When serving a fetch, a Git server needs to send the client everything reachable from the set of objects they want, less anything reachable from the set that they already have. (You can think of a clone as a “special case” fetch where the client wants everything and has nothing).

In order to compute this set efficiently, Git can use reachability bitmaps. One of these .bitmap files stores a set of bitmaps, each corresponding to some commit. The contents of an individual bitmap is a string of bits, one per object, indicating which objects are reachable from each commit.

In the past, the contents of a reachability bitmap were tied to the order of objects within a single packfile. This meant that a bitmap could only cover objects in one packfile. In other words, bitmaps were only useful if you could efficiently pack the entire contents of your repository down into a single packfile.

For many repositories, writing all objects into the same pack is completely feasible. But the effort it takes to write a pack (including searching for deltas between objects, compressing individual objects, and I/O cost) scales with the size of the pack you’re writing.

Git 2.34 introduces a new bitmap format that is instead tied to the contents of the multi-pack index file. This means that a bitmap can now flexibly represent objects in multiple packs, and server operators no longer need to repack their biggest repositories into a single pack in order to take full advantage of reachability bitmaps.

For more details, including some of the steps required to make this new feature work, see the aforementioned blog post.

[source, source, source]

A new default merge strategy

In an earlier blog post, we explained Git’s newest merge strategy: ort. Here are some of the basics:

When Git needs to merge two branches, it uses one of several “strategy” backends in order to resolve the changes or emit conflicts when two changes cannot be reconciled.

For years, Git has used a strategy called “recursive”. If you have ever done a merge in Git without passing -s <strategy>, then you have almost certainly used the recursive engine. Recursive behaves mostly like a standard three-way merge, with one exception. In the case of “criss-cross” merges (where there isn’t a single merge base), recursive merges multiple bases together in pairs (recursively) in order to produce a single tree which is then treated as the new merge base. This makes it possible to resolve cases where a traditional three-way merge might produce a conflict.

In recent versions of Git, there has been an ongoing effort to replace the recursive strategy with a new one called ort (short for “ostensibly recursive‘s twin”). Why do this? There are a few reasons, but perhaps the most compelling is that a rewrite allowed Git to implement a merge strategy that doesn’t operate on the index (that same one we talked about a couple of sections ago)!

ort does just that: it’s a full-blown rewrite of the merge strategy that aims to emulate the same concepts behind recursive while avoiding many of its long-standing performance and correctness problems. In a merge containing many renames, ort outperforms recursive by 500x. For a series of similar merges (like in a rebase operation), the speedup is over 9000x, in part due to ort’s ability to cache and reuse results from previous merges.

These numbers show off some of the worst-case scenarios for recursive, but in testing, ort consistently outperforms recursive with much less variance. In Git 2.34, ort is now the default merge strategy, so you should notice faster merges with fewer bugs just by upgrading.

For more details about the ort merge strategy, see our earlier blog post, or any one of a six-part series of posts written by ort‘s creator, Elijah Newren: part one, part two, part three, part four, part five, and part six.

[source]

Tidbits

Now that we have looked at some of the bigger features in detail, let’s turn to a handful of smaller topics from this release.

  • You might be aware that Git allows you to sign your work by attaching your PGP signature to certain objects. For example, the Git project itself publishes tags signed by the maintainer in order to verify that each release comes from someone trustworthy.

    But the experience of using GPG and maintaining keys can be somewhat
    cumbersome. One alternative is to use a new feature of OpenSSH (released
    back in OpenSSH 8.0) that allows using the SSH key you likely already have as a signing key.

    Git 2.34 includes support to take advantage of this feature and allows you to sign your work using SSH keys. To try it out, you can either set user.signingKey to the SSH key you want to use (for example, by asking your ssh-agent for a list with ssh-add -L), or set gpg.format to ssh and gpg.ssh.defaultKeyCommand to ssh-add -L in order to automatically use the first SSH key available.

    After configuring Git to sign objects using your SSH keys, you can use git
    commit -S
    , git merge -S, and git tag -s as usual, and they will automatically use your SSH key.

    For more information about the new configuration options, including information about how to verify SSH signatures with an “allowed signers” file, check out the documentation.

    [source, source, source]

  • If you’ve ever accidentally typed git psuh when you meant push, you
    might have seen this message:

    $ git psuh
    git: 'psuh' is not a git command. See 'git --help'.
    
    The most similar command is
      push
    

    You have always been able to control this behavior by setting the
    help.autoCorrect configuration. You can hide this advice by setting that
    configuration to never, or let Git automatically rerun the most similar
    command for you immediately or with a delay (by setting immediate, or a
    real number of seconds to wait before rerunning your command).

    In Git 2.34, you can now configure Git to ask you interactively whether you
    want to rerun your last operation with the suggested command by setting
    help.autoCorrect to prompt.

    [source]

In Git 2.34, a handful of patch series were focused on improving the performance of interacting with other repositories. Here’s a pair of tidbits that improves the performance of git fetch and git push:

  • When fetching from a remote, your client needs to do some bookkeeping before
    and after it receives a set of objects from the remote.

    Before anything happens, your client needs to figure out what it has in common with the remote it’s fetching from, and what commits it wants as a result. Previously, this process was somewhat wasteful: Git used to load commit objects directly when they could instead have been read from the commit-graph, resulting in much improved performance. In Git 2.34, commits loaded in this code path use the commit-graph when possible. The effect of this scales with the number of references in your repository: in an example repository with over 2 million references, it cuts the time it takes to fetch a single commit by more than half.

    [source]

  • Another patch series made a handful of improvements to updating local references when fetching, along with some changes to improve fetch negotiation, as well as skipping the connectivity check (which I’ll talk about in more detail in the next tidbit) when the receiving end had already verified the connectedness of the new objects. These changes together contributed similarly impressive performance improvements to the git fetch command.

    [source]

You might have heard of “submodules,” the Git feature that allows combining multiple repositories by storing links to other repositories. Submodules have been somewhat neglected over the years, but this release brought renewed attention to the feature. Here are just some of the changes that enhance submodules:

  • It might be a surprise to learn that, though the majority of Git is written in C, the original git submodule command is actually a shell script!

    The Git project has been converting many of its subcommands written in other languages into C. Reimplementing subcommands as C programs means that
    they can be read and written more easily, take advantage of Git’s comprehensive libraries, and avoid the overhead of spawning many processes, especially on platforms where the new process overhead is rather costly.

    In Git 2.34, many parts of the git submodule command were rewritten in C.
    This project was completed by Atharva Raykar, who is a Google Summer of Code
    student. You can check out their final report here, along with Git’s other GSoC participant ZheNing Hu’s report here.

    [source, source, source]

  • While we’re on the topic of submodules, one thing you might not know is that
    when using commands that deal with objects from both the submodule and the
    repository containing it, the submodule is temporarily added as an alternate
    object store of the other repository!

    Alternates are Git’s object borrowing mechanism, which allow you to in effect link multiple object stores together. When using a repository with alternates, any object lookups that fail to find an object are retried in that repository’s alternate.

    In order to make both the objects in a submodule and the objects in the repository that contains that submodule available to git grep (among a select set of
    other commands), the submodule would temporarily be added as an alternate for the duration of that command.

    If you’re thinking to yourself, “this is a hack”, then you’re not alone. Git has made internal changes to parameterize many functions in terms of a repository (which is usually the global the_repository). This allowed Git to avoid combining multiple repositories via alternates and instead make function calls by passing two (or more) separate repository instances. This enables Git to avoid hackily relying on the alternates mechanism, which produced less confusing and error-prone code as a result.

    [source, source, source]

  • One last submodule-related topic (though there are more we couldn’t fit here!). If you are cloning a repository that you know to contain submodules, it is often useful to pass the --recurse-submodules, which will cause that repository’s submodules to be cloned and initialized, too.

    But other commands that can optionally recurse into submodules (like git diff, for example) don’t themselves recurse into submodules by default, even when you cloned with --recurse-submodules. In Git 2.34, this is no longer the case, with one caveat: when cloning with --recurse-submodules, other commands only recurse into submodules if the submodule.stickyRecursiveClone configuration is set, to prevent commands from unintentionally running in submodules.

    [source]

Now that I’ve listed out a few of the submodule-related changes, let’s get back
to the rest of the tidbits:

  • If you’ve ever scripted around Git, you have almost certainly run into Git’s cat-file plumbing command. This tool can be used to print out a single object (by providing the object name as an argument), a stream of objects (by providing line-delimited object names over stdin), or all objects in your repository (with --batch-all-objects).

    This low-level command accidentally took into account replace refs, which produced confusing results when combined with --batch-all-objects, resulting in it not actually showing all objects in your repository if some were hidden by refs/replace.

    Dropping support for replacement refs made it possible for cat-file to reuse some information when it is given --batch-all-objects. Namely, to populate the list of objects, it iterates each object in each pack and therefore knows the byte offset within each pack where each object can be found. Previous versions of Git did not reuse this information when looking up objects to parse them, but Git 2.34 retains this information.

    This makes it possible to process an object’s metadata much more quickly by avoiding having to locate it twice. In a copy of torvalds/linux, the time it takes to print the name and type of each object (for the curious, that’s git cat-file --batch-check='%(objectname) %(objecttype)' --batch-all-objects --unordered) dropped from 8.1 seconds to just 4.3 seconds.

    [source]

  • There has been a recent concerted effort to remove some memory leaks from Git’s code. Unlike library code, Git typically has a very short runtime. This makes the need to free allocated memory much less urgent, since if a process is about to exit, all memory allocated to it will be “freed” by the operating system.

    A recent patch has made it so that Git’s integration tests can be run in a mode that ensures no memory is leaked (by setting GIT_TEST_PASSING_SANITIZE_LEAK=true in the environment). Since Git’s test suite still contains memory leaks in some tests, a new mode was added to run only tests that have been specifically marked as being leak-free. That way, when Git is compiled with leak detection (by running make SANITIZE=leak), you can easily spot regressions in tests that were supposedly leak-free.

    Building off this new infrastructure, there have been many patch series that remove leaks from the code in various places.

    [source, source, source, source, source, source, source, source, source, source, source]

  • When you need to get some debugging information out of a Git process, like what version you’re running, or how much time it spent in a particular region, the trace2 mechanism is a good choice. Often, looking at these logs is like looking at a piece of a puzzle. For example, when you run git fetch, you actually run git fetch-pack, which then invokes git upload-pack on the remote, which itself invokes git pack-objects.

    Trace2 output includes information about when child processes are started and stopped (and consequently, how long they took to run), but what if you’re trying to figure out something more basic than that, like what process you were started by? In other words, if you’re stuck looking at output from a slow git pack-objects, how do you figure out whether it was a fetch (in which case it would have been started by upload-pack) or part of a repository repack (which here would be started by git repack)?

    Git 2.34 includes additional debugging information in trace2 output to indicate the full ancestry of a process, so you can easily read out the name of the program a process was started by, like so:

    $ cat trace2.log
    21:14:38.170730 common-main.c:48                  version 2.34.0.rc1.14.g88d915a634
    21:14:38.170810 common-main.c:49                  start /home/ttaylorr/src/git/git pack-objects git pack-objects --revs --thin --stdout --progress --delta-base-offset
    21:14:38.174325 compat/linux/procinfo.c:170       cmd_ancestry sh <- git-upload-pack <- sh <- git <- zsh <- sshd <- systemd
    

    (Above, you can see that pack-objects was run by git upload-pack, which was run by sh–that’s where we inserted the trace point via uploadpack.packObjectsHook, which was run by git, in my shell, over sshd, which was started by systemd.)

    [source, source]

  • In a previous post, we talked about the background maintenance daemon, which can be used to perform routine repository maintenance in the background (like pre-fetching, or repacking the objects in your repository).

    When this feature was first released back in Git 2.31, it had support for cron on Linux, launchctl on macOS, and schtasks on Windows. Git 2.34 brings support for systemd-based timers on Linux. This has a few benefits over cron: cron may not be available everywhere, and using systemd isolates each service into its own cgroup and writes its logs separately.

    If you want to use systemd instead of the default scheduler, you can run:

    $ git maintenance start --scheduler=systemd
    

    [source]

  • In a previous blog post, we talked about how git rebase works, and how to move a complicated branching structure elsewhere in your repository’s history.

    The brief history is that this used to be done with the --preserve-merges option, which attempted to replay merges elsewhere in history. Confusingly, this mode uses rebase’s interactive machinery internally, so attempting to manually edit the rebase sequence (with git rebase -i) often produced counterintuitive results.

    The --rebase-merges option fixed many of these issues and has been the recommended replacement of --preserve-merges for some time now. In Git 2.34, the --preserve-merges option is now gone for good.

    [source]

  • You might have used git grep to quickly search through your code. But you might not have known that git log has a --grep=<expression> option, which allows you to filter through commits produced by git log to only show ones whose commit messages match the provided expression.

    In previous versions, the --grep option only filtered down which results were presented in the output of git log. But in Git 2.34, git log now knows how to colorize the parts of its output that matched the provided expression, like so:

    [source]

  • Last but not least, if you’re using Git in a terminal on Windows, you might have noticed that your terminal is left in a weird state after running git commit, or git rebase, like in this issue.

    This was because Git shares its terminal with any child processes it spawns, including your $EDITOR. If your editor sets special terminal settings but does not clear them upon exiting, it can leave your terminal in a broken state.

    Git 2.34 introduces functionality to save and restore the terminal settings before and after launching your editor. That means that even misbehaving editors cannot corrupt your terminal since it will always be restored to the state it was in before launching the editor.

    [source]

The rest of the iceberg

That’s just a sample of changes from the latest release. For more, check out the release notes for 2.34, or any previous version in the Git repository.

Make your monorepo feel small with Git’s sparse index

Post Syndicated from Derrick Stolee original https://github.blog/2021-11-10-make-your-monorepo-feel-small-with-gits-sparse-index/

One way that Git scales to the largest monorepos is the sparse-checkout feature, which allows you to focus on a subset of the files. This is supposed to make it feel like you are actually in a small repository, even though you are contributing to a large repository.

There’s only one problem: the Git index is still large in a monorepo, and users can feel it. Until now.

The Git index is a critical data structure in Git. It serves as the “staging area” between the files you have on your filesystem and your commit history. When you run git add, the files from your working directory are hashed and stored as objects in the index, leading them to be “staged changes”. When you run git commit, the staged changes as stored in the index are used to create that new commit. When you run git checkout, Git takes the data from a commit and writes it to the working directory and the index.

The working directory, index, and commit history

In addition to storing your staged changes, the index also stores filesystem information about your working directory. This helps Git report changed files more quickly. One problem is that the index stores this information for every file at HEAD, even if those files are outside of the sparse-checkout definition. This means that the index can be much larger in a monorepo than it would be if your important subset of files was in its own repository.

Throughout the past year, the Git Fundamentals team at GitHub contributed a new feature to Git called the sparse index, which allows the index to focus on the files within the sparse-checkout cone. If you are in a repository that can use sparse-checkout, then you can enable the sparse index using these commands:

git sparse-checkout init --cone --sparse-index
git sparse-checkout set <dir1> <dir2> ... <dirN>

The size of the sparse index will scale with the number of files within your chosen directories, instead of the full size of your repository. When enabled with a number of other performance features, this can have a dramatic performance impact.

As we built the sparse index, we tested its performance against a large monorepo that has over two million files at HEAD, and with a sparse-checkout definition that populated the working directory with about 100,000 of those files. We then compared the performance between having a normal “full” index, a sparse index, and a repository that only contained the files matching the sparse-checkout definition.

Command performance by index and repository type

The chart above demonstrates the significant performance improvements enabled by the sparse index. The bottom bars for each Git command show the runtime without the sparse index. The middle bars show the runtime of the same commands with the sparse index enabled. The top bars show the runtime of these commands, except in a repository that only contained the files within the sparse-checkout cone, representing the theoretical optimum. Since the sparse index still contains pointers to the rest of the monorepo, there is still some overhead. This overhead is hardly noticeable, since the difference is at most 60 milliseconds, even in the worst case above.

Today, I will go deep into the design and implementation of the sparse index. In particular, I’ll focus on how the Git community made such a significant change to a critical data structure in a safe way. I will include links to the actual changes in the Git codebase as I go.

This post is going to go deep into the guts of Git. If you are unfamiliar with Git’s object model, then learn about commits, trees, and blobs before continuing.

You can also get an overview of the sparse index alongside several other advanced Git features in this presentation I gave with colleague Lessley Dennington at the GitHub Nova event.

First, let’s dig into the Git index to understand its structure and purpose. I’ll use the derrickstolee/trace2-flamechart repository as a concrete example (and to generate some of the figures). If you want to follow along with the Git commands shown, then clone that repository.

The Git index

The index file stores a list of every file at HEAD, along with the object ID for its blob and some metadata. This list of files is stored as a flat list and Git parses the index into an array.

You can expose the list of files in the index using the git ls-files command:

$ git ls-files
LICENSE
README.md
bin/index.js
examples/fetch/git-fetch-after.png
examples/fetch/git-fetch-after.svg
examples/fetch/git-fetch-after.txt
examples/fetch/git-fetch-before.png
examples/fetch/git-fetch-before.svg
examples/fetch/git-fetch-before.txt
examples/fetch/git-fetch-combined.png
examples/fetch/git-fetch-combined.svg
examples/maintenance/trace.png
examples/maintenance/trace.svg
examples/maintenance/trace.txt
package.json

In this repository, many of the files live in an examples/ directory, but you don’t actually need them for the functionality of the code, which lives in the bin/ directory. You can focus the repository only on the necessary files using the git sparse-checkout command:

$ ls
LICENSE     README.md     bin       examples   package.json
$ git sparse-checkout init --cone --sparse-index
$ git sparse-checkout set bin
$ ls
LICENSE     README.md     bin       package.json

Even though I used the sparse-checkout command to reduce the size of the working directory, my git ls-files command will return the same set of files as before. In fact, I can dig in a little more and expose some more information using git ls-files --debug.

$ git ls-files --debug
LICENSE
  ctime: 1634910503:287405820
  mtime: 1634910503:287405820
  dev: 16777220 ino: 119325319
  uid: 501  gid: 20
  size: 1098    flags: 0
README.md
  ctime: 1634910503:288090279
  mtime: 1634910503:288090279
  dev: 16777220 ino: 119325320
  uid: 501  gid: 20
  size: 934 flags: 0
bin/index.js
  ctime: 1634910767:828434033
  mtime: 1634910767:828434033
  dev: 16777220 ino: 119325520
  uid: 501  gid: 20
  size: 7292    flags: 0
examples/fetch/git-fetch-after.png
  ctime: 0:0
  mtime: 0:0
  dev: 0    ino: 0
  uid: 0    gid: 0
  size: 0   flags: 40004000
(...)

The above output is truncated, but it shows that each index entry contains additional filesystem information for each path. The last entry listed shows what happens for a file that is outside of the sparse-checkout definition: all of the filesystem information is removed and the flags entry has some bits enabled. These bits include a SKIP_WORKTREE bit that signifies that Git will not write that file to the working directory.

If these files are not written to disk, then why are they listed in the index at all? The reason is that Git still needs to understand the content that would be there if the index was expanded. Further, that information is used to generate a commit with the git commit command.

In the Git codebase, there is a test helper that can show additional information from the index: test-tool read-cache. (You won’t have this command if you just have normal Git installed.) Running it here, you can see that the index also stores the object IDs for every file:

$ test-tool read-cache --table
100644 blob 646521d0d6c070e6f15e0f5828be1127d3b75503    LICENSE
100644 blob b230b3a6e2d81d50dc00177e970a10726b5baf08    README.md
100755 blob 918533d51c7a5f91622311893dcfd40bfd4f43d7    bin/index.js
100644 blob e0f88531b916b92821476760672e8161b9954898    examples/fetch/git-fetch-after.png
100644 blob f4a523cd1acb0a9d2620970ad7a43405d6e305dc    examples/fetch/git-fetch-after.svg
100644 blob fc4e30dca5fcb0c3d2031dc82a43d5d644e26b41    examples/fetch/git-fetch-after.txt
100644 blob 15dc889965617df3b5a30cf01e52c491e41c59c1    examples/fetch/git-fetch-before.png
100644 blob 602bd5bcbd815914a035d0d4f0d2a3896f600de2    examples/fetch/git-fetch-before.svg
100644 blob bc40a8e4658d17c35de996f3655e737b85ce7ad9    examples/fetch/git-fetch-before.txt
100644 blob 356cdd36e0d78a62af8b010d25d658054bb6fdc7    examples/fetch/git-fetch-combined.png
100644 blob cc0c23f2c8a822c51a17c46268f38c2268b400ae    examples/fetch/git-fetch-combined.svg
100644 blob dfc0893d172d841d971e206461466db935b7c192    examples/maintenance/trace.png
100644 blob a10a876472e46c6ae58e6fc6e2adc64d4dae809b    examples/maintenance/trace.svg
100644 blob 8f5e8bfbc44674feb3aa96e0b7bf1bf717495658    examples/maintenance/trace.txt
100644 blob a4599a9e0a01c28a2c0a622457664fc8c55bfdf9    package.json

Notice in particular how every single row lists the object type as blob, meaning a file. Also, the bin/index.js file has executable permissions, so the file permission column shows 100755 instead of 100644 like the others. This is all important metadata to store for each index entry.

To visualize the index, the diagram below displays our blobs as boxes in a line in the order given above, but it represents the trees that connect the root tree to those blobs as triangles. Thus, the root tree has two subtrees for bin/ and examples/, and the examples/ subtree has two subtrees for fetch/ and maintenance/.

full index

This figure represents all of the links between the trees and blobs. However, the core index data structure stores only the list of blobs as a flat list. The nesting tree structure does not exist in the core of the file.

However, there is an extension to the format that includes the information of the nesting directories: the cache-tree extension. Each node of the cache-tree stores a list of sub-nodes and a range of index entries that are covered by the current node. Each node stores the object ID for the tree it represents.

The index and the cache tree

The root node always covers all of the blobs in the index. The contained nodes have ranges contained within that range.

Git commands such as git add update the cache-tree extension in order to make the next git commit command very fast. To create the new commit, Git can use the tree from the root of the cache-tree extension.

Many Git commands use the index in many different ways. Some commands compare the working directory to the index and update one or the other when there is a difference. Others compare the index and a commit. Some compare multiple indexes together. Some use the cache-tree extension to navigate the nested tree structure, but mostly they scan the flat list of files in the form of an array.

The index affects Git performance at scale

The index can be very large in monorepos. I will show Git performance data from an example monorepo that has over two million files at HEAD. Even using the latest compression techniques available, the index file is over 180 MB in this monorepo.

This has a significant effect on normal Git commands. Presented below is an annotated flamechart of a git status command with one of these large indexes. The x-axis represents time since the start of the command, and each rectangle represents a region of Git’s execution that is marked by its trace2 logging library.

`git status` with full index

Three regions are annotated here:

  1. The index is read from disk and parsed into memory.
  2. The working directory is compared to the index. This triggers a lazy initialization of some hash tables that are required for this effort.
  3. The modified index is written to disk.

Parsing is multi-threaded, but writes are not. This explains some of the differences in how long those actions take.

Clearly, the amount of data in the index is a significant portion of this command. This also affects other commands such as git add and git commit, which are expected to be fast.

This performance concern became abundantly clear when our monorepo customer wanted to group more dependencies within the monorepo. Some teams had isolated Git repositories that were hundreds of times smaller than the monorepo, but these repositories created packages that were consumed by the monorepo, causing complications in tracking dependencies. The hope was that they could merge into the monorepo and rely on sparse-checkout to make it feel like they were still working in a small repository. The user experience was actually much worse, and the root cause was the time it took to read and write the index.

The main culprit is that there are millions of index entries corresponding to files these users do not care about for their daily work. When they push to the server and create a pull request, the build machines can handle the massive scale of building the entire tree and verifying that the small change works within the larger whole of the monorepo. Users should not need to pay that cost.

As members of the Git Fundamentals team, we are very focused on Git performance, and the index has been on our minds for years. For example, the index is a bottleneck for the VFS for Git environment, but that environment has particular needs that prevent improvements in this area.

The biggest thing that has changed recently is the creation of “cone mode” sparse-checkout patterns. These use directory-based pattern matching instead of file-based pattern matching. While cone mode was originally designed to speed up pattern matching in the sparse-checkout feature, it has now unlocked a new way to shrink the index.

The sparse index

The sparse index differs from a normal “full” index in one aspect: it can store directory paths with the object ID for its tree object. This is in addition to the file paths which are paired with blob objects. Since the cone mode sparse-checkout patterns match on a directory level, we can determine that an entire directory is out of the sparse-checkout cone and replace all of its contained file paths with a single directory path.

Back in my example derrickstolee/trace2-flamegraph repository, you can enable the sparse index command and then use the test-tool read-cache tool to show the contents of the index.

$ git sparse-checkout init --cone --sparse-index
$ test-tool read-cache --table
100644 blob 646521d0d6c070e6f15e0f5828be1127d3b75503    LICENSE
100644 blob b230b3a6e2d81d50dc00177e970a10726b5baf08    README.md
100755 blob 918533d51c7a5f91622311893dcfd40bfd4f43d7    bin/index.js
040000 tree b395192a7adbf21793f9489f3623c117802b2043    examples/
100644 blob a4599a9e0a01c28a2c0a622457664fc8c55bfdf9    package.json

Similar to my previous visualizations, you can now see how the index contains a directory entry in addition to the four blobs.

sparse index

The sparse directory entries correspond to directories that are just outside of the sparse-checkout definition. These directories also have a cache-tree node whose range is only one entry: that sparse directory entry.

I can even display the full details of the --debug output for git ls-files. This currently requires a --sparse flag that I have implemented in my personal fork of Git, but a similar feature will eventually be available in the core Git client.

$ git ls-files --debug --sparse
LICENSE
  ctime: 1634910503:287405820
  mtime: 1634910503:287405820
  dev: 16777220 ino: 119325319
  uid: 501  gid: 20
  size: 1098    flags: 200000
README.md
  ctime: 1634910503:288090279
  mtime: 1634910503:288090279
  dev: 16777220 ino: 119325320
  uid: 501  gid: 20
  size: 934 flags: 200000
bin/index.js
  ctime: 1634910767:828434033
  mtime: 1634910767:828434033
  dev: 16777220 ino: 119325520
  uid: 501  gid: 20
  size: 7292    flags: 200000
examples/
  ctime: 0:0
  mtime: 0:0
  dev: 0    ino: 0
  uid: 0    gid: 0
  size: 0   flags: 40004000
package.json
  ctime: 1634910503:288676330
  mtime: 1634910503:288676330
  dev: 16777220 ino: 119325321
  uid: 501  gid: 20
  size: 680 flags: 200000

This output is not truncated as it was before, and you can see that the sparse directory entry for examples/ is the only one with blank filesystem data. It also has the same flags value as the sparse file entries did before.

By removing the number of index entries as well as reducing the average path length, you can shrink the index size significantly. In our example monorepo, most users will reduce their index size from 180 MB to less than 10 MB!

Back to our monorepo, let’s try that git status example again and create a new flamechart. Here, I compare the flamechart for git status with a full index followed by one with a sparse index.

Annotated `git status` flame chart

With the sparse index, the git status command drops from 1.3 seconds to under 200 milliseconds! In the flame chart above I highlighted some regions that have similar appearance in each run. These represent the parts of the git status command that are actually walking the working directory and doing work independent of the index size. Everything else is slower in the full index case entirely because of the size of the index!

Building the sparse index safely

Pruning the index at the directory level is a relatively simple idea with a rather complicated result: our flat list of paths now contains two types of Git objects! There are dozens of places in the Git codebase that interact directly with the index in subtly different ways, and all of them are expecting every index entry to point to a blob object.

In order to make such a change to a critical data structure, we needed to first create a compatibility layer. To safely interact with a sparse index, we needed a way to expand a sparse index to an equivalent full index. This way, code paths that have not been integrated and tested with a sparse index can still be used, even if the on-disk format is sparse.

In the Git codebase, we started by creating the ensure_full_index() method, which converts a sparse index into a full one. This method inspects the list for directory entries and replaces them with its contained file entries. Since the directory is outside of the sparse-checkout cone, we could ignore all of the filesystem metadata information and populate the list by traversing the tree objects under that directory. Before anything else happens, the ensure_full_index() method is called immediately after parsing the index so no interactions with the index happen until the sparse directories are removed.

Expanding to a full index

When Git expands a sparse index to a full one, it scans the entries in lexicographic order. If the entry is a file, then Git copies it to the new list. If the entry is a directory, then the tree at that location is passed to the read_tree_at() method to iterate over all contained blobs. For each contained blob, Git generates an index entry for the corresponding file. Finally, the index entry list is copied back into the index and the index is no longer sparse.

Once that protection was in place, we extended Git to write the sparse index format. When writing the index, a full index is converted to a sparse one in-memory using the convert_to_sparse() method.

Collapsing to a sparse index

To convert from a full index to a sparse one, Git uses the cache-tree extension to find the object ID for our new sparse directory entries. The existing file entries are copied, and Git inserts the directory entries as needed.

Once these steps were built, we could verify that the index size was shrinking to the scale we expected. Both of these steps were included in a single series that introduced the format and implemented the conversions.

While it is nice that the index size has shrunk, we couldn’t stop there. The index is a very compact data structure, so it is more efficient to read it from disk than to recreate it by parsing trees. The ensure_full_index() method takes noticeably longer to expand a sparse index to a full one than it would take to read a full one from disk. In order to gain the performance benefits of a sparse index, we needed to teach Git what to do when encountering sparse directory entries.

Before embarking on these integrations, we first set up more guardrails. A new setting, command_requires_full_index, was created which is enabled by default. This setting is used to trigger ensure_full_index() upon parsing a sparse index unless the Git command being run has explicitly disabled the setting. This allowed us to integrate with Git commands one-by-one without disrupting the behavior of other Git commands. In addition to these settings, we inserted calls to ensure_full_index() before most index interactions. to make sure that we were operating on a full index in any code path that might iterate over the index entries. This allowed us to find which code paths needed integration: we could debug a Git command with a breakpoint on ensure_full_index() and see the call stack that led to that expansion.

The first command to integrate with the sparse index was git status. In hindsight, this was a challenging command to use as a starting point, because it performs multiple index operations that are common to other commands. This became clear when integrating with git checkout and git commit because most of the work was already done in the git status integration.

Let’s explore some of the smaller interactions that needed special care with directory entries.

Example implementation detail: git diff

The git diff command can show what is different between different representations of a working directory. There are two interesting cases that involve the index: comparing the working directory to the index, and comparing the index to a commit.

With no other arguments, git diff shows the differences in the working directory compared to what is staged in the index. This algorithm is mostly simple to integrate with the sparse index: while walking the working directory, Git drills into a directory only if it exists. If the sparse directory entries in the sparse index do not appear as directories in the working directory, then it never tries to drill into the sparse directory entries. If Git finds that a sparse directory entry does exist in the filesystem as a real directory, then the ensure_full_index() method expands the index and Git continues as normal. This is not desired, so we did everything possible to make sure that these directories do not exist, including updating the sparse-checkout feature to delete ignored files outside the cone.

The git diff --cached command compares the files staged in the index with the commit at HEAD. Here, it is easier to have differences outside the sparse-checkout cone, such as when using git reset --soft to change the HEAD commit without changing the working directory or index. In this case, the git diff --cached command wants to compare the root tree for the HEAD commit to the files in the index. This can proceed normally for the files that exist in the sparse index, but when we reach a sparse directory entry, we see the tree object staged in the index as well as a tree object from the tree walk. At this point, we shift from a tree-vs-index comparison to a tree-vs-tree comparison of those subtrees. When that diff is complete, we can continue with the larger comparison.

One major benefit to the tree-vs-tree comparison is that it is easier to compare the same type of objects. The recursive comparison can also prune the walk when it finds two subtrees with the same object ID, as all of their content is the same at that point.

This change allows us to report on these differences not only in the git diff command, but also such diffs as are written during git status, git checkout, and git commit.

Implementation detail: ORT merge strategy

When beginning the sparse index work, there was a huge question that we did not know how to tackle: three-way merges. The default merge strategy, recursive, uses the index as a data structure during its computation. It was going to be difficult to reconcile that algorithm to work within the confines of a sparse index. In fact, many merges that a monorepo user runs would need to resolve merges outside of the sparse-checkout cone.

Luckily, another contributor, Elijah Newren, announced that he was creating a new merge strategy, named the ORT strategy, that did not use the index. We prioritized reviewing and testing that strategy so that we could take advantage of it. It turns out that it is also a better algorithm in general, so it will become the new default strategy with Git 2.34.

The critical feature of the ORT strategy was its replacement of the index with a recursive tree-like structure. That structure is built from the root tree and only creates subtrees for paths that have changed since the merge base. At the end, the ORT strategy creates an index to match its representation of the resulting merge commit.

Because of the ORT merge strategy, integrating the sparse index into git merge, git rebase, git cherry-pick, and git revert was very simple. We just needed to make sure the index that was created at the end of the merge was sparse from its original creation.

Different merge strategies and their performance

As we reported earlier, the ORT strategy improves over the recursive strategy in the typical case, but also the recursive strategy has significant outliers as shown in the box plot above. Enabling the sparse index on top of the ORT strategy provides even more improvements.

Without the ORT merge strategy, the sparse index work could have easily doubled in scope. For a detailed look at the ORT strategy and its many optimizations, take a look at Elijah’s six-part blog series:

Testing the sparse index

The sparse index was touching critical code and doing so in interesting ways. We needed a way to carefully test that these changes were as correct as possible. The Git test suite is substantial and has excellent coverage of most index operations. However, almost all of those tests do not use sparse-checkout, so we couldn’t immediately gain value in checking the sparse index by enabling it globally.

We created a test script that focused on testing the sparse index in a new way. The test starts by creating a repository with some interesting data shapes in it. Then, each test case starts by copying that repository into three new repositories. Those three repositories have different configurations:

  1. The repository as-is, without sparse-checkout.
  2. The repository with cone mode sparse-checkout enabled.
  3. The repository with cone mode sparse-checkout and sparse index enabled.

Then, each test case runs a number of Git commands against all three repositories, expecting the same output and results in the working directory. This allowed us to be confident that the changes we were making to enable the sparse index would have identical behavior with the other two cases.

Along the way, we found some interesting differences between sparse-checkout and full repositories. Several of these bugs have been fixed since. Sometimes, it was unclear whether the sparse-checkout feature should do the same thing as a normal repository, specifically when interacting with files outside of the sparse-checkout cone. This led to changing how some commands interact with sparse entries. In Git 2.34, some commands will need a --sparse flag in order to modify paths outside of the sparse-checkout cone.

In addition to these test scripts, we routinely ran the Scalar functional tests against our development branches, since many of those tests focus on special circumstances around the sparse-checkout feature. If a Scalar test would fail when the Git tests did not, then we would create a similar test in Git to prevent such a bug in the future.

Once we had integrated with a core set of Git commands, we also created an experimental release that contained early versions of these integrations. We provided this version to a subset of monorepo users to evaluate the performance. We found some interesting data from some of the users, but overall the results confirmed that the sparse index was going to significantly improve the user experience in the monorepo. The most important thing we discovered is that the sparse-checkout feature should remove ignored files outside of the cone, as those files cause the sparse index to expand to a full one, negating the performance benefits. There is an additional benefit in that the working directory shrinks even more by deleting these files.

The current state of the sparse index

Not all Git commands understand the sparse index. Those that have not been integrated trigger a compatibility check that converts a sparse index into a full one during the first index read. The integrated commands are ones that have been carefully tested with the sparse index. They likely received some code updates in order to properly handle a sparse index. These integrations were dispersed across the last few Git versions, and some only exist in the microsoft/git fork until we can complete contributing them to the core Git project.

scope

In June, Git 2.32.0 was released with an understanding of the sparse index format. In August, Git 2.33.0 included integrations with git status, git commit, and git checkout. Git 2.34.0 is slated for a November release with integrations for git add, git merge, git rebase, git cherry-pick, and git reset. In order to serve our monorepo users, we fast-tracked some integrations into a pre-release in our fork including integrations with git diff, git blame, git clean, git sparse-checkout, and git stash.

Based on our understanding of how users interact with a monorepo, the commands that are listed here are sufficient to cover almost all users’ needs. We expect that users who adopt the sparse index with these integrations will have a significantly improved experience from before. This all depends on the size of their monorepo and on the size of their sparse-checkout cone.

We will release this feature widely to our monorepo users with the sparse index on by default in the 2.34 release of our Git fork. The core Git project will keep the sparse index off by default until it has all of these features and the implementation has been stable for a few versions.

Looking to the future

At this point, we have covered all of the integrations we need to have a successful monorepo experience. There is more work to be done. In particular, we need to finish contributing the final integrations in our list. Upstream progress takes time and we are grateful for all of the feedback we have received from the community so far. There are more commands that could use integrations, as well.

For now, we are focused on ensuring that monorepo users transition to the sparse index without incident. If you are interested in the sparse index, then we believe it is in an excellent state to start using it. If you have any issues with its performance or stability, then please do not hesitate to create an issue or start a discussion. We will be there to help!

Through the sparse index, we broke through a significant barrier to monorepo scale. We continue to seek the next innovation that will help Git scale to the largest repos out there.

Security keys are now supported for SSH Git operations

Post Syndicated from Kevin Jones original https://github.blog/2021-05-10-security-keys-supported-ssh-git-operations/

GitHub has been at the forefront of security key adoption for many years. We were an early adopter of Universal 2nd Factor (“U2F”) and were also one of the first sites to transition to Webauthn. We’re always on the lookout for new standards that both increase security and usability. Today we’re taking the next step by shipping support for security keys when using Git over SSH.

What are security keys and how do they work?

Security keys, such as the YubiKey, are portable and transferable between machines in a convenient form factor. Most security keys connect via USB, NFC, or Bluetooth. When used in a web browser with two-factor authentication enabled, security keys provide a strong, convenient, and phishing-proof alternative to one-time passwords provided by applications or SMS. Much of the data on the key is protected from external access and modification, ensuring the secrets cannot be taken from the security key. Security keys should be protected as a credential, so keep track of them and you can be confident that you have usable, strong authentication. As long as you retain access to the security key, you can be confident that it can’t be used by anyone else for any other purpose.

Screenshot of GitHub identity verification screen with security key option

Use your existing security key for Git operations

When used for SSH operations, security keys move the sensitive part of your SSH key from your computer to a secure external security key. SSH keys that are bound to security keys protect you from accidental private key exposure and malware. You perform a gesture, such as a tap on the security key, to indicate when you intend to use the security key to authenticate. This action provides the notion of “user presence.”

Security keys are not limited to a single application, so the same individual security key is available for both web and SSH authentication. You don’t need to acquire a separate security key for each use case. And unlike web authentication, two-factor authentication is not a requirement when using security keys to authenticate to Git. As always, we recommend using a strong password, enrolling in two-factor authentication, and setting up account recovery mechanisms. Conveniently, security keys themselves happen to be a great recovery option for securely retaining access to your two-factor-enabled account if you lose access to your phone and backup codes.

The same SSH keys you already know and love, just a little different

Generating and using security keys for SSH is quite similar to how you generated and used SSH keys in the past. You can password-protect your key and require a security key! According to our data, you likely either use an RSA or ed25519 key. Now you can use two additional key types: ecdsa-sk and ed25519-sk, where the “sk” suffix is short for “security key.”

$ ssh-keygen -t ecdsa-sk -C <email address> 
Generating public/private ecdsa-sk key pair. 
You may need to touch your authenticator to authorize key generation.

Once generated, you add these new keys to your account just like any other SSH key. You’ll still create a public and private key pair, but secret bits are generated and stored in the security key, with the public part stored on your machine like any other SSH public key. There is a private key file stored on your machine, but your private SSH key is a reference to the security key device itself. If your private key file on your computer is stolen, it would be useless without the security key. When using SSH with a security key, none of the sensitive information ever leaves the physical security key device. If you’re the only person with physical access to your security key, it’s safe to leave plugged in at all times.

Screenshot of SSH keys associated with GitHub user account

Safer Git access and key management

With security keys, you can achieve a higher level of account security and protection from account takeover. You can take things a step further by removing your previously registered SSH keys, using only SSH keys backed by security keys. Using only SSH keys backed by security keys gives you strong assurance that you are the only person pulling your Git data via SSH as long as you keep the security key safe like any other private key.

Security keys provide meaningful safety assurances even if you only access Git on trusted, consistent systems. At the other end of the spectrum, you might find yourself working in numerous unfamiliar environments where you need to perform Git operations. Security keys dramatically reduce the impact of inadvertent exposure without the need to manage each SSH key on your account carefully. You can confidently generate and leave SSH keys on any system for any length of time and not have to worry about removing access later. We’ll remove unused keys from your account, making key management even easier. Remember to periodically use keys you want to retain over time so we don’t delete them for you.

Protecting against unintended operations

Every remote Git operation will require an additional key tap to ensure that malware cannot initiate requests without your approval. You can still perform local operations, such as checkout, branch, and merge, without interruption. When you’re happy with your code or ready to receive updates, remote operations like push, fetch, and pull will require that you tap your security key before continuing. As always, SSH keys must be present and optionally unlocked with a password for all Git operations. Unlike password-protected SSH keys, clients do not cache security key taps for multiple operations.

$ git clone [email protected]:github/secure_headers.git
Cloning into 'secure_headers'...
Confirm user presence for key ECDSA-SK SHA256:xzg6NAJDyJB1ptnbRNy8UxD6mdm7J/YBdu2p5+fCUa0
User presence confirmed

Already familiar with using SSH keys backed by security keys? In that case, you might wonder why we require verification (via the security key “tap”) when you can configure your security key to allow operations to proceed as long as the security key is present. While we understand the appeal of removing the need for the taps, we determined our current approach to require presence and intention is the best balance between usability and security.

Towards a future with fewer passwords

Today, you can use a password, a personal access token (PAT), or an SSH key to access Git at GitHub. Later this year, as we continue to iterate toward more secure authentication patterns, passwords will no longer be supported for Git operations. We recognize that passwords are convenient, but they are a consistent source of account security challenges. We believe passwords represent the present and past, but not the future. We would rather invest in alternatives, like our Personal Access Tokens, by adding features such as fine-grained access and more control over expiration. It’s a long journey, but every effort to reduce the use of passwords has improved the security of the entire GitHub ecosystem.

By removing password support for Git, as we already successfully did for our API, we will raise the baseline security hygiene for every user and organization, and for the resulting software supply chain. By adding SSH security key support, we have provided a new, more secure, and easy-to-use way to strongly authenticate with Git while preventing unintended and potentially malicious access. If you are ready to make the switch, log in to your account and follow the instructions in our documentation to create a new key and add it to your account.

We wanted to extend our gratitude to Yubico, with whom we’ve partnered several times over the years, for being an early collaborator with us on this feature and providing us valuable feedback to ensure we continue to improve developer security.

Scaling monorepo maintenance

Post Syndicated from Taylor Blau original https://github.blog/2021-04-29-scaling-monorepo-maintenance/

At GitHub, we serve some of the largest Git repositories on the planet. We also serve some of the fastest-growing repositories. Each day, the largest repositories we host become even larger.

About a year ago, we noticed that the job we use to repack Git repositories began hitting our self-imposed timeouts on larger repositories. Even when expanding these timeouts, failing maintenance on these repositories has generally been the cause of degraded performance that is hard to mitigate.

Today, these problems do not exist. GitHub can repack even the largest repositories we host in a fraction of the time it used to take. In this post, we’ll talk about what problems we were encountering, the solutions we built, how we deployed them safely, and describe some possible future directions.

All of our work here is being contributed to the open source Git project, and will be available in an upcoming release.

The problem

Why is GitHub’s maintenance job so expensive in the first place? It’s because we chose to have maintenance repack the entire contents of each repository into a single packfile. Doing so is expensive, but having just one packfile carries some benefits, too. With only one packfile, looking up objects doesn’t require opening and searching through multiple packs to find it. It also means that all objects can be compressed as a delta relative to all other objects (Git’s packfile format supports cross-pack deltas, but currently Git will never store them on disk). But, the most important reason is that reachability bitmaps, a performance-critical data structure, are only compatible with a single pack.

A new feature in Git, multi-pack indexes solves the former problem by making all object lookups go through a single index, but didn’t yet solve the latter. So, we set out to fill in the gaps by bringing bitmap support to multi-pack indexes in order to remove the single-pack limitation on reachability bitmaps.

But in order to build multi-pack bitmaps, we had to solve a number of other interesting problems along the way. First, we had to decide how to arrange the objects in a multi-pack index to achieve good bitmap compression. We also had to figure out how to quickly invert that ordering to translate between bit positions back to the objects they refer to. Some of these steps also yielded notable performance improvements on single-pack repositories, too. Finally, we had to figure out a new repacking strategy that scaled with the size of recent pushes, rather than with the size of the entire repository.

But before we get into all of that, let’s start from the very beginning.

Objects, packs, and fetching

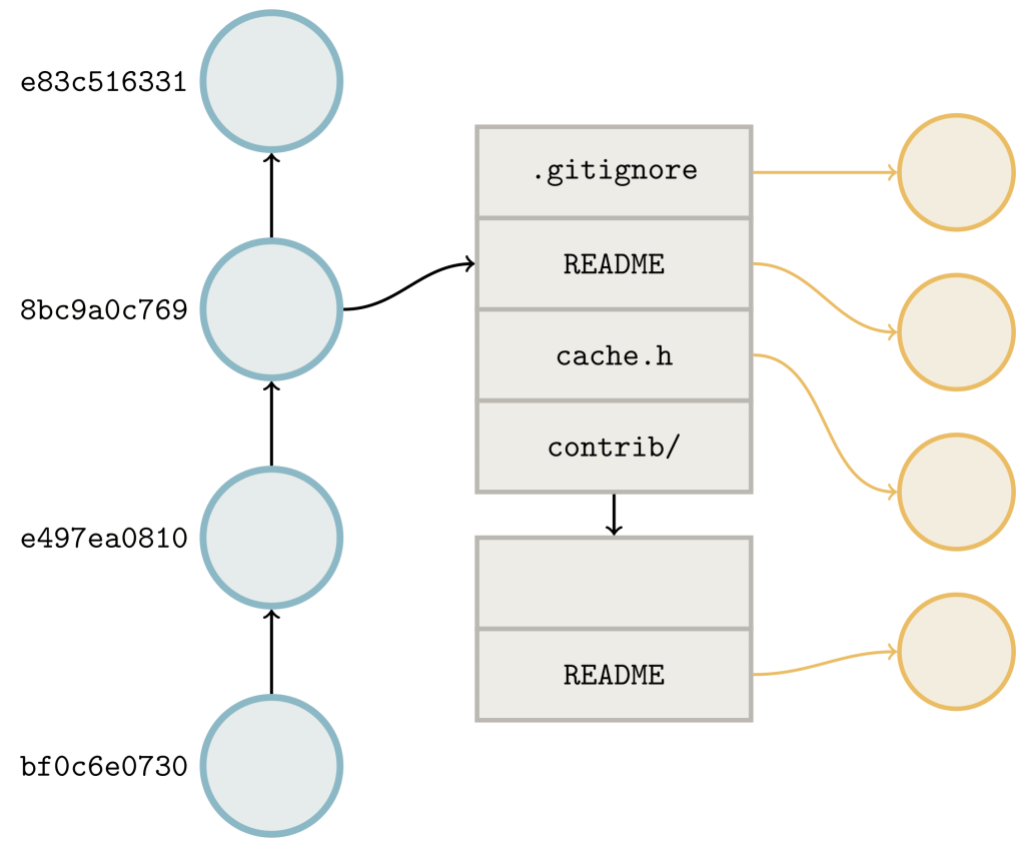
You might be aware that Git stores the contents of your repositories as a set of objects. Each object represents an individual piece of your repository: a single file, tree, commit, or tag. These objects may be stored individually as “loose” objects, or together in a packfile.

If you’ve ever heard that a Git repository is “nothing more than a directed acyclic graph,” then you know that these objects can refer to one another. A tree refers to a set of blobs (which correspond to files) and other trees (which correspond to sub-directories). A commit refers to a single tree (the repository root), and zero or more other commits which are its parents.

These links help Git figure out which objects it needs to transfer to fulfill a fetch or clone request. When you fetch a repository from GitHub, Git performs a negotiation to figure out which objects to send. The server advertises the objects at the tip of its references (basically the tips of branches and tags). The client does the same, along with the set of references that it wants from the server. Then, the server walks the links between the requested objects and the objects that the client already has in order to figure out what to send.

Above is an object graph. The client advertises its ref tips (indicated by the darker blue commits). The server’s advertised references are colored dark red. The blue shaded area represents the result of walking along the edges to obtain the reachability closure of the objects the client already has. The red shaded area represents the same closure from the server’s perspective, excluding objects that the client already has. Objects in this region are the ones which need to be sent to the client.

During a fetch, Git needs to send not just the commits in between what the client has and wants, but also all of the objects that are reachable from those commits. Because Git doesn’t store the list of every reachable object, this may be expensive, especially in the case of a clone. When cloning, the client doesn’t have any objects, so it asks the server for all of the objects reachable from any reference.

In an earlier blog post, we talked about how we use reachability bitmaps to accelerate this negotiation. In case you haven’t read that post, below is a quick primer.

Reachability bitmaps

How does Git handle this special case where the client has nothing and wants everything? Ultimately, the server needs to determine the reachability closure of all of the reference tips. In other words, it needs a list of all of the objects at the reference tips, and all of the ancestors of those objects in order to assemble a complete copy of the repository at the other end.

Unfortunately for us, the larger the repository is, the longer it takes Git to compute the list of objects to send. This isn’t feasible even for medium-sized repositories. Git could handle our case specially by just sending every object it has, but that might result in many unwanted objects being sent, too. (For example, GitHub stores the outcome of “test merges” in special refs which aren’t ordinarily sent during fetches, but whose objects are stored in the same object directory nonetheless.)

Instead, Git stores a set of reachability bitmaps corresponding to some of the commits in a packfile. The idea is rather simple: arrange the objects in a pack in some order (the particular order used is something we’ll discuss shortly in detail). Then, the ith bit in the bitmap corresponding to commit C is 1 if C can reach the ith object, and 0 otherwise.

Having a one-to-one correspondence between objects and bit positions has a couple of appealing properties: taking the union of reachable objects between commits is as simple as ORing their bitmaps together, and taking the difference is as simple as combining AND and NOT. So, when a bitmap exists, Git can dramatically speed up the object negotiation phase:

  • First, OR all of the bitmaps corresponding to the reference tips that the client wants. Call this new bitmap W.
  • Then, do the same with the bitmaps corresponding to the reference tips that the client advertised as already having. Call this bitmap H.
  • Finally, compute W AND NOT H to produce the set of objects the client needs (in other words, everything it wants but does not already have). Then, send those objects.

Because all of the reachability information is encoded directly into the bitmaps, Git saves time by avoiding the need to open up and parse objects, allowing it to produce the same result in a fraction of the time.

This idea has been used since at least the 1970s to speed up queries in relational databases. In Git, reachability bitmaps can provide dramatic speed-ups when walking objects that reside in the same pack: walking all of the objects in the Linux kernel repository took more than 33 seconds without bitmaps, but only 1.57 seconds to perform the same traversal with bitmaps.

The object order

How does Git turn a set of objects into a sequence of bit positions? One way you might imagine to do this is assign bit positions in lexicographic order. The first bit corresponds to 000023961a, the second to 0000d6543f, the third to 000182eacf, and so on in lexical order.

Why not do this? Recall that an object’s ID is determined by a SHA-1 of its contents, which means that reachability of any object in this order is only reachable to nearby objects by chance. And reachability of nearby objects matters: Git compresses the bitmaps using EWAH compression, which relies on having long runs of identical bits. If the object order makes reachability look essentially random from bit to bit, Git won’t be able to efficiently compress the bitmaps.

Pack order—that is, the physical arrangement of objects in a packfile—produces a sequence of bit positions that tends to place reachable objects next to each other. And this produces exactly the kind of long runs of identical bits that make EWAH compression perform well.

The problem

But, all of this creates a problem for us: if the order of bit positions is dictated by a pack, then bitmaps are coupled in implementation and in concept to the existence of a single packfile. So, any objects that accumulate outside of the bitmapped pack won’t benefit from the same speed-ups.

To address this, we periodically repack the repository’s entire contents into a single pack, and then generate a new reachability bitmap. This makes reachability queries in more recent parts of the repository’s history faster.

But generating that new pack takes time; in fact, it’s quadratic. Bigger repositories take longer to repack, but also grow at a faster rate, which means they run maintenance more often. This compounding effect sometimes makes it such that some repositories are constantly undergoing maintenance: by the time one maintenance job has finished, another is already sitting in the queue, waiting to be run.

Since the bottleneck for maintenance is the compression of an entire repository’s contents into a single packfile, what would it take to be able to repack the contents into multiple packfiles instead?

Multi-pack indexes

To order a set of objects spanning multiple packs, we looked to a recent Git feature: multi-pack indexes.

When Git wants to locate an object by name in a single pack, it uses that pack’s index (.idx) file, which provides a binary-searchable list of object locations. Multi-pack indexes work similarly to .idx files, but the location they indicate is a pair containing both the pack containing the object, as well as where in that pack the object can be found.

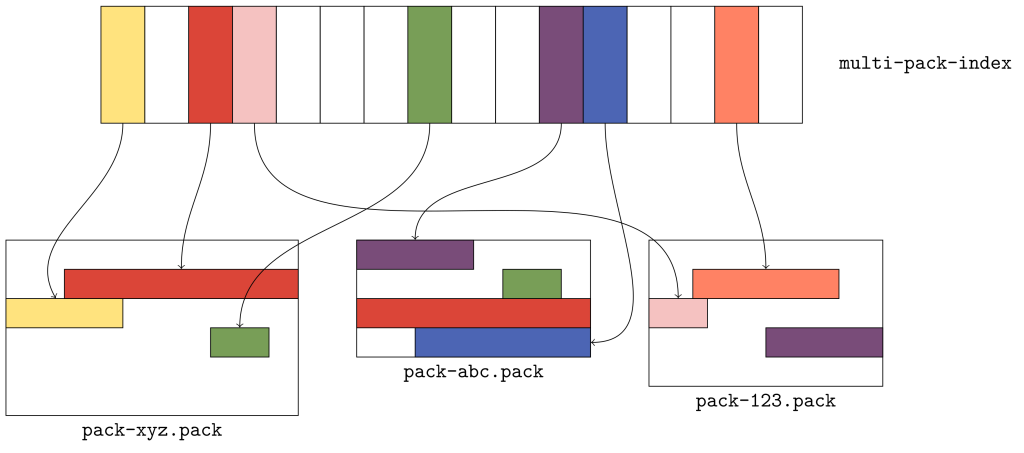
The figure above gives a flavor for what kind of data is organized in a multi-pack index. Here, there are three packs, each with a handful of objects. The multi-pack index stores the location of each unique object among the set of packs. When multiple copies of an object exist (like the green or red objects in packs xyz and abc), ties are broken in favor of the copy in the pack with the earliest modification time.

The order of objects in the multi-pack index differs from the order in each individual pack. Since a pack is free to store objects in any order it wants, the multi-pack index stores objects in lexicographic order so that an object can be found quickly by name using a binary search.

Ordering objects

Given a multi-pack index, how should we order the objects in the packs it contains? We discussed earlier that ordering objects lexicographically results in poor compression. We also noted that objects in packs are ordered topologically, which for our purposes we can consider to imply that individual objects tend to appear near other objects which they reach in this order.

So, any ordering of the objects in a multi-pack index should capture as much of those two properties as possible. With that in mind, we decided on the following order:

  • Objects are first grouped according to which packfile they appear in, and packs are ordered according to the multi-pack index.
  • Objects within the same pack should be ordered according to their locations within that pack.

This effectively concatenates the pack-order of multiple packs together, according to some other ordering defined on the packs themselves.

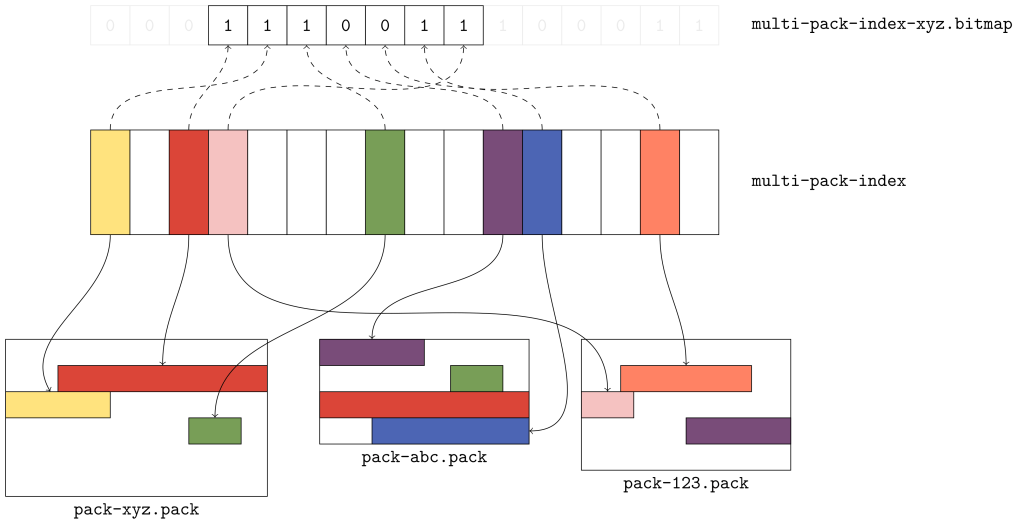
To see what this looks like, let’s overlay a portion of a bitmap that covers the objects in our earlier example:

The first three bits correspond to the red, yellow, and green objects, respectively. Each one of those objects comes from the xyz pack, which means that the xyz pack has the oldest modification among the three. Scanning the bitmap from left to right, these objects appear in pack order; that is, the byte offset of the red object is less than the byte offsets of the yellow and green objects that follow it.

The purple and blue objects come next, since they are in the pack that follows. But note that the copies of the red and green objects in the abc pack don’t correspond to any bits highlighted. Why? Because the multi-pack index selected the copy of those objects in the earlier pack.

Finally, the orange and pink objects appear, also in pack order. And, as we expect, the copy of the purple object that appears in pack 123 isn’t included in the bitmap, because the copy in pack abc was.

This ordering gives us great locality, but we still need to address how to map bit positions back to the objects they represent. For example, let’s look at the fifth bit position, which we know refers to the blue object: how could Git discover this same fact?

You could reasonably imagine that knowing how many total objects are in each pack would be good enough to figure out which objects each bit corresponds to. But that isn’t enough information; we don’t know how many unique objects selected by the multi-pack index appear in each pack, and we also don’t know which non-unique objects are missing. So it’s not good enough to count past the three bits corresponding to objects in pack xyz and then count two more bits up to the fifth bit, because that would point at the copy of the green object in pack abc.

Reverse indexes

To solve this problem, we introduced reverse indexes. In the same way that the pack index provides a mapping from object name to object location, the reverse index maps an object’s location back to its name.

The idea is simple: in addition to the pack’s contents (stored in a .pack file) and index (stored in an .idx file), we’ll write an array of numbers (which comprise the reverse index, and are stored in a new .rev file). These numbers provide a mapping between an object’s position in pack order and its position in lexicographic order.

To better understand this, let’s take a look at an example on a single pack.

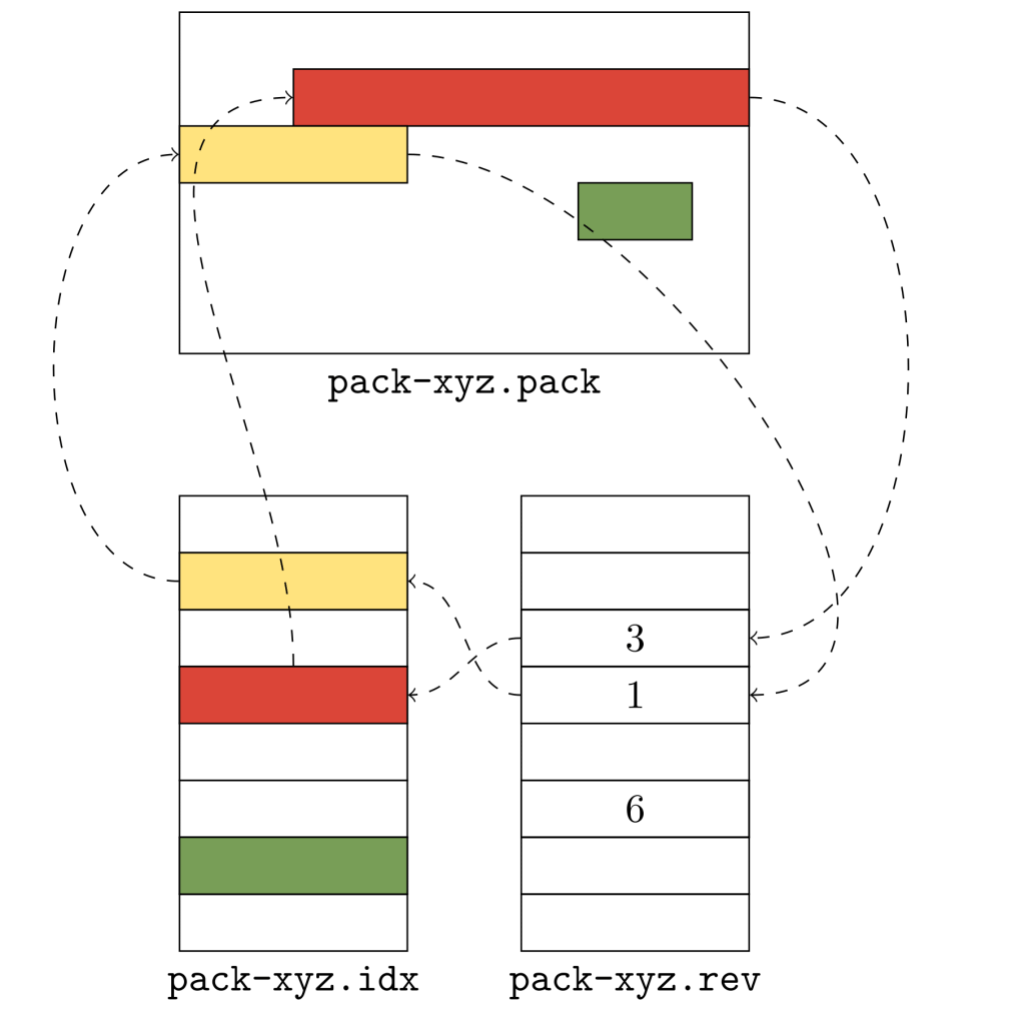
The .idx file (shown in the lower left) lists objects in lexicographic order: the yellow object comes before the red one, and the red one comes before the green one. But their pack order is different: there, the red object comes before the yellow one instead of the other way around. The reverse index helps us unwind the two: it tells us that the red object is in the position 3 in lexicographic order, and the yellow object is in position 1.

The reverse index allows us to map quickly from offsets into the packfile to object positions they correspond to. That allows us to quickly determine the size of a packed object. For example, say that you want to figure out how large the red object is. Because Git doesn’t store that information directly, you have one of two options: either scan linearly through the packed data (inflating its contents until you locate the stream end), or locate the adjacent object (in this case, the yellow one) by name, and measure the difference of their offsets.

Without the reverse index, there is no way to figure out where the adjacent object starts. But with a reverse index, locating the red object is as simple as reading the adjacent entry in the reverse index to discover the offset. Here, that value is 1, which points at an entry in the .idx file, which in turn points at the location in the pack.

Before the on-disk reverse index, Git computed this table on the fly and stored the results in an array in memory. This had a couple of major downsides. To build a reverse index on the fly, Git has to allocate a pair of pack offset and index position. This requires memory and runtime, which both scale relative to the size of the pack. Even though this processes using radix sort, sorting the reverse index entries can be noticeably slow when done once per process.

Some initial testing of these reverse indexes showed that they could enable rather dramatic speed-ups when serving fetches on real-world repositories. To verify our early results, we gradually rolled out reverse indexes on a handful of repositories.

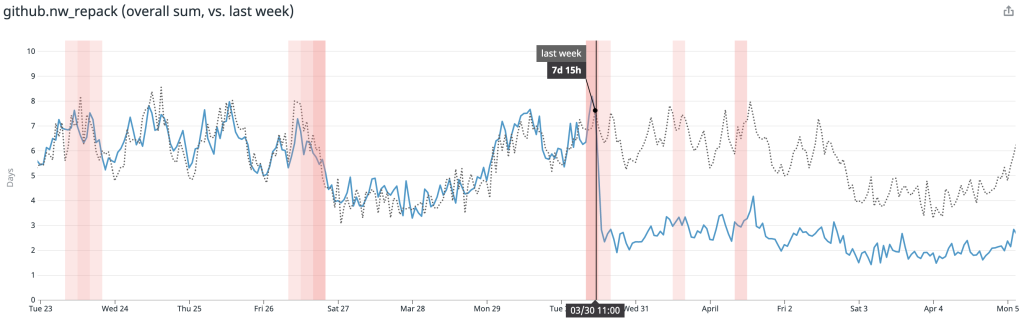
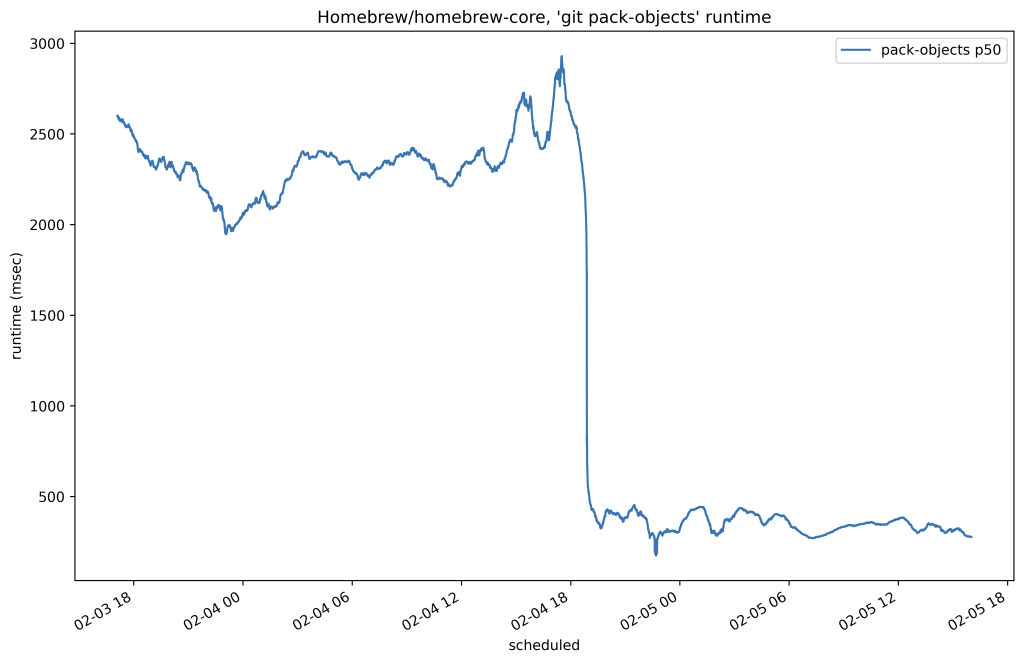
Below is the 50th percentile of CPU time for fetches to Homebrew/homebrew-core on our testing host before and after the change:

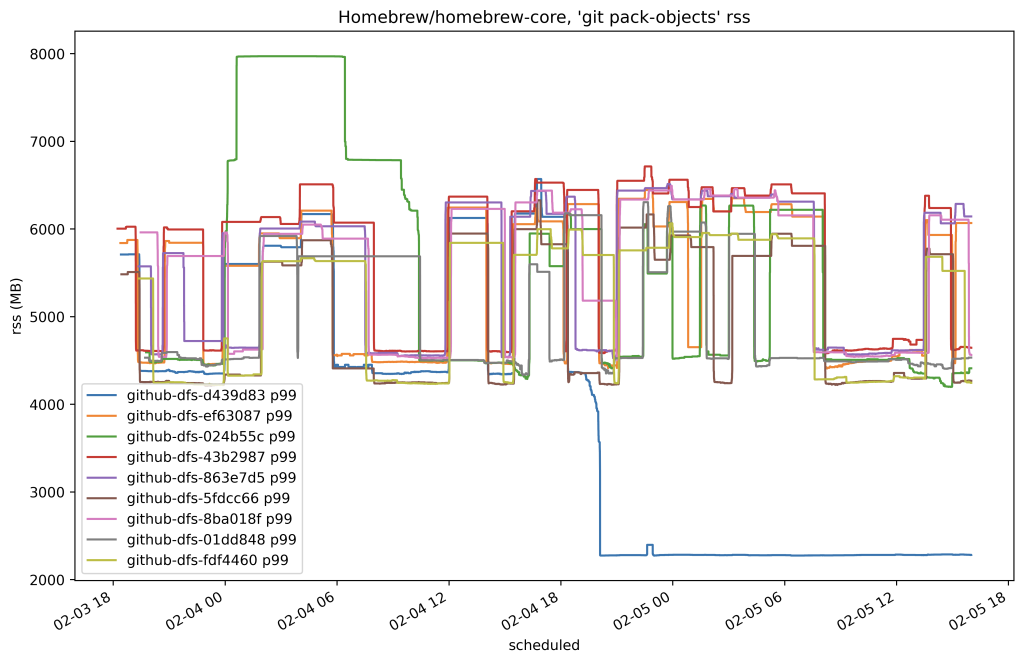
In this case, we reduced the amount of time it took to serve any fetch of that repository by around 80%. Here’s another plot from the same time which shows the resident set size of the program used to serve fetches by replicas of that same repository:

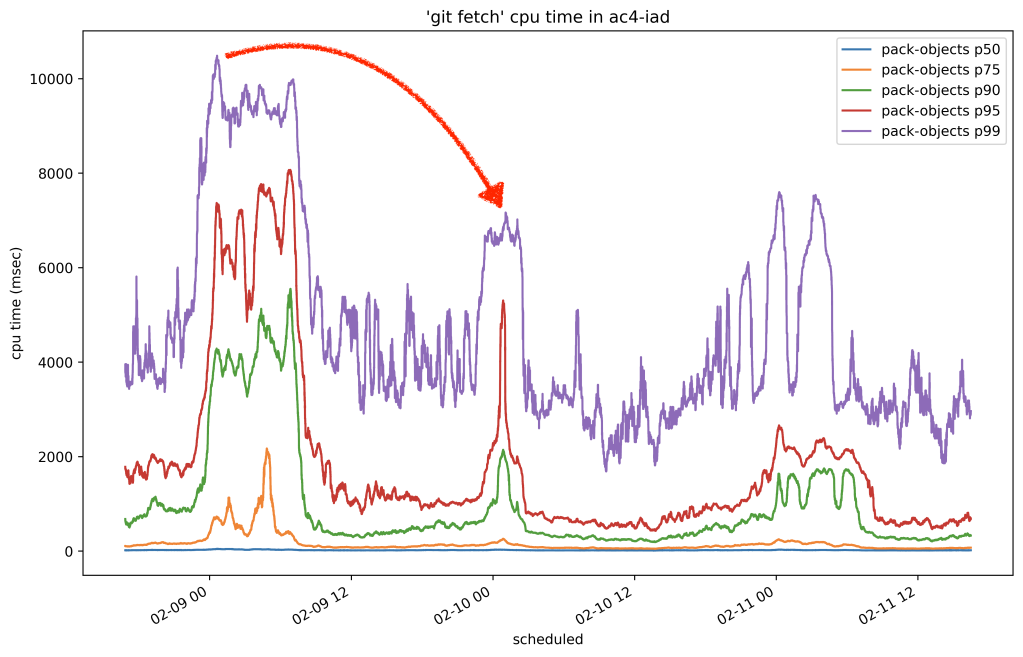
Encouraged by our first results in production, we proceeded to cautiously roll out on-disk reverse indexes to all other replicas. Once we completed the roll-out, we let a couple of days pass in order for replicas to have enough time to generate reverse indexes. Then, we sampled the overall CPU time it took to serve fetches across all repositories and observed the drop we were hoping for:

In the graph above, you can see three 24-hour cycles. The first day was before we rolled out .rev files, and the second two peaks are after. The per-day peaks dropped from around 10.8 seconds to 7 seconds, for a collective savings of around 35% on all repositories.

Multi-pack bitmaps

Now that we have a format for .rev files, we can reuse it as the missing piece we need to build multi-pack bitmaps. Instead of writing positions relative to a pack .idx file, a multi-pack reverse index writes positions which are relative to a multi-pack-index file.

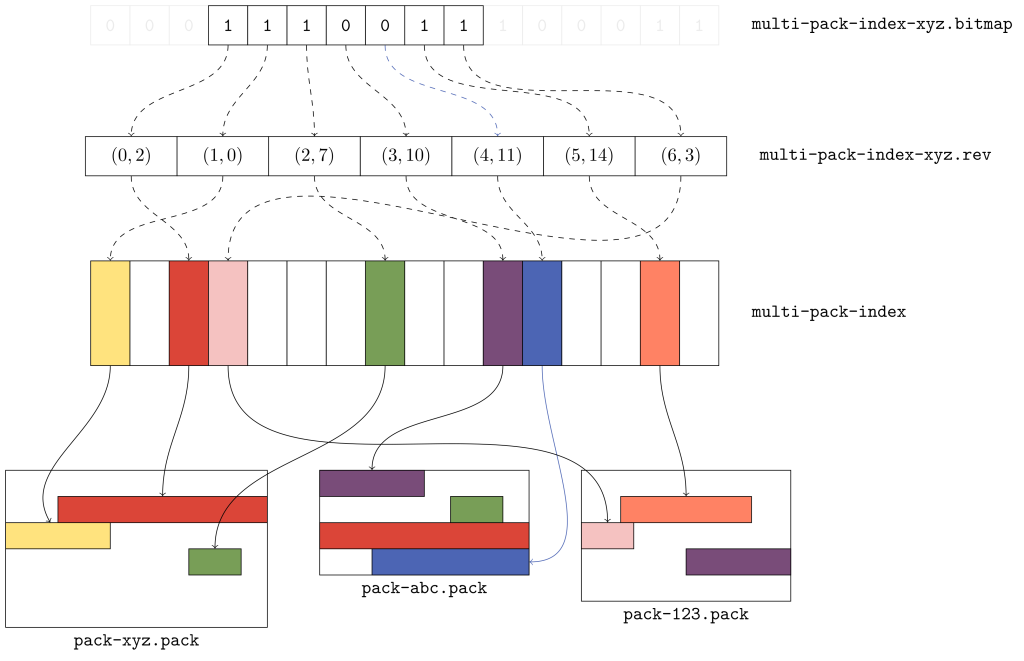
This provides exactly the information we need to rediscover the mapping between bit positions and the objects they refer to in the multi-pack index. To see why, let’s take a look at another example:

To figure out that the fifth bit corresponds to the blue object in the above diagram, we read the fifth entry in the multi-pack reverse index and get back that the fifth bit maps to the eleventh object in the multi-pack index. And, sure enough, the 11th object points back to the blue object that we were looking for in pack abc.

Putting it all together, this gives us a bitmap which can refer to objects in multiple packs. Based on its filename, each bitmap knows whether or not it belongs to a pack (and if so, which one) or to a multi-pack index. And based on that information, it can translate its object lookups to be relative to a packfile, or to the multi-pack index via its reverse index.

Since we chose the ordering carefully, these multi-pack bitmaps compress exactly as well as their single-pack counterparts. And they decouple bitmaps from individual packs. So, a repository can still have at most one bitmap, but that bitmap can now correspond to multiple packs.

Geometric repacking

Now that we can include multiple packs in a single bitmap, what’s the best way to repack a repository during maintenance?

With single-pack bitmaps, the only option was to pack everything together into one enormous pack. But now that this restriction no longer exists, we have to figure out the best way to repack the objects. When deciding on a new repacking strategy, we wanted something that struck a balance between two properties:

  • On average, there is a relatively small number of packs in the repository.
  • On average, we create a pack that collects objects that were pushed since the last maintenance run.

We decided on an invariant to ensure that the packs in a repository form a geometric progression by object size. In particular, if you sort the packs by number of objects, with the first pack having the most and the final pack having the least, then each pack will contain at least twice as many objects as the next one.

We taught git repack a new --geometric= mode, which creates exactly this geometric progression. Soon (at the time of writing, these patches are still being submitted and reviewed), you’ll be able to try this yourself on your own repository by running:

$ packsizes() {
    find .git/objects/pack -type f -name '*.pack' |
    while read pack; do
      printf "%7d %s\n" \
        "$(git show-index < ${pack%.pack}.idx | wc -l)" "$pack"
    done | sort -rn
  }
$ packsizes # before
$ git repack --write-midx --write-bitmap-index -d --geometric=2
$ packsizes # after

How does this command work? We select a set of packs and combine their objects into one new pack that replaces the set. But picking this set optimally is NP-hard, so we have to approximate it.

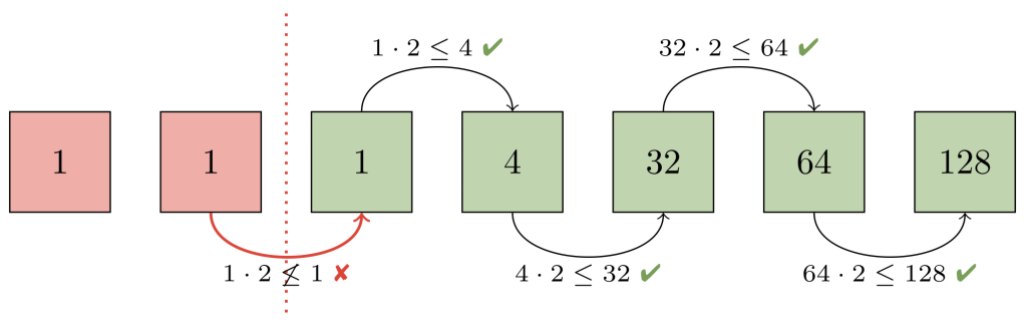
To see how we perform that approximation, let's walk through an example. The first step is to figure out how many packs already form a geometric progression. To do this, imagine ordering packs by how many objects they contain. Then, consider each adjacent pair of packs from largest to smallest. At each step, ask: "is the larger pack at least twice the size of the smaller one?". If so, then every pack from that pair onwards already forms a geometric progression.

In this example, the second and third packs (each containing one object) violate our progression. At that point, we know that the second pack, and any packs below it must be repacked together in order to restore the progression.

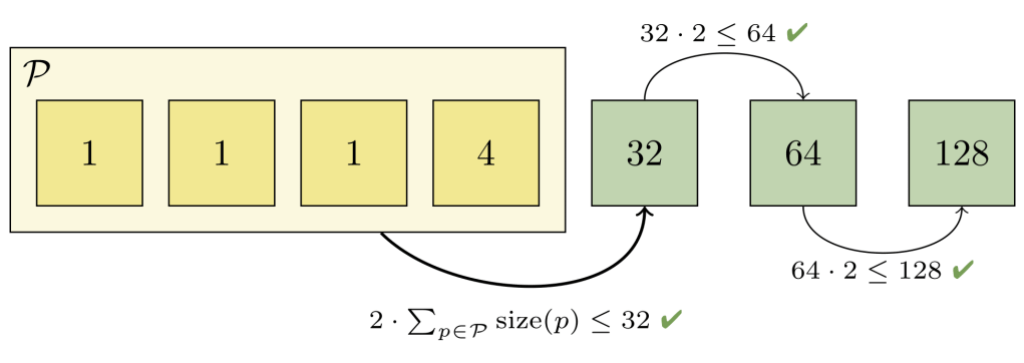
But we can't just repack the first two packs together, since the combined pack would still be too big (it would contain two objects, and the third pack only contains one). So we grow the set of packs to combine until the invariant is restored:

Here, we had to combine the first four packs together in order to restore a geometric progression. Those packs together contain 7 objects, which is less than half of the next-largest pack (which contains 32 objects). And we can't combine any more packs, since doing so would violate the remainder of the progression.

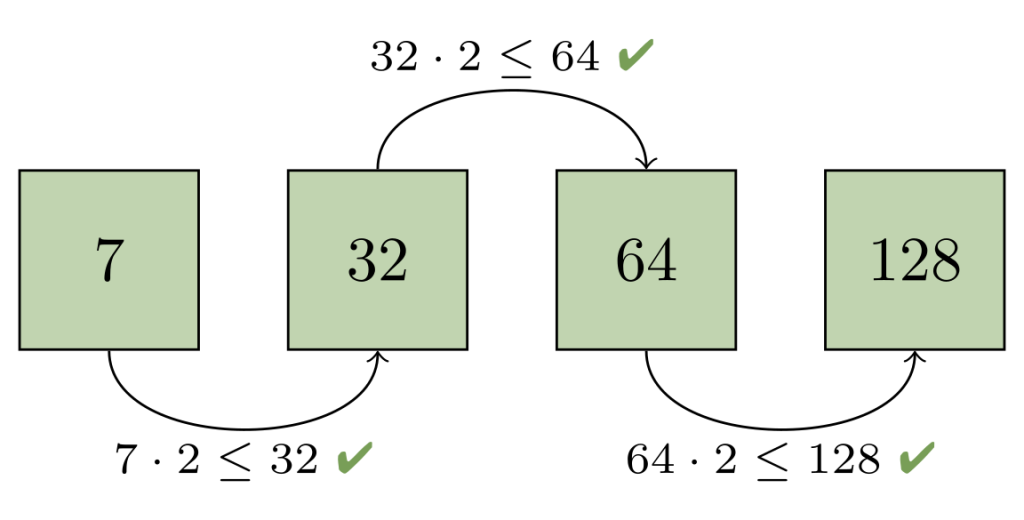
At this point, we can write a new pack containing just the objects in the set of packs we combined in the previous step. After discarding the now-redundant packs, the remaining packs again form a geometric progression:

This means that the number of packs grow logarithmically over time, so a repository will never have too many packs at any one point in time. It also has the appealing property that older objects tend to get pushed into the larger packs, meaning they get repacked less frequently as time passes. An important corollary of this is that each repack tends to focus on the most recently pushed objects. In other words, this strategy tends to make repacking take time proportional to the number of new objects, not the number of overall objects.

In order to keep the repository performing well over many geometric repacks, we intersperse an all-into-one repack once for every eight geometric repacks.

Importantly, this means that even though the classically-slow repacks are still slow, we aren't forced to run them every time we want to repack a repository.

Deploying to production

Now that we have a way to write a bitmap that covers the objects in multiple packs, a way to quickly map between bit positions and the objects they refer to in a multi-pack index, and a repacking strategy which only requires modifying recent additions to the repository, we are ready to put everything together.

Before rolling out a change as large as this one, we performed extensive local testing to ensure that writing bitmaps worked correctly, and that our new repacking strategy wasn't silently corrupting repositories. But our local testing can only go so far: there are endless corner cases when serving fetches and clones, so the real test occurs only after putting real traffic in front of these new paths. Our goal was to design a deployment strategy that simultaneously exercised enough of those cases, while also ensuring that any potential corruption could never occur on a majority of repository replicas.

Our first test cases were internal repositories. We broke our original tests into two phases. In the first phase, we wrote "multi-pack bitmaps" which contained only a single pack. This allowed us to exercise the most basic case of multi-pack bitmaps (having only one pack) without running our new repack code. Once we had built confidence in that approach, we expanded our test to alternate between geometric and full repacks.

After a couple of weeks without any issues, we were confident enough in our change to start testing it on other repositories external to GitHub. We selected first an individual host, and then a whole rack of hosts on which every repack would alternate between geometric and full. At this stage, results were encouraging: the average time to repack had dropped significantly, as had the overall amount of time spent repacking.

By this stage, our roll-out proceeded for several weeks in only one of three data centers. Because we never place a majority of repository replicas in any single datacenter, this configuration made it impossible for our changes to corrupt a majority set of replicas in an unrecoverable fashion, while still putting our changes in the request path for a large amount of traffic.

Finally, after adopting this configuration for a week, we proceeded to enroll percentages of replicas hosted in other datacenters to also use multi-pack bitmaps until all repositories were using multi-pack reachability bitmaps.

After rolling out our new repacking strategy with multi-pack bitmaps, we saved on average 5.67 CPU days every hour compared to the old strategy.

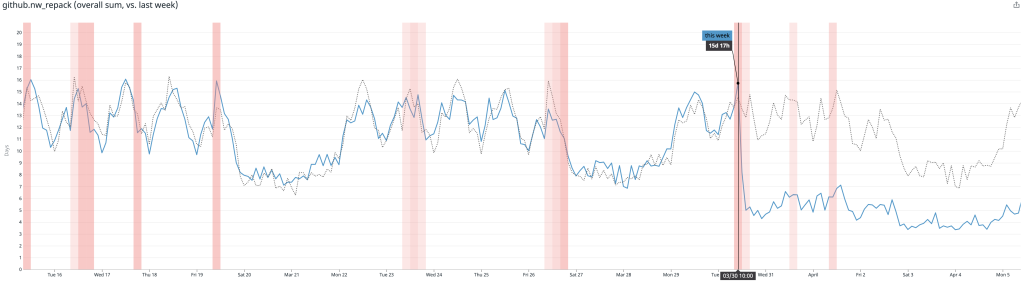
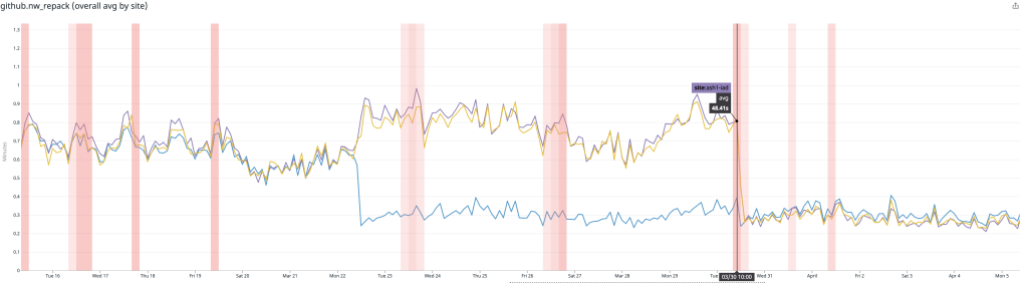
Likewise, the average time spent repacking any single repository also dropped considerably. Below, the plot is broken out per-site, and you can see when we began testing in a single site, as well as when we expanded our deployment to all sites.

There, the average dropped from around 1 minute to repack a repository to just 15 seconds.

Future directions

There are two major open areas we're considering for the future that will make it possible for further performance improvements:

One open area is the bitmap computation itself. Git's bitmap generation code can reuse existing bitmaps by permuting their bits into a new order, but this operation can still take time proportional to the size of the repository. One way to solve this would be to write bitmaps incrementally, only walking the new objects introduced since the last time a bitmap was written. This problem is tricky because it requires not only that the bitmap file be able to be written incrementally, but also that the object ordering we select is stable: that is, that introducing new bitmaps won't render the existing ones meaningless.

Another open area is the pack structure. Creating packs that form a geometric sequence is a promising step forward that allows us to trade off between full and partial repacks. But some repositories are so large that repacking the whole repository isn't feasible, much less desirable. Designing a strategy which freezes the packs containing the oldest objects in a repository's history will allow us to grow to support even larger repositories in the future.

Thank you

This project would not have been possible without help from the upstream Git community, as well as many engineering teams within GitHub. Each of these changes required extensive review, both to the Git project, as well as to internal GitHub services. Special thanks to Jeff King, Derrick Stolee, Jonathan Tan, Junio Hamano, and others for making this possible.