Today, we’re announcing some changes that will improve the security of accessing Git data over SSH.
What’s changing?
We’re adding a new post-quantum secure SSH key exchange algorithm, known alternately as sntrup761x25519-sha512 and [email protected], to our SSH endpoints for accessing Git data.
This only affects SSH access and doesn’t impact HTTPS access at all.
It also does not affect GitHub Enterprise Cloud with data residency in the United States region.
Why are we making these changes?
These changes will keep your data secure both now and far into the future by ensuring they are protected against future decryption attacks carried out on quantum computers.
When you make an SSH connection, a key exchange algorithm is used for both sides to agree on a secret. The secret is then used to generate encryption and integrity keys. While today’s key exchange algorithms are secure, new ones are being introduced that are secure against cryptanalytic attacks carried out by quantum computers.
We don’t know if it will ever be possible to produce a quantum computer powerful enough to break traditional key exchange algorithms. Nevertheless, an attacker could save encrypted sessions now and, if a suitable quantum computer is built in the future, decrypt them later. This is known as a “store now, decrypt later” attack.
To protect your traffic to GitHub when using SSH, we’re rolling out a hybrid post-quantum key exchange algorithm: sntrup761x25519-sha512 (also known by the older name [email protected]). This provides security against quantum computers by combining a new post-quantum-secure algorithm, Streamlined NTRU Prime, with the classical Elliptic Curve Diffie-Hellman algorithm using the X25519 curve. Even though these post-quantum algorithms are newer and thus have received less testing, combining them with the classical algorithm ensures that security won’t be weaker than what the classical algorithm provides.
These changes are rolling out to github.com and non-US resident GitHub Enterprise Cloud regions. Only FIPS-approved cryptography may be used within the US region, and this post-quantum algorithm isn’t approved by FIPS.
When are these changes effective?
We’ll enable the new algorithm on September 17, 2025 for GitHub.com and GitHub Enterprise Cloud with data residency (with the exception of the US region).
This will also be included in GitHub Enterprise Server 3.19.
How do I prepare?
This change only affects connections with a Git client over SSH. If your Git remotes start with https://, you won’t be impacted by this change.
For most uses, the new key exchange algorithm won’t result in any noticeable change. If your SSH client supports [email protected] or sntrup761x25519-sha512 (for example, OpenSSH 9.0 or newer), it will automatically choose the new algorithm by default if your client prefers it. No configuration change should be necessary unless you modified your client’s defaults.
If you use an older SSH client, your client should fall back to an older key exchange algorithm. That means you won’t experience the security benefits of using a post-quantum algorithm until you upgrade, but your SSH experience should continue to work as normal, since the SSH protocol automatically picks an algorithm that both sides support.
If you want to test whether your version of OpenSSH supports this algorithm, you can run the following command: ssh -Q kex. That lists all of the key exchange algorithms supported, so if you see sntrup761x25519-sha512 or [email protected], then it’s supported.
To check which key exchange algorithm OpenSSH uses when you connect to GitHub.com, run the following command on Linux, macOS, Git Bash, or other Unix-like environments:
For other implementations of SSH, please see the documentation for that implementation.
What’s next?
We’ll keep an eye on the latest developments in security. As the SSH libraries we use begin to support additional post-quantum algorithms, including ones that comply with FIPS, we’ll update you on our offerings.
OPKSSH makes it easy to SSH with single sign-on technologies like OpenID Connect, thereby removing the need to manually manage and configure SSH keys. It does this without adding a trusted party other than your identity provider (IdP).
In this post, we describe what OPKSSH is, how it simplifies SSH management, and what OPKSSH being open source means for you.
Background
A cornerstone of modern access control is single sign-on (SSO), where a user authenticates to an identity provider (IdP), and in response the IdP issues the user a token. The user can present this token to prove their identity, such as “Google says I am Alice”. SSO is the rare security technology that both increases convenience — users only need to sign in once to get access to many different systems — and increases security.
OpenID Connect
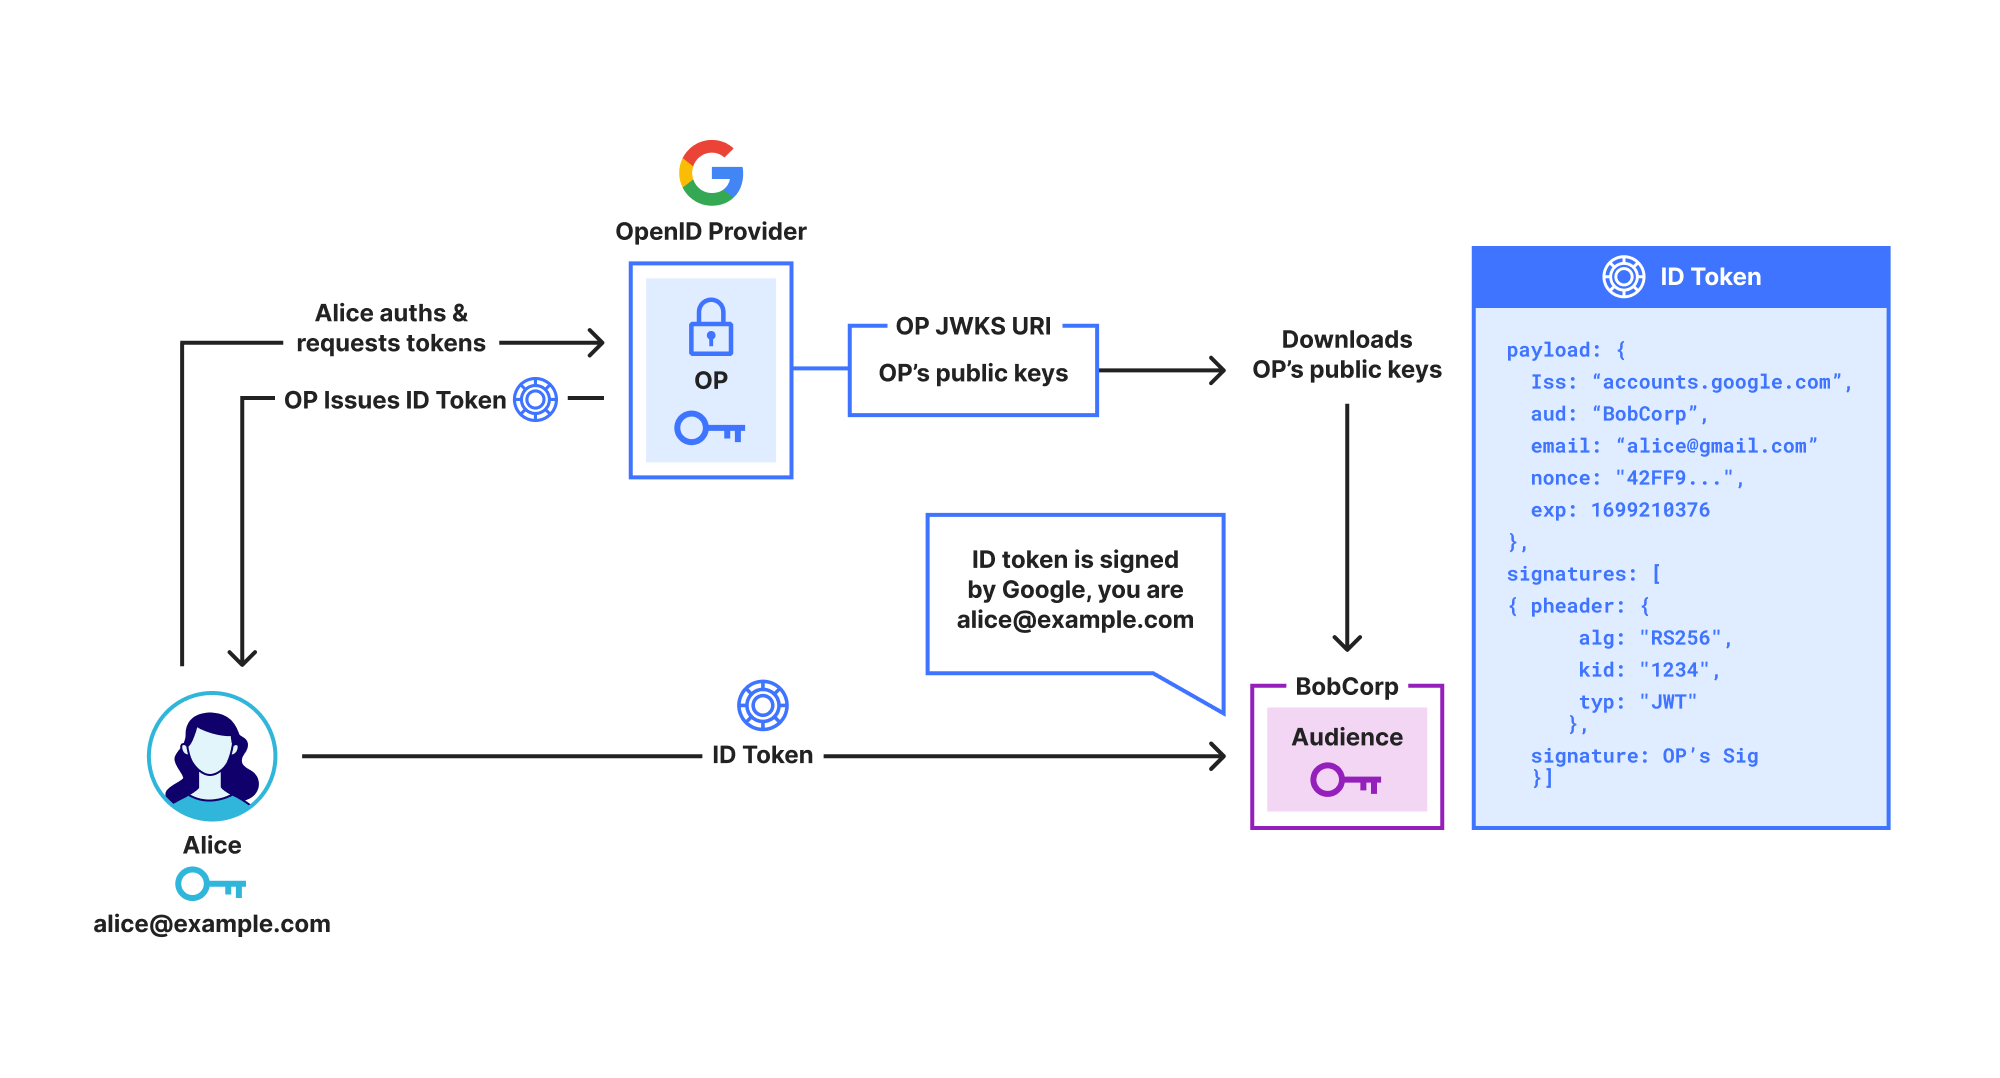
OpenID Connect (OIDC) is the main protocol used for SSO. As shown below, in OIDC the IdP, called an OpenID Provider (OP), issues the user an ID Token which contains identity claims about the user, such as “email is [email protected]”. These claims are digitally signed by the OP, so anyone who receives the ID Token can check that it really was issued by the OP.
Unfortunately, while ID Tokens do include identity claims like name, organization, and email address, they do not include the user’s public key. This prevents them from being used to directly secure protocols like SSH or End-to-End Encrypted messaging.
Note that throughout this post we use the term OpenID Provider (OP) rather than IdP, as OP specifies the exact type of IdP we are using, i.e., an OpenID IdP. We use Google as an example OP, but OpenID Connect works with Google, Azure, Okta, etc.
Shows a user Alice signing in to Google using OpenID Connect and receiving an ID Token
OpenPubkey
OpenPubkey, shown below, adds public keys to ID Tokens. This enables ID Tokens to be used like certificates, e.g. “Google says [email protected] is using public key 0x123.” We call an ID token that contains a public key a PK Token. The beauty of OpenPubkey is that, unlike other approaches, OpenPubkey does not require any changes to existing SSO protocols and supports any OpenID Connect compliant OP.
Shows a user Alice signing in to Google using OpenID Connect/OpenPubkey and then producing a PK Token
While OpenPubkey enables ID Tokens to be used as certificates, OPKSSH extends this functionality so that these ID Tokens can be used as SSH keys in the SSH protocol. This adds SSO authentication to SSH without requiring changes to the SSH protocol.
Why this matters
OPKSSH frees users and administrators from the need to manage long-lived SSH keys, making SSH more secure and more convenient.
“In many organizations – even very security-conscious organizations – there are many times more obsolete authorized keys than they have employees. Worse, authorized keys generally grant command-line shell access, which in itself is often considered privileged. We have found that in many organizations about 10% of the authorized keys grant root or administrator access. SSH keys never expire.”
– Challenges in Managing SSH Keys – and a Call for Solutions by Tatu Ylonen (Inventor of SSH)
In SSH, users generate a long-lived SSH public key and SSH private key. To enable a user to access a server, the user or the administrator of that server configures that server to trust that user’s public key. Users must protect the file containing their SSH private key. If the user loses this file, they are locked out. If they copy their SSH private key to multiple computers or back up the key, they increase the risk that the key will be compromised. When a private key is compromised or a user no longer needs access, the user or administrator must remove that public key from any servers it currently trusts. All of these problems create headaches for users and administrators.
OPKSSH overcomes these issues:
Improved security: OPKSSH replaces long-lived SSH keys with ephemeral SSH keys that are created on-demand by OPKSSH and expire when they are no longer needed. This reduces the risk a private key is compromised, and limits the time period where an attacker can use a compromised private key. By default, these OPKSSH public keys expire every 24 hours, but the expiration policy can be set in a configuration file.
Improved usability: Creating an SSH key is as easy as signing in to an OP. This means that a user can SSH from any computer with opkssh installed, even if they haven’t copied their SSH private key to that computer.
To generate their SSH key, the user simply runs opkssh login, and they can use ssh as they typically do.
Improved visibility: OPKSSH moves SSH from authorization by public key to authorization by identity. If Alice wants to give Bob access to a server, she doesn’t need to ask for his public key, she can just add Bob’s email address [email protected] to the OPKSSH authorized users file, and he can sign in. This makes tracking who has access much easier, since administrators can see the email addresses of the authorized users.
OPKSSH does not require any code changes to the SSH server or client. The only change needed to SSH on the SSH server is to add two lines to the SSH config file. For convenience, we provide an installation script that does this automatically, as seen in the video below.
How it works
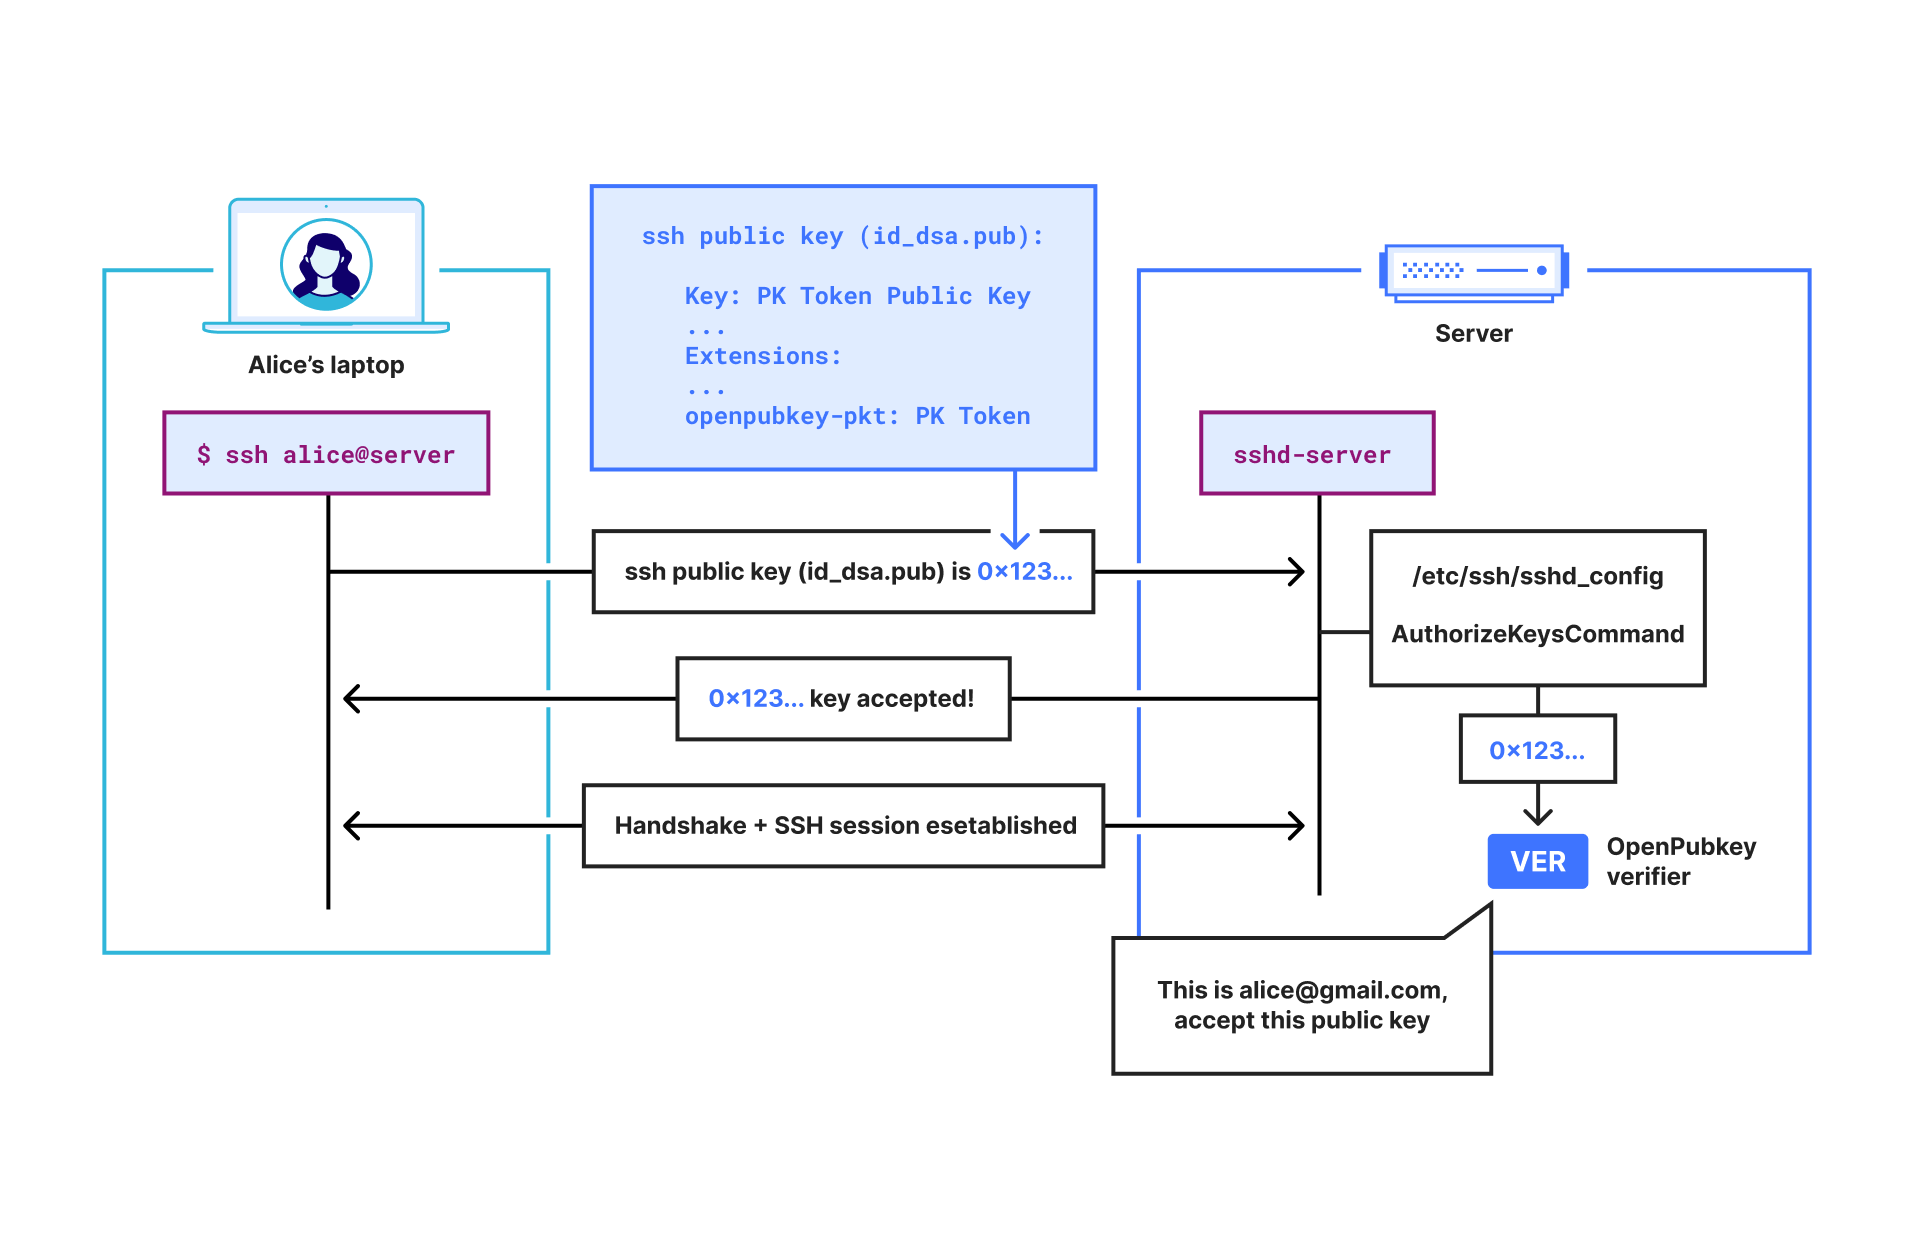
Shows a user Alice SSHing into a server with her PK Token inside her SSH public key. The server then verifies her SSH public key using the OpenPubkey verifier.
Let’s look at an example of Alice ([email protected]) using OPKSSH to SSH into a server:
Alice runs opkssh login. This command automatically generates an ephemeral public key and private key for Alice. Then it runs the OpenPubkey protocol by opening a browser window and having Alice log in through their SSO provider, e.g., Google.
If Alice SSOs successfully, OPKSSH will now have a PK Token that commits to Alice’s ephemeral public key and Alice’s identity. Essentially, this PK Token says “[email protected] authenticated her identity and her public key is 0x123…”.
OPKSSH then saves to Alice’s .ssh directory:
an SSH public key file that contains Alice’s PK Token
and an SSH private key set to Alice’s ephemeral private key.
When Alice attempts to SSH into a server, the SSH client will find the SSH public key file containing the PK Token in Alice’s .ssh directory, and it will send it to the SSH server to authenticate.
The SSH server forwards the received SSH public key to the OpenPubkey verifier installed on the SSH server. This is because the SSH server has been configured to use the OpenPubkey verifier via the AuthorizedKeysCommand.
The OpenPubkey verifier receives the SSH public key file and extracts the PK Token from it. It then verifies that the PK Token is unexpired, valid, signed by the OP and that the public key in the PK Token matches the public key field in the SSH public key file. Finally, it extracts the email address from the PK Token and checks if [email protected] is allowed to SSH into this server.
Consider the problems we face in getting OpenPubkey to work with SSH without requiring any changes to the SSH protocol or software:
How do we get the PK Token from the user’s machine to the SSH server inside the SSH protocol?
We use the fact that SSH public keys can be SSH certificates, and that SSH certificates have an extension field that allows arbitrary data to be included in the certificate. Thus, we package the PK Token into an SSH certificate extension so that the PK Token will be transmitted inside the SSH public key as a normal part of the SSH protocol. This enables us to send the PK Token to the SSH server as additional data in the SSH certificate, and allows OPKSSH to work without any changes to the SSH client.
How do we check that the PK Token is valid once it arrives at the SSH server? SSH servers support a configuration parameter called the AuthorizedKeysCommandthat allows us to use a custom program to determine if an SSH public key is authorized or not. Thus, we change the SSH server’s config file to use the OpenPubkey verifier instead of the SSH verifier by making the following two line change to sshd_config:
The OpenPubkey verifier will check that the PK Token is unexpired, valid and signed by the OP. It checks the user’s email address in the PK Token to determine if the user is authorized to access the server.
How do we ensure that the public key in the PK Token is actually the public key that secures the SSH session?
The OpenPubkey verifier also checks that the public key in the public key field in the SSH public key matches the user’s public key inside the PK Token. This works because the public key field in the SSH public key is the actual public key that secures the SSH session.
What is happening
We have open sourced OPKSSH under the Apache 2.0 license, and released it as openpubkey/opkssh on GitHub. While the OpenPubkey project has had code for using SSH with OpenPubkey since the early days of the project, this code was intended as a prototype and was missing many important features. With OPKSSH, SSH support in OpenPubkey is no longer a prototype and is now a complete feature. Cloudflare is not endorsing OPKSSH, but simply donating code to OPKSSH.
OPKSSH provides the following improvements to OpenPubkey:
Production ready SSH in OpenPubkey
Automated installation
Better configuration tools
To learn more
See the OPKSSH readme for documentation on how to install and connect using OPKSSH.
How to get involved
There are a number of ways to get involved in OpenPubkey or OPKSSH. The project is organized through the OPKSSH GitHub. We are building an open and friendly community and welcome pull requests from anyone. If you are interested in contributing, see our contribution guide.
We run a community meeting every month which is open to everyone, and you can also find us over on the OpenSSF Slack in the #openpubkey channel.
BastionZero joined Cloudflare in May 2024. We are thrilled to announce Access for Infrastructure as BastionZero’s native integration into our SASE platform, Cloudflare One. Access for Infrastructure will enable organizations to apply Zero Trust controls in front of their servers, databases, network devices, Kubernetes clusters, and more. Today, we’re announcing short-lived SSH access as the first available feature. Over the coming months we will announce support for other popular infrastructure access target types like Remote Desktop Protocol (RDP), Kubernetes, and databases.
Applying Zero Trust principles to infrastructure
Organizations have embraced Zero Trust initiatives that modernize secure access to web applications and networks, but often the strategies they use to manage privileged access to their infrastructure can be siloed, overcomplicated, or ineffective. When we speak to customers about their infrastructure access solution, we see common themes and pain points:
Too risky: Long-lived credentials and shared keys get passed around and inflate the risk of compromise, excessive permissions, and lateral movement
Too clunky: Manual credential rotations and poor visibility into infrastructure access slow down incident response and compliance efforts
Some organizations have dealt with the problem of privileged access to their infrastructure by purchasing a Privileged Access Management (PAM) solution or by building a homegrown key management tool. Traditional PAM solutions introduce audit logging and session recording features that capture user interactions with their servers and other infrastructure and/or centralized vaults that rotate keys and passwords for infrastructure every time a key is used. But this centralization can introduce performance bottlenecks, harm usability, and come with a significant price tag. Meanwhile, homegrown solutions are built from primitives provided by cloud providers or custom infrastructure-as-code solutions, and can be costly and tiresome to build out and maintain.
We believe that organizations should apply Zero Trust principles to their most sensitive corporate resources, which naturally includes their infrastructure. That’s why we’re augmenting Cloudflare’s Zero Trust Network Access (ZTNA) service with Access to Infrastructure to support privileged access to sensitive infrastructure, and offering features that will look somewhat similar to those found in a PAM solution:
Access: Connect remote users to infrastructure targets via Cloudflare’s global network.
Authentication: Eliminate the management of credentials for servers, containers, clusters, and databases and replace them with SSO, MFA, and device posture.
Authorization: Use policy-based access control to determine who can access what target, when, and under what role.
Auditing: Provide command logs and session recordings to allow administrators to audit and replay their developers’ interactions with the organization’s infrastructure.
At Cloudflare, we are big believers that unified experiences produce the best security outcomes, and because of that, we are natively rebuilding each BastionZero feature into Cloudflare’s ZTNA service. Today, we will cover the recently-released feature for short-lived SSH access.
Secure Shell (SSH) and its security risks
SSH (Secure Shell) is a protocol that is commonly used by developers or system administrators to secure the connections used to remotely administer and manage (usually Linux/Unix) servers. SSH access to a server often comes with elevated privileges, including the ability to delete or exfiltrate data or to install or remove applications on the server.
Modern enterprises can have tens, hundreds, or even thousands of SSH targets. Servers accessible via SSH can be targeted in cryptojacking or proxyjacking attacks. Manually tracking, rotating, and validating SSH credentials that grant access is a chore that is often left undone, which creates risks that these long-lived credentials could be compromised. There’s nothing stopping users from copying SSH credentials and sharing them with other users or transferring them to unauthorized devices.
Although many organizations will gate access to their servers to users that are inside their corporate network, this is no longer enough to protect against modern attackers. Today, the principles of Zero Trust demand that an organization also tracks who exactly is accessing their servers with SSH, and what commands they are running on those servers once they have access. In fact, the elevated privileges that come along with SSH access mean that compliance frameworks like SOC2, ISO27001, FedRAMP and others have criteria that require monitoring who has access with SSH and what exactly they are doing with that access.
Introducing SSH with Access for Infrastructure
We’ve introduced SSH with Access for Infrastructure to provide customers with granular control over privileged access to servers via SSH. The feature provides improved visibility into who accessed what service and what they did during their SSH session, while also eliminating the risk and overhead associated with managing SSH credentials. Specifically, this feature enables organizations to:
Eliminate security risk and overhead of managing SSH keys and instead use short-lived SSH certificates issued by a Cloudflare-managed certificate authority (CA).
Author fine-grained policy to govern who can SSH to your servers and through which SSH user(s) they can log in as.
Monitor infrastructure access with Access and SSH command logs, supporting regulatory compliance and providing visibility in case of security breach.
Avoid changing end-user workflows. SSH with Access for Infrastructure supports whatever native SSH clients end users happen to be using.
SSH with Access for Infrastructure is supported through one of the most common deployment models of Cloudflare One customers. Users can connect using our device client (WARP), and targets are made accessible using Cloudflare Tunnel (cloudflared or the WARP connector). This architecture allows customers with existing Cloudflare One deployments to enable this feature with little to no effort. The only additional setup will be configuring your target server to accept a Cloudflare SSH certificate.
Cloudflare One already offers multiple ways to secure organizations’ SSH traffic through network controls. This new SSH with Access for Infrastructure aims to incorporate the strengths of those existing solutions together with additional controls to authorize ports, protocols, and specific users as well as a much improved deployment workflow and audit logging capabilities.
Eliminating SSH credentials using an SSH CA
How does Access for Infrastructure eliminate your SSH credentials? This is done by replacing SSH password and SSH keys with an SSH Certificate Authority (CA) that is managed by Cloudflare. Generally speaking, a CA’s job is to issue certificates that bind an entity to an entity’s public key. Cloudflare’s SSH CA has a secret key that is used to sign certificates that authorize access to a target (server) via SSH, and a public key that is used by the target (server) to cryptographically validate these certificates. The public key for the SSH CA can be obtained by querying the Cloudflare API. And the secret key for the SSH CA is kept secure by Cloudflare and never exposed to anyone.
To use SSH with Access for Infrastructure to grant access via SSH to a set of targets (i.e. servers), you need to instruct those servers to trust the Cloudflare SSH CA. Those servers will then grant access via SSH whenever they are presented with an SSH certificate that is validly signed by the Cloudflare SSH CA.
The same Cloudflare SSH CA is used to support SSH access for all of your developers and engineers to all your target servers. This greatly simplifies key management. You no longer need to manage long-lived SSH keys and passwords for individual end users, because access to targets with SSH is granted via certificates that are dynamically issued by the Cloudflare SSH CA. And, because the Cloudflare SSH CA issued short-lived SSH certificates that expire after 3 minutes, you also don’t have to worry about creating or managing long-lived SSH credentials that could be stolen by attackers.
The 3-minute time window on the SSH certificate only applies to the time window during which the user has to authenticate to the target server; it does not apply to the length of the SSH session, which can be arbitrarily longer than 3 minutes. This 3-minute window was chosen because it was short enough to reduce the risk of security compromise and long enough to ensure that we don’t miss the time window of the user’s authentication to the server, especially if the user is on a slow connection.
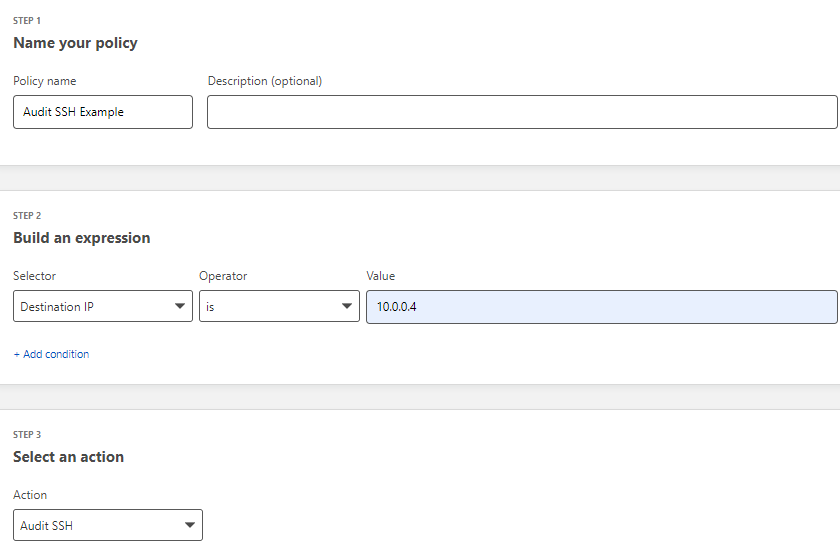
Centrally managing policies down to the specific Linux user
One of the problems with traditional SSH is that once a user has an SSH key or password installed on a server, they will have access to that server forever — unless an administrator somehow remembers to remove their SSH key or password from the server in question. This leads to privilege creep, where too many people have standing access to too many servers, creating a security risk if an SSH key or password is ever stolen or leaked.
Instead, SSH with Access for Infrastructure allows you to centrally write policies in the Cloudflare dashboard specifying exactly what (set of) users has access to what (set of) servers. Users may be authenticated by SSO, MFA, device posture, location, and more, which provides better security than just authenticating them via long-lived SSH keys or passwords that could be stolen by attackers.
Moreover, the SSH certificates issued by the Cloudflare CA include a field called ValidPrinciples which indicates the specific Linux user (e.g. root, read-only, ubuntu, ec2-user) that can be assumed by the SSH connection. As such, you can write policies that specify the (set of) Linux users that a given (set of) end users may access on a given (set of) servers, as shown in the figure below. This allows you to centrally control the privileges that a given end user has when accessing a given target server. (The one caveat here is that the server must also be pre-configured to already know about the specific Linux user (e.g. root) that is specified in the policies and presented in the SSH certificate. Cloudflare is NOT managing the Linux users on your Linux servers.)
As shown below, you could write a policy that says users in Canada, the UK, and Australia that are authenticated with MFA and face recognition can access the root and ec2-user Linux users on a given set of servers in AWS.
How does Cloudflare capture SSH command logs?
Cloudflare captures SSH command logs because we built an SSH proxy that intercepts the SSH connections. The SSH proxy establishes one SSH connection between itself and the end user’s SSH client, and another SSH connection between itself and the target (server). The SSH proxy can therefore inspect the SSH commands and log them.
SSH commands are encrypted at rest using a public key that the customer uploads via the Cloudflare API. Cloudflare cannot read SSH command logs at rest, but they can be extracted (in encrypted form) from the Cloudflare API and decrypted by the customer (who holds the corresponding private key). Instructions for uploading the encryption public key are available in our developer documentation.
How the SSH interception works under the hood
How does generic SSH work?
To understand how Cloudflare’s SSH proxy works, we first must review how a generic SSH connection is established.
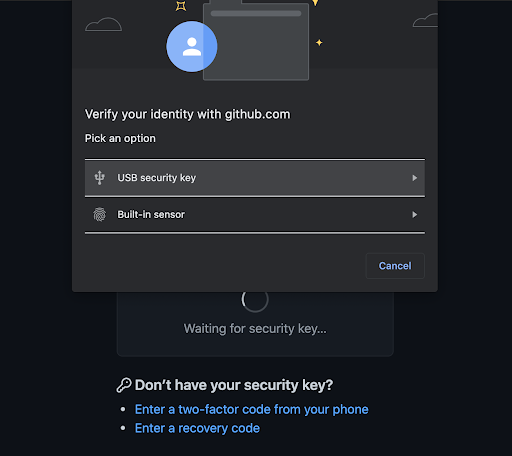
First off, SSH runs over TCP, so to establish an SSH connection, we first need to complete a TCP handshake. Then, once the TCP handshake is complete, an SSH key exchange is needed to establish an ephemeral symmetric key between the client and the server that will be used to encrypt and authenticate their SSH traffic. The SSH key exchange is based on the server public key, also known as the hostkey. If you’ve ever used SSH, you’ve probably seen this message — that is the SSH server telling your SSH client to trust this hostkey for all future SSH interactions. (This is also known as TOFU or Trust On First Use.)
Finally, the client needs to authenticate itself to the server. This can be done using SSH passwords, SSH keys, or SSH certificates (as described above). SSH also has a mode called none, which means that the client does NOT need to authenticate itself to the server at all.
So how does Cloudflare’s SSH proxy work?
To understand this, we note that whenever you set up SSH with Access for Infrastructure in the Cloudflare dashboard, you first need to create the set of targets (i.e. servers) that you want to make accessible via SSH. Targets can be defined by IP address or hostname. You then create an Access for Infrastructure application that captures the TCP ports (e.g. port 22) that SSH runs over for those targets, and write policies for those SSH connections, as we already described above and in our developer documentation.
This setup allows Cloudflare to know the set of IP addresses and ports for which it must intercept SSH traffic. Thus, whenever Cloudflare sees a TCP handshake with an IP address and port that must be intercepted, it sends traffic for that TCP connection to the SSH proxy.
The SSH proxy leverages the client’s already authenticated identity from the WARP client, and enforces the configured Access for Infrastructure policies against it. If the policies do not allow the identity to connect to the target under the requested Linux user (e.g. root), the SSH proxy will reject the connection and log an Access deniedevent to the Access logs. Otherwise, if policies do allow the identity to connect, the the SSH proxy will establish the following two SSH connections:
SSH connection from SSH proxy to target
SSH connection from end user’s SSH client (via Cloudflare’s WARP client) to SSH proxy
Let’s take a look at each of these SSH connections, and the cryptographic material used to set them up.
To establish the SSH connection from SSH proxy to the target, the SSH proxy acts as a client in the SSH key exchange between itself and the target server. The handshake uses the target server’s hostkey to establish an ephemeral symmetric key between the client and the server that will encrypt and authenticate their SSH traffic. Next, the SSH proxy must authenticate itself to the target server. This is done by presenting the server with a short-lived SSH certificate, issued by the Cloudflare SSH CA, for the specified Linux user that is requested for this connection as we already described above. Because the target server has been configured to trust the Cloudflare SSH CA, the target server will be able to successfully validate the certificate and the SSH connection will be established.
To establish the SSH connection from the end-user’s SSH client to SSH proxy, the SSH proxy acts as a server in the SSH key exchange between itself and the end-user’s SSH client.
To do this, the SSH proxy needs to inform the end user’s SSH client about the hostkey that will be used to establish this connection. But what hostkey should be used? We cannot use the same hostkey used by the target server, because that hostkey is the public key that corresponds to a private key that is known only to the target server, and not known to the SSH proxy. So, Cloudflare’s SSH proxy needs to generate its own hostkey. We don’t want the end user to randomly see warnings like the one shown below, so the SSH proxy should provide the same hostkey each time the user wants to access a given target server. But, if something does change with the hostkey of the target server, we do want the warning below to be shown.
To achieve the desired behavior, the SSH proxy generates a hostkey and its corresponding private key by hashing together (a) a fixed secret value valid that associated with the customer account, along with (b) the hostkey that was provided by this target server (in the connection from SSH proxy to target server). This part of the design ensures that the end user only needs to see the TOFU notification the very first time it connects to the target server via WARP, because the same hostkey is used for all future connections to that target. And, if the hostkey of the target server does change as a result of a Monster-In-The-Middle attack, the warning above will be shown to the user.
Finally, during the SSH key exchange handshake from WARP client to SSH proxy, the SSH proxy informs that end user’s native SSH client that it is using none for client authentication. This means that the SSH client does NOT need to authenticate itself to the server at all. This part of the design ensures that the user need not enter any SSH passwords or store any SSH keys in its SSH configuration in order to connect to the target server via WARP. Also, this does not compromise security, because the SSH proxy has already authenticated the end user via Cloudflare’s WARP client and thus does not need to use the native SSH client authentication in the native SSH client.
Put this all together, and we have accomplished our goal of having end users authenticate to target servers without any SSH keys or passwords, using Cloudflare’s SSH CA instead. Moreover, we also preserve the desired behaviors of the TOFU notifications and warnings built into native SSH clients!
All the keys
Before we wrap up, let’s review the cryptographic keys you need in order to deploy SSH with Access for Infrastructure. There are two keys:
Public key of the SSH CA. The private key of the SSH CA is only known to Cloudflare and not shared with anyone. The public key of the SSH CA is obtained from the Cloudflare API and must be installed on all your target servers. The same public key is used for all of your targets. This public key does not need to be kept secret.
Private key for SSH command log encryption. To obtain logs of SSH commands, you need to generate a public-private key pair, and upload the public key to Cloudflare. The public key will be used to encrypt your SSH commands logs at REST. You need to keep the private key secret, and you can use it to decrypt your SSH command logs.
That’s it! No other keys, passwords, or credentials to manage!
Try it out today
At Cloudflare, we are committed to providing the most comprehensive solution for ZTNA, which now also includes privileged access to sensitive infrastructure like servers accessed over SSH.
Organizations can now treat SSH like any other Access application and enforce strong MFA, device context, and policy-based access prior to granting user access. This allows organizations to consolidate their infrastructure access policies into their broader SSE or SASE architecture.
You can try out Access for Infrastructure today by following these instructions in our developer documentation. Access for Infrastructure is currently available free to teams of under 50 users, and at no extra cost to existing pay-as-you-go and Contract plan customers through an Access or Zero Trust subscription. Expect to hear about a lot more features from us as we continue to natively rebuild BastionZero’s technology into Cloudflare’s Access for Infrastructure service!
The vulnerability, which is a signal handler race condition in OpenSSH’s server (sshd), allows unauthenticated remote code execution (RCE) as root on glibc-based Linux systems; that presents a significant security risk. This race condition affects sshd in its default configuration.
[…]
This vulnerability, if exploited, could lead to full system compromise where an attacker can execute arbitrary code with the highest privileges, resulting in a complete system takeover, installation of malware, data manipulation, and the creation of backdoors for persistent access. It could facilitate network propagation, allowing attackers to use a compromised system as a foothold to traverse and exploit other vulnerable systems within the organization.
Moreover, gaining root access would enable attackers to bypass critical security mechanisms such as firewalls, intrusion detection systems, and logging mechanisms, further obscuring their activities. This could also result in significant data breaches and leakage, giving attackers access to all data stored on the system, including sensitive or proprietary information that could be stolen or publicly disclosed.
This vulnerability is challenging to exploit due to its remote race condition nature, requiring multiple attempts for a successful attack. This can cause memory corruption and necessitate overcoming Address Space Layout Randomization (ASLR). Advancements in deep learning may significantly increase the exploitation rate, potentially providing attackers with a substantial advantage in leveraging such security flaws.
Last week, the Internet dodged a major nation-state attack that would have had catastrophic cybersecurity repercussions worldwide. It’s a catastrophe that didn’t happen, so it won’t get much attention—but it should. There’s an important moral to the story of the attack and its discovery: The security of the global Internet depends on countless obscure pieces of software written and maintained by even more obscure unpaid, distractible, and sometimes vulnerable volunteers. It’s an untenable situation, and one that is being exploited by malicious actors. Yet precious little is being done to remedy it.
Programmers dislike doing extra work. If they can find already-written code that does what they want, they’re going to use it rather than recreate the functionality. These code repositories, called libraries, are hosted on sites like GitHub. There are libraries for everything: displaying objects in 3D, spell-checking, performing complex mathematics, managing an e-commerce shopping cart, moving files around the Internet—everything. Libraries are essential to modern programming; they’re the building blocks of complex software. The modularity they provide makes software projects tractable. Everything you use contains dozens of these libraries: some commercial, some open source and freely available. They are essential to the functionality of the finished software. And to its security.
You’ve likely never heard of an open-source library called XZ Utils, but it’s on hundreds of millions of computers. It’s probably on yours. It’s certainly in whatever corporate or organizational network you use. It’s a freely available library that does data compression. It’s important, in the same way that hundreds of other similar obscure libraries are important.
Many open-source libraries, like XZ Utils, are maintained by volunteers. In the case of XZ Utils, it’s one person, named Lasse Collin. He has been in charge of XZ Utils since he wrote it in 2009. And, at least in 2022, he’s had some “longterm mental health issues.” (To be clear, he is not to blame in this story. This is a systems problem.)
Beginning in at least 2021, Collin was personally targeted. We don’t know by whom, but we have account names: Jia Tan, Jigar Kumar, Dennis Ens. They’re not real names. They pressured Collin to transfer control over XZ Utils. In early 2023, they succeeded. Tan spent the year slowly incorporating a backdoor into XZ Utils: disabling systems that might discover his actions, laying the groundwork, and finally adding the complete backdoor earlier this year. On March 25, Hans Jansen—another fake name—tried to push the various Unix systems to upgrade to the new version of XZ Utils.
And everyone was poised to do so. It’s a routine update. In the span of a few weeks, it would have been part of both Debian and Red Hat Linux, which run on the vast majority of servers on the Internet. But on March 29, another unpaid volunteer, Andres Freund—a real person who works for Microsoft but who was doing this in his spare time—noticed something weird about how much processing the new version of XZ Utils was doing. It’s the sort of thing that could be easily overlooked, and even more easily ignored. But for whatever reason, Freund tracked down the weirdness and discovered the backdoor.
It’s a masterful piece of work. It affects the SSH remote login protocol, basically by adding a hidden piece of functionality that requires a specific key to enable. Someone with that key can use the backdoored SSH to upload and execute an arbitrary piece of code on the target machine. SSH runs as root, so that code could have done anything. Let your imagination run wild.
This isn’t something a hacker just whips up. This backdoor is the result of a years-long engineering effort. The ways the code evades detection in source form, how it lies dormant and undetectable until activated, and its immense power and flexibility give credence to the widely held assumption that a major nation-state is behind this.
If it hadn’t been discovered, it probably would have eventually ended up on every computer and server on the Internet. Though it’s unclear whether the backdoor would have affected Windows and macOS, it would have worked on Linux. Remember in 2020, when Russia planted a backdoor into SolarWinds that affected 14,000 networks? That seemed like a lot, but this would have been orders of magnitude more damaging. And again, the catastrophe was averted only because a volunteer stumbled on it. And it was possible in the first place only because the first unpaid volunteer, someone who turned out to be a national security single point of failure, was personally targeted and exploited by a foreign actor.
This is no way to run critical national infrastructure. And yet, here we are. This was an attack on our software supply chain. This attack subverted software dependencies. The SolarWinds attack targeted the update process. Other attacks target system design, development, and deployment. Such attacks are becoming increasingly common and effective, and also are increasingly the weapon of choice of nation-states.
It’s impossible to count how many of these single points of failure are in our computer systems. And there’s no way to know how many of the unpaid and unappreciated maintainers of critical software libraries are vulnerable to pressure. (Again, don’t blame them. Blame the industry that is happy to exploit their unpaid labor.) Or how many more have accidentally created exploitable vulnerabilities. How many other coercion attempts are ongoing? A dozen? A hundred? It seems impossible that the XZ Utils operation was a unique instance.
Solutions are hard. Banning open source won’t work; it’s precisely because XZ Utils is open source that an engineer discovered the problem in time. Banning software libraries won’t work, either; modern software can’t function without them. For years, security engineers have been pushing something called a “software bill of materials”: an ingredients list of sorts so that when one of these packages is compromised, network owners at least know if they’re vulnerable. The industry hates this idea and has been fighting it for years, but perhaps the tide is turning.
The fundamental problem is that tech companies dislike spending extra money even more than programmers dislike doing extra work. If there’s free software out there, they are going to use it—and they’re not going to do much in-house security testing. Easier software development equals lower costs equals more profits. The market economy rewards this sort of insecurity.
We need some sustainable ways to fund open-source projects that become de facto critical infrastructure. Public shaming can help here. The Open Source Security Foundation (OSSF), founded in 2022 after another critical vulnerability in an open-source library—Log4j—was discovered, addresses this problem. The big tech companies pledged $30 million in funding after the critical Log4j supply chain vulnerability, but they never delivered. And they are still happy to make use of all this free labor and free resources, as a recent Microsoft anecdote indicates. The companies benefiting from these freely available libraries need to actually step up, and the government can force them to.
There’s a lot of tech that could be applied to this problem, if corporations were willing to spend the money. Liabilities will help. The Cybersecurity and Infrastructure Security Agency’s (CISA’s) “secure by design” initiative will help, and CISA is finally partnering with OSSF on this problem. Certainly the security of these libraries needs to be part of any broad government cybersecurity initiative.
We got extraordinarily lucky this time, but maybe we can learn from the catastrophe that didn’t happen. Like the power grid, communications network, and transportation systems, the software supply chain is critical infrastructure, part of national security, and vulnerable to foreign attack. The US government needs to recognize this as a national security problem and start treating it as such.
The cybersecurity world got really lucky last week. An intentionally placed backdoor in XZ Utils, an open-source compression utility, was pretty much accidentally discovered by a Microsoft engineer—weeks before it would have been incorporated into both Debian and Red Hat Linux. From ArsTehnica:
Malicious code added to XZ Utils versions 5.6.0 and 5.6.1 modified the way the software functions. The backdoor manipulated sshd, the executable file used to make remote SSH connections. Anyone in possession of a predetermined encryption key could stash any code of their choice in an SSH login certificate, upload it, and execute it on the backdoored device. No one has actually seen code uploaded, so it’s not known what code the attacker planned to run. In theory, the code could allow for just about anything, including stealing encryption keys or installing malware.
It was an incredibly complex backdoor. Installing it was a multi-year process that seems to have involved socialengineering the lone unpaid engineer in charge of the utility. More from ArsTechnica:
In 2021, someone with the username JiaT75 made their first known commit to an open source project. In retrospect, the change to the libarchive project is suspicious, because it replaced the safe_fprint function with a variant that has long been recognized as less secure. No one noticed at the time.
The following year, JiaT75 submitted a patch over the XZ Utils mailing list, and, almost immediately, a never-before-seen participant named Jigar Kumar joined the discussion and argued that Lasse Collin, the longtime maintainer of XZ Utils, hadn’t been updating the software often or fast enough. Kumar, with the support of Dennis Ens and several other people who had never had a presence on the list, pressured Collin to bring on an additional developer to maintain the project.
There’s a lot more. The sophistication of both the exploit and the process to get it into the software project scream nation-state operation. It’s reminiscent of Solar Winds, although (1) it would have been much, much worse, and (2) we got really, really lucky.
I simply don’t believe this was the only attempt to slip a backdoor into a critical piece of Internet software, either closed source or open source. Given how lucky we were to detect this one, I believe this kind of operation has been successful in the past. We simply have to stop building our critical national infrastructure on top of random software libraries managed by lone unpaid distracted—or worse—individuals.
For the first time, researchers have demonstrated that a large portion of cryptographic keys used to protect data in computer-to-server SSH traffic are vulnerable to complete compromise when naturally occurring computational errors occur while the connection is being established.
[…]
The vulnerability occurs when there are errors during the signature generation that takes place when a client and server are establishing a connection. It affects only keys using the RSA cryptographic algorithm, which the researchers found in roughly a third of the SSH signatures they examined. That translates to roughly 1 billion signatures out of the 3.2 billion signatures examined. Of the roughly 1 billion RSA signatures, about one in a million exposed the private key of the host.
Abstract: We demonstrate that a passive network attacker can opportunistically obtain private RSA host keys from an SSH server that experiences a naturally arising fault during signature computation. In prior work, this was not believed to be possible for the SSH protocol because the signature included information like the shared Diffie-Hellman secret that would not be available to a passive network observer. We show that for the signature parameters commonly in use for SSH, there is an efficient lattice attack to recover the private key in case of a signature fault. We provide a security analysis of the SSH, IKEv1, and IKEv2 protocols in this scenario, and use our attack to discover hundreds of compromised keys in the wild from several independently vulnerable implementations.
SSH (Secure Shell Protocol) is an important protocol for managing remote machines. It provides a way for infrastructure teams to remotely and securely manage their fleet of machines. SSH was a step-up in security from other protocols like telnet. It ensures encrypted traffic and enforces per user controls over access to a particular machine. However, it can still introduce a significant security risk. SSH, especially root access, is destructive in the wrong hands (think rm -r *) and can be difficult to track. Logging and securing user actions via SSH typically requires custom development or restrictive software deployments. We’re excited to announce SSH command logging as part of Cloudflare Zero Trust.
Securing SSH access
Security teams put significant effort into securing SSH across their organization because of the negative impact it can have in the wrong hands. Traditional SSH security consists of strong authentication, like certificate based authentication, and tight controls on who has “root” access. Additionally, VPNs and IP allow lists are used to further protect a machine from being publicly accessible to the Internet. The security challenges that remain are visibility and potential for lateral movement.
SSH commands to a remote machine are end-to-end encrypted, which means that it is impossible to see what is being run by a particular user on a specific machine. Typically, logs can only be captured on the machine itself in log files, and a malicious user can delete log files as easily as any other command they’re running to cover their tracks. Solutions exist to send these logs to an external logging service, but this requires installing additional software on every machine that can be accessed using SSH. ProxyJump, a common way to deploy a JumpHost model, further compounds this problem because a user can easily traverse a local network of machines once they gain access to a machine in the network.
Introducing SSH command logging
We built SSH command logging into Cloudflare Zero Trust to provide SSH visibility at a network layer instead of relying on software on individual machines. Our first customer for this capability is the Cloudflare security team. SSH command logging provides a full replay of all commands run during an SSH session, including across multiple jump-hosts or bastions. This allows for a clear picture of what happened in the event of an accident, suspected breach, or attack.
SSH command logging was built as an extension of Cloudflare’s Secure Web Gateway. The Secure Web Gateway already performs secure TLS inspection of all traffic from a user device. Now, it also supports SSH inspection by bootstrapping a proxy server upon new connections. Administrators are able to configure network policies to allow SSH access and audit the specific commands run.
This then exposes that machine for SSH access and proxies all SSH commands via Cloudflare’s global edge network. All commands are automatically captured without complex logging software installed on the machine and across all hosts. TTY traffic can also be recorded for a later full session replay.
As an added measure of security, all logs captured by Cloudflare are immediately encrypted via a public key provided by each customer, to ensure that only authorized security users can inspect SSH commands. Furthermore, we are launching this feature with an opt-in FIPS 140-2 mode to support FedRAMP compliant users.
All user authentication is performed via Cloudflare Short-Lived Certificates. Once the client certificate is loaded onto a user machine, their SSH setup is complete and secure. This eliminates the need for tedious and tricky SSH key-pair management. This means no more key management on end user devices, all the need is the Cloudflare root CA, and they can access any machine they are entitled to, including using ProxyJump.
What’s next
This is only the beginning for SSH security in Cloudflare Zero Trust. In the future, we will integrate with popular SIEM tools and provide alerting for specific commands and risky behavior.
SSH command logging is in closed beta, and we will be opening this feature up to users in the coming weeks. Stay tuned for more updates when we announce general availability!
GitHub has been at the forefront of security key adoption for many years. We were an early adopter of Universal 2nd Factor (“U2F”) and were also one of the first sites to transition to Webauthn. We’re always on the lookout for new standards that both increase security and usability. Today we’re taking the next step by shipping support for security keys when using Git over SSH.
What are security keys and how do they work?
Security keys, such as the YubiKey, are portable and transferable between machines in a convenient form factor. Most security keys connect via USB, NFC, or Bluetooth. When used in a web browser with two-factor authentication enabled, security keys provide a strong, convenient, and phishing-proof alternative to one-time passwords provided by applications or SMS. Much of the data on the key is protected from external access and modification, ensuring the secrets cannot be taken from the security key. Security keys should be protected as a credential, so keep track of them and you can be confident that you have usable, strong authentication. As long as you retain access to the security key, you can be confident that it can’t be used by anyone else for any other purpose.
Use your existing security key for Git operations
When used for SSH operations, security keys move the sensitive part of your SSH key from your computer to a secure external security key. SSH keys that are bound to security keys protect you from accidental private key exposure and malware. You perform a gesture, such as a tap on the security key, to indicate when you intend to use the security key to authenticate. This action provides the notion of “user presence.”
Security keys are not limited to a single application, so the same individual security key is available for both web and SSH authentication. You don’t need to acquire a separate security key for each use case. And unlike web authentication, two-factor authentication is not a requirement when using security keys to authenticate to Git. As always, we recommend using a strong password, enrolling in two-factor authentication, and setting up account recovery mechanisms. Conveniently, security keys themselves happen to be a great recovery option for securely retaining access to your two-factor-enabled account if you lose access to your phone and backup codes.
The same SSH keys you already know and love, just a little different
Generating and using security keys for SSH is quite similar to how you generated and used SSH keys in the past. You can password-protect your key and require a security key! According to our data, you likely either use an RSA or ed25519 key. Now you can use two additional key types: ecdsa-sk and ed25519-sk, where the “sk” suffix is short for “security key.”
$ ssh-keygen -t ecdsa-sk -C <email address>
Generating public/private ecdsa-sk key pair.
You may need to touch your authenticator to authorize key generation.
Once generated, you add these new keys to your account just like any other SSH key. You’ll still create a public and private key pair, but secret bits are generated and stored in the security key, with the public part stored on your machine like any other SSH public key. There is a private key file stored on your machine, but your private SSH key is a reference to the security key device itself. If your private key file on your computer is stolen, it would be useless without the security key. When using SSH with a security key, none of the sensitive information ever leaves the physical security key device. If you’re the only person with physical access to your security key, it’s safe to leave plugged in at all times.
Safer Git access and key management
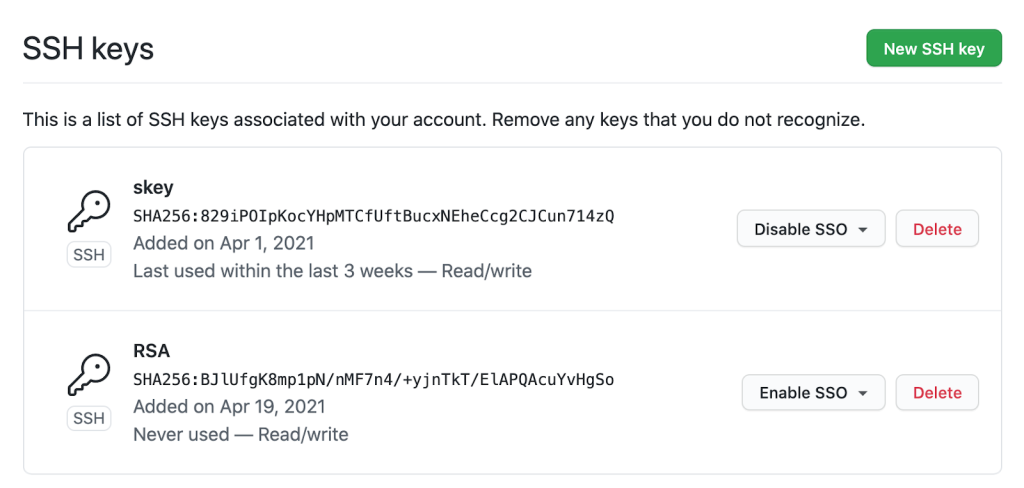
With security keys, you can achieve a higher level of account security and protection from account takeover. You can take things a step further by removing your previously registered SSH keys, using only SSH keys backed by security keys. Using only SSH keys backed by security keys gives you strong assurance that you are the only person pulling your Git data via SSH as long as you keep the security key safe like any other private key.
Security keys provide meaningful safety assurances even if you only access Git on trusted, consistent systems. At the other end of the spectrum, you might find yourself working in numerous unfamiliar environments where you need to perform Git operations. Security keys dramatically reduce the impact of inadvertent exposure without the need to manage each SSH key on your account carefully. You can confidently generate and leave SSH keys on any system for any length of time and not have to worry about removing access later. We’ll remove unused keys from your account, making key management even easier. Remember to periodically use keys you want to retain over time so we don’t delete them for you.
Protecting against unintended operations
Every remote Git operation will require an additional key tap to ensure that malware cannot initiate requests without your approval. You can still perform local operations, such as checkout, branch, and merge, without interruption. When you’re happy with your code or ready to receive updates, remote operations like push, fetch, and pull will require that you tap your security key before continuing. As always, SSH keys must be present and optionally unlocked with a password for all Git operations. Unlike password-protected SSH keys, clients do not cache security key taps for multiple operations.
$ git clone [email protected]:github/secure_headers.git
Cloning into 'secure_headers'...
Confirm user presence for key ECDSA-SK SHA256:xzg6NAJDyJB1ptnbRNy8UxD6mdm7J/YBdu2p5+fCUa0
User presence confirmed
Already familiar with using SSH keys backed by security keys? In that case, you might wonder why we require verification (via the security key “tap”) when you can configure your security key to allow operations to proceed as long as the security key is present. While we understand the appeal of removing the need for the taps, we determined our current approach to require presence and intention is the best balance between usability and security.
Towards a future with fewer passwords
Today, you can use a password, a personal access token (PAT), or an SSH key to access Git at GitHub. Later this year, as we continue to iterate toward more secure authentication patterns, passwords will no longer be supported for Git operations. We recognize that passwords are convenient, but they are a consistentsource of account security challenges. We believe passwords represent the present and past, but not the future. We would rather invest in alternatives, like our Personal Access Tokens, by adding features such as fine-grained access and more control over expiration. It’s a long journey, but every effort to reduce the use of passwords has improved the security of the entire GitHub ecosystem.
By removing password support for Git, as we already successfully did for our API, we will raise the baseline security hygiene for every user and organization, and for the resulting software supply chain. By adding SSH security key support, we have provided a new, more secure, and easy-to-use way to strongly authenticate with Git while preventing unintended and potentially malicious access. If you are ready to make the switch, log in to your account and follow the instructions in our documentation to create a new key and add it to your account.
We wanted to extend our gratitude to Yubico, with whom we’ve partnered several times over the years, for being an early collaborator with us on this feature and providing us valuable feedback to ensure we continue to improve developer security.
To provide the best experiences, we use technologies like cookies to store and/or access device information. Consenting to these technologies will allow us to process data such as browsing behavior or unique IDs on this site. Not consenting or withdrawing consent, may adversely affect certain features and functions.
Functional
Always active
The technical storage or access is strictly necessary for the legitimate purpose of enabling the use of a specific service explicitly requested by the subscriber or user, or for the sole purpose of carrying out the transmission of a communication over an electronic communications network.
Preferences
The technical storage or access is necessary for the legitimate purpose of storing preferences that are not requested by the subscriber or user.
Statistics
The technical storage or access that is used exclusively for statistical purposes.The technical storage or access that is used exclusively for anonymous statistical purposes. Without a subpoena, voluntary compliance on the part of your Internet Service Provider, or additional records from a third party, information stored or retrieved for this purpose alone cannot usually be used to identify you.
Marketing
The technical storage or access is required to create user profiles to send advertising, or to track the user on a website or across several websites for similar marketing purposes.