Post Syndicated from Marco Sommella original https://aws.amazon.com/blogs/security/how-to-configure-ldaps-endpoint-for-simple-ad/
In this blog post, we show you how to configure an LDAPS (LDAP over SSL or TLS) encrypted endpoint for Simple AD so that you can extend Simple AD over untrusted networks. Our solution uses Network Load Balancer (NLB) as SSL/TLS termination. The data is then decrypted and sent to Simple AD. Network Load Balancer offers integrated certificate management, SSL/TLS termination, and the ability to use a scalable Amazon Elastic Compute Cloud (Amazon EC2) backend to process decrypted traffic. Network Load Balancer also tightly integrates with Amazon Route 53, enabling you to use a custom domain for the LDAPS endpoint. To simplify testing and deployment, we have provided an AWS CloudFormation template to provision the network load balancer (NLB).
Simple AD, which is powered by Samba 4, supports basic Active Directory (AD) authentication features such as users, groups, and the ability to join domains. Simple AD also includes an integrated Lightweight Directory Access Protocol (LDAP) server. LDAP is a standard application protocol for accessing and managing directory information. You can use the BIND operation from Simple AD to authenticate LDAP client sessions. This makes LDAP a common choice for centralized authentication and authorization for services such as Secure Shell (SSH), client-based virtual private networks (VPNs), and many other applications. Authentication, the process of confirming the identity of a principal, typically involves the transmission of highly sensitive information such as user names and passwords. To protect this information in transit over untrusted networks, companies often require encryption as part of their information security strategy.
This post assumes that you understand concepts such as Amazon Virtual Private Cloud (Amazon VPC) and its components, including subnets, routing, internet and network address translation (NAT) gateways, DNS, and security groups. If needed, you should familiarize yourself with these concepts and review the solution overview and prerequisites in the next section before proceeding with the deployment.
Note: This solution is intended for use by clients who require only an LDAPS endpoint. If your requirements extend beyond this, you should consider accessing the Simple AD servers directly or by using AWS Directory Service for Microsoft AD.
Solution overview
The following description explains the Simple AD LDAPS environment. The AWS CloudFormation template creates the network-load-balancer object.
- The LDAP client sends an LDAPS request to the NLB on TCP port 636.
- The NLB terminates the SSL/TLS session and decrypts the traffic using a certificate. The NLB sends the decrypted LDAP traffic to Simple AD on TCP port 389.
- The Simple AD servers send an LDAP response to the NLB. The NLB encrypts the response and sends it to the client.
The following diagram illustrates how the solution works and shows the prerequisites (listed in the following section).
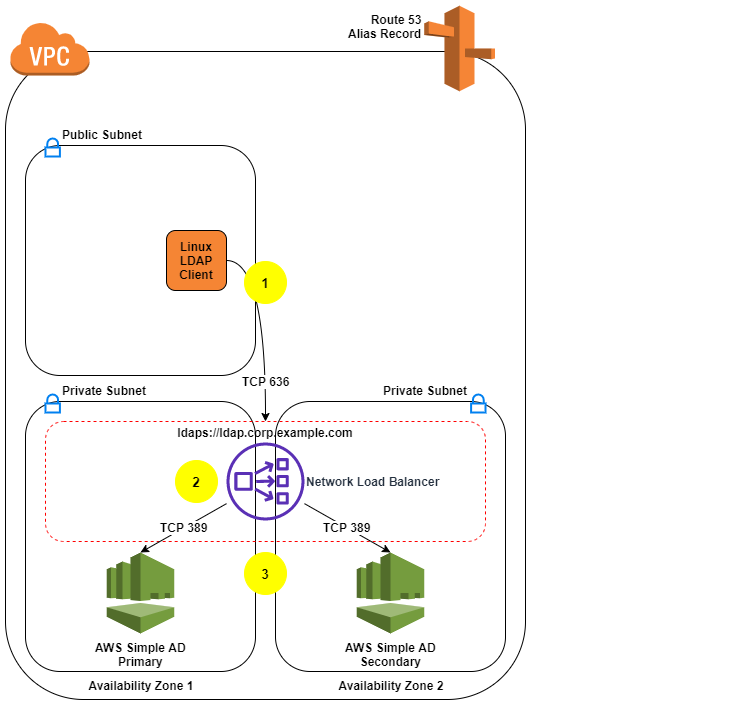
Figure 1: LDAPS with Simple AD Architecture
Note: Amazon VPC prevents third parties from intercepting traffic within the VPC. Because of this, the VPC protects the decrypted traffic between the NLB and Simple AD. The NLB encryption provides an additional layer of security for client connections and protects traffic coming from hosts outside the VPC.
Prerequisites
- Our approach requires an Amazon VPC with one public and two private subnets. If you don’t have an Amazon VPC that meets that requirement, use the following instructions to set up a sample environment:
- Identify an AWS Region that supports Simple AD and network load balancing.
- Identify two Availability Zones in that Region to use with Simple AD. The Availability Zones are needed as parameters in the AWS CloudFormation template used later in this process.
- Create or choose an Amazon VPC in the region you chose.
- Enable DNS support within your VPC so you can use Route 53 to resolve the LDAPS endpoint.
- Create two private subnets, one per Availability Zone. The Simple AD servers use the subnets that you create.
- Create a public subnet in the same VPC.
- The LDAP service requires a DNS domain that resolves within your VPC and from your LDAP clients. If you don’t have an existing DNS domain, create a private hosted zone and associate it with your VPC. To avoid encryption protocol errors, you must ensure that the DNS domain name is consistent across your Route 53 zone and in the SSL/TLS certificate.
- Make sure you’ve completed the Simple AD prerequisites.
- You can use a certificate issued by your preferred certificate authority or a certificate issued by AWS Certificate Manager (ACM). If you don’t have a certificate authority, you can create a self-signed certificate by following the instructions in section 2 (Create a certificate).
Note: To prevent unauthorized direct connections to your Simple AD servers, you can modify the Simple AD security group on port 389 to block traffic from locations outside of the Simple AD VPC. You can find the security group in the Amazon EC2 console by creating a search filter for your Simple AD directory ID. It is also important to allow the Simple AD servers to communicate with each other as shown on Simple AD Prerequisites.
Solution deployment
This solution includes 5 main parts:
- Create a Simple AD directory.
- (Optional) Create a SSL/TLS certificate, if you don’t have already have one.
- Create the NLB by using the supplied AWS CloudFormation template.
- Create a Route 53 record.
- Test LDAPS access using an Amazon Linux 2 client.
1. Create a Simple AD directory
With the prerequisites completed, your first step is to create a Simple AD directory in your private VPC subnets.
To create a Simple AD directory:
- In the Directory Service console navigation pane, choose Directories and then choose Set up directory.
- Choose Simple AD.

Figure 2: Select directory type
- Provide the following information:
- Directory Size: The size of the directory. The options are Small or Large. Which you should choose depends on the anticipated size of your directory.
- Directory DNS: The fully qualified domain name (FQDN) of the directory, such as corp.example.com.
Note: You will need the directory FQDN when you test your solution.
- NetBIOS name: The short name for the directory, such as corp.
- Administrator password: The password for the directory administrator. The directory creation process creates an administrator account with the user name Administrator and this password. Don’t lose this password, because it can’t be recovered. You also need this password for testing LDAPS access in a later step.
- Description: An optional description for the directory.

Figure 3: Directory information
- Select the VPC and subnets, and then choose Next:
- VPC: Use the dropdown list to select the VPC to install the directory in.
- Subnets: Use the dropdown lists to select two private subnets for the directory servers. The two subnets must be in different Availability Zones. Make a note of the VPC and subnet IDs to use as input parameters for the AWS CloudFormation template. In the following example, the subnets are in the us-east-1a and us-east-1c Availability Zones.

Figure 4: Choose VPC and subnets
- Review the directory information and make any necessary changes. When the information is correct, choose Create directory.

Figure 5: Review and create the directory
- It takes several minutes to create the directory. From the AWS Directory Service console, refresh the screen periodically and wait until the directory Status value changes to Active before continuing.
- When the status has changed to Active, choose your Simple AD directory and note the two IP addresses in the DNS address section. You will enter them in a later step when you run the AWS CloudFormation template.


Note: How to administer your Simple AD implementation is out of scope for this post. See the documentation to add users, groups, or instances to your directory. Also see the previous blog post, How to Manage Identities in Simple AD Directories.
2. Add a certificate
Now that you have a Simple AD directory, you need a SSL/TLS certificate. The certificate will be used with the NLB to secure the LDAPS endpoint. You then import the certificate into ACM, which is integrated with the NLB.
As mentioned earlier, you can use a certificate issued by your preferred certificate authority or a certificate issued by AWS Certificate Manager (ACM).
(Optional) Create a self-signed certificate
If you don’t already have a certificate authority, you can use the following instructions to generate a self-signed certificate using OpenSSL.
Note: OpenSSL is a standard, open source library that supports a wide range of cryptographic functions, including the creation and signing of x509 certificates.
Use the command line interface to create a certificate:
- You must have a system with OpenSSL installed to complete this step. If you don’t have OpenSSL, you can install it on Amazon Linux by running the command sudo yum install openssl. If you don’t have access to an Amazon Linux instance you can create one with SSH access enabled to proceed with this step. Use the command line to run the command openssl version to see if you already have OpenSSL installed.
- Create a private key using the openssl genrsa command.
- Generate a certificate signing request (CSR) using the openssl req command. Provide the requested information for each field. The Common Name is the FQDN for your LDAPS endpoint (for example, ldap.corp.example.com). The Common Name must use the domain name you will later register in Route 53. You will encounter certificate errors if the names do not match.
- Use the openssl x509 command to sign the certificate. The following example uses the private key from the previous step (privatekey.pem) and the signing request (server.csr) to create a public certificate named server.crt that is valid for 365 days. This certificate must be updated within 365 days to avoid disruption of LDAPS functionality.
- You should see three files: privatekey.pem, server.crt, and server.csr.
- Restrict access to the private key.
Note: Keep the private key and public certificate to use later. You can discard the signing request, because you are using a self-signed certificate and not using a certificate authority. Always store the private key in a secure location, and avoid adding it to your source code.
Import a certificate
For this step, you can either use a certificate obtained from a certificate authority, or a self-signed certificate that you created using the optional procedure above.
- In the ACM console, choose Import a certificate.
- Using a Linux text editor, paste the contents of your certificate file (called server.crt if you followed the procedure above) file in the Certificate body box.
- Using a Linux text editor, paste the contents of your privatekey.pem file in the Certificate private key box. (For a self-signed certificate, you can leave the Certificate chain box blank.)
- Choose Review and import. Confirm the information and choose Import.
- Take note of the Amazon Resource Name (ARN) of the imported certificate.
3. Create the NLB by using the supplied AWS CloudFormation template
Now that you have a Simple AD directory and SSL/TLS certificate, you’re ready to use the AWS CloudFormation template to create the NLB.
Create the NLB:
- Load the AWS CloudFormation template to deploy an internal NLB. After you load the template, provide the input parameters from the following table:
Input parameter Input parameter description VPCId The target VPC for this solution. Must be the VPC where you deployed Simple AD and available in your Simple AD directory details page. SubnetId1 The Simple AD primary subnet. This information is available in your Simple AD directory details page. SubnetId2 The Simple AD secondary subnet. This information is available in your Simple AD directory details page. SimpleADPriIP The primary Simple AD Server IP. This information is available in your Simple AD directory details page. SimpleADSecIP The secondary Simple AD Server IP. This information is available in your Simple AD directory details page. LDAPSCertificateARN The Amazon Resource Name (ARN) for the SSL certificate. This information is available in the ACM console. - Enter the input parameters and choose Next.
- On the Options page, accept the defaults and choose Next.
- On the Review page, confirm the details and choose Create. The stack will be created in approximately 5 minutes.
- Wait until the AWS Cloud formation stack status is CREATE_COMPLETE before starting the next procedure, Create a Route 53 record.
- Go to Outputs and note the FQDN of your new NLB. The FQDN is in the output variable named LDAPSURL.
Note: You can find the parameters of your Simple AD on the directory details page by choosing your Simple AD in the Directory Service console.
4. Create a Route 53 record
The next step is to create a Route 53 record in your private hosted zone so that clients can resolve your LDAPS endpoint.
Note: Don’t start this procedure until the AWS CloudFormation stack status is CREATE_COMPLETE.
Create a Route 53 record:
- If you don’t have an existing DNS domain for use with LDAP, create a private hosted zone and associate it with your VPC. The hosted zone name should be consistent with your Simple AD (for example, corp.example.com).
- When the AWS CloudFormation stack is in CREATE_COMPLETE status, locate the value of the LDAPSURL on the Outputs tab of the stack. Copy this value for use in the next step.
- On the Route 53 console, choose Hosted Zones and then choose the zone you used for the Common Name value for your self-signed certificate. Choose Create Record Set and enter the following information:
- Name: A short name for the record set (remember that the FQDN has to match the Common Name of your certificate).
- Type: Leave as A – IPv4 address.
- Alias: Select Yes.
- Alias Target: Paste the value of the LDAPSURL from the Outputs tab of the stack.
- Leave the defaults for Routing Policy and Evaluate Target Health, and choose Create.
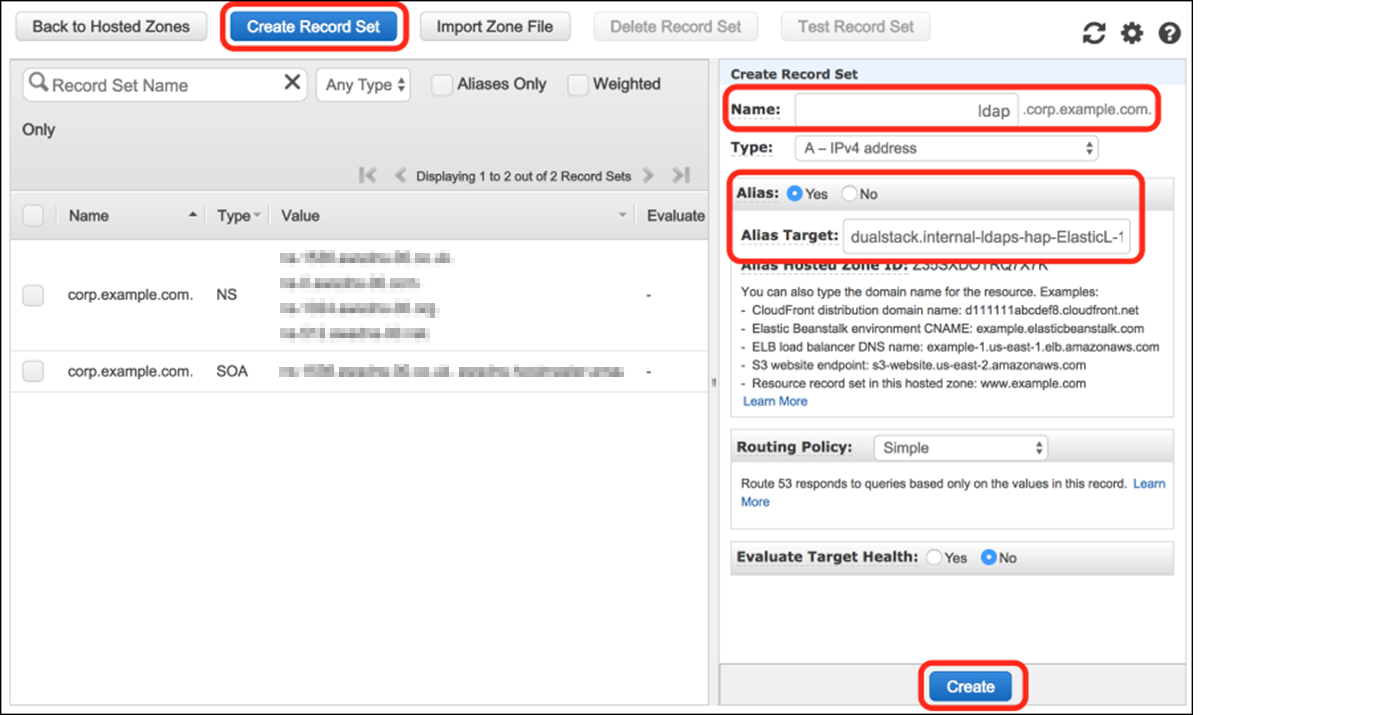
Figure 6: Create a Route 53 record
5. Test LDAPS access using an Amazon Linux 2 client
At this point, you’re ready to test your LDAPS endpoint from an Amazon Linux client.
Test LDAPS access:
- Create an Amazon Linux 2 instance with SSH access enabled to test the solution. Launch the instance on one of the public subnets in your VPC. Make sure the IP assigned to the instance is in the trusted IP range you specified in the security group associated with the Simple AD.
- Use SSH to sign in to the instance and complete the following steps to verify access.
- Install the openldap-clients package and any required dependencies:
- Add the server.crt file to the /etc/openldap/certs/ directory so that the LDAPS client will trust your SSL/TLS certificate. You can download the file directly from the NLB the certificate and save it in the proper format, or copy the file using Secure Copy or create it using a text editor:
Replace <LDAPSURL> with the FQDN of your NLB, the address can be found in the Outputs section of the stack created in CloudFormation.
- Edit the /etc/openldap/ldap.conf file to define the environment variables:
- BASE: The Simple AD directory name.
- URI: Your DNS alias.
- TLS_CACERT: The path to your public certificate.
- TLSCACertificateFile: The path to your self-signed certificate authority. If you used the instructions in section 2 (Create a certificate) to create a certificate, the path will be /etc/ssl/certs/ca-bundle.crt.
Here’s an example of the file:
- To test the solution, query the directory through the LDAPS endpoint, as shown in the following command. Replace corp.example.com with your domain name and use the Administrator password that you configured in step 3 of section 1 (Create a Simple AD directory).
- The response will include the directory information in LDAP Data Interchange Format (LDIF) for the administrator distinguished name (DN) from your Simple AD LDAP server.
You can now use the LDAPS endpoint for directory operations and authentication within your environment. Here are a few resources to learn more about how to interact with an LDAPS endpoint:
- The ldapsearch, ldapdelete, and ldapmodify utilities
- Managing access with the System Security Services Daemon (SSSD): SSSD can be used within a Linux environment to authenticate LDAP sessions.
Troubleshooting
If the ldapsearch command returns something like the following error, there are a few things you can do to help identify issues.
- You might be able to obtain additional error details by adding the -d1 debug flag to the ldapsearch command.
- Verify that the parameters in ldap.conf match your configured LDAPS URI endpoint and that all parameters can be resolved by DNS. You can use the following dig command, substituting your configured endpoint DNS name.
- Confirm that the client instance you’re connecting from is in the trusted IP range you specified in the security associated with your Simple AD directory.
- Confirm that the path to your public SSL/TLS certificate in ldap.conf as TLS_CAERT is correct. You configured this as part of step 2 in section 5 (Test LDAPS access using an Amazon Linux 2 client). You can check your SSL/TLS connection with the following command, replacing ldap.corp.example.com with the DNS name of your endpoint.
- Verify that the status of your Simple AD IPs is Healthy in the Amazon EC2 console.
- Open the EC2 console and choose Load Balancing and then Target Groups in the navigation pane.
- Choose your LDAPS target and then choose Targets.
Conclusion
You can use NLB to provide an LDAPS endpoint for Simple AD and transport sensitive authentication information over untrusted networks. You can explore using LDAPS to authenticate SSH users or integrate with other software solutions that support LDAP authentication. The AWS CloudFormation template for this solution is available on GitHub.
If you have comments about this post, submit them in the Comments section below. If you have questions about or issues implementing this solution, start a new thread on the AWS Directory Service forum or contact AWS Support.
Want more AWS Security how-to content, news, and feature announcements? Follow us on Twitter.