February 2, 2024: We’ve updated this post to fix broken links and added a note on migrating passwords.
Customers often ask us how to migrate their on-premises Active Directory (AD) domain to AWS so they can be free of the operational management of their AD infrastructure. Frequently they are unsure how to make the migration simple. A common approach using the CSVDE utility doesn’t migrate attributes such as user passwords. This makes migration difficult and necessitates manual effort for a large part of the migration that can cause operational and security challenges when migrating to a new directory. So, what’s changed?
You can now use the Active Directory Migration Toolkit (ADMT) along with the Password Export Service (PES) to migrate your self-managed AD to AWS Directory Service for Microsoft Active Directory, also known as AWS Managed Microsoft AD. This enables you to migrate AD objects and encrypted passwords for your users more easily.
AWS Managed Microsoft AD is a managed service built on Microsoft Active Directory. AWS provides operational management of the domain controllers, and you use standard AD tools to administer users, groups, and computers. AWS Managed Microsoft AD enables you to take advantage of built-in Active Directory features, such as Group Policy, trusts, and single sign-on and helps make it simple to migrate AD-dependent workloads into the AWS Cloud. With AWS Managed Microsoft AD, you can join Amazon EC2 and Amazon RDS for SQL Server instances to a domain, and use AWS Enterprise IT applications, such as Amazon WorkSpaces, and AWS IAM Identity Center with Active Directory users and groups.
In this post, we will show you how to migrate your existing AD objects to AWS Managed Microsoft AD. The source of the objects can be your self-managed AD running on EC2, on-premises, co-located, or even another cloud provider. We will show how to use ADMT and PES to migrate objects including users (and their passwords), groups, and computers.
The post assumes you are familiar with AD and how to use the Remote Desktop Protocol client to sign and use EC2 Windows instances.
Background
In this post, we will migrate user and computer objects, as well as passwords, to a new AWS Managed Microsoft AD directory. The source will be an on-premises domain.
This example migration will be for a fairly simple use case. Large customers with complex source domains or forests may have more complex processes involved to map users, groups, and computers to the single OU structure of AWS Managed Microsoft AD. For example, you may want to migrate an OU at a time. Customers with single domain forests may be able to migrate in fewer steps. Similarly, the options you might select in ADMT will vary based on what you are trying to accomplish.
To perform the migration, we will use the Admin user account from the AWS Managed Microsoft AD. AWS creates the Admin user account and delegates administrative permissions to the account for an organizational unit (OU) in the AWS Managed Microsoft AD domain. This account has most of the permissions required to manage your domain, and all the permissions required to complete this migration.
In this example, we have a Source domain called source.local that’s running in a 10.0.0.0/16 network range, and we want to migrate users, groups, and computers to a destination domain in AWS Managed Microsoft AD called destination.local that’s running in a network range of 192.168.0.0/16.
To migrate users from source.local to destination.local, we need a migration computer that we join to the destination.local domain on which we will run ADMT. We also use this machine to perform administrative tasks on the AWS Managed Microsoft AD. As a prerequisite for ADMT, we must install Microsoft SQL Express 2019 on the migration computer. We also need an administrative account that has permissions in both the source and destination AD domains. To do this, we will use an AD trust and add the AWS Managed Microsoft AD admin account from destination.local to the source.local domain. Next we will install ADMT on the migration computer, and run PES on one of the source.local domain controllers. Finally, we will migrate the users and computers.
Note: If you migrate user passwords by using ADMT and PES, and if the supported Kerberos encryption type RC4_HMAC_MD5 is disabled on client computers, Kerberos authentication fails for the users until they reset their passwords. This occurs because of the design of the PES tool and the method that it uses to synchronize passwords. We recommend for the user to reset their password after migration.
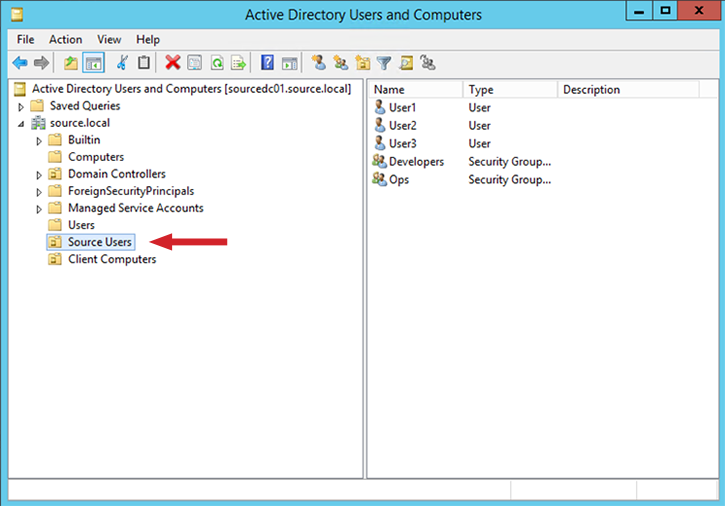
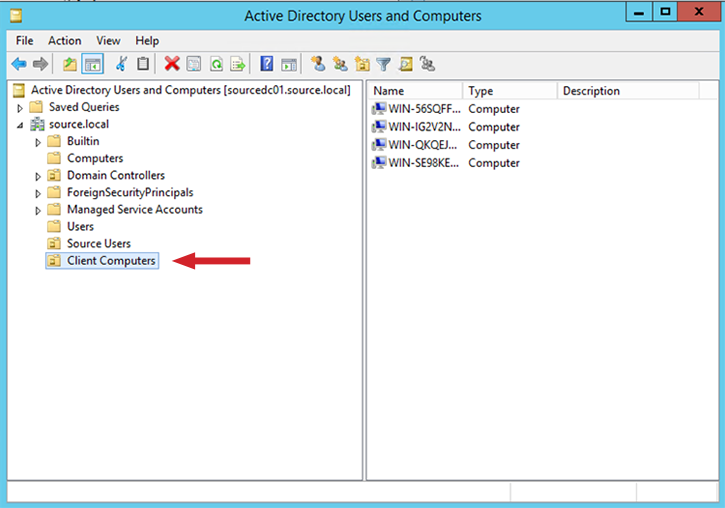
For this example, we have a handful of users, groups, and computers, shown in the source domain in these screenshots, that we will migrate:
Figure 1: Example source users
Figure 2: Example client computers
In the remainder of this post, we will show you how to do the migration in 5 main steps:
Prepare the forests, migration computer, and administrative account.
Install SQL Express and ADMT on the migration computer.
Configure ADMT and PES.
Migrate users and groups.
Migrate computers.
Step 1: Prepare the forests, migration computer, and administrative account
To migrate users and passwords from the source domain to AWS Managed Microsoft AD, you must have a 2-way forest trust. The trust from the source domain to AWS Managed Microsoft AD enables you to add the admin account from the AWS Managed Microsoft AD to the source domain. This is necessary so you can grant the AWS Managed Microsoft AD Admin account permissions in your source AD directory so it can read the attributes to migrate. We’ve already created a two-way forest trust between these domains. You should do the same by following this guide. Once your trust has been created, it should show up in the AWS console as Verified.
The ADMT tool should be installed on a computer that isn’t the domain controller in the destination domain destination.local. For this, we will launch an EC2 instance in the same VPC as the domain controller and we will add it to the destination.local domain using the EC2 seamless domain join feature. This will act as the ADMT transfer machine.
Launch a Microsoft Windows Server 2019 instance.
Complete a domain join to the target domain destination.local. You can complete this manually, or alternatively you can use AWS Systems Manager to complete a seamless domain join as covered here.
Sign into the instance using RDP and use Active Directory Users and Computers (ADUC) to add the AWS Managed Microsoft AD admin user from the destination.local domain to the source.local domain’s built-in administrators group (you will not be able to add the Admin user as a domain admin). For information on how to set up this instance to use ADUC, please see this documentation.
Figure 3: the “Administrator’s Properties” dialog box
Step 2: Install SQL Express and ADMT on the migration computer
Next, we need to install SQL Express and ADMT on the migration computer by following these steps.
Run the installer and, when setting the tool up, on the Database Selection page of the wizard, for Database (Server\Instance), type the local instance of Microsoft SQL Express we previously installed to work with ADMT.
Figure 4: Specify the “Database (Server\Instance)”
On the Database Import page of the wizard, select No, do not import data from an existing database (Default).
Figure 5: The “Database Import” dialog box
Complete the rest of the installation using all of the default options.
Step 3: Configure ADMT and PES
We’ll use PES to take care of encrypted password synchronization. Before we configure that, we need to create an encryption key that will be used during this process to encrypt the password migration.
On the ADMT transfer machine, open an elevated Command Prompt and use the following format to create the encryption key.
Note: If you get an error stating that the command is not found, close and reopen Command Prompt to refresh the path locations to the ADMT executable, and then try again.
Copy the outputted key file onto one of the source.local domain controllers.
Start the install and, in the ADMT Password Migration DLL Setup window, browse to the encryption file you created in the previous step.
When prompted, enter the password used in the ADMT encryption command.
Run PES using the local system account. Note that this will prompt a restart of the domain controller you’re installing PES on.
Once the domain controller has rebooted, open services.msc and start the Password Export Server Service, which is currently set to Manual. You might choose to set this to automatic if it’s likely your DC will be rebooted again before the end of your migration.
Figure 6: Start the Password Export Server Service
You can now open the Active Directory Migration Tool: Control Panel > System and Security > Administrative Tools > Active Directory Migration Tool.
Right-click Active Directory Migration Tool to see the migration options:
Figure 7: List of migration options
Step 4: Migrate users and groups
In the Domain Selection page, select or type the Source and Target domains, and then select Next.
On the User Selection page, select the users to migrate. You can use an include file if you have a large domain. Select Next.
On the Organizational Unit Selection page, select the destination OU that you want to migrate your users across to, and then select Next. AWS Managed Microsoft AD gives you a managed OU where you can create your OU tree structure.
On the Password Options page, select Migrate passwords, and then select Next. This will contact PES running on the source domain controller.
On the Account Transitions Page, decide how to handle the migration of user objects. In this example, we’re going to replicate the state from the source domain. Migrating SID history is beneficial when you’re doing long, staged migrations where users may need to access resources in the source and destination domain before migration is complete. At this time, AWS Managed Microsoft AD doesn’t support migrating user SIDs. We select Target same as source, and then select Next. Again, what you choose to do might be different.
Figure 8: The “Account Transition Options” dialog
Now, let’s customize the transfer. The following screen shot shows the commonly selected options on the User Options page of the User Account Migration Wizard:
\Figure 9: Common user options
It’s likely that you’ll have more than one migration pass, so choosing how you handle existing objects is important. This will be a single run for us, but the default behavior is to not migrate if the object already exists (see the image of the Conflict Management page below). If you’re running multiple passes, you’ll will want to look at options that involve merging conflicting objects. The method you select will depend on your use case. If you don’t know where to start, read this article.
Figure 10: The “Conflict Management” dialog box
In our example, you can see that our 3 users, and any groups they were members of, have been migrated.
Figure 11: The “Migration Progress” window
We can verify this by checking that the users exist in our destination.local domain:
Figure 12: Checking the users exist in the destination.local domain
Step 5: Migrate computers
Now, we’ll move on to computer objects.
Open the Active Directory Migration Tool: Control Panel > System and Security > Administrative Tools > Active Directory Migration Tool.
Right-click Active Directory Migration Tool and select Computer Migration Wizard.
Select the computers you want to migrate to the new domain. We’ll select four computers for migration.
Figure 13: Four computers that will be migrated
On the Translate Objects page, select which access controls you want to reapply during the migration, and then select Next.
Figure 14: The “Translate Objects” dialog box
The migration process will show completed, but we need to make sure the entire process worked.
To verify that the migration was successful, select Close, and the migration tool will open a new window that has a link to the migration log. Check the log file to see that it has started the process of migrating these four computers:
2017-08-11 04:09:01 The Active Directory Migration Tool Agent will be installed on WIN-56SQFFFJCR1.source.local
2017-08-11 04:09:01 The Active Directory Migration Tool Agent will be installed on WIN-IG2V2NAN1MU.source.local
2017-08-11 04:09:01 The Active Directory Migration Tool Agent will be installed on WIN-QKQEJHUEV27.source.local
2017-08-11 04:09:01 The Active Directory Migration Tool Agent will be installed on WIN-SE98KE4Q9CR.source.local
If the admin user doesn’t have access to the C$ or admin$ share on the computer in the source domain share, then then installation of the agent will fail as shown here:
2017-08-11 04:09:29 ERR2:7006 Failed to install agent on \\WIN-IG2V2NAN1MU.source.local, rc=5 Access is denied.
Once the agent is installed, it will perform a domain disjoin from source.local and perform a join to desintation.local. The log file will update when this has been successful:
2017-08-11 04:13:29 Post-check passed on the computer ‘WIN-SE98KE4Q9CR.source.local’. The new computer name is ‘WIN-SE98KE4Q9CR.destination.local’.
2017-08-11 04:13:29 Post-check passed on the computer ‘WIN-QKQEJHUEV27.source.local’. The new computer name is ‘WIN-QKQEJHUEV27.destination.local’.
2017-08-11 04:13:29 Post-check passed on the computer ‘WIN-56SQFFFJCR1.source.local’. The new computer name is ‘WIN-56SQFFFJCR1.destination.local’.
You can then view the new computer objects in the destination domain.
Log in to one of the old source.local computers and, by looking at the computer’s System Properties, confirm that the computer is now a member of the new destination.local domain.
Figure 15: Confirm the computer is member of the destination.local domain
Summary
In this simple example we showed how to migrate users and their passwords, groups, and computer objects from an on premises deployment of Active Directory, to our fully AWS Managed Microsoft AD. We created a management instance on which we ran SQL Express and ADMT, we created a forest trust to grant permissions for an account to use ADMT to move users, we configured ADMT and the PES tool, and then stepped through the migration using ADMT.
The ADMT tool gives us a great way to migrate to our managed Microsoft AD service that allows powerful customization of the migration, and it does so in a more secure way through encrypted password synchronization. You may need to do additional investigation and planning if the complexity of your environment requires a different approach with some of these steps.
If you have feedback about this post, submit comments in the Comments section below. If you have questions about this post, start a new thread on the AWS Directory service forum or contact AWS Support.
August 17, 2023: We updated the instructions and screenshots in this post to align with changes to the AWS Management Console.
April 25, 2023: We’ve updated this blog post to include more security learning resources.
AD Connector is designed to give you an easy way to establish a trusted relationship between your Active Directory and AWS. When AD Connector is configured, the trust allows you to:
Sign in to AWS applications such as Amazon WorkSpaces, Amazon WorkDocs, and Amazon WorkMail by using your Active Directory credentials.
Seamlessly join Windows instances to your Active Directory domain either through the Amazon EC2 launch wizard or programmatically through the EC2 Simple System Manager (SSM) API.
Provide federated sign-in to the AWS Management Console by mapping Active Directory identities to AWS Identity and Access Management (IAM) roles.
AD Connector cannot be used with your custom applications, as it is only used for secure AWS integration for the three use-cases mentioned above. Custom applications relying on your on-premises Active Directory should communicate with your domain controllers directly or utilize AWS Managed Microsoft AD rather than integrating with AD Connector. To learn more about which AWS Directory Service solution works best for your organization, see the service documentation.
With AD Connector, you can streamline identity management by extending your user identities from Active Directory. It also enables you to reuse your existing Active Directory security policies such as password expiration, password history, and account lockout policies. Also, your users will no longer need to remember yet another user name and password combination. Since AD Connector doesn’t rely on complex directory synchronization technologies or Active Directory Federation Services (AD FS), you can forego the added cost and complexity of hosting a SAML-based federation infrastructure. In sum, AD Connector helps foster a hybrid environment by allowing you to leverage your existing on-premises investments to control different facets of AWS.
This blog post will show you how AD Connector works as well as walk through how to enable federated console access, assign users to roles, and seamlessly join an EC2 instance to an Active Directory domain.
AD Connector – Under the Hood
AD Connector is a dual Availability Zone proxy service that connects AWS apps to your on-premises directory. AD Connector forwards sign-in requests to your Active Directory domain controllers for authentication and provides the ability for applications to query the directory for data. When you configure AD Connector, you provide it with service account credentials that are securely stored by AWS. This account is used by AWS to enable seamless domain join, single sign-on (SSO), and AWS Applications (WorkSpaces, WorkDocs, and WorkMail) functionality. Given AD Connector’s role as a proxy, it does not store or cache user credentials. Rather, authentication, lookup, and management requests are handled by your Active Directory.
In order to create an AD Connector, you must also provide a pair of DNS IP addresses during setup. These are used by AD Connector to retrieve Service (SRV) DNS records to locate the nearest domain controllers to route requests to. The AD connector proxy instances use an algorithm similar to the Active Directory domain controller locator process to decide which domain controllers to connect to for LDAP and Kerberos requests.
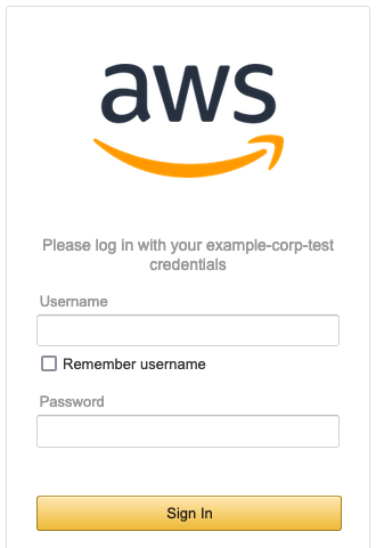
For authentication to AWS applications and the AWS Management Console, you can configure an access URL from the AWS Directory Service console. This access URL is in the format of https://<alias>.awsapps.com and provides a publicly accessible sign-in page. You can visit https://<alias>.awsapps.com/workdocs to sign in to WorkDocs, and https://<alias>.awsapps.com/console to sign in to the AWS Management Console. The following image shows the sign-in page for the AWS Management Console.
Figure 1: Login
For added security you can enable multi-factor authentication (MFA) for AD Connector, but you’ll need to have an existing RADIUS infrastructure in your on-premises network set up to leverage this feature. See AD Connector – Multi-factor Authentication Prerequisites for more information about requirements and configuration. With MFA enabled with AD Connector, the sign-in page hosted at your access URL will prompt users for an MFA code in addition to their standard sign-in credentials.
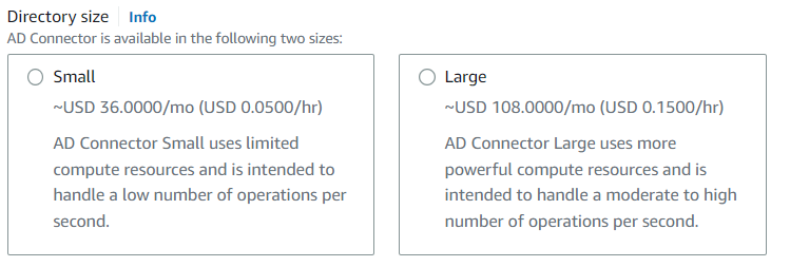
AD Connector comes in two sizes: small and large. A large AD Connector runs on more powerful compute resources and is more expensive than a small AD Connector. Depending on the volume of traffic to be proxied by AD Connector, you’ll want to select the appropriate size for your needs.
Figure 2: Directory size
AD Connector is highly available, meaning underlying hosts are deployed across multiple Availability Zones in the region you deploy. In the event of host-level failure, Directory Service will promptly replace failed hosts. Directory Service also applies performance and security updates automatically to AD Connector.
The following diagram illustrates the authentication flow and network path when you enable AWS Management Console access:
A user opens the secure custom sign-in page and supplies their Active Directory user name and password.
The authentication request is sent over SSL to AD Connector.
AD Connector performs LDAP authentication to Active Directory.
Note: AD Connector locates the nearest domain controllers by querying the SRV DNS records for the domain.
After the user has been authenticated, AD Connector calls the STS AssumeRole method to get temporary security credentials for that user. Using those temporary security credentials, AD Connector constructs a sign-in URL that users use to access the console.
Note: If a user is mapped to multiple roles, the user will be presented with a choice at sign-in as to which role they want to assume. The user session is valid for 1 hour.
Figure 3: Authentication flow and network path
Before getting started with configuring AD Connector for federated AWS Management Console access, be sure you’ve read and understand the prerequisites for AD Connector. For example, as shown in Figure 3 there must be a VPN or Direct Connect circuit in place between your VPC and your on-premises environment. Your domain also has to be running at Windows 2003 functional level or later. Also, various ports have to be opened between your VPC and your on-premises environment to allow AD Connector to communicate with your on-premises directory.
Configuring AD Connector for federated AWS Management Console access
Enable console access
To allow users to sign in with their Active Directory credentials, you need to explicitly enable console access. You can do this by opening the Directory Service console and clicking the Directory ID name (Figure 4).
This opens the Directory Details page, where you’ll find a dropdown menu on the Apps & Services tab to enable the directory for AWS Management Console access.
Figure 4: Directories
Choose the Application management tab as seen in Figure 5.
Figure 5: Application Management
Scroll down to AWS Management Console as shown in Figure 6, and choose Enable from the Actions dropdown list.
Figure 6: Enable console access
After enabling console access, you’re ready to start configuring roles and associating Active Directory users and groups with those roles.
Follow these steps to create a new role. When you create a new role through the Directory Service console, AD Connector automatically adds a trust relationship to Directory Service. The following code example shows the IAM trust policy for the role, after a role is created.
Now that AD Connector is configured and you’ve created a role, your next job is to assign users or groups to those IAM roles. Role mapping is what governs what resources a user has access to within AWS. To do this you’ll need to do the following steps:
In the search bar, type the name of the role you just created.
Select the role that you just created by choosing the name under the IAM role field.
Choose Add, and enter the name to be added to find users or groups for this role.
Choose Add, and the user or group is now assigned to the role.
When you’re finished, you should see the name of the user or group along with the corresponding ID for that object. It is also important to note that this list can be used to remove users or groups from the role. The next time the user signs in to the AWS Management Console from the custom sign-in page, they will be signed in under the EC2ReadOnly security role.
Seamlessly join an instance to an Active Directory domain
Another advantage to using AD Connector is the ability to seamlessly join Windows (EC2) instances to your Active Directory domain. This allows you to join a Windows Server to the domain while the instance is being provisioned instead of using a script or doing it manually. This section of this blog post will explain the steps necessary to enable this feature in your environment and how the service works.
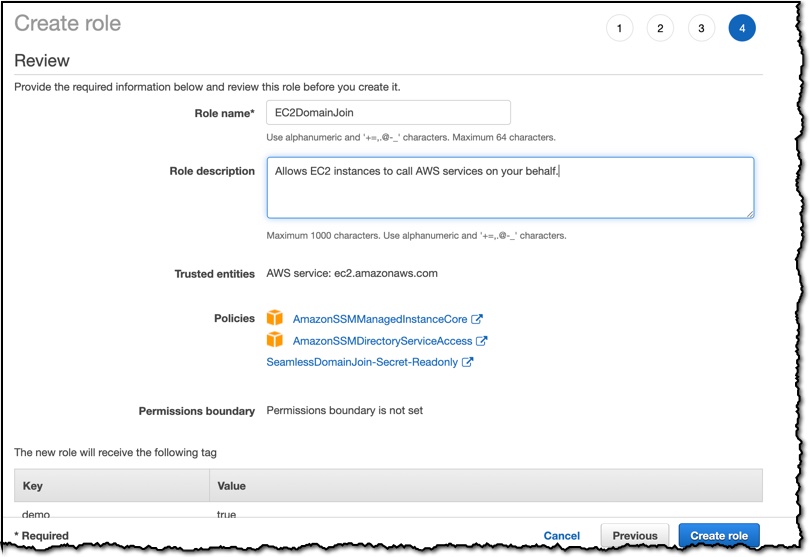
Step 1: Create a role
Until recently you had to manually create an IAM policy to allow an EC2 instance to access the SSM, an AWS service that allows you to configure Windows instances while they’re running and on first launch. Now, there’s a managed policy called AmazonEC2RoleforSSM that you can use instead. The role you are about to create will be assigned to an EC2 instance when it’s provisioned, which will grant it permission to access the SSM service.
To create the role:
Open the IAM console.
Click Roles in the navigation pane.
Click Create Role.
Type a name for your role in the Role Name field.
Under AWS Service Roles, select Amazon EC2 and then click Select.
On the Attach Policy page, select AmazonEC2RoleforSSM and then click Next Step.
On the Review page, click Create Role.
If you click the role you created, you’ll see a trust policy for EC2, which looks like the following code example.
Step 2: Create a new Windows instance from the EC2 console
With this role in place, you can now join a Windows instance to your domain via the EC2 launch wizard. For a detailed explanation about how to do this, see Joining a Domain Using the Amazon EC2 Launch Wizard.
If you’re instantiating a new instance from the API, however, you will need to create an SSM configuration document and upload it to the SSM service beforehand. We’ll step through that process next.
Note: The instance will require internet access to communicate with the SSM service.
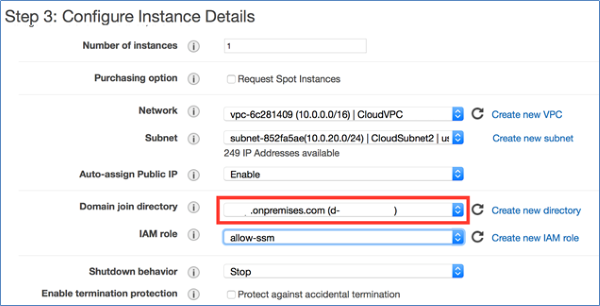
Figure 7: Configure instance details
When you create a new Windows instance from the EC2 launch wizard as shown in Figure 7, the wizard automatically creates the SSM configuration document from the information stored in AD Connector. Presently, the EC2 launch wizard doesn’t allow you to specify which organizational unit (OU) you want to deploy the member server into.
Step 3: Create an SSM document (for seamlessly joining a server to the domain through the AWS API)
If you want to provision new Windows instances from the AWS CLI or API or you want to specify the target OU for your instances, you will need to create an SSM configuration document. The configuration document is a JSON file that contains various parameters used to configure your instances. The following code example is a configuration document for joining a domain.
{
	"schemaVersion": "1.0",
	"description": "Sample configuration to join an instance to a domain",
	"runtimeConfig": {
	   "aws:domainJoin": {
	       "properties": {
	          "directoryId": "d-1234567890",
	          "directoryName": "test.example.com",
	          "directoryOU": "OU=test,DC=example,DC=com",
	          "dnsIpAddresses": [
	             "198.51.100.1",
	             "198.51.100.2"
	          ]
	       }
	   }
	}
}
In this configuration document:
directoryId is the ID for the AD Connector you created earlier.
directoryName is the name of the domain (for example, examplecompany.com).
directoryOU is the OU for the domain.
dnsIpAddresses are the IP addresses for the DNS servers you specified when you created the AD Connector.
For additional information, see aws:domainJoin. When you’re finished creating the file, save it as a JSON file.
Note: The name of the file has to be at least 1 character and at most 64 characters in length.
Step 4: Upload the configuration document to SSM
This step requires that the user have permission to use SSM to configure an instance. If you don’t have a policy that includes these rights, create a new policy by using the following JSON, and assign it to an IAM user or group.
Note: On Linux/Mac systems, you need to add a “/” at the beginning of the path (for example, file:///Users/username/temp).
This command uploads the configuration document you created to the SSM service, allowing you to reference it when creating a new Windows instance from either the AWS CLI or the EC2 launch wizard.
Conclusion
This blog post has shown you how you can simplify account management by federating with your Active Directory for AWS Management Console access. The post also explored how you can enable hybrid IT by using AD Connector to seamlessly join Windows instances to your Active Directory domain. Armed with this information you can create a trust between your Active Directory and AWS. In addition, you now have a quick and simple way to enable single sign-on without needing to replicate identities or deploy additional infrastructure on premises.
We’d love to hear more about how you are using Directory Service, and welcome any feedback about how we can improve the experience. You can post comments below, or visit the Directory Service forum to post comments and questions.
Monday means it’s time for another Week in Review post, so, without further ado, let’s dive right in!
Last Week’s Launches Here’s some launch announcements from last week you may have missed.
AWS Directory Service for Microsoft Active Directory is now available on Windows Server 2019, and all new directories will run on this server platform. Those of you with existing directories can choose to update with either a few clicks on the AWS Managed Microsoft AD console, or you can update programmatically using an API. With either approach, you can update at a time convenient to you and your organization between now and March 2023. After March 2023, directories will be updated automatically.
AWS Activate is a program that offers free tools, resources, and the opportunity to apply for credits to smaller early stage businesses and also more advanced digital businesses, helping them get started quickly on AWS. The program is now open to any self-identified startup.
Amazon QuickSight users who employ row-level security (RLS) to control access to restricted datasets will be interested in a new feature that enables you to ask questions against topics in these datasets. User-based rules control the answers received to questions and any auto-complete suggestions provided when the questions are being framed. This ensures that users only ever receive answer data that they are granted permission to access.
Other AWS News This interesting blog post focus on the startup Pieces Technologies, who are putting predictive artificial intelligence (AI) and machine learning (ML) tools to work on AWS to predict and offer clinical insights on patient outcomes such as such as projected discharge dates, anticipated clinical and non-clinical barriers to discharge, and risk of readmission. To help healthcare teams work more efficiently, the insights are provided in natural language and seek to optimize overall clarity of a patient’s clinical issues.
As usual, there’s another AWS open-source and updates newsletter. The newsletter is published weekly to bring you up to date on the latest news on open-source projects, posts, and events.
Upcoming Events Speaking of upcoming events, the following are some you may be interested in joining, especially if you work with .NET:
Looking to modernize .NET workloads using Windows containers on AWS? There’s a free webinar, with follow-along lab, in just a couple of days on October 20. You can find more details and register here.
My .NET colleagues are also hosting another webinar on November 2 related to building modern .NET applications on AWS. If you’re curious about the hosting and development capabilities of AWS for .NET applications, this is a webinar you should definitely check out. You’ll find further information and registration here.
And finally, a reminder that reserved seating for sessions at AWS re:Invent 2022 is now open. We’re now just 6 weeks away from the event! There are lots of great sessions for your attention, but those of particular interest to me are the ones related to .NET, and at this year’s event we have seven breakouts, three chalk talks, and a workshop for you. You can find all the details using the .NET filter in the session catalog (the sessions all start with the prefix XNT, by the way).
That’s all for this week. Check back next Monday for another AWS Week in Review!
In Part 1 of this two-part series, we shared an overview of some of the most important 2021 Amazon Web Services (AWS) Security service and feature launches. In this follow-up, we’ll dive deep into additional launches that are important for security professionals to be aware of and understand across all AWS services. There have already been plenty in the first half of 2022, so we’ll highlight those soon, as well.
AWS Identity
You can use AWS Identity Services to build Zero Trust architectures, help secure your environments with a robust data perimeter, and work toward the security best practice of granting least privilege. In 2021, AWS expanded the identity source options, AWS Region availability, and support for AWS services. There is also added visibility and power in the permission management system. New features offer new integrations, additional policy checks, and secure resource sharing across AWS accounts.
AWS Single Sign-On
For identity management, AWS Single Sign-On (AWS SSO) is where you create, or connect, your workforce identities in AWS once and manage access centrally across your AWS accounts in AWS Organizations. In 2021, AWS SSO announced new integrations for JumpCloud and CyberArk users. This adds to the list of providers that you can use to connect your users and groups, which also includes Microsoft Active Directory Domain Services, Okta Universal Directory, Azure AD, OneLogin, and Ping Identity.
For access management, there have been a range of feature launches with AWS Identity and Access Management (IAM) that have added up to more power and visibility in the permissions management system. Here are some key examples.
IAM made it simpler to relate a user’s IAM role activity to their corporate identity. By setting the new source identity attribute, which persists through role assumption chains and gets logged in AWS CloudTrail, you can find out who is responsible for actions that IAM roles performed.
IAM added support for policy conditions, to help manage permissions for AWS services that access your resources. This important feature launch of service principal conditions helps you to distinguish between API calls being made on your behalf by a service principal, and those being made by a principal inside your account. You can choose to allow or deny the calls depending on your needs. As a security professional, you might find this especially useful in conjunction with the aws:CalledVia condition key, which allows you to scope permissions down to specify that this account principal can only call this API if they are calling it using a particular AWS service that’s acting on their behalf. For example, your account principal can’t generally access a particular Amazon Simple Storage Service (Amazon S3) bucket, but if they are accessing it by using Amazon Athena, they can do so. These conditions can also be used in service control policies (SCPs) to give account principals broader scope across an account, organizational unit, or organization; they need not be added to individual principal policies or resource policies.
Another very handy new IAM feature launch is additional information about the reason for an access denied error message. With this additional information, you can now see which of the relevant access control policies (for example, IAM, resource, SCP, or VPC endpoint) was the cause of the denial. As of now, this new IAM feature is supported by more than 50% of all AWS services in the AWS SDK and AWS Command Line Interface, and a fast-growing number in the AWS Management Console. We will continue to add support for this capability across services, as well as add more features that are designed to make the journey to least privilege simpler.
IAM Access Analyzer also launched the ability to generate fine-grained policies based on analyzing past AWS CloudTrail activity. This feature provides a great new capability for DevOps teams or central security teams to scope down policies to just the permissions needed, making it simpler to implement least privilege permissions. IAM Access Analyzer launched further enhancements to expand policy checks, and the ability to generate a sample least-privilege policy from past activity was expanded beyond the account level to include an analysis of principal behavior within the entire organization by analyzing log activity stored in AWS CloudTrail.
AWS Resource Access Manager
AWS Resource Access Manager (AWS RAM) helps you securely share your resources across unrelated AWS accounts within your organization or organizational units (OUs) in AWS Organizations. Now you can also share your resources with IAM roles and IAM users for supported resource types. This update enables more granular access using managed permissions that you can use to define access to shared resources. In addition to the default managed permission defined for each shareable resource type, you now have more flexibility to choose which permissions to grant to whom for resource types that support additional managed permissions. Additionally, AWS RAM added support for global resource types, enabling you to provision a global resource once, and share that resource across your accounts. A global resource is one that can be used in multiple AWS Regions; the first example of a global resource is found in AWS Cloud WAN, currently in preview as of this publication. AWS RAM helps you more securely share an AWS Cloud WAN core network, which is a managed network containing AWS and on-premises networks. With AWS RAM global resource sharing, you can use the Cloud WAN core network to centrally operate a unified global network across Regions and accounts.
AWS Directory Service
AWS Directory Service for Microsoft Active Directory, also known as AWS Managed Microsoft Active Directory (AD), was updated to automatically provide domain controller and directory utilization metrics in Amazon CloudWatch for new and existing directories. Analyzing these utilization metrics helps you quantify your average and peak load times to identify the need for additional domain controllers. With this, you can define the number of domain controllers to meet your performance, resilience, and cost requirements.
Amazon Cognito
Amazon Cognitoidentity pools (federated identities) was updated to enable you to use attributes from social and corporate identity providers to make access control decisions and simplify permissions management in AWS resources. In Amazon Cognito, you can choose predefined attribute-tag mappings, or you can create custom mappings using the attributes from social and corporate providers’ access and ID tokens, or SAML assertions. You can then reference the tags in an IAM permissions policy to implement attribute-based access control (ABAC) and manage access to your AWS resources. Amazon Cognito also launched a new console experience for user pools and now supports targeted sign out through refresh token revocation.
Governance, control, and logging services
There were a number of important releases in 2021 in the areas of governance, control, and logging services.
This approach provides a powerful new middle ground between the older security models of prevention (which provide developers only an access denied message, and often can’t distinguish between an acceptable and an unacceptable use of the same API) and a detect and react model (when undesired states have already gone live). The Cfn-Guard 2.0 model gives builders the freedom to build with IaC, while allowing central teams to have the ability to reject infrastructure configurations or changes that don’t conform to central policies—and to do so with completely custom error messages that invite dialog between the builder team and the central team, in case the rule is unnuanced and needs to be refined, or if a specific exception needs to be created.
For example, a builder team might be allowed to provision and attach an internet gateway to a VPC, but the team can do this only if the routes to the internet gateway are limited to a certain pre-defined set of CIDR ranges, such as the public addresses of the organization’s branch offices. It’s not possible to write an IAM policy that takes into account the CIDR values of a VPC route table update, but you can write a Cfn-Guard 2.0 rule that allows the creation and use of an internet gateway, but only with a defined and limited set of IP addresses.
AWS Systems Manager Incident Manager
An important launch that security professionals should know about is AWS Systems Manager Incident Manager. Incident Manager provides a number of powerful capabilities for managing incidents of any kind, including operational and availability issues but also security issues. With Incident Manager, you can automatically take action when a critical issue is detected by an Amazon CloudWatch alarm or Amazon EventBridge event. Incident Manager runs pre-configured response plans to engage responders by using SMS and phone calls, can enable chat commands and notifications using AWS Chatbot, and runs automation workflows with AWS Systems Manager Automation runbooks. The Incident Manager console integrates with AWS Systems Manager OpsCenter to help you track incidents and post-incident action items from a central place that also synchronizes with third-party management tools such as Jira Service Desk and ServiceNow. Incident Manager enables cross-account sharing of incidents using AWS RAM, and provides cross-Region replication of incidents to achieve higher availability.
Amazon Simple Storage Service (Amazon S3) is one of the most important services at AWS, and its steady addition of security-related enhancements is always big news. Here are the 2021 highlights.
Access Points aliases
Amazon S3 introduced a new feature, Amazon S3 Access Points aliases. With Amazon S3 Access Points aliases, you can make the access points backwards-compatible with a large amount of existing code that is programmed to interact with S3 buckets rather than access points.
To understand the importance of this launch, we have to go back to 2019 to the launch of Amazon S3 Access Points. Access points are a powerful mechanism for managing S3 bucket access. They provide a great simplification for managing and controlling access to shared datasets in S3 buckets. You can create up to 1,000 access points per Region within each of your AWS accounts. Although bucket access policies remain fully enforced, you can delegate access control from the bucket to its access points, allowing for distributed and granular control. Each access point enforces a customizable policy that can be managed by a particular workgroup, while also avoiding the problem of bucket policies needing to grow beyond their maximum size. Finally, you can also bind an access point to a particular VPC for its lifetime, to prevent access directly from the internet.
With the 2021 launch of Access Points aliases, Amazon S3 now generates a unique DNS name, or alias, for each access point. The Access Points aliases look and acts just like an S3 bucket to existing code. This means that you don’t need to make changes to older code to use Amazon S3 Access Points; just substitute an Access Points aliases wherever you previously used a bucket name. As a security team, it’s important to know that this flexible and powerful administrative feature is backwards-compatible and can be treated as a drop-in replacement in your various code bases that use Amazon S3 but haven’t been updated to use access point APIs. In addition, using Access Points aliases adds a number of powerful security-related controls, such as permanent binding of S3 access to a particular VPC.
S3 Bucket Keys were launched at the end of 2020, another great launch that security professionals should know about, so here is an overview in case you missed it. S3 Bucket Keys are data keys generated by AWS KMS to provide another layer of envelope encryption in which the outer layer (the S3 Bucket Key) is cached by S3 for a short period of time. This extra key layer increases performance and reduces the cost of requests to AWS KMS. It achieves this by decreasing the request traffic from Amazon S3 to AWS KMS from a one-to-one model—one request to AWS KMS for each object written to or read from Amazon S3—to a one-to-many model using the cached S3 Bucket Key. The S3 Bucket Key is never stored persistently in an unencrypted state outside AWS KMS, and so Amazon S3 ultimately must always return to AWS KMS to encrypt and decrypt the S3 Bucket Key, and thus, the data. As a result, you still retain control of the key hierarchy and resulting encrypted data through AWS KMS, and are still able to audit Amazon S3 returning periodically to AWS KMS to refresh the S3 Bucket Keys, as logged in CloudTrail.
Returning to our review of 2021, S3 Bucket Keys gained the ability to use Amazon S3 Inventory and Amazon S3 Batch Operations automatically to migrate objects from the higher cost, slightly lower-performance SSE-KMS model to the lower-cost, higher-performance S3 Bucket Keys model.
To understand this launch, we need to go in time to the origins of Amazon S3, which is one of the oldest services in AWS, created even before IAM was launched in 2011. In those pre-IAM days, a storage system like Amazon S3 needed to have some kind of access control model, so Amazon S3 invented its own: Amazon S3 access control lists (ACLs). Using ACLs, you could add access permissions down to the object level, but only with regard to access by other AWS account principals (the only kind of identity that was available at the time), or public access (read-only or read-write) to an object. And in this model, objects were always owned by the creator of the object, not the bucket owner.
After IAM was introduced, Amazon S3 added the bucket policy feature, a type of resource policy that provides the rich features of IAM, including full support for all IAM principals (users and roles), time-of-day conditions, source IP conditions, ability to require encryption, and more. For many years, Amazon S3 access decisions have been made by combining IAM policy permissions and ACL permissions, which has served customers well. But the object-writer-is-owner issue has often caused friction. The good news for security professionals has been that a deny by either type of access control type overrides an allow by the other, so there were no security issues with this bi-modal approach. The challenge was that it could be administratively difficult to manage both resource policies—which exist at the bucket and access point level—and ownership and ACLs—which exist at the object level. Ownership and ACLs might potentially impact the behavior of only a handful of objects, in a bucket full of millions or billions of objects.
With the features released in 2021, Amazon S3 has removed these points of friction, and now provides the features needed to reduce ownership issues and to make IAM-based policies the only access control system for a specified bucket. The first step came in 2020 with the ability to make object ownership track bucket ownership, regardless of writer. But that feature applied only to newly-written objects. The final step is the 2021 launch we’re highlighting here: the ability to disable at the bucket level the evaluation of all existing ACLs—including ownership and permissions—effectively nullifying all object ACLs. From this point forward, you have the mechanisms you need to govern Amazon S3 access with a combination of S3 bucket policies, S3 access point policies, and (within the same account) IAM principal policies, without worrying about legacy models of ACLs and per-object ownership.
Additional database and storage service features
AWS Backup Vault Lock
AWS Backup added an important new additional layer for backup protection with the availability of AWS Backup Vault Lock. A vault lock feature in AWS is the ability to configure a storage policy such that even the most powerful AWS principals (such as an account or Org root principal) can only delete data if the deletion conforms to the preset data retention policy. Even if the credentials of a powerful administrator are compromised, the data stored in the vault remains safe. Vault lock features are extremely valuable in guarding against a wide range of security and resiliency risks (including accidental deletion), notably in an era when ransomware represents a rising threat to data.
ACM Private CA achieved FedRAMP authorization for six additional AWS Regions in the US.
Additional certificate customization now allows administrators to tailor the contents of certificates for new use cases, such as identity and smart card certificates; or to securely add information to certificates instead of relying only on the information present in the certificate request.
Additional capabilities were added for sharing CAs across accounts by using AWS RAM to help administrators issue fully-customized certificates, or revoke them, from a shared CA.
Integration with Kubernetes provides a more secure certificate authority solution for Kubernetes containers.
Online Certificate Status Protocol (OCSP) provides a fully-managed solution for notifying endpoints that certificates have been revoked, without the need for you to manage or operate infrastructure yourself.
Network and application protection
We saw a lot of enhancements in network and application protection in 2021 that will help you to enforce fine-grained security policies at important network control points across your organization. The services and new capabilities offer flexible solutions for inspecting and filtering traffic to help prevent unauthorized resource access.
AWS WAF
AWS WAF launched AWS WAF Bot Control, which gives you visibility and control over common and pervasive bots that consume excess resources, skew metrics, cause downtime, or perform other undesired activities. The Bot Control managed rule group helps you monitor, block, or rate-limit pervasive bots, such as scrapers, scanners, and crawlers. You can also allow common bots that you consider acceptable, such as status monitors and search engines. AWS WAF also added support for custom responses, managed rule group versioning, in-line regular expressions, and Captcha. The Captcha feature has been popular with customers, removing another small example of “undifferentiated work” for customers.
AWS Shield Advanced
AWS Shield Advanced now automatically protects web applications by blocking application layer (L7) DDoS events with no manual intervention needed by you or the AWS Shield Response Team (SRT). When you protect your resources with AWS Shield Advanced and enable automatic application layer DDoS mitigation, Shield Advanced identifies patterns associated with L7 DDoS events and isolates this anomalous traffic by automatically creating AWS WAF rules in your web access control lists (ACLs).
Amazon CloudFront
In other edge networking news, Amazon CloudFront added support for response headers policies. This means that you can now add cross-origin resource sharing (CORS), security, and custom headers to HTTP responses returned by your CloudFront distributions. You no longer need to configure your origins or use custom Lambda@Edge or CloudFront Functions to insert these headers.
Following Route 53 Resolver’s much-anticipated launch of DNS logging in 2020, the big news for 2021 was the launch of its DNS Firewall capability. Route 53 Resolver DNS Firewall lets you create “blocklists” for domains you don’t want your VPC resources to communicate with, or you can take a stricter, “walled-garden” approach by creating “allowlists” that permit outbound DNS queries only to domains that you specify. You can also create alerts for when outbound DNS queries match certain firewall rules, allowing you to test your rules before deploying for production traffic. Route 53 Resolver DNS Firewall launched with two managed domain lists—malware domains and botnet command and control domains—enabling you to get started quickly with managed protections against common threats. It also integrated with Firewall Manager (see the following section) for easier centralized administration.
AWS Network Firewall and Firewall Manager
Speaking of AWS Network Firewall and Firewall Manager, 2021 was a big year for both. Network Firewall added support for AWS Managed Rules, which are groups of rules based on threat intelligence data, to enable you to stay up to date on the latest security threats without writing and maintaining your own rules. AWS Network Firewall features a flexible rules engine enabling you to define firewall rules that give you fine-grained control over network traffic. As of the launch in late 2021, you can enable managed domain list rules to block HTTP and HTTPS traffic to domains identified as low-reputation, or that are known or suspected to be associated with malware or botnets. Prior to that, another important launch was new configuration options for rule ordering and default drop, making it simpler to write and process rules to monitor your VPC traffic. Also in 2021, Network Firewall announced a major regional expansion following its initial launch in 2020, and a range of compliance achievements and eligibility including HIPAA, PCI DSS, SOC, and ISO.
Elastic Load Balancing now supports forwarding traffic directly from Network Load Balancer (NLB) to Application Load Balancer (ALB). With this important new integration, you can take advantage of many critical NLB features such as support for AWS PrivateLink and exposing static IP addresses for applications that still require ALB.
The AWS Networking team also made Amazon VPC private NAT gateways available in both AWS GovCloud (US) Regions. The expansion into the AWS GovCloud (US) Regions enables US government agencies and contractors to move more sensitive workloads into the cloud by helping them to address certain regulatory and compliance requirements.
Compute
Security professionals should also be aware of some interesting enhancements in AWS compute services that can help improve their organization’s experience in building and operating a secure environment.
Amazon Elastic Compute Cloud (Amazon EC2) launched the Global View on the console to provide visibility to all your resources across Regions. Global View helps you monitor resource counts, notice abnormalities sooner, and find stray resources. A few days into 2022, another simple but extremely useful EC2 launch was the new ability to obtain instance tags from the Instance Metadata Service (IMDS). Many customers run code on Amazon EC2 that needs to introspect about the EC2 tags associated with the instance and then change its behavior depending on the content of the tags. Prior to this launch, you had to associate an EC2 role and call the EC2 API to get this information. That required access to API endpoints, either through a NAT gateway or a VPC endpoint for Amazon EC2. Now, that information can be obtained directly from the IMDS, greatly simplifying a common use case.
Amazon EC2 launched sharing of Amazon Machine Images (AMIs) with AWS Organizations and Organizational Units (OUs). Previously, you could share AMIs only with specific AWS account IDs. To share AMIs within AWS Organizations, you had to explicitly manage sharing of AMIs on an account-by-account basis, as they were added to or removed from AWS Organizations. With this new feature, you no longer have to update your AMI permissions because of organizational changes. AMI sharing is automatically synchronized when organizational changes occur. This feature greatly helps both security professionals and governance teams to centrally manage and govern AMIs as you grow and scale your AWS accounts. As previously noted, this feature was also added to EC2 Image Builder. Finally, Amazon Data Lifecycle Manager, the tool that manages all your EBS volumes and AMIs in a policy-driven way, now supports automatic deprecation of AMIs. As a security professional, you will find this helpful as you can set a timeline on your AMIs so that, if the AMIs haven’t been updated for a specified period of time, they will no longer be considered valid or usable by development teams.
Looking ahead
In 2022, AWS continues to deliver experiences that meet administrators where they govern, developers where they code, and applications where they run. We will continue to summarize important launches in future blog posts. If you’re interested in learning more about AWS services, join us for AWS re:Inforce, the AWS conference focused on cloud security, identity, privacy, and compliance. AWS re:Inforce 2022 will take place July 26–27 in Boston, MA. Registration is now open. Register now with discount code SALxUsxEFCw to get $150 off your full conference pass to AWS re:Inforce. For a limited time only and while supplies last. We look forward to seeing you there!
To stay up to date on the latest product and feature launches and security use cases, be sure to read the What’s New with AWS announcements (or subscribe to the RSS feed) and the AWS Security Blog.
If you have feedback about this post, submit comments in the Comments section below. If you have questions about this post, contact AWS Support.
Want more AWS Security news? Follow us on Twitter.
Are you ready to extend your on-premises Active Directory to Amazon Web Services (AWS) to remove undifferentiated heavy lifting? Would you like to maintain a highly available Directory Service for your applications? Companies who have already set up integration with Okta Identity Cloud for external or internal applications require Active Directory objects to be synced to Okta for authentication. To achieve centralized access for on-premises and cloud applications, you can extend your on-premises Active Directory to AWS Managed Microsoft Active Directory (AD) using a trust relationship.
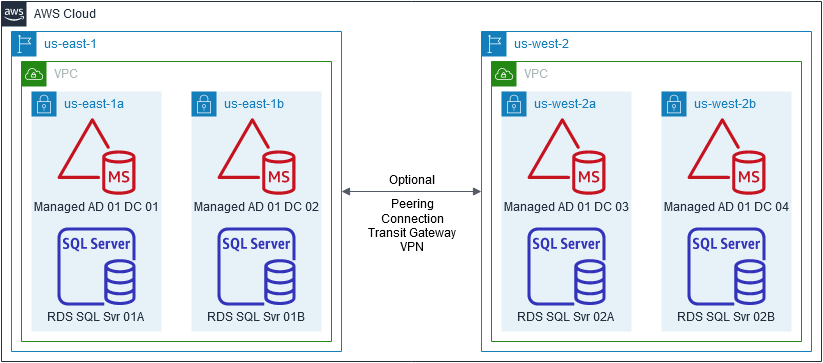
This blog shows an architecture pattern that you can use to synchronize your on-premises AD and AWS Managed AD objects. You can use Okta Identity Cloud using an Okta AD agent for syncing users and groups. The Okta AD agent can be installed and configured on a domain-joined on-premises server or an Amazon EC2 instance on AWS (see Figure 1).
AWS Directory Service lets you run Microsoft Active Directory (AD) as a managed service, and is powered by Windows Server 2012 R2. When you select and launch this directory type, it is created as a highly available pair of domain controllers connected to your Amazon Virtual Private Cloud (VPC). The domain controllers run in different Availability Zones in an AWS Region of your choice.
Okta is an enterprise-grade identity management service, which is compatible with many on-premises and cloud applications. The Okta AD agent enables you to integrate Okta with your on-premises AD. This way you can integrate your SaaS applications and your AD instances with Okta. You can simplify and centralize user management and share user credentials with other integrated cloud and on-premises applications.
Figure 1. Active Directory objects synchronization to Okta identity cloud
Network connectivity between corporate data center and AWS Regions
Before getting started with configuring a trust relationship with on-premises AD and AWS managed AD, be sure you’ve read and understand the prerequisites for setting up trust. For example, it is highly recommended to have a VPN or AWS Direct Connect circuit in place between your VPC and your on-premises environment. To create a resilient VPN connection, refer to the Site-to-Site VPN User Guide.
AWS Site-to-Site VPN is a fully managed service that uses IP security (IPsec) tunnels to create a secure connection between your data center or branch office, and your AWS resources. When using Site-to-Site VPN, you can connect to Amazon VPC and also AWS Transit Gateway. Two tunnels per connection are used for increased redundancy. You can also create a dedicated or a hosted connection using AWS Direct Connect.
Trust relationship between on-premises AD and AWS Managed AD
A trust relationship is a link between two different domains. For example, a one-way trust scenario allows the user accounts from the trusted domain to access resources in the trusting domain. In a two-way trust scenario, user accounts and resources can be passed between the two domains bidirectionally. A two-way trust relationship is commonly set up between on-premises AD and AWS Managed AD to extend authentication. This is used for any directory-aware workloads in the AWS Cloud, providing users and groups access to resources in either domain using single sign-on (SSO).
AWS Managed Microsoft Active Directory (AD) supports external and forest trust relationships with your existing on-premises domain in all three trust relationship directions:
One-way incoming
One-way outgoing
Two-way bidirectional
To create a trust relationship, follow these steps:
Prepare your on-premises domain for the trust relationship. This includes preparing your firewall configuration, enable Kerberos pre-authentication, and configuring conditional forwarders.
Prepare your AWS Managed Microsoft AD for the trust relationship. This includes configuring your VPC subnets, security groups, and enabling Kerberos pre-authentication.
Download and install Okta AD agent on your Amazon EC2 instance, which should be domain-joined with AWS Managed AD. One Okta AD agent can associate with multiple domains. Once the trust has been set up between on-premises AD and AWS Managed AD, you can associate multiple domains under the same Okta AD agent on Amazon EC2, instead of hosting and managing separate Okta AD agent servers in your own data center and AWS.
For a highly available architecture, a redundant Okta AD agent running in your corporate data center is recommended. This will help you avoid the impact of network connectivity failure between data centers and AWS Regions. Okta recommends installing multiple Okta AD agents on each domain server to achieve high availability and failover protection.
Read Okta AD integration step-by-step setup for installing and configuring Okta agent.
Validate AD objects
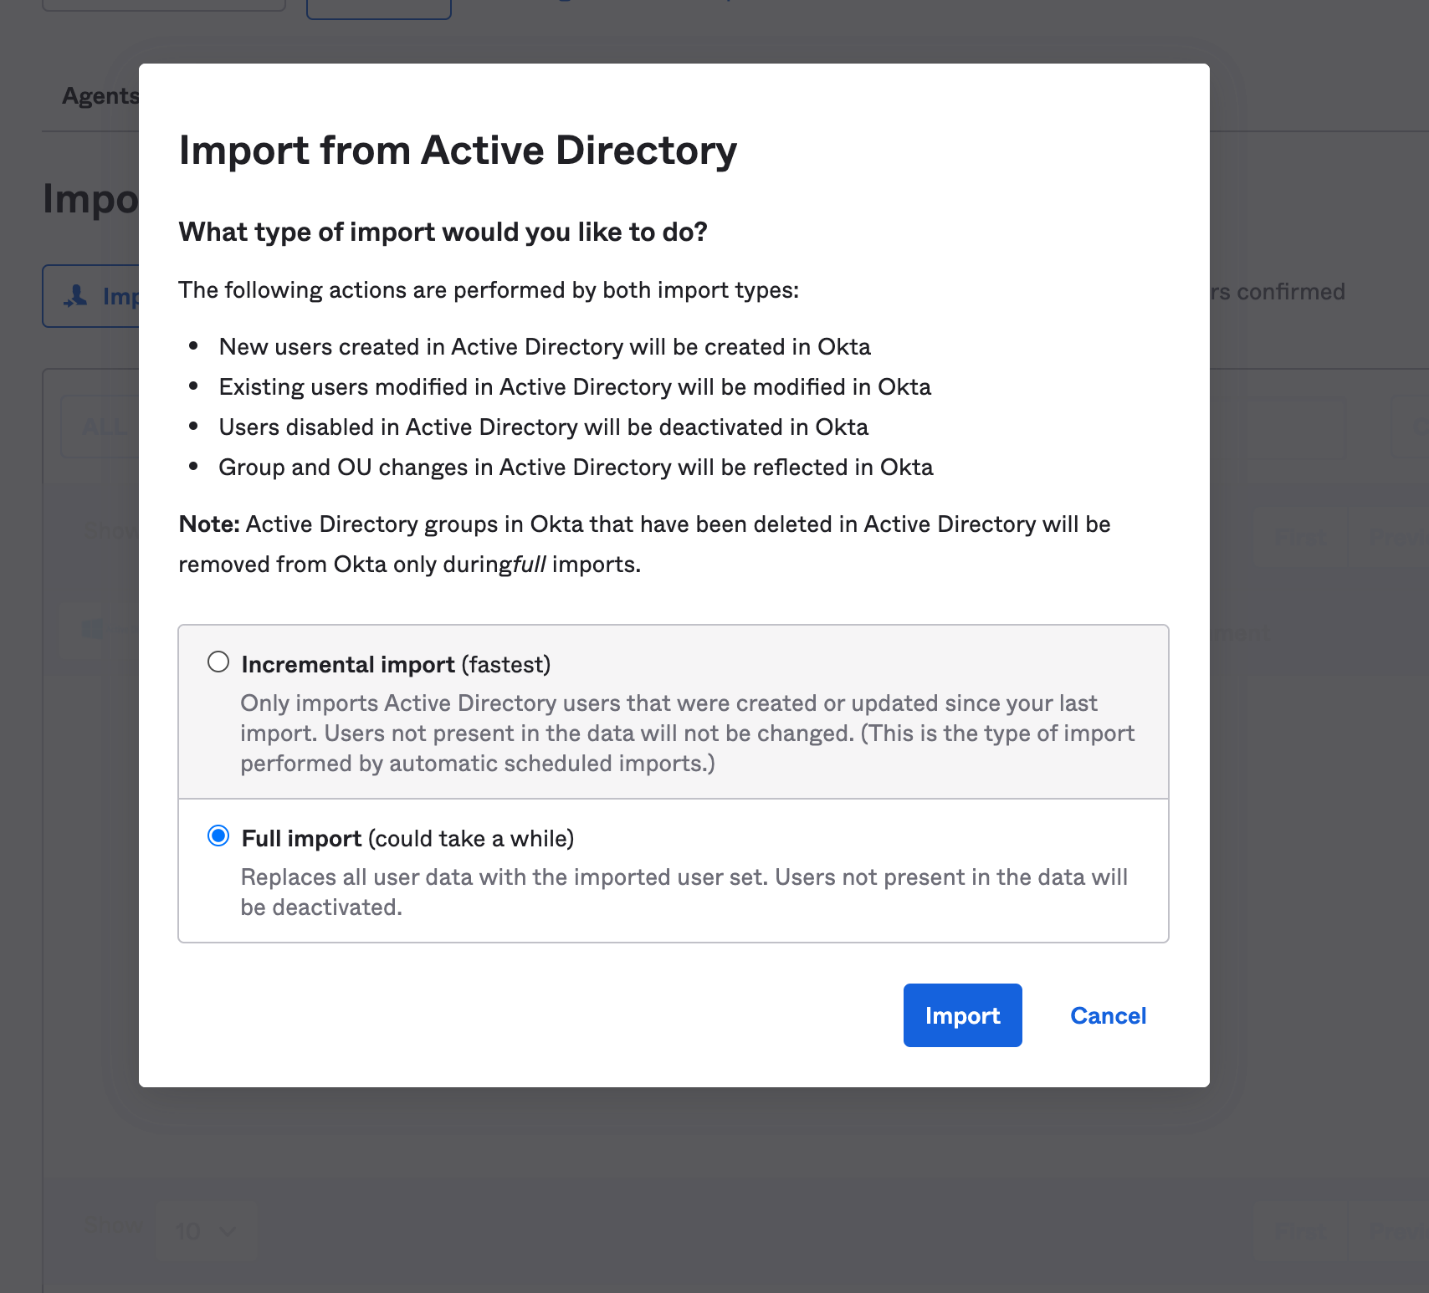
Once the Okta agent is installed and configured on the Amazon EC2 instance, log in to the Okta admin console. Under the provisioning to Okta tab, do a full import of users from AWS Managed AD (see Figure 2, Figure 3). The subsequent objects synchronization will be done through scheduled import with a minimum interval of one hour. After the import is done, if there are any user account overlaps between AWS Managed AD and Okta, manually assign the AD users to Okta users. You can create matching rules to automatically map the users from AD to Okta. Read Import AD users to Okta.
Figure 2. Import users under Okta admin console
Figure 3. Import users results under Okta admin console
Matching rules are used in the import of users from all apps and directories that provide importing. If there is an existing Okta account, AD allows you to import and confirm users automatically (see Figure 4).
Figure 4. User creation and matching under Okta admin console
You can import groups from any forest or domain connected to Okta. The Okta AD Agent detects all groups in the domain or the organizational units (OUs) that you select. If you register an Okta AD Agent for more than one domain and you have the root OU selected for all domains, all groups will be imported. Read Import AD Groups to Okta to synchronize groups from AD to Okta.
Synchronize passwords to Okta
When you sign in to Okta using your organization’s AD credentials, the authentication process is delegated to the connected on-premises AD. Okta does not see or store the credentials.
In some cases, the credentials must be synchronized from a directory across Okta to an application. If a user changes the password stored in Active Directory and then tries to access applications using the same single sign-on session, they will receive a password error message. This is because the new password has not been synchronized to the application, so a new sign-in process is required for password validation.
To avoid a disruptive user experience, use the Okta AD Password Sync Agent to synchronize passwords from AD to Okta and to integrated apps. The Okta AD Password Sync Agent will track password changes in AD and then synchronize to Okta.
In this blog post, we discussed a way for synchronizing users and credentials from on-premises Active Directory and AWS Managed AD to Okta Identity Cloud. With synchronization, you can centralize access of cloud and on-premises applications and provide seamless access to AD-aware services within AWS.
Customers can also migrate on-premises AD to AWS using Active Directory Migration Tool (ADMT) along with the Password Export Server (PES) service.
Many Amazon Web Services (AWS) customers use Active Directory to centralize user authentication and authorization for a variety of applications and services. For these customers, Active Directory is a critical piece of their IT infrastructure. AWS offers AWS Directory Service for Microsoft Active Directory, also known as AWS Managed Microsoft AD, to provide a highly available and resilient Active Directory service.
One of the most common AWS Managed Microsoft AD use cases is for customers who need to integrate their on-premises Active Directory domain or forest with AWS services like Amazon Relational Database Service (Amazon RDS), Amazon FSx, Amazon WorkSpaces, and other AWS applications and services. This type of integration can require a trust relationship. When it comes to trusts, there are some common misconceptions about what happens and doesn’t happen when a trust is created.
In this post, I’m going to dive deep into various aspects of Active Directory trusts and debunk some common myths along the way. This post will cover the following areas:
The first part of understanding how trusts work is to understand how authentication flows across a trust, particularly with Kerberos. Kerberos is a subject that, on the surface, is simple enough, but can quickly become much more complex. This post isn’t going to go into detail about Kerberos in Microsoft Windows. If you wish to look further into the topic, see the Microsoft Kerberos documentation. In this post, I’m just going to give you an overview of how Kerberos authentication works across trusts.
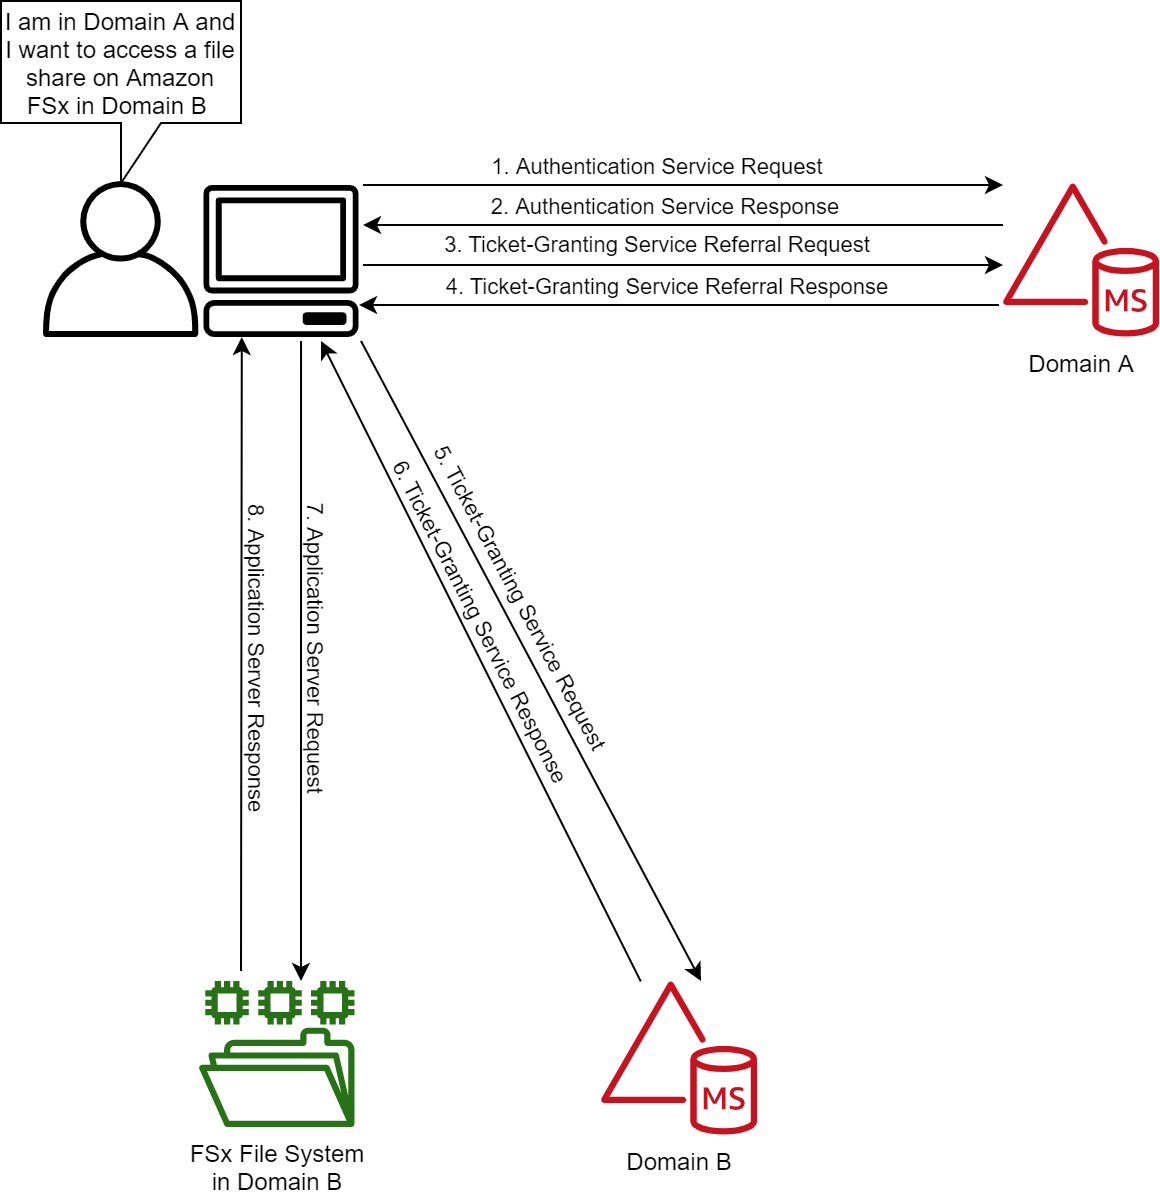
Figure 1: Kerberos authentication across trusts
If you only remember one thing about Kerberos and trust, it should be referrals. Let’s look at the workflow in Figure 1, which shows a user from Domain A who is logged into a computer in Domain A and wants to access an Amazon FSx file share in Domain B. For simplicity’s sake, I’ll say there is a two-way trust between Domains A and B.
Note: When a trust is integrated with AWS Managed Microsoft AD, you need to enable Kerberos preauthentication for accounts that traverse the trusts. Disabling Kerberos preauthentication isn’t recommended, because a malicious user can directly send dummy requests for authentication. The key distribution center (KDC) will return an encrypted Ticket-Granting Ticket (TGT), which the malicious user can brute force offline. See Kerberos Pre-Authentication: Why It Should Not Be Disabled for more details.
The steps of the Kerberos authentication process over trusts are as follows:
1. Kerberos authentication service request (KRB_AS_REQ): The client contacts the authentication service (AS) of the KDC (which is running on a domain controller) for Domain A, which the client is a member of, for a short-lived ticket called a Ticket-Granting Ticket (TGT). The default lifetime of the TGT is 10 hours. For Windows clients this happens at logon, but Linux clients might need to run a kinit command.
2. Kerberos authentication service response (KRB_AS_REP): The AS constructs the TGT and creates a session key that the client can use to encrypt communication with the ticket-granting service (TGS). At the time that the client receives the TGT, the client has not been granted access to any resources, even to resources on the local computer.
3. Kerberos ticket-granting service request (KRB_TGS_REQ): The user’s Kerberos client sends a KRB_TGS_REQ message to a local KDC in Domain A, specifying fsx@domainb as the target. The Kerberos client compares the location with its own workstation’s domain. Because these values are different, the client sets a flag in the KDC Options field of the KRB_TGS_REQ message for NAME_CANONICALIZE, which indicates to the KDC that the server might be in another realm (domain).
4. Kerberos ticket-granting service response (KRB_TGS_REP): The user’s local KDC (for Domain A) receives the KRB_TGS_REQ and sends back a TGT referral ticket for Domain B. The TGT is issued for the next intervening domain along the shortest path to Domain B. The TGT also has a referral flag set, so that the KDC will be informed that the KRB_TGS_REQ is coming from another realm. This flag also tells the KDC to fill in the Transited Realms field. The referral ticket is encrypted with the interdomain key that is decrypted by Domain B’s TGS.
Note: When a trust is established between domains or forests, an interdomain key based on the trust password becomes available for authenticating KDC functions and is used to encrypt and decrypt Kerberos tickets.
5. Kerberos ticket-granting service request (KRB_TGS_REQ): The user’s Kerberos client sends a KRB_TGS_REQ along with the TGT it received from the Domain A KDC to a KDC in Domain B.
6. Kerberos ticket-granting service response (KRB_TGS_REP): The TGS in Domain B examines the TGT and the authenticator. If these are acceptable, the TGS creates a service ticket. The client’s identity is taken from the TGT and copied to the service ticket. Then the ticket is sent to the client.
7. Application server service request (KRB_TGS_REQ): After the client has the service ticket, the client sends the ticket and a new authenticator to the target server, requesting access. The server will decrypt the ticket, validate the authenticator, and (for Windows services), create an access token for the user based on the SIDs in the ticket.
8. Application server service response (KRB_TGS_REP): Optionally, the client might request that the target server verify its own identity. This is called mutual authentication. If mutual authentication is requested, the target server takes the client computer’s timestamp from the authenticator, encrypts it with the session key the TGS provided for client-target server messages, and sends it to the client.
The basics of trust transitivity, direction, and types
Let’s start off by defining a trust. Active Directory trusts are a relationship between domains, which makes it possible for users in one domain to be authenticated by a domain controller in the other domain. Authenticated users, if given proper permissions, can access resources in the other domain.
Active Directory Domain Services supports four types of trusts: External (Domain), Forest, Realm, and Shortcut. Out of those four types of trusts, AWS Managed Microsoft AD supports the External (Domain) and Forest trust types. I’ll focus on External (Domain) and Forest trust types for this post.
Transitivity: What is it?
Before I dive into the types of trusts, it’s important to understand the concept of transitivity in trusts. A trust that is transitive allows authentication to flow through other domains (Child and Trees) in the trusted forests or domains. In contrast, a non-transitive trust is a point-to-point trust that allows authentication to flow exclusively between the trusted domains.
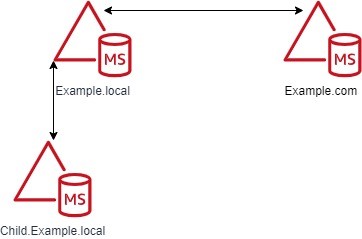
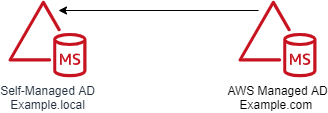
Figure 2: Forest trusts between the Example.local and Example.com forests
Don’t worry about the trust types at this point, because I’ll cover those shortly. The example in Figure 2 shows a Forest trust between Example.com and Example.local. The Example.local forest has a child domain named Child. With a transitive trust, users from the Example.local and Child.Example.local domain can be authenticated to resources in the Example.com domain.
If Figure 2 has an External trust, only users from Example.local can be authenticated to resources in the Example.com domain. Users from Child.Example.local cannot traverse the trust to access resources in the Example.com domain.
Trust direction
Two-way trusts are bidirectional trusts that allow authentication referrals from either side of the trust to give users access resources in either domain or forest. If you look in the Active Directory Domains and Trusts area of the Microsoft Management Console (MMC), which provides consoles to manage the hardware, software, and network components of Microsoft Windows operating system, you can see both an incoming and an outgoing trust for the trusted domain.
One-way trusts are a single-direction trust that allows authentication referrals from one side of the trust only. A one-way trust is either outgoing or incoming, but not both (that would be a two-way trust).
An outgoing trust allows users from the trusted domain (Example.com) to authenticate in this domain (Example.local).
An incoming trust allows users from this domain (Example.local) to authenticate in the trusted domain (Example.com).
Figure 3: One-way trust direction
Let’s use a diagram to further explain this concept. Figure 3 shows a one-way trust between Example.com and Example.local. This an outgoing trust from Example.com and an incoming trust on Example.local. Users from Example.local can authenticate and, if given proper permissions, access resources in Example.com. Users from Example.com cannot access or authenticate to resources in Example.local.
Trust types
In this section of the post, I’ll examine the various types of Active Directory trusts and their capabilities.
External trusts
This trust type is used to share resources between two domains. These can be individual domains within or external to a forest. Think of this as a point-to-point trust between two domains. See Understanding When to Create an External Trust for more details on this trust type.
This trust type is used to share resources between two forests. This is the preferred trust model, because it works fully with Kerberos without any caveats. See Understanding When to Create a Forest Trust for more details.
Transitivity: Transitive
Direction: One-way or two-way
Authentication types: Kerberos and NTLM
AWS Managed Microsoft AD support: Yes
Realm trusts
This trust type is used to form a trust relationship between a non-Windows Kerberos realm and an Active Directory domain. See Understanding When to Create a Realm Trust for more details.
The default User Principal Name (UPN) suffix for a user account is the Domain Name System (DNS) domain name of the domain where the user account resides. In AWS Managed Microsoft AD and self-managed AD, alternative UPN suffixes are added to simplify administration and user logon processes by providing a single UPN suffix for all users. The UPN suffix is used within the Active Directory forest, and is not required to be a valid DNS domain name. See Adding User Principal Name Suffixes for the process to add UPN suffixes to a forest.
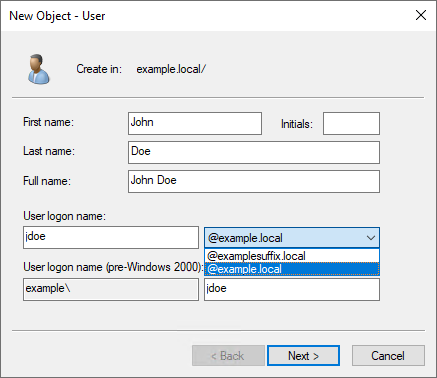
For example, if your domain is Example.local but you want your users to sign in with what appears to be another domain name (such as ExampleSuffix.local), you would need to add a new UPN suffix to the domain. Figure 4 shows a user being created with an alternate UPN suffix.
Figure 4: UPN selection on object creation
If you’re logged into a Windows system, you can use the whoami /upn command to see the UPN of the current user.
Forest trusts and name suffix routing
Name suffix routing manages how authentication requests are routed across forest trusts. A unique name suffix is a name suffix within a forest, such as a UPN suffix or DNS forest or domain tree name, that isn’t subordinate to any other name suffix. For example, the DNS forest name Example.com is a unique name suffix within the example.com forest.
All names that are subordinate to unique name suffixes are routed implicitly. For example, if your forest root is named Example.local, authentication requests for all child domains of Example.local (Child.Example.local) will be routed because the child domains are subordinate to the Example.local name suffix. If you want to exclude members of a child domain from authenticating in the specified forest, you can disable name suffix routing for that name. You can also disable routing for the forest name itself, if necessary. With domain trees and additional UPN suffixes, name suffix routing by default is disabled and must be enabled if those suffixes are to be able to traverse the trust.
Note: In AWS Managed Microsoft AD, customers don’t have the ability to create or modify trusts by using the native Microsoft tools. If you need a name suffix route enabled for your trust, open a support case with Premium Support.
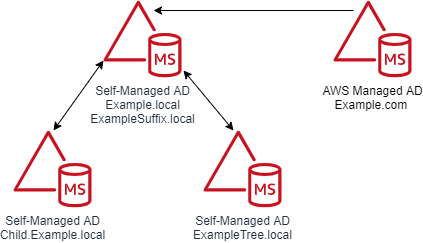
A couple of diagrams will make it easier to digest this information. Figure 5 shows the trust configuration. There is a one-way outgoing forest trust from Example.com to Example.local. Example.local has a UPN suffix named ExampleSuffix.local added to it. Example.local also has a child domain named Child and a tree domain named ExampleTree.local. By default, users in Example.local and Child.Example.local will be able to authenticate to resources in Example.com. Users in the ExampleTree.local domain will not be able to authenticate to resources in Example.com, unless the name suffix route for ExampleTree.local is enabled on the trust object in Example.com.
Figure 5: Multi-domain and suffix forest with a trust
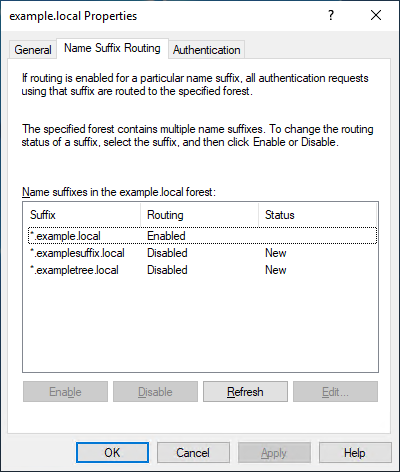
Figure 6 is from the trust properties dialog from the Example.com forest of a trust between Example.com and Example.local. As you can see, *.example.local is enabled. But the custom UPN suffix ExampleSuffix.local and the tree domain ExampleTree.local are disabled by default.
Figure 6: Example.local trusts details
Selective authentication
With AWS Managed Microsoft AD and self-managed AD, you have the option of configuring Selective Authentication. This option restricts authentication access over a trust to only the users in a trusted domain or forest who have been explicitly given authentication permissions to computer objects that reside in the trusting domain or forest.
When you use domain or forest-wide authentication, depending on the trust direction, users can authenticate across the trust. Authentication by itself doesn’t provide access—users have to be delegated permissions to access resources. When Selective Authentication is enabled, you must set the Allowed to Authenticate permission on each computer object the trusted user will be accessing, in addition to any other permissions that are required to access the computer object.
While Selective Authentication is a way to provide additional hardening of trusts, it requires a significant amount of planning and delegation, because you have to set the Allowed to Authenticate permission on all computer objects that are being accessed. It can also make troubleshooting permissions and trust issues more difficult.
I won’t spend a lot of time on the subject of SID filtering, since this feature is enabled in AWS Managed Microsoft AD and can’t be disabled. SID filtering prevents malicious users who have domain or enterprise administrator level access in a trusted forest from granting elevated user rights to a trusting forest. It does this by preventing misuse of the attributes containing SIDs on security principals in the trusted forest. For example, a malicious user with administrative credentials located in a trusted forest could, through various means, obtain the SID information of a domain or enterprise admin in the trusting forest. After obtaining the SID of an administrator from the trusting forest, a malicious user with administrative credentials can add that SID to the SID history attribute of a security principal in the trusted forest and attempt to gain full access to the trusting forest and the resources within it.
Keeping SID filtering disabled on your on-premises domain can open your domain up to risks from malicious users. We understand that during a domain migration, you may need to disable it to allow an object’s SID from the original domain to be used during the migration. But in AWS Managed Microsoft AD, this filtering cannot be disabled. See SID Filtering for more details.
Network ports that are required to create trusts
The following network ports are required to be open between domain controllers on both domains or forests prior to attempting to create a trust. Note, the Security Group used by your AWS Managed Microsoft AD directory already has these inbound ports open. You will need to adjust the outbound rules of the Security Group to let it communicate with the to be trusted domains or forests. The following table is based on Microsoft’s recommendations. Depending on your use case, some of these ports might not need to be opened. For example, if LDAP over SSL isn’t configured, then TCP 636 isn’t needed.
Port
Protocol
Service
53
TCP and UDP
DNS
88
TCP and UDP
Kerberos
123
UDP
Windows Time
135
TCP
Remote Procedure Call (RPC)
389
TCP and UDP
Lightweight Directory Access Protocol (LDAP)
445
TCP
Server Message Block (SMB)
464
TCP and UDP
Kerberos Password Change
636
TCP
LDAP over SSL
3268
TCP
LDAP Global Catalog (GC)
3269
TCP
LDAP GC over SSL
49152–65535
TCP and UDP
RPC
Trust creation process overview
AWS Managed Microsoft AD is based on Windows Server Active Directory Domain Services, which means that Active Directory trusts function the same way they do with self-managed Active Directory. The only difference is how the trust is created. You use the AWS Management Console or APIs to create the trust for the AWS Managed Microsoft AD side. This process has been documented thoroughly in the AWS Directory Service Administration Guide, so I won’t go into detail on the steps.
The high-level overview of the process is:
Ensure that network and DNS name resolution is available and functional between the domains.
Create the trust on the on-premises Active Directory.
Common trust scenarios with AWS Managed Microsoft AD
When you create trust between an on-premises domain and AWS Managed Microsoft AD, there are some items to take into consideration that will help you decide what direction of trust you need to deploy. In this post, I’ll cover a couple of the most common scenarios.
All scenarios: Selecting a trust type
Let’s start with the choice between a Forest or External trust. We generally recommend using a Forest trust type. The reason for that is that Forest trusts fully support Kerberos without any caveats. With that said, if you have a specific requirement to implement an External trust, you can do so—just be aware of these caveats.
Scenario 1: Use AWS Managed Microsoft AD as a resource forest for Amazon RDS, Amazon FSx for Windows File Server, or Amazon EC2 instances
In this scenario, you might want to use AWS Managed Microsoft AD as a resource forest for Amazon RDS, Amazon FSx for Windows File Server, or Amazon Elastic Compute Cloud (Amazon EC2). AWS Managed Microsoft AD is going to be a resource domain, and user accounts will reside on the on-premises side of the trust and need to be able to access the resources in the AWS Managed Microsoft AD side of the trust.
In this scenario, the AWS applications (Amazon RDS, Amazon FSx for Windows File Server, or Amazon EC2) don’t require a two-way trust to function, because they are natively integrated with Active Directory. This tells you that you only need authentication to flow one way. This scenario requires a one-way incoming trust on the on-premises domain and one-way outgoing trusts on the AWS Managed Microsoft AD domain. Figure 7 demonstrates this.
Figure 7: A one-way trust
Scenario 2: Use AWS Managed Microsoft AD as a resource forest for all other supported AWS applications
In this scenario, you want to use AWS Managed Microsoft AD as a resource domain for all other supported AWS applications that aren’t included in Scenario 1. As the previous scenario stated, AWS Managed Microsoft AD will be a resource domain, and the user accounts will reside on the on-premises side of the trust and need to be able to access the resources in the AWS Managed Microsoft AD.
I have had many conversations with customers concerning trusts between their on-premises domain and their AWS Managed Microsoft AD domain. These are some of the common myths and misconceptions we’ve come across in our conversations.
Trusts synchronize objects between each domain.
This is false. A trust between domains or forests acts as a bridge that allows validated authentication requests, in the form of Kerberos or NTLM traffic, to travel between domains or forests. Objects are not synchronized between the domains or forests. Only the trust password is synchronized, which is used for Kerberos.
My password is passed over the trust when authenticating.
This is false. As I showed earlier in the Starting with Kerberos section, when authenticating across trusts, the user’s password is not passed between domains. The only things passed between domains are the Ticket Granting Service (TGS) requests and responses, which are generated in real time, are single use, and expire within hours.
A one-way trust allows bidirectional authentication.
This is false. One-way trusts allow authentications to traverse in one direction only. Users or objects from the trusted domain are able to authenticate and, if they are delegated, to access resources in the trusting domain. Users in the trusting domain can’t authenticate into the trusted domain, and aren’t granted permissions to access resources. Let’s say there is an Amazon FSx file system in Example.local and a one-way trust between Example.com (outgoing trust direction) and Example.local (incoming trust direction). A user in Example.com can’t be delegated permission to the Amazon FSx file system Example.local with the current trust configuration. That’s the nature of a one-way trust.
Trusts are inherently insecure by default.
This is false, although an improperly configured trust can increase your risk and exposure. Trusts by themselves do very little to increase an Active Directory’s attack surface. You should always use best practices when creating a trust to minimize risk. For example, a trust without a purpose should be removed. You should disable the SID History unless you’re in the process of migrating domains. See Security Considerations for Trusts for more guidance on securing trusts.
Users in the trusted domain are granted permissions to my domain when a trust is created.
This is false. By default, with two-way trusts, objects have read-only permission to Active Directory in both directions. Objects are not delegated permissions or access to resources or servers by default. For example, if you want a user to log into a computer in another domain, you first must delegate the user access to the resource in the other domain. Without that delegation, the user won’t be able to access the resource.
Troubleshooting trusts
Based on our experience working with many customers, the vast majority of trust configuration issues are either DNS resolution or networking connectivity errors. These are some troubleshooting steps to help you resolve any of these common issues:
Check whether you allowed outbound networking traffic on the AWS Managed Microsoft AD. See Step 1: Set up your environment for trusts to learn how to find your directory’s security group and how to modify it.
If the DNS server or the network for your on-premises domain uses a public (non-RFC 1918) IP address space, follow these steps:
In the AWS Directory Service console, go to the IP routing section for your directory, choose Actions, and then choose Add route.
Enter the IP address block of your DNS server or on-premises network using CIDR format, for example 203.0.113.0/24.
This step isn’t necessary if both your DNS server and your on-premises network are using RFC 1918 private IP address spaces.
After you verify the security group and check whether any applicable routes are required, launch a Windows Server instance and join it to the AWS Managed Microsoft AD directory. See Step 3: Deploy an EC2 instance to manage your AWS Managed Microsoft AD to learn how to do this. Once the instance is launched, do the following:
Run the following PowerShell command to test DNS connectivity: Resolve-DnsName -Name 'example.local' -DnsOnly
You should also look through the message explanations in the Trust creation status reasons guide in the AWS Directory Service documentation.
Summary of AWS Managed Microsoft AD trust considerations
In this blog post, I covered Kerberos authentication over Active Directory trusts and provided details on what Active Directory trusts are and how they function. Here’s a quick list of items that you should consider when you plan trust creation with AWS Managed Microsoft AD:
Ensure that you have a network connection and the appropriate network ports opened between both domains. Note, it is recommended all Active Directory traffic occur over private network connection like a VPN or Direct Connect.
Ensure that DNS resolution is working on both sides of the trust.
Decide whether you will implement selective authentication. If it will be used, plan your Active Directory access control list (ACL) delegation strategy before implementation.
As of this blog’s publication, keep in mind that AWS Managed Microsoft AD currently supports Forest trusts and External trusts only.
Ensure that Kerberos preauthentication is enabled for all objects that traverse trusts with AWS Managed Microsoft AD.
If you find that you need a name suffix route enabled for your trust, open a support case with AWS Support, requesting that the name suffix route be enabled.
If you have feedback about this post, submit comments in the Comments section below. If you have questions about this post, start a new thread on the AWS Directory Service forum.
Want more AWS Security how-to content, news, and feature announcements? Follow us on Twitter.
AWS Secrets Manager helps you protect the secrets that are needed to access your applications, services, and IT resources. With this service, you can rotate, manage, and retrieve database credentials, API keys, OAuth tokens, and other secrets throughout their lifecycle. The secret value rotation feature has built-in integration for services like Amazon Relational Database Service (Amazon RDS) , whose credentials can be rotated. The same integration functionality can also be extended to other types of secrets, including API keys and OAuth tokens, with the help of AWS Lambda functions.
This blog post provides details on how Secrets Manager can be used to store and rotate the admin password of AWS Directory Service at a specified frequency. Customers who use the directory services in AWS can deploy the solution in this blog post to minimize the effort spent by their operations team to manually rotate the password (which is one of the best practices of password management). These customers can also benefit by using the secure API access of Secrets Manager to allow access by applications that are using Active Directory–specific accounts. A good example is having an application to reset passwords for AD users and can be done using the API access.
Solution overview
When you configure AWS Directory Service, one of the inputs the service expects is the password for the admin user (administrator). By using an AWS Lambda function and Secrets Manager, you can store the password and rotate it periodically.
Figure 1 shows the architecture diagram for this solution.
Figure 1: Architecture diagram
The workflow is as follows:
During initial setup (which can be performed either manually or through a CloudFormation template), the password of the admin user is stored as a secret in Secrets Manager. The secret is in the JSON format and contains three fields: Directory ID, UserName, and Password. The secret is encrypted using KMS Key to provide an added layer of security.
This secret is attached to a Lambda function that controls rotation.
This rotation Lambda function generates a new password, updates Active Directory, and then updates the secret. The function can be invoked on as-needed basis or at a desired interval. The CFN template we provide in this post schedules the rotation at a 30-day interval.
Applications can securely fetch the new secret value from Secrets Manager.
Prerequisites and assumptions
To implement this solution, you need an AWS account to test the solution and access AWS services.
Also be aware of the following:
In this solution, you will configure all the (supported) services in the same virtual private cloud (VPC) to simplify networking considerations.
The predefined admin user name for Simple Active Directory is Administrator.
The predefined password is a random 12-character string.
Important: The AWS CloudFormation template that we provide deploys a Simple Active Directory. This is for testing and demonstration purposes; you can modify or reuse the solution for other types of Active Directory solutions.
Deploy the solution
To deploy the solution, you first provision the baseline networking and other resources by using a CloudFormation stack.
The resource provisioning in this step creates these resources:
Secrets Manager has permission to invoke Lambda functions
The Lambda function has permission to update the secret in Secrets Manager
The Lambda function has permission to update the password for Directory Service
To deploy the solution by using the CloudFormation template
You can use this downloadable template to set up the resources. To launch directly through the console, choose the following Launch Stack button, which creates the stack in the us-east-1 AWS Region.
Choose Next to go to the Specify stack details page.
The bucket hosting the Lambda function code is predefined for ease of implementation, but you can edit the bucket name if necessary. Specify any other template details as needed, and then choose Next.
(Optional) On the Configure Stack Options page, enter any tags, and then choose Next.
On the Review page, select the check box for I acknowledge that AWS CloudFormation might create IAM resources with custom names, and choose Create stack.
It takes approximately 20–25 minutes for the provisioning to complete. When the stack status shows Create Complete, review the outputs that were created by navigating to the Outputs tab, as shown in Figure 2.
Figure 2: Outputs created by the CloudFormation template
Now that the stack creation has completed successfully, you should validate the resources that were created.
To validate the resources
Navigate to the AWS Directory Service console. You should see a new directory service that has the corp.com directory set up.
Navigate to the AWS Secrets Manager console and review the secret that was created called DSAdminPswd. Choose the secret value, and then choose Retrieve secret value to reveal the secret values.
Figure 3: Checking the secret value in the Secrets Manager console
As you might have noticed, the secret value changed from what was initially generated in the template. The Lambda function was invoked when it was attached to the secret, which caused the secret to rotate. To verify that the secret value changed, navigate to the Amazon CloudWatch console, and then navigate to Log groups.
In the search bar, type the Lambda function name dj-rotate-lambda to filter on the log group name.
Figure 4: CloudWatch log groups
Choose the log group /aws/lambda/dj-rotate-lambda to open the detailed log streams.
Look at the Log streams and open the recent log stream to view the series of rotation events.
Figure 5: The log data for a complete rotation
You should see that each of the four stages of rotation (create, set, test, and finish) are called in the right sequence. A Success message in the finishSecret stage confirms the successful rotation of the secret value.
The next step is to rotate the secret manually or set a policy for rotation.
To rotate the secret
The CloudFormation automation has set the rotation configuration to rotate the secret every 30 days. You can alternatively initiate another rotation by choosing Rotate secret immediately, as shown in Figure 6. You will observe the log stream (in CloudWatch Logs) changing, followed by the new secret value.
Figure 6: Manual rotation of the secret
You can also edit the rotation configuration by choosing Edit rotation and configuring the rotation policy that suits your organizational standards, as shown in Figure 7.
Figure 7: Editing the rotation configuration
Code walkthrough
The rotation Lambda function works in four stages:
CreateSecret – In this stage, the Lambda function creates a new password for the administrator user and sets up the staging label AWSPENDING for the secret’s new value.
SetSecret – In this stage, the Lambda function fetches the newly generated password by using the label AWSPENDING and sets it as the password to the Active Directory administrator user.
TestSecret – In this stage, the Lambda function verifies that the password is working by using the kinit command and the necessary dependent libraries of the Linux OS (the base OS for Lambda functions). If successful, the function continues to the next stage. In the case of failure, the catch block reverts the password of the Active Directory administrator user to the value in the AWSCURRENT label.
FinishSecret – This is the final stage, where the Lambda function moves the labels AWSCURRENT from the current version of secret to the new version. And the same time, the old version of the secret is given AWSPREVIOUS label.
The Lambda function is written in Python 3.7 runtime and uses AWS SDK for Python (Boto3) API calls for interacting with Secrets Manager and Directory Services.
The directory ID and Secrets Manager endpoint are supplied as environment variables to the Lambda function, as shown in Figure 8. The secret ID is fetched from the event context.
Figure 8: Environment variables setup
You can download the Lambda code that is used for the rotation logic and modify it to suit your organizational needs. For instance, the random password is configured to have a length of 12 characters, excluding special characters and punctuations, as shown in the following code snippet. You can modify this configuration as needed.
As mentioned in the Prerequisites section, make sure that you do proper testing in development or test environments before proceeding to deploy the solution in production environments.
Cleanup
After you complete and test this solution, clean up the resources by deleting the AWS CloudFormation stack called aws-ds-creds-manager. For more information on deleting the stacks, see Deleting a stack on the AWS CloudFormation console.
If you have feedback about this post, submit comments in the Comments section below. If you have questions about this post, start a new thread on the AWS Secrets Manager forum or contact AWS Support.
Want more AWS Security how-to content, news, and feature announcements? Follow us on Twitter.
You can further improve visibility by monitoring Windows login activities on your AWS Managed Microsoft AD domain-joined EC2 instances, and in this blog post, I show you how. Monitoring and tracking Windows security events on your AWS Managed Microsoft AD domain-joined instances can reveal unexpected activities on your domain-joined EC2 instances so that you can take proactive remediating action.
For example, every time there is an unsuccessful attempt to log in to a domain-joined EC2 instance or on-premises server by using an AWS Managed Microsoft AD user or a local account, an “Audit Failure” Windows security event with ID 4625 is recorded on the EC2 instance itself. The event data includes details of the account name, workstation name, and source network address. Unsuccessful attempts to log in to non–domain-joined EC2 instances and servers are handled the same way. You can track and monitor these events on an ongoing basis across your fleet of Windows EC2 instances by using the solution described here.
Solution overview
Figure 1 shows the workflow for the solution.
Figure 1: Solution architecture
The workflow steps are as follows:
An Amazon CloudWatch agent that is running on the EC2 instances sends the Windows security event logs to Amazon CloudWatch.
CloudWatch filters the logs based on the filter you specify. When the configured threshold is met, CloudWatch posts an alert to an SNS topic.
The Lambda function scans through the events and determines which EC2 instance(s) generated the security events at a frequency that satisfies the configured threshold. It discards any other instances listed in the events that don’t meet the specified criteria. The function sends an email to the configured email address with a high-level description of the event logs and the instance(s) that generated them.
Note: Although this example uses email notification via Amazon SES to monitor failed logins, there are opportunities to extend the solution. For example, you can integrate with a Security Information and Event Management (SIEM) tool that may potentially be integrated with a ticketing service and/or some automation or incident response process when a set threshold for failed logins is breached.
Prerequisites
Before you deploy the solution, you must complete the following steps:
The solution I present here involves four main steps:
Install and configure the CloudWatch agent for your EC2 instances.
Create a metric filter in CloudWatch.
Create a CloudWatch alarm based on the metric filter and add SNS notification.
Create a Lambda function and subscribe the function to the SNS topic.
Step 1: Install and configure the CloudWatch agent for all your EC2 instances
The first step is to create an AWS Systems Manager parameter to contain the JSON configuration for the CloudWatch agent that runs on the EC2 instances. You’ll then use Systems Manager Run Command to install the CloudWatch agent on the instances and to apply the configuration in the Parameter Store to the CloudWatch agent.
To install and configure the CloudWatch agent
Open the AWS Systems Manager console and in the navigation pane, choose Parameter Store to create a new Systems Manager parameter.
Give your parameter a name. In my example, I named my parameter AmazonCloudWatch-Windows.
For Tier, choose Standard. For Type, choose String. For Data type, choose Text.
For the value of the parameter, enter the following JSON configuration and choose Create Parameter.
Note: This JSON configuration creates a log group in CloudWatch with the name /aws/SecurityAuditLogs. If you would prefer to use another log group name, you can modify the JSON configuration. Also, if you already have a Systems Manager parameter named AmazonCloudWatch-Windows, you can use any other name of your choice.
The Parameter details page should look similar to the following.
Figure 2: Create the System Manager parameter for the CloudWatch agent
Next, you’ll use Run Command to install and configure the CloudWatch agent. In the navigation pane, choose Run Command.
On the Run a command page, in the search box, enter Document name prefix: Equals: AWS-ConfigureAWSPackage. Press Enter and select the document that appears.
Under Command parameters, for Name, enter AmazonCloudWatchAgent.
Figure 3: Install the CloudWatch agent on the instances
Under Targets, specify your EC2 instances based on their tags, or choose them manually, and then choose Run.
To configure the CloudWatch agent, choose Run Command again. On the Run a command screen, enter Document name prefix: Equals: AmazonCloudWatch-ManageAgent. Press Enter and select the document that appears.
Under Command parameters, for Optional Configuration Location, enter the name of the Systems Manager parameter you created earlier. In my example, I used the name AmazonCloudWatch-Windows. Keep the defaults for the other settings.
Figure 4: Configure the CloudWatch agent on the instances
Under Targets, specify your EC2 instances based on their tags, or choose them manually, and then choose Run.
Step 2: Create a metric filter in CloudWatch
After the completion of the tasks in Step 1, your EC2 instances should now be sending logs to a log group in Amazon CloudWatch called /aws/SecurityAuditLogs. The log group should have log streams named after the EC2 instances that are sending the logs to CloudWatch. The next step is to create a metric filter to filter the noise from the logs.
To create a metric filter
Open the CloudWatch console and in the left navigation menu, choose Log Groups.
Select the check box next to the /aws/SecurityAuditLogs log group, choose Actions, and then choose Create metric filter.
On the Define pattern page, enter Audit Failure, keep the defaults for the other settings, and then choose Next.
Enter values for Filter name, Metric namespace, Metric name, and Metric value, and then choose Next to create the metric filter.
Figure 5: Create a CloudWatch metric filter
Step 3: Create a CloudWatch alarm based on the metric filter and add SNS notification
In this step, you set a threshold for how many “Audit Failure” events you want to allow within a period of time before triggering an alarm.
To create the CloudWatch alarm and add SNS notification
Provide a name for your topic, and then choose Create topic. In my example, I named the topic WindowsSecurityLogsAlarmNotifications.
Open the CloudWatch console, choose Log groups, and select the /aws/SecurityAuditLogs log group.
Choose the Metric filters tab, select the check box next to the WindowsSecurityAuditFailures filter you just created, and choose Create alarm.
On the Specify metric and conditions page, set the parameters as follows:
For Statistic, choose Sample count.
For Period, choose 5 minutes.
For Threshold type, choose Static.
For Define the alarm condition, choose Greater>threshold.
For Define the threshold value, specify the threshold number of failed login attempts that will cause a notification to be sent.
Note: In my example, I’ve specified to be notified after five failed login attempts. You should determine the appropriate threshold to use, based on your organization’s security policies.
Figure 6: Create a CloudWatch alarm
On the Configure actions page, choose Next.
Choose In alarm, choose Select an existing SNS topic, and then select the SNS topic you created earlier in this procedure.
Specify a name for the alarm, and then choose Create Alarm.
Step 4: Create a Lambda function and subscribe the function to the SNS topic
CloudWatch alarm messages are predefined, can’t be modified, and don’t provide details based on CloudWatch streams. Additionally, a CloudWatch alarm will trigger when a combination of failed login attempts on two or more instances meets the threshold. For instance, in my example, when there are three failed attempts on one instance and two failed attempts on a second instance all within a 5-minute period, a CloudWatch alarm will be triggered.
The purpose of the Lambda function that you’ll create in this step is to validate whether the triggered alarms meet the specified threshold on a per-instance basis before the function sends an email notification to the designated email address. When a CloudWatch alarm is triggered, the function reads through the CloudWatch logs and filters the logs based on CloudWatch log streams that meet the specified threshold for the alarm. If no individual CloudWatch log stream (that is, no individual instance or server) meets the threshold, the function won’t send a notification. The function only sends a notification if it determines that one or more instances have each met the specified threshold. The function also provides more information about the failed login attempts when it does send you an email.
To create the Lambda function and subscribe it to the SNS topic
Open the AWS Lambda console and choose Create function.
Choose Author from scratch, and provide a name for your function. Under Runtime, select Node.js 14.x, and then choose Create function.
Double-click index.js, replace the code with the following code, and then choose Deploy.
var aws = require('aws-sdk');
var cwl = new aws.CloudWatchLogs();
var ses = new aws.SES();
let alarmThreshold = process.env.ALARM_THRESHOLD;

exports.handler = function(event, context) {
    var message = JSON.parse(event.Records[0].Sns.Message);
    var alarmName = message.AlarmName;
    var oldState = message.OldStateValue;
    var newState = message.NewStateValue;
    var reason = message.NewStateReason;
    var requestParams = {
        metricName: message.Trigger.MetricName,
        metricNamespace: message.Trigger.Namespace
    };
    cwl.describeMetricFilters(requestParams, function(err, data) {
        if(err) console.error('Error is:', err);
        else {
            console.log('Metric Filter data is:', data);
    	    getInstanceIdsAndSendEmail(message, data);
        }
    });
};

function getInstanceIdsAndSendEmail(message, metricFilterData) {
    var timestamp = Date.parse(message.StateChangeTime);
    var offset = message.Trigger.Period * message.Trigger.EvaluationPeriods * 1000;
    var metricFilter = metricFilterData.metricFilters[0];
    var dictInstances = {};
    var arrayInstances = [];
    var instancesFinalList = [];
    var key;
    var val;
    // Getting the Instance Ids
    var paramsForInstanceId = {
        'logGroupName' : metricFilter.logGroupName,
        'filterPattern' : metricFilter.filterPattern ? metricFilter.filterPattern : "",
         'startTime' : timestamp - offset,
         'endTime' : timestamp
    };
    cwl.filterLogEvents(paramsForInstanceId, function (err, data){
        if (err) {
            console.error('Filtering failure:', err);
        } else {
            var events = data.events;
            for (var i in events) {
                var InstanceId = JSON.stringify(events[i]['logStreamName']);
                arrayInstances.push(InstanceId);
            }
            console.log('Array Instance is:', arrayInstances);
            for (var i = 0; i < arrayInstances.length; i++) {
                var instId = arrayInstances[i];
                dictInstances[instId] = dictInstances[instId] ? dictInstances[instId] + 1 : 1;
            }
            console.log('Instance(s) and number of audit failure occurrences:', dictInstances);
            for([key, val] of Object.entries(dictInstances)) {
                if (val > alarmThreshold) {
                    instancesFinalList.push(key.replace(/['"]+/g, ''));
                }
            }
            console.log('Instance(s) with failure audit that exceed the threshold:', instancesFinalList);
    	    getLogsAndSendEmail(message, metricFilterData, instancesFinalList);
        }
    });
}

function getLogsAndSendEmail(message, metricFilterData, logStreamNames_Instance) {
    var timestamp = Date.parse(message.StateChangeTime);
    var offset = message.Trigger.Period * message.Trigger.EvaluationPeriods * 1000;
    var metricFilter = metricFilterData.metricFilters[0];
    var dictInstances = {};
    var arrayInstances = [];
    var instancesFinalList = []

    // Send Email to the Instances
    var paramsForEmail = {
        'logGroupName' : metricFilter.logGroupName,
        'filterPattern' : metricFilter.filterPattern ? metricFilter.filterPattern : "",
         'startTime' : timestamp - offset,
         'endTime' : timestamp,
         'logStreamNames' : logStreamNames_Instance
    };
    cwl.filterLogEvents(paramsForEmail, function (err, data){
        if (err) {
            console.error('Filtering failure:', err);
        } else {
            console.log("===SENDING EMAIL===");
			var email = ses.sendEmail(generateEmailContent(data, message), function(err, data){
                if(err) console.error(err);
                else {
                    console.log("===EMAIL SENT===");
                    console.log(data);
                }
            });
        }
    });
}

function generateEmailContent(data, message) {
    var events = data.events;
    let senderEmail = process.env.SENDER_EMAIL;
    let recipientEmail = process.env.RECIPIENT_EMAIL.split(",");
    console.log('Recipient is: ', recipientEmail);
    console.log('Events are:', events);
    var style = '<style> pre {color: red;} </style>';
    var logData = '<br/>Logs:<br/>' + style;
    for (var i in events) {
        logData += '<pre>Instance:' + JSON.stringify(events[i]['logStreamName'])  + '</pre>';
        logData += '<pre>Message:' + JSON.stringify(events[i]['message']) + '</pre><br/>';
    }
    var date = new Date(message.StateChangeTime);
    var text = 'Alarm Name: ' + '<b>' + message.AlarmName + '</b><br/>' +
               'Message: ' + 'There has been an unusually high number of Windows Security Audit Failure events for the instance(s) with details below. Please review the event logs <br/>' +
               'Account ID: ' + message.AWSAccountId + '<br/>'+
               'Region: ' + message.Region + '<br/>'+
               'Alarm Time: ' + date.toString() + '<br/>'+
               logData;
    var subject = 'Alarm Triggered - ' + message.AlarmName;
    var emailContent = {
        Destination: {
            ToAddresses: recipientEmail
        },

        Message: {
            Body: {
                Html: {
                    Data: text
                }
            },
            Subject: {
                Data: subject
            }
        },
        Source: senderEmail
    };
    return emailContent;
}
Choose Add trigger, and in the drop-down list, choose SNS.
Under SNS topic, select the SNS topic you created in Step 3, and then choose Add.
Figure 7: Create the AWS Lambda function
Choose the Configuration tab, and then choose Environment variables. Choose Edit to add the environment variables for ALARM_THRESHOLD, RECIPIENT_EMAIL, and SENDER_EMAIL, and then choose Save.
Figure 8: The Lambda environment variables
Note: The variables’ keys must be set exactly as ALARM_THRESHOLD, RECIPIENT_EMAIL, and SENDER_EMAIL, because otherwise the code will fail. For the recipient, you can specify a single email or multiple email addresses that are separated by commas, as shown in Figure 8, provided that the emails are verified as specified in the Prerequisites section.
Next, create an IAM policy, which you’ll attach to a role that will be assumed by the Lambda function. This policy provides permissions to perform the DescribeMetricFilters, FilterLogEvents, and SendEmail API calls that are necessary for the function to work. It also provides permissions to create a log group and log stream in CloudWatch for the Lambda function, so that you can review the logs if the Lambda function fails to run properly.
To create the IAM policy
Sign in to the IAM console, and in the navigation bar, choose Policies.
In the content pane, choose Create policy, and then choose JSON.
Replace the content with the following script. Make sure to replace the placeholders with the ARN of the Lambda function, the ARNs for log group creation and the ARN of your SES verified email address to use as sender.
Here is how it appears in my example. Note that FilterSendSecurityEvents is the name of my Lambda function and /aws/SecurityAuditLogs is the name my log group created in Step 1.
Figure 9: Example policy for the IAM role to be attached to the Lambda function
Choose Review policy, specify a name and a description for the policy, and then choose Create policy.
Next, create an IAM role and attach this policy.
To create the IAM role and attach the policy
In the IAM console navigation bar, choose Roles, and then choose Create role.
Under Choose the service that will use this role, choose Lambda, and then choose Next: Permissions.
On the next page, select the policy you just created, and then choose Next: Tags. Add an optional tag, and then choose Next: Review.
Specify a name and description for the role, and then choose Create role.
To attach this role to the Lambda function, go to the AWS Lambda console. Navigate to the Lambda function, and choose Configurations.
Choose Permissions, and then under Execution role, choose Edit.
On the Edit basic settings page, under Existing role, select the role you just created, and then choose Save.
And that’s it! You will now be notified whenever there are “Audit Failure” events that reach the threshold you set on a per-instance basis for your AWS Managed Microsoft AD domain-joined instances. If you installed and configured the CloudWatch agent on non–domain-joined instances in Step 1, then you’ll also get notifications for “Audit Failure” events that are generated by failed login attempts that use local accounts.
Conclusion
In this post, I showed you how you can proactively track and monitor Windows security audit failures across your AWS Managed Microsoft AD domain-joined EC2 instances. This helps provide greater visibility into Windows login activities for administrators, so that they can take action to maintain the security of their server fleet. This solution can also be extended to potentially trigger an automation workflow or incident response process in the event of unexpected events.
Although this blog has specifically targeted AWS Managed Microsoft AD domain-joined instances, the procedure here also applies to standalone EC2 instances or on-premises servers that are configured to send logs to CloudWatch.
If you have feedback about this post, submit comments in the Comments section below. If you have questions about this post, start a new thread on the AWS Directory Service forum or contact AWS Support.
Want more AWS Security how-to content, news, and feature announcements? Follow us on Twitter.
In this blog post, I show you how to deploy an automated solution that helps you fully automate the Active Directory join and unjoin process for Amazon Elastic Compute Cloud (Amazon EC2) instances that don’t have internet access.
Managing Active Directory domain membership for EC2 instances in Amazon Web Services (AWS) Cloud is a typical use case for many organizations. In a dynamic environment that can grow and shrink multiple times in a day, adding and removing computer objects from an Active Directory domain is a critical task and is difficult to manage without automation.
AWS seamless domain join provides a secure and reliable option to join an EC2 instance to your AWS Directory Service for Microsoft Active Directory. It’s a recommended approach for automating joining a Windows or Linux EC2 instance to the AWS Managed Microsoft AD or to an existing on-premises Active Directory using AD Connector, or a standalone Simple AD directory running in the AWS Cloud. This method requires your EC2 instances to have connectivity to the public AWS Directory Service endpoints. At the time of writing, Directory Service doesn’t have PrivateLink endpoint support. This means you must allow traffic from your instances to the public Directory Service endpoints via an internet gateway, network address translation (NAT) device, virtual private network (VPN) connection, or AWS Direct Connect connection.
At times, your organization might require that any traffic between your VPC and Directory Service—or any other AWS service—not leave the Amazon network. That means launching EC2 instances in an Amazon Virtual Private Cloud (Amazon VPC) with no internet access and still needing to join and unjoin the instances from the Active Directory domain. Provided your instances have network connectivity to the directory DNS addresses, the simplest solution in this scenario is to run the domain join commands manually on the EC2 instances and enter the domain credentials directly. Though this process can be secure—as you don’t need to store or hardcode the credentials—it’s time consuming and becomes difficult to manage in a dynamic environment where EC2 instances are launched and terminated frequently.
VPC endpoints enable private connections between your VPC and supported AWS services. Private connections enable you to privately access services by using private IP addresses. Traffic between your VPC and other AWS services doesn’t leave the Amazon network. Instances in your VPC don’t need public IP addresses to communicate with resources in the service.
The solution in this blog post uses AWS Secrets Manager to store the domain credentials and VPC endpoints to enable private connection between your VPC and other AWS services. The solution described here can be used in the following scenarios:
Manage domain join and unjoin for EC2 instances that don’t have internet access.
Manage only domain unjoin if you’re already using seamless domain join provided by AWS, or any other method for domain joining.
Manage only domain join for EC2 instances that don’t have internet access.
This solution uses AWS CloudFormation to deploy the required resources in your AWS account based on your choice from the preceding scenarios.
Note: If your EC2 instances can access the internet, then we recommend using the seamless domain join feature and using scenario 2 to remove computers from the Active Directory domain upon instance termination.
The solution described in this blog post is designed to provide a secure, automated method for joining and unjoining EC2 instances to an on-premises or AWS Managed Microsoft AD domain. The solution is best suited for use cases where the EC2 instances don’t have internet connectivity and the seamless domain join option cannot be used.
How this solution works
This blog post includes a CloudFormation template that you can use to deploy this solution. The CloudFormation stack provisions an EC2 Windows instance running in an Amazon EC2 Auto Scaling group that acts as a worker and is responsible for joining and unjoining other EC2 instances from the Active Directory domain. The worker instance communicates with other required AWS services such as Amazon Simple Storage Service (Amazon S3), Secrets Manager, and Amazon Simple Queue Service (Amazon SQS) using VPC endpoints. The stack also creates all of the other resources needed for this solution to work.
Figure 1 shows the domain join and unjoin workflow for EC2 instances in an AWS account.
Figure 1: Workflow for joining and unjoining an EC2 instance from a domain with full protection of Active Directory credentials
The event flow in Figure 1 is as follows:
An EC2 instance is launched or terminated in an account.
The CloudWatch event triggers an AWS Lambda function that looks for the tag JoinAD: true to check if the instance needs to join or unjoin the Active Directory domain.
A standalone, highly secured EC2 instance acts as a worker and polls the Amazon SQS queue for new messages.
Whenever there’s a new message in the queue, the worker EC2 instance invokes scripts on the remote EC2 instance to add or remove the instance from the domain based on the instance operating system and state.
In this solution, the security of the Active Directory credentials is enhanced by storing them in Secrets Manager. To secure the stored credentials, the solution uses resource-based policies to restrict the access to only intended users and roles.
The credentials can only be fetched dynamically from the EC2 instance that’s performing the domain join and unjoin operations. Any access to that instance is further restricted by a custom AWS Identity and Access Management (IAM) policy created by the CloudFormation stack. The following policies are created by the stack to enhance security of the solution components.
An S3 bucket policy to prevent unauthorized access to the Active Directory join and remove scripts that are stored in the S3 bucket.
The IAM role that’s used to fetch the credentials from Secrets Manager is restricted by a custom IAM policy and can only be assumed by the worker EC2 instance. This prevents every entity other than the worker instance from using that IAM role.
All API and console access to the worker EC2 instance is restricted by a custom IAM policy with an explicit deny.
A policy to deny all but the worker EC2 instance access to the credentials in Secrets Manager. With the worker EC2 instance doing the work, the EC2 instances that need to join the domain don’t need access to the credentials in Secrets Manager or to scripts in the S3 bucket.
Prerequisites and setup
Before you deploy the solution, you must complete the following in the AWS account and Region where you want to deploy the CloudFormation stack.
AWS Managed Microsoft AD with an appropriate DNS name (for example, test.com). You can also use your on premises Active Directory, provided it’s reachable from the Amazon VPC over Direct Connect or AWS VPN.
Create a DHCP option set with on-premises DNS servers or with the DNS servers pointing to the IP addresses of directories provided by AWS.
Associate the DHCP option set with the Amazon VPC that you’re going to use with this solution.
Any other Amazon VPCs that are hosting EC2 instances to be domain joined must be peered with the VPC that hosts the relevant AWS Managed Microsoft AD. Alternatively, AWS Transit Gateway can be used to establish this connectivity.
Create a new SSH key pair and store it in Secrets Manager using the following commands. Replace <Region> with the Region of your deployment. Replace <MyKeyPair> with any custom name or leave it default.
Note: Don’t change the name of the secret, as other scripts in the solution reference it. The worker EC2 instance will fetch the SSH key using GetSecretValue API to SSH or RDP into other EC2 instances during domain join process.
Deploy the solution
With the prerequisites in place, your next step is to download or clone the GitHub repo and store the files on your local machine. Go to the location where you cloned or downloaded the repo and review the contents of the config/OS_User_Mapping.json file to validate the instance user name and operating system mapping. Update the file if you’re using a user name other than the one used to log in to the EC2 instances. The default user name used in this solution is ec2-user for Linux instances and Administrator for Windows.
The solution requires installation of some software on the worker EC2 instance. Because the EC2 instance doesn’t have internet access, you must download the latest Windows 64-bit version of the following software to your local machine and upload it into the solution deployment S3 bucket in subsequent steps.
Once created, enable versioning on this bucket using the following documentation. Versioning lets you keep multiple versions of your objects in one bucket and helps you easily retrieve and restore previous versions of your scripts.
Upload the software you downloaded to the S3 bucket. This is only required if your instance doesn’t have internet access.
Upload the cloned or downloaded GitHub repo files to the S3 bucket.
Go to the S3 bucket and select the template name secret-active-dir-solution.json, and copy the object URL.
Open the CloudFormation console. Choose the appropriate AWS Region, and then choose Create Stack. Select With new resources.
Select Amazon S3 URL as the template source, paste the object URL that you copied in Step 5, and then choose Next.
On the Specify stack details page, enter a name for the stack and provide the following input parameters. You can modify the default values to customize the solution for your environment.
ADUSECASE – From the dropdown menu, select your required use case. There is no default value.
AdminUserId – The canonical user ID of the IAM user who manages the Active Directory credentials stored in Secrets Manager. To learn how to find the canonical user ID for your IAM user, scroll down to Finding the canonical user ID for your AWS account in AWS account identifiers.
DenyPolicyName – The name of the IAM policy that restricts access to the worker EC2 instance and the IAM role used by the worker to fetch credentials from Secrets Manager. You can keep the default value or provide another name.
InstanceType – Instance type to be used when launching the worker EC2 instance. You can keep the default value or use another instance type if necessary.
Placeholder – This is a dummy parameter that’s used as a placeholder in IAM policies for the EC2 instance ID. Keep the default value.
S3Bucket – The name of the S3 bucket that you created in the first step of the solution deployment. Replace the default value with your S3 bucket name.
S3prefix – Amazon S3 object key where the source scripts are stored. Leave the default value as long as the cloned GitHub directory structure hasn’t been changed.
SSHKeyRequired – Select true or false based on whether an SSH key pair is required to RDP into the EC2 worker instance. If you select false, the worker EC2 instance will not have an SSH key pair.
SecurityGroupId – Security group IDs to be associated with the worker instance to control traffic to and from the instance.
Subnet – Select the VPC subnet where you want to launch the worker EC2 instance.
VPC – Select the VPC where you want to launch the worker EC2 instance. Use the VPC where you have created the AWS Managed Microsoft AD.
WorkerSSHKeyName – An existing SSH key pair name that can be used to get the password for RDP access into the EC2 worker instance. This isn’t mandatory if you’re using user name and password based login or AWS Systems Manager Session Manager. This is required only if you have selected true for the SSHKeyRequired parameter.
Figure 2: Defining the stack name and input parameters for the CloudFormation stack
Enter values for all of the input parameters, and then choose Next.
On the Options page, keep the default values and then choose Next.
On the Review page, confirm the details, acknowledge that CloudFormation might create IAM resources with custom names, and choose Create Stack.
Once the stack creation is marked as CREATE_COMPLETE, the following resources are created:
An EC2 instance that acts as a worker and runs Active Directory join scripts on the remote EC2 instances. It also unjoins instances from the domain upon instance termination.
A secret with a default Active Directory domain name, user name, and a dummy password. The name of the default secret is myadcredV1.
A Secrets Manager resource-based policy to deny all access to the secret except to the intended IAM users and roles.
An EC2 IAM profile and IAM role to be used only by the worker EC2 instance.
A managed IAM policy called DENYPOLICY that can be assigned to an IAM user, group, or role to restrict access to the solution resources such as the worker EC2 instance.
An S3 bucket policy to restrict access to the source S3 bucket from unauthorized users or roles.
A CloudWatch log group to stream the logs of the worker EC2 instance.
Test the solution
Now that the solution is deployed, you can test it to check if it’s working as expected. Before you test the solution, you must navigate to the secret created in Secrets Manager by CloudFormation and update the Active Directory credentials—domain name, user name, and password.
To test the solution
In the CloudFormation console, choose Services, and then CloudFormation. Select your stack name. On the stack Outputs tab, look for the ADSecret entry.
Choose the ADSecret link to go to the configuration for the secret in the Secrets Manager console. Scroll down to the section titled Secret value, and then choose Retrieve secret value to display the default Secret Key and Secret Value as shown in Figure 3.
Figure 3: Retrieve value in Secrets Manager
Choose the Edit button and update the default dummy credentials with your Active Directory domain credentials.(Optional) Directory_ou is used to store the organizational unit (OU) and directory components (DC) for the directory; for example, OU=test,DC=example,DC=com.
Note: instance_password is an optional secret key and is used only when you’re using user name and password based login to access the EC2 instances in your account.
Now that the secret is updated with the correct credentials, you can launch a test EC2 instance and determine if the instance has successfully joined the Active Directory domain.
Create an Amazon Machine Image
Note: This is only required for Linux-based operating systems other than Amazon Linux. You can skip these steps if your instances have internet access.
As your VPC doesn’t have internet access, for Linux-based systems other than Amazon Linux 1 or Amazon Linux 2, the required packages must be available on the instances that need to join the Active Directory domain. For that, you must create a custom Amazon Machine Image (AMI) from an EC2 instance with the required packages. If you already have a process to build your own AMIs, you can add these packages as part of that existing process.
To install the package into your AMI
Create a new EC2 Linux instance for the required operating system in a public subnet or a private subnet with access to the internet via a NAT gateway.
Connect to the instance using any SSH client.
Install the required software by running the following command that is appropriate for the operating system:
Navigate to the Amazon EC2 console and launch an Amazon Linux or Windows EC2 instance in the same Region and VPC that you used when creating the CloudFormation stack. For any other operating system, make sure you are using the custom AMI created before.
In the Add Tags section, add a tag named JoinAD and set the value as true. Add another tag named Operating_System and set the appropriate operating system value from:
AMAZON_LINUX
FEDORA
RHEL
CENTOS
UBUNTU
DEBIAN
SUSE
WINDOWS
Make sure that the security group associated with this instance is set to allow all inbound traffic from the security group of the worker EC2 instance.
Use the SSH key pair name from the prerequisites (Step 6) when launching the instance.
Wait for the instance to launch and join the Active Directory domain. You can now navigate to the CloudWatch log group named /ad-domain-join-solution/ created by the CloudFormation stack to determine if the instance has joined the domain or not. On successful join, you can connect to the instance using a RDP or SSH client and entering your login credentials.
To test the domain unjoin workflow, you can terminate the EC2 instance launched in Step 1 and log in to the Active Directory tools instance to validate that the Active Directory computer object that represents the instance is deleted.
Solution review
Let’s review the details of the solution components and what happens during the domain join and unjoin process:
1) The worker EC2 instance:
The worker EC2 instance used in this solution is a Windows instance with all configurations required to add and remove machines to and from an Active Directory domain. It can also be used as an Active Directory administration tools instance. This instance is continuously running a bash script that is polling the SQS queue for new messages. Upon arrival of a new message, the script performs the following tasks:
Check if the instance is in running or terminated state to determine if it needs to be added or removed from the Active Directory domain.
If the message is from a newly launched EC2 instance, then this means that this instance needs to join the Active Directory domain.
The script identifies the instance operating system and runs the appropriate PowerShell or bash script on the remote EC2.
Similarly, if the instance is in terminated state, then the worker will run the domain unjoin command locally to remove the computer object from the Active Directory domain.
If the worker fails to process a message in the SQS queue, it sends the unprocessed message to a backup queue for debugging.
The worker writes logs related to the success or failure of the domain join to a CloudWatch log group. Use /ad-domain-join-solution to filter for all other logs created by the worker instance in CloudWatch.
2) The worker bash script running on the instance:
This script polls the SQS queue every 5 seconds for new messages and is responsible for following activities:
Fetching Active Directory join credentials (user name and password) from Secrets Manager.
If the remote EC2 instance is running Windows, running the Invoke-Command PowerShell cmdlet on the instance to perform the Active Directory join operation.
If the remote EC2 instance is running Linux, running realm join command on the instance to perform the Active Directory join operation.
Running the Remove-ADComputer command to remove the computer object from the Active Directory domain for terminated EC2 instances.
Storing domain-joined EC2 instance details—computer name and IP address—in an Amazon DynamoDB table. These details are used to check if an instance is already part of the domain and when removing the instance from the Active Directory domain.
More information
Now that you have tested the solution, here are some additional points to be noted:
The Active Directory join and unjoin scripts provided with this solution can be replaced with your existing custom scripts.
To update the scripts on the worker instance, you must upload the modified scripts to the S3 bucket and the changes will automatically synchronize on the instance.
This solution works with single account, Region, and VPC combination. It can be modified to use across multiple Regions and VPC combinations.
For VPCs in a different account or Region, you must share your AWS Managed Microsoft AD with another AWS account when the networking prerequisites have been completed.
The instance user name and operating system mapping used in the solution is based on the default user name used by AWS.
You can use AWS Systems Manager with VPC endpoints to log in to EC2 instances that don’t have internet access.
The solution is protecting your Active Directory credentials and is making sure that:
Active Directory credentials can be accessed only from the worker EC2 instance.
The IAM role used by the worker EC2 instance to fetch the secret cannot be assumed by other IAM entities.
Only authorized users can read the credentials from the Secrets Manager console, through AWS CLI, or by using any other AWS Tool—such as an AWS SDK.
The focus of this solution is to demonstrate a method you can use to secure Active Directory credentials and automate the process of EC2 instances joining and unjoining from an Active Directory domain.
You can associate the IAM policy named DENYPOLICY with any IAM group or user in the account to block that user or group from accessing or modifying the worker EC2 instance and the IAM role used by the worker.
If your account belongs to an organization, you can use an organization-level service control policy instead of an IAM-managed policy—such as DENYPOLICY—to protect the underlying resources from unauthorized users.
Conclusion
In this blog post, you learned how to deploy an automated and secure solution through CloudFormation to help secure the Active Directory credentials and also manage adding and removing Amazon EC2 instances to and from an Active Directory domain. When using this solution, you incur Amazon EC2 charges along with charges associated with Secrets Manager pricing and AWS PrivateLink.
You can use the following references to help diagnose or troubleshoot common errors during the domain join or unjoin process.
AWS Launch Wizard is a console-based service to quickly and easily size, configure, and deploy third party applications, such as Microsoft SQL Server Always On and HANA based SAP systems, on AWS without the need to identify and provision individual AWS resources. AWS Launch Wizard offers an easy way to deploy enterprise applications and optimize costs. Instead of selecting and configuring separate infrastructure services, you go through a few steps in the AWS Launch Wizard and it deploys a ready-to-use application on your behalf. It reduces the time you need to spend on investigating how to provision, cost and configure your application on AWS.
You can now use AWS Launch Wizard to deploy and configure self-managed Microsoft Windows Server Active Directory Domain Services running on Amazon Elastic Compute Cloud (EC2) instances. With Launch Wizard, you can have fully-functioning, production-ready domain controllers within a few hours—all without having to manually deploy and configure your resources.
You can use AWS Directory Service to run Microsoft Active Directory (AD) as a managed service, without the hassle of managing your own infrastructure. If you need to run your own AD infrastructure, you can use AWS Launch Wizard to simplify the deployment and configuration process.
In this post, I walk through creation of a cross-region Active Directory domain using Launch Wizard. First, I deploy a single Active Directory domain spanning two regions. Then, I configure Active Directory Sites and Services to match the network topology. Finally, I create a user account to verify replication of the Active Directory domain.
Figure 1: Diagram of resources deployed in this post
Prerequisites
You must have a VPC in your home. Additionally, you must have remote regions that have CIDRs that do not overlap with each other. If you need to create VPCs and subnets that do not overlap, please refer here.
Each subnet used must have outbound internet connectivity. Feel free to either use a NAT Gateway or Internet Gateway.
The VPCs must be peered in order to complete the steps in this post. For information on creating a VPC Peering connection between regions, please refer here.
If you choose to deploy your Domain Controllers to a private subnet, you must have an RDP jump / bastion instance setup to allow you to RDP to your instance.
Deploy Your Domain Controllers in the Home Region using Launch Wizard
In this section, I deploy the first set of domain controllers into the us-east-1 the home region using Launch Wizard. I refer to US-East-1 as the homeregion, and US-West-2 as the remoteregion.
Assign a Controller IP address for each domain controller
Remote Desktop Gateway preferences: Disregard for now, this is set up later.
Check the I confirm that a public subnet has been set up. Each of the selected private subnets have outbound connectivity enabled check box.
Select Next.
In the Define infrastructure requirements page, set the following inputs.
Storage and compute: Based on infrastructure requirements
Number of AD users: Up to 5000 users
Select Next.
In the Review and deploy page, review your selections. Then, select Deploy.
Note that it may take up to 2 hours for your domain to be deployed. Once the status has changed to Completed, you can proceed to the next section. In the next section, I prepare Active Directory Sites and Services for the second set of domain controller in my other region.
Configure Active Directory Sites and Services
In this section, I configure the Active Directory Sites and Services topology to match my network topology. This step ensures proper Active Directory replication routing so that domain clients can find the closest domain controller. For more information on Active Directory Sites and Services, please refer here.
Retrieve your Administrator Credentials from Secrets Manager
From the AWS Secrets Manager Console in us-east-1, select the Secret that begins with LaunchWizard-UsEast1AD.
In the middle of the Secret page, select Retrieve secret value.
This will display the username and password key with their values.
You need these credentials when you RDP into one of the domain controllers in the next steps.
Rename the Default First Site
Log in to the one of the domain controllers in us-east-1.
Select Start, type dssite and hit Enter on your keyboard.
The Active Directory Sites and Services MMC should appear.
Expand Sites. There is a site named Default-First-Site-Name.
Right click on Default-First-Site-Name select Rename.
Enter us-east-1 as the name.
Leave the Active Directory Sites and Services MMC open for the next set of steps.
Create a New Site and Subnet Definition for US-West-2
Using the Active Directory Sites and Services MMC from the previous steps, right click on Sites.
Select New Site… and enter the following inputs:
Name: us-west-2
Select DEFAULTIPSITELINK.
Select OK.
A pop up will appear telling you there will need to be some additional configuration. Select OK.
Expand Sites and right click on Subnets and select New Subnet.
Enter the following information:
Prefix: the CIDR of your us-west-2 VPC. An example would be 1.0.0/24
Site: select us-west-2
Select OK.
Leave the Active Directory Sites and Services MMC open for the following set of steps.
Configure Site Replication Settings
Using the Active Directory Sites and Services MMC from the previous steps, expand Sites, Inter-Site Transports, and select IP. You should see an object named DEFAULTIPSITELINK,
Right click on DEFAULTIPSITELINK.
Select Properties. Set or verify the following inputs on the General tab:
In the DEFAULTIPSITELINKProperties, select the Attribute Editor tab and modify the following:
Scroll down and double click on Enter 1 for the Value, then select OK twice.
For more information on these settings, please refer here.
Close the Active Directory Sites and Services MMC, as it is no longer needed.
Prepare Your Home Region Domain Controllers Security Group
In this section, I modify the Domain Controllers Security Group in us-east-1. This allows the domain controllers deployed in us-west-2 to communicate with each other.
Assign a Controller IP address for each domain controller
Remote Desktop Gateway preferences: disregard for now, as I set this later.
Check the I confirm that a public subnet has been set up. Each of the selected private subnets have outbound connectivity enabled check box
In the Define infrastructure requirements page set the following:
Storage and compute: Based on infrastructure requirements
Number of AD users: Up to 5000 users
In the Review and deploy page, review your selections. Then, select Deploy.
Note that it may take up to 2 hours to deploy domain controllers. Once the status has changed to Completed, proceed to the next section. In this next section, I prepare Active Directory Sites and Services for the second set of domain controller in another region.
Prepare Your Remote Region Domain Controllers Security Group
In this section, I modify the Domain Controllers Security Group in us-west-2. This allows the domain controllers deployed in us-west-2 to communicate with each other.
Select the Domain Controllers Security Group that was created by your Launch Wizard Active Directory.
Select Edit inbound rules. The Security Group should start with LaunchWizard-UsWest2AD-EC2ADStackExistingVPC-
Choose Add rule and enter the following:
Type: Select All traffic
Protocol: All
Port range: All
Source: Select Custom
Enter the CIDR of your remote VPC. An example would be 0.0.0/24
Choose Save rules.
Create an AD User and Verify Replication
In this section, I create a user in one region and verify that it replicated to the other region. I also use AD replication diagnostics tools to verify that replication is working properly.
Create a Test User Account
Log in to one of the domain controllers in us-east-1.
Select Start, type dsa and press Enter on your keyboard. The Active Directory Users and Computers MMC should appear.
Right click on the Users container and select New > User.
Enter the following inputs:
First name: John
Last name: Doe
User logon name: jdoe and select Next
Password and Confirm password: Your choice of complex password
Uncheck User must change password at next logon
Select Next.
Select Finish.
Verify Test User Account Has Replicated
Log in to the one of the domain controllers in us-west-2.
Select Start and type dsa.
Then, press Enter on your keyboard. The Active Directory Users and Computers MMC should appear.
Select Users. You should see a user object named John Doe.
Note that if the user is not present, it may not have been replicated yet. Replication should not take longer than 60 seconds from when the item was created.
Summary
Congratulations, you have created a cross-region Active Directory! In this post you:
Launched a new Active Directory forest in us-east-1 using AWS Launch Wizard.
Configured Active Directory Sites and Service for a multi-region configuration.
Launched a set of new domain controllers in the us-west-2 region using AWS Launch Wizard.
Created a test user and verified replication.
This post only touches on a couple of features that are available in the AWS Launch Wizard Active Directory deployment. AWS Launch Wizard also automates the creation of a Single Tier PKI infrastructure or trust creation. One of the prime benefits of this solution is the simplicity in deploying a fully functional Active Directory environment in just a few clicks. You no longer need to do the undifferentiated heavy lifting required to deploy Active Directory. For more information, please refer to AWS Launch Wizard documentation.
Many Amazon Web Services (AWS) customers use Active Directory to centralize user authentication and authorization for a variety of applications and services. For these customers, Active Directory is a critical piece of their IT infrastructure.
AWS also offers Amazon Relational Database Service (Amazon RDS) for SQL Server. Amazon RDS enables you to prioritize application development by managing time-consuming database administration tasks including provisioning, backups, software patching, monitoring, and hardware scaling. If you require Windows authentication with Amazon RDS for SQL Server, Amazon RDS for SQL Server instances need to be integrated with AWS Managed Microsoft AD.
With the release of AWS Managed Microsoft AD cross-Region support, you only need one distinct AWS Managed Microsoft AD that spans multiple AWS Regions; this simplifies directory management and configuration. Additionally, it simplifies trusts between the AWS Managed Microsoft AD domain and your on-premises domain. Now, only a single trust between your on-premises domain and AWS Managed Microsoft AD domain is required, as compared to the previous pattern of only one AWS Managed Microsoft AD per Region—each of which would require a trust if you wanted to allow on-premises objects access to your AWS Managed Microsoft AD domain. Further, AWS Managed Microsoft AD cross-Region support provides an additional benefit when using your on-premises users and groups with Amazon RDS for SQL Server: You only need a single, one-way, outgoing trust between your multi-Region AWS Managed Microsoft AD and your on-premises domain.
As detailed in this post, to enable AWS Managed Microsoft AD cross-Region support, you create a new AWS Managed Microsoft AD and extend it to multiple Regions (as shown in Figure 1 below). Once you’ve extended your directory, you deploy an Amazon RDS SQL Server instance in each Region, integrating it to the same directory. Finally, you install SQL Server Management Studio (SSMS) on an instance joined to the AWS Managed Microsoft AD directory. You use that instance to connect to the RDS SQL Server instances using the same domain user account.
Figure 1: High level diagram of resources deployed in this post
The architecture in Figure 1 includes a network connection between the Regions. That connection isn’t required for the AWS Managed Microsoft AD to function. If you don’t require network connectivity between your regions, you can disregard the network link in the diagram. Since you will be using a single Amazon Elastic Compute Cloud (Amazon EC2) instance in one Region, the network connection is needed between Amazon VPCs in the two Regions to allow that instance to connect to a domain controller in each Region.
Prerequisites for AWS Managed Microsoft AD cross-Region Support
An AWS Managed Microsoft AD deployed in a Region of your choice. If you don’t have one already deployed, you can follow the instructions in Create Your AWS Managed Microsoft AD directory to create one. For this post, I recommend that you use us-east-1.
Extend your AWS Managed Microsoft AD to another Region
We’ve made the process to extend your directory to another Region straightforward. There is no cost to add another Region; you only pay for the resources for your directory running in the new Region. See here for additional information on pricing changes with new Regions. For example, in this post you will be extending your directory into the us-east-2 region. There will be an additional cost for two new domain controllers. Figure 3 shows the additional cost to extend the directory.
Let’s walk through the steps of setting up Windows Authentication with Amazon RDS for SQL Server instances in multiple Regions using a single cross-Region AWS Managed Microsoft AD.
To extend your directory to another Region:
In the AWS Directory Service console navigation pane, choose Directories.
Note: You should see a list of your AWS Managed Microsoft AD directories.
Choose the Directory ID of the directory you want to expand to another Region.
Go to the Directory details page. In the Multi-region replication section, select Add Region.
Figure 2: Directory details and new multi-Region replication pane
On the Add region page:
For Region to add, select the Region you want to extend your directory to.
For Subnets, select two unique subnets in the Amazon VPC that you selected in the preceding step.
Once you have everything to your liking, choose Add.
Figure 3: Add a Region
In the background, AWS is provisioning two new AWS managed domain controllers in the Region you selected. It could take up to 2 hours for your directory to become available in the Region.
Note: Your managed domain controllers in the home Region are fully functional during this process.
On the Directory details page, in Multi-Region replication, the status should be Active when the process has completed. Now you’re ready to deploy your Amazon RDS SQL Server instances.
Enable Amazon RDS for SQL Server
Integrating Amazon RDS into AWS Managed Microsoft AD is exactly the same process as it was before the cross-Region feature was released. This post goes through that original process with only one change, which is that you select the same directory ID for both Regions.
Create an Amazon RDS SQL Server instance in each Region using the same directory
The steps for creating an Amazon RDS SQL Server instance in each Region are the same. The following process will create the first instance. Once you’ve completed the process, you change the AWS Management Console Region to the Region you extended your directory to and repeat the process.
To create an Amazon RDS SQL Server instance:
In the AWS Managed Microsoft AD directory primary Region, go to the Amazon RDS console navigation pane and choose Create database.
Choose Microsoft SQL Server.
You can leave the default values, except for the following settings:
Under Settings select Master and Confirm password.
Under Connectivity, expand Additional connectivity configuration:
Choose Create new to create a new VPC security group.
Enter a name in New VPC security group name.
Select No preference for Availability Zone.
Enter 1433 for Database port.
Figure 4: Connectivity settings
Select the Enable Microsoft SQL Server Windows authentication check box and then choose Browse Directory.
Figure 5: Enable Microsoft SQL Server Windows authentication selected
Select your directory and select Choose.
Figure 6: Select a directory
Choose Create database.
Repeat these steps in your expanded Region. Note that the Directory ID will be the same for both Regions. You can complete the next section while your Amazon RDS SQL instances are provisioning.
Create an Active Directory user and group to delegate SQL administrative rights
The following steps walk you through the process of creating an Active Directory user and group for delegation. Following this process, you add the user to the group you just created and to the AWS Delegated Server Administrators group.
To create a user and group:
Log in to the domain-joined instance with a domain user account that has permissions to create Active Directory users and groups.
Choose Start, enter dsa.msc, and press Enter.
In Active Directory Users and Computers, right-click on the Users OU, select New, and then Group. The New Object – Group window pops up.
Fill in the Group name boxes with your choice of name.
In Active Directory Users and Computers, right-click on your Users OU and select New and then User. The New Object – User window pops up.
Fill in the boxes with your choice of information, and then choose Next.
Enter your choice of password and clear User must change password at next logon, then choose Next.
On the confirmation page, choose Finish.
Double-click on the user you just created. The user account properties window appears.
Select the Member of tab.
Choose Add.
Enter the name of the group that you previously created and choose Check Names. Next, enter AWS Delegated Server Administrators and choose Check Names again. If you do not receive any error, choose OK, and then OK again.
The Member of tab for the user should include the two groups you just added. Choose OK to close the properties page.
Delegate SQL Server permissions in each Region using the Active Directory group you just created
The following steps guide you through the process of modifying the Amazon RDS SQL security group, installing SQL Server Management Studio (SSMS), and delegating permission in SQL to your Active Directory group.
Modify the Amazon RDS SQL security group
In these next steps, you modify the security group you created with your Amazon RDS instances, allowing your Windows Server instance to connect to the Amazon RDS SQL Server instances over port 1433.
Note: If desired, you can disable IE Enhanced Security Configuration and download directly to the Windows Server instance using IE or any other browser, and skip to step 3.
RDP into your Windows Server instance and copy SSMS-Setup-ENU.exe to your RDP session.
Run the file on your Windows Server instance.
Choose Install.
Figure 8: Install SMMS
It might take a few minutes to install. When complete, choose Close.
Delegate permissions in SSMS
All of the following steps are performed on the Windows Server instance from Prerequisite 3. Log in to the Amazon RDS SQL instance using the SQL master user account. Next, create a SQL login for the Active Directory group you created previously and give it elevated permission to the Amazon RDS SQL instance.
To delegate permissions:
Start SMMS.
On the Connect to Server window, enter or select:
Server name – Your Amazon RDS SQL Server endpoint.
Authentication – Select SQL Server Authentication.
Login – Enter the master user name you used when you launched your Amazon RDS SQL instance. The default is admin.
Password – Enter the password for the master user name.
Choose Connect.
Figure 9: Connect to server
In SMMS, Choose New Query at the top of the window.
Figure 10: New query
In the query window, enter the following query. Replace <CORP\SQL-Admins> with the name of the group you created earlier.
CREATE LOGIN [<CORP\SQL-Admins>] FROM WINDOWS WITH DEFAULT_DATABASE = [master],
   DEFAULT_LANGUAGE = [us_english];
Figure 11: Query SQL database
Choose Execute on the menu bar. You should see a Commands completed successfully message.
Figure 12: Commands completed successfully
Next, navigate to the Logins directory on the navigation page. Right-click on the group you added with the SQL command in step 5 and select Properties.
Figure 13: Open group properties
Select Server Roles and select the processadmin and setupadmin checkboxes. Then choose OK.
Figure 14: Configure server roles
You can log off from the instance. For the next steps, you log in to the instance using the user account you created previously.
Repeat these steps on the Amazon RDS SQL instance in the other Region.
Connect to the Amazon RDS SQL Server with the same Active Directory user in both Regions
All of the steps are performed on the Windows Server instance from Prerequisite 3. You must log in to the instance using the account you created earlier. You then log in to the Amazon RDS SQL instance using Windows authentication with that account.
Log in to the instance with the user account you created earlier.
Start SSMS.
On the Connect to Server window, enter or select:
Server name: Your Amazon RDS SQL Server endpoint.
Authentication: Select Windows Authentication.
Choose Connect.
Figure 15: Connect to server
You should be logged in to SSMS. If you aren’t logged in, make sure you added your user account to the group you created earlier and try again.
Repeat these steps using the other Amazon RDS SQL instance endpoint for the server name. You should be able to connect to both Amazon RDS SQL instances using the same user account.
Summary
In this post, you extended your AWS Managed Microsoft AD into a new Region. You then deployed Amazon RDS for SQL Server in multiple Regions attached to the same AWS Managed Microsoft AD directory. You then tested authentication to both Amazon RDS SQL instances using the same Active Directory user.
To learn more about using AWS Managed Microsoft AD or AD Connector, visit the AWS Directory Service documentation. For general information and pricing, see the AWS Directory Service home page. If you have comments about this blog post, submit a comment in the Comments section below. If you have implementation or troubleshooting questions, start a new thread on the AWS Directory Service forum or contact AWS Support.
As organizations scale up their Amazon Web Services (AWS) presence, they are faced with the challenge of administering user identities and controlling access across multiple accounts and Regions. As this presence grows, managing user access to cloud resources such as Amazon Elastic Compute Cloud (Amazon EC2) becomes increasingly complex. AWS Directory Service for Microsoft Active Directory (also known as an AWS Managed Microsoft AD) makes it easier and more cost-effective for you to manage this complexity. AWS Managed Microsoft AD is built on highly available, AWS managed infrastructure. Each directory is deployed across multiple Availability Zones, and monitoring automatically detects and replaces domain controllers that fail. In addition, data replication and automated daily snapshots are configured for you. You don’t have to install software, and AWS handles all patching and software updates. AWS Managed Microsoft AD enables you to leverage your existing on-premises user credentials to access cloud resources such as the AWS Management Console and EC2 instances.
This blog post describes how EC2 resources launched across multiple AWS accounts and Regions can automatically domain-join a centralized AWS Managed Microsoft AD. The solution we describe in this post is implemented for both Windows and Linux instances. Removal of Computer objects from Active Directory upon instance termination is also implemented. The solution uses Amazon DynamoDB to centrally store account and directory information in a central security account. We also provide AWS CloudFormation templates and platform-specific domain join scripts for you to use with AWS Lambda as a quick start solution.
Architecture
The following diagram shows the domain-join process for EC2 instances across multiple accounts and Regions using AWS Managed Microsoft AD.
Figure 1: EC2 domain join architecture
The event flow works as follows:
An EC2 instance is launched in a peered virtual private cloud (VPC) of a workload or security account. VPCs that are hosting EC2 instances need to be peered with the VPC that contains AWS Managed Microsoft AD to enable network connectivity with Active Directory.
The CloudWatch event is forwarded to a regional CloudWatch event bus in the security account.
If the CloudWatch event bus is in the same Region as AWS Managed Microsoft AD, it delivers the event to an Amazon Simple Queue Service (Amazon SQS) queue, referred to as the domain-join queue in this post.
If the CloudWatch event bus is in a different Region from AWS Managed Microsoft AD, it delivers the event to an Amazon Simple Notification Service (Amazon SNS) topic. The event is then delivered to the domain-join queue described in step 4, through the Amazon SNS topic subscription.
Messages in the domain-join queue are held for five minutes to allow for EC2 instances to stabilize after they reach the “running” state. This delay allows time for installation of additional software components and agents through the use of EC2 user data and AWS Systems Manager Distributor.
After the holding period is over, messages in the domain-join queue invoke the AWS AD Join/Leave Lambda function. The Lambda function does the following:
Retrieves the AWS account ID that originated the event from the message and retrieves account-specific configurations from a DynamoDB table. This configuration identifies AWS Managed Microsoft AD domain controller IPs, credentials required to perform EC2 domain join, and an AWS Identity and Access Management (IAM) role that can be assumed by the Lambda function to invoke AWS Systems Manager Run Command.
Retrieves EC2 instance information, such as the instance state, platform, and tags, and validates the instance state.
Retrieves platform-specific domain-join scripts that are deployed with the Lambda function’s code bundle, and configures invocation of those scripts by using data read from the DynamoDB table (bash script for Linux instances and PowerShell script for Windows instances).
Uses AWS Systems Manager Run Command to invoke the domain-join script on the instance. Run Command enables you to remotely and securely manage the configuration of your managed instances.
The domain-join script runs on the instance. It uses script parameters and instance attributes to configure the instance and perform the domain join. The adGroupName tag value is used to configure the Active Directory user group that will have permissions to log in to the instance. The instance is rebooted to complete the domain join process. Various software components are installed on the instance when the script runs. For the Linux instance, sssd, realmd, krb5, samba-common, adcli, unzip, and packageit are installed. For the Windows instance, the RDS-RD-Server feature is installed.
Removal of EC2 instances from AWS Managed Microsoft AD upon instance termination follows a similar sequence of steps. Each instance that is domain joined creates an Active Directory domain object under the “Computer” hierarchy. This domain object needs to be removed upon instance termination so that a new instance that uses the same private IP address in the subnet (at a future time) can successfully domain join and enable instance access with Active Directory credentials. Removal of the Active Directory Computer object is done by running the leaveDomaini.ps1 script (included with this blog) through Run Command on the Active Directory Tools instance identified in Figure 1.
Prerequisites and setup
To build the solution outlined in this post, you need:
AD Tools. To install AD Tools and use it to create the required users:
Launch a Windows EC2 instance in the same account and Region, and domain-join it with the directory you created in the previous step. Log in to the instance through Remote Desktop Protocol (RDP) and install AD Tools as described in Installing the Active Directory Administration Tools.
After the AD Tools are installed, launch the AD Users & Computers application to create domain users, and assign those users to an Active Directory security group (for example, my_UserGroup) that has permission to access domain-joined instances.
Create a least-privileged user for performing domain joins as described in Delegate Directory Join Privileges for AWS Managed Microsoft AD. The identity of this user is stored in the DynamoDB table and read by the AD Join Lambda function to invoke Active Directory join scripts.
Store the password for the least-privileged user in an encrypted Systems Manager parameter. The password for this user is stored in the secure string System Manager parameter and read by the AD Join Lambda function at runtime while processing Amazon SQS messages.
Assign a unique tag key and value to identify the AD Tools instance. This instance will be invoked by the Lambda function to delete Computer objects from Active Directory upon termination of domain-joined instances.
All VPCs that are hosting EC2 instances to be domain joined must be peered with the VPC that hosts the relevant AWS Managed Microsoft AD. Alternatively, AWS Transit Gateway could be used to establish this connectivity.
In addition to having network connectivity to the AWS Managed Microsoft AD domain controllers, domain join scripts that run on EC2 instances must be able to resolve relevant Active Directory resource records. In this solution, we leverage Amazon Route 53 Outbound Resolver to forward DNS queries to the AWS Managed Microsoft AD DNS servers, while still preserving the default DNS capabilities that are available to the VPC. Learn more about deploying Route 53 Outbound Resolver and resolver rules to resolve your directory DNS name to DNS IPs.
Each domain-join EC2 instance must have a Systems Manager Agent (SSM Agent) installed and an IAM role that provides equivalent permissions as provided by the AmazonEC2RoleforSSM built-in policy. The SSM Agent is used to allow domain-join scripts to run automatically. See Working with SSM Agent for more information on installing and configuring SSM Agents on EC2 instances.
Solution deployment
The steps in this section deploy AD Join solution components by using the AWS CloudFormation service.
The CloudFormation template provided with this solution (mad_auto_join_leave.json) deploys resources that are identified in the security account’s AWS Region that hosts AWS Managed Microsoft AD (the top left quadrant highlighted in Figure 1). The template deploys a DynamoDB resource with 5 read and 5 write capacity units. This should be adjusted to match your usage. DynamoDB also provides the ability to auto-scale these capacities. You will need to create and deploy additional CloudFormation stacks for cross-account, cross-Region scenarios.
To deploy the solution
Create a versioned Amazon Simple Storage Service (Amazon S3) bucket to store a zip file (for example, adJoinCode.zip) that contains Python Lambda code and domain join/leave bash and PowerShell scripts. Upload the source code zip file to an S3 bucket and find the version associated with the object.
Navigate to the AWS CloudFormation console. Choose the appropriate AWS Region, and then choose Create Stack. Select With new resources.
Choose Upload a template file (for this solution, mad_auto_join_leave.json), select the CloudFormation stack file, and then choose Next.
Enter the stack name and values for the other parameters, and then choose Next.
Figure 2: Defining the stack name and parameters
The parameters are defined as follows:
S3CodeBucket: The name of the S3 bucket that holds the Lambda code zip file object.
adJoinLambdaCodeFileName: The name of the Lambda code zip file that includes Lambda Python code, bash, and Powershell scripts.
adJoinLambdaCodeVersion: The S3 Version ID of the uploaded Lambda code zip file.
DynamoDBTableName: The name of the DynamoDB table that will hold account configuration information.
CreateDynamoDBTable: The flag that indicates whether to create a new DynamoDB table or use an existing table.
ADToolsHostTagKey: The tag key of the Windows EC2 instance that has AD Tools installed and that will be used for removal of Active Directory Computer objects upon instance termination.
ADToolsHostTagValue: The tag value for the key identified by the ADToolsHostTagKey parameter.
Acknowledge creation of AWS resources and choose to continue to deploy AWS resources through AWS CloudFormation.The CloudFormation stack creation process is initiated, and after a few minutes, upon completion, the stack status is marked as CREATE_COMPLETE. The following resources are created when the CloudFormation stack deploys successfully:
An AD Join Lambda function with associated scripts and IAM role.
A CloudWatch Events rule to detect the “running” and “terminated” states for EC2 instances.
An SQS event queue to hold the EC2 instance “running” and “terminated” events.
CloudWatch event mapping to the SQS event queue and further to the Lambda function.
A DynamoDB table to hold the account configuration (if you chose this option).
The DynamoDB table hosts account-level configurations. Account-specific configuration is required for an instance from a given account to join the Active Directory domain. Each DynamoDB item contains the account-specific configuration shown in the following table. Storing account-level information in the DynamoDB table provides the ability to use multiple AWS Managed Microsoft AD directories and group various accounts accordingly. Additional account configurations can also be stored in this table for implementation of various centralized security services (instance inspection, patch management, and so on).
Attribute
Description
accountId
AWS account number
adJoinUserName
User ID with AD Join permissions
adJoinUserPwParam
Encrypted Systems Manager parameter containing the AD Join user’s password
dnsIP1
Domain controller 1 IP address2
dnsIP2
Domain controller 2 IP address
assumeRoleARN
Amazon Resource Name (ARN) of the role assumed by the AD Join Lambda function
Following is an example of how you could insert an item (row) in a DynamoDB table for an account.
(Update with your own values as appropriate for your environment.)
In the preceding example, adJoinLambdaRole is assumed by the AD Join Lambda function (if needed) to establish cross-account access using AWS Security Token Service (AWS STS). The role needs to provide sufficient privileges for the AD Join Lambda function to retrieve instance information and run cross-account Systems Manager commands.
adJoinUserName identifies a user with the minimum privileges to do the domain join; you created this user in the prerequisite steps.
adJoinUserPwParam identifies the name of the encrypted Systems Manager parameter that stores the password for the AD Join user. You created this parameter in the prerequisite steps.
Solution test
After you successfully deploy the solution using the steps in the previous section, the next step is to test the deployed solution.
To test the solution
Navigate to the AWS EC2 console and launch a Linux instance. Launch the instance in a public subnet of the available VPC.
Choose an IAM role that gives at least AmazonEC2RoleforSSM permissions to the instance.
Add an adGroupName tag with the value that identifies the name of the Active Directory security group whose members should have access to the instance.
Make sure that the security group associated with your instance has permissions for your IP address to log in to the instance by using the Secure Shell (SSH) protocol.
Wait for the instance to launch and perform the Active Directory domain join. You can navigate to the AWS SQS console and observe a delayed message that represents the CloudWatch instance “running” event. This message is processed after five minutes; after that you can observe the Lambda function’s message processing log in CloudWatch logs.
Log in to the instance with Active Directory user credentials. This user must be the member of the Active Directory security group identified by the adGroupName tag value. Following is an example login command.
Similarly, launch a Windows EC2 instance to validate the Active Directory domain join by using Remote Desktop Protocol (RDP).
Terminate domain-joined instances. Log in to the AD Tools instance to validate that the Active Directory Computer object that represents the instance is deleted.
The AD Join Lambda function invokes Systems Manager commands to deliver and run domain join scripts on the EC2 instances. The AWS-RunPowerShellScript command is used for Microsoft Windows instances, and the AWS-RunShellScript command is used for Linux instances. Systems Manager command parameters and execution status can be observed in the Systems Manager Run Command console.
The AD user used to perform the domain join is a least-privileged user, as described in Delegate Directory Join Privileges for AWS Managed Microsoft AD. The password for this user is passed to instances by way of SSM Run Commands, as described above. The password is visible in the SSM Command history log and in the domain join scripts run on the instance. Alternatively, all script parameters can be read locally on the instance through the “adjoin” encrypted SSM parameter. Refer to the domain join scripts for details of the “adjoin” SSM parameter.
Additional information
Directory sharing
AWS Managed Microsoft AD can be shared with other AWS accounts in the same Region. Learn how to use this feature and seamlessly domain join Microsoft Windows EC2 instances and Linux instances.
autoadjoin tag
Launching EC2 instances with an autoadjoin tag key with a “false” value excludes the instance from the automated Active Directory join process. You might want to do this in scenarios where you want to install additional agent software before or after the Active Directory join process. You can invoke domain join scripts (bash or PowerShell) by using user data or other means. However, you’ll need to reboot the instance and re-run scripts to complete the domain join process.
Summary
In this blog post, we demonstrated how you could automate the Active Directory domain join process for EC2 instances to AWS Managed Microsoft AD across multiple accounts and Regions, and also centrally manage this configuration by using AWS DynamoDB. By adopting this model, administrators can centrally manage Active Directory–aware applications and resources across their accounts.
If you have feedback about this post, submit comments in the Comments section below. If you have questions about this post, contact AWS Support.
Want more AWS Security how-to content, news, and feature announcements? Follow us on Twitter.
Our customers build applications that need to serve users that live in all corners of the world. When listening to our customers, they told us that whilst they were comfortable building Active Directory (AD) aware applications on AWS, making them work globally can be a real challenge.
Customers told us that AWS Directory Service for Microsoft Active Directory had saved them time and money and provided them with all the capabilities they need to run their AD-aware applications. However, if they wanted to go global, they needed to create independent AWS Managed Microsoft AD directories per Region. They would then need to create a solution to synchronize data across each Region. This level of management overhead is significant, complex, and costly. It also slowed customers as they sought to migrate their AD-aware workloads to the cloud.
Today, I want to tell you about a new feature that allows customers to deploy a single AWS Managed Microsoft AD across multiple AWS Regions. This new feature called multi-region replication automatically configures inter-region networking connectivity, deploys domain controllers, and replicates all the Active Directory data across multiple Regions, ensuring that Windows and Linux workloads residing in those Regions can connect to and use AWS Managed Microsoft AD with low latency and high performance. AWS Managed Microsoft AD makes it more cost-effective for customers to migrate AD-aware applications and workloads to AWS and easier to operate them globally. In addition, automated multi-region replication provides multi-region resiliency.
AWS can now synchronize all customer directory data, including users, groups, Group Policy Objects (GPOs), and schema across multiple Regions. AWS handles automated software updates, monitoring, recovery, and the security of the underlying AD infrastructure across all Regions, enabling customers to focus on building their applications. Integrating with Amazon CloudWatch Logs and Amazon Simple Notification Service (SNS), AWS Managed Microsoft AD makes it easy for customers to monitor the directory’s health, and security logs globally.
How It Works Let me show you how to create an Active Directory that spans multiple Regions using the AWS Managed Microsoft AD console. You do not have to create a new directory to use multi-region replication it will work on all your existing directories too.
First, I create a new Directory following the normal steps. I select Enterprise Edition since this is the only edition that supports multi-region replication.
I give my Directory a name and a description and then set an Admin password. I then click Next which takes me to the Networking setup.
I select a Amazon Virtual Private Cloud that I use for demos and then choose two subnets which are in separate Availability Zones. The AWS Managed Microsoft AD deploys two domain controllers per region and places them in separate subnets which are in different Availability Zones, this is done for resiliency reasons so that the directory can still operate even if one of the Availability Zones has issues.
Once I click next, I am presented with the review screen and I click Create Directory.
The directory takes between 20-45 minutes to be created. There is now a column on the Directories listing page that says Multi-Region, this directory has this value currently set to No indicating that it does not span multiple Regions.
Once the directory has been created, I click on the Directory ID and drill into the details. I now have a new section called Multi-Region replication and there is a button called Add Region. If I click this button I can then configure an additional Region.
I select the Region that I want to add to my directory, in this example US West (Oregon) us-west-2, I then select a VPC in that Region and two subnets that must reside in separate Availability Zones. Finally, I click the Add button to add this new Region for my directory.
Now back on the directory details page I see there are two Regions listed one in US East (N. Virginia) and one in US West (Oregon), again the creation process can take upto 45 minutes, but once it has complete I will have my directory replicated across two Regions.
Costs You pay by the hour for the domain controllers in each region, plus the cross-region data transfer. It’s important to understand that this feature will create two domain controllers in each Region that you Add, and so applications that reside in these Regions can now communicate with a local directory which lowers costs by minimizing the need for data transfer. To learn more, visit the pricing page.
Available Now This new feature can be used today and is available for both new and existing directories that use the Enterprise Edition in any of the following Regions: US East (N. Virginia), US East (Ohio), US West (N. California), US West (Oregon), AWS GovCloud (US-East), US West (Oregon), Asia Pacific (Mumbai), Asia Pacific (Seoul), Asia Pacific (Singapore), Asia Pacific (Sydney), Asia Pacific (Tokyo), Canada (Central), Europe (Frankfurt), Europe (Ireland), Europe (London), Europe (Paris), Europe (Stockholm), and South America (São Paulo).
Head over to the product page to learn more, view pricing, and get started creating directories that span multiple AWS Regions.
In this post, we explain how you can use AWS Directory Service for Microsoft Active Directory (AWS Managed Microsoft AD) to enable your users to access Microsoft Office 365 without synchronizing passwords using Azure Active Directory (Azure AD) Pass-through Authentication (PTA). This makes it easier to configure Microsoft Office 365 with AWS Managed Microsoft AD. Azure AD PTA reduces management overhead by eliminating the need to deploy and manage complex federation or password synchronization infrastructure. It also helps you meet your organization’s security standards because you can continue to apply and manage stronger password policies using AWS Managed Microsoft AD.
Previously, AWS enabled you to access Office 365 with credentials that you manage in AWS Managed Microsoft AD. AWS did this by deploying Azure AD Connect and Active Directory Federation Services for Windows Server 2016 (AD FS 2016) with AWS Managed Microsoft AD. While AWS continues to support this model, the focus of this post is to explain a new, supported model that produces the same result without deploying a federation or password synchronization implementation. In the new model, when users sign in to Office 365, Azure AD PTA validates their passwords against AWS Managed Microsoft AD directly.
We explain how to use Azure AD Connect to synchronize users from AWS Managed Microsoft AD into Azure AD. We then show you how to enable Azure AD Connect PTA to automatically authenticate users directly against your AWS Managed Microsoft AD directory. We do this in four steps:
Delegate permissions to your Active Directory Domain Services (AD DS) Connector account.
Configure the AWS security group rules for your Azure AD Connect server.
Install and configure Azure AD Connect Pass-through Authentication with AWS Managed Microsoft AD.
Use an AWS Managed Microsoft AD user account to sign in to Office 365.
Joined an Amazon EC2 for Windows Server instance to the AWS Managed Microsoft AD domain you will use as your Azure AD Connect server. We show you how to install Azure AD Connect on this instance later. Azure AD Connect supports Windows Server 2012 R2 or later, for this post, we use Windows Server 2019. While not in scope of this blog, because the Azure AD Connect server only requires outbound traffic, you should run the Azure AD Connect server in a private subnet, with outbound traffic routed via a NAT gateway or instance in a public subnet, see VPC with public and private subnets.
Using Active Directory Users and Computers on your Management instance, create a standard user named AADConnectSvc in your AWS Managed Microsoft AD directory. The AADConnectSvc standard user will be used as your AD DS Connector account. You will use the AD DS Connector account (AADConnectSvc) in Azure AD Connect later.
You can use Azure AD Pass-through Authentication with AWS Managed Microsoft AD to:
Synchronize users from AWS Managed Microsoft AD to Azure AD.
Assign a license to and use an AWS Managed Microsoft AD identity to sign in to Office 365.
Figure 1 shows how Azure AD Connect Server orchestrates the synchronization of AD identities from AWS Managed Microsoft AD to Azure AD. It also shows you how Azure AD Connect Pass-through authentication validates users’ credentials when a user signs in to Office 365.
Figure 1: Architecture diagram of AD synchronization and pass-through authentication between the AWS Managed Microsoft AD and Office 365
Delegate AD permissions to the AD DS Connector account using the Management instance.
You install and configure Azure AD Connect Pass-through authentication with AWS Managed Microsoft AD.
AWS Managed Microsoft AD identities are synchronized to Azure AD using the Azure AD Connect server.
User signs in to Office 365.
Azure AD communicates with the Azure AD Connect server to validate user credentials.
Azure AD Connect server validates user’s credentials with the AWS Managed Microsoft AD.
User successfully signed in to Office 365 with AWS Managed Microsoft AD credentials.
Note: This blog post uses a single Microsoft Windows Server running Azure AD Connect Pass-through Authentication agent. For high availability, you can install additional Authentication agents on Microsoft Windows Servers, see Ensure high availability.
Step 1: Delegate permissions to your Active Directory Domain Services (AD DS) Connector account
In this step, you delegate basic read AD permissions to your AD DS Connector account (AADConnectSvc). The AD DS Connector account (AADConnectSvc) is used by Azure AD Connect to connect to and read AD objects in your AWS Managed Microsoft AD directory. To delegate the permissions, download and use the ADSyncConfig PowerShell module included in the Azure AD Connect installation.
Perform the following steps after signing in to the Management instance using the admin user account for the AWS Managed Microsoft AD directory:
A. Download the ADSyncConfig PowerShell module from the Azure AD Connect installation
Download and initiate the Azure AD Connect installation on the Management instance.
On the Welcome page of the Microsoft Azure Active Directory Connect wizard, close the installation by selecting x. At this stage, the Azure AD Connect installation has downloaded the ADSyncConfig PowerShell module to the Management instance.
Verify the ADSyncConfig PowerShell module has been downloaded and is in the following location:
C:\Program Files\Microsoft Azure Active Directory Connect\AdSyncConfig\AdSyncConfig.psm1
B. Configure permissions to your AD DS Connector account
Import the ADSyncConfig PowerShell module, using the following Windows PowerShell command.
Import-Module "C:\Program Files\Microsoft Azure Active Directory Connect\AdSyncConfig\AdSyncConfig.psm1"
Add basic read permissions to your AWS Managed Microsoft AD directory for the AD DS Connector account (AADConnectSvc) by running the following Windows PowerShell command. Be sure to replace the names in <red italic> text with the names from your AWS Managed Microsoft AD directory.
Next, you will add permissions to your AD DS Connector account (AADConnectSvc) by running the following Windows PowerShell command. The permissions allow Azure to manage the source anchor for AWS Managed Microsoft AD identities synchronized to Azure AD. Be sure to replace the names in <red italic> text with the names from your AWS Managed Microsoft AD directory.
Step 2: Configure the AWS security group rules for your Azure AD Connect server
In this step, you configure the AWS security group rules so that your Azure AD Connect server can communicate with Azure AD. To do this, you must add outbound rules to your Azure AD Connect server AWS security group to allow outbound traffic on HTTPS (port 443) and HTTP (port 80).
Follow these steps to configure AWS security group rules:
In the navigation pane of the Amazon EC2 console, choose Security Groups.
In the list, select the security group for the Azure AD Connect server, and then choose Actions, Edit outbound rules.
Choose Add Rule. Choose HTTPS for Type and Anywhere for Destination. Choose Save rules.
Next, choose Add Rule. Choose HTTP for Type and Anywhere for Destination. Choose Save rules.
Step 3: Install and configure Azure AD Connect Pass-through Authentication with AWS Managed Microsoft AD
Follow the outlined steps to install Azure AD Connect Pass-through Authentication on the Azure AD Connect server. The Azure AD Connect server synchronizes your users from AWS Managed Microsoft AD to Azure AD and manages password validation against your AWS Managed Microsoft AD directory.
Perform the following steps after signing in to the Azure AD Connect server using the admin user account for the AWS Managed Microsoft AD directory:
Download and initiate the installation of Azure AD Connect on the Azure AD Connect server.
On the Welcome page of the Microsoft Azure Active Directory Connect wizard, accept the license terms and privacy notice, and then select Continue.
On the Express Settings page, at the bottom of the page, select Customize.
On the Install required components page, select Install.
On the User sign-in page, select Pass-through authentication, and then select Next.
On the Connect your directories page, for DIRECTORY TYPE, select Active Directory, and for FOREST, select your AWS Managed Microsoft AD Forest, and then select Add Directory.
Figure 2: Select a directory to add
In the AD forest account screen, select Use existing AD account, enter your AD DS Connector account (AADConnectSvc) credentials, and then select OK.
Figure 3: Add an AD forest account
Now that you’ve added your AWS Managed Microsoft AD directory, on the Connect your directories screen, select Next.
On the Azure AD sign-in configuration page, select userPrincipalName in the USER PRINCIPAL NAME field, and then select Next.
Figure 4: Select the USER PRINCIPAL NAME
Note: If you don’t have a matching UPN suffix for your Azure AD domain in AWS Managed Microsoft AD UPN suffix. You can add a new UPN suffix to AWS Managed Microsoft AD. After adding the new UPN suffix to AWS Managed Microsoft AD, you can update your users UPN by following the steps below. The UPN attribute format combines the user’s login name and the UPN suffix. The UPN suffix is your AWS Managed Microsoft AD domain name.
In the following example from the Account tab of the AWS User Properties in the Active Directory Users and Computers tool, the user’s UPN is [email protected]. The UPN is created by combining the User logon name, awsuser, and the UPN suffix, @awsexample.com.
Figure 5: Example user properties
On the Domain and OU filtering page, select Sync selected domains and OUs, choose the Users OU under your NetBIOS OU, and then choose Next.
Note: AWS Managed Microsoft AD stores your users and computers under a dedicated OU with your domain’s NetBIOS name.
Figure 6: Domain and OU filtering
On the Uniquely identifying your users page, select Next.
On the Filter users and devices page, select Next.
On the Optional features page, select Next.
On the Ready to configure page, select Start the synchronization process when configuration completes, and then select Install.
Select Exit. Your Azure AD Connect installation is complete.
Note: By default, the Azure AD Connect sync scheduler runs every 30 minutes to synchronize your AWS Managed Microsoft AD identities to Azure AD. You can change this schedule using PowerShell. For more information, read Azure AD Connect sync: Scheduler.
Tip: If you need to synchronize a change immediately, you can manually start a sync cycle outside the scheduled sync cycle from the Azure AD Connect sync instance. Open a Windows PowerShell session as an administrator and run the following Windows PowerShell commands:
Step 4: Use an AWS Managed Microsoft AD user account to sign in to Office 365
The following steps explain how to assign a license to an AWS Managed Microsoft AD user account, and then use that account to sign in to Office 365 with the AWS Managed Microsoft AD user account UPN.
In this post, we showed you how to use Azure AD Connect to synchronize user names from your Active Directory in AWS into Azure AD so that Office 365 can use those identities. You enabled Azure AD Pass-through Authentication to authenticate the identities against your AWS Managed Microsoft AD directory with no passwords synchronized or stored in Azure AD or Office 365.
If you have feedback about this post, submit comments in the Comments section below. If you have questions about this post, start a new thread on the AWS Directory Service forum or contact AWS Support.
Want more AWS Security how-to content, news, and feature announcements? Follow us on Twitter.
In this blog post, we show you how to configure an LDAPS (LDAP over SSL or TLS) encrypted endpoint for Simple AD so that you can extend Simple AD over untrusted networks. Our solution uses Network Load Balancer (NLB) as SSL/TLS termination. The data is then decrypted and sent to Simple AD. Network Load Balancer offers integrated certificate management, SSL/TLS termination, and the ability to use a scalable Amazon Elastic Compute Cloud (Amazon EC2) backend to process decrypted traffic. Network Load Balancer also tightly integrates with Amazon Route 53, enabling you to use a custom domain for the LDAPS endpoint. To simplify testing and deployment, we have provided an AWS CloudFormation template to provision the network load balancer (NLB).
Simple AD, which is powered by Samba 4, supports basic Active Directory (AD) authentication features such as users, groups, and the ability to join domains. Simple AD also includes an integrated Lightweight Directory Access Protocol (LDAP) server. LDAP is a standard application protocol for accessing and managing directory information. You can use the BIND operation from Simple AD to authenticate LDAP client sessions. This makes LDAP a common choice for centralized authentication and authorization for services such as Secure Shell (SSH), client-based virtual private networks (VPNs), and many other applications. Authentication, the process of confirming the identity of a principal, typically involves the transmission of highly sensitive information such as user names and passwords. To protect this information in transit over untrusted networks, companies often require encryption as part of their information security strategy.
This post assumes that you understand concepts such as Amazon Virtual Private Cloud (Amazon VPC) and its components, including subnets, routing, internet and network address translation (NAT) gateways, DNS, and security groups. If needed, you should familiarize yourself with these concepts and review the solution overview and prerequisites in the next section before proceeding with the deployment.
Note: This solution is intended for use by clients who require only an LDAPS endpoint. If your requirements extend beyond this, you should consider accessing the Simple AD servers directly or by using AWS Directory Service for Microsoft AD.
Solution overview
The following description explains the Simple AD LDAPS environment. The AWS CloudFormation template creates the network-load-balancer object.
The LDAP client sends an LDAPS request to the NLB on TCP port 636.
The NLB terminates the SSL/TLS session and decrypts the traffic using a certificate. The NLB sends the decrypted LDAP traffic to Simple AD on TCP port 389.
The Simple AD servers send an LDAP response to the NLB. The NLB encrypts the response and sends it to the client.
The following diagram illustrates how the solution works and shows the prerequisites (listed in the following section).
Figure 1: LDAPS with Simple AD Architecture
Note: Amazon VPC prevents third parties from intercepting traffic within the VPC. Because of this, the VPC protects the decrypted traffic between the NLB and Simple AD. The NLB encryption provides an additional layer of security for client connections and protects traffic coming from hosts outside the VPC.
Prerequisites
Our approach requires an Amazon VPC with one public and two private subnets. If you don’t have an Amazon VPC that meets that requirement, use the following instructions to set up a sample environment:
Identify two Availability Zones in that Region to use with Simple AD. The Availability Zones are needed as parameters in the AWS CloudFormation template used later in this process.
Create or choose an Amazon VPC in the region you chose.
Enable DNS support within your VPC so you can use Route 53 to resolve the LDAPS endpoint.
Create two private subnets, one per Availability Zone. The Simple AD servers use the subnets that you create.
Create a public subnet in the same VPC.
The LDAP service requires a DNS domain that resolves within your VPC and from your LDAP clients. If you don’t have an existing DNS domain, create a private hosted zone and associate it with your VPC. To avoid encryption protocol errors, you must ensure that the DNS domain name is consistent across your Route 53 zone and in the SSL/TLS certificate.
You can use a certificate issued by your preferred certificate authority or a certificate issued by AWS Certificate Manager (ACM). If you don’t have a certificate authority, you can create a self-signed certificate by following the instructions in section 2 (Create a certificate).
Note: To prevent unauthorized direct connections to your Simple AD servers, you can modify the Simple AD security group on port 389 to block traffic from locations outside of the Simple AD VPC. You can find the security group in the Amazon EC2 console by creating a search filter for your Simple AD directory ID. It is also important to allow the Simple AD servers to communicate with each other as shown on Simple AD Prerequisites.
Solution deployment
This solution includes 5 main parts:
Create a Simple AD directory.
(Optional) Create a SSL/TLS certificate, if you don’t have already have one.
Create the NLB by using the supplied AWS CloudFormation template.
Create a Route 53 record.
Test LDAPS access using an Amazon Linux 2 client.
1. Create a Simple AD directory
With the prerequisites completed, your first step is to create a Simple AD directory in your private VPC subnets.
To create a Simple AD directory:
In the Directory Service console navigation pane, choose Directories and then choose Set up directory.
Choose Simple AD.
Figure 2: Select directory type
Provide the following information:
Directory Size: The size of the directory. The options are Small or Large. Which you should choose depends on the anticipated size of your directory.
Note: You will need the directory FQDN when you test your solution.
NetBIOS name: The short name for the directory, such as corp.
Administrator password: The password for the directory administrator. The directory creation process creates an administrator account with the user name Administrator and this password. Don’t lose this password, because it can’t be recovered. You also need this password for testing LDAPS access in a later step.
Description: An optional description for the directory.
Figure 3: Directory information
Select the VPC and subnets, and then choose Next:
VPC: Use the dropdown list to select the VPC to install the directory in.
Subnets: Use the dropdown lists to select two private subnets for the directory servers. The two subnets must be in different Availability Zones. Make a note of the VPC and subnet IDs to use as input parameters for the AWS CloudFormation template. In the following example, the subnets are in the us-east-1a and us-east-1c Availability Zones.
Figure 4: Choose VPC and subnets
Review the directory information and make any necessary changes. When the information is correct, choose Create directory.
Figure 5: Review and create the directory
It takes several minutes to create the directory. From the AWS Directory Service console, refresh the screen periodically and wait until the directory Status value changes to Active before continuing.
When the status has changed to Active, choose your Simple AD directory and note the two IP addresses in the DNS address section. You will enter them in a later step when you run the AWS CloudFormation template.
Now that you have a Simple AD directory, you need a SSL/TLS certificate. The certificate will be used with the NLB to secure the LDAPS endpoint. You then import the certificate into ACM, which is integrated with the NLB.
As mentioned earlier, you can use a certificate issued by your preferred certificate authority or a certificate issued by AWS Certificate Manager (ACM).
(Optional) Create a self-signed certificate
If you don’t already have a certificate authority, you can use the following instructions to generate a self-signed certificate using OpenSSL.
Note: OpenSSL is a standard, open source library that supports a wide range of cryptographic functions, including the creation and signing of x509 certificates.
Use the command line interface to create a certificate:
You must have a system with OpenSSL installed to complete this step. If you don’t have OpenSSL, you can install it on Amazon Linux by running the command sudo yum install openssl. If you don’t have access to an Amazon Linux instance you can create one with SSH access enabled to proceed with this step. Use the command line to run the command openssl version to see if you already have OpenSSL installed.
[ec2-user@ip-10-21-32-162 ~]$ openssl version
OpenSSL 1.0.1k-fips 8 Jan 2015
Create a private key using the openssl genrsa command.
[ec2-user@ip-10-21-32-162 tmp]$ openssl genrsa 2048 > privatekey.pem
Generating RSA private key, 2048 bit long modulus
......................................................................................................................................................................+++
..........................+++
e is 65537 (0x10001)
Generate a certificate signing request (CSR) using the openssl req command. Provide the requested information for each field. The Common Name is the FQDN for your LDAPS endpoint (for example, ldap.corp.example.com). The Common Name must use the domain name you will later register in Route 53. You will encounter certificate errors if the names do not match.
[ec2-user@ip-10-21-32-162 tmp]$ openssl req -new -key privatekey.pem -out server.csr
You are about to be asked to enter information that will be incorporated into your certificate request.
Use the openssl x509 command to sign the certificate. The following example uses the private key from the previous step (privatekey.pem) and the signing request (server.csr) to create a public certificate named server.crt that is valid for 365 days. This certificate must be updated within 365 days to avoid disruption of LDAPS functionality.
Note: Keep the private key and public certificate to use later. You can discard the signing request, because you are using a self-signed certificate and not using a certificate authority. Always store the private key in a secure location, and avoid adding it to your source code.
Import a certificate
For this step, you can either use a certificate obtained from a certificate authority, or a self-signed certificate that you created using the optional procedure above.
Using a Linux text editor, paste the contents of your certificate file (called server.crt if you followed the procedure above) file in the Certificate body box.
Using a Linux text editor, paste the contents of your privatekey.pem file in the Certificate private key box. (For a self-signed certificate, you can leave the Certificate chain box blank.)
Choose Review and import. Confirm the information and choose Import.
When the AWS CloudFormation stack is in CREATE_COMPLETE status, locate the value of the LDAPSURL on the Outputs tab of the stack. Copy this value for use in the next step.
On the Route 53 console, choose Hosted Zones and then choose the zone you used for the Common Name value for your self-signed certificate. Choose Create Record Set and enter the following information:
Name: A short name for the record set (remember that the FQDN has to match the Common Name of your certificate).
Type: Leave as A – IPv4 address.
Alias: Select Yes.
Alias Target: Paste the value of the LDAPSURL from the Outputs tab of the stack.
Leave the defaults for Routing Policy and Evaluate Target Health, and choose Create.
Figure 6: Create a Route 53 record
5. Test LDAPS access using an Amazon Linux 2 client
At this point, you’re ready to test your LDAPS endpoint from an Amazon Linux client.
Test LDAPS access:
Create an Amazon Linux 2 instance with SSH access enabled to test the solution. Launch the instance on one of the public subnets in your VPC. Make sure the IP assigned to the instance is in the trusted IP range you specified in the security group associated with the Simple AD.
Use SSH to sign in to the instance and complete the following steps to verify access.
Install the openldap-clients package and any required dependencies:
sudo yum install -y openldap-clients.
Add the server.crt file to the /etc/openldap/certs/ directory so that the LDAPS client will trust your SSL/TLS certificate. You can download the file directly from the NLB the certificate and save it in the proper format, or copy the file using Secure Copy or create it using a text editor:
Replace <LDAPSURL> with the FQDN of your NLB, the address can be found in the Outputs section of the stack created in CloudFormation.
Edit the /etc/openldap/ldap.conf file to define the environment variables:
BASE: The Simple AD directory name.
URI: Your DNS alias.
TLS_CACERT: The path to your public certificate.
TLSCACertificateFile: The path to your self-signed certificate authority. If you used the instructions in section 2 (Create a certificate) to create a certificate, the path will be /etc/ssl/certs/ca-bundle.crt.
Here’s an example of the file:
BASE dc=corp,dc=example,dc=com
URI ldaps://ldap.corp.example.com
TLS_CACERT /etc/openldap/certs/server.crt
TLSCACertificateFile /etc/ssl/certs/ca-bundle.crt
To test the solution, query the directory through the LDAPS endpoint, as shown in the following command. Replace corp.example.com with your domain name and use the Administrator password that you configured in step 3 of section 1 (Create a Simple AD directory).
The response will include the directory information in LDAP Data Interchange Format (LDIF) for the administrator distinguished name (DN) from your Simple AD LDAP server.
# extended LDIF
#
# LDAPv3
# base <dc=corp,dc=example,dc=com> (default) with scope subtree
# filter: sAMAccountName=Administrator
# requesting: ALL
#

# Administrator, Users, corp.example.com
dn: CN=Administrator,CN=Users,DC=corp,DC=example,DC=com
objectClass: top
objectClass: person
objectClass: organizationalPerson
objectClass: user
description: Built-in account for administering the computer/domain
instanceType: 4
whenCreated: 20170721123204.0Z
uSNCreated: 3223
name: Administrator
objectGUID:: l3h0HIiKO0a/ShL4yVK/vw==
userAccountControl: 512
…
You can now use the LDAPS endpoint for directory operations and authentication within your environment. Here are a few resources to learn more about how to interact with an LDAPS endpoint:
Verify that the parameters in ldap.conf match your configured LDAPS URI endpoint and that all parameters can be resolved by DNS. You can use the following dig command, substituting your configured endpoint DNS name.
$ dig ldap.corp.example.com
Confirm that the client instance you’re connecting from is in the trusted IP range you specified in the security associated with your Simple AD directory.
Confirm that the path to your public SSL/TLS certificate in ldap.conf as TLS_CAERT is correct. You configured this as part of step 2 in section 5 (Test LDAPS access using an Amazon Linux 2 client). You can check your SSL/TLS connection with the following command, replacing ldap.corp.example.com with the DNS name of your endpoint.
Verify that the status of your Simple AD IPs is Healthy in the Amazon EC2 console.
Open the EC2 console and choose Load Balancing and then Target Groups in the navigation pane.
Choose your LDAPS target and then choose Targets.
Conclusion
You can use NLB to provide an LDAPS endpoint for Simple AD and transport sensitive authentication information over untrusted networks. You can explore using LDAPS to authenticate SSH users or integrate with other software solutions that support LDAP authentication. The AWS CloudFormation template for this solution is available on GitHub.
If you have comments about this post, submit them in the Comments section below. If you have questions about or issues implementing this solution, start a new thread on the AWS Directory Service forum or contact AWS Support.
Want more AWS Security how-to content, news, and feature announcements? Follow us on Twitter.
Many customers I speak to use Active Directory to manage centralized user authentication and authorization for a variety of applications and services. For these customers, Active Directory is a critical piece of their IT Jigsaws.
At AWS, we offer the AWS Directory Service for Microsoft Active Directory that provides our customers with a highly available and resilient Active Directory service that is built on actual Microsoft Active Directory. AWS manages the infrastructure required to run Active Directory and handles all of the patching and software updates needed. It’s fully managed, so for example, if a domain controller fails, our monitoring will automatically detect and replace that failed controller.
Manually connecting a machine to Active Directory is a thankless task; you have to connect to the computer, make a series of manual changes, and then perform a reboot. While none of this is particularly challenging, it does take time, and if you have several machines that you want to onboard, then this task quickly becomes a time sink.
Today the team is unveiling a new feature which will enable a Linux EC2 instance, as it is launched, to connect to AWS Directory Service for Microsoft Active Directory seamlessly. This complements the existing feature that allows Windows EC2 instances to seamlessly domain join as they are launched. This capability will enable customers to move faster and improves the experience for Administrators.
Now you can have both your Windows and Linux EC2 instances seamlessly connect to AWS Directory Service for Microsoft Active Directory. The directory can be in your own account or shared with you from another account, the only caveat being that both the instance and the directory must be in the same region.
Create and Store AD Credentials To seamlessly join a Linux machine to my AWS Managed Active Directory Domain, I will need an account that has permissions to join instances into the domain. While members of the AWS Delegated Administrators have sufficient privileges to join machines to the domain, I have created a service account that has the minimum privileges required. Our documentation explains how you go about creating this sort of service account.
The seamless domain join feature needs to know the credentials of my active directory service account. To achieve this, I need to create a secret using AWS Secrets Manager with specifically named secret keys, which the seamless domain feature will use to join instances to the directory.
In the AWS Secrets Manager console I click on the Store a new secret button, on the next screen, when asked to Select a secret type, I choose the option named Other type of secrets. I can now add two secret key/values. The first is called awsSeamlessDomainUsername, and in the value textbox, I enter the username for my Active Directory service account. The Second key is called awsSeamlessDomainPassword, and here I enter the password for my service account.
Since this is a demo, I chose to use the DefaultEncryptionKey for the secret, but you might decide to use your own key.
After clicking next, I am asked to give the secret a name. I add the following name, replacing d-xxxxxxxxx with my directory ID.
The domain join will fail if you mistype this name or if you have any leading or ending spaces.
I take note down the Secret ARN as I will need it when I create my IAM Policy.
Create The Required IAM Policy and Role Now I need to create an IAM policy that gives permission to read my seamless-domain-join secret.
I sign in to the IAM console and choose Policies. In the content pane, I select Create policy. I switch over to the JSON tab and copy the text from the following JSON policy document, replacing the Secrets Manager ARN with the one I noted down earlier.
On the Review page, I name the policy SeamlessDomainJoin-Secret-Readonly then choose Create policy to save my work.
Now I need to create an IAM Role that will use this policy (and a few others). In the IAM Console, I choose Roles, and then in the content pane, choose to Create role. Under Select type of trusted entity, I select AWS service and then select EC2 as a use case and click Next:Permissions.
I attach the following policies to my Role: AmazonSSMManagedInstanceCore, AmazonSSMDirectoryServiceAccess, and SeamlessDomainJoin-Secret-Readonly.
I click through to the Review screen where it asks for a Role name, I call the role EC2DomainJoin, but it could be called whatever you like. I then create the role by pressing the button at the bottom right of the screen.
Create an Amazon Machine Image When I launch a Linux Instance later I will need to pick a Linux Amazon Machine Image (AMI) as a template. Currently, the default Linux AMIs do not contain the version of AWS Systems Manager agent (SSM agent) that this new seamless domain feature needs. Therefore I am going to have to create an AMI with an updated SSM agent. To do this, I first create a new Linux Instance in my account and then connect to it using my SSH client. I then follow the documentation to update the SSM agent to 2.3.1644.0 or newer. Once the instance has finished updating I am then able to create a new AMI based on this instance using the following documentation.
I now have a new AMI which I can use in the next step. In the future, the base AMIs will be updated to use the newer SSM agent, and then we can skip this section. If you are interested to know what version of the SSM agent an instance is using this documentation explains how you can check.
Seamless Join To start, I need to create a Linux instance, and so I head over to the EC2 console and choose Launch Instance.
Next, I pick a Linux Amazon Machine Image (AMI). I select the AMI which I created earlier.
When configuring the instance, I am careful to choose the Amazon Virtual Private Cloud that contains my directory. Using the drop-down labeled Domain join directory I am able to select the directory that I want this instance to join.
In the IAM role, I select the EC2DomainJoin role that I created earlier.
When I launch this instance, it will seamlessly join my directory. Once the instance comes online, I can confirm everything is working correctly by using SSH to connect to the instance using the administrator credentials of my AWS Directory Service for Microsoft Active Directory.
This new feature is available from today, and we look forward to hearing your feedback about this new capability.
To provide the best experiences, we use technologies like cookies to store and/or access device information. Consenting to these technologies will allow us to process data such as browsing behavior or unique IDs on this site. Not consenting or withdrawing consent, may adversely affect certain features and functions.
Functional
Always active
The technical storage or access is strictly necessary for the legitimate purpose of enabling the use of a specific service explicitly requested by the subscriber or user, or for the sole purpose of carrying out the transmission of a communication over an electronic communications network.
Preferences
The technical storage or access is necessary for the legitimate purpose of storing preferences that are not requested by the subscriber or user.
Statistics
The technical storage or access that is used exclusively for statistical purposes.The technical storage or access that is used exclusively for anonymous statistical purposes. Without a subpoena, voluntary compliance on the part of your Internet Service Provider, or additional records from a third party, information stored or retrieved for this purpose alone cannot usually be used to identify you.
Marketing
The technical storage or access is required to create user profiles to send advertising, or to track the user on a website or across several websites for similar marketing purposes.