Post Syndicated from Kristaps Naglis original https://blog.zabbix.com/monitoring-oracle-cloud-infrastructure-oci-with-zabbix/27638/
Monitoring Oracle Cloud Infrastructure resources is crucial for maintaining optimal performance, security, and cost-efficiency. By continuously monitoring resources such as compute instances, storage, databases, and networking components, you can proactively identify and address potential issues before they escalate, ensuring uninterrupted service delivery.
Monitoring also provides valuable insights into resource utilization patterns, enabling capacity planning and optimization efforts. Furthermore, effective monitoring enhances security posture by detecting anomalies or suspicious activities that could indicate potential security breaches.
This integration consists of multiple templates, where each template covers a specific OCI resource. As of writing this blog post, such services are supported:
- OCI Compute;
- OCI Autonomous Database (serverless);
- OCI Object Storage;
- OCI Virtual Cloud Networks (VCNs);
- OCI Block Volumes;
- OCI Boot Volumes.
The structure of these templates is made so that you do not need to configure each service separately. There is a master template Oracle Cloud by HTTP, which needs to be configured and rest of the services get monitored automatically using low-level discovery and host prototypes. Overall, the structure of templates looks like this:

Prepare OCI for monitoring with Zabbix
In all of these examples, an OCI web console will be used, therefore, keep in mind that some of the UI elements or navigation menus can potentially change in the future.
User creation
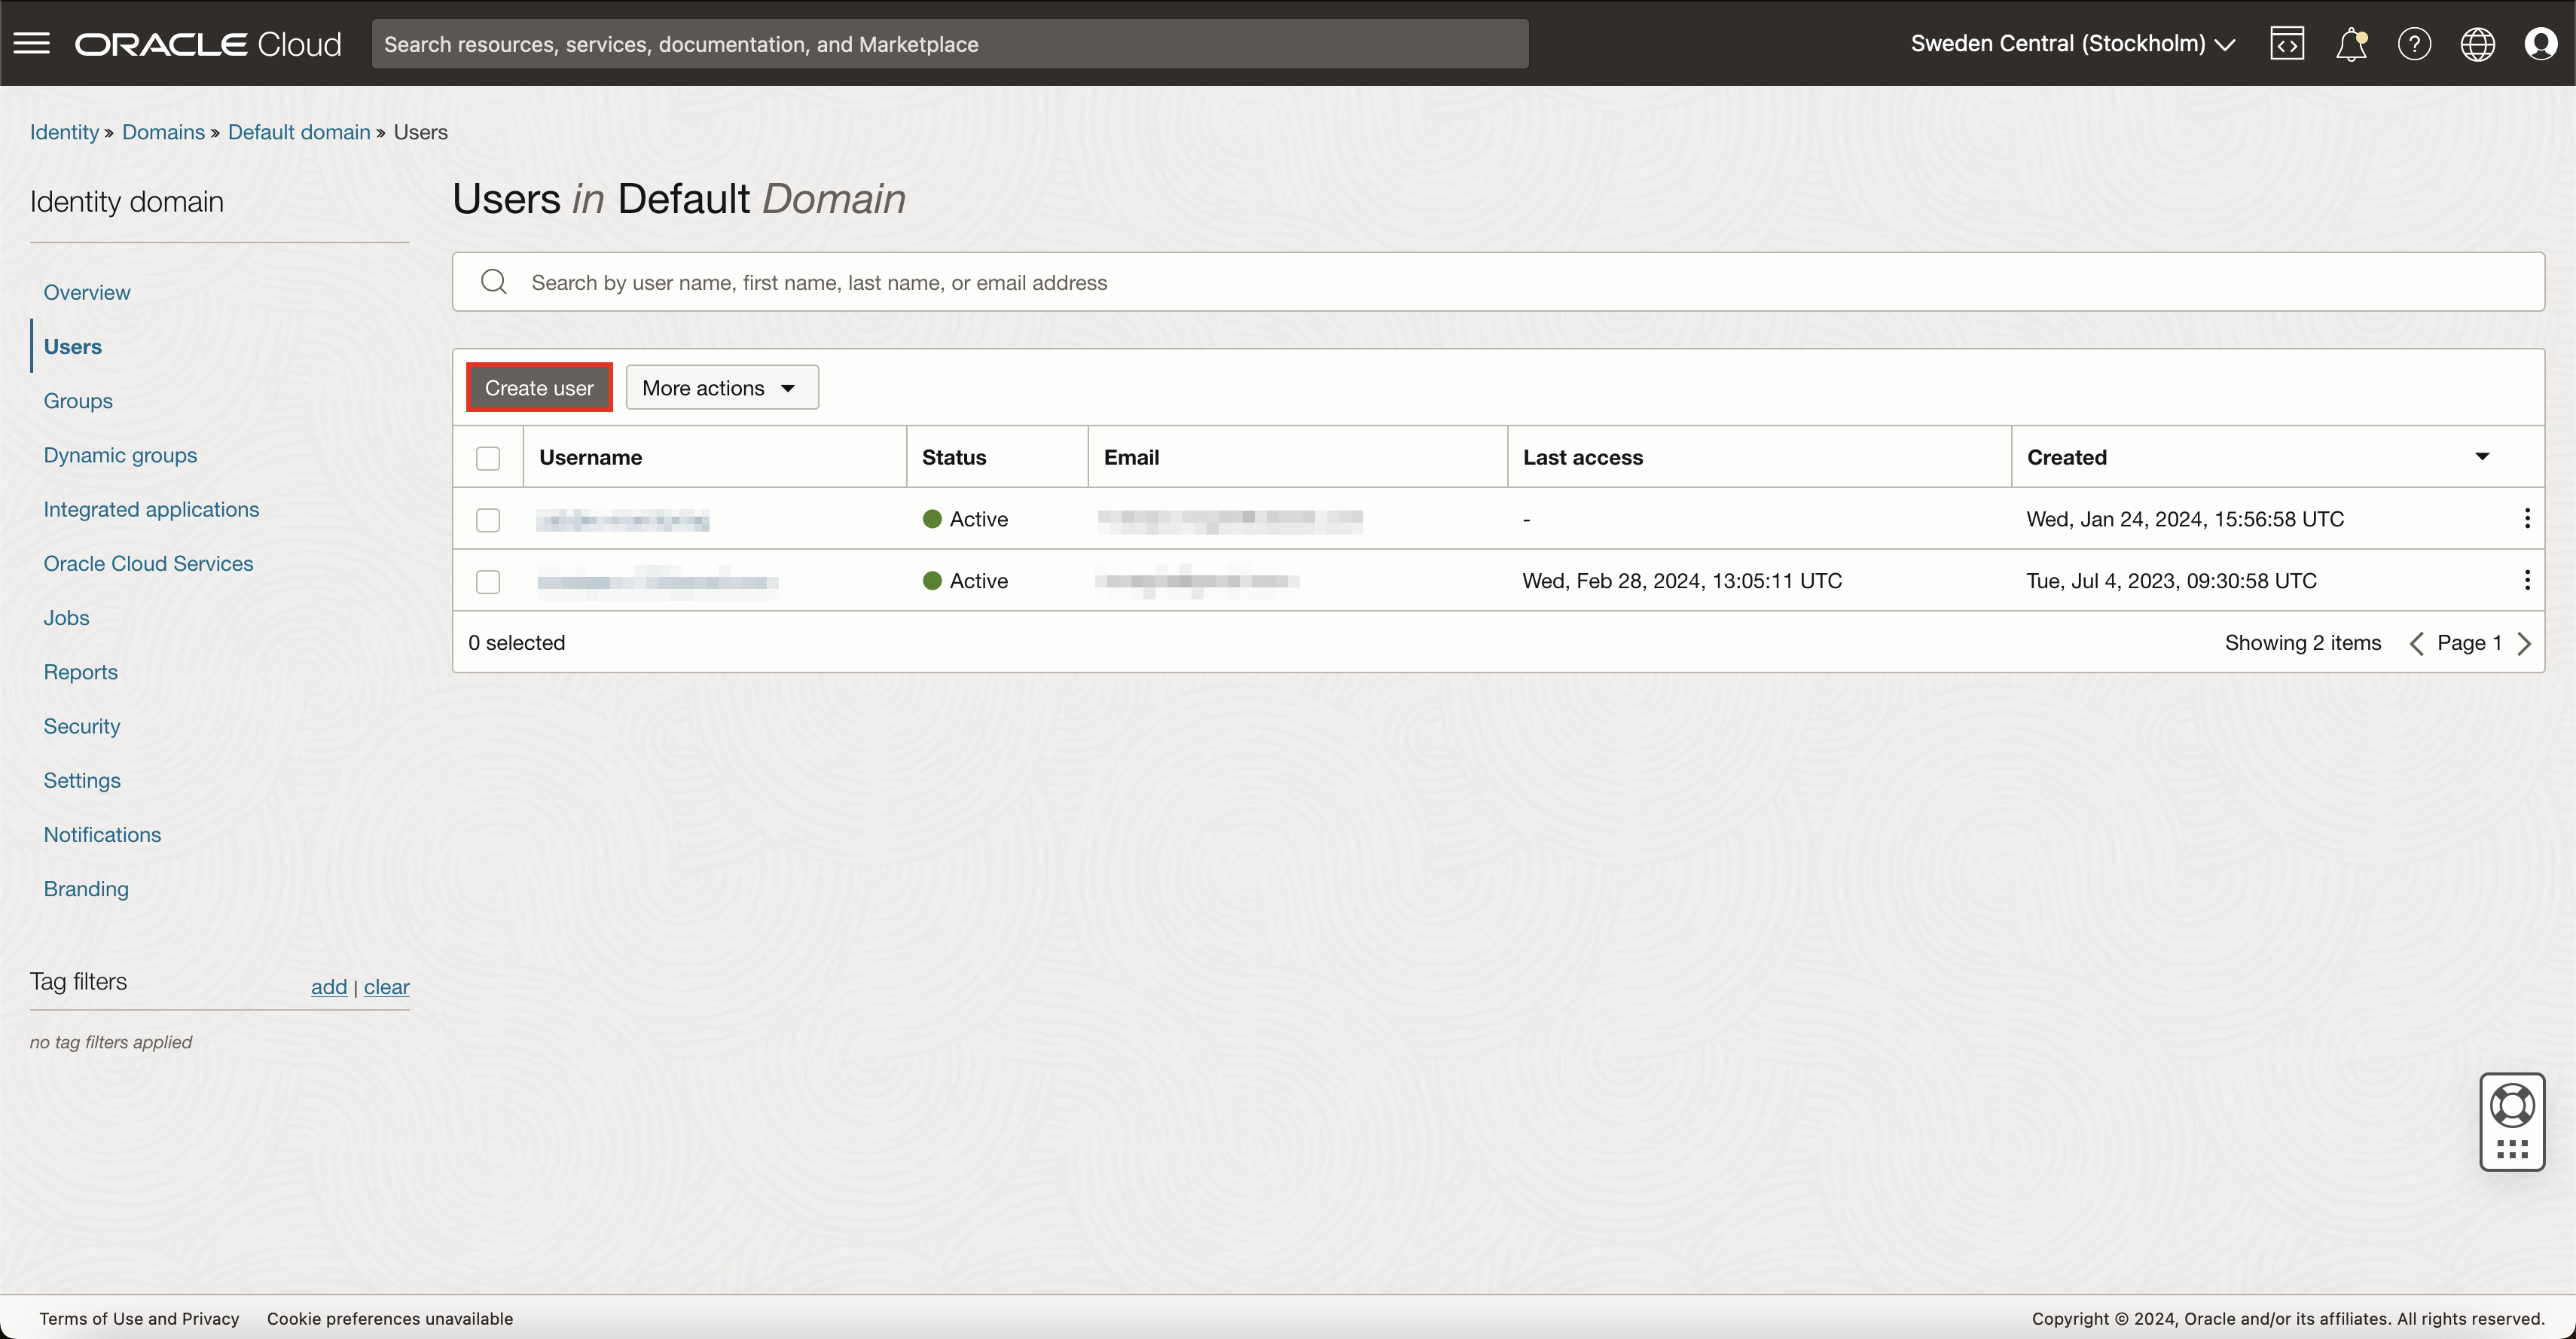
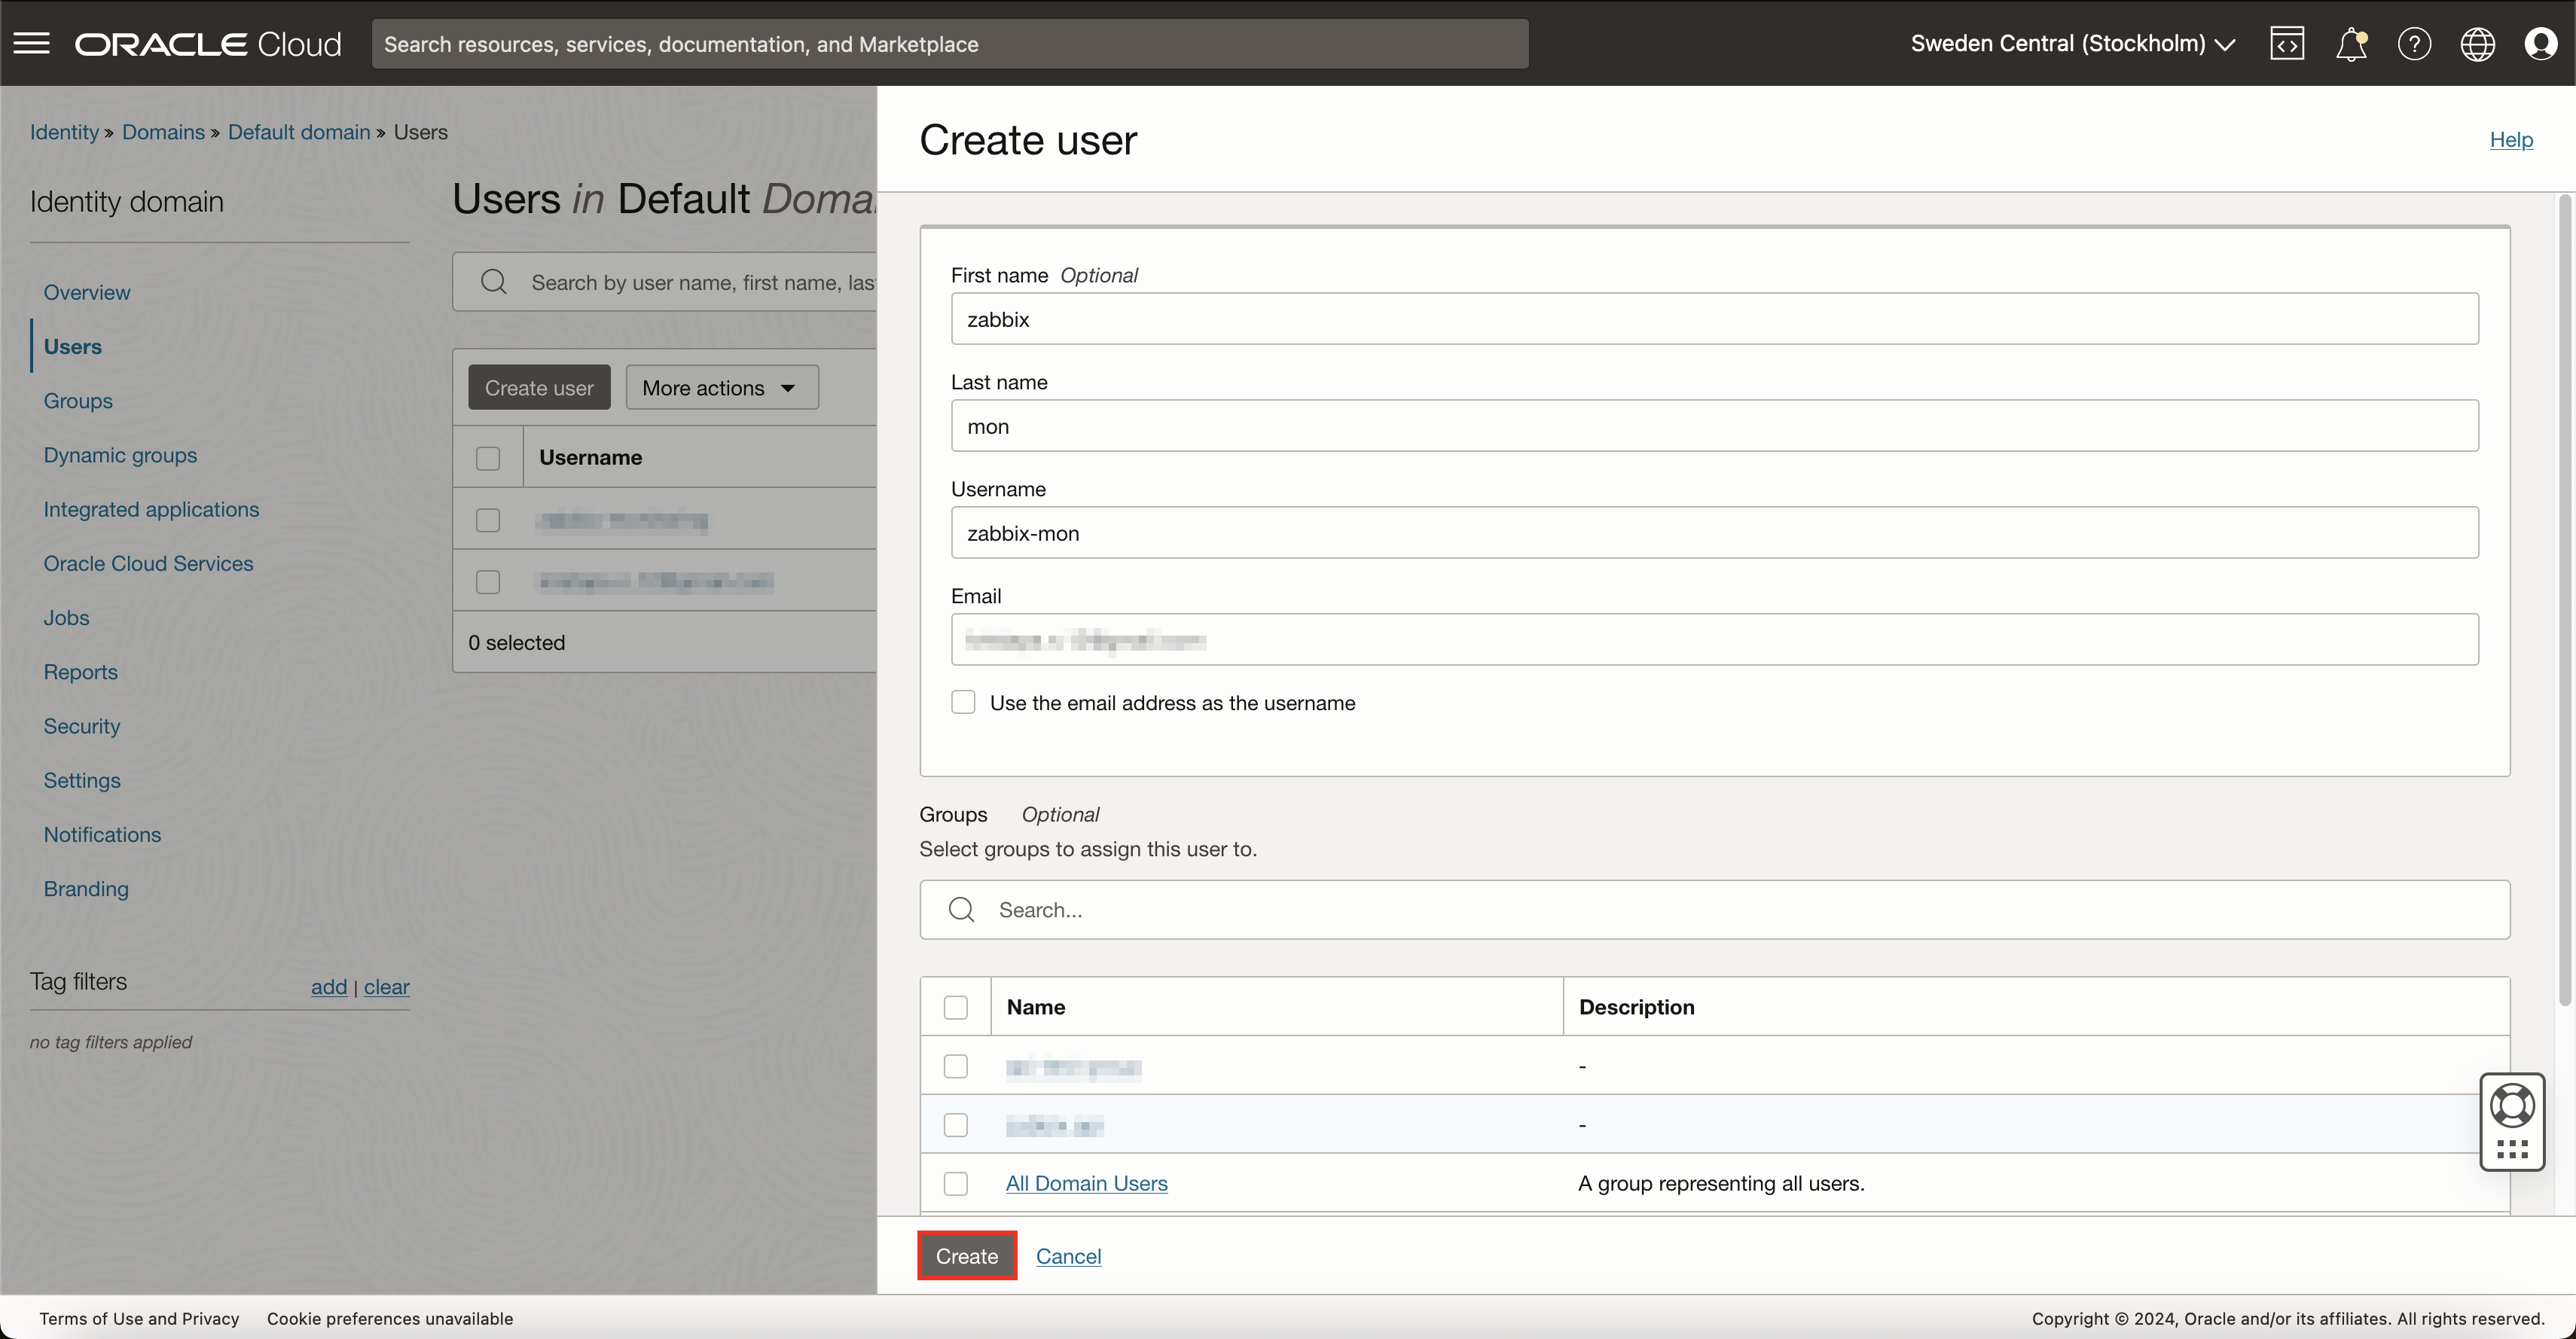
First of all, you need to set up a user in OCI that Zabbix will use to access the Rest API and gather data. To do so, navigate to 'Identity & Security' -> 'Domains' from the main menu in top-left of the screen. Select the domain for which you wish to monitor resources and head over to Users view on the left sidebar. Here, create a new user.
API key generation
After this, OCI should automatically redirect you to the newly created user page. If not, for some reason, go back to all users in domain and open your previously created user.
You need to assign API keys to this user. To do so, on the left sidebar, press API keys and then Add API key. If you already have an RSA key pair that you wish to use for this monitoring user, you can select an option to either upload or paste the public key. However, in this example, I will generate a completely new key pair.
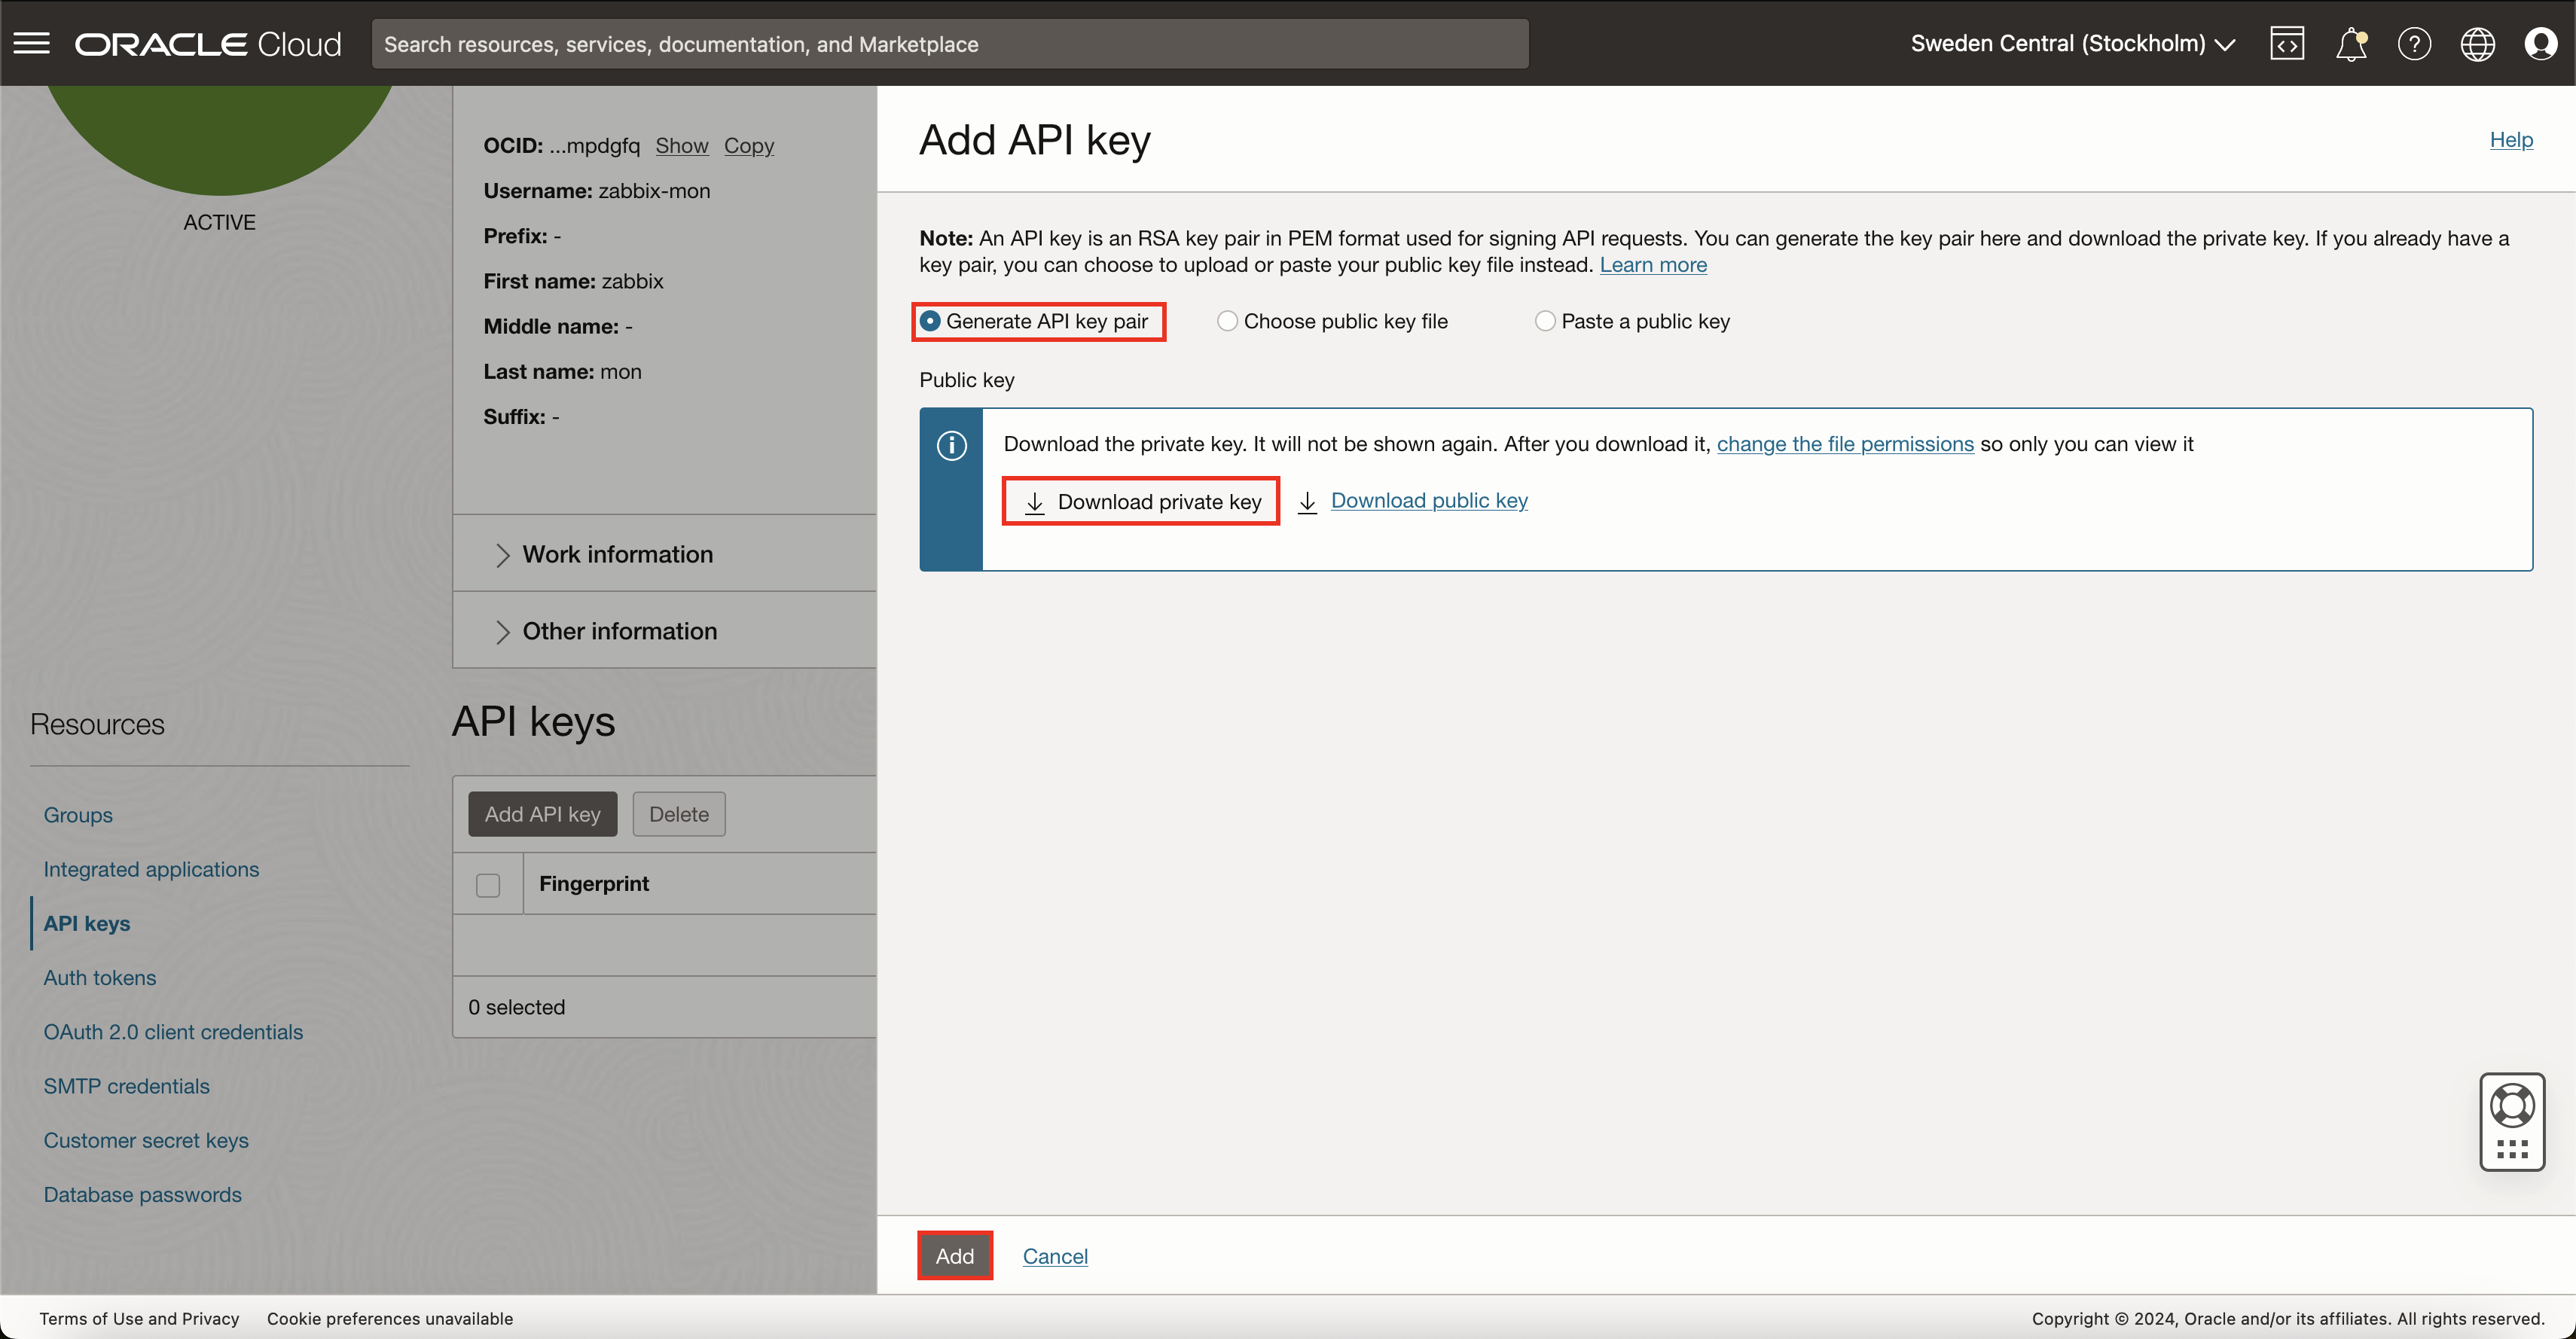
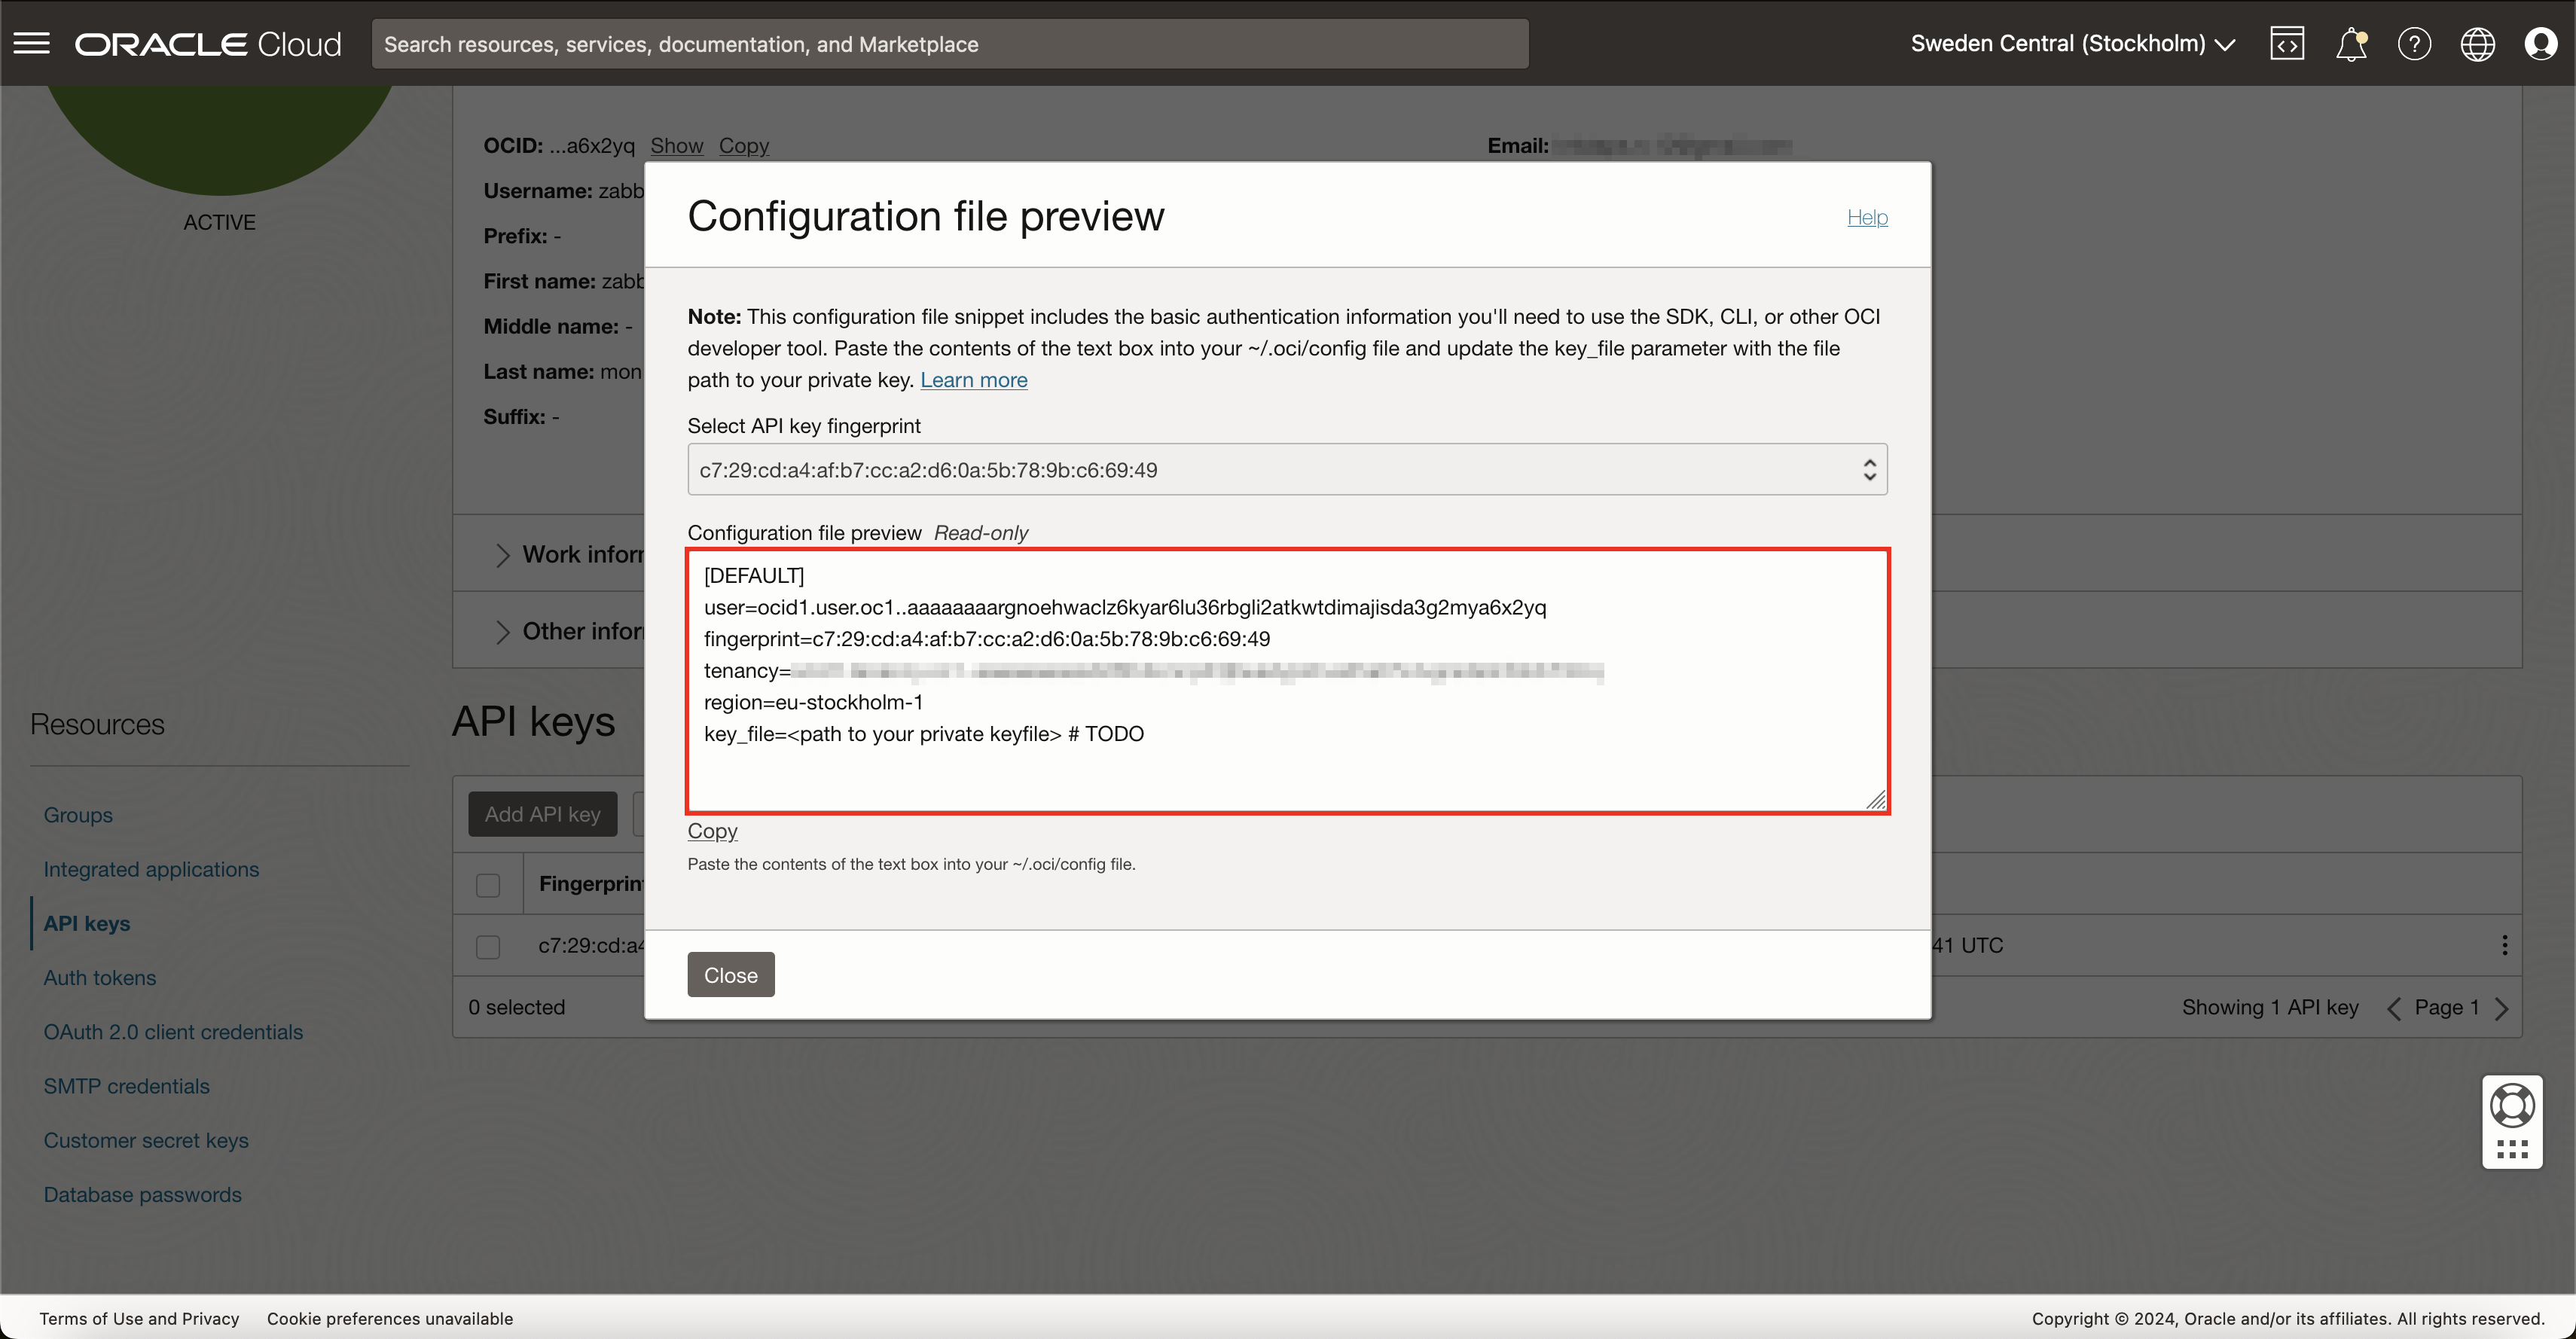
After pressing button Add, OCI will show you details about your environment and the API key. Save this information somewhere safe for now, as we will need to use this data later inside Zabbix. After saving this, you can now close this pop-up.
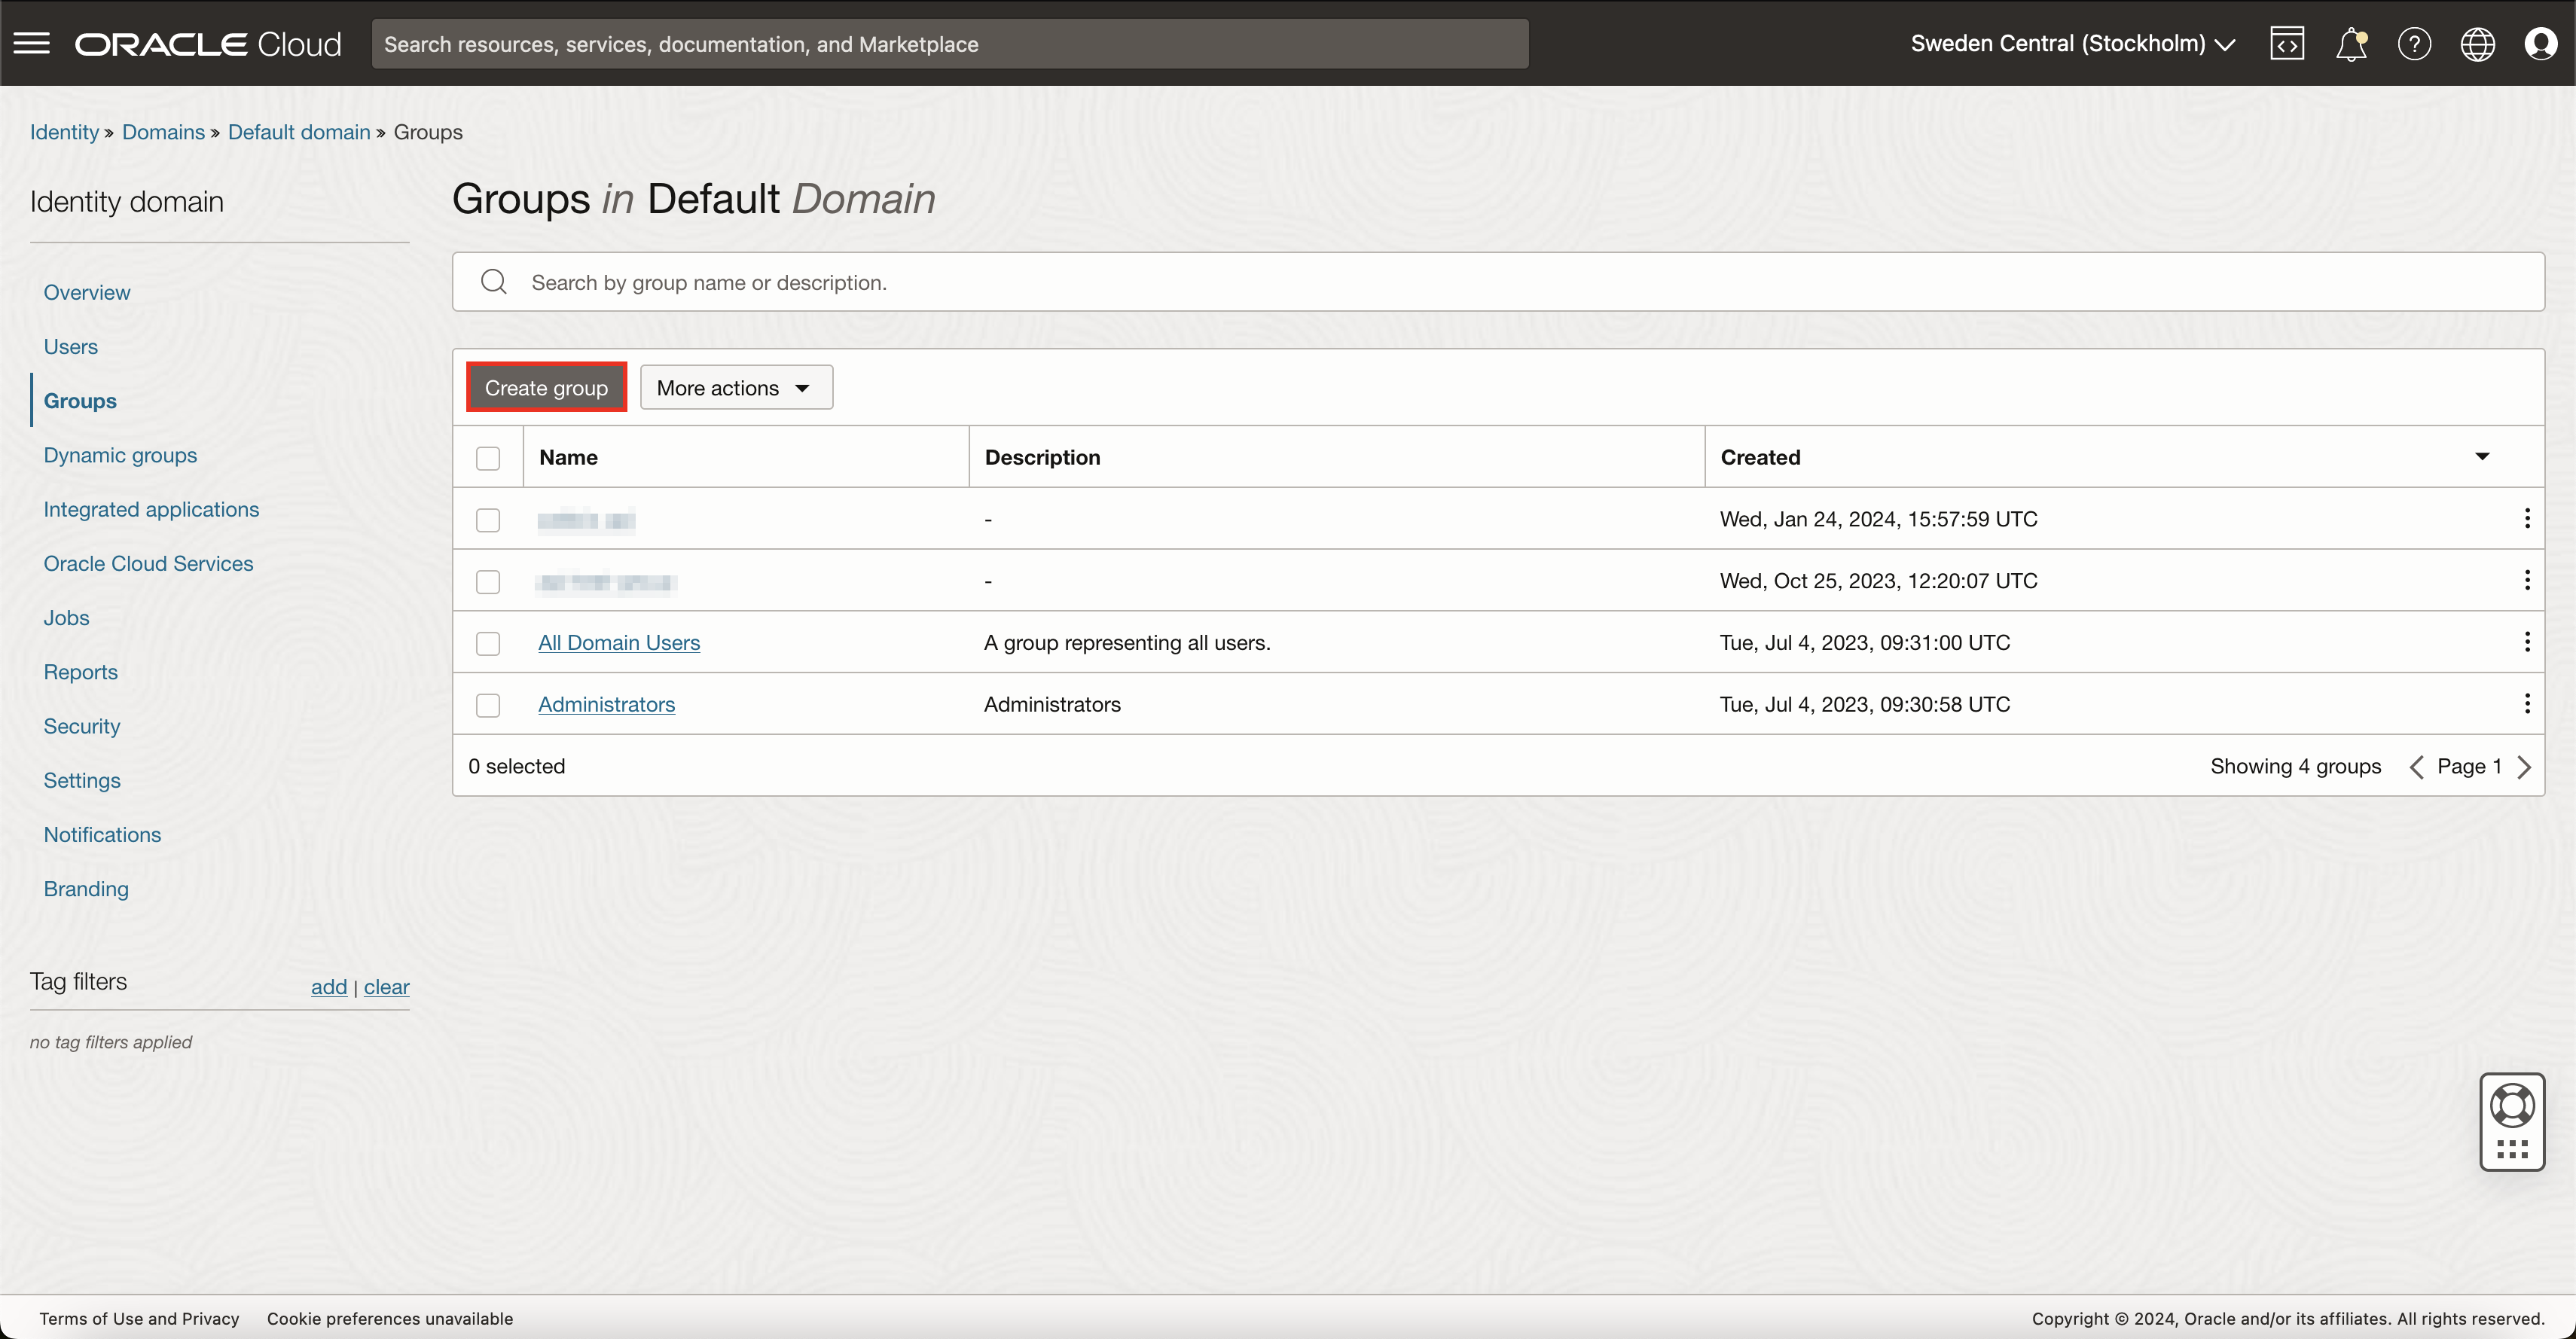
User group creation
To make user management more flexible, a good idea would be to create a user group specifically for monitoring and assign monitoring user to this group. So in case, in the future, you will need more monitoring users, you will be able to just assign those users to a common monitoring user group, and all access rights will work automatically.
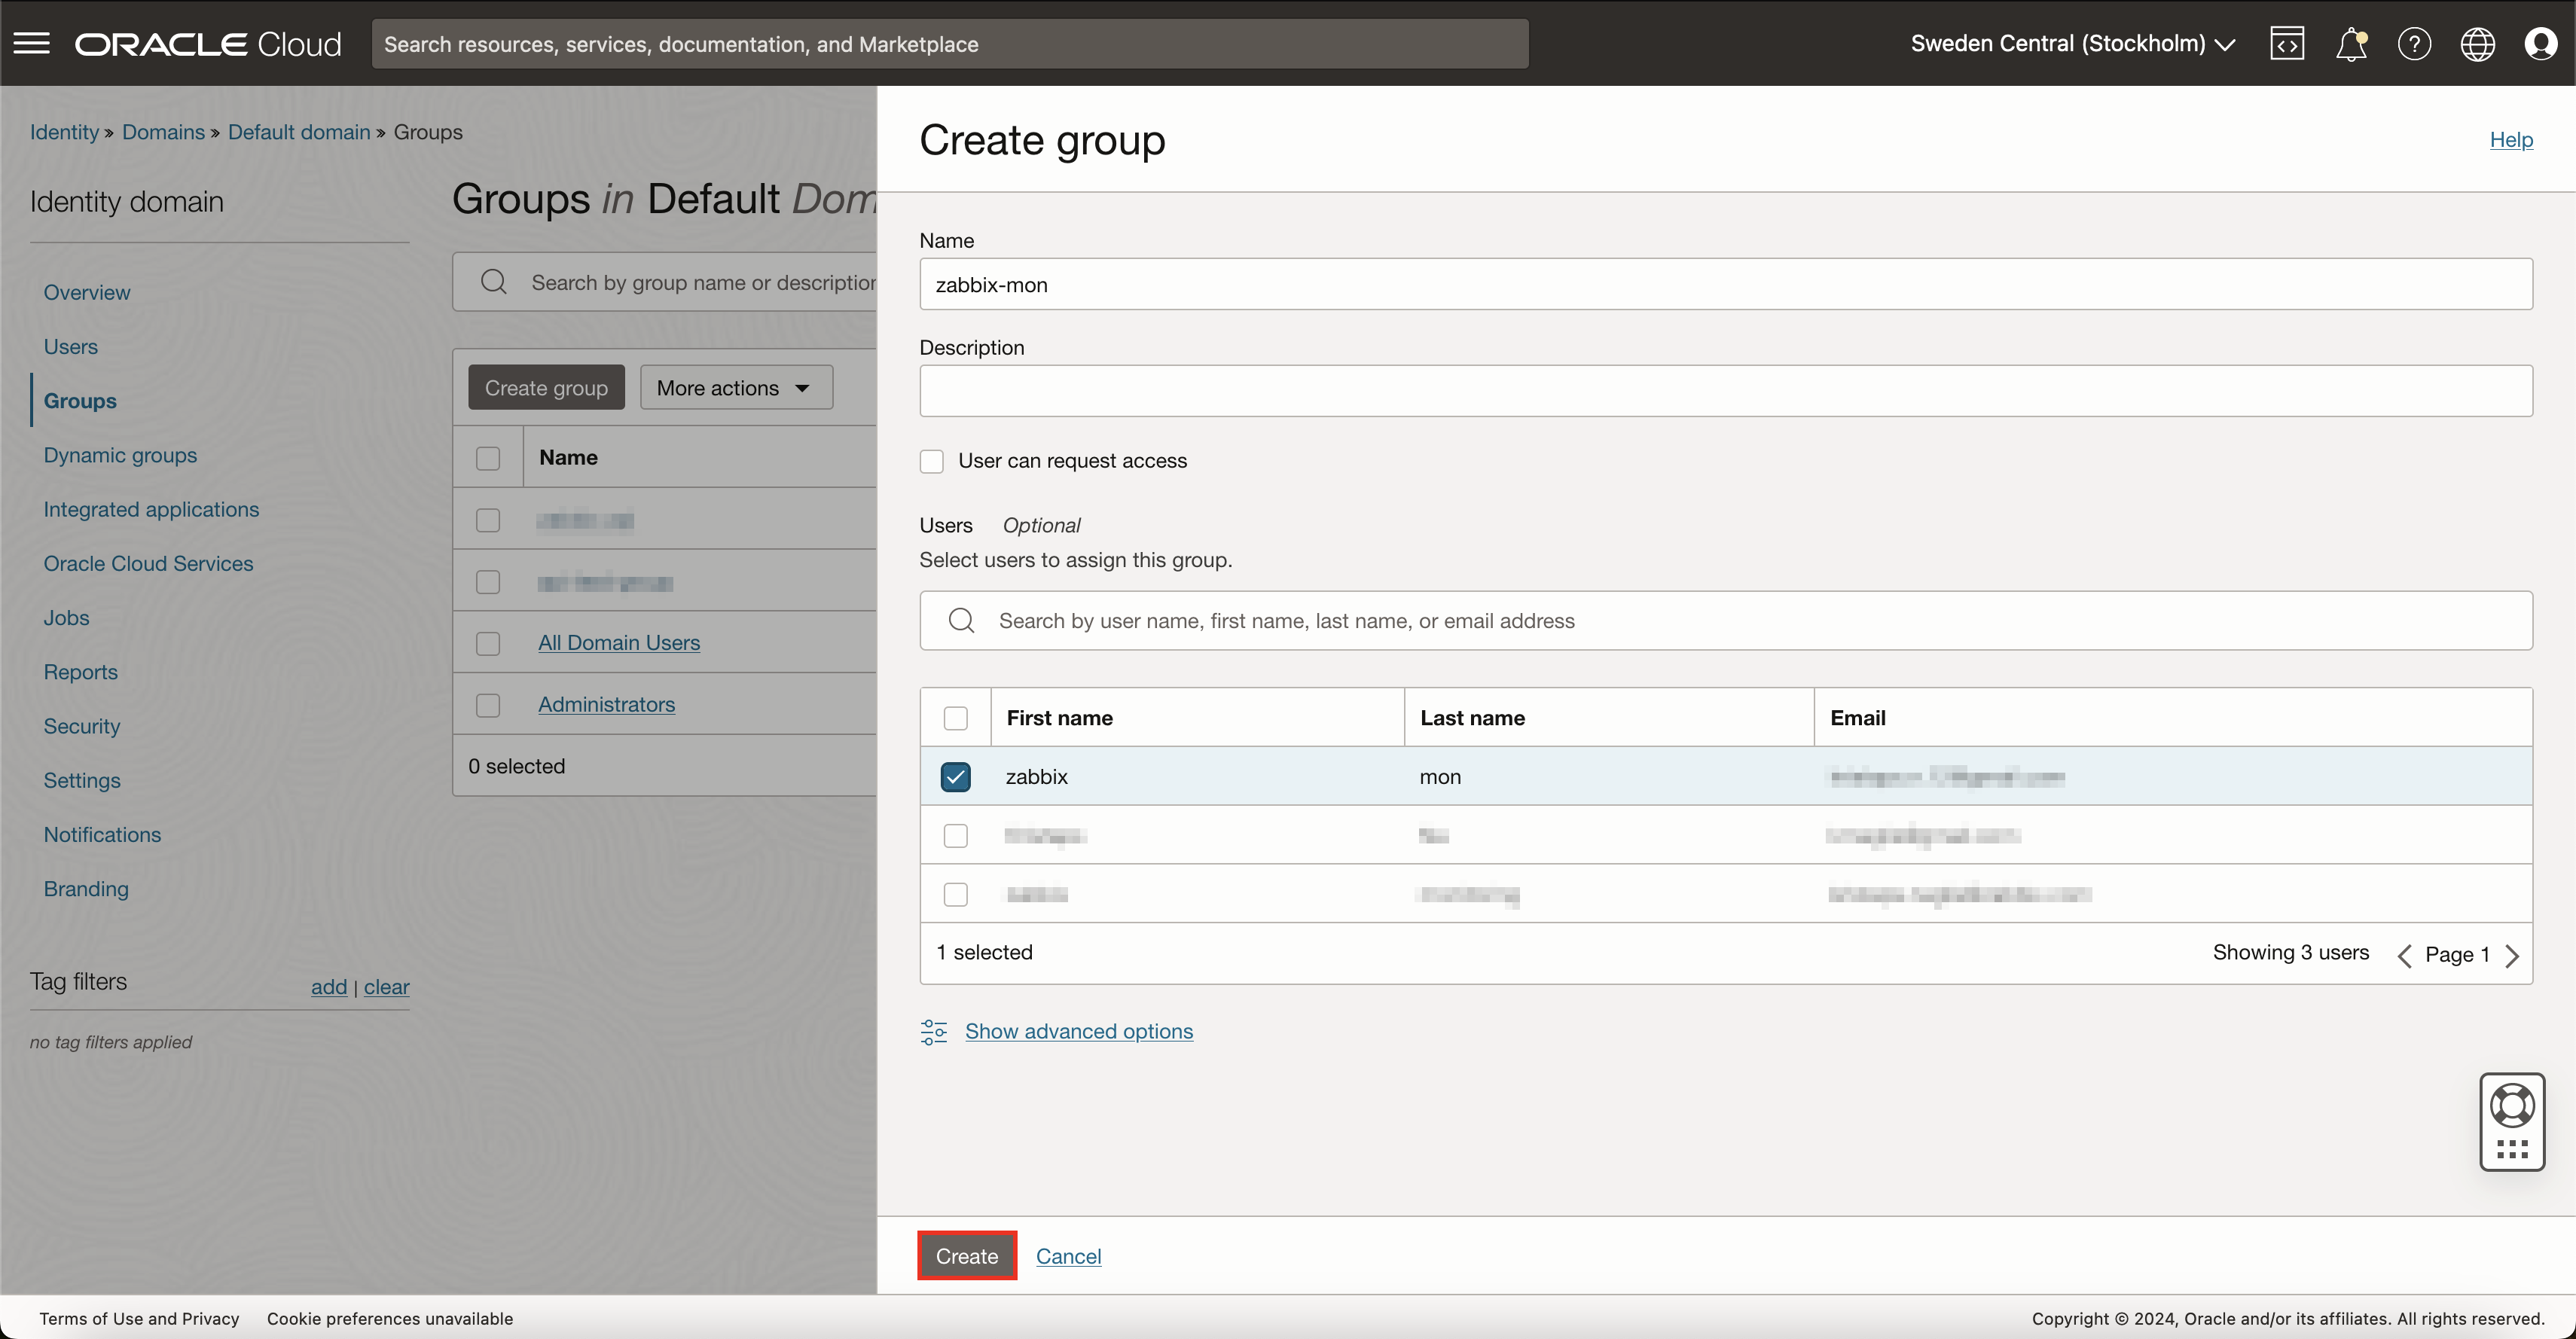
To do this, navigate back to 'Identity & Security' -> 'Domains' and select Groups. Here press on button Create group. Give a name for this group and assign your monitoring user to it while you’re at it.
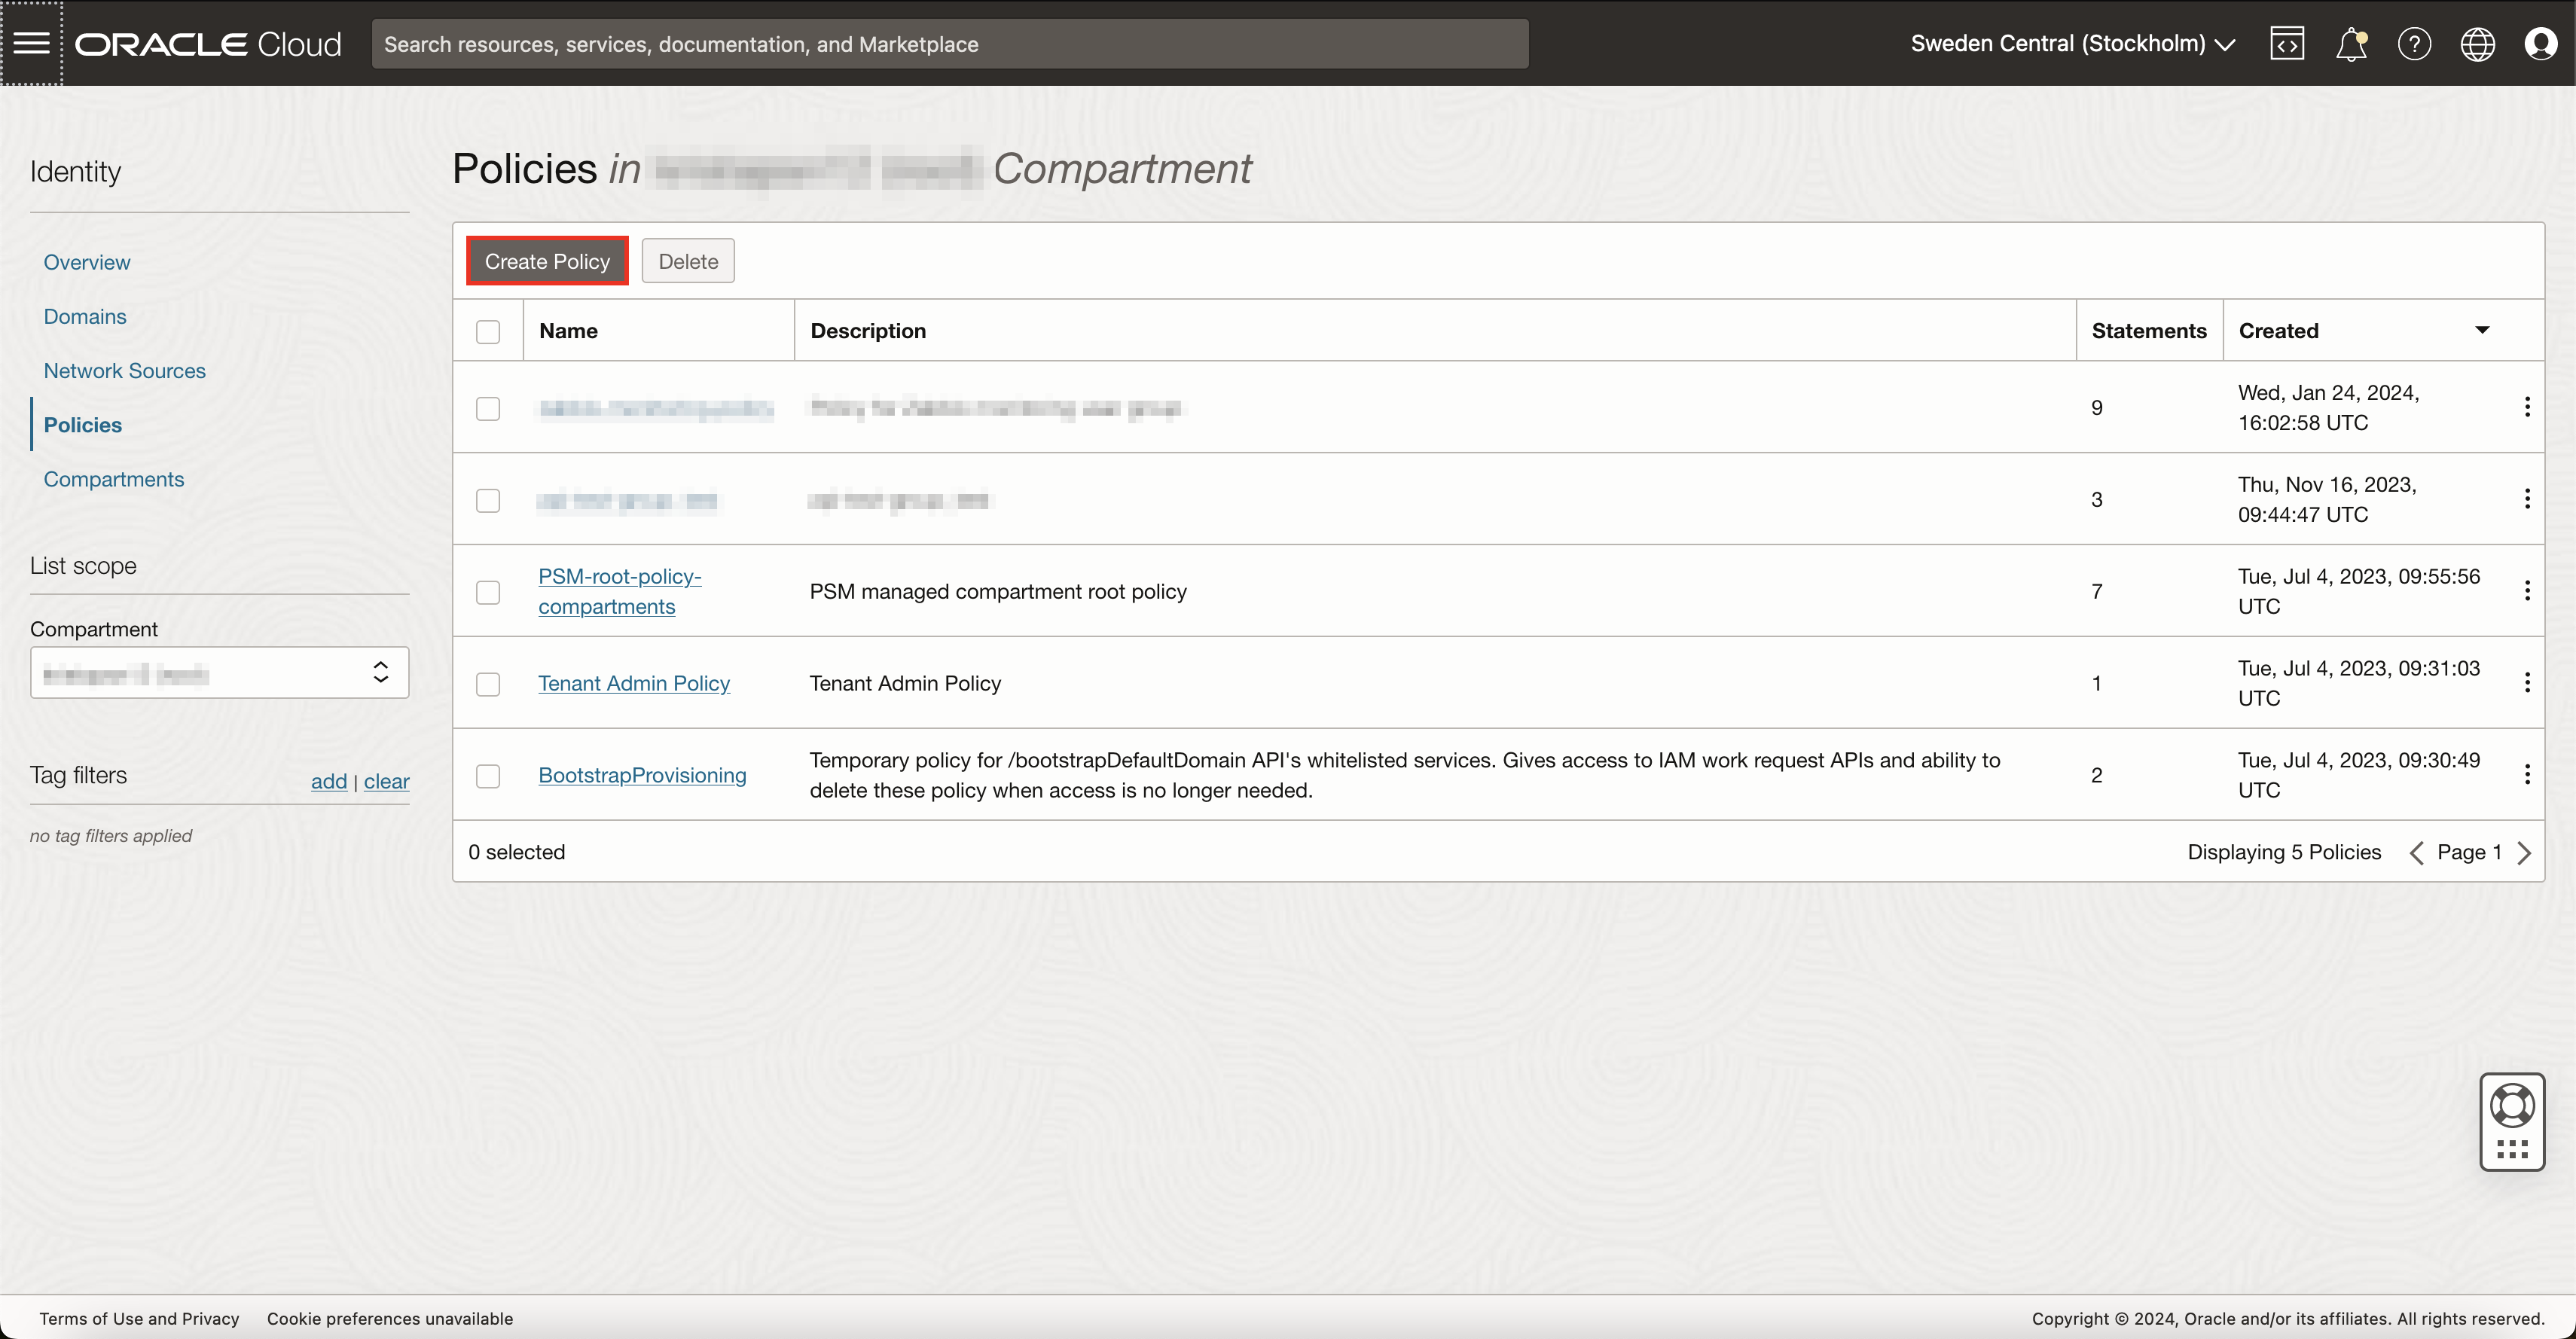
Policy creation
Now that you have successfully created a monitoring user, generated API keys and created a user group for monitoring, you now need to create a new OCI policy. Policies in OCI regulate what resources its users can access and what they can do with those resources. To create a new policy, open the top-left menu and navigate to 'Identity & Security' -> 'Policies' and press on the button Create Policy.
This will open a new view where you can define policy settings. Give this policy a name and description and select the appropriate compartment. Inside the policy builder, enable Show manual editor and copy-paste these rules, just remember to replace zabbix-mon with your monitoring group name:
Allow group 'zabbix-mon' to read metrics in tenancy
Allow group 'zabbix-mon' to read instances in tenancy
Allow group 'zabbix-mon' to read subnets in tenancy
Allow group 'zabbix-mon' to read vcns in tenancy
Allow group 'zabbix-mon' to read vnic-attachments in tenancy
Allow group 'zabbix-mon' to read volumes in tenancy
Allow group 'zabbix-mon' to read objectstorage-namespaces in tenancy
Allow group 'zabbix-mon' to read buckets in tenancy
Allow group 'zabbix-mon' to read autonomous-databases in tenancy
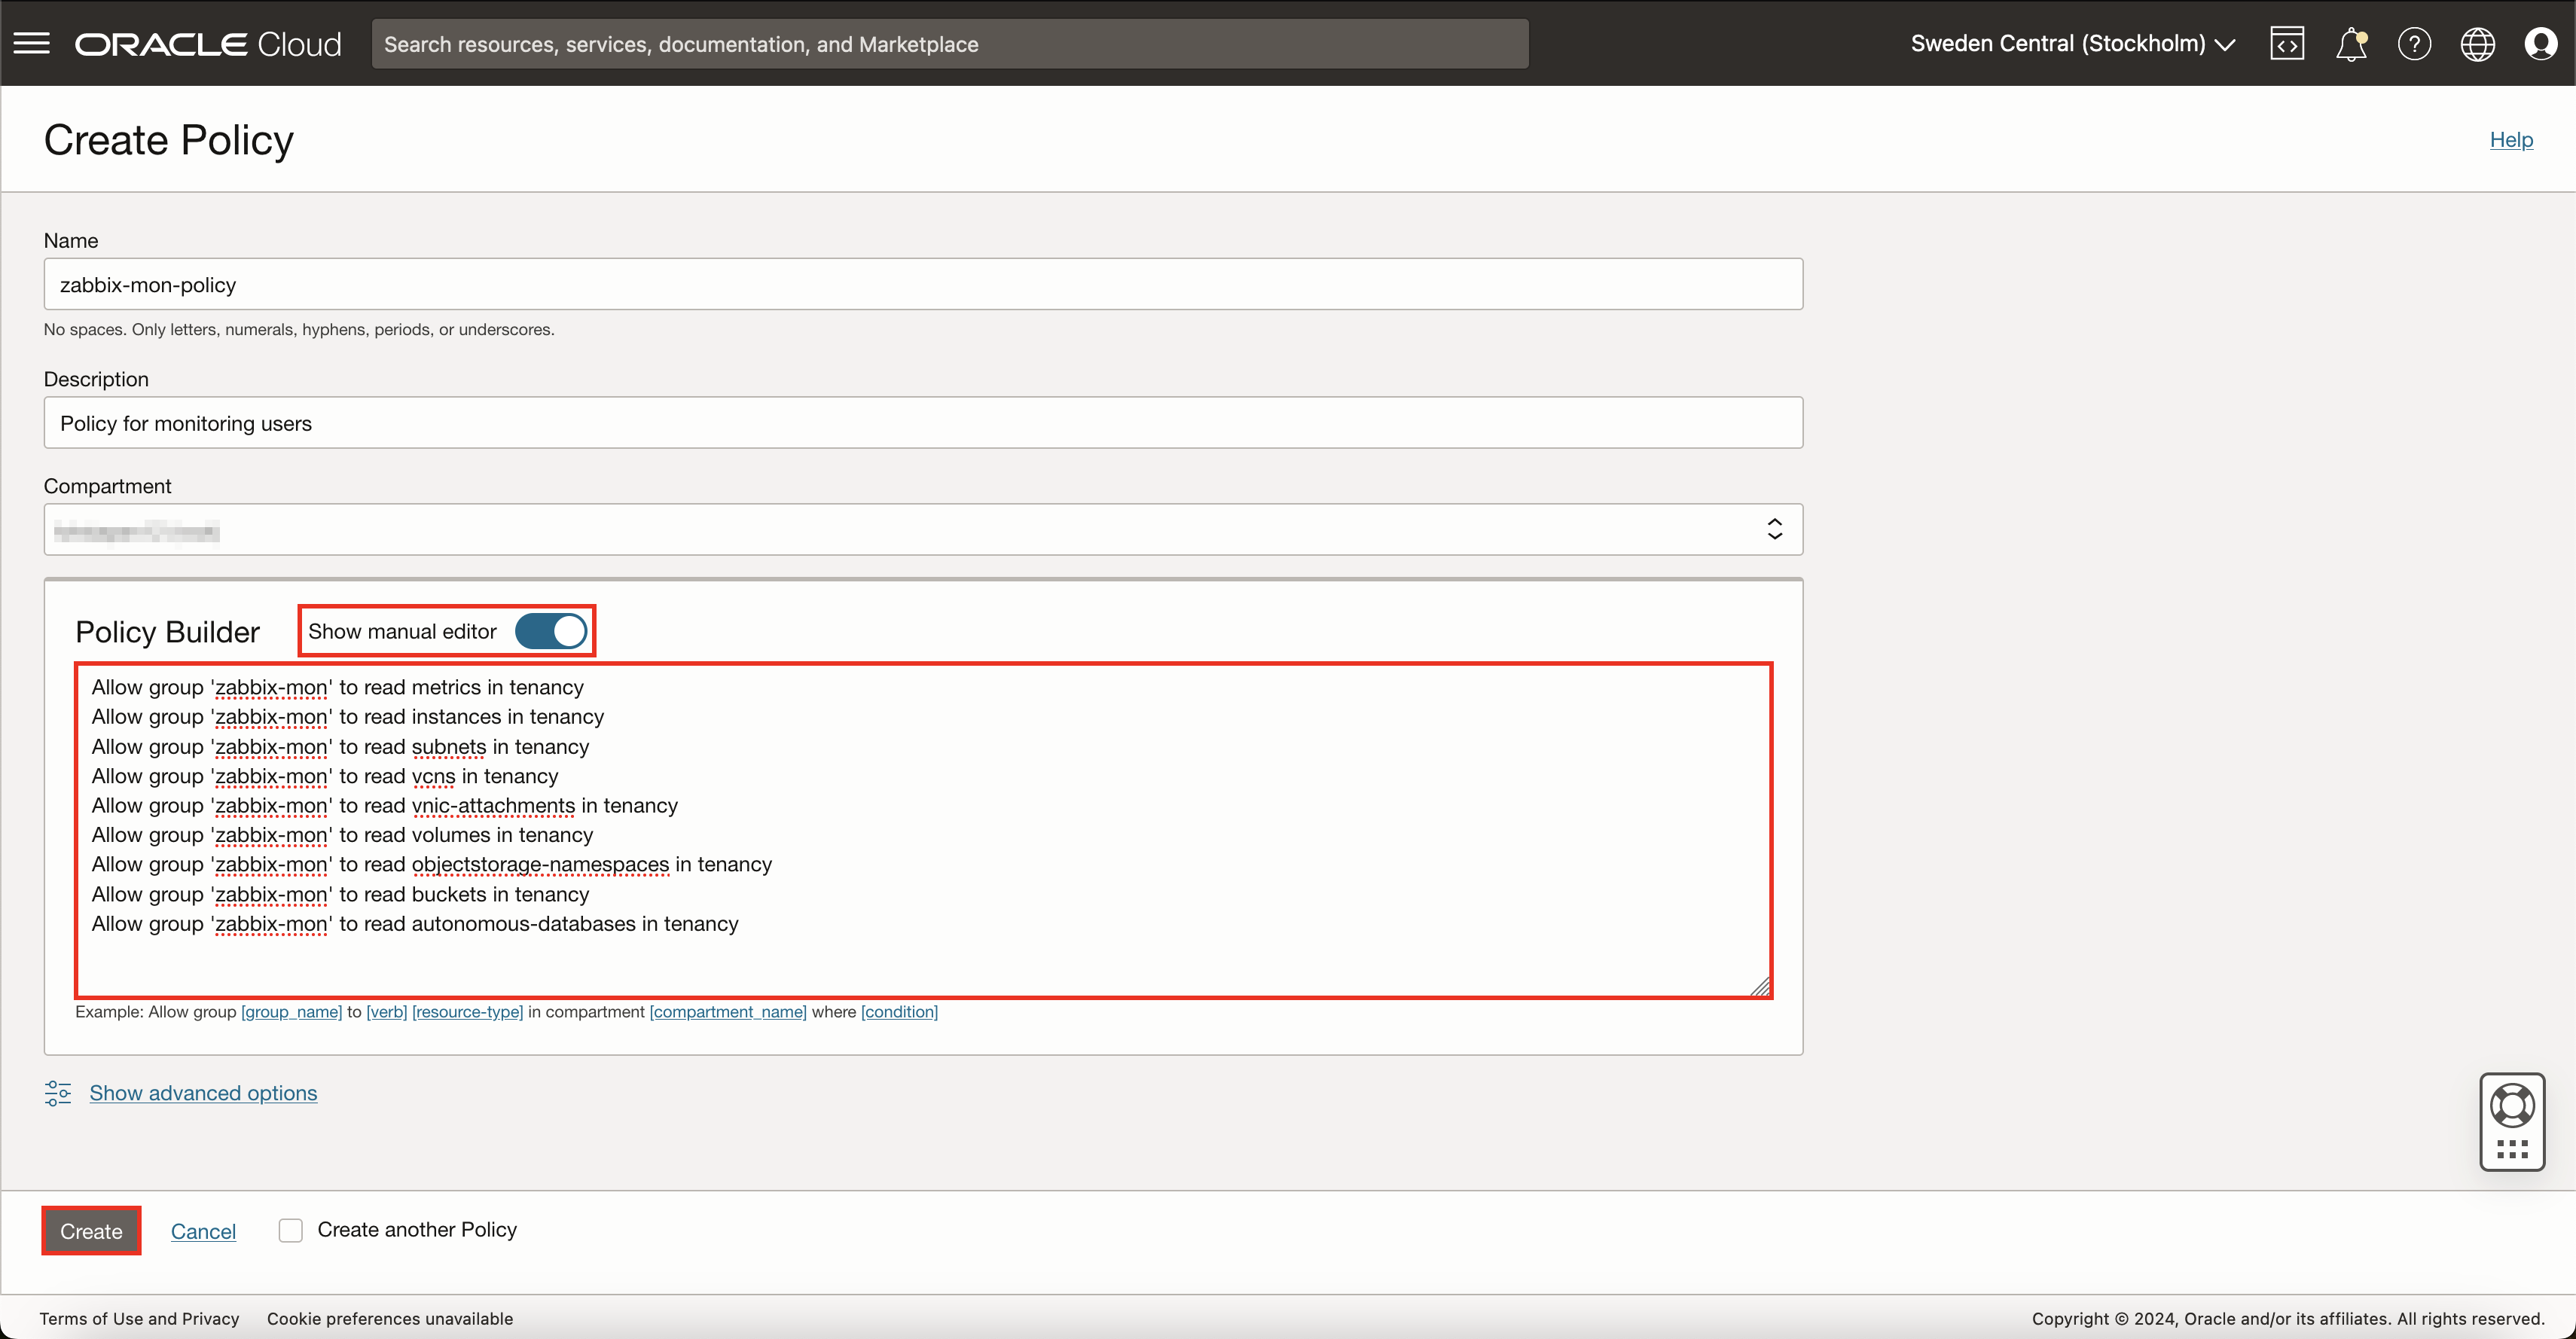
This set of rules will give your monitoring group users read-only access to only those resources that Zabbix Oracle Cloud Infrastructure templates use.
After you are done, press the Create button and the policy will be created.
If you decide to modify our template to access more data from OCI, you will need to append appropriate rules here as well.
That is it for configuration on the OCI side now.
Prepare Zabbix
Create host
First, open up your Zabbix web interface, head over to Hosts section and create a new host. Here, you will need to specify a host name of your choice, template Oracle Cloud by HTTPS and assign it to a group.
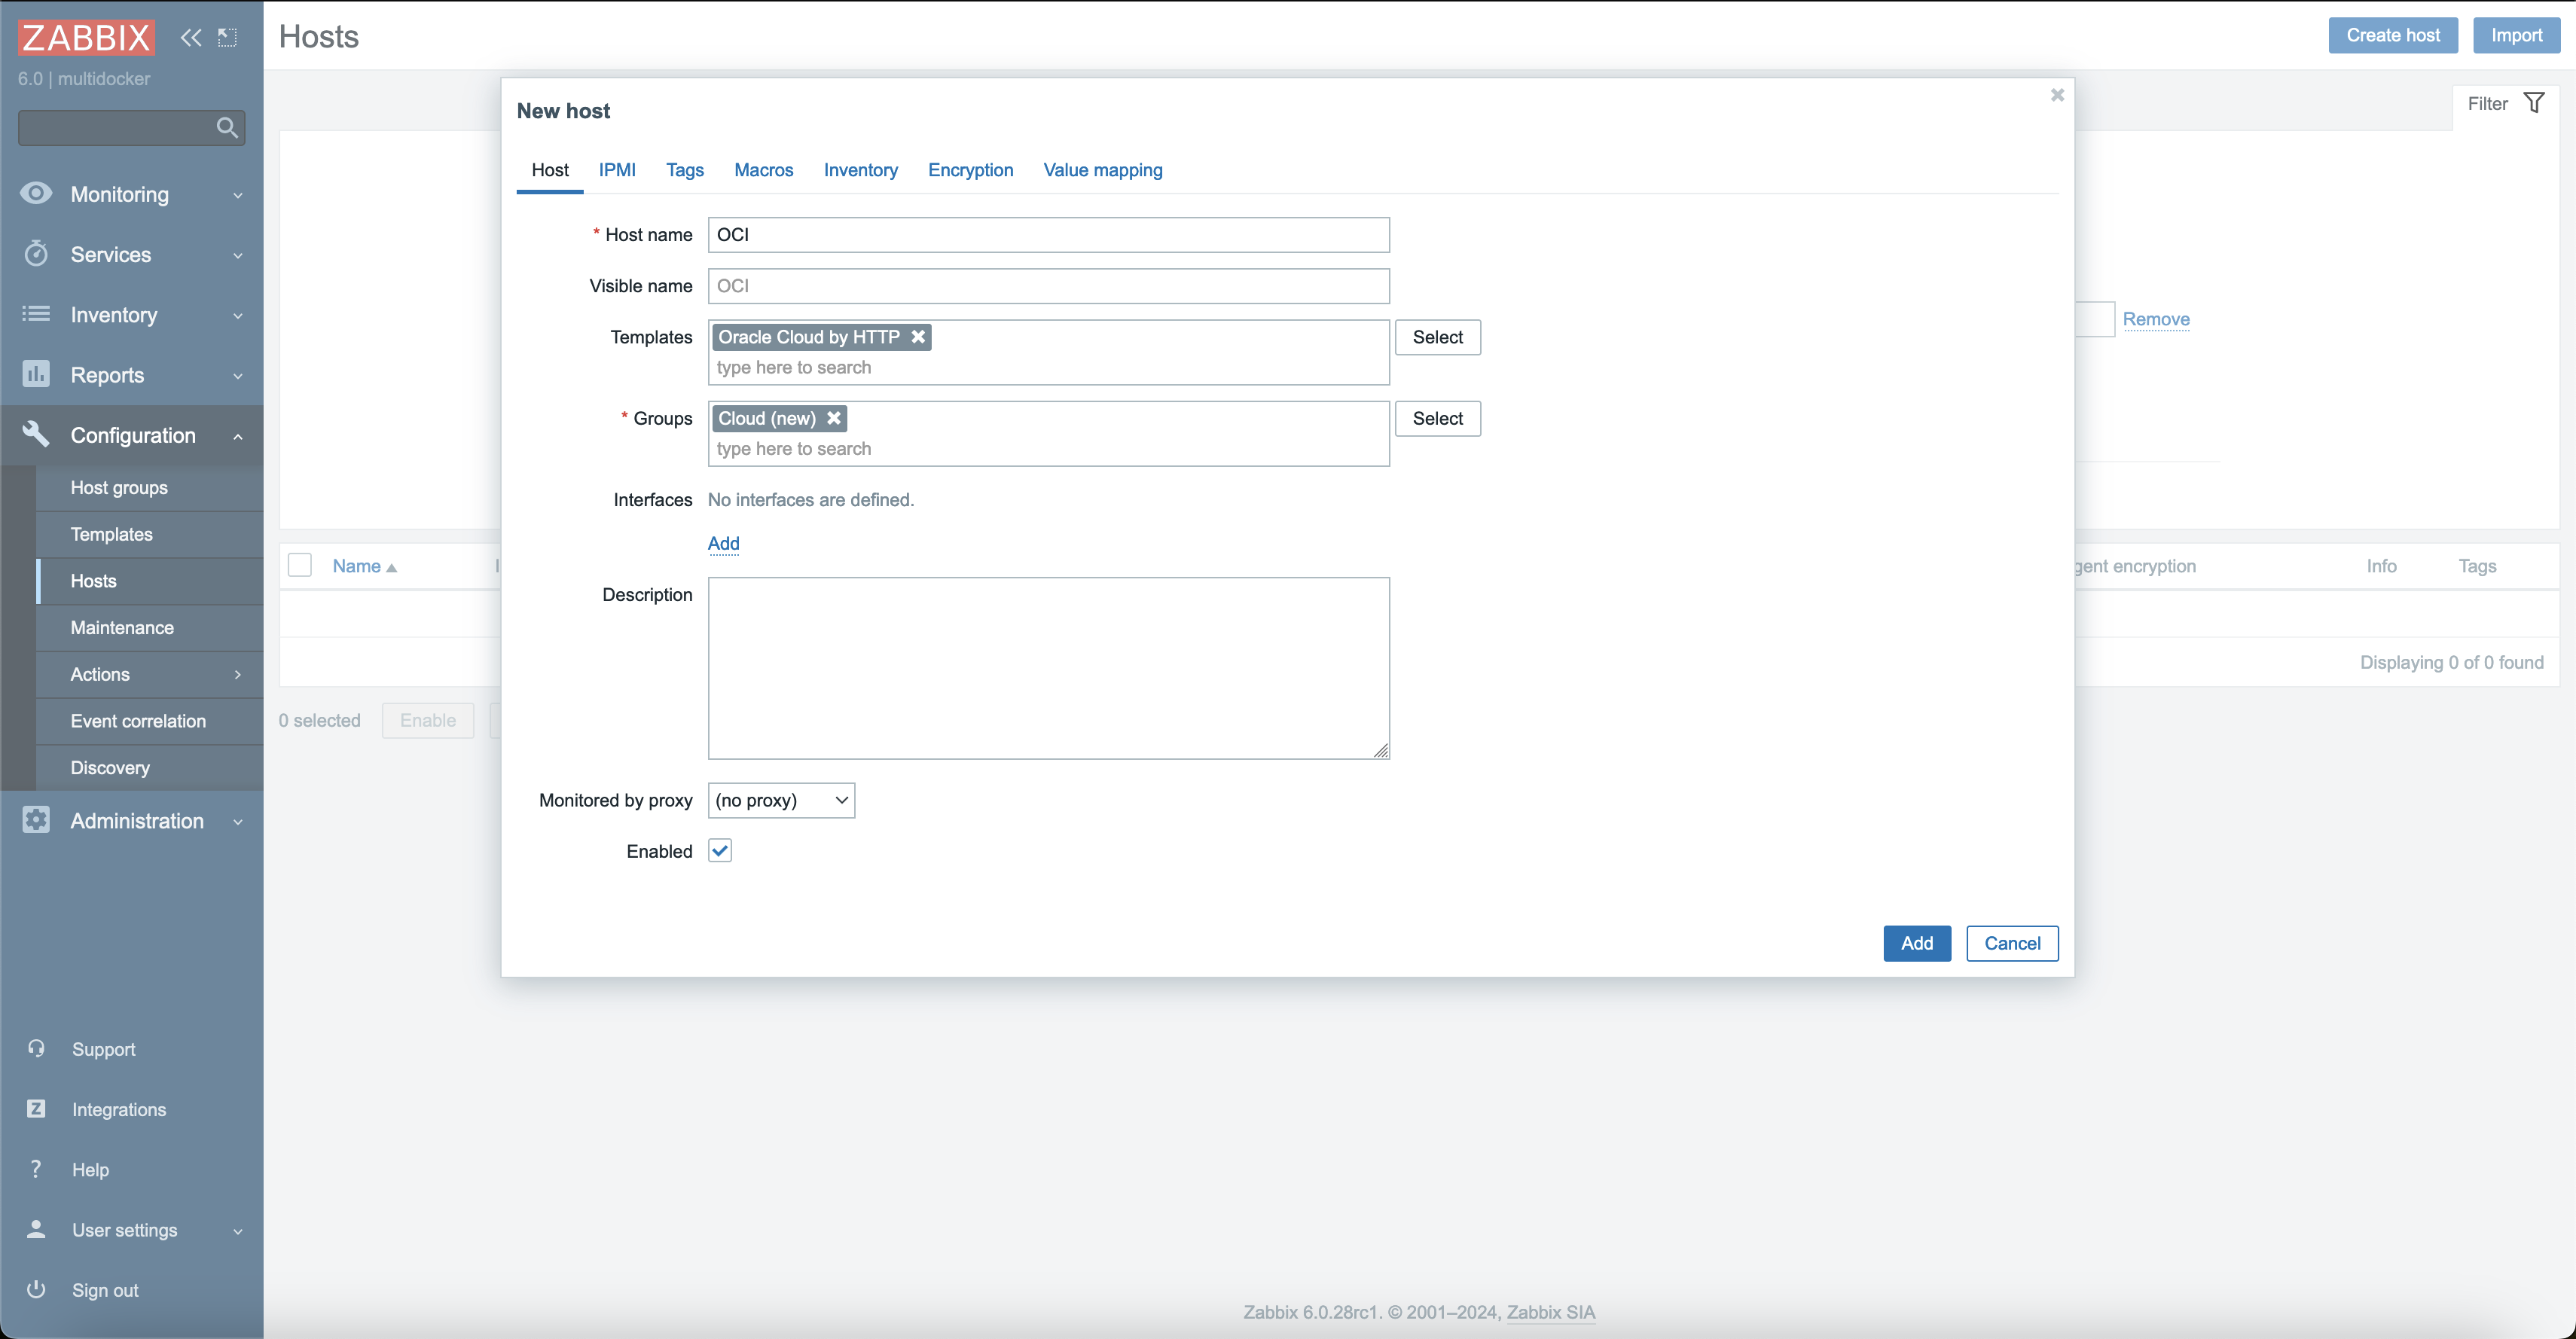
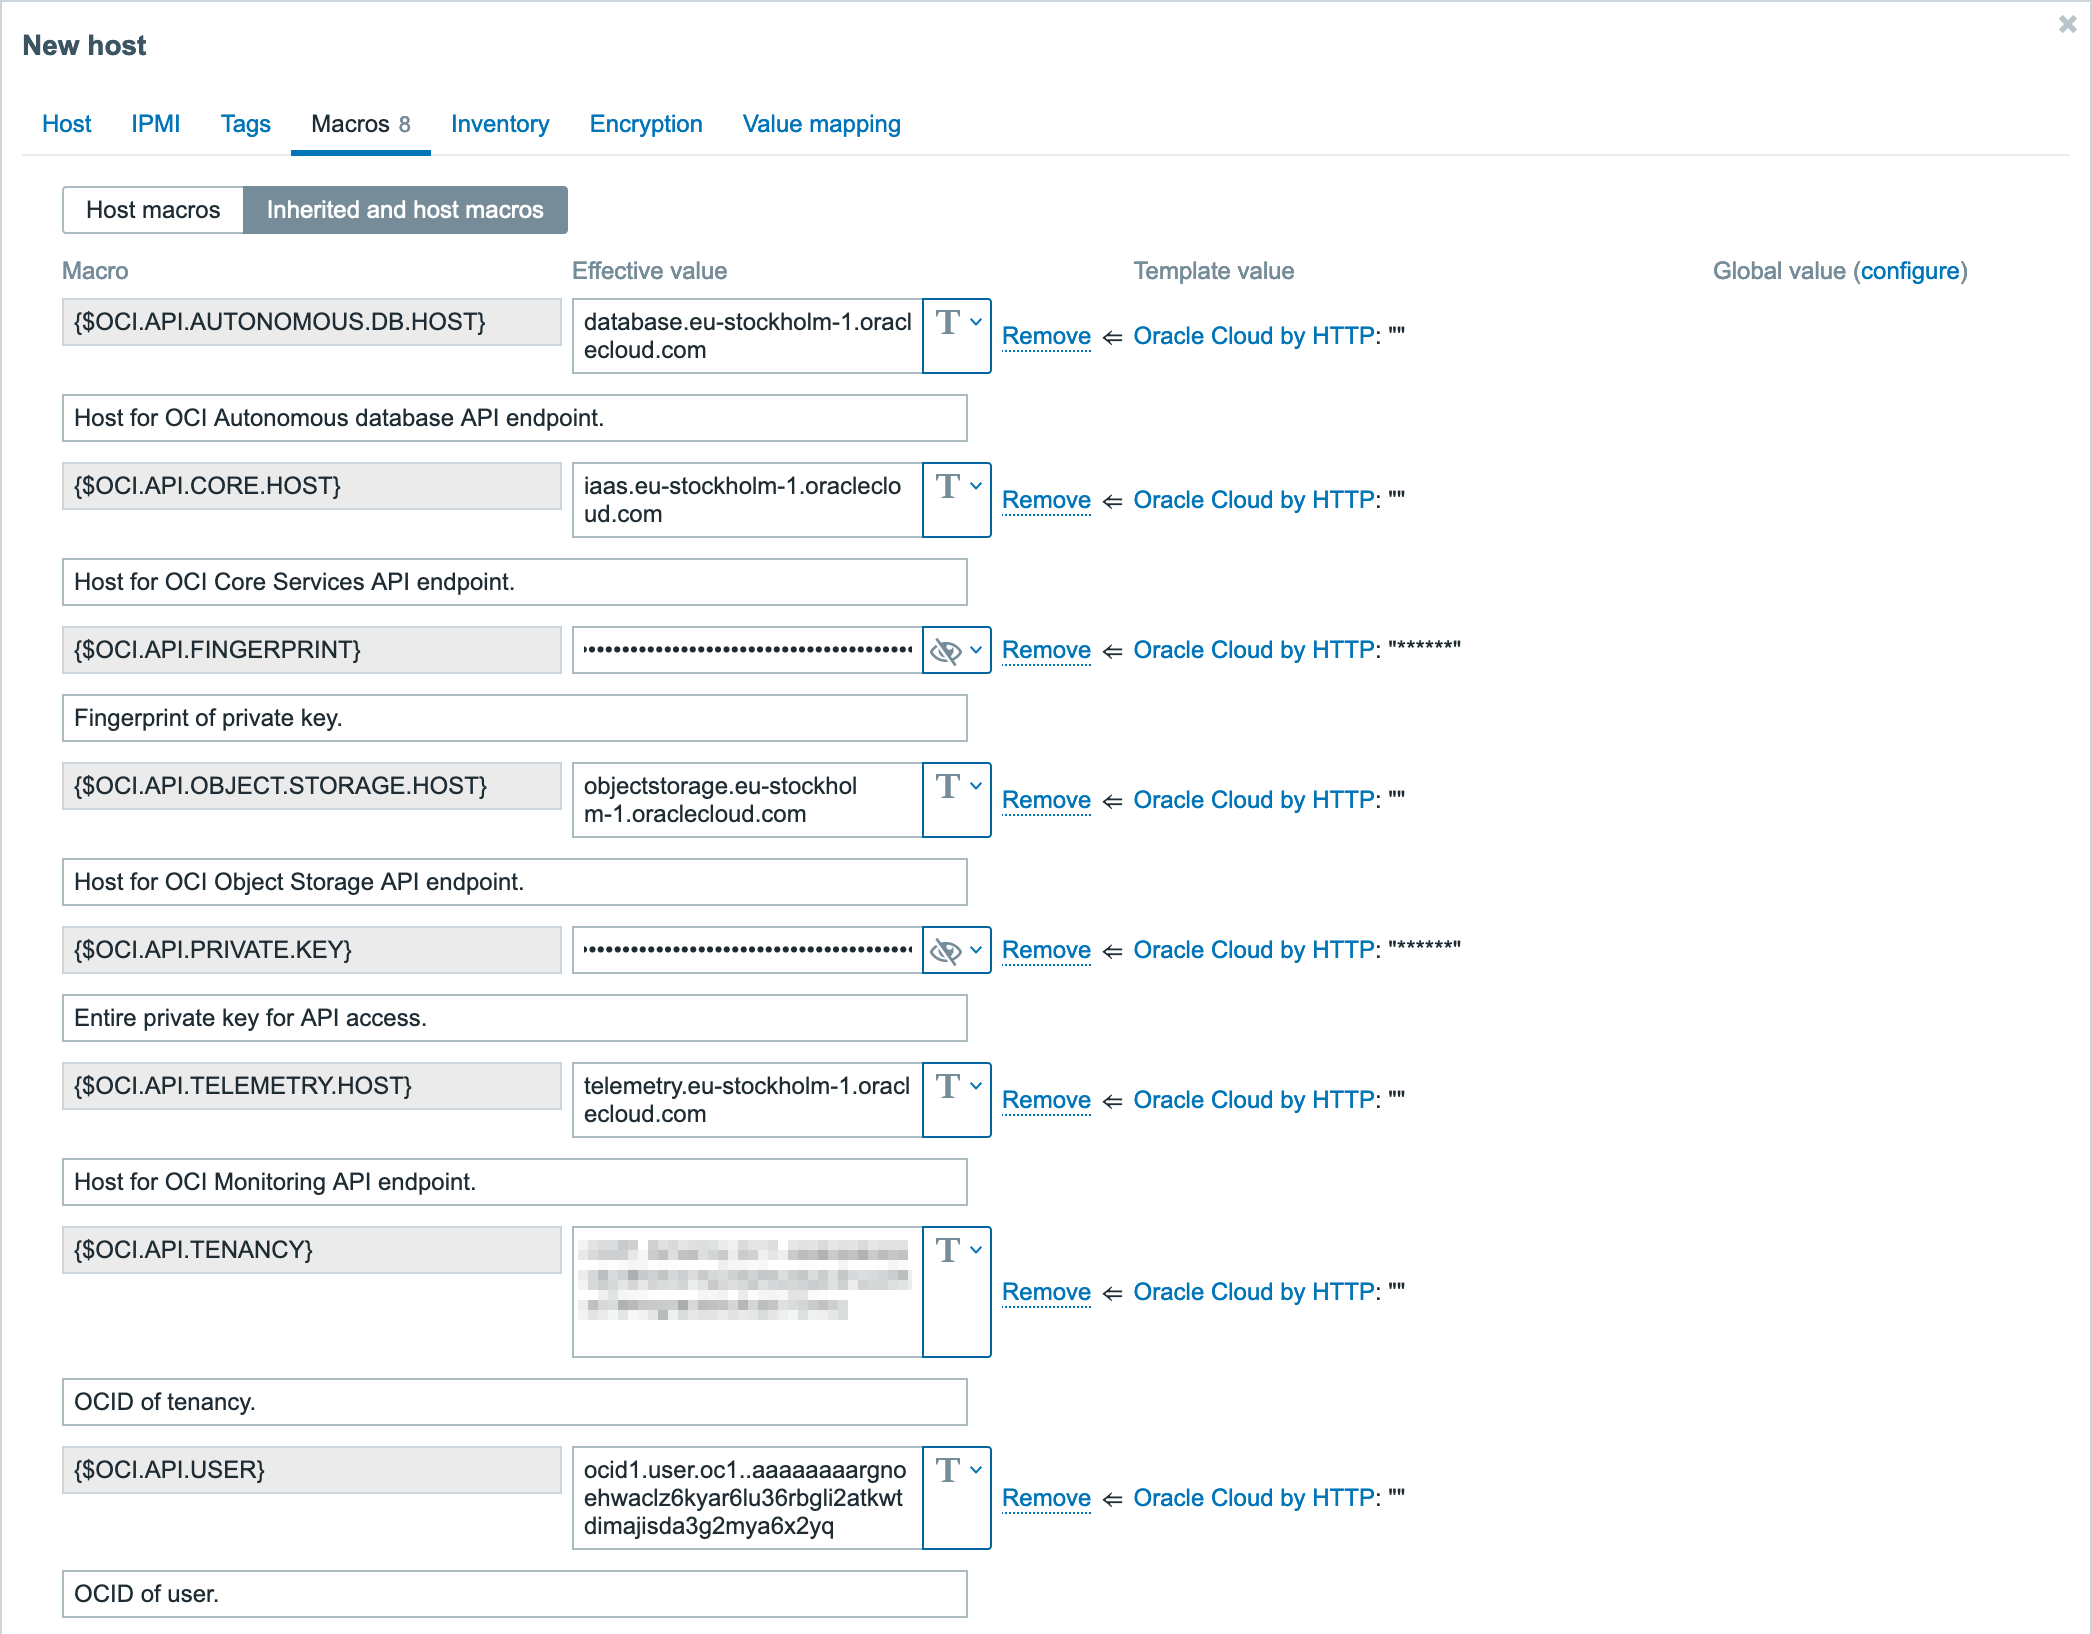
Before pressing the Add button, you should configure macros. Open the Macros tab and select Inherited and host macros. There will be quite a few of them, but each with its own use-case. Some of these macros are discussed in Optional configuration section, so for now let’s focus on the ones that are necessary for template to work at all.
Essentially, there are 3 steps to take here:
- This is the moment when OCI configuration file values from API key generation section come into play. You will need to set the macro value to the value that OCI gave you:
{$OCI.API.TENANCY}– here set the tenancy OCID value;{$OCI.API.USER}– here set the user OCID value;{$OCI.API.FINGERPRINT}– here set the fingerprint value;
- Now you need to find where you saved the private key for your OCI monitoring user from the same API key generation section. Copy the contents of that private key file and paste them into
{$OCI.API.PRIVATE.KEY}macro. - Once the authentication credentials are entered, you need to identify the correct OCI API endpoints that match for your region (the one that OCI configuration file gave you in the API key generation section). One way to do this is to go to Oracle Cloud Infrastructure Documentation, and on the left side you will find all the API services. Under each of these services, there is a home page dedicated to each service with respective API endpoints available. Required API service endpoints for Zabbix are:
In my case the OCI region is
eu-stockholm-1, therefore the above API service endpoints look like this:OCI API service URL Zabbix macro name Core Services API iaas.eu-stockholm-1.oraclecloud.com{$OCI.API.CORE.HOST}Database Service API database.eu-stockholm-1.oraclecloud.com{$OCI.API.AUTONOMOUS.DB.HOST}Object Storage Service API objectstorage.eu-stockholm-1.oraclecloud.com{$OCI.API.OBJECT.STORAGE.HOST}Monitoring API telemetry.eu-stockholm-1.oraclecloud.com{$OCI.API.TELEMETRY.HOST}Now that you have the necessary host names, you need to save them as values for their respective Zabbix macros.
IMPORTANT! API Endpoint URLs need to be entered without the HTTP scheme (
https://).
After these 3 steps, your Macros tab should look something like this.
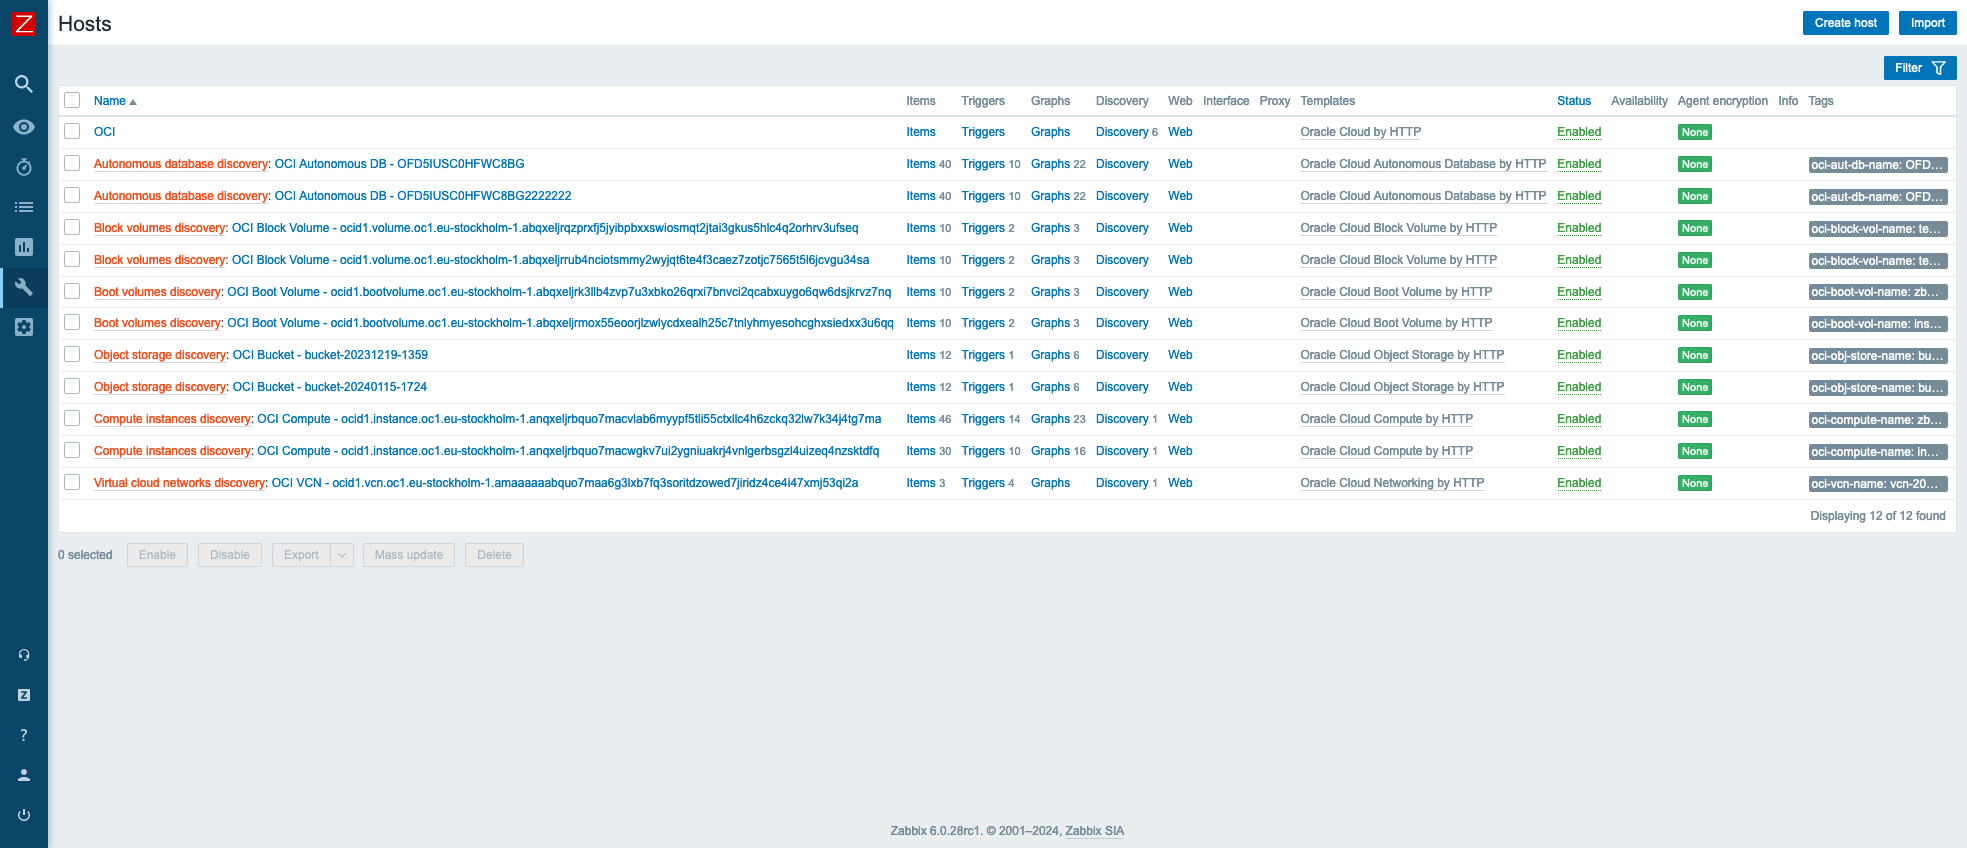
After pressing the button Add, this host will be added to Zabbix.
This host will not have any metrics items, instead it will discover all the OCI resources and add them as separate hosts in Zabbix. This will happen automatically, sometime between when Zabbix server reloads its configuration cache and 1 hour after that (because discovery rules have update interval of 1 hour). However, if you want to speed this up, you can manually refresh Zabbix server config cache with CLI command zabbix_server -R config_cache_reload and execute all discovery rules manually.
After that, in the Hosts view, you should see all of your monitored OCI resources.
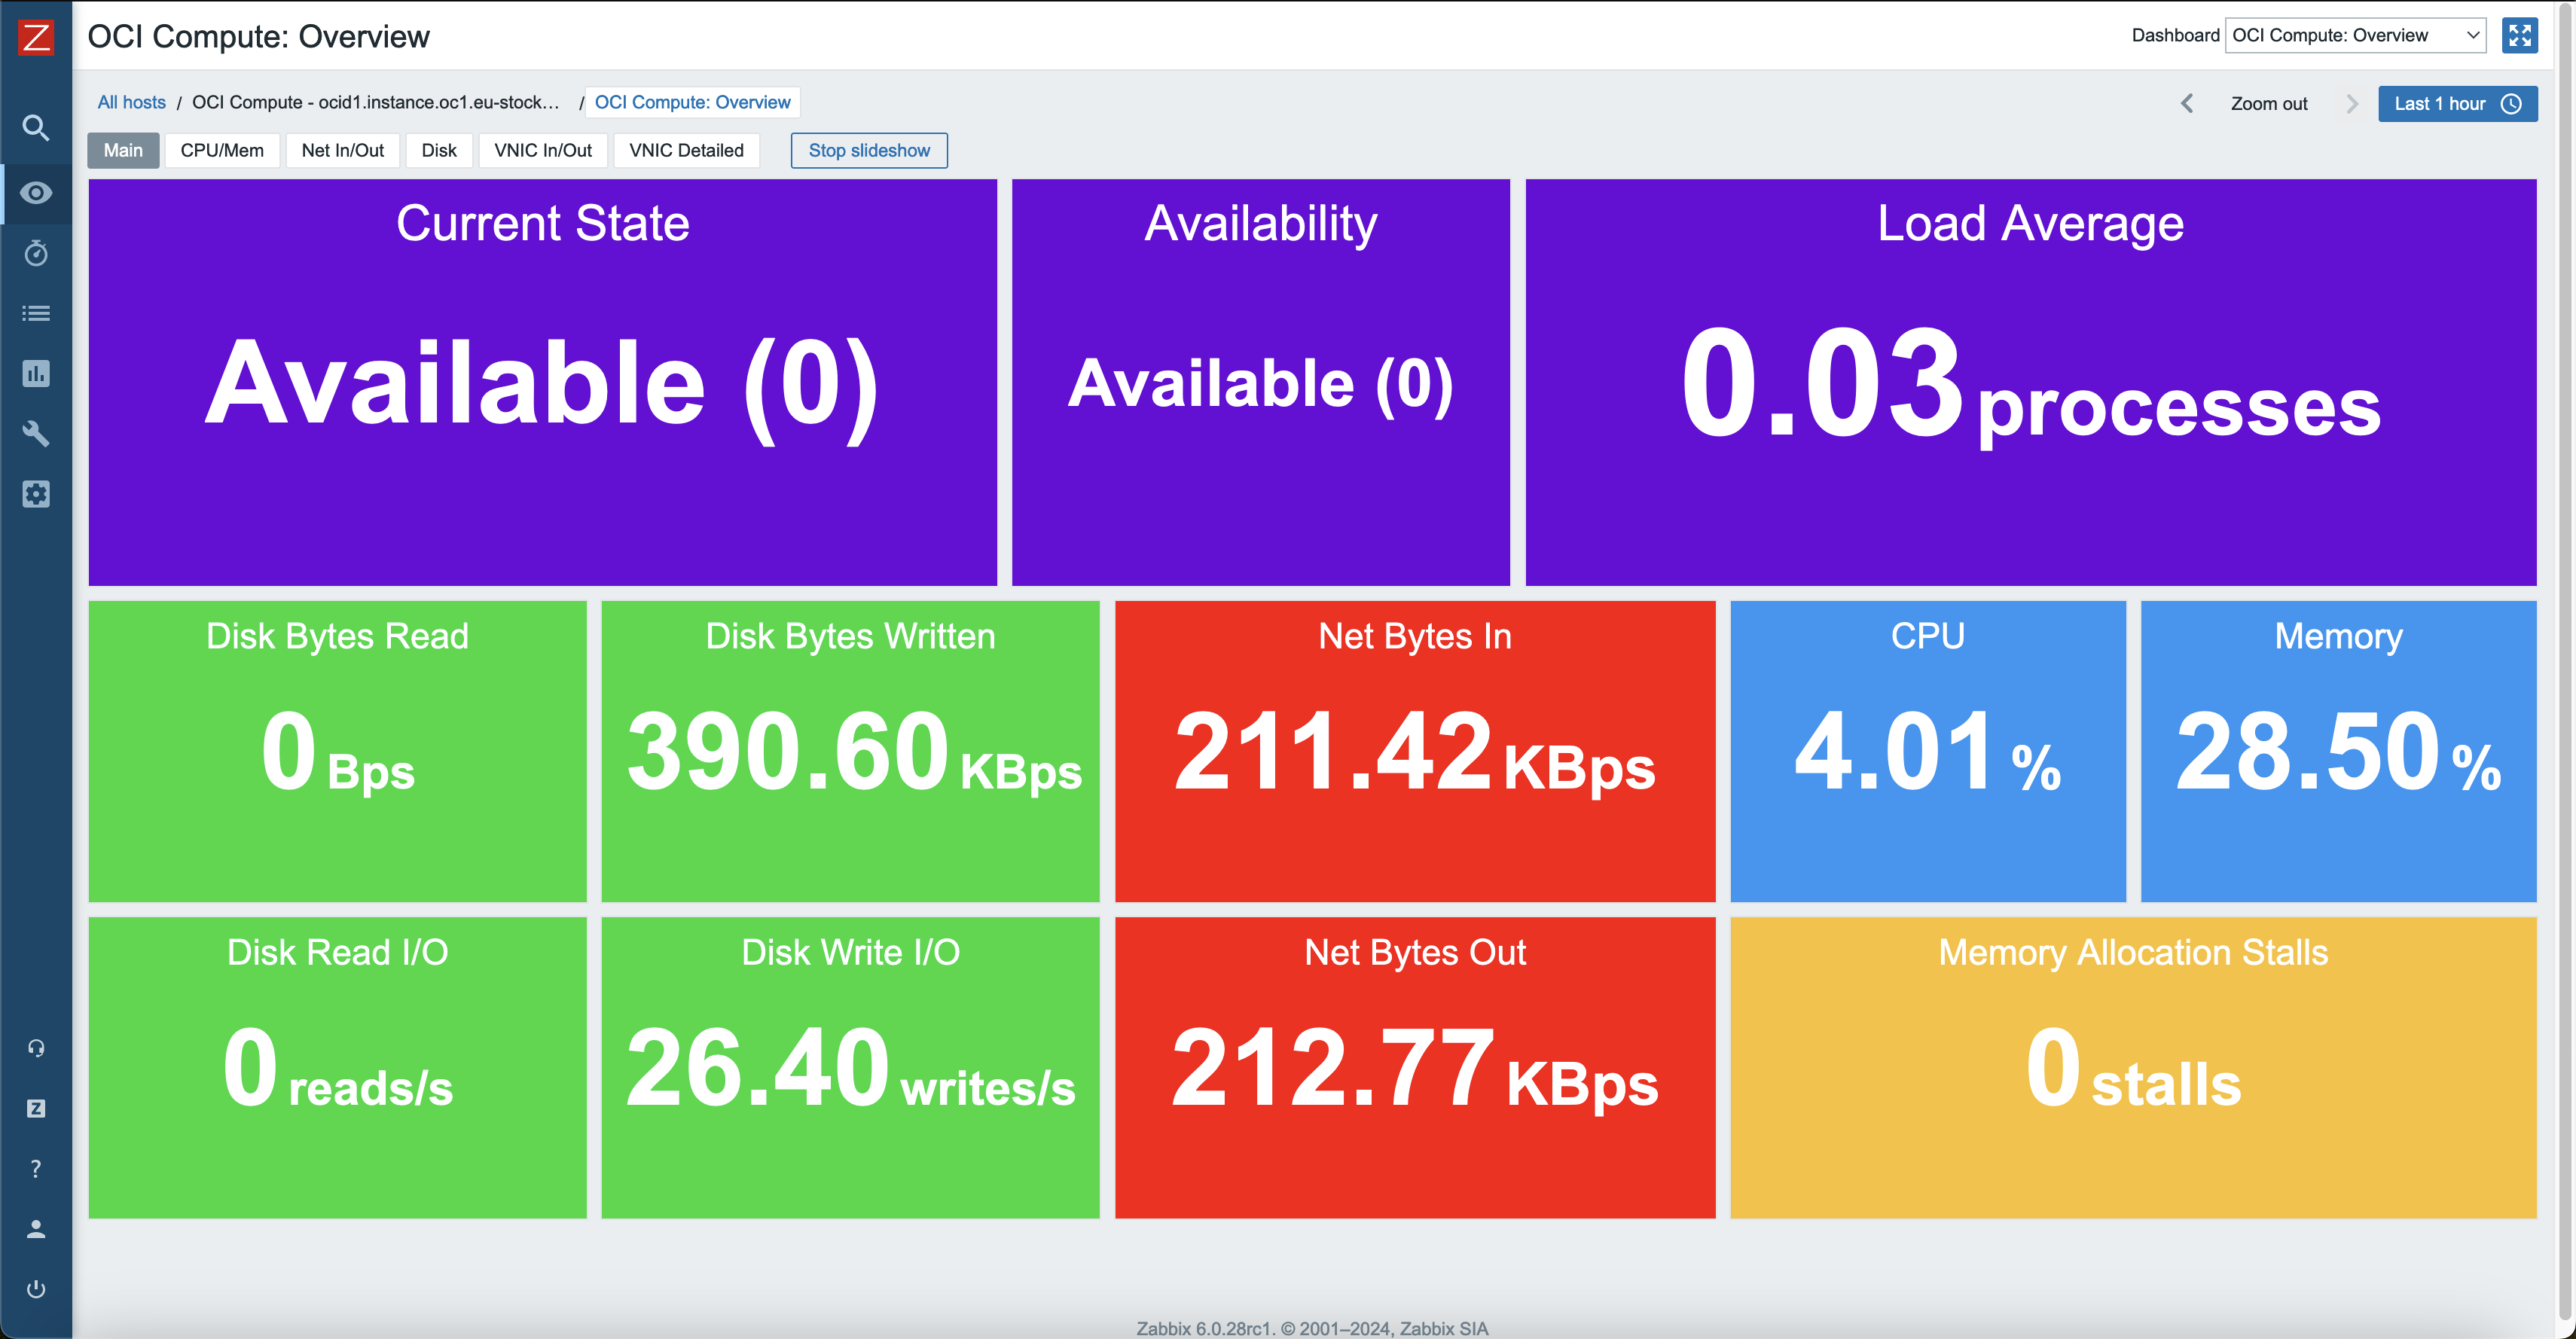
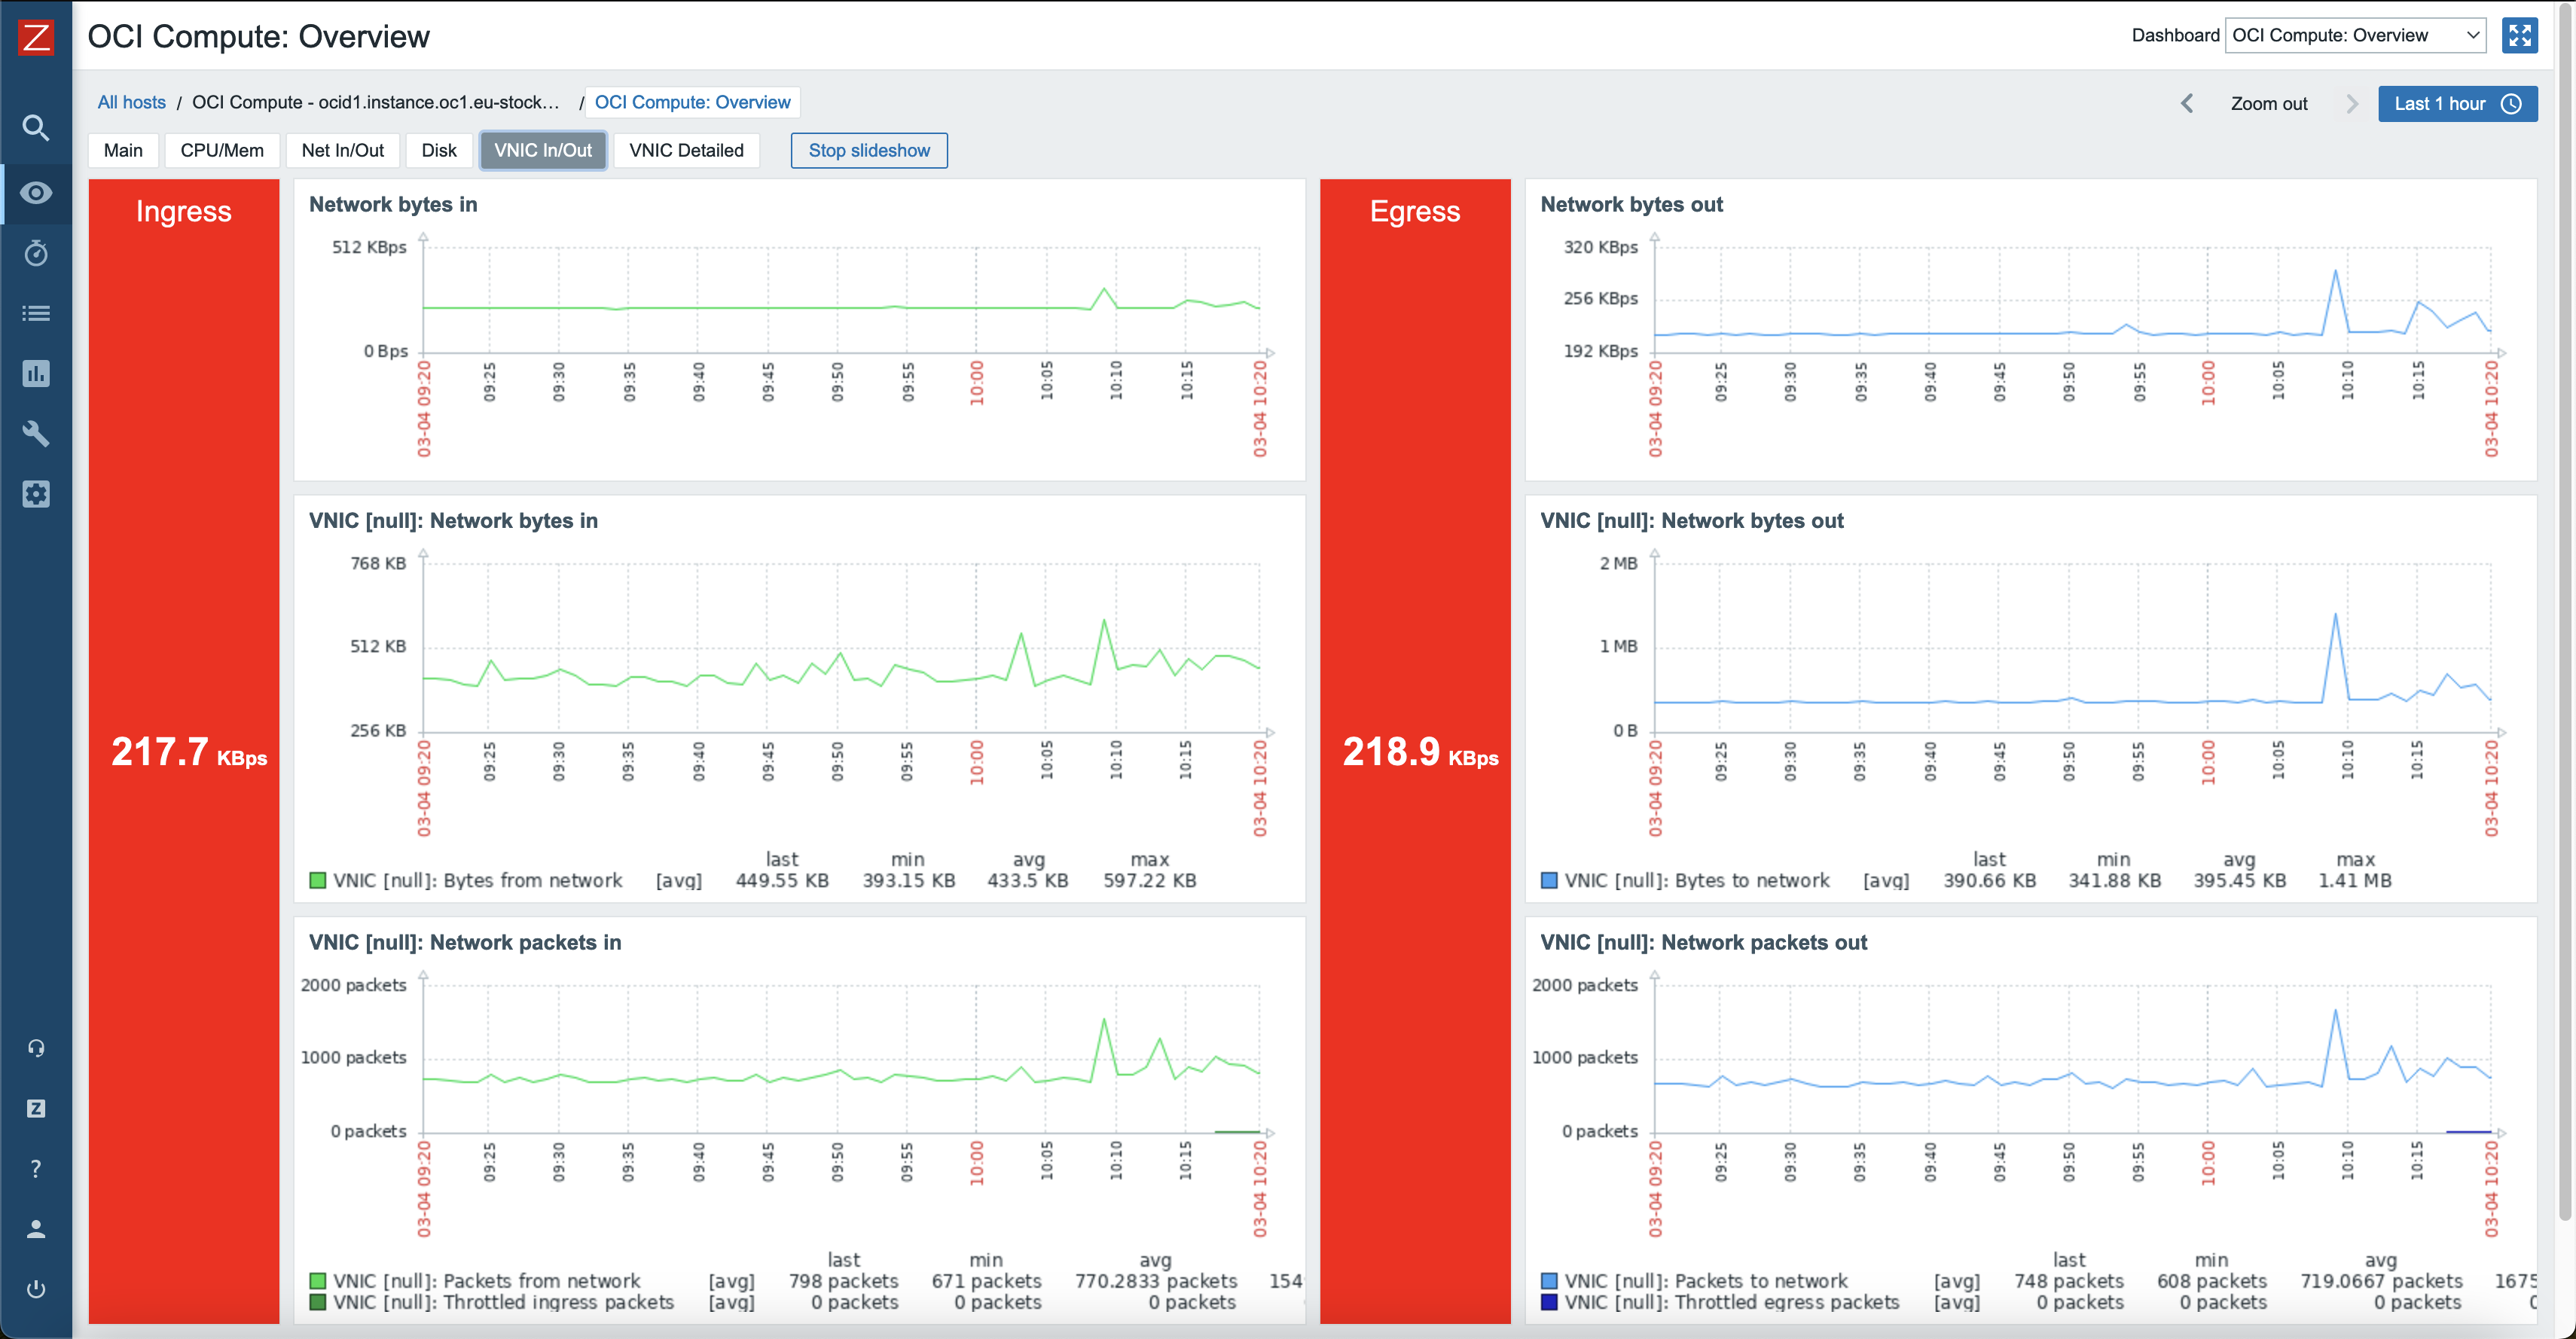
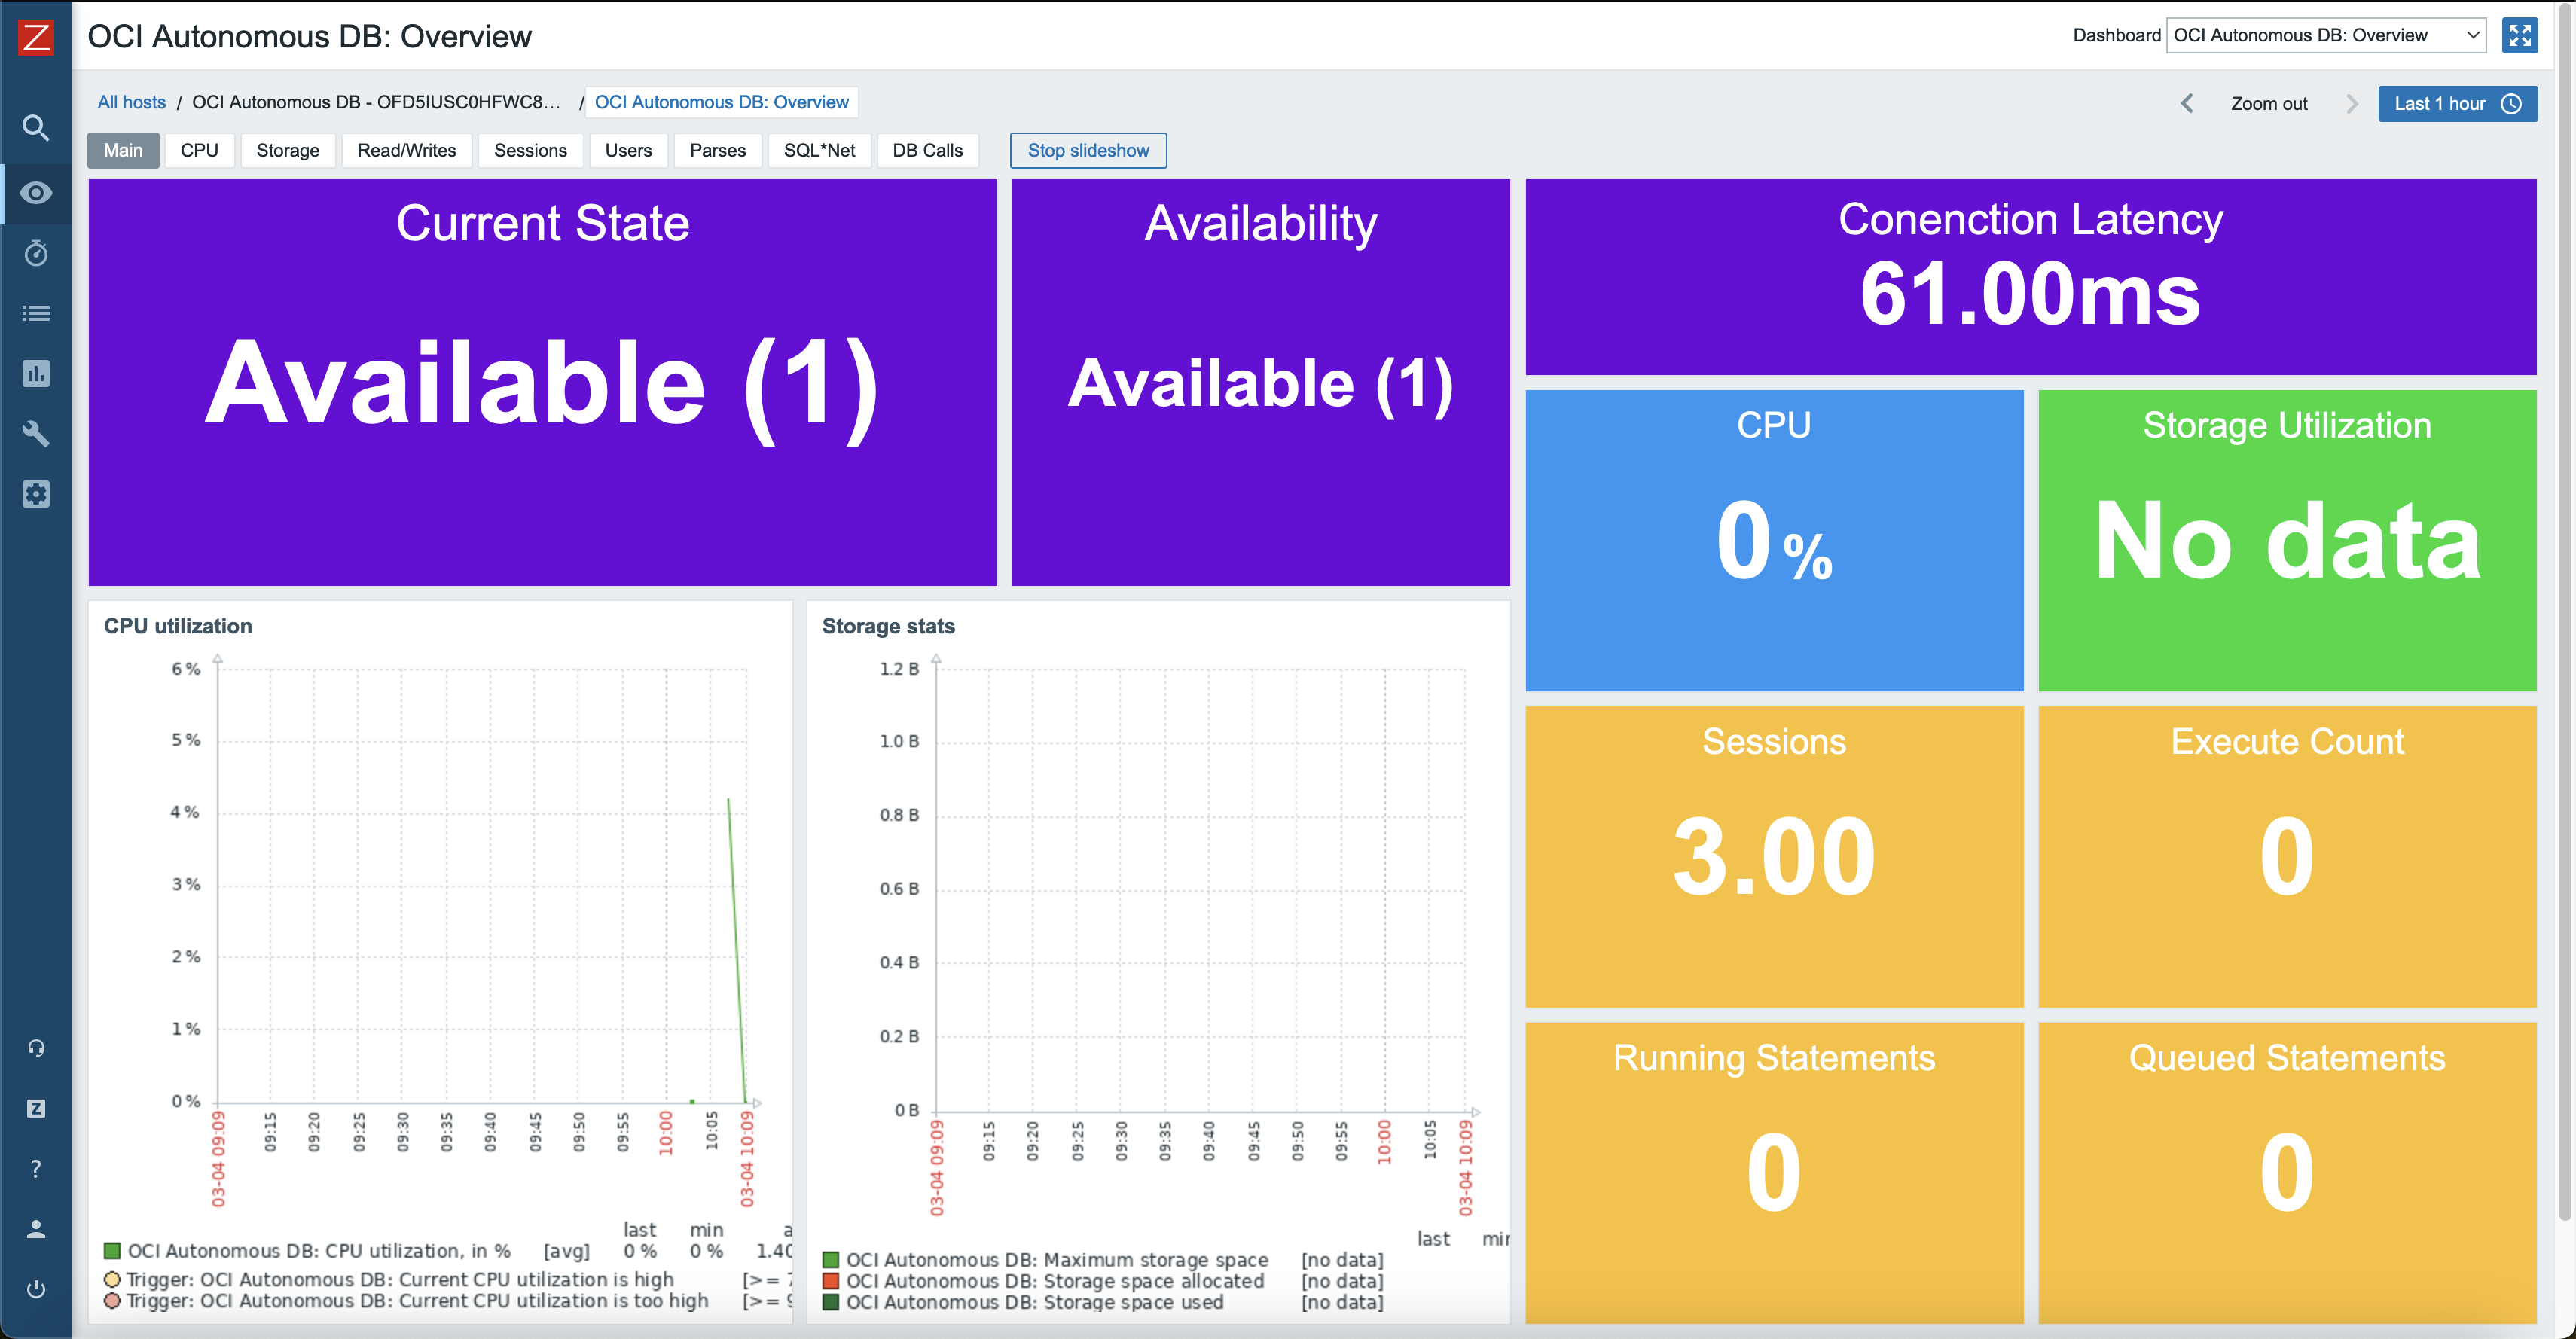
Also, each of these hosts will have their own dashboards created automatically that will give a good overview of resource utilization.
Optional configuration
When creating the OCI host in Zabbix, there were a few macros that required modification of values. As you might have noticed, there were quite a few other macros that we skipped over. In the following sections, usage of these macros will be explained. These are optional macros, so depending on your requirements, you might not even need to change them.
Use macros for low-level discovery filtering
In official Zabbix templates, you might find macros that end with MATCHES and NOT_MATCHES. These are used for Low-level discovery rules (LLDs), to help you filter resources that should or should not be discovered. These values are using regular expressions. Therefore, you can use wildcard symbols for pattern matching.
Usage of these macros can be found in Filters tab, under discovery rules.
Usually default values for MATCHES is .* and for NOT_MATCHES – CHANGE_IF_NEEDED. This means that any kind of value will be discovered if it is not equal to CHANGE_IF_NEEDED. For example, if such macros are filtering compute instance name:
{"instance-name": "compute_instance_1"}will be discovered;{"instance-name": "web-server"}will be discovered;{"instance-name": "CHANGE_IF_NEEDED"}will not be discovered.
In OCI templates, such discovery macros are also used. One example is compute instance discovery where filters are checking the instance state:
- Macro
{$OCI.COMPUTE.DISCOVERY.STATE.MATCHES}has a value of.*; - Macro
{$OCI.COMPUTE.DISCOVERY.STATE.NOT_MATCHES}has a value ofTERMINATED.
This means that any instance that is in terminated state will not be discovered. This is because when you terminate an instance in OCI, it is still kept for a while, but there is no reason to monitor such an instance.
Now that you have an idea how these filters work, you can adjust them based on your requirements.
Low-level discovery resource filtering by free-form tags of OCI resources
To add additional resource discovery filtering options, every discovery script (except VCN discovery), gathers free-form tag data about a specific resource. Since free-form tags are completely custom and format or usage will vary between users, the free-from tag filters are not included under LLD filters by default, but can be easily added as they are already being collected by scripts.
To show an example, let’s assume that you want to categorize OCI compute instances by their usage utilizing free-form tags.
For one of the instances, add a new free-from tag, such as, usage with value web-server.


You need to repeat this for other compute instances and set usage free-from tag values as you want to.
Now, switch over to Zabbix and open Oracle Cloud by HTTP template in Zabbix and go to Discovery rules. Find Compute instances discovery and open it.
Under LLD macros tab, add a new macro that will represent this location group tag, for example, {#USAGE} $.tags.usage.

Under the Filters tab, there will already be filters regarding the compute instance name and state. Click “Add” to add a new filter and define the previously created LLD macro and add a matching pattern and value, for example, {#USAGE} matches web-server.

The next time Compute instances discovery is executed, it will only discover OCI compute instances that have the free-form tag usage that matches the regex of web-server. You can also experiment with the LLD filter pattern matching value to receive different matching results for a specified value.
IMPORTANT! You must have the free-from tag present on every resource in OCI that you are using this method on. In these examples you would need to set
usagefree-form tag on every compute instance, or Zabbix LLD will stop working. If a tag does not exist when Zabbix LLD searches for it, it will throw an error. The free-form tag does not need to have a value, make sure that the tag key is there.
HTTP proxy usage
If needed, you can specify an HTTP proxy for the template to use by changing the value of {$OCI.HTTP.PROXY} user macro. Every request will use this proxy.
Custom OK HTTP response
If using proxy, returned OK HTTP response could change from 200 to some different value. In that case, please change user macro {$OCI.HTTP.RETURN.CODE.OK} to the appropriate value. By default, this is set to 200, therefore, all request items will only accept data when response is 200.
That is about it. Good luck and have fun!
The post Monitoring Oracle Cloud Infrastructure (OCI) with Zabbix appeared first on Zabbix Blog.