Post Syndicated from Nick Cuneo original https://aws.amazon.com/blogs/security/deploy-an-automated-chatops-solution-for-remediating-amazon-macie-findings/
The amount of data being collected, stored, and processed by Amazon Web Services (AWS) customers is growing at an exponential rate. In order to keep pace with this growth, customers are turning to scalable cloud storage services like Amazon Simple Storage Service (Amazon S3) to build data lakes at the petabyte scale. Customers are looking for new, automated, and scalable ways to address their data security and compliance requirements, including the need to identify and protect their sensitive data. Amazon Macie helps customers address this need by offering a managed data security and data privacy service that uses machine learning and pattern matching to discover and protect your sensitive data that is stored in Amazon S3.
In this blog post, I show you how to deploy a solution that establishes an automated event-driven workflow for notification and remediation of sensitive data findings from Macie. Administrators can review and approve remediation of findings through a ChatOps-style integration with Slack. Slack is a business communication tool that provides messaging functionality, including persistent chat rooms known as channels. With this solution, you can streamline the notification, investigation, and remediation of sensitive data findings in your AWS environment.
Prerequisites
Before you deploy the solution, make sure that your environment is set up with the following prerequisites:
- You have access to an AWS account with permissions to create the resources listed in the solution overview through AWS CloudFormation.
- The AWS Command Line Interface (AWS CLI) is installed and configured for use. Make sure that your configured default Region supports Macie by checking service availability.
- The AWS Cloud Development Kit (AWS CDK) is installed and configured for use.
- You have a Slack account with permissions to add apps and integrations in your desired workspace and channel. If you aren’t already a Slack user, it’s free to sign up and create a workspace and channel of your own.
Important: This solution uses various AWS services, and there are costs associated with these resources after the Free Tier usage. See the AWS pricing page for details.
Solution overview
The solution architecture and workflow are detailed in Figure 1.
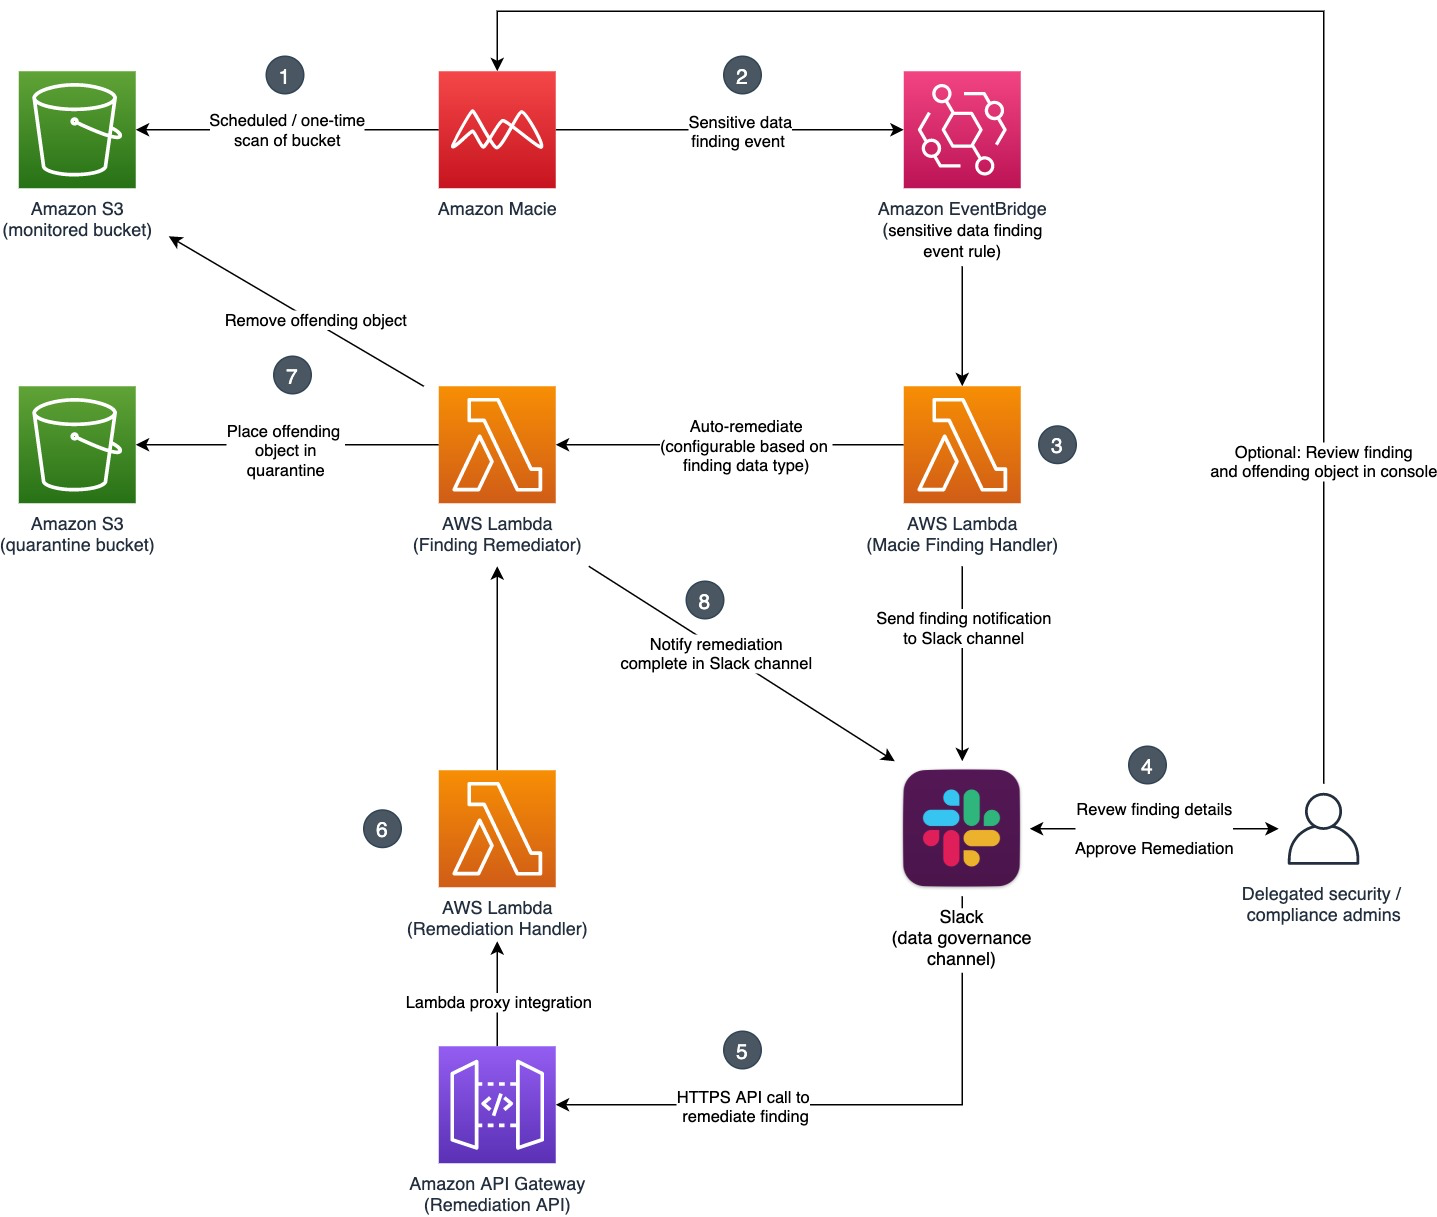
Figure 1: Solution overview
This solution allows for the configuration of auto-remediation behavior based on finding type and finding severity. For each finding type, you can define whether you want the offending S3 object to be automatically quarantined, or whether you want the finding details to be reviewed and approved by a human in Slack prior to being quarantined. In a similar manner, you can define the minimum severity level (Low, Medium, High) that a finding must have before the solution will take action. By adjusting these parameters, you can manage false positives and tune the volume and type of findings about which you want to be notified and take action. This configurability is important because customers have different security, risk, and regulatory requirements.
Figure 1 details the services used in the solution and the integration points between them. Let’s walk through the full sequence from the detection of sensitive data to the remediation (quarantine) of the offending object.
- Macie is configured with sensitive data discovery jobs (scheduled or one-time), which you create and run to detect sensitive data within S3 buckets. When Macie runs a job, it uses a combination of criteria and techniques to analyze objects in S3 buckets that you specify. For a full list of the categories of sensitive data Macie can detect, see the Amazon Macie User Guide.
- For each sensitive data finding, an event is sent to Amazon EventBridge that contains the finding details. An EventBridge rule triggers a Lambda function for processing.
- The Finding Handler Lambda function parses the event and examines the type of the finding. Based on the auto-remediation configuration, the function either invokes the Finding Remediator function for immediate remediation, or sends the finding details for manual review and remediation approval through Slack.
- Delegated security and compliance administrators monitor the configured Slack channel for notifications. Notifications provide high-level finding information, remediation status, and a link to the Macie console for the finding in question. For findings configured for manual review, administrators can choose to approve the remediation in Slack by using an action button on the notification.
- After an administrator chooses the Remediate button, Slack issues an API call to an Amazon API Gateway endpoint, supplying both the unique identifier of the finding to be remediated and that of the Slack user. API Gateway proxies the request to a Remediation Handler Lambda function.
- The Remediation Handler Lambda function validates the request and request signature, extracts the offending object’s location from the finding, and makes an asynchronous call to the Finding Remediator Lambda function.
- The Finding Remediator Lambda function moves the offending object from the source bucket to a designated S3 quarantine bucket with restricted access.
- Finally, the Finding Remediator Lambda function uses a callback URL to update the original finding notification in Slack, indicating that the offending object has now been quarantined.
Deploy the solution
Now we’ll walk through the steps for configuring Slack and deploying the solution into your AWS environment by using the AWS CDK. The AWS CDK is a software development framework that you can use to define cloud infrastructure in code and provision through AWS CloudFormation.
The deployment steps can be summarized as follows:
- Configure a Slack channel and app
- Check the project out from GitHub
- Set the configuration parameters
- Build and deploy the solution
- Configure Slack with an API Gateway endpoint
To configure a Slack channel and app
- In your browser, make sure you’re logged into the Slack workspace where you want to integrate the solution.
- Create a new channel where you will send the notifications, as follows:
- Choose the + icon next to the Channels menu, and select Create a channel.
- Give your channel a name, for example macie-findings, and make sure you turn on the Make private setting.
Important: By providing Slack users with access to this configured channel, you’re providing implicit access to review Macie finding details and approve remediations. To avoid unwanted user access, it’s strongly recommended that you make this channel private and by invite only.
- On your Apps page, create a new app by selecting Create New App, and then enter the following information:
- For App Name, enter a name of your choosing, for example MacieRemediator.
- Select your chosen development Slack workspace that you logged into in step 1.
- Choose Create App.

Figure 2: Create a Slack app
- You will then see the Basic Information page for your app. Scroll down to the App Credentials section, and note down the Signing Secret. This secret will be used by the Lambda function that handles all remediation requests from Slack. The function uses the secret with Hash-based Message Authentication Code (HMAC) authentication to validate that requests to the solution are legitimate and originated from your trusted Slack channel.

Figure 3: Signing secret
- Scroll back to the top of the Basic Information page, and under Add features and functionality, select the Incoming Webhooks tile. Turn on the Activate Incoming Webhooks setting.
- At the bottom of the page, choose Add New Webhook to Workspace.
- Select the macie-findings channel you created in step 2, and choose Allow.
- You should now see webhook URL details under Webhook URLs for Your Workspace. Use the Copy button to note down the URL, which you will need later.

Figure 4: Webhook URL


To check the project out from GitHub
The solution source is available on GitHub in AWS Samples. Clone the project to your local machine or download and extract the available zip file.
To set the configuration parameters
In the root directory of the project you’ve just cloned, there’s a file named cdk.json. This file contains configuration parameters to allow integration with the macie-findings channel you created earlier, and also to allow you to control the auto-remediation behavior of the solution. Open this file and make sure that you review and update the following parameters:
- autoRemediateConfig – This nested attribute allows you to specify for each sensitive data finding type whether you want to automatically remediate and quarantine the offending object, or first send the finding to Slack for human review and authorization. Note that you will still be notified through Slack that auto-remediation has taken place if this attribute is set to AUTO. Valid values are either AUTO or REVIEW. You can use the default values.
- minSeverityLevel – Macie assigns all findings a Severity level. With this parameter, you can define a minimum severity level that must be met before the solution will trigger action. For example, if the parameter is set to MEDIUM, the solution won’t take any action or send any notifications when a finding has a LOW severity, but will take action when a finding is classified as MEDIUM or HIGH. Valid values are: LOW, MEDIUM, and HIGH. The default value is set to LOW.
- slackChannel – The name of the Slack channel you created earlier (macie-findings).
- slackWebHookUrl – For this parameter, enter the webhook URL that you noted down during Slack app setup in the “Configure a Slack channel and app” step.
- slackSigningSecret – For this parameter, enter the signing secret that you noted down during Slack app setup.
Save your changes to the configuration file.
To build and deploy the solution
- From the command line, make sure that your current working directory is the root directory of the project that you cloned earlier. Run the following commands:
- npm install – Installs all Node.js dependencies.
- npm run build – Compiles the CDK TypeScript source.
- cdk bootstrap – Initializes the CDK environment in your AWS account and Region, as shown in Figure 5.

Figure 5: CDK bootstrap output
- cdk deploy – Generates a CloudFormation template and deploys the solution resources.
The resources created can be reviewed in the CloudFormation console and can be summarized as follows:
- Lambda functions – Finding Handler, Remediation Handler, and Remediator
- IAM execution roles and associated policy – The roles and policy associated with each Lambda function and the API Gateway
- S3 bucket – The quarantine S3 bucket
- EventBridge rule – The rule that triggers the Lambda function for Macie sensitive data findings
- API Gateway – A single remediation API with proxy integration to the Lambda handler
- After you run the deploy command, you’ll be prompted to review the IAM resources deployed as part of the solution. Press y to continue.
- Once the deployment is complete, you’ll be presented with an output parameter, shown in Figure 6, which is the endpoint for the API Gateway that was deployed as part of the solution. Copy this URL.

Figure 6: CDK deploy output


To configure Slack with the API Gateway endpoint
- Open Slack and return to the Basic Information page for the Slack app you created earlier.
- Under Add features and functionality, select the Interactive Components tile.
- Turn on the Interactivity setting.
- In the Request URL box, enter the API Gateway endpoint URL you copied earlier.
- Choose Save Changes.

Figure 7: Slack app interactivity

Now that you have the solution components deployed and Slack configured, it’s time to test things out.
Test the solution
The testing steps can be summarized as follows:
- Upload dummy files to S3
- Run the Macie sensitive data discovery job
- Review and act upon Slack notifications
- Confirm that S3 objects are quarantined
To upload dummy files to S3
Two sample text files containing dummy financial and personal data are available in the project you cloned from GitHub. If you haven’t changed the default auto-remediation configurations, these two files will exercise both the auto-remediation and manual remediation review flows.
Find the files under sensitive-data-samples/dummy-financial-data.txt and sensitive-data-samples/dummy-personal-data.txt. Take these two files and upload them to S3 by using either the console, as shown in Figure 8, or AWS CLI. You can choose to use any new or existing bucket, but make sure that the bucket is in the same AWS account and Region that was used to deploy the solution.
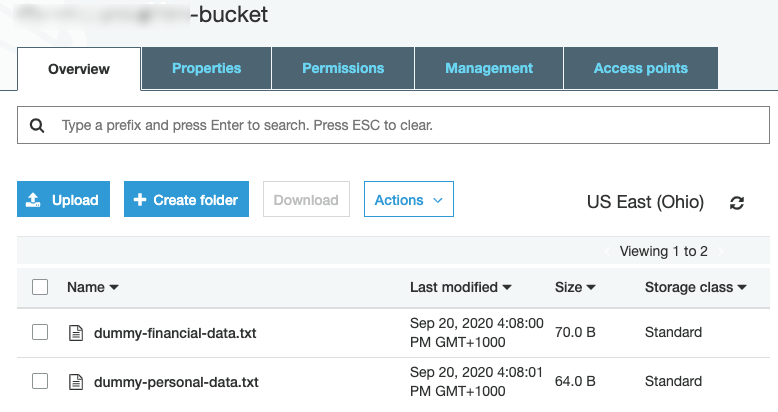
Figure 8: Dummy files uploaded to S3
To run a Macie sensitive data discovery job
- Navigate to the Amazon Macie console, and make sure that your selected Region is the same as the one that was used to deploy the solution.
- If this is your first time using Macie, choose the Get Started button, and then choose Enable Macie.
- On the Macie Summary dashboard, you will see a Create Job button at the top right. Choose this button to launch the Job creation wizard. Configure each step as follows:
- Select S3 buckets: Select the bucket where you uploaded the dummy sensitive data file. Choose Next.
- Review S3 buckets: No changes are required, choose Next.
- Scope: For Job type, choose One-time job. Make sure Sampling depth is set to 100%. Choose Next.
- Custom data identifiers: No changes are required, choose Next.
- Name and description: For Job name, enter any name you like, such as Dummy job, and then choose Next.
- Review and create: Review your settings; they should look like the following sample. Choose Submit.
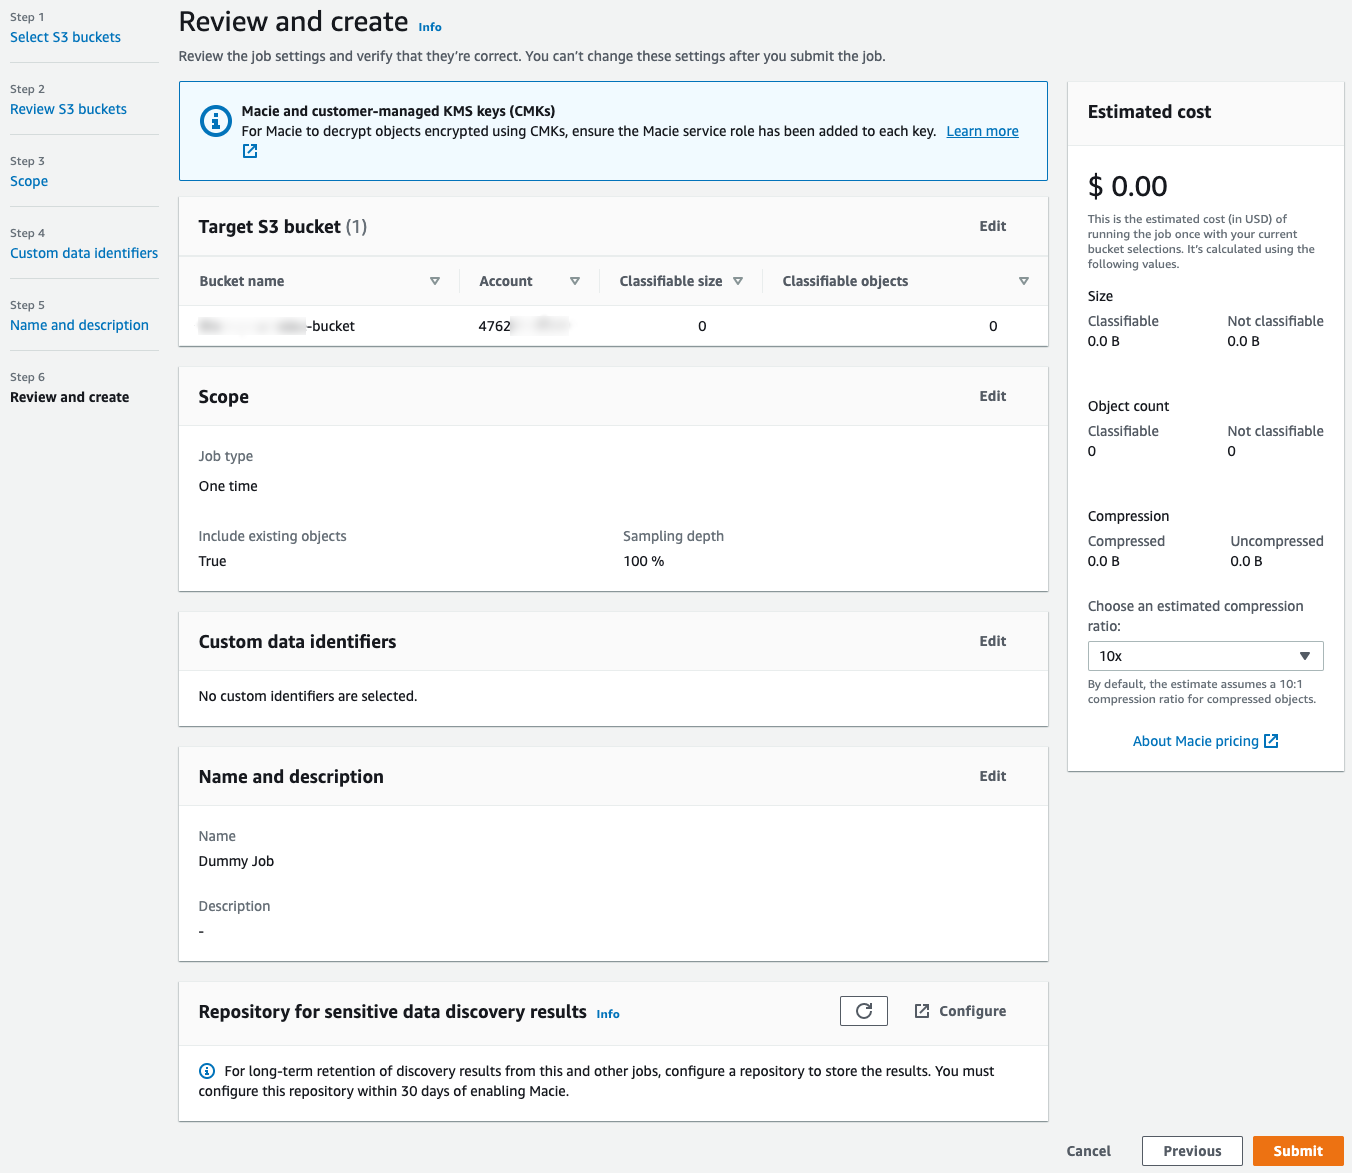
Figure 9: Configure the Macie sensitive data discovery job
Macie will launch the sensitive data discovery job. You can track its status from the Jobs page within the Macie console.
To review and take action on Slack notifications
Within five minutes of submitting the data discovery job, you should expect to see two notifications appear in your configured Slack channel. One notification, similar to the one in Figure 10, is informational only and is related to an auto-remediation action that has taken place.
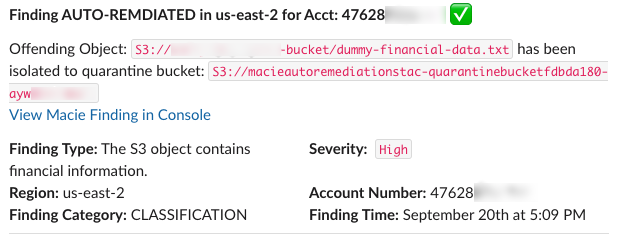
Figure 10: Slack notification of auto-remediation for the file containing dummy financial data
The other notification, similar to the one in Figure 11, requires end user action and is for a finding that requires administrator review. All notifications will display key information such as the offending S3 object, a description of the finding, the finding severity, and other relevant metadata.
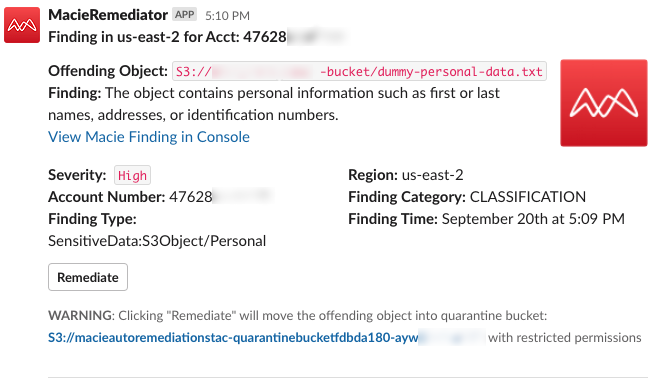
Figure 11: Slack notification for human review of the file containing dummy personal data
(Optional) You can review the finding details by choosing the View Macie Finding in Console link in the notification.
In the Slack notification, choose the Remediate button to quarantine the object. The notification will be updated with confirmation of the quarantine action, as shown in Figure 12.
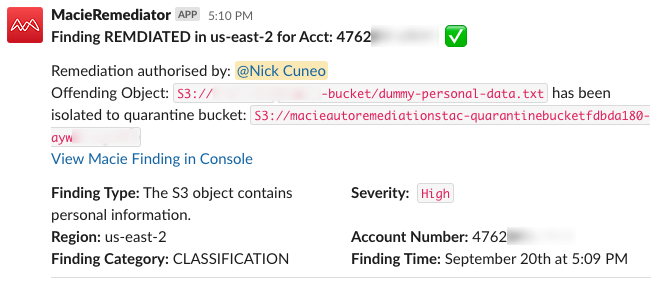
Figure 12: Slack notification of authorized remediation
To confirm that S3 objects are quarantined
Finally, navigate to the S3 console and validate that the objects have been removed from their original bucket and placed into the quarantine bucket listed in the notification details, as shown in Figure 13. Note that you may need to refresh your S3 object listing in the browser.
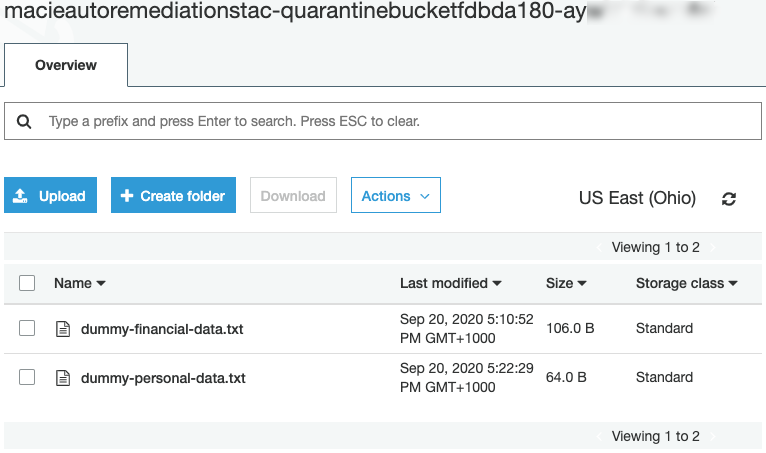
Figure 13: Slack notification of authorized remediation
Congratulations! You now have a fully operational solution to detect and respond to Macie sensitive data findings through a Slack ChatOps workflow.
Solution cleanup
To remove the solution and avoid incurring additional charges from the AWS resources that you deployed, complete the following steps.
To remove the solution and associated resources
- Navigate to the Macie console. Under Settings, choose Suspend Macie.
- Navigate to the S3 console and delete all objects in the quarantine bucket.
- Run the command cdk destroy from the command line within the root directory of the project. You will be prompted to confirm that you want to remove the solution. Press y.
Summary
In this blog post, I showed you how to integrate Amazon Macie sensitive data findings with an auto-remediation and Slack ChatOps workflow. We reviewed the AWS services used, how they are integrated, and the steps to configure, deploy, and test the solution. With Macie and the solution in this blog post, you can substantially reduce the heavy lifting associated with detecting and responding to sensitive data in your AWS environment.
I encourage you to take this solution and customize it to your needs. Further enhancements could include supporting policy findings, adding additional remediation actions, or integrating with additional findings from AWS Security Hub.
If you have feedback about this post, submit comments in the Comments section below. If you have questions about this post, start a new thread on the Amazon Macie forum or contact AWS Support.
Want more AWS Security how-to content, news, and feature announcements? Follow us on Twitter.