Tag Archives: EventBridge

Let’s Architect! Designing serverless solutions

Post Syndicated from Luca Mezzalira original https://aws.amazon.com/blogs/architecture/lets-architect-designing-serverless-solutions/

During his re:Invent 2022 keynote, Werner Vogels, AWS Vice President and Chief Technology Officer, emphasized the asynchronous nature of our world and the challenges associated with incorporating asynchronicity into our architectures. AWS serverless services can help users concentrate on the asynchronous aspects of their workloads, easing the execution of event-driven architectures and enabling the adoption of effective integration patterns for communication both within and beyond a bounded context.

In this edition of Let’s Architect!, we offer an in-depth exploration of the architecture of serverless AWS services, such as AWS Lambda. We also present a new workshop centered on design patterns employing serverless AWS services, which ultimately delivers valuable insights on implementing event-driven architectures within systems.

A closer look at AWS Lambda

This video is the perfect companion for those seeking to learn and master a Lambda architecture, empowering you to effectively leverage its capabilities in your workloads.

With the knowledge gained from this video, you will be well-equipped to design your functions’ code in a highly optimized manner, ensuring efficient performance and resource utilization. Furthermore, a comprehensive understanding of Lambda functions can help identify and apply the most suitable approach to cloud workloads, resulting in an agile and robust cloud infrastructure that meets a project’s unique requirements.

Take me to this video!

Discover how AWS Lambda functions work under the hood

Discover how AWS Lambda functions work under the hood

Implementing an event-driven serverless story generation application with ChatGPT and DALL-E

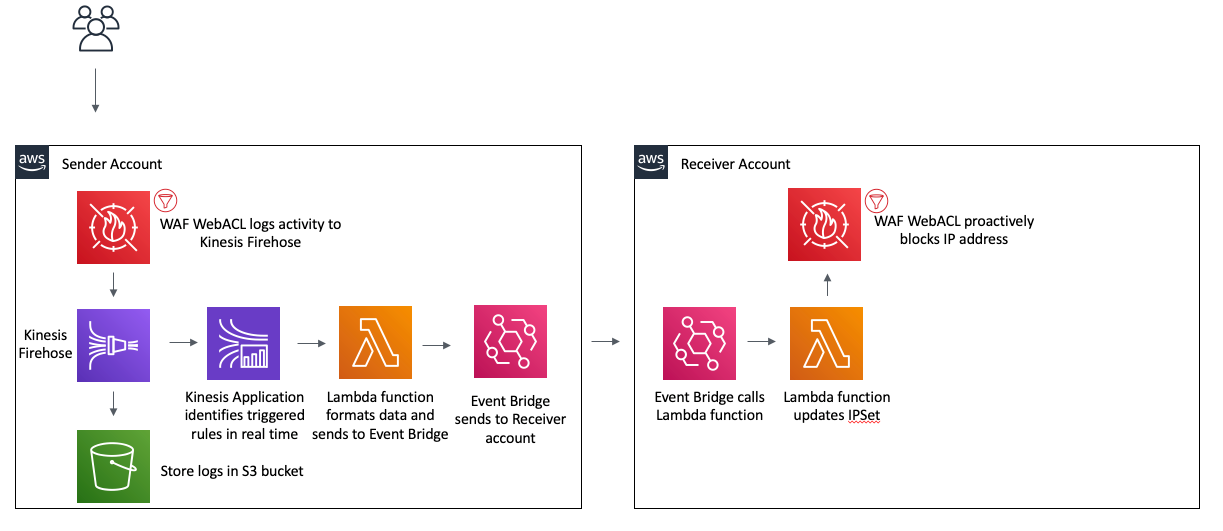
This example of an event-driven serverless architecture showcases the power of leveraging AWS services and AI technologies to develop innovative solutions. Built upon a foundation of serverless services, including Amazon EventBridge, Amazon DynamoDB, Lambda, Amazon Simple Storage Service, and managed artificial intelligence (AI ) services like Amazon Polly, this architecture demonstrates the seamless capacity to create daily stories with a scheduled launch. By utilizing EventBridge scheduler, an Lambda function is initiated every night to generate new content. The integration of AI services, like ChatGPT and DALL-E, further elevates the solution, as their compatibility with the serverless model enables efficient and dynamic content creation. This case serves as a testament to the potential of combining event-driven serverless architectures, with cutting-edge AI technologies for inventive and impactful applications.

Take me to this Compute Blog post!

How to build an event-driven architecture with serverless AWS services integrating ChatGPT and DALL-E

How to build an event-driven architecture with serverless AWS services integrating ChatGPT and DALL-E

AWS Workshop Studio: Serverless Patterns

The AWS Serverless Patterns workshop offers a comprehensive learning experience to enhance your understanding of architectural patterns applicable to serverless projects. Throughout the workshop, participants will delve into various patterns, such as synchronous and asynchronous implementations, tailored to meet the demands of modern serverless applications. This hands-on approach ensures a production-ready understanding, encompassing crucial topics like testing serverless workloads, establishing automation pipelines, and more. Take this workshop to elevate your serverless architecture knowledge!

Take me to the serverless workshop!

The high-level architecture of the workshops modules

The high-level architecture of the workshops modules

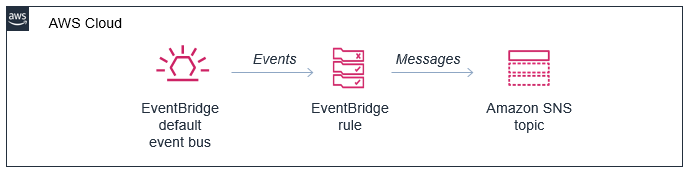
Building Serverlesspresso: Creating event-driven architectures

Serverlesspresso is an event-driven, serverless workload that uses EventBridge and AWS Step Functions to coordinate events across microservices and support thousands of orders per day. This comprehensive session delves into design considerations, development processes, and valuable lessons learned from creating a production-ready solution. Discover practical patterns and extensibility options that contribute to a robust, scalable, and cost-effective application. Gain insights into combining EventBridge and Step Functions to address complex architectural challenges in larger applications.

Take me to this video!

How to leverage AWS Step Functions for orchestrating your workflows

How to leverage AWS Step Functions for orchestrating your workflows

See you next time!

Thanks for joining our conversation on serverless solutions! We’ll see you next time when we talk about AWS microservices.

Can’t get enough of the Let’s Architect! series? Visit the Let’s Architect! page of the AWS Architecture Blog!

Export historical Security Hub findings to an S3 bucket to enable complex analytics

Post Syndicated from Jonathan Nguyen original https://aws.amazon.com/blogs/security/export-historical-security-hub-findings-to-an-s3-bucket-to-enable-complex-analytics/

AWS Security Hub is a cloud security posture management service that you can use to perform security best practice checks, aggregate alerts, and automate remediation. Security Hub has out-of-the-box integrations with many AWS services and over 60 partner products. Security Hub centralizes findings across your AWS accounts and supported AWS Regions into a single delegated administrator account in your aggregation Region of choice, creating a single pane of glass to consolidate and view individual security findings.

Because there are a large number of possible integrations across accounts and Regions, your delegated administrator account in the aggregation Region might have hundreds of thousands of Security Hub findings. To perform complex analytics or machine learning across the existing (historical) findings that are maintained in Security Hub, you can export findings to an Amazon Simple Storage Service (Amazon S3) bucket. To export new findings that have recently been created, you can implement the solution in the aws-security-hub-findings-export GitHub repository. However, Security Hub has data export API rate quotas, which can make exporting a large number of findings challenging.

In this blog post, we provide an example solution to export your historical Security Hub findings to an S3 bucket in your account, even if you have a large number of findings. We walk you through the components of the solution and show you how to use the solution after deployment.

Prerequisites

To deploy the solution, complete the following prerequisites:

  1. Enable Security Hub.
  2. If you want to export Security Hub findings for multiple accounts, designate a Security Hub administrator account.
  3. If you want to export Security Hub findings across multiple Regions, enable cross-Region aggregation.

Solution overview and architecture

In this solution, you use the following AWS services and features:

  • Security Hub export orchestration
    • AWS Step Functions helps you orchestrate automation and long-running jobs, which are integral to this solution. You need the ability to run a workflow for hours due to the Security Hub API rate limits and number of findings and objects.
    • AWS Lambda functions handle the logic for exporting and storing findings in an efficient and cost-effective manner. You can customize Lambda functions to most use cases.
  • Storage of exported findings
  • Job status tracking
    • Amazon EventBridge tracks changes in the status of the Step Functions workflow. The solution can run for over 100 hours; by using EventBridge, you don’t have to manually check the status.
    • Amazon Simple Notification Service (Amazon SNS) sends you notifications when the long-running jobs are complete or when they might have issues.
    • AWS Systems Manager Parameter Store provides a quick way to track overall status by maintaining a numeric count of successfully exported findings that you can compare with the number of findings shown in the Security Hub dashboard.

Figure 1 shows the architecture for the solution, deployed in the Security Hub delegated administrator account in the aggregation Region. The figure shows multiple Security Hub member accounts to illustrate how you can export findings for an entire AWS Organizations organization from a single delegated administrator account.

Figure 1: High-level overview of process and resources deployed in the Security Hub account

Figure 1: High-level overview of process and resources deployed in the Security Hub account

As shown in Figure 1, the workflow after deployment is as follows:

  1. The Step Functions workflow for the Security Hub export is invoked.
  2. The Step Functions workflow invokes a single Lambda function that does the following:
    1. Retrieves Security Hub findings that have an Active status and puts them in a temporary file.
    2. Pushes the file as an object to Amazon S3.
    3. Adds the global count of exported findings from the Step Functions workflow to a Systems Manager parameter for validation and tracking purposes.
    4. Repeats steps b–c for about 10 minutes to get the most findings while preventing the Lambda function from timing out.
    5. If a nextToken is present, pushes the nextToken to the output of the Step Functions.

      Note: If the number of items in the output is smaller than the number of items returned by the API call, then the return output includes a nextToken, which can be passed to a subsequent command to retrieve the next set of items.

  3. The Step Functions workflow goes through a Choice state as follows:
    • If a Security Hub nextToken is present, Step Functions invokes the Lambda function again.
    • If a Security Hub nextToken isn’t present, Step Functions ends the workflow successfully.
  4. An EventBridge rule tracks changes in the status of the Step Functions workflow and sends events to an SNS topic. Subscribers to the SNS topic receive a notification when the status of the Step Functions workflow changes.

Deploy the solution

You can deploy the solution through either the AWS Management Console or the AWS Cloud Development Kit (AWS CDK).

To deploy the solution (console)

  • In your delegated administrator Security Hub account, launch the AWS CloudFormation template by choosing the following Launch Stack button. It will take about 10 minutes for the CloudFormation stack to complete.

    Launch Stack

    Note: The stack will launch in the US East (N. Virginia) Region (us-east-1). If you are using cross-Region aggregation, deploy the solution into the Region where Security Hub findings are consolidated. You can download the CloudFormation template for the solution, modify it, and deploy it to your selected Region.

To deploy the solution (AWS CDK)

  1. Download the code from our aws-security-hub-findings-historical-export GitHub repository, where you can also contribute to the sample code. The CDK initializes your environment and uploads the Lambda assets to Amazon S3. Then, you deploy the solution to your account.
  2. While you are authenticated in the security tooling account, run the following commands in your terminal. Make sure to replace <AWS_ACCOUNT> with the account number, and replace <REGION> with the AWS Region where you want to deploy the solution.
    cdk bootstrap aws://<AWS_ACCOUNT>/<REGION>
    cdk deploy SechubHistoricalPullStack

Solution walkthrough and validation

Now that you’ve successfully deployed the solution, you can see each aspect of the automation workflow in action.

Before you start the workflow, you need to subscribe to the SNS topic so that you’re notified of status changes within the Step Functions workflow. For this example, you will use email notification.

To subscribe to the SNS topic

  1. Open the Amazon SNS console.
  2. Go to Topics and choose the Security_Hub_Export_Status topic.
  3. Choose Create subscription.
  4. For Protocol, choose Email.
  5. For Endpoint, enter the email address where you want to receive notifications.
  6. Choose Create subscription.
  7. After you create the subscription, go to your email and confirm the subscription.

You’re now subscribed to the SNS topic, so any time that the Step Functions status changes, you will receive a notification. Let’s walk through how to run the export solution.

To run the export solution

  1. Open the Amazon Step Functions console.
  2. In the left navigation pane, choose State machines.
  3. Choose the new state machine named sec_hub_finding_export.
  4. Choose Start execution.
  5. On the Start execution page, for Name – optional and Input – optional, leave the default values and then choose Start execution.
    Figure 2: Example input values for execution of the Step Functions workflow

    Figure 2: Example input values for execution of the Step Functions workflow

  6. This will start the Step Functions workflow and redirect you to the Graph view. If successful, you will see that the overall Execution status and each step have a status of Successful.
  7. For long-running jobs, you can view the CloudWatch log group associated with the Lambda function to view the logs.
  8. To track the number of Security Hub findings that have been exported, open the Systems Manager console, choose Parameter Store, and then select the /sechubexport/findingcount parameter. Under Value, you will see the total number of Security Hub findings that have been exported, as shown in Figure 3.
    Figure 3: Systems Manager Parameter Store value for the number of Security Hub findings exported

    Figure 3: Systems Manager Parameter Store value for the number of Security Hub findings exported

Depending on the number of Security Hub findings, this process can take some time. This is primarily due to the GetFindings quota of 3 requests per second. Each GetFindings request can return a maximum of 100 findings, so this means that you can get up to 300 findings per second. On average, the solution can export about 1 million findings per hour. If you have a large number of findings, you can start the finding export process and wait for the SNS topic to notify you when the process is complete.

How to customize the solution

The solution provides a general framework to help you export your historical Security Hub findings. There are many ways that you can customize this solution based on your needs. The following are some enhancements that you can consider.

Change the Security Hub finding filter

The solution currently pulls all findings with RecordState: ACTIVE, which pulls the active Security Hub findings in the AWS account. You can update the Lambda function code, specifically the finding_filter JSON value within the create_filter function, to pull findings for your use case. For example, to get all active Security Hub findings from the AWS Foundational Security Best Practices standard, update the Lambda function code as follows.

{
                 WorkflowState: [
                     {
                         "Value": "NEW ",
                         "Comparison": "EQUALS"
                     },
                 ],
                 "RecordState": [
                     {
                         "Value": "ACTIVE",
                         "Comparison": "EQUALS"
                     },
                 ]
            }

Export more than 100 million Security Hub findings

The example solution can export about 100 million Security Hub findings. This number is primarily determined by the speed at which findings can be exported, due to the following factors:

If you want to export more than 100 million Security Hub findings, do one of the following:

Note: If you implement either of these solutions, make sure that the nextToken also gets passed to the new Step Functions execution by updating the Lambda function code to parse and pass the nextToken received in the last request.

Speed up the export

One way to increase the export bandwidth, and reduce the overall execution time, is to run the export job in parallel across the individual Security Hub member accounts rather than from the single delegated administrator account.

You could use CloudFormation StackSets to deploy this solution in each Security Hub member account and send the findings to a centralized S3 bucket. You would need to modify the solution to allow an S3 bucket to be provided as an input, and all the Lambda function Identity and Access Management (IAM) roles would need cross-account access to the S3 bucket and corresponding AWS Key Management Service (AWS KMS) key. You would also need to make updates in each member account to iterate through the various Regions in which the Security Hub findings exist.

Next steps

The solution in this post is designed to assist in the retrieval and export of all existing findings currently in Security Hub. After you successfully run this solution to export historical findings, you can continuously export new Security Hub findings by using the sample solution in the aws-security-hub-findings-export GitHub repository.

Now that you’ve exported the Security Hub findings, you can set up and run custom complex reporting or queries against the S3 bucket by using Amazon Athena and AWS Glue. Additionally, you can run machine learning and analytics capabilities by using services like Amazon SageMaker or Amazon Lookout for Metrics.

Conclusion

In this post, you deployed a solution to export the existing Security Hub findings in your account to a central S3 bucket, so that you can apply complex analytics and machine learning to those findings. We walked you through how to use the solution and apply it to some example use cases after you successfully exported existing findings across your AWS environment. Now your security team can use the data in the S3 bucket for predictive analytics and determine if there are Security Hub findings and specific resources that might need to be prioritized for review due to a deviation from normal behavior. Additionally, you can use this solution to enable more complex analytics on multiple fields by querying large and complex datasets with AWS Athena.

If you have feedback about this post, submit comments in the Comments section below. If you have questions about this post, start a thread on AWS Security Hub re:Post.

 
Want more AWS Security news? Follow us on Twitter.

Jonathan Nguyen

Jonathan Nguyen

Jonathan is a Shared Delivery Team Senior Security Consultant at AWS. His background is in AWS Security with a focus on threat detection and incident response. Today, he helps enterprise customers develop a comprehensive security strategy and deploy security solutions at scale, and he trains customers on AWS Security best practices.

Use Security Hub custom actions to remediate S3 resources based on Macie discovery results

Post Syndicated from Jonathan Nguyen original https://aws.amazon.com/blogs/security/use-security-hub-custom-actions-to-remediate-s3-resources-based-on-macie-discovery-results/

The amount of data available to be collected, stored and processed within an organization’s AWS environment can grow rapidly and exponentially. This increases the operational complexity and the need to identify and protect sensitive data. If your security teams need to review and remediate security risks manually, it would either take a large team or the actions might not be timely. There is also a chance that with manual operation, a step could be missed or the incorrect action could be taken. As a result, your security teams will need an automated and scalable way to support these operations efficiently.

Amazon Macie is a fully managed data security and data privacy service that uses machine learning and pattern matching to discover and protect your sensitive data in AWS. Macie generates findings for sensitive data in an S3 object or a potential issue with the security or privacy of an S3 bucket. AWS Security Hub allows you to gain a centralized view into the security posture across your AWS environment by aggregating security findings from various AWS services and partner products, including Amazon Macie. Security Hub also includes the custom actions feature, which you can use to create actions for response and remediation to selected findings within the Security Hub console in an efficient and consistent manner.

It is important for your security teams to create effective and standardized mechanisms for taking action against Macie findings to ensure that data remains secure. By using Security Hub custom actions, you can have predefined actions for the security team to take against Macie findings without having to manually find and remediate the resources.

This blog post provides you with an example solution for responding to Macie sensitive data findings and policy findings in Security Hub by using custom actions. I will walk through the components of the solution, as well as opportunities where resources can be customized for your specific use case.

Prerequisites

You must have AWS Security Hub and Amazon Macie enabled in the AWS account where you are deploying this solution.

Solution overview

In this solution, you’ll use a combination of Security Hub custom actions, Amazon EventBridge, and AWS Lambda to take action on Macie findings in Security Hub. You will be working with the findings within the same AWS account where you deployed the solution.

Macie generates two categories of findings relating to different resources, which will require different remediation actions.

  1. Policy finding is a detailed report of a potential policy violation or issue with the security or privacy of an Amazon Simple Storage Service (Amazon S3) bucket.
  2. Sensitive data finding is a detailed report of sensitive data in an S3 object.

A full list of Macie finding types can be found in the Macie User guide.

For the two Macie finding categories, there is an associated Security Hub custom action:

  1. Custom action for sensitive data finding (S3 object) – When the security team selects this custom action, the action invokes a Lambda function that will take the following steps on the S3 object in the Macie finding:
    1. Tag the object with the Security Hub finding ID
    2. Encrypt the S3 object with a different customer-managed KMS key
    3. Update the Security Hub finding workflow status to RESOLVED
  2. Custom action for policy finding (S3 bucket). When you select this this custom action, it invokes a Lambda function that will take the following steps on the S3 bucket in the Macie finding:
    1. Tag the object with the Security Hub finding ID
    2. Update the S3 bucket configuration to:
      • Enable default encryption
      • Enable public access block
    3. Update the Security Hub finding workflow status to RESOLVED

The solution is configured to take action within the AWS account where the finding and corresponding resource is generated. In order to enable cross-account remediation, you will need to deploy an additional IAM role for the automation to assume and provision a KMS key to use for encryption.

Note: The custom actions in this solution are meant to be examples of actions to take against Macie policy and sensitive data findings. These actions will be different depending on your use-case and environment. You will also need to review and update the associated Lambda function execution role IAM policies accordingly.

Solution architecture

Figure 1: Resources deployed in the Security AWS account taking action on resources identified in the Workload AWS account

Figure 1: Resources deployed in the Security AWS account taking action on resources identified in the Workload AWS account

Figure 1 shows the architecture for the solution. The workflow is as follows:

  1. A Macie job runs and creates findings, which are sent to Security Hub in the same AWS account as the Macie finding.
  2. The delegated administrator Security Hub account combines findings across all member Security Hub accounts, including Macie findings.
  3. The security team reviews the Macie findings in the Security Hub delegated administrator account and determines to take remediation actions for a finding by selecting the finding and then selecting the appropriate Security Hub custom action.
  4. The Security Hub custom action sends the finding to the EventBridge rule, which is linked to the Lambda function.
  5. The EventBridge rule invokes the Lambda function to take action against the resources from the Macie finding.
  6. The Lambda function will:
    1. Take action for the S3 resource
    2. Mark the Macie finding as resolved in the delegated administrator Security Hub account

The solution is currently intended to work in a single Region. In order to enable this solution across Regions, you will need to change the Remediation Lambda function code for any regional resources used for remediation actions (i.e. AWS Key Management Service).

Deploy the solution

You can deploy the solution through either the AWS Management Console or the AWS Cloud Development Kit (AWS CDK).

To deploy the solution by using the AWS Management Console

  • In your security tooling account, launch the AWS CloudFormation template by choosing the following Launch Stack button. It will take approximately 10 minutes for the CloudFormation stack to complete.
    Select this image to open a link that starts building the CloudFormation stack

    Note: The stack will launch in the N. Virginia (us-east-1) Region. To deploy this solution into other AWS Regions, download the solution’s CloudFormation template, modify it, and deploy it to the selected Region.

  • (OPTIONAL) If you want to enable cross-account remediation, launch the following AWS CloudFormation template in the AWS account where you want to be able to take remediation actions. You can also use AWS CloudFormation StackSets if deploying to multiple AWS accounts.
    Select this image to open a link that starts building the CloudFormation stack

To deploy the solution by using AWS CDK

You can find the latest code in our GitHub repository, where you can also contribute to the sample code. The following commands show how to deploy the solution by using the AWS CDK. First, the CDK initializes your environment and uploads the AWS Lambda assets to Amazon S3. Then, you can deploy the solution to your account. Make sure to replace <AWS_ACCOUNT> with the account number, and replace <REGION> with the AWS Region that you want the solution deployed to.

  1. Run the following commands in your terminal while authenticated in the security tooling AWS account:

    cdk bootstrap aws://<Security_Tooling_AWS_ACCOUNT>/<REGION>

    cdk deploy MacieRemediationStack

  2. (OPTIONAL) If you want to enable cross-account remediation, Run the following commands in your terminal while authenticated to member AWS account:

    cdk bootstrap aws://<Member_AWS_ACCOUNT>/<REGION>

    cdk deploy MacieRemediationIAMStack –parameters solutionaccount=<Security_Tooling_AWS_ACCOUNT>

Solution walkthrough and validation

Now that you’ve successfully deployed the solution, you can see things in action. You have two options for testing the workflow on your own:

  1. Use a sample event, generated by a Macie finding in Security Hub, and invoke the Lambda function that is tied to the Security Hub custom action.

    Note: If using sample events, you can replace the values for the resources with real resources. Otherwise, you will not be able to see the Lambda function successfully take action because the resource in your sample event may not exist.

  2. Generate demo Macie findings in Security Hub by using this sample data for Amazon Macie.

I have existing findings for Macie generated in my AWS account, and in the procedures in this section, I’ll walk through taking action against these.

Note: If you set up Macie and Security Hub in a delegated administrator and member model that ingests findings from other AWS accounts, the IAM remediation roles for the S3 bucket and S3 objects must be deployed in the member accounts.

Review deployed resources in the AWS console

Before taking action on your sample findings, review the deployed resources that you’ll use.

To review deployed resources

  1. In the AWS account console where the automation was deployed, go to Security Hub, choose Settings, and then choose Custom actions. You should see two custom actions:
    • Macie Policy Finding
      • arn:aws:securityhub:<region>:<account-id>:action/custom/MacieS3BucketPolicy
    • Macie Data Finding
      • arn:aws:securityhub:<region>:<account-id>:action/custom/MacieSensitiveData
        Figure 2: Custom actions in Security Hub

        Figure 2: Custom actions in Security Hub

  2. Navigate to the EventBridge console and then choose Rules. You should see four rules:
    • Disabled – These are disabled by default during deployment
      • Autoremediate_Macie_Policy_Finding
      • Autoremediate_Macie_Sensitive_Data_Finding
        Figure 3: Disabled EventBridge rules for autoremediation of Macie findings in Security Hub

        Figure 3: Disabled EventBridge rules for autoremediation of Macie findings in Security Hub

    • Enabled – These are enabled by default during deployment:
      • Custom_Action_Macie_Policy_Finding
      • Custom_Action_Macie_Sensitive_Data_Finding
        Figure 4: Enabled EventBridge rules tied to the Security Hub custom actions

        Figure 4: Enabled EventBridge rules tied to the Security Hub custom actions

    In the enabled EventBridge rules, you should see the corresponding Security Hub custom action Amazon Resource Names (ARNs) in the rule event pattern.

    Figure 5: Enabled EventBridge rule event pattern for the Security Hub custom action

    Figure 5: Enabled EventBridge rule event pattern for the Security Hub custom action

Take action on an Amazon Macie object or policy finding

Each Security Hub custom action invokes a corresponding Lambda function that is configured as a target in the EventBridge rule. The Lambda function parses the information in the Macie finding from Security Hub to take action.

Each Security Hub custom action is specific to either an S3 object or an S3 bucket. If you attempt a custom action meant for an S3 object against a Macie policy finding, this will successfully initiate the custom action, but the Lambda function that is invoked will be unsuccessful.

If the Macie finding is specific to an S3 object, the title will display “The S3 object …,” whereas if the Macie finding is for a policy finding, the title will display information for an S3 bucket.

To take action on findings

  1. In the AWS account console where the automation was deployed, navigate to AWS Security Hub, and then choose Findings.
  2. Filter the findings by setting Product Name to Macie.
    Figure 6: Filter for Macie findings in Security Hub

    Figure 6: Filter for Macie findings in Security Hub

  3. Select the checkbox for either a Macie policy finding or a sensitive data finding; this will select a custom action. After you select the action, there is no confirmation step, and the action will invoke the Lambda function.
    Figure 7: Validate Custom Action has sent the finding to Amazon CloudWatch Events (EventBridge rule)

    Figure 7: Validate Custom Action has sent the finding to Amazon CloudWatch Events (EventBridge rule)

Review and validate the Security Hub custom action on target resources

In order to validate or troubleshoot the solution, you need to review whether the Lambda function was able to take action against the resources in the Security Hub finding for Macie.

To validate or troubleshoot the custom action

  1. For validation of sensitive data finding remediation, review S3 object configuration:
    1. Navigate to the Amazon S3 console.
    2. Choose the S3 object in the Macie finding.
    3. Choose the Properties tab and review the following fields:
      • Tags should be set to SH_Finding_ID.
      • AWS KMS key ARN should be set to the KMS key with the alias `macie_key`
        1. Click on the KMS key ARN and validate the key’s alias is the key deployed in the solution
  2. For validation of policy finding remediation, review the S3 bucket configuration:
    1. Navigate to the Amazon S3 console.
    2. Choose the S3 bucket in the Macie finding.
    3. Choose the Properties tab and review the following fields:
      • Tags should be set to SH_Finding_ID.
      • Default Encryption should be set to Enabled.
    4. Choose the Permissions tab and review the following fields:
      • Block public access should be set to On.
  3. For troubleshooting, you can review the CloudWatch logs for the Lambda function:
    1. Navigate to the CloudWatch console.
    2. Choose /aws/lambda/Remediate_Macie_S3_Bucket.
    3. Choose the most recent log stream and review the logs to see what actions were taken on the resources.

Next steps and customization

The solution in this post has a custom action for an S3 object and an S3 bucket, and is meant to serve as a template. You could modify the Lambda functions associated with the custom actions to take different or additional actions that are specific to your environment and data classification.

Additionally, I walked through specific Security Hub custom actions for Macie policy (bucket) or sensitive data (objects) findings. If you have defined actions to take for both, you could consolidate the custom actions and invoke a Lambda function that parses information from the Security Hub Macie finding to determine if it is a policy or sensitive data finding.

The two disabled EventBridge rules deployed as part of the solution are examples that can be leveraged for auto-remediation. After you use Security Hub’s custom actions to remediate findings, your security team could start to see a trend where you always want to take specific actions and enable the EventBridge rules to take action without requiring your security team to select a custom action in Security Hub in the AWS console.

  • Autoremediate_Macie_Policy_Finding
  • Autoremediate_Macie_Sensitive_Data_Finding

Conclusion

In this post, you deployed a solution to allow your security team to take automated actions against a Macie sensitive data and policy finding from Security Hub by using custom actions in the AWS console. We walked through what the solution does and how the solution can be customized to your use case.

If you have feedback about this post, submit comments in the Comments section below. If you have any questions about this post, start a thread on the AWS Security Hub forum or Amazon Macie forum.

Want more AWS Security news? Follow us on Twitter.

Jonathan Nguyen

Jonathan Nguyen

Jonathan is a Shared Delivery Team Senior Security Consultant at AWS. His background is in AWS Security with a focus on threat detection and incident response. Today, he helps enterprise customers develop a comprehensive security strategy and deploy security solutions at scale, and he trains customers on AWS Security best practices.

Deploy an automated ChatOps solution for remediating Amazon Macie findings

Post Syndicated from Nick Cuneo original https://aws.amazon.com/blogs/security/deploy-an-automated-chatops-solution-for-remediating-amazon-macie-findings/

The amount of data being collected, stored, and processed by Amazon Web Services (AWS) customers is growing at an exponential rate. In order to keep pace with this growth, customers are turning to scalable cloud storage services like Amazon Simple Storage Service (Amazon S3) to build data lakes at the petabyte scale. Customers are looking for new, automated, and scalable ways to address their data security and compliance requirements, including the need to identify and protect their sensitive data. Amazon Macie helps customers address this need by offering a managed data security and data privacy service that uses machine learning and pattern matching to discover and protect your sensitive data that is stored in Amazon S3.

In this blog post, I show you how to deploy a solution that establishes an automated event-driven workflow for notification and remediation of sensitive data findings from Macie. Administrators can review and approve remediation of findings through a ChatOps-style integration with Slack. Slack is a business communication tool that provides messaging functionality, including persistent chat rooms known as channels. With this solution, you can streamline the notification, investigation, and remediation of sensitive data findings in your AWS environment.

Prerequisites

Before you deploy the solution, make sure that your environment is set up with the following prerequisites:

Important: This solution uses various AWS services, and there are costs associated with these resources after the Free Tier usage. See the AWS pricing page for details.

Solution overview

The solution architecture and workflow are detailed in Figure 1.

Figure 1: Solution overview

Figure 1: Solution overview

This solution allows for the configuration of auto-remediation behavior based on finding type and finding severity. For each finding type, you can define whether you want the offending S3 object to be automatically quarantined, or whether you want the finding details to be reviewed and approved by a human in Slack prior to being quarantined. In a similar manner, you can define the minimum severity level (Low, Medium, High) that a finding must have before the solution will take action. By adjusting these parameters, you can manage false positives and tune the volume and type of findings about which you want to be notified and take action. This configurability is important because customers have different security, risk, and regulatory requirements.

Figure 1 details the services used in the solution and the integration points between them. Let’s walk through the full sequence from the detection of sensitive data to the remediation (quarantine) of the offending object.

  1. Macie is configured with sensitive data discovery jobs (scheduled or one-time), which you create and run to detect sensitive data within S3 buckets. When Macie runs a job, it uses a combination of criteria and techniques to analyze objects in S3 buckets that you specify. For a full list of the categories of sensitive data Macie can detect, see the Amazon Macie User Guide.
  2. For each sensitive data finding, an event is sent to Amazon EventBridge that contains the finding details. An EventBridge rule triggers a Lambda function for processing.
  3. The Finding Handler Lambda function parses the event and examines the type of the finding. Based on the auto-remediation configuration, the function either invokes the Finding Remediator function for immediate remediation, or sends the finding details for manual review and remediation approval through Slack.
  4. Delegated security and compliance administrators monitor the configured Slack channel for notifications. Notifications provide high-level finding information, remediation status, and a link to the Macie console for the finding in question. For findings configured for manual review, administrators can choose to approve the remediation in Slack by using an action button on the notification.
  5. After an administrator chooses the Remediate button, Slack issues an API call to an Amazon API Gateway endpoint, supplying both the unique identifier of the finding to be remediated and that of the Slack user. API Gateway proxies the request to a Remediation Handler Lambda function.
  6. The Remediation Handler Lambda function validates the request and request signature, extracts the offending object’s location from the finding, and makes an asynchronous call to the Finding Remediator Lambda function.
  7. The Finding Remediator Lambda function moves the offending object from the source bucket to a designated S3 quarantine bucket with restricted access.
  8. Finally, the Finding Remediator Lambda function uses a callback URL to update the original finding notification in Slack, indicating that the offending object has now been quarantined.

Deploy the solution

Now we’ll walk through the steps for configuring Slack and deploying the solution into your AWS environment by using the AWS CDK. The AWS CDK is a software development framework that you can use to define cloud infrastructure in code and provision through AWS CloudFormation.

The deployment steps can be summarized as follows:

  1. Configure a Slack channel and app
  2. Check the project out from GitHub
  3. Set the configuration parameters
  4. Build and deploy the solution
  5. Configure Slack with an API Gateway endpoint

To configure a Slack channel and app

  1. In your browser, make sure you’re logged into the Slack workspace where you want to integrate the solution.
  2. Create a new channel where you will send the notifications, as follows:
    1. Choose the + icon next to the Channels menu, and select Create a channel.
    2. Give your channel a name, for example macie-findings, and make sure you turn on the Make private setting.

      Important: By providing Slack users with access to this configured channel, you’re providing implicit access to review Macie finding details and approve remediations. To avoid unwanted user access, it’s strongly recommended that you make this channel private and by invite only.

  3. On your Apps page, create a new app by selecting Create New App, and then enter the following information:
    1. For App Name, enter a name of your choosing, for example MacieRemediator.
    2. Select your chosen development Slack workspace that you logged into in step 1.
    3. Choose Create App.
    Figure 2: Create a Slack app

    Figure 2: Create a Slack app

  4. You will then see the Basic Information page for your app. Scroll down to the App Credentials section, and note down the Signing Secret. This secret will be used by the Lambda function that handles all remediation requests from Slack. The function uses the secret with Hash-based Message Authentication Code (HMAC) authentication to validate that requests to the solution are legitimate and originated from your trusted Slack channel.

    Figure 3: Signing secret

    Figure 3: Signing secret

  5. Scroll back to the top of the Basic Information page, and under Add features and functionality, select the Incoming Webhooks tile. Turn on the Activate Incoming Webhooks setting.
  6. At the bottom of the page, choose Add New Webhook to Workspace.
    1. Select the macie-findings channel you created in step 2, and choose Allow.
    2. You should now see webhook URL details under Webhook URLs for Your Workspace. Use the Copy button to note down the URL, which you will need later.

      Figure 4: Webhook URL

      Figure 4: Webhook URL

To check the project out from GitHub

The solution source is available on GitHub in AWS Samples. Clone the project to your local machine or download and extract the available zip file.

To set the configuration parameters

In the root directory of the project you’ve just cloned, there’s a file named cdk.json. This file contains configuration parameters to allow integration with the macie-findings channel you created earlier, and also to allow you to control the auto-remediation behavior of the solution. Open this file and make sure that you review and update the following parameters:

  • autoRemediateConfig – This nested attribute allows you to specify for each sensitive data finding type whether you want to automatically remediate and quarantine the offending object, or first send the finding to Slack for human review and authorization. Note that you will still be notified through Slack that auto-remediation has taken place if this attribute is set to AUTO. Valid values are either AUTO or REVIEW. You can use the default values.
  • minSeverityLevel – Macie assigns all findings a Severity level. With this parameter, you can define a minimum severity level that must be met before the solution will trigger action. For example, if the parameter is set to MEDIUM, the solution won’t take any action or send any notifications when a finding has a LOW severity, but will take action when a finding is classified as MEDIUM or HIGH. Valid values are: LOW, MEDIUM, and HIGH. The default value is set to LOW.
  • slackChannel – The name of the Slack channel you created earlier (macie-findings).
  • slackWebHookUrl – For this parameter, enter the webhook URL that you noted down during Slack app setup in the “Configure a Slack channel and app” step.
  • slackSigningSecret – For this parameter, enter the signing secret that you noted down during Slack app setup.

Save your changes to the configuration file.

To build and deploy the solution

  1. From the command line, make sure that your current working directory is the root directory of the project that you cloned earlier. Run the following commands:
    • npm install – Installs all Node.js dependencies.
    • npm run build – Compiles the CDK TypeScript source.
    • cdk bootstrap – Initializes the CDK environment in your AWS account and Region, as shown in Figure 5.

      Figure 5: CDK bootstrap output

      Figure 5: CDK bootstrap output

    • cdk deploy – Generates a CloudFormation template and deploys the solution resources.

    The resources created can be reviewed in the CloudFormation console and can be summarized as follows:

    • Lambda functions – Finding Handler, Remediation Handler, and Remediator
    • IAM execution roles and associated policy – The roles and policy associated with each Lambda function and the API Gateway
    • S3 bucket – The quarantine S3 bucket
    • EventBridge rule – The rule that triggers the Lambda function for Macie sensitive data findings
    • API Gateway – A single remediation API with proxy integration to the Lambda handler
  2. After you run the deploy command, you’ll be prompted to review the IAM resources deployed as part of the solution. Press y to continue.
  3. Once the deployment is complete, you’ll be presented with an output parameter, shown in Figure 6, which is the endpoint for the API Gateway that was deployed as part of the solution. Copy this URL.

    Figure 6: CDK deploy output

    Figure 6: CDK deploy output

To configure Slack with the API Gateway endpoint

  1. Open Slack and return to the Basic Information page for the Slack app you created earlier.
  2. Under Add features and functionality, select the Interactive Components tile.
  3. Turn on the Interactivity setting.
  4. In the Request URL box, enter the API Gateway endpoint URL you copied earlier.
  5. Choose Save Changes.

    Figure 7: Slack app interactivity

    Figure 7: Slack app interactivity

Now that you have the solution components deployed and Slack configured, it’s time to test things out.

Test the solution

The testing steps can be summarized as follows:

  1. Upload dummy files to S3
  2. Run the Macie sensitive data discovery job
  3. Review and act upon Slack notifications
  4. Confirm that S3 objects are quarantined

To upload dummy files to S3

Two sample text files containing dummy financial and personal data are available in the project you cloned from GitHub. If you haven’t changed the default auto-remediation configurations, these two files will exercise both the auto-remediation and manual remediation review flows.

Find the files under sensitive-data-samples/dummy-financial-data.txt and sensitive-data-samples/dummy-personal-data.txt. Take these two files and upload them to S3 by using either the console, as shown in Figure 8, or AWS CLI. You can choose to use any new or existing bucket, but make sure that the bucket is in the same AWS account and Region that was used to deploy the solution.

Figure 8: Dummy files uploaded to S3

Figure 8: Dummy files uploaded to S3

To run a Macie sensitive data discovery job

  1. Navigate to the Amazon Macie console, and make sure that your selected Region is the same as the one that was used to deploy the solution.
    1. If this is your first time using Macie, choose the Get Started button, and then choose Enable Macie.
  2. On the Macie Summary dashboard, you will see a Create Job button at the top right. Choose this button to launch the Job creation wizard. Configure each step as follows:
    1. Select S3 buckets: Select the bucket where you uploaded the dummy sensitive data file. Choose Next.
    2. Review S3 buckets: No changes are required, choose Next.
    3. Scope: For Job type, choose One-time job. Make sure Sampling depth is set to 100%. Choose Next.
    4. Custom data identifiers: No changes are required, choose Next.
    5. Name and description: For Job name, enter any name you like, such as Dummy job, and then choose Next.
    6. Review and create: Review your settings; they should look like the following sample. Choose Submit.
Figure 9: Configure the Macie sensitive data discovery job

Figure 9: Configure the Macie sensitive data discovery job

Macie will launch the sensitive data discovery job. You can track its status from the Jobs page within the Macie console.

To review and take action on Slack notifications

Within five minutes of submitting the data discovery job, you should expect to see two notifications appear in your configured Slack channel. One notification, similar to the one in Figure 10, is informational only and is related to an auto-remediation action that has taken place.

Figure 10: Slack notification of auto-remediation for the file containing dummy financial data

Figure 10: Slack notification of auto-remediation for the file containing dummy financial data

The other notification, similar to the one in Figure 11, requires end user action and is for a finding that requires administrator review. All notifications will display key information such as the offending S3 object, a description of the finding, the finding severity, and other relevant metadata.

Figure 11: Slack notification for human review of the file containing dummy personal data

Figure 11: Slack notification for human review of the file containing dummy personal data

(Optional) You can review the finding details by choosing the View Macie Finding in Console link in the notification.

In the Slack notification, choose the Remediate button to quarantine the object. The notification will be updated with confirmation of the quarantine action, as shown in Figure 12.

Figure 12: Slack notification of authorized remediation

Figure 12: Slack notification of authorized remediation

To confirm that S3 objects are quarantined

Finally, navigate to the S3 console and validate that the objects have been removed from their original bucket and placed into the quarantine bucket listed in the notification details, as shown in Figure 13. Note that you may need to refresh your S3 object listing in the browser.

Figure 13: Slack notification of authorized remediation

Figure 13: Slack notification of authorized remediation

Congratulations! You now have a fully operational solution to detect and respond to Macie sensitive data findings through a Slack ChatOps workflow.

Solution cleanup

To remove the solution and avoid incurring additional charges from the AWS resources that you deployed, complete the following steps.

To remove the solution and associated resources

  1. Navigate to the Macie console. Under Settings, choose Suspend Macie.
  2. Navigate to the S3 console and delete all objects in the quarantine bucket.
  3. Run the command cdk destroy from the command line within the root directory of the project. You will be prompted to confirm that you want to remove the solution. Press y.

Summary

In this blog post, I showed you how to integrate Amazon Macie sensitive data findings with an auto-remediation and Slack ChatOps workflow. We reviewed the AWS services used, how they are integrated, and the steps to configure, deploy, and test the solution. With Macie and the solution in this blog post, you can substantially reduce the heavy lifting associated with detecting and responding to sensitive data in your AWS environment.

I encourage you to take this solution and customize it to your needs. Further enhancements could include supporting policy findings, adding additional remediation actions, or integrating with additional findings from AWS Security Hub.

If you have feedback about this post, submit comments in the Comments section below. If you have questions about this post, start a new thread on the Amazon Macie forum or contact AWS Support.

Want more AWS Security how-to content, news, and feature announcements? Follow us on Twitter.

Author

Nick Cuneo

Nick is an Enterprise Solutions Architect at AWS who works closely with Australia’s largest financial services organisations. His previous roles span operations, software engineering, and design. Nick is passionate about application and network security, automation, microservices, and event driven architectures. Outside of work, he enjoys motorsport and is found most weekends in his garage wrenching on cars.

Building resilient serverless patterns by combining messaging services

Post Syndicated from James Beswick original https://aws.amazon.com/blogs/compute/building-resilient-no-code-serverless-patterns-by-combining-messaging-services/

In “Choosing between messaging services for serverless applications”, I explain the features and differences between the core AWS messaging services. Amazon SQS, Amazon SNS, and Amazon EventBridge provide queues, publish/subscribe, and event bus functionality for your applications. Individually, these are robust, scalable services that are fundamental building blocks of serverless architectures.

However, you can also combine these services to solve specific challenges in distributed architectures. By doing this, you can use specific features of each service to build sophisticated patterns with little code. These combinations can make your applications more resilient and scalable, and reduce the amount of custom logic and architecture in your workload.

In this blog post, I highlight several important patterns for serverless developers. I also show how you use and deploy these integrations with the AWS Serverless Application Model (AWS SAM).

Examples in this post refer to code that can be downloaded from this GitHub repo. The README.md file explains how to deploy and run each example.

SNS to SQS: Adding resilience and throttling to message throughput

SNS has a robust retry policy that results in up to 100,010 delivery attempts over 23 days. If a downstream service is unavailable, it may be overwhelmed by retries when it comes back online. You can solve this issue by adding an SQS queue.

Adding an SQS queue between the SNS topic and its subscriber has two benefits. First, it adds resilience to message delivery, since the messages are durably stored in a queue. Second, it throttles the rate of messages to the consumer, helping smooth out traffic bursts caused by the service catching up with missed messages.

To build this in an AWS SAM template, you first define the two resources, and the SNS subscription:

  MySqsQueue:
    Type: AWS::SQS::Queue

  MySnsTopic:
    Type: AWS::SNS::Topic
    Properties:
      Subscription:
        - Protocol: sqs
          Endpoint: !GetAtt MySqsQueue.Arn

Finally, you provide permission to the SNS topic to publish to the queue, using the AWS::SQS::QueuePolicy resource:

  SnsToSqsPolicy:
    Type: AWS::SQS::QueuePolicy
    Properties:
      PolicyDocument:
        Version: "2012-10-17"
        Statement:
          - Sid: "Allow SNS publish to SQS"
            Effect: Allow
            Principal: "*"
            Resource: !GetAtt MySqsQueue.Arn
            Action: SQS:SendMessage
            Condition:
              ArnEquals:
                aws:SourceArn: !Ref MySnsTopic
      Queues:
        - Ref: MySqsQueue

To test this, you can publish a message to the SNS topic and then inspect the SQS queue length using the AWS CLI:

aws sns publish --topic-arn "arn:aws:sns:us-east-1:123456789012:sns-sqs-MySnsTopic-ABC123ABC" --message "Test message"
aws sqs get-queue-attributes --queue-url "https://sqs.us-east-1.amazonaws.com/123456789012/sns-sqs-MySqsQueue- ABC123ABC " --attribute-names ApproximateNumberOfMessages

This results in the following output:

CLI output

Another usage of this pattern is when you want to filter messages in architectures using an SQS queue. By placing the SNS topic in front of the queue, you can use the message filtering capabilities of SNS. This ensures that only the messages you need are published to the queue. To use message filtering in AWS SAM, use the AWS:SNS:Subcription resource:

  QueueSubcription:
    Type: 'AWS::SNS::Subscription'
    Properties:
      TopicArn: !Ref MySnsTopic
      Endpoint: !GetAtt MySqsQueue.Arn
      Protocol: sqs
      FilterPolicy:
        type:
        - orders
        - payments 
      RawMessageDelivery: 'true'

EventBridge to SNS: combining features of both services

Both SNS and EventBridge have different characteristics in terms of targets, and integration with broader features. This table compares the major differences between the two services:

Amazon SNS Amazon EventBridge
Number of targets 10 million (soft) 5
Limits 100,000 topics. 12,500,000 subscriptions per topic. 100 event buses. 300 rules per event bus.
Input transformation No Yes – see details.
Message filtering Yes – see details. Yes, including IP address matching – see details.
Format Raw or JSON JSON
Receive events from AWS CloudTrail No Yes
Targets HTTP(S), SMS, SNS Mobile Push, Email/Email-JSON, SQS, Lambda functions 15 targets including AWS LambdaAmazon SQSAmazon SNSAWS Step FunctionsAmazon Kinesis Data StreamsAmazon Kinesis Data Firehose.
SaaS integration No Yes – see integration partners.
Schema Registry integration No Yes – see details.
Dead-letter queues supported Yes No
Public visibility Can create public topics Cannot create public buses
Cross-Region You can subscribe your AWS Lambda functions to an Amazon SNS topic in any Region. Targets must be same Region. You can publish across Region to another event bus.

In this pattern, you configure an SNS topic as a target of an EventBridge rule:

SNS topic as a target for an EventBridge rule

In the AWS SAM template, you declare the resources in the preceding diagram as follows:

Resources:
  MySnsTopic:
    Type: AWS::SNS::Topic

  EventRule: 
    Type: AWS::Events::Rule
    Properties: 
      Description: "EventRule"
      EventPattern: 
        account: 
          - !Sub '${AWS::AccountId}'
        source:
          - "demo.cli"
      Targets: 
        - Arn: !Ref MySnsTopic
          Id: "SNStopic"

The default bus already exists in every AWS account, so there is no need to declare it. For the event bus to publish matching events to the SNS topic, you define permissions using the AWS::SNS::TopicPolicy resource:

  EventBridgeToToSnsPolicy:
    Type: AWS::SNS::TopicPolicy
    Properties: 
      PolicyDocument:
        Statement:
        - Effect: Allow
          Principal:
            Service: events.amazonaws.com
          Action: sns:Publish
          Resource: !Ref MySnsTopic
      Topics: 
        - !Ref MySnsTopic       

EventBridge has a limit of five targets per rule. In cases where you must send events to hundreds or thousands of targets, publishing to SNS first and then subscribing those targets to the topic works around this limit. Both services have different targets, and this pattern allows you to deliver EventBridge events to SMS, HTTP(s), email and SNS mobile push.

You can transform and filter the message using these services, often without needing an AWS Lambda function. SNS does not support input transformation but you can do this in an EventBridge rule. Message filtering is possible in both services but EventBridge provides richer content filtering capabilities.

AWS CloudTrail can log and monitor activity across services in your AWS account. It can be a useful source for events, allowing you to respond dynamically to objects in Amazon S3 or react to changes in your environment, for example. This natively integrates with EventBridge, allowing you to ingest events at scale from dozens of services.

Using EventBridge enables you to source events from outside your AWS account, offering integrations with a list of software as a service (SaaS) providers. This capability allows you to receive events from your accounts with SaaS providers like Zendesk, PagerDuty, and Auth0. These events are delivered to a partner event bus in your account, and can then be filtered and routed to an SNS topic.

Additionally, this pattern allows you to deliver events to Lambda functions in other AWS accounts and in other AWS Regions. You can invoke Lambda from SNS topics in other Regions and accounts. It’s also possible to make SNS topics publicly read-only, making them extensible endpoints that other third parties can consume from. SNS has comprehensive access control, which you can incorporate into this pattern.

Cross-account publishing

EventBridge to SQS: Building fault-tolerant microservices

EventBridge can route events to targets such as microservices. In the case of downstream failures, the service retries events for up to 24 hours. For workloads where you need a longer period of time to store and retry messages, you can deliver the events to an SQS queue in each microservice. This durably stores those events until the downstream service recovers. Additionally, this pattern protects the microservice from large bursts of traffic by throttling the delivery of messages.

Fault-tolerant microservices architecture

The resources declared in the AWS SAM template are similar to the previous examples, but it uses the AWS::SQS::QueuePolicy resource to grant the appropriate permission to EventBridge:

  EventBridgeToToSqsPolicy:
    Type: AWS::SQS::QueuePolicy
    Properties:
      PolicyDocument:
        Statement:
        - Effect: Allow
          Principal:
            Service: events.amazonaws.com
          Action: SQS:SendMessage
          Resource:  !GetAtt MySqsQueue.Arn
      Queues:
        - Ref: MySqsQueue

Conclusion

You can combine these services in your architectures to implement patterns that solve complex challenges, often with little code required. This blog post shows three examples that implement message throttling and queueing, integrating SNS and EventBridge, and building fault tolerant microservices.

To learn more building decoupled architectures, see this Learning Path series on EventBridge. For more serverless learning resources, visit https://serverlessland.com.

Automatically updating AWS WAF Rule in real time using Amazon EventBridge

Post Syndicated from Adam Cerini original https://aws.amazon.com/blogs/security/automatically-updating-aws-waf-rule-in-real-time-using-amazon-eventbridge/

In this post, I demonstrate a method for collecting and sharing threat intelligence between Amazon Web Services (AWS) accounts by using AWS WAF, Amazon Kinesis Data Analytics, and Amazon EventBridge. AWS WAF helps protect against common web exploits and gives you control over which traffic can reach your application.

Attempted exploitation blocked by AWS WAF provides a data source on potential attackers that can be shared proactively across AWS accounts. This solution can be an effective way to block traffic known to be malicious across accounts and public endpoints. AWS WAF managed rules provide an easy way to mitigate and record the details of common web exploit attempts. This solution will use the Admin protection managed rule for demonstration purposes.

In this post you will see references to the Sender account and the Receiver account. There is only one receiver in this example, but the receiving process can be duplicated multiple times across multiple accounts. This post walks through how to set up the solution. You’ll notice there is also an AWS CloudFormation template that makes it easy to test the solution in your own AWS account. The diagram in figure 1 illustrates how this architecture fits together at a high level.
 

Figure 1: Architecture diagram showing the activity flow of traffic blocked on the Sender AWS WAF

Figure 1: Architecture diagram showing the activity flow of traffic blocked on the Sender AWS WAF

Prerequisites

You should know how to do the following tasks:

Extracting threat intelligence

AWS WAF logs using a Kinesis Data Firehose delivery stream. This allows you to not only log to a destination S3 bucket, but also act on the stream in real time using a Kinesis Data Analytics Application. The following SQL code demonstrates how to extract any unique IP addresses that have been blocked by AWS WAF. While this example returns all blocked IPs, more complex SQL could be used for a more granular result. The full list of log fields is included in the documentation.


CREATE OR REPLACE STREAM "wafstream" (
 "clientIp" VARCHAR(16),
 "action" VARCHAR(8),
 "time_stamp" TIMESTAMP
 );

CREATE OR REPLACE PUMP "WAFPUMP" as
INSERT INTO "wafstream" (
"clientIp",
"action",
"time_stamp"
) 

Select STREAM DISTINCT "clientIp", "action", FLOOR(WAF_001.ROWTIME TO MINUTE) as "time_stamp"
FROM "WAF_001"
WHERE "action" = 'BLOCK';

Proactively blocking unwanted traffic

After extracting the IP addresses involved in the abnormal traffic, you will want to proactively block those IPs on your other web facing resources. You can accomplish this in a scalable way using Amazon EventBridge. After the Kinesis Application extracts the IP address, it will use an AWS Lambda function to call PutEvents on an EventBridge event bus. This process will create the event pattern, which is used to determine when to trigger an event bus rule. This example uses a simple pattern, which acts on any event with a source of “custom.waflogs” as shown in Figure 2. A more complex pattern could be used to for finer grain control of when a rule triggers.
 

Figure 2: EventBridge Rule creation

Figure 2: EventBridge Rule creation

Once the event reaches the event bus, the rule will forward the event to an event bus in “Receiver” account, where a second rule will trigger to call a Lambda function to update a WAF IPSet. A Web ACL rule is used to block all traffic sourcing from an IP address contained in the IPSet.

Test the solution by using AWS CloudFormation

Now that you’ve walked through the design of this solution, you can follow these instructions to test it in your own AWS account by using CloudFormation stacks.

To deploy using CloudFormation

  1. Launch the stack to provision resources in the Receiver account.
  2. Provide the account ID of the Sender account. This will correctly configure the permissions for the EventBridge event bus.
  3. Wait for the stack to complete, and then capture the event bus ARN from the output tab.

    This stack creates the following resources:

    • An AWS WAF v2 web ACL
    • An IPSet which will be used to contain the IP addresses to block
    • An AWS WAF rule that will block IP addresses contained in the IPSet
    • A Lambda function to update the IPSet
    • An IAM policy and execution role for the Lambda function
    • An event bus
    • An event bus rule that will trigger the Lambda function
  4. Switch to the Sender account. This should be the account you used in step 2 of this procedure.
  5. Provide the ARN of the event bus that was captured in step 3. This stack will provision the following resources in your account:
    • A virtual private cloud (VPC) with public and private subnets
    • Route tables for the VPC resources
    • An Application Load Balancer (ALB) with a fixed response rule
    • A security group that allows ingress traffic on port 80 to the ALB
    • A web ACL with the AWS Managed Rule for Admin Protection enabled
    • An S3 bucket for AWS WAF logs
    • A Kinesis Data Firehose delivery stream
    • A Kinesis Data Analytics application
    • An EventBridge event bus
    • An event bus rule
    • A Lambda function to send information to the Receiver account event bus
    • A custom CloudFormation resource which enables WAF logging and starts the Kinesis Application
    • An IAM policy and execution role that allows a Lamba function to put events into the event bus
    • An IAM policy and role to allow the custom CloudFormation resource to enable WAF logging and start the Kinesis Application
    • An IAM policy and role that allows the Kinesis Firehose to put logs into S3
    • An IAM policy that allows the WAF Web ACL to put records into the Firehose
    • An IAM policy and role that allows the Kinesis Application to invoke a Lambda function and log to CloudWatch
    • An IAM policy and role that allows the “Sender” account to put events in the “Receiver” event bus

After the CloudFormation stack completes, you should test your environment. To test the solution, check the output tab for the DNS name of the Application Load Balancer and run the following command:

curl ALBDNSname/admin

You should be able to check the Receiver account’s AWS WAF IPSet named WAFBlockIPset and find your IP.

Conclusion

This example is intentionally simple to clearly demonstrate how each component works. You can take these principles and apply them to your own environment. Layering the Amazon managed rules with your own custom rules is the best way to get started with AWS WAF. This example shows how you can use automation to update your WAF rules without needing to rely on humans. A more complete solution would source log data from each Web ACL and update an active IP Set in each account to protect all resources. As seen in Figure 3, a more complete implementation would send all logs in a region to a centralized Kinesis Firehose to be processed by the Kinesis Analytics Application, EventBridge would be used to update a local IPset as well as forward the event to other accounts event buses for processing.
 

Figure 3: Updating across accounts

Figure 3: Updating across accounts

You can also add additional targets to the event bus to do things such as send to a Simple Notification Service topic for notifications, or run additional automation. To learn more about AWS WAF web ACLs, visit the AWS WAF Developer Guide. Using Amazon EventBridge opens up the possibility to send events to partner integrations. Customers or APN Partners like PagerDuty or Zendesk can enrich this solution by taking actions such as automatically opening a ticket or starting an incident. To learn more about the power of Amazon EventBridge, see the EventBridge User Guide.

If you have feedback about this post, submit comments in the Comments section below. If you have questions about this post, start a new thread on the AWS WAF forum or contact AWS Support.

Want more AWS Security how-to content, news, and feature announcements? Follow us on Twitter.

Author

Adam Cerini

Adam is a Senior Solutions Architect with Amazon Web Services. He focuses on helping Public Sector customers architect scalable, secure, and cost effective systems. Adam holds 5 AWS certifications including AWS Certified Solutions Architect – Professional and AWS Certified Security – Specialist.