Tag Archives: zero-ETL

Improve DynamoDB analytics with AWS Glue zero-ETL schema and partition controls

Post Syndicated from Raju Ansari original https://aws.amazon.com/blogs/big-data/improve-dynamodb-analytics-with-aws-glue-zero-etl-schema-and-partition-controls/

You store transactional data in Amazon DynamoDB and get single-digit millisecond performance. However, when you want to run analytics, machine learning (ML), or reporting on that same data, you face a gap: your flexible, semi-structured DynamoDB schemas don’t align with the flat, columnar formats that analytics engines require. Bridging this gap typically means building and maintaining custom ETL pipelines, which adds development cost and operational overhead.

AWS Glue Zero-ETL integration removes that pipeline work. It enables replication of your DynamoDB tables to Apache Iceberg tables in Amazon Simple Storage Service (Amazon S3), then query it directly with Amazon Athena. During setup, you can configure two capabilities that will shape how replicated data looks and performs: schema unnesting flattens nested attributes into individual columns, and data partitioning organizes data so your queries scan only what they need.

In this post, you learn how to replicate Amazon DynamoDB data to Apache Iceberg tables in Amazon S3 through a zero-ETL integration. We walk through the challenges that the DynamoDB nested, schema-flexible data model introduces for analytics workloads, and show you how to configure schema unnesting and data partitioning for a sample product catalog table. We also cover how to query the replicated data in Amazon Athena using standard SQL.

Semi-structured data meets analytics

Your product catalog in DynamoDB contains items with nested attributes like product details, pricing tiers, and inventory information. A typical item looks like this:

{
  "product_id": "P-1001",
  "name": "Wireless Headphones",
  "productdetails": {
    "brand": "AudioTech",
    "category": "Electronics",
    "weight_kg": 0.25,
    "specification": {
       "color": "Black",
       "storage": "128GB"
    }
  },
  "pricing": {
    "list_price": 79.99,
    "discount_pct": 10
  },
  "created_at": 1701388800000
}

This structure supports fast transactional reads and writes. However, when you replicate this data for analytics, you face two decisions:

  • You must decide whether to flatten nested maps like productdetails into individual columns or preserve them as-is.
  • You must choose how to organize the data on disk so that queries filtering by brand or date range scan only relevant partitions.

With AWS Glue Zero-ETL, you address both decisions through configurable schema unnesting and data partitioning.

Solution overview

You replicate data from your DynamoDB table through AWS Glue Zero-ETL into Apache Iceberg tables stored in Amazon S3, then query the results with Amazon Athena. The following diagram illustrates the end-to-end architecture:
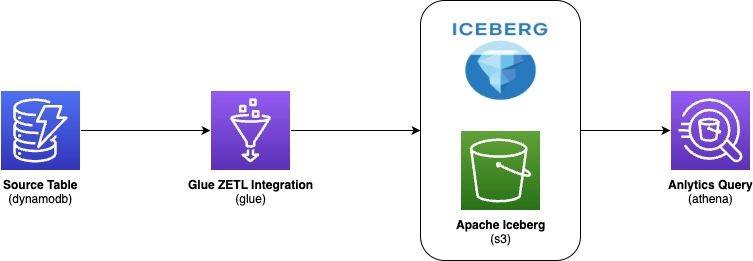
Data flow diagram showing AWS data pipeline: DynamoDB source table → AWS Glue zero-ETL integration → Apache Iceberg on Amazon S3 → Amazon Athena analytics query.

AWS Glue zero-ETL ingests data from Amazon DynamoDB, writes it in Apache Iceberg format to your Amazon S3 data lake, and makes it available for SQL queries in Amazon Athena—with no pipelines to build or maintain. With this integration, you:

  • Save development time by skipping custom code and ETL job management
  • Keep DynamoDB performance intact because replication doesn’t consume table’s provisioned read/write capacity
  • Get data within 15 minutes of changes in the source table
  • Query with standard tools because data lands in Apache Iceberg format, an open table format that AWS natively supports for high-performance analytics

During setup, you configure two output settings:

  1. Schema unnesting in Zero-ETL: You choose how nested attributes appear in the target. Flattening nested maps into individual columns streamlines your queries and reduces complexity.
  2. Data partitioning in Zero-ETL: You choose how data is organized into partitions. When you filter on a partition column, the query engine reads only matching data instead of scanning everything, cutting both query time and cost.

Schema unnesting

When you create a zero-ETL integration, you can choose one of three unnesting options. Schema unnesting transforms complex, nested DynamoDB structures into formats that analytics engines can query directly, removing post-processing transformations.

Each option changes how nested DynamoDB attributes appear in the target table. The right choice depends on your analytics tools and how consistent your DynamoDB schemas are.

Option 1: No unnesting

This option preserves the original nested structure. DynamoDB maps and lists remain as structured columns in the target.

Using the product example, the target table retains productid and value as columns to hold DynamoDB partition key and a DynamoDB record respectively.

Recommended for: Workloads where your analytics tools natively support querying nested data and you want to preserve the DynamoDB structure unchanged.

Option 2: Unnest one level

This option flattens top-level maps into individual columns. Lists remain nested.

With this option, productdetails and pricing each become separate columns.

Recommended for: Scenarios where your DynamoDB items have a consistent schema and you want to balance structure preservation with query simplicity.

Option 3: Unnest all levels (default)

This option recursively flattens nested structures using dot notation and produces the flattest schema.

For the product table, this creates columns such as productdetails.brand, productdetails.category, productdetails.specification.color , productdetails.specification.storage , pricing.list_price, and pricing.discount_pct. The pricing map flattens similarly. Each column is directly queryable without nested access patterns.

Recommended for: Analytics tools that prefer flat schemas when your DynamoDB items have a reasonably consistent structure. Note that deeply nested or highly variable schemas can produce very wide tables.

Data partitioning

You can speed up your queries and reduce costs by partitioning your replicated data. Partitioning divides data into logical segments on disk.

When you include a filter on a partition column in your query, the query engine skips irrelevant segments entirely. This behavior is called partition pruning: instead of scanning the entire dataset, the engine reads only the data that matches your filter conditions. For large tables, partition pruning can reduce both query runtime and cost significantly.

Default partitioning

If you don’t specify partition columns, AWS Glue Zero-ETL partitions data using the DynamoDB primary key with bucketing. This approach supports general-purpose queries without requiring manual configuration. For specific query patterns or performance requirements, you can define custom partitioning strategies described in the subsections that follow.

Identity partitioning

Identity partitioning uses raw column values to create partitions. You apply this strategy to low-to-medium cardinality columns such as brand, category, or AWS Region. To partition the product table by productdetails.brand and create a separate partition for each brand, use this configuration:

{
  "partitionSpec": [
    {
      "fieldName": "productdetails.brand",
      "functionSpec": "identity"
    }
  ]
}

With this setup, AWS Glue creates one partition directory per unique brand value. When you query for a specific brand, Athena reads only that partition.

Important: Avoid identity partitioning on high-cardinality columns such as primary keys or timestamps. This creates many small partitions, which degrades both ingestion and query performance

Time-based partitioning

Time-based partitioning organizes data by timestamp at a chosen granularity: year, month, day, or hour. You apply this strategy to time-series data and time-range queries. To partition the product table by month on the created_at column, which stores epoch milliseconds, use this configuration:

{
  "partitionSpec": [
    {
      "fieldName": "created_at",
      "functionSpec": "month",
      "conversionSpec": "epoch_milli"
    }
  ]
}

The conversionSpec parameter tells AWS Glue how to interpret the source timestamp. Supported values: epoch_sec (Unix seconds), epoch_milli (Unix milliseconds), and iso (ISO 8601 format).

Note: The original column values remain unchanged. AWS Glue transforms only the partition column values to timestamp type in the target table

Multi-level partitioning

You can combine strategies for a hierarchical scheme. To partition first by month and then by brand, use this configuration:

{
  "partitionSpec": [
    {
      "fieldName": "created_at",
      "functionSpec": "month",
      "conversionSpec": "epoch_milli"
    },
    {
      "fieldName": "productdetails.brand",
      "functionSpec": "identity"
    }
  ]
}

This scheme supports efficient queries that filter by date range, brand, or both. Place higher-selectivity columns first in the hierarchy and align the scheme with your most common query patterns.

Best practices

Keep these guidelines in mind when you configure your integration:

  • Avoid identity partitioning on high-cardinality columns such as primary keys, timestamps, or system-generated IDs. This leads to partition explosion and degrades performance.
  • Apply only one time-based function per column. For example, don’t partition col1 by year, month, day, and hour simultaneously.
  • Match conversionSpec to your actual data format. If your timestamps are in epoch milliseconds, use epoch_milli, not epoch_sec or iso.
  • Choose granularity based on data volume. High-volume tables benefit from finer granularity (day or hour). Lower-volume tables work well with coarser granularity (month or year).
  • Account for timezone implications with ISO timestamps. AWS Glue Zero-ETL normalizes timestamp partition values to UTC.

Prerequisites

To implement the AWS Glue Zero-ETL integration with a DynamoDB source, you will need:

  1. An AWS account with least privilege principle
  2. An AWS Glue database (for example, ddb_zero_etl_demo_db) with an Amazon S3 bucket associated as the database location (setup instructions)
  3. AWS Glue Data Catalog settings updated with an AWS Identity and Access Management (IAM) policy that grants fine-grained access control for zero-ETL (setup instructions)
  4. Create an IAM role named zetl-role, to be used by zero-ETL to access data from your DynamoDB table
  5. A DynamoDB source table (for example, product) configured for zero-ETL integration (setup instructions)

Walkthrough: Create the zero-ETL integration

Complete these steps to create a zero-ETL integration with DynamoDB as the source and Apache Iceberg tables in Amazon S3 as the target.

Step 1: Select the source type

  1. Open the AWS Glue console.
  2. In the navigation pane, under Data Integration and ETL, choose Zero-ETL integrations.
  3. Choose Create zero-ETL integration.
  4. Select Amazon DynamoDB as the source type, then choose Next.
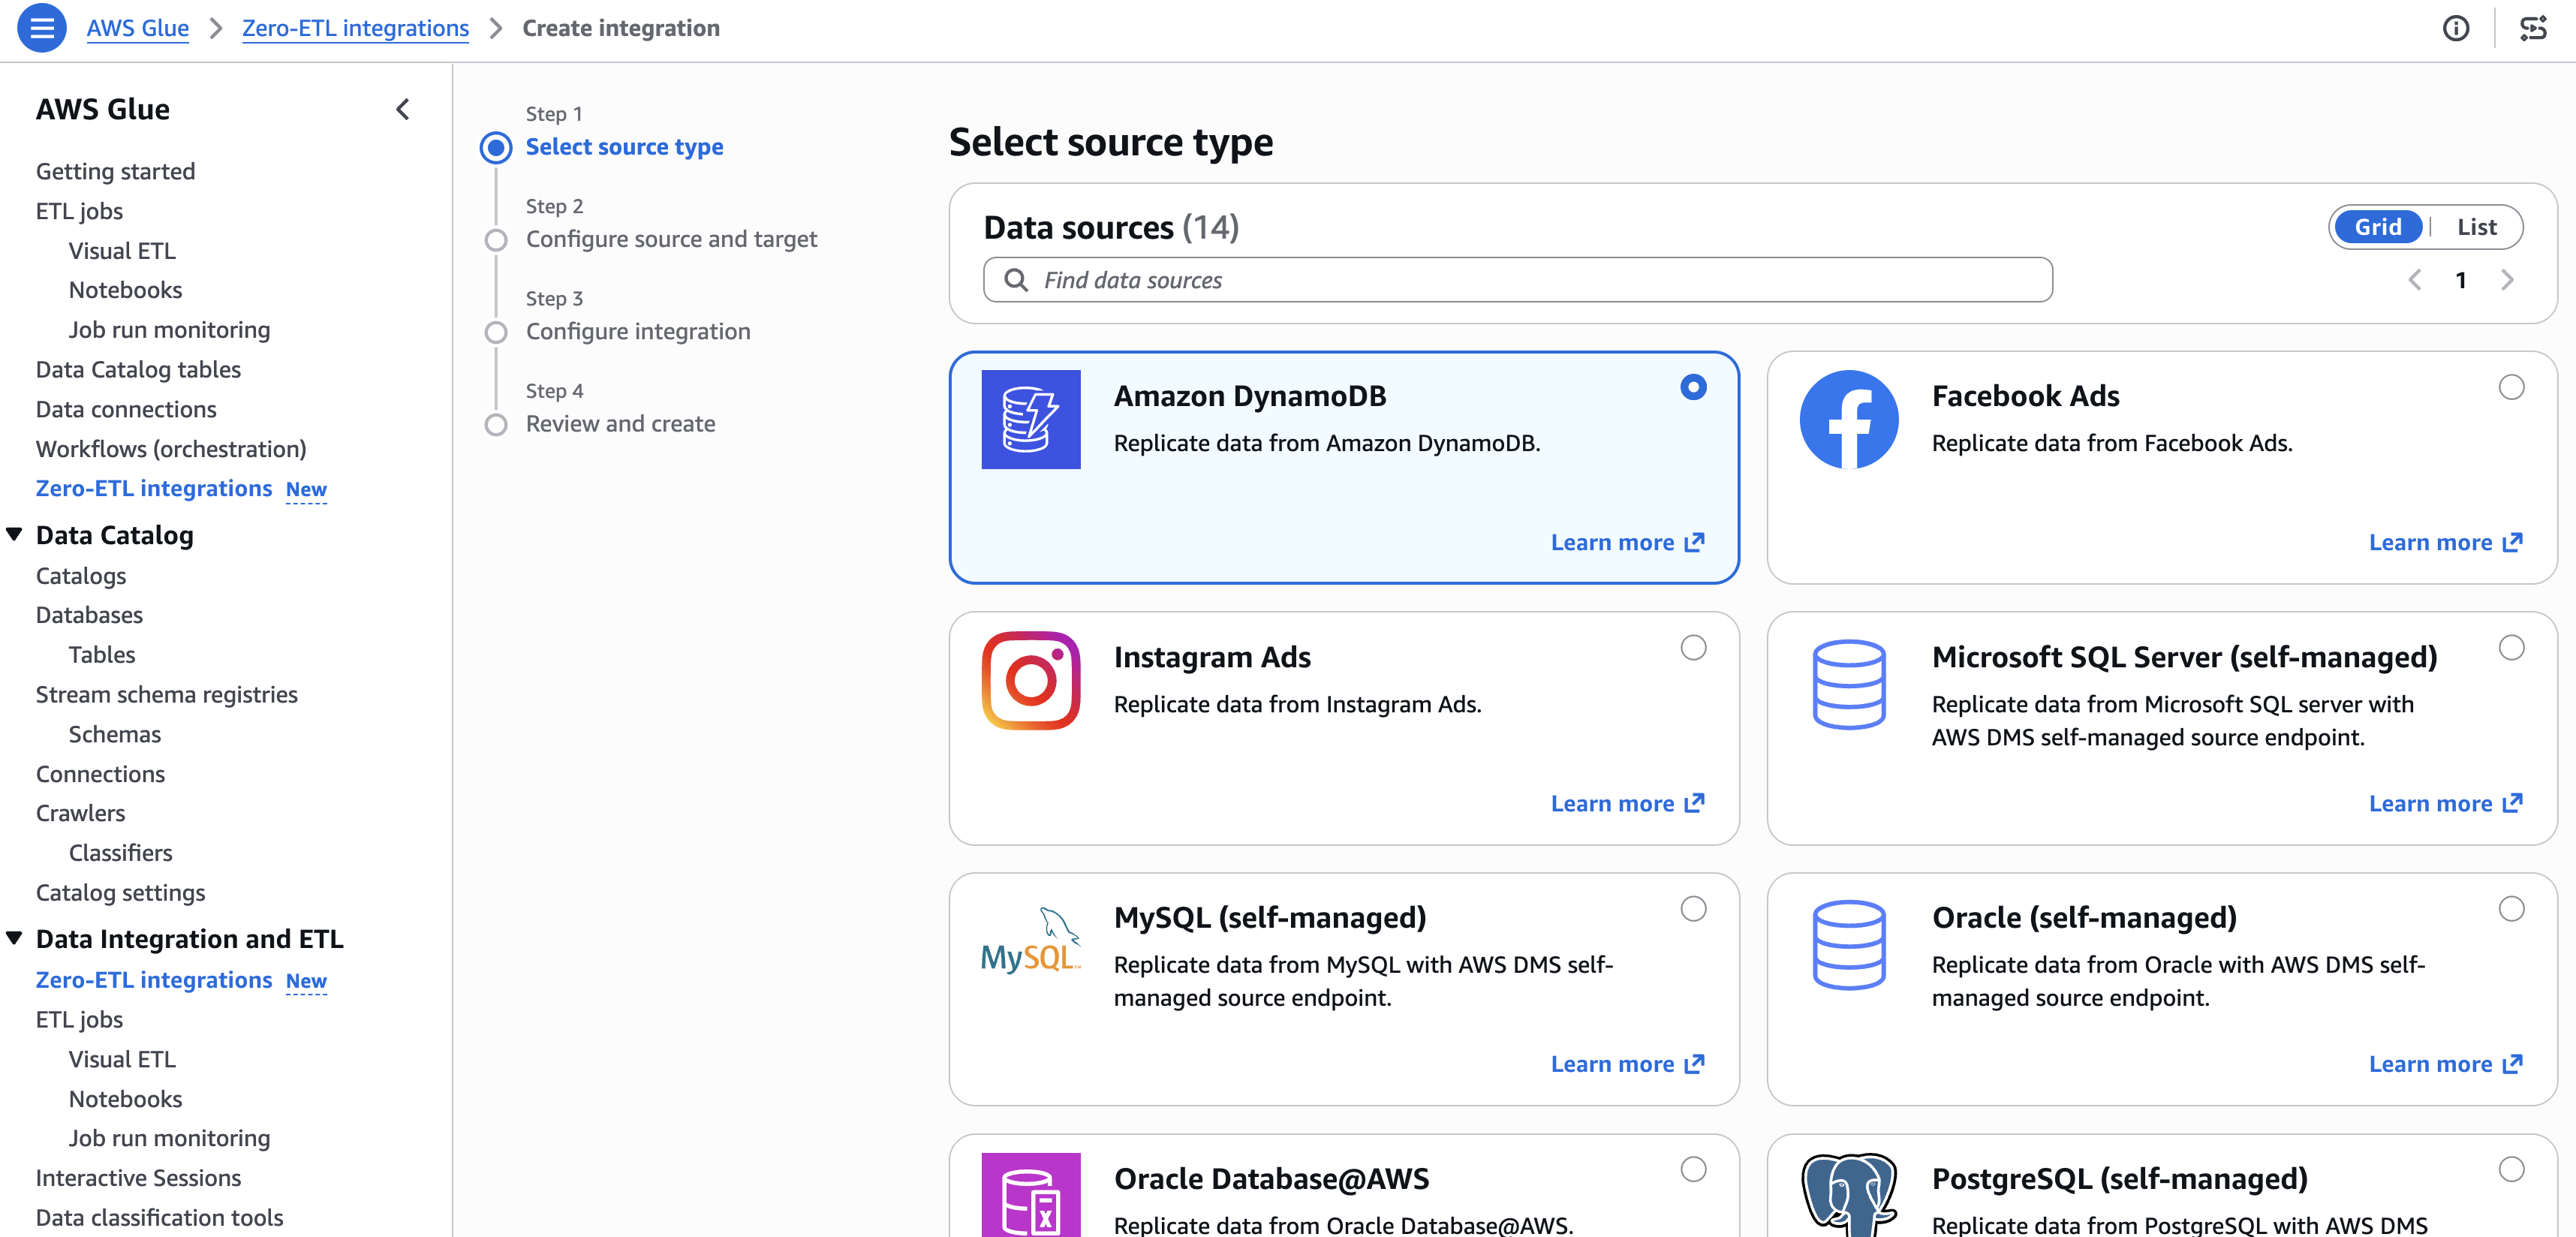
AWS Glue console showing Step 1 of creating a Zero-ETL integration — selecting a source type from 14 available data sources including Amazon DynamoDB, Facebook Ads, Instagram Ads, MySQL, Oracle, PostgreSQL, and Microsoft SQL Server

[Figure 1: Selecting Amazon DynamoDB as the zero-ETL source type]

Step 2: Configure source and target

  1. In Source details, select your DynamoDB table (for example, product).
  2. In Target details:
    • Select the current account as target.
    • Choose the catalog and target database (for example, ddb_zero_etl_demo_db).
    • Select the IAM role (for example, zetl-role).
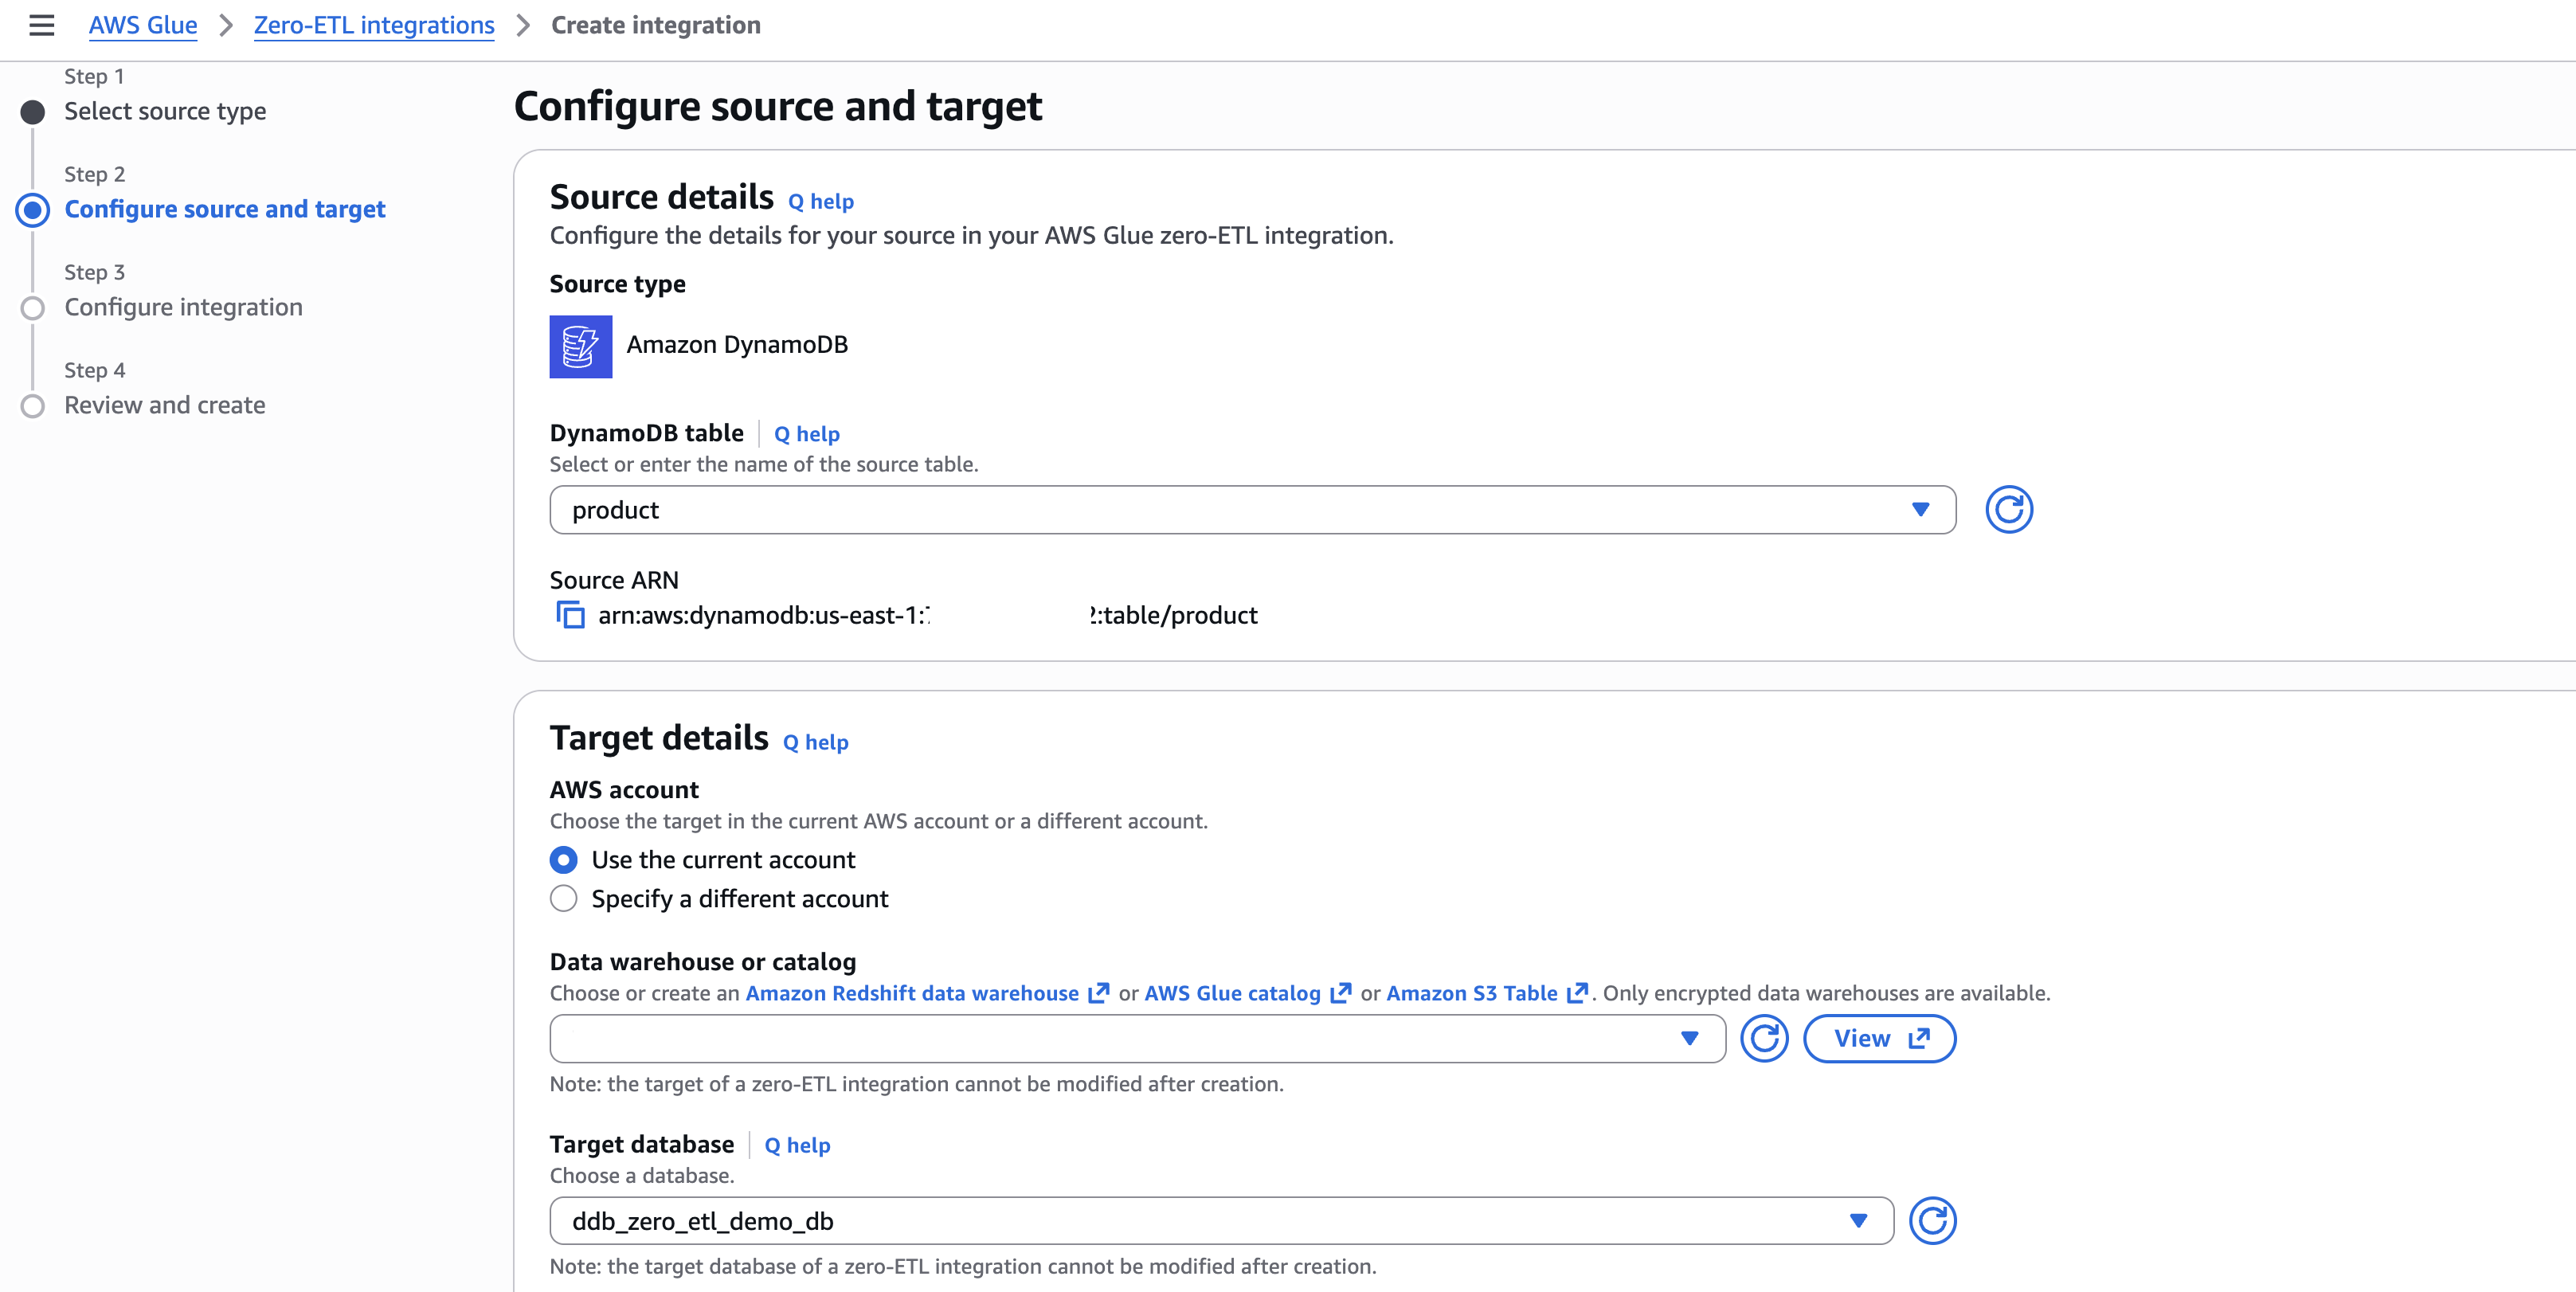
AWS Glue console Step 2 — configuring source and target for a zero-ETL integration with Amazon DynamoDB "product" table as source and an AWS Glue catalog database "ddb_zero_etl_demo_db" as target

[Figure 2: Configuring source DynamoDB table and target database]

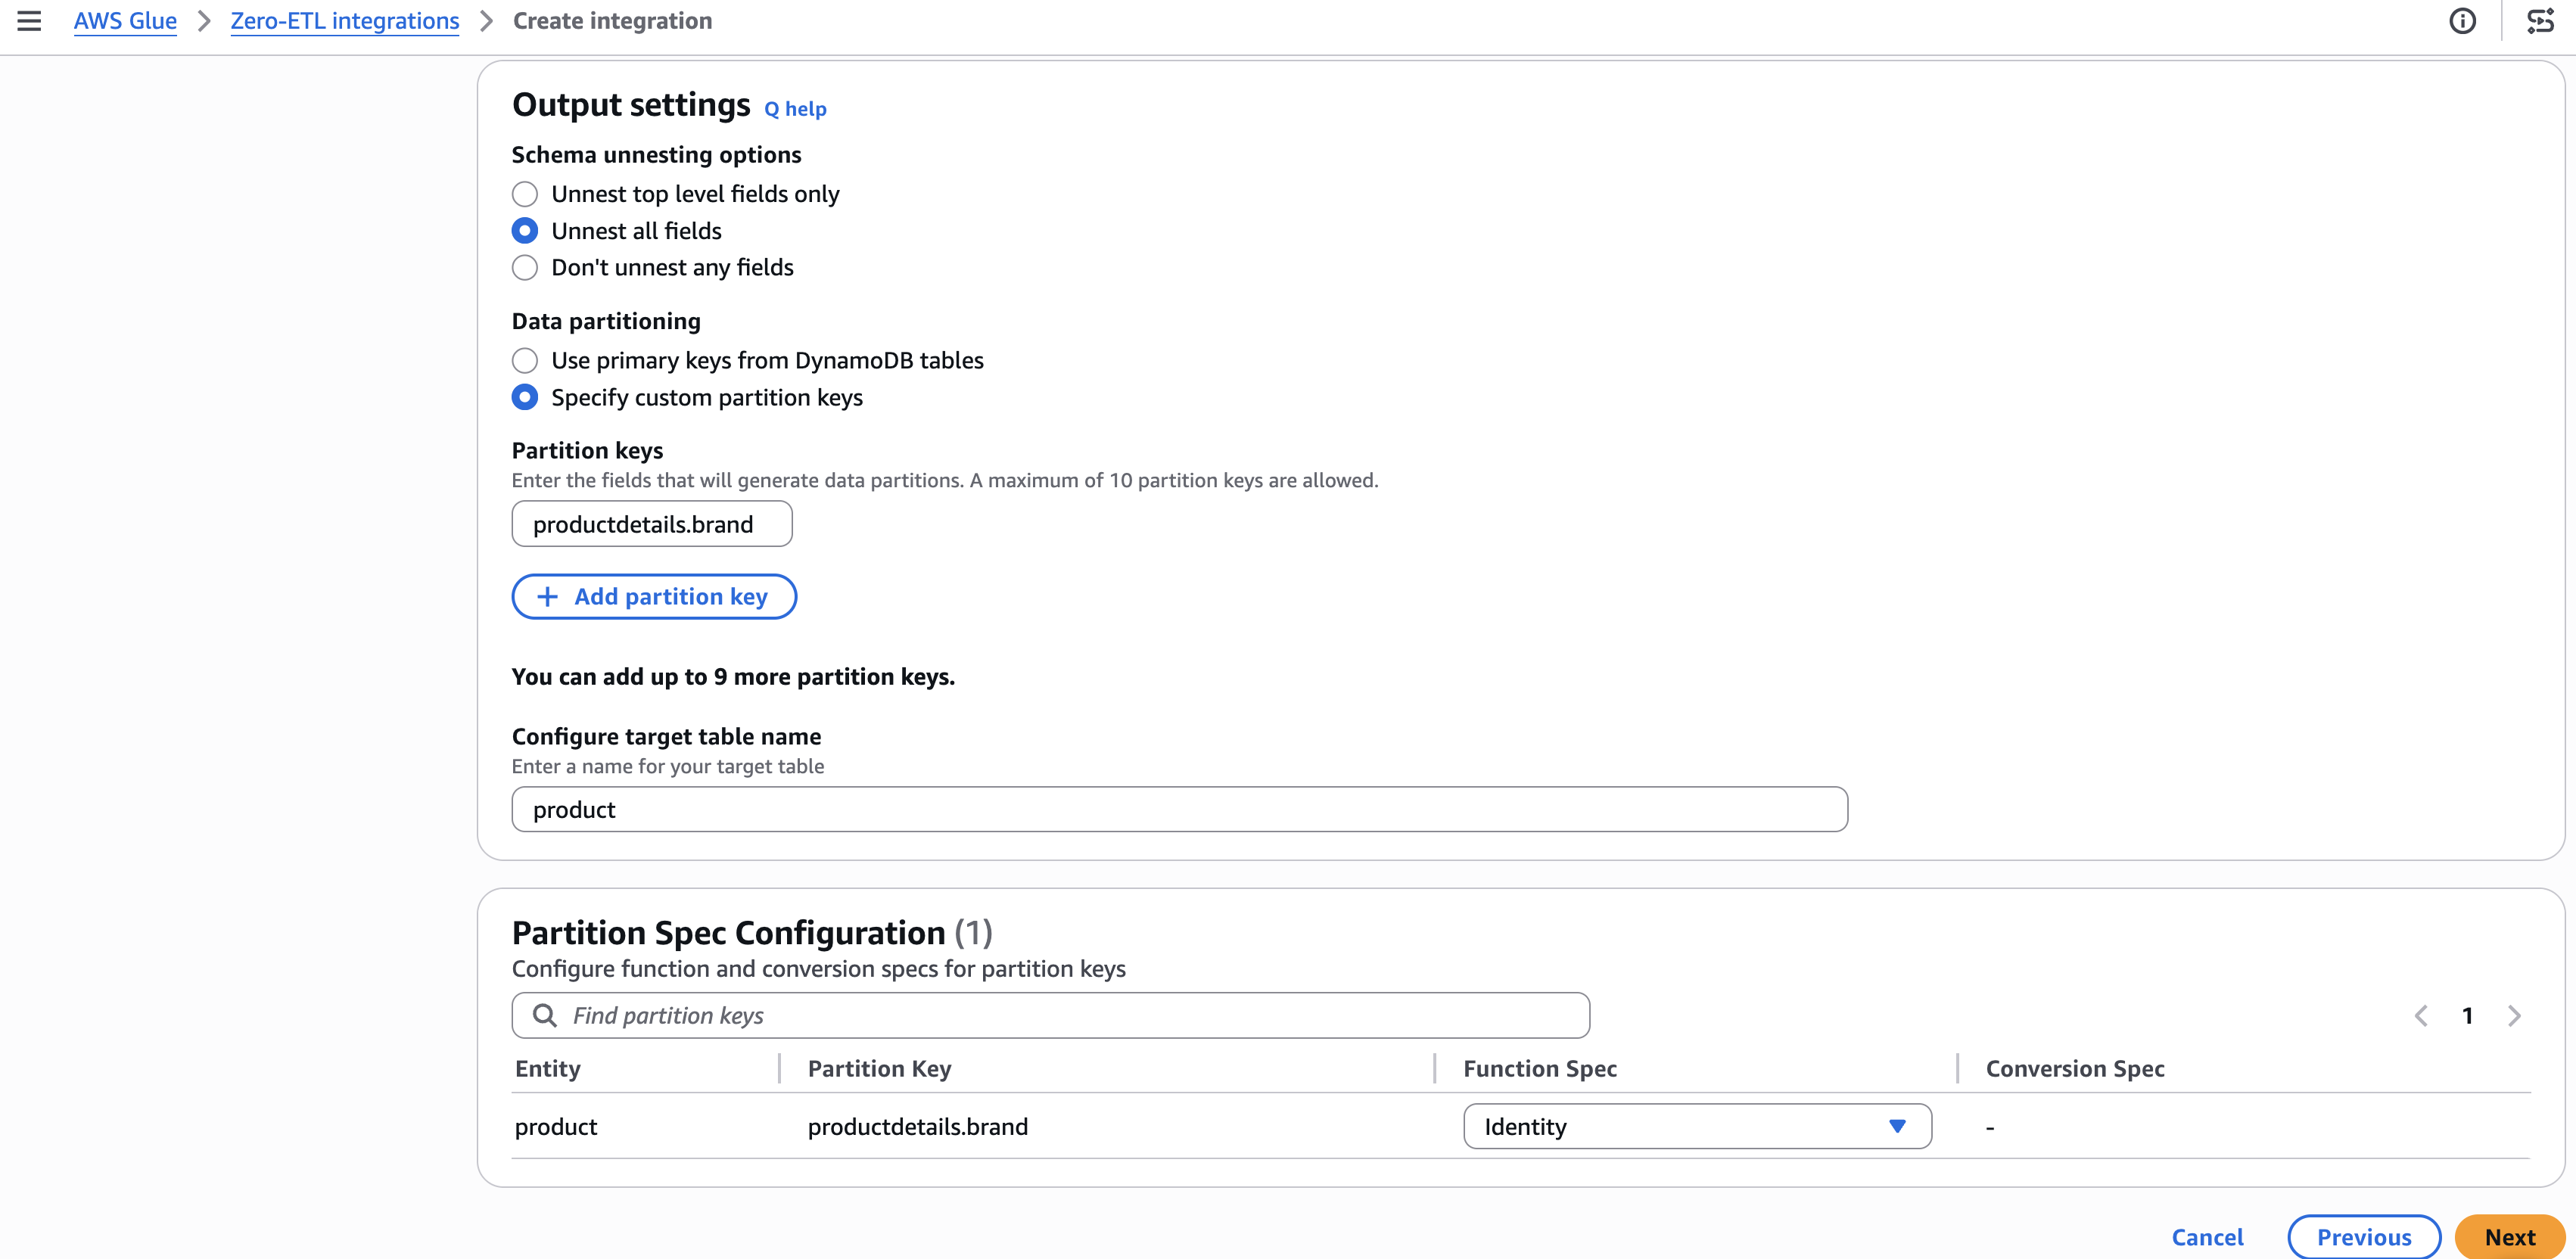
Step 3: Configure output settings

  1. Under Schema unnesting, select Unnest all fields.
  2. Under Data partitioning, select Specify custom partition keys.
  3. Enter the partition key (for example, productdetails.brand) and set the function to Identity.
  4. Choose Next.

AWS Glue Zero-ETL integration output settings showing schema unnesting set to "Unnest all fields," custom partition key "productdetails.brand" configured with Identity function, and target table named "product.

[Figure 3: Configuring schema unnesting and partition key settings]

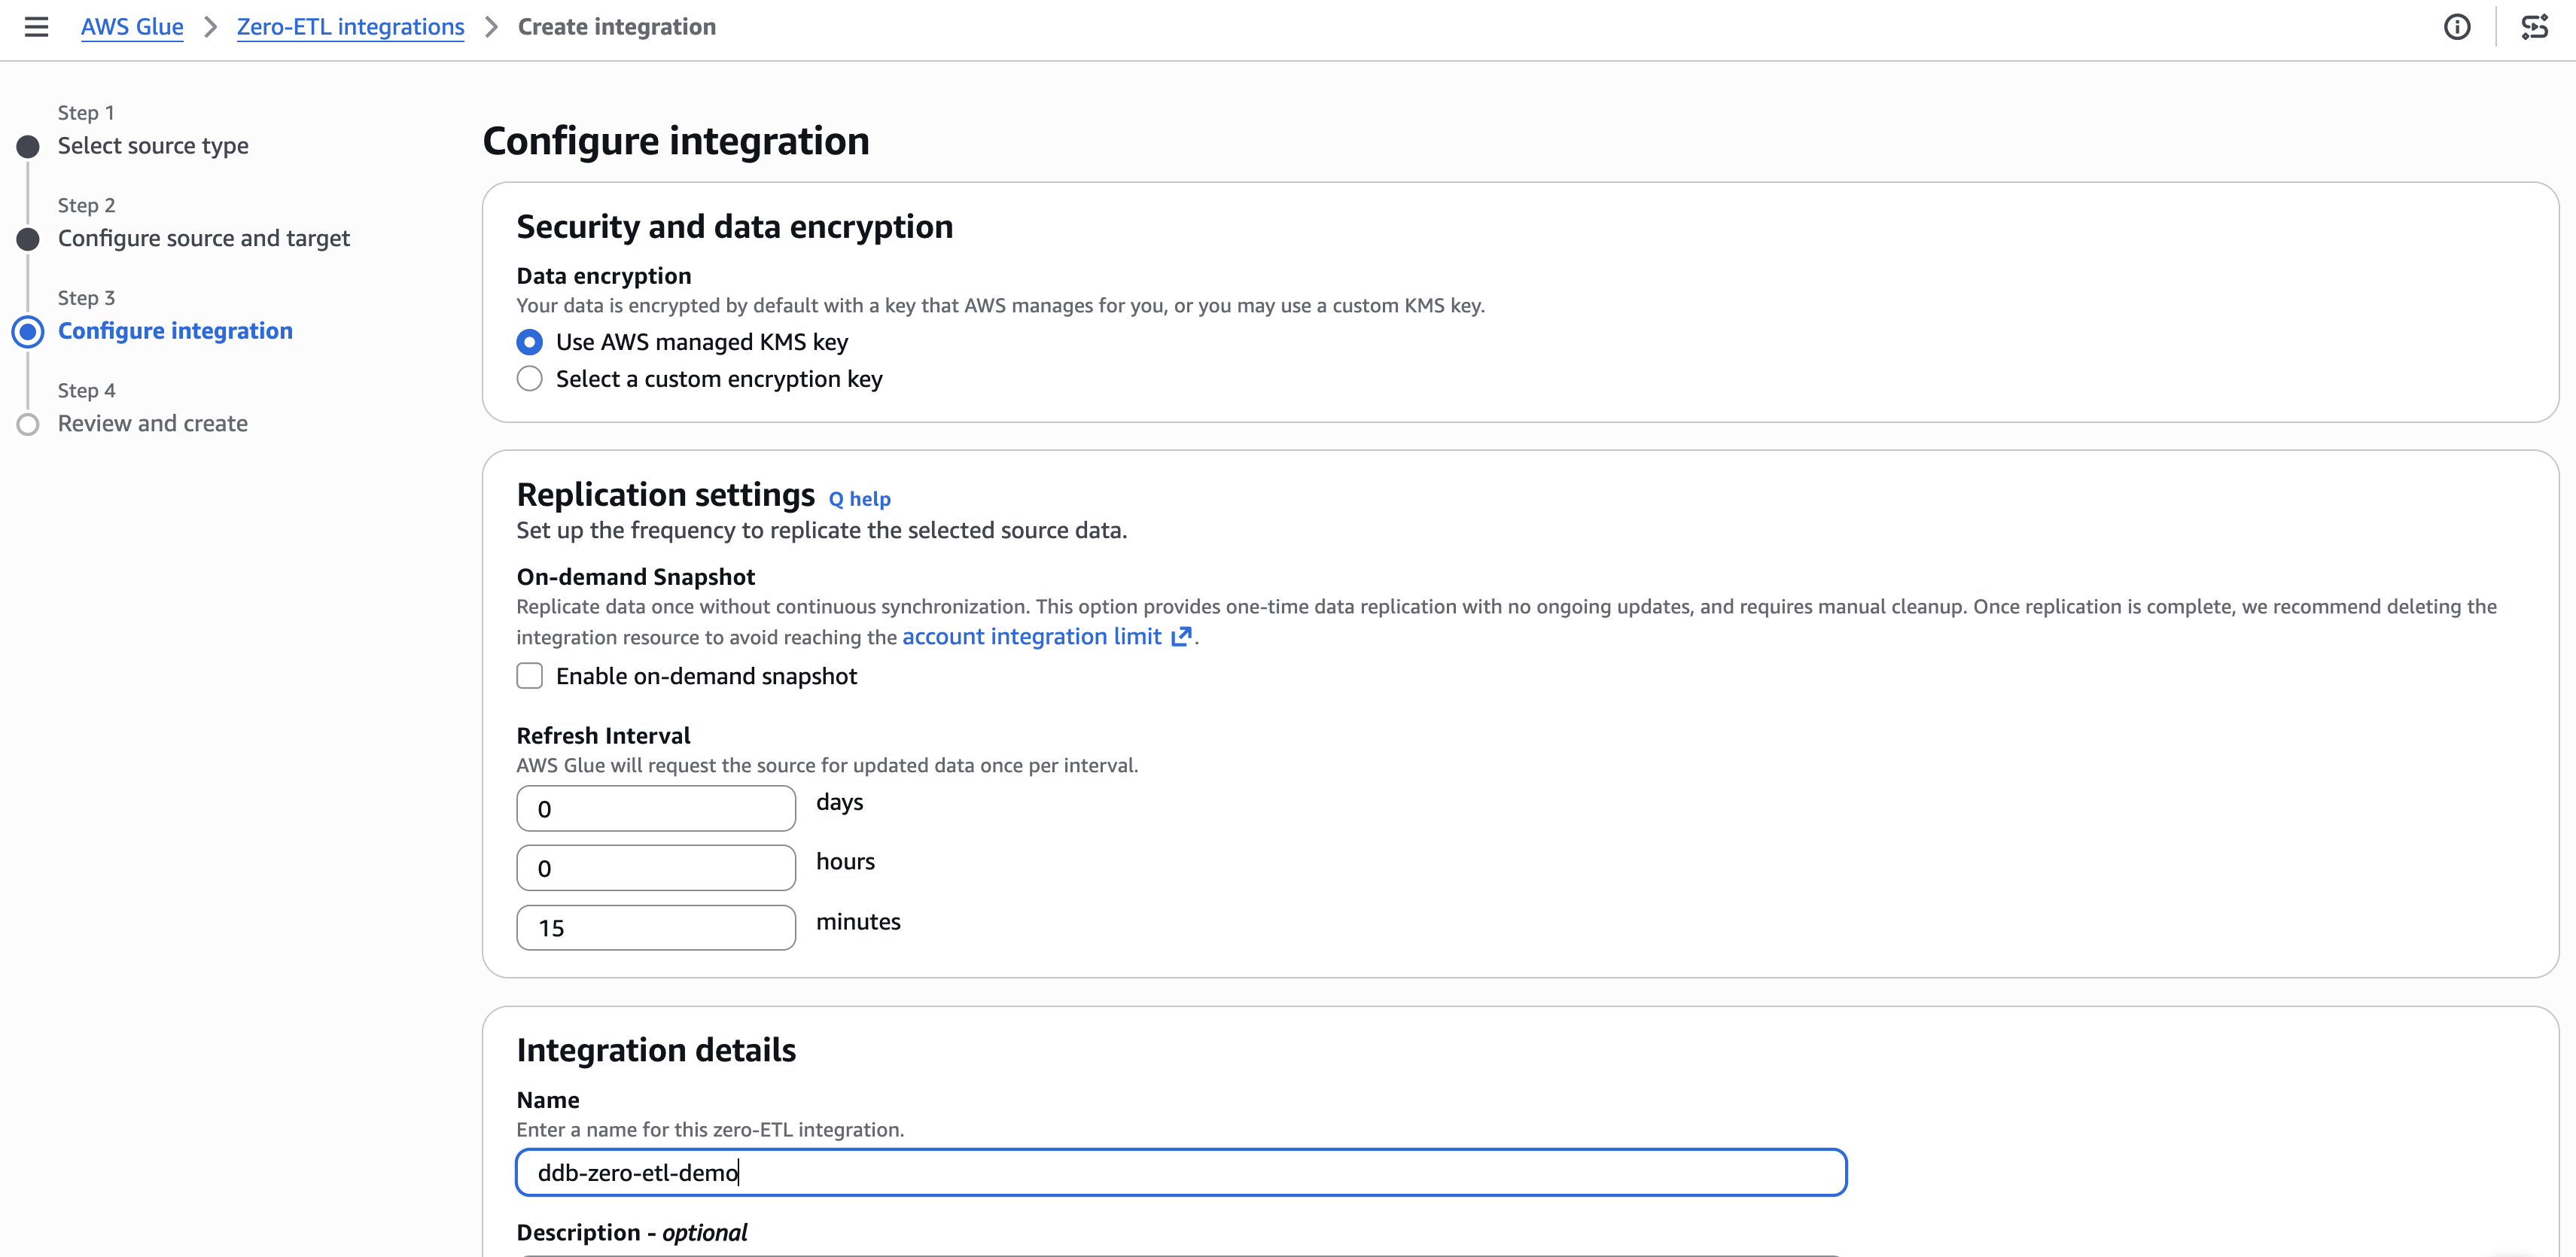
Step 4: Set integration details

  1. Optionally configure encryption and replication settings. The default refresh interval is 15 minutes.
  2. Enter a name for the integration (for example, ddb-zero-etl-demo).
  3. Choose Next.

AWS Glue Zero-ETL integration Step 3 — configuring security with AWS managed KMS key, replication refresh interval set to 15 minutes, and integration named "ddb-zero-etl-demd

[Figure 4: Configuring encryption and replication settings]

Step 5: Review and create

  1. Review your settings and choose Create and launch integration.
  2. The integration shows as Active within about a minute.
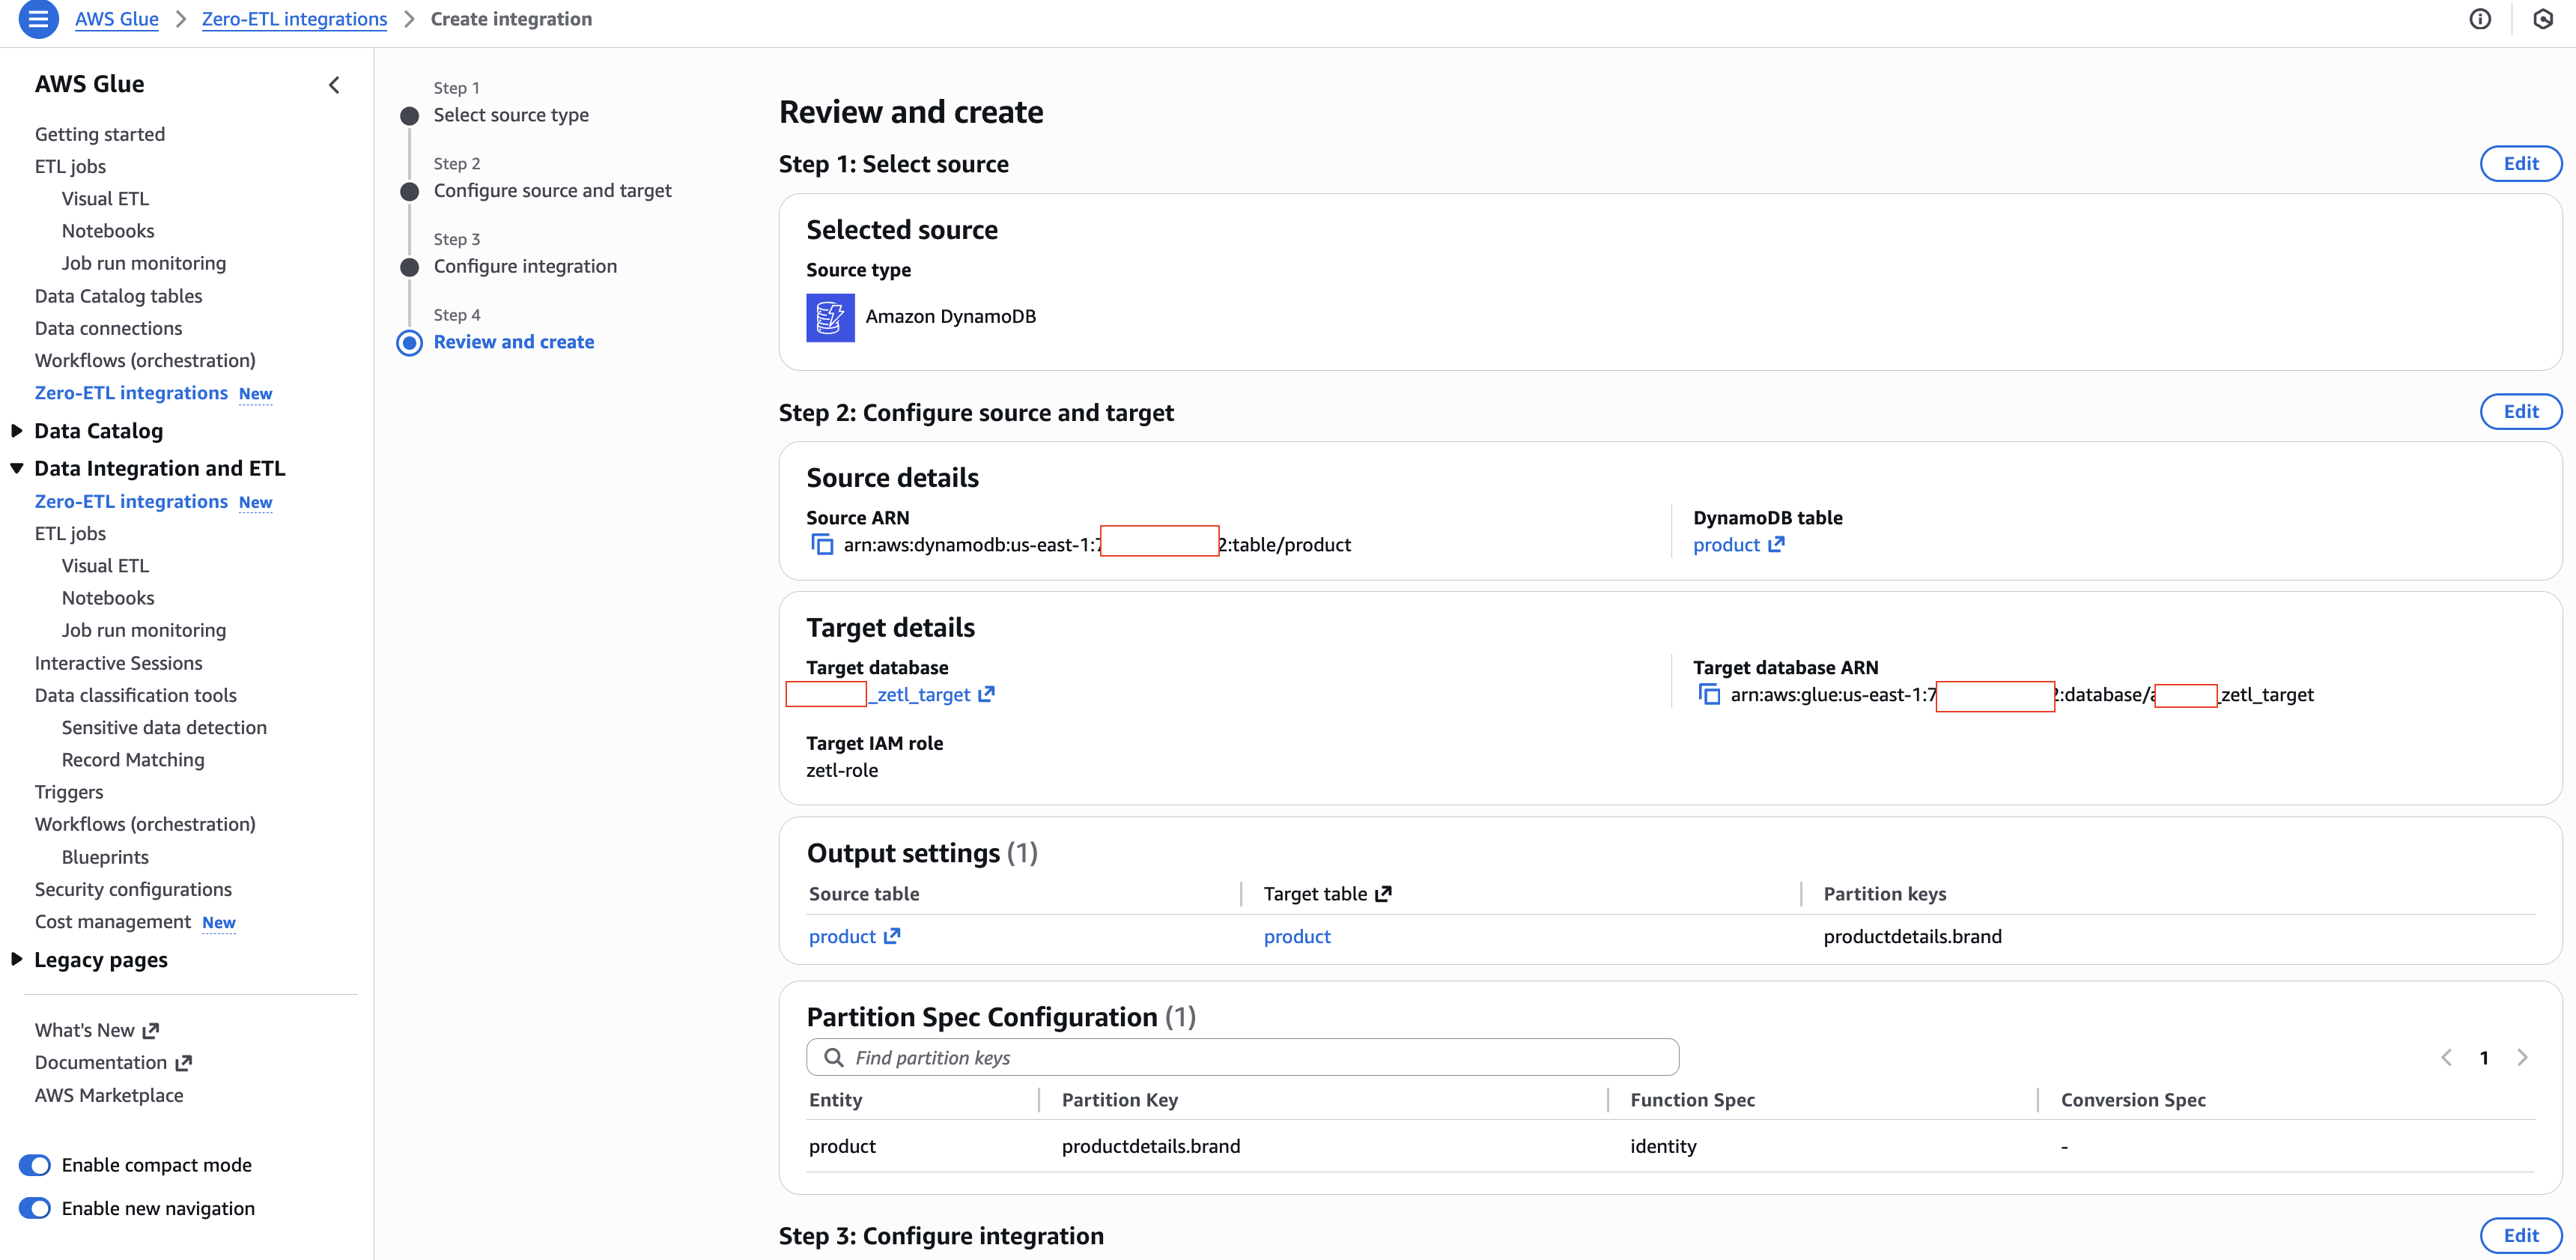
AWS Glue Zero-ETL integration Step 4: Review and Create — showing DynamoDB "product" table as source, Glue database "zett_target" as target with IAM role "zett-role," and partition key "productdetails.brand" with Identity function

[Figure 5: Review and create summary]
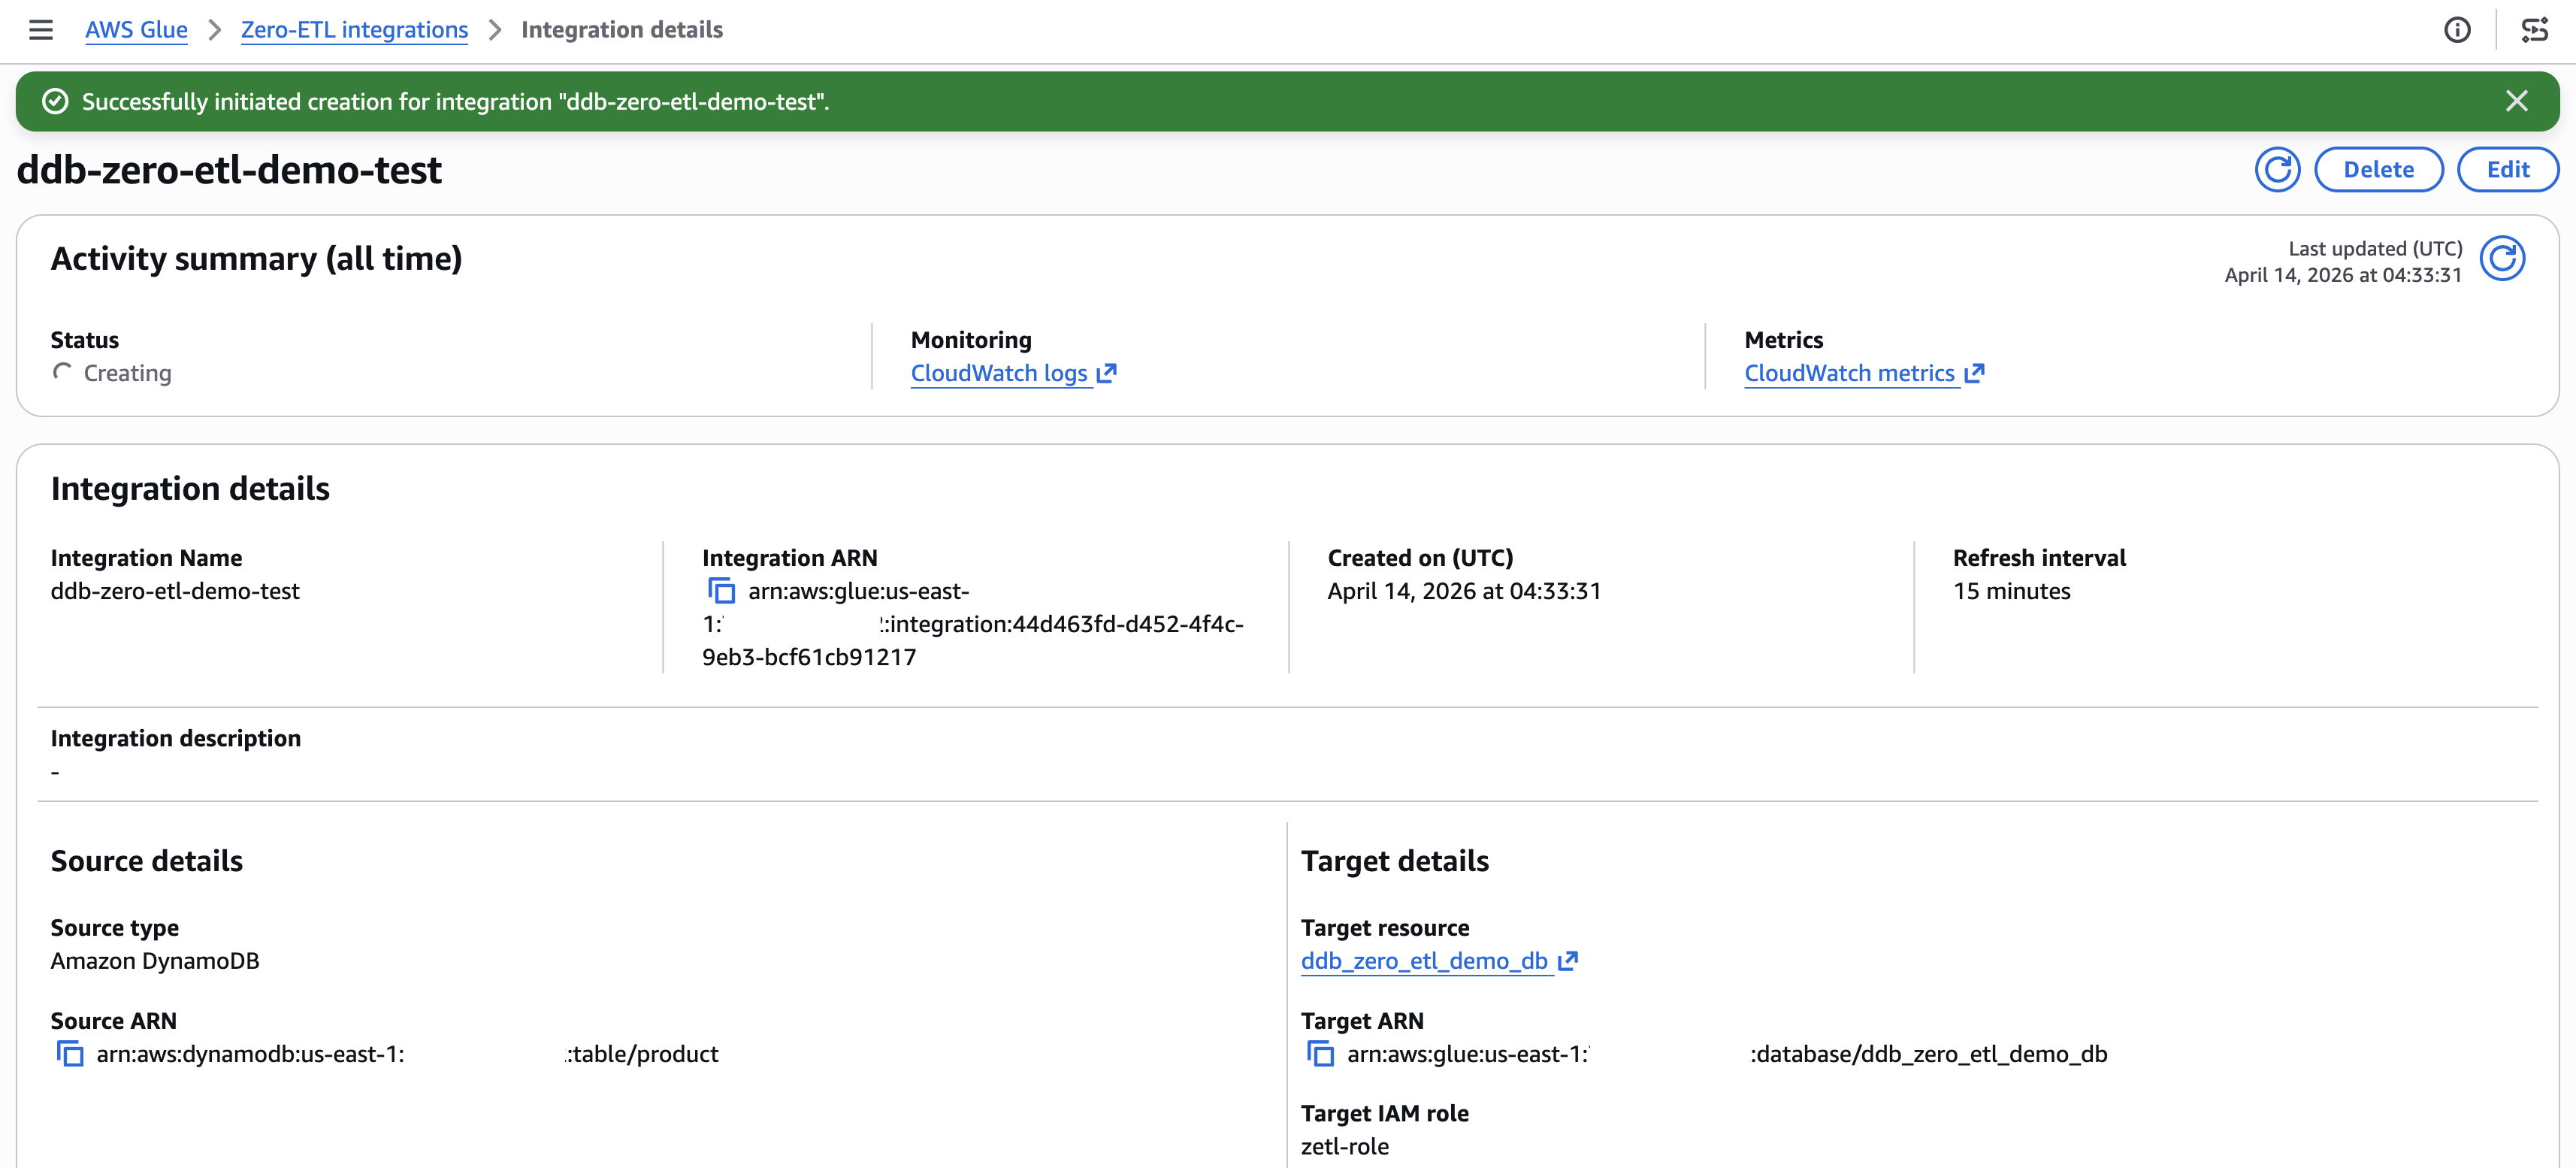
AWS Glue Zero-ETL Integration Details page showing "ddb-zero-etl-demo-test" integration with status "Creating," DynamoDB "product" table as source, Glue database "ddb_zero_etl_demo_db" as target, and a 15-minute refresh interval

[Figure 6: Integration active with successful status]

Query the replicated data

After the integration is active and the initial replication completes (typically 15–30 minutes), you can query the data in Amazon Athena.

Preview the replicated data

  1. Open the Amazon Athena console.
  2. In the query editor, select your target database (for example, ddb_zero_etl_demo_db).
  3. Run a preview query:
SELECT * FROM "ddb_zero_etl_demo_db"."product"LIMIT 10;

Verify schema unnesting

With Unnest all fields selected, nested attributes appear as individual columns with dot notation:

SELECT "productdetails.brand", "productdetails.category", "pricing.list_price" 
FROM "ddb_zero_etl_demo_db"."product"
WHERE "productdetails.category" = 'Electronics';

Verify partition pruning

Queries that filter on the partition column (productdetails.brand) automatically skip irrelevant partitions:

SELECT product_id, name, "pricing.list_price"
FROM "ddb_zero_etl_demo_db"."product"
WHERE "productdetails.brand" = 'AudioTech';
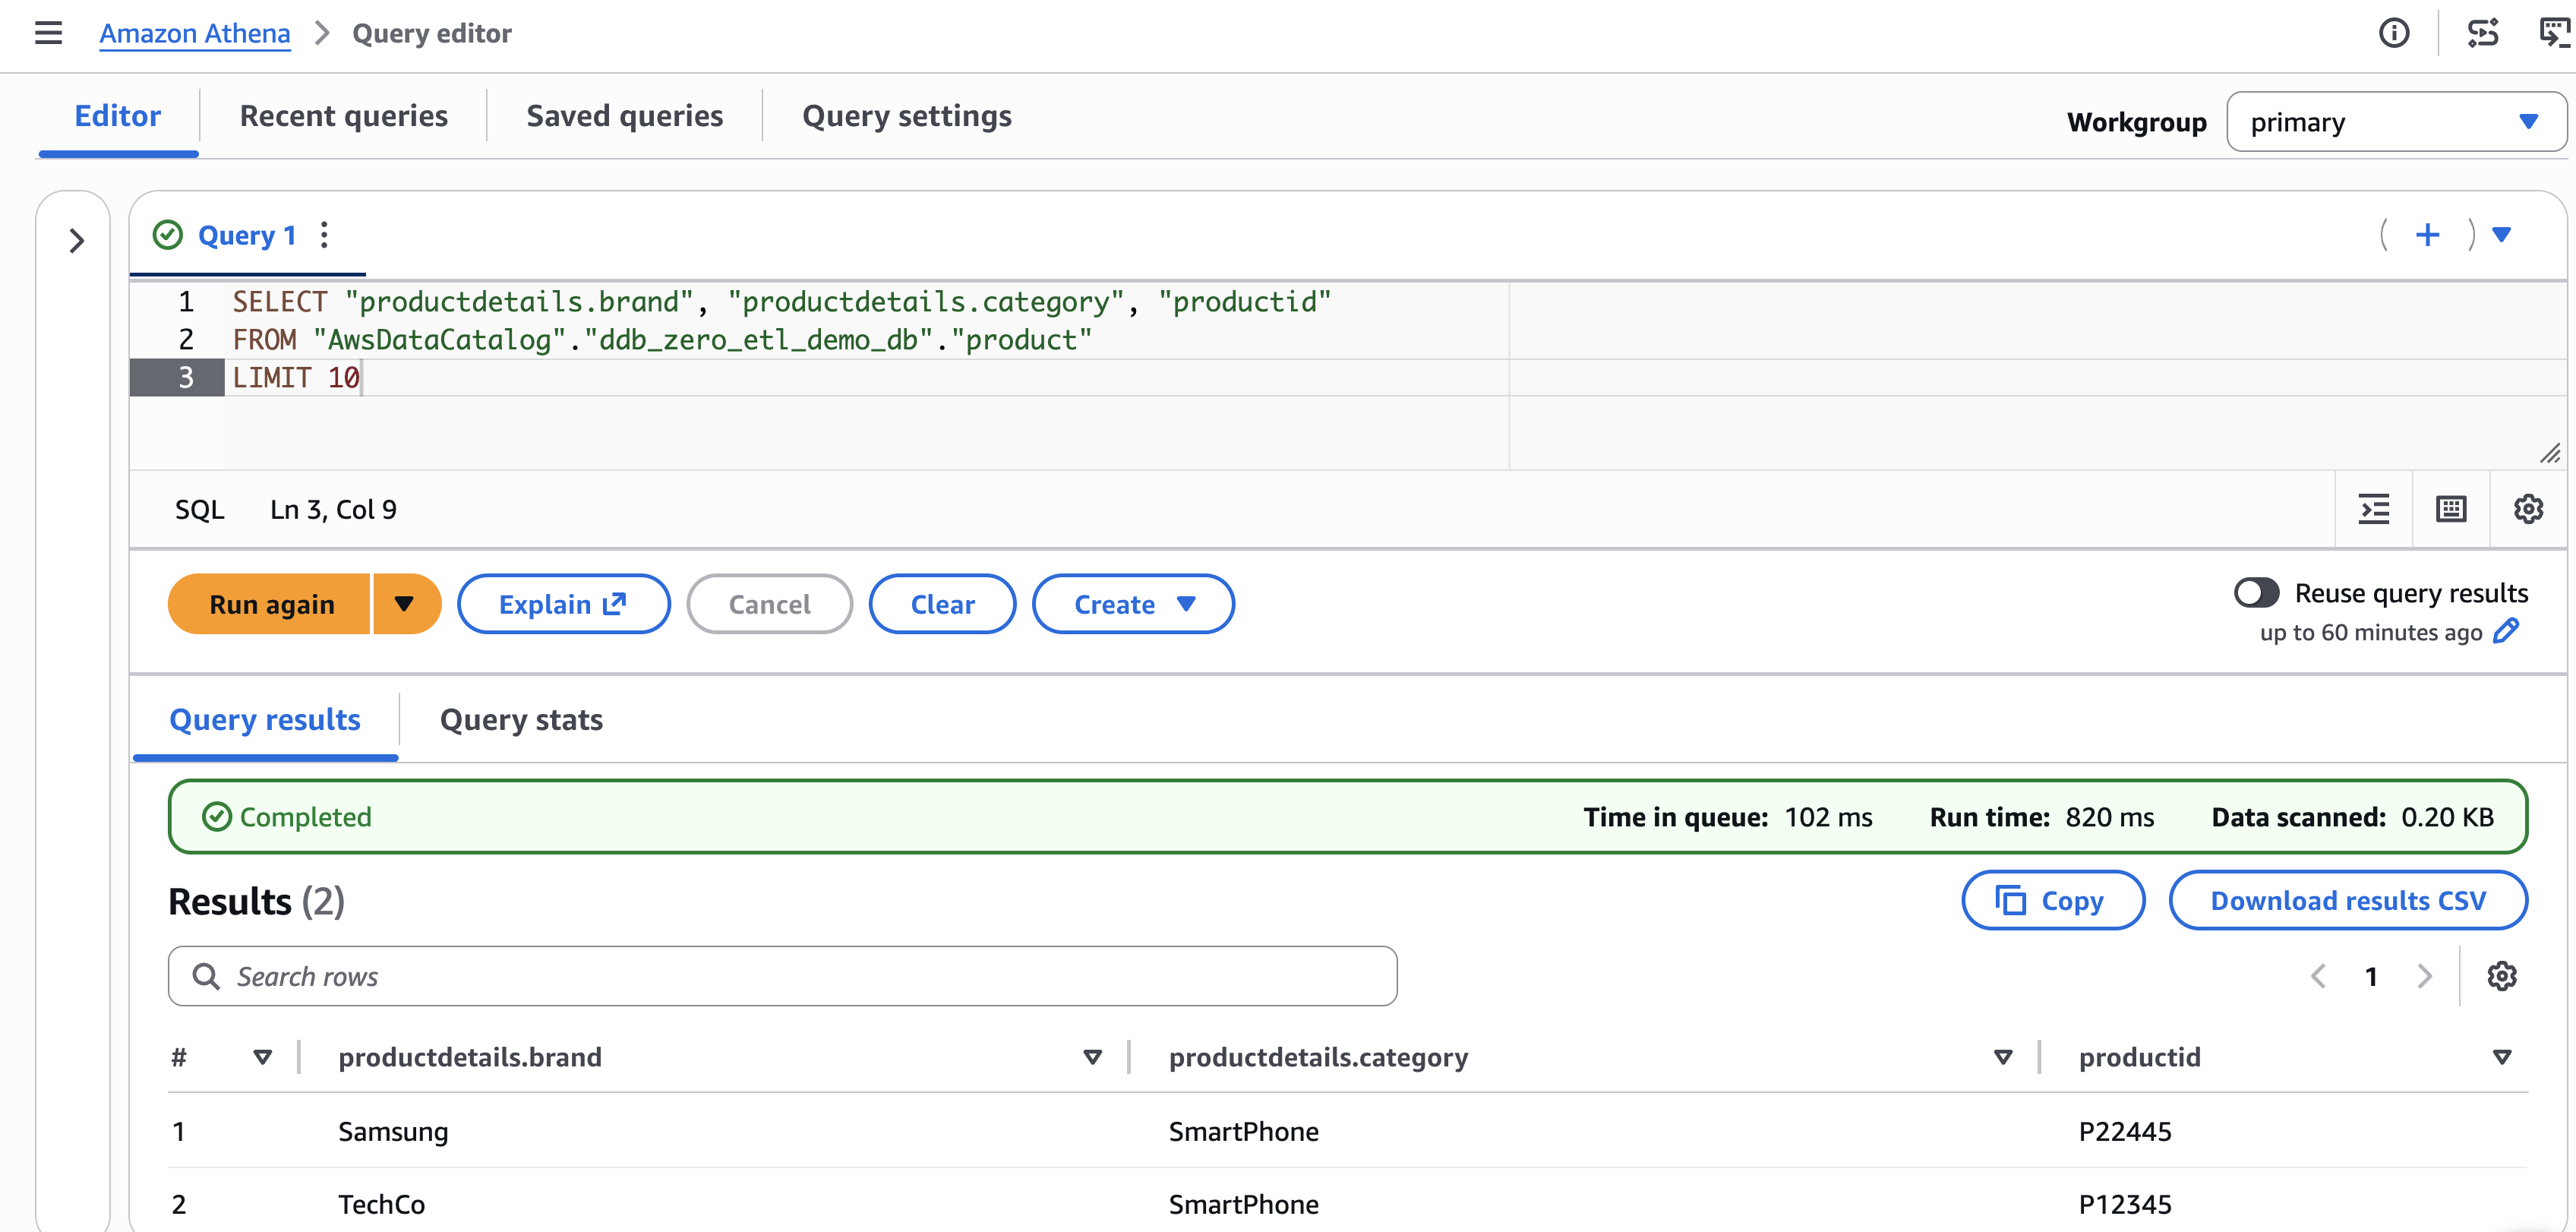
Amazon Athena Query Editor showing a completed SQL query selecting brand, category, and product ID from a DynamoDB zero-ETL Glue catalog table, returning two results: Samsung SmartPhone P22445 and TechCo SmartPhone P12345

[Figure 7: Athena query to retrieve the data from Apache Iceberg lakehouse]

You can verify the partition structure by navigating to the Amazon S3 bucket associated with your database. The data organizes into directories like:
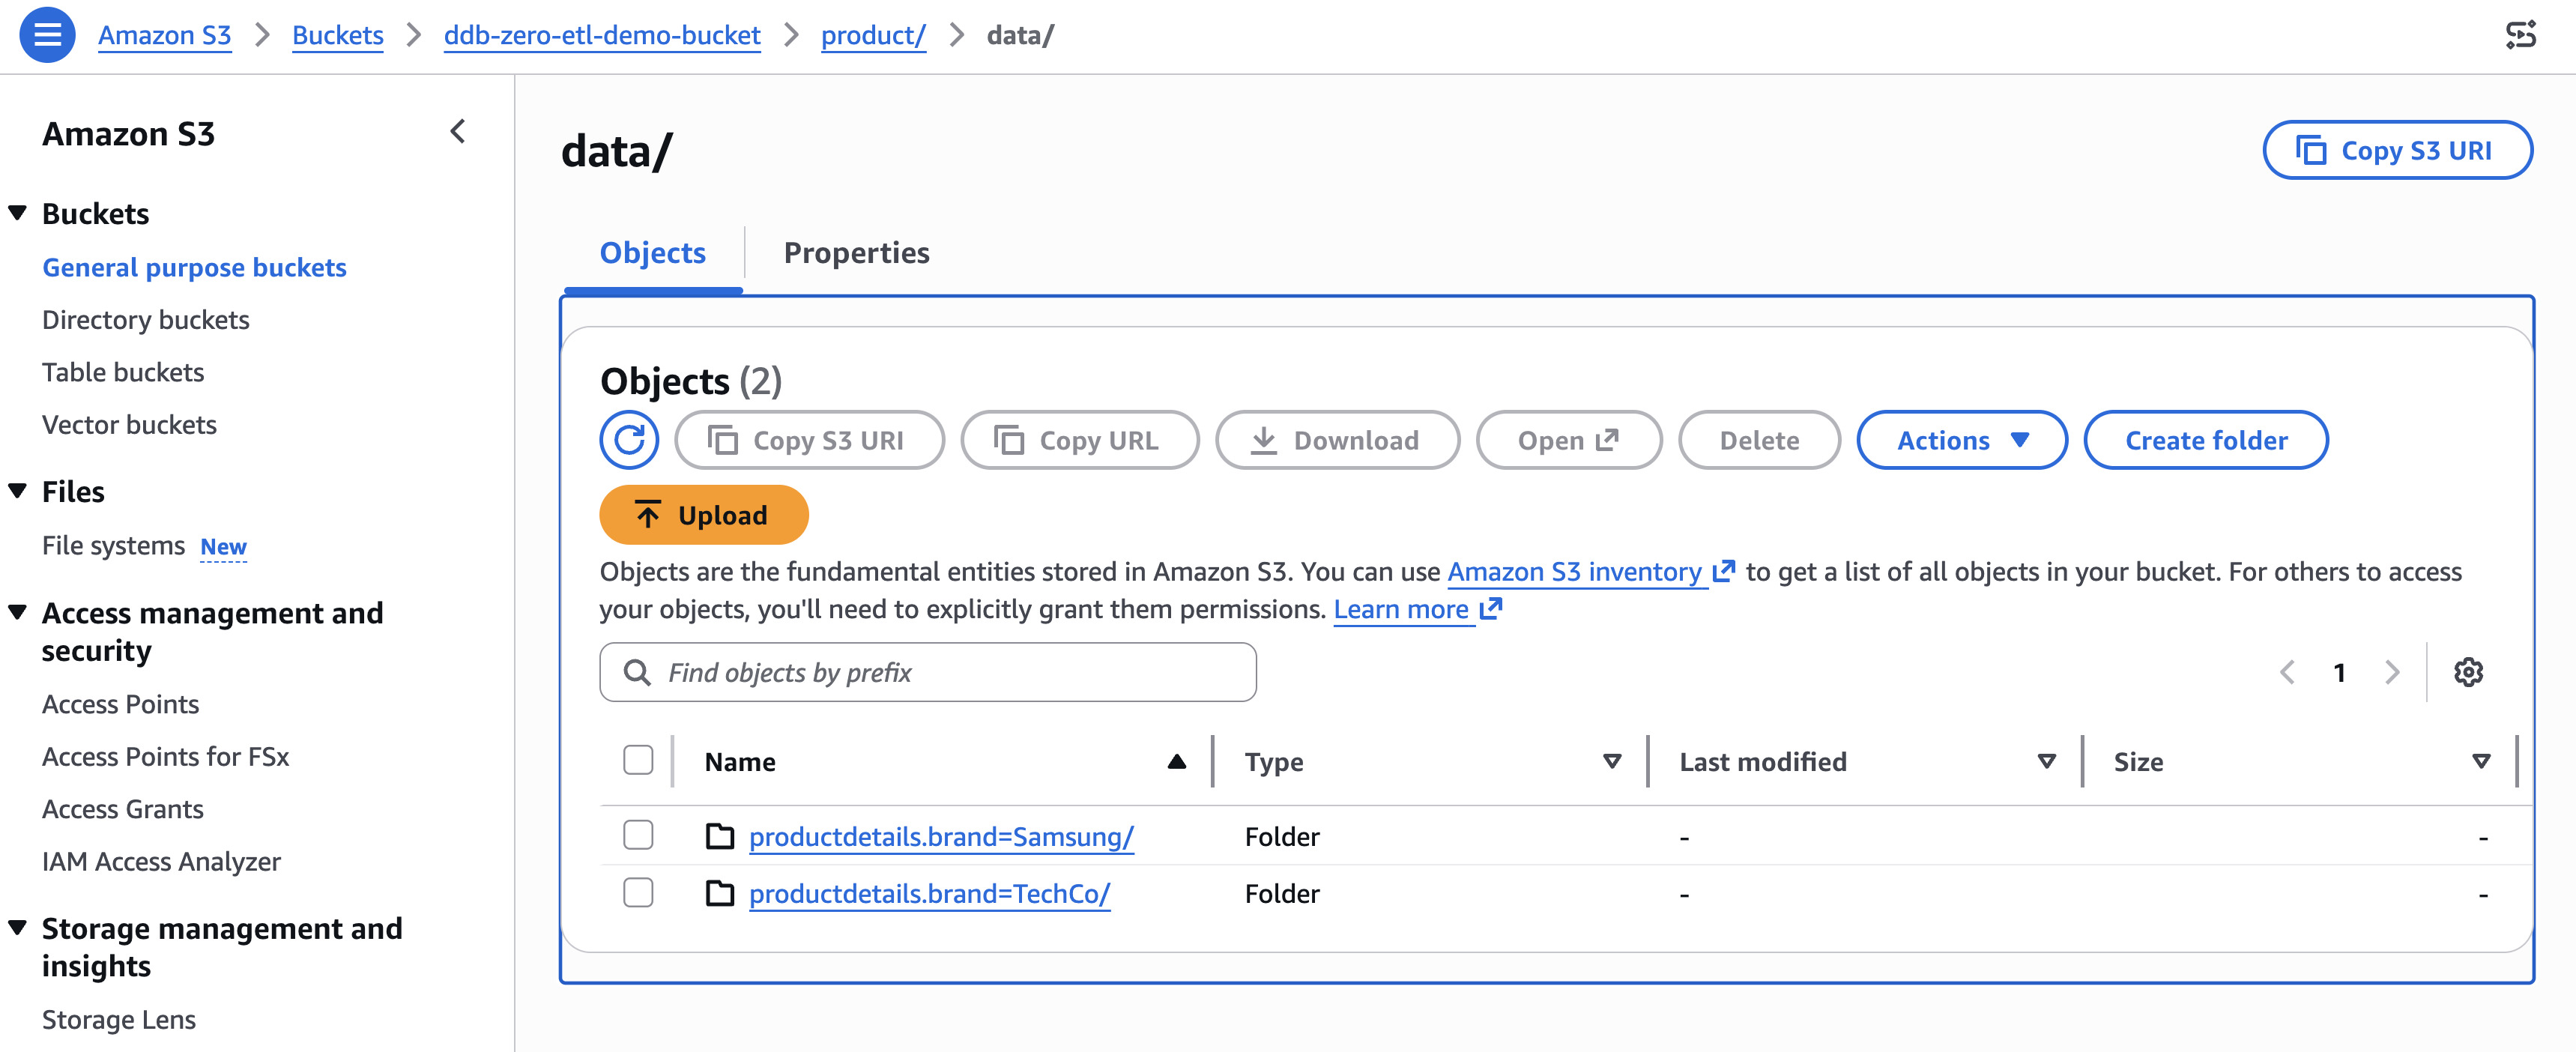
Amazon S3 bucket browser showing the "data/" folder in "ddb-zero-etl-demo-bucket" with two partitioned folders: "productdetails.brand=Samsung/" and "productdetails.brand=TechCo/" — confirming Iceberg partition structure from DynamoDB zero-ETL integration

[Figure 8: Amazon S3 bucket organization for the identity partition productdetails.brand]

Clean up

To avoid ongoing charges, delete the resources in this order:

  1. Delete the zero-ETL integration. In the AWS Glue console, navigate to Zero-ETL integrations, select your integration, and choose Delete. Existing replicated data remains in the target, but new changes stop replicating.
  2. Delete the replicated table. In the AWS Glue Data Catalog, navigate to Tables, select the replicated table, and delete it.
  3. Delete the AWS Glue database. In the Data Catalog, select the database and delete it.
  4. Delete the Amazon S3 data. Empty and delete the S3 bucket associated with the database.
  5. Delete the DynamoDB table. If you created it for this walkthrough, delete the source table.
  6. Delete IAM resources. Remove the IAM role and policies created for the integration.

Conclusion

You configured schema unnesting and data partitioning for a DynamoDB zero-ETL integration, replicated a product catalog table to Apache Iceberg tables in Amazon S3, and verified the results in Amazon Athena. Unnesting flattened nested attributes into directly queryable columns. Partitioning helped the query engine skip irrelevant data, reducing both query time and cost. To take your integration further, try monitoring replication lag and data freshness with Amazon CloudWatch metrics. You can also experiment with different partitioning strategies on a staging table before applying them to production workloads, testing time-based partitioning alongside identity partitioning to find the optimal scheme for your query patterns. For broader analytics coverage, query the same Iceberg tables from Amazon Redshift Spectrum or Amazon EMR alongside Athena. For more details, explore these resources:


About the authors

Raju Ansari

Raju is a Senior Software Development Engineer at AWS, specializing in building scalable, secure, serverless solutions that simplify data analytics and AI agent development. He helps organizations modernize their data analytics infrastructure and develop cutting-edge AI agentic applications. Currently, Raju focuses on building foundational AI services, including Amazon Bedrock Agents, which enable developers to create intelligent, autonomous applications at scale. Outside of work, Raju is passionate about giving back to the tech community. He actively volunteers at IEEE events and mentor early and mid-career professionals

Shashank Sharma

Shashank is an Engineering Leader with over 15 years of experience delivering data integration and replication solutions for first-party and third-party databases and SaaS for enterprise customers. He leads engineering for AWS Glue Zero-ETL and Amazon AppFlow, building fully managed pipelines that replicate data from sources like Salesforce, SAP, DynamoDB, and Oracle into Amazon Redshift and Apache Iceberg-based data lakes. Shashank advises startups on technology strategy and mentors engineers and technical leaders at various career stages

SAP data ingestion and replication with AWS Glue zero-ETL

Post Syndicated from Shashank Sharma original https://aws.amazon.com/blogs/big-data/sap-data-ingestion-and-replication-with-aws-glue-zero-etl/

Organizations increasingly want to ingest and gain faster access to insights from SAP systems without maintaining complex data pipelines. AWS Glue zero-ETL with SAP now supports data ingestion and replication from SAP data sources such as Operational Data Provisioning (ODP) managed SAP Business Warehouse (BW) extractors, Advanced Business Application Programming (ABAP), Core Data Services (CDS) views, and other non-ODP data sources. Zero-ETL data replication and schema synchronization writes extracted data to AWS services like Amazon Redshift, Amazon SageMaker lakehouse, and Amazon S3 Tables, alleviating the need for manual pipeline development. This creates a foundation for AI-driven insights when used with AWS services such as Amazon Q and Amazon Quick Suite, where you can use natural language queries to analyze SAP data, create AI agents for automation, and generate contextual insights across your enterprise data landscape.

In this post, we show how to create and monitor a zero-ETL integration with various ODP and non-ODP SAP sources.

Solution overview

The key component of SAP integration is the AWS Glue SAP OData connector, which is designed to work with the SAP data structures and protocols. The connector provides connectivity to ABAP-based SAP systems and adheres to the SAP security and governance frameworks. Key features of the AWS SAP connector include:

  • Uses OData protocol for data extraction from various SAP NetWeaver systems
  • Managed replication for complex SAP data models such as BW extractors (such as 2LIS_02_ITM) and CDS views (such as C_PURCHASEORDERITEMDEX)
  • Handles both ODP and non-ODP entities using the SAP change data capture (CDC) technology

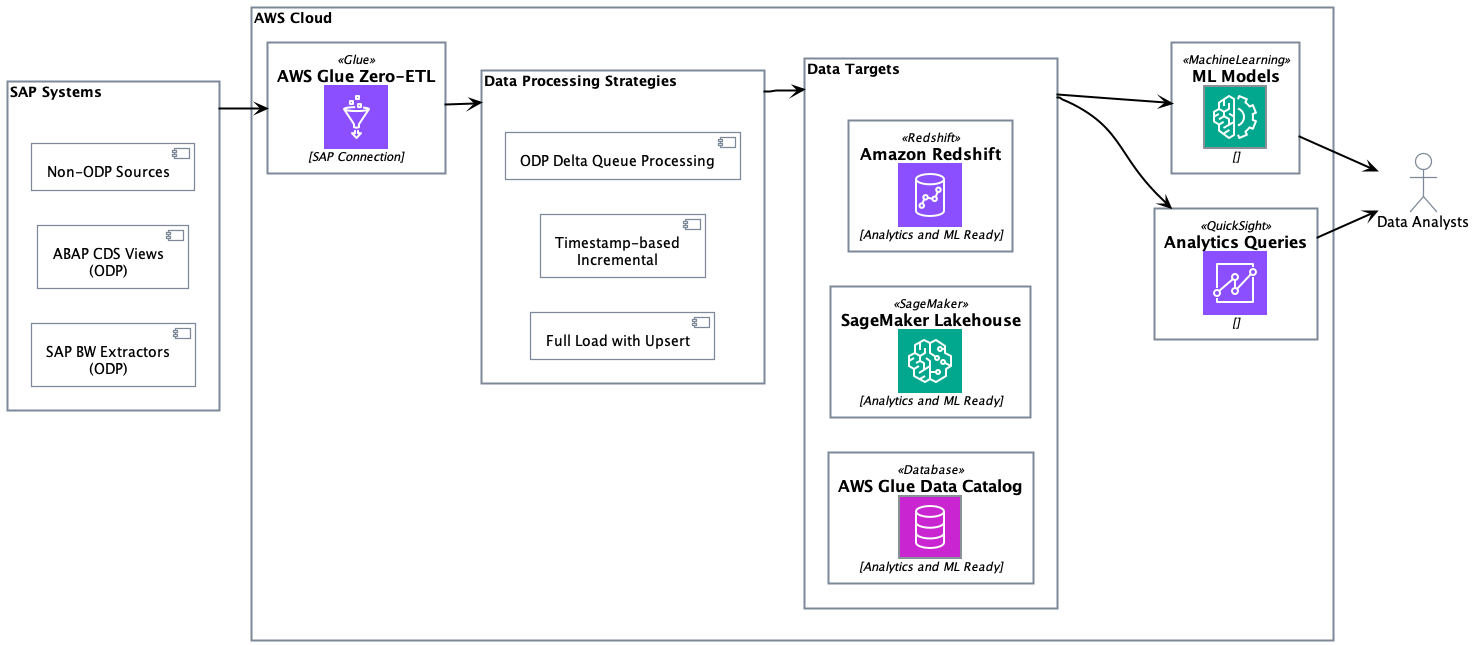
The SAP connector works with both AWS Glue Studio or AWS managed replication with zero-ETL. Self-managed replication in AWS Glue Studio provides full control over data processing units, replication frequencies, adjusting price-performance, page size, data filters, destinations, file formats, data transformation, and writing your own code with selected runtime. AWS managed data replication in zero-ETL removes burden of custom configurations and provides an AWS managed alternative, allowing replication frequencies between 15 minutes to 6 days. The following solution architecture demonstrates the approaches of ingesting ODP and non-ODP SAP data using zero-ETL from various SAP sources and writing to Amazon Redshift, SageMaker lakehouse, and S3 Tables.

Change data capture for ODP sources

SAP ODP is a data extraction framework that enables incremental and data replication from SAP source systems to target systems. The ODP framework provides applications (subscribers) to request data from supported objects, such as BW extractors, CDS views, and BW objects, in an incremental manner.

AWS Glue zero-ETL data ingestion begins with executing a full initial load of entity data to establish the baseline dataset in the target system. After the initial full load is complete, SAP provisions a delta queue known as Operational Delta Queue (ODQ), which captures data changes, including deletions. The delta token is sent to the subscriber during the initial load and persisted within the zero-ETL internal state management system.

The incremental processing retrieves the last stored delta token from the state store, then sends a delta change request to SAP using this token using the OData protocol. The system processes returned INSERT/UPDATE/DELETE operations through the SAP ODQ mechanism and receives a new delta token from SAP even in scenarios where no records were modified. This new token is persisted in the state management system after successful ingestion. In error scenarios, the system preserves the existing delta token state, enabling retry mechanics without data loss.

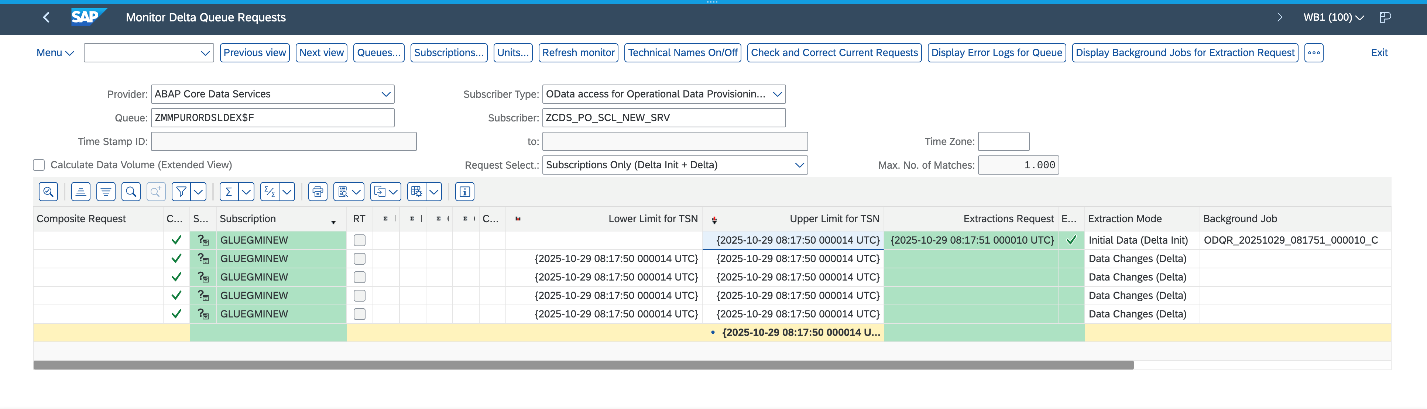
The following screenshot illustrates a successful initial load followed by four incremental data ingestions on the SAP system.

Change data capture for non-ODP sources

Non-ODP structures are OData services that are not ODP enabled. These are APIs, functions, views, or CDS views that are exposed directly without the ODP framework. Data is extracted using this mechanism; however, incremental data extraction depends on the nature of the object. If the object, for example, contains a “last modified date” field, it is used to track changes and provide incremental data extraction.

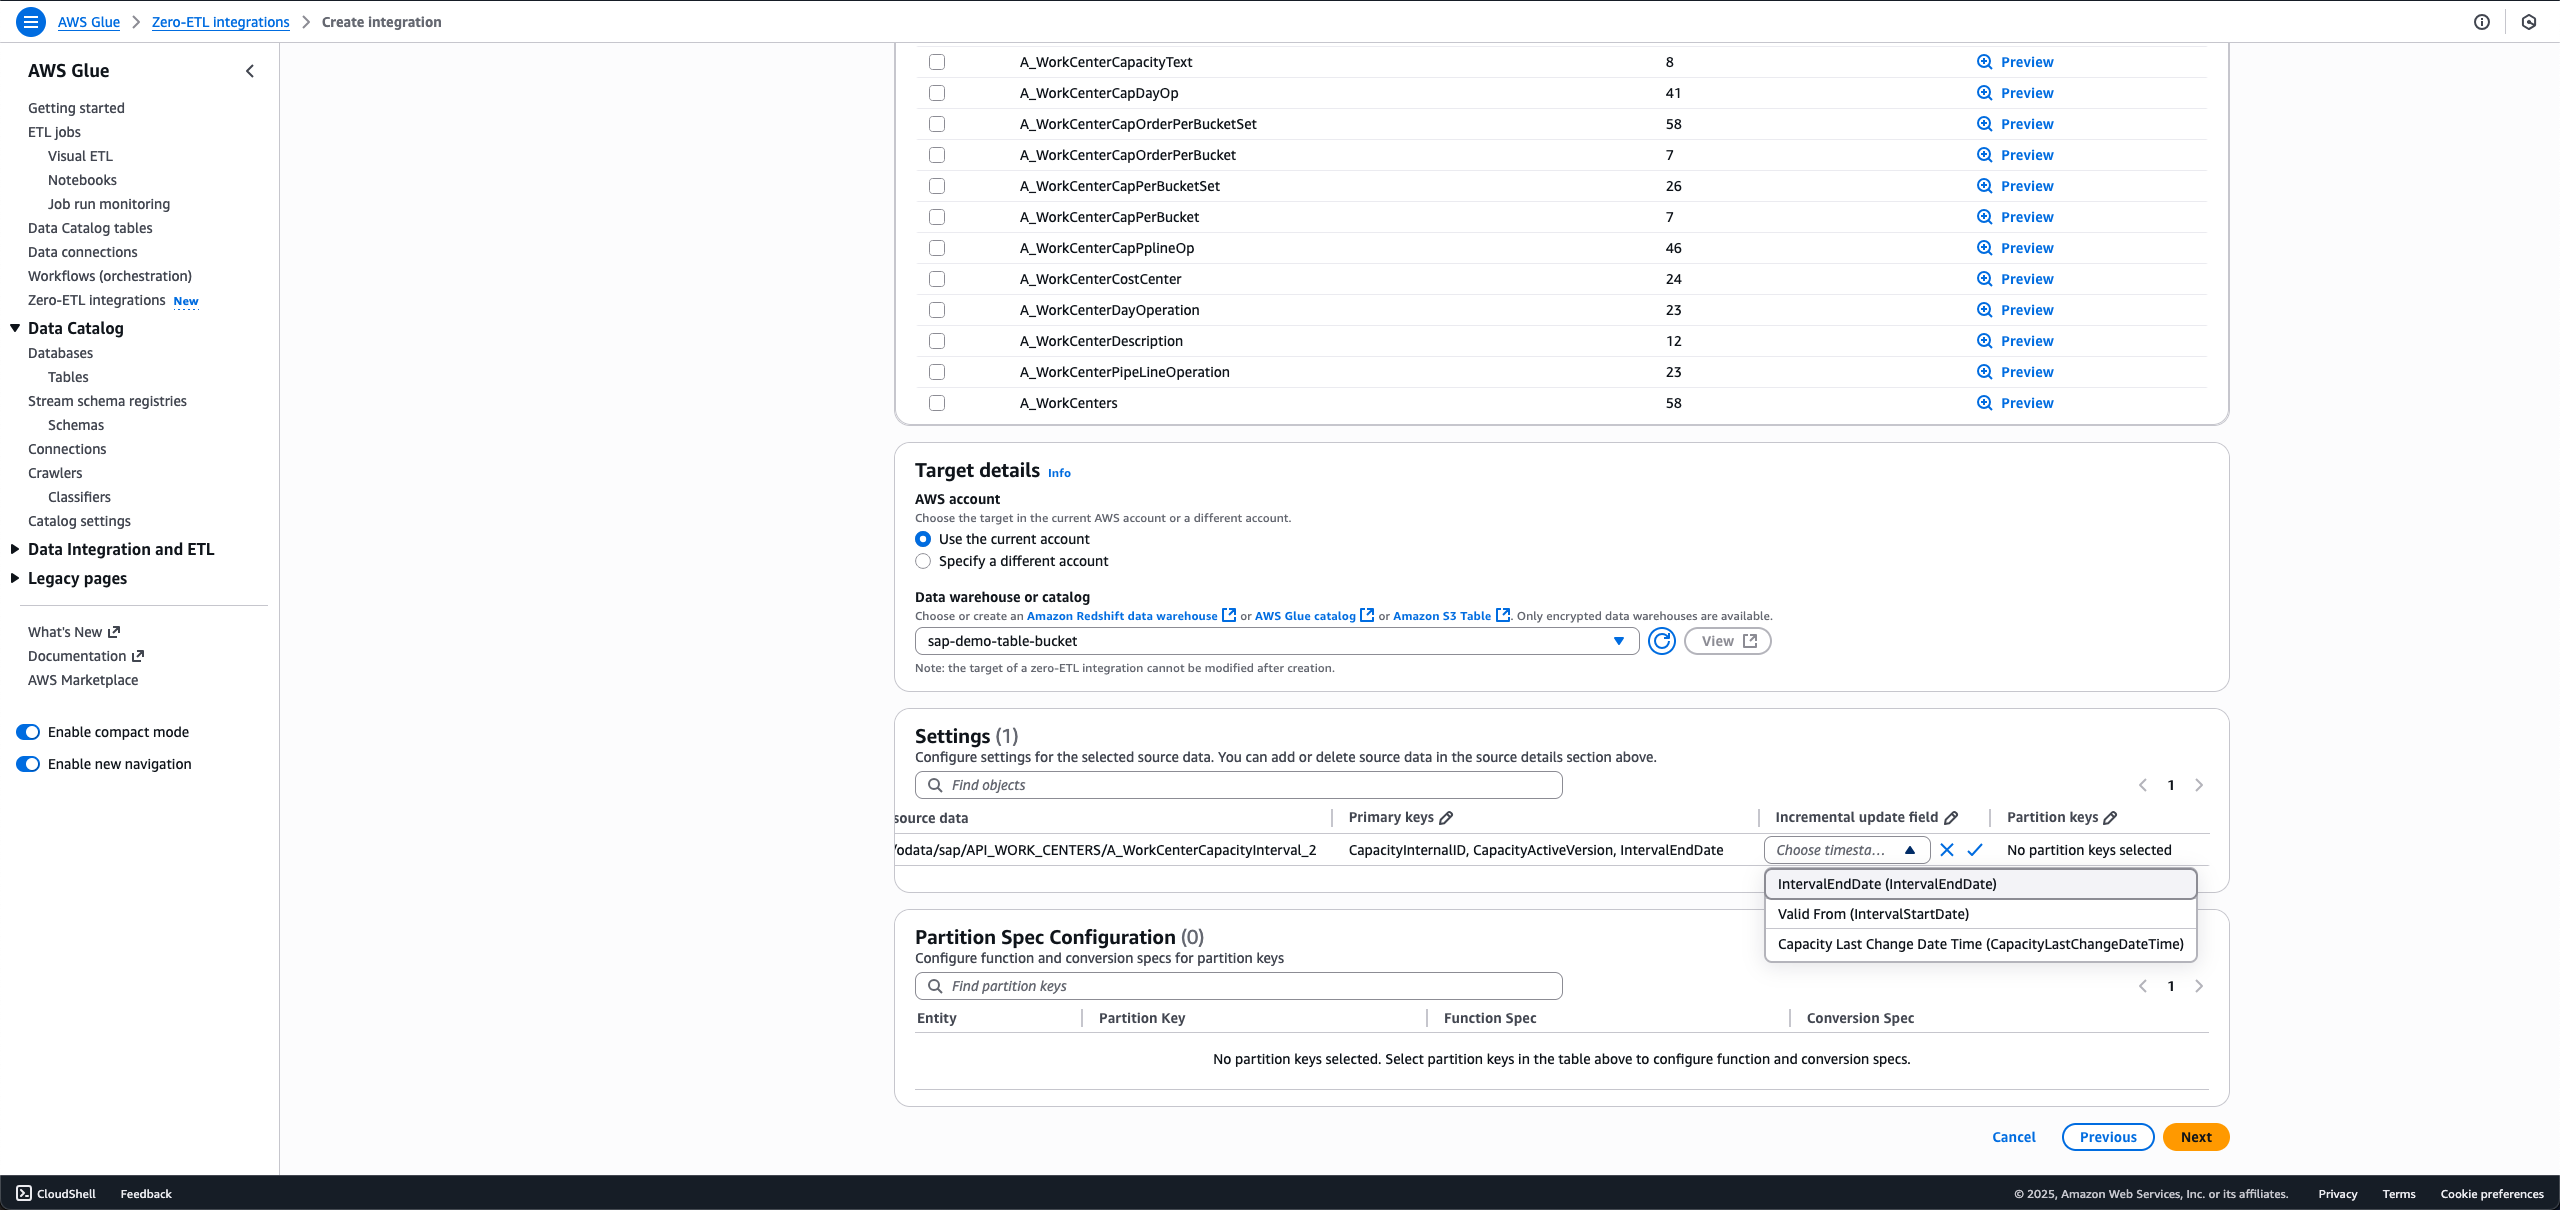
AWS Glue zero-ETL provides out-of-the-box incremental data extraction for non-ODP OData services, provided the entity includes a field to track changes (last modified date or time). For such SAP services, zero-ETL provides two approaches for data ingestion: timestamp-based incremental processing and full load.

Timestamp-based incremental processing

Timestamp-based incremental processing uses customers’ configured timestamp fields in zero-ETL to optimize the data extraction process. The zero-ETL system establishes a starting timestamp that serves as the foundation for subsequent incremental processing operations. This timestamp, known as the watermark, is crucial for facilitating data consistency. The query construction mechanism builds OData filters based on timestamp comparisons. These queries extract records that are created or modified since the last successful processing execution. The system’s watermark management functionality maintains tracking of the highest timestamp value from each processing cycle and uses this information as the starting point for subsequent executions. The zero-ETL system performs an upsert on the target using the configured primary keys. This approach facilitates proper handling of updates while maintaining data integrity. After each successful target system update, the watermark timestamp is advanced, creating a reliable checkpoint for future processing cycles.

However, the timestamp-based approach has a limitation: it can’t track physical deletions because SAP systems don’t maintain deletion timestamps. In scenarios where timestamp fields are either unavailable or not configured, the system transitions to a full load with upsert processing.

Full load

The full load approach serves as both a standalone approach and a fallback mechanism when timestamp-based processing is not feasible. This method involves extracting the complete entity dataset during each processing cycle, making it suitable for scenarios where change tracking is not available or required. The extracted dataset is upserted in the target system. The upsert processing logic handles both new record insertions and updates to existing records.

When to choose incremental or full load

The timestamp-based incremental processing approach offers optimal performance and resource utilization for large datasets with frequent updates. Data transfer volumes are reduced through the selective transfer of only modified records, resulting in reductions in network traffic. This optimization directly translates into lower operational costs. The full load with upsert facilitates data synchronization in scenarios where incremental processing is not feasible.

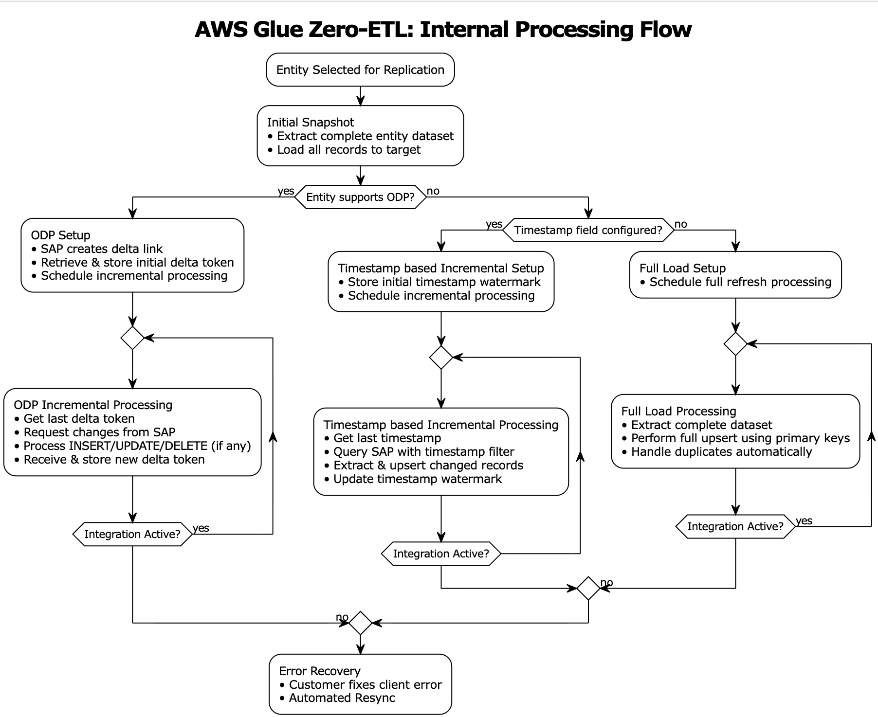
Together, these approaches form a complete solution for zero-ETL integration with non-ODP SAP structures, addressing the diverse requirements of enterprise data integration scenarios. Organizations using these approaches should evaluate their specific use cases, data volumes, and performance requirements when choosing between the two approaches.The following diagram illustrates the SAP data ingestion workflow.

Flowchart diagram showing a data replication process. Starts with 'Entity Selected for Replication' at the top, flows to 'Initial Snapshot' step, then branches based on a decision 'Entity supports ODP?' into three paths: left path shows 'ODP Setup' leading to 'ODP Incremental Processing', middle path shows 'Timestamp based Incremental Setup' leading to 'Timestamp based Incremental Processing', and right path shows 'Full Load Setup' leading to 'Full Load Processing'. Each processing path includes an 'Integration Active?' decision point that loops back if yes, or flows to 'Error Recovery' at the bottom if no. The diagram uses rounded rectangles for processes, diamonds for decisions, and arrows showing flow direction.

Observing SAP zero-ETL integrations

AWS Glue maintains state management, logs, and metrics using Amazon CloudWatch logs. For instructions to configure observability, refer to Monitoring an integration. Make sure AWS Identity and Access Management (IAM) roles are configured for log delivery. The integration is monitored from both source ingestion and writing to the chosen target.

Monitoring source ingestion

The integration of AWS Glue zero-ETL with CloudWatch provides monitoring capabilities to track and troubleshoot the data integration processes. Through CloudWatch, you can access detailed logs, metrics, and events that help identify issues, monitor performance, and maintain operational health of your SAP data integrations. Let’s look at a few instances of success and error scenarios.

Scenario 1: Missing permissions on your role

This error occurred during a data integration process in AWS Glue when attempting to access SAP data. The connection encountered a CLIENT_ERROR with a 400 Bad Request status code, indicating that the role has missing permissions:

{
    "eventTimestamp": 1755031897157,
    "integrationArn": "arn:aws:glue:us-east-2:012345678901:integration:1da4dccd-96ce-4661-8ef1-bf216623d65f",
    "sourceArn": "arn:aws:glue:us-east-2:012345678901:connection/SAPOData-sap-glue-dev",
    "level": "ERROR",
    "messageType": "IngestionFailed",
    "details": {
        "loadType": "",
        "errorMessage": "You do not have the necessary permissions to access the glue connection. make sure that you have the correct IAM permissions to access AWS Glue resources.",
        "errorCode": "CLIENT_ERROR"
    }
}

Scenario 2: Broken delta links

The CloudWatch log indicates an issue with missing delta tokens during data synchronization from SAP to AWS Glue. The error occurs when attempting to access the SAP sales document item table FactsOfCSDSLSDOCITMDX through the OData service. The absence of delta tokens, which are needed for incremental data loading and tracking changes, has resulted in a CLIENT_ERROR (400 Bad Request) when the system tried to open the data extraction API RODPS_REPL_ODP_OPEN:

{
    "eventTimestamp": 1760700305466,
    "integrationArn": "arn:aws:glue:us-east-1:012345678901:integration:f62e1971-092c-46a3-ba88-d32f4c6cd649",
    "sourceArn": "arn:aws:glue:us-east-1:012345678901:connection/SAPOData-sap-glue-dev",
    "level": "ERROR",
    "messageType": "IngestionFailed",
    "details": {
        "tableName": "/sap/opu/odata/sap/Z_C_SALESDOCUMENTITEMDEX_SRV/FactsOfCSDSLSDOCITMDX",
        "loadType": "",
        "errorMessage": "Received an error from SAPOData: Could not open data access via extraction API RODPS_REPL_ODP_OPEN. Status code 400 (Bad Request).",
        "errorCode": "CLIENT_ERROR"
    }

Scenario 3: Client errors on SAP data ingestion

This CloudWatch log reveals a client exception scenario where the SAP entity EntityOf0VENDOR_ATTR is not located or accessed through the OData service. This CLIENT_ERROR occurs when the AWS Glue connector attempts to parse the response from the SAP system but fails, due to either the entity being non-existent in the source SAP system or the SAP instance being temporarily unavailable:

{
    "eventTimestamp": 1752676327649,
    "integrationArn": "arn:aws:glue:us-east-1:012345678901:integration:9f1acbc0-599f-47d2-8e84-e9779976af59",
    "sourceArn": "arn:aws:glue:us-east-1:012345678901:connection/SAPOData-sap-glue-dev",
    "level": "ERROR",
    "messageType": "IngestionFailed",
    "details": {
        "tableName": "/sap/opu/odata/sap/ZVENDOR_ATTR_SRV/EntityOf0VENDOR_ATTR",
        "loadType": "",
        "errorMessage": "Data read from source failed for entity /sap/opu/odata/sap/ZVENDOR_ATTR_SRV/EntityOf0VENDOR_ATTR using connector SAPOData; ErrorMessage: Glue connector returned client exception. The response from the connector application couldn't be parsed.",
        "errorCode": "CLIENT_ERROR"
    }
}

Monitoring target write

Zero-ETL employs monitoring mechanisms depending on the target system. For Amazon Redshift targets, it uses the svv_integration system view, which provides detailed information about integration status, job execution, and data movement statistics. When working with SageMaker lakehouse targets, zero-ETL tracks integration states through the zetl_integration_table_state table, which maintains metadata about synchronization status, timestamps, and execution details. Additionally, you can use CloudWatch logs to monitor the integration progress, capturing information about successful commits, metadata updates, and potential issues during the data writing process.

Scenario 1: Successful processing on SageMaker lakehouse target

The CloudWatch logs show successful data synchronization activity for the plant table using CDC mode. The first log entry (IngestionCompleted) confirms the successful completion of the ingestion process at timestamp 1757221555568, with a last sync timestamp of 1757220991999. The second log (IngestionTableStatistics) provides detailed statistics of the data modifications, showing that during this CDC sync 300 new records were inserted, 8 records were updated, and 2 records were deleted from the target database gluezetl. This level of detail helps in monitoring the volume and types of changes being propagated to the target system.

{
    "eventTimestamp": 1757221555568,
    "integrationArn": "arn:aws:glue:us-east-1:012345678901:integration:b7a1c69a-e180-4d27-b71d-5fcf196d9d2d",
    "sourceArn": "arn:aws:glue:us-east-1:012345678901:connection/mam301",
    "targetArn": "arn:aws:glue:us-east-1:012345678901:database/gluezetl",
    "level": "VERBOSE",
    "messageType": "IngestionCompleted",
    "details": {
        "tableName": "plant",
        "loadType": "CDC",
        "message": "Successfully completed ingestion",
        "lastSyncedTimestamp": 1757220991999,
        "consumedResourceUnits": "10"
    }
}

{
    "eventTimestamp": 1757222506936,
    "integrationArn": "arn:aws:glue:us-east-1:012345678901:integration:b7a1c69a-e180-4d27-b71d-5fcf196d9d2d",
    "sourceArn": "arn:aws:glue:us-east-1:012345678901:connection/mam301",
    "targetArn": "arn:aws:glue:us-east-1:012345678901:database/gluezetl",
    "level": "INFO",
    "messageType": "IngestionTableStatistics",
    "details": {
        "tableName": "plant",
        "loadType": "CDC",
        "insertCount": 300,
        "updateCount": 8,
        "deleteCount": 2
    }
}

Scenario 2: Metrics on Amazon SageMaker lakehouse target

The zetl_integration_table_state table in SageMaker lakehouse provides a view of integration status and data modification metrics. In this example, the table shows a successful integration for an SAP CDS view table with integration ID 62b1164f-5b85-45e4-b8db-9aa7ab841e98 in the testdb database. The record indicates that at timestamp 1733000485999, there were 10 insertion records processed (recent_insert_record_count: 10), with no updates or deletions (both counts at 0). This table serves as a monitoring tool, providing a centralized view of integration states and detailed statistics about data modifications, making it straightforward to track and verify data synchronization activities in the lakehouse.

+---+--------------------------------------+---------------+----------------------------------------------------------+-----------+--------+-----------------+-------------------------------+------------------------------+------------------------------+------------------------------+
| # | integration_id                       | target_database | table_name                                               | table_state | reason | last_updated_timestamp | recent_ingestion_record_count | recent_insert_record_count | recent_update_record_count | recent_delete_record_count |
+---+--------------------------------------+---------------+----------------------------------------------------------+-----------+--------+-----------------+-------------------------------+------------------------------+------------------------------+------------------------------+
| 2 | 62b1164f-5b85-45e4-b8db-9aa7ab841e98 | testdb        | _sap_opu_odata_sap_zcds_po_scl_new_srv_factsofzmmpurordsldex | SUCCEEDED |        | 1733000485999   | 10                            | 0                            | 0                            | 0                            |
+---+--------------------------------------+---------------+----------------------------------------------------------+-----------+--------+-----------------+-------------------------------+------------------------------+------------------------------+------------------------------+

Scenario 3: Redshift monitoring system uses two views to track zero-ETL integration status

svv_integration provides a high-level overview of the integration status, showing that integration ID 03218b8a-9c95-4ec2-81ad-dd4d5398e42a has successfully replicated 18 tables with no failures, and the last checkpoint was at transaction sequence 1761289852999.

+--------------------------------------+---------------+-----------+-----------------+-------------+----------------------------------------------+-------------------------+-----------------------+---------------+------------------+-----------------+-----------------+------------------+-----------------+-----------------+
| integration_id                       | target_database | source    | state           | current_lag | last_replicated_checkpoint                   | total_tables_replicated | total_tables_failed | creation_time | refresh_interval | source_database | is_history_mode | query_all_states | truncatecolumns | accept_invchars |
+--------------------------------------+---------------+-----------+-----------------+-------------+----------------------------------------------+-------------------------+-----------------------+---------------+------------------+-----------------+-----------------+------------------+-----------------+-----------------+
| 03218b8a-9c95-4ec2-81ad-dd4d5398e42a | test_case     | GlueSaaS  | CdcRefreshState | 771754      | {"txn_seq":"1761289852999","txn_id":"0"}     | 18                      | 0                     | 22:54.7       | 0                |                 | FALSE           | FALSE            | FALSE           | FALSE           |
+--------------------------------------+---------------+-----------+-----------------+-------------+----------------------------------------------+-------------------------+-----------------------+---------------+------------------+-----------------+-----------------+------------------+-----------------+-----------------+

svv_integration_table_state offers table-level monitoring details, showing the status of individual tables within the integration. In this case, the SAP material group text entity table is in Synced state, with its last replication checkpoint matching the integration checkpoint (1761289852999). The table currently shows 0 rows and 0 size, suggesting it’s newly created.

+--------------------------------------+---------------+-------------+--------------------------------------------------------------+-------------+----------------------------------------------+--------+-----------------------+------------+------------+-----------------+
| integration_id                       | target_database | schema_name | table_name                                                   | table_state | table_last_replicated_checkpoint             | reason | last_updated_timestamp | table_rows | table_size | is_history_mode |
+--------------------------------------+---------------+-------------+--------------------------------------------------------------+-------------+----------------------------------------------+--------+-----------------------+------------+------------+-----------------+
| 03218b8a-9c95-4ec2-81ad-dd4d5398e42a | test_case     | public      | /sap/opu/odata/sap/ZMATL_GRP_1_SRV/EntityOf0MATL_GRP_1_TEXT | Synced      | {"txn_seq":"1761289852999","txn_id":"0"}     |        | 23:03.8               | 0          | 0          | FALSE           |
+--------------------------------------+---------------+-------------+--------------------------------------------------------------+-------------+----------------------------------------------+--------+-----------------------+------------+------------+-----------------+

These views together provide a comprehensive monitoring solution for tracking both overall integration health and individual table synchronization status in Amazon Redshift.

Prerequisites

In the following sections, we walk through the steps required to set up an SAP connection and using that connection to create a zero-ETL integration. Before implementing this solution, you must have the following in place:

  • An SAP account
  • An AWS account with administrator access
  • Create an S3 Tables target and associate the S3 bucket sap_demo_table_bucket as a location of the database
  • Update AWS Glue Data Catalog settings using the following IAM policy for fine-grained access control of the Data Catalog for zero-ETL
  • Create an IAM role named zero_etl_bulk_demo_role, to be used by zero-ETL to access data from your SAP account
  • Create the secret zero_etl_bulk_demo_secret in AWS Secrets Manager to store SAP credentials

Create connection to SAP instance

To set up a connection to your SAP instance and provide data to access, complete the following steps:

  1. On the AWS Glue console, in the navigation pane under Data catalog, choose Connections, then choose Create Connection.
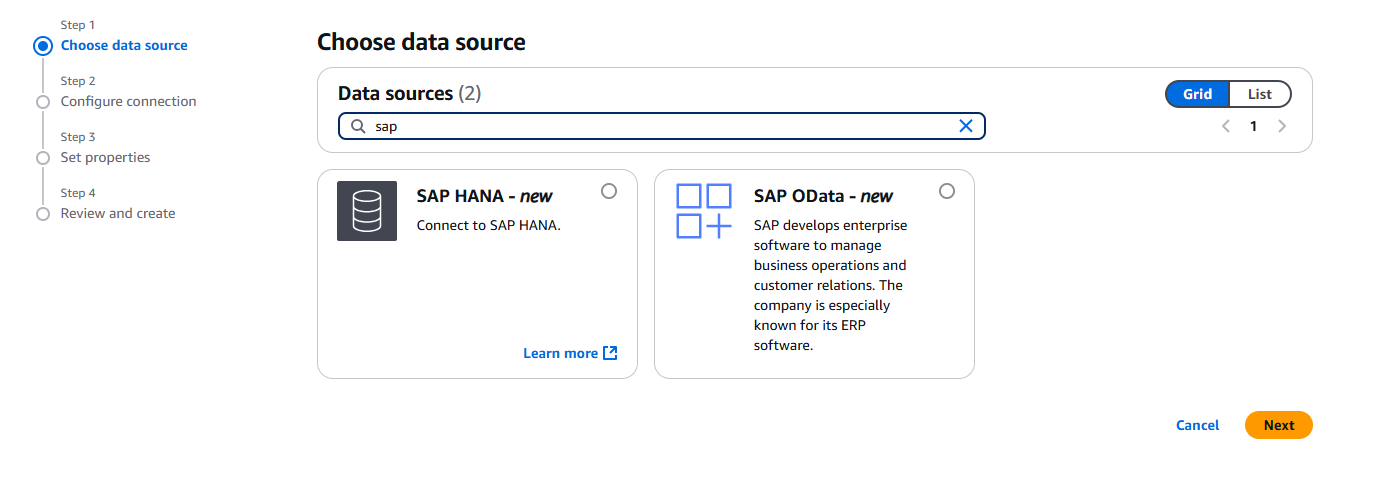
  2. For Data sources, select SAP OData, then choose Next.
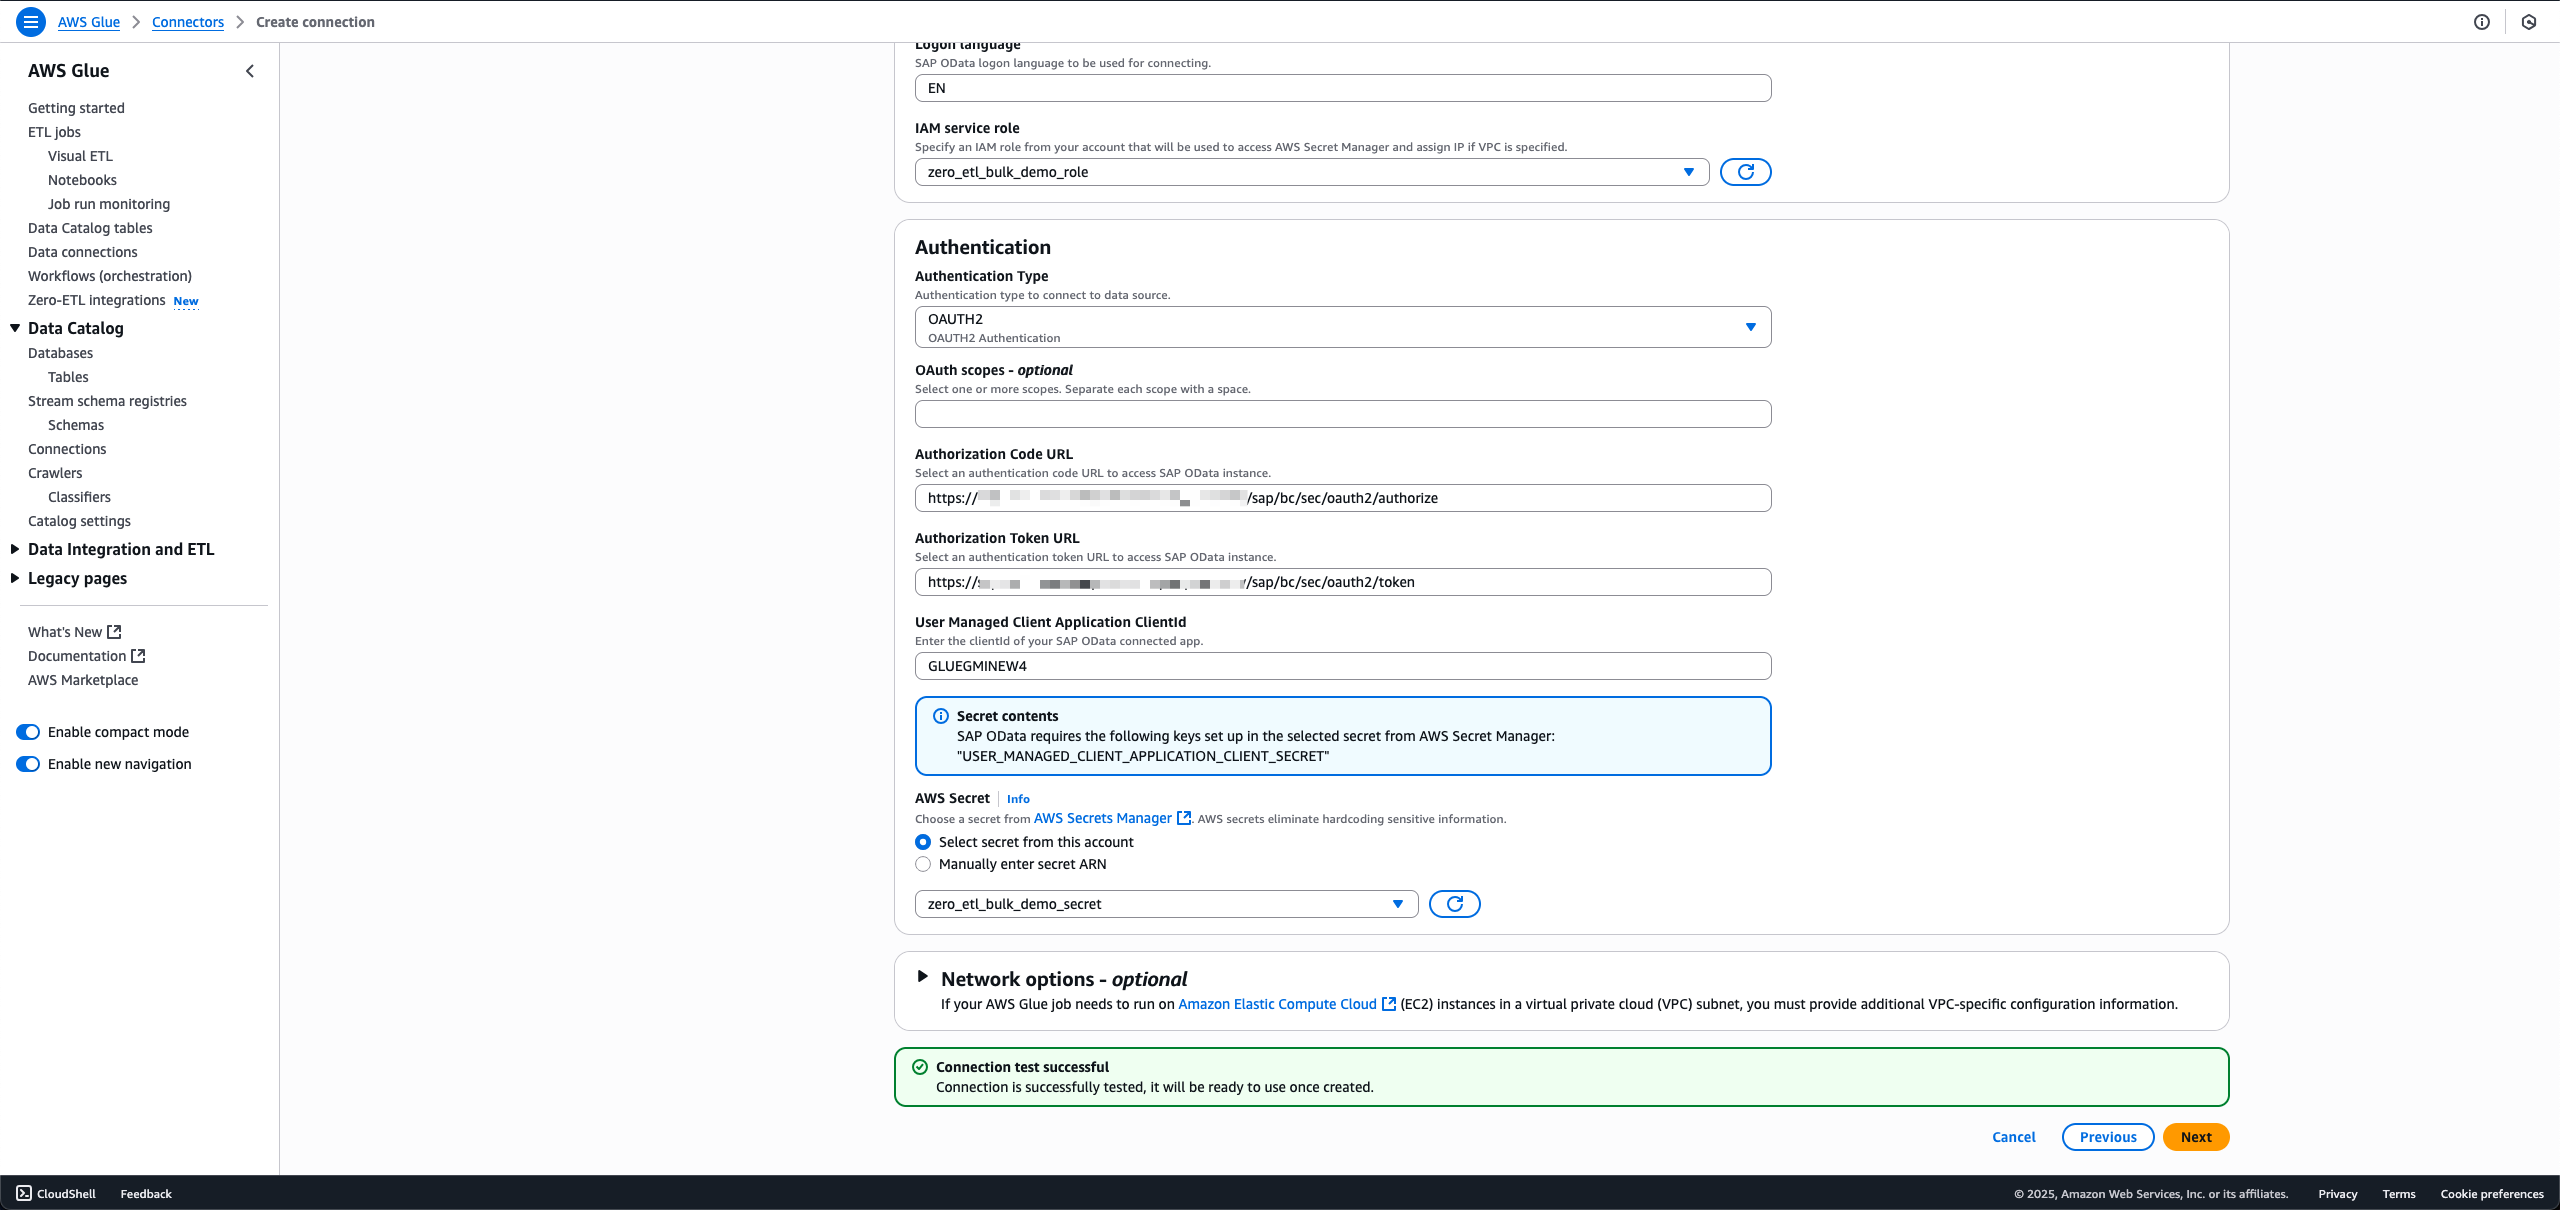
  3. Enter the SAP instance URL.
  4. For IAM service role, choose the role zero_etl_bulk_demo_role (created as a prerequisite).
  5. For Authentication Type, choose the authentication type that you’re using for SAP.
  6. For AWS Secret, choose the secret zero_etl_bulk_demo_secret (created as a prerequisite).
  7. Choose Next.
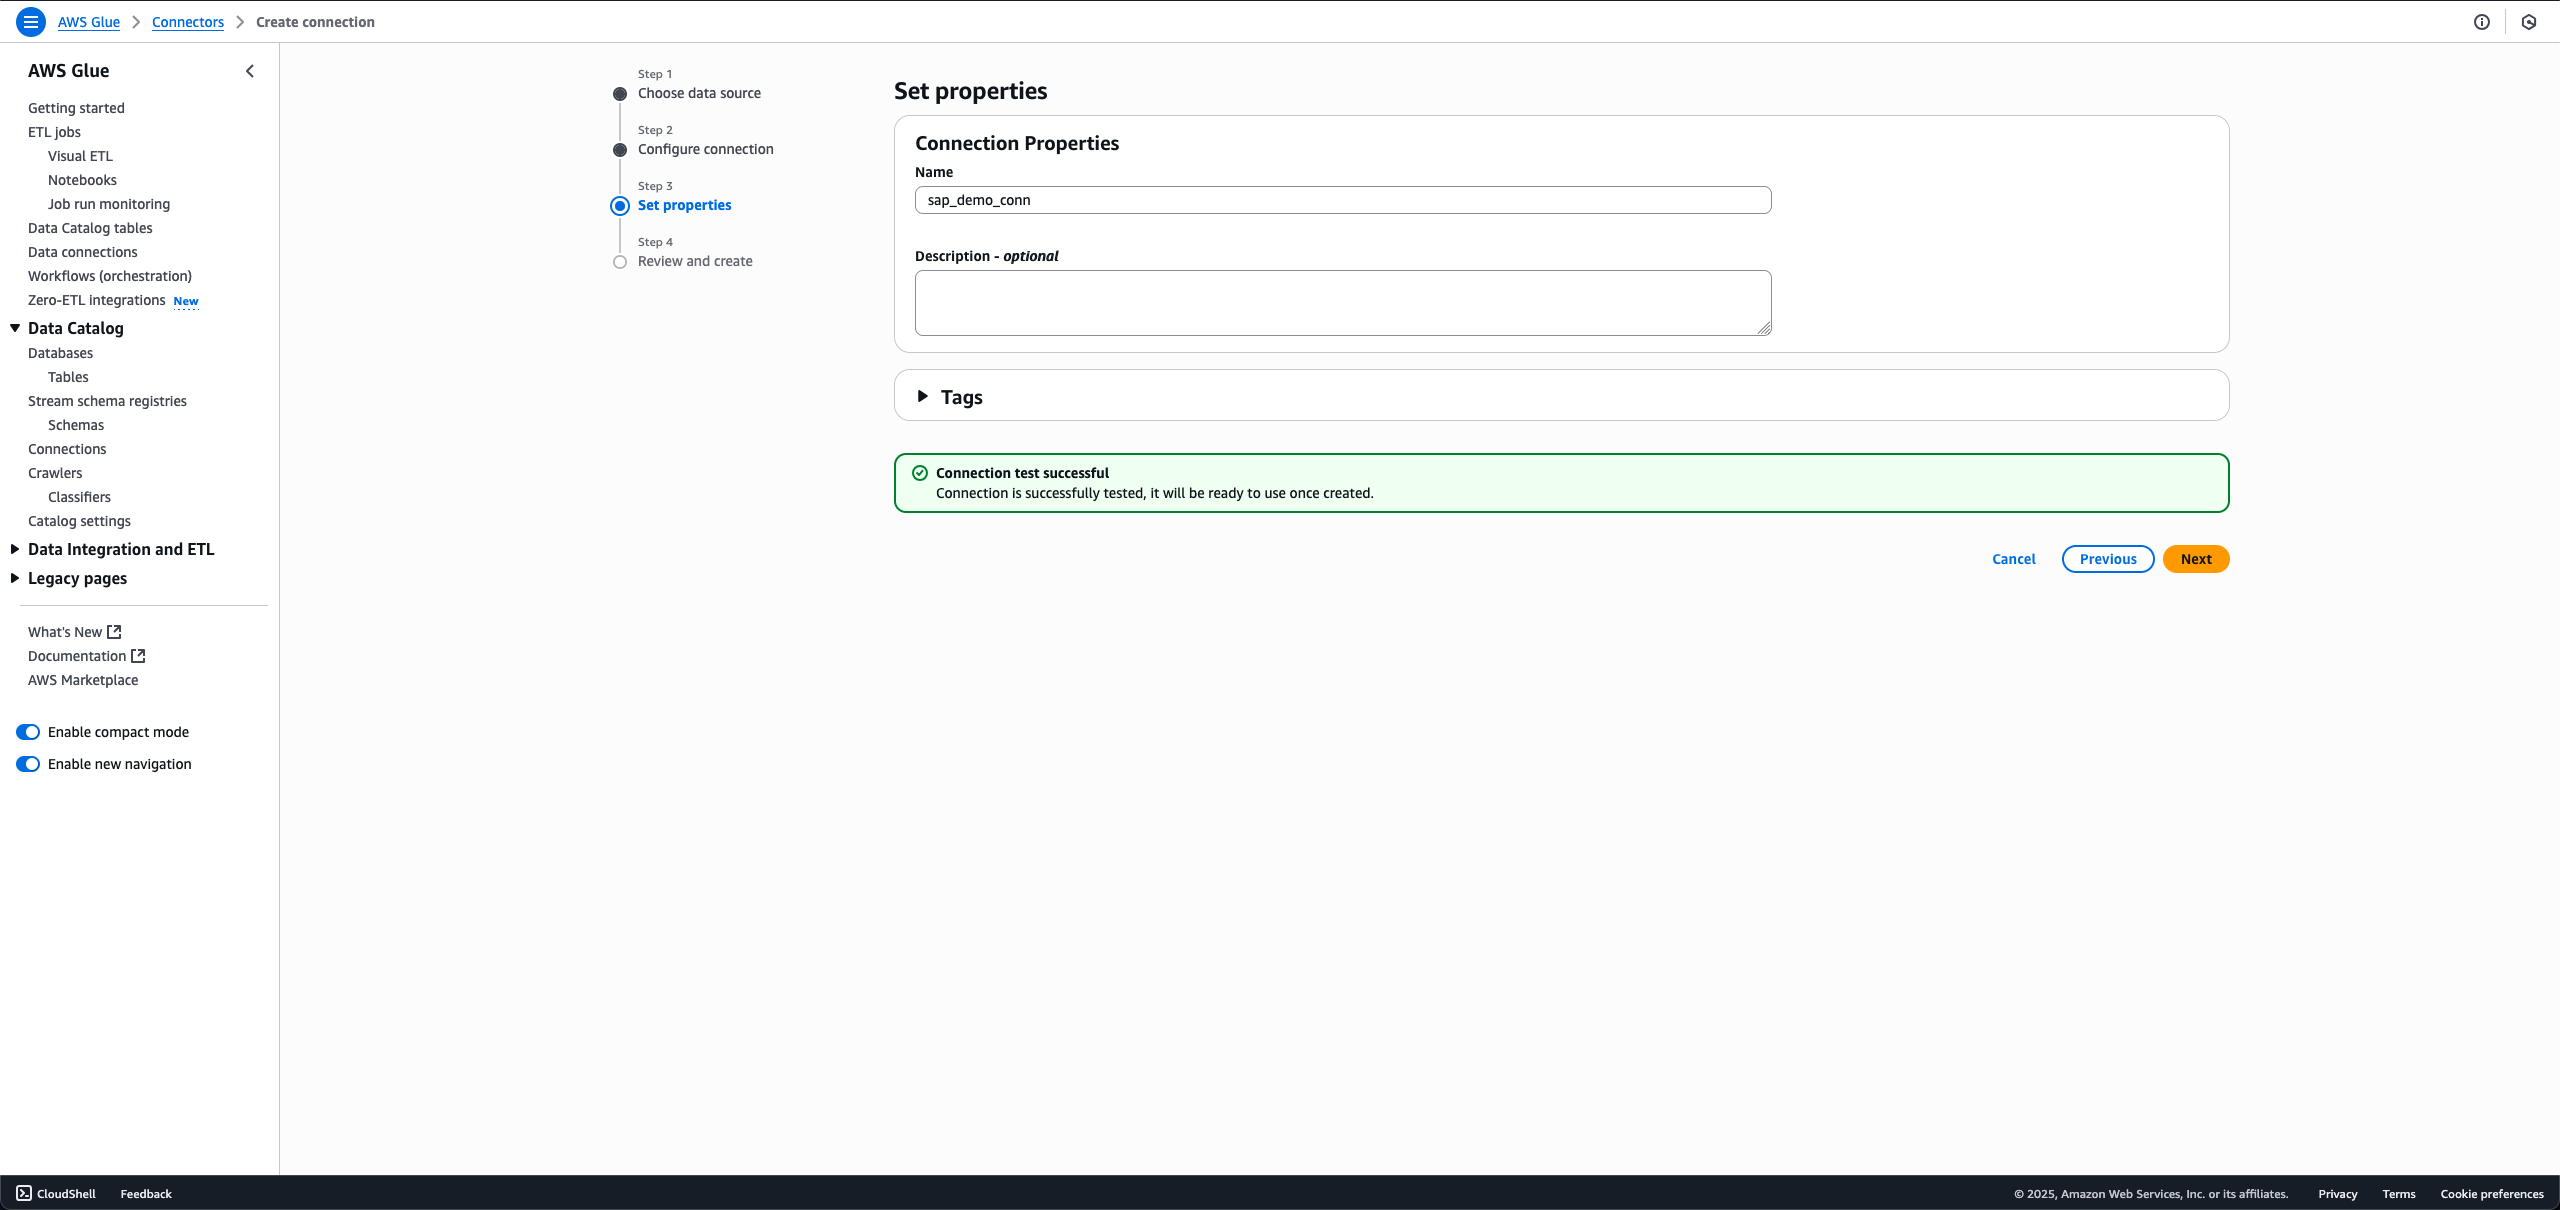
  8. For Name, enter a name, such as sap_demo_conn.
  9. Choose Next.

Create zero-ETL integration

To create the zero-ETL integration, complete the following steps:

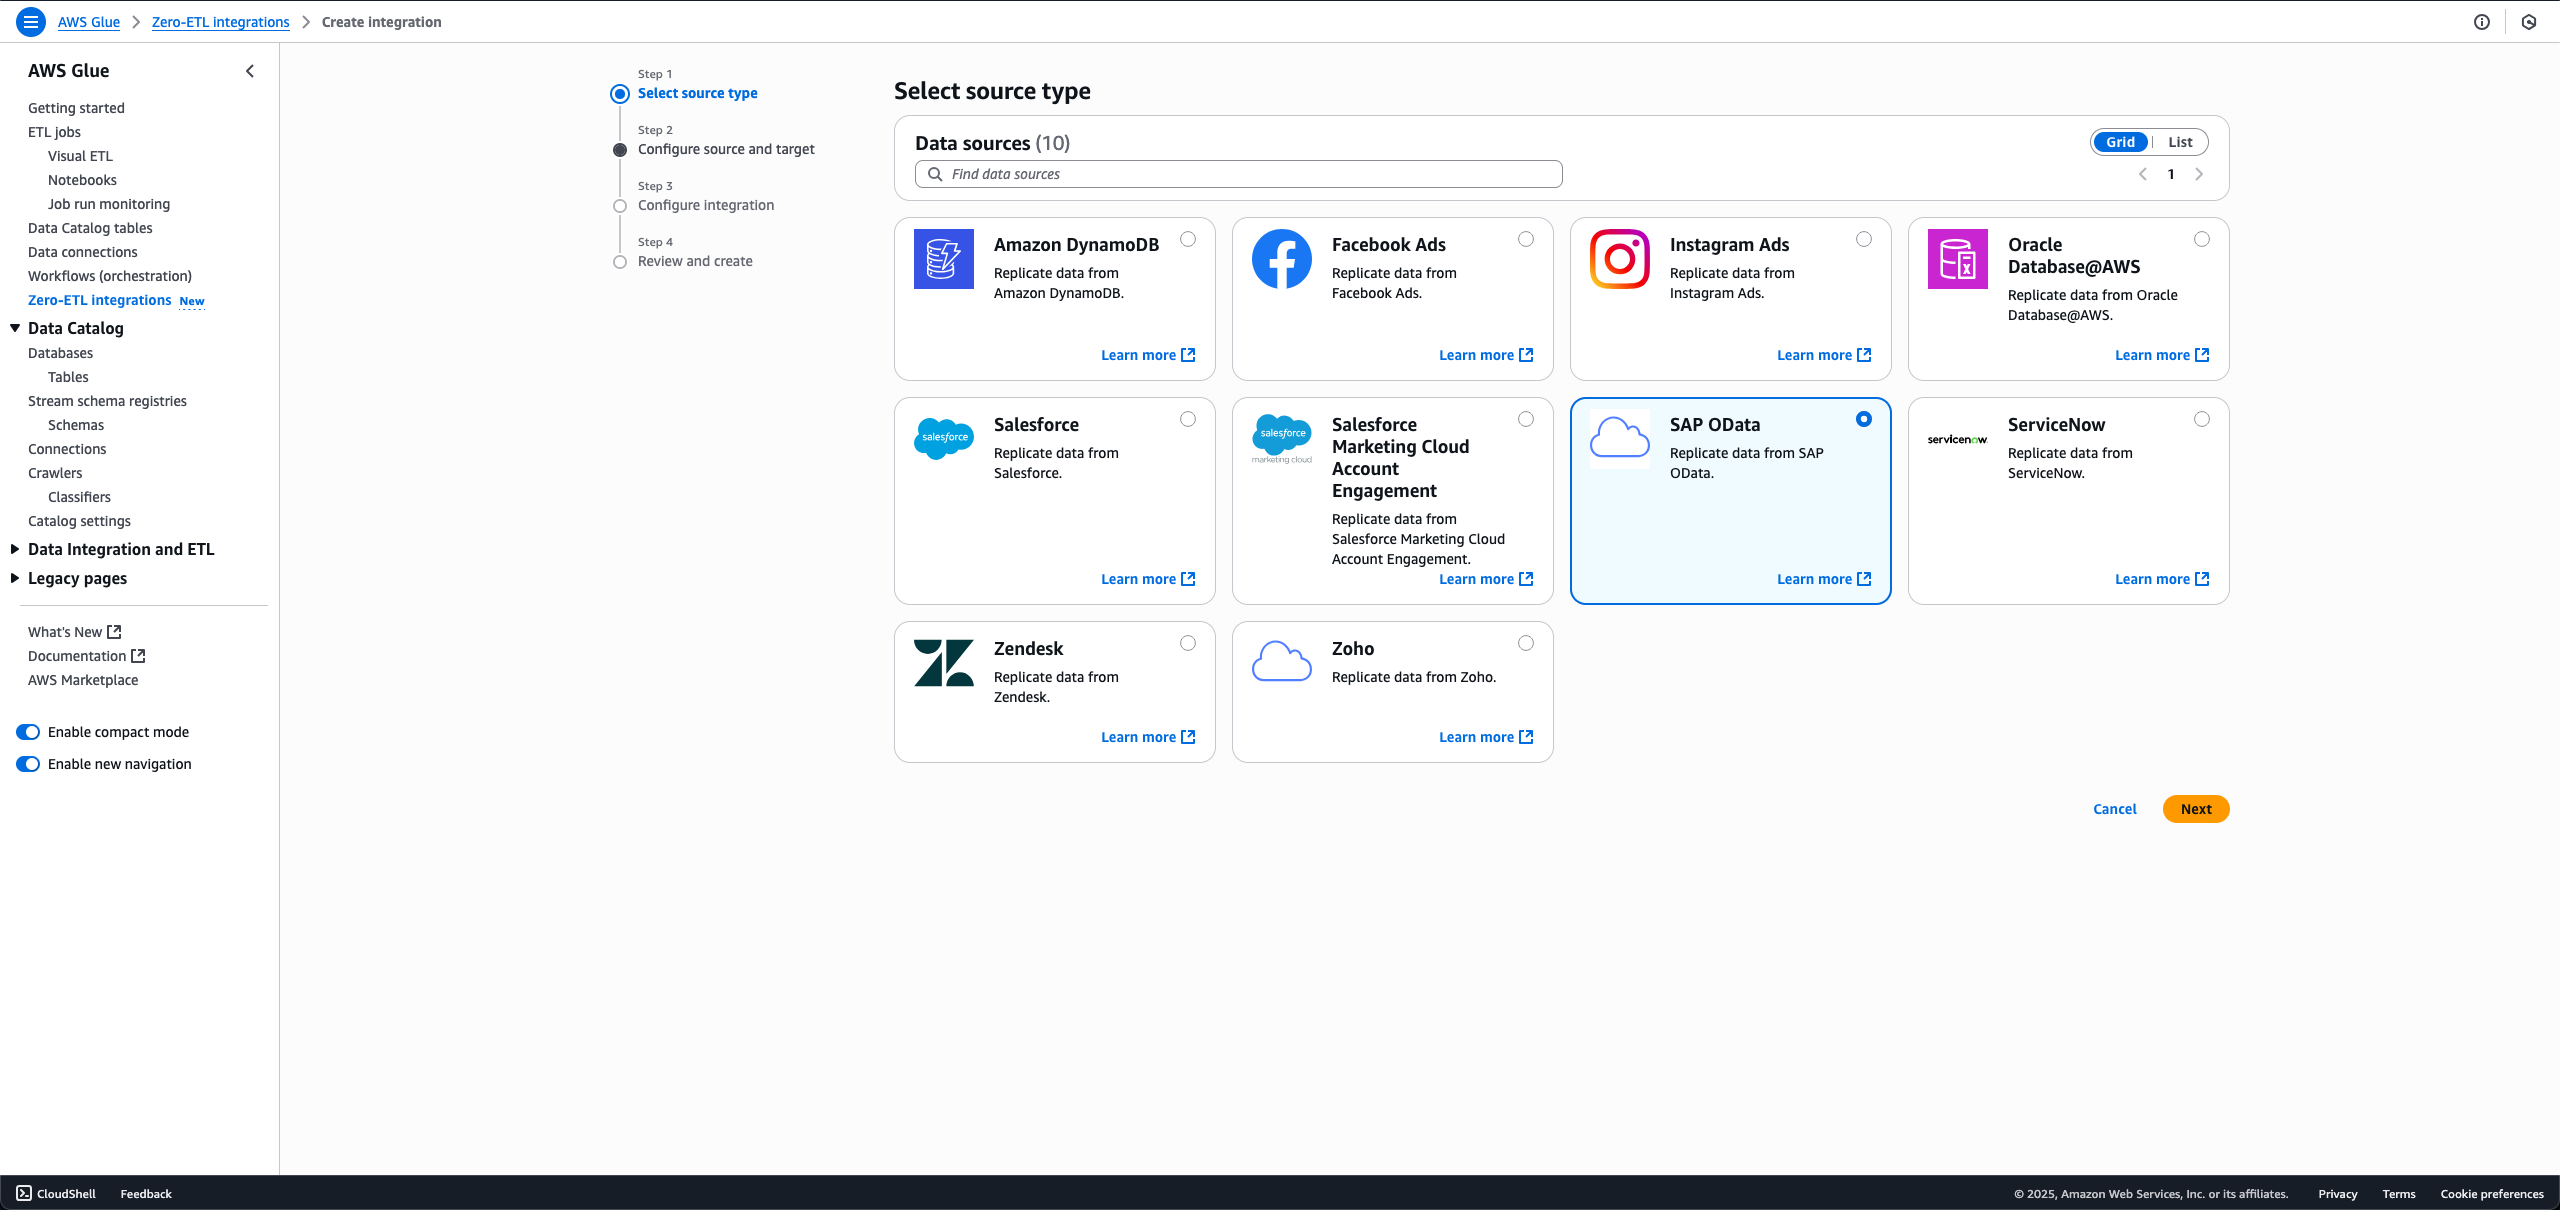
  1. On the AWS Glue console, in the navigation pane under Data catalog, choose Zero-ETL integrations, then choose Create zero-ETL integration.
  2. For Data source, select SAP OData, then choose Next.
  3. Choose the connection name and IAM role that you created in the previous step.
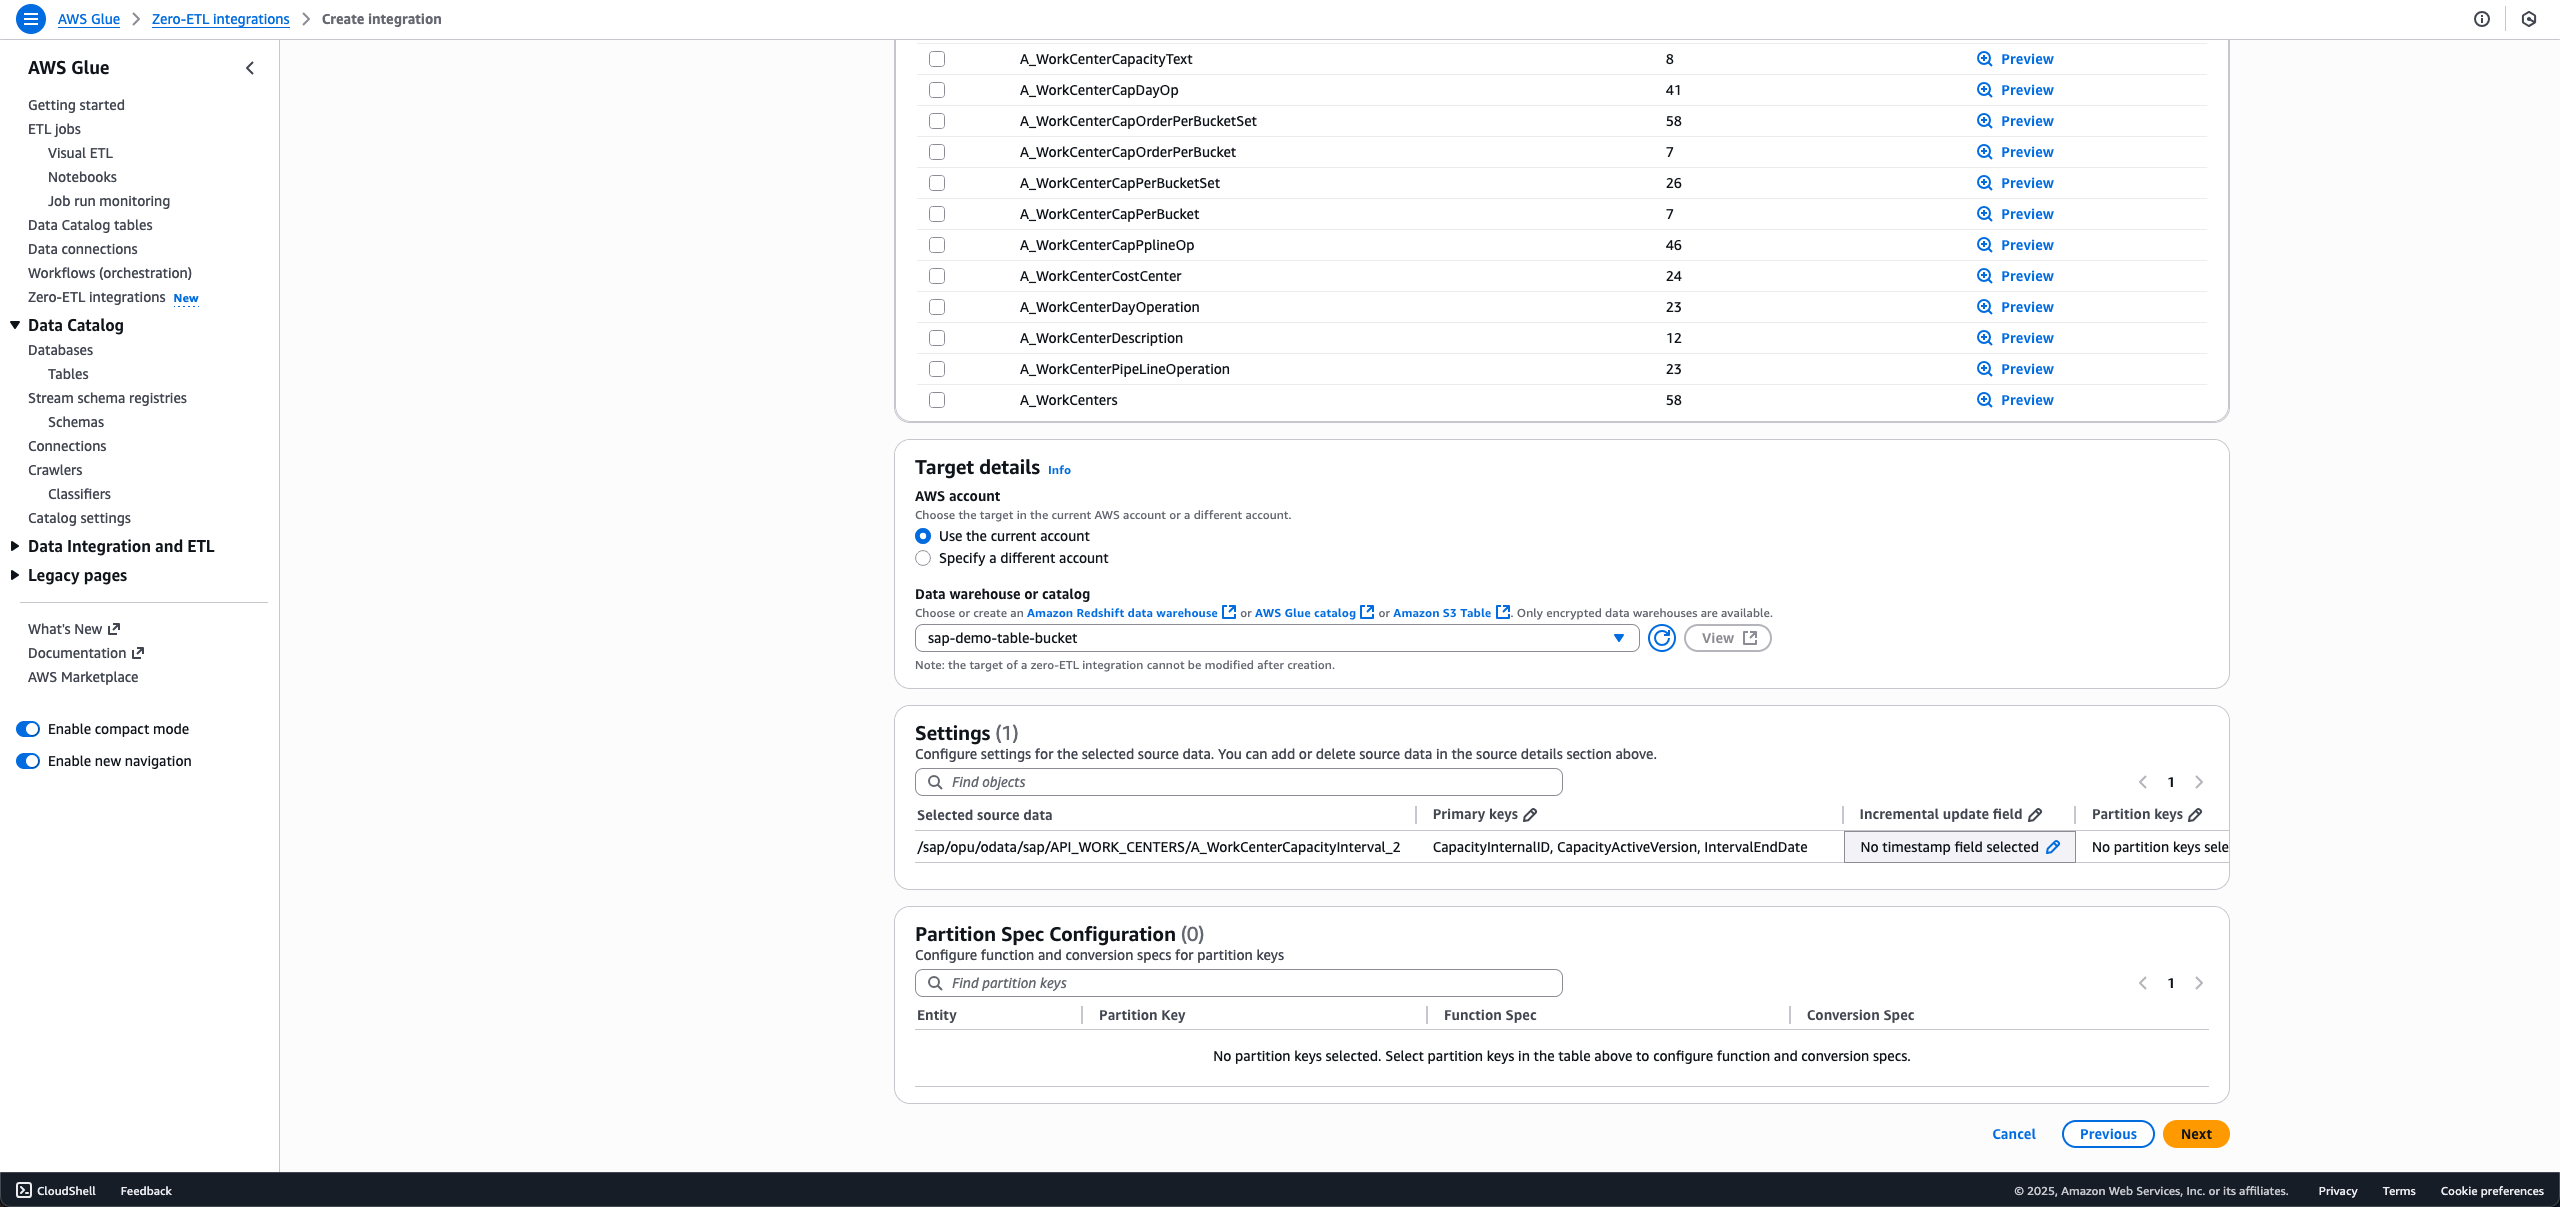
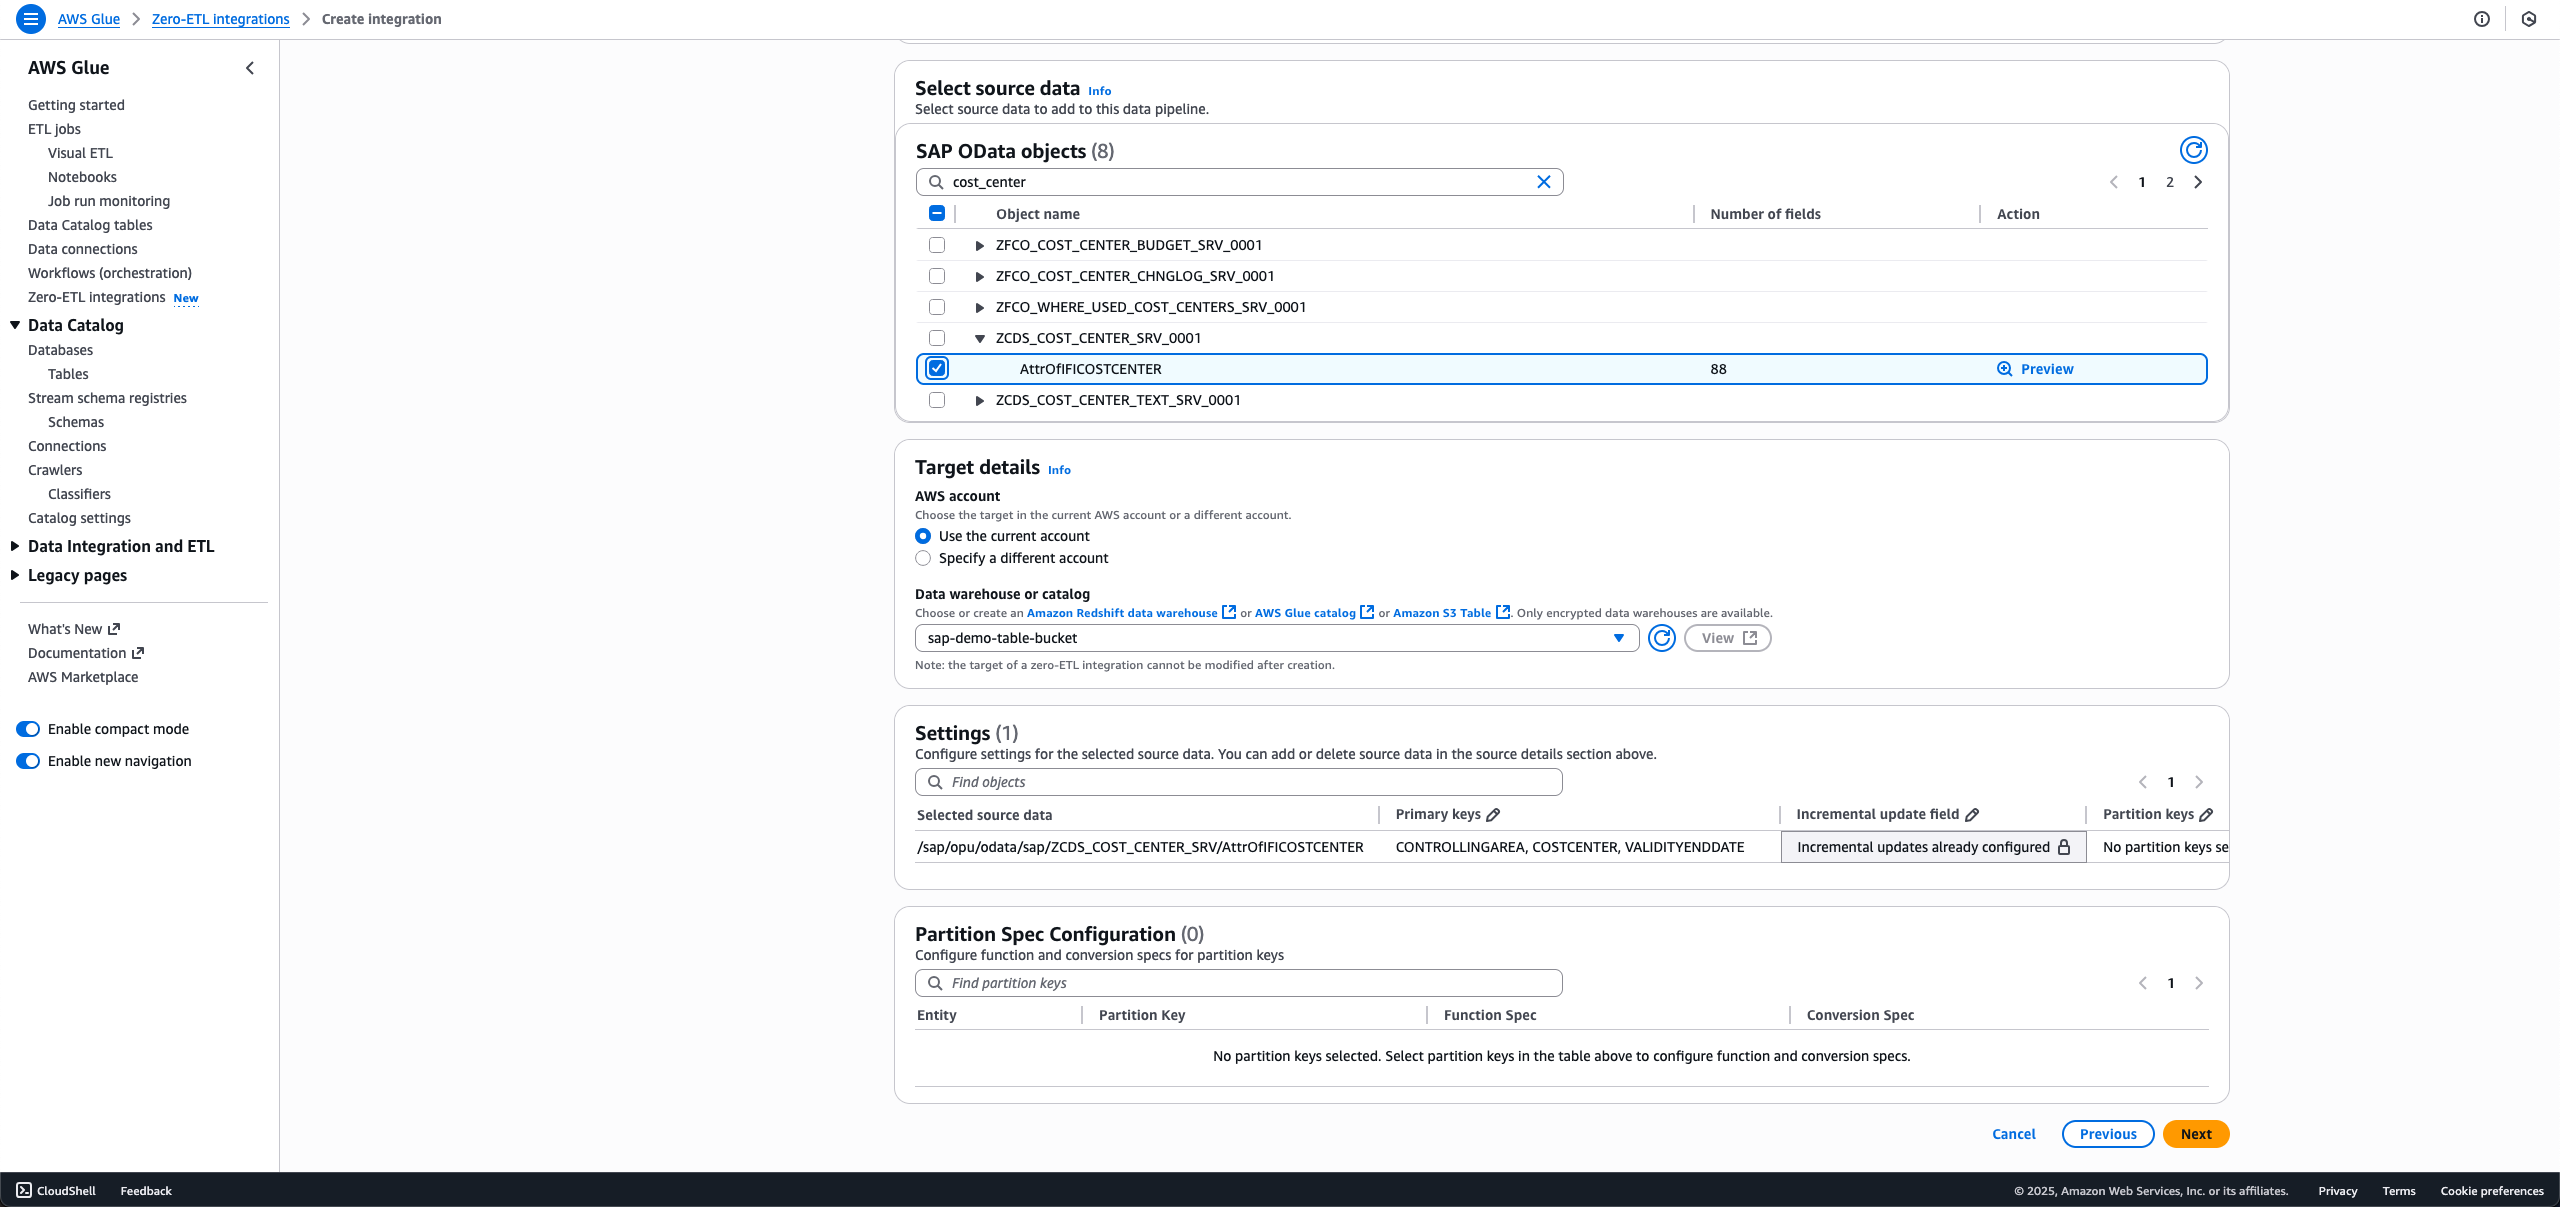
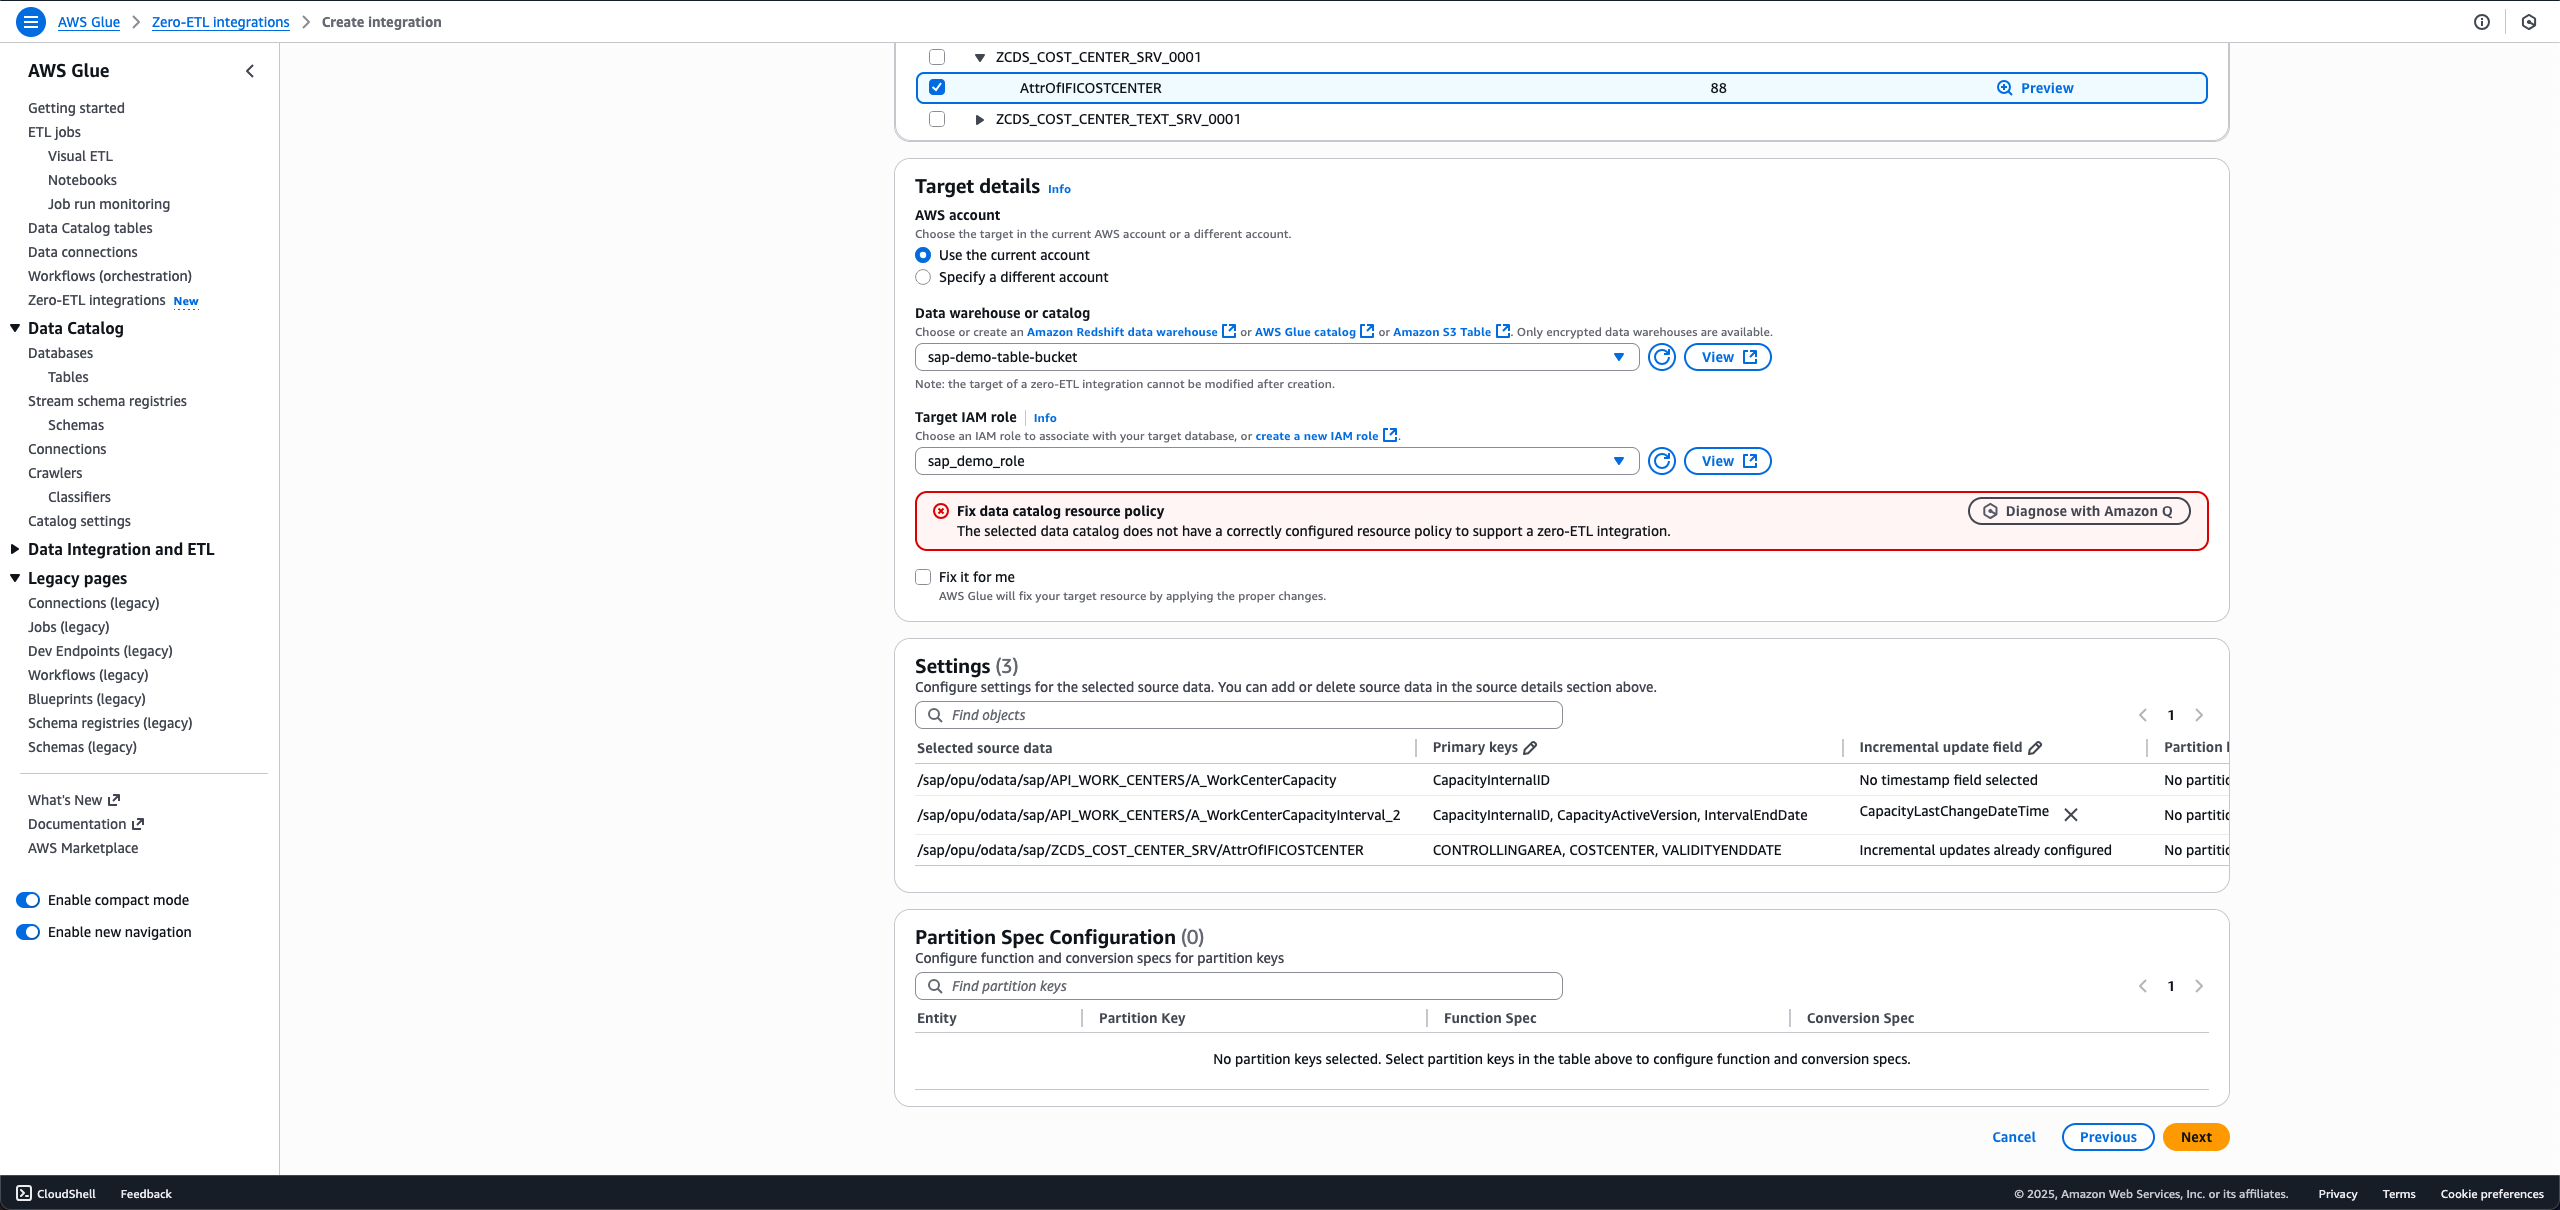
  4. Choose the SAP objects you want in your integration. The non-ODP objects are either configured for full load or incremental load, and ODP objects are automatically configured for incremental ingestion.
    1. For full load, leave Incremental update field set as No timestamp field selected.
    2. For incremental load, choose the edit icon for Incremental update field and choose a timestamp field.
    3. For ODP entities that offer delta token, the incremental update field is pre-selected, and no customer action is necessary.

      When making a new integration using the same SAP connection and entity in the data filter, you will not be able to select a different incremental update field from the first integration.
  5. For Target details, choose sap_demo_table_bucket (created as a prerequisite).
  6. For Target IAM role, choose sap_demo_role (created as a prerequisite).
  7. Choose Next.
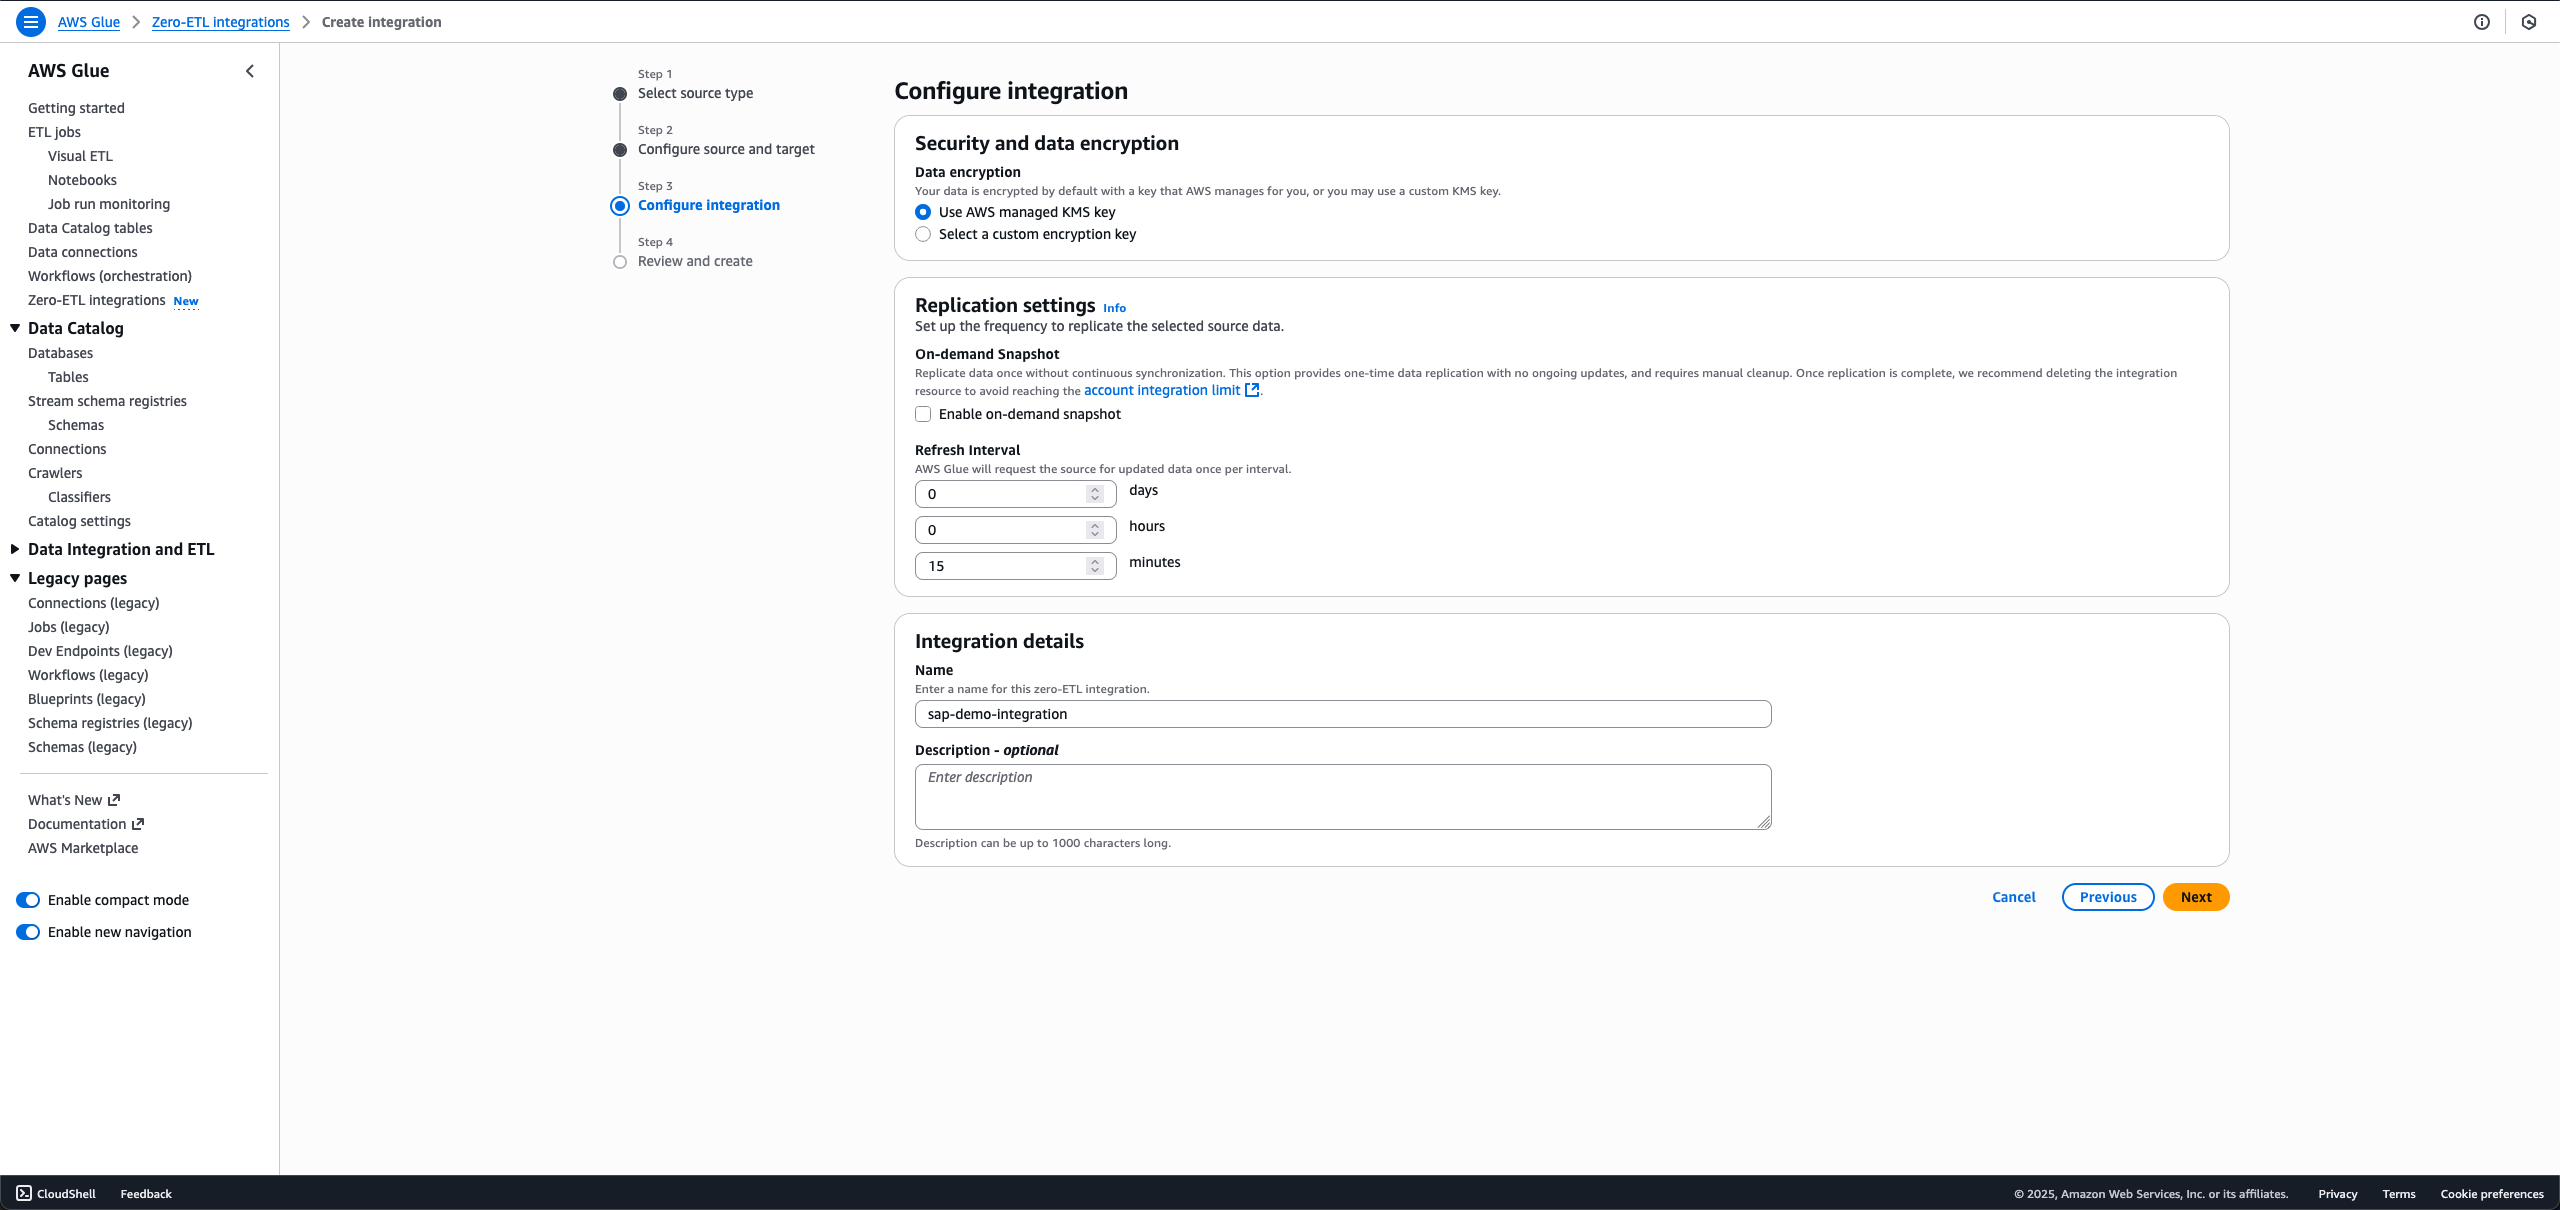
  8. In the Integration details section, for Name, enter sap-demo-integration.
  9. Choose Next.
  10. Review the details and choose Create and launch integration.

The newly created integration is shown as Active in about a minute.

Clean up

To clean up your resources, complete the following steps. This process will permanently delete the resources created in this post; back up important data before proceeding.

  1. Delete the zero-ETL integration sap-demo-integration.
  2. Delete the S3 Tables target bucket sap_demo_table_bucket.
  3. Delete the Data Catalog connection sap_demo_conn.
  4. Delete the Secrets Manager secret zero_etl_bulk_demo_secret.

Conclusion

You can now transform your SAP data analytics without the complexity of traditional ETL processes. With AWS Glue zero-ETL, you can gain immediate access to your SAP data while maintaining its structure across S3 Tables, SageMaker lakehouse, and Amazon Redshift. Your teams can use ACID-compliant storage with time travel capabilities, schema evolution, and concurrent reads/writes at scale, while keeping data in cost-effective cloud storage. The solution’s AI capabilities through Amazon Q and SageMaker can help your business create on-demand data products, run text-to-SQL queries, and deploy AI agents using Amazon Bedrock and Quick Suite.

To learn more, refer to the following resources:

Ready to modernize your SAP data strategy? Explore AWS Glue zero-ETL and enrich your organization’s data analytics capabilities.


About the authors

Shashank Sharma

Shashank Sharma

Shashank is an Engineering Leader with over 15 years of experience in delivering data integration and replication solutions for first-party and third-party databases and SaaS for enterprise customers. He leads engineering for AWS Glue Zero-ETL and Amazon AppFlow.

Parth Panchal

Parth Panchal

Parth is an experienced Software Engineer with over 10 years of development experience, specializing in AWS Glue zero-ETL and SAP data integration solutions. He excels at diving deep into complex data replication challenges, delivering scalable solutions while maintaining high standards for performance and reliability.

Diego Lombardini

Diego Lombardini

Diego is an experienced Enterprise Architect with over 20 years’ experience across SAP technologies, specializing in SAP innovation and data and analytics. He has worked both as partner and as a customer, giving him a complete perspective on what it takes to sell, implement, and run systems and organizations. He is passionate about technology and innovation, focusing on customer outcomes and delivering business value.

Abhijeet Jangam

Abhijeet Jangam

Abhijeet is Data and AI leader with 20 years of SAP techno functional experience leading strategy and delivery across multiple industries. With dozens of SAP implementations experiences, he brings broad functional process knowledge along with deep technical expertise in application development, data engineering, and integrations.

Accelerate AWS Glue Zero-ETL data ingestion using Salesforce Bulk API

Post Syndicated from Shashank Sharma original https://aws.amazon.com/blogs/big-data/accelerate-aws-glue-zero-etl-data-ingestion-using-salesforce-bulk-api/

Efficiently integrating and analyzing Salesforce data is essential in today’s business environment. AWS Glue Zero ETL (extract, transform, and load) now supports Salesforce Bulk API, delivering substantial performance gains compared to Salesforce REST API for large-scale data integration for targets such as Amazon SageMaker lakehouse and Amazon Redshift. You can use this enhancement to process millions of Salesforce records in minutes while efficiently handling wide-column entities with hundreds of fields. In this blog post, we show you how to use Zero-ETL powered by AWS Glue with Salesforce Bulk API to accelerate your data integration processes.

Zero-ETL represents a modern approach to data integration that eliminates the need for traditional ETL processes by establishing direct connections between data sources and destinations. Rather than explicitly extracting data, transforming it, and loading it in separate steps, Zero-ETL handles these operations in the background. Zero-ETL enables direct integration with software as a service (SaaS) applications like Salesforce, automatically synchronizing data while maintaining consistency and eliminating the complexity of manual ETL pipeline development. This approach reduces development time, maintenance overhead, and the potential for errors in data movement processes.

Solution overview

Traditionally, Zero-ETL used Salesforce REST API for data ingestion. While the REST API provides a straightforward way to interact with Salesforce data, it comes with certain limitations, especially when dealing with large datasets. These include request limits, data volume constraints, performance overhead, and concurrency limitations. As of August 2025, depending on the Salesforce edition and license type, you might be limited to between 15,000 and 100,000 API calls per 24-hour period. When retrieving large volumes of data, multiple API calls are required, leading to inefficiency and extended processing times.

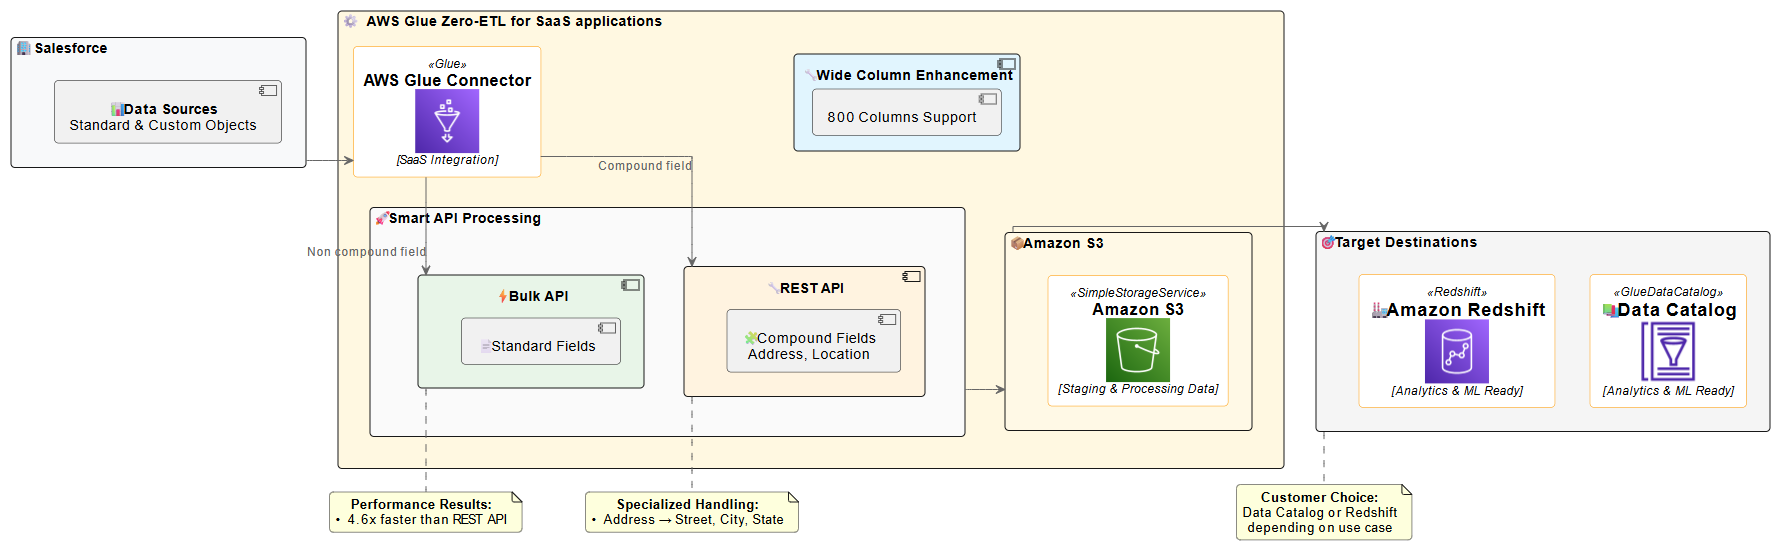
To address these limitations and enhance performance, AWS Glue Zero-ETL now supports Salesforce Bulk API. The Bulk API is designed for processing large datasets, offering several advantages over the REST API. It uses asynchronous processing, so you can process much larger data volumes without timing out. Data is processed in batches, which can be parallelized for faster processing. As of August 2025, the Bulk API also has more generous limits; up to 150,000,000 API calls, which is 15,000 batches, per 24-hour period, with each batch containing up to 10,000 records. The following diagram shows a Salesforce Zero-ETL architecture ingesting data through Salesforce Bulk and REST APIs and writing to Amazon SageMaker Lakehouse (in Amazon Simple Storage Service (Amazon S3) or Apache Iceberg) or Amazon Redshift.

AWS Glue Zero-ETL architecture highlighting data flow, API processing, and analytics capabilities with performance metrics

The diagram illustrates the Zero-ETL data flow from Salesforce to AWS analytics services. Salesforce data is ingested using smart API processing, which intelligently selects between Bulk API for standard fields and REST API for compound fields. This approach is necessary because, as of now, the Salesforce Bulk API does not support compound fields (such as Address). Therefore, you must use the REST API in such cases for comprehensive data extraction. The solution supports Salesforce wide-column entities containing up to 800 fields, enabling comprehensive data integration. The processed data is then staged in an S3 bucket owned by the service team before being made available in the AWS Glue Data Catalog or Amazon Redshift, ready for analytics and machine learning applications.

AWS Glue Zero-ETL now uses the Salesforce Bulk API by default for most data integration scenarios, delivering superior performance and scalability. This approach optimizes data extraction for most use cases, particularly when dealing with large datasets. However, the solution automatically switches to the REST API when handling compound fields. Compound fields, such as addresses (which include street, city, state, postal code, and country), are automatically processed using the REST API.This intelligent API selection provides efficient processing while maintaining the performance benefits of the Bulk API for standard data extraction. This hybrid approach provides the best of both worlds: the scalability and throughput of the Bulk API for most operations, with the specialized handling capabilities of the REST API where it makes the most sense. The system handles this switch automatically, so you don’t need to worry about which API to use for different scenarios.

Performance details

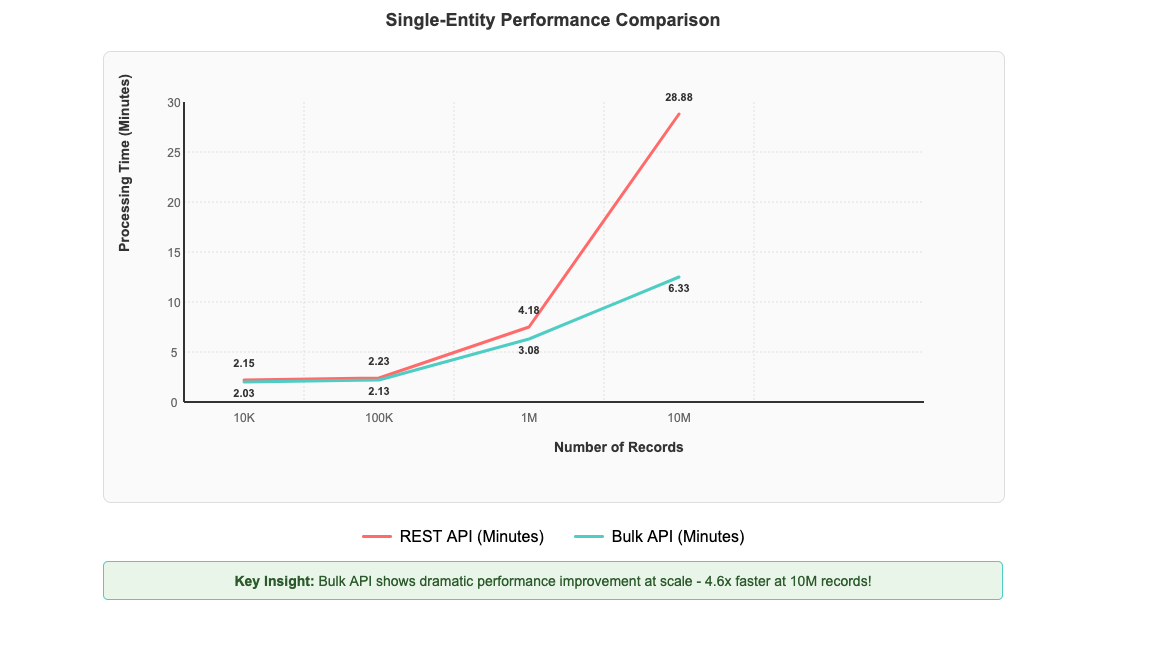
After implementing Salesforce Bulk API support in AWS Glue Zero-ETL, you can see significant performance improvements that scale dramatically with data volume. To test performance benefits, we created a custom object in our Salesforce account and populated it with 10 million records. We then established a Zero-ETL integration between Salesforce and AWS Glue databases to measure data transfer performance. The most impressive gains are evident with large-scale operations: processing 10 million records now completes in 6 minutes and 20 seconds compared to 28 minutes and 53 seconds with the REST API—representing a 4.6-fold improvement in processing time in our controlled testing environment, as shown in the following figure. Performance improvements can vary depending on factors such as data volume, field complexity, network conditions, and computational resources.

Graph demonstrating Bulk API's 4.6x performance advantage over REST API when processing 10M records

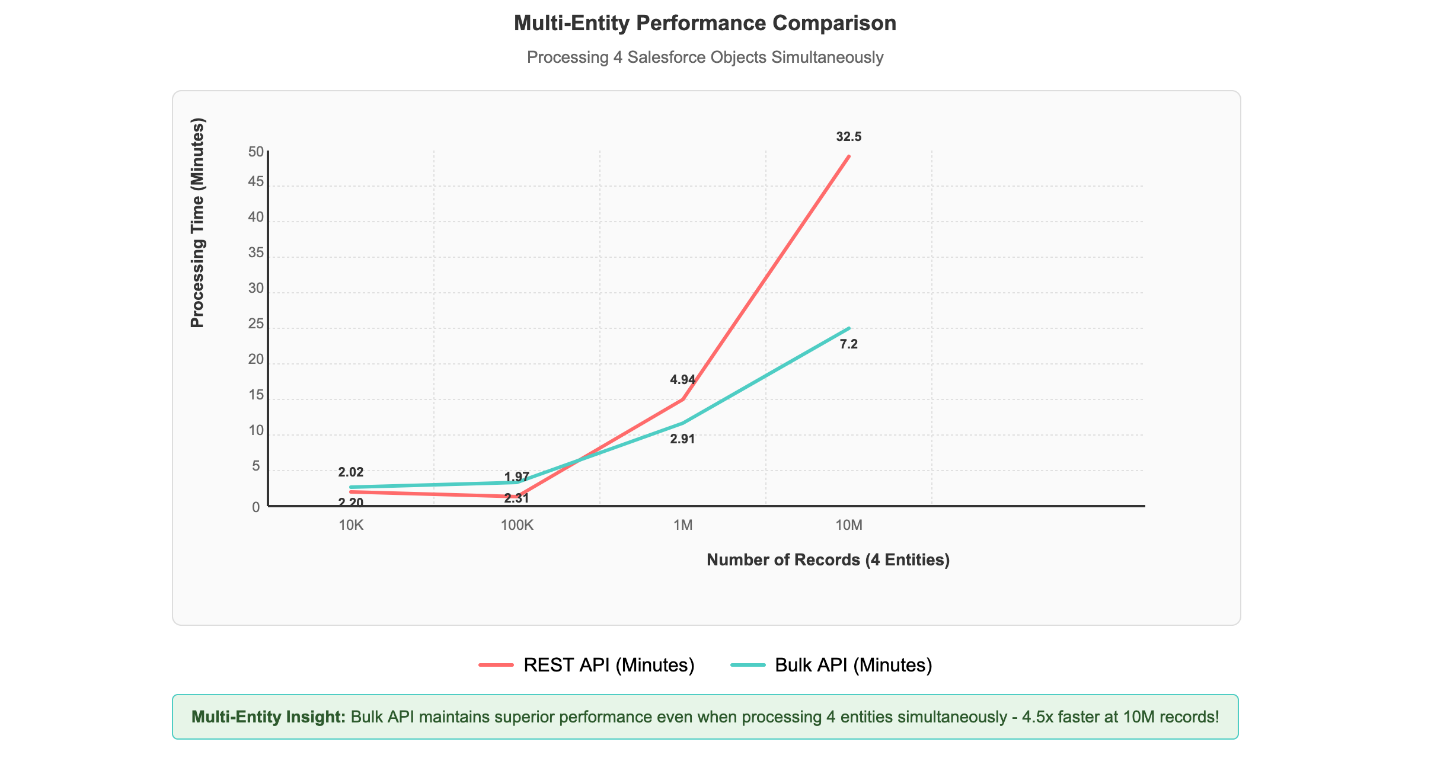
Multi-entity processing scenarios, where four different Salesforce objects are processed simultaneously, demonstrate the solution’s scalability. Even with this concurrent load, 1 million records across multiple entities complete processing in under 3 minutes, showcasing the Bulk API’s superior handling of real-world data integration scenarios, as shown in the following figure.

Multi-entity comparison graph demonstrating Bulk API's 4.6x performance advantage over REST when processing 4 objects at 10M scale

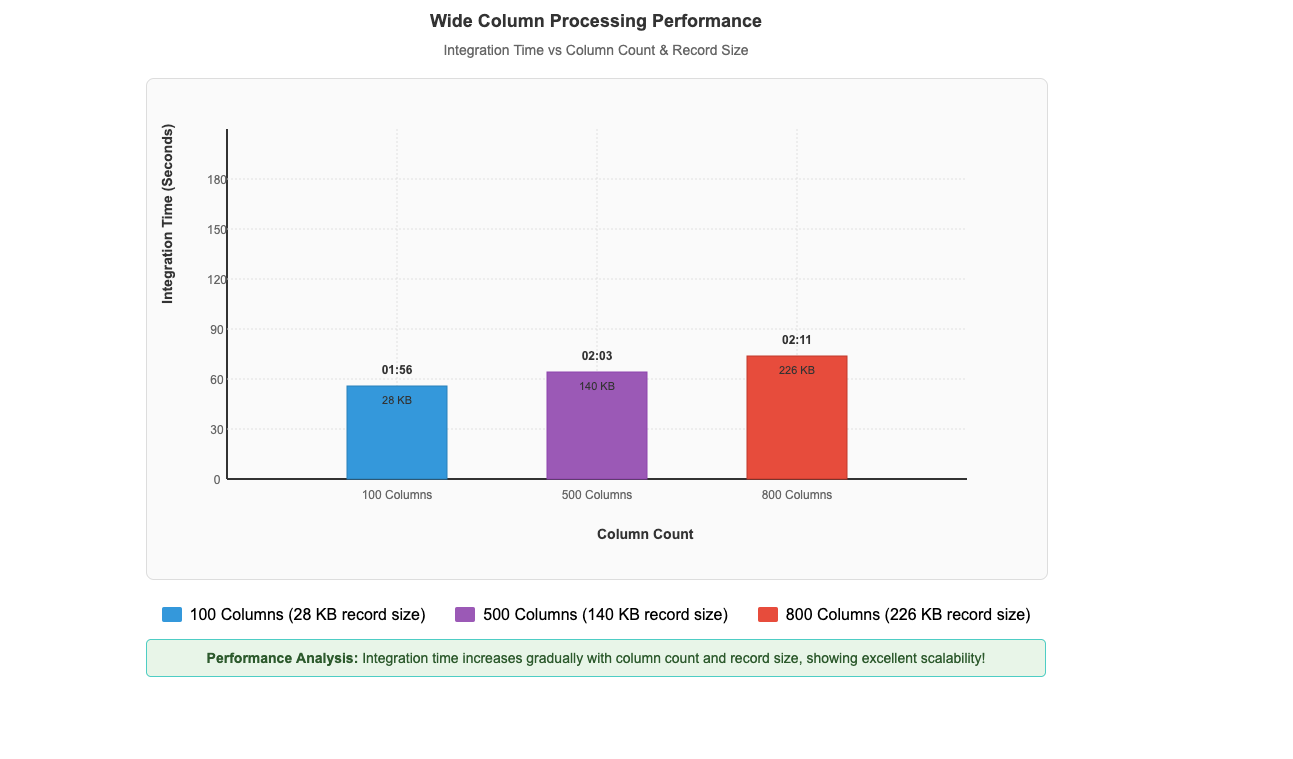
This performance pattern demonstrates that the Bulk API’s asynchronous, batch-oriented architecture delivers exceptional results when handling the large-scale data volumes that enterprises typically encounter in production Salesforce integrations. The performance advantage scales directly with data volume, making it particularly valuable for organizations processing millions of records in their daily operations. As dataset size increases, the efficiency gains become increasingly pronounced, establishing the Bulk API as the optimal choice for enterprise-scale data processing requirements.Beyond the impressive performance gains with large datasets, our recent enhancements have also unlocked another critical capability: efficient processing of wide-column entities. Our performance benchmarks demonstrate this capability in action, with custom objects containing up to 800 columns and 226 KB record sizes processing in just 2 minutes and 11 seconds, while entities with 500 columns and 140 KB records complete in 2 minutes and 3 seconds, and 100-column entities with 28 KB records process in 1 minute and 56 seconds (shown in the following figure). This remarkable consistency across varying column counts and record sizes demonstrates that Zero-ETL from SaaS applications maintains excellent performance while efficiently ingesting and processing these wide-column entities, which means that you can use your complete Salesforce datasets for analytics and machine learning initiatives.

Wide column processing graph demonstrating scalable integration times from 01:56 to 02:11 minutes across increasing data volumes

Impact

The performance improvements, demonstrated by AWS Glue Zero-ETL with Salesforce Bulk API support, offer tangible benefits for businesses managing large volumes of Salesforce data. As mentioned earlier, our controlled testing, demonstrated a 4.6-fold improvement over the REST API when processing 10 million records. With these results, you can significantly reduce your data integration time windows. This faster processing allows for more frequent data updates, potentially enabling you to work with fresher data for your analytics and reporting needs. Additionally, the efficient handling of wide-column entities, such as processing custom objects with up to 800 columns in just over 2 minutes, means that you can more readily use your complete Salesforce datasets without sacrificing performance.

Prerequisites

Before implementing this solution, you need to have the following in place:

  1. A Salesforce Enterprise, Unlimited, or Performance Edition account
  2. An AWS account with administrator access
  3. Create an AWS Glue database with a name such as zero_etl_bulk_demo_db and associate the S3 bucket zeroetl-etl-bulk-demo-bucket as a location of the database.
  4. Update AWS Glue Data Catalog settings using the following IAM policy for fine-grained access control of the data catalog for zero-ETL.
  5. Create an AWS Identity and Access Management (IAM) role named zero_etl_bulk_role. The IAM role will be used by Zero-ETL to access data from your Saleforce account
  6. Create the secret zero_etl_bulk_demo_secret in AWS Secrets Manager to store Salesforce credentials.

Build and verify the zero-ETL integration

This section covers the steps required to set up a Salesforce connection and using that connection to create a Zero-ETL integration.

Step 1: Set up a connector to your Salesforce instance to enable data access

  1. Open the AWS Management Console for AWS Glue.
  2. In the navigation pane, under Data catalog, choose Connections.
  3. Choose Create Connection.
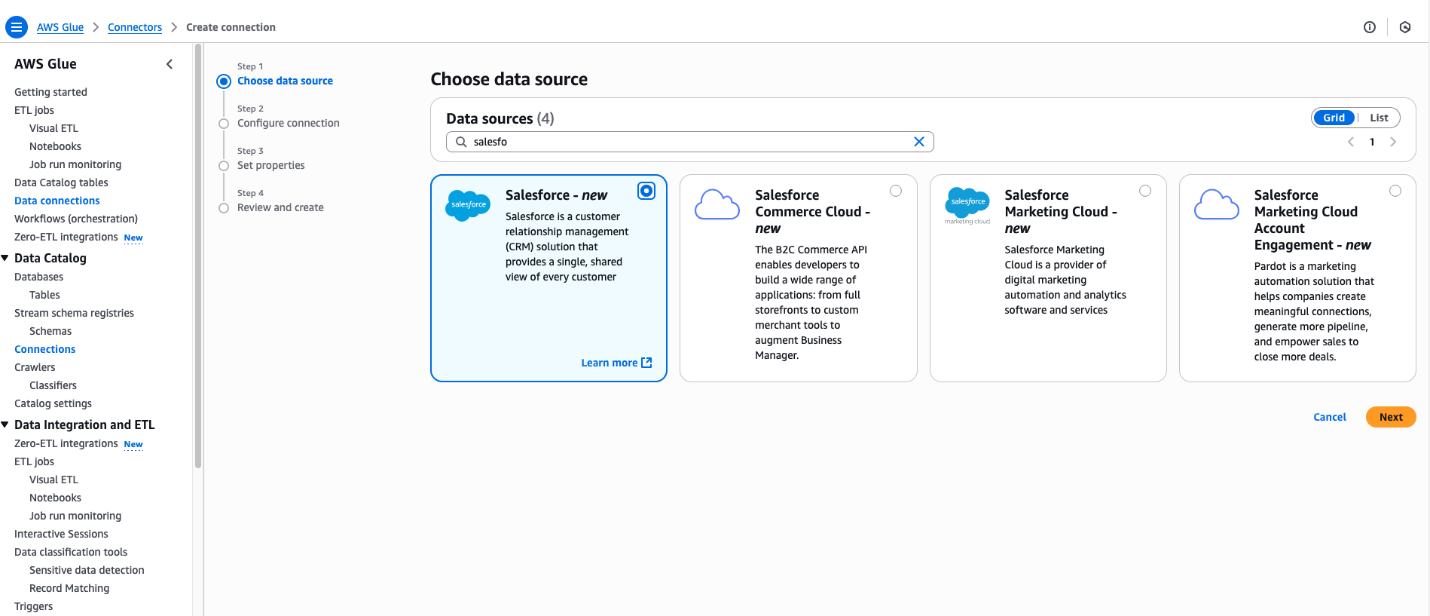
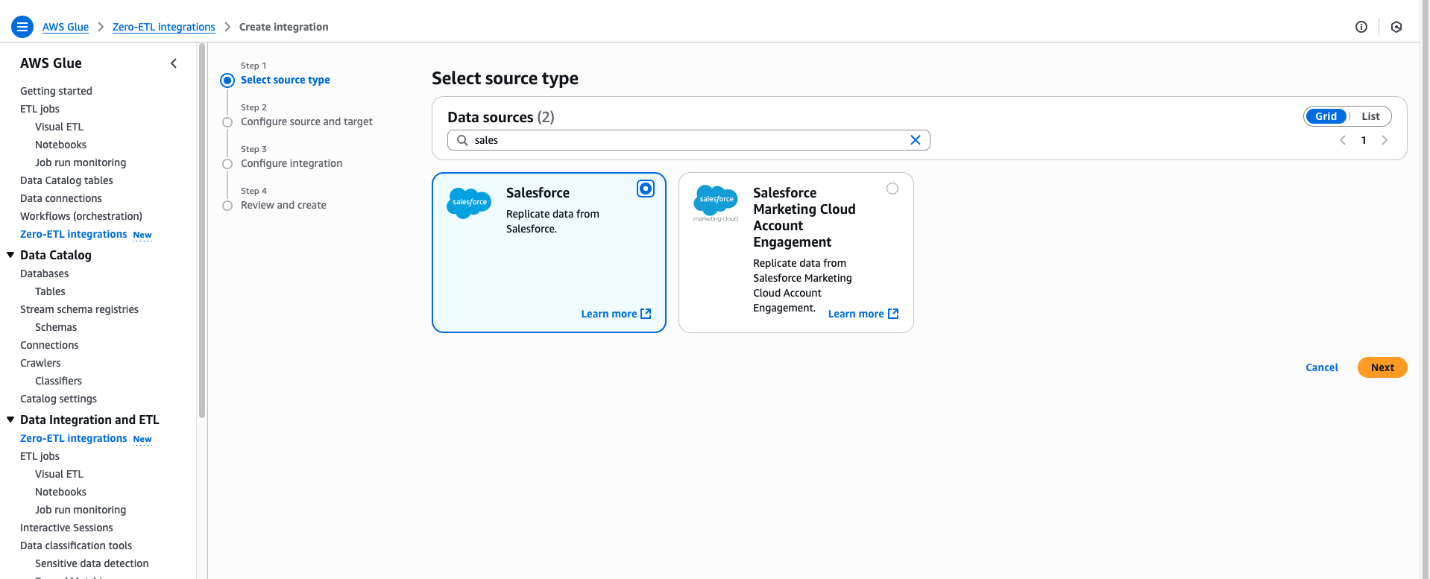
  4. In the Create Connection pane, enter Salesforce in Data Sources.
  5. Choose Salesforce.
  6. Choose Next.

AWS Glue connection creation interface highlighting Salesforce data source options

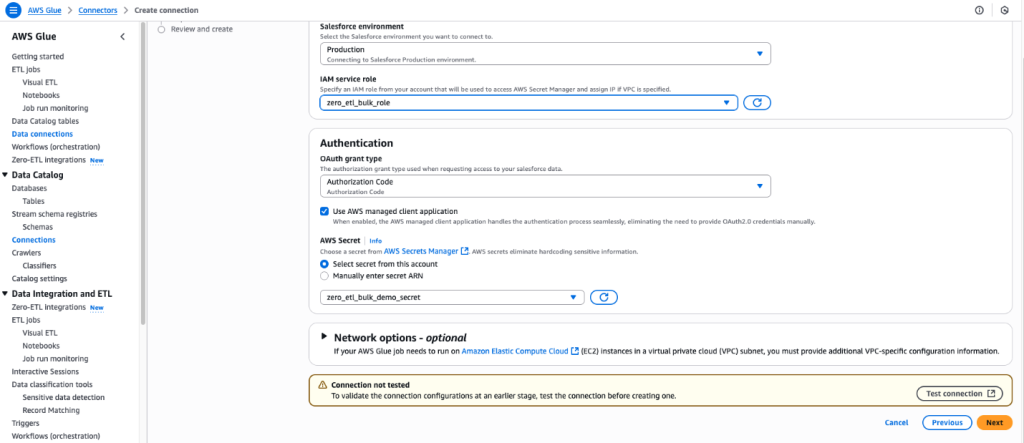
  1. Enter the Salesforce URL Instance URL
  2. For IAM service role, select the zero_etl_bulk_demo_role (created as part of the prerequisites).
  3. For Authentication Type, select the authentication type that you’re using for Salesforce. In this example, we selected Authorization Code.
  4. For AWS Secret, select the secret zero_etl_bulk_demo_secret (created as part of the prerequisites).
  5. Choose Next.

AWS Glue data connection interface for configuring Salesforce integration with security credentials

  1. In the Connection Properties section, for Name, enter zero_etl_bulk_demo_conn.
  2. Choose Next.

Successfully configured AWS Glue Salesforce connector interface with connection details

Step 2: Set up Zero-ETL integration

  1. Open the AWS Glue console.
  2. In the navigation pane, under Data catalog, choose Zero-ETL integrations.
  3. Choose Create zero-ETL integration.
  4. In the Create integration pane, enter Salesforce in Data Sources.
  5. Choose Salesforce.
  6. Choose Next.

AWS Glue integration wizard displaying Salesforce data source options with four-step configuration process


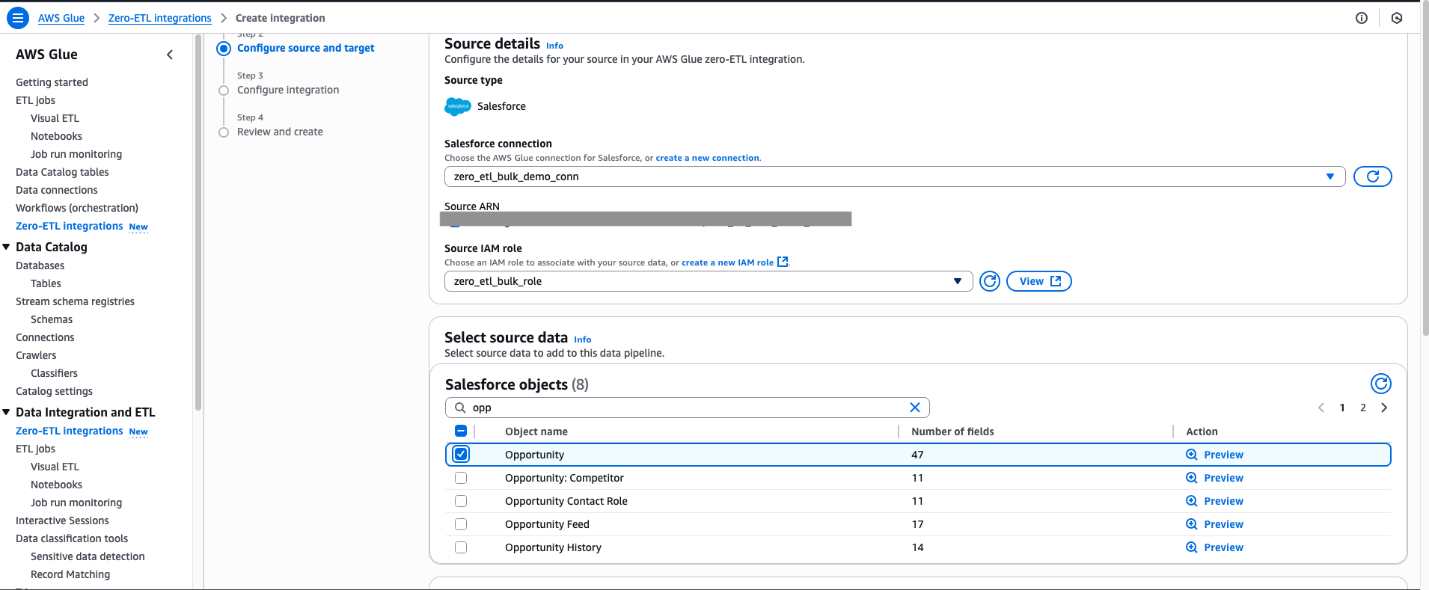
  1. Select the connection name that you created in the previous step.
  2. Select the IAM role which you created in the previous step.
  3. For Salesforce object, select the objects you want to perform the ingestion managed by Zero-ETL integration. For this post, select Opportunity.

AWS Glue Zero-ETL configuration interface displaying Salesforce connection settings and opportunity objects selection

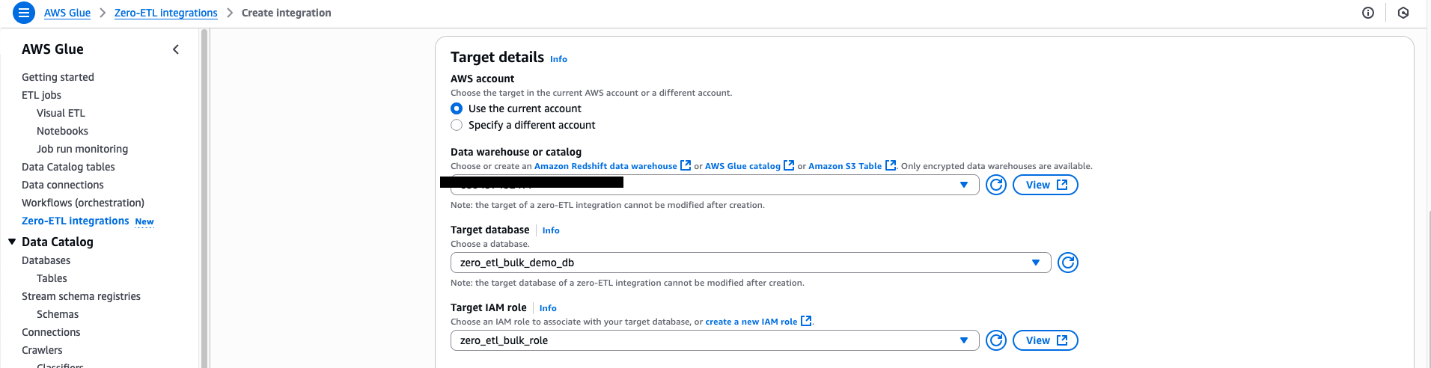
For Namespace or Database In this example, we use the zero_etl_bulk_demo_db (from the prerequisites).

  1. For Target IAM role, select the zero_etl_demo_role (from the prerequisites).
  2. Choose Next.

AWS Glue Zero-ETL target configuration interface with data warehouse selection

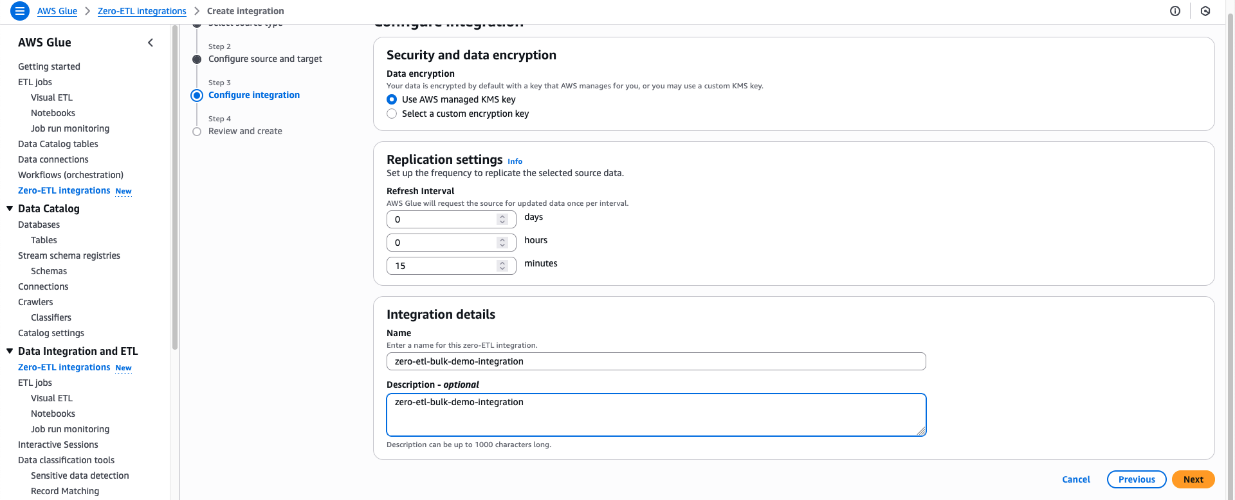
  1. In the Integration details section, for Name, enter zero-etl-bulk-demo-integration.
  2. Choose Next.

AWS Glue Zero-ETL configuration interface displaying AWS-managed KMS encryption, customizable replication timing, and integration naming

  1. Review the details and choose Create and launch integration.
  2. The newly created integration will show as Active in about a minute.

AWS Glue Zero-ETL integration dashboard displaying successful creation confirmation and monitoring status

Clean up

Note that following these steps will permanently delete the resources created in this post; back up any important data before proceeding.

  1. Delete the Zero-ETL integration zero-etl-bulk-demo-integration.
  2. Delete content from the S3 bucket zeroetl-etl-bulk-demo-bucket.
  3. Delete the Data Catalog database zero_etl_bulk_demo_db.
  4. Delete the Data Catalog connection zero_etl_bulk_demo_conn.
  5. Delete the Secrets Manager secret zero_etl_bulk_demo_secret.

Conclusion

The integration of Salesforce Bulk API support in AWS Glue Zero-ETL marks a significant advancement in our data integration capabilities. By addressing the limitations of the REST API, efficiently handling wide-column entities and compound fields, and implementing robust error handling, you can now use AWS Glue Zero-ETL to ingest larger volumes of Salesforce data more efficiently.This enhancement improves performance and opens up new possibilities for your organization to use their Salesforce data for analytics, machine learning, and other data-driven initiatives. As we continue to evolve AWS Glue Zero-ETL, we remain committed to providing cutting-edge solutions that empower our customers to make the most of their data integration processes.

Learn more


About the authors

Shashank Sharma

Shashank Sharma

Shashank is an Engineering Leader within AWS Glue delivering data integration and replication solutions for enterprise customers. He leads engineering for AWS Glue Zero-ETL and Amazon AppFlow.


Shashi Shekhar

Shashi Shekhar

Shashi is a Software Engineer within AWS Glue Zero-ETL, building scalable data pipeline solutions for enterprise workloads. He is passionate about distributed systems, performance engineering, and simplifying complex data integration processes.