Post Syndicated from Saurabh Shrivastava original https://aws.amazon.com/blogs/big-data/building-a-real-time-notification-system-with-amazon-kinesis-data-streams-for-amazon-dynamodb-and-amazon-kinesis-data-analytics-for-apache-flink/
Amazon DynamoDB helps you capture high-velocity data such as clickstream data to form customized user profiles and Internet of Things (IoT) data so that you can develop insights on sensor activity across various industries, including smart spaces, connected factories, smart packing, fitness monitoring, and more. It’s important to store these data points in a centralized data lake in real time, where they can be transformed, analyzed, and combined with diverse organizational datasets to derive meaningful insights and make predictions.
A popular use case in the wind energy sector is to protect wind turbines from wind speed. As per National Wind Watch, every wind turbine has a range of wind speeds, typically 30–55 mph, in which it produces maximum capacity. When wind speed is greater than 70 mph, it’s important to start shutdown to protect the turbine from a high wind storm. Customers often store high-velocity IoT data in DynamoDB and use Amazon Kinesis streaming to extract data and store it in a centralized data lake built on Amazon Simple Storage Service (Amazon S3). To facilitate this ingestion pipeline, you can deploy AWS Lambda functions or write custom code to build a bridge between DynamoDB Streams and Kinesis streaming.
Amazon Kinesis Data Streams for DynamoDB help you to publish item-level changes in any DynamoDB table to a Kinesis data stream of your choice. Additionally, you can take advantage of this feature for use cases that require longer data retention on the stream and fan out to multiple concurrent stream readers. You also can integrate with Amazon Kinesis Data Analytics or Amazon Kinesis Data Firehose to publish data to downstream destinations such as Amazon Elasticsearch Service, Amazon Redshift, or Amazon S3.
In this post, you use Kinesis Data Analytics for Apache Flink (Data Analytics for Flink) and Amazon Simple Notification Service (Amazon SNS) to send a real-time notification when wind speed is greater than 60 mph so that the operator can take action to protect the turbine. You use Kinesis Data Streams for DynamoDB and take advantage of managed streaming delivery of DynamoDB data to other AWS services without having to use Lambda or write and maintain complex code. To process DynamoDB events from Kinesis, you have multiple options: Amazon Kinesis Client Library (KCL) applications, Lambda, and Data Analytics for Flink. In this post, we showcase Data Analytics for Flink, but this is just one of many available options.
Architecture
The following architecture diagram illustrates the wind turbine protection system.
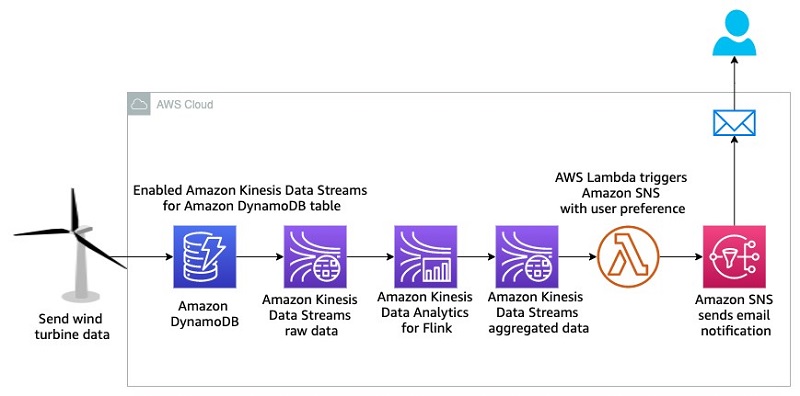
In this architecture, high-velocity wind speed data comes from the wind turbine and is stored in DynamoDB. To send an instant notification, you need to query the data in real time and send a notification when the wind speed is greater than the established maximum. To achieve this goal, you enable Kinesis Data Streams for DynamoDB, and then use Data Analytics for Flink to query real-time data in a 60-second tumbling window. This aggregated data is stored in another data stream, which triggers an email notification via Amazon SNS using Lambda when the wind speed is greater than 60 mph. You will build this entire data pipeline in a serverless manner.
Deploying the wind turbine data simulator
To replicate a real-life scenario, you need a wind turbine data simulator. We use Amazon Amplify in this post to deploy a user-friendly web application that can generate the required data and store it in DynamoDB. You must have a GitHub account which will help to fork the Amplify app code and deploy it in your AWS account automatically.
Complete the following steps to deploy the data simulator web application:
- Choose the following AWS Amplify link to launch the wind turbine data simulator web app.

- Choose Connect to GitHub and provide credentials, if required.

- In the Deploy App section, under Select service role, choose Create new role.
- Follow the instructions to create the role
amplifyconsole-backend-role. - When the role is created, choose it from the drop-down menu.
- Choose Save and deploy.

On the next page, the dynamodb-streaming app is ready to deploy.
- Choose Continue.

On the next page, you can see the app build and deployment progress, which might take as many as 10 minutes to complete.
- When the process is complete, choose the URL on the left to access the data generator user interface (UI).
- Make sure to save this URL because you will use it in later steps.

You also get an email during the build process related to your SSH key. This email indicates that the build process created an SSH key on your behalf to connect to the Amplify application with GitHub.
- On the sign-in page, choose Create account.

- Provide a user name, password, and valid email to which the app can send you a one-time passcode to access the UI.
- After you sign in, choose Generate data to generate wind speed data.
- Choose the Refresh
 icon to show the data in the graph.

You can generate a variety of data by changing the range of minimum and maximum speeds and the number of values.
To see the data in DynamoDB, choose the DynamoDB icon, note the table name that starts with windspeed-, and navigate to the table in the DynamoDB console.

Now that the wind speed data simulator is ready, let’s deploy the rest of the data pipeline.
Deploying the automated data pipeline by using AWS CloudFormation
You use AWS CloudFormation templates to create all the necessary resources for the data pipeline. This removes opportunities for manual error, increases efficiency, and ensures consistent configurations over time. You can view the template and code in the GitHub repository.
- Choose Launch with CloudFormation Console:

- Choose the US West (Oregon) Region (us-west-2).
- For pEmail, enter a valid email to which the analytics pipeline can send notifications.
- Choose Next.

- Acknowledge that the template may create AWS Identity and Access Management (IAM) resources.
- Choose Create stack.
This CloudFormation template creates the following resources in your AWS account:
- An IAM role to provide a trust relationship between Kinesis and DynamoDB to replicate data from DynamoDB to the data stream
- Two data streams:
- An input stream to replicate data from DynamoDB
- An output stream to store aggregated data from the Data Analytics for Flink app
- A Lambda function
- An SNS topic to send an email notifications about high wind speeds
- When the stack is ready, on the Outputs tab, note the values of both data streams.

Check your email and confirm your subscription to receive notifications. Make sure to check your junk folder if you don’t see the email in your inbox.

Now you can use Kinesis Data Streams for DynamoDB, which allows you to have your data in both DynamoDB and Kinesis without having to use Lambda or write custom code.
Enabling Kinesis streaming for DynamoDB
AWS recently launched Kinesis Data Streams for DynamoDB so that you can send data from DynamoDB to Kinesis Data. You can use the AWS Command Line Interface (AWS CLI) or the AWS Management Console to enable this feature.
To enable this feature from the console, complete the following steps:
- In the DynamoDB console, choose the table that you created earlier (it begins with the prefix
windspeed-). - On the Overview tab, choose Manage streaming to Kinesis.

- Choose your input stream.

- Choose Enable.

- Choose Close.

Make sure that Stream enabled is set to Yes.

Building the Data Analytics for Flink app for real-time data queries
As part of the CloudFormation stack, the new Data Analytics for Flink application is deployed in the configured AWS Region. When the stack is up and running, you should be able to see the new Data Analytics for Flink application in the configured Region. Choose Run to start the app.

When your app is running, you should see the following application graph.

Review the Properties section of the app, which shows you the input and output streams that the app is using.

Let’s learn important code snippets of the Flink Java application in next section, which explain how the Flink application reads data from a data stream, aggregates the data, and outputs it to another data stream.
Diving Deep into Flink Java application code:
In the following code, createSourceFromStaticConfig provides all the wind turbine speed readings from the input stream in string format, which we pass to the WindTurbineInputMap map function. This function parses the string into the Tuple3 data type (exp Tuple3<>(turbineID, speed, 1)). All Tuple3 messages are grouped by turbineID to further apply a one-minute tumbling window. The AverageReducer reduce function provides two things: the sum of all the speeds for the specific turbineId in the one-minute window, and a count of the messages for the specific turbineId in the one-minute window. The AverageMap map function takes the output of the AverageReducer reduce function and transforms it into Tuple2 (exp Tuple2<>(turbineId, averageSpeed)). Then all turbineIds are filtered with an average speed greater than 60 and map them to a JSON-formatted message, which we send to the output stream by using the createSinkFromStaticConfig sink function.
The following code demonstrates how the createSourceFromStaticConfig and createSinkFromStaticConfig functions read the input and output stream names from the properties of the Data Analytics for Flink application and establish the source and sink of the streams.
In the following code, the WindTurbineInputMap map function parses Tuple3 out of the string message. Additionally, the AverageMap map and AverageReducer reduce functions process messages to accumulate and transform data.
Receiving email notifications of high wind speed
The following screenshot shows an example of the notification email you will receive about high wind speeds.

To test the feature, in this section you generate high wind speed data from the simulator, which is stored in DynamoDB, and get an email notification when the average wind speed is greater than 60 mph for a one-minute period. You’ll observe wind data flowing through the data stream and Data Analytics for Flink.
To test this feature:
- Generate wind speed data in the simulator and confirm that it’s stored in DynamoDB.
- In the Kinesis Data Streams console, choose the input data stream,
kds-ddb-blog-InputKinesisStream. - On the Monitoring tab of the stream, you can observe the Get records – sum (Count) metrics, which show multiple records captured by the data stream automatically.
- In the Kinesis Data Analytics console, choose the Data Analytics for Flink application,
kds-ddb-blog-windTurbineAggregator. - On the Monitoring tab, you can see the Last Checkpoint metrics, which show multiple records captured by the Data Analytics for Flink app automatically.
- In the Kinesis Data Streams console, choose the output stream,
kds-ddb-blog-OutputKinesisStream. - On the Monitoring tab, you can see the Get records – sum (Count) metrics, which show multiple records output by the app.
- Finally, check your email for a notification.
If you don’t see a notification, change the data simulator value range between a minimum of 50 mph and maximum of 90 mph and wait a few minutes.
Conclusion
As you have learned in this post, you can build an end-to-end serverless analytics pipeline to get real-time insights from DynamoDB by using Kinesis Data Streams—all without writing any complex code. This allows your team to focus on solving business problems by getting useful insights immediately. IoT and application development have a variety of use cases for moving data quickly through an analytics pipeline, and you can make this happen by enabling Kinesis Data Streams for DynamoDB.
If this blog post helps you or inspires you to solve a problem, we would love to hear about it! The code for this solution is available in the GitHub repository for you to use and extend. Contributions are always welcome!
About the Authors
 Saurabh Shrivastava is a solutions architect leader and analytics/machine learning specialist working with global systems integrators. He works with AWS partners and customers to provide them with architectural guidance for building scalable architecture in hybrid and AWS environments. He enjoys spending time with his family outdoors and traveling to new destinations to discover new cultures.
 Sameer Goel is a solutions architect in Seattle who drives customers’ success by building prototypes on cutting-edge initiatives. Prior to joining AWS, Sameer graduated with a Master’s degree with a Data Science concentration from NEU Boston. He enjoys building and experimenting with creative projects and applications.
 Pratik Patel is a senior technical account manager and streaming analytics specialist. He works with AWS customers and provides ongoing support and technical guidance to help plan and build solutions by using best practices, and proactively helps keep customers’ AWS environments operationally healthy.