Post Syndicated from Molly Clancy original https://www.backblaze.com/blog/how-to-wipe-pc-ssd-or-hard-drive/

Are you hanging on to an old PC because you don’t know how to scrub the hard drive clean of all your personal information? Worried there’s data lurking around in there even after you empty the recycle bin? (Yes, there is.)
You always have the option of taking a baseball bat to the thing. Truly, physical destruction is one way to go (more on that later). But, there are much easier and more reliable, if less satisfying, ways to make sure your Windows PC is as clean as the day it left the factory.
First Things First: Back Up
Before you break out the Louisville Slugger (or follow our simple steps below), make sure your data is backed up as part of a 3-2-1 backup strategy where you keep three copies of your data on two types of media with one off-site. Your first copy is the one on your computer. Your second copy can be kept on an external hard drive or other external media. And the third copy should be kept in an off-site location like the cloud. If you’re not backing up an off-site copy, now is a great time to get started.
Windows 7, 8, 8.1, 10, and 11 all have basic utilities you can use to create a local backup on an external hard drive that you can use to move your files to a new computer or just to have a local backup for safekeeping. Once you’re backed up, you’re ready to wipe your PC’s internal hard drive.
How to Completely Wipe a PC
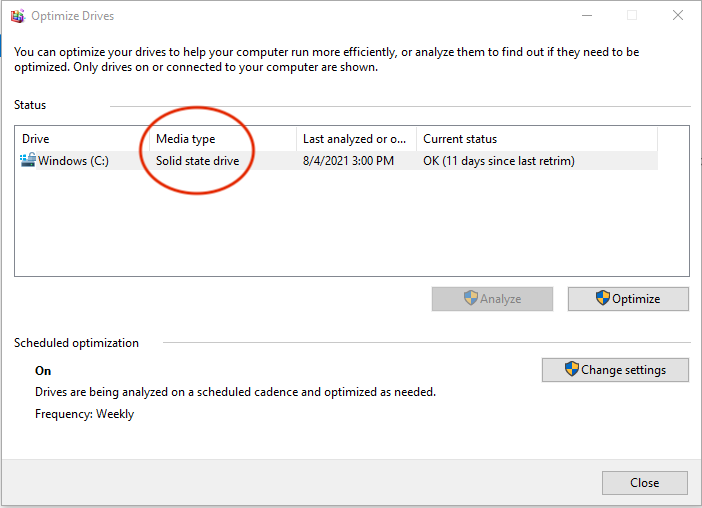
First, you’ll need to figure out if your Windows PC has a hard disk drive (HDD) or solid state drive (SSD). Most desktops and laptops sold in the last few years will have an SSD, but you can easily find out to be sure:
- Open Settings.
- Type “Defragment” in the search bar.
- Click on “Defragment and Optimize Your Drives.”
- Check the media type of your drive.

How to Erase Your Windows Drive
Now that you know what kind of drive you have, there are two options for wiping your PC:
- Reset: In most cases, wiping a PC is as simple as reformatting the disk and reinstalling Windows using the Reset function. If you’re just recycling, donating, or selling your PC, the Reset function makes it acceptably difficult for someone to recover your data, especially if it’s also encrypted. This can be done easily in Windows versions 8, 8.1, 10, and 11 for either an HDD or an SSD.
- Secure Erase Using Third-party Tools: If Reset doesn’t make you feel completely comfortable that your data can’t be recovered, or if you have a PC running Windows 7 or older, you have another option. There are a number of good third-party tools you can use to securely erase your disk, which we’ll get into below. These are different depending on whether you have an HDD or an SSD.
Follow these instructions for different versions of Windows to reset your PC:
How to Wipe a Windows 10 and 11 Hard Drive
- Go to Settings → System (Update & Security in Windows 10) → Recovery.
- Under “Reset this PC” click “Reset.” (Click “Get Started” in Windows 10.)
- Choose “Remove everything.” (If you’re not getting rid of your PC, you can use “Keep my files” to give your computer a good cleaning to improve performance.)
- You will be prompted to choose to reinstall Windows via “Cloud download” or “Local reinstall.” If you’re feeling generous and want to give your PC’s next owner a fresh version of Windows, choose “Cloud download.” This will use internet data. If you’re planning to recycle your PC, “Local reinstall” works just fine.
- In “Additional settings,” click “Change settings” and toggle “Clean data” to on. This takes longer, but it’s the most secure option.
- Click “Reset” to start the process.
How to Wipe a Windows 8 and 8.1 Hard Drive
- Go to Settings → Change PC Settings → Update and Recovery → Recovery.
- Under “Remove everything and reinstall Windows,” click “Get started,” then click “Next.”
- Select “Fully clean the drive.” This takes longer, but it’s the most secure option.
- Click “Reset” to start the process.
Secure Erase Using Third-party Tools
If your PC is running an older version of Windows or if you just want to have more control over the erasure process, there are a number of open-source third-party tools to wipe your PC hard drive, depending on whether you have an HDD or an SSD.
Secure Erase an HDD
The process for erasing an HDD involves overwriting the data, and there are many utilities out there to do it yourself:
- DBAN: Short for Darik’s Boot and Nuke, DBAN has been around for years and is a well-known and trusted drive wipe utility for HDDs. It does multiple pass rewrites (binary ones and zeros) on the disk. You’ll need to download it to a USB drive and run it from there.
- Disk Wipe: Disk Wipe is another free utility that does multiple rewrites of binary data. You can choose from a number of different methods for overwriting your disk. Disk Wipe is also portable, so you don’t need to install it to use it.
- Eraser: Eraser is also free to use. It gives you the most control over how you erase your disk. Like Disk Wipe, you can choose from different methods that include varying numbers of rewrites, or you can define your own.
Keep in mind, any disk erase utility that does multiple rewrites is going to take quite a while to complete.
If you’re using Windows 7 or older and you’re just looking to recycle your PC, you can stop here. If you intend to sell or donate your PC, you’ll need the original installation discs (yes, that’s discs with a “c”…remember? Those round shiny things?) to reinstall a fresh version of Windows.
Secure Erase an SSD
If you have an SSD, you may want to take the time to encrypt your data before erasing it to make sure it can’t be recovered. Why? The way SSDs store and retrieve data is different from HDDs.
HDDs store data in a physical location on the drive platter. SSDs store data using electronic circuits and individual memory cells organized into pages and blocks. Writing and rewriting to the same blocks over and over wears out the drive over time. So, SSDs use “wear leveling” to write across the entire drive, meaning your data is not stored in one physical location —it’s spread out.
When you tell an SSD to erase your data, it doesn’t overwrite said data, but instead writes new data to a new block. This has implications for erasing your SSD—some of your data might be hanging around your SSD even after you told it to be erased until such time as wear leveling decides the cells in that block can be overwritten. As such, it’s good practice to encrypt your data on an SSD before erasing it. That way, if any data is left lurking, at least no one will be able to read it without an encryption key.
You don’t have to encrypt your data first, but if Windows Reset is not enough for you and you’ve come this far, we figure it’s a step you’d want to take. Even if you’re not getting rid of your computer or if you have an HDD, encrypting your data is a good idea. If your laptop falls into the wrong hands, encryption makes it that much harder for criminals to access your personal information.
Encrypting your data isn’t complicated, but not every Windows machine is the same. First, check to see if your device is encrypted by default:
- Open the Start menu.
- Scroll to the “Windows Administrative Tools” dropdown menu.
- Select “System Information.” You can also search for “system information” in the taskbar.
- If the “Device Encryption Support” value is “Meets prerequisites,” you’re good to go—encryption is enabled on your device.
If not, your next step is to check if your device has BitLocker built in:
- Open Settings.
- Type “BitLocker” in the search bar.
- Click “Manage BitLocker.”
- Click “Turn on BitLocker” and follow the prompts.
If neither of those options are available, you can use third-party software to encrypt your internal SSD. VeraCrypt and AxCrypt are both good options. Just remember to record the encryption passcode somewhere and also the OS, OS version, and encryption tool used so you can recover the files later on if desired.
Once you’ve encrypted your data, your next step is to erase, and you have a few options:
- Parted Magic: Parted Magic is the most regularly recommended third-party erase tool for SSDs, but it does cost $11. It’s a bootable tool like some of the HDD erase tools—you have to download it to a USB drive and run it from there.
- ATA Secure Erase: ATA Secure Erase is a command that basically shocks your SSD. It uses a voltage spike to flush stored electrons. While this sounds damaging (and it does cause some wear), it’s perfectly safe. It doesn’t overwrite the data like other secure erase tools, so there’s actually less damage done to the SSD.
The Nuclear Option
When nothing less than total destruction will do, just make sure you do it safely. I asked around to see if our team could recommend the best way to bust up your drive. Our Senior Systems Administrator, Tim Lucas, is partial to explosives, but we don’t recommend it. You can wipe an HDD with a magnet, otherwise known as “degaussing,” but a regular old fridge magnet won’t work. You’ll need to open up your PC and get at the hard drive itself, and you’ll need a neodymium magnet—one that’s strong enough to obliterate digits (both the ones on your hard drive and the ones on your hand) in the process. Not the safest way to go, either.
If you’re going to tear apart your PC to get at the HDD anyway, drilling some holes through the platter or giving it an acid bath are better options, as our CEO, Gleb Budman, explained in this Scientific American article. Drilling holes distorts the platter, and acid eats away at its surface. Both render an HDD unreadable.
Finally, we still stand by our claim that the safest and most secure way to destroy an HDD, and the only way we’d recommend physically destroying an SSD, is to shred it. Check with your local electronics recycling center to see if they have a shredder you can use (or if they’ll at least let you watch as giant metal gears chomp down on your drive). Shredding it should be a last resort though. Drives typically last five to 10 years, and millions get shredded every year before the end of their useful life. While blowing up your hard drive is probably a blast, we’re pretty sure you can find something even more fun to do with that old drive.
Still have questions about how to securely erase or destroy your hard drives? Let us know in the comments.
The post Getting Rid of Your PC? Here’s How to Wipe a Windows SSD or Hard Drive appeared first on Backblaze Blog | Cloud Storage & Cloud Backup.