Post Syndicated from Eric Johnson original https://aws.amazon.com/blogs/compute/simplifying-serverless-permissions-with-aws-sam-connectors/
This post written by Kurt Tometich, Senior Solutions Architect, AWS.
Developers have been using the AWS Serverless Application Model (AWS SAM) to streamline the development of serverless applications with AWS since late 2018. Besides making it easier to create, build, test, and deploy serverless applications, AWS SAM now further simplifies permission management between serverless components with AWS SAM Connectors.
Connectors allow the builder to focus on the relationships between components without expert knowledge of AWS Identity and Access Management (IAM) or direct creation of custom policies. AWS SAM connector supports AWS Step Functions, Amazon DynamoDB, AWS Lambda, Amazon SQS, Amazon SNS, Amazon API Gateway, Amazon EventBridge and Amazon S3, with more resources planned in the future.
AWS SAM policy templates are an existing feature that helps builders deploy serverless applications with minimally scoped IAM policies. Because there are a finite number of templates, they’re a good fit when a template exists for the services you’re using. Connectors are best for those getting started and who want to focus on modeling the flow of data and events within their applications. Connectors will take the desired relationship model and create the permissions for the relationship to exist and function as intended.
In this blog post, I show you how to speed up serverless development while maintaining secure best practices using AWS SAM connector. Defining a connector in an AWS SAM template requires a source, destination, and a permission (for example, read or write). From this definition, IAM policies with minimal privileges are automatically created by the connector.
Usage
Within an AWS SAM template:
- Create serverless resource definitions.
- Define a connector.
- Add a source and destination ID of the resources to connect.
- Define the permissions (read, write) of the connection.
This example creates a Lambda function that requires write access to an Amazon DynamoDB table to keep track of orders created from a website.
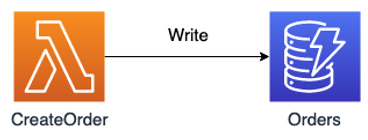
AWS Lambda function needing write access to an Amazon DynamoDB table
The AWS SAM connector for the resources looks like the following:
LambdaDynamoDbWriteConnector:
  Type: AWS::Serverless::Connector
  Properties:
    Source:
      Id: CreateOrder
    Destination:
      Id: Orders
    Permissions:
      - Write
“LambdaDynamoDbWriteConnector” is the name of the connector, while the “Type” designates it as an AWS SAM connector. “Properties” contains the source and destination logical ID for our serverless resources found within our template. Finally, the “Permissions” property defines a read or write relationship between the components.
This basic example shows how easy it is to define permissions between components. No specific role or policy names are required, and this syntax is consistent across many other serverless components, enforcing standardization.
Example
AWS SAM connectors save you time as your applications grow and connections between serverless components become more complex. Manual creation and management of permissions become error prone and difficult at scale. To highlight the breadth of support, we’ll use an AWS Step Functions state machine to operate with several other serverless components. AWS Step Functions is a serverless orchestration workflow service that integrates natively with other AWS services.
Solution overview
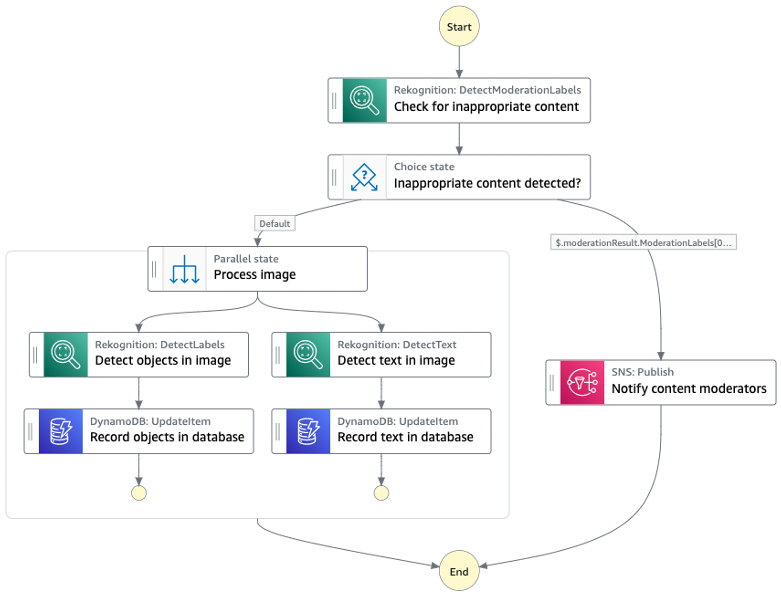
Architectural overview
This solution implements an image catalog moderation pipeline. Amazon Rekognition checks for inappropriate content, and detects objects and text in an image. It processes valid images and stores metadata in an Amazon DynamoDB table, otherwise emailing a notification for invalid images.
Prerequisites
- Git installed
- AWS SAM CLI version 1.58.0 or greater installed
Deploying the solution
- Clone the repository and navigate to the solution directory:
git clone https://github.com/aws-samples/step-functions-workflows-collection cd step-functions-workflows-collection/moderated-image-catalog - Open the template.yaml file located at step-functions-workflows-collection/moderated-image-catalog and replace the “ImageCatalogStateMachine:” section with the following snippet. Ensure to preserve YAML formatting.
ImageCatalogStateMachine: Type: AWS::Serverless::StateMachine Properties: Name: moderated-image-catalog-workflow DefinitionUri: statemachine/statemachine.asl.json DefinitionSubstitutions: CatalogTable: !Ref CatalogTable ModeratorSNSTopic: !Ref ModeratorSNSTopic Policies: - RekognitionDetectOnlyPolicy: {} - Within the same template.yaml file, add the following after the ModeratorSNSTopic section and before the Outputs section:
# Serverless connector permissions
StepFunctionS3ReadConnector:
  Type: AWS::Serverless::Connector
  Properties:
    Source:
      Id: ImageCatalogStateMachine
    Destination:
      Id: IngestionBucket
    Permissions:
      - Read

StepFunctionDynamoWriteConnector:
  Type: AWS::Serverless::Connector
  Properties:
    Source:
      Id: ImageCatalogStateMachine
    Destination:
      Id: CatalogTable
    Permissions:
      - Write

StepFunctionSNSWriteConnector:
  Type: AWS::Serverless::Connector
  Properties:
    Source:
      Id: ImageCatalogStateMachine
    Destination:
      Id: ModeratorSNSTopic
    Permissions:
      - Write
You have removed the existing inline policies for the state machine and replaced them with AWS SAM connector definitions, except for the Amazon Rekognition policy. At the time of publishing this blog, connectors do not support Amazon Rekognition. Take some time to review each of the connector’s syntax.
- Deploy the application using the following command:
sam deploy --guidedProvide a stack name, Region, and moderators’ email address. You can accept defaults for the remaining prompts.
Verifying permissions
Once the deployment has completed, you can verify the correct role and policies.
- Navigate to the Step Functions service page within the AWS Management Console and ensure you have the correct Region selected.
- Select State machines from the left menu and then the moderated-image-catalog-workflow state machine.
- Select the “IAM role ARN” link, which will take you to the IAM role and policies created.
You should see a list of policies that correspond to the AWS SAM connectors in the template.yaml file with the actions and resources.
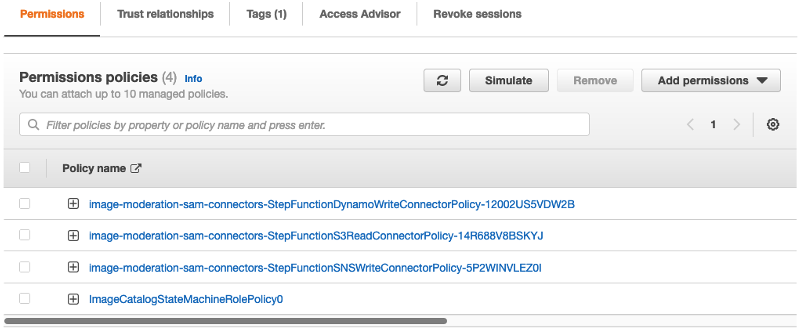
Permissions list in console
You didn’t need to supply the specific policy actions: Use Read or Write as the permission and the service handles the rest. This results in improved readability, standardization, and productivity, while retaining security best practices.
Testing
- Upload a test image to the Amazon S3 bucket created during the deployment step. To find the name of the bucket, navigate to the AWS CloudFormation console. Select the CloudFormation stack via the name entered as part of “sam deploy –guided.” Select the Outputs tab and note the IngestionBucket name.
- After uploading the image, navigate to the AWS Step Functions console and select the “moderated-image-catalog-workflow” workflow.
- Select Start Execution and input an event:
{ "bucket": "<S3-bucket-name>", "key": "<image-name>.jpeg" } - Select Start Execution and observe the execution of the workflow.
- Depending on the image selected, it will either add to the image catalog, or send a content moderation email to the email address provided. Find out more about content considered inappropriate by Amazon Rekognition.
Cleanup
To delete any images added to the Amazon S3 bucket, and the resources created by this template, use the following commands from the same project directory.
aws s3 rm s3://< bucket_name_here> --recursive
sam delete
Conclusion
This blog post shows how AWS SAM connectors simplify connecting serverless components. View the Developer Guide to find out more about AWS SAM connectors. For further sample serverless workflows like the one used in this blog, see Serverless Land.