Post Syndicated from Eric Johnson original https://aws.amazon.com/blogs/compute/simplifying-private-api-integrations-with-amazon-eventbridge-and-aws-step-functions-2/
This blog written by Pawan Puthran, Principal Specialist TAM, Serverless and Vamsi Vikash Ankam, Senior Serverless Solutions Architect.
In December 2024, AWS announced that Amazon EventBridge and AWS Step Functions support integration with private APIs using AWS PrivateLink and Amazon VPC Lattice. This feature allows users to integrate applications seamlessly across private networks, on-premises infrastructure, and cloud platforms. It provides operational simplicity, enabling secure and controlled communication between services within a Virtual Private Cloud (VPC). This blog post explores how to leverage this new capability to integrate Step Functions with private APIs, making application interactions across private networks more efficient and secure.
Overview
Private integrations are essential for secure communication between cloud services within a VPC. As organizations modernize their applications in the cloud, they often need to integrate existing systems with private network environments. EventBridge and Step Functions previously needed proxies to send events to HTTPS applications. These proxies, such as AWS Lambda or Amazon Simple Queue Service (Amazon SQS), delivered events to applications running on Amazon Elastic Compute Cloud (Amazon EC2), Amazon Elastic Kubernetes Service (Amazon EKS), or Amazon Elastic Container Service (Amazon ECS). Now, users can directly invoke private HTTPS-based endpoints running within their VPC using EventBridge and Step Functions.
This new capability offers several key benefits:
- Enhanced security and compliance: Private API integrations significantly enhance security by keeping APIs within private networks, minimizing exposure to internet threats and making sure of compliance in regulated industries such as finance and healthcare.
- Simplified architecture and increased developer productivity: This feature streamlines integration by enabling direct access to private APIs, eliminating complex network setups and proxy solutions. It allows developers to focus on core logic, resulting in cleaner architectures, faster development, and reduced maintenance. By removing the need for custom code and unifying application architecture, the integration process accelerates, leading to faster time to market and enhanced innovation.
- Improved performance and reliability: Private API integrations to VPC resources enhance performance by leveraging the AWS backbone network. This direct connectivity improves speed, increases reliability, and minimizes external network dependencies and points of failure.
EventBridge and Step Functions use new capabilities of PrivateLink and VPC Lattice, Resource Gateway and Resource Configuration, to facilitate secure network connectivity to services and resources inside of a VPC. To establish the private connectivity, you need the following components:
- Resource Gateway: A Resource Gateway serves as a secure entry point for the inbound traffic to the resource. This acts as an ingress point within the VPC where the resources reside.
- Resource Configuration: A Resource Configuration is a logical entity that identifies the resource and specifies how and who can access it. Defining a resource configuration allows you to allow private, secure, and unidirectional network connectivity to resources in your VPC from clients and services in other VPCs and accounts.
- EventBridge Connections: EventBridge Connections used in EventBridge API destinations and Step Function workflows, establishes connectivity to your private HTTPS endpoints by using resource configurations.
- AWS Resource Access Manager: You can share the resource configuration through AWS Resource Access Manager (AWS RAM), a service that securely shares your VPC resources across your organizations and with other AWS accounts.
Workload overview
To illustrate how Step Functions invoke private HTTPS APIs, consider the following workflow that classifies product reviews as fake or real.
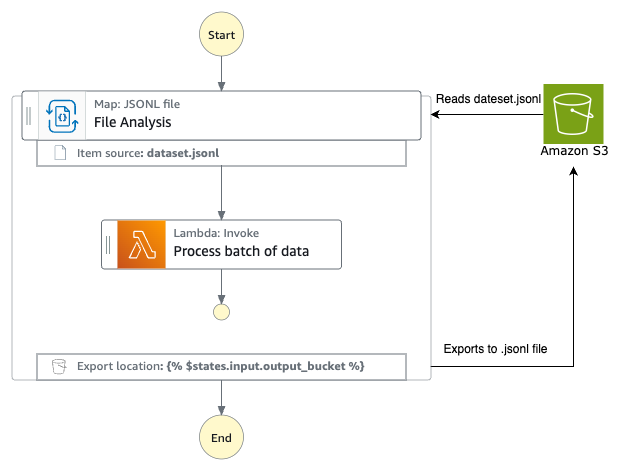
- The Step Functions workflow processes an array of product reviews using Distributed Map.
- It involves calling the Amazon Nova Micro model through Amazon Bedrock to classify the review text.
- If a review is classified as fake, then the workflow publishes an event to an EventBridge bus, providing a flexible integration for potential downstream analysis or notifications.
- If a review is classified as real, then Step Functions calls the private HTTPS endpoint, using DNS address to further process the reviews.
- This private API is hosted in AWS Fargate behind an internal Application Load Balancer (ALB) within a VPC.

Figure 1: Step Functions workflow calling private HTTPS-based endpoint running in AWS Fargate
In real-world scenarios, this includes analyzing text patterns, user behavior, and linguistic cues to determine the authenticity of each review. Suspicious reviews are automatically flagged by building customized workflows to maintain the integrity of the product feedback system.
Deploying the example
Before configuring the private integration, create an Amazon Route53 public hosted zone with a registered domain (such as api.com), and an AWS Certificate Manager (ACM) certificate corresponding to the domain. While Amazon Route53 private hosted zones is currently not supported, utilizing public hosted zones resolves the domain name to a private IP address, accessible only from within the VPC.
This post includes a sample application and deployment instructions. For complete details, refer to the README.
Scenario 1: Single account
In this scenario, the Step Functions, EventBridge connections, and private resources reside in the same account, as shown in the following figure

Figure 2: Overview of a single account setup with Step Functions workflow and private API in the same account
- VPC Resource Gateway acts like the entry point to access the private resources running within your VPC. As a best-practice, consider creating a resource gateway to span across multiple private subnets (Availability Zones) for high availability. Refer to the AWS Cloud Development Kit (AWS CDK) code snippet in lib/vpclattice-stack.ts for resource gateway implementation.
- Resource Configurations establish the connection between the private endpoint and the Resource Gateway and are used to uniquely identify the private resources running within your VPC. Refer to the AWS CDK code snippet in lib/vpclattice-stack.ts to create Resource Configuration, and configure the domain name and port.
- To enable Step Functions to communicate with the private VPC resources, you create an EventBridge Connection. This handles the authorization and private connectivity to connect to the private API. Refer to the AWS CDK code snippet in lib/workflow-stack.ts for creating EventBridge Connections.
- The Step Functions state machine deployed as part of the sample application uses the HTTPS Invoke task type to call the private API. Calling private APIs from Step Functions allows you to use features such as built-in error handling like retries for transient issues and redrive for errors.
You can use the following payload to test the Step Functions execution:
{
  "items": [
    {
      "asin": "B000FA64PA",
      "helpful": [ 0, 0],
      "overall": 5,
      "reviewText": "Darth Maul working under cloak of darkness committing sabotage now that is a story worth reading many times over. Great story.",
      "reviewTime": "10 11, 2013",
      "unixReviewTime": 1381449600
    },
    {
      "asin": "B000F83SZQ",
      "helpful": [ 1, 1],
      "overall": 4,
      "reviewText": "Never heard of Amy Brewster. But I don't need to like Amy Brewster to like this book. Actually, Amy Brewster is a sidekick in this story, who added mystery to the story not the one resolved it. The story brings back the old times, simple life, simple people, and straight relationships.",
      "reviewTime": "03 22, 2014",
      "unixReviewTime": 1395446400
    }
  ]
}
The following figure shows the Step Functions execution where the review is classified as real and successfully invokes the private HTTPS endpoint.

Figure 3: Step Functions execution classifying the product reviews as real and successfully invoking the private API
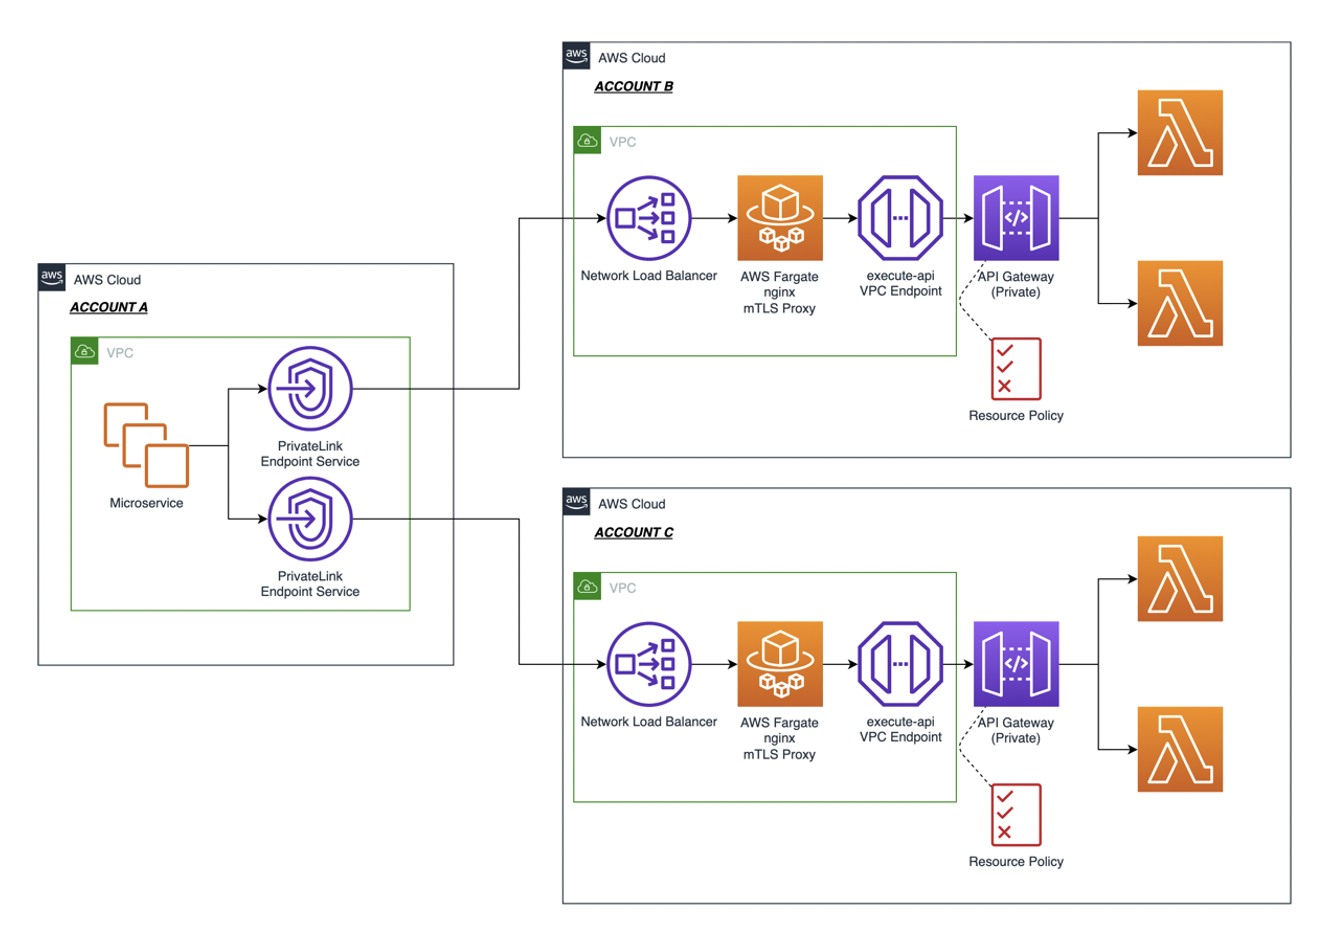
Scenario 2: Cross account
In this scenario, all the private resources reside in Account A. The Step Functions and EventBridge Connections reside in Account B. The cross-account resource sharing is powered by AWS RAM, as shown in the following figure.

Figure 4: Cross-account setup
Following the creation of the Resource Gateway and the Resource Configuration, as described in the previous section, configure the resource share using AWS RAM in Account A.
- The sample application creates the AWS RAM resource share in Account A. This allows Account B to access private VPC resources in Account A, enabling secure, AWS Identity and Access Management (IAM) authorized access to the VPC resources in Account A. Refer to the CDK code snippet in lib/vpclattice-stack.ts to create cross-account resource share using AWS RAM.
- In Account B, AWS RAM receives an invitation from Account A to access the private VPC resources. Upon acceptance, the resource share status changes to Active, granting access to the private VPC resources in Account A.
- To enable access from Account B’s Step Function or EventBridge to Account A’s private VPC resources, create an EventBridge Connection as described in Step 3 (Single account scenario). Map this connection to the shared AWS RAM Resource Configuration created from the previous step.
Enterprises with distributed development teams operate across multiple AWS accounts. The setup described above enables secure cross-account access to VPC resources.
New connection state events
EventBridge now publishes change in the state events for new or existing connections. This is useful when taking actions on state changes or for troubleshooting purposes. The following example shows the state change events published for Connection Authorized and Connection Activated.

Figure 5: EventBridge connections state change
Conclusion
The new integration allows Amazon EventBridge and AWS Step Functions to integrate with private APIs, powered by AWS PrivateLink and Amazon VPC Lattice. Users can integrate legacy on-premises systems with cloud-native applications using event-driven architectures and workflow orchestration. The integration helps enterprises modernize distributed applications across public and private networks, enabling faster innovation, higher performance, and lower costs by eliminating the need for custom networking or integration code.
For more details, refer to the EventBridge and Step Functions documentation. Check out this video on setting up integrations with EventBridge and Step Functions. Get the sample code used in this post from this GitHub repository.
To expand your serverless knowledge, visit Serverless Land.