Post Syndicated from Vinay Ujjini original https://aws.amazon.com/blogs/messaging-and-targeting/build-ai-and-ml-into-email-sms-for-customer-engagement/
Build AI and ML into Email & SMS for customer engagement
Customers engage with businesses through various channels like email, SMS, Push, and in-app. With the availability and ease of usage of mobile phones, businesses can use 2-way Short Service Messages (SMS) to engage with their customers. Text messaging does not need applications and provides immediate interaction with your customers. Amazon Pinpoint enables businesses & organizations to interact in 2-way SMS messages with their customers. Since it is not practical and scalable for organizations to have people responding to millions of their customer’s texts, we can leverage Amazon Lex which helps build the conversational AI into the 2-way SMS. Amazon Lex is a fully managed artificial intelligent (AI) AWS service with advanced natural language models to design, build, test, and deploy conversational interfaces in applications. Machine Learning (ML) is used in digital marketing to help businesses detect patterns in customer bhevaior.
Today, if customers want to know the latest status on their order, they have to send an email, which is hard for businesses to monitor and respond, and time consuming for the customer to call regarding their order status and also expensive for businesses to field the calls.
This blog post shows how you can elevate your customer’s experience using Amazon Pinpoint’s omni-channel capabilities, Amazon Lex’s AI powered chat, and ML-powered personalization using Amazon Personalize.
The solution presented in this blog helps resolve all the above issues. The example I have used to depict this where a customer orders a bike and since the delivery has been delayed, he wants to get timely updates on the progress. He has been given a phone number by the bike company to text them with any questions. This solution elevates the customer’s experience by providing him with timely update by checking the latest from the database and also sending additional product recommendations, predicting what the customer might need.
Architecture
This solution uses Amazon Pinpoint, Amazon Lex, AWS Lambda, Amazon Dynamo DB, Amazon Simple Notification Services, Amazon Personalize.

- The customer sends a message to the number provided by the store asking about their order status.
- Pinpoint 2-way SMS has as SNS topic tied to it.
- The SNS topic relays the message to the Lex integration Lambda.
- This Lex integration lambda has the integration between Pinpoint & Lex.
- When the customer checks on their order status, Lex taps into the fulfillment lambda that is tied to it.
- That lambda checks on the order status from the DynamoDB and sends it back to Lex.
- Lex sends the order details to Amazon Pinpoint and Amazon Pinpoint delivers the SMS with the order details to the customer’s phone number.
- Amazon Lex lets fulfillment Lambda know to send an email to the customer with the order details.
- Fulfillment Lambda create an event called ‘Order Status’ for Amazon Pinpoint Journey to consume in its Journey.
- Amazon Pinpoint’s message template reaches out to Amazon Personalize to get the 3 recommendations.
- Amazon Pinpoint’s Journey triggers an email message to the customer with the order information and recommendations
Prerequisites
To deploy this solution, you must have the following:
- An AWS account.
- An Amazon Pinpoint project.
- An originating identity that supports 2 way SMS in the country you are planning to send SMS to – Supported countries and regions (SMS channel).
- A mobile number to send and receive text messages.
- An SMS customer segment – Download the example CSV, that contains a sample SMS & email endpoints. Replace the phone number (column C) with yours, and email with your email and import it to Amazon Pinpoint – How to import an Amazon Pinpoint segment.
- Add your mobile number in the Amazon Pinpoint SMS sandbox.
- Verify your email address that needs to receive messages from this account.
- Download the LexIntegration.zip & RE_Order_Validation.zip Lambda files from this Github location.
Preparation:
- Download the CloudFormation template.
- Go to Amazon S3 console and create a bucket. I created one for this example as ‘pinpointreinventaiml-code’. Under that S3 bucket, create a sub-folder and name it Lambda.
- Upload the 2 zip files you downloaded earlier from the Github.
- In Amazon Pinpoint > Phone numbers, Check to make sure the phone number you are using is enabled for SMS and its status is active.
- Add the machine learning generated product recommendations using Amazon Personalize.
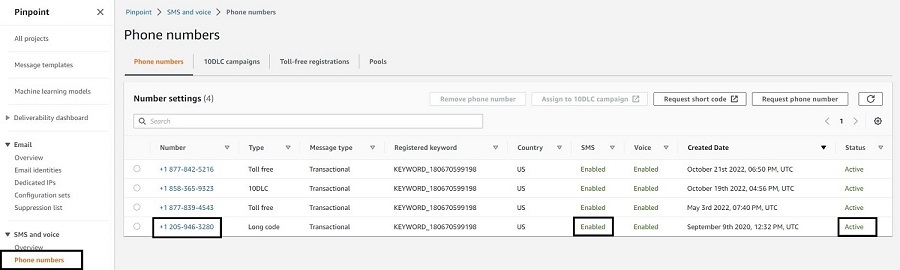
Phone numbers in Pinpoint console
Solution implementation
Create a Lex Chat bot:
- Now it’s time to create your bot. To create your bot, sign in to the Lex console at https://console.aws.amazon.com/lex.
- For more information about creating bots in Lex, see https://docs.aws.amazon.com/lex/latest/dg/gs-console.html.
- Click on Create bot button. Next steps:
- Select Create a blank bot radio button.
- Give a Bot name ‘Order Status’ under Bot name Configuration. (Use the same Bot name as mentioned here. If you change the Bot name here, your CloudFormation will fail)
- Under IAM permissions, select the radio button Create a role with basic Amazon Lex permissions.
- For COPPA, choose No. Click Next
- Under Language dropdown, choose the language of usage. I chose Language as English in my example.
- Click Done, to complete the Bot creation.
- You have to create an Intent within the Bot you just created
- Click on the Bot you just created. Click on Intents and click the dropdown Add intent and select Add empty intent.
- Give an intent name and click Ok.
- Once the intent is created, go to the intent and open the Conversation flow section in the intent and create a flow that that has the following info and looks like below image:
- Click on Sample utterance and it takes you to Sample Utterance and type in Order status.
- Click on initial response and type in Okay, I can help with that. What is your order number?
- Click on the slot value and click on Add a slot. Name: OrderNumber and Slot type is AMAZON.AlphaNumeric. In the prompt, enter Please enter your order number.
- Click on Save Intent button. The conversation flow should look like the below screenshot:

6. Go back to the Intent you just created and click on the Build button that is to the right side of the page.

7. Once the build is successfully completed, go back to the Bot you created and click on Aliases on the left frame. Click on the Alias that was created earlier, TestBotAlias.

8. In the Languages section, click on the English language that we created earlier.
9. Open the Lambda function – optional section and point the source to RE_Order_Validation Lambda that we downloaded earlier.
10. For Lambda function version or alias, select $LATEST. Click on Save.

11. Go to Intents, choose the intent you just built and click on Build button again. Once build is complete, you can test the intent.
Import and execute CloudFormation:
- Navigate to the Amazon CloudFormation console in the AWS region you want to deploy this solution.
- Select Create stack and With new resources. Choose Template is ready as Prerequisite – Prepare template and Upload a template file as Specify template. Upload the template downloaded in step 1 under Preparation section of this document. Click Next.
- Fill the AWS CloudFormation parameters as shown below:
- Stack name: Give a name to this stack.
- Under Parameters, for BotAlias: The Bot Alias that you created as part of Amazon Lex above.
- BotId: The Bot ID for the bot that you created as part of Amazon Lex above.
- CodeS3Bucket: Give the name of the S3 bucket you created in step3 of the Preparation topic above.
- OriginationNumber: This is the origination identity phone number you created in step4 of the Preparation topic above.
- PinpointProjectId: Use the ProjectID you have from step2 of the Prerequisites phase above.
- After entering all the parameter info, it would look something like this below:

- Click Next. Leave the default options on the next page and click Next again.
- Check the box I acknowledge that AWS CloudFormation might create IAM resources with custom names. Click Submit.

Set up data in Amazon Dynamo DB
- We are using DynamoDB table here as the transactional database that stores order information for the bike store.
- Once the solution has been successfully deployed, navigate to the Amazon DynamoDB console and access the OrderStatus DynamoDB table. Each row created in this table represents an order and it’s details. Each row should have a unique Order_Num that holds the order number and it’s related information. You can put additional information about the order like the example below:
-
{ "Order_Num":{ "Value":"ABC123" }, "Delivery_Dt":{ "Value":"12/01/2022" }, "Order_Dt":{ "Value":"11/01/2022" } "Shipping_Dt":{ "Value":"11/24/2022" } "UserId":{ "Value":"example-iser-id-3" } } - Once you enter the data, it should look like the image below. Click on Create item.


Set up Amazon Simple Notification Service (SNS) topic
- We need the Amazon Simple Notification Service here, to provide internal message delivery from publishers (customer’s text message) to subscribers (Amazon Lex in this example). This is used for internal notifications in this use case.
- As part of the CloudFormation above, check if you have an SNS topic created by the name LexPinpointIntegrationDemo.
- Now, we have successfully created an Amazon SNS topic.
Set up Lambda Functions
- Go to AWS Lambda console and open the Lambda function LexIntegration. Under the Function overview, click on the Add trigger. Under Trigger configuration dropdown, select SNS and under SNS Topic select LexPinpointIntegrationDemo topic. Click on Add.
- Note: In this example, I used Node.js in a Lambda and Python in another, to show how AWS Lambda functions are flexible to use the scripting language of your choice.
Setting up 2-way SMS in Amazon Pinpoint
- Go to Amazon Pinpoint console and click on Phone numbers under SMS & Voice in the left frame. If you don’t see any phone numbers, please refer to #3 under prerequisites section above.
- This is how your screen should look like

- Click on the number.
- On the right frame, expand Two-way SMS drop down arrow.
- Click on the check box ‘Enable two-way SMS’.
- In the ‘Incoming message destination’ select the radio button ‘Choose an existing SNS topic’ and in the drop down below, choose the SNS topic you built above.
- The result would look like the screenshot below:

- Click on Save.


Import Machine Learning model into Pinpoint
- Go to Amazon Pinpoint.
- Click on Machine Learning Models. Click on Add recommender model.
- Give a recommender model name and description under model details.
- Under Model configuration, choose the radio button ‘Automatically create a role’ and give an IAM role name in the textbox below.
- Under recommender model, choose the recommender model campaign that you created in Amazon Personalize earlier in the project.
- If you did not create it, use this Pinpoint workshop to create a recommender model in Amazon Personalize.
- The data used in this example is for retail industry, please edit the data as needed for your use case and industry.
- Under the settings section:
- Select ‘User Id’ as identifier.
- Click on the drop down ‘Number of recommendations per message’ and select 3.
- For Processing method, choose ‘Use value returned by model’.
- Click on Next.
- You are presented with attributes section. Give a display name as ‘product_name’ for the attributes and click next.
- On the next screen, you can review all the information provided and click on Publish.
- The completed model after publishing looks like the screen below:


Create a Message Template in Amazon Pinpoint
- Use chapter 6.4 in this workshop Amazon Pinpoint Workshop to create a message template.
- Once the template is created, you need to add recommendations to the message template using this Amazon Pinpoint Workshop details. Change the type of data needed for your use case and industry in this workshop. I used sample retail data.
- To create a Amazon Pinpoint Journey, navigate to the Amazon Pinpoint console , select Journeys and click on Create journey.
- Give a name, click on Set entry condition in the Journey entry block.
- Choose the radio button Add participants when they perform an activity.
- Click in the ‘Events’ text box and type in OrderStatus.

- Click on Add activity and select Send an email.
- Click on choose an email template and select the email message template we created earlier in this blog. Click on choose template button.
- Select a Sender email address from the drop down list.

- Click Save. The final journey should look like this:

- Click on Actions > Settings where you will review the journey settings. There you set the start and end date of the journey if applicable as well as other advanced settings. Configure your journey settings to look like the screenshot below and click Save.

- To publish your journey click on Review. On the Review your journey click Next > Mark as reviewed > Publish. A 5 minutes countdown will begin after, which your journey will be live.
- Once the journey is live, we need to pass the event OrderStatus and the endpoints will go through that journey and will receive an email.


Testing the solution
- Use a phone with a valid number (in this example, I took a US phone number) and send a text ‘Order Status’ to the number generated in Amazon Pinpoint above.
- You should get a response “Okay, I can help with that. What is your order number?”
- You should type in the order number you generated earlier and stored it in Amazon DynamoDB table.
- You should get a response “Your order <order number> was shipped on <shipped_dt> and is expected to be delivered to your address on <delivery_dt>. Your order details have been emailed to you.”

- Alternatively, you can test this solution from the Lex bot.
- In Amazon Lex, go to the intent you created above and click on the Test button. Next steps:
- In the text box, enter Order Status.
- Bot should respond with Okay, I can help with that. What is your order number?
- You can respond with the order number you entered in the DynamoDB table.
- Bot should respond with Your order <Order_Num> was shipped on <Shipping_Dt> and is expected to be delivered to your address on <Delivery_Dt>. Your order details have been emailed to you.


Conclusion
Using this blog post, you can elevate your customer’s experience by using Amazon Lex’s AI chat capabilities, Amazon Personalize’s ML recommendation models and trigger a Pinpoint Journey. This blog highlights how organizations can interact in a 2-way SMS with their customers and convert that engagement to a triggered email, with product recommendations, if needed.
Next Steps
You can use the above solution and modify it easily to use it across different verticals and applicable use cases. You can also extend this solution to Amazon Connect to an agent via SMS chat, using this blog.
Clean-up
- To delete the solution, go to CloudFormation you created as part od this project. Click on the stack and click Delete.
- Navigate to Amazon Pinpoint and stop the Journey you ran in this solution. Delete the Journey, Machine learning models, Message templates you created for this solution. Delete the Project you created for this solution.
- In Amazon Lex, delete the intent and bot you created for this solution.
- Delete the folder and bucket you created in S3 as part of this project.
- Amazon Personalize resources like Dataset groups, datasets, etc. are not created via AWS Cloudformation, thus you have to delete them manually. Please follow the instructions in the AWS documentation on how to clean up the created resources.
Additional resources
Retry delivering failed SMS using Pinpoint
How to target customers using ML, based on their interest in a product
About the Authors

Vinay Ujjini is an Amazon Pinpoint and Amazon Simple Email Service Principal Specialist Solutions Architect at AWS. He has been solving customer’s omni-channel challenges for over 15 years. In his spare time, he enjoys playing tennis & cricket.