Post Syndicated from Eucke Warren original https://aws.amazon.com/blogs/security/how-to-use-amazon-guardduty-and-aws-waf-v2-to-automatically-block-suspicious-hosts/
In this post, we’ll share an automation pattern that you can use to automatically detect and block suspicious hosts that are attempting to access your Amazon Web Services (AWS) resources. The automation will rely on Amazon GuardDuty to generate findings about the suspicious hosts, and then you can respond to those findings by programmatically updating AWS WAF to block the host from accessing your workloads.
You should implement security measures across your AWS resources by using a holistic approach that incorporates controls across multiple areas. In the AWS CAF Security Perspective section of the AWS Security Incident Response Guide, we define these controls across four categories:
- Directive controls — Establish the governance, risk, and compliance models the environment will operate within
- Preventive controls — Protect your workloads and mitigate threats and vulnerabilities
- Detective controls — Provide full visibility and transparency over the operation of your deployments in AWS
- Responsive controls — Drive remediation of potential deviations from your security baselines
Security automation is a key principle outlined in the Response Guide. It helps reduce operational overhead and creates repeatable, predictable approaches to monitoring and responding to events. AWS services provide the building blocks to create powerful patterns for the automated detection and remediation of threats against your AWS environments. You can configure automated flows that use both detective and responsive controls and might also feed into preventative controls to help mitigate risks in the future. Depending on the type of source event, you can automatically invoke specific actions, such as modifying access controls, terminating instances, or revoking credentials.
The patterns highlighted in this post provide an example of how to automatically remediate detected threats. You should modify these patterns to suit your defined requirements, and test and validate them before deploying them in a production environment.
AWS services used for the example pattern
Amazon GuardDuty is a continuous security monitoring and threat detection service that incorporates threat intelligence, anomaly detection, and machine learning to help protect your AWS resources, including your AWS accounts. Amazon EventBridge delivers a near-real-time stream of system events that describe changes in AWS resources. Amazon GuardDuty sends events to Amazon CloudWatch when a change in the findings takes place. In the context of GuardDuty, such changes include newly generated findings and subsequent occurrences of these findings. You can quickly set up rules to match events generated by GuardDuty findings in EventBridge events and route those events to one or more target actions. The pattern in this post routes matched events to AWS Lambda, which then updates AWS WAF web access control lists (web ACLs) and Amazon Virtual Private Cloud (Amazon VPC) network access control lists (network ACLs). AWS WAF is a web application firewall that helps protect your web applications from common web exploits that could affect application availability, security, or excess resource consumption. It supports both managed rules as well as a powerful rule language for custom rules. A network ACL is stateless and is an optional layer of security for your VPC that helps you restrict specific inbound and outbound traffic at the subnet level.
Pattern overview
This example pattern assumes that Amazon GuardDuty is enabled in your AWS account. If it isn’t enabled, you can learn more about the free trial and pricing, and follow the steps in the GuardDuty documentation to configure the service and start monitoring your account. The example code will only work in the us-east-1 AWS Region due to the use of Amazon CloudFront and web ACLs within the template.
Figure 1 shows how the AWS CloudFormation template creates the sample pattern.
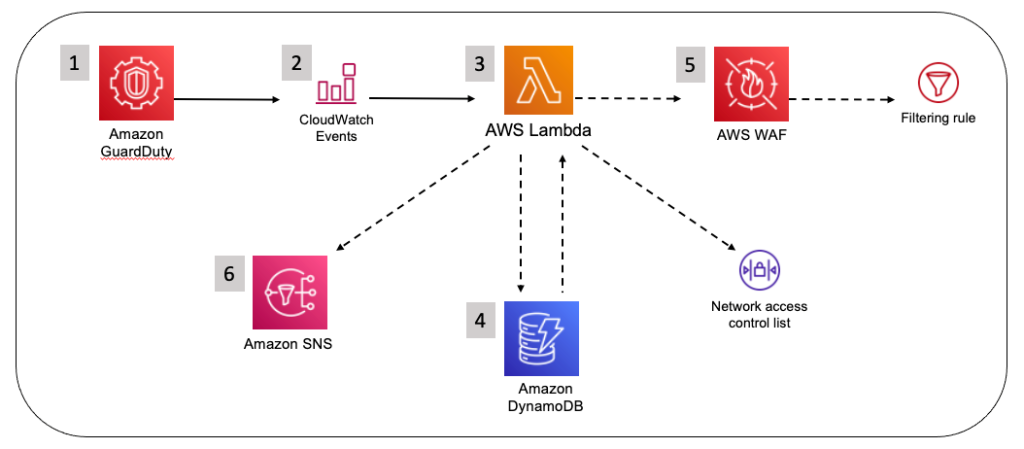
Figure 1: How the CloudFormation template works
Here’s how the pattern works, as shown in the diagram:
- A GuardDuty finding is generated due to suspected malicious activity.
- An EventBridge event is configured to filter for GuardDuty finding types by using event patterns.
- A Lambda function is invoked by the EventBridge event and parses the GuardDuty finding.
- The Lambda function checks the Amazon DynamoDB state table for an existing entry that matches the identified host. If state data is not found in the table for the identified host, a new entry is created in the Amazon DynamoDB state table.
- The Lambda function creates a web ACL rule inside AWS WAF and updates a subnet network ACL.
- A notification email is sent through Amazon Simple Notification Service (SNS).
A second Lambda function runs on a 5-minute recurring schedule and removes entries that are past the configurable retention period from AWS WAF IPSets (an IPSet is a list that contains the blocklisted IPs or CIDRs), VPC network ACLs, and the DynamoDB table.
GuardDuty prefix patterns and findings
The EventBridge event rule provided by the example automation uses the following seven prefix patterns, which allow coverage for 36 GuardDuty finding types. These specific finding types are of a network nature, and so we can use AWS WAF to block them. Be sure to read through the full list of finding types in the GuardDuty documentation to better understand what GuardDuty can report findings for. The covered findings are as follows:
- UnauthorizedAccess:EC2
- UnauthorizedAccess:EC2/MaliciousIPCaller.Custom
- UnauthorizedAccess:EC2/MetadataDNSRebind
- UnauthorizedAccess:EC2/RDPBruteForce
- UnauthorizedAccess:EC2/SSHBruteForce
- UnauthorizedAccess:EC2/TorClient
- UnauthorizedAccess:EC2/TorRelay
- Recon:EC2
- Recon:EC2/PortProbeEMRUnprotectedPort
- Recon:EC2/PortProbeUnprotectedPort
- Recon:EC2/Portscan
- Trojan:EC2
- Trojan:EC2/BlackholeTraffic
- Trojan:EC2/BlackholeTraffic!DNS
- Trojan:EC2/DGADomainRequest.B
- Trojan:EC2/DGADomainRequest.C!DNS
- Trojan:EC2/DNSDataExfiltration
- Trojan:EC2/DriveBySourceTraffic!DNS
- Trojan:EC2/DropPoint
- Trojan:EC2/DropPoint!DNS
- Trojan:EC2/PhishingDomainRequest!DNS
- Backdoor:EC2
- Backdoor:EC2/C&CActivity.B
- Backdoor:EC2/C&CActivity.B!DNS
- Backdoor:EC2/DenialOfService.Dns
- Backdoor:EC2/DenialOfService.Tcp
- Backdoor:EC2/DenialOfService.Udp
- Backdoor:EC2/DenialOfService.UdpOnTcpPorts
- Backdoor:EC2/DenialOfService.UnusualProtocol
- Backdoor:EC2/Spambot
- Impact:EC2
- Impact:EC2/AbusedDomainRequest.Reputation
- Impact:EC2/BitcoinDomainRequest.Reputation
- Impact:EC2/MaliciousDomainRequest.Reputation
- Impact:EC2/PortSweep
- Impact:EC2/SuspiciousDomainRequest.Reputation
- Impact:EC2/WinRMBruteForce
- CryptoCurrency:EC2
- CryptoCurrency:EC2/BitcoinTool.B
- CryptoCurrency:EC2/BitcoinTool.B!DNS
- Behavior:EC2
- Behavior:EC2/NetworkPortUnusual
- Behavior:EC2/TrafficVolumeUnusual
When activity occurs that generates one of these GuardDuty finding types and is then matched by the EventBridge event rule, an entry is created in the target web ACLs and subnet network ACLs to deny access from the suspicious host, and then a notification is sent to an email address by this pattern’s Lambda function. Blocking traffic from the suspicious host helps to mitigate potential threats while you perform additional investigation and remediation. For more information, see Remediating a compromised EC2 instance.
Solution deployment
To deploy the solution, you’ll do the following steps. Each step is described in more detail in the sections that follow.
- Download the required files.
- Create your Amazon Simple Storage Service (Amazon S3) bucket and upload the .zip files.
- Deploy the CloudFormation template.
- Create and test the Lambda function for a GuardDuty finding event.
- Confirm the entry for the test event in the VPC network ACL.
- Confirm the entry in the AWS WAF IP sets.
- Confirm the SNS notification email alert.
- Apply the AWS WAF web ACLs to resources.
Step 1: Download the required files
Download the following four files from the amazon-guardduty-waf-acl GitHub code repository:
- CloudFormation template – Copy and save the linked raw text, using the file name guarddutytoacl.template on your local file system.
- JSON event test file – Copy and save the linked raw text, using the file name gd2acl_test_event.json on your local file system.
- guardduty_to_acl_lambda_wafv2.zip – Choose the Download button on the GitHub page and save the .zip file to your local file system.
- prune_old_entries_wafv2.zip – Choose the Download button on the GitHub page and save the .zip file to your local file system.
Step 2: Create your S3 bucket and upload .zip files
For this step, create an S3 bucket with public access blocked, and then upload the Lambda .zip files to the newly created S3 bucket.
To create your S3 bucket and upload .zip files
- Create an S3 bucket in the us-east-1 Region.
- Upload the .zip files guardduty_to_acl_lambda_wafv2.zip and prune_old_entries_wafv2.zip that you saved to your local file system in Step 1 to the newly created S3 bucket.
Step 3: Deploy the CloudFormation template
For this step, deploy the CloudFormation template only to the us-east-1 Region within the AWS account where GuardDuty findings are to be monitored.
To deploy the CloudFormation template
- Sign in to the AWS Management Console, choose the CloudFormation service, and set N.Virginia (us-east-1) as the Region.
- Choose Create stack, and then choose With new resources (standard).
- When the Create stack landing page is presented, make sure that Template is ready is selected in the Prepare template section. In the Template source section, choose Upload a template file.
- Choose the Choose file button and browse to the location where the guarddutytoacl.template file was saved on your local file system. Select the file, choose Open, and then choose Next.
- On the Specify stack details page, provide the following input parameters. You can modify the default values to customize the pattern for your environment.
Input parameter Input parameter description Notification email The email address to receive notifications. Must be a valid email address. Retention time, in minutes How long to retain IP addresses in the blocklist (in minutes). The default is 12 hours. S3 bucket for artifacts The S3 bucket with artifact files (Lambda functions, templates, HTML files, and so on). Keep the default value for deployment into the N. Virginia Region. S3 path to artifacts The path in the S3 bucket that contains artifact files. Keep the default value for deployment into the N. Virginia Region. CloudFrontWebACL Create CloudFront Web ACL? If set to true, a CloudFront IP set will be created automatically. RegionalWebACL Create Regional Web ACL? If set to true, a Regional IP set will be created automatically. Figure 2 shows an example of the values entered on this page.

Figure 2: CloudFormation parameters on the Specify stack details page
- Enter values for all of the input parameters, and then choose Next.
- On the Configure stack options page, accept the defaults, and then choose Next.
- On the Review page, confirm the details, check the box acknowledging that the template will require capabilities for AWS::IAM::Role, and then choose Create Stack.
The stack normally requires no more than 3–5 minutes to complete.
- While the stack is being created, check the email inbox that you specified for the Notification email address parameter. Look for an email message with the subject “AWS Notification – Subscription Confirmation”. Choose the link in the email to confirm the subscription to the SNS topic. You should see a message similar to the following.
Figure 3: Subscription confirmation


When the Status field for the CloudFormation stack changes to CREATE_COMPLETE, as shown in Figure 4, the pattern is implemented and is ready for testing.

Figure 4: The stack status is CREATE_COMPLETE
Step 4: Create and test the Lambda function for a GuardDuty finding event
After the CloudFormation stack has completed deployment, you can test the functionality by using a Lambda test event.
To create and run a Lambda GuardDuty finding test event
- In the AWS Management Console, choose Services > VPC > Subnets and locate a subnet that is suitable for testing the pattern.
- On the Details tab, copy the subnet ID to the clipboard or to a text editor.

Figure 5: The subnet ID value on the Details tab
- In the AWS Management Console, choose Services > CloudFormation > GuardDutytoACL stack. On the Outputs tab for the stack, look for the GuardDutytoACLLambda entry.
Figure 6: The GuardDutytoACLLambda entry on the Outputs tab
- Choose the link for the entry, and you’ll be redirected to the Lambda console, with the Lambda Code source page already open.
Figure 7: The Lambda function open in the Lambda console
- In the middle of the Code source menu, in the Test dropdown list, locate and select the Configure test event option.
Figure 8: Select Configure test event from the dropdown list
- To facilitate testing, we’ve provided a test event file. On the Configure test event page, do the following:
- For Event name, enter a name.
- In the body of the Event JSON field, paste the provided test event JSON, overwriting the existing contents.
- Update the value of SubnetId key (line 35) to the value of the subnet ID that you chose in Step 1 of this procedure.
- Choose Save.
Figure 9: Update the value of the subnetId key
- Choose Test to invoke the Lambda function with the test event. You should see the message “Status: succeeded” at the top of the execution results, similar to what is shown in Figure 10.
Figure 10: The Test button and the “succeeded” message


Step 5: Confirm the entry in the VPC network ACL
In this step, you’ll confirm that the DENY entry was created in the network ACL. This pattern is configured to create up to 10 entries in an ACL, ranging between rule numbers 71 and 80. Because network ACL rules are processed in order, it’s important that the DENY rule is placed before the ALLOW rule.
To confirm the entry in the VPC network ACL
- In the AWS Management Console, choose Services > VPC > Subnets, and locate the subnet you provided for the test event.
- Choose the network ACL link and confirm that the new DENY entry was generated from the test event.
Figure 11: Check the entry from the test event on the Network tab
Note that VPC network ACL entries are created in the rule number range between 71 and 80. Older entries are aged out to create a “sliding window” of blocked hosts.

Step 6: Confirm the entry in the AWS WAF IP sets and blocklists
Next, verify that the entry was added to the CloudFront AWS WAF IP set and to the Application Load Balancer (ALB) AWS WAF IP set.
To confirm the entry in the AWS WAF IP set and blocklist
- In the AWS Management Console, choose Services > WAF & Shield > Web ACLs, and then set the selected Region to Global (CloudFront).
- Find and select the web ACL name that starts with CloudFrontBlockListWeb. In the Rule view, on the Rules tab, select the rule named CloudFrontBlocklistIPSetRule. Note that 198.51.100.0/32 appears as an entry in the rule.
Figure 12: Confirm that the IP address was added
- In the AWS Management Console, on the left navigation menu, choose Web ACLs, and then set the selected Region to US East (N. Virginia).
- Find and select the web ACL name that starts with RegionalBlocklistACL. In the Rule view, on the Rules tab, select the rule named RegionalBlocklistIPSetRule. Note that 198.51.100.0/32 appears as an entry in the rule.
Figure 13: Make sure that the IP address was added


There might be specific host addresses that you want to prevent from being added to the blocklist. You can do this within GuardDuty by using a trusted IP list. Trusted IP lists consist of IP addresses that you have allowlisted for secure communication with your AWS infrastructure and applications. GuardDuty doesn’t generate findings for IP addresses on trusted IP lists. For more information, see Working with trusted IP lists and threat lists.
Step 7: Confirm the SNS notification email
Finally, verify that the SNS notification was sent to the email address you set up.
To confirm receipt of the SNS notification email
- Review the email inbox that you specified for the AdminEmail parameter and look for a message with the subject line “AWS GD2ACL Alert”. The contents of the message from SNS should be similar to the following.
Figure 14: SNS message example

Step 8: Apply the AWS WAF web ACLs to resources
The final task is to associate the web ACL with the CloudFront distributions and Application Load Balancers that you want to automatically update with this pattern. To learn how to do this, see Associating or disassociating a web ACL with an AWS resource.
You can also use AWS Firewall Manager to associate the web ACLs. AWS Firewall Manager can simplify your AWS WAF administration and maintenance tasks across multiple accounts and resources. With Firewall Manager, you set up your firewall rules just once. The service automatically applies your rules across your accounts and resources, even as you add new resources.
Conclusion
In this post, you’ve learned how to use Lambda to automatically update AWS WAF and VPC network ACLs in response to GuardDuty findings. With just a few steps, you can use this sample pattern to help mitigate threats by blocking communication with suspicious hosts. You can explore additional possible patterns by using GuardDuty finding types and Amazon EventBridge target actions. This pattern’s code is available on GitHub. Feel free to play around with the code to add more GuardDuty findings to this pattern and also to build bigger and better patterns! Make sure to modify the patterns in this post to suit your defined requirements, and test and validate them before deploying them in a production environment.
If you have comments about this blog post, you can submit them in the Comments section below. If you have questions about using this pattern, start a thread in the GuardDuty, AWS WAF, or CloudWatch forums, or contact AWS Support.
Want more AWS Security news? Follow us on Twitter.