Post Syndicated from Pascal Vogel original https://aws.amazon.com/blogs/compute/integrating-ibm-mq-with-amazon-sqs-and-amazon-sns-using-apache-camel/
This post is written by Joaquin Rinaudo, Principal Security Consultant and Gezim Musliaj, DevOps Consultant.
IBM MQ is a message-oriented middleware (MOM) product used by many enterprise organizations, including global banks, airlines, and healthcare and insurance companies.
Customers often ask us for guidance on how they can integrate their existing on-premises MOM systems with new applications running in the cloud. They’re looking for a cost-effective, scalable and low-effort solution that enables them to send and receive messages from their cloud applications to these messaging systems.
This blog post shows how to set up a bi-directional bridge from on-premises IBM MQ to Amazon MQ, Amazon Simple Queue Service (Amazon SQS), and Amazon Simple Notification Service (Amazon SNS).
This allows your producer and consumer applications to integrate using fully managed AWS messaging services and Apache Camel. Learn how to deploy such a solution and how to test the running integration using SNS, SQS, and a demo IBM MQ cluster environment running on Amazon Elastic Container Service (ECS) with AWS Fargate.
This solution can also be used as part of a step-by-step migration using the approach described in the blog post Migrating from IBM MQ to Amazon MQ using a phased approach.
Solution overview
The integration consists of an Apache Camel broker cluster that bi-directionally integrates an IBM MQ system and target systems, such as Amazon MQ running ActiveMQ, SNS topics, or SQS queues.
In the following example, AWS services, in this case AWS Lambda and SQS, receive messages published to IBM MQ via an SNS topic:

- The cloud message consumers (Lambda and SQS) subscribe to the solution’s target SNS topic.
- The Apache Camel broker connects to IBM MQ using secrets stored in AWS Secrets Manager and reads new messages from the queue using IBM MQ’s Java library. Only IBM MQ messages are supported as a source.
- The Apache Camel broker publishes these new messages to the target SNS topic. It uses the Amazon SNS Extended Client Library for Java to store any messages larger than 256 KB in an Amazon Simple Storage Service (Amazon S3) bucket.
- Apache Camel stores any message that cannot be delivered to SNS after two retries in an S3 dead letter queue bucket.
The next diagram demonstrates how the solution sends messages back from an SQS queue to IBM MQ:
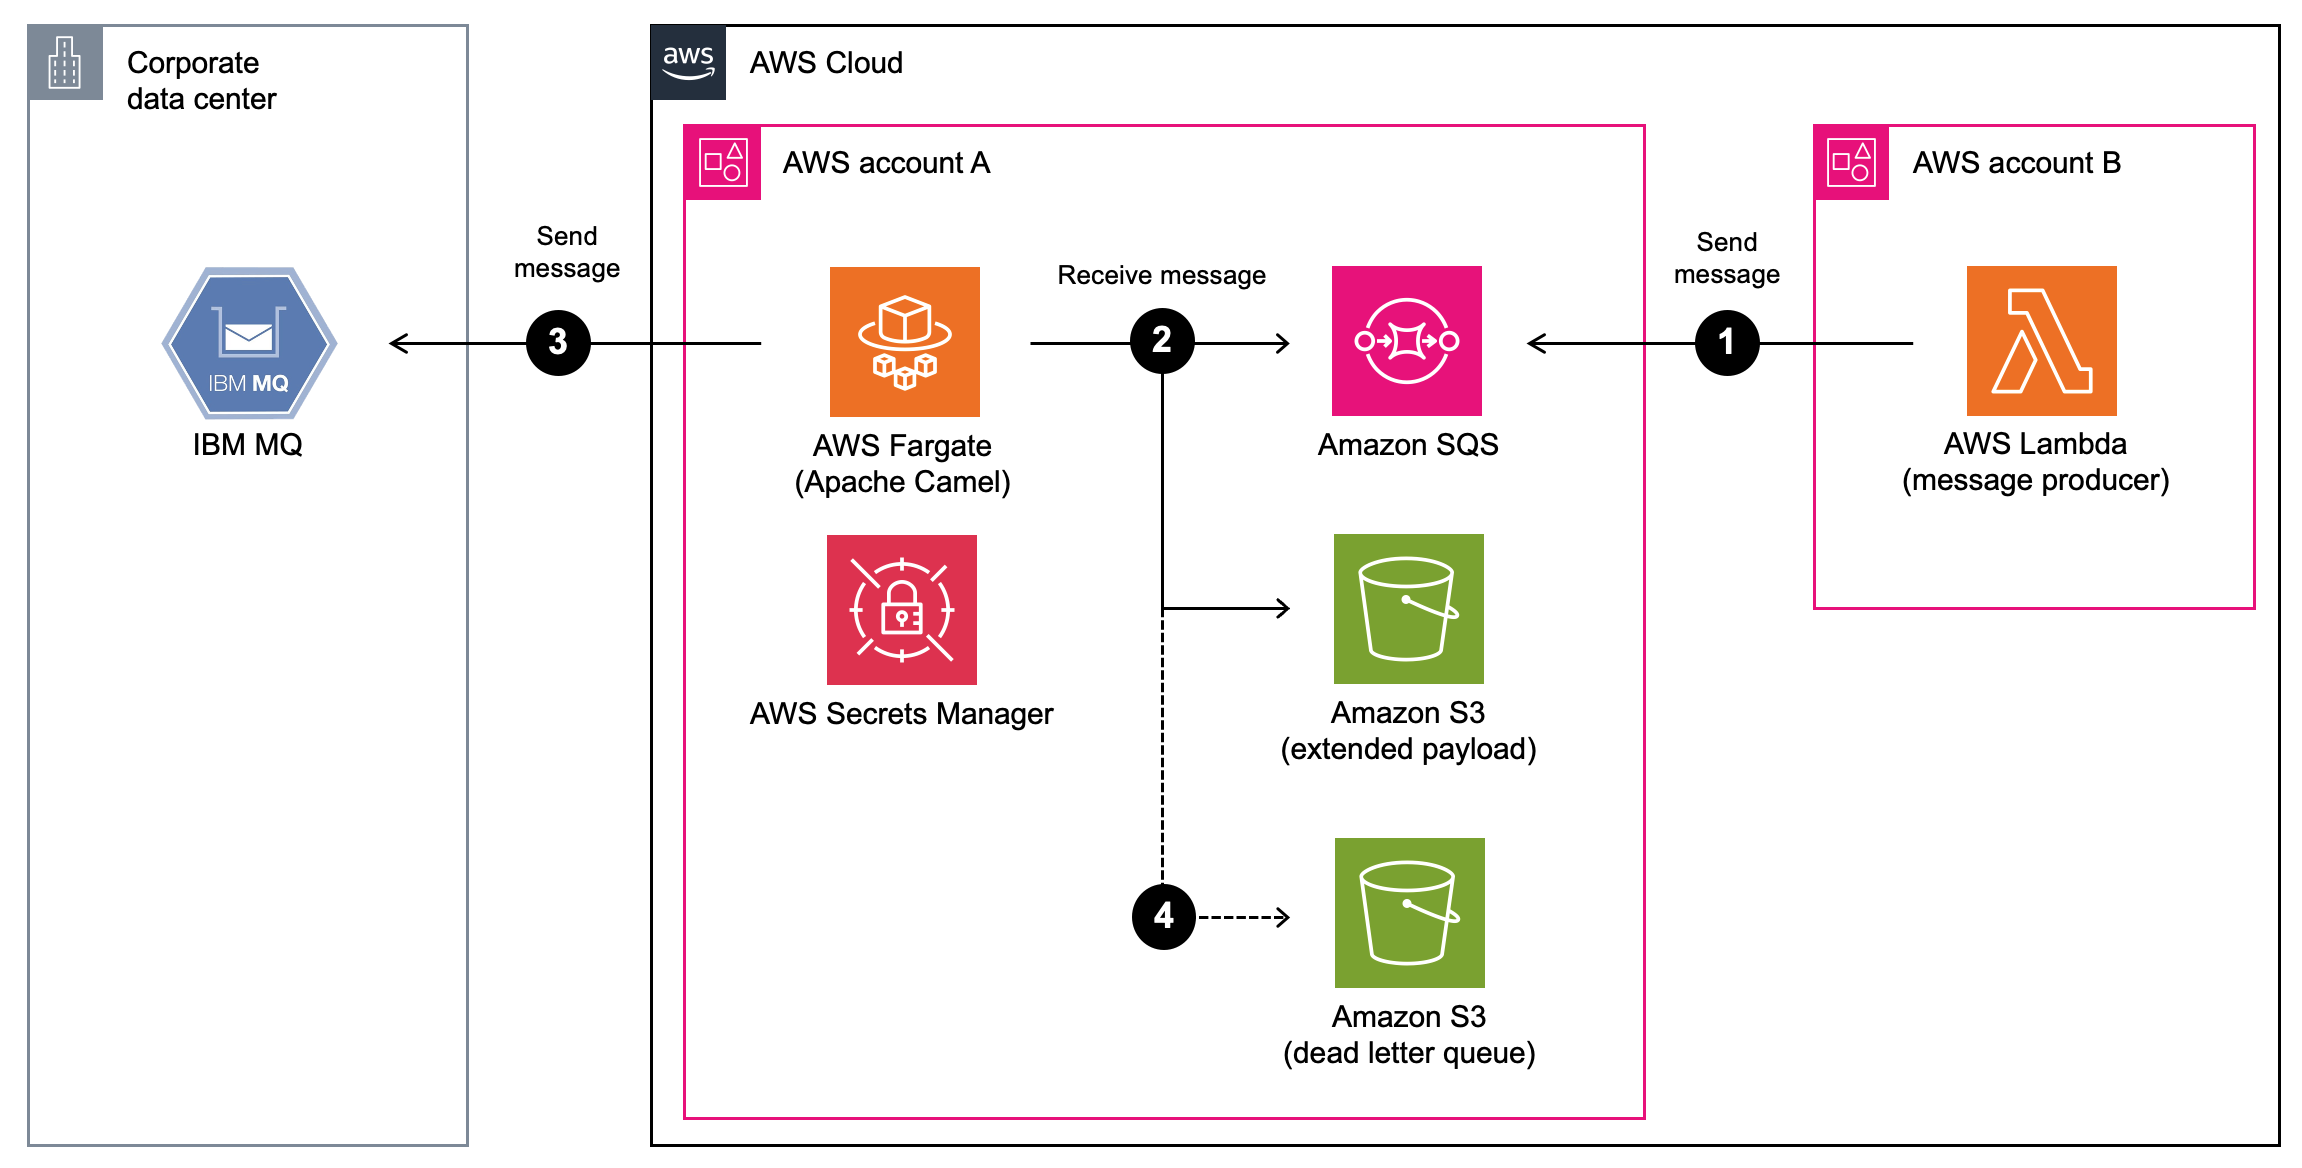
- A sample message producer using Lambda sends messages to an SQS queue. It uses the Amazon SQS Extended Client Library for Java to send messages larger than 256 KB.
- The Apache Camel broker receives the messages published to SQS, using the SQS Extended Client Library if needed.
- The Apache Camel broker sends the message to the IBM MQ target queue.
- As before, the broker stores messages that cannot be delivered to IBM MQ in the S3 dead letter queue bucket.
A phased live migration consists of two steps:
- Deploy the broker service to allow reading messages from and writing to existing IBM MQ queues.
- Once the consumer or producer is migrated, migrate its counterpart to the newly selected service (SNS or SQS).
Next, you will learn how to set up the solution using the AWS Cloud Development Kit (AWS CDK).
Deploying the solution
Prerequisites
- AWS CDK
- TypeScript
- Java
- Docker
- Git
- Yarn
Step 1: Cloning the repository
Clone the repository using git:
git clone https://github.com/aws-samples/aws-ibm-mq-adapterStep 2: Setting up test IBM MQ credentials
This demo uses IBM MQ’s mutual TLS authentication. To do this, you must generate X.509 certificates and store them in AWS Secrets Manager by running the following commands in the app folder:
- Generate X.509 certificates:
./deploy.sh generate_secrets - Set up the secrets required for the Apache Camel broker (replace
<integration-name>with, for example,dev):./deploy.sh create_secrets broker <integration-name> - Set up secrets for the mock IBM MQ system:
./deploy.sh create_secrets mock - Update the
cdk.jsonfile with the secrets ARN output from the previous commands:IBM_MOCK_PUBLIC_CERT_ARNIBM_MOCK_PRIVATE_CERT_ARNIBM_MOCK_CLIENT_PUBLIC_CERT_ARNIBMMQ_TRUSTSTORE_ARNIBMMQ_TRUSTSTORE_PASSWORD_ARNIBMMQ_KEYSTORE_ARNIBMMQ_KEYSTORE_PASSWORD_ARN
If you are using your own IBM MQ system and already have X.509 certificates available, you can use the script to upload those certificates to AWS Secrets Manager after running the script.
Step 3: Configuring the broker
The solution deploys two brokers, one to read messages from the test IBM MQ system and one to send messages back. A separate Apache Camel cluster is used per integration to support better use of Auto Scaling functionality and to avoid issues across different integration operations (consuming and reading messages).
Update the cdk.json file with the following values:
accountId: AWS account ID to deploy the solution to.region: name of the AWS Region to deploy the solution to.defaultVPCId: specify a VPC ID for an existing VPC in the AWS account where the broker and mock are deployed.allowedPrincipals: add your account ARN (e.g.,arn:aws:iam::123456789012:root) to allow this AWS account to send messages to and receive messages from the broker. You can use this parameter to set up cross-account relationships for both SQS and SNS integrations and support multiple consumers and producers.
Step 4: Bootstrapping and deploying the solution
- Make sure you have the correct
AWS_PROFILEandAWS_REGIONenvironment variables set for your development account. - Run
yarn cdk bootstrap –-qualifier mq <aws://<account-id>/<region>to bootstrap CDK. - Run
yarn installto install CDK dependencies. - Finally, execute
yarn cdk deploy '*-dev' –-qualifier mq --require-approval neverto deploy the solution to thedevenvironment.
Step 5: Testing the integrations
Use AWS System Manager Session Manager and port forwarding to establish tunnels to the test IBM MQ instance to access the web console and send messages manually. For more information on port forwarding, see Amazon EC2 instance port forwarding with AWS System Manager.
- In a command line terminal, make sure you have the correct
AWS_PROFILEandAWS_REGIONenvironment variables set for your development account. - In addition, set the following environment variables:
IBM_ENDPOINT: endpoint for IBM MQ. Example: network load balancer for IBM mockmqmoc-mqada-1234567890.elb.eu-west-1.amazonaws.com.BASTION_ID: instance ID for the bastion host. You can retrieve this output from Step 4: Bootstrapping and deploying the solution listed after themqBastionStackdeployment.
Use the following command to set the environment variables:
export IBM_ENDPOINT=mqmoc-mqada-1234567890.elb.eu-west-1.amazonaws.com export BASTION_ID=i-0a1b2c3d4e5f67890 - Run the script
test/connect.sh. - Log in to the IBM web console via
https://127.0.0.1:9443/adminusing the default IBM user (admin) and the password stored in AWS Secrets Manager asmqAdapterIbmMockAdminPassword.
Sending data from IBM MQ and receiving it in SNS:
- In the IBM MQ console, access the local queue manager
QM1andDEV.QUEUE.1. - Send a message with the content
Hello AWS. This message will be processed by AWS Fargate and published to SNS. - Access the SQS console and choose the
snsIntegrationStack-dev-2prefix queue. This is an SQS queue subscribed to the SNS topic for testing. - Select Send and receive message.
- Select Poll for messages to see the
Hello AWSmessage previously sent to IBM MQ.
Sending data back from Amazon SQS to IBM MQ:
- Access the SQS console and choose the queue with the prefix
sqsPublishIntegrationStack-dev-3-dev. - Select Send and receive messages.
- For Message Body, add
Hello from AWS. - Choose Send message.
- In the IBM MQ console, access the local queue manager
QM1andDEV.QUEUE.2to find your message listed under this queue.
Step 6: Cleaning up
Run cdk destroy '*-dev' to destroy the resources deployed as part of this walkthrough.
Conclusion
In this blog, you learned how you can exchange messages between IBM MQ and your cloud applications using Amazon SQS and Amazon SNS.
If you’re interested in getting started with your own integration, follow the README file in the GitHub repository. If you’re migrating existing applications using industry-standard APIs and protocols such as JMS, NMS, or AMQP 1.0, consider integrating with Amazon MQ using the steps provided in the repository.
If you’re interested in running Apache Camel in Kubernetes, you can also adapt the architecture to use Apache Camel K instead.
For more serverless learning resources, visit Serverless Land.